

Page 1
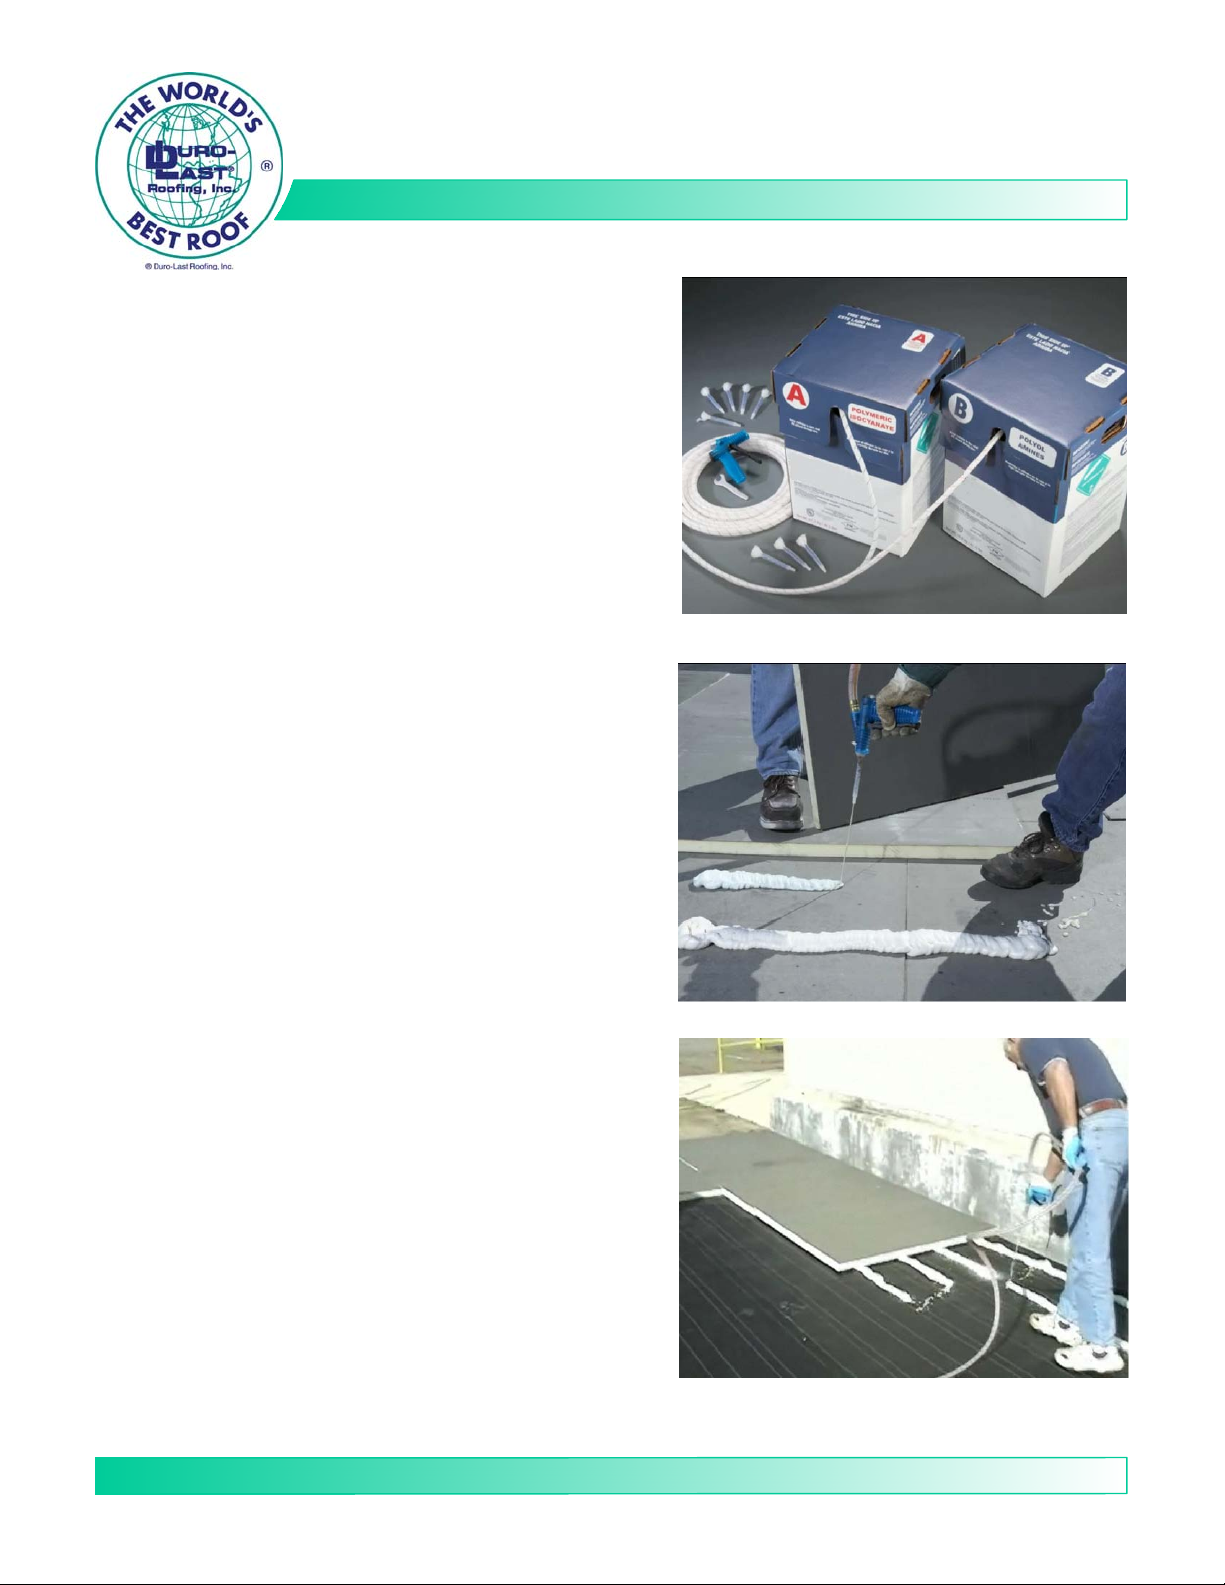
DURO-LAST® DURO-GRIP INSULATION ADHESIVE
Description:
Duro-Grip™ Insulation Adhesive is a two component
elastomeric polyurethane froth adhesive designed to adhere
both insulation and cover boards to various substrates. It can
also be used to adhere insulation boards together where
multiple layers are required.
Duro-Grip is applied in bead form directly to an approved
substrate. The “A” and “B” components are dispensed from two
pre-pressurized disposable cylinders using the hose and nozzle
kit. The insulation or cover board is placed onto the adhesive
and a chemical cure takes place several minutes after
application depending on temperature and weather conditions.
DATA SHEET
Duro-Grip contains less than 250 g/L of Volatile Organic
Compounds (VOC) and meets all VOC restrictions and
regulations in the United States. See Table 1 for VOC
information.
Duro-Grip is ideal for use when mechanical fastener penetration
into the roof deck is undesirable. Duro-Grip is approved for use
with many roof deck substrates, insulation and cover boards.
Structural concrete (poured-in-place)
Structural concrete (precast)
Lightweight structural concrete (pull test required)
Insulating concrete (pull test required)
Cementitious wood fiber planks
Gypsum decks (pull test required)
Steel - 22 gauge or thicker ("B" deck profile)
Plywood and OSB
Polyisocyanurate (flat or tapered)
Expanded polystyrene (EPS, flat or tapered)
Extruded polystyrene (XPS, flat or tapered)
DensDeck Roof Board
SECUROCK Gyp sum -Fiber Board
Various aged built-up roofs (pull test required)
Vapor retarders (contact Duro-Last for approved
product list)
A/B Tank Kit, Ho se/Gun Kit, Wrench and Nozzles
Duro-Grip is applied to substrate in 2.5 inch beads
Material Safety Data Sheet:
1. Review MSDS sheets for both "A" and "B" components
before working with the product.
2. MSDS available at www.duro-last.com.
Duro-Last: The Proven Performer®
www.duro-last.com
"Duro-Last " an d " The World's Best Roof" are registered marks owned by Duro-Las t , Inc.
1 of 4
800-248-0280
May 20, 2010
Page 2

DURO-GRIP INSULATION ADHESIVE
Determining Bead Spacing:
1. Apply Duro-Grip per the "Directions for Use" section.
2. For any project located in an area with the design
wind speed greater than 120 mph or a roof deck
height greater than 100 feet, the Duro-Last
Engineering Services Department must determine
the bead spacing pattern to be used. Otherwise, use
the guidelines below.
3. The spacing between beads of Duro-Grip is less in
the perimeter area of the roof than in the main field
area to compensate for higher wind uplift pressures.
4. The width of the perimeter area is defined as the
lesser of either 40% of the building eave height or
10% of the lesser roof plan dimension, but in no case
less than 6 feet. The remainder of the roof is the field
area.
a. Perimeter area: apply beads 6 inches on center.
b. Field area: apply beads 12 inches on center.
5. Use the bead spacing above for all layers to be
applied with Duro-Grip.
6. Refer to Table 2 for the estimated coverage per each
A/B Tank Kit based on bead spacing.
Limitations:
1. Maximum size of insulation board to be attached with
Duro-Grip is 4 x 4 foot (1.2 x 1.2 m).
2. Maximum size of cover board to be attached with
Duro-Grip is 4 x 8 foot (1.2 x 2.4 m)
3. The product temperature must be between 70 °F and
90 °F (21 - 32 °C) when applied. This ensures that
the proper mixing ratio is maintained during
installation and will give the best yield per tank kit.
When the product temperature falls outside of this
range the tanks may take several hours to adjust to
an acceptable temperature. Therefore, keeping the
tanks in a warm environment overnight during cold
weather months and keeping the tanks from getting
to hot in the summer will avoid delays during
installation.
4. The substrate temperature that the product is applied
to must be at least 40 °F (5 °C) and rising.
5. Do not use during inclement weather.
6. Concrete and gypsum decks must be cured before
applying Duro-Grip.
Do not use on wet surfaces. Do not install
7.
Duro-Grip on a wet surface. Take whatever
precautions are necessary to ensure that the surface
is dry during the application and curing of the
Duro-Grip.
8. Do not use on any roof deck that shows signs of
deterioration or loss of integrity.
9. Do not use on excessively dirty or grease laden
surfaces.
10.Do not use after expiration date.
Storage and Handling:
1. The "A" and "B" containers should be stored between
45 and 95 °F (7 - 35 °C). The shelf life at these
temperatures is 18 months from the date of
production.
2. Follow instructions on the "A" and "B" boxes for
overnight and longer term storage.
TABLE 1. TYPICAL PROPERTIES - BY COMPONENT
Product
Base
Blowing Agent
Physical For m Liquid Liquid
Net Weight
(cylinder)
Specific Gravity
(77°F/25°C)
Color
Volatile Organic
Compounds (VOC)
VOC when used as
intended with both parts
Flash Point (TCC) >200 °F (> 93°C) >200 °F (> 93°C)
Auto Igniti o n
Temperature
Viscosity (77°F / 25 °C)
Mix Ratio 1.14 1
¹ Technical i n f o rmation and data should be conside re d represent ative
or typical only and should not be used for specification purposes.
TABLE 2. TYPICAL PROPERTIES - MIXED COMP O N ENTS
Proper ties Mixe d Component s
Open Time (2.5 inch bead)
Work L i fe in Mixing Nozzle
Time to Tack Free 5 - 12 minutes*
Time to Hand l ing Strength 4 - 8 minutes af ter bonding*
Time to Full Cure 24 hours
2.5 inch beads, 12 inches o.c.
(field area)
2.5 inch beads, 6 inches o.c.
(perimeter area)
* Times may be affected by temperature and weather conditions
A - Co mponent
Polymeric
Isocyanurate
134a 134a
40.0 lbs. 35.0 lbs.
1.23 1.1
Light Brown
0 g/L 135.6 g/L
>600 °F (> 315°C)
130 cps 150 cps
Coverage
¹ B - Co mponent¹
Polyol Amines
Amber To Brown
67.5 g/L
Not Determine d
1.5 - 5 minute s*
1 minute*
2,000 sq-ft per A/B T a nk Kit
1,000 sq-ft per A/B T a nk Kit
Duro-Last: The Proven Performer®
www.duro-last.com
"Duro-Last " an d " The World's Best Roof" are registered marks owned by Duro-Las t , Inc.
2 of 4
800-248-0280
May 20, 2010
Page 3

DURO-GRIP INSULATION ADHESIVE
Ordering Duro-Grip:
1. The following items are available when ordering.
a. A/B Tank Kit. (Item #1109) Each kit includes:
"A" & "B" Tank s
8 Nozzles
Wrench
Installation Instruction Sheet
b. Hose/Gun Kit. (Item #1109-001)
Order 1 for every 4 A/B Tank Kits.
c. Extra Nozzles, bag of 10 (Item #1109-002)
Directions for Use:
1. Application Surface and Temperatures:
a. For best results, all surfaces to be bonded must
be clean, dry and free from dirt, dust, oil, loose
paint, wax or grease, etc.
b. The temperature of the adhesive should be
between 70 - 90 ˚F (21 - 32 ˚C) and the surfaces
being bonded should be at 40 ˚F (4 ˚C) or above.
Temperatures outside this range may affect
bonding range, dispensability and performance of
the product.
2. Equipment Set Up:
a. There are two cylinder tanks per system: an “A”
cylinder that is RED and a “B” cylinder that is
BLUE. These two cylinders must have matching
fill dates to be used together.
b. The cylinders can only be used in the upright
position (never open the valves unless the
cylinders are upright).
c. The lids on the boxes are designed to shield the
cylinders from direct sunlight and keep the
product from getting too hot. For this reason, the
box lid should remain closed during use.
d. Using the wrench included in the nozzle pack,
connect the RED striped hose to the “A” cylinder.
e. Connect the BLACK striped hose to the “B”
cylinder.
f. Slowly open the cylinder valves and inspect the
connections for any leaks. Tighten if needed.
Fully open the valves.
g. Activate the trigger, dispensing into a proper
waste receptacle, until all the air is released from
the hoses and a good stream of both chemicals is
visible through the applicator orifices.
h. Clean residue from the output tips.
i. Attach the mixing nozzle to the applicator. Insert
the bottom tab of the nozzle into the bottom slot
of the applicator gun. Secure the top latch by
pushing towards the back of the applicator until it
www.duro-last.com
"Duro-Last " an d " The World's Best Roof" are registered marks owned by Duro-Las t , Inc.
3 of 4
“snaps” into the locked position.
3. Adhesive Test Spray:
a. When spraying for the first time or when starting
a new kit, it is recommended to trigger the gun
only ½ to ¾ open, until the desired output and
spray pattern is achieved. This controllable
metering ability is a major advantage of the gun,
allowing the user complete control of the flow rate
and spray pattern that best fits the application.
b. Apply several test shots on plastic or cardboard
before beginning the job.
Extremely Important - When spraying is stopped
c.
for more than 1 minute, the nozzle should be
removed and replaced with a new nozzle. The
chemical in the nozzle will begin to cure and will
clog the nozzle when spraying has stopped for
more than a few minutes. If the trigger is pulled
while a clogged nozzle is on the gun, the
chemical from the cylinders (which is under
pressure!) will be blocked by the clogged nozzle
and will cause a “back-up” of chemical into the
hoses, which is called a crossover . The gun will
no longer dispense chemicals in the right
proportions and the adhesive will not function
properly. This situation can be easily avoided by
simply changing nozzle when sprayi ng is stopped
for more than 1 minute.
4. Adhesive Applications:
a. To dispense foam, point the applicator’s nozzle at
the surface to be sprayed, holding it
approximately 20 inches from the surface.
Squeeze the trigger and move hand at a speed
which delivers the desired adhesive pattern.
b. Refer to the "Determining Bead Spacing" section
for the spacing between beads.
c. Insulation boards are to be placed immediately
on the wet adhesive but not walked-into-place or
compressed into the adhesive until the adhesive
has begun to thicken and has started to develop
its initial bond.
d. The time involved in this process is contingent on
the ambient as well as deck surface temperature.
The chart below illustrates the approximate time
required prior to walking in or adding ballast to
the boards.
Duro-Last: The Proven Performer®
Ambient / Deck Temperature Time Before Walking In
40 - 60 °F 6 - 10 minutes
60 - 80 °F 3 - 6 minutes
80 - 100 °F 1 - 3 minutes
800-248-0280
May 20, 2010
Page 4

DURO-GRIP INSULATION ADHESIVE
e. After the adhesive has attained its initial bond
strength the boards can be walked-in and will be
compressed to the deck or substrate exhibiting
minimal slippage or movement. The boards
should be exposed to minimum traffic for at least
10-20 minutes (depending on temperature) after
they have been walked-into-place to avoid
breaking the freshly formed bond.
f. Membranes can be applied once the adhesive
has achieved sufficient bond strength to the
immediate substrate to which it is adhered. It is
recommended that the contractor inspect the
installed insulation for proper adhesion and
re-adhere any boards and/or corners that are not
adequately attached.
g. Boards that will not lay flat due to cupping,
warping or crowning, or surface irregularities of
the substrate, should have weights placed on the
boards until the adhesive has achieved adequate
adhesion to hold the boards in place.
h. When spraying stops for breaks, lunch or
overnight repeat the purging procedure in
step # 2g.
Very Important: As the hoses are exposed to the
i.
heat of the sun, especially in the summer months,
the pressure in the hoses will build up. Purging
the hoses for a few seconds prior to spraying
relieves the excess pressure and allows the
chemical to flow in the proper proportions.
b. Check the face of the gun to make sure the outlet
ports are clear and the face of the gun is free from
dirt, chemical or other debris.
c. If necessary, use a rag to remove any cured foam
or chemical from the face of the gun.
d. See Equipment Set Up directions on the previous
page.
7. Disposal Procedures:
a. Do not puncture or incinerate cylinder tanks.
b. After cylinders are empty, they must be vented.
CAUTION:Tanks will still be under pressure. Eye
protection and impervious gloves MUST be worn
during the procedure.
c. With tank valve in opposite position of use, slowly
open the tank valve, point tank AWAY from face
and allow pressure to completel y vent. CAUTION:
Empty tank could contain potential vapor toxicity
hazard. Provide adequate ventilation or
respiratory protection (consult MSDS).
d. DISPOSE OF EM P T Y CYLINDERS
ACCORDING TO APPLICABLE FEDERAL,
STATE AND LOCAL REGULATIONS.
5. Equipment Storage and Re-Use:
a. Turn the cylinder tank valves off.
b. Do not store at temperatures above 95 ˚F (35 ˚C)
or below 45 ˚F (7 ˚C).
c. The used nozzle should be left on the gun during
storage.
d. Engage the trigger safety lock.
e. Close the supply valves on both “A” and “B”
cylinders.
f. The dispensing gun is a disposable unit and is not
designed for prolonged storage or continuous
re-use. To help extend the storage life, it is
recommended to dispense a minimal amount of
foam from the gun at least once every seven days
to ensure optimum flow of chemical through the
hoses.
g. Use up the adhesive within 30 days of initial use.
h. Make certain valves are in correct position when
turning them on and when operating the unit.
6. Re-Use of Applicator Gun After Storage:
a. Before disengaging the trigger safety lock,
remove the used nozzle.
www.duro-last.com
"Duro-Last " an d " The World's Best Roof" are registered marks owned by Duro-Las t , Inc.
4 of 4
Wear eye protection and impervious gloves
Duro-Last: The Proven Performer®
800-248-0280
May 20, 2010
 Loading...