

DURAVIT SensoWash Series Mounting Instructions

Leben im Bad
Living bathrooms
SensoWash
®
Mounting instructions
Instrucciones de montaje
Notice de montage
# 254459 .. 92
# 256359 .. 92
# 253359 .. 92
# 222659 .. 92
# 252959 .. 92
# 254259 .. 92
# 253759 .. 92
# 255059 .. 92
# 256159 .. 92
# 252559 .. 92
Wall-mounted WC
Inodoro suspendido
Cuvette suspendue

2
SensoWash_MAL_WWC_US_57045/17.03.3

Wichtige Hinweise Elektroinstallation/Wasserinstallation 4
Important information Electrical/water Installation 6
Remarques importantes Installation électrique/installation hydraulique 8
es enfr
Installation, Montaje, Montage, 56
SensoWash_MAL_WWC_US_57045/17.03.3
3

en
Important information
About the mounting instructions
These mounting instructions come as part of the
Duravit Shower WC and should be read carefully prior to
installation.
Explanation of the key words and symbols
DANGER! At high risk of fatal hazards or serious
injuries
NOTE! To avoid property damage
Link to the Electrical Installation section
Link to the installation information in this
section
Link to the Water Installation section
Inspection (e.g. for scratches)
Safety instructions
DANGER!
Risk of fatal electric shock.
>Do NOT remove individual Shower WC components.
> If the supply cord is damaged, it must be replaced
by the manufacturer, its service agent or similarly
qualified persons in order to avoid a hazard.
Installation Instructions
Please read pre-installation data sheets prior to the
installation. These are available to download on the
Internet at www.duravit.com.
The Shower WC unit installation is described in separate
instructions.
An installation video of the complete shower WC is
available at pro.duravit.com/mounting.
Simply use this
QR code
Inspection to collect water
Do not kink hose
Target Readership and Qualifications
The Shower WC and associated water connection may
only be installed by qualified plumbers. The electrical
installation may only be carried out by qualified electricians.
NOTE!
Local installation regulations, countr y-specific standards
and the low voltage directives must be observed at all
times.
NOTE!
DO NOT not install the Shower WC in rooms where there
is a danger of frost. The room temperature must not be
less than 39 °F.
4
Measuring clearance y (Diagram 4)
7
Installing sound insulation set (Diagram 7)
>if the sound insulation set is included with the
delivery, take z into account in the clearance
between the wall and bolt:
55
Clearance = z+y+
/64”.
>Screw the bolt onto the hanger bolt until you
achieve the calculated clearance to the wall.
>Install the sound insulation set.
20
Attaching the ceramics to the wall (Diagram 20)
>Position the ceramics on the wall. Ensure that the
hose is not kinked or trapped.
4
SensoWash_MAL_WWC_US_57045/17.03.3
en
Electrical installation
Power supply
6. . . . . . . 1 . . . . . . 100 - 120 V 50/60 Hz
Max. rated power 1.65 kW
Circuit breaker I
RCCB I
Protection type IP X4
Protection class 1
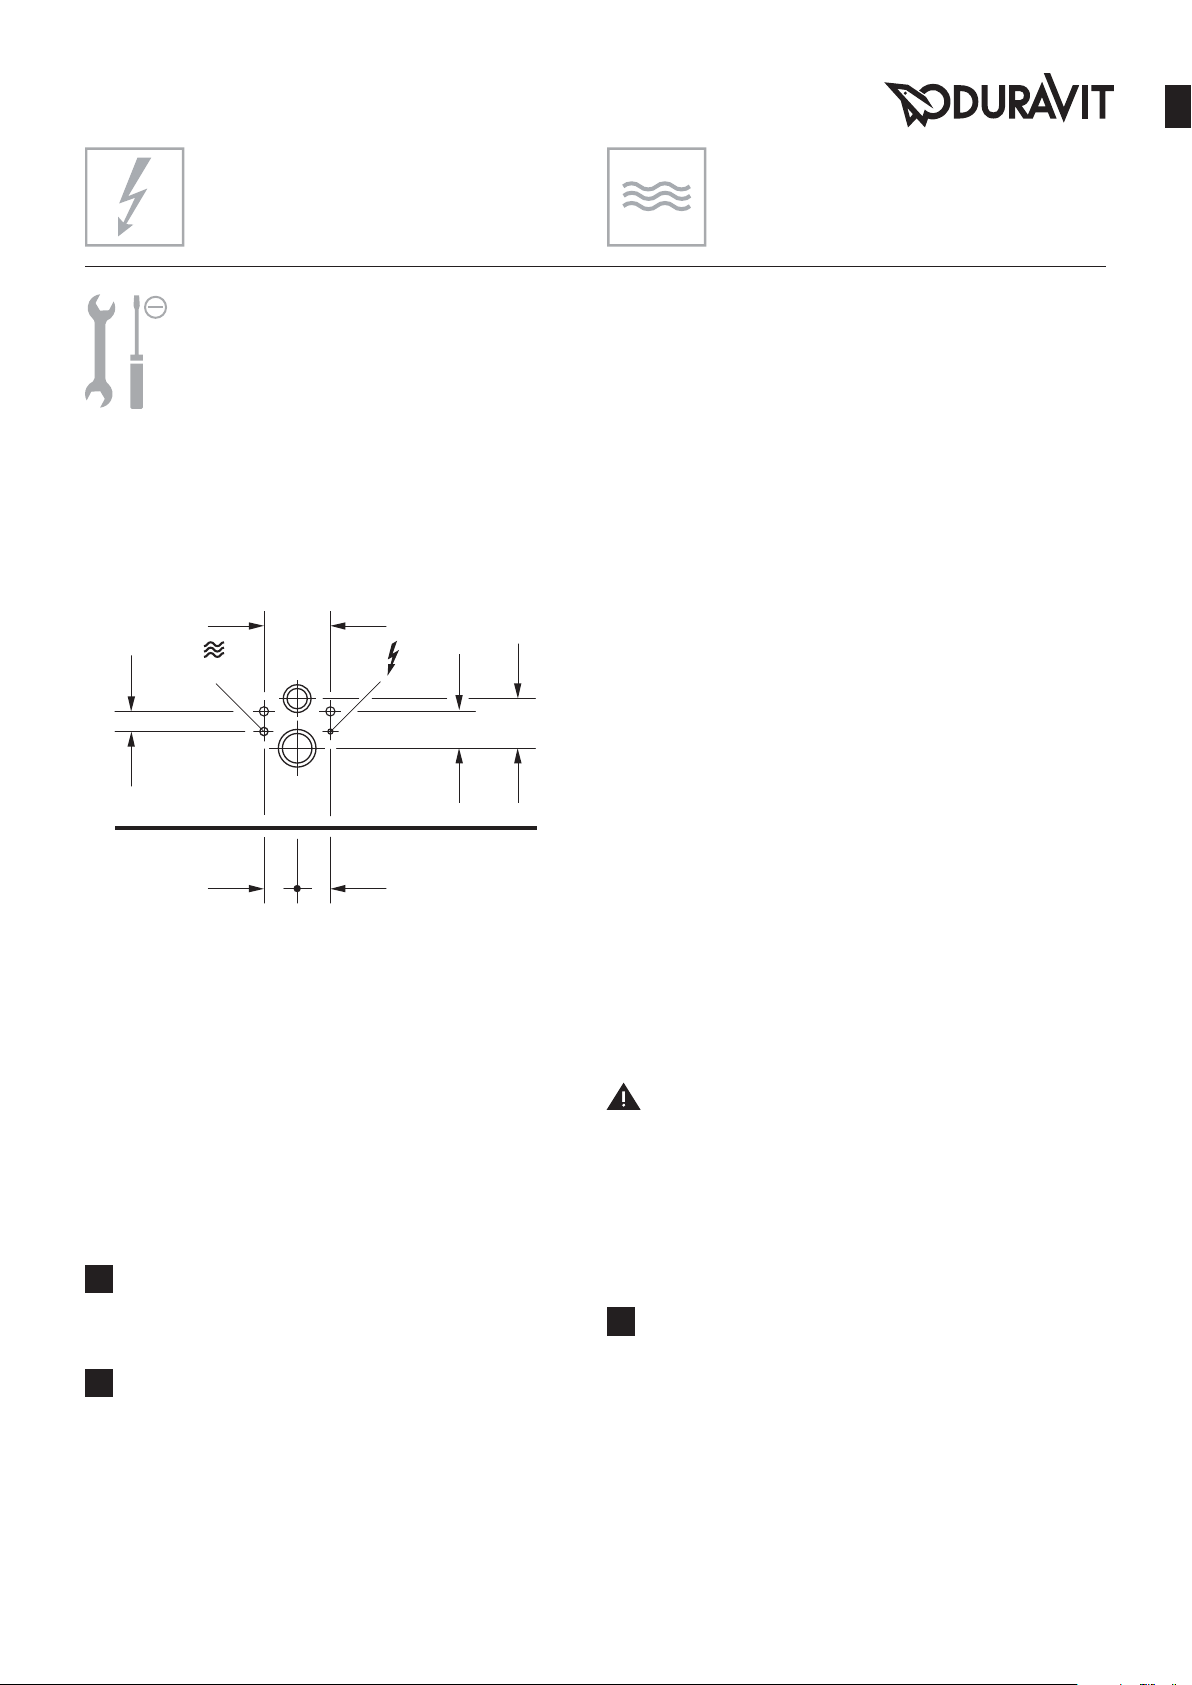
Position of electrical / water connection
180
IG 1/2”
1/8”
55
2
7
N
N
1/8”
= 16 A
= 30 mA
100
135
7/8”
3
3/8”
5
Water installation
Cold water DN 15(½")
Water pressure 10 - 109 psi
(0.07 – 0.75 MPa)
Water hardness max. 2,4 mmol/l
NOTE!
> Install a water water softener with water
hardness ≥ 2.4 mmol/l
(≥ 14° dH and/or 24° fH).
90 90
3
3
1/2”
Pre-Installation
> Lay a permanent power supply line:
Please observe the position of the electrical
connection
Leave at least 31 ½“ of feed cable exposed
> Install circuit breaker
Connect a separate upstream circuit breaker
Connect an upstream residual current device (RCD)
separating all poles
> Appliances have to be correctly earthed.
24
Connecting the cable (Diagram 24)
>Please observe the L, N and PE conductors.
26
Installing junction box (Diagram 26)
> Fix the junction box in the Wall-mounted WC in
the designated place.
1/2”
Pre-Installation
>Install the water connection and water outlet in the
specified areas.
DANGER!
Health risk and potential product damage.
> Supply the Shower WC with cold drinking water from
the main water system.
>Do not connect any waste water, grey water, industrial
water, sea water or other untreated or semi-treated
water.
11
Connecting the water (Diagram 11)
NOTE! Avoiding any malfunctions!
>Only use the water supply hoses provided.
SensoWash_MAL_WWC_US_57045/17.03.3
5
 Loading...