

Page 1

Leben im Bad
Living bathrooms
Pool
BedienungsanleitungOperating Instructions
3
Page 2

Page 3

Contents
. Diagrams and Pictures .....................................................................................
. Remote control ............................................................................................
. Control panel ...............................................................................................
. Menu hierarchy ............................................................................................
. Blue Moon ...................................................................................................
. Sundeck .....................................................................................................
. For your Safety ..............................................................................................
. Normal use ................................................................................................
. Safety instructions .....................................................................................
. Description of Symbols ..................................................................................
. Product Information .......................................................................................
. Whirl circuits .............................................................................................
Emotion circuit ..........................................................................................
Relax circuit ...............................................................................................
Power circuit..............................................................................................
. Whirl programmes ....................................................................................
Energise .....................................................................................................
Balance ......................................................................................................
Revive ........................................................................................................
Regeneration .............................................................................................
Fitness .......................................................................................................
. Coloured light ............................................................................................
Colours ......................................................................................................
Colour programmes ...................................................................................
. Sound (optional) .......................................................................................
. Hygiene and temperature circuit ...............................................................
. Change water ............................................................................................
. Shutdown modes .......................................................................................
ECO-mode ..................................................................................................
Standby-mode ...........................................................................................
. Integrated filling (optional) ........................................................................
. Insulate floating sheet ...............................................................................
. Tub covers ..................................................................................................
. Tarpaulin ..................................................................................................
. First Start-up of the Pool ...............................................................................
Step : Charge remote control ...................................................................
Step : Prepare filter .................................................................................
3
Page 4

Step : Configure operator's panel ............................................................
Step : Fill pool ..........................................................................................
Step : Safeguard water-quality ................................................................
. Basics of Operation ........................................................................................
. Buttons and their functions .......................................................................
Remote control ..........................................................................................
Control panel .............................................................................................
. Operation .......................................................................................................
. Emotion circuit ..........................................................................................
To switch on, change the steam setting or to switch off .............................
To change intensity ....................................................................................
. Relax circuit ...............................................................................................
To switch on, change the steam setting or to switch off .............................
To change intensity ....................................................................................
. Power circuit..............................................................................................
To switch on, change the steam setting or to switch off .............................
To change intensity ....................................................................................
. Whirl programmes ....................................................................................
To switch on ...............................................................................................
To switch off ...............................................................................................
. Light ..........................................................................................................
To switch off ...............................................................................................
To switch the white light on or off ..............................................................
To switch the colour on or off .....................................................................
To switch on the colour programme ..........................................................
To alter the brightness ...............................................................................
To alter the speed of the colour change or the pulsing ..............................
. Sound (optional) ........................................................................................
. Charge remote control ...............................................................................
. Start integrated filling (optional) ...............................................................
. Empty pool .................................................................................................
. Change Settings .............................................................................................
. Change / activate / deactivate PIN .............................................................
. Change water temperature ........................................................................
Change bath water temperature ................................................................
ECO-mode temperature .............................................................................
Change standby-mode temperature ..........................................................
. Change loop time for water changing ........................................................
. Changing the language ..............................................................................
4
Page 5

. Changing the time .....................................................................................
. Change units ..............................................................................................
. Reset settings ............................................................................................
. Shutting Down the Pool ..................................................................................
. Duration of shut down: days – weeks ..................................................
Activate ECO-mode ....................................................................................
Deactivate ECO-mode ...............................................................................
. Duration of shut down: - weeks.............................................................
Activate Standby-mode ..............................................................................
Deactivate Standby-mode ..........................................................................
. Duration of shut down: A number of months .............................................
Start up pool again ....................................................................................
. Cleaning and Maintenance .............................................................................
. Dirt-absorbing sponge ...............................................................................
. Coarse filter insert .....................................................................................
. Fine filter ...................................................................................................
. Acrylic ........................................................................................................
Cleaning .....................................................................................................
Damage .....................................................................................................
. Stainless steel ............................................................................................
. Remote control ..........................................................................................
. Charging station ........................................................................................
. Control panel .............................................................................................
. Optional extras ..........................................................................................
Wooden liners, decorative teak (Blue Moon) ..............................................
Bath cushions/resting deck (Sundeck) .......................................................
Tarpaulin ...................................................................................................
Retainer for pool cover (Blue Moon) ..........................................................
Foot rest (Blue Moon).................................................................................
. Water Treatment ...........................................................................................
. Information on water treatment ................................................................
Why water treatment is important ............................................................
Water treatment products .........................................................................
How often should the water be treated? ....................................................
How should the water be treated? .............................................................
. Regulate pH value ......................................................................................
. Check alkalinity, also known as the TA value (Total Alkalinity) ...................
. Disinfect water ...........................................................................................
. Inhibit algae development .........................................................................
5
Page 6

. Change filter (minimum twice per year) ....................................................
. Add tap water ............................................................................................
. Clean pool ..................................................................................................
. Disposal .........................................................................................................
. Troubleshooting Support ...............................................................................
. Maintenance ..................................................................................................
. Technical Data ................................................................................................
. Identification Plate .....................................................................................
. Filling volume ............................................................................................
. Whirlpool ...................................................................................................
. Remote control ..........................................................................................
. Automatic shut-down time .......................................................................
. Charging station ........................................................................................
. Accessories ................................................................................................
Liner (Blue Moon) ......................................................................................
Pool cover (Blue Moon) ..............................................................................
Retainer for pool cover (Blue Moon) ..........................................................
Relaxing deck (Sundeck) ............................................................................
Tarpaulin ...................................................................................................
Foot rest (Blue Moon).................................................................................
6
Page 7
1. Diagrams and Pictures
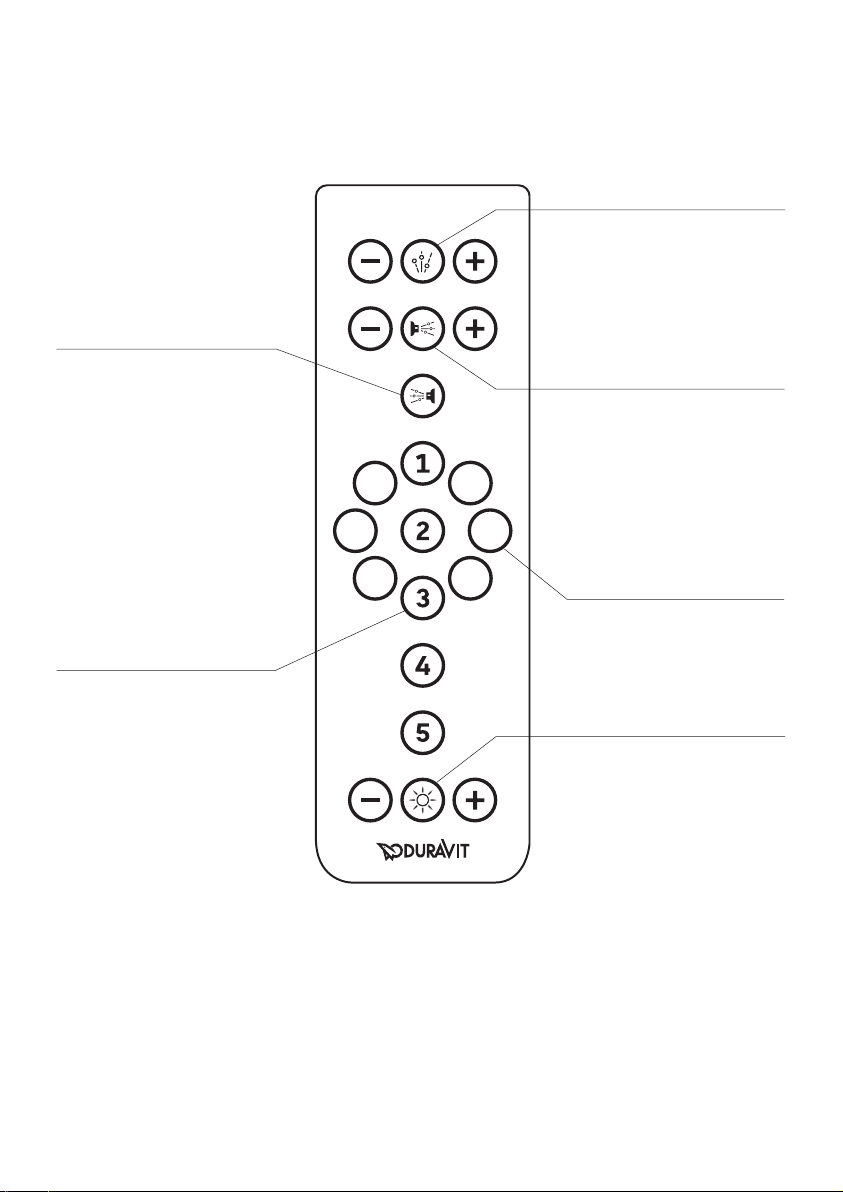
1.1 Remote control
Power button
Emotion button
Relax button
Colour buttons
Programming buttons
Light button
7
Page 8
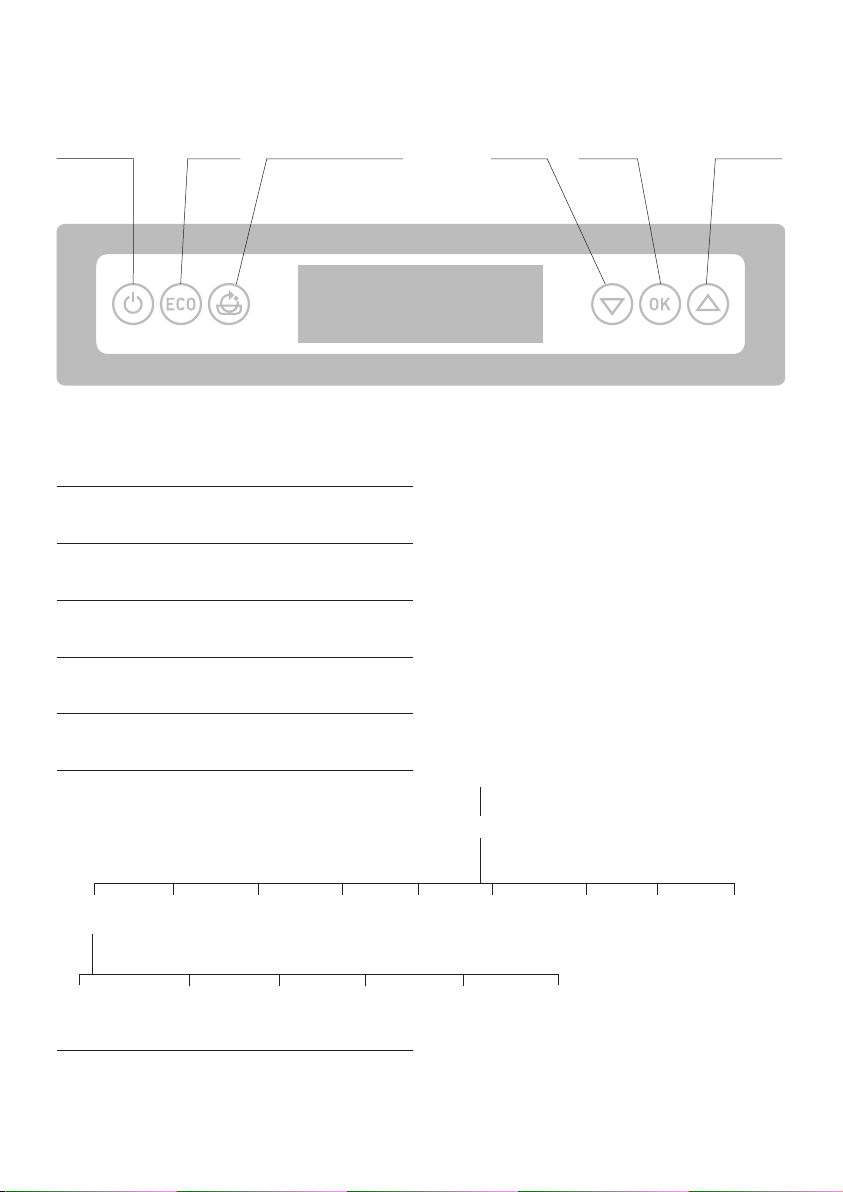
1.2 Control panel
Off
Eco
1.3 Menu hierarchy
Hygiene
Down Up
Emotion
Relax
Light
Sound*
Power
OK
Water Time Units Lan-
Tempera-
ture
Standby
tempera-
ture
Hygiene Filling*
8
guage
Settings
PIN (optional)
PIN
Emptying
Back
Default
settings
SERVICE VersionChange
Back
Back
*optional
Page 9
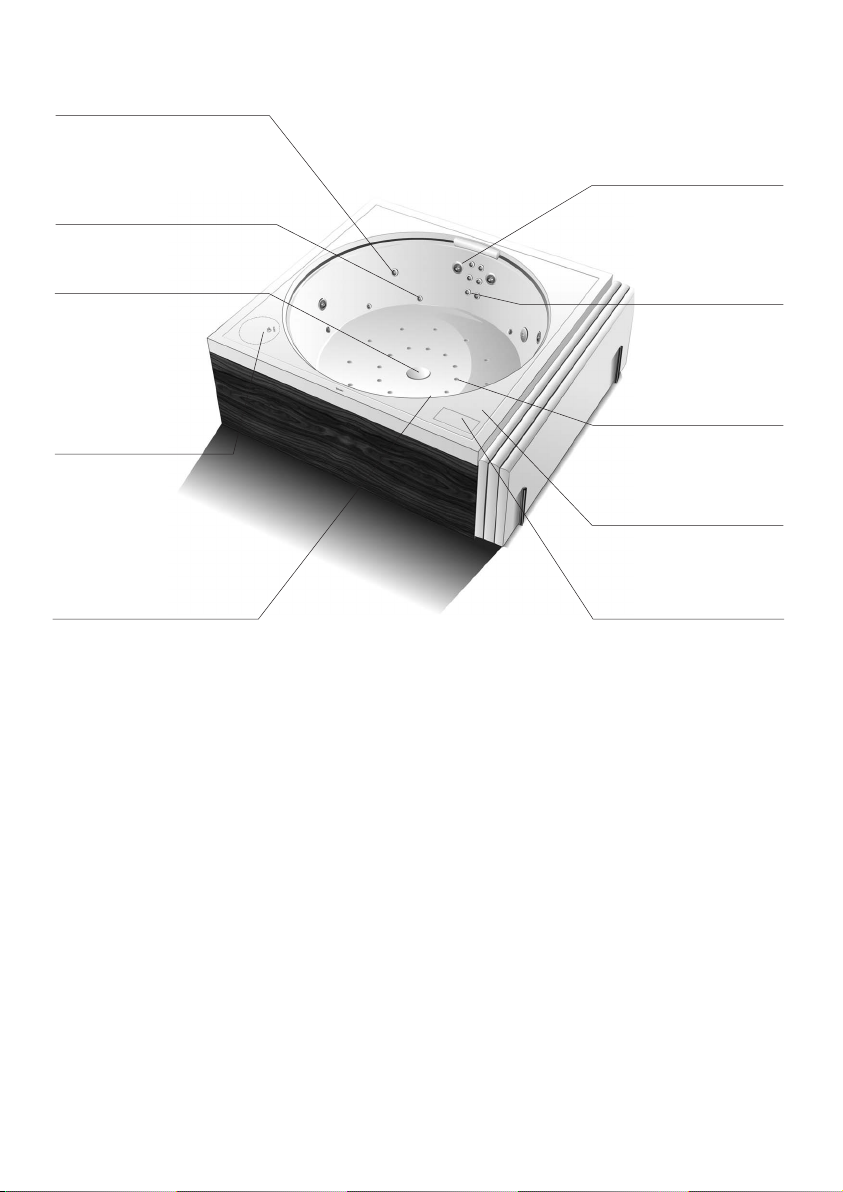
1.4 Blue Moon
(1) Inlet jet for hygiene and
temperature circuit
Coloured light
10 LED spotlights
Power circuit
4 Power jets
(3) Suction outlet
for hygiene and
temperature circuit
with coarse filter
insert
(5) Fine filter with
exchangeable
cartridge and
(4) Air valves
(2) Supply jet
for integrated filling
(optional)
Relax circuit
6 Midi jets
4 Roto jets
Emotion circuit
24 Durapearl jets
(6) Acrylic/wooden liner
Control panel
9
Page 10

1.5 Sundeck
(2) Supply jet
for integrated filling
(optional)
Relax circuit
9 Midi jets
4 Roto jets
Power circuit
2 Power jets
4 Roto jets
3 Midi jets
(1) Inlet jet
for hygiene and
temperature circuit
Coloured light
5 LED spotlights
(3) Suction outlet for
hygiene and temperature
circuit with coarse filter
insert
Emotion circuit
24 Durapearl jets
(5) Fine filter with
exchangeable
cartridge and
(4) Air valves
Control
panel
10
Page 11
2. For your Safety
To ensure that you will have many years of pleasure from your pool, please read these
operating instructions carefully, particularly the safety instructions.
Keep them in a safe place and in the case of a change in ownership, please ensure
they are given to the new owner.
2.1 Normal use
The pool is to be used exclusively on private property, in a hotel room, in a residential
home or other similar situations and is not intended for use in a public area.
Do not modify any technical components of the pool. Do not operate the pool with additional devices such as heat exchangers, solar panels or anything similar.
The pool is to be used solely for bathing. Any other usage will be deemed as not corresponding with normal usage. DURAVIT AG assumes no liability for abnormal usage.
2.2 Safety instructions
Please read and comply with the following safety instructions!
Remove any electrical equipment in the immediate vicinity.
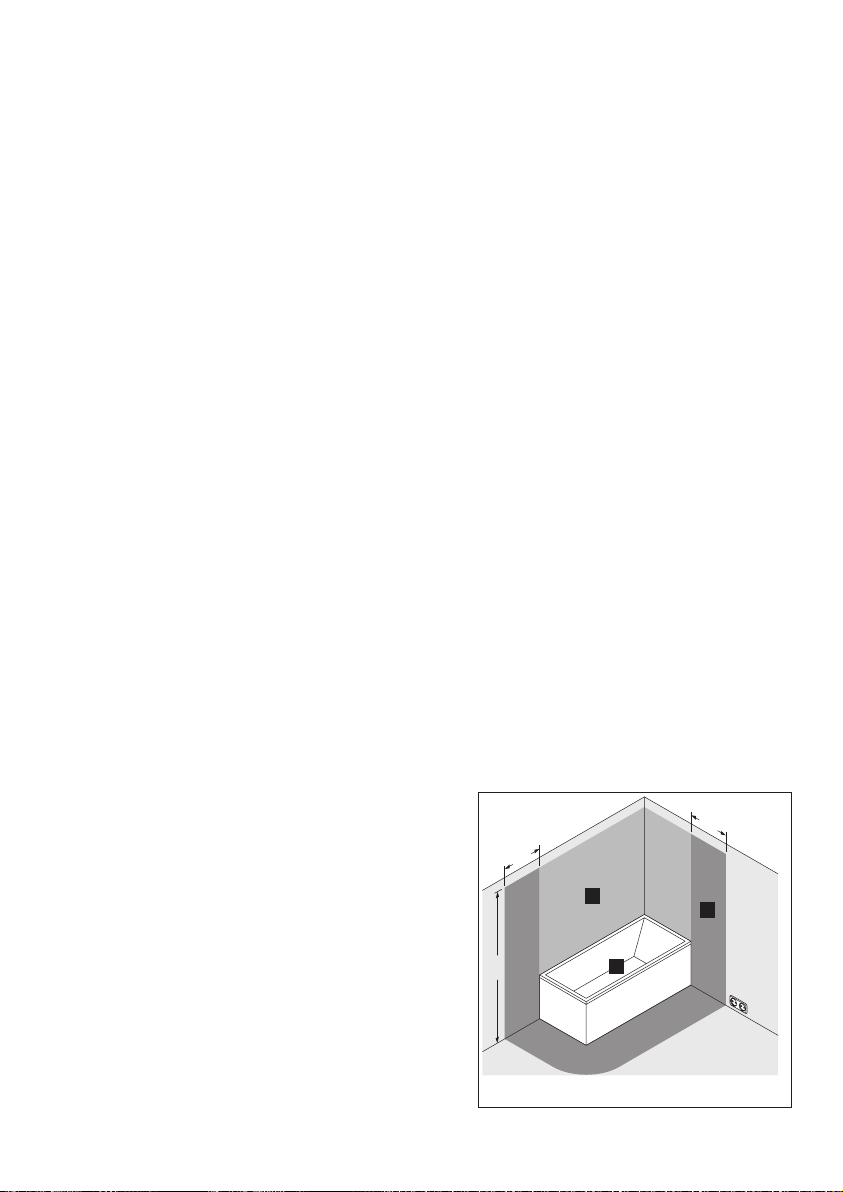
• Satisfy yourself that there are no electrical devices in the immediate vicinity of the
pool (protection area 0-2, see fig.).
• Observe and uphold the national regulations.
Never shut the suction and/or inlet jet. Due to risk of scolding, and the pool system
can also be damaged.
• Make sure that the suction outlet (3) and inlet
jet (1) are free and unobstructed.
This product is designed to be used only by
adults.
600
1
600
2
• Children, elderly or frail people as well as
people with disabilities may only use the pool
2250
0
when supervised.
Safeguard the water-quality.
• Take a shower before using the pool.
Protection areas 0-2 according to
DIN VDE 0100-701
11
Page 12

• Check the water quality regularly in accordance with the steps listed in the chapter
“Water Treatment”.
Bathe only when in good health.
• Do not use the pool if you have symptoms of influenza, a common cold or an infectious disease.
• Consult your doctor before using the pool if you suffer from high or low blood pressure, blood pressure irregularities, a tendency to bleed, cardiac or vascular illness,
acute illnesses or infections, circulation problems, diabetes or if you are pregnant.
• If taking medication, consult a doctor before using the steam bath.
• Do not use the pool while under the influence of drugs or alcohol.
• Do not use the steam bath immediately after strenuous physical exercise.
Do not set the pool water temperature too high and do not remain in the pool too long.
• Pool water temperature should not exceed 40 °C/104 °F for adults and should be
between 36-38 °C/97-100 °F for children.
• Danger of hyperthermia (overheating of the body). You must leave the pool immediately at the first signs of hyperthermia. Prolonged bathing in hot water can lead to
hyperthermia, a condition where the normal body temperature of about 37 °C/99 °F
is exceeded by several degrees. Possible consequences are feeling uncomfortably
hot, tired or lethargic, unwillingness to leave the pool, unconsciousness and danger
of drowning.
Always check that the pool is not damaged before use.
• Check the suction outlet cover and the LED spotlights. If they are damaged (cracks,
broken corners, water in the LED spotlights, etc.), the pool must not be used.
• The protective sheet must not be removed.
Damage to the pool by water with a high calcium content and the wrong pH-value.
• Fill the pool only with tap water with a water hardness of 1-1.5 mmol/l (5.6-8.4°dH).
• Pay careful attention to compliance with the prescribed pH value (7.2-7.4) to avoid
corrosion and other damages.
• The limits for drinking water must not be exceeded (see chapter
“Add tap water”).
Damage to the surface of the charging station by weather conditions.
• Store the charging station and remote control indoors.
12
Page 13

3. Description of Symbols
The following warning signs warn you of dangerous situations and their severity:
DANGER
WARNING
CAUTION
NOTICE
The following symbols are used:
Hints and tips are provided here!
> A request for your input.
@ Further information for you on the Internet.
Indicates a dangerous situation with a high risk that will lead to
death or serious injury.
Indicates a dangerous situation with a moderate risk that may
lead to death or serious injury.
Indicates a dangerous situation with a low risk that may lead to
minor or moderate injury.
Indicates possible damage to property
4. Product Information
4.1 Whirl circuits
Emotion circuit
Select a bubbling air/water jet, preheated air or a fine water jet, which is then fed into
the bath via Durapearl jets in the floor of the bath. If air is being mixed with the water
then the intensity of the air stream can be varied.
Relax circuit
6 Midi and 4 Roto jets (plus 3 other Midi jets in the side panels with Sundeck) are
driven from a single pump. The intensity can be varied continuously from the remote
control. The massaging effect can be boosted by the addition of air and switched off
automatically by an interval timer.
13
Page 14

Power circuit
In Blue Moon pools 4 large Power jets work to produce a very strong massaging effect.
In Sundeck pools 2 large Power jets and an additional 4 Roto and 3 Midi jets in the
side panels form the Power Flow. During bathing the intensity of the Power jets can be
adjusted by turning the jets. The massaging effect can be boosted by the addition of
air and switched off automatically by an interval timer.
4.2 Whirl programmes
Coloured light programmes individually matched to the various whirlcircuits create an
idyllic atmosphere. You can select a programme that is appropriate to your personal
mood. Each whirl programme lasts 16 minutes.
Energise
In conjunction with the
by the gushing flow of water. This combination of light and massage leaves you feeling
relaxed.
Balance
Sparkling water and air mixture will restore a balanced sense of well being.
“coloured flush” programme, you'll enjoy being re-invigorated
Revive
This programme is particularly suited to the morning hours. The combination of the
“Sundawn” programme and a slow, steady increase in the intensity of the massage will
revive your body.
Regeneration
This whirl programme is coordinated with the
“Sunset” programme. It starts with a
vigorous massage and winds down with a smooth spray jet of water from the floor of
the bath.
14
Page 15

Fitness
The
“pulsed light” programme combines a colourful mix of the different circuits. This
illustrates the variety of different programmes.
4.3 Coloured light
Various colours, white light and predefined coloured light programmes can be selected. and the intensity of all colours is dimmable. The loop times of the colour progressions can be adjusted in coloured light programmes 1, 2 and 5.
Colours
Yellow Stimulating, liberating
Red Stimulating, warming, vitalising
Violet Soothing, regenerating, inspiring
Blue Calming, soothing
Turquoise Vitalising, invigorating
Green Relieving, calming, stabilising
Colour programmes
• 1: Coloured flush
Changing light from a six coloured hard colour progression:
White – blue – turquoise – green – yellow – red – violet – white - ...
The loop time can be varied between 5 and 22 seconds.
• 2: Rainbow
Changing light from a six coloured soft colour progression:
White – blue – turquoise – green – yellow – red – violet – white - ...
The loop time can be varied between 5 and 22 seconds.
• 3: Sundawn
A 15 minute simulation of the lighting characteristics during daybreak.
• 4: Sunset
A 15 minute simulation of the lighting characteristics during sunset.
• 5: Pulsed colours
Pulses of a selected colour with a variable loop time.
15
Page 16

4.4 Sound (optional)
The sound system ensures music can be heard and enjoyed above and below the water.
You can connect your music player and listen to your favourite music via Bluetooth.
4.5 Hygiene and temperature circuit
The hygiene and temperature circuit maintains the continuousblending and recirculation of the water. This ensures that the water is always safe and kept constant at the
normal temperature. The coarse and fine filters, heater and ozone (O
all located in the circularflow.
An O
generator is a standard feature, designed for basic disinfection. This ozone pro-
3
duced from ultraviolet light is blended with the water flowing in the hygiene and temperature circuit before the water enters the bath. Ozone is a highly effective disinfectant. It is more active than oxygen and consists of three oxygen atoms. If ozone comes
into contact with material that has been coated with water then it gives off one oxygen
atom, which causes algae, bacteria, body oils or other impurities to be oxidised. The
only waste product from ozone is oxygen that is re-absorbed into the atmosphere.
) generator are
3
NOTICE
As ozone decays very quickly it is used only as a basic disinfectant
and must be supplemented with other disinfectants. An additional disinfection using
the products recommended in the chapter
”Water Treatment” is essential. However
the amount of additional disinfectant is reduced considerably.
A very small amount of ozone is used for water treatment and this constitutes no risk
for the environment.
4.6 Change water
Changing the water ensures that the water in all of the circuits and pipes is remixed
regularly. This additionally serves for regular automatic venting of the hygiene and
temperature circuit. To do this, all of the units are switched on twice a day for one
minute. You can change the time points individually when the water change takes
place. As soon as temperatures approach the freezing point, a water change is carried
out repeatedly and automatically to ensure that the water in the pipes of the pool do
not freeze.
If the
“Integrated Filling” option has been selected, then fresh water is also added. This
16
Page 17

prevents stagnant water sitting in the connecting pipe and the backflow preventer is
regularly flushed.
4.7 Shutdown modes
Water quality must also be monitored during shutdown modes.
ECO-mode
In ECO-mode the bath water is maintained at 2 °C below the normal temperature in
order to save energy. When you activate ECO mode with a timer (ECO timer), the ECOmode will be automatically deactivatedand the water heated to the bathing temperature. Heating to the normal water temperature requires one to two hours, depending
on the ambient temperature. Only one ECO-mode loop with the timer is permitted
during any 24 hour period.
Standby-mode
This is an energy saving mode. It is recommended for when the pool will not be used
for two to four weeks and helps to keep the energy costs as low as possible. Longer
durations should not be covered in this way, as water quality could potentially be reduced by microbial contamination.
4.8 Integrated filling (optional)
If the ”Integrated Filling” option was ordered, then you have the possibility of filling the
pool by pressing a button. As soon as you activate this function
your pool's water drain will close automatically and the pool will be filled via the supply jet (2).
4.9 Insulate floating sheet
Besides providing thermal insulation, the insulating floating sheet protects against
dirt and evaporation of the water.
17
Page 18

4.10 Tub covers
When the pool is not in use, use pool covers to reduce the pool's energy consumption
and evaporation of the water.
4.11 Tarpaulin
We recommend the use of a tarpaulin when the pool is not in use. This protects the pool
against dirt and damage. Only use the tarpaulin if you have also fitted the pool covers.
5. First Start-up of the Pool
Carry out each of these steps individually in order to start-up the pool correctly and
as quickly as possible. The diagrams referred to are collected together in the chapter
“Diagrams and Pictures”.
Step 1: Charge remote control
> Place the remote control on the charging station.
The
“Emotion” button blinks, when the battery is being charged.
When the battery is fully charged the
nated.
“Emotion” button will be permanently illumi-
Step 2: Prepare filter
> Remove the acrylic/wooden liner (6 - Blue Moon) and/or the padded cover (Sun-
deck).
> Remove the white cover located over the fine filter (5).
> Pull the tab upwards and turn the screw of the fine filter (5)in an anti-clockwise
direction (Fig. 1) and remove. (Fig. 2)
> Remove the cover completely. (Fig. 3)
> Remove the exchangeable cartridge from its packing and place it in the fine filter
(5). (Fig. 4)
> Close the fine filter (5) again.
18
Page 19
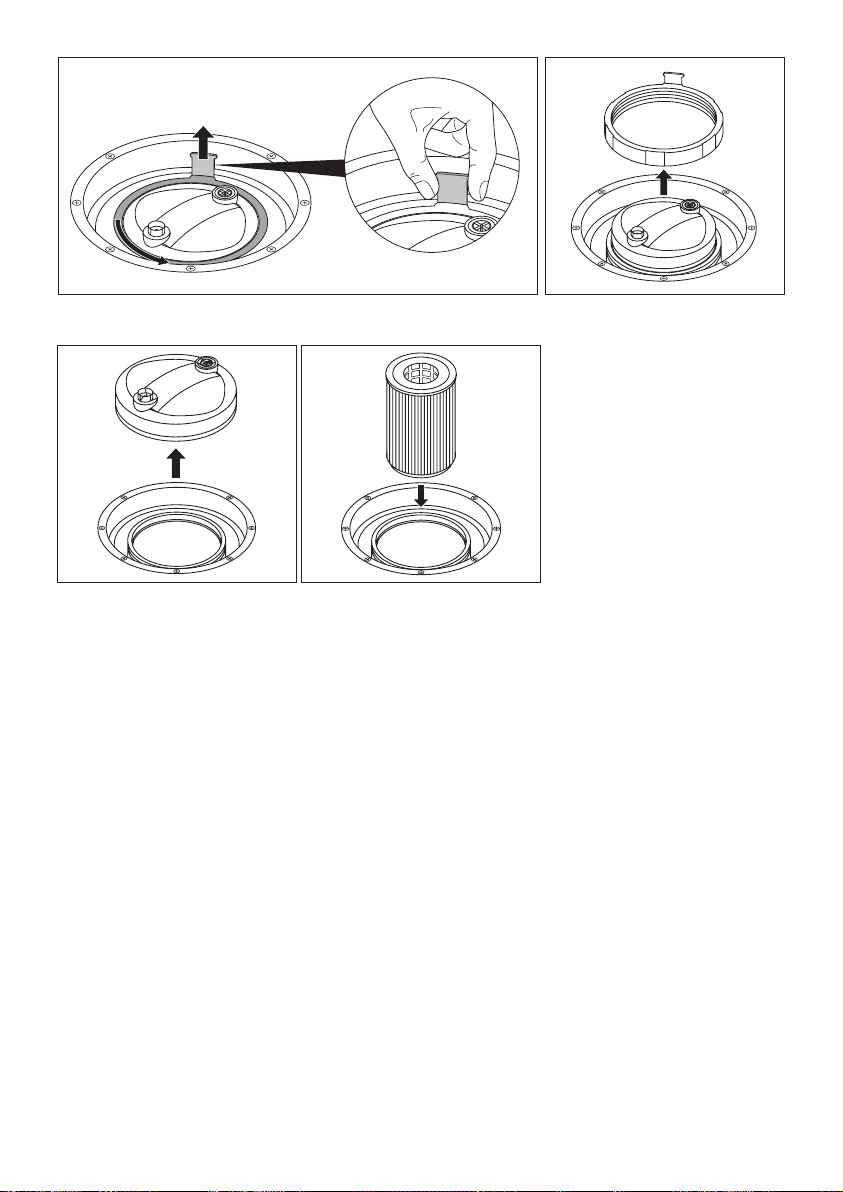
Fig. 1 Fig. 2
Fig. 3 Fig. 4
Step 3: Configure operator's panel
> Switch on the main switch.
A list of languages is displayed on the panel.
Select language
> Press the
> Press the
“Time h” is displayed on the operator's panel.
“Off” button until the required language is visible.
“OK” button to activate the language.
Set time
> Press the
> Press the
“Time m” is displayed on the operator's panel.
> Press the
> Press the
“Units” is displayed on the operator's panel.
“Off” or “On” button until the current hour is displayed.
“OK” button to set the hour.
“Off” or “On” button until the current minute is displayed.
“OK” button to confirm the time.
19
Page 20

Set units
> Press the
> Press the
“Nominal” is displayed on the operator's panel.
“Off” or “On” button until the correct unit is displayed.
“OK” button to confirm the units.
Adjust nominal temperature
> Press the
> Press the
“PIN-request” is displayed on the operator's panel - the first digit flashes.
“Off” or “On” button until the desired value is displayed.
“OK” button to confirm the value.
Set PIN
The Settings menu and the ECO/Standby-mode can be protected by activating the PIN
function. If you do not want to do this, you can deactivate it by selecting
“0000” as the
PIN.
> Press the
> Press the
“Off” or “On” button until the required digit is displayed.
“OK” button to confirm the digit.
The next digit flashes on the operator's panel.
> Repeat this procedure until all four digits of the PIN have been changed.
The operator's panel is now configured. The actual and nominal temperatures are
displayed on the operator's panel.
Step 4: Fill pool
> Fill the pool with tap-water (water temperature <40 °C; water hardness of
1-1.5 mmol/l (5.6-8.4°dH)) until the water level is about 50 mm above the upper-
most jet.
> Wait until the pool is completely filled.
> When it is completely filled the water changing cycle starts for one minute and
ter Changing Activated
” appears on the operator's panel.
> Wait for another three minutes until the hygiene and temperature circuit starts
automatically.
> The
“Hygiene” button lights up.
Step 5: Safeguard water-quality
Check the water quality in accordance with the steps listed in the chapter
Treatment
”.
“Water
> Repeat your water quality check as soon as the water has reached the normal tem-
perature that has been set.
The pool is now configured and ready, you can enjoy your first bath!
“Wa-
20
Page 21

6. Basics of Operation
The pool is operated from the remote control. Settings are altered via the operator's panel.
If the remote control has been misplaced or the batteries are empty then basic functions can also be switched on or off from the operator's panel.
NOTICE
> Do not use any bathing bubbles, oils or exfoliating products.
Damage to pool from water additives.
6.1 Buttons and their functions
Remote control
• Press the respective button to switch on a function.
The button will briefly light up in blue.
• To switch off a function, keep the required button pressed for two seconds.
If there is another remote control in radio range, the house symbol will appear on
the operator's display panel. If you move outside the radio range, all the remote
control buttons will light up briefly.
Control panel
• Deactivate all functions using the
• To access the menu, press the
• Move between menu items with the
A menu item is marked when a square to its right blinks.
• In order to select the marked menu item, press the
• To access the ECO menu, press the
“Off” button.
“OK” button.
“up” and “down” buttons.
“OK” button.
“ECO” button.
7. Operation
7.1 Emotion circuit
To switch on, change the steam setting or to switch off
> Press the
“Emotion” button.
21
Page 22

Air / water stream is activated.
> Press the
“Emotion” button a second time.
Air stream is activated.
> Press the
“Emotion” button a third time.
Water stream is activated.
> Press the
“Emotion” button a fourth time.
Emotioncircuit is switched off.
If the batteries in the remote control are empty or you can't find it? The Emotion
circuit can be turned on or off at the operator's panel:
> Press the
“OK” button to call up the menu.
> Select Emotion.
Massage with bubbling air/water stream can be switched on or off.
To change intensity
The desired intensity can only be changed on functions with air stream.
> Press the
“-” or “+” buttons.
7. 2 Relax circuit
To switch on, change the steam setting or to switch off
> Press the
“Relax” button.
Water stream is activated.
> Press the
“Relax” button a second time.
Air / water stream is activated.
> Press the
“Relax” button a third time.
Timed air / water stream is activated.
> Press the
“Relax” button a fourth time.
The relaxcircuit will be switched off.
If the batteries in the remote control are empty or you can't find it? The Relaxcircuit
can be turned on or off at the operator's panel:
> Select Relax.
Massage with air/water stream can be switched on or off.
22
Page 23

To change intensity
> Press the
“-” or “+” buttons until the desired intensity of the water stream is set.
7.3 Power circuit
To switch on, change the steam setting or to switch off
> Press the
Water stream is activated.
> Press the
Air / water stream is activated.
> Press the
Timed air / water stream is activated.
> Press the
The powercircuit will be switched off.
If the batteries in the remote control are empty or you can't find it? The Power cir-
cuit can be turned on or off at the operator's panel:
> Press the
> Select Power.
Massage with air/water stream can be switched on or off.
“Power” button.
“Power” button a second time.
“Power” button a third time.
“Power” button a fourth time.
“OK” button to access the menu.
To change intensity
The intensity can only be changed with Power jets (not with Roto or Midi jets).
NOTICE
Damage to the unit due to closed Power jets.
> At least one jet must always be left open.
> Turn the jet inserts on, turn the Power jets to the left to increase the intensity, and
to the right to reduce the intensity.
7. 4 Whirl programmes
To switch on
> Press the required programme button
The whirl programme will be switched on.
“1-5” twice.
23
Page 24

To switch off
> Press the activated programme button continuously for two seconds.
The whirl programme (including coloured lights) will be switched off.
7.5 Light
CAUTION
Risk of eye injury from light beam.
> Do NOT look directly into the lighting elements.
To switch off
> Press the
“Light” button to switch off the coloured lights or the coloured light pro-
gramme.
To switch the white light on or off
> Press the
“Light” button.
The white light can be switched on or off.
To switch the colour on or off
> Press the required colour button.
A solid colour can be switched on or off.
To switch on the colour programme
> Press the required programme button
“1–5”.
The colour programme can be switched on.
> For colour programme 5: First press the required colour button.
If the batteries in the remote control are empty or you can't find it? A “Rainbow”
colour programme can be turned on or off at the operator's panel:
> Press the
“OK” button to access the menu.
> Select Light.
The
“Rainbow” colour programme can be switched on or off.
24
Page 25

To alter the brightness
> Press the
“-” or “+” button in order to alter the brightness of the six coloured and the
white lights. The lighting strength decreases or increases.
To alter the speed of the colour change or the pulsing
Prerequisite: Colour programme 1, 2 or 5 is activated. The speed or the pulsing can
only be altered for these colour programmes.
> Press the
“-” or “+” buttons.
7. 6 Sound (optional)
Prerequisite: Bluetooth capable audio source with protocol A2DP.
> Press the “OK” button to access the menu.
> Select Sound.
Bluetooth mode is activated.
> Activate the Bluetooth mode on your audio source as described in its operating
instructions.
> Search for the
> Enter the activation code:
> Select music and adjust the volume on your audio source.
“Duravit” Bluetooth device and establish a connection to it.
“2412”.
7.7 Charge remote control
> Place the remote control on the charging station.
The
“Emotion” button blinks, when the battery is being charged.
When the battery is fully charged the
nated.
Keep the remote control on the charging station when not in use. This will help keep
the remote control charged.
What if the remote control does not respond?
If the remote control is located out of radio range, it reverts to the energy saver
mode in order to extend the life of the battery. The remote control must then be
reactivated:
> Place the remote control on the charging station.
After 2 seconds, the
“Emotion” button lights up. The remote control is now active
“Emotion” button will be permanently illumi-
25
Page 26

again. As soon as the remote control is in radio range, the house symbol appears
on the operator's panel display.
What if the remote control still does not respond?
> For further causes, see chapter
“Help in Case of Problems”.
7.8 Start integrated filling (optional)
> Press the “OK” button to access the menu.
> Select Settings > Water > Fill.
> Press the
The pool will start filling and a check mark appears next to Filling.
The filling will stop automatically as soon as the pool is filled.
“OK” button.
7. 9 Empty pool
> Press the “OK” button to access the menu.
> Select Settings > Water > Empty.
> Press the
The pool will start to empty and a check mark appears next to Emptying. When the
pool is completely empty, the blowing procedure begins after about five minutes.
> Wait until the blowing process is finished (about two minutes) and an additional five
minutes until the drain closes automatically.
“Emptying in Process” message will go out on the operator's panel.
> Make sure the pool is switched off at the mains socket/switch.
“OK” button.
8. Change Settings
8.1 Change / activate / deactivate PIN
The Settings menu and the ECO/Standby-mode can be protected by activating the PIN
function. If you do not want to do this, you can deactivate it by selecting
PIN.
> Press the
> Select Settings > Change PIN.
“PIN-request” is displayed on the operator's panel
26
“OK” button to access the menu.
“0000” as the
Page 27

> Press the “Off” or “On” button until the required digit is displayed.
> Press the
“OK” button to confirm the digit.
The next digit flashes on the operator's panel.
> Repeat this procedure until all four digits of the PIN have been changed.
The set PIN is stored; the PIN is requested when the Settings menu and the ECO
menu are selected.
8.2 Change water temperature
Change bath water temperature
> Press the
> Select Settings > Water > Temperature.
> Press the
> Press the
The temperature selected is stored and you are returned to the Water sub-menu.
ECO-mode temperature
The ECO-mode temperature can not be changed. It is pre-defined at 2 °C lower than
the temperature of the bath water, which can be changed.
Change standby-mode temperature
The temperature can be set between 15-25 °C/59-77 °F.
> Press the
> Select Settings > Water > Standby Temperature.
> Press the
played.
> Press the
The temperature selected is stored, you are returned to the Water sub-menu.
“OK” button to call up the menu.
“Off” or “On” button until the required temperature is displayed.
“OK” button.
“OK” button to access the menu.
“Off” or “On” button until the required Standby-mode temperature is dis-
“OK” button.
8.3 Change loop time for water changing
CAUTION
When water changing is deactivated there is no blending of water in the pipes. The O
generator is also switched off. This may lead to deposits in the pipes.
> Do NOT select
The loop time is pre-defined to 8:00 and 20:00. If you wish to change it, please note
Deactivating water changing can lead to contaminated water.
“Off” as the loop time.
3
27
Page 28

the following:
• The time ofloop 1 must be before the time ofcycle 2.
• There must be at least 8 hours difference between the times ofloop 1 and 2.
Example:
• Time ofloop 1 = 07:00
• Time ofloop 2 = 16:00
• Time of loop 1 takes place before time of loop 2.
There is a 9 hour difference (>8 hours) between loops 1 and 2.
> Press the
“OK” button to access the menu.
> Select Settings > Water > Water Changing.
“Loop 1” is displayed on the operator's panel
> Press the
> Press the
“Loop 2” is displayed on the operator's panel
> Press the
> Press the
“Off” or “On” button in order to set theloop 1 time.
“OK” button.
“Off” or “On” button in order to set theloop 2 time.
“OK” button.
The loop times have been changed and you are now in the Water sub-menu.
8.4 Changing the language
> Press the “OK” button to access the menu.
> Select Settings > Language.
> Press the
> Press the
The language is activated and you are returned to the Settings sub-menu.
If you have selected the wrong language and you can't navigate to the Language menu?
> Press
You are now in the Language menu.
> Select the desired language.
> Press the
The desired language is activated.
“Off” button until the required language is marked.
“OK” button.
“Off” and “OK” simultaneously.
“OK” button.
8.5 Changing the time
> Press the “OK” button to access the menu.
> Select Settings > Time.
28
Page 29

“Time h” is displayed on the operator's panel.
> Press the
> Press the
“Time m” is displayed on the operator's panel.
> Press the
> Press the
“Off” or “On” button until the required hour is displayed.
“OK” button.
“Off” or “On” button until the minute required is displayed.
“OK” button.
The time is changed and you are returned to the Settings sub-menu.
You have changed the time and now “Check heater” is displayed on the control panel?
> Disconnect the pool from power for 3 min.
8.6 Change units
> Press the “OK” button to access the menu.
> Select Settings > Units.
> Press the
> Press the
“Off” or “On” button until the units required is displayed.
“OK” button.
The units is changed and you are returned to the Settings sub-menu.
8.7 Reset settings
> Press the “OK” button to access the menu.
> Select Settings > Default (Default settings).
“Default” is displayed on the operator's panel.
> Press the
“OK” button.
All the settings for the pool are reset to their factory defaults and the pool must be
configured again from the start (see chapter
“First Start-up of the Pool”).
9. Shutting Down the Pool
If you are not going to use the pool for days, weeks or months at a time, there are different pool modes to cater optimally for energy consumption.
If the pool is disconnected from the power supply for a longer period, the time must
be reset.
29
Page 30

> For this, refer to the chapter “Initial start of the pool” under Step 3 the item “To set
the time
”.
9.1 Duration of shut down: 2 days – 2 weeks
ECO-mode: Water temperature is lowered by 2 °C.
Activate ECO-mode
DANGER
Potential health risk due to insufficient care of the water!
> Monitor the water quality during ECO-mode as well.
... without timer
> Press the
“ECO” button.
Select from the menu.
> Select ECO.
The
“ECO” button is illuminated, ECO-mode is activated. “ECO” is displayed on the
operator's panel.
> Allow the dirt-absorbing sponge and floating sheet to float on the surface of the water.
> Place the bath cushions around the pool and collapse the relaxing deck.
> Pull the tarpaulin over the pool and the cushions/relaxing deck.
... with timer
The ECO timer can only be switched on for the next 24 hours.
> Press the
“ECO” button.
> Select ECO timer.
“Turn on-time” is displayed on the operator's panel.
> Press the
> Press the
The
“Off” or “On” button until the required time is displayed.
“OK” button.
“ECO” button flashes, the ECO timer is activated. The message “ECO” appears on
the operator's panel with the turn on-time of the bathing mode.
> Allow the dirt-absorbing sponge and floating sheet to float on the surface of the water.
> Place the bath cushions around the pool and collapse the relaxing deck.
> Pull the tarpaulin over the pool and the cushions/relaxing deck.
Deactivate ECO-mode
At least one to two hours before you want to bathe!
> Press the
30
“ECO” button.
Page 31

Select from the menu.
Select ECO and/or ECO timer.
The
“ECO” button goes out and the water is warmed to bathing temperature.
> Check and adjust the water quality without fail before each use of the pool as this
can easily have deteriorated during the weeks that the pool was not in use.
9.2 Duration of shut down: 2-4 weeks
Standby-mode: The water temperature is reduced to the Standby-mode temperature.
Activate Standby-mode
DANGER
Potential health risk due to insufficient care of the water!
> Monitor the water quality during Standby-mode as well.
> Press the
“ECO” button.
> Select Standby.
The
“ECO” button is illuminated, Standby-mode is activated. “Standby” is displayed on
the operator's panel, together with the temperature.
> Allow the dirt-absorbing sponge provided and the floating sheet to float on the sur-
face of the water.
> Place the bath cushions around the pool and collapse the relaxing deck.
> Pull the tarpaulin over the pool and the cushions/relaxing deck.
Deactivate Standby-mode
At least 8 hours before you want to bathe!
> Press the
“ECO” button.
> Select Standby.
The
“ECO” button goes out and the water is warmed to bathing temperature.
> Check and adjust the water quality without fail before each use of the pool as this
can easily have deteriorated during the weeks that the pool was not in use.
9.3 Duration of shut down: A number of months
The diagrams referred to are collected together in the chapter “Diagrams and Pictures”.
> Empty the pool (see
“Empty pool” in the chapter “Operation”).
> Switch off the pool at the mains switch and remove the plug from the socket and
31
Page 32
ensure the switch is not activated until you are ready to proceed.
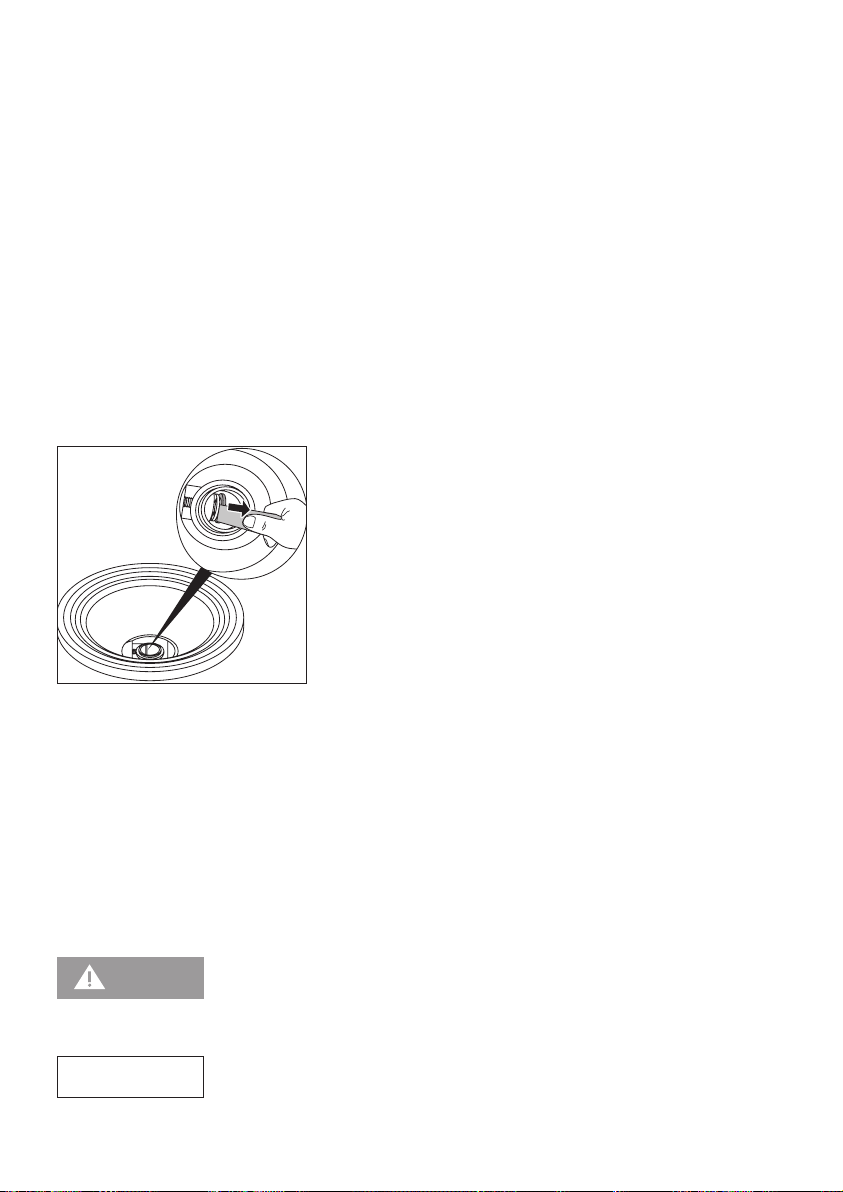
> Open the fine filter (5).
> Remove the exchangeable cartridge and dispose of it (microbial contamination!)
> Open the bypass valve at the bottom of the fine filter with the tool supplied, so that
the hygiene and temperature circuit can run empty. (Fig. 5)
> Wait until the water has drained off.
> Close the bypass valve again.
> Clean the air valves in the cover of the fine filter housing under running water.
> Check the operation of the air valves.
> Clean out the fine filter housing with a damp cloth and re-close it (without a new
cartridge).
> Clean the coarse filter insert (3).
> Place the bath cushions around the pool and collapse the relaxing deck.
> Pull the tarpaulin over the pool and the cushions/relaxing deck.
Fig. 5
Start up pool again
Follow steps 1-2 and 4-5 as described in the chapter
operator's panel does not need to be configured again from the start.
“First Start-up of the Pool”. The
10. Cleaning and Maintenance
CAUTION
> Please ensure that detergents do not end up in the pool bathing water.
NOTICE
32
Detergents can unknowingly affect the hygiene balance of the water.
Damage can occure to the surfaces and the whirl system due to
Page 33

using the wrong detergents!
> Never use abrasive, aggressive or chemical cleaners.
10.1 Dirt-absorbing sponge
The dirt-absorbing sponge gathers 40 times its own weight in oils and reduces the
load on the filter system.
> Allow the dirt-absorbing sponge to float on the surface of the water.
> Wash the sponge regularly.
> Replace the sponge at least once a year (Order no. 7900951).
10.2 Coarse filter insert
NOTICE
Damage to the pump due to the incorrect setting of the hygiene
and temperature circuit!
> Stop the hygiene and temperature circuit to clean the coarse filter insert.
Clean the coarse filter insert after every bath, but at least once every 1-2 weeks:
> Press the
“Hygiene” button on the operator's panel to stop the hygiene and tempera-
ture circuit (starts again automatically after one hour).
The
“Hygiene” button flashes.
> Remove the cover of the suction outlet (3) located in the centre of the bath.
> Remove the cylindrical coarse filter insert plus any dirt.
> Remove the dirt and any visible particles.
> Clean the coarse filter insert, replace it and then replace the suction outlet cover.(3).
> Press the
The
“Hygiene” button on the operator's panel.
“Hygiene” button will light up, and the hygiene and temperature circuit will
start.
10.3 Fine filter
Clean out the fine filter housing and the filter cartridge weekly.
The diagrams referred to are collected together in the chapter
> Press the
“Hygiene” button on the operator's panel to stop the hygiene and tempera-
“Diagrams and Pictures”.
33
Page 34

ture circuit (this will start again automatically after one hour).
> The
“Hygiene” button flashes.
> Remove the acrylic/wooden liner (6 - Blue Moon) and/or the padded cover (Sundeck).
> Remove the white cover located over the fine filter (5).
> Pull the tab upwards and turn the screw of the fine filter (5) in anti-clockwise mo-
tion (Fig. 1; Chapter 5) and remove it. (Fig. 2; Chapter 5)
> Remove the cover completely. (Fig. 3; Chapter 5)
> Remove the fine filter cartridge (cf. Fig. 4; Chapter 5) and wash it under running
water.
> Clean the fine filter housing (5) with a damp cloth.
> Re-insert the fine filter cartridge.
> Close the fine filter (5).
> Press the
The
“Hygiene” button on the operator's panel.
“Hygiene” button lights up, the hygiene and temperature circuit starts.
10.4 Acrylic
Cleaning
> Clean acrylic with a soft, damp cloth. particularly the surfaces under the liner (Blue
Moon) or the overflow channel (Sundeck).
> Use the Duravit Maintenance Set for Acrylic Surfaces for the occasional thorough
cleaning and for removing stubborn spots.
> Remove extensive soiling with warm water and a liquid detergent, dish washing
liquid or soap suds.
> Rinse after cleaning the pool carefully so that all detergent residues are removed.
Damage
> Remove scratches and surface damage with the Duravit Acrylic Surface Maintenance
and Repair Set.
10.5 Stainless steel
NOTICE
• Do not use metal items to remove scaling.
• When using cleaning sponges ensure that the scrubbing side does not contain metal
particles.
34
Page 35

> Clean scaling from stainless steel parts immediately.
> Clean stainless steel with detergents that DO NOT contain either hydrochloric acid or
chloride.
> Rinse off deposited materials with normal water and remove stubborn chloride
deposits manually.
10.6 Remote control
> Clean the remote control with a soft, damp cloth.
10.7 Charging station
DANGER
> Disconnect the charging station from the mains socket before cleaning.
> Remove the cover from the charging station.
> Clean the chrome-plated station with a soft, damp cloth.
Danger of electric shock from electrical equipment.
10.8 Control panel
> Clean the control panel with a soft, damp cloth.
10.9 Optional extras
Wooden liners, decorative teak (Blue Moon)
> Clean the liners with normal commercial plastic cleaner and a clean, soft cloth.
Bath cushions/resting deck (Sundeck)
NOTICE
• Under no circumstances should thinners be used. This will damage the material.
• Do not use strong detergents containing ketone, such as nail varnish remover.
> Clean the bath cushions/relaxing deck with a clean, soft, damp cloth.
35
Page 36

> Remove stubborn dirt with a little washing up liquid.
> Remove more stubborn stains with alcohol or benzene.
Tarpaulin
NOTICE
• Do not use detergents containing solvents or are strongly alkaline.
> Rinse the surface dirt off with water.
> Dry with a cloth or allow to dry in the air.
> Store away the tarpaulin only when it is absolutely clean and dry.
Retainer for pool cover (Blue Moon)
> Clean the retainers with hot water and a soft sponge or a soft brush and mild liquid
cleaner that does not contain abrasives.
> Remove lime scale with an acidic detergent that contains approx. 10% citric or acetic
acid.
> Mop with clean water and rub the retainers dry with a clean cloth.
Foot rest (Blue Moon)
> Clean the foot rest with a clean, soft, damp cloth.
> Remove extensive staining by rubbing with a wet scouring sponge and scouring
detergent.
11. Water Treatment
11.1 Information on water treatment
Why water treatment is important
The bathing water is alive and is exposed daily to a wide variety of contaminants.
It is unavoidable that organic and inorganic particles get transferred to the water from
the bather, from nature or from the environment. In warm whirlpool water in particular this can very soon lead to bacterial and algae growth if regular monitoring and
treatment of the water is not carried out.
The following steps should be followed for chemical water treatment.
36
Page 37

• Regulate pH value
The pH value is an indication of the acidity or alkalinity of the water. Ideally, this
value lies between 7.2 and 7.4.
The pH value is subject to fluctuations for a number of reasons. A weekly check and
adjustment of the pH value is therefore required.
Without properly adjusted pH value, no effective disinfection of the pool can be
performed.
Water with a pH value that is too low leads to corrosion of metals; a value that is too
high leads to increased lime precipitation and physical impairment such as skin and
eye irritations.
• Control alkalinity also known as the TA value (Total Alkalinity)
The alkalinity of pool water protects the pH value from sudden fluctuations. The level
should be between 80 and 160 mg/l.
If the alkalinity falls below 80 mg/l, it can result in significant fluctuations in the pH
value, thereby causing corrosive water conditions.
If the alkalinity is too high, then setting the pH becomes very difficult, if not even
impossible. If despite the addition of pH minus or pH plus (also in larger quantities)
no change is measurable, you should check the TA value.
• Disinfect the water
The ideal living conditions for micro-organisms prevail in water. Only a few are really
pathogenic but these constitute an infection risk for you; nevertheless an unsightly
bio film can develop on your pool. In order to maintain the water in a safe, clean and
hygienic condition it is necessary to kill these bacteria.
The pool is already fitted with an O
generator as standard and this handles the
3
basic disinfection. This is usually sufficient but only so long as no organic material
is introduced by the bather or the environment. Thus, additionally a chemical water
disinfection is unavoidable.
• Prevent
algae (particularly outdoors)
Current disinfectants are not really sufficient, particularly outdoors, to prevent algae
formation over a long period of time. Timely treatment of the bathing water with
products that inhibit algae build up should therefore be considered.
A low percentage of algae prevention medium should always be available in associa-
tion with outdoor usage.
• Clean and change filter
In order to extend the use of a filter cartridge to the maximum, it is important that
you take a shower before bathing. Sebaceous matter, dandruff and creams in par-
ticular (sun cream, body lotion etc.) all combine to ensure that the filter cartridge
must be replaced after a very short time.
Clean the filter cartridge once a week and change it at least twice a year.
Always have 1-2 filter cartridges available (order no. 790598 00 0 00 0000).
37
Page 38

• Add tap water
The addition of water is necessary to replace water lost by evaporation and this
helps to preserve the freshness of the pool water.
Make sure that the limits for drinking water are not exceeded (see the chapter
tap water
”).
“Add
• Clean pool
A prerequisite for hygienic, problem free water is naturally the maintenance and
cleaning of the whole system. The frequency of the basic cleaning is dependent on
the location and the usage profile.
After each basic cleaning of the pool carry out disinfection. For this purpose, adhere
to the information provided by the disinfectant manufacturer.
NOTICE
Damage to components due to an incorrect water hardness.
• Arrange for an analysis of the water with which the pool is operated. The degree
of hardness is especially significant, as
“too soft” or “too hard” water may damage
components of the pool.
The ideal water hardness is 1-1.5 mmol/l (5.6-8.4°dH).
@ Learn online about the special water treatment for whirlpools:
> Go to the homepage: http://www.bayrol.com and search for
treatment
”.
“Whirlpool water
Water treatment products
Only use the recommended Bayrol products intended for use in whirlpools and always
follow the manufacturer's instructions.
@ A list of distributor addresses is available from the Duravit Customer Hotline
(phone: +49 7833 70403 and/or [email protected]) or via the homepage: http://www.
bayrol.com/en/bayrol-dealers/index.html.
Use of unsuitable water treatment products could damage your system! If you cannot
obtain the recommended BAYROL product visit an expert swimming pool dealer and
ask for advice about a comparable product. When using alternatives, ensure that they
are intended for use in a whirlpool. Never use water treatment products that contain
sulphate. In addition, the product selected must be suitable for use in conjunction with
the following materials:
• Acrylic
• PVC
• Stainless steel
38
Page 39

• HPL (High pressure laminates)
How often should the water be treated?
How often you will need to treat the water is dependent on a collection of different
factors such as location of the system, number of bathers, bathing frequency, water
temperature, soiling due to leaves, pollen, insects, etc. Thus, you will need to determine the optimal rhythm and check this when any of the above factors change.
> To start with, carry out steps 7 every 3-5 days. After one to two months you should
have found your optimal rhythm.
> Carry out thorough cleaning of the pool at least three to four times per year. Always
clean the pool when it is emptied and refilled or if the water becomes cloudy due to
your disinfection measures and the pH value cannot be set within the recommended
limits.
How should the water be treated?
NOTICE
• Do not add water care products simultaneously, add each care product one at a
time.
> Add the water care products.
> Activate all whirl circuits for 2-3 minutes to mix the water thoroughly.
11.2 Regulate pH value
NOTICE
• After the pool is filled afresh the pH value will rise rapidly during the first days.
Check and set the pH value only in small steps (max. frequently by 0.3 in every
step). An excessive lowering of the pH value in one step also lowers the alkalinity.
This effect can be reduced by regulation at a lower pH value.
• Do not regulate the pH value with hydrochloric acid.
• If you would like to bathe during this time, perform a check and regulate the pH
value after bathing!
39
Page 40

> Measure the pH value using BAYROL QuickTest strips and regulate it according to the
manufacturer's instructions:
Measured value:
> 7. 4 > Use BAYROL pH-minus in accordance with the manufacturer's
instructions.
< 7. 2 > Use BAYROL pH-plus in accordance with the manufacturer's
instructions.
7. 2 - 7.4 The water has an ideal pH value.
11.3 Check alkalinity, also known as the TA value (Total Alkalinity)
> Measure the TA value using BAYROL Quick Test strips and regulate it according to the
manufacturer's instructions.
11.4 Disinfect water
CAUTION
can lead to irritation of the skin, lungs and eyes. Corrosion of metals can also occur.
• Take care to ensure that the amount of disinfectant used is always within the limits
defined.
• If you would like to bathe during this time, check and add disinfectant as necessary
after bathing.
Chloride tablets that are added directly into the water can cause damage to acrylic
and to other surfaces.
• Never put disinfectant tablets directly into the bathing water.
• Always use a suitable dosing unit, available from good swimming pool suppliers, to
dissolve the tablets.
• Always dissolve the granules in a separate container before adding.
Prerequisite: The pH value is regulated.
> Use the BAYROL water disinfection products based on chloride and active oxygen in
accordance with the manufacturer's instructions.
> Remove any surface contaminants such as leaves immediately as these encourage
the development of algae and microbial contamination of the water.
40
If the disinfectant level is too high (chloride, active oxygen, etc.)
Page 41

11.5 Inhibit algae development
NOTICE
Air inclusions may cause damage to the whirl system.
• Only use foam free algae inhibitors.
> Add BAYROL Desalgin Jet to the bathing water in accordance with the manufacturer's
instructions.
> Remove any surface contaminants such as leaves immediately as these encourage
the development of algae and microbial contamination of the water.
11.6 Change filter (minimum twice per year)
NOTICE
• If you have more than the regular number of bathers or if you forget to cover the
pool and if it is outdoors then inspect the filter earlier and change as necessary.
• The pool must only be used when the exchangeable cartridge that is in place and
must never be used without a cartridge.
The diagrams referred to are collected together in the chapter
tures
”.
> Press the
ture circuit (this starts again automatically after one hour).
The
“Hygiene” button flashes.
> Remove the acrylic/wooden liner (6 - Blue Moon) and/or the padded cover (Sun-
deck).
> Remove the white cover over the fine filter (5).
> Pull the tab upwards and turn the screw of the fine filter (5) in anti-clockwise mo-
tion (Fig. 1; Chapter 5) and remove it. (Fig. 2; Chapter 5)
> Remove the cover completely. (Fig. 3; Chapter 5)
> Remove the fine filter cartridge. (cf. Fig. 4; Chapter 5)
> Clean fine filter housing (5) with a damp cloth.
> Replace the air valves in the cover of the fine filter housing. New valves are included
with the new filter cartridge.
> For this, unscrew and remove the gland of the silicone valve from the cover. (Fig. 6)
> Pull out the blue silicon valve.
> Carefully insert a new silicone valve from inside into the gland.
> Screw the gland again into the cover.
“Diagrams and Pic-
“Hygiene” button on the operator's panel to stop the hygiene and tempera-
41
Page 42
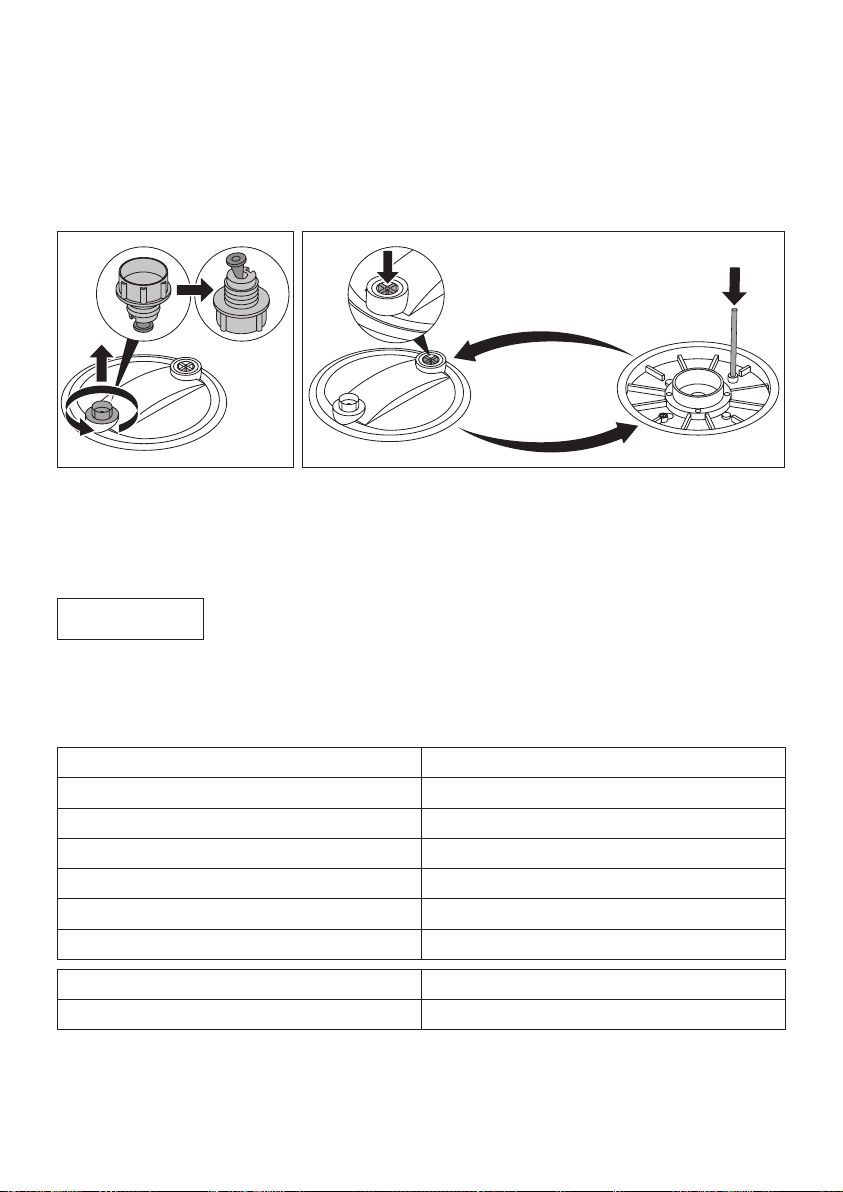
> Press out the white plastic valve from the inside out with a blunt object. (Fig. 7)
> Carefully insert a new plastic valve from the outside.
> Insert a new exchangeable cartridge (order no. 790598 00 0 00 0000).
> Close the fine filter (5) again.
> Press the
The
“Hygiene” button on the operator's panel.
“Hygiene” button lights up, the hygiene and temperature circuit starts.
Fig. 6 Fig. 7
11.7 Add tap water
NOTICE
Damage to health and the pool due to increased drinking water limits.
> Observe the drinking water limits in accordance with the drinking water regulations
(TrinkwV 2001).
Chloride 250 mg/l
Iron 0.2 mg/l
Sodium 200 mg/l
Sulphate 250 mg/l
Tritium 100 Bq/l
Calcium 48 mg/l
Calcium carbonate 120 mg/l
Electrical conductivity 2790 µS/cm at 25 °C
Oxidation ability 5 mg/l O
2
> Fill the pool with tap-water (water temperature <40 °C; water hardness 1-1.5 mmol/l
(5.6-8.4°dH)) until the water level is about 50 mm above the uppermost jet.
42
Page 43

“Water Level Too Low” goes out on the operator's panel.
11.8 Clean pool
CAUTION
Chlorine bleach irritates the skin.
> Avoid contact with other chemicals and store separately.
> Observe the safety instructions on the disinfectant label.
> Do NOT bathe in the pool while disinfecting it.
> Empty and refill the pool when finished.
The diagrams referred to are collected together in the chapter
“Diagrams and Pictures”.
> Ensure that the room is well-ventilated during the disinfection process.
> Empty the pool (see
“Empty pool” in the chapter “Operation”).
> Spray a stream of water into the whirl circuit jets in order to rinse them.
> Wait until the message
“Emptying in process” goes out on the operator's panel.
> Fill the Pool with tap-water (water temperature <40 °C; water hardness of
1-1.5 mmol/l) until the water level is about 50 mm above the uppermost jet.
> Wait until the pool is completely filled. When it is completely filled the water chang-
ing cycle starts for one minute.
“Water change active” appears on the operator's panel.
> Wait for 3 minutes until the hygiene and temperaturecircuit starts automatically.
The
“Hygiene” button lights up.
> Open the air bleed valve (4) until water escapes then close it immediately.
> Add the chlorine bleach to the water in accordance with the manufacturer's instruc-
tions.
> Activate all whirlcircuits (duration according to instructions on the package insert).
> Empty the pool again.
> Spray a stream of water into the jets of the whirl circuits in order to rinse the disin-
fectant from the pipes.
> Wait until the message
> Replace the fine filter (5) (see Replacing the filter in the chapter
“Emptying in process” goes out on the operator's panel.
“Water treatment”).
> Clean the coarse filter insert (3).
> Fill the pool with tap-water (water temperature <40 °C; water hardness of
1-1.5 mmol/l (5.6-8.4°dH)) until the water level is about 50 mm above the upper-
most jet.
> Wait until the pool is completely filled. When it is completely filled the water chang-
ing cycle starts for one minute.
43
Page 44
“Water change active” appears on the operator's panel.
> Wait for 3 minutes until the hygiene and temperaturecircuit starts automatically.
The
“Hygiene” button lights up.
> Open the air bleed valve (4) until water escapes then close it immediately.
> Check your normal temperature and let the pool warm up.
12. Disposal
Dispose of the packaging in an environmentally-friendly manner.
The pool must be disposed of in an orderly, environmentally-friendly manner according to the standard regulations that apply in your local area. Electronic components
must be recycled. Please consult the recycling point in your area.
13. Troubleshooting Support
DANGER
or quality can no longer be guaranteed.
> Take the pool out of use.
> Make the pool winter proof (see the chapter
CAUTION
> The pool may be repaired only by qualified plumbers and electricians.
Problem
Button “ECO” illuminates. ECO or Standby-mode is
Button “ECO” flashes. ECO timer is active. 30
44
If a problem cannot be solved quickly then the water temperature
“Shutting down the pool”)
Potential cause Solution
activated.
See
page
30
Page 45

Problem
“Hygiene” button flashes. Hygiene and tempera-
A continuous acoustic
signal sounds.
Foaming Soap, shampoo, wrong /
Whirl system does not
start.
Water flows out of the vent
valve, while a whirlpool
system is active.
Water runs out continuously from the vent valve.
Remote control does not
respond.
Potential cause Solution
turecircuit stopped manually.
“Water level too low” is
also displayed.
Heating defective.
too much cleaning / care
agent in bathwater
Mains switch switched off. > Switch on at mains.
Earth leakage current
protection tripped.
Otherwise:
This is normal because the
air valve is vented while
some water escapes.
Filter fouled
Airvalve is wrongly installed
Airvalve fouled > Clean the air valves under
Airvalve defective
Battery drained. > Recharge the remote con-
Remote control has
dropped into energy saver
mode.
> Press the “Hygiene” button.
The “Hygiene” button lights
up, the hygiene and temperature circuit starts.
> Refill the water until the
water level is about 50
mm above the uppermost jet.
> Please call Customer Ser-
vice.
> Empty pool, clean and refill.
> Check whether the earth
leakage current protection
has tripped.
> Please call Customer Ser-
vice.
> Replace the filter.
> Remove the valve and re-
install as described.
running water.
> Replace the air valves and
filter.
trol for at least 3 hours.
After having been stored
outside of radio range, the
remote control needs to be
reactivated:
> Place the remote control on
the charging station.
After 2 seconds, the “Emotion” button lights up.
See
page
43
41
41
41
25
25
45
Page 46

Problem
Remote control does not
respond.
All buttons on the remote
control blink for a short
time.
Despite disinfection water
becomes cloudy and
cannot be set within the
recommended limits.
Unpleasant odour. Water in the overflow has
Messages
“Water change active”
outside the programmed
cycle time.
“Temperature sensor
water defect”
“Temperature sensor
air defect”
Potential cause Solution
Remote control is outside
of reception range.
Charging station defective.
Remote control is outside
the reception area of the
pool.
evaporated.
Sub-freezing temperatures
are present under the
pool. This prevents freezing of the system.
> Move closer to the pool.
Once you are in range, you
will see the house icon in
the control panel of the
pool.
> Check the electrical con-
nection.
> Place the remote control on
the charging station:
> If the “Emotion” button is
blinking or permanently
illuminated, the charging
unit is fully operational.
> If the button is neither
blinking nor permanently
illuminated, please call
Customer Service.
> Move closer to the pool.
> Carry out basic cleaning.
(see “Pool cleaning” in the
chapter “Water treatment”)
> Perform a disinfection and
adapt the pH value afterwards.
> Pour 0.5 litres of water into
the overflow (Blue Moon)/
overflows (Sundeck).
> Please call Customer Ser-
vice.
> Please call Customer Ser-
vice.
See
page
43
46
Page 47
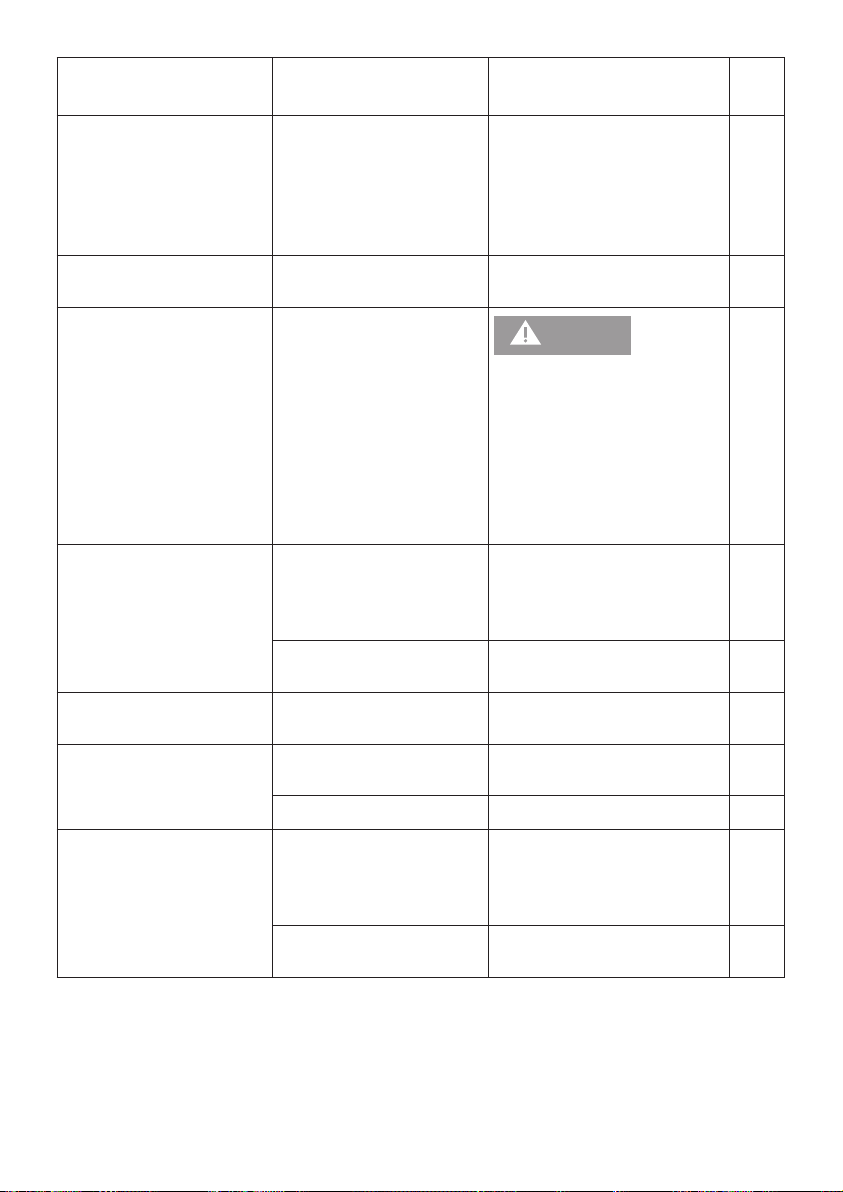
Problem
“Check heater” • Fresh water was added
Potential cause Solution
manually
• The time was changed
• Malfunction or heating
defect.
“Connection
defective”
“Water temperature
too high”
> Disconnect the pool from
the mains for 3 minutes.
> If the error message
appears again within
2 hours, call Customer
Service.
> Please call Customer Ser-
vice.
CAUTION
circumstances should you
bathe until the water temperature has fallen again!
Under no
> Refill with some cold water.
> Wait until the system has
cooled down. Temperature
must be reduced below
42 °C/108 °F.
See
page
“Water level too low” Not enough water in the
bath.
Otherwise:
“Difference
water sensors”
“Wrong PIN” You have entered the
wrong PIN.
Forgot PIN?
“Timeout when filling” Pool has not reached
maximum fill level. Pipe
pressure too low, pipe not
supplying enough water.
Otherwise:
> Refill the water until the
water level is about 50
mm above the uppermost
jet.
> Please call Customer Ser-
vice.
> Please call Customer Ser-
vice.
> Enter the correct PIN
> Enter PIN 2412.
> Check water connection.
> Please call Customer Ser-
vice.
47
Page 48

Problem
“Flow rate heating” Heating deactivated be-
“Maintenance O
ator”
“Function not present” Sound and integrated fill-
-gener-
3
Potential cause Solution
> Check the suction outlet,
cause of insufficient water
flow rate.
Otherwise:
The maximum operating
life of the O
expired.
ing are optional modules.
generator has
3
inlet jet, coarse filter and
fine filter of the hygiene
and temperature circuit
for objects that may cause
clogging.
> Please call Customer Ser-
vice.
> Arrange an appointment
with our local Customer
Service at the most 2
months after the warning is
first displayed.
14. Maintenance
Backflow preventer with dirt filter
With the option
into the pool.
> Arrange for the backflow preventer and its dirt filter to be checked regularly by a
qualified plumber.
“Integrated filling” a backflow preventer with dirt filter is integrated
See
page
Residual-current circuit-breaker
> Check the residual current circuit breaker regularly as described in the operating
instructions.
O
Generator
3
The basic disinfection of the pool is performed by an O
generator. a disinfection unit
3
that generates ozone using an ultra-violet (UV) lamp. The duty life of the UV lamp
is limited to 20,000 hours and 1,000 hours before expiry of the duty life a message
“Maintenance O
-generator” will be displayed on the operator's panel.
3
> Arrange an appointment with our Customer Service, phone 49 7833 70403 and/or
[email protected] within 2 months after the warning is first displayed.
In normal operation this replacement has to be made every 6-7 years.
48
Page 49

15. Technical Data
15.1 Identification Plate
The identification plate is on the back page of the operating instructions. This product
conforms to all the appropriate EU guidelines.
15.2 Filling volume
Blue Moon 730 l
Sundeck 493 l
15.3 Whirlpool
Rated voltage 220–240 V - (AC)
Frequency 76xxxx 00 0 PS xx00 50 Hz,
76xxxx 00 0 PS xx06 60 Hz
Max. rated power
• Heater element 3 KW
• Whirl system 3 KW
Protection class I
Protection rating IP X5, protection against sprayed water (from any direction)
Average energy consumption of the pool (pool with insulated lining, covered with
floating film, tub covers / relaxing deck and tarpaulin). The values can vary greatly in
an individual case due to user behaviour and weather and serve only for guidance:
Blue Moon Sundeck
0 °C/32 °F 0.3 kW/h 0.3 kW/h
15°C/59°F 0.2 kW/h 0.2 kW/h
25°C/77°F 0.1 kW/h 0.1 kW/h
15.4 Remote control
Temperature range 0-45 °C/32-113 °F
Protection rating IP X8, protection against continuous submersion
49
Page 50

15.5 Automatic shut-down time
LED-Light 12 hours after button was last pushed
Bluetooth mode (for sound) 12 hours after button was last pushed
Whirl system 20 minutes after activation
Whirl programmes 16 minutes after activation
Water change 1 minute after activation
15.6 Charging station
Rated voltage 100 - 240 V
Frequency 50/60 Hz
15.7 Accessories
Liner (Blue Moon)
Material Decorative teak or acrylic
Pool cover (Blue Moon)
Material High-quality synthetic leather, white
Max. load-bearing capacity 150 kg, with static surface loading
Retainer for pool cover (Blue Moon)
Material Highly polished stainless steel
Relaxing deck (Sundeck)
Material High-quality synthetic leather, white
Max. load-bearing capacity 150 kg, with static surface loading
Tarpaulin
Material High-strength polyester fabric
Foot rest (Blue Moon)
Material Natural Acrylic Stone
50
Page 51

51
Page 52

Duravit AG
P.O. Box 240
Werderstr. 36
78132 Hornberg
Germany
Phone +49 78 33 70 0
Fax +49 78 33 70 289
[email protected]
www.duravit.com
Best.-Nr. 53578/16.05.7 · We reserve the right to make technical improvements and design modifications to the products illustrated.
 Loading...