

Page 1
Instruction Manual
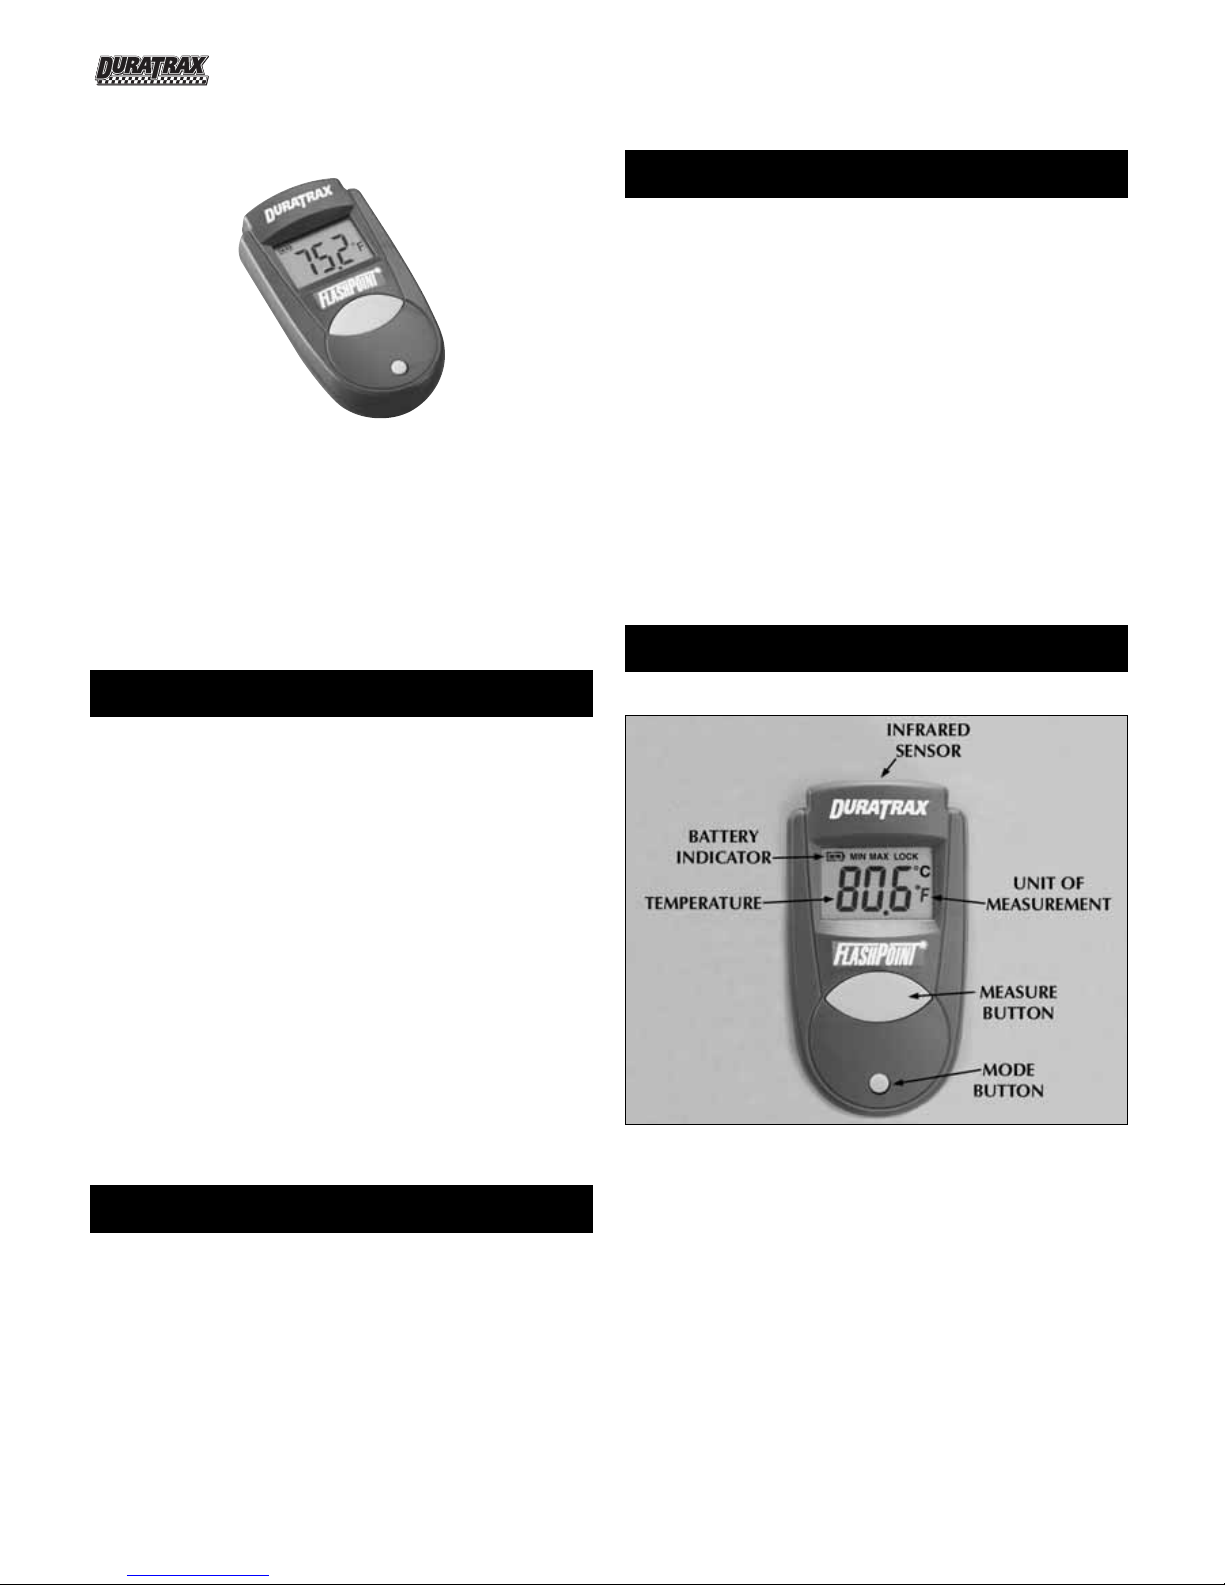
The DuraTrax®FlashPoint™Temperature Gauge is a
non-contact infrared thermometer. Specifically
designed for use with R/C engines, batteries, motors,
sealing irons and heat guns, simply aim the
temperature gauge at the target and press the
measurement button to quickly and easily display the
surface temperature! The distance to target ratio is
1:1, and therefore the temperature gauge should be
positioned as close to the target as possible.
Temperature Range: -27 to +428 degrees F
[-33 to +220°C]
Display Resolution: 0.1°F or C (switchable)
Response Time: 1 second
Infrared Accuracy: +/- 2% of reading
Field of View: 1:1 optics ratio
Emissivity: 0.95 default - adjustable
0.01 to
1 emissivity
Battery Life: 40 hours continuous use
(auto power off after 15
seconds)
Battery Type: CR2032 lithium primary
(not rechargeable)
Display Type: custom LCD
Dimensions: 0.7 x 1.5 x 2.7"
[18 x 37 x 68mm]
Weight: 1.13 oz. including battery [32g]
• Push-button start
• Extremely small and lightweight, for easy
portability anywhere.
• Reads temperatures in degrees Fahrenheit (F)
or Celsius (C).
• Very wide temperature range of -27 to +428
degrees F [-33 to +220°C].
• Large, custom designed LCD for easy viewing and
a built-in battery power indicator.
• Fast 1 second response time.
• Highly accurate to within +/-2% of reading.
• Easy push-button control of setup and measurement.
• Includes a 15 second auto-off timer to prevent
accidental draining of battery.
• Common non-rechargeable lithium battery included.
• Handy wrist-strap included.
• Electromagnetic / Radio Frequency
Interference:
Readings may be affected if the unit is operated
within a radio frequency electromagnetic field
strength of approximately 3 volts per meter, but
the performance of the instrument will not be
permanently affected. Keep this gauge at least 6
inches away from R/C transmitters to avoid radio
frequency interference.
• Avoid keeping the temperature gauge too close
for long periods of time to objects that
continuously
generate high heat (like a hot plate), which can
cause overheating of the temperature gauge.
• Do not allow water or moisture to come in contact
with the gauge.
• Do not replace the battery with one other than a
“CR2032 lithium” non-rechargeable battery.
Sometimes it is easier to accurately measure the
temperature of an object by physically attaching a
thermometer or thermocouple to it. However, it can
often be difficult or inconvenient to do so.
Sometimes, it is only necessary to see the large
heat patterns of an object, rather than measuring
a temperature at a very precise location on the
device. In these cases, measuring an object’s heat
radiation with an infrared temperature gauge is a
good solution.
To get started using the FlashPoint Infrared
Temperature Gauge, first press the large
“MEASURE” button. The first display will show the
unit of measure of “°F” for fahrenheit or “°C” for
celsius. Follow these steps to change the unit of
measure, to adjust other settings, or to begin
measuring temperatures:
SETTING ADJUSTMENTS & TAKING
TEMPERATURE MEASUREMENTS
IMPORTANT PRECAUTIONS
SPECIAL FEATURES
SPECIFICATIONS
®
FlashPoint™Infrared
Temperature Gauge
Page 2
Note: FlashPoint will automatically shut off if a
command has not been given within approximately
15 seconds. This feature protects the on-board
battery from accidentally becoming drained (this
option can be disabled as described in point #4
below). To re-start, simply press the “MEASURE”
button again.
1. FAHRENHEIT OR CELSIUS: Proceed as
follows only to change the “°F” or “°C” unit of
measure that is shown on screen (if the unit of
measure is o.k., skip to the next step). First, turn
on the gauge by pressing the “MEASURE” button,
then press the “MODE” button four times. The “°C”
or “°F” symbol will flash. Simply press the
“MEASURE” button, and the unit of measure
shown on screen will change.
2. MEASURING TEMPERATURES: There are two
ways to immediately begin measuring
temperatures. Point the sensor located on the top
end of the gauge directly at the object to be
measured, and do one of the following:
a. Press the “MEASURE” button once for an
instantaneous temperature reading to be
shown on-screen.
b. Press and hold the “MEASURE” button to read
temperatures continually. The temperature onscreen will be updated every 1 second or so
while the button is being held. Letting go of the
button will cause the last reading to remain
on-screen.
3. STORING MINIMUM AND MAXIMUM
TEMPERATURES: FlashPoint can temporarily
store minimum or maximum temperatures. Turn
the unit on by pressing the “MEASURE” button.
Then, press the “MODE” button once for the
minimum function or twice for maximum. The
appropriate “MIN” or “MAX” icon will flash in the
top of the screen. Then press the “MEASURE”
button to confirm the selected mode.
a. Minimum temperatures: point the sensor to the
object being measured, and press and HOLD
the “MEASURE” button and FlashPoint will
display and hold the coolest or “MIN”
temperature that is observed while the button
is being held.
b. Maximum temperatures. Point the sensor to
the object being measured, and press and
HOLD the “MEASURE” button and FlashPoint
will display and hold the hottest or “MAX”
temperature that is observed while the button
is being held.
c. Note: FlashPoint will only store the minimum
or maximum temperatures respectively until
the unit is powered off. FlashPoint will reset all
data at this time.
4. TIMER LOCKOUT MODE: FlashPoint’s 15
second automatic shut-off timer can be disabled
allowing the temperature gauge to function
continuously for up to 60 minutes if desired. This
extended operation function is called the LOCK
MODE, and is particularly useful for continuous
monitoring of temperatures. To activate the lock
mode, press the “MEASURE” button to turn the
gauge on. Then, press the “MODE” button three
times whereby the “LOCK” icon will flash. Then,
press the “MEASURE” button to enable the “LOCK”
mode. FlashPoint will continuously display and
update temperatures for up to 60 minutes, or until
the “MEASURE” button is pressed again which
disables the “LOCK” mode.
Note: Using the “LOCK” mode will cause the onboard battery to drain more quickly.
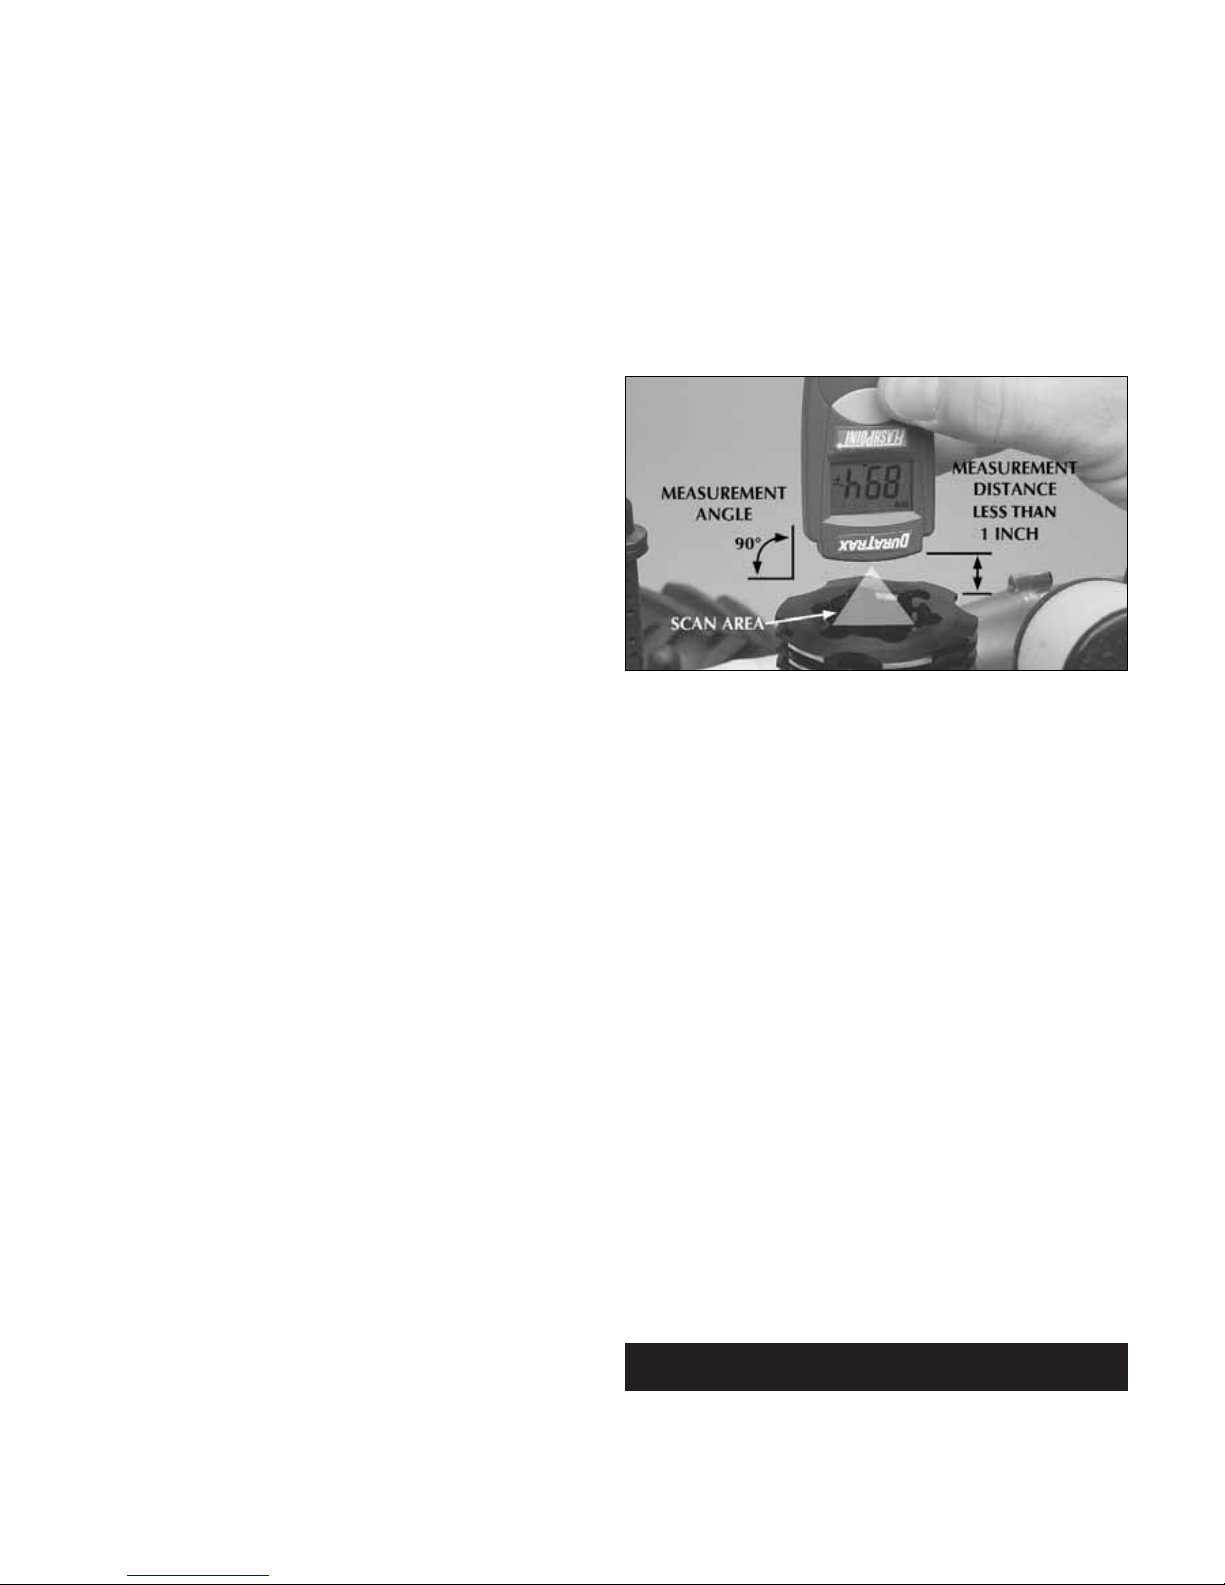
5. MEASURING TIPS: For the most accurate
measurements, follow these tips when using the
FlashPoint temperature gauge:
a. Make sure the gauge’s sensor is as close to the
object as possible, preferably within 1 inch, so
that the infrared sensor’s field of view is fully
focused on the object. Attempting to read
temperatures with the gauge further away from
the object will result in less accurate readings.
b. Always point the sensor directly at the object
being measured. Try not to have the gauge
tilted at a different angle in relation to the
object being measured.
c. It may be a good idea to re-measure the
temperature of an object at a slightly different
location on the object, to reconfirm the
accuracy of the reading.
d. Try to avoid allowing sunlight or other artificial
light from beaming in-between the gauge and
object being measured, as heat from such light
could skew actual readings. For the same reason,
also try to prevent wind from blowing in-between
the gauge and object being measured.
e. Generally, higher air or ambient temperatures
lend to more accurate readings. Cold ambient
temperatures can result in inaccurate
readings. Ambient or air temperature refers to
the area around the infrared temperature
gauge, the higher the temperature the more
accurate the reading, the lower the
temperature the less accurate the readings.
The FlashPoint can be used to measure
temperature on various types of R/C equipment
such as engines, heat guns, motors, battery packs,
battery chargers, and sealing irons. Manufacturers
specify an operating temperature at which each
APPLICATIONS FOR R/C USAGE
2
Page 3

engine type should run. Setting up your engine to
operate near this specified temperature is a key to
long lasting operation from your engine, and
FlashPoint is the perfect tool to help you do this
job! Engines which run too hot can suffer too
much wear and tear, and have a shortened
lifespan. Engines which run too cold are often not
running at optimum efficiency. Adjusting different
parameters such as carb set-up, air flow, fuel type
and/or oil content can directly affect engine
temperature. Refer to your engine’s instruction
manual to determine the proper adjustment
methods for your engine, and monitor engine
temperature with FlashPoint for dialing-in the
optimum overall performance level for your engine.
Using FlashPoint can help to eliminate these problems:
Engines Covering
Fuel too lean Wrinkles
Binding equipment Covering does not adhere
Bad fuel Holes in covering
Oil content too low
Nitro content too high
Many external forces can cause errors in how
temperatures are measured by infrared
temperature gauges such as FlashPoint. This is
because infrared temperature gauges do not make
physical contact with the heated object. In fact, it
is not unusual for the temperature measurement
of an infrared temperature gauge to be different
than that of a thermometer which makes physical
contact with the heated object - even when they
are measuring the exact same point! There is a way
to adjust how infrared temperature gauges read
temperatures that can make up for these
unwanted external forces, and make temperature
readings more accurate.
“Emissivity” is the way that any object emits heat
energy into the air. Emissivity is always rated by a
numerical value. Different types of materials have
different emissivity values. An object’s emissivity is
dependent on its surface condition, material type,
temperature and wavelength of temperature
measurement. Adjusting the infrared temperature
gauge to compensate for the emissivity values of
different objects is the key in getting the most
accurate temperature readings.
In general, an object having perfect heat
dissipation characteristics has an emissivity value
of 1.00 (think of this like saying 100%) – this is the
absolute maximum possible emissivity value.
Thus, the higher an objects’ emissivity rating the
better FlashPoint will be able to make an accurate
reading without any adjustments. The lower an
objects’ emissivity rating, the more inaccurate
FlashPoint will be and adjustment of FlashPoint’s
emissivity setting might be needed. The absolute
lowest possible emissivity rating is 0.01.
In general, it is best NOT to change FlashPoint’s
emissivity value if you are not comfortable in doing
so. FlashPoint’s factory default emissivity value is
0.95, displayed as “95E” which will provide
accurate temperature measurements for most
materials. Many metals, especially those having
very shiny or clean surfaces have emissivity values
that vary in value. For example, the emissivity
rating of shiny metals such as copper can be
extremely low. If you measured the temperature of
copper using an infrared temperature gauge the
reading could be MUCH lower than the
temperature measured using a thermometer which
makes physical contact with the copper. This is
because the emissivity value of copper is extremely
low at 0.05. Adjusting FlashPoint’s emissivity
value for materials having very low emissivity
values might be desirable to get the most accurate
temperature measurements. In addition, if the
heated object is significantly hotter than the
temperatures of the materials immediately
surrounding the object, it may be desirable to
change FlashPoint’s emissivity value.
To change FlashPoint’s emissivity setting, first
turn the gauge on by pressing the “MEASURE”
button, then press the “MODE” button five times
for the emissivity function. Here, “95E” will show
on-screen. Press the “MEASURE” button to
increase the gauge’s emissivity value. To select a
lower emissivity value, keep pressing the
“MEASURE” button and the reading will reset to
“1E” and will continue to count upward to the
desired level. Press the “MODE” button again to
confirm the desired setting and exit the emissivity
screen. For information relating to the emissivity of
specific materials, please contact Hobby Services.
Note: Non-contact infrared temperature gauges
are not recommended for use in measuring the
temperature of shiny or polished metals.
For R/C use, there are 3 commonly used
emissivity settings:
1) Aluminum: Sandblasted (standard car and
airplane engines, not anodized) set the
emissivity at 21E.
2) Aluminum: Anodized (for colored car and
airplane engines, may be powder coated) set
the emissivity at 77E.
3) Batteries Packs (with or without covering) and
Airplane Covering: Leave at default 95E.
FlashPoint incorporates visual diagnostic
messages
as follows:
“Hi” or “Lo” will be displayed when the measured
temperature is outside of the -27 to +428°F range
of the instrument. “Hi” will show when the
measured
temperature is higher than +427°F, and “Lo” will
show when the temperature is lower than -27°F.
When FlashPoint is exposed to rapid changes in
ambient or air temperature, “Er2” will show onscreen. “Er3” is shown when the ambient air
temperature exceeds +14 to +122°F (-10 to +50°C).
In either case, allow approximately 30 minutes for
FlashPoint’s electronic components to adjust and
LCD ERROR MESSAGES
3
Page 4

stabilize themselves to the ambient temperature.
For best results, use in ambient temperatures that
range from +32 to 104°F (0 to +40°C).
For any other “Er” error messages it is necessary to
reset FlashPoint’s circuitry. To reset, turn the
instrument off, remove the battery and wait for a
minimum of one minute, then re-insert the battery
and turn the unit on. If the error message remains
please contact Hobby Services for further
assistance. Dispose of used lithium batteries
properly and keep away from children.
FlashPoint’s custom LCD incorporates a built-in
battery power indicator that indicates the
condition of the on-board battery, which functions
as follows:
“
Full Battery:” Temperature
measurement
fully functional.
“Partially Full Battery:” Battery needs
to be replaced, but temperature
measurements are possible.
“
Low Battery:” Temperature
measurements
are no longer accurate or possible.
When the battery power icon indicates the on-board
battery is low, the battery should be replaced
immediately ONLY with CR2032 lithium cell, which
are commonly found at major retail stores. The
battery is located under the twist cover on the rear of
the case. Please Note: It is important to turn the
instrument off before replacing the battery;
otherwise it could cause the FlashPoint to
malfunction. When replacing the battery, make sure
the “+” symbol is facing outward!
To attach the included wrist strap, insert the thin
thread into the holes (located on the bottom, rear
of the temperature gauge). Pass the thick part of
the wrist strap through the middle of the thin
thread (see picture for details).
A belt clip is also located on the back of the
temperature gauge, for easy portability if you do not
wish to use the wrist strap. Be sure not to bend the
belt clip past reasonable limits, as it could wear and
possibly break.
FlashPoint’s sensor lens is the most delicate part of
the gauge. The lens should be kept clean at all times.
Care should be taken when cleaning the lens using
only a soft cloth or cotton swab with water or rubbing
alcohol, allowing the lens to fully dry before using
FlashPoint. Do NOT submerge any part of FlashPoint
in any liquid. FlashPoint should be stored at room
temperature between +50 to 72°F (+10 to +40°C).
DuraTrax warrants this product to be free from defects in materials
and workmanship for a period of one (1) year from the date of
purchase. During that period, we will repair or replace, at our option,
any product that does not meet these standards. You will be required
to provide proof of purchase date (invoice or receipt). If during the one
year period, your DuraTrax product shows defects caused by abuse,
misuse, alteration or accident, it will be repaired or replaced at our
option, at a service charge not greater than 50% of the current retail
price. Be sure to include your daytime telephone number in case we
need to contact you about your repair. This warranty does not cover
components worn by use, application of reverse voltage, cross
connections, poor installation, subjection of components to foreign
materials, any alterations to wires, or tampering. In no case shall our
liability exceed the original cost of the product.
Your warranty is voided if...
A. You tamper with any of the electronic components.
B. You allow water, moisture, or any foreign material to enter the case.
Under no circumstances will the purchaser be entitled to
consequential or incidental damages. This warranty gives you specific
legal rights, and you may also have other rights which vary from state
to state. If you attempt to disassemble or repair this unit yourself it
may void the warranty.
For service on your DuraTrax product, either in or out of warranty,
send it post-paid and insured to:
HOBBY SERVICES
3002 N. Apollo Drive, Suite 1
Champaign, IL 61822
(217) 398-0007
E-mail: hobbyservices@hobbico.com
Internet address: www.duratrax.com
WARRANTY
STORAGE & CLEANING
WRIST STRAP & BELT CLIP
BATTERY REPLACEMENT
ON-SCREEN BATTERY INDICATOR
Entire Contents © 2006 Made in Taiwan DTXZ1058 For DTXP3100 V1.1
1
2
 Loading...