

Page 1

®
ASSEMBL
ASSEMBL
Y AND OPERA
Y AND OPERA
TION MANU
TION MANU
AL
AL
www
www
.duratrax.com
.duratrax.com
™
DTXZ1115 for DTXD98**Entire Contents Copyright © 2006
Page 2
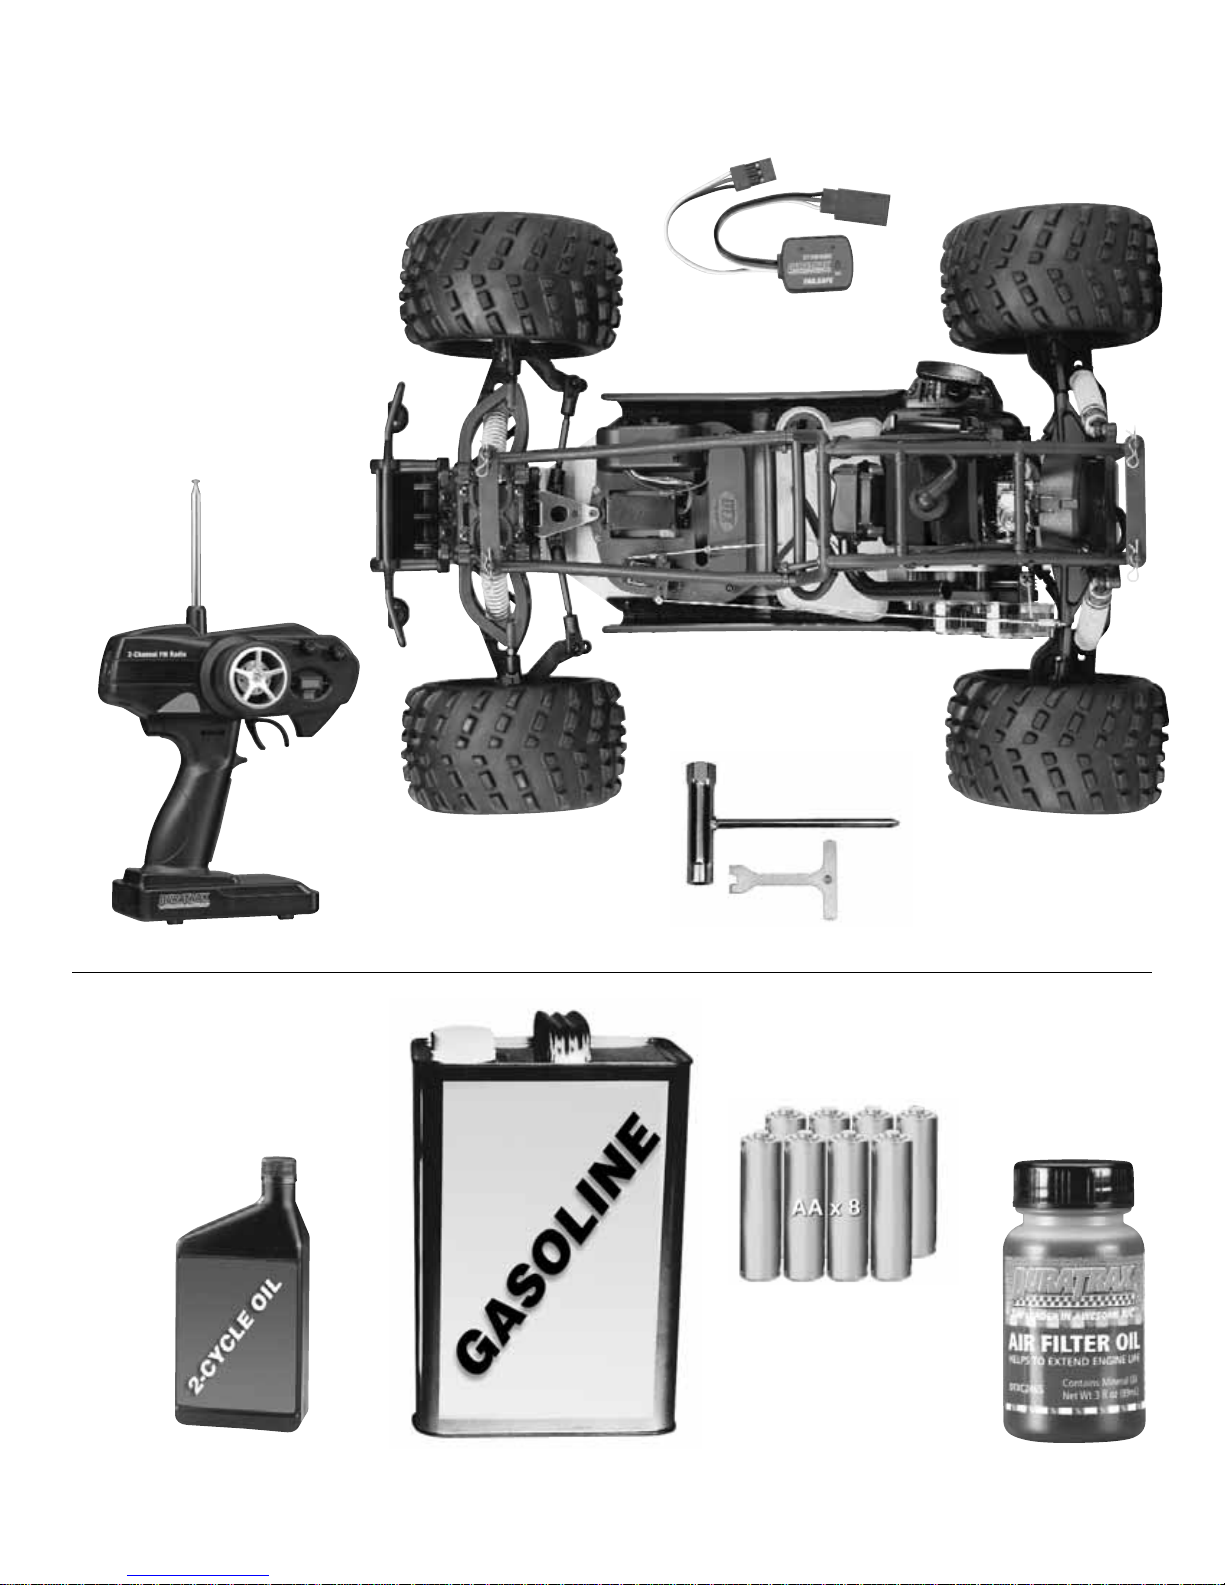
YYOU
OU
WILL
WILL
NEED
NEED
ALKALINE BATTERIES
AIR FILTER OIL
DTXC2465
ITEMS
ITEMS
INCLUDED
INCLUDED
The following items are included:
Chassis
Body
Fail Safe Unit (Installed)
Decal Sheet
Transmitter
Transmitter Antenna
Receiver Antenna Tube
Receiver Battery
Receiver Battery Charger
Exploded View/Parts Listing
Tools
2
GASOLINE
2-CYCLE OIL
Page 3

SAFETY PRECA
SAFETY PRECA
UTIONS
UTIONS
When the safety precautions are followed, the
FireHammer MT will provide years of
enjoyment. Use care and good sense at all
times when operating this radio controlled
truck. Failure to use this vehicle in a safe,
sensible manner can result in injury or damage
to property.Y ou and y ou alone must insure that
the instructions are carefully followed and all
safety precautions are obeyed.
• Do not operate the FireHammer MT near
people. Spectators should be behind the
driver or at a safe distance away from
the vehicle.
• Water can cause the electronics to short
out and can cause permanent damage.
• Always turn on the transmitter before
turning on the receiver.
• Fully extend the transmitter antenna
before operating your vehicle.
• Before turning on your radio system,
check to make sure that no one else is
running on the same frequency.
• The engine and exhaust produce quite a
bit of noise.Do not run this vehicle when
or where it can disturb others.
• The engine and exhaust can become
very hot. Avoid touching any of these
parts during use and until they have
cooled down.
• Gasoline is extremely flammable. Keep
it away from open flame, excessive heat
or sparks. Do not smoke while operating
the FireHammer MT.
• This engine was designed for R/C
vehicles and should not be used for any
other purpose.
• The engine emits harmful fumes just
like real vehicles. Do not operate this
model indoors.
• Avoid running the truck in cold weather.
The plastic and metal parts can become
brittle at low temperatures. In addition,
grease and oil become thick, causing
premature wear and poor performance.
SPECIFICA
SPECIFICA
TION AND
TION AND
DESCRIPTION CHANGES
DESCRIPTION CHANGES
All pictures, descriptions and specifications
found in this instruction manual are subject to
change without notice.DuraTrax maintains no
responsibility for inadvertent errors in this
manual. Visit www.duratrax.com for the
latest updates and information for your model.
STRESS-TECH
STRESS-TECH
™
™
PPARARTS
TS
GUGUARANTEE
ARANTEE
We have engineered the FireHammer MT to
take the rough and tumble abuse that makes
R/C trucks fun. We are so confident of the
quality and durability of the Stress-Tech plastic
parts that we will replace any Stress-Tech
plastic part you break during the first 12
months you own the truck. Just send in the
part to us and we will send you a FREE
replacement. Please see the FireHammer MT
parts list for the items covered under the
Stress-Tech guarantee.
To receive your free replacement part
please send the following to the Hobby
Services address listed under the warranty.
❏ 1.The broken part must be included.
❏ 2.The part number and description of
the broken part.
❏ 3.Copy of your dated invoice or
purchase receipt.
❏ 4.Your name, phone number and
shipping address.
WWARRANTY
ARRANTY
• DuraTrax guarantees this kit to be free
from defects in both material and
workmanship at the date of purchase.
DuraTrax will warranty this kit for 90 days
after the purchase date. DuraTrax will
repair or replace, at no charge, the
incorrectly made part.
• Make sure you save the receipt or in voice
you were given when you bought your
model! It is your proof of purchase and
we must see it before we can honor the
warranty. Further, DuraTrax reser ves the
right to change or modify this warranty
without notice.
• In that DuraTrax has no control over the
final user assembly or material used for
final user assembly, no liability shall be
assumed nor accepted for any damage
resulting from the use by the user of the
final user-assembled product.By the act of
using the user-assembled product, the
user accepts all resulting liability.
•
The engine is under a limited warranty for
3 years. DuraTrax warrants this engine to
be free from defects in materials and
workmanship for a period of three years
from the date of purchase. During that
period, DuraT rax will, at its option, repair or
replace without service charge any
product deemed defective due to those
causes. You will be required to provide
proof of purchase date (receipt or invoice).
•
This warranty does not cover damage
caused by crash, abuse, misuse,
alterations or accident. Damaged caused
by customer disassembly, tampering, use
of substandard fuel, use of incorrect
accessories (spark plug, etc) or any use
of the engine for which it is not specifically
intended will automatically void the
warranty of the engine.If there is damage
resulting from these causes within the
stated warranty period, DuraTrax will, at
its option, repair or replace it for a service
charge not greater than 50% of the
current retail list value.Be sure to include
your daytime telephone number and email address in case we need to contact
you about your repair.
•
Under no circumstances will the purchaser
be entitled to consequential or incidental
damages.This warranty gives you specific
legal rights and you may also have other
rights, which vary from state to state.
•
If you attempt to disassemble or repair this
unit yourself, it may void your warranty.
To return your FireHammer MT for repairs
covered under warranty you should send
your truck to:
Hobby Services
3002 N. Apollo Drive Suite 1
Champaign, Illinois 61822
Attn: Service Department
Phone: (217) 398-0007 9:00 am-5:00 pm
Central Time M-F
E-mail:
hobbyservices@hobbico.com
www.hobbyservices.com
If the buyer is not prepared to accept the
liability associated with the use of this
product, the buyer is advised to return
this kit immediately in new and unused
condition to the place of purchase.
REP
REP
AIR SER
AIR SER
VICE
VICE
Repair service is available anytime.
• After the 90 day warranty, you can still
have your FireHammer MT repaired for a
small charge by the experts at DuraTrax’s
authorized repair facility, Hobby Services.
• To speed up the repair process, please
follow the instructions listed below.
❏ 1. Under most circumstances return the
ENTIRE vehicle. The exception would
be sending in a Stress-Tech part. See
the instruction under the StressTech Guarantee.
❏ 2.Make sure the transmitter is turned off,
all of the batteries are removed and
the fuel tank is completely empty.
❏ 3. Send written instructions which include: a
list of all items returned, a THOROUGH
explanation of the problem, the service
needed and your phone number during
the day. If you expect the repair to be
covered under warranty, be sure to
include a proof of date of purchase (your
store receipt or purchase invoice).
THINGS
THINGS TTOO
KNO
KNO
W
W
3
Page 4

FINISHING
FINISHING
THE FIREHAMMER MT
THE FIREHAMMER MT
• Disconnect the receiver battery lead from the
ON/OFF switch lead.
• Plug the charger (included) into an electrical
outlet.
• Plug the battery into the charger.
• Charge the battery.
• Install eight “AA” batteries into transmitter, making sure the polarity is correct.
• Insert the antenna into the top of the transmitter and tighten.
• Turn the transmitter on and check the battery light.
• If both LEDs light up, the batteries are acceptable. If only the red LED lights
up, immediately replace the batteries.
4
TRANSMITTER PREPARATION
R
STTH
N
ST
TH
AA
–
AA
+
AA
–
AA
+
CHARGING THE RECEIVER BA TTER Y
+
–
AA
–
+
AA
+
–
AA
–
+
AA
+
–
+
–
INCLUDED
CHARGER
RECEIVER
BATTERY
LEAD
Page 5

ANTENNA MOUNT
ANTENNA TUBE
RECEIVER
ANTENNA
WIRE
ANTENNA CAP
• Uncoil and straighten the antenna wire.
• Route the receiver antenna wire through
the antenna tube.
• Install the tube into the antenna mount.
• Install the antenna cap onto the top of the
antenna tube to hold the assembly in place.
• The air filter comes pre-oiled.However, after runs in dusty conditions, clean and re-oil the foam element.
• Remove the air filter top and foam element.
• Clean the foam using soap and water.
• Apply air filter oil (DTXC2465) onto the foam element, squeezing the element until it is completely coated
with the oil. TIP! Placing the element in a plastic bag will help keep your hands clean.
• Remove any excess oil with a paper towel.
• Reinstall, making sure the filter is properly seated on the base.
5
RECEIVER ANTENNA INSTALLATION
DO NOT CUT
ANTENNA WIRE!
X
AIR FILTER MAINTENANCE
AIR FILTER
FOAM
ELEMENT
BASE
AIR FILTER
TOP
Page 6

RADIO SYSTEM CHECK
• Fully extend the transmitter antenna.
• Turn the transmitter on, then turn the receiver on.
• Turn the transmitter wheel to the right—the front wheels should turn to the right. If not, move the steering servo reverse switch.
• When running, adjust the steering trim so the truck tracks straight.
• Pull the throttle trigger to make sure the carburetor opens fully and the throttle linkage functions properly without binding.
• Adjust the throttle trim until the carb is at the idle position. Always adjust idle speed with the idle stop screw on the carb, not
the throttle trim.
• Push the trigger and roll the truck to make sure the brakes are applied.
• Decal the body to your liking. Use the
photos on the box as a reference.
• Install the body onto the chassis using
four body clips.
6
ON/OFF
ANTENNA
SERVO
REVERSING
STTH
STEERING
TRIM
R
N
THROTTLE
TRIM
ST
TH
DUAL
RATE
THROTTLE
BRAKE
CHECK THE RADIO SYSTEM
FOR PROPER FUNCTION
!
BEFORE EACH RUN
BODY INSTALLATION
Page 7

BEFORE OPERATION:
•
Prepare only the amount of gasoline needed.
•
If the engine was just run, make sure you allow enough time for it
to cool down before you run it again.Also, wipe off any residue the
engine may have blown on the FireHammer MT.
•
Fuel the FireHammer MT with the adequate gasoline mix.
ENGINE BREAK IN:
•
To break in your FireHammer MT engine, you need to run the
engine for two tanks of fuel with a fuel mixture that contains a
25:1 (4%) fuel/oil ratio (5oz. per 1 gallon).
•
Do not adjust the high-speed needle on the carburetor to break
in the engine. If you do so, carbon will accumulate in the spark
plug and making ignition difficult.
•
Do not run at full power for extended periods of time while
breaking in your engine.
•
Run the FireHammer MT with the body off for break in.
RUNNING THE FIREHAMMER MT AFTER BREAK IN:
•
Once the engine is broken in, use 40:1 (2.5%) fuel/oil mix
(3.2oz. per 1 gallon).
ENGINE ADJUSTMENTS:
•
Always make high and low speed needle adjustments with the
engine shut off.
•
Always make small adjustment to the needles to prevent overadjustment.
•
To lean the engine, make a clockwise adjustment to the desired
needle.
•
It is not necessary to change the needle settings if the engine
is running smoothly. Normally only the high speed needle will
need adjustment from time to time, and only a small amount.
IDLE ADJUSTMENT:
Do not confuse the idle screw with the low speed needle. The idle
screw physically adjusts how much the carb uretor v alv e can close.The
low speed needle adjusts the gasoline to air mixture when the engine
is running at low rpm. If your engine appears to work correctly except
that the low rpm are not as low as you want them to be, then adjust the
idle screw .If your engine behaves erratically at lo w rpm, then adjust the
low speed needle.When adjusting, turn the screw about 1/8th of a turn
each time.A dirty plug will make it difficult to adjust the idle rpm.
PRECAUTIONS
•
Do not use silicone fuel tubing on the model. The gasoline will
attack it. Use vinyl or neoprene rubber fuel line.
•
Make sure the fuel line is not against the cylinder head. The
heat from the head can damage the fuel tubing.
•
The engine will be hot after being run. Allow the engine to
thoroughly cool before touching it.
•
Do not leave fuel in the tank or lines while transporting.
FUELING THE FIREHAMMER MT
1.
Unscrew the fuel cap from the fuel tank.
2. Pour the proper fuel mixture into the fuel tank.
3. Thread the fuel cap back into the fuel tank, making sure that the
fuel cap is thoroughly tightened.
4. Wipe off any fuel that may have spilled onto the truck during the
fueling process with an old towel.
STARTING THE FIREHAMMER MT
1. Tur n on the transmitter and then the receiver.
2. Check the throttle and steering to make sure they are
functioning properly.
3. Prime the engine.Push the primer button until you start to see fuel
in it. Note: Do not press the primer after you start to see fuel.
This will flood the engine and cause it to be hard to start.
4. Rotate the choke lever to the closed position.
5. T ug on the recoil until the engine starts.(The engine should start
after a few pulls). It may be necessary to slightly open the
throttle to get the engine to start.
6. Once the engine star ts, return the throttle to neutral and open the
choke back up. Note: If you do not open the choke after the
engine starts, it will probably die quickly.
SHUTTING THE FIREHAMMER MT OFF
To stop the engine press the red shut off switch on the engine.We
recommend that you familiarize yourself with the switch and what
the easiest way is to get to it with the body on.This way you are
not fumbling around to find it in case of an emergency.
SPARK PLUG
The recommended spark plug is a DuraTrax NGK CMR 7H Spark
Plug (DTXG3100).To avoid improper operation or possible engine
damage, do not use any other type of spark plugs. The plug gap
should be .025" to .030" (if the plug gap is incorrect, adjust it with
a spark plug gapping tool, wash it with gasoline and allow it to dry
completely before you reinstall the plug into the engine).
RRUNNING
UNNING
THE
THE
ENGINE
ENGINE
PREP
PREP
ARE
ARE
THE
THE
ENGINE
ENGINE
7
LOW
SPEED
HIGH
SPEED
IDLE
CHOKE
CLOSED
CHOKE
OPEN
Page 8

FAIL SAFE SET-UP
The fail safe is designed with a signal fail safe and a battery fail safe.
If the receiver loses contact with the transmitter, the fail safe will set
the throttle to the designated position and the red LED will be
constantly lit.If the battery goes below the preset v oltage, the f ail saf e
will set the throttle to the designated position and the red LED will be
constant and the green LED will flash. If this occurs, shut the
FireHammer MT off and recharge the receiver battery before running
the model again.
The fail safe should be set from the factory, but we recommend that
you double check it before running the FireHammer MT.
1. Check that the fail safe is functioning properly before starting
the engine.
2. With the receiver on, advance your throttle on the transmitter.
Then shut off the transmitter and see if the throttle servo moves
to the desired position (idle).
3. Turn on the radio system and make sure the throttle is positioned
at idle. Press and hold the “SET” button for 2 seconds.
BEFORE EACH RUN
1.Check to make sure that all screws are tight and there are not
any screws missing.
2.Check that the transmitter and receiver batteries are not low.
3.Check that all of the moving parts of the FireHammer MT move
freely and do not bind.
4.Check for broken or damaged parts. Replace any broken or
damaged parts before running the FireHammer MT. Running of
the FireHammer MT with broken or damaged parts could result
in damage to other parts.
5.Check to make sure that all wires are properly connected and secure.
AFTER EACH RUN
1. Clean any large globs of dirt or debris from the chassis and
moving parts.
2. Drain any remaining gas from the tank.
3. Check for any broken or damaged parts.This way parts may be
replaced before the next run.
AFTER EVERY 10 RUNS
1. Check to make sure that the bearings are free of dirt and debris
and roll smoothly.
2. Check the shocks for leakage.If the shocks have leaked any shock
fluid out, you should properly refill the shocks for best performance.
3. Make sure the ser vo saver does not bind.This will help prevent
stripping of the servo during running. Clean as needed.
4. Check for proper gear mesh between the spur gear and the
pinion gear.
When tuning the FireHammer MT, make sure that you have equal
lengths from one side to the other on the shocks, camber rods and
steering rods. Also, make sure to have the shock pre-load
adjusters at the same setting from left to right.They do not have to
be the same front to rear.
CASTER
Caster refers to the angle which the
kingpin is at in relation to the surface
when viewed from the side.0-degrees of
caster means that the kingpin is straight
up and down.
CAMBER
Camber refers to the angle at which the
tire and wheel ride in relation to the
ground when viewed from the front or rear .
Negative camber is when the tire and
wheel lean inward and positive camber is
when the tire and wheel lean outward.
Typically you want 0 to -2 degrees of
camber. Never put in positive camber.
Make sure that both sides are equal.
FRONT AND REAR TOE-IN AND TOE-OUT
Toe-in and toe-out refers to the angle
at which the tire is at when view from
above. Toe-in increases stability
under acceleration. However, toe-in
also decreases steering when
entering a corner. Toe-out will
increase steering into corners, but will
decrease the overall stability during
acceleration.The front typically is set-up with 0 to -2 degrees of toe-in.
RIDE HEIGHT
The ride height of the FireHammer MT affects how it jumps and
handles.The r ide height of the FireHammer MT is adjustable through
the threaded pre-load adjusters on the shock bodies.To measure the
ride height of the FireHammer MT, set the truck up as if you are ready
to run. Push the front of the truck down all of the way and release it.
When the truck returns the front arms should be parallel with the
surface.The rear ride height is set up the same except that the drive
shafts are parallel with the surface. Lowering the front ride height will
increase steering response due to more weight on the front wheels.
Lowering the rear ride height will increase rear traction and reduce
steering response due to more weight on the rear wheels.
REAR SHOCK ADJUSTMENT
Moving the tops of the shocks in will result in more traction in the
corners and smoother handling over the bumps. Moving the tops
of the shocks out will give the truck more steering and better ability
to handle large jumps.
SHOCK OILS
Thinner shock oil makes the shock react faster, but makes the
truck less stable and may cause the truck to bottom out over large
jumps. Thicker shock oil makes the truck smoother over large
jumps and in straights, but less reactive over rough sections.
TUNING
TUNING
GUIDE
GUIDE
MAINTENANCE
MAINTENANCE
TIPS
TIPS
Wheels pointed towards each other
1˚ Toe-In
1˚ 1˚
 Loading...