

Page 1

D
Duratec POS S15
User manual
Page 2

Page 3

Your Duratec dealer
Stamp
Date: 12.06.2015
D
© 2015 by Duratec
Subject to error and technical modification
Manufacturer
Duratec - a brand of Vectron Systems AG
Willy-Brandt-Weg 41
48155 Muenster, Germany
www.duratec-systems.de
3
Page 4

Page 5

D
Inhalt
1. Important information ......................................................... 9
1.1. Target group of this user manual ................................................... 9
1.2. Dealer support .................................................................................. 9
1.3. Scope of delivery ............................................................................ 10
2. Terms, signs and signals ................................................... 11
2.1. Safety-related information ........................................................... 11
2.1.1. Warnings .......................................................................................... 11
2.1.2. Warning symbol .............................................................................. 11
2.1.3. Signal words .................................................................................... 12
2.2. Notes ................................................................................................ 12
3. Notes on safety .................................................................. 13
4. Device description .............................................................15
4.1. Intended use ................................................................................... 15
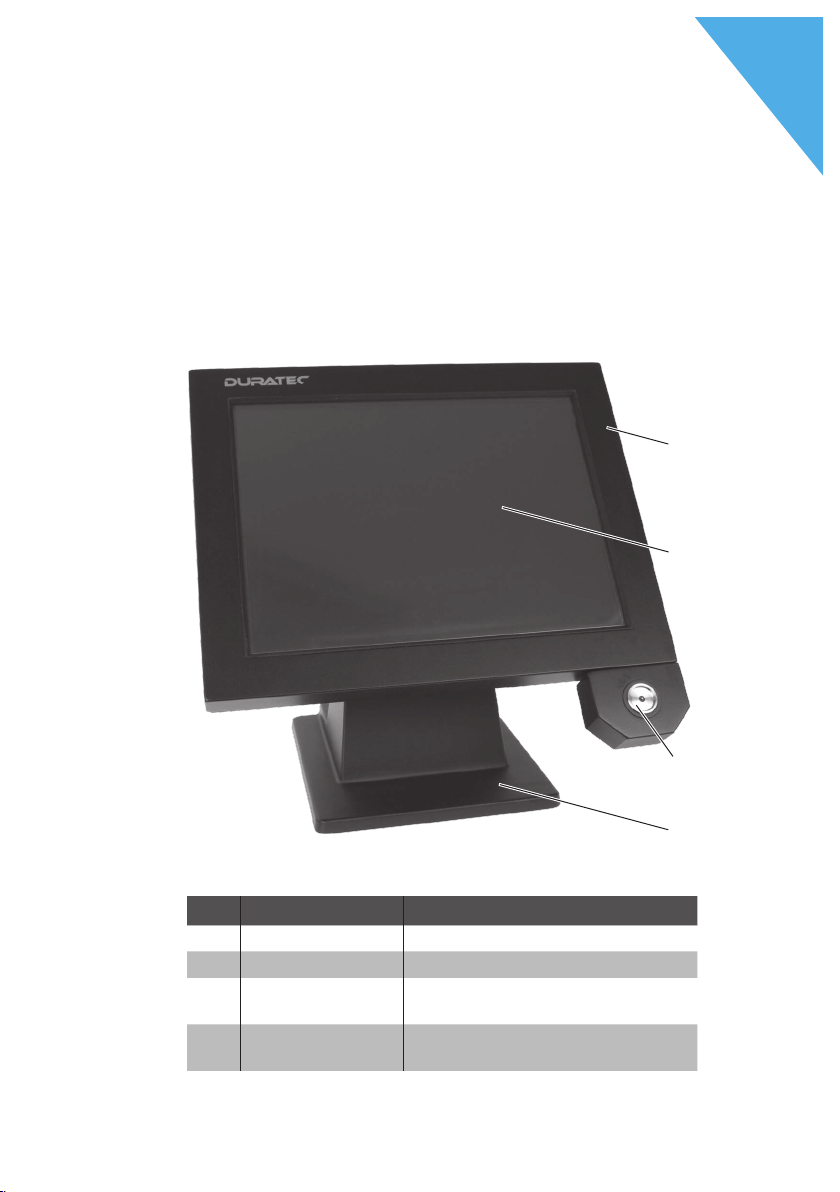
4.2. POS S15 POS system ..................................................................... 16
4.2.1. Front view ........................................................................................ 16
4.2.2. Rear view ......................................................................................... 17
4.2.3. Ports and connections ................................................................... 18
4.2.4. Dimensions ...................................................................................... 19
4.3. Power supply PS61 ........................................................................ 20
4.4. Mains cable .....................................................................................21
4.5. Duratec POS software ................................................................... 21
4.6. Technical data ................................................................................. 22
4.6.1. POS S15 POS system ..................................................................... 22
4.6.2. Power supply PS61 ........................................................................ 24
4.6.3. Duratec POS software ................................................................... 25
5. Start-up .............................................................................. 26
5.1. Setting up the POS S15 ................................................................. 26
5.1.1. Selecting the set-up site for the POS S15 .................................. 26
5.1.2. Connecting the POS S15 to the power supply ............................ 27
5.1.3. Connecting devices to the POS S15 ............................................28
5.2. Aligning the screen ........................................................................ 29
5
Page 6

DURATEC POS S15
6. Operation ............................................................................30
6.1. Switching the POS S15 on and off ............................................... 30
6.1.1. Switching on the POS S15 .............................................................30
6.1.2. Switching off the POS S15 ............................................................ 31
6.1.3. Rebooting the POS S15 ................................................................. 31
6.2. Log in and out at the POS S15 ..................................................... 31
6.2.1. Login via operator button ............................................................. 32
6.2.2. Login via operator key ................................................................... 33
6.3. Registration surface ...................................................................... 35
6.3.1. Functions .........................................................................................37
6.3.2. Payment user interface .................................................................40
6.4. Working with guest checks ........................................................... 41
6.4.1. Opening a table .............................................................................. 41
6.4.1.1. Open table ................................................................................. 41
6.4.1.2. Re-opening a table ................................................................... 42
6.4.2. Open tables ..................................................................................... 43
6.4.3. Booking PLUs to a table ................................................................ 45
6.4.4. Closing table ................................................................................... 45
6.4.5. Finalizing a table ............................................................................ 46
6.4.5.1. Cash payment ........................................................................... 46
6.4.5.2. Other media ..............................................................................46
6.4.6. Separate invoicing of groups or single persons .........................47
6.4.7. Splitting single PLUs to another table ........................................48
6.4.8. Moving all PLUs from one table to another ................................ 49
6.4.9. Transferring tables to another operator ..................................... 49
6.5. Working with reports ..................................................................... 50
6.6. Void and merchandise return ....................................................... 51
D
7. Programming ...................................................................... 52
7.1. Edit master data ............................................................................. 54
7.1.1. Configure department ................................................................... 55
7.1.2. Configure PLUs ............................................................................... 56
7.1.3. Configuring extra items .................................................................57
7.1.4. Configuring extra item lists .......................................................... 57
7.1.5. Assigning the extra item list ......................................................... 58
7.1.6. Save data ......................................................................................... 58
6
Page 7

D
8. Service and maintenance ..................................................59
8.1. Cleaning ...........................................................................................59
8.1.1. Cleaning housing and display ....................................................... 59
8.1.2. Cleaning the contacts .................................................................... 60
8.2. Maintenance ....................................................................................60
8.3. Contacting the customer service ................................................. 60
9. Errors, possible reasons and troubleshooting ................61
10. Shutdown ............................................................................ 64
11. Disposal ..............................................................................66
12. Glossary .............................................................................. 67
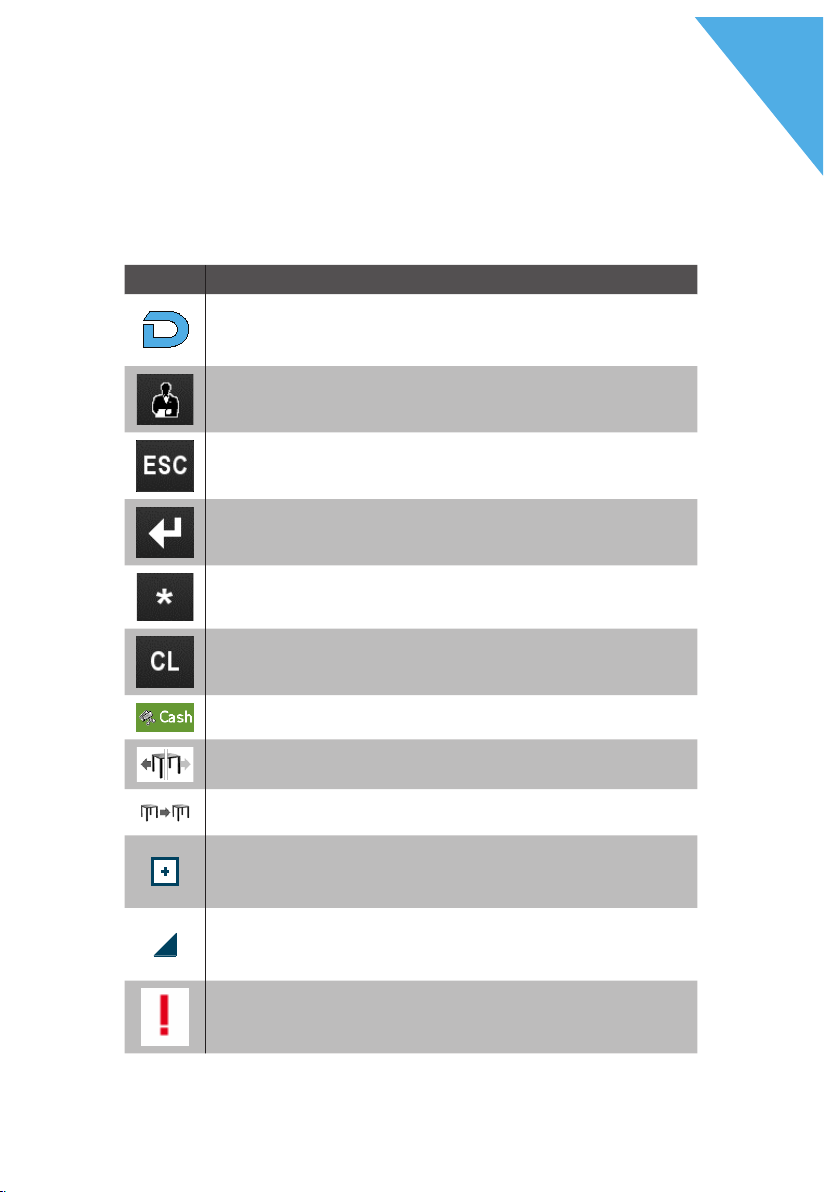
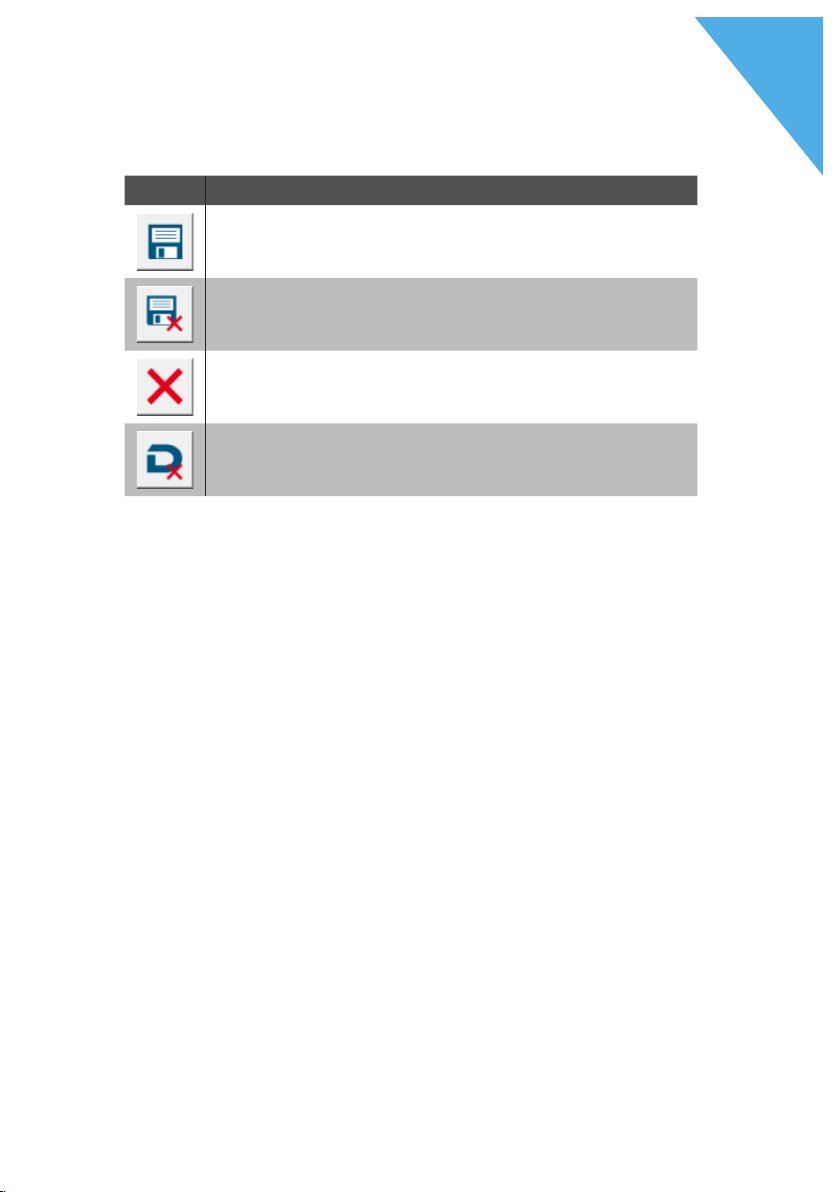
13. Icons ....................................................................................68
14. EU Declaration of Conformity ........................................... 71
15. Accessories ........................................................................72
15.1. Stylus ............................................................................................... 72
15.1.1. Stylus ............................................................................................... 72
15.1.2. Vectron stylus .................................................................................72
15.1.3. Multifunction stylus .......................................................................73
15.2. Wall mount ...................................................................................... 73
16. Other Duratec products .................................................... 74
16.1. Duratec Control .............................................................................. 74
16.2. Mobile App ...................................................................................... 74
7
Page 8

Page 9

1. Important information
This user manual is part of the Duratec POS S15.
Please read the whole document and in particular the chapter
"Notes on safety" before working with the product. Keep the
document so that it is available for all users at any time. Always
enclose the required documents when forwarding the product to
others.
1.1. Target group of this user manual
End users of the Duratec POS S15.
1.2. Dealer support
D
Your dealer has programmed the POS S15 for you and
is your contact partner for questions concerning the
programming. If necessary, he will be happy to support you
during initial start-up and will train you in using your POS
system.
9
Page 10

DURATEC POS S15
1.3. Scope of delivery
Duratec S15 POS system.
Operator lock Duratec L21 with four operator keys.Two
port covers each for SD-card- and SIM-card slot (one port
cover when the card is inserted and one for the empty
slot).
One port cover for the whole ports rail.
Stand S50.
Power supply PS61.
Mains cable.
D
10
Duratec POS software with licence.
User manual.
Dispatch box.
Page 11

2. Terms, signs and signals
2.1. Safety-related information
These instructions contain introductory safety information
and specific warnings for your POS system S15.
2.1.1. Warnings
A SIGNAL WORD
Type and source of danger.
Consequence of non-compliance.
X
Averting of a danger
a
D
2.1.2. Warning symbol
Warning sym-
bol
Warning symbols for instructions
A A
warning of injuries.
General warning symbol.
a
Warning symbol for hazards due to
q
s
crushing.
Warning symbol for hazards due to
electric shock.
Meaning
11
Page 12

DURATEC POS S15
2.1.3. Signal words
The signal word „DANGER“ indicates a danger with high
risk, which will result in death or severe injury if it is not
avoided.
The signal word „WARNING“ indicates a danger with
medium risk, which could result in death or severe injury if
it is not avoided.
The signal word „CAUTION“ indicates a danger with low
risk, which could result in minor injuries if it is not avoided.
D
A DANGER
A WARNING
A CAUTION
12
NOTICE
The signal word „NOTICE“ indicates a danger which could
result in material damage if it is not avoided.
2.2. Notes
This sign refers to information that can
be helpful when operating your POS S15.
i
Page 13

3. Notes on safety
A DANGER
Deadly shock caused by damaged POS system
components.
X
Disconnect the mains cable from the power grid
in case of damage. Contact your Duratec dealer if
POS system components are damaged.
A CAUTION
Pinching of fingers when aligning the screen.
The gap between the screen housing and the joint
changes during alignment.
X
Do not insert your fingers between the screen
housing and the joint.
X
Before aligning the screen see the notes in chapter
“5.2. Aligning the screen” on page 29.
D
Danger of tripping and damaging device caused by
device cables lying unprotected in the room.
X
Route the device cables so that they do not pose a
potential hazard!
13
Page 14

DURATEC POS S15
Damage of POS system components caused by
excessively high voltages or currents.
X
Use an earthed socket to which alternating current
between 110 and 240 volts is connected.
X
Use power sources which are protected with a
residual-current circuit breaker.
Malfunctions caused by faulty programming.
X
Only change the programming when your are
absolutely sure of the effects this will have.Protect
the programming and programming functions with
passwords.
X
Your Duratec dealer will support you should you
have questions on programming or will program
the POS system according to your requirements.
Aggressive cleansers can damage the housing surface.
X
Do not use any scouring or dissolving agents for
cleaning.If necessary clean the housing surface
with a smooth, lint-free cloth.
X
In case of strong contamination you can dampen
the cloth with water or with a mild, residue-free
cleanser.
D
NOTICE
14
Damage to POS system components when
transporting in unsuitable packing.
X
Dispatch the POS system components exclusively
in the original packing.
Page 15

4. Device description
4.1. Intended use
The POS S15 is a mobile POS system for order taking and
payment.
The POS S15 may be used under ambient conditions as
defined in chapter “4.6. Technical data” on page 22.
Operation of the POS S15 is exclusively allowed with
Duratec original accessories or Vectron-approved
accessories.
The Vectron Systems AG does not accept liability for
damages or injuries resulting from improper use.
D
The operating company of the POS S15 is responsible for
saving and backup of data that was created with the POS
S15.
The operating company of the POS S15 is responsible for
processing the data in accordance with the legal demands.
15
Page 16
DURATEC POS S15
4.2. POS S15 POS system
The full metal housing and the aluminium stand of the
POS S15 have a black powder coating.
4.2.1. Front view
D
1
2
16
3
4
Fig. 1: Front view
Pos. Designation Description
1 Housing
2 Touch screen Data input with stylus or fingers.
3 Operator lock Sign in- and and out to the sys-
tem via operator key.
4 Stand Stand with integrated power
supply PS61.
Page 17
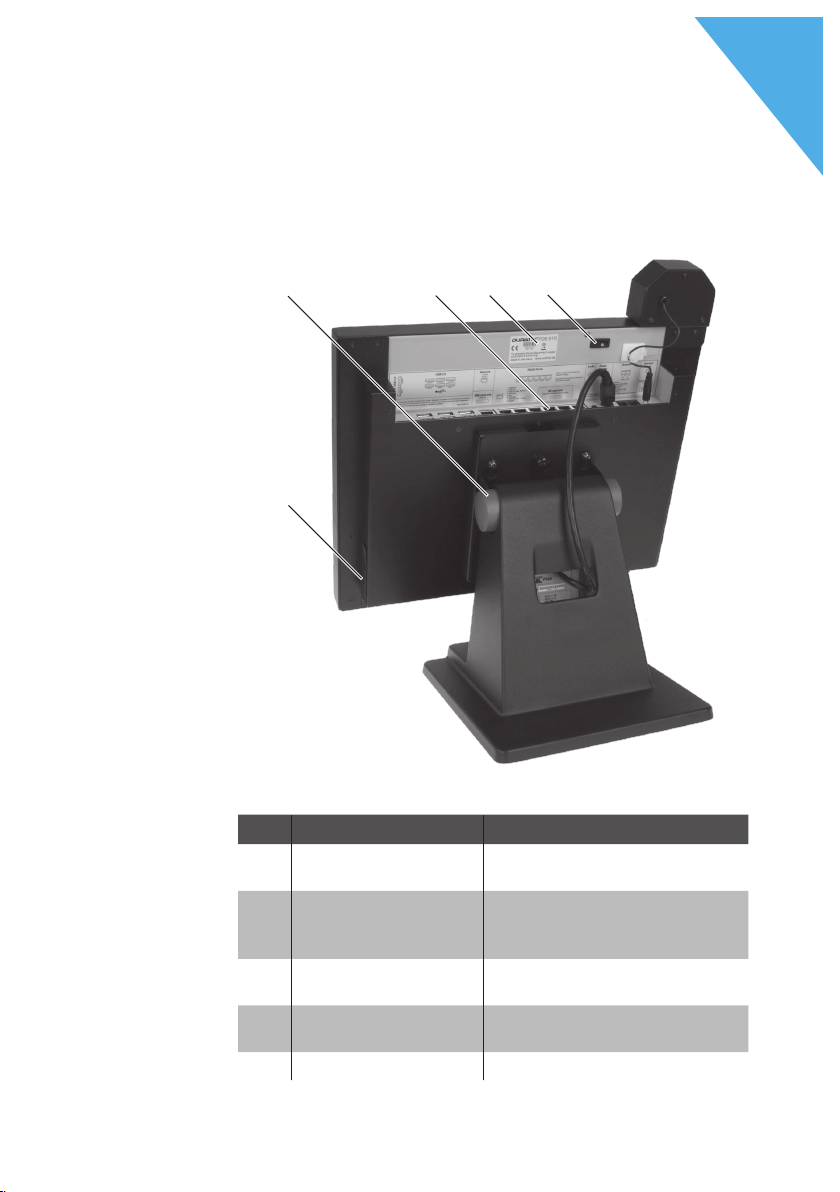
4.2.2. Rear view
D
2
1
Pos. Designation Description
1 2 USB ports For connection of external
2 Joint The joint serves for tilting
3 Ports and connec-
tions
4 Label Product designation and
5 On/Off key
43 5
Fig. 2: Rear view
devices and storage media.
the housing to adjust the display to your angle of view.
For connection of external
devices and storage media.
serial number.
17
Page 18
DURATEC POS S15
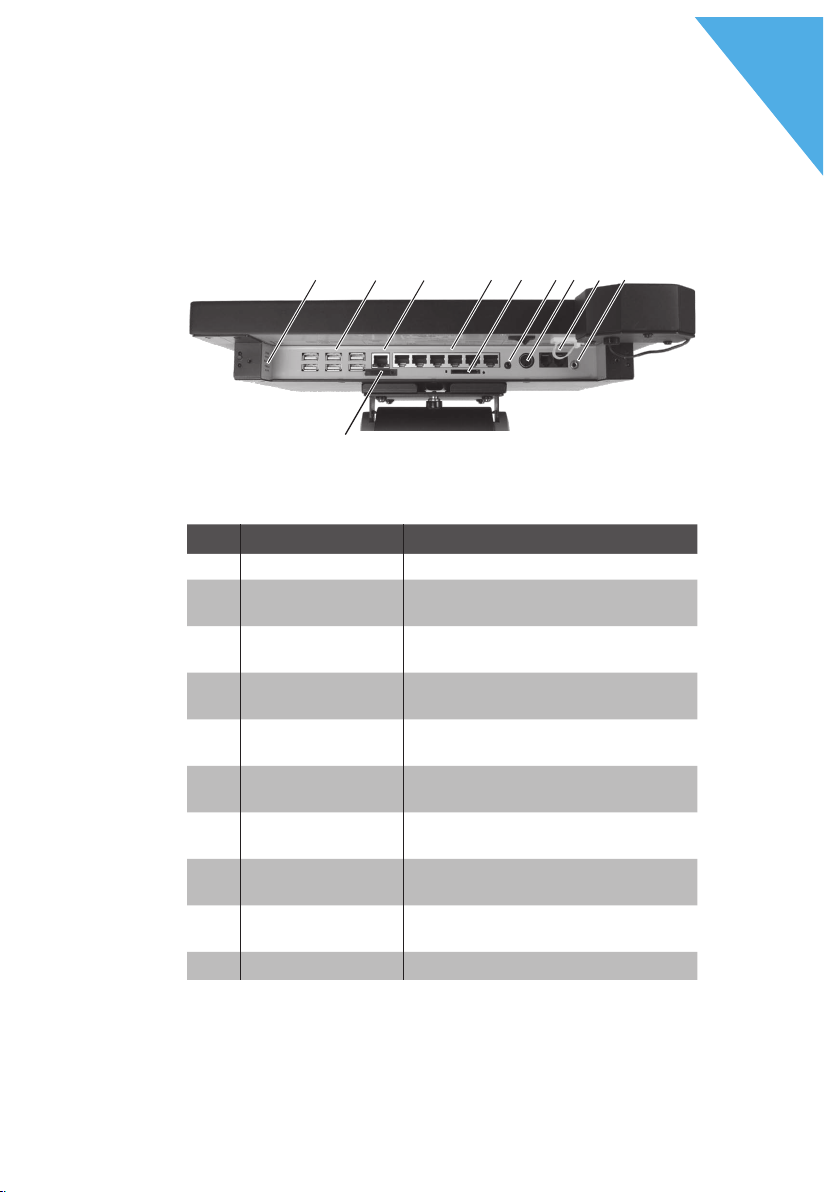
4.2.3. Ports and connections
Fig. 3: Detailed view of ports and connections
Pos. Designation Description
1 Loudspeaker For playback of system sounds.
2 USB ports Six USB 2.0-ports for external
3 Network Network port, RJ45, 10/100
4 Serial ports Six serial ports for external
5 Card port Slot for SD- and SDHC-memory
6 Audio connection Connection for stereo
7 Power connec-
tion
8 Drawer connec-
tion
9 Connection for
operator lock
10 SIM-card slot
D
21 43 5 6 7 8 9
10
devices and storage media.
Bas eT.
devices, RJ45.
cards.
loudspeaker.
Connection for power supply
PS61.
Two ports for cash drawers (port
B without function).
3.5 mm jack bush.
18
Page 19
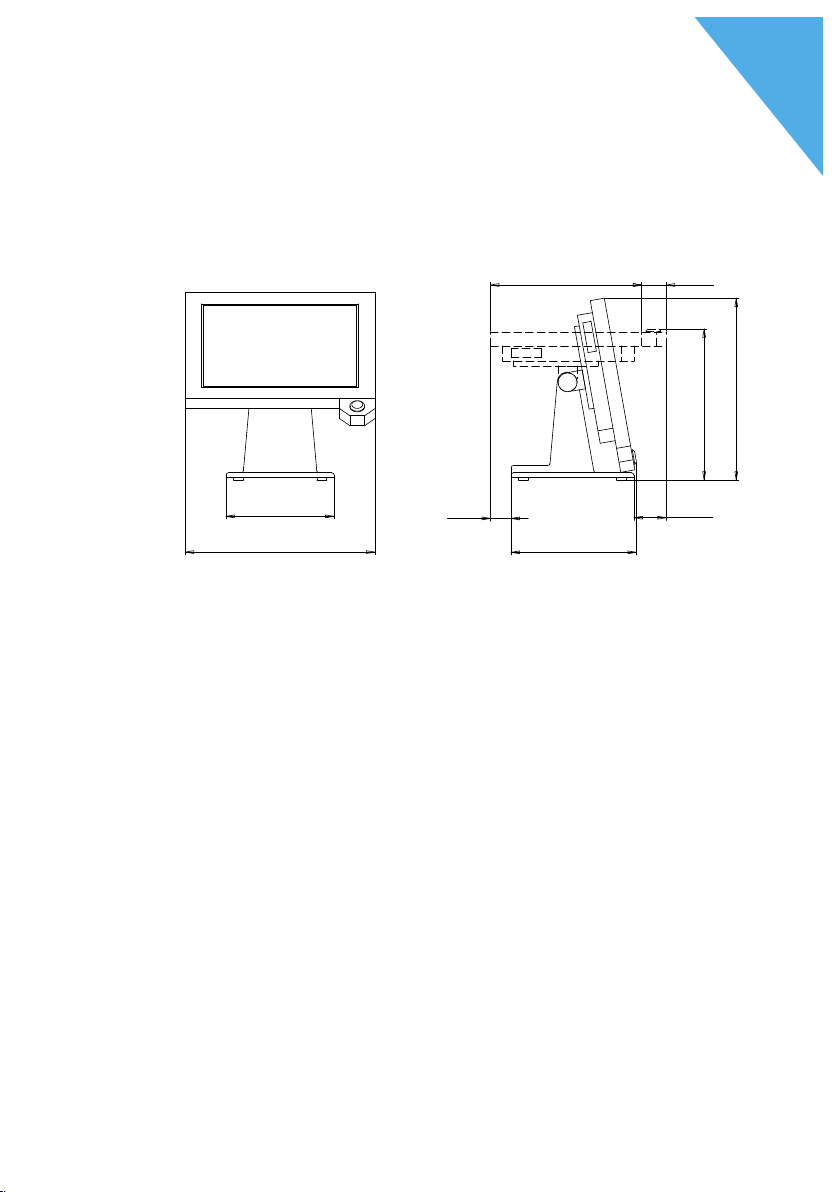
4.2.4. Dimensions
220
(8.7")
386
(15.2")
255
(10.0")
42
(1.7")
66
(2.6")
308
(12.1")
50
(2.0")
311
(12.2")
374
(14.7")
Fig. 4: POS S15 (Dimensions in millimeters and inch)
D
19
Page 20
DURATEC POS S15
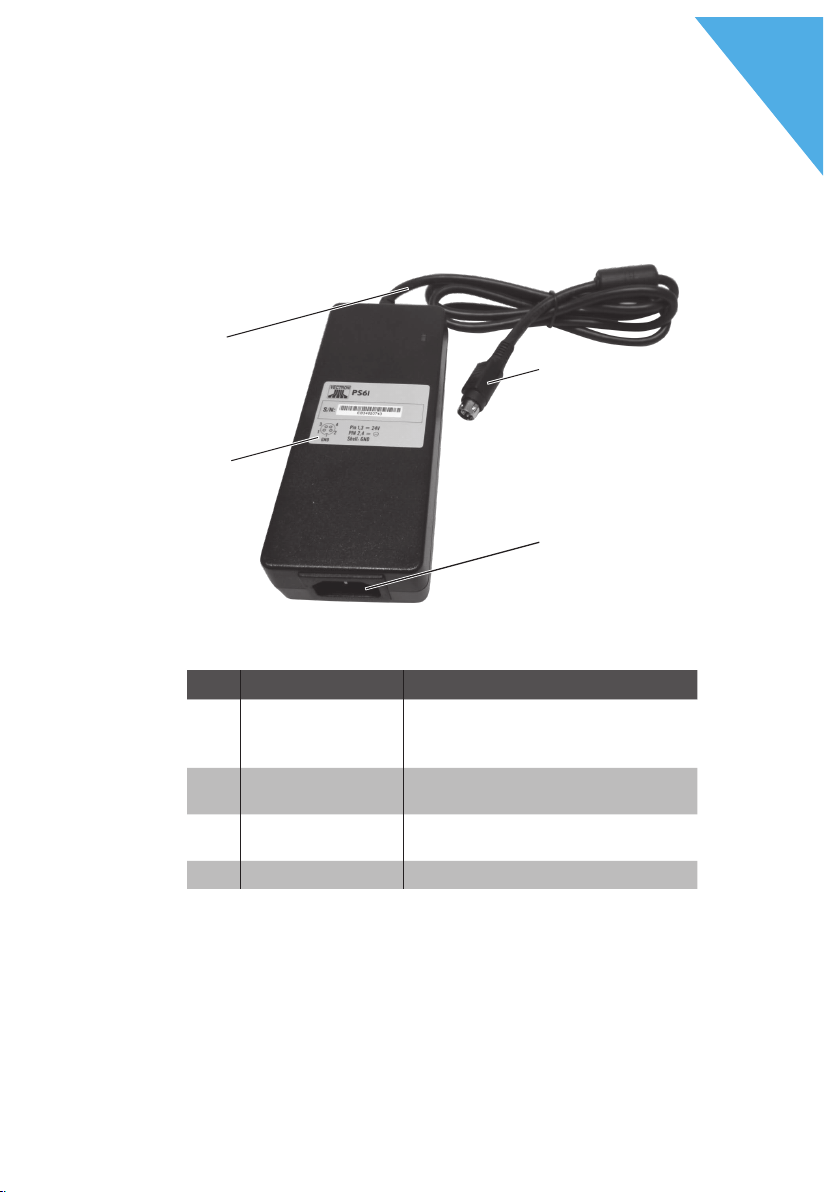
4.3. Power supply PS61
4
3
D
1
2
20
Fig. 5: Power supply PS61
Pos. Designation Description
1 Power supply
plug
2 Built-in connec-
tor
3 Label Product designation and serial
4 Power supply line
The power supply plug is put
into the power connector of the
POS S15.
The mains cable is plugged into
the connector.
number.
Page 21
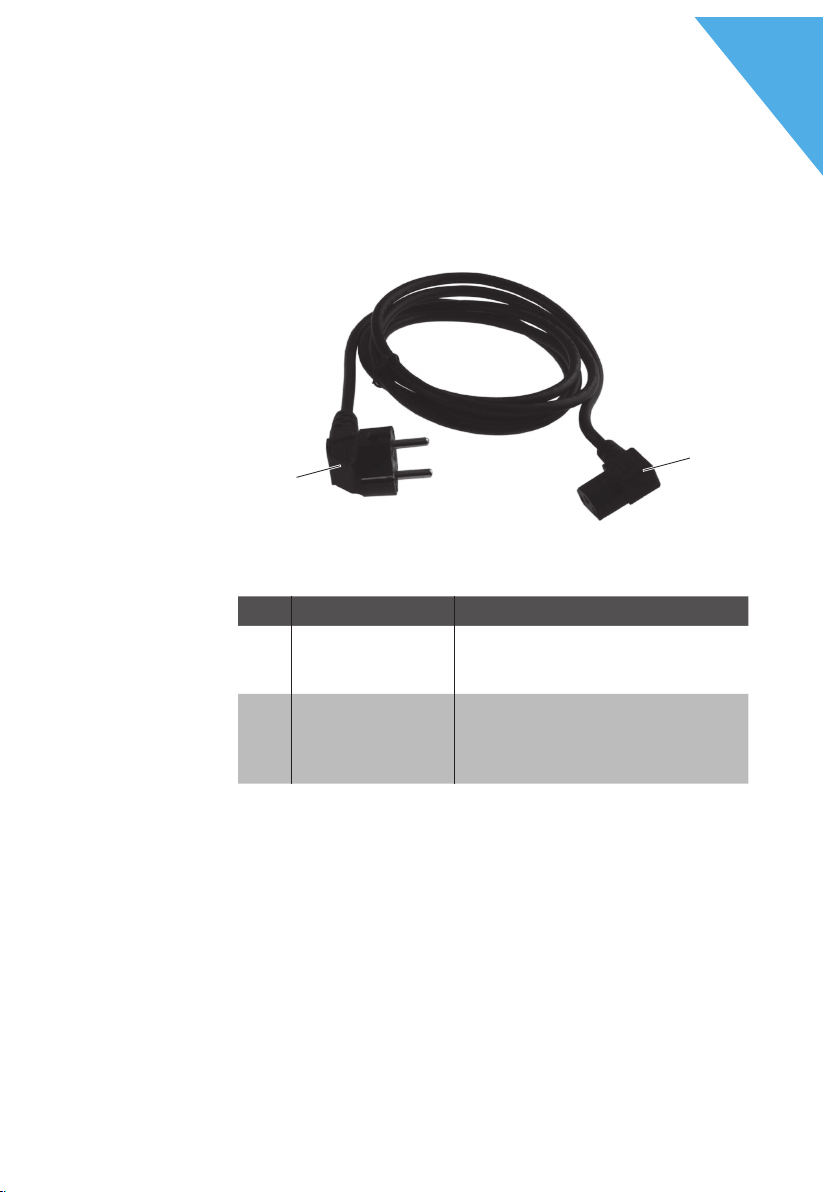
4.4. Mains cable
2
1
Pos. Designation Description
1 Mains cable con-
nector
D
Fig. 6: Mains cable
The mains cable connector is
plugged into the power supply.
2 Safety plug The safety plug is put into a
socket. The picture of the safety
plug may differ from actual
product.
4.5. Duratec POS software
The functions that you can use with the installed Duratec
POS software depended on the used software version and
the programming.
Your Duratec dealer will support you should you have
questions on programming or will program the POS system
according to your requirements.
21
Page 22

DURATEC POS S15
4.6. Technical data
4.6.1. POS S15 POS system
Technical data of the POS S15 POS system
Display diagonal
Display type
Display lighting
Display size (active)
Display resolution
Colours
Input
Housing
Stand
Processor
Main memory
Cache
Mass storage
Network
USB ports
Serial ports
Cash drawer ports
Audio connection
D
38.1 cm (15")
TF T- LCD
CCFL backlight
30.4 x 22.8 cm
1024 x 768 Pixel
up to 65,536
Analog-resistive 5-wire touchscreen.
Black powder-coated full metal
housing.
Black; powder-coated aluminum.
Marvell ARMADA 168, 1066 MHz
512 MB DDR2-RAM
1 MB SRAM
4 GB Flash memory
10/100BASE-T; Ethernet (mobile
POS systems can be released per
additional licences).
8x USB 2.0; port type A; 2 of
which at the left side.
6x RS232; port type RJ45; for
external devices.
RJ12-port for connection of a
cash drawer.
3.5 mm jack; stereo; for loudspeaker.
22
Page 23

Technical data of the POS S15 POS system
Operator lock connection
SD-card slot
3.5 mm jack; for Duratec L20
lock system.
For SD-cards up to 4 GB and
SDHC-cards up to 32 GB.
Loudspeaker
Power supply
Mono; 2 W.
Via external power supply PS61;
integrated in stand.
Buffer battery
For permanent power supply of
cache.
Power consumption
18 W in normal mode without
external appliances; 0.5 W in
standby mode.
Temperature
Storage: -10 to 50 °C
operation: 0 to 40 °C.
Dimensions (W x H
x D)
Weight
Certified
See drawings.
Ca. 9.5 kg.
CE
D
23
Page 24

DURATEC POS S15
4.6.2. Power supply PS61
Technical data of the power supply PS61
Input voltage
Input current
Output voltage
Output current
Output power
Power consumption
No-load loss
Temperature Storage: -40 to 85 °C
Air humidity Operation: 5 to 95 %, non
Dimensions
(W x H x D)
Weight
Certified CE, UL 60950-1
D
100 to 240 V alternating voltage.
Maximal 1,07 A.
+ 24 V direct current
Maximal 3,75 A.
Maximal 90 W.
Maximal 93 W.
0,3 bis 0,5 W.
operation: 0 to 40 °C.
condensing.
145 x 60 x 32 mm
450 g
24
Page 25

4.6.3. Duratec POS software
Technical data of the Duratec POS software
PLUs
Departments
Prices 3 (normal price, staff price, happy
Operators
Tables
Cash registers per
network
Printers per network 5
Features Sort groups for three courses.
2,000
90
hour price).
50
200
6
Intuitive PLU selection via button
levels.
Staff price.
Happy hour function.
VIP sale.
Eight payment modes.
Tip / gratuity.
Different discount types
adjustable.
Invoice buffer for the last 200
invoices.
D
25
Page 26

DURATEC POS S15
5. Start-up
5.1. Setting up the POS S15
5.1.1. Selecting the set-up site for the POS S15
• Set up the POS S15 in a well ventilated room with a
temperature of between 0 and 40°C.
• The POS S15 must not be covered during operation.
• Select the set-up site so that the POS S15 is not exposed
to direct sunlight.
• Place the POS S15 on a stable and even suface with
sufficient space.
• Make sure that no liquids can flow over the POS S15, the
power supply or the mains cable.
• Route the cables so that they are not subjected to
tensile loading.
• Route the cables so that no one can trip over them.
D
26
Page 27
5.1.2. Connecting the POS S15 to the power supply
NOTICE
Damage of display or housing caused by
sharp objects.
X
Remove all objects from the setup
a
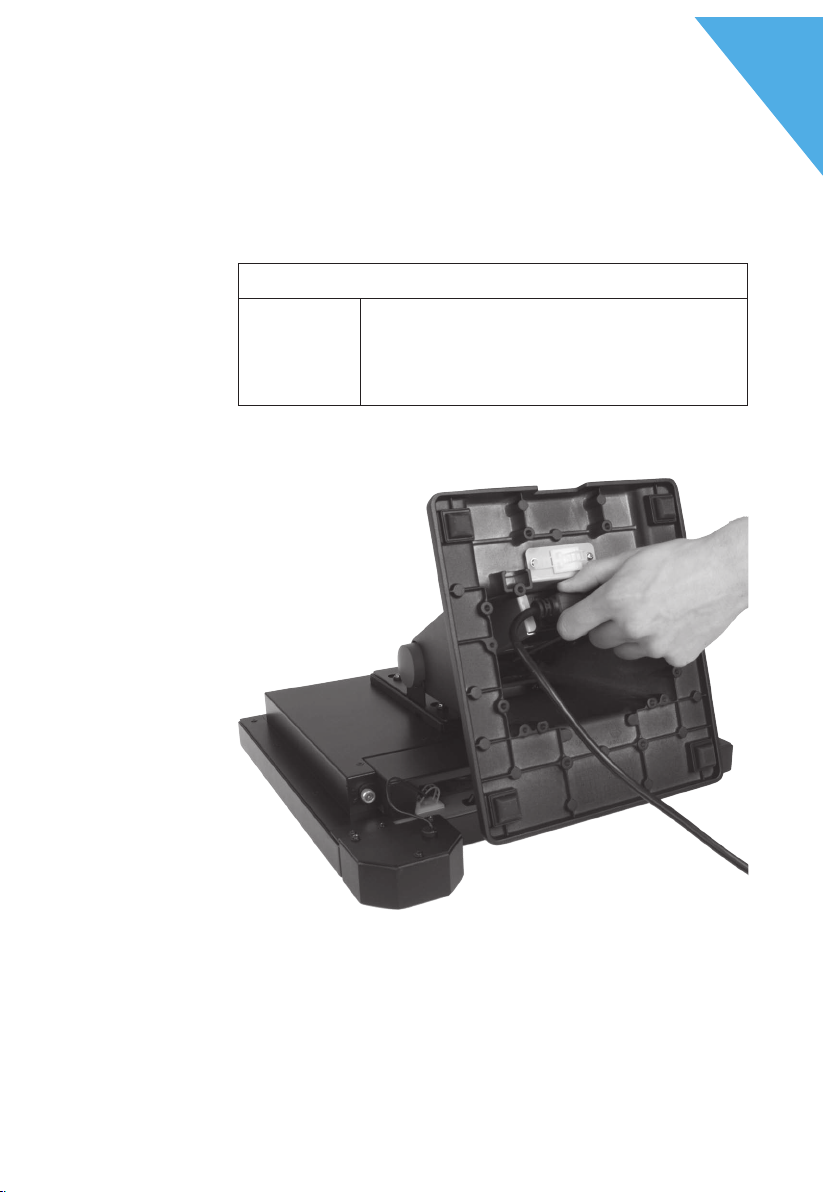
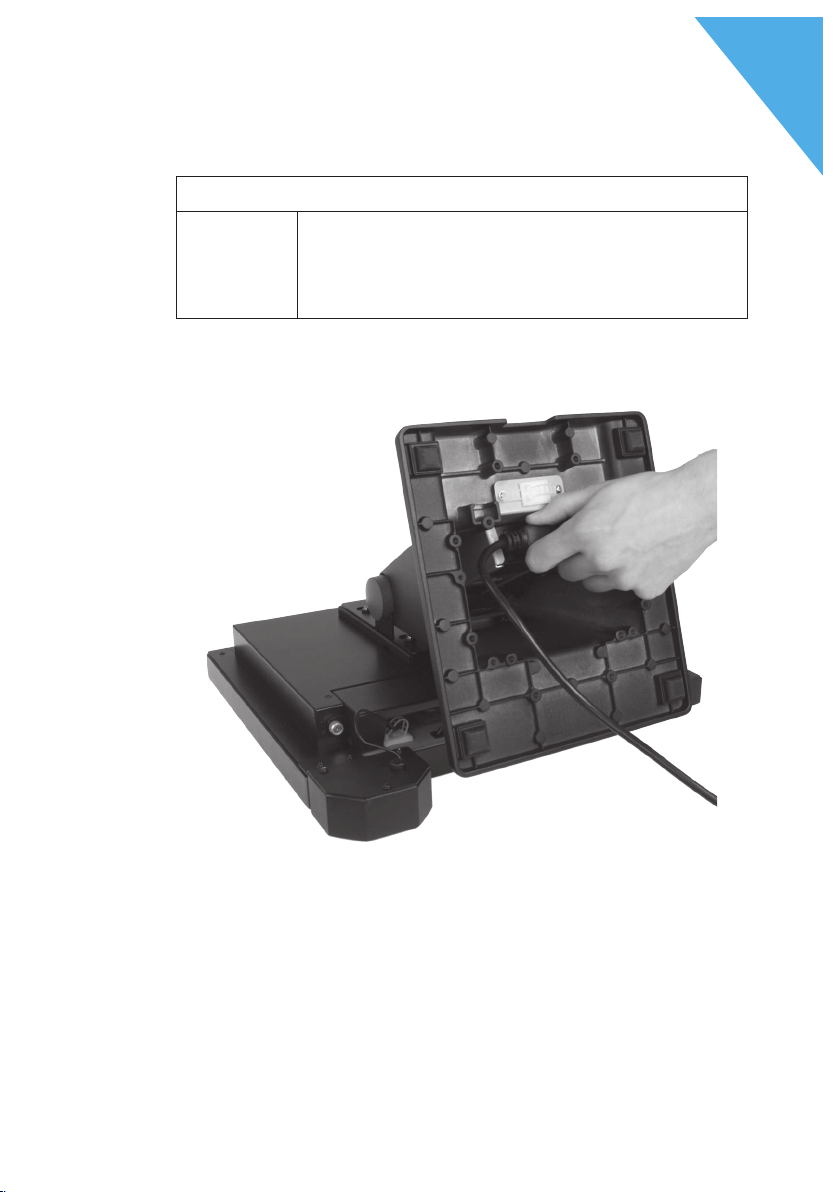
• Position the POS S15 as shown in fig. 7.
site.
D
Fig. 7: Plugging the mains cable to the connector
• Plug the mains cable into the power supply connector.
• Lead the power supply line through the recess of the
stand.
27
Page 28
DURATEC POS S15
• Place the POS S15 on the stand.
a
a
A CAUTION
Danger of tripping and damaging
device caused by device cables lying
unprotected in the room.
X
Route the device cables so that they
do not pose a potential hazard!
X
Route the cables so that they are not
subjected to tensile loading.
NOTICE
Damage of POS system components
caused by excessively high voltages or
currents.
X
Use an earthed socket to which
alternating current between 110 and
240 volts is connected.
X
Use power sources which are protected with a residual-current circuit
breake r.
D
28
• Insert the earthing-pin plug of the mains cable in a
socket.
5.1.3. Connecting devices to the POS S15
Your Duratec dealer will be happy to
inform you on available peripheral
i
devices .
Page 29
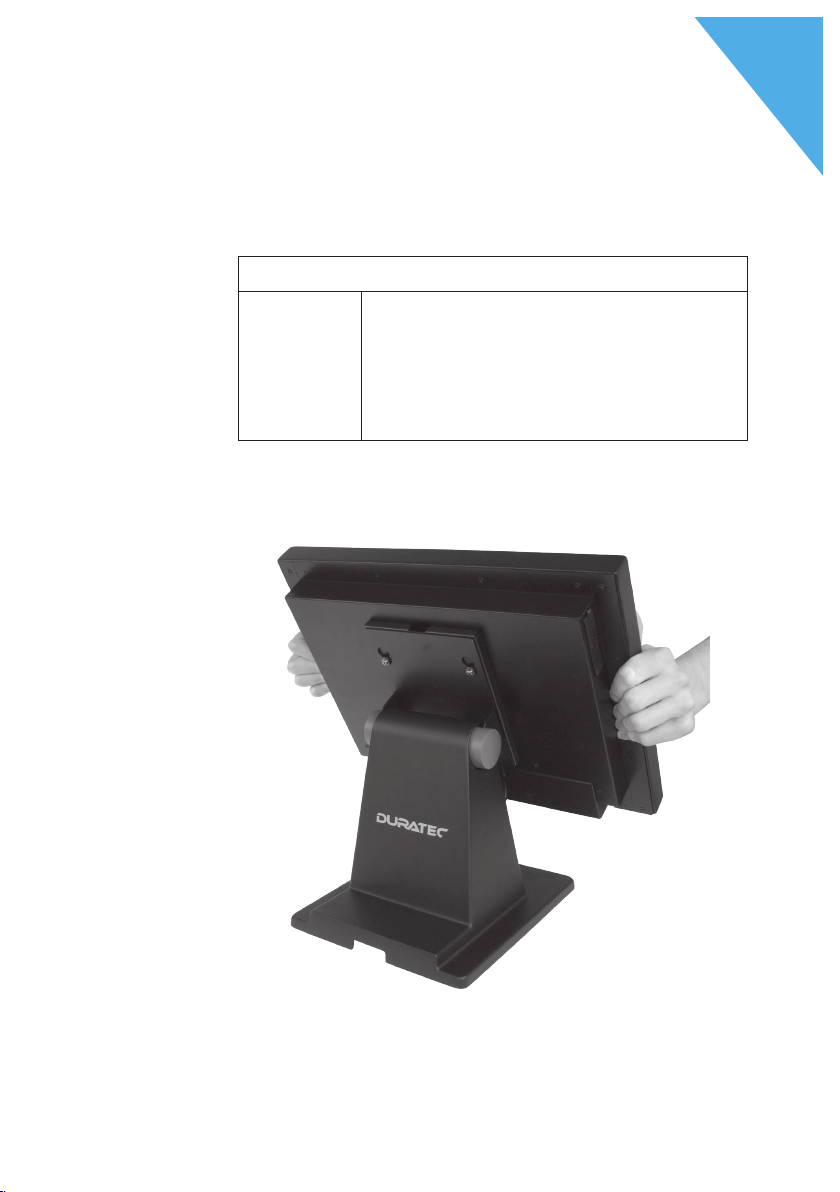
5.2. Aligning the screen
Pinching of fingers when aligning the
screen.
The gap between the screen housing
and the joint changes during alignment.
X
q
• Adjust the screen to your field of vision by tilting the
housing.
Do not insert your fingers between
the screen housing and the joint.
D
A CAUTION
Fig. 8: Aligning the screen
29
Page 30
DURATEC POS S15
6. Operation
6.1. Switching the POS S15 on and off
6.1.1. Switching on the POS S15
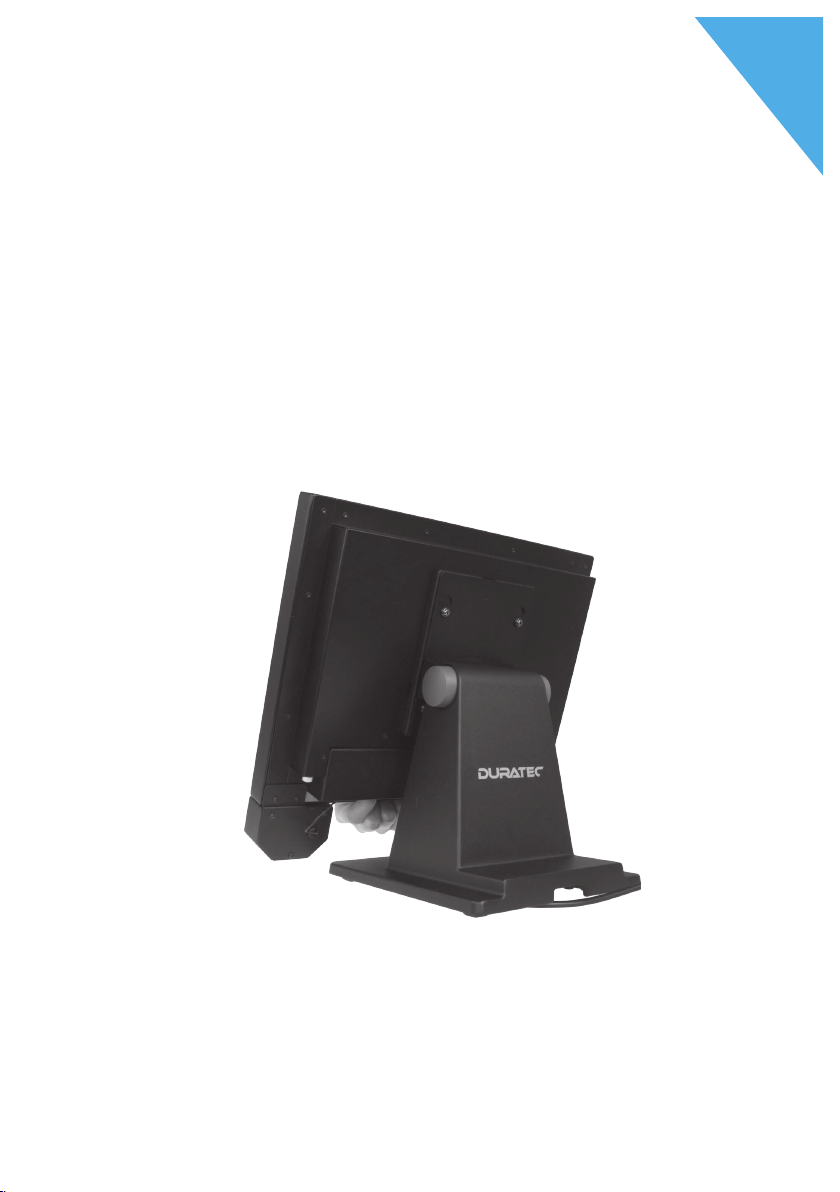
If the POS S15 was started as described in chapter “5.
Start-up” on page 26, you can switch on the POS S15.
• Shortly press the on-/off key to switch on the POS S15.
D
30
Fig. 9: Switching on the POS S15
Page 31

6.1.2. Switching off the POS S15
• Shortly press the on-/off key to switch off the POS S15.
6.1.3. Rebooting the POS S15
• Shortly press the on-/off key to switch off the POS S15.
• Wait for about 10 seconds.
• Shortly press the on-/off key to switch on the POS S15.
6.2. Log in and out at the POS S15
You can configure up to 50 operators.
To these operators you can assign
any number from 1-98. Only
number 99 is fixed assigned to the
programming.
i
To each operator you can assign
operator rights of the following rights
groups:
D
Rights group Definition
Operator Normal sales.
Supervisor Booking of foreign tables.
Manager
Void operator Additional void rights.
Training
Supervisor rights plus additional
functions.
Registration and programming for
training purposes, without generating sales data.
31
Page 32
DURATEC POS S15
Rights group Definition
X-repo rts Inspection and print of X-reports.
X-repo rts
Programming
You can program two types of operator login.
If you want to login by operator key, please continue in
chapter “6.2.2. Login via operator key” on page 33.
If you don't have an operator key, please continue in
chapter “6.2.1. Login via operator button” on page 32.
6.2.1. Login via operator button
a
Inspection of fiscal journals and Zreports Print of Z-reports.
Programming rights (operator no.
99 when delivered).
NOTICE
Damage of touch screen caused by
unsuitable objects.
X
For operation of the POS S15 touch
screen please use exclusively a
stylus or your fingers!
D
32
• Enter the operator number to the numeric pad.
• Press the button <Operator> .
Page 33
• Enter the secret code if it is required.
• For confirmation press <Enter> to log in this
operator.
Log out
• To log out the logged-in operator press on his name in
the status display or <Login/out> .
or
• When you are in programming, press <Logout>.
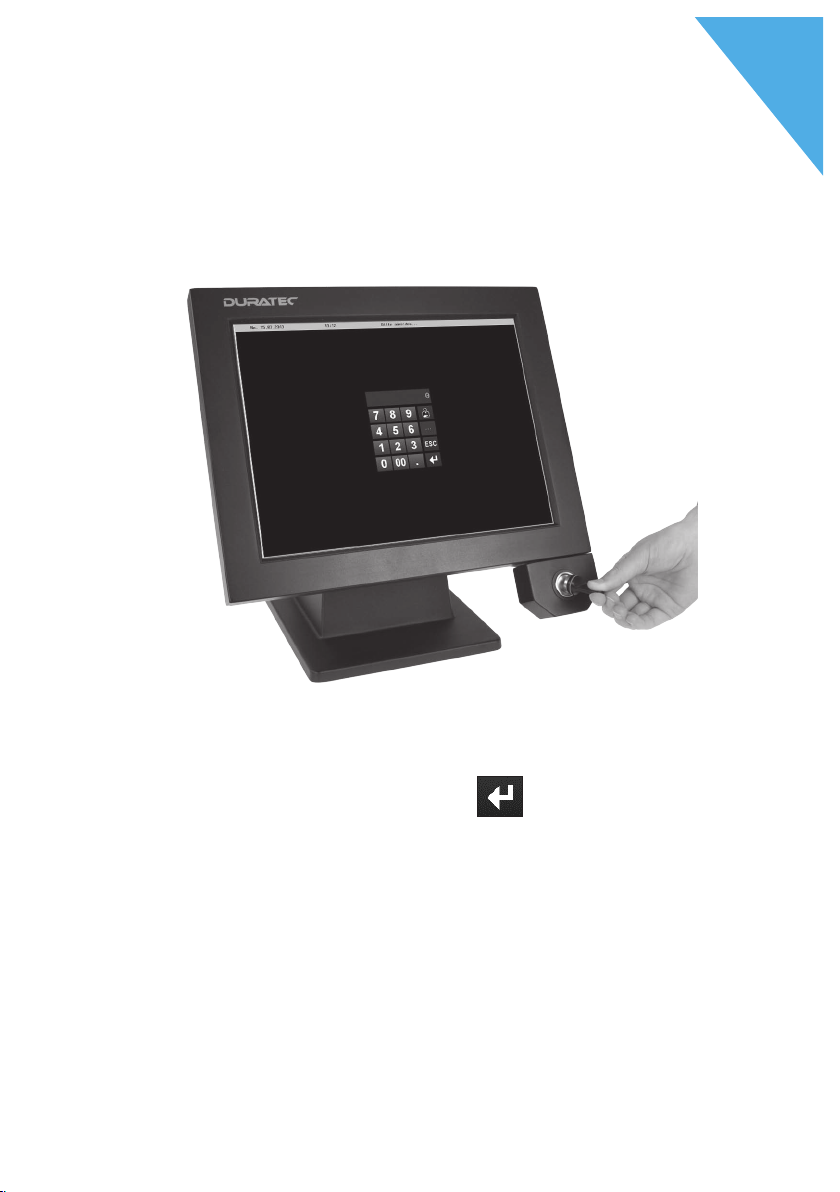
6.2.2. Login via operator key
The POS S15 is supplied with an operator lock system. It
consists of two elements: operator lock and operator key.
D
The operator lock is mounted to your POS S15. You get the
operator keys from your Duratec dealer.
Operator lock Operator key
Each operator key has a unique number. Your operator
key number is stored in the user administration. By means
of this assignment the Duratec POS software recognizes
which operator is logged in to the POS system and
activates the programmed user rights.
33
Page 34
DURATEC POS S15
Carry out the following steps when your POS S15 is
programmed for login by operator key.
• Approach the key to the operator lock.
D
34
Fig. 10: Approaching the key to the operator lock
• Enter the secret code if it is required.
• For confirmation press <Enter> to log in this
operator.
Log out
• Remove the key from the operator lock.
Page 35
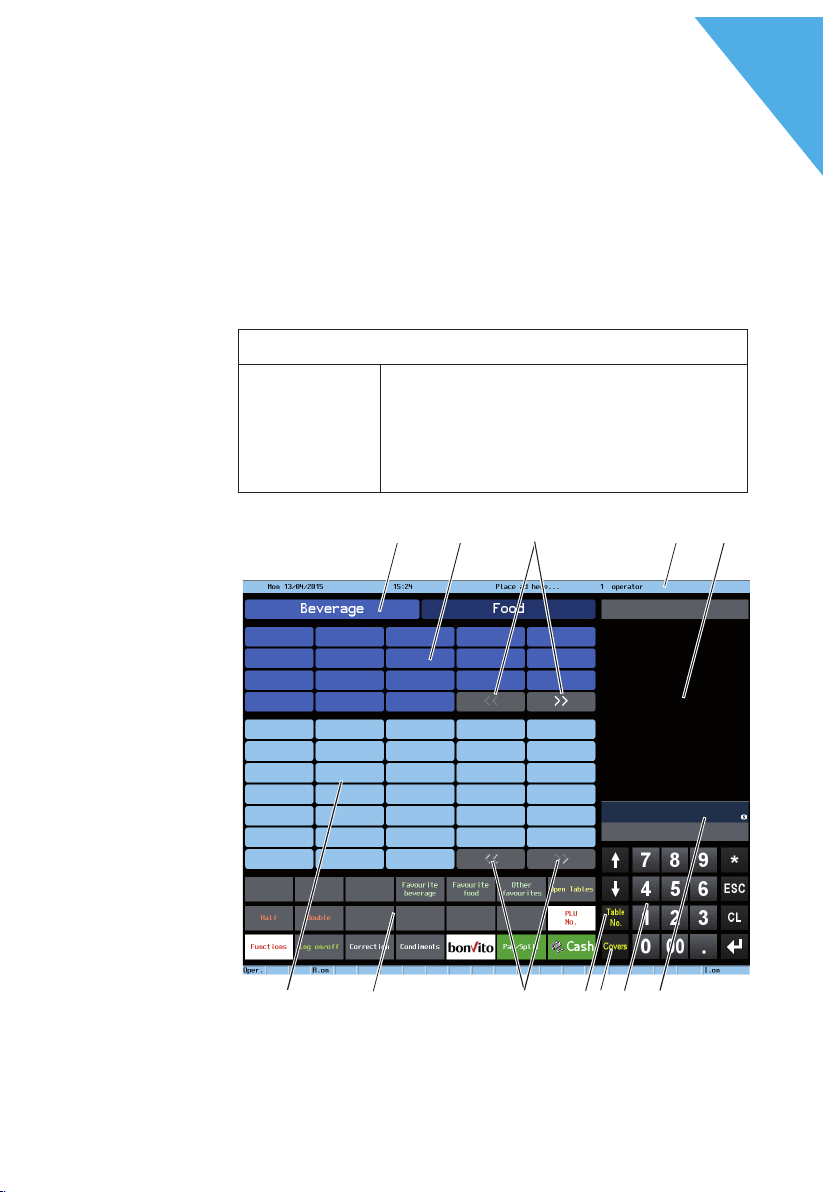
6.3. Registration surface
1 2 3
10
12
4 5
7 6
8
11
9
After having started and switched on the POS S15 your
POS system is ready for data input.
NOTICE
Damage of touch screen caused by
unsuitable objects.
X
For operation of the POS S15 touch
a
screen please use exclusively a
stylus or your fingers!
D
Fig. 11: Registration surface
35
Page 36

DURATEC POS S15
Pos. Designation Description
1 Main groups Food or drinks.
2 Department se-
lection
3 Scrolling in de-
partment selection
4 Status display 4-column display:
5 Receipt-, invoice-
and GC display
6 Balance display In balance display in field
7 Numeric pad Number input.
8 Covers Number of guests at a table.
9 Table no. To open a table for bookings en-
10 Scrolling in PLU
selection
11 Functions Default and programmable
12 PLU selection Selection of ordered PLUs.
D
Subgroups of the respectively
selected main group.
date/time/advertising text (adjustable)/logged in operator.
Display of different booking
data.
"Receipt" you see the sum of
current PLUs on a receipt. In balance display in field "Sales" you
see the sum of all PLUs booked
to a table.
ter the table no. to the numeric
pad and press the button <table
no.>.
buttons.
36
Page 37
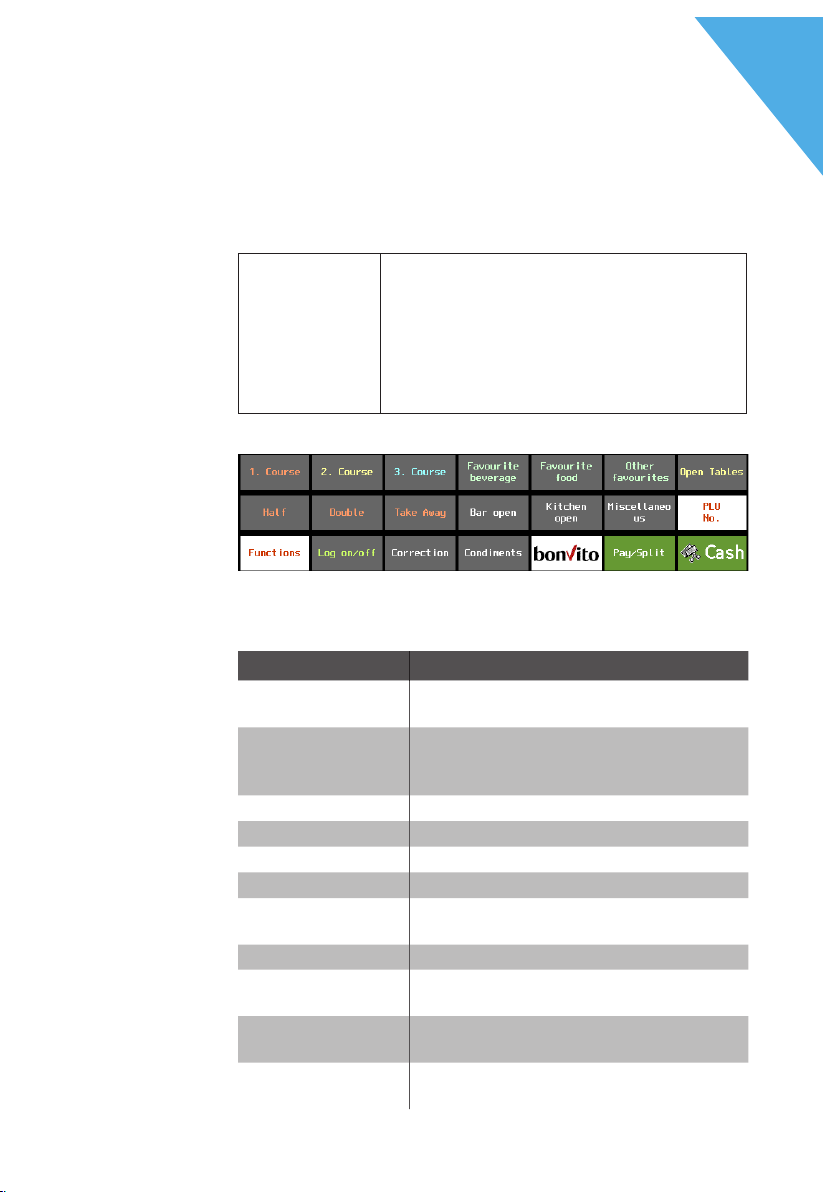
6.3.1. Functions
i
D
Your dealer has programmed the
POS S15 for you and is your contact
partner for questions concerning the
programming.
Should the functions described below
not be enabled in your POS S15, please
contact your Duratec dealer.
Fig. 12: Functions - page 1
Function Definition
Courses (course
1-3)
Favourites (food,
drinks, other)
Open tables
Half
Double
Take away
Open PLUs (food,
drinks, other)
PLU no. Booking by entering the PLU no.
Functions Shows page 2 with additional func-
Log on/off The active operator is logged out and
Correction Enables the correction mode: click on
Enables the course function.
Shows programmed PLUs, which were
marked as favourites in the master
data.
Display of open tables with sales.
Use of function half pint.
Use of function double pint.
Enables the "Take away" function.
Booking of PLUs of the respective
department with free price input.
tions.
the login screen opens.
faulty bookings to undo them.
37
Page 38
DURATEC POS S15
Function Definition
Condiments
bonVito Switches to the bonVito functions
Pay / Split Opens the payment interface with
Cash Enables the cash payment.
D
page when bonVito is enabled.
various payment modes and the
option to split and move PLUs and
tables.
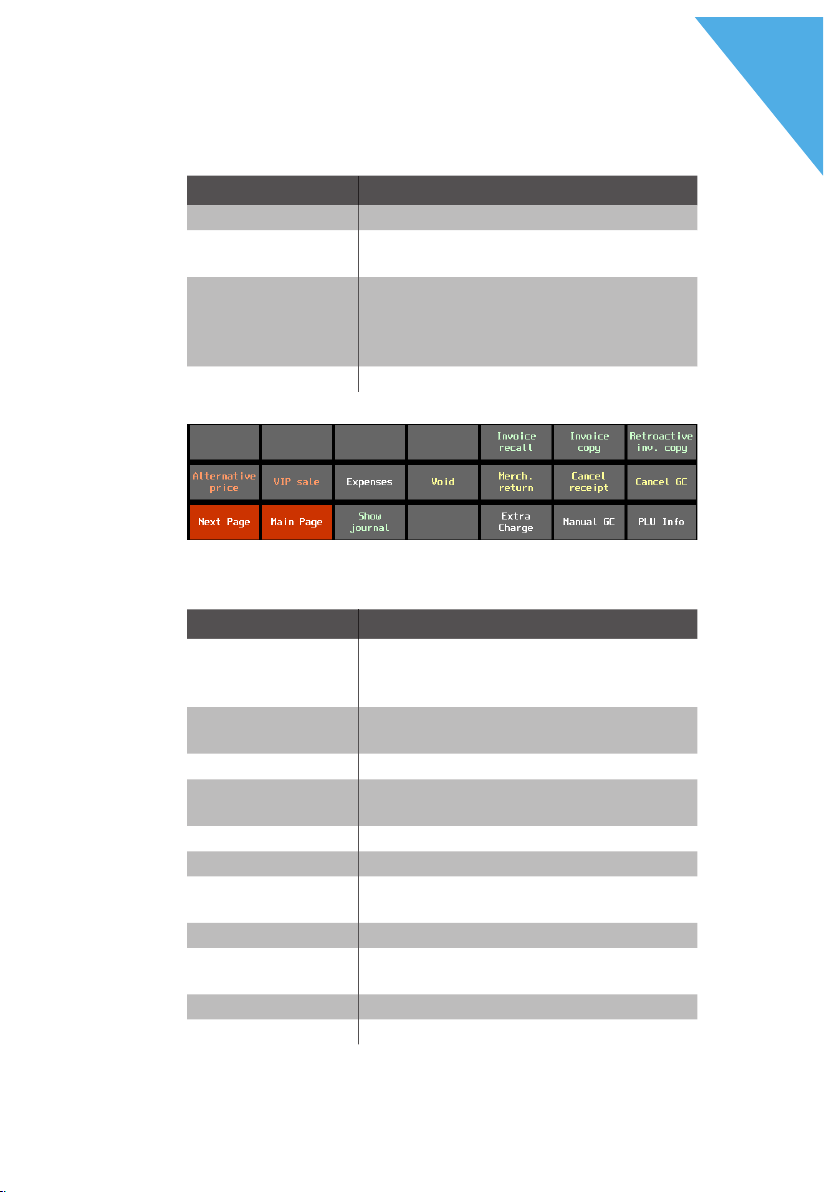
Fig. 13: Functions - page 2
38
Function Definition
Discount 1 - 4
(not active in the
figure)
Invoice recall Recalls an already finalized invoice to
Invoice copy
Retroactive inv.
copy
Alternative price
VIP sale Enables the VIP sale.
Expenses Registration of sales-neutral
Void Enables the void.
Merchandise
return
Cancel receipt Cancels the receipt.
Cancel table Cancels the table.
Enables the programmed discount.
The name of these four functions is
fully selectable.
close it with another payment mode.
Creates an invoice copy.
Creates a retroactive invoice copy.
Books PLUs at a programmed price.
expenses like e.g. cigarette money.
Enables the merchandise return.
Page 39
D
Function Definition
Next Page Enables page 3 of the functions view.
Main Page Enables page 1 of the functions view.
Show journal Display of electronic journal.
Extra Charge Tip / gratuity function.
Manual invoice
PLU info Enables a window for manual input of
additional information on the previous booking.
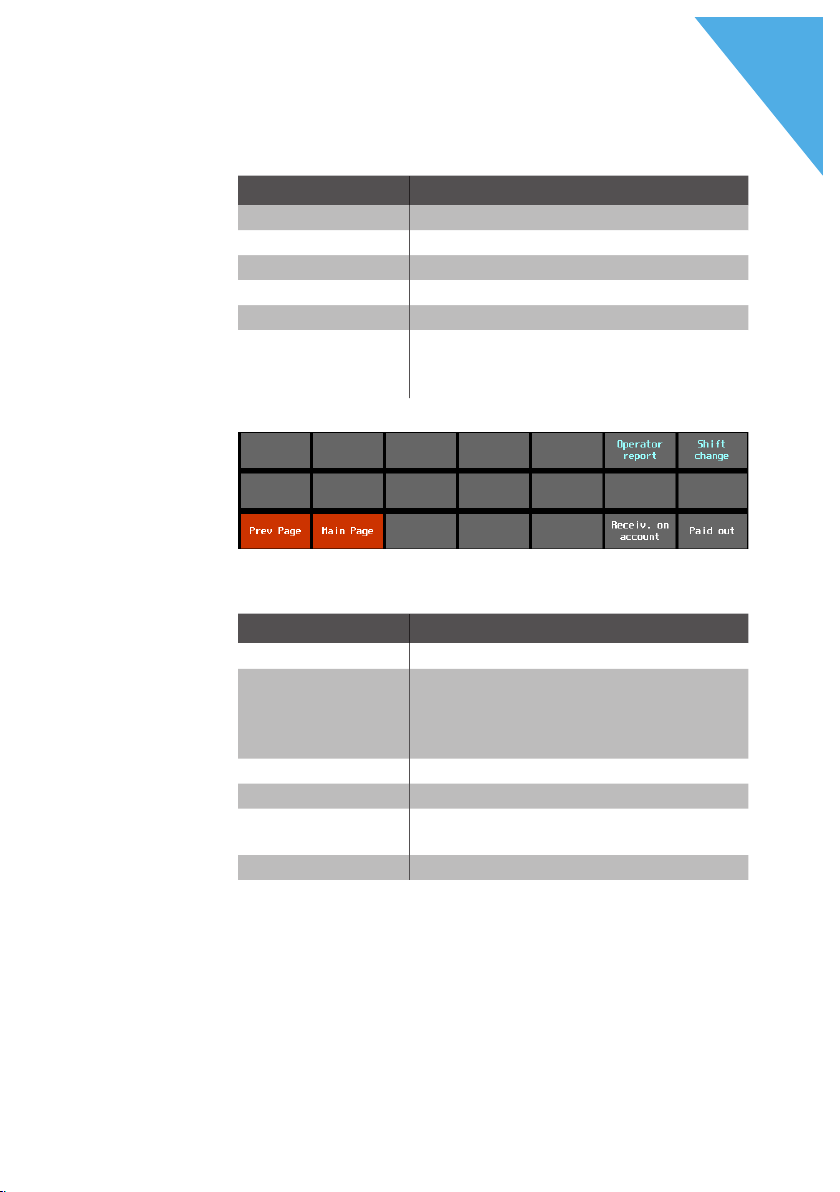
Fig. 14: Functions - page 3
Function Definition
Operator Report Opens the operator report.
Shift change Enables the shift change: input of
operator who is to change shift with
the active operator; then inquiry
whether tables are to be transferred.
Prev Page Functions page 2.
Main Page Functions page 1.
Receiv. on
Incoming payment.
account
Paid out Outpayment
39
Page 40
DURATEC POS S15
1 2 3 4
57
6
8
9
6.3.2. Payment user interface
D
40
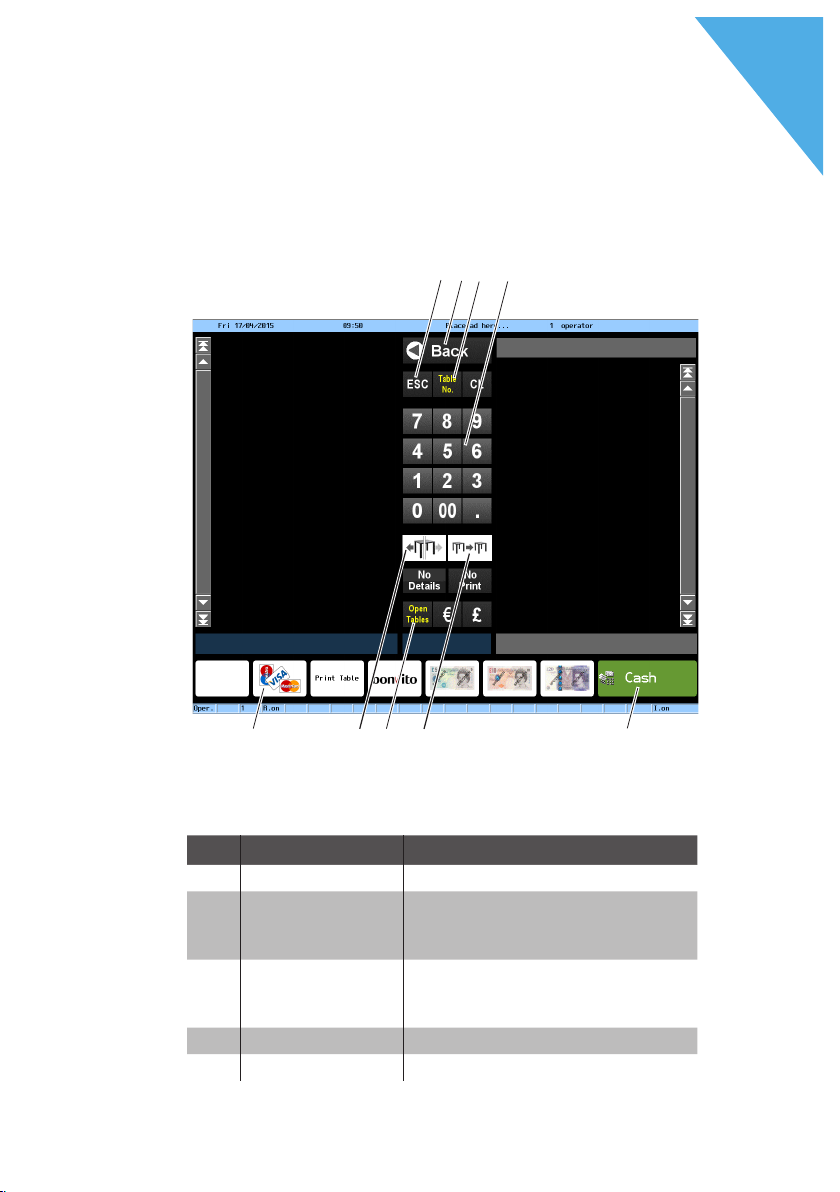
Fig. 15: Payment user interface
Pos. Designation Description
1 ESC Cancel input.
2 Back Closes the payment interface
and opens the registration user
interface.
3 Table no. To open a table, enter the table
no. to the numeric pad and press
the button <table no.>.
4 Numeric pad Number input.
5 Cash Enables the cash payment.
Page 41

Pos. Designation Description
6 Move table Moving all PLUs from one table
to another.
7 Open tables Display of open tables with
sales.
8 Split table For invoicing of single guests or
transfer of single PLUs to another table.
9 Credit cards Selection of various credit
cards.
6.4. Working with guest checks
For separate invoicing of tables.
For separate invoicing of groups or single persons at a
table.
D
The POS S15 can process 200 open tables simultanously.
6.4.1. Opening a table
6.4.1.1. Open table
In order to store bookings you first have to open a table.
• Enter the table number to the numeric pad.
• Press the button <Table no.> to open the table.
41
Page 42
DURATEC POS S15
i
i
D
With according programming you have
to enter the number of guests to be
assigned to a table before you can
book PLUs to a table.
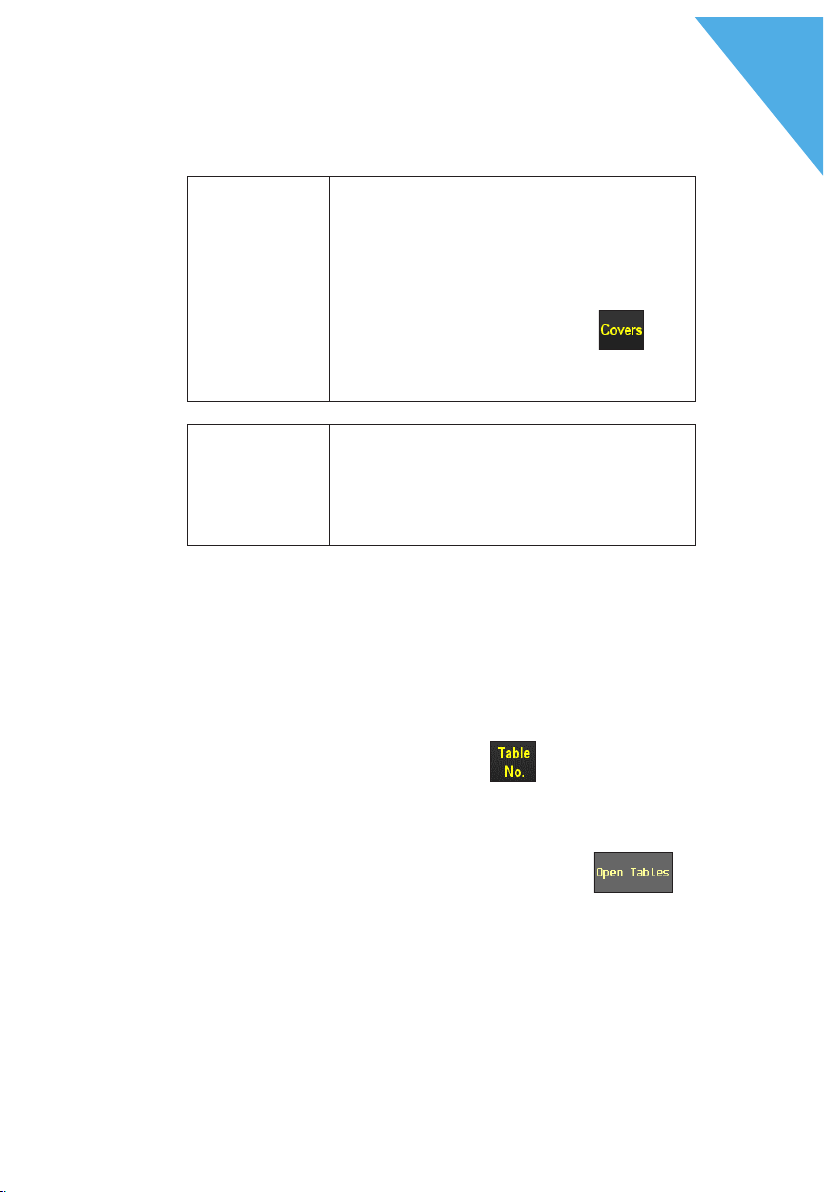
• Enter the number of guests to the
numeric pad.
• Press the button <Covers> to
assign the number of guests to the
table.
You can enter or change the number
of guests for the opened table at any
time.
42
6.4.1.2. Re-opening a table
Tables that already contain bookings but were not yet
invoiced (open tables), can be opened again.
• Enter the table number to the numeric pad.
• Press the button <Table no.> to re-open the
table.
or
• Open the window with the list "Open tables"
(see in chapter “6.4.2. Open tables” on page 43).
• Open the desired table by pressing the respective entry
in the table overview.
Page 43
6.4.2. Open tables
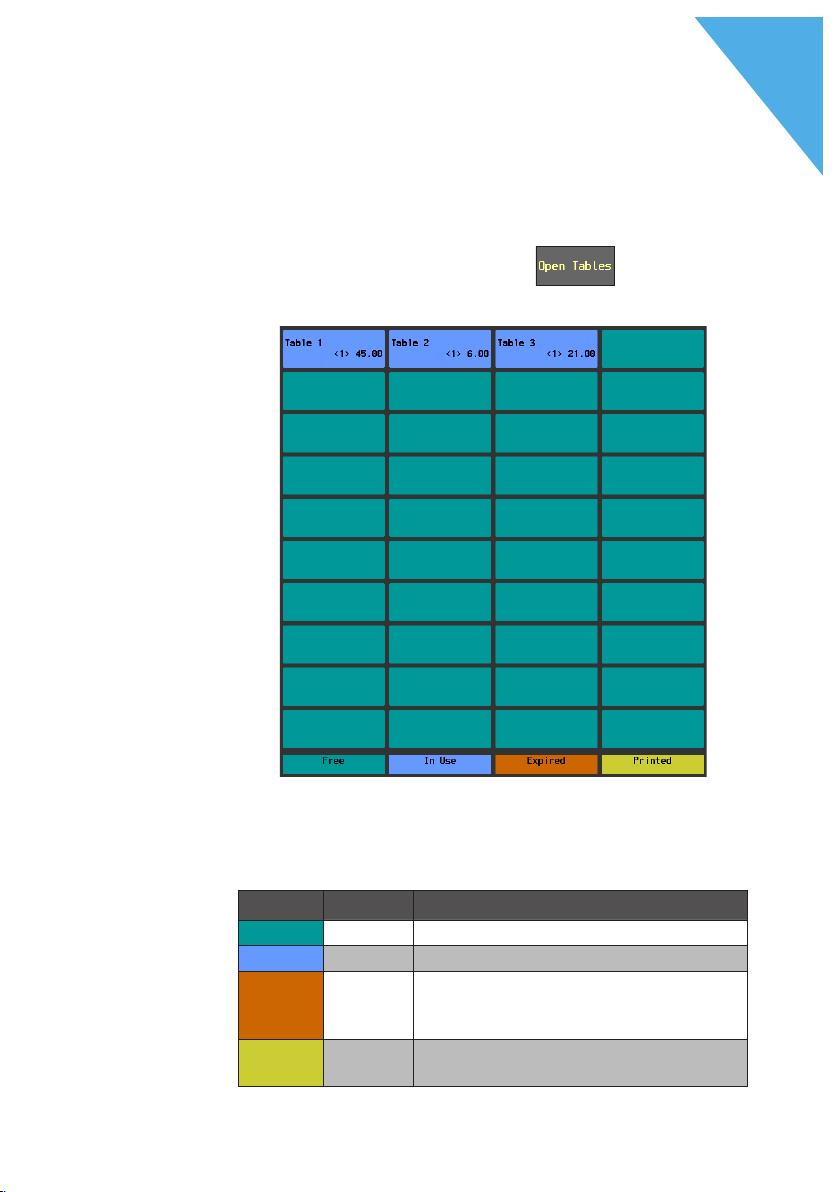
Pressing the button <Open tables> brings you to
an overview on open tables.
D
Fig. 16: Overview “open tables”
Colours indicate the status of available tables:
Colour Status Definition
Green Vacant
Blue Occupied
Red Alt The table is occupied. No bookings
Yel l ow Printed A subtotal invoice for this table was
The table is vacant.
The table is occupied.
made for a period that your Duratec
dealer programmed.
printed.
43
Page 44
DURATEC POS S15
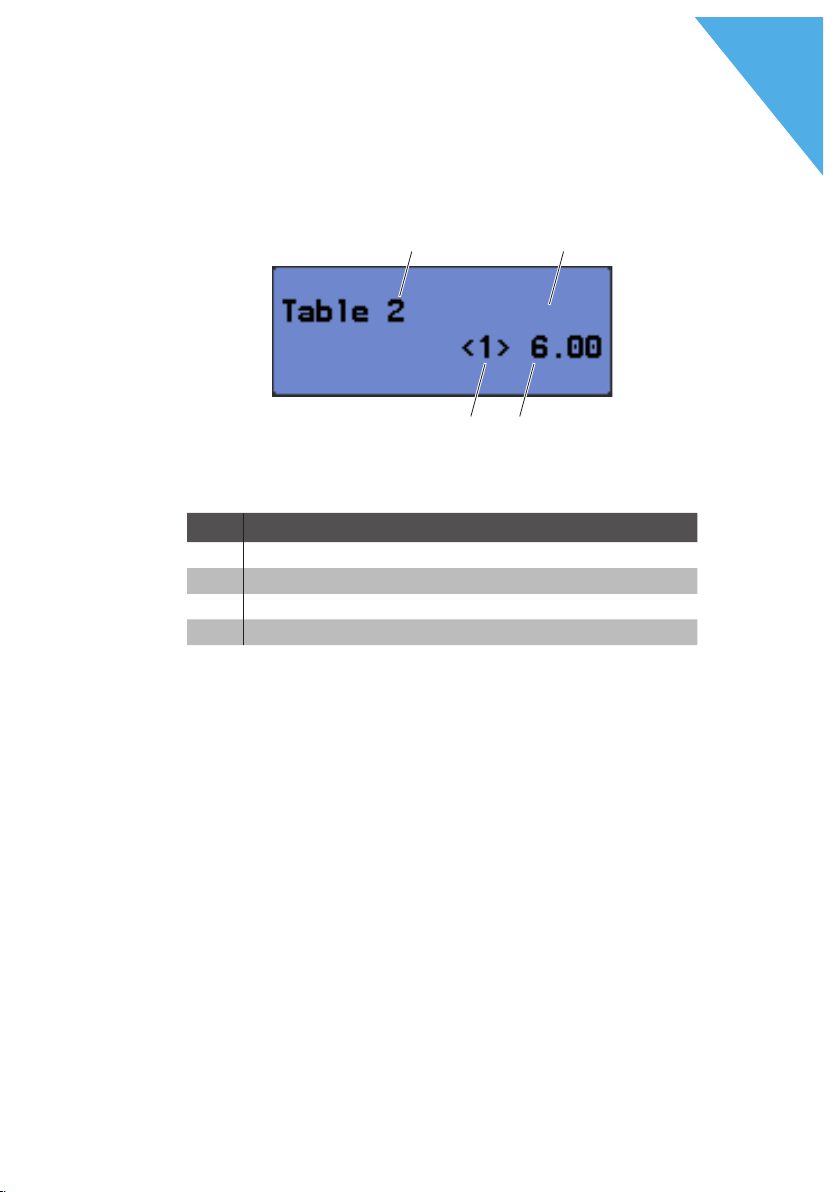
The following information is displayed for each open table:
D
1
Fig. 17: Information on open table
Pos. Designation
1
Table no.
2
Colour for table status.
3
Amount of booked PLUs.
4
Operator number.
2
34
44
Page 45
6.4.3. Booking PLUs to a table
• Open the table to which you want to book the PLUs as
described in chapter “6.4.1. Opening a table” on page
41 .
• To book PLUs press the respective buttons in the PLU
selection.
or
• For multiple booking of a PLU you can enter the desired
number on the numeric pad and select the respective
PLU after the asterisk. The display shows the sum
of desired PLUs in one line.
6.4.4. Closing table
D
When you close a table, bookings for this table are stored.
There are several ways to close a table.
• Press the button <Table no.> .
or
• Open a new table as described in chapter “6.4.1.
Opening a table” on page 41 to close the currently
opened table.
If you close a table to which no PLUs
were booked it will be cancelled
automatically and will no longer
i
appear in the list of open tables.
45
Page 46
DURATEC POS S15
6.4.5. Finalizing a table
Various media are available for finalization. The table is
closed after finalization and no longer appears in the list
of open GCs. The bookings are stored in the journal.
6.4.5.1. Cash payment
• Open the table that you want to finalize as described in
chapter “6.4.1. Opening a table” on page 41 .
• If you got the exact amount from the customer you
directly press the <Cash> button.
or
• Enter the amount you got from the customer on the
numeric pad.
D
46
• Press the button <Cash> .
• The change amount is displayed.
6.4.5.2. Other media
It depends on the programming of your POS S15 whether
you can use this function.
• Open the table that you want to finalize as described in
chapter “6.4.1. Opening a table” on page 41 .
• Press the button <Pay/Split> .
• Press the button for credit card selection on the
payment user interface .
• Press the button of the desired credit card.
Page 47
6.4.6. Separate invoicing of groups or single persons
The split function can only be carried
out if all PLUs of the tables have been
booked. To book the PLUs, close the
i
• Open the table that you want to split as described in
chapter “6.4.1. Opening a table” on page 41 .
• Press the button <Pay/Split> to display the
payment user interface.
• Press the button <Split table> .
• Select the PLUs to be split on the list. This moves a PLU
to the left.
table as described in chapter “6.4.4.
Closing table” on page 45 .
D
• Press the <Cash> button or select another
media to invoice the split PLUs.
47
Page 48
DURATEC POS S15
6.4 .7. Splitting single PLUs to another table
This function is useful when guests want to change the
table.
i
• Open the table that you want to split as described in
chapter “6.4.1. Opening a table” on page 41 .
• Press the button <Pay/Split> to display the
payment user interface.
• Enter the number of the table, to which the PLUs are to
be moved.
D
The split function can only be carried
out if all PLUs of the tables have been
booked. To book the PLUs, close the
table as described in chapter “6.4.4.
Closing table” on page 45.
48
• Press the button <Split table> .
• Select the PLUs to be split.
• Press the button <Table no.> to split the selected
PLUs.
Page 49
6.4.8. Moving all PLUs from one table to another
• Open the table that you want to move as described in
chapter “6.4.1. Opening a table” on page 41 .
• Press the button <Pay/Split> to display the
payment user interface.
• Enter the number of the table, to which the PLUs are to
be moved.
• Press the button <Move table> to move the
table.
6.4.9. Transferring tables to another operator
It depends on the programming of your POS S15 whether
you can use this function.
D
This function is useful for shift changes.
• Open the table that you want to transfer as described in
chapter “6.4.1. Opening a table” on page 41 .
• Press the button <Functions> .
• Press the button <Next Page> .
• Press the button <Shift change> .
• Select an operator from the list to transfer the table to
this operator.
49
Page 50

DURATEC POS S15
6.5. Working with reports
It depends on the programming of your POS S15 and the
user rights whether you can use this function.
Reports serve for evaluating data that were stored in the
POS system.
The Duratec POS software supplies various standard
reports. You can display and print reports.
With Duratec POS software you can create two types
of reports: X-reports and Z-reports. Z-reports are final
reports where the data is deleted from the booking
memory. X-reports are intermediate reports, where the
data is just polled.
D
50
Page 51

6.6. Void and merchandise return
Faulty bookings can be cancelled.
If a customer returns PLUs these can be cancelled and the
respective invoice can be corrected.
The appropriate user rights for void and merchandise
return can be assigned individually to respective operator
groups.
D
51
Page 52

DURATEC POS S15
7. Programming
Malfunctions caused by faulty programming.
X
Only change the programming when your
are absolutely sure of the effects this will
have.
X
Protect the programming and
a
To come to programming mode you have to log in as programmer
to the POS S15 as described in chapter “6.2. Log in and out at the
POS S15” on page 31 .
programming functions with passwords.
X
Your Duratec dealer will support
you should you have questions on
programming or will program the POS
system according to your requirements.
D
NOTICE
52
i
As delivered, only the operator with number
99 is authorized for programming.
Operator 99 cannot be deleted. You can
change the password (9999) for operator 99
in menu <Master data: Edit.> .
Page 53
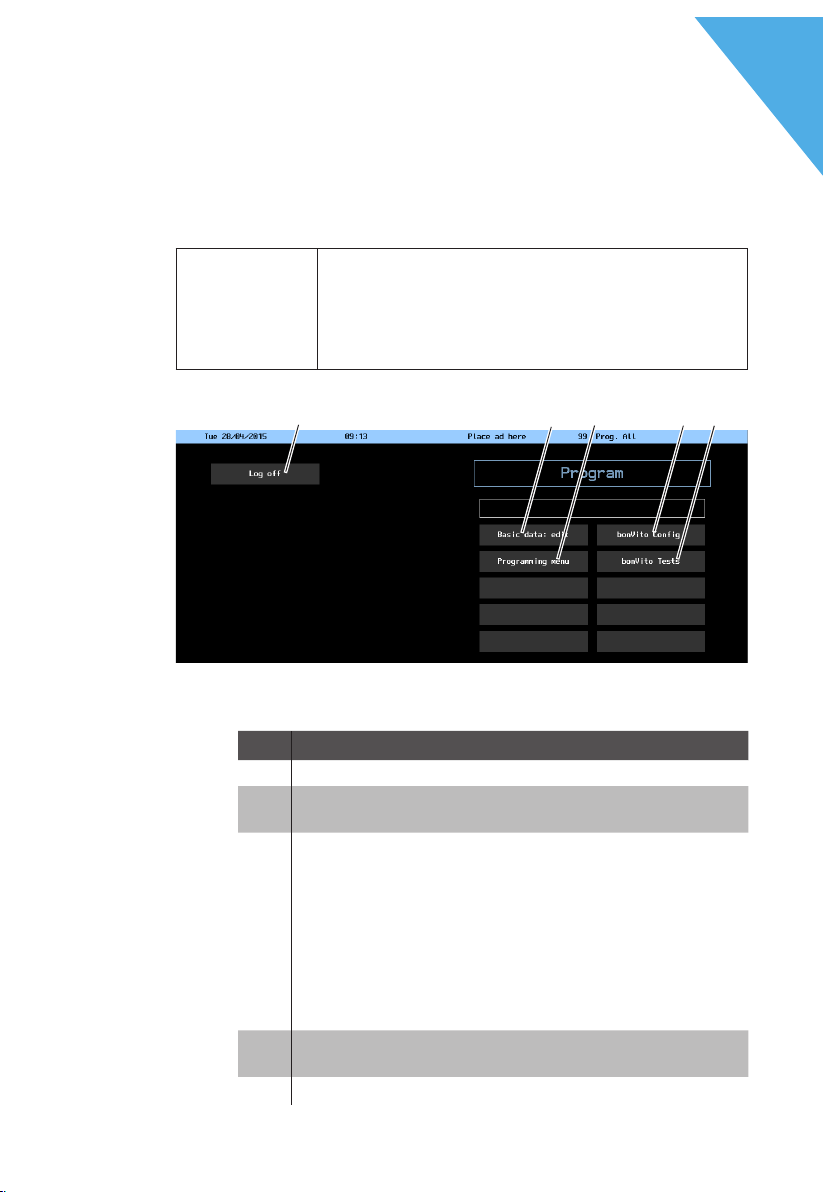
As soon as you log in as programmer the programming menu will
1 5432
be displayed.
Buttons that are mentioned in this chapter
are shown in chapter “13. Icons” on page
i
68.
D
Pos. Designation Description
1 Log out Log out of active operator.
2 Master data: Edit Configuration and change
3 Programming menu General POS system
4 bonVito Config. Configuration of bonVito
5 bonVito Tests Test of bonVito.
Fig. 18: Programming
of master data.
settings.
Your Duratec dealer
will support you should
you have questions
on programming or
will program the POS
system according to your
requirements.
(www.bonvito.net),
53
Page 54
DURATEC POS S15
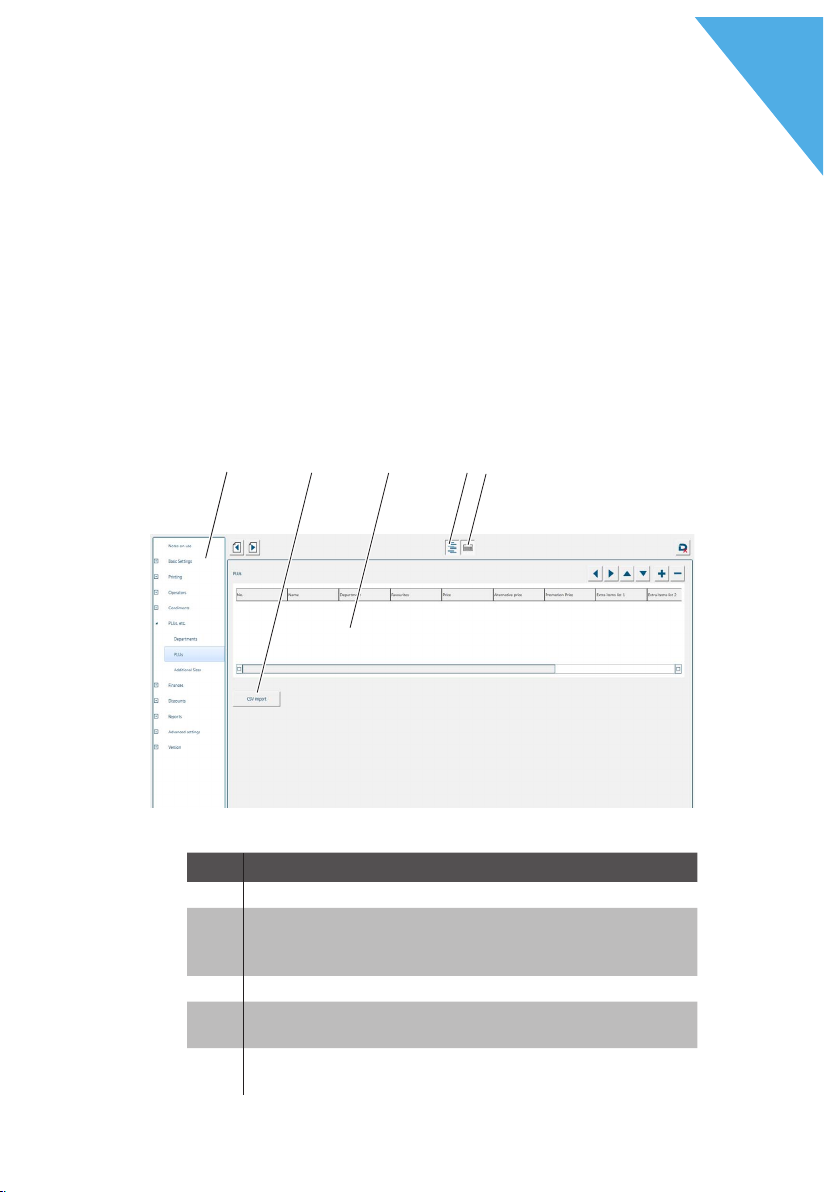
1 2 3 4 5
7.1 . Edit master data
This chapter explains the editing of master data by means
of an example in PLU programming (chips, ketchup,
mayonnaise and coke).
To explain the basic principles we will explain the required
basic settings.
• Select the menu item "Master data: Edit". The
programming mode opens.
D
Fig. 19: Programming mode
Pos. Designation Description
1 Navigation Select the input menu.
2 CSV import Data import via text file
3 Entries Data input.
4 Switching the navi-
gation on/off
5 Switching the key-
board on/off
54
Please contact your Duratec
dealer.
Page 55
7.1.1. Configure department
For this example, the departments "Drinks" and "Food" are
to be configured.
• In navigation select <PLUs etc.>.
The navigation under "PLUs etc." is now expanded and an
explanation is displayed in the input area.
• To configure departments select <Department> in the
navigation area or the button <next page> .
• To configure a new department press the button <new
record> .
• In column "Name" enter the department name.
• In column "Main group" press <0-(none)>.
D
• Press the down arrow .
• Select the required entry from the dropdown menu.
• Proceed accordingly to program the desired record.
55
Page 56
DURATEC POS S15
7.1 .2 . Configure PLUs
• To configure PLUs select <PLU> in the navigation area or
the button <next page> .
• Configure a new record by pressing the button <new
record> .
• In column "Name" enter "chips".
• In column "Department" press <0-(none).
• Press the down arrow.
• Select the required entry from the dropdown menu.
• Select a price.
• Proceed alike to configure the PLU "Coke".
D
56
We recommend indicating the size of
drinks.
i
Page 57
7.1 .3. Configuring extra items
• To configure side dishes, ways of preparation or other
PLU information select <extra items> in the navigation
area.
• Configure a new record by pressing the button <new
record> .
• In column "Name" enter "ketchup".
• In column "Price" enter the price.
• In column "to extra item selection" choose "yes".
• Proceed accordingly to configure the extra item
"mayonnaise".
7.1 .4. Configuring extra item lists
D
• To configure the extra item list select <extra item lists>
in the navigation area or the button <next page> .
• Configure a new record by pressing the button <new
record> .
• In column "Name" enter "sauces".
• Under "extra item 1" or "extra item 2" select one of the
configured extra items.
57
Page 58

DURATEC POS S15
7.1 .5. Assigning the extra item list
In order to offer sauces when booking chips assign the
respective extra item list to this PLU.
• In navigation select <PLUs>.
• Scroll down the list until the PLU "chips" appears.
• Scroll to the right up to column "extra item list 1".
• Enable the dropdown menu for selection of the extra
item list by pressing the respective cell.
• Select the extra item list "sauces".
7.1 .6. Save data
To save your changes select <End programming mode>
D
58
and then <save changes> .
You can now book the programmed PLUs in the
registration. When booking chips the sauces will be
displayed directly in a selection window. If no sauce is to
be added you can close the window without selection.
Page 59

8. Service and maintenance
8.1. Cleaning
A DANGER
Deadly shock caused by liquid entry.
X
Do not open Duratec POS S15 and
power supply.
X
s
8.1.1. Cleaning housing and display
Prior to cleaning shut down the
POS S15 as described in chapter
“10. Shutdown” on page 64 .
D
a
NOTICE
Aggressive cleansers can damage the
housing surface.
X
Do not use any scouring or
dissolving agents for cleaning.
If necessary clean the housing
surface with a smooth, lint-free
cloth.
X
In case of strong contamination
you can dampen the cloth with
water or with a mild, residue-free
cleanser.
59
Page 60

DURATEC POS S15
8.1.2. Cleaning the contacts
If necessary clean the contacts of the POS S15 with a
cotton bud and without applying pressure.
8.2. Maintenance
Your Duratec dealer is the contact partner for maintenance
work at the POS S15.
8.3. Contacting the customer service
s
A G EFAH R
Deadly shock caused by improper
repairs.
Some components can contain high
residual voltages which discharge
when touched.
X
Contact your Duratec dealer if POS
system components are damaged.
D
60
Page 61

9. Errors, possible reasons and troubleshooting
Errors Possible reasons Troubleshooting
The POS S15 cannot
be switched on.
The POS S15 does
not react to your
entries.
The POS S15 does
not react to your
entries.
The power supply
plug is not put into
a voltage-carrying
outlet.
The power supply
plug is not put into
the power connector
of the POS S15.
The Duratec POS
software has a malfunction.
The POS S15 POS
system is damaged.
The signed-in operator is not authorized
for the respectiv
function.
The touch screen is
not calibrated.
The Duratec POS
software has a malfunction.
Insert the safety plug of the
power supply to a
voltage-carrying
outlet.
Put the power supply plug into the
power connector
of the POS S15.
Reboot the POS
S15 as described
in chapter “6.1.3.
Rebooting the
POS S15” on page
31 .
Please contact
your Duratec
dealer.
Please contact
your Duratec
dealer.
Please contact
your Duratec
dealer.
Reboot the POS
S15 as described
in chapter “6.1.3.
Rebooting the
POS S15” on page
31 .
D
61
Page 62

DURATEC POS S15
Errors Possible reasons Troubleshooting
The POS S15
does not display
anything.
The POS S15 processes other entries
than those made on
the touch screen.
The sound reproduction of the POS
S15 does not work.
Faulty programming
of the POS S15 system.
The touch screen is
damaged.
The POS S15 POS
system is damaged.
The Duratec POS
software has a malfunction.
The screen saver is
active.
The POS S15 POS
system is damaged.
The touch screen is
not calibrated.
The touch screen is
damaged.
Loudspeakers are
connected to the
audio port but the
volume is too low.
Loudspeaker or audio port are damaged.
D
Please contact
your Duratec
dealer.
Please contact
your Duratec
dealer.
Please contact
your Duratec
dealer.
Reboot the POS
S15 as described
in chapter “6.1.3.
Rebooting the
POS S15” on page
31 .
Touch the screen
with the stylus or
with your fingers.
Please contact
your Duratec
dealer.
Please contact
your Duratec
dealer.
Please contact
your Duratec
dealer.
Remove the loudspeakers or increase the volume.
Please contact
your Duratec
dealer.
62
Page 63

Errors Possible reasons Troubleshooting
The operator lock of
the POS S15 does
not work.
The operator lock is
not plugged into the
connector.
Operator lock or operator lock connector
are damaged.
D
Plug in the operator lock.
Please contact
your Duratec
dealer.
63
Page 64
DURATEC POS S15
10. Shutdown
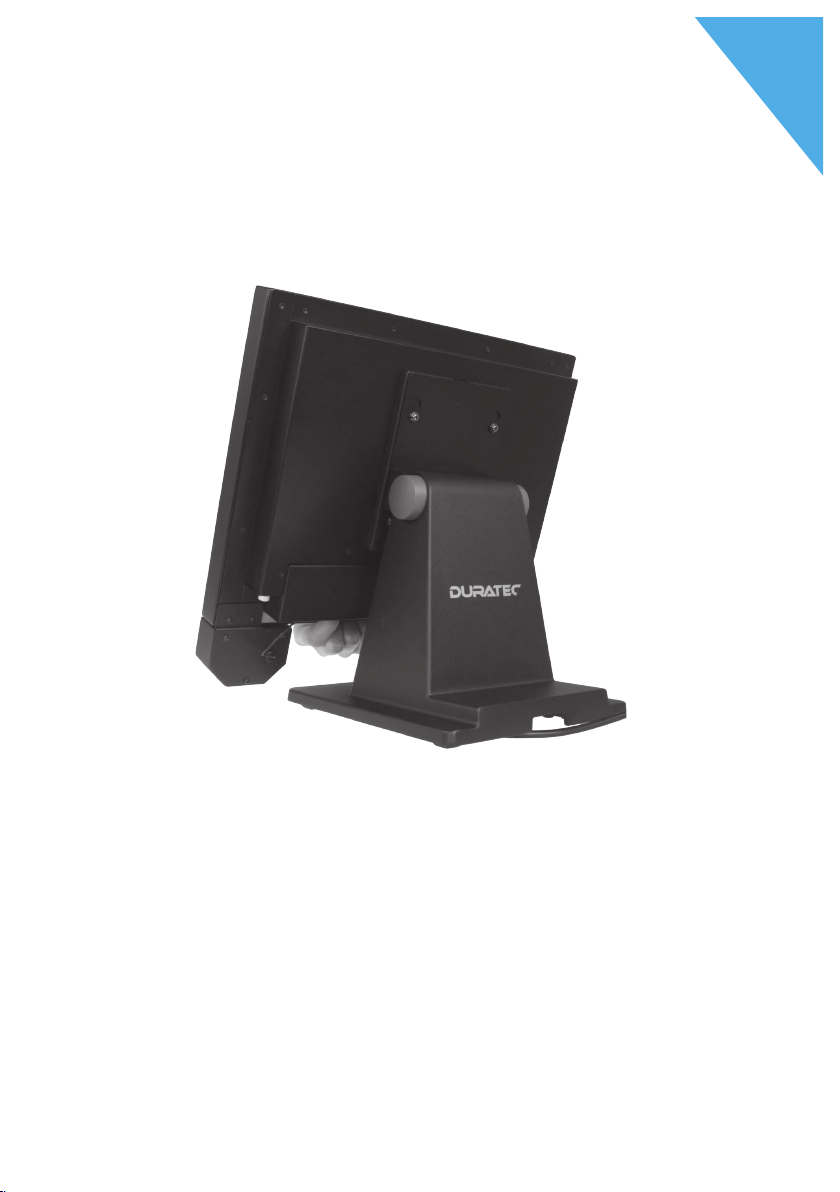
• Shortly press the on-/off key to switch off the POS S15.
D
64
Fig. 20: Switching off the POS S15
• Unplug the safety plug of the mains cable from the socket.
• Unplug all the cables that are connected to the POS S15, except
for that of operator lock and power line plug.
Page 65
NOTICE
Damage of display or housing caused by sharp
objects.
X
Remove all objects from the setup site.
a
• Place the POS S15 on a stable and even suface with sufficient
space.
D
Fig. 21: Unplug the mains cable
• Unplug the mains cable from the power supply connector.
• Pack the POS S15 and the mains cable in the original
packaging.
• Store the POS S15 in a room with temperature of between -10
to 50 °C.
65
Page 66

DURATEC POS S15
11. Disposal
Directive 2012/19/EU (WEEE)
Waste electric and electronic equipment must not
be disposed of together with domestic waste.
Vectron Systems AG takes back waste electric
and electronic equipment that has been used for
commercial purposes and that was produced by or
on behalf of the company. The company disposes
of the waste electric and electronic equipment
properly.
The legal take-back obligation applies for devices that were put
on the market after 13 August 2005. In addition, Vectron Systems
AG extends this obligation to all devices that have been put on the
market as of 1 January 2004.
D
66
Please send back waste electric and electronic equipment that
was produced by or on behalf of as well as their accessories in
the original packaging, marked "Waste electric and electronic
equipment" franco domicile to Vectron Systems AG.
WEEE-Reg.-Nr. DE 91733199
Page 67

12. Glossary
Term Definition
Button A button is programmed in the POS system and
Media Method for finalizing an invoice. Media are for
Flash memory Memory in which data is kept even after the
Icon Pictograph used in graphical user interfaces.
LCD Liquid Crystal Display.
POS Point Of Sale In this context the POS system
Thin Film
Transistor
(TFT)
GC server POS system, which in the ECR network takes
Touch screen Touch screen with entry function (finger or
X-repo r t Intermediate report, where data is kept in the
Z-r epor t Final report where the data is deleted from the
D
releases commands.
example cash- and credit card payment.
voltage supply was switched off.
When touching or clicking on icons you call
functions of the Duratec POS software.
station.
Electronic component for control of screens.
over the central guest check management.
stylus).
booking memory of the POS system.
booking memory.
67
Page 68
DURATEC POS S15
13. Icons
Icon Meaning
Duratec-Logo
Operator
Escape
Enter
Fakto r
D
68
Clear
Cash
Split table
Move table
Node in the navigation area (closed)
Node in the navigation area (open)
Error
Page 69
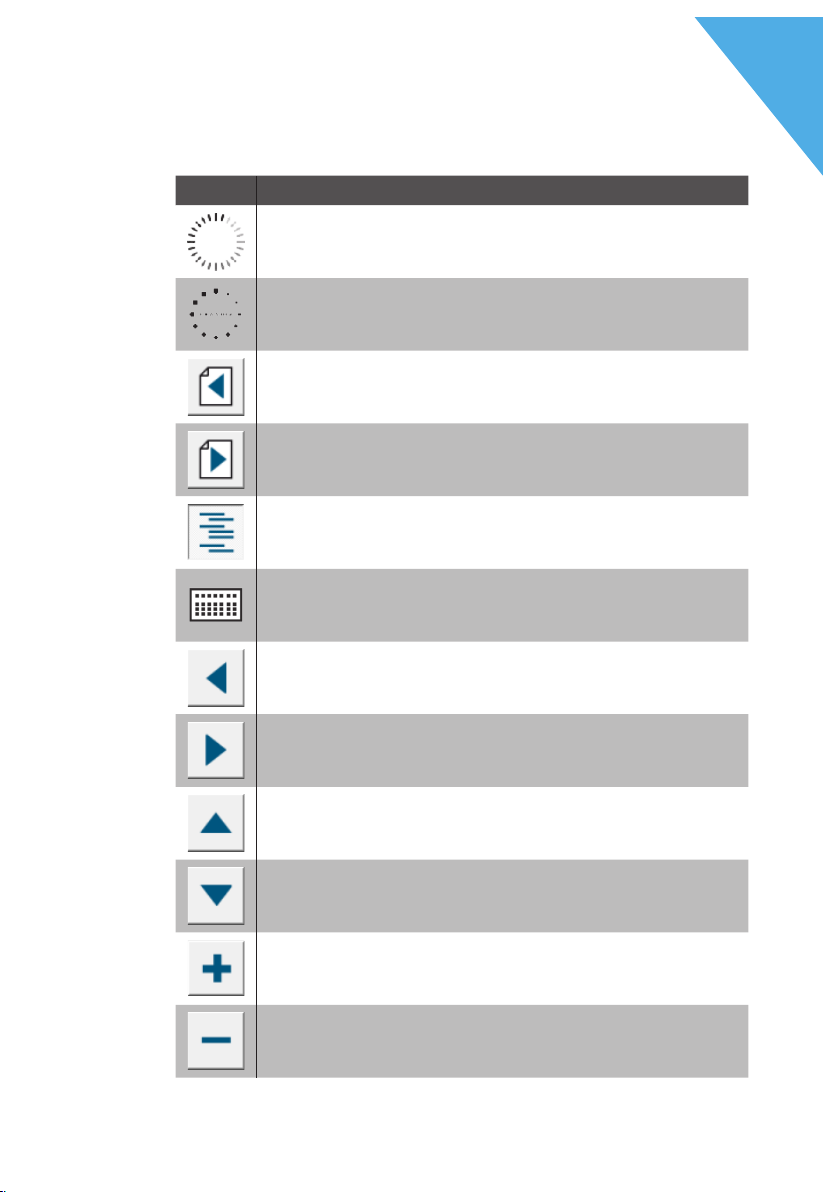
Icon Meaning
Normal waiting
Load
Previous page
Next page
Navigation tree fade in/out
Virtual keyboard fade in/out
D
Cell to the left
Cell to the right
Cell up
Cell down
New record
Delete record
69
Page 70
DURATEC POS S15
Icon Meaning
Quit and save changes
Quit without saving changes
Abort (without quitting the program)
Quit programming mode
D
70
Page 71

14. EU Declaration of Conformity
Manufacturer Vectron Systems AG
Willy-Brandt-Weg 41
D-48155 Münster
Device type Mobile POS system
Type designation Duratec POS S15
The manufacturer declares that the above designated product
complies with the fundamental standards of directives 2014/30/
EU and 2014/35/EU when used as directed.
Applied standards:
• EN 55022:2006 + A1:2007
• EN 55024:1998 + A1:2001 + A2:2003
• EN 60950-1:2006
• EN 61000-3-2:2006
• EN 61000-3-3:2008
D
Muenster, 30 March 2015
Jens Reckendorf
Member of the Board
Thomas Stümmler
Member of the Board
71
Page 72
DURATEC POS S15
15. Accessories
At this point we would like to inform you about the accessories
you can purchase for the POS S15.
For questions concerning our products please contact your Duratec dealer.
15.1. Stylus
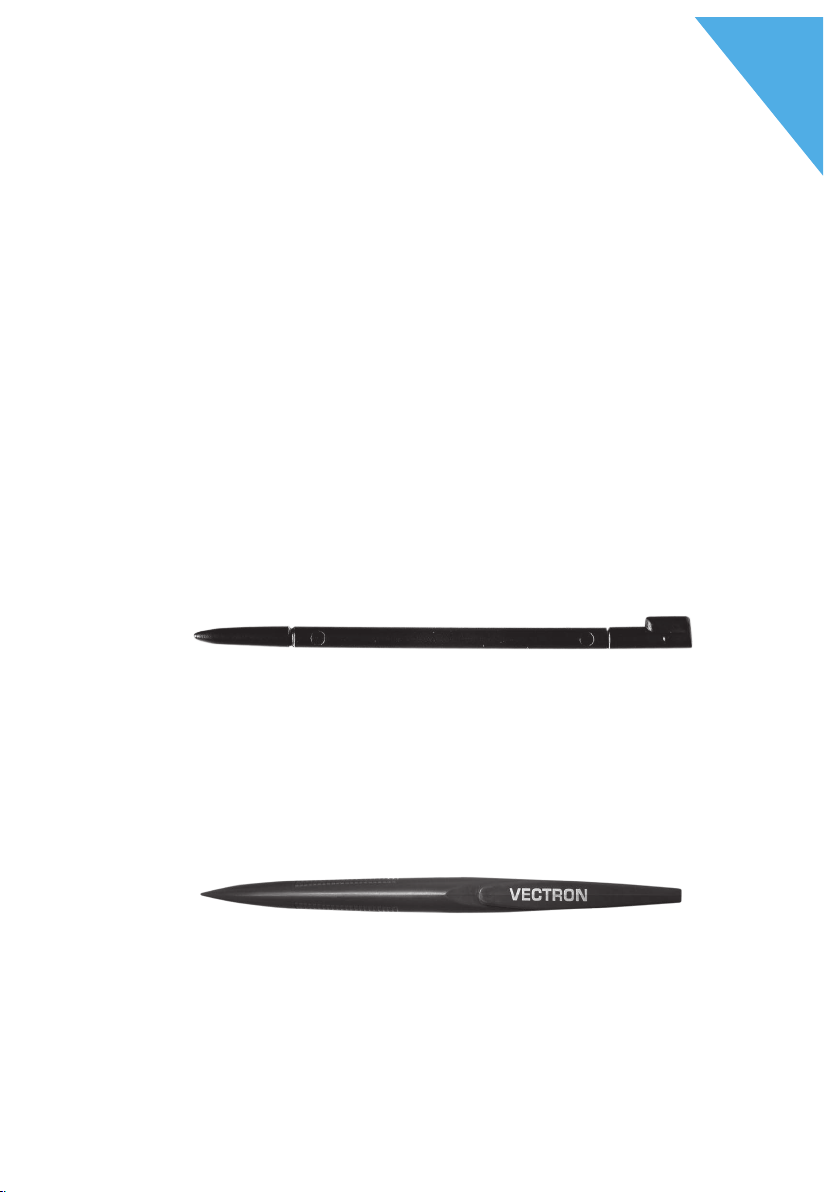
15.1.1. Stylus
The stylus serves for entering data via the touch screen of
the POS S15. The stylus is made of plastic.
D
72
Fig. 22: Stylus
15.1.2. Vectron stylus
The stylus serves for entering data via the touch screen of
the POS S15. The stylus is made of plastic.
Fig. 23: Vectron stylus
Page 73
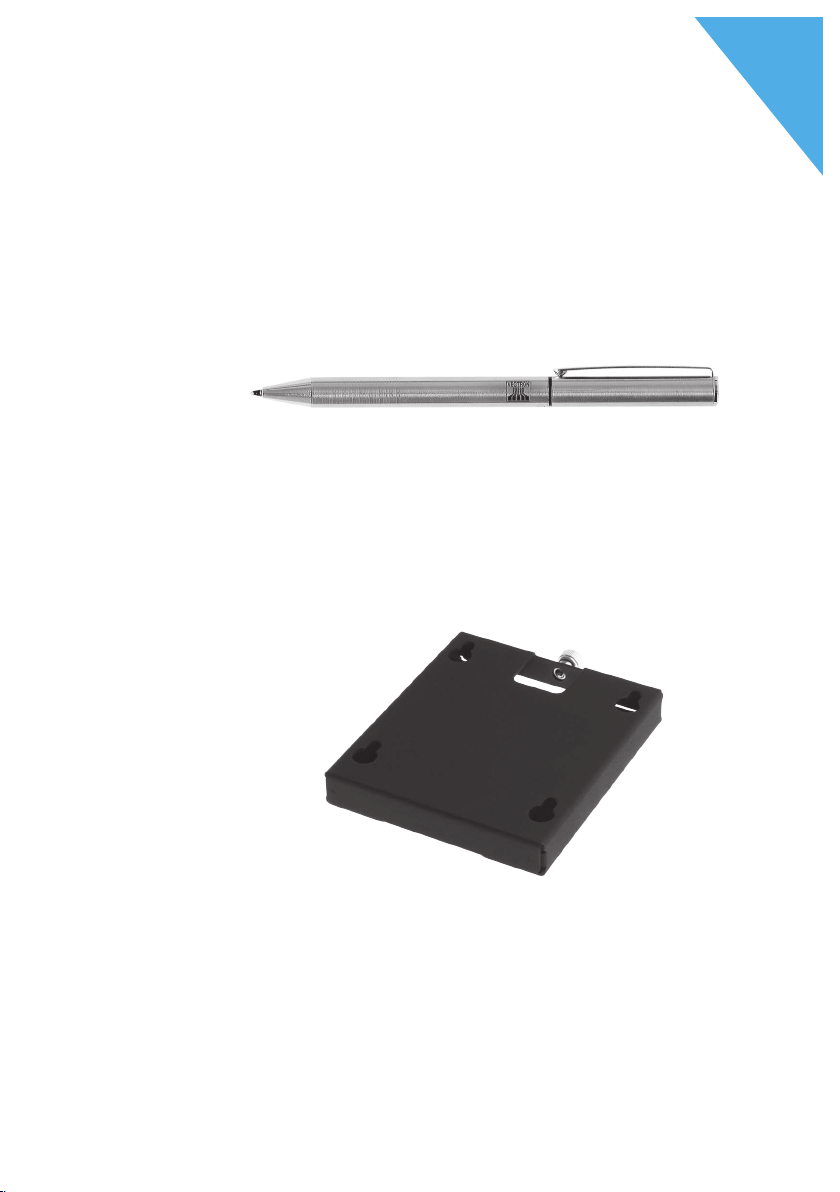
15.1.3. Multifunction stylus
The multifunction stylus serves for entering data via the
touch screen of the POS S15. The multifunction stylus has
an integrated ball pen refill. By turning the case you can
switch between writing- and touch function.
Fig. 24: Multifunction stylus
15.2. Wall mount
The optionally available wall mount serves for attaching
the POS S15 at a wall.
D
Fig. 25: Wall mount
73
Page 74

DURATEC POS S15
16. Other Duratec products
16.1. Duratec Control
Duratec Control software is Windows©-PC service
software which helps you program the POS system
conveniently from a PC. Furthermore, service functions
like data backup, data recovery and remorte maintenance
are available. With an additional licence you can extend the
software by reporting. For more information on Duratec
Control please see the respective data sheet.
16.2. Mobile App
The "Duratec MobileApp" supplements stationary Duratec
POS systems to provide a professional solution for taking
mobile orders, managing tables and invoicing in the
hospitality sector.
Expand the functions of your Duratec POS system by
mobile ordering, mobile table selection, mobile payments.
All you require is the Duratec MobileApp and one or
several iPodTouch, iPhone, iPadMini devices.
D
74
 Loading...