

Page 1
OWNER'S MANUAL
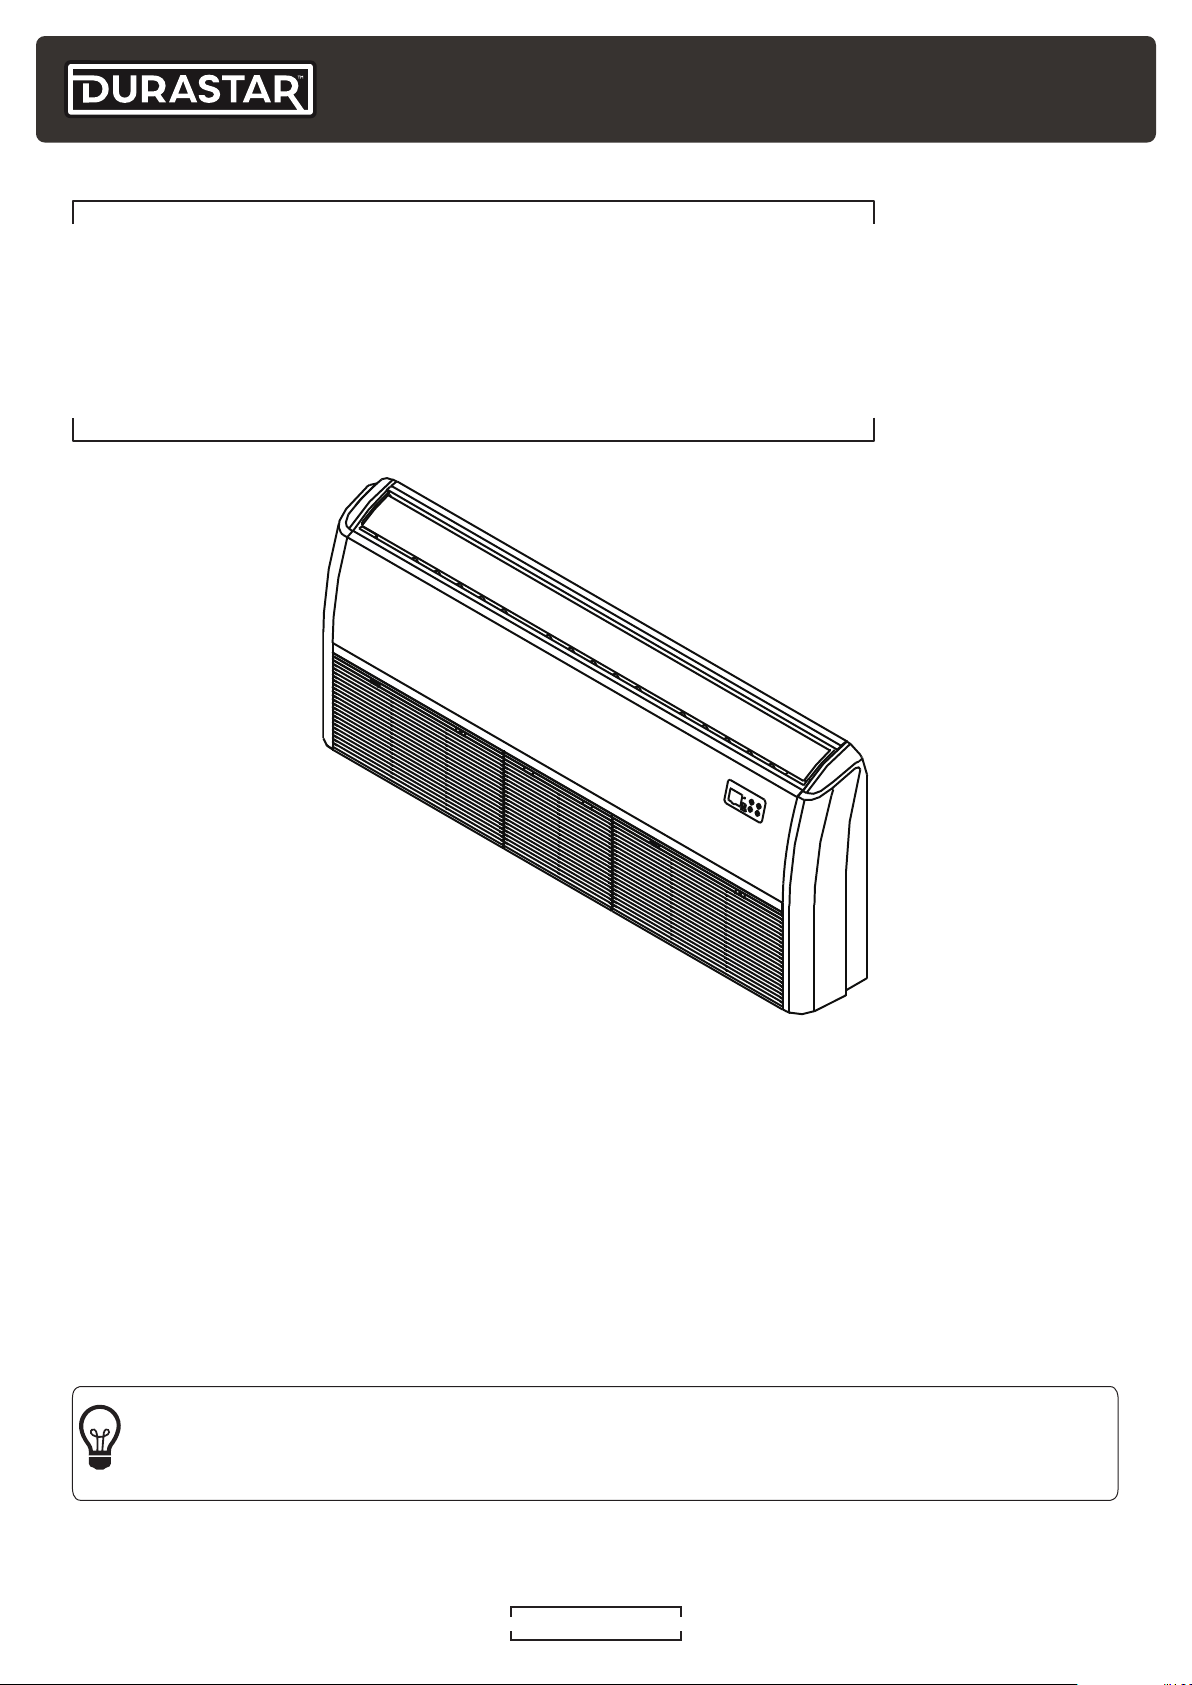
FLOOR/CEILING INDOOR UNIT
SPLIT-STYLE AIR CONDITIONER
DRAF18F1A, DRAF24F1A
Model Number:
Serial Number:
Purchase Date:
Installing Contractor Company Name:
TIP
Capture relevant information about your Durastar mini-split equipment before it is
installed and write it above for future reference.
FPO
DURASTAR.COM1
Page 2
TABLE OF CONTENTS
TABLE OF CONTENTS ....................................................................................................................................2
INTRODUCTION ..................................................................................................................................................3
WARNINGS ............................................................................................................................................................3
IMPORTANT SAFETY PRECAUTIONS .................................................................................................... 4
PARTS IDENTIFICATION ................................................................................................................................7
INDOOR UNIT ........................................................................................................................................................7
OUTDOOR UNIT .................................................................................................................................................. 7
INCLUDED ACCESSORIES ............................................................................................................................8
OPERATING TEMPERATURES ................................................................................................................... 9
REMOTE CONTROL .........................................................................................................................................10
OPERATING MODES ....................................................................................................................................... 11
ADVANCED FEATURES .................................................................................................................................12
MANUAL OPERATION (USE WITHOUT REMOTE) .........................................................................15
LOUVERED AIR FLOW ...................................................................................................................................16
CARE AND MAINTENANCE .........................................................................................................................17
TROUBLESHOOTING ......................................................................................................................................19
LIMITED WARRANTY - PARTS.................................................................................................................. 23
DURASTAR.COM2
Page 3
INTRODUCTION
To better serve you, please do the following before contacting customer service:
• If you received a damaged product, immediately contact the retailer or dealer that sold you the
product.
• Read and follow this owner's manual carefully to help you use and maintain your air conditioner.
• Read the troubleshooting section of this manual as it will help you diagnose and solve common
issues.
• Visit us on the web at www.durastar.com to download product guides and up-to-date
information.
• If you need warranty service, our friendly customer service representatives are available via
email at [email protected] or by telephone at 1-888-320-0706.
WARNINGS
Symbols Used in This Manual
The warning symbol indicates cautionary information for the user. Extra care and
precautions should be taken to ensure the user's safety.
The pencil indicates any manufacturer notes relating to surrounding content. These may
include further clarifications or call-outs.
A light bulb symbol indicates suggested manufacturer tips for the user to get the most
out of the Durastar equipment and to accommodate the best user experience.
DURASTAR.COM
3
Page 4
IMPORTANT SAFETY PRECAUTIONS
Improper handling can cause serious damage or injury. Please read the following safety
information in its entirety.
Operation, Cleaning, and Maintenance Safety Precautions
• Children and people with reduced physical, sensory, or mental capabilities, or lack of
experience and knowledge, should only use this air conditioner if they are given supervision or
instructions concerning use of the air conditioner in a safe way and understand the hazards
involved.
• Children should not play with the air conditioner.
• Never stick fingers or any other body parts into the air conditioner openings. The internal fan
may be rotating at high speeds, and may result in injury.
• After removing the filter, do not touch the fins in order to avoid injury.
• Maintenance must be performed by qualified professionals. Otherwise, you may experience
personal injury or damage to the air conditioner and surrounding property.
• Do not repair the air conditioner by yourself. It may cause electric shock or damage. Please
contact a qualified service representative when you need to repair the air conditioner.
• Do not block the air outlet or air inlet. This could cause a malfunction.
• Do not spill water on the remote control as this can permanently damage the remote.
• If the below problems occur, please turn off the air conditioner and disconnect power at the
circuit breaker immediately. Then contact your dealer or a qualified professional for service.
• The power cord is overheating or damaged.
• There is an abnormal sound during operation.
• The circuit breaker trips frequently.
• The air conditioner gives off a burning smell.
• The indoor unit is leaking.
• If the air conditioner operates under abnormal conditions, it may cause malfunctions, electric
shock, or fire hazard.
• When turning the unit on or off via the emergency operation switch, press the switch with an
insulated object other than metal.
• Do not step on the top panel of the unit, or put heavy objects on the top panel. This could
cause damage or personal injury.
• Cleaning and user maintenance should not be performed by children without supervision.
• Do not spray water on the indoor unit. This could cause electric shock or a unit malfunction.
• Do not use flammable materials such as hair spray, lacquer, or paint near the air conditioner as
they may catch fire.
• Do not operate the air conditioner in places near combustible gases. Emitted gases may
collect around the air conditioner and cause an explosion.
• Do not use fire or a hair dryer to dry the filter. This could cause a deformation or fire hazard.
• Do not wash the air conditioner with water as this could cause an electric shock.
• Disconnect the power supply by turning it off at the circuit breaker when cleaning the air
conditioner. Otherwise, you could risk electric shock.
DURASTAR.COM4
Page 5
Electrical Safety
• Only use the specified power cord. If the power cord is damaged, it must be replaced by the
manufacturer, its service agent, or similarly qualified persons in order to avoid a hazard.
• Keep the power plug clean. Remove any dust or grime that accumulates on or around the
plug. Dirty plugs can cause fire or electric shock.
• Do not pull the power cord to unplug unit. Hold the plug firmly and pull it from the outlet. Pulling
directly on the cord can damage it, which can lead to fire or electric shock.
• Do not connect the air conditioner to a multi-purpose socket. Doing so could cause a fire
hazard.
• Do not modify the length of the power supply cord or use an extension cord to power the unit.
• If the supply cord is damaged, it must be replaced by the manufacturer, a service agent, or a
similarly qualified person in order to avoid a safety hazard.
• Do not share the electrical outlet with other appliances. Improper or insufficient power supply
can cause fire or electrical shock.
• The product must be properly grounded at the time of installation, or electrical shock may
occur.
• For all electrical work, follow all local and national wiring standards and regulations. Connect
cables tightly, and clamp them securely to prevent external forces from damaging the
terminal. Improper electrical connections can overheat and cause fire, and may also cause
shock. All electrical connections must be made according to the Electrical Connection
Diagram located on the panels of the indoor and outdoor units.
• All wiring must be properly arranged to ensure that the control board cover can close
properly. If the control board cover is not closed properly, it can lead to corrosion and cause
the connection points on the terminal to heat up, catch fire, or cause electrical shock.
• The air conditioner’s circuit board (PCB) is designed with a fuse to provide overcurrent
protection. The specifications of the fuse are printed on the circuit board.
DURASTAR.COM
5
Page 6
Installation Safety
• Installation must be performed by an authorized dealer or specialist. Improper installation
can cause water leakage, electrical shock, or fire. (In North America, installation must be
performed in accordance with NEC and CEC requirements by authorized personnel only.)
• Installation must be performed according to the installation instructions. Improper installation
can cause water leakage, electrical shock, or fire.
• This air conditioner shall be installed in accordance with national and local wiring regulations.
• Contact an authorized service technician for repair or maintenance of this unit.
• Only use the included accessories, parts, and specified parts for installation. Using non-
standard parts can cause water leakage, electrical shock, fire, and can cause the unit to fail.
• Install the unit in a firm location that can support the unit’s weight. If the chosen location
cannot support the unit’s weight, or the installation is not done properly, the unit may fall and
cause serious injury and damage.
• Install drainage piping according to the instructions in the installation manual. Improper
drainage may cause water damage to your home and property.
• For units that have an auxiliary electric heater, do not install the unit within 1 meter (3 feet) of
any combustible materials.
• Do not install the unit in a location that may be exposed to combustible gas leaks. If
combustible gas accumulates around the unit, it may cause a fire.
• Do not turn on the power until all work has been completed.
• When moving or relocating the air conditioner, consult experienced service technicians for
disconnection and reinstallation of the unit.
Additional Precautions
• Turn off the air conditioner and disconnect the power if you are not going to use it for a long
time.
• Turn off and unplug the unit during storms.
• Make sure that water condensation can drain unhindered from the unit.
• Do not operate the air conditioner with wet hands. This may cause electric shock.
• Do not use this device for any other purpose than its intended use.
• Do not climb onto or place objects on top of the outdoor unit.
• Do not allow the air conditioner to operate for long periods of time with doors or windows
open, or if the humidity is very high.
DURASTAR.COM6
Page 7
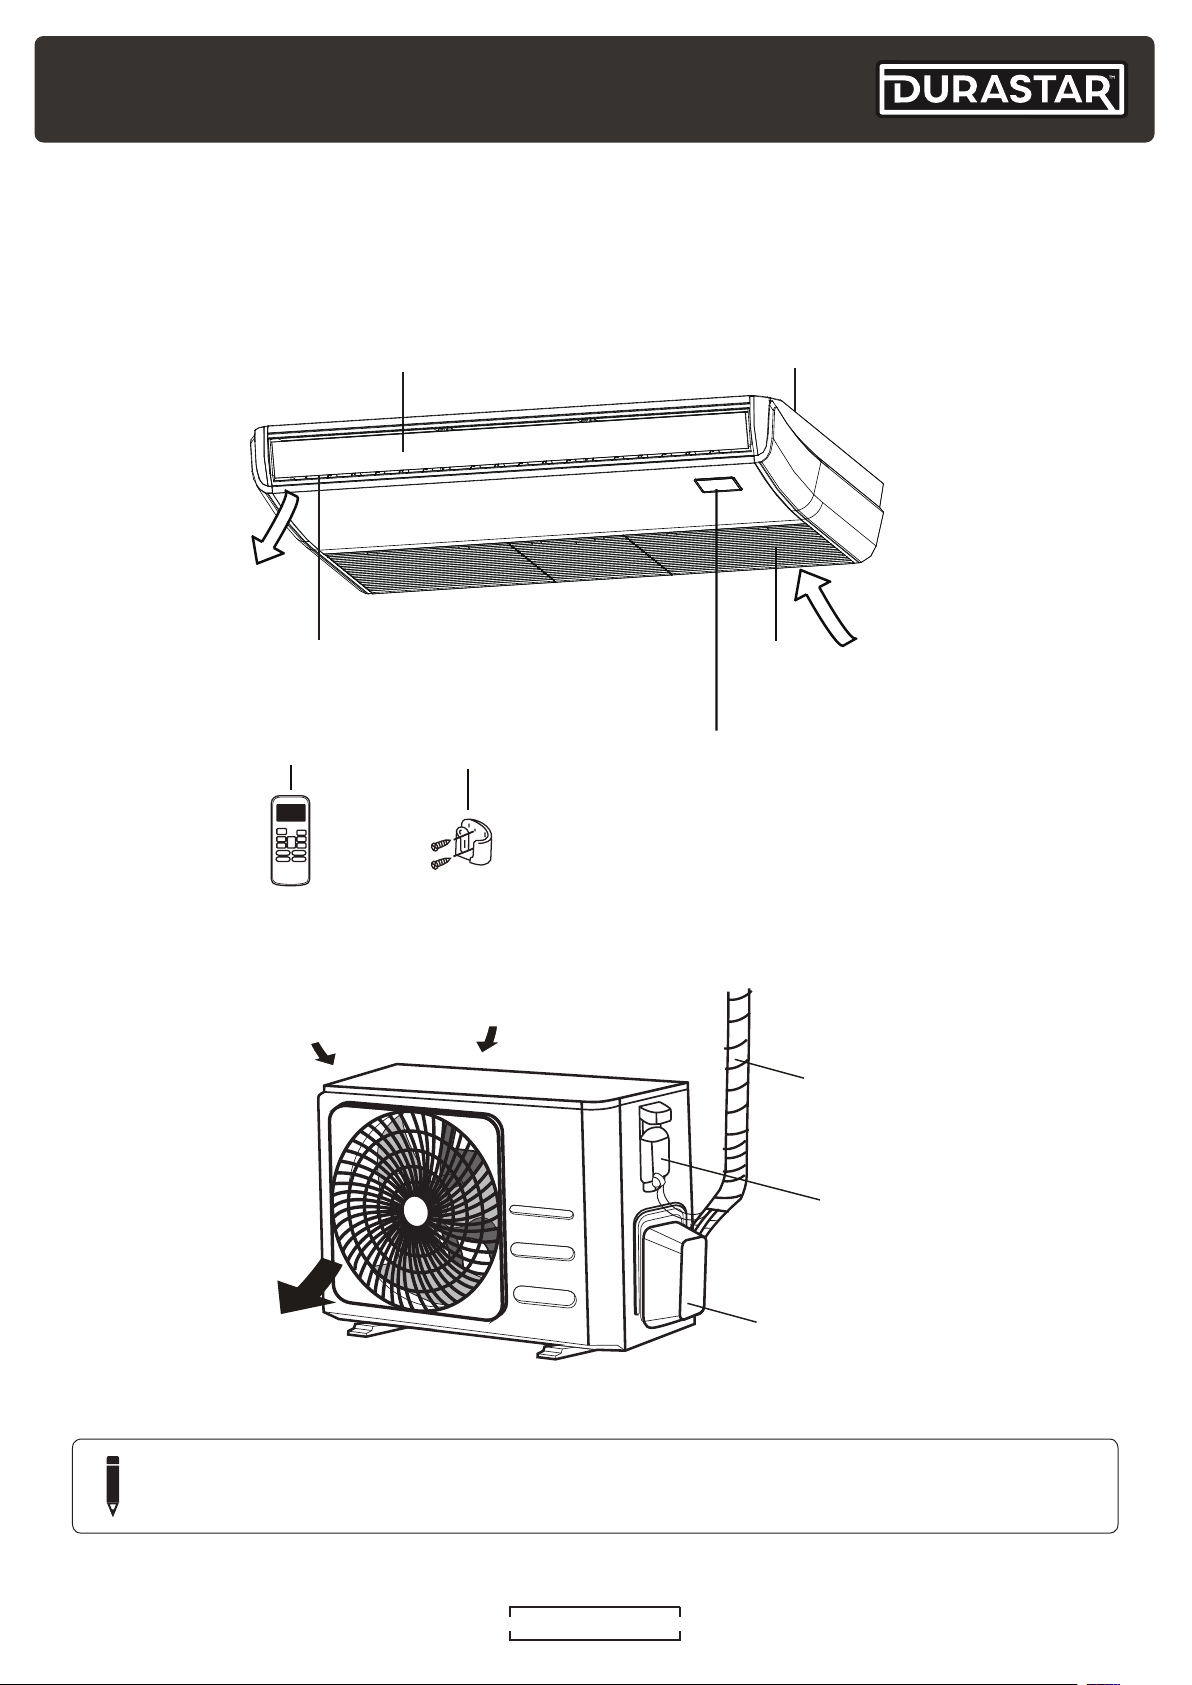
PARTS IDENTIFICATION
Signal Cable,
Louver
Installation Hooks (On Rear)
INDOOR UNIT
Remote
Control
OUTDOOR UNIT
Air Outlet
Remote Control
Air Inlets
Holder
Air Inlet
Control Panel
Refrigerant Pipes,
and Drain Hose
Wiring Terminal
Air Outlet
NOTE
Outdoor units may vary in appearance.
DURASTAR.COM
Valve Cover
7
Page 8
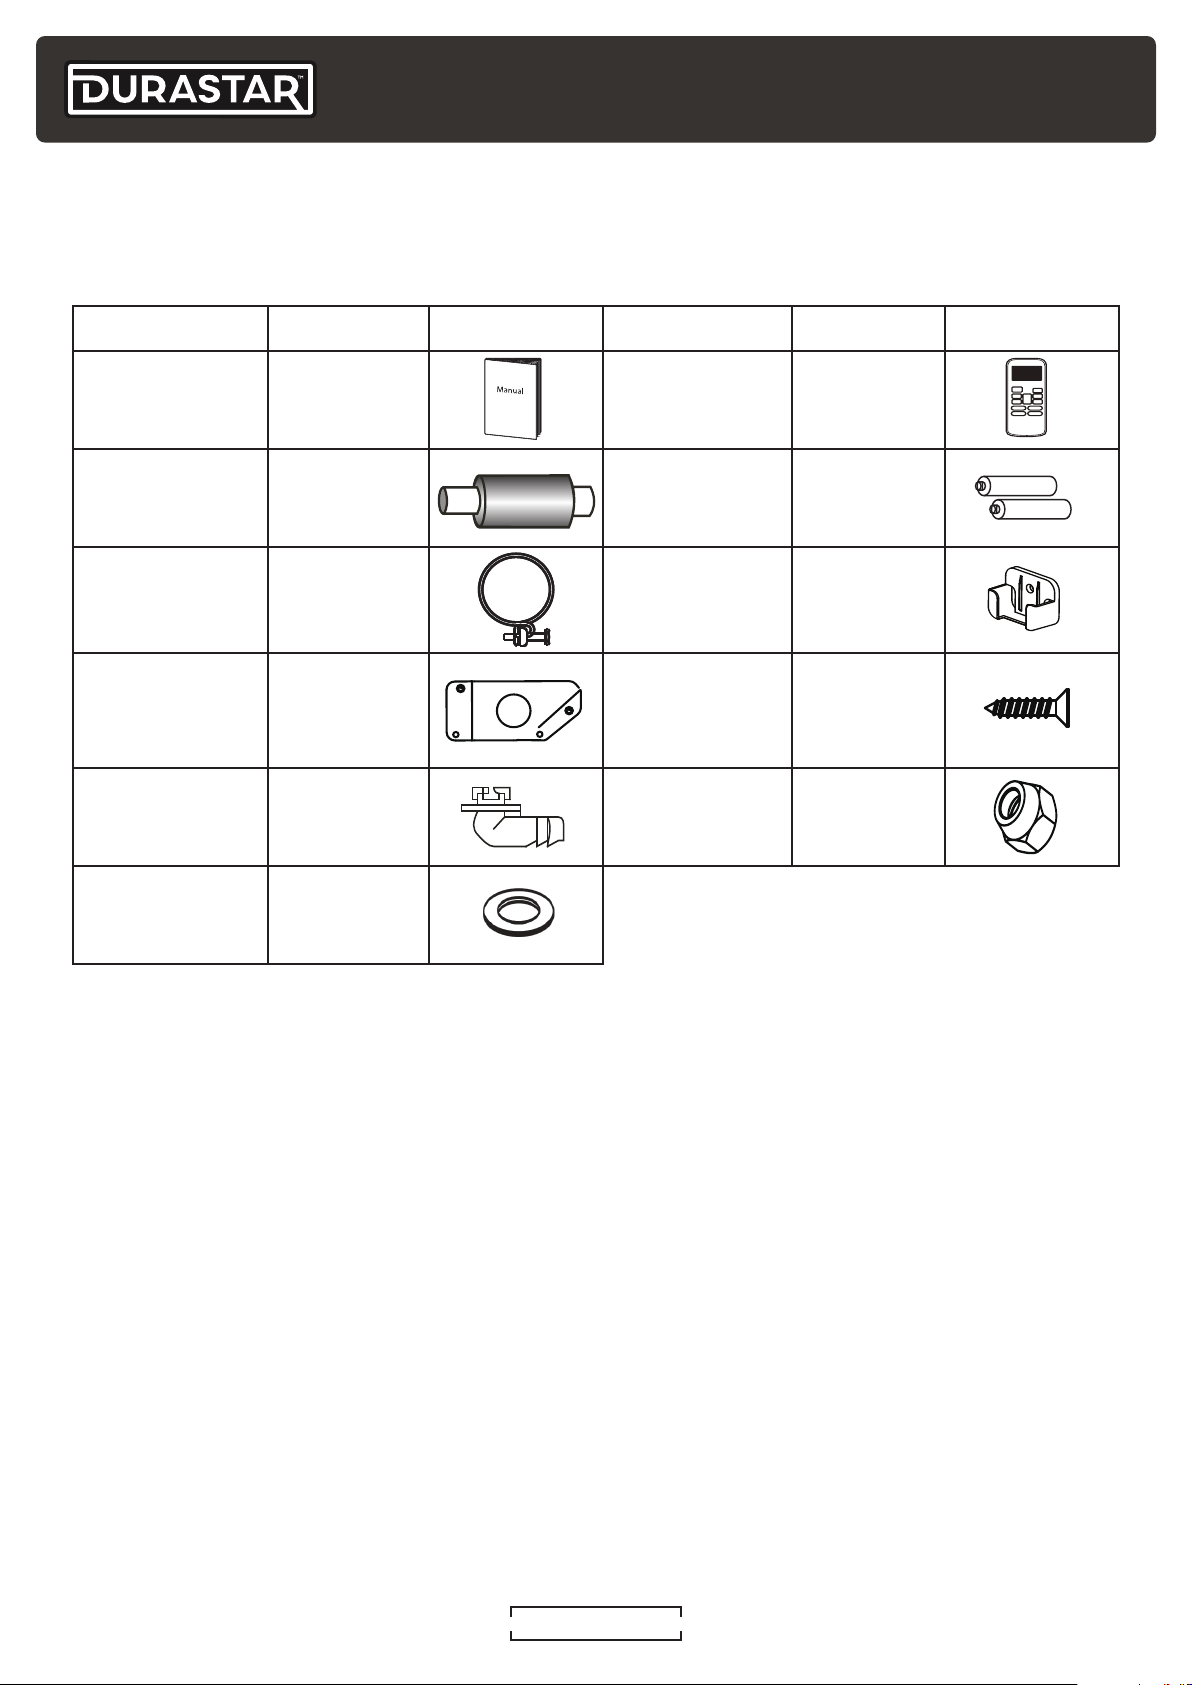
INCLUDED ACCESSORIES
The air conditioning system comes with the following accessories.
Accessory Quantity Image Accessory Quantity Image
Manual 1-2 Remote Control 1
Drain Pipe
Adapter
Drain Pipe
Worm Clamp
Conduit
Installation
Plate
Drain Joint 1 Copper Nut 2
Drain Joint Seal 1
1 Battery 2
2 Remote Control
Holder
1 Remote
Control Holder
Mounting Screw
1
2
DURASTAR.COM8
Page 9
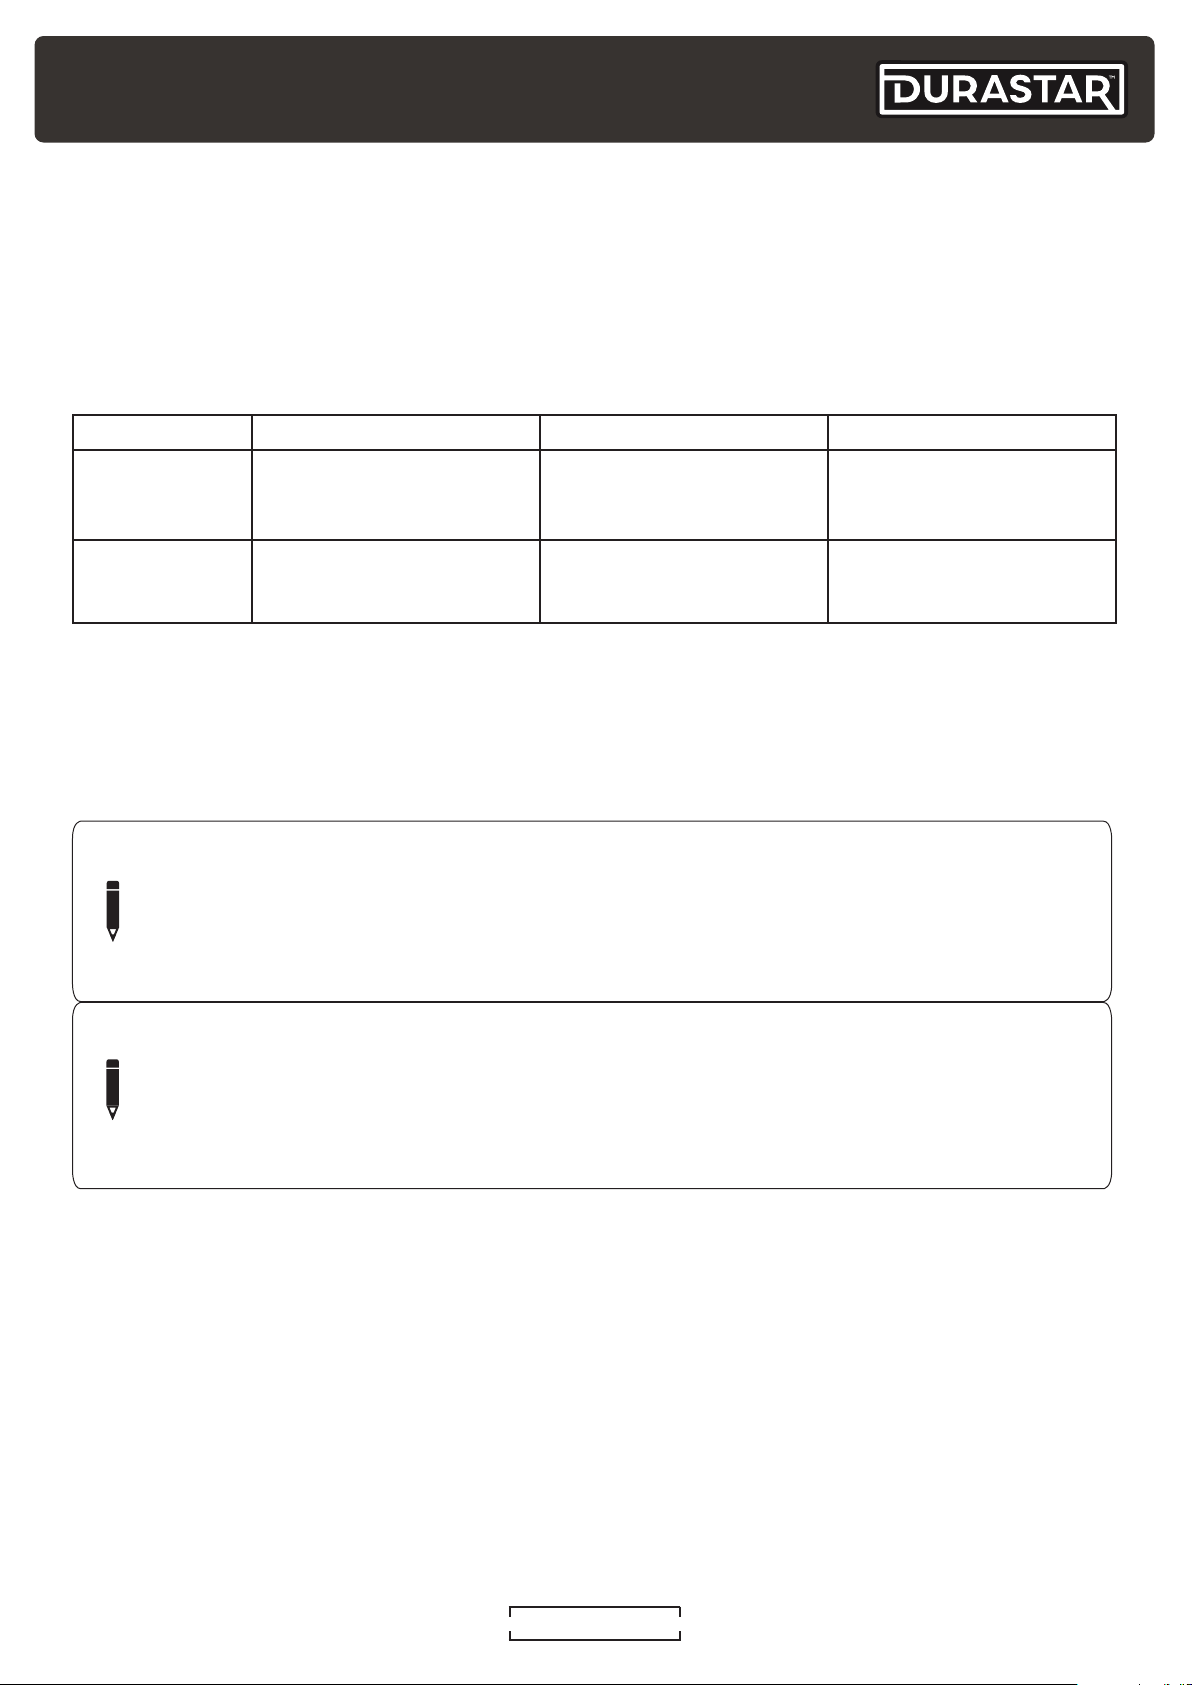
OPERATING TEMPERATURES
Your air conditioner is designed to operate in the following indoor and outdoor temperatures.
When your air conditioner is used outside of the following temperature ranges, certain safety
features may activate and turn off the unit to protect it from damage.
TEMPERATURE RANGES
COOL Mode HEAT Mode DRY Mode
Indoor Air
Temperature
Outdoor Air
Temperature
To further optimize the performance of your unit, do the following:
• Keep doors and windows closed.
• Limit energy usage by using TIMER ON and TIMER OFF features.
• Do not block air inlets or outlets.
• Regularly inspect and clean air filters.
NOTE
Your Durastar air conditioner's outdoor unit is equipped with a base pan heater, allowing
it to continue to operate at freezing temperatures as low as -13°F (-25°C). When outdoor
air temperatures are at or below 32°F (0°C), we strongly recommend keeping the unit
plugged in at all times to ensure smooth ongoing performance.
NOTE
62°F - 90°F
(17°C - 32°C)
-13°F - 122°F
(-25°C - 50°C)
32°F - 86°F
(0°C - 30°C)
-13°F - 86°F
(-25°C - 30°C)
50°F - 90°F
(10°C - 32°C)
32°F - 122°F
(0°C - 50°C)
Keep the room's relative humidity below 80%. If the air conditioner operates in excess
of this, the surface of the air conditioner may attract condensation. To help prevent
condensation from forming and dripping, set the vertical airflow louver to its maximum
angle (vertically to the floor) and set the fan to HIGH.
DURASTAR.COM
9
Page 10
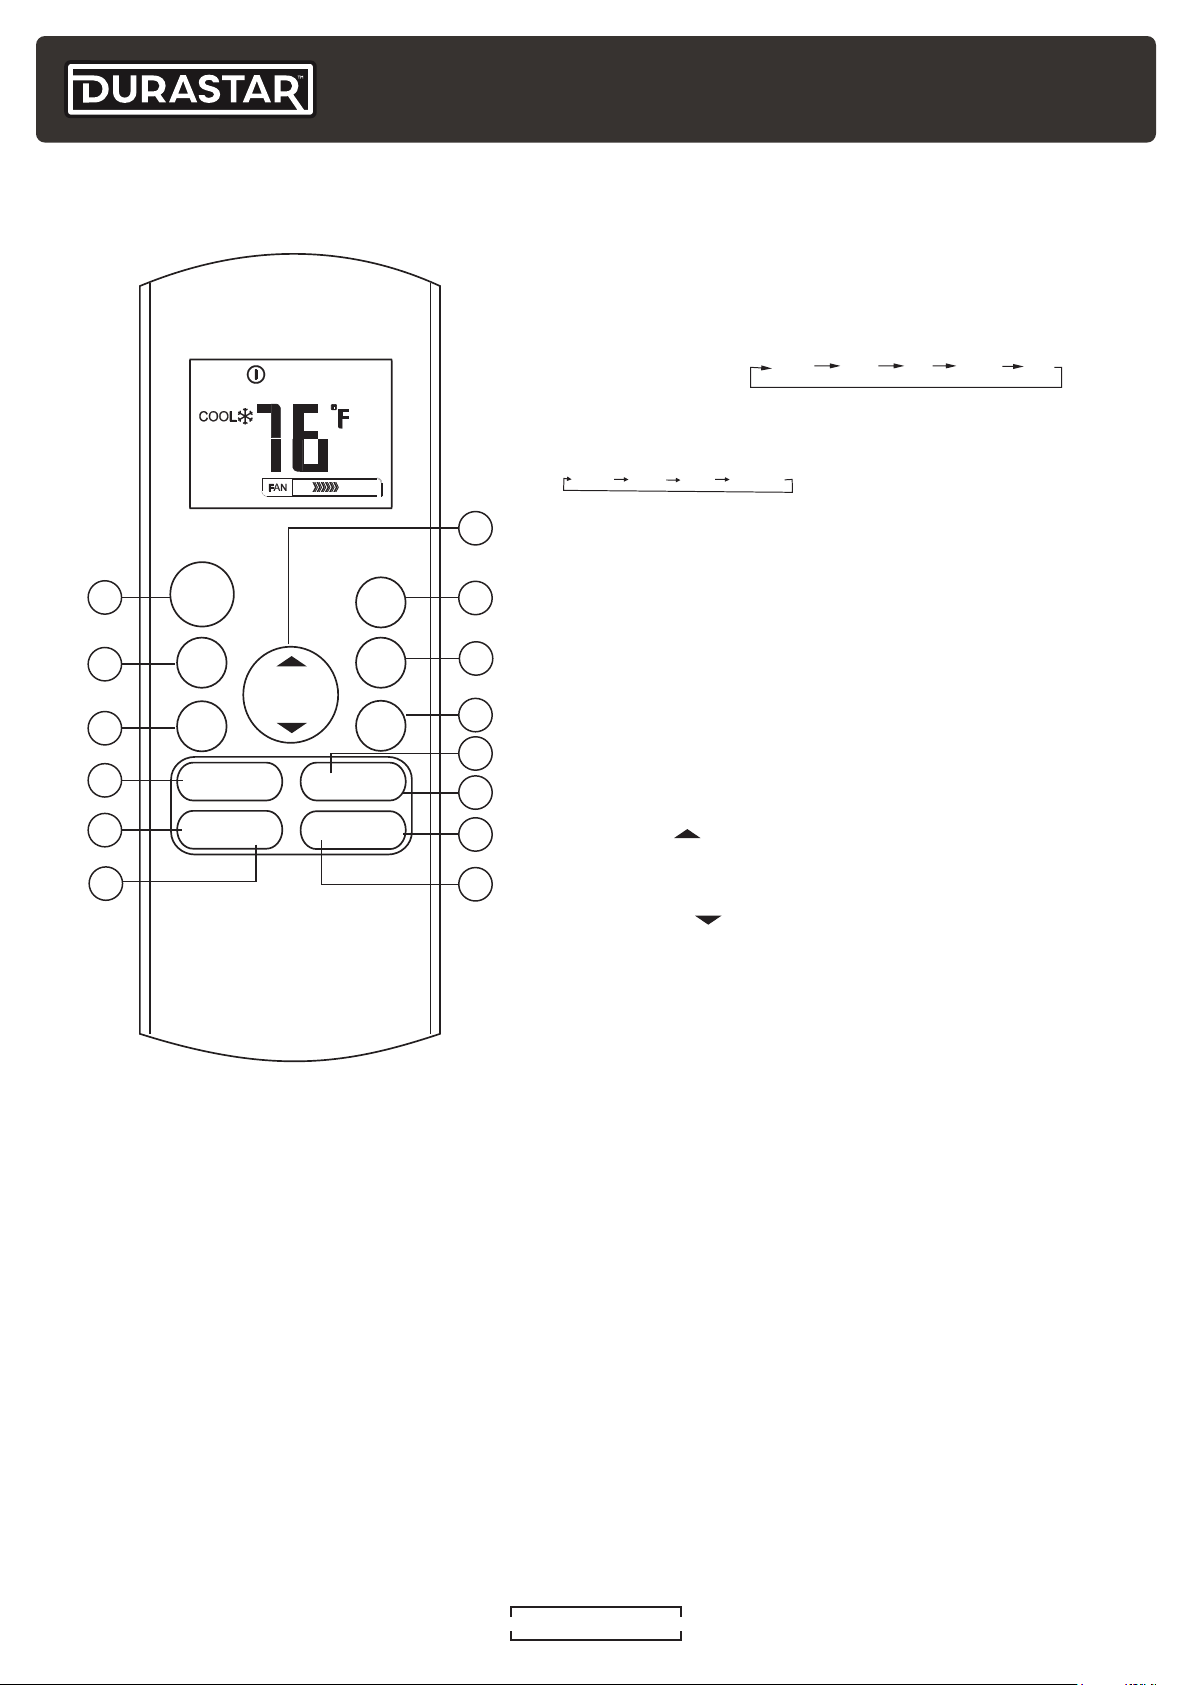
REMOTE CONTROL
AUTO LOW MED HIGH
1. ON/OFF Button
Turns the air conditioner ON and OFF.
2. MODE Button
Press to adjust the air conditioner MODE in the
following sequence:
AUTO
COOL
DRY
HEAT
3. FAN Button
Press to select the following FAN speeds:
FAN
7
4. SLEEP Button
See the "SLEEP" section under "Advanced Features."
1
ON /O FF
SI LE NC E
FP
8
5. TURBO Button
2
3
MO DE
TE MP
FAN
TI ME R
ON
TI ME R
OFF
9
10
11
4
5
SL EE P
TU RB O SEL F
CLE AN
SW IN G DIRE CT
LE D FOL LO W
ME
12
13
See the "TURBO" section under "Advanced Features."
6. SELF CLEAN Button
See the "SELF CLEAN" section under "Advanced
Features."
7. UP Button
Press to increase the set temperature in 1°F / 1C
6
14
increments.
DOWN Button
Press to decrease the set temperature in 1°F / 1C
increments.
8. SILENCE / FP Button
See the "SILENCE" and "FP" sections under
"Advanced Features."
9. TIMER ON Button
Press to initiate the TIMER ON feature. For details see the TIMER feature section of this manual.
10. TIMER OFF Button
Press to initiate the TIMER OFF feature. For details see the TIMER feature section of this manual.
11. SWING Button
Press to start and stop the automatic louver movement.
12. DIRECT Button
Press to change the louver angle. Each press will adjust the angle by 6°.
13. FOLLOW ME Button
See the "FOLLOW ME" section under "Advanced Features."
14. LED Button
Feature unavailable on this unit.
DURASTAR.COM10
Page 11
NOTE
The FAN speed cannot be adjusted in AUTO or DRY Mode.
NOTE
Press and hold the UP and DOWN buttons simultaneously for 3 seconds to switch
between F and C.
OPERATING MODES
SETTING TEMPERATURE
This unit can be set at any temperature between 62 and 86°F (17-30°C) in cool, heat, and dry
modes. You can increase or decrease the set temperature in 1°F (1°C) increments using the TEMP
up ( ) or TEMP down ( )button.
AUTO
In AUTO mode, the unit will automatically select the COOL, FAN, HEAT, or DRY modes to maintain
the set temperature.
1. Press the MODE button and select AUTO.
2. Set your desired temperature using the TEMP down or TEMP up button.
3. Press the ON/OFF button to start the unit.
COOL
1. Press the MODE button and select COOL.
2. Set your desired temperature using the TEMP down or TEMP up button.
3. Press the FAN SPEED button to select the fan speed: AUTO, LOW, MED or HIGH.
4. Press the ON/OFF button to start the unit.
FAN
1. Press the MODE button and select FAN.
2. Press the FAN SPEED button to select the fan speed: AUTO, LOW, MED or HIGH.
3. Press the ON/OFF button to start the unit.
NOTE
You cannot adjust the temperature in FAN mode. As a result, your remote control's LCD
display will not display a temperature.
DRY (DEHUMIDIFY)
1. Press the MODE button and select DRY.
2. Set your desired temperature using the TEMP down or TEMP up button.
3. Press the ON/OFF button to start the unit.
DURASTAR.COM
11
Page 12
HEAT
1. Press the MODE button and select HEAT.
2. Set your desired temperature using the TEMP down or TE MP up button.
3. Press FAN button to select the fan speed: AUTO, LOW, MED or HIGH.
4. Press the ON/OFF button to start the unit.
NOTE
As outdoor temperature drops, the performance of your unit’s HEAT function may be
affected.
NOTE
Two or more indoor units can be operated by one outdoor unit. However, two or more
indoor units cannot operate simultaneously when different operating modes have been
selected. If COOL/DRY/FAN is selected with one or more indoor units and HEAT with
another, the unit(s) in HEAT has priority.
ADVANCED FEATURES
TIMER
The TIMER feature establishes the amount of time that will elapse before the unit will
automatically turn on/off.
Press the TIMER ON button to initiate the auto-on time sequence. Each subsequent press of
this button will increase the setting in 30 minute increments up to 10 hours. Once the setting time
displays 10.0, each additional press will increase the setting in 60 minute increments. To cancel the
auto-timed program, simply adjust the timer to 0.0.
Press the TIMER OFF button to initiate the auto-off time sequence. Each subsequent press of
this button will increase the setting in 30 minute increments up to 10 hours. When the setting time
displays 10.0, each additional press will increase the setting in 60 minute increments. To cancel the
auto-timed program, simply adjust the timer to 0.0.
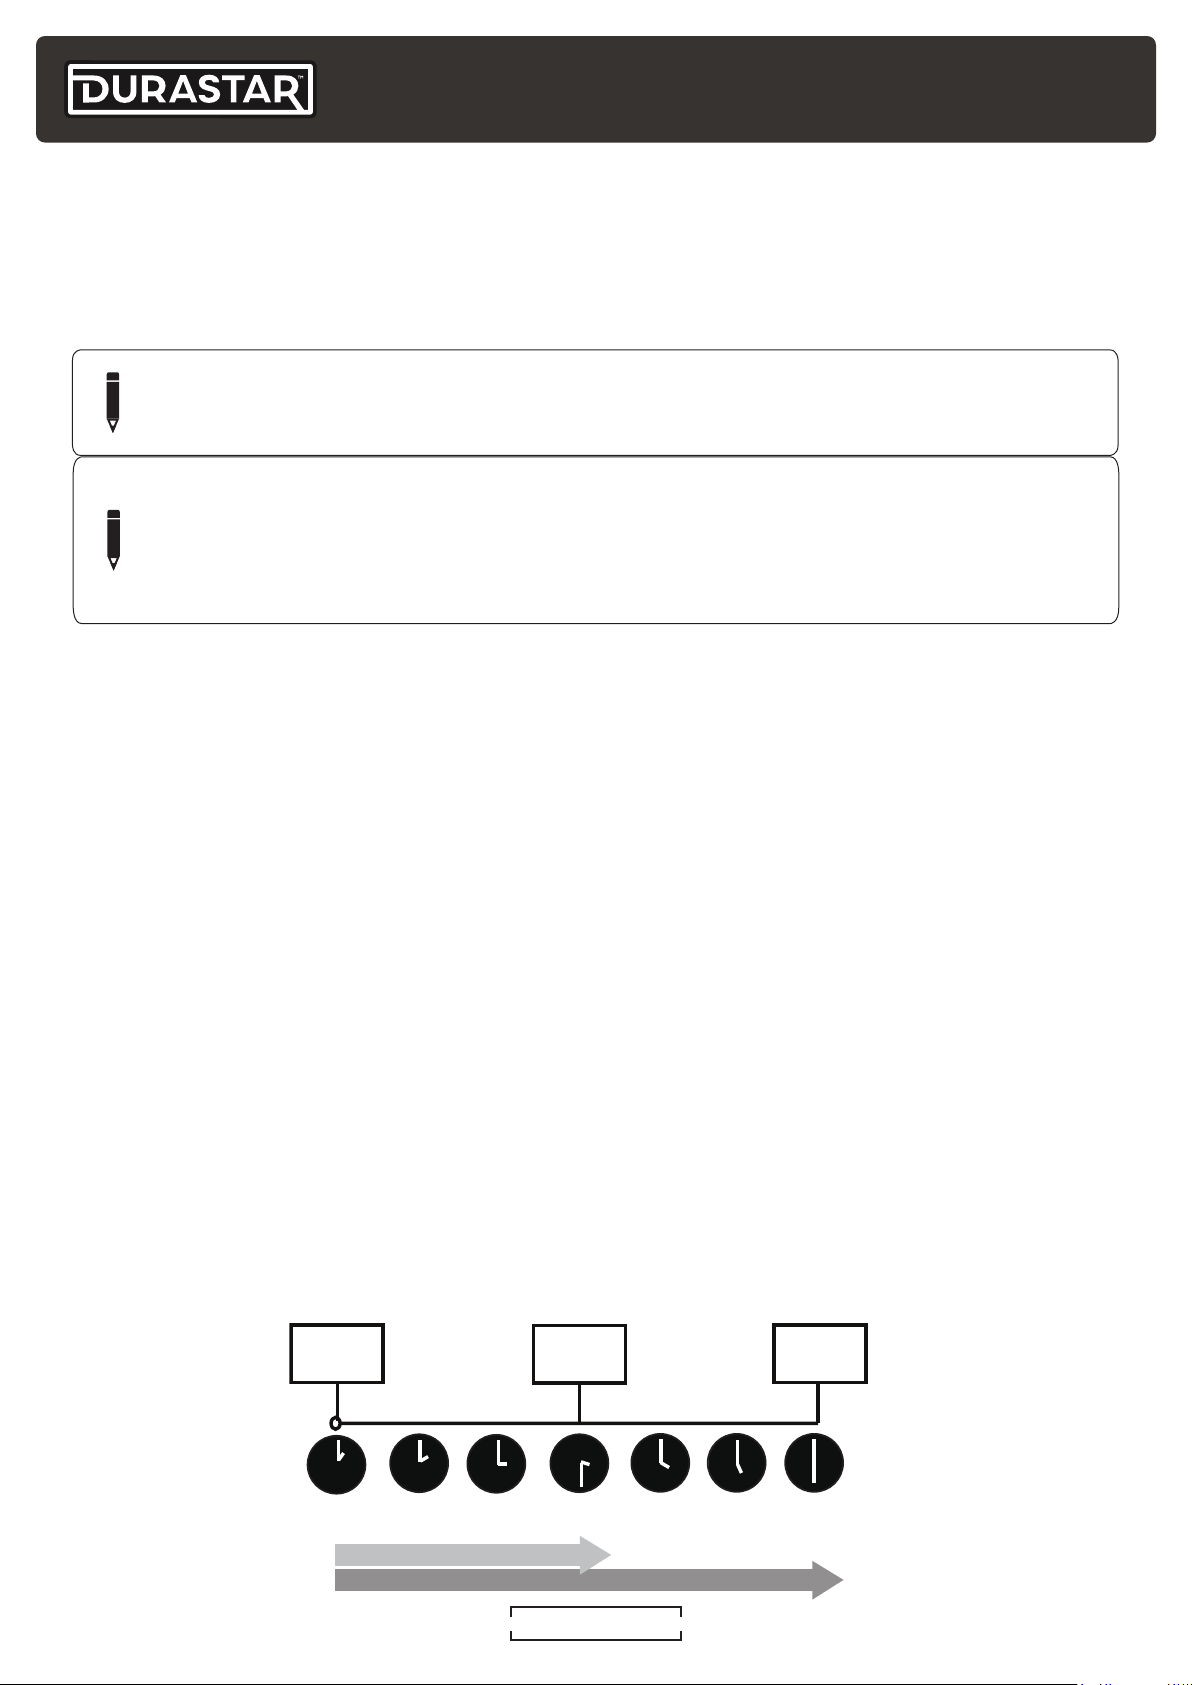
TIMER ON and OFF setting example.
Keep in mind that the time periods you set for both the on and off feature refers to hours after the
current time.
If the current time is 1:00 PM and the TIMER ON setting is adjusted to 2.5 hours, the auto-on time
sequence will turn the air conditioner on 2.5 hours later at 3:30 PM. Setting the TIMER OFF autooff sequence to 5.0 hours will turn off the air conditioner 5 hours later at 6:00 PM.
Timer starts
Unit turns
ON
Unit turns
OFF
Current Time
1:00PM
2:00PM 3:00PM
2.5 hours later
5 hours later
3:30PM
DURASTAR.COM12
4:00PM
5:00PM
6:00PM
Page 13
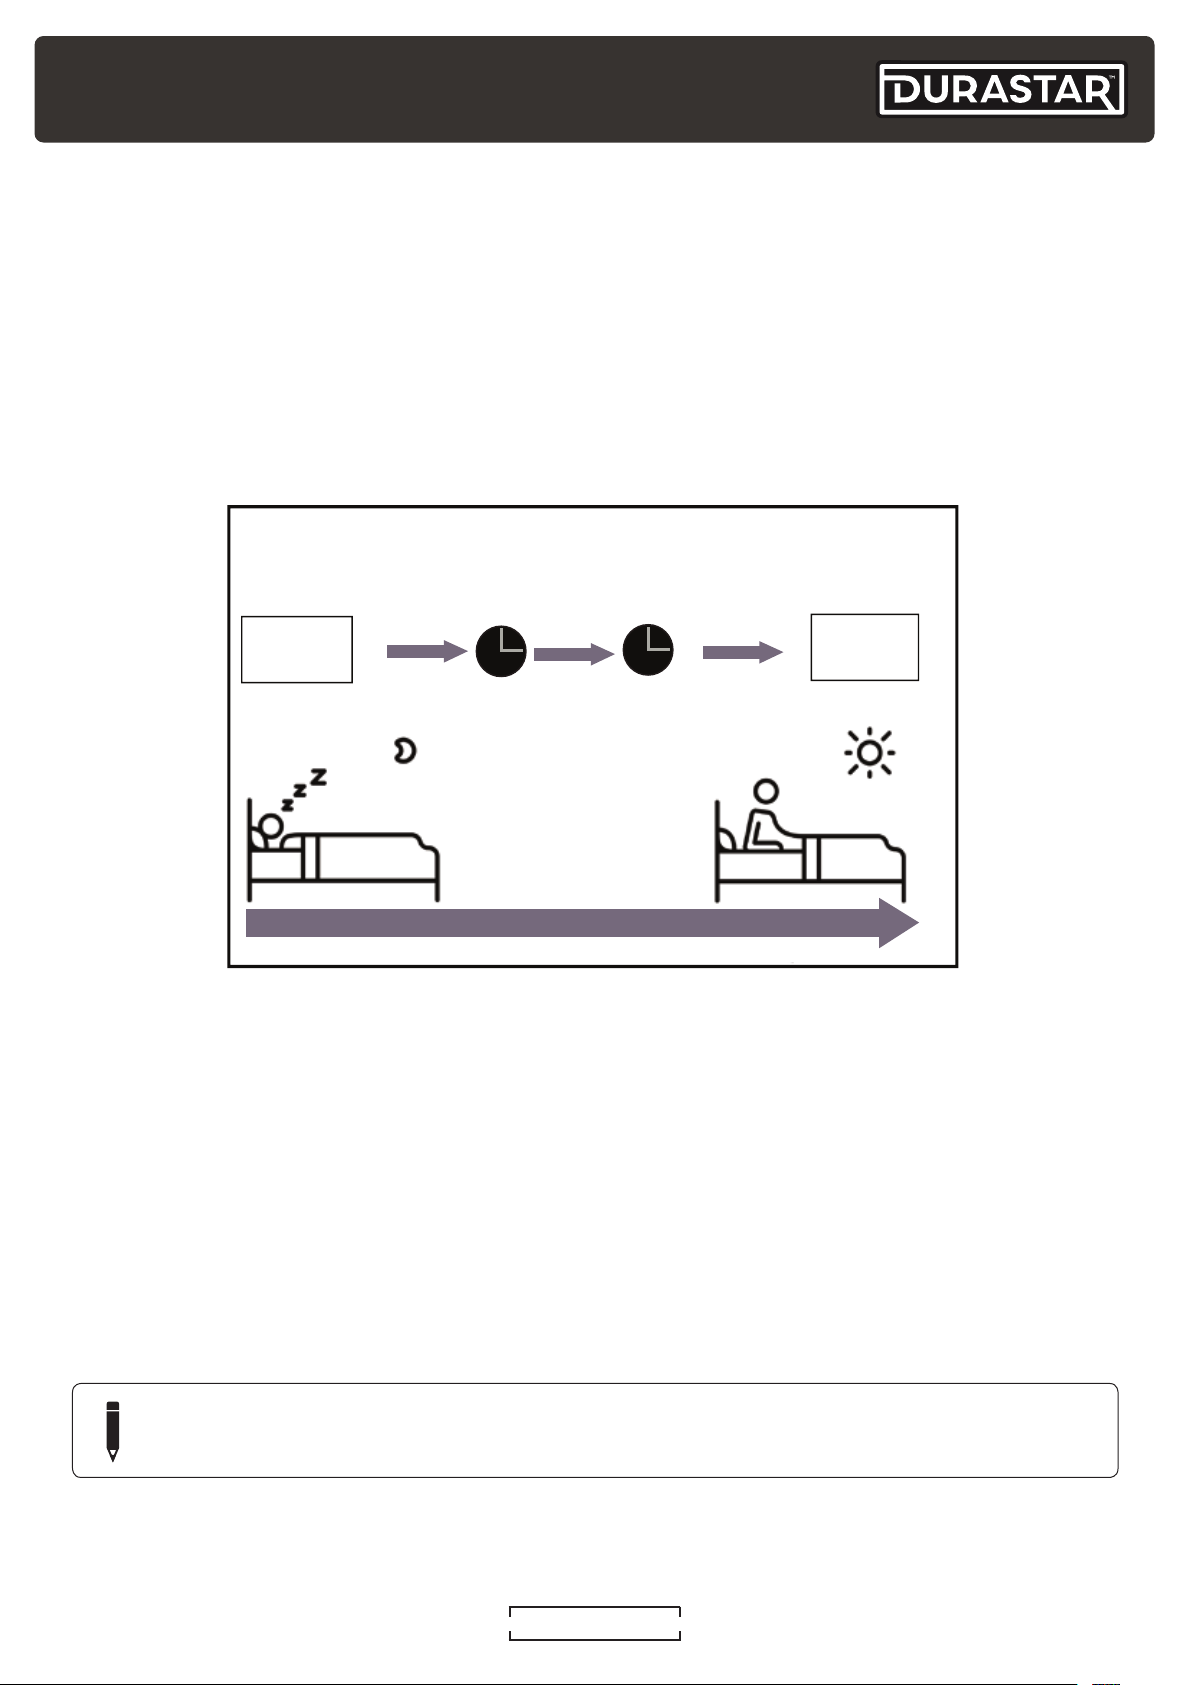
SLEEP
Set
Temperature
1hr
1hr
Keep
Running
SLEEP Operation
Saves energy during sleep
In HEAT mode, temperature adjusts
(-1°C/2°F) per hour for the first two hours
In COOL mode, temperature adjusts
(+1°C/2°F) per hour for the first two hours
The SLEEP feature is designed to decrease energy use while you sleep. This feature can only be
activated by remote control. The SLEEP feature is not available in FAN or DRY mode.
Press the SLEEP button when you are ready to go to sleep. When in COOL mode, the unit will
increase the temperature by 2°F (1°C) after 1 hour, and will increase an additional 2°F (1°C) after
another hour. When in HEAT mode, the unit will decrease the temperature by 2°F (1°C) after 1
hour, and will decrease an additional 2°F (1°C) after another hour.
The SLEEP feature will turn off after 8 hours and the system will return to normal functioning.
TURBO
Press the TURBO button to turn this feature on and off. The TURBO feature enables the unit to
reach the set temperature in the shortest time by automatically controlling the fan speed. This
feature is only available in COOL and HEAT modes.
SELF CLEAN
Airborne bacteria can grow in the moisture that condenses around heat exchanger in the unit.
With regular use, most of this moisture is evaporated from the unit. By pressing the CLEAN button,
your unit will clean itself automatically. After cleaning, the unit will turn off automatically. Pressing
the CLEAN button mid-cycle will cancel the operation and turn off the unit. You can use CLEAN as
often as you like.
NOTE
You can only activate the SELF CLEAN function in COOL or DRY modes.
DURASTAR.COM
13
Page 14
SILENCE
Press the SILENCE / FP button to turn on and off the SILENCE feature. When the SILENCE feature
is activated, the compressor will slow and the indoor unit will turn the fan to low. This will reduce
the noise of the indoor unit to the lowest level. Due to the slow operation of the compressor, it
may result in insufficient cooling and heating capacity.
FP
Press and hold the SILENCE / FP button for 2 seconds to start the FP feature. This feature is only
available in HEAT mode.
The FP feature sets the indoor temperature to 46°F (8°C). The unit will maintain this temperature
and prevent indoor pipes and household items from freezing when the house is unoccupied for
long periods of time in the winter. Press and hold this button again to turn off the feature.
FOLLOW ME
This feature uses the temperature at the remote's location, instead of the indoor unit's location,
to optimize the temperature around you and ensure maximum comfort. Press the FOLLOW
ME button to turn on this feature and the remote will display the temperature at its location.
When using AUTO, COOL, and HEAT modes the air conditioner will continue running until the
temperature at the remote’s location is satisfied. Press the FOLLOW ME button again to turn off
this feature.
AUTO-RESTART
The auto-restart feature is enabled when power is interrupted to the unit. After power is restored,
the unit will automatically return to its prior settings before power was lost. No buttons need to be
pressed to set this feature - it is automatic.
DURASTAR.COM14
Page 15
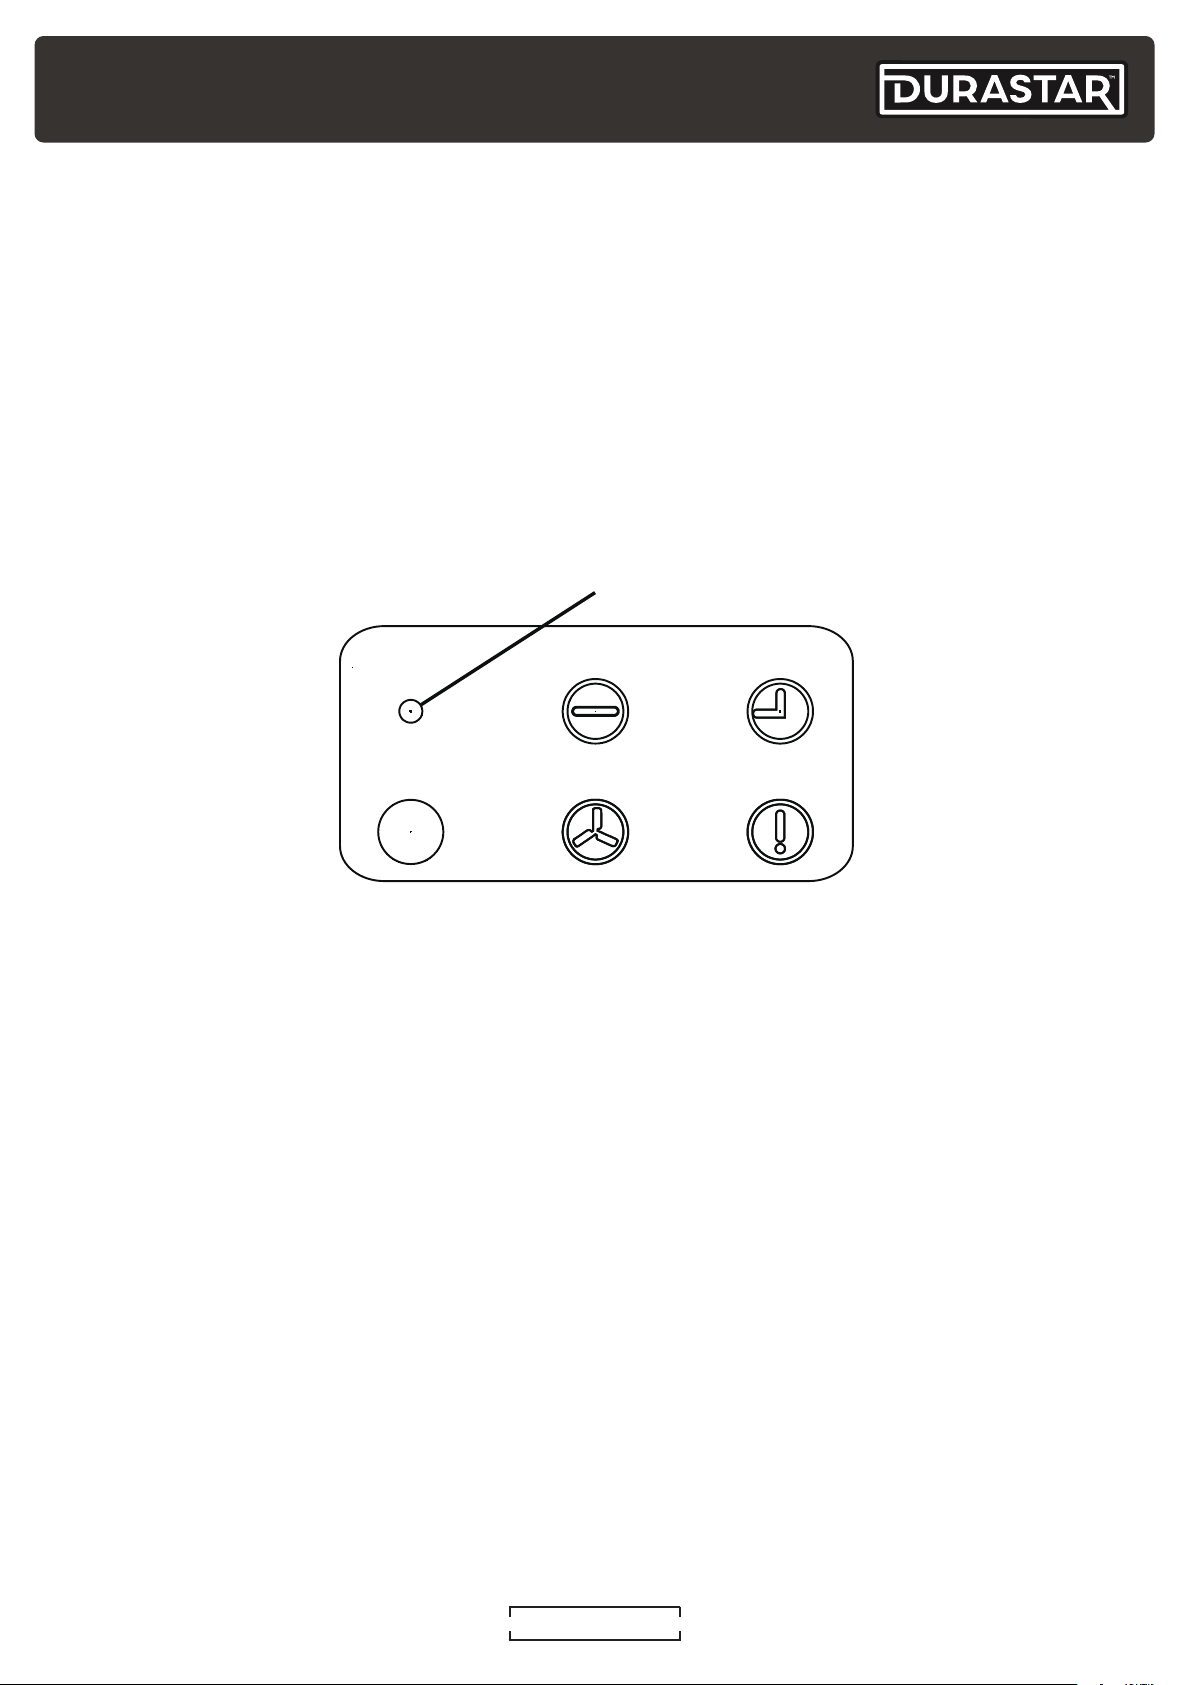
MANUAL OPERATION (USE WITHOUT REMOTE)
Manual Button
ALARMDEF./FAN
MANUAL OPERATION TIMER
The manual override button is intended for testing purposes and emergency operation. Please do
not use this button unless the remote control is lost and it is absolutely necessary. The unit must
be turned off before manual operation.
To operate your unit manually:
1. Locate the MANUAL button on the control panel of the unit.
2. Press the MANUAL button one time to activate FORCED AUTO mode.
3. Press the MANUAL button again to activate FORCED COOLING mode.
4. Press the MANUAL button a third time to turn the unit off.
DURASTAR.COM
15
Page 16
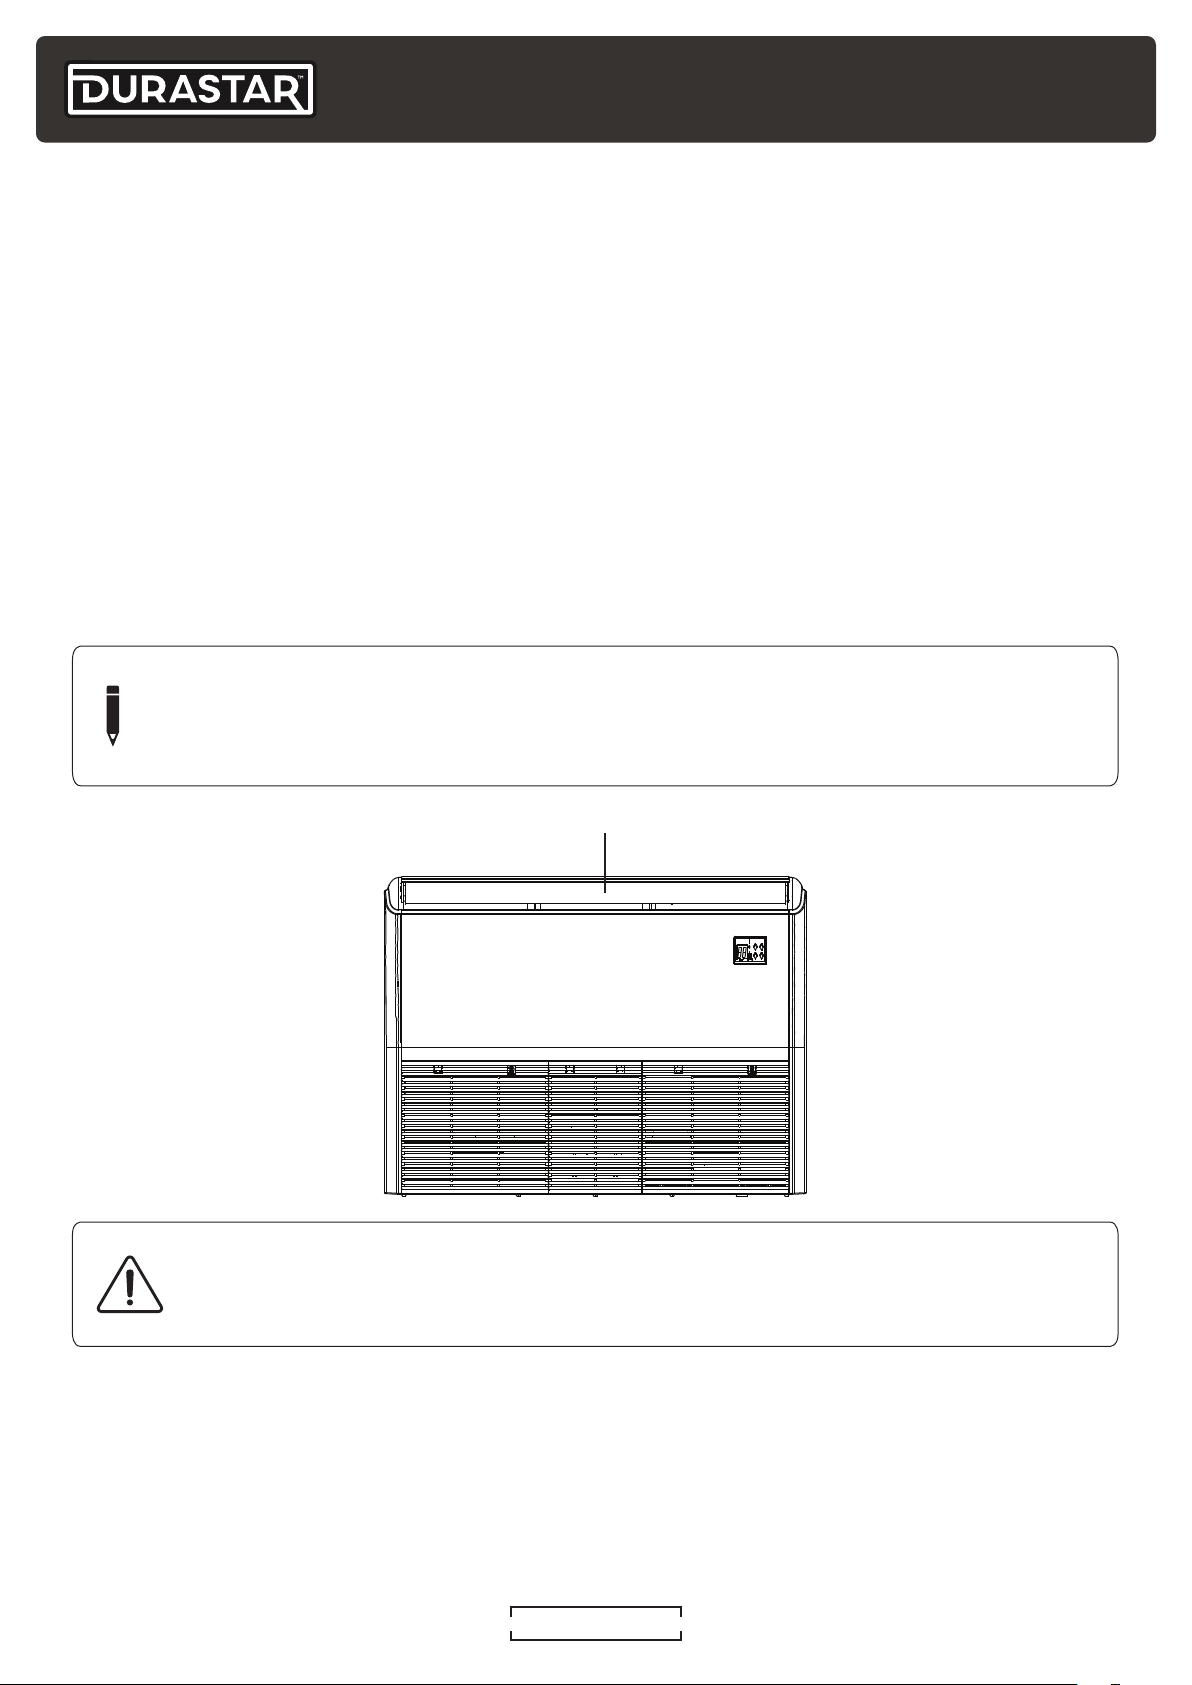
LOUVERED AIR FLOW
Louver
SETTING THE LOUVER ANGLE
While the unit is on, press the SWING or DIRECT button on the remote control to set the louvered
direction of airflow.
SWING (AUTOMATIC)
Press the SWING button to start the automatic up and down movement of the louver. Press again
to make it stop.
DIRECT (FIXED)
Press the DIRECT button to adjust the fixed angle of the louver. Each press will adjust the louver
by 6°. Press the button until the desired angle is reached.
NOTE
Do not move louver by hand. This will cause the louver to become out of sync. If this
occurs, turn off the unit and shut off the breaker for 30 seconds, then restart the unit. This
will reset the louver.
CAUTION
Do not put your fingers in or near the blower and suction side of the unit. The highspeed fan inside the unit may cause injury.
DURASTAR.COM16
Page 17
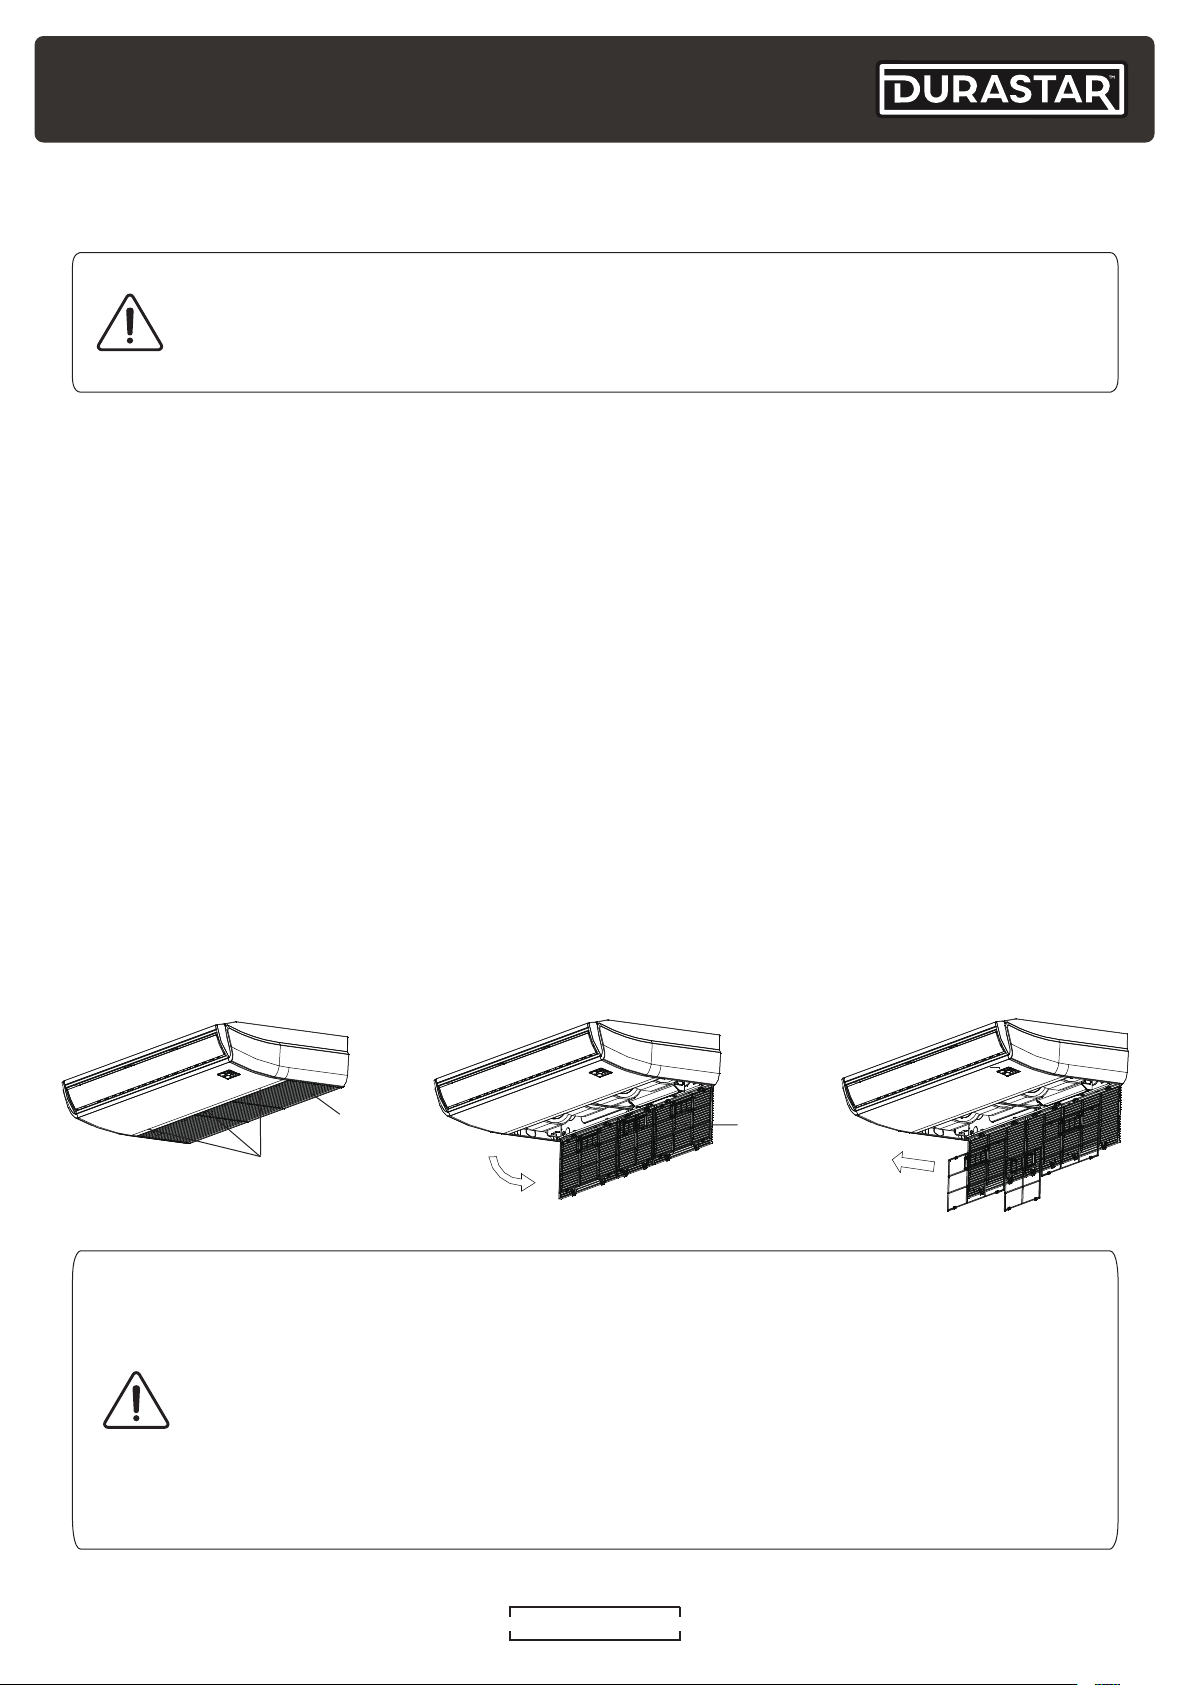
CARE AND MAINTENANCE
Fig. 1
Fig. 2
CAUTION
• Always turn off the unit and disconnect power before cleaning or maintenance.
• Only use a soft, dry cloth to wipe the unit clean. If the unit is especially dirty, you can
use a cloth soaked in warm water to wipe it clean.
CLEANING INDOOR UNIT
• Do not use chemicals or chemically treated cloths to clean the unit.
• Do not use benzene, paint thinner, polishing powder or other solvents to clean the unit. They
can cause the plastic surface to crack or deform.
• Do not use water hotter than 104°F (40°C) to clean the front panel. This can cause the panel to
deform or become discolored.
CLEANING THE AIR FILTER
A dirty air filter can reduce the cooling efficiency of your unit, and can also be bad for your health.
Make sure to clean the filter once every two weeks.
1. Remove the 3 screws holding the air inlet panel in place. (Fig. 1)
2. Open the panel away from the main unit to expose the air filter. (Fig. 2)
3. Remove the air filter. (Fig. 3)
4. Clean the air filter by gently vacuuming the surface or washing it in warm water with a mild
detergent.
5. Rinse the filter with clean water and allow it to air dry. Do not dry the filter in direct sunlight.
6. Reinstall the filter.
7. Close the air intake panel and replace the screws to secure it in place.
Fig. 3
Air Inlet
Screws
CAUTION
Air Filter
• Before changing the filter or cleaning, turn off the unit and disconnect its power
supply.
• When removing the filter, do not touch the metal parts in the unit. The sharp metal
edges can cut you.
• Do not use water to clean the inside of the indoor unit. This can destroy insulation
and cause electrical shock.
• Do not expose filter to direct sunlight when drying. This can shrink the filter.
DURASTAR.COM
17
Page 18
MAINTENANCE - LONG PERIODS OF NON-USE
If you do not plan to use your air conditioner for an extended period of time, do the following:
• Clean all filters.
• Turn on the FAN until the unit dries out completely.
• Turn off the unit and disconnect the power.
• Remove batteries from remote control.
MAINTENANCE - PRE-SEASON INSPECTION
After long periods of non-use, or before periods of frequent use, do the following:
• Inspect for damaged wires
• Clean all filters.
• Check for leaks.
• Replace batteries.
• Make sure nothing is blocking any air inlets or outlets.
DURASTAR.COM18
Page 19
TROUBLESHOOTING
SAFETY PRECAUTIONS
If ANY of the following conditions occurs, turn off your unit immediately!
• The power cord is damaged or abnormally warm
• You smell a burning odor
• The unit emits loud or abnormal sounds
• A power fuse blows or the circuit breaker frequently trips
• Water or other objects fall into or out of the unit
DO NOT ATTEMPT TO FIX THESE YOURSELF! CONTACT AN AUTHORIZED SERVICE
PROVIDER IMMEDIATELY!
COMMON ISSUES
The following problems are not a malfunction and in most situations will not require repairs.
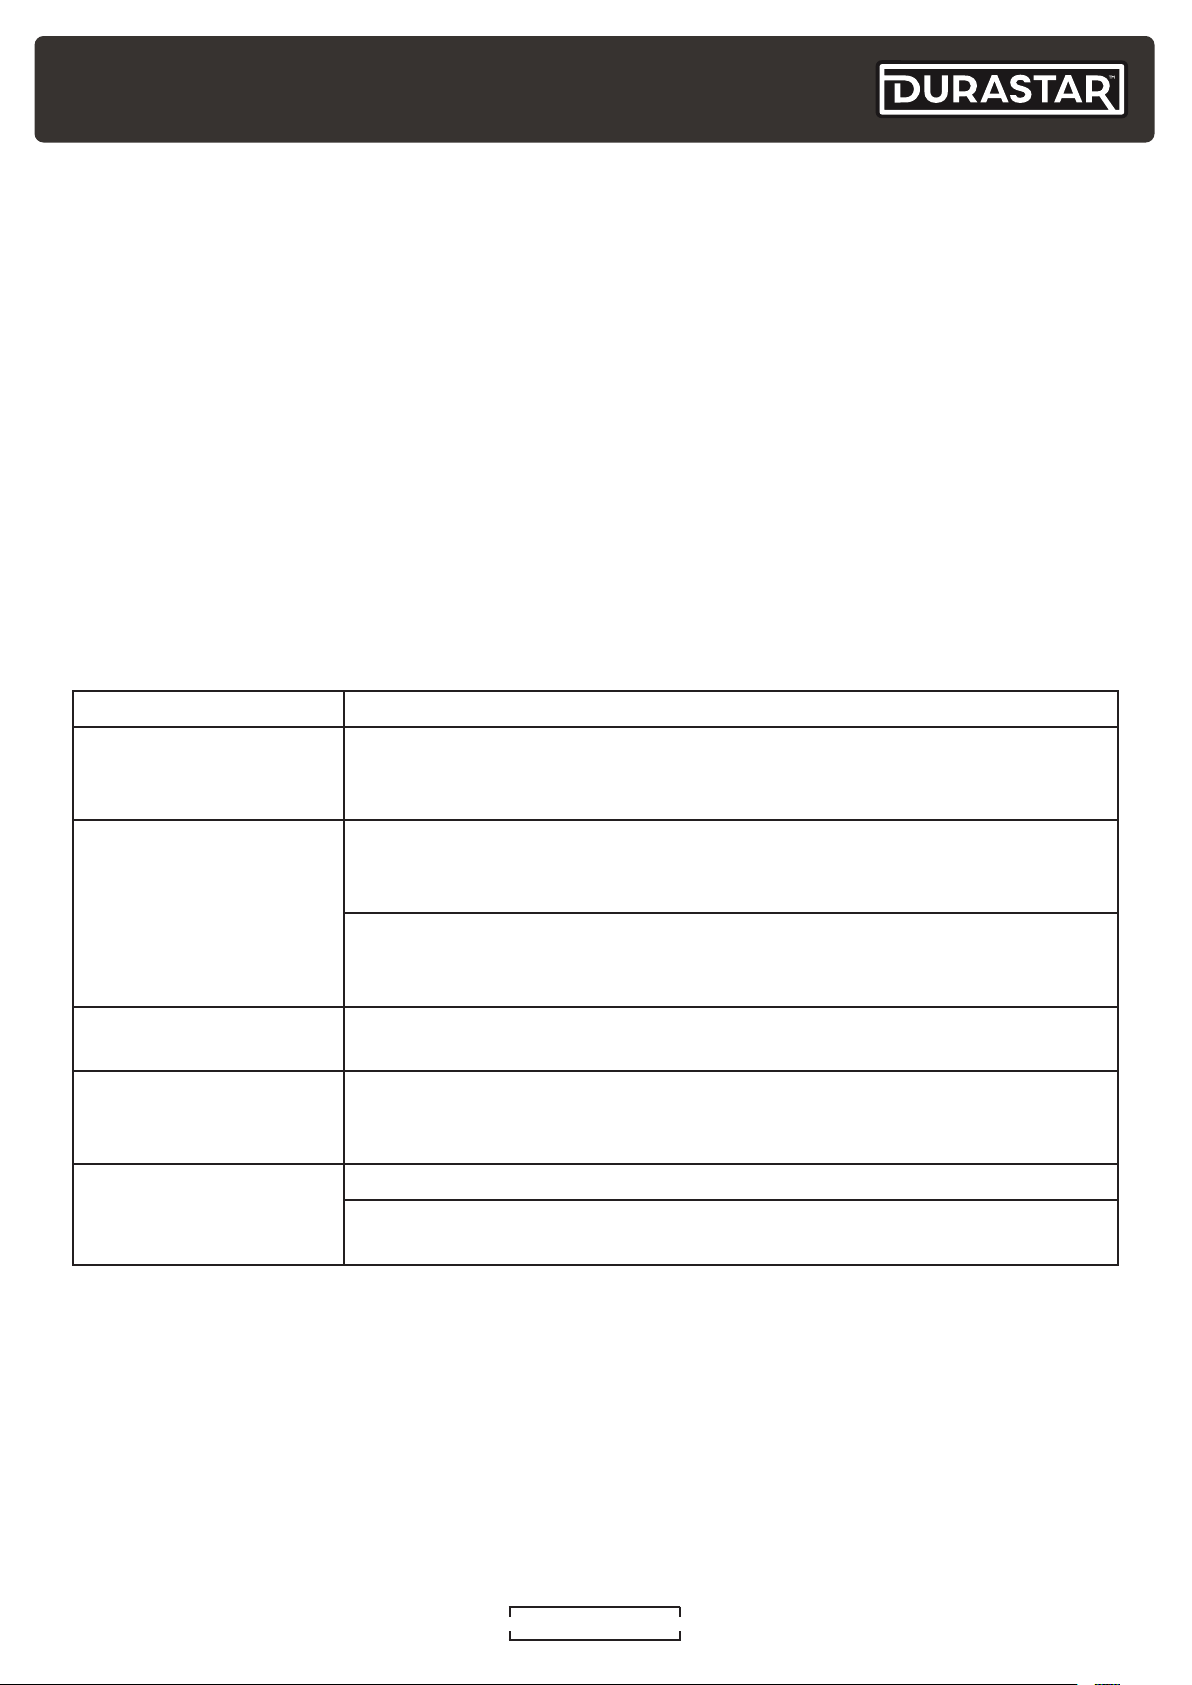
ISSUE POSSIBLE CAUSES
Unit does not turn on
when pressing ON/OFF
button
The unit changes from
COOL/HEAT mode to
FAN mode
The indoor unit emits
white mist
Both the indoor and
outdoor units emit
white mist
The indoor unit makes
noises
The unit has a 3-minute protection feature that prevents the unit from
overloading. The unit cannot be restarted within three minutes of being
turned off.
The unit may change its setting to prevent frost from forming on the
unit. Once the temperature increases, the unit will start operating in the
previously selected mode again.
The set temperature has been reached, at which point the unit
turns off the compressor. The unit will continue operating when the
temperature fluctuates again.
In humid regions, a large temperature difference between the room’s
air and the conditioned air can cause white mist.
When the unit restarts in HEAT mode after defrosting, white mist may
be emitted due to moisture generated during the defrosting process.
A rushing air sound may occur when the louver resets its position.
A squeaking sound may occur after running the unit in HEAT mode due
to expansion and contraction of the unit’s plastic parts.
DURASTAR.COM
19
Page 20
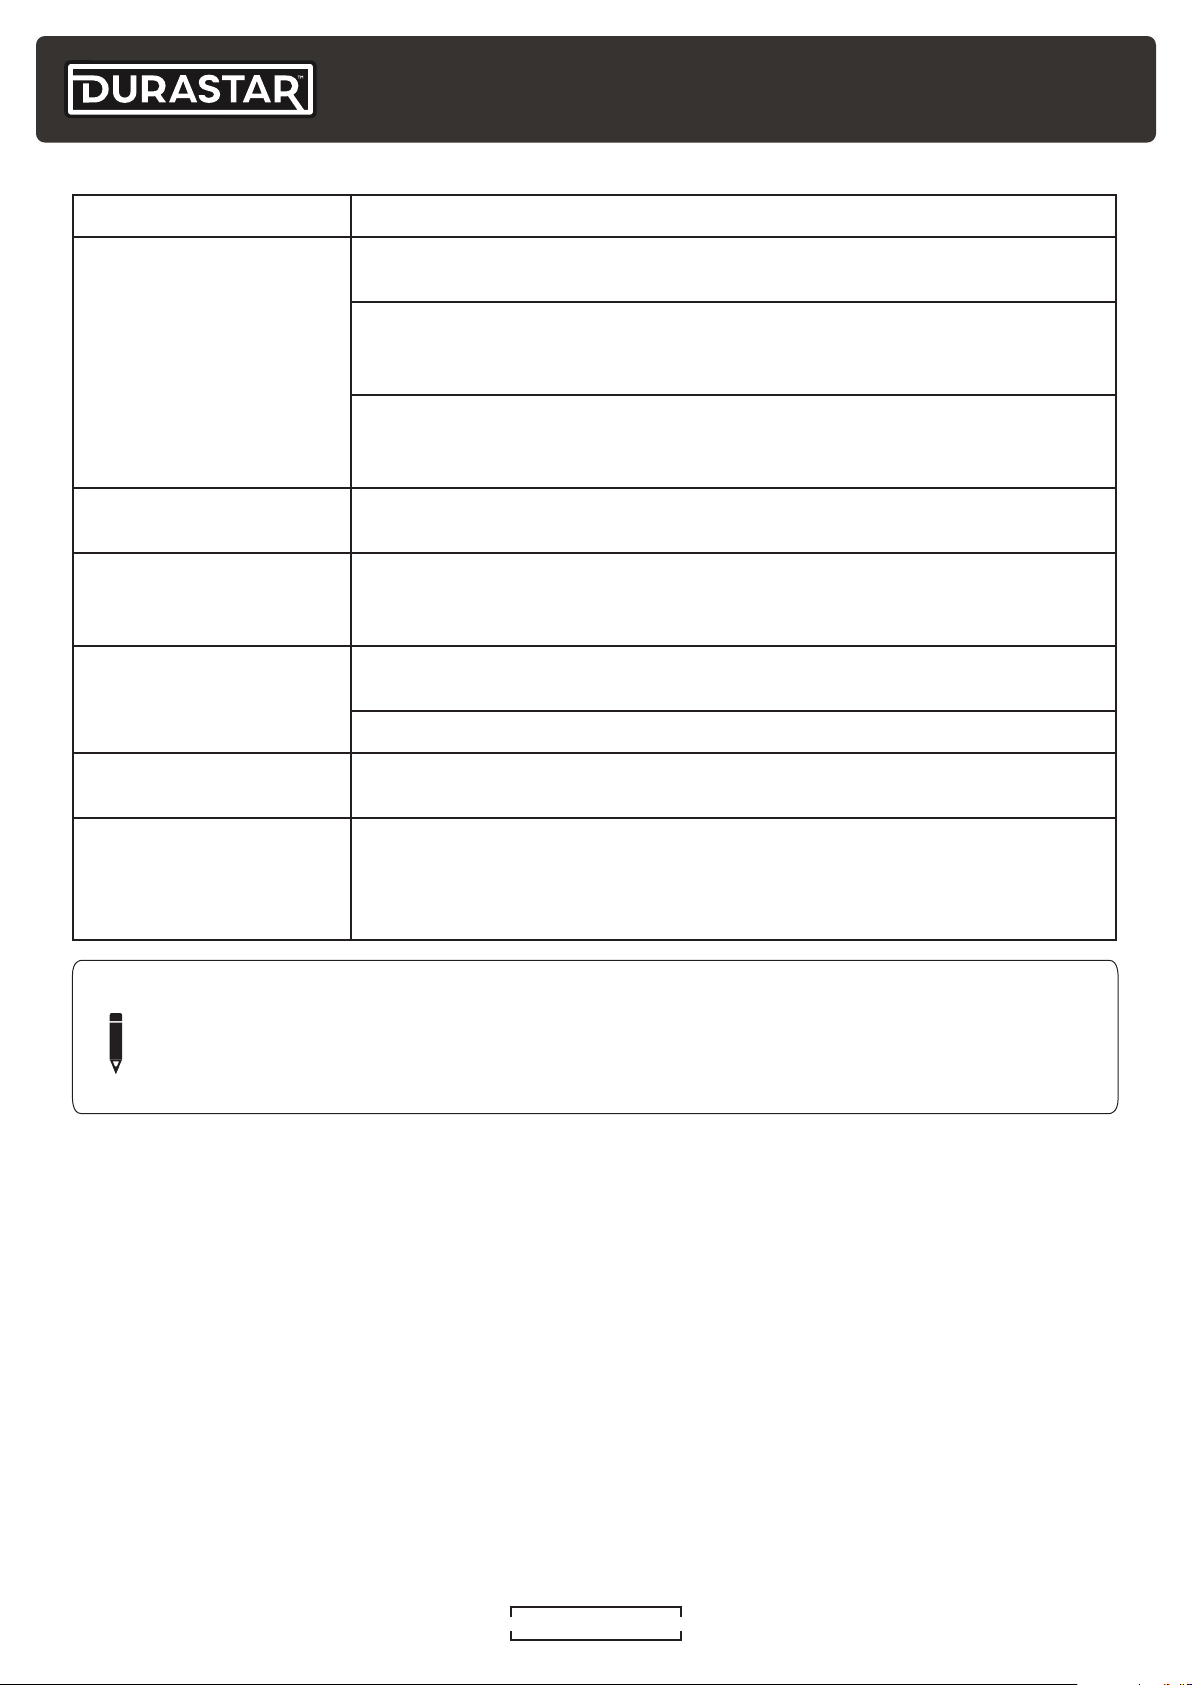
ISSUE POSSIBLE CAUSES
Both the indoor unit
and outdoor unit make
noises
The outdoor unit
makes noises
Dust is emitted from
either the indoor or
outdoor unit
The unit emits a bad
odor
The fan of the outdoor
unit does not operate
Low hissing sound during operation: This is normal and is caused by
refrigerant gas flowing through both indoor and outdoor units.
Low hissing sound when the system starts, has just stopped running,
or is defrosting: This noise is normal and is caused by the refrigerant
gas stopping or changing direction.
Squeaking sound: Normal expansion and contraction of plastic and
metal parts caused by temperature changes during operation can
cause squeaking noises.
The unit will make different sounds based on its current operating
mode.
The unit may accumulate dust during extended periods of non-use,
which will be emitted when the unit is turned on. This can be mitigated
by covering the unit during long periods of inactivity.
The unit may absorb odors from the environment (such as furniture,
cooking, cigarettes, etc.) which will be emitted during operations.
The unit’s filters have become moldy and should be cleaned.
During operation, the fan speed is controlled to optimize product
operation.
Operation is erratic,
unpredictable, or unit is
unresponsive
NOTE
If problem persists, contact a local dealer or your nearest customer service center.
Provide them with a detailed description of the unit malfunction as well as your model
number.
Interference from cell phone towers and remote boosters may cause
the unit to malfunction. In this case, try the following:
• Disconnect the power, then reconnect.
• Press ON/OFF button on remote control to restart operation.
DURASTAR.COM20
Page 21
TROUBLESHOOTING
When troubles occurs, please check the following points before contacting a repair company.
PROBLEM POSSIBLE CAUSES SOLUTION
Poor cooling
performance
Poor heating
performance
Temperature setting may be higher
Lower the temperature setting
than ambient room temperature
The heat exchanger on the indoor
Clean the affected heat exchanger
or outdoor unit is dirty
The air filter is dirty Remove the filter and clean it according
to instructions
The air inlet or outlet of either unit is
blocked
Turn the unit off, remove the obstruction
and turn it back on
Doors and windows are open Make sure that all doors and windows are
closed while operating the unit
Excessive heat is generated by
sunlight
Low refrigerant due to leak or longterm use
Too many sources of heat in
Close windows and curtains during
periods of high heat or bright sunshine
Check for leaks, re-seal if necessary and
top off refrigerant
Reduce amount of heat sources
the room (people, computers,
electronics, etc.)
The outdoor temperature is
Use auxiliary heating device
extremely low
The unit
starts
and stops
frequently
Indicator
lamps
continue
flashing or
error code
appears
Cold air is entering through doors
and windows
Low refrigerant due to leak or
long-term use
There’s too much or too little
refrigerant in the system
Incompressible gas or moisture has
entered the system
Make sure that all doors and windows are
closed during use
Check for leaks, re-seal if necessary and
top off refrigerant
Check for leaks and recharge the system
with refrigerant
Evacuate and recharge the system with
refrigerant
The compressor is broken Replace the compressor
The voltage is too high or too low Install a manostat to regulate the voltage
The unit may stop operation or continue to run safely. If the indicator lamps
continue to flash or error codes appear, wait for about 10 minutes. The problem
may resolve itself.
If not, disconnect the power, then connect it again. Turn the unit on.
If the problem persists, disconnect the power and contact your nearest
customer service center.
DURASTAR.COM
21
Page 22
PROBLEM POSSIBLE CAUSES SOLUTION
The unit is not
working
NOTE
If your problem persists after performing the checks and diagnostics above, or the error
code remains, turn off your unit immediately and contact an authorized service center.
Power failure Wait for the power to be restored
The power is turned off Turn on the power
The fuse is burned out Replace the fuse
Remote control batteries are dead Replace batteries
The unit’s 3-minute protection has
been activated
Wait three minutes after restarting the
unit
Timer is activated Turn timer off
DURASTAR.COM22
Page 23
LIMITED WARRANTY - PARTS
TEN (10) YEARS PARTS
Subject to all of the terms of this Limited Warranty, including, but not limited to, the specific exclusions set
forth below and subject to the Manufacturer’s right to inspect and validate the warranty claim as set forth
below, Manufacturer will repair or replace, at its option, ANY PART of Covered Equipment that is found to
be defective in materials or workmanship. If an exact replacement part is not available, an equivalent part
or credit will be provided.
The parts are warranted for a period of ten (10) years to the original owner of the mini-split equipment
under normal use and service. For a period of ten (10) years from the date of installation, if any parts prove
defective due to improper workmanship and/or material, Durastar with replace any defective part without
charge for the part. Replacement parts carry the balance of the original 10-year parts warranty.
To qualify:
• The mini-split equipment must be installed in a residential single-family home.*
• The original mini-split equipment owner must reside in the single-family home.
• The mini-split equipment must be properly installed. This includes installation by a contractor licensed
for HVAC installation following all local and state laws.
• Any part to be replaced must be made available in exchange for the replacement.
*Single-family home is defined as any single-family dwelling, which includes apartments, condominiums,
duplexes, and homes.
EFFECTIVE DATE OF WARRANTY
The Effective Date of warranty coverage is determined as follows: (a) If the original installation date can
be verified by the installer’s invoice then the Effective Date of warranty coverage is the original installation
date as shown on the installer’s invoice. For residential new construction installations, the final occupancy
permit, or proof of purchase from the builder can be substituted for the installer’s invoice. (b) if the original
installation date cannot be verified by the installer’s invoice, or proof of purchase from the builder in
residential new construction applications, then the Effective Date of warranty coverage is the Covered
Equipment’s manufacture date (as verified by the product’s serial number) plus ninety (90) days.
There is NO LABOR component provided with this warranty. This Limited Warranty does NOT cover any
labor costs or expenses for service, NOR for removing or reinstalling parts. You are responsible for all labor
costs or expenses, unless a labor service agreement exists between you and your contractor.
This Limited Warranty does NOT cover shipping costs. You are responsible for the cost of shipping
warranty replacement parts from our factory to the Manufacturer’s distributor and from the distributor
to the location of your Covered Equipment. You also are responsible for the cost of shipping failed parts
to the distributor and for incidental costs incurred locally, including handling charges. (If in Alaska, Hawaii
or Canada, you also must pay the shipping costs of returning the failed part to the port of entry into the
continental United States.)
EXCLUSIONS
In addition to the other exclusions identified in this Limited Warranty, this Limited Warranty excludes:
• Damages, malfunctions, or failures resulting from failure to properly install, operate, or maintain
Covered Equipment in accordance with the Manufacturer’s instructions.
• Damages, malfunctions, or failures resulting from misuse, accident, contaminated, or corrosive
atmosphere, vandalism, freight damage, fire, flood, freeze, lightning, acts of war, acts of God and the
like.
• Parts installed with Covered Equipment or used in connection with normal maintenance, such as
cleaning or replacing air filters, refrigerant, thermostats, tubing, or concrete pads.
• Covered Equipment that is not installed in the United States.
DURASTAR.COM
23
Page 24
• Covered Equipment that is not installed by a qualified, trained HVAC professional in accordance with
applicable codes, ordinances, and good trade practices.
• Damages, malfunctions, or failures resulting from the use of any attachment, accessory, or component
not authorized by the Manufacturer or resulting from alteration or modification of the unit.
• Covered Equipment moved from the original installation location.
• Covered Equipment when operated with system components (indoor unit, outdoor unit, coil,
and refrigerant control devices) or accessories which do not match or meet the specifications
recommended by the Manufacturer.
• Any Covered Equipment manufactured that has been sold to the consumer via the Internet or auction
website, and has not been installed by a trained, qualified HVAC professional.
• Covered Equipment that is not part of a properly matched system as specified by the Air Conditioning,
Heating & Refrigeration Institute (AHRI).
COMMERCIAL WARRANTY
Installations in commercial applications carry a ONE (1) YEAR PARTS warranty following the other
provisions in this Limited Warranty.
OBTAINING WARRANTY SERVICE
If you believe your product is defective, contact the licensed contractor who installed your mini-split
system. Alternatively, contact a licensed contractor, dealer, or distributor.
Durastar Customer Support is available for troubleshooting assistance. Before contacting Customer
Support, please locate your model number, serial number, and proof of purchase. These items will be
required to complete any warranty service. A Durastar authorized representative will verify warranty
eligibility and determine appropriate service options. Service will be provided during normal business days
and hours.
THIS WARRANTY IS IN LIEU OF ANY OTHER WARRANTY, EXPRESS OR IMPLIED, INCLUDING WITHOUT
LIMITATION, ANY WARRANTY OF MERCHANTABILITY OR FITNESS FOR A PARTICULAR PURPOSE.
TO THE EXTENT ANY IMPLIED WARRANTY IS REQUIRED BY LAW, IT IS LIMITED IN DURATION TO THE
EXPRESS WARRANTY PERIOD ABOVE. NEITHER THE MANUFACTURER NOR ITS DISTRIBUTORS SHALL
BE LIABLE FOR ANY INCIDENTAL, CONSEQUENTIAL, INDIRECT, SPECIAL, OR PUNITIVE DAMAGES
OF ANY NATURE, INCLUDING WITHOUT LIMITATION, LOST REVENUES OR PROFITS, OR ANY OTHER
DAMAGE WHETHER BASED IN CONTRACT, TORT, OR OTHERWISE. IN NO EVENT AND UNDER NO
CIRCUMSTANCE OF ANY TYPE OR KIND SHALL THE SELLER, MANUFACTURER AND/OR DISTRIBUTOR
BE LIABLE FOR ANY REASON, UNDER ANY THEORY, FOR MORE THAN THE BASIC COST OF THE
PRODUCT TO THE PURCHASER OR END USER. SOME STATES DO NOT ALLOW THE EXCLUSION OF
INCIDENTAL OR CONSEQUENTIAL DAMAGES, SO THE ABOVE EXCLUSION MAY NOT
APPLY TO YOU. THIS WARRANTY GIVES YOU SPECIFIC LEGAL RIGHTS. YOU MAY HAVE OTHER RIGHTS
THAT VARY FROM STATE TO STATE.
DURASTAR.COM24
V2.0 0821
 Loading...