


MINI MULTI COOKER MINI MULTICUISEUR
USAGE INSTRUCTIONS
INSTRUCTIONS D’UTILISATION

IMPORTANT SAFEGUARDS
Like any electrical appliance, the Mini Multi Cooker must be handled with care at all times. To ensure your own safety, the following precautions should be followed.
1.BEFORE USING YOUR COOKER, READ ALL INSTRUCTIONS CAREFULLY.
2.To protect against risk or electric shock, do not place Housing, Removable Power Cord, or plug in water or any liquid. Do not touch appliance with wet hands.
3.Close supervision is necessary when any appliance is used by or near children.
4.Turn appliance off, by removing power cord from the outlet when not in use. Allow appliance to cool down before assembling or disassembling parts and before cleaning.
5.Do not operate any appliance with a damaged cord or plug, or after the appliance has malfunctioned or has been dropped or damages in any way. Contact manufacturer at their customer service telephone number for information on examination, repair, or adjustment.
6.Do not use outdoors.
7.Do not let cord hang over edge of table or counter and do not let the cord touch hot surfaces.
8.CAUTION: This appliance generates heat during use. Proper precaution must be taken to prevent the risk of burns, fires or other damages to persons or properties.
9.Do not leave appliance unattended while in use.
10.This appliance is for household use only. Do not use appliance for anything other than its intended use.
11.Do not place or use the Removable Pot on any gas stove or electric hot plate.
2
12.To prevent any injury from hot steam, do not place hand or face directly over Air Vent while cooking.
13.Ensure Air Vent is free from any clogs before every use. A clogged air vent may cause steam and pressure to build up.
14.Ensure there is enough ventilation on all sides of appliance when in use. Never operate appliance near any flammable materials such as dish towels, paper towels, curtains, paper plates, etc.
15.Do not fill Removable Pot more than 3/4 full (about 2 1/2 cups). Overfilling Pot may cause air vents to become clogged and pressure to build up.
16.Certain foods such as rice, grains, and pastas can foam, froth, sputter, and clog Air Vent. Follow provided recipes for these foods to prevent any problems.
SAVE THESE INSTRUCTIONS FOR HOUSEHOLD USE ONLY
3

PARTS & ACCESSORIES |
USING YOUR MINI MULTI COOKER |
10
9
8
1
2
11
3 |
|
7 |
|
6 |
|
|
|
|
|
4 |
12 |
|
|
5
13
1. |
Power button |
8. |
Air vent |
2. |
Function selection light |
9. |
Lid heat shield |
3. |
Lid cover |
10. |
Power cord (removable) |
4. |
Lid open button |
11. |
Spatula |
5. |
Housing |
12. |
Measuring Cup |
6. |
Handle |
|
(capacity 6oz/180ml) |
7. |
Control panel |
13. |
Removable pot |
Before first use, refer to Care and Cleaning Guide to clean all Mini Multi Cooker components. Remove any stickers and packaging materials.
IMPORTANT: Removable Pot and Lid Cover get very hot after cooking. Be careful when removing Pot. Always use oven mitts or towel when handling.
OPERATING YOUR MINI MULTI COOKER
1.Place Mini Multi Cooker on flat, clean and stable surface.
2.Press Lid Open Button to open lid and remove Removable Pot (see Figure 1).
3.Place ingredients in Pot as per the recipe.
4.Ensure outside of Pot is dry before placing in Housing.
5.Plug Cooker into power outlet. Using Power button, select desired cooking function. See Function Control Guide.
6.When done cooking, turn Cooker off by removing power cord from outlet and let Cooker cool before cleaning.
FIGURE 1
1. PRESS BUTTON |
2. LID OPENS |
3. REMOVE POT |
4 |
5 |
FUNCTION CONTROL GUIDE
HOW TO USE
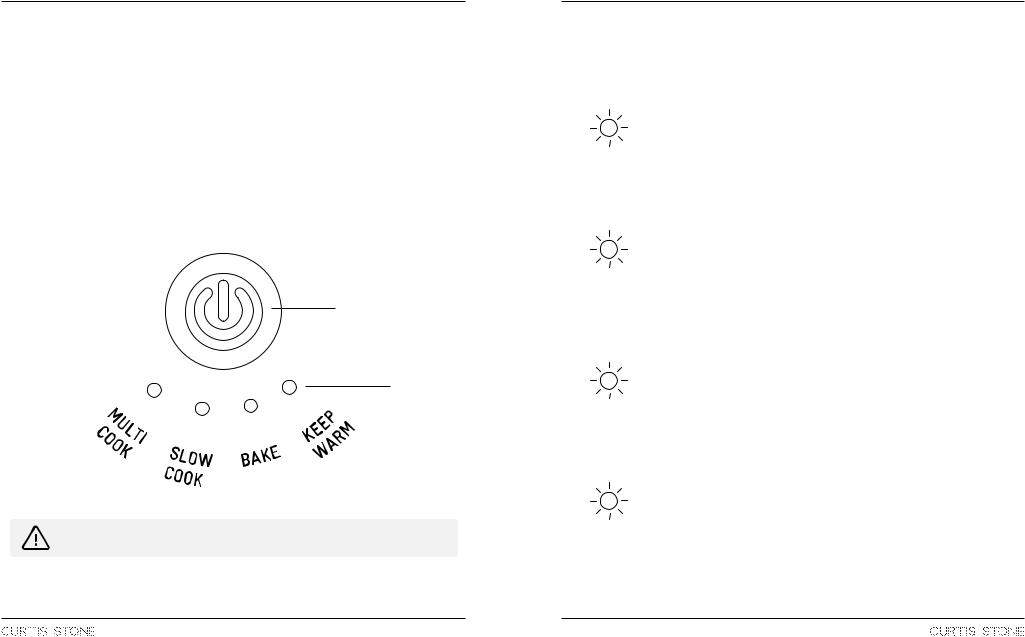
When Cooker is first plugged in, all the lights will turn on for 1 second and then the Power Button will flash. This light will continue flashing until a function is selected, at which time the light will stay lit indicating the Cooker is on.
Touch Power Button to toggle through different functions, starting from left to right:
a)Multi Cook
b)Slow Cook
c)Bake
d)Keep Warm
Once a function has been selected, the desired Function Selection Light will flash for 3 seconds then remain on, indicating that cooking has begun.
POWER BUTTON
FUNCTION
SELECTION
LIGHTS
CAUTION: During cooking the air vent on the lid may release hot steam.
6
FUNCTION PROGRAMS
PROGRAM |
RUNNING TIME |
FUNCTION |
|
|
|
|
|
MULTI COOK |
30 Minutes |
Mini Multi Cooker will heat up and cook food |
|
for a 30 minute cycle. |
|||
|
|
||
|
|
After 30 minutes, you will hear 1 long beep, |
|
|
|
indicating cycle has completed. |
|
|
|
The Cooker will then automatically switch |
|
Red |
|
to Keep Warm function for a maximum of 6 |
|
Indicator Light |
|
hours. |
|
|
|
|
|
SLOW COOK |
60 Minutes |
Mini Multi Cooker will heat up and cook |
|
|
|
food at a slightly lower temperature for a 60 |
|
|
|
minute cycle. |
|
|
|
After 60 minutes, you will hear 1 long beep, |
|
|
|
indicating cycle has completed. |
|
|
|
The Cooker will then automatically switch |
|
Red |
|
to Keep Warm function for a maximum of 6 |
|
Indicator Light |
|
hours. |
|
|
|
|
|
BAKE |
40 Minutes |
Mini Multi Cooker will heat up and cook food |
|
|
|
for a 40 minute cycle. |
|
|
|
After 40 minutes, you will hear 1 long beep, |
|
|
|
indicating cycle has completed. |
|
|
|
The Cooker will then automatically switch |
|
Red |
|
to Keep Warm function for a maximum of 6 |
|
Indicator Light |
|
hours. |
|
|
|
|
|
KEEP WARM |
6 Hours |
Mini Multi Cooker will keep food warm at |
|
|
|
a lower gentle heat for a maximum 6 hour |
|
|
|
cycle. |
|
|
|
The Cooker will then automatically shut off. |
|
Blue |
|
|
|
Indicator Light |
|
|
|
|
|
|
7
CARE & CLEANING
This appliance requires little maintenance. It contains no user serviceable parts. Do not try to repair it yourself. Contact the customer service department for any unusual issues you may experience.
1.Always unplug Mini Multi Cooker before cleaning.
2.To clean Housing, wipe down with a damp cloth and dry thoroughly. Never submerge Housing in water or other liquids.
3.To clean Removable Pot, wash in warm soapy water with soft sponge. Dry thoroughly. Do not place in dishwasher.
4.To remove and clean Lid Heat Shield, refer to page 9.
5.Do not use abrasive cleaners.
6.Store Mini Multi Cooker in a clean dry place.
7.Contact Customer Service for any issues or malfunctions that should occur.
8
REMOVING AND CLEANING LID HEAT SHIELD
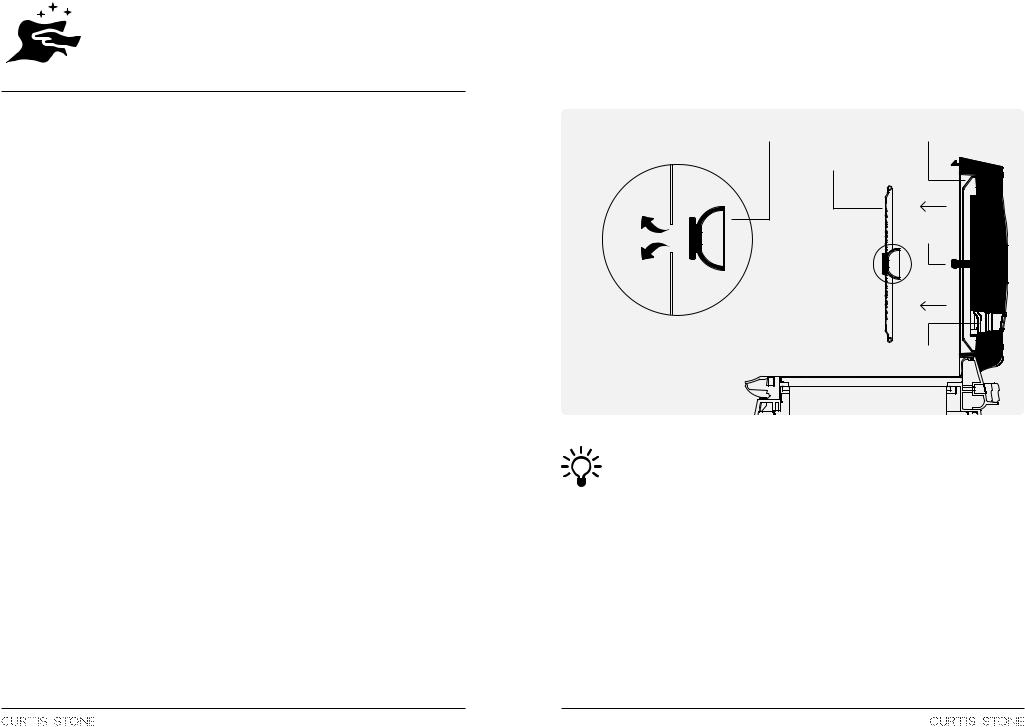
When cool, pull the Lid Heat Shield off and wash with warm soapy water and soft sponge. Using a damp cloth, wipe underside of lid, ensuring to wipe the Outer Lid Seal gasket and Air Vent thoroughly (see Figure 2).
FIGURE 2 |
HEAT SHIELD PLUG |
OUTER LID SEAL GASKET |
LID HEAT SHIELD
LOCK PIN
|
2. REMOVING LID HEAT SHIELD: |
|
|
|
Pull out to remove. |
|
|
|
To assemble, push lid |
|
|
|
heat shield in till lock pin |
|
|
|
protrudes through heat |
|
|
1. REMOVE HEAT SHIELD PLUG: |
shield plug and holds lid |
|
|
heat shield in place. |
AIR VENT |
||
Pull out/push in silicon plug. |
|||
|
|||
|
|
||
Note: make sure the heat shield |
|
|
|
plug is reinstalled in correct |
|
|
|
position (see figure 2). |
|
|
TIPS FOR BEST RESULTS
1.Do not fill Removable Pot more than 3/4 full. Overfilling Pot can cause liquids to overflow onto heating elements and clog Air Vents.
2.To ensure foods are cooked within the provided cooking cycles, cut meats and vegetables into bite sized pieces. Large pieces of food may need multiple cooking cycles to cook.
3.If cooking cycle ends before food has finished cooking, press and hold Power Button for 3 seconds until flashing. Select desired function and continue cooking.
4.Cook food with lid closed to keep heat from escaping. If necessary to stir occasionally in recipe, stir food and quickly close lid.
5.For fluffier rice, rinse measured rice under running water until water runs clear. This removes excess starches which results in a less sticky rice.
9
 Loading...