

Page 1
Bio-ethanol Fire Pit with Log Set
Model # 62000
Distributed by:
Duraame, Inc., Stockton, CA 95201
Made in China
For questions about Assembly and Operating instructions or Warranty Claims
contact Duraame, Inc. Consumer Aairs
info@duraame.com
1 (866) 552-3015
www.duraame.com/illuma
Patents Pending
WARNING: If the information in this manual is not followed exactly, a fire or explosion may
result, causing property damage, personal injury, or loss of life.
Do not store or use gasoline or other flammable vapors and liquids in the vicinity of this or any
other appliance.
WHAT TO DO IN THE EVENT OF AN ALCOHOL SPILL: DO NOT light the burner. Extinguish
any open flame near the spill. Wipe up the spill, and wait several minutes for the residue to
evaporate.
WARNING: Improper installation, adjustment, alteration, service, or maintenance can cause
injury or property damage. Refer to this manual for correct installation and operational
procedures.
This appliance is for use only with the type of fuel indicated on the rating plate. This appliance
is not convertible for use with other fuels.
Make sure that all packaging materials, including anything made from plastic, paper or
cardboard is removed before assembling and using the appliance.
Save this manual for future reference.
-1-
Page 2

TABLE OF CONTENTS
page
I. Safety Information ........................................................................ 3
II. Setup ............................................................................................6
III. Minimum Clearances ....................................................................6
IV. Installation ....................................................................................7
V. Installing the Fuel Canister .........................................................10
VI. Operation ....................................................................................11
VII. Refueling .....................................................................................11
VIII. Adjusting the Flames .................................................................. 12
IX. Emptying Water from the Burner ................................................12
X. Maintenance ............................................................................... 13
XI. Troubleshooting .......................................................................... 14
XII. Parts List .....................................................................................15
Warranty .....................................................................................16
-2-
Page 3
I. SAFETY INFORMATION
IMPORTANT: Read this owner’s manual carefully and completely before trying to assemble,
operate, or service this appliance. Improper use of this appliance or failure to comply with the
safety rules can cause serious injury or death from burns, fire, explosion, or carbon monoxide
poisoning. Keep this manual. It should be read by all users of the appliance.
This appliance is designed for outdoor use. Do not use indoors. Using this appliance indoors
may result in harmful emissions, including dangerous levels of carbon monoxide emissions.
DANGER: Carbon monoxide poisoning may lead to death!
Carbon Monoxide Poisoning: Early signs of carbon monoxide poisoning resemble the u, with
headaches, dizziness, or nausea. If you have these signs, the appliance may not be working
properly.
WARNING: Any change to this appliance or its controls can be dangerous.
WARNING: Risk of explosion. Never use any fuel other than the fuels specifically identified for
use in the appliance. Never use gasoline. Never use this appliance in areas where flammable
vapors or gas may be present. Never store fuel in the living space of the house.
WARNING: Do not use this appliance to heat or boil water or use as a cooking appliance. Do
not burn trash or any other material in or on the appliance.
Due to high temperatures, this appliance should be located out of traffic and away from
flammable objects (clothing, rugs, furniture, etc.). Flammable objects should not come into
contact with the appliance or the flames. Keep them at least three feet away. Never place any
objects on the appliance or inside the burner.
The appliance becomes very hot when in operation. Keep children and adults (and pets) away
from flames and hot surfaces to avoid burns or clothing ignition. The appliance will remain hot
for a time after shutdown. Allow the appliance to cool before touching it.
Carefully supervise young children when they are in the vicinity of this appliance.
Keep the appliance area clear and free from combustible materials, gasoline, and other
flammable vapors and liquids.
Do not store the duraame® illuma-fuel® canisters near the appliance. Store illuma-fuel canisters
tightly closed in a dry, cool place, out of direct sunlight and away from heat sources, open res
or other sources of ignition, and out of the reach of children. Never pour the fuel into another
container. If swallowed, seek medical attention immediately. In case of contact with eyes, ush
immediately with cool water for 15 minutes and seek medical attention. For contact with skin,
rinse thoroughly with cool water. If irritation develops, see your doctor.
Do not remove an illuma-fuel canister from the appliance until the canister is completely empty.
WHAT TO DO IN THE EVENT OF AN ALCOHOL SPILL: DO NOT light the burner. Extinguish
any open ame near the spill. Wipe up the spill, and wait at least 5 minutes for the residue to
evaporate. In addition to the potential for re, spilled fuel can damage some surfaces like wood
and leather. Wipe up any spills immediately.
Use this appliance in compliance with the laws of your local jurisdiction. This appliance should not
be installed indoors. Do not use this appliance in trailers, boats, vehicles or tents.
The appliance must be set on a level surface.
-3-
Page 4

This appliance is designed to be smokeless. If the logs begin to smoke, extinguish the appliance
by using the snuer (see Section VI Operation), and check the positioning of the logs. Note: During
initial operation, slight smoking may occur due to log curing and the burning o of manufacturing
residues. This is a normal condition.
Do not run this appliance where ammable liquids or vapors are used or stored, or in a dusty
environment. Do not place any ammable material close to the appliance. Do not place any
empty or full bottles of fuel near this appliance.
If the appliance has been rained on or has been under water, be sure that the water has been
emptied from the burners and reservoir (refer to Section IX). Water will dilute the fuel, aect the
performance of the appliance, and could prevent the fuel from igniting and/or burning.
Do not operate this appliance if any log is broken or has a chip (dime-sized or larger). Do not use
the appliance if there is visible damage. If you see damage, contact Duraame. Do not attempt to
repair the appliance yourself. Do not use your appliance if it has been modied in any way.
Turn o the appliance and let it cool before servicing, installing, or repairing the appliance.
An open re is always a potential hazard. You must have a Class B re extinguisher nearby in case
of re.
Do not use any bottle, tank, canister or fuel that is not made by Duraame specically for this
appliance. Do not pour any fuel or any liquid (duraame brand or other) directly into the burners.
Never rell the duraame illuma-fuel canisters with any fuel including duraame fuel.
This appliance must be operated using only authorized accessories and equipment.
Do not move the appliance while it is burning. This could cause a re. Wait until the unit has
cooled before moving it. If the unit is moved while fuel is still in it, the fuel may spill out. Make
sure that the spill is cleaned thoroughly.
Do not put your head over the burner while lighting it.
Do not leave the appliance burning for long periods of time unattended. Extinguish the ames
before you leave the house or go to bed.
Extinguish the ames by snung the ames with the tool provided. Do not attempt to blow out
the ames. Do not use water to extinguish the ames. This could cause the ames to splatter and
spread. Only use the tool provided to snu the ames. Do not obstruct the burner in any way as
this could interfere with your ability to extinguish the ames.
In case of burns, seek treatment from your doctor or hospital.
Duraame, Inc. accepts no responsibility for any damage that might result if this appliance is used
for purposes other than that for which it is intended, or if it is incorrectly operated or repaired by
unqualied persons.
Keep packing materials away from children, as they could be a choking or suocation hazard.
-4-
Page 5
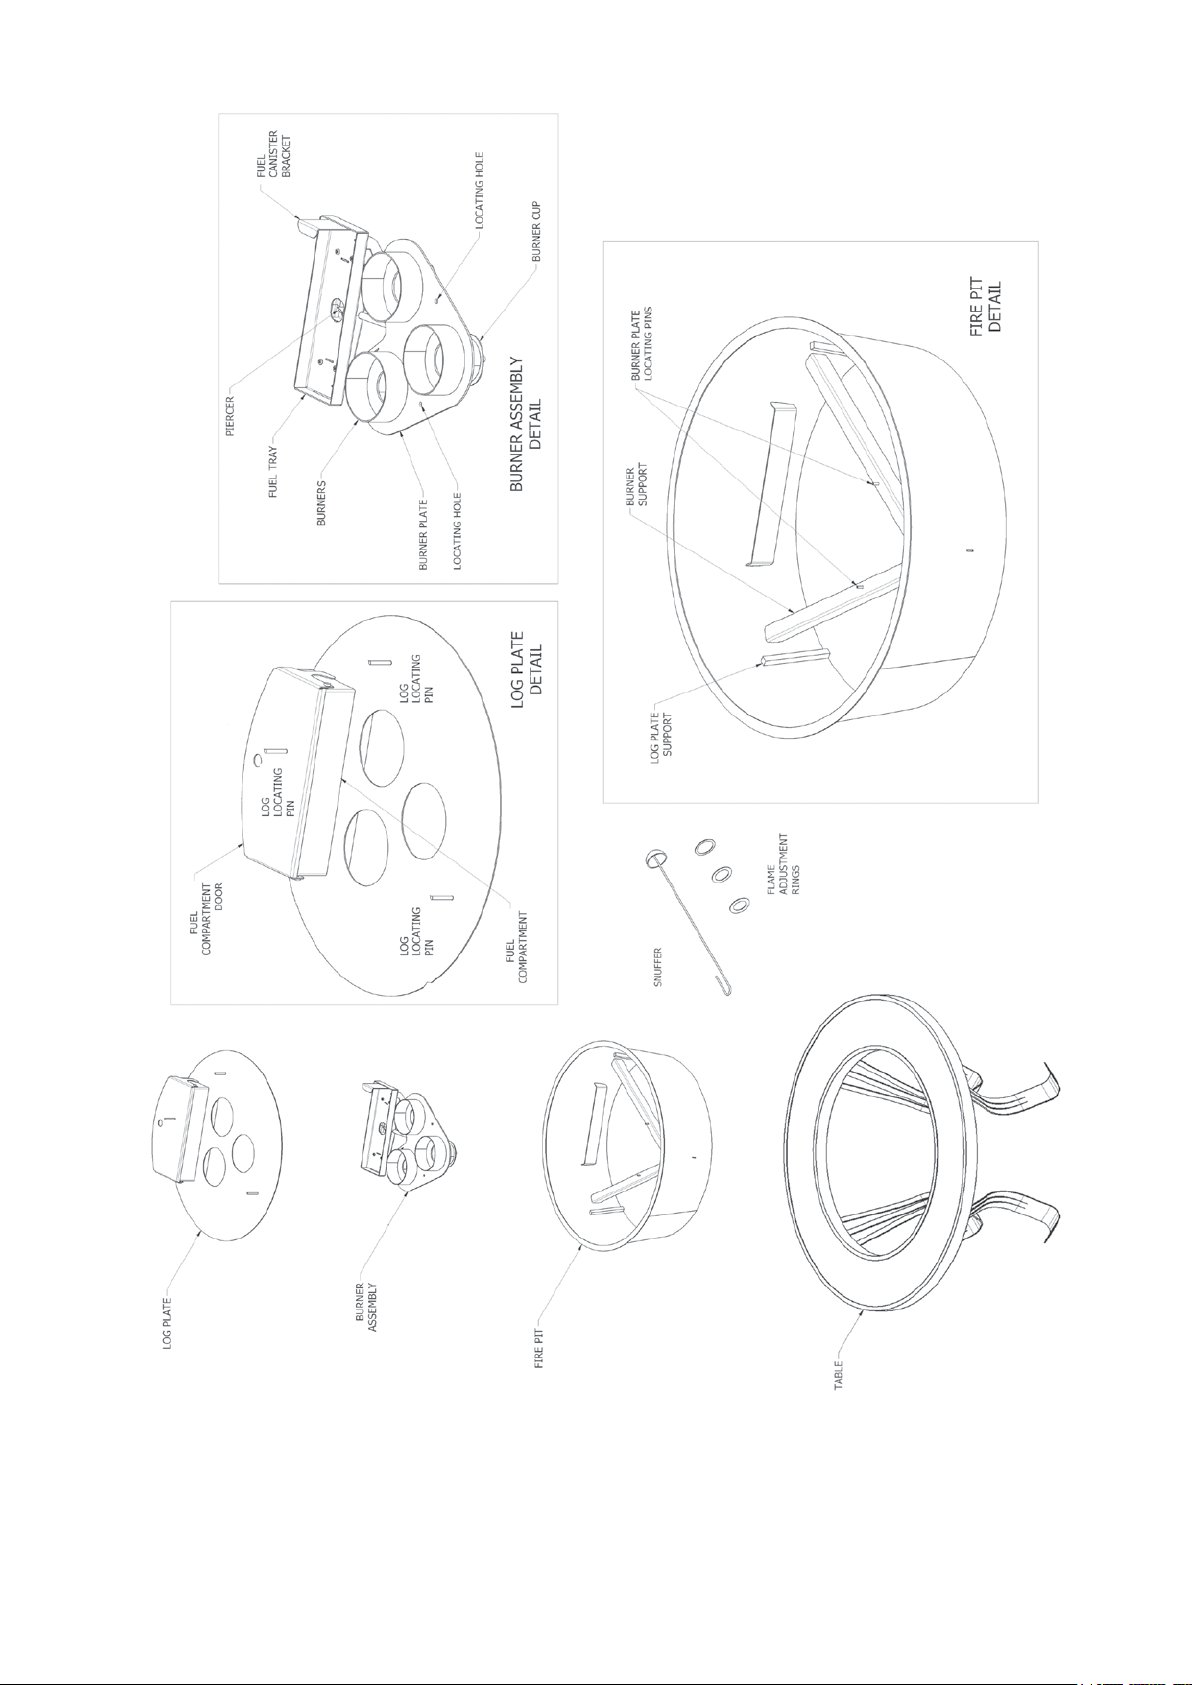
Figure 1
Parts of the Appliance
-5-
Page 6

II. SETUP
CAUTION: Do not remove the metal data plate that is attached to the underside of the door
to the fuel compartment of the appliance. It contains important product information.
WARNING: Never install this appliance
• indoors
• inarecreationalvehicle,boat,ortent
• wherefurniture,clothing,orotherammableobjectsarelessthan42inches(3.5feet)
from the front, top, or sides of the appliance
• inhightrafcareas
Use this appliance in compliance with all local ordinances.
III. MINIMUM CLEARANCES
WARNING: Maintain or exceed the minimum clearances.
In order to prevent a re or heat damage, you must maintain or exceed the minimum clearances to
combustible materials (see FIGURE 2). Keep the re pit AT LEAST 3 feet from walls. If the re pit
is used under an overhang, the overhang must be AT LEAST 7 feet above the table of the re pit.
Figure2
Minimal Clearances on a Typical Patio
-6-
Page 7

IV. INSTALLATION
1. Carefully remove the contents of the carton. You should nd (See Figure 1):
• Table
• Table Legs
• Hardware needed (screws and nuts)
• Fire Pit
• Burner Assembly
• Log Plate
• Five logs
• Flame Snuer
• One set of three ame adjustment rings (packaged inside the burners)
• Water Proof Cover
If components are missing, contact Duraame.
Figure3
How to attach the legs
2. Remove all these components from their packing. When handling the logs, take care not to
damage them. Keep packing materials away from children, as they could be a choking or
suocation hazard.
3. Check each component for shipping damage. If components are damaged, contact
Duraame.
4. Attach the legs to the table using supplied nuts. (see Figure 3).
5. Set the table on a level surface away from all ammable materials. For this appliance to
function properly, the table must be stable and level. If the surface on which the table is set is
uneven or unlevel, you must shim under the table legs. (see Figure 4 Step #1).
6. Carefully set the re pit into the center opening of the table. The outer rim of the bowl rests on
top of the inner rim of the table. (see Figure 4 Step #2).
7. Carefully lower the burner down onto the burner supports of the re pit. The burner is precisely
located by the two pins that protrude upward from the burner supports (see Figure 1). Take
care to see that the burner ts down over these pins. (see Figure 4 Step #3).
8. Carefully lower the log plate down over the burner. The three burners should protrude through
the three large holes in the log plate, and the log plate should rest on the three supports
located around the inside edge of the re pit. (see Figure 4 Step #4).
-7-
Page 8

Step #1: Table
Step#2:AddingFirePit
Step#3:AddingBurnerAssembly
Figure4
Steps for Assembling Fire Pit
9. Remove ame adjustment rings from inside the burners.
10. Carefully position the logs on the log plate according to the illustrations provided below (see
Figures 6-10). The pins that protrude upward from the log plate and fuel compartment door
will help you to position the logs correctly. Log #1 will t on a pin that protrudes from the door.
Log # 2 will t on the pin on the log plate. Log #3 will t on a pin on the log plate also. Log #4
ts on a pin that is on the top surface of log #3. Finally Log #5 ts on a pin that protrudes from
the top surface of log #4. It is essential for the proper functioning of this appliance that the logs
be placed as shown in the illustrations.
Step#4:AddingLogPlate
-8-
Page 9

Figure5
Logs
Figure 6
Installing Log 1
Figure 7
InstallingLog2
Figure 9
InstallingLog4
Figure 8
InstallingLog3
Figure 10
InstallingLog5
-9-
Page 10

V. INSTALLING THE FUEL CANISTER
NOTE: Use only 1 L duraame illuma-fuel bio-ethanol fuel canisters with this appliance. The
canisters are NOT rellable.
1. Remove the log that covers the door of the canister compartment. Set the log in a safe place
where it will not be damaged. (see Figure 11). Do not touch the log in any area other than
the one shown when flames are present or the appliance is still hot.
Figure 11
Removing Log #1
2. Open the door of the fuel canister compartment using the hole in the door. (see Figure 12).
3. Remove the screw cap from a canister of illuma-fuel to expose the foil seal covering the
opening. DO NOT remove the foil seal.
4. Invert the canister and position it so that the left end of the canister ts under the bracket
at the end of the fuel tray (see Figure 13). Lower the canister so that neck is aligned with
the piercer hole in the tray at the bottom of the fuel compartment. Push down rmly on the
canister until the piercer punctures the foil seal and the canister is seated rmly on the tray.
To assist the ow of fuel from the canister, wiggle it back and forth slightly on the piercer. You
Opening Compartment door
Figure12
Figure13
Tank Installation and Removal
Figure14
Closing Compartment door
-10-
Page 11

might hear a soft gurgling noise as the fuel from the canister begins to ll the burner—this is
normal. Make sure the left side is tipped down during installation.
5. After the canister has been installed, close the door of the fuel compartment using the hook on
either side of the door, and replace the log that was removed in step 1. (see Figure 14).
The appliance is now ready for use. Make sure you use the hook on either side of the door
to close the door when the appliance is hot. The hooks are cooler than other parts of
the door.
VI. OPERATION
WARNING: If you do not follow these instructions exactly, a fire may result, causing property
damage, personal injury or loss of life.
NOTE: During initial operation of the new appliance, the logs may emit a slight odor. This is
normal, and the odor will dissipate after a few hours.
1. Before lighting the appliance, check to see that the burners are free of any obstructions. Also
make certain that there is no water in the burners. If you nd water, you must empty it out (see
Section IX).
2. If you have just installed a canister of illuma-fuel, you may need to wait a minute or so to
allow the fuel to drain into the burner. When you can see fuel in all three burner cups, light
a long match or a long butane lighter and hold the ame down in each cup until it ignites.
(WARNING: Do not use a short match to light the burner, as this could result in burns.)
Initially, the ames might have a bluish hue. This will quickly change to a yellow ame as the
fuel heats up.
3. To extinguish the ames, grasp the end of the snuer tool that is provided with this appliance.
Lower the rounded end of the snuer down into each burner cylinder slowly and seat it in the
hole of the burner. The hole must be completely covered to extinguish the ames. Note that
this appliance can be relit at any time—immediately, if desired.
4. Any unused fuel that remains in the burners/tray/canister after the unit is extinguished will
eventually evaporate.
VII. REFUELING
This appliance is designed so that a canister of illuma-fuel will provide a continuous supply of
fuel to the burner for about an hour and forty minutes on its maximum setting*. To allow for
uninterrupted burning beyond this time, the burner has been designed so that about ten minutes
before the fuel is completely exhausted, the ames in the two burner cylinders nearest to the fuel
compartment will go out, and only the single remaining burner cylinder will be burning. At this
point, you can replace the empty canister with a full one. This can be done while the appliance is
burning - there is no need to extinguish all the ames. The two burners without ames may need
to be relit after the canister is replaced.
To replace the canister:
-11-
Page 12

1. Remove the log that covers the fuel compartment door. Be very careful about where you
touch the log. See Figure 11. Make sure you handle the log on the branch that is farther from
the ames. CAUTION: THE AREAS OF THE LOG THAT ARE CLOSEST TO THE FLAME ARE
VERY HOT AND WILL BURN YOUR HAND. Set the log in a safe place where it will not be:
damaged, come into contact with anything combustible, or be touched by somebody else.
2. Open the door of the fuel canister compartment using the hole in the door. (see Figure 12).
3. Grasp the empty canister by the notches provided. Pull it up and tip it so that it clears
the bracket and then lift it straight up to remove it. Make sure the left side stays tipped
downwards to minimize any spilling that may occur if the canister still has some fuel in it.
(see Figure 13).
4. Install a new canister as described above (see INSTALLING THE FUEL CANISTER, Steps 3
and 4).
5. After the canister has been installed, close the door of the fuel compartment. Make sure you
use the hook on the side of the door to close it, because the top of the door may be hot.
Replace the log. The appliance is now ready to use.
*NOTE: Burn times will vary depending on conditions such as: wind, outside temperature, and
levelness of the appliance. Maximum burn time is achieved when the 3 rings are installed in the
burners. See Section VIII.
VIII. ADJUSTING THE FLAMES
This appliance comes with a set of three ame adjustment rings that were originally shipped inside
the burners. You can use them to reduce the size of the ames and increase the burn time, if you
like. Simply place a ring in a burner cylinder (when the unit is not burning and is cool. DO NOT
attempt to do this while the unit is burning or is still hot). The hole in the ring should be centered
over the hole in the burner cylinder, and you should not use more than one ring per cylinder. The
rings should rest horizontally inside the burners. You do not need to use any rings—this will give
you the largest ames, but the shortest burn time. You also have the option to place one or two
rings in one or two burners respectively and leave the others without rings.
IX. EMPTYING WATER FROM THE BURNERS
Before lighting the appliance, you must always be certain that there is no water in the burners.
Always cover the appliance with the supplied water proof cover when not in use. This will prevent
water and debris from entering the burners.
If you nd water, you must empty it out before using the appliance. To do so, remove the logs, log
plate, and burner. Invert the burner, and shake it vigorously until all the water has been emptied
from it. Reinstall the logs, log plate, and burner according to steps 6 to 8 in the INSTALLATION
section above.
-12-
Page 13

X. MAINTENANCE
WARNING: Turn off the appliance and let it cool before cleaning.
CAUTION: Periodic cleaning is necessary to ensure proper functioning of this appliance.
The only maintenance needed for the continued proper performance of this appliance is periodic
cleaning. To clean the appliance:
1. Allow the ames to die out naturally by consuming all the fuel. This will ensure that there is
only residual alcohol in the tubes between the fuel tray area and the burners. Also, since the
burner is quite hot while in operation, wait at least 30 minutes after the ames have died out
before cleaning the appliance.
2. Metal components of the appliance should be cleaned using a damp cloth and a mild dish
detergent. Never use abrasive cleaners, as they can damage the metal. Also, never use any
liquid for cleaning that is volatile or that is oxidizing (i.e., that contains ammonia or any other
similar liquid), or any cleaner that leaves a residue inside the burners.
3. The logs should be dusted lightly.
4. All debris should be removed from inside the burners or tubes leading to the burners.
5. Before relighting the burner, make sure that all parts of the appliance are dry and are returned
to their proper operating positions.
6. Ensure that the piercer is installed properly after cleaning. See Figure 15.
-13-
Figure15
Proper Installation of piercer
Page 14

XI. TROUBLESHOOTING
Use the following guide to solve any problems you might encounter in operating this appliance.
PROBLEM
1. You see fuel on the ground near the
appliance.
2. You do not see fuel in the burner cups prior
to lighting the appliance.
SOLUTION
• DO NOT light the burner. Extinguish any open
ame near the spill. Wipe up the spill, and wait
several minutes for the residue to evaporate. If
you see no additional fuel on the ground, you
may light the burner. If you see additional fuel
on the ground, you might have a leak. DO NOT
use this appliance if it leaks fuel.
• The appliance might be out of level. Check
to make sure the appliance is level, and shim
under the table legs, if necessary. Shim only
with metal washers or other non-ammable
objects.
• A small piece of foil that covers the opening of
the illuma-fuel canister might be obstructing the
piercer tube. Remove the log above the fuel
compartment, and open the fuel compartment
door. Gently wiggle the fuel canister tray to
enlarge the opening in the foil. DO NOT lift the
illuma-fuel canister from the fuel tray, as this
could cause a fuel spill.
• The tubes connecting the burner cups to
the fuel reservoir and to each other may be
clogged. (This is almost certainly the case if
only one of the burner cups does not contain
fuel.) Starting at the tube opening in the
bottom of the burner cup, run a thin, exible
wire the length of the tube to remove the
obstruction.
3. You see fuel in the burner cups, but the
appliance will not light.
4. The burners light, but will not stay lit.
• The Illuma-Fuel might be contaminated with
water. See Section IX. EMPTYING WATER
FROM THE BURNERS, above. (NOTE: You
should always check for water in the burner
cups and empty any water you might nd
BEFORE installing an illuma-fuel canister. If
you nd that there is water in the burners after
you have installed a canister, you must remove
the canister before emptying the water. This
will result in a small fuel spill. DO NOT light
the burner. Extinguish any open ame near
the spill. Wipe up the spill, and wait several
minutes for the residue to evaporate.)
• Conditions might be too windy to use the
appliance. DO NOT attempt to block the wind
with combustible materials, as this could result
in a re.
-14-
Page 15

If the canister is dicult to insert or the canister binds to the piercer when being removed, it
means that the bracket on the left side of the reservoir is bent too far to the right. Carefully bend
the bracket on the left side of the reservoir slightly to the left to allow a little more space for the
canister when it is being installed or removed.
XII. PARTS LIST
PART NO. ITEM
62000 illuma Fire Pit with Log Set
62001 36” Slate Table
62002 Table Legs
62003 Fire Pit Burner Assembly
62004 Fire Pit Insert
62005 Log Support Plate
62006 Fuel Compartment Door
62007 Flame Snuer
62008 Flame Adjustment Rings (3)
62009 Ceramic Fiber Log #1
62010 Ceramic Fiber Log #2
62011 Ceramic Fiber Log #3
62012 Ceramic Fiber Log #4
62013 Ceramic Fiber Log #5
62014 Fuel Canister Piercer
62015 Waterproof Cover
-15-
Page 16

WARRANTY INFORMATION
KEEP THIS WARRANTY
Model: ____________________________________
Serial No.: _________________________________
Date Purchased: ____________________________
Always specify model and serial numbers when communicating with Duraame, Inc.
We reserve the right to amend the specications of this product at any time without notice. The only warranty
applicable is our standard written warranty. We make no other warranty, expressed or implied.
LIMITED WARRANTY – DURAFLAME ILLUMA™ LOG SETS AND FIRE PIT PRODUCTS
Duraame, Inc. warrants to the original purchaser this product to be free from defects in materials and
workmanship, exclusive of normal manufacturing defects and customary variations not aecting ordinary
performance, under normal home use and service for one (1) year from the date of rst purchase, provided
that the product has been properly installed, operated, and maintained in accordance with all applicable
instructions. To make a claim under this warranty the original purchase receipt, Bill of Sale, or cancelled
check must be presented.
Our obligation under this warranty shall be limited to the repair or exchange of any part(s) which may
be demonstrated to be defective from faulty material or poor workmanship under normal home use and
service within one (1) year from the date of rst purchase and which are required to restore this product to
proper operating condition, along with a reasonable allowance for labor when provided by a Duraame, Inc.
Authorized Service Center. Warranty part(s) MUST be obtained through authorized dealers of this product
and/or Duraame, Inc., which will provide original factory replacement parts. Failure to use original factory
replacement parts voids this warranty. Correction in the manner provided above shall constitute a fulllment
of all liabilities of Duraame, Inc. with respect to the quality of the product. The product MUST be installed
by a person capable of following all instructions in accordance with all local codes and instructions furnished
with the unit.
This warranty does not apply to parts that are not in original condition because of normal wear and tear,
or parts which have been subject to accident, negligence, alteration, abuse, or misuse, or which fail or
become damaged as a result of lack of proper maintenance, or to defects caused by improper assembly or
installation. We make no warranty whatsoever in respect to accessories or parts not supplied by us. Travel,
diagnostic cost, labor, shipping and handling, and any and all such other costs related to repairing a product
damaged through normal wear and tear, misuse, or negligence will be the responsibility of the owner.
TO THE FULL EXTENT ALLOWED BY THE LAW OF THE JURISDICTION THAT GOVERNS THE SALE OF
THE PRODUCT, THIS WARRANTY IS EXPRESSLY IN LIEU OF ALL OTHER WARRANTIES EXPRESSED OR
IMPLIED INCLUDING THE WARRANTIES OF MERCHANTABILITY AND FITNESS FOR USE AND OF ALL
OTHER OBLIGATIONS OR LIABILITIES ON OUR PART, AND WE NEITHER ASSUME, NOR AUTHORIZE
ANY OTHER PERSON TO ASSUME FOR US, ANY OTHER LIABILITY IN CONNECTION WITH THE SALE
OF THIS PRODUCT. IN NO EVENT SHALL DURAFLAME, INC. AT ANY TIME BECOME LIABLE FOR ANY
BREACH OF WARRANTY IN AN AMOUNT EXCEEDING THE PURCHASE PRICE OF THE PRODUCT AND
DURAFLAME, INC. SHALL NOT BE LIABLE FOR ANY OTHER DAMAGES WHATSOEVER INCLUDING
INDIRECT, INCIDENTAL, OR CONSEQUENTIAL DAMAGES.
Some states do not allow a limitation on how long an implied warranty lasts or an exclusion or limitation of
incidental or consequential damages, so the above limitation on implied warranties, or exclusion or limitation
on damages may not apply to you.
This warranty gives you specic legal rights, and you may also have other rights that vary from state to state.
For information about this warranty write to:
Attn: Consumer Aairs, Duraame, Inc., 2894 Monte Diablo Ave., Stockton, CA 95203, www.duraame.com
-16-
 Loading...