


wirelessinteractive multimedia slate
AS3A
quick start guide

FEDERAL COMMUNICATIONS COMMISSION INTERFERENCE STATEMENT
This equipment has been tested and found to comply with the limits for a Class B digital device,
pursuant to part 15 of the FCC Rules. These limits are designed to provide reasonable protection against harmful interference in a residential installation. This equipment generates, uses
and can radiate radio frequency energy and , if not installed and used in accordance with the instructions, may cause harmful interference to radio communications. However, there is no guarantee that interference will not occur in a particular installation. If this equipment does cause
harmful interference to radio or television receptions, which can be determined by turning the
equipment off and on, the user is encourage to try to correct the interference by one or more of
the following measures: 1) Reorient or relocate the receiving antenna; 2)Increase the separation
between the equipment and receiver; 3) Connect the equipment into an outlet on a circuit different from that to which the receiver is connected; 4) Consult the dealer or an experienced
radio/TV technician for help.
CAUTION: Any changes or modifications not expressly approved by the grantee of this device
could void the user’s authority to operate the equipment.
RF Exposure Warning
This equipment complies with FCC RF exposure limits set forth for an uncontrolled environment.
The equipment must not be co-located or operating in conjunction with any other antenna or
transmitter.
Safety Precautions
PREVENT RISK OF ELECTRICAL SHOCK:
Ÿ Do not use near water.
PREVENT RISK OF PERSONAL INJURY OR EQUIPMENT DAMAGE:
Ÿ Do not place product on floor.
Ÿ Be careful of placement of USB Charging cable.
Ÿ Do not place objects on top of product or cables.
Ÿ Do not leave product in direct sunlight or direct heat source.
Ÿ Do not use in extremely high humidity environments.
Ÿ Do not attempt to disassemble the product.
DO NOT USE WITHIN 6 INCHES OF A PACEMAKER.
DISPOSE OF PRODUCT PROPERLY. DO NOT PLACE IN STANDARD MUNICIPAL WASTE.
USE THE CHARGING CABLE SUPPLIED WITH THE PRODUCT.
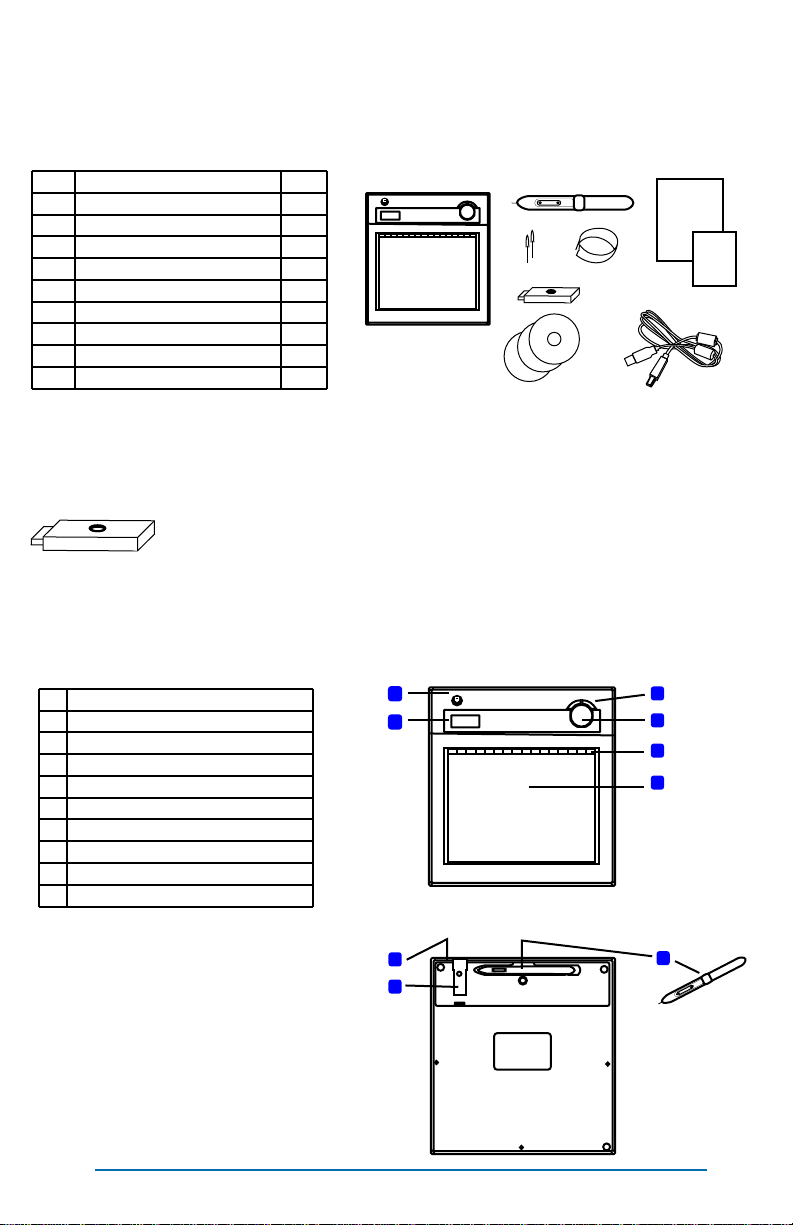
Contents
Take a quick inventory of what you received in your box.
# Description Qty
1 AS3A (2.4G RF) x1
2 Stylus (pen) x1
3 Replacement tips for pen x2
4 Tool for removing pen tip x1
5 USB RF Receiver Dongle (2.4G) x1
6 Install Discs x2
7 QuickStart Guide x1
8 Multi-lingual Guide x0
9 USB Recharging Cable x1
1
2
3
5
6
IMPORTANT – PLEASE READ BEFORE BEGINNING INSTALLATION!
Ÿ Do not plug in the USB RF Receiver Dongle until after
you have installed the tablet driver (page 4).
7
4
8
9
# Description
1 Power Button (push for 3 seconds)
2 LCD Display (Status Indicators)
3 Page Up / Page Down Buttons (Scroll)
4 Volume Control (adjust computer vol.)
5 MacroKeys / Hot Spots (see page 6)
6 Active Area (6” x 8”, 10” Diagonal)
7 USB Battery Charging Port
8 USB RF 2.4G Receiver Dongle
9 Pen/Stylus
1
2
7
8
Page 3
3
4
5
6
9

Prepare Tablet For Use
Before using your AS3A Wireless Tablet you will want to make sure the battery is charged and
the pen battery has been installed.
Ÿ To charge your AS3A simply plug the USB Charging Cable into the pad and any open
USB port on your computer. The pad will require approximately two hours to ensure a full
charge.
Ÿ To install the pen battery
q Unscrew the pen and insert a AAA battery as indicated (note battery is not included).
q Re-tighten the pen battery cap. Do not over-tighten.
+ -
Setup & Installation
Installing on Mac OS X (10.4+)
Ÿ Insert the “Tablet Driver – Mac” CD-ROM into your Apple Computer.
Ÿ Browse the disc and open the Pen Pad Tablet Driver.app to install the driver.
Ÿ After the driver is installed you can safely connect your AS3A using the USB RF Receiver
Dongle. (See Page 5 “Linking AS3A to PC” for more details)
Installing on Windows XP/2000 (Vista users should skip to the next section)
Ÿ Insert the “Wireless Tablet” CD-ROM into your PC.
Ÿ Required Software
q Click the button to start the Macro Key Manager Installation. The install wizard will
guide you through the install process. The Tablet Driver will be installed with the Macro Key Manager software.
Ÿ Optional Software
q Free Notes/Office Ink – Create notes, insert handwriting into Documents.
q Power Presenter RE II – Full on-screen annotation.
Ÿ Restart your computer after installation.
Ÿ You can now safely connect your AS3A using the USB RF Receiver Dongle. (See Page 5
“Linking AS3A to PC” for more details)
Installing on Windows Vista (32-bit and 64-bit)
Ÿ Insert the “Wireless Tablet” CD-ROM into your PC.
Ÿ Required Software
q Click the button to start the Macro Key Manager Installation. The install wizard will
guide you through the install process. The Tablet Driver will be installed with the Macro Key Manager software.
Ÿ Optional Software
q Free Notes/Office Ink – Not available on Vista. These functions are included in the Vista operating
system as part of the Tablet PC system.
q Power Presenter RE II –
Ÿ Eject the “Wireless Tablet” CD-ROM and Insert the “PowerPresenter RE II” CD-ROM
q Follow the installation wizard to install PowerPresenter.
Ÿ You can now safely connect your AS3A using the USB RF Receiver Dongle. (See Page 5
“Linking AS3A to PC” for more details)

Linking AS3A to PC
Upon first use the tablet will need to be synchronized with the USB RF Receiver. NOTE:
Make sure the MacroKey Manager software has been installed first.
q To link the tablet and receiver:
ü Power on the tablet (hold the power button for 3 seconds or more)
ü Press the round button on the USB Receiver (it will flash blue)
ü Press the red button on the back of the tablet
ü The pad’s LCD display will now indicate the tablet is connected (the tablet will be
assigned an ID number and this will be shown in the display, I.e. “001”, and the
signal tower icon will appear in the LCD display)
LCD Display Icons and Their Meaning
a
ICON
a
888
Replacing Pen Tip
If the pen tip is broken or worn down it can easily be replaced with a new tip using the “tip removal tool”.
888
Description
Power On. Indicates the pad is powered on.
Link Successful. Indicates the RF Receiver has accepted the
pad and issued a tablet ID number.
Connection Status. Indicates successful connection to PC.
Pen Status. Blinking indicates pen is hovering above tablet
within the active area. Steady indicates pen tip is touching
pad.
Battery Indicator. Four levels of charge indicated.
Active Tablet. When displayed the tablet is in active mode.
Icon disappears when pad is in power saving mode.
Tablet Number. Indicates the ID number assigned to the pad.
Multiple pads can be connected to one USB RF Receiver.
Volume Adjustment. Indicates direction of volume adjustment.
Replacement
pen tips.
Page 5
Tip removal tool.
Use to grasp the
pen tip.

Using The Bundled Software
The user manuals for the bundled software are installed on your computer with the software.
View and read the PDF manuals for instructions on using the applications.
Setting Up the Macro Keys (hot spots)
The MacroKey Manager provides an easy to use interface for setting the actions of each of the
16 programmable hot spots along the top of the AS3A active area (see yellow shaded area in
the image below).
The MacroKey Manager software is located
under the Programs menu.
The MacroKey Manager can also be found in
your system tray. The application icon will show
‘grayed out’ when the tablet is not linked to the PC,
and will show ‘white’ when the tablet is connected.
Tablet not connected
Tablet connected
There is a user’s guide for the MacroKey Manager.
To access the user’s guide right click on the
MacroKey icon in the system tray and select Help.
The ‘right-click’ menu also provides access to pen and tablet preference settings.
Show – Opens the MacroKey Manager Interface.
Disable/Enable – Disables/Enables the MacroKey function.
Setting – Set the MacroKey response time (I.e. How long the pen must be pressed on the
hot spot before the macro is run).
Pen Pad – Options for controlling how the pen functions. Including options for controlling the pen buttons (right click/double click/single click).
Help – User’s Guide.
Quit – Exit MacroKey Manager. Closes from system tray. Run the MacroKey Manager un-
der Programs to restart the service.

Product Specifications
DUKANE CORP AV SERVICE DEPT
2900 Dukane Drive
St Charles, IL 60174
800-676-2487 / 630-762-4032
Fax 630-584-5156
avservice@dukane.com
http://www.dukane.com/av/service/
Toll-free Support During Business Hours
800-676-2487
Wireless Technology 2.4Ghz RF (30’ range)
Input Technology Electromagnetic Induction
Active Area 10” Diagonal (6” x 8”)
Resolution 2000 lines per inch
Report Rate 120 points per second
Pen Pressure 1024 levels
Macro Keys 16 Programmable Keys (hot spots)
Quick Buttons Page Up/Page Down, Volume Control
LCD TN LCD (17.7 x 40.9 mm)
LCD Icons Battery Status (4 levels), Connection Mode,
Connection Power Status, Volume Status,
Tablet ID No.
Battery Type Nokia LB5C Li-ion Rechargeable
Battery Capacity 800mA
Battery Charge Life 16 hours under continuous use
25 hours under typical use
Recharge Method USB Cable (included)
Power Consumption max 50mA (active operating mode)
Receiver Type USB RF Receiver Dongle
Operating System Windows 2000/XP/Vista/7;
Mac OSX 10.4 and up
Pen Battery 1 x AAA Battery (not included)
Pen Dimensions 5” long, 0.54” diameter
Pen Proximity 0.4” above pad
Page 7

Audio Visual Products
2900 Dukane Drive
St. Charles, Illinois 60174
www.dukane.com/av
Toll-free: 888-245-1966
Fax: 630-584-5156
E-mail: avsales@dukane.com
 Loading...