

Page 1

User Manual
Please visit Lumens
http://www.lumens.com.tw/goto.htm to
download the latest software, drivers, and
documentation.
DC-A11
Wireless Flyer
[Important]
English - 0
Page 2

Table of contents
Copyright Information ....................................................................................... 3
Chapter 1 Safety Instructions .......................................................................... 4
Safety Precautions ....................................................................................... 5
FCC Warning ................................................................................................ 5
EN55022 (CE Radiation) Warning ............................................................... 6
SAR Warning ................................................................................................ 6
Revisions............................................................................................................ 7
Chapter 2 Package Contents ......................................................................... 8
Chapter 3 Product Overview ............................................................................ 9
3.1 Settle the USB connector ................................................................... 9
Chapter 4 Installation and Connections........................................................ 10
4.1 Installing DC-120 .............................................................................. 10
4.2 Installing Dongle ............................................................................... 11
4.3 Connect to a computer by using a wireless USB Dongle .................. 12
4.4 Use a network cable to connect to a computer ................................ 12
4.5 Installing application software........................................................... 13
Chapter 5 Start Using ...................................................................................... 22
Chapter 6 Function Menu ............................................................................. 23
6.1 General ............................................................................................. 23
6.2 Profile ............................................................................................... 24
6.3 Available Network ............................................................................. 25
6.4 Status ................................................................................................ 25
6.5 Statistics ........................................................................................... 26
6.6 Wi-Fi Protected Setup (WPS) ........................................................... 26
Chapter 7
Descriptions of Major Functions
English - 1
..................................................... 27
Page 3

7.1 I would like to configure DC-A11 connection settings on the Internet27
7.2 I would like to change the login password ........................................ 27
7.3 I would like to change the SSID and channel ................................... 27
7.4 I would like to check the WPS connection settings .......................... 28
7.5 I would like to update the firmware ................................................... 28
7.6 I Want to enable the encryption mode .............................................. 29
7.7 I Want to cancel the encryption mode .............................................. 32
Chapter 8 LED Light Indicators ..................................................................... 34
Chapter 9 Troubleshooting ............................................................................. 35
English - 2
Page 4

Copyright Information
Copyrights © Lumens Digital Optics Inc. All rights reserved.
Lumens is a trademark that is currently being registered by Lumens Digital Optics
Inc.
Copying, reproducing or transmitting this file is not allowed if a license is not
provided by Lumens Digital Optics Inc. unless copying this file is for the purpose
of backup after purchasing this product.
In order to keep improving the product, Lumens Digital Optics Inc. hereby
reserves the right to make changes to product specifications without prior notice.
The information in this file is subject to change without prior notice.
To fully explain or describe how this product should be used, this manual may
refer to names of other products or companies, nevertheless without any intention
of infringement.
Disclaimer of warranties: Lumens Digital Optics Inc. is neither responsible for any
possible technological, editorial errors or omissions, nor responsible for any
incidental or related damages arising from providing this file, using, or operating
this product.
English - 3
Page 5

Chapter 1 Safety Instructions
Always follow these safety instructions when setting up and using the Wireless Flyer:
1. Do not place Wireless Flyer in tilted position.
2. Do not place the Wireless Flyer on an unstable trolley, stand or table.
3. Do not use the Wireless Flyer near water or source of heat.
4. Use attachments only as recommended.
5. Use the type of power source indicated on the Wireless Flyer. If you are not sure of
the type of power available, consult your dealer or local electricity company for
advice.
6. Place the Wireless Flyer on a place that it can be unplugged easily.
7. Always take the following precautions when handling the plug. Failure to do so may
result in sparks or fire.
Ensure the plug is free of dust before inserting it into a socket.
Ensure that the plug is inserted into the socket securely.
8. Do not overload wall sockets, extensions leads or multi-way plug boards as this may
cause fire or electric shock.
9. Do not place the Wireless Flyer where the cord can be stepped on as this may result
in fraying or damage to the lead or the plug.
10. Unplug the projector from the wall socket before cleaning. Use a damp cloth for
cleaning. Do not use liquid or aerosol cleaners.
11. Do not block the slots and openings in the projector case. They provide ventilation
and prevent the Wireless Flyer from overheating. Do not place the Wireless Flyer on a
sofa, rug or other soft surface or in a built-in installation unless proper ventilation is
provided.
12. Never push objects of any kind through cabinet slots. Never allow liquid of any kind to
spill into the Wireless Flyer.
13. Except as specifically instructed in this User Manual, do not attempt to operate this
product by yourself. Opening or removing covers may expose you to dangerous
voltages and other hazards. Refer all servicing to licensed service personnel.
14. Unplug the Wireless Flyer during thunderstorms or if it is not going to be used for an
extended period, do not place the Wireless Flyer or remote control on top of
heat-emitting equipment or heated objects such as a car and etc.
15. Unplug the Wireless Flyer from the wall outlet and refer serving to licensed service
personnel when the following situations happen:
If the power cable or plug becomes damaged or frayed.
If liquid is spilled into it or the Wireless Flyer has been exposed to rain or water.
<NOTE> Do not remove the battery of Wireless Flyer. In case of any failure,
please contact the original manufacturer for maintenance service.
English - 4
Page 6
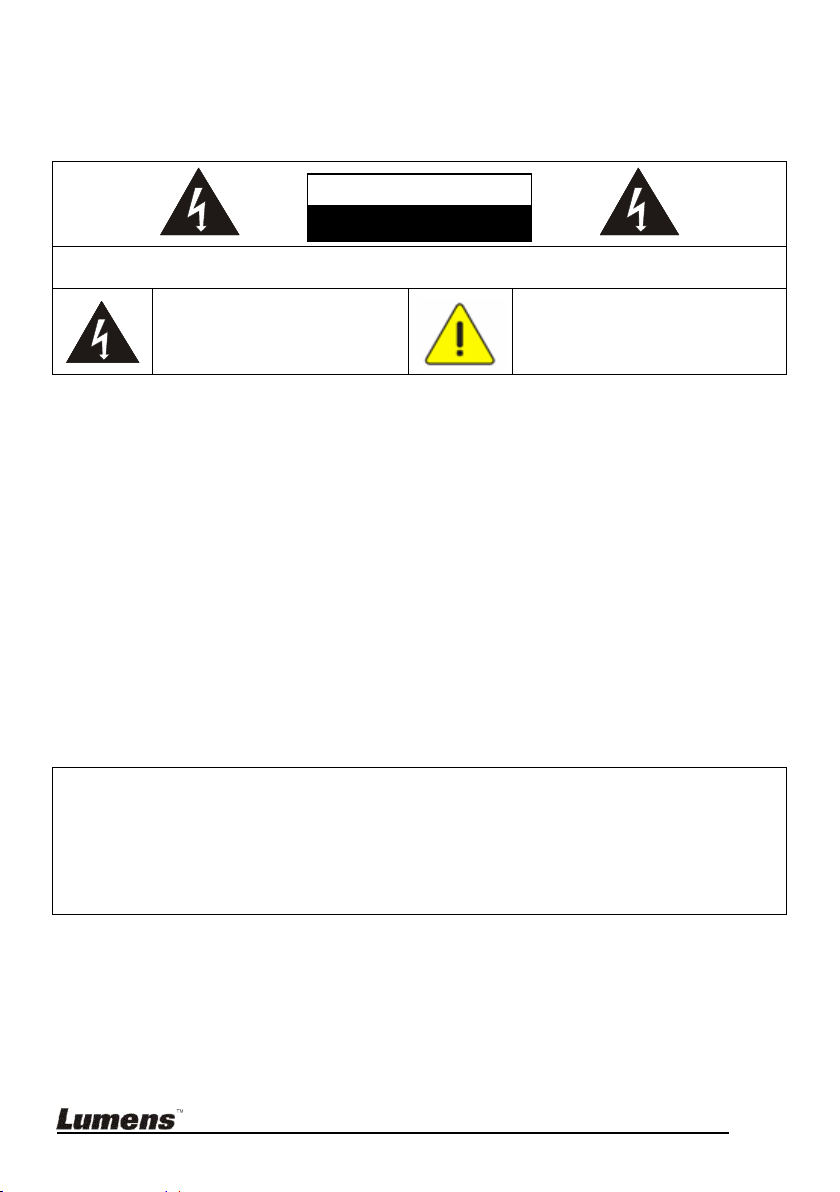
Safety Precautions
Note: To reduce the risk of electric shock. Do not remove cover (or back). No
user-serviceable parts inside. Refer servicing to licensed service Personnel.
This symbol indicates that this
equipment may contain
dangerous voltage which
could cause electric shock.
This symbol indicates that there
are important operating and
maintenance instructions in this
User Manual with this unit.
CAUTION
RISK OF EXPLOSION IF BATTERY IS REPLACED
BY AN INCORRECT TYPE.
DISPOSE OF USED BATTERIES ACCORDING
TO THE INSTRUCTIONS.
Note
Risk of Electric Shock
Warning: To reduce the risk of fire or electric shock, do not expose this appliance to
rain or moisture.
FCC Warning
This equipment has been tested and found to comply with the limits for a Class B digital
device, pursuant to Part 15 of FCC Rules. These limits are designed to provide reasonable
protection against harmful interference in a residential installation.
This device complies with Part 15 of the FCC Rules. Operation is subject to the
following two conditions:
(1) This device may not cause harmful interference.
(2) This device must accept any interference received, including interference that
may cause undesired operation.
This transmitter must not be co-located or operating in conjunction with any other
antenna or transmitter.
Warning :The wireless Docking unit (FCC ID: YVR-DC-A11) complies with FCC
radiation exposure limits set forth for an uncontrolled environment. This equipment
should be installed and operated with minimum distance 20 cm between the radiator
& your body.
English - 5
Page 7

EN55022 (CE Radiation) Warning
This product is intended for use in a commercial, industrial, or educational environment. It
is not intended for residential use.
This is a Class A product. In a domestic environment it may cause radio interference, in
which case the user may be required to take adequate measures. The typical use is in a
conference room, meeting room or auditorium.
SAR Warning
This transmitter(Dongle) must not be co-located or operating in conjunction with any other
antenna or transmitter. This device complies with internationally recognized standards
covering Specific Absorption Rate (SAR) related to human exposure to electromagnetic
fields from radio devices.
The maximum level of Specific Absorption Rate (SAR) measured is 0.620W/kg.
English - 6
Page 8

Revisions
English - 7
Page 9
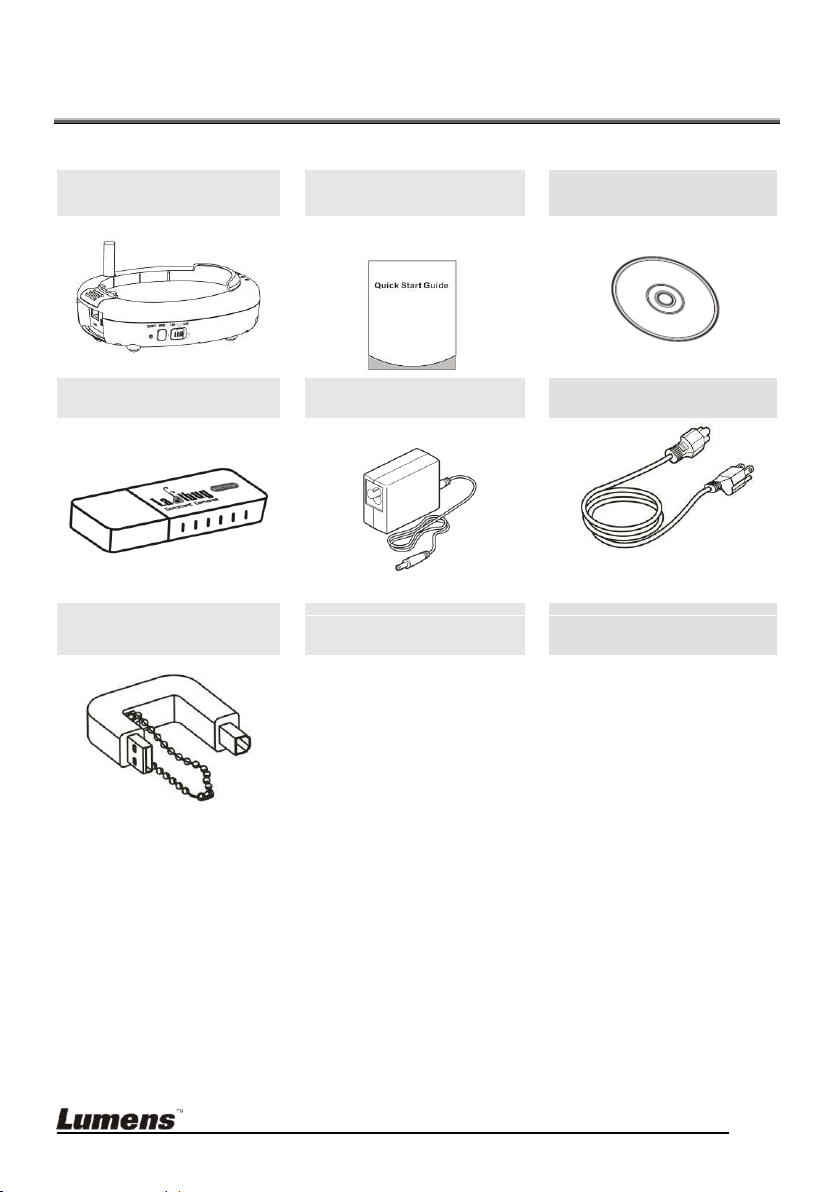
Chapter 2 Package Contents
DC-A11
Quick Start Guide
CD
(To download this manual in other
languages, visit Lumens website)
Dongle
AC Adapter
Power Cord
Appearance may vary depending
on country/region
USB Connection
Cable
English - 8
Page 10
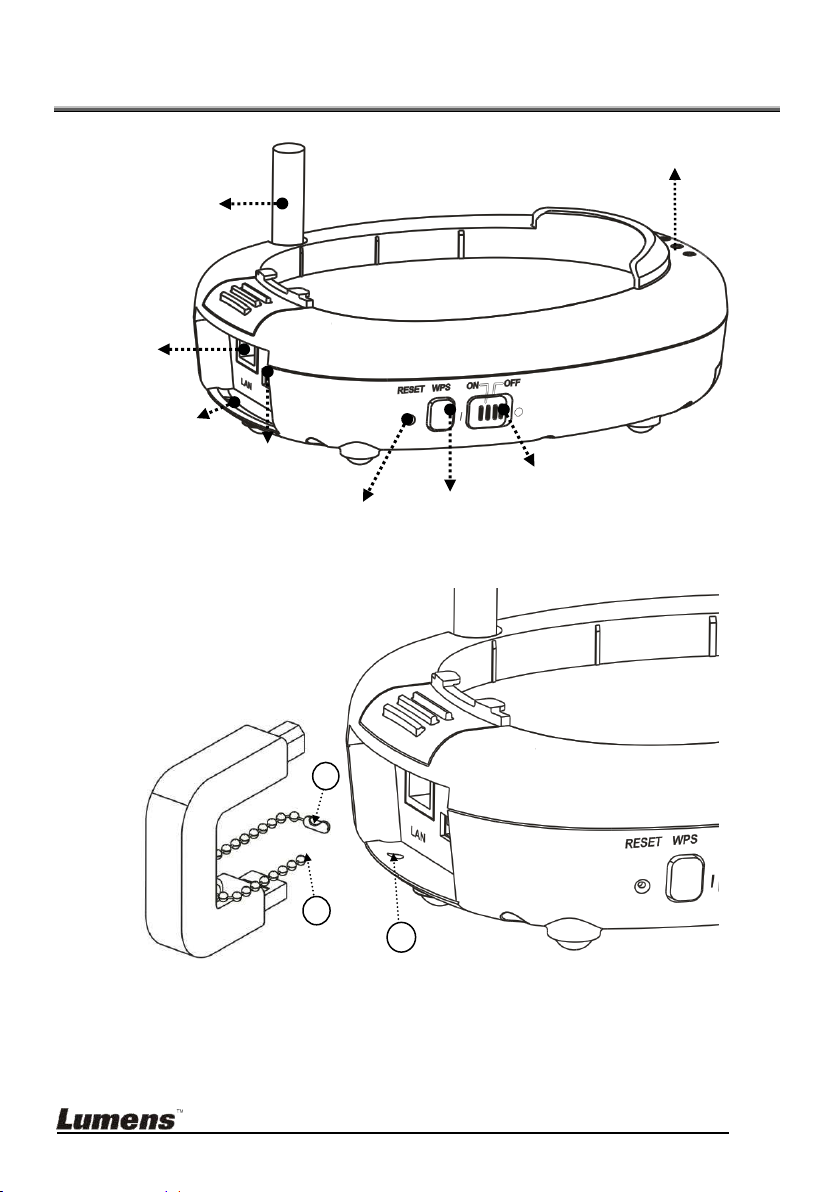
Chapter 3 Product Overview
1
2
8. USB connector
fixing hole
4. USB
2.WPS
1.POWER
5. LAN
3.Default
6. Antenna
7. LED indicator
3.1 Settle the USB connector
1. Disconnect the ball chain on the USB connector holder.
2. Thread the ball chain through the connector fixing hole on DC-A11.
3. Shackle the ball chain.
English - 9
Page 11
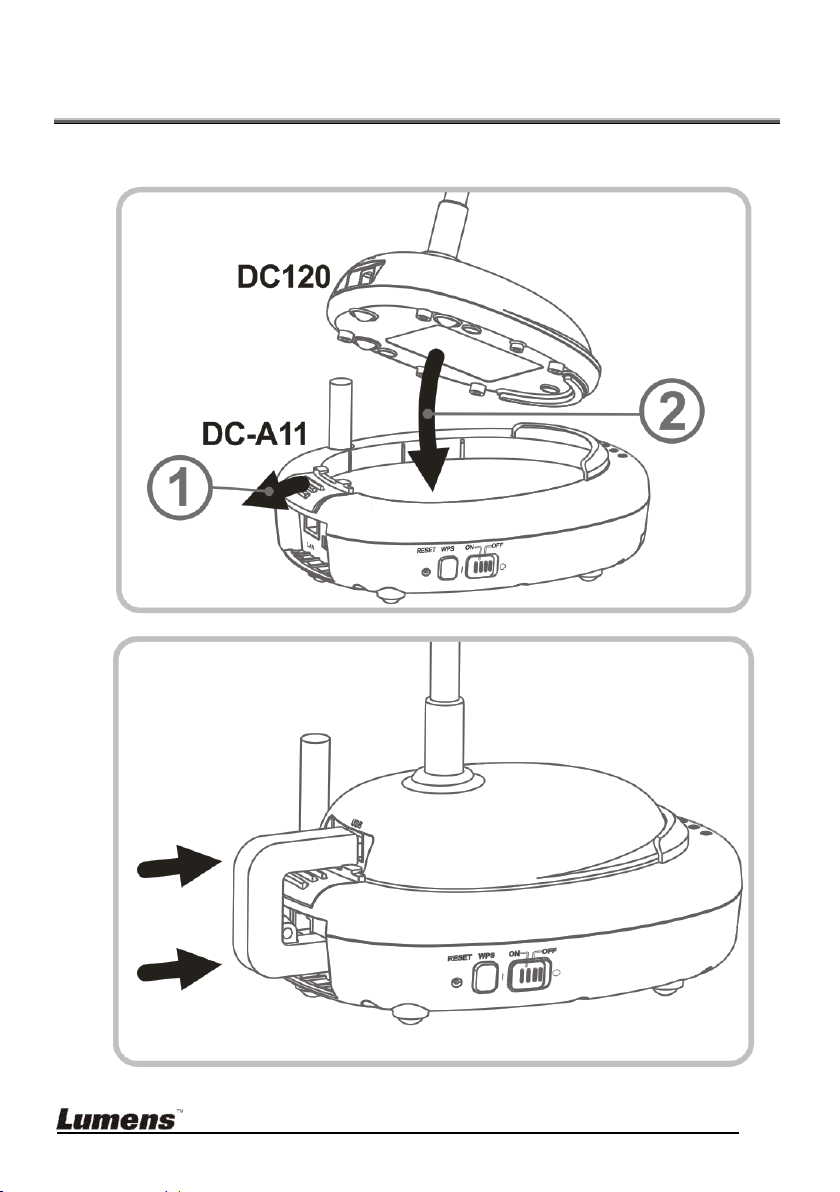
Chapter 4 Installation and Connections
USB
Connection
Cable
4.1 Installing DC-120
1.
2.
English - 10
Page 12
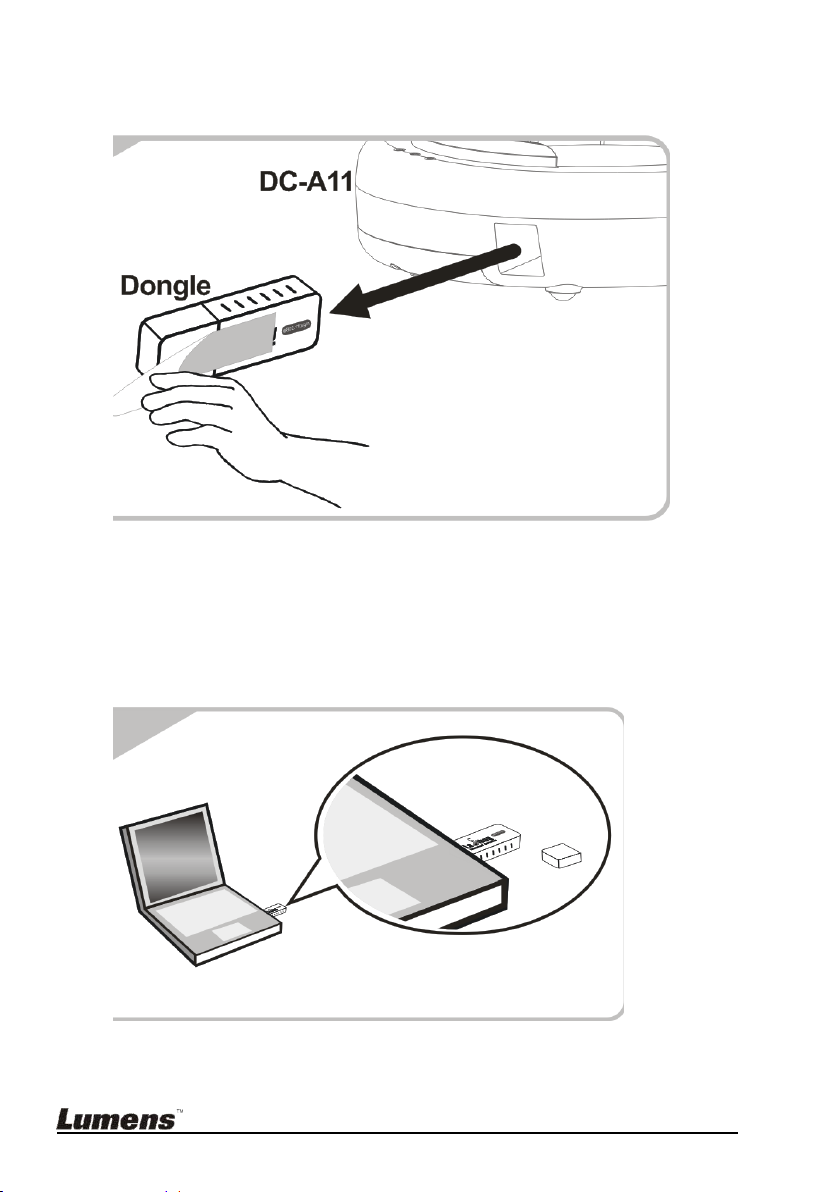
4.2 Installing Dongle
Dongle
Computer
Computer
4.2.1 Pull out the Dongle and remove the protective film
4.2.2 Installing the Dongle into the USB port on a computer
<NOTE> If the preview of LadibugTM is opened, do not unplug the
Dongle directly from the computer. You should unplug the Dongle
after the LadibugTM is closed.
English - 11
Page 13
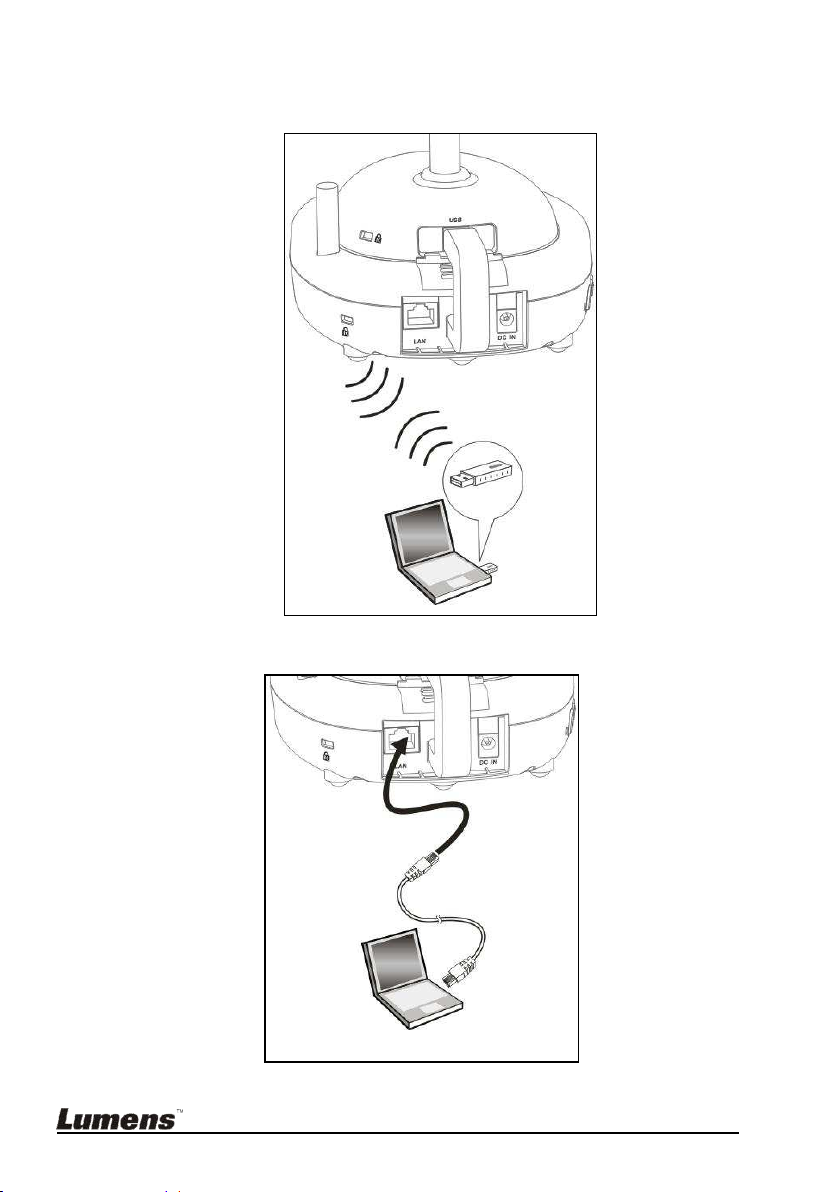
4.3 Connect to a computer by using a wireless USB Dongle
Computer
Computer
Dongle
Computer
4.4 Use a network cable to connect to a computer
English - 12
Page 14
4.5 Installing application software
Windows XP
Windows Vista / Windows 7
CPU: P4 2.8 GHz and above
Memory: 512MB
Support DirectX 9
Resolution: 1024x768
100MB Free Hard-disk Space
Windows XP SP2 and above
CPU: P4 2.8 Ghz and above
Memory: 1GB (32-bits) / 2GB (64-bits)
DirectX 9 Compatible
Resolution: 1024x768
100MB Free Hard-disk Space
4.5.1 System requirements
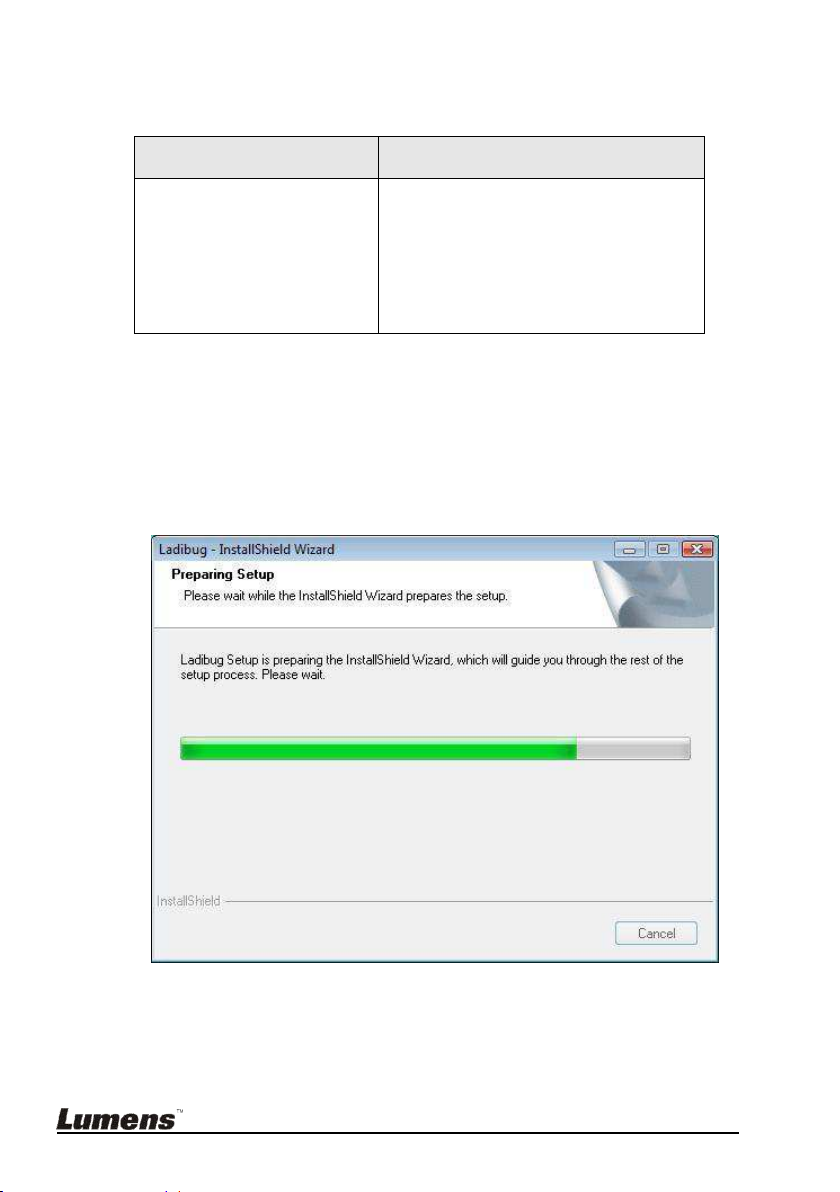
4.5.2 Installing Ladibug
TM
[ NOTE: Please be sure to install the Ladibug™ from the DC-A11 CD. ]
4.5.2.1 Insert the software CD into your computer.
4.5.2.2 The software installation program will automatically launch. Please
select [ Install Ladibug ] to begin installation.
English - 13
Page 15
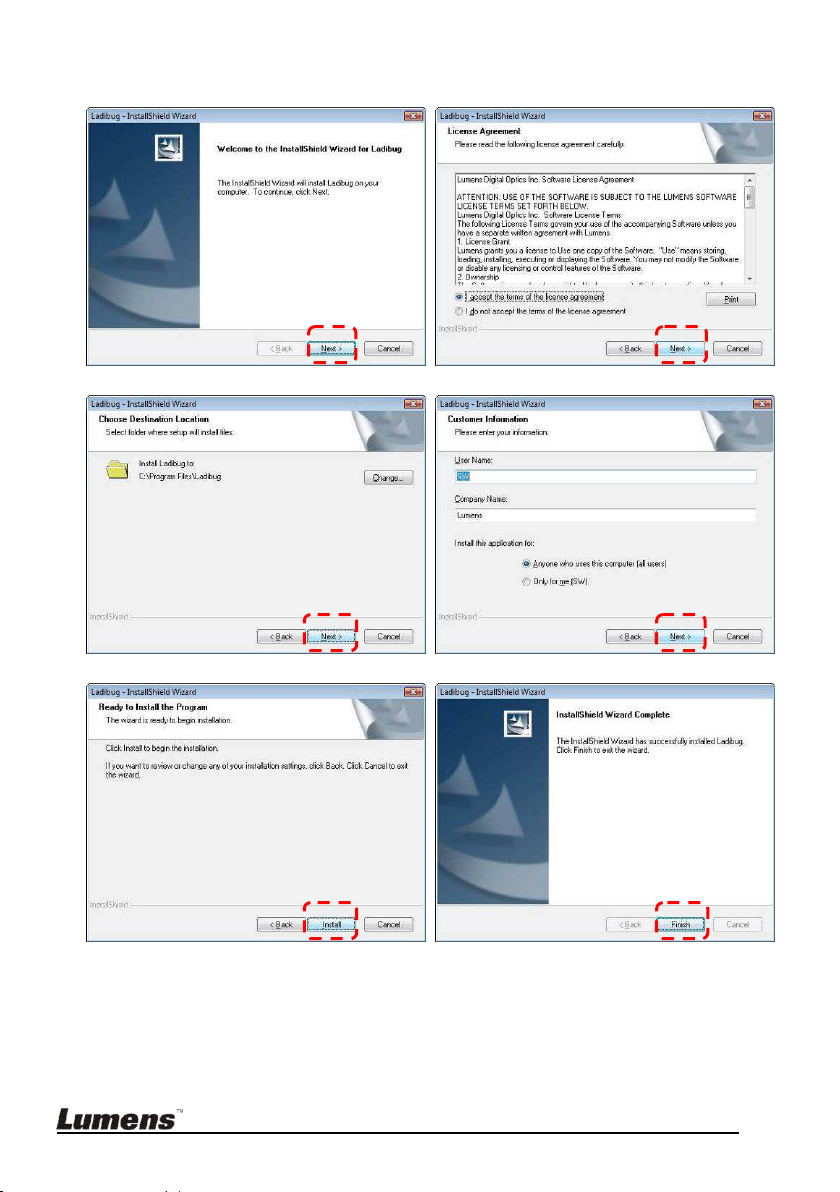
4.5.2.3 Please follow the instructions, then press [ Next ].
English - 14
Page 16
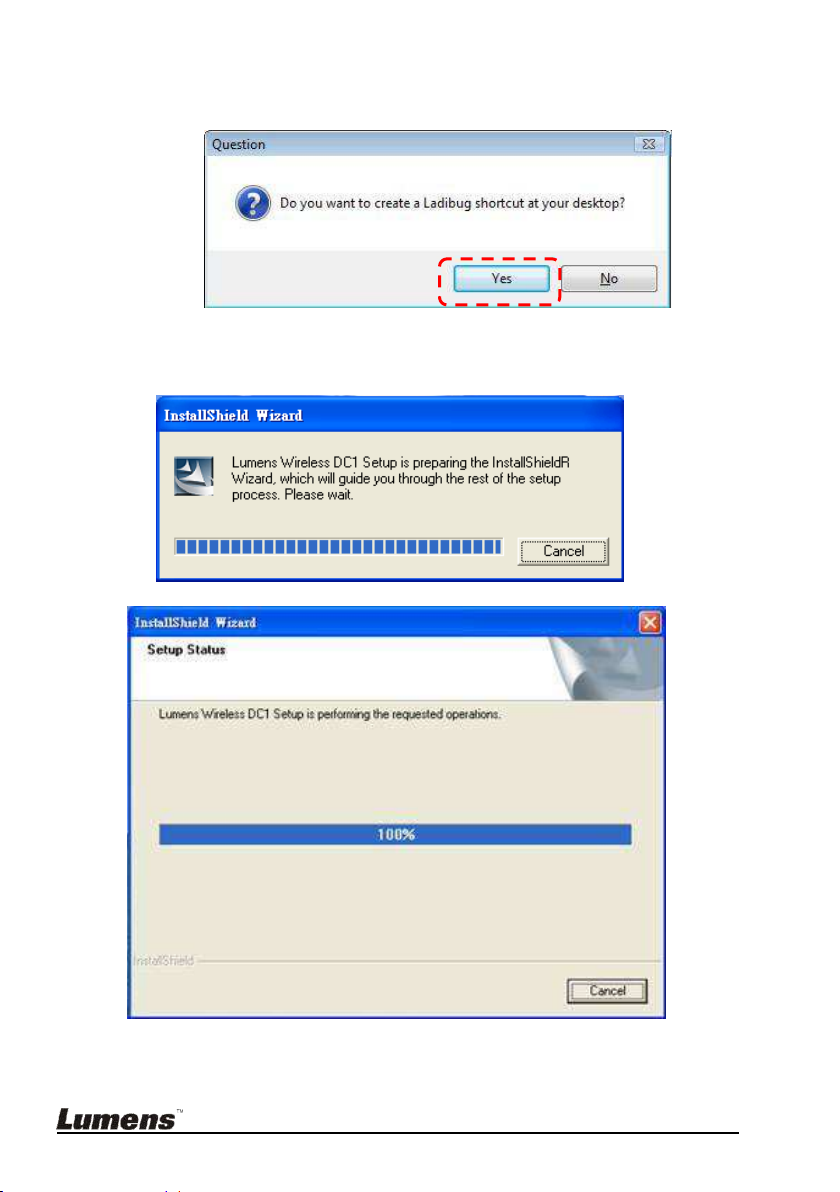
4.5.2.4 Press [ Yes ] to create a Ladibug™ shortcut on your desktop.
4.5.2.5 Continue to install the [ Lumens Wireless DC1 ] .
English - 15
Page 17
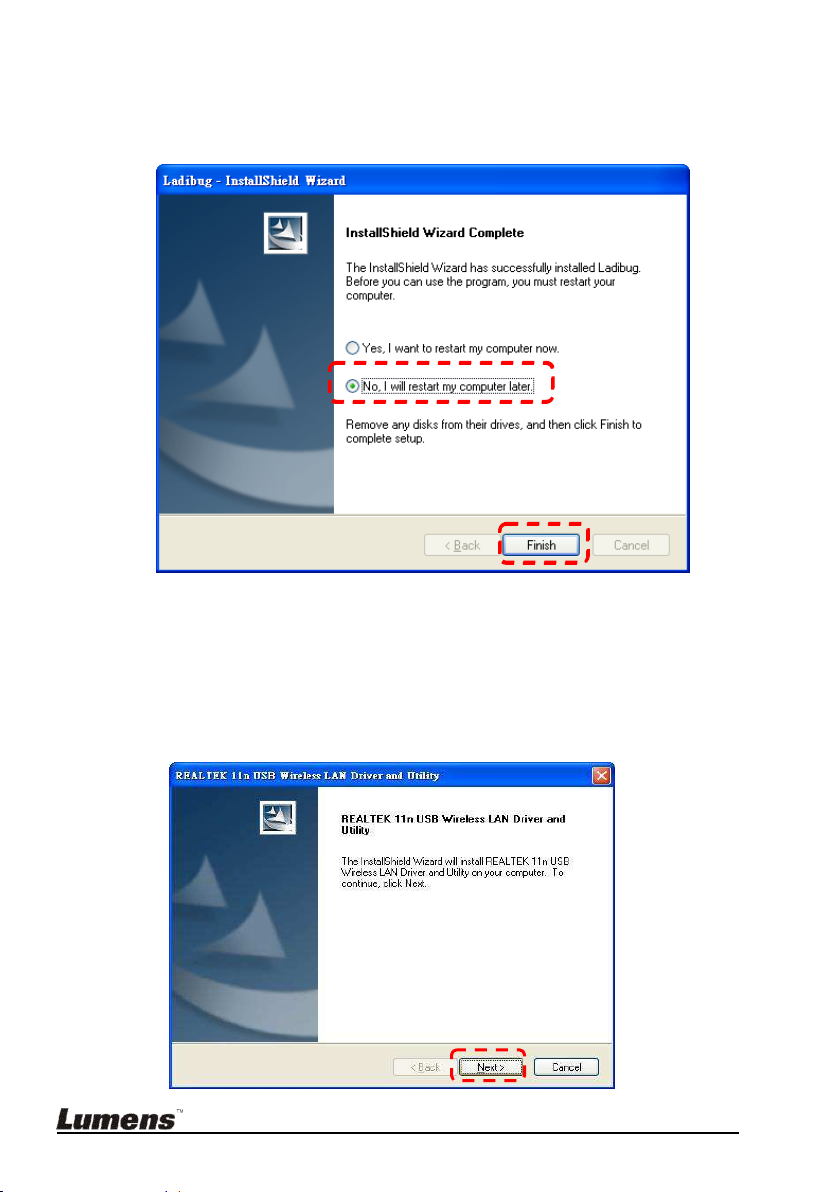
4.5.2.6 Click [ NO ], then press [ Finish ] to cancel the restart.
[NOTE: Please restart the computer only when the installation of
Wireless LAN Utility is completed.]
4.5.3 Installing Wireless LAN Utility
<NOTE> This utility doesn’t support MAC OS.
4.5.3.1 Please select [ Wireless LAN Utility ] to begin installation.
4.5.3.2 Select Language.
4.5.3.3 Please follow the instructions, then press [ Next ].
English - 16
Page 18
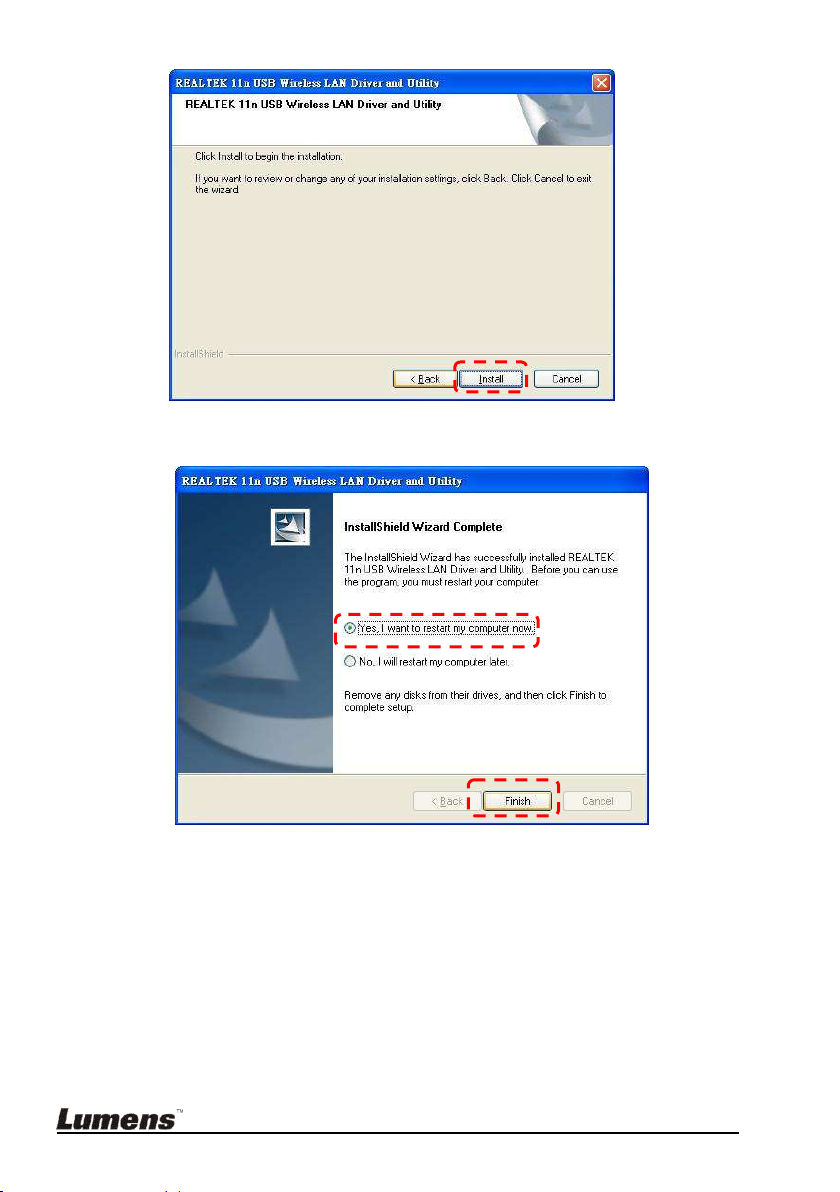
4.5.3.4 Please click the [ Finish ] button to restart your computer.
English - 17
Page 19
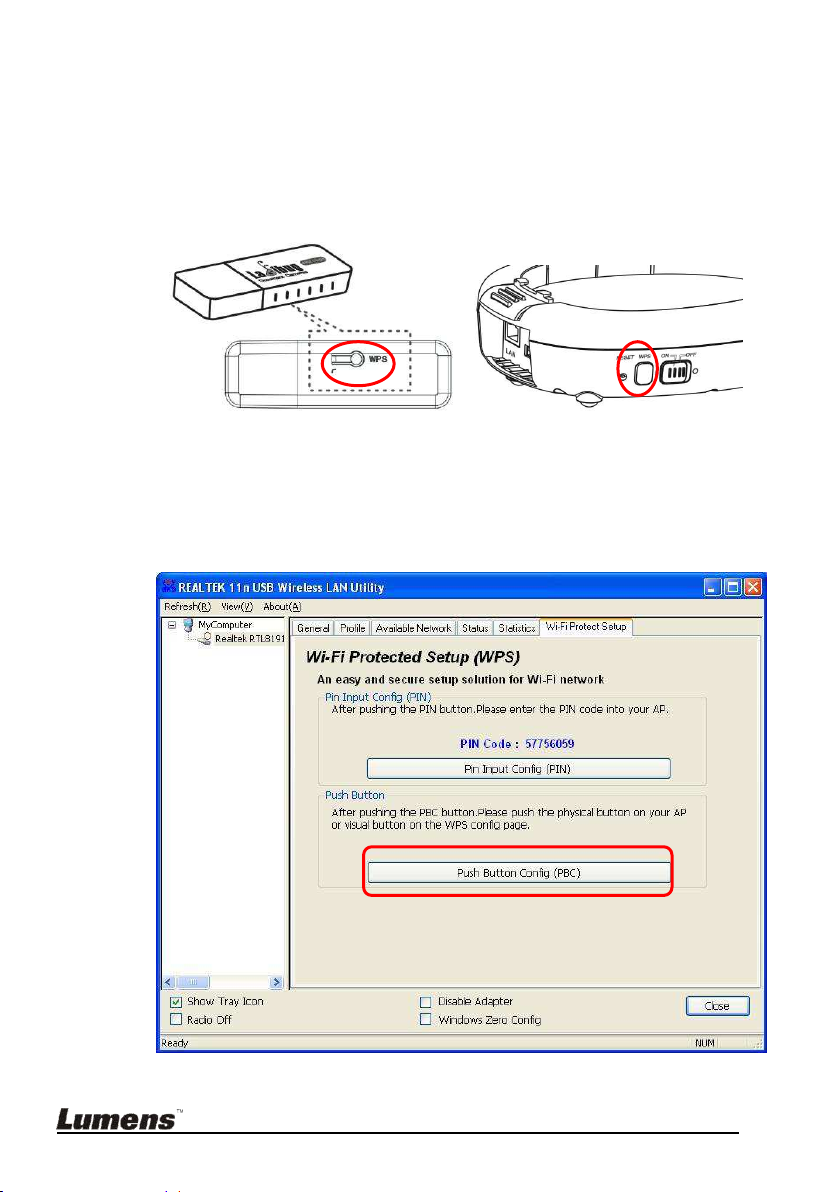
4.5.3.5 Setup the utility
4.5.3.5.1 Auto connection
a. Power on.
b. Press the WPS buttons on DC-A11 and the Dongle. (Whatever
the order, but the action must be within 30 seconds.)
(NOTE: If the WPS button on the wireless Dongle cannot be used,
open the Wireless LAN Utility and go to the [Wi-Fi Protected Setup]
page. Click [Push Button Config] to enable the WPS connection.)
English - 18
Page 20
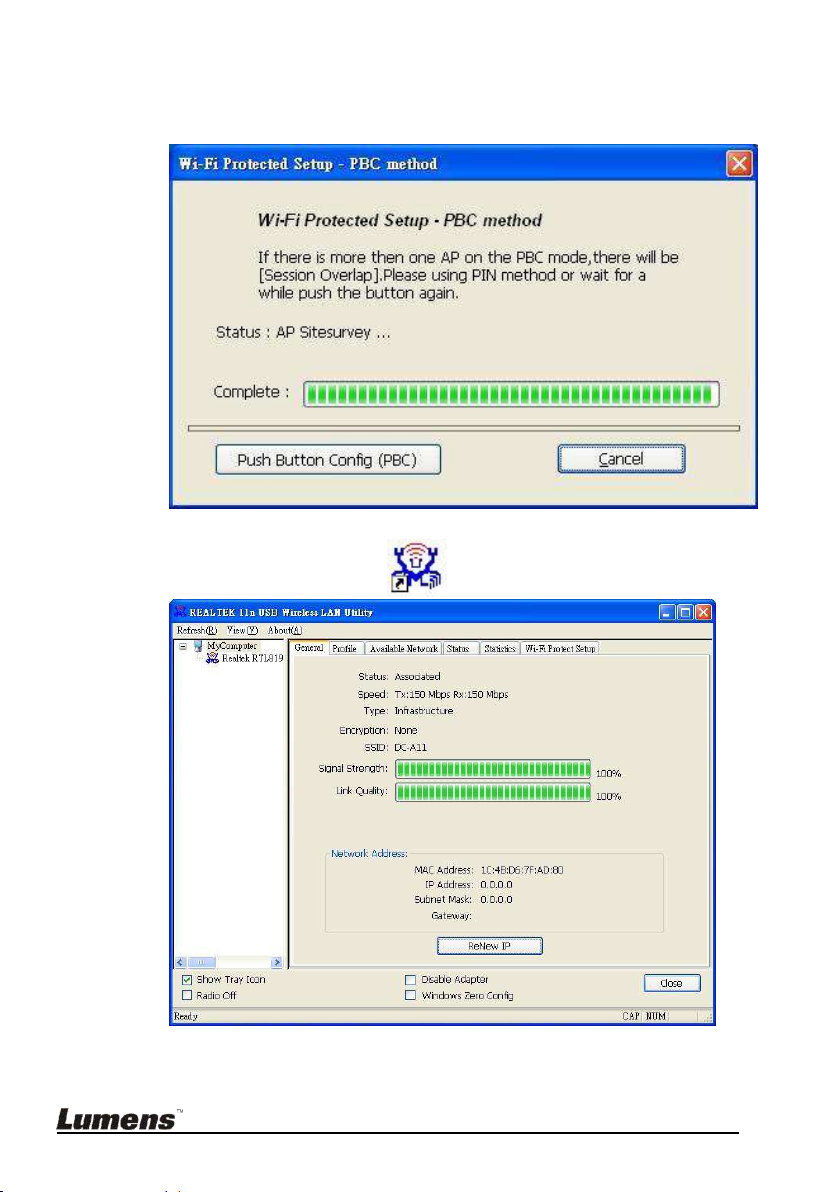
c. The connection will start when the following window pops up. The
connection will complete when the window closes.
d. Double click the icon of Wireless LAN Utility.
English - 19
Page 21
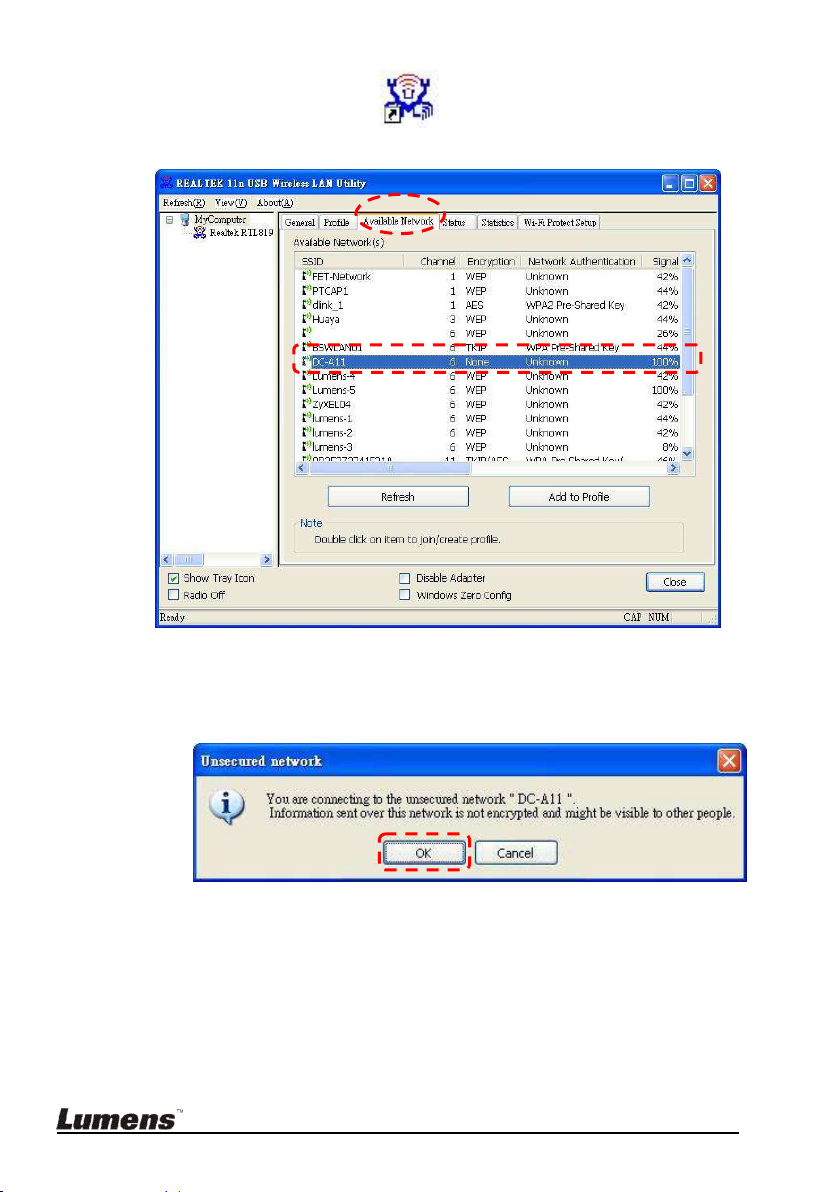
4.5.3.5.2 Manual connection
a. Double click the icon of Wireless LAN Utility.
b. Select [ Available Network ] tab, double click [ DC-A11 ] (Default).
c. Click [ OK ]. (Remark: This step may not show up due to different
OS.)
English - 20
Page 22
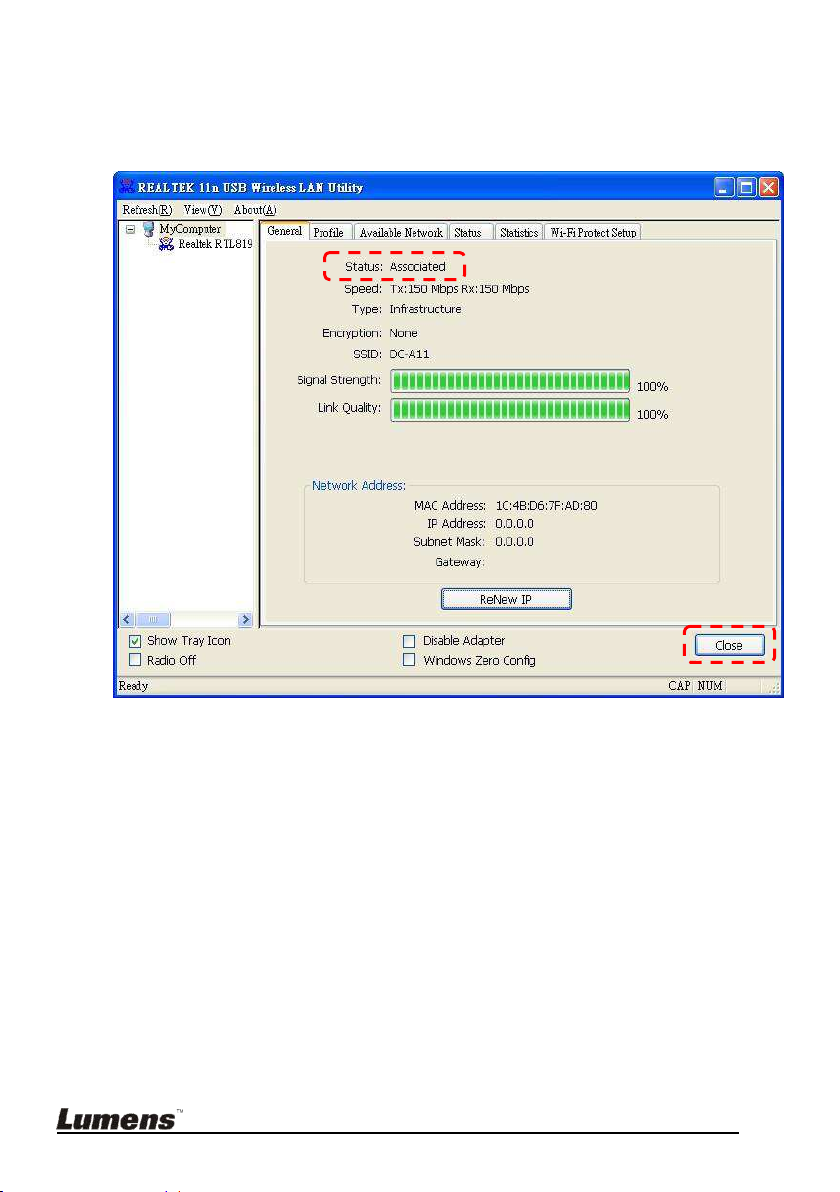
d. The connection is activated if the status is [ Associated ]. Please
click [ Close ] to exit.
English - 21
Page 23
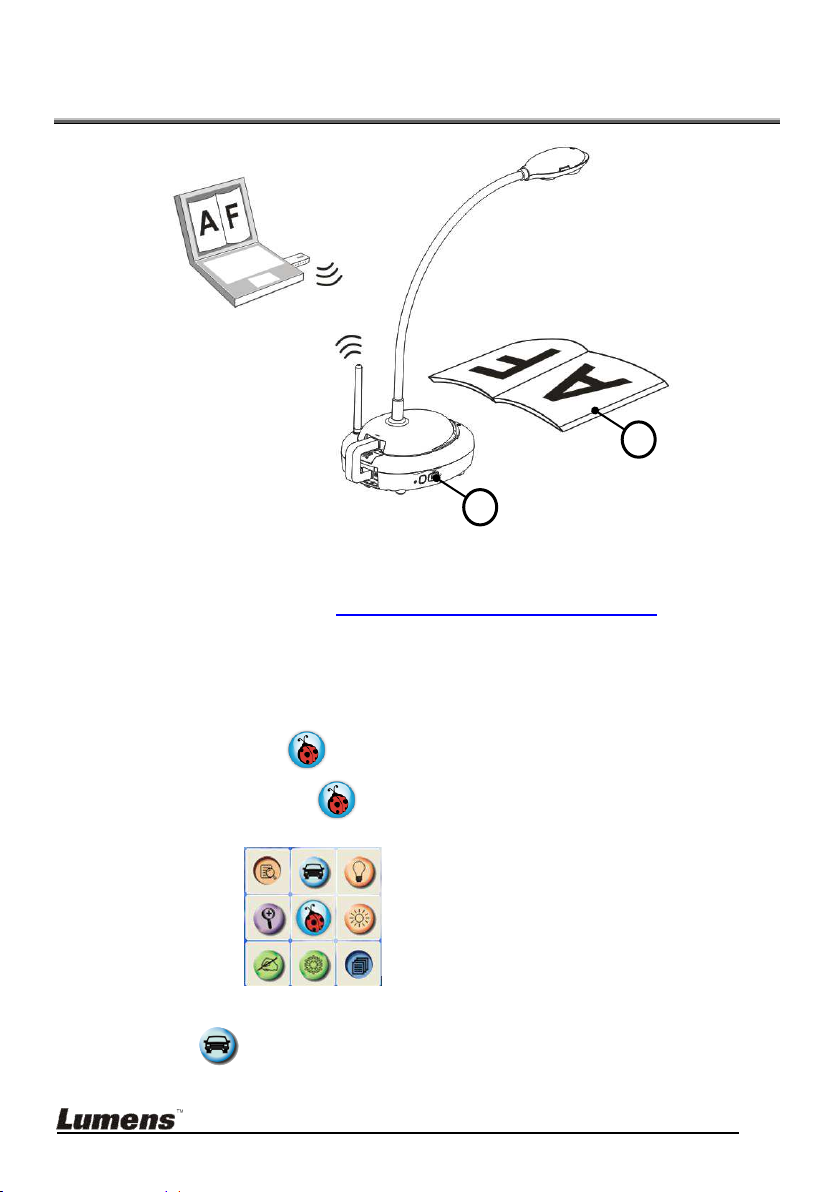
Chapter 5 Start Using
Dongle
7
3
1. Charge unit for 3 hours.
2. Please make sure you have installed Ladibug™ and Wireless LAN
Utility. Please refer to
3. Switch the Power to [ ON ].
4. Select the DC-A11 wireless network by using Dongle or internal wireless
connection.
5. Double click on
6. Move the cursor to
displayed.
7. Place an object to be displayed under the camera.
8. Click
button to optimize the image.
English - 22
4.5 Installing application software
icon to activate LadibugTM software.
icon, and the main function menu will be
Page 24
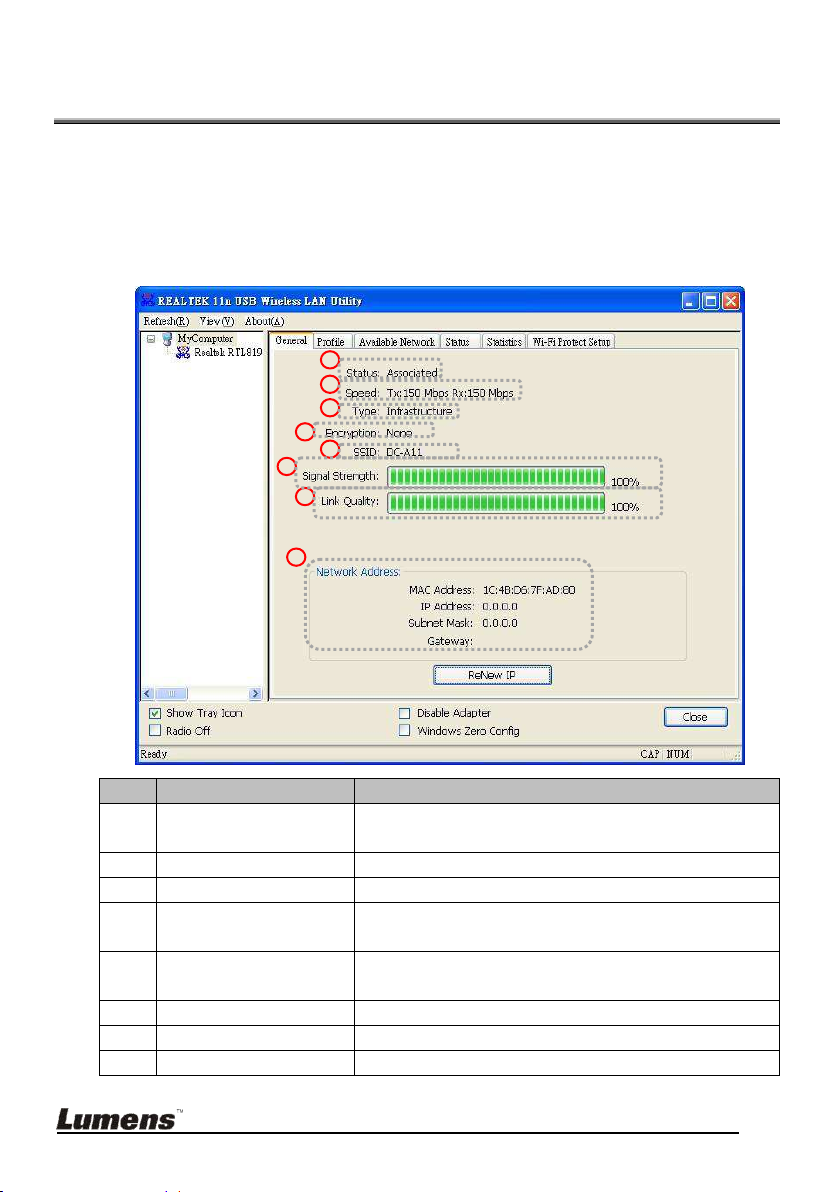
Chapter 6 Function Menu
NO
Functions
1
Status
Check if the device is connected to target
network.
2
Speed
The current connection speed.
3
Type
Infrastructure or Ad-Hoc mode.
4
Encryption
The encryption mode for connecting to
current network profile.
5
SSID
The SSID ( network name ) of the connected
wireless network
6
Signal Strength
Indicates the signal strength.
7
Link Quality
Indicates the quality of connection.
8
Network Address
Shows the current IP address settings.
6.1 General
After starting the utility, the general page pops up. The [ General ] tab
provides the information of your current wireless network connection. You
may click the [ Renew IP ] button to refresh the information.
English - 23
Page 25
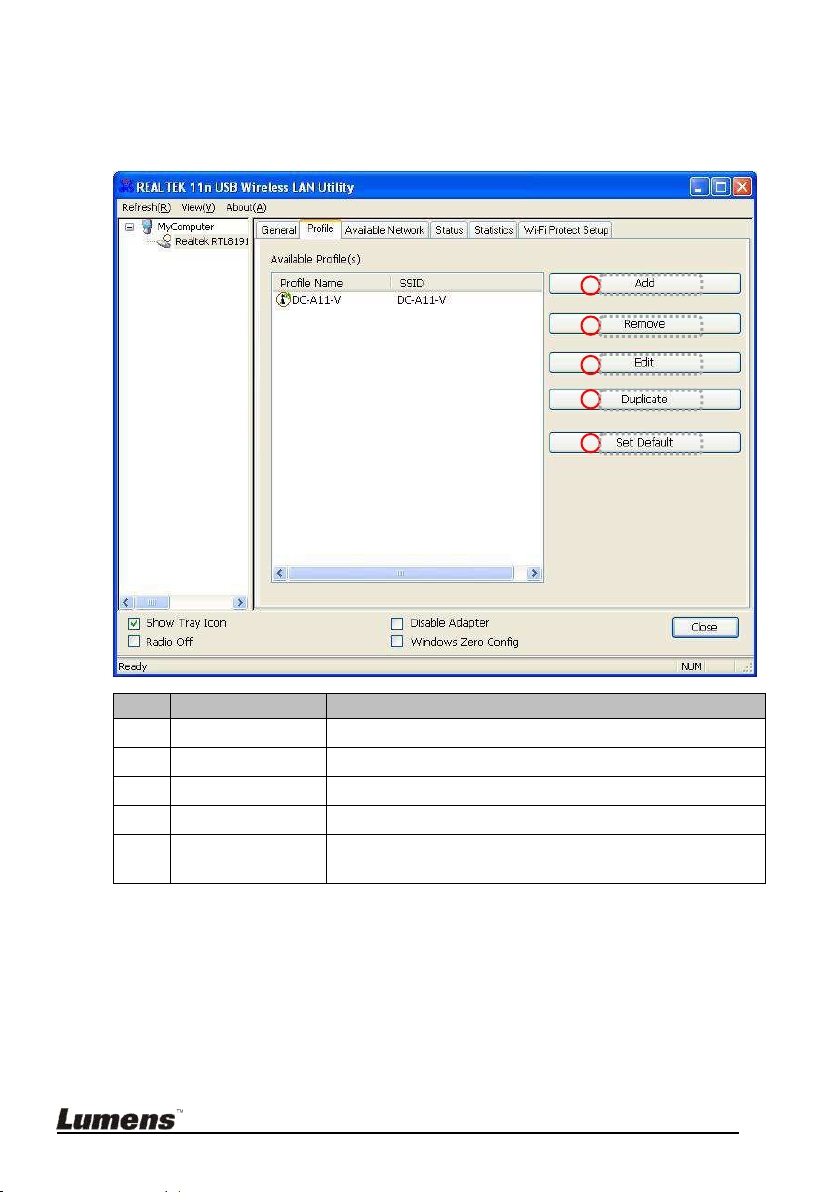
6.2 Profile
NO
Functions
1
Add
To add a connection profile.
2
Remove
To remove a connection profile.
3
Edit
To modify the configurations for a profile.
4
Duplicate
To make a copy of a profile.
5
Set Default
To select a profile as your default wireless
connection.
1
2 3 4
5
The [ Profile ] tab lists the preferred connections. You can click the buttons
beside to configure each connection.
English - 24
Page 26
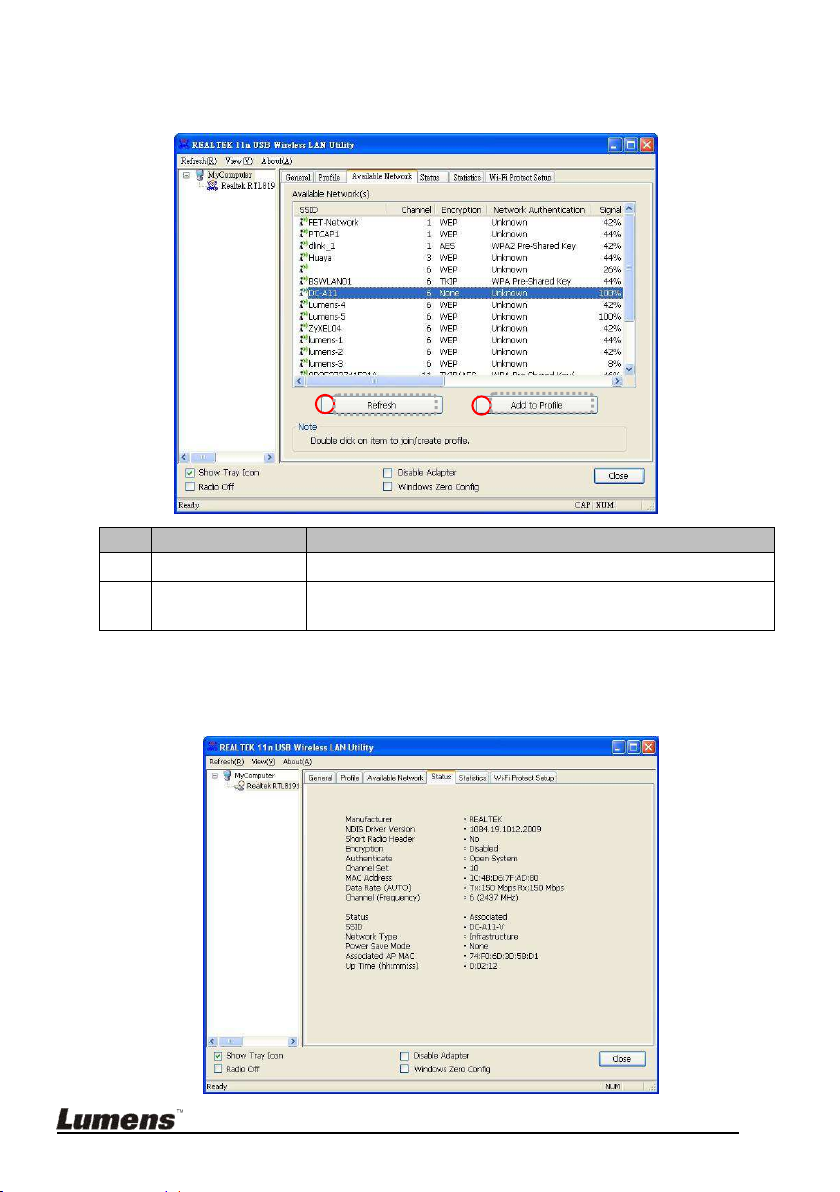
6.3 Available Network
NO
Functions
1
Refresh
To rescan available Wireless Networks.
2
Add to Profile
To add an available Wireless Networks to your
profile list.
1
2
The [ Available Network ] tab lists the reachable wireless network.
6.4 Status
The [ Status ] tab shows the current connection status.
English - 25
Page 27
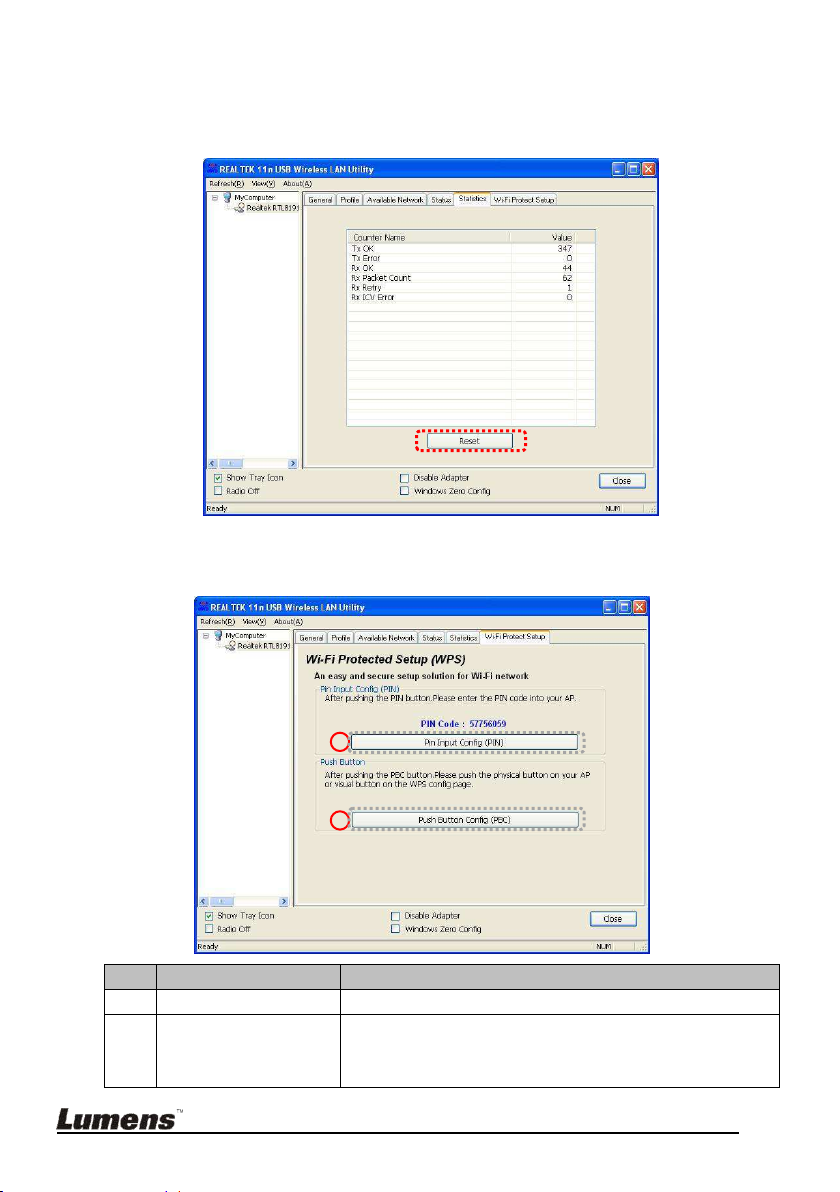
6.5 Statistics
NO
Functions
1
Pin Input Config
Choose your AP for PIN Code connection.
2
Push Button Config
Search for available network connection.
<NOTE> Please also push the WPS button on
DC-A11 for connection.
1
2
The [ Statistics ] tab shows the transmission activity record. Clicking the
[ Reset ] button recounts the values from zero.
6.6 Wi-Fi Protected Setup (WPS)
An easy and secure setup solution for Wi-Fi network.
English - 26
Page 28
Chapter 7
1
2 3 4
Descriptions of Major Functions
7.1 I would like to configure DC-A11 connection settings
on the Internet
7.1.1 Open the Internet Explorer webpage browser, and enter [192.168.2.1]
in the address bar.
7.1.2 Enter the Login Name [ Admin ].
7.1.3 Enter the Password ([ Admin ] by default), and click the [ Login ] button.
<NOTE> Close the LadibugTM before you modify any
settings.
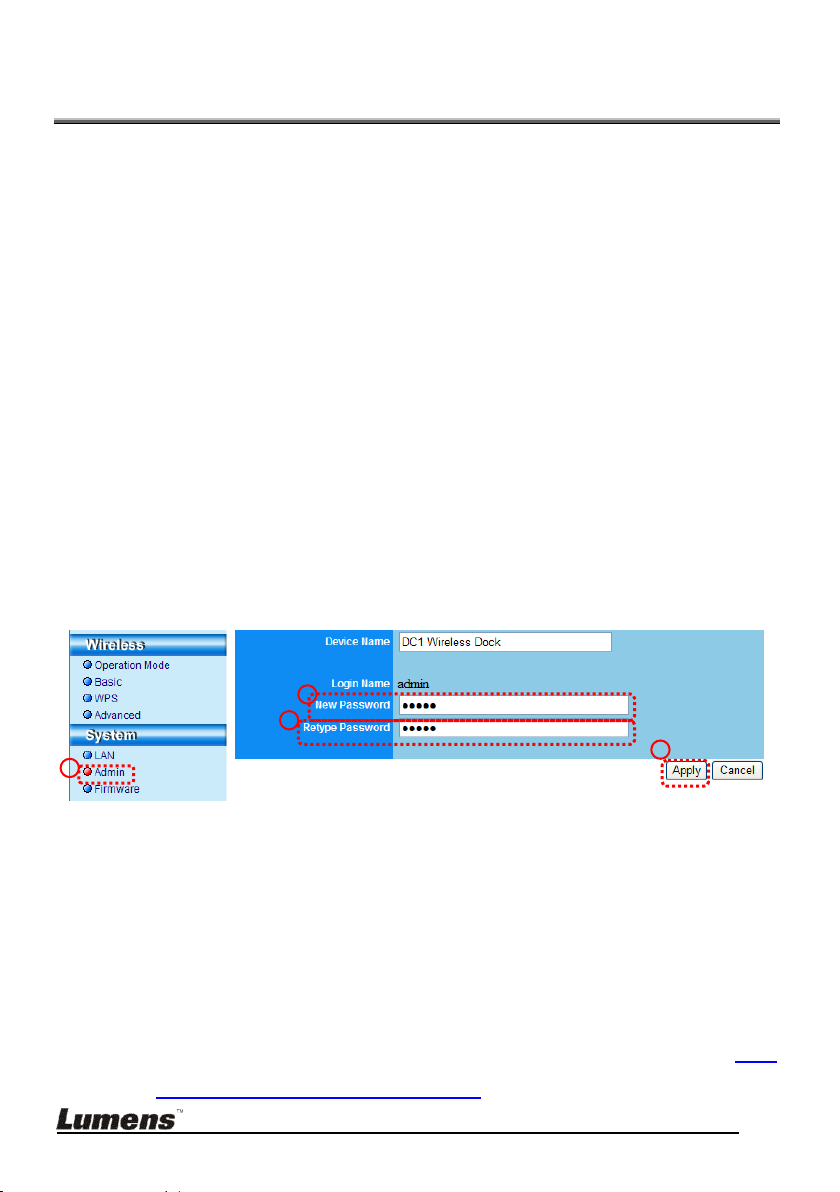
7.2 I would like to change the login password
7.2.1 Click the [ Admin ] button to enter the [Admin] page.
7.2.2 Enter the new password in the [New Password] field.
7.2.3 Re-enter the password in the [Retype Password] field for verification.
7.2.4 Click [ Apply ]
7.3 I would like to change the SSID and channel
7.3.1 Click the [ Basic ] button to enter the [ Basic ] page.
[ SSID ] : (the public name of a wireless network): Set and change the
name of the wireless network to be displayed.
[ Channel ] : The channel is [ Channel 06 ] by default. Please choose
your own channel frequency.
[ Encryption Type ] : Choose your encrytion type. (Please refer to
Want to Enable the Encryption Mode)
English - 27
7.6 I
Page 29
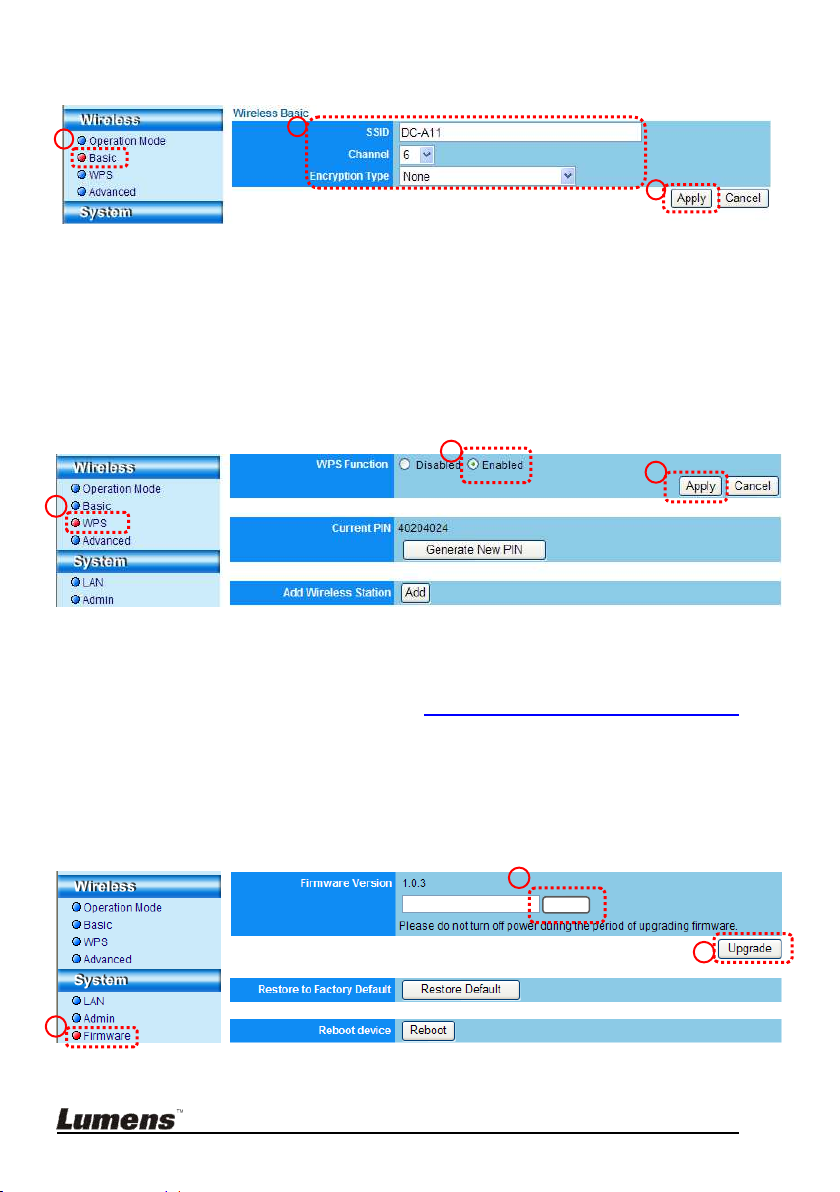
7.3.2 Click [ Apply ]
1
2
3
1 2 3
Browse
1
2
3
7.4 I would like to check the WPS connection settings
7.4.1 Click the [ WPS ] button to enter the [ WPS ] page.
7.4.2 The default setting is [ Enabled ]. If you want to modify the settings,
please select [ Disable ].
7.4.3 Click [ Apply ]
7.5 I would like to update the firmware
7.5.1 Please visit Lumens website :
download the updated firmware file.
7.5.2 Click the [ Firmware ] button to enter the [ Firmware ] page.
7.5.3 Click [ Browse ] to load the update file that you’ve just downloaded.
7.5.4 Click [ Upgrade ].
English - 28
http://www.lumens.com.tw/goto.htm to
Page 30
7.6 I Want to enable the encryption mode
1 2 4
3
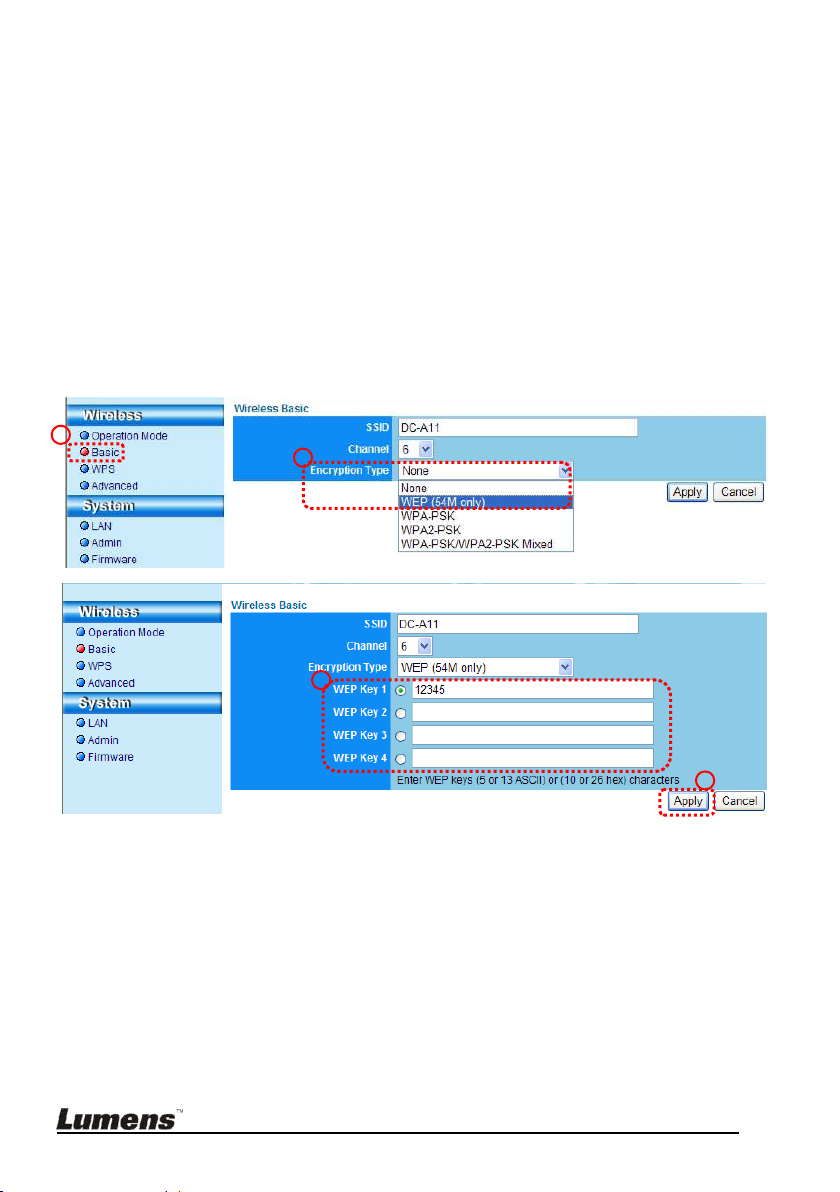
7.6.1 Set up encryption
1. Enter [Basic] Page.
2. [ Encryption Type ]:Select an encryption mode. It is recommended that
you set up your password with [WEP] Type.
1. To use ASCII: Enter 5 or 13 characters (0-9 and A-Z only).
2. To use HEX: Enter 10 or 26 characters (0-9 and A-F only).
<NOTE> Only one set of columns can be used at a time.
3. Press [Apply] to apply your changes.
English - 29
Page 31
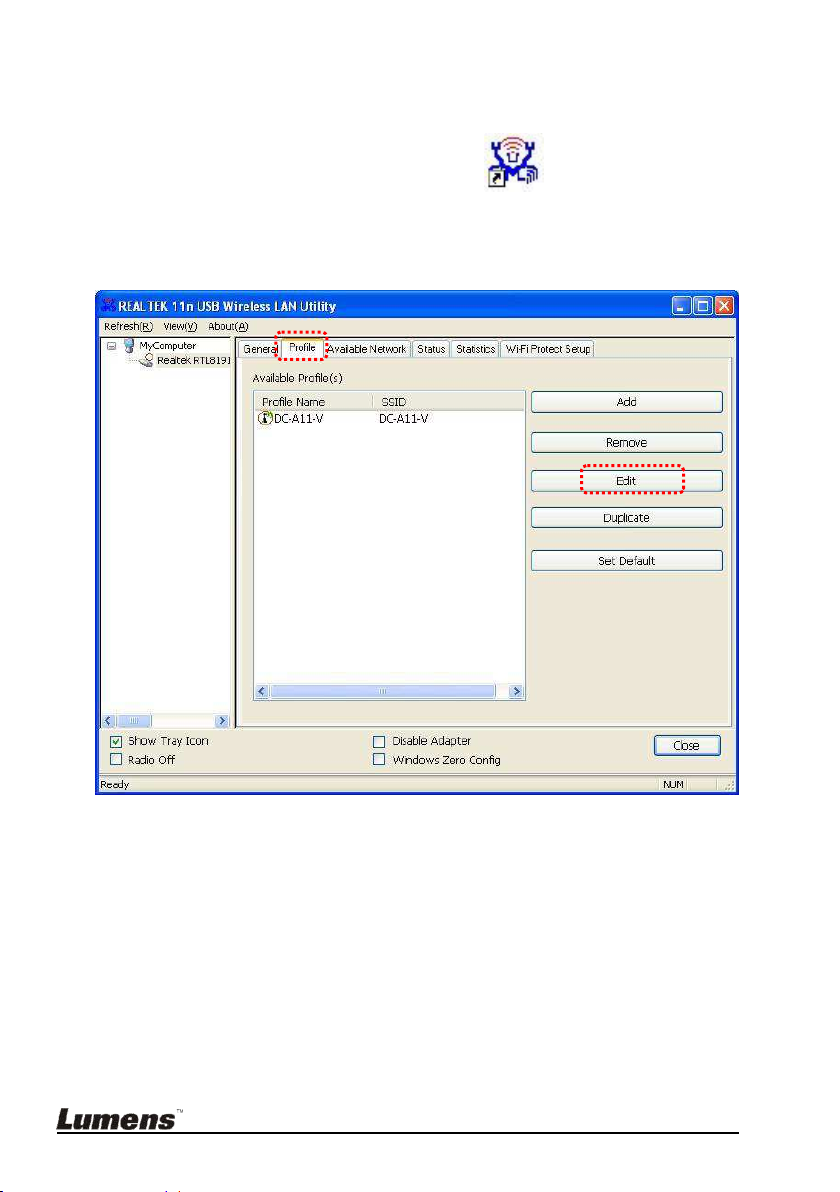
7.6.2 Enable encrypted connections (WEP encryption)
1. Double click the Wireless LAN Utility
2. Open [Profile] menu, click DC-A11 (default name), and then click the
[EDIT] on the right side to open the profile.
icon.
3. Settings:
A. Network Authentication : Open System
B. Data encryption : WEP
C. Enter a Network Key and Encoding Mode
C1. To use ASCII : Please check [ASCII] and enter a
corresponding passphrase.
C2. To use HEX : Please enter data in the [Network key] and
[Confirm network key] column.
English - 30
Page 32
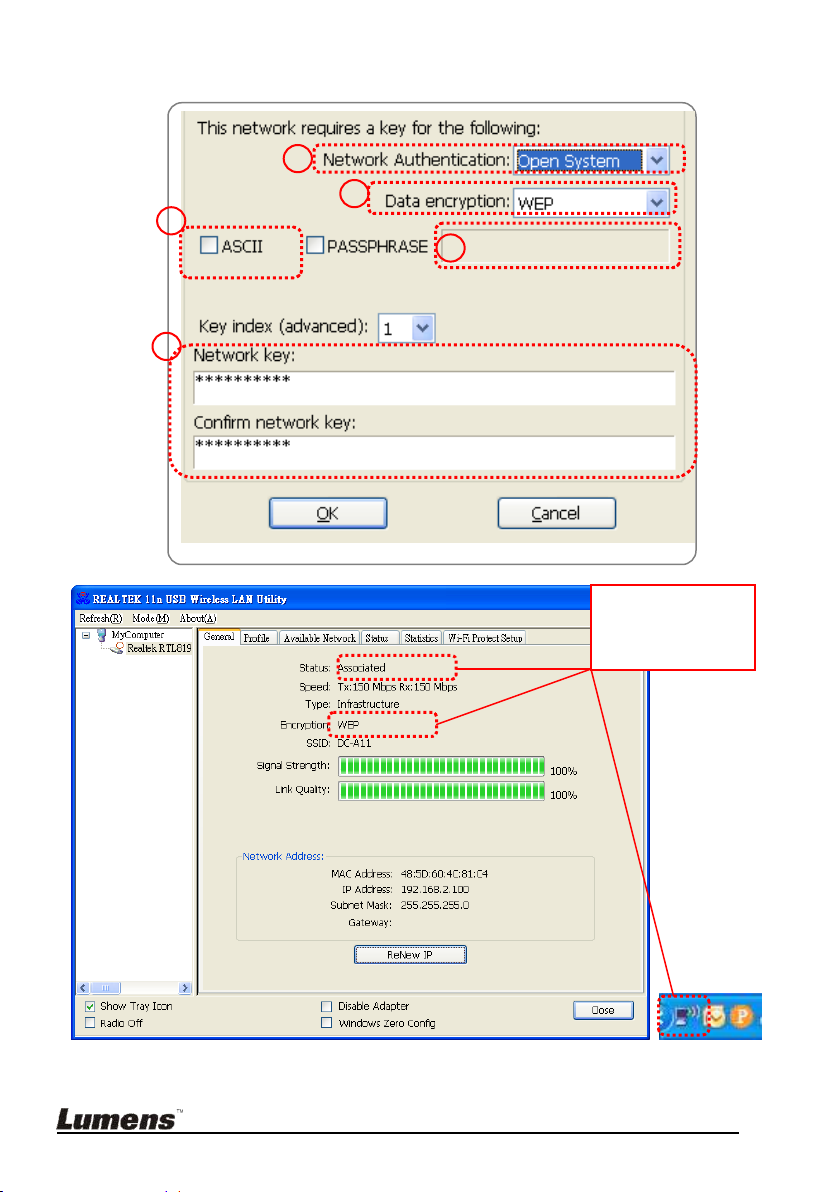
4. Press [OK] to apply your changes.
A
C2
C1 B C1
Connection is
successfully
encrypted
English - 31
Page 33
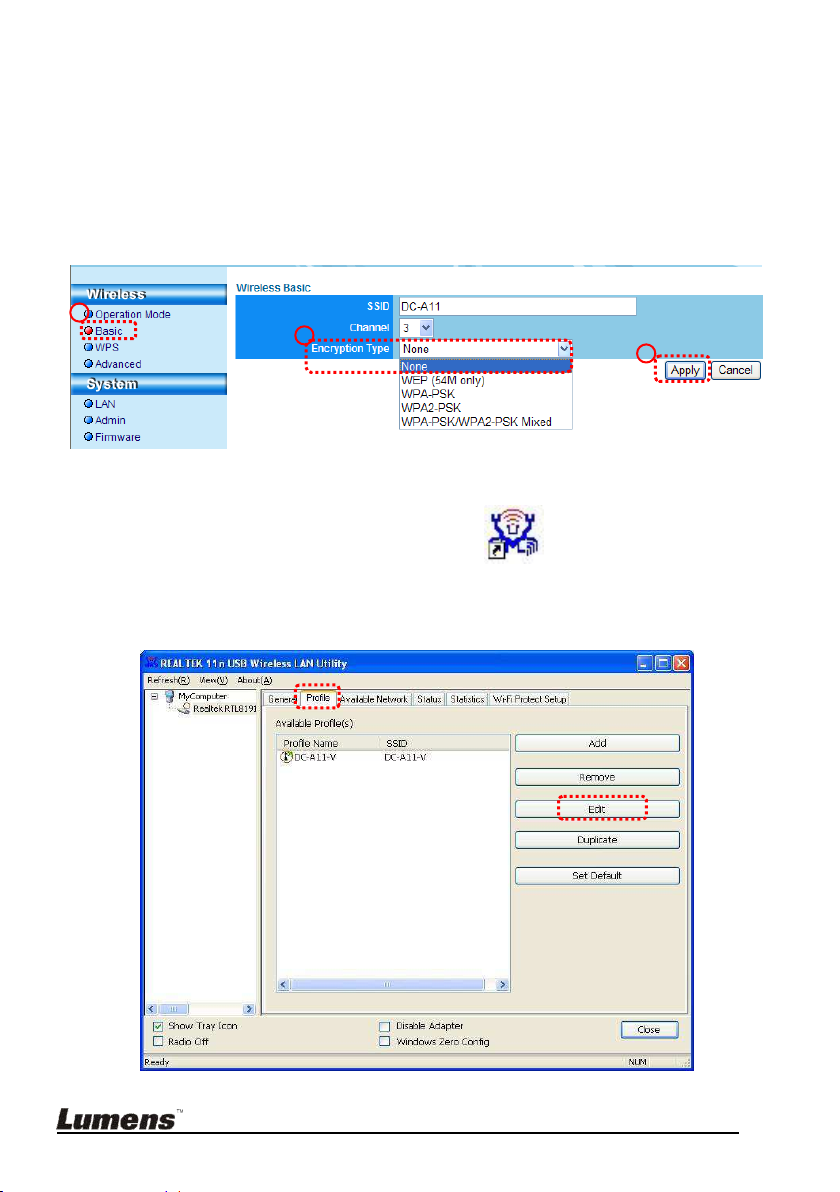
7.7 I Want to cancel the encryption mode
1
2
3
7.7.1 Setup
1. Enter [Basic] page.
2. [ Encryption Type ] : Select [None].
3. Press [Apply] to apply your changes.
7.7.2 Connecting (Without encryption)
1. Double click the Wireless LAN Utility icon.
2. Open [Profile] menu, click DC-A11 (default name), and then click the
[EDIT] on the right side to open the profile.
English - 32
Page 34
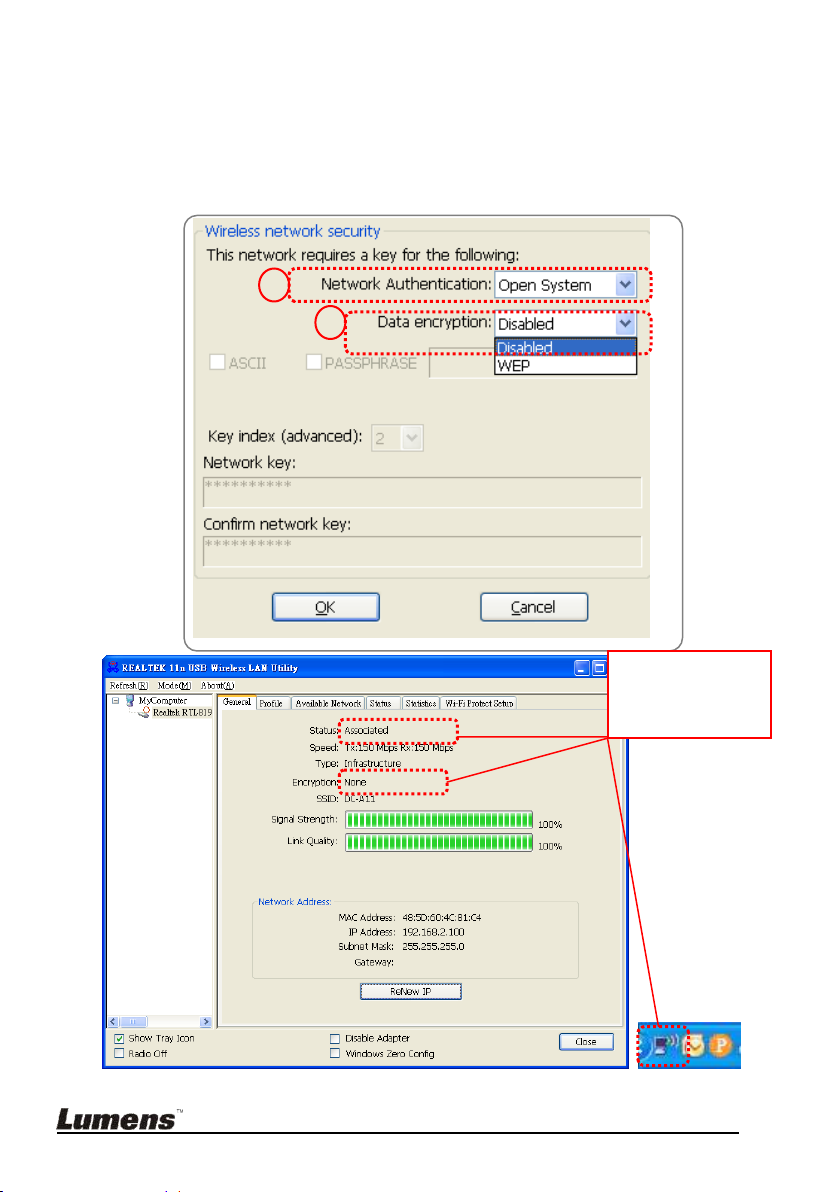
3. Settings :
A
B
Successfully
connected
A. Network Authentication : Open System
B. Data encryption : Disabled
4. Press [OK] to apply your changes.
English - 33
Page 35
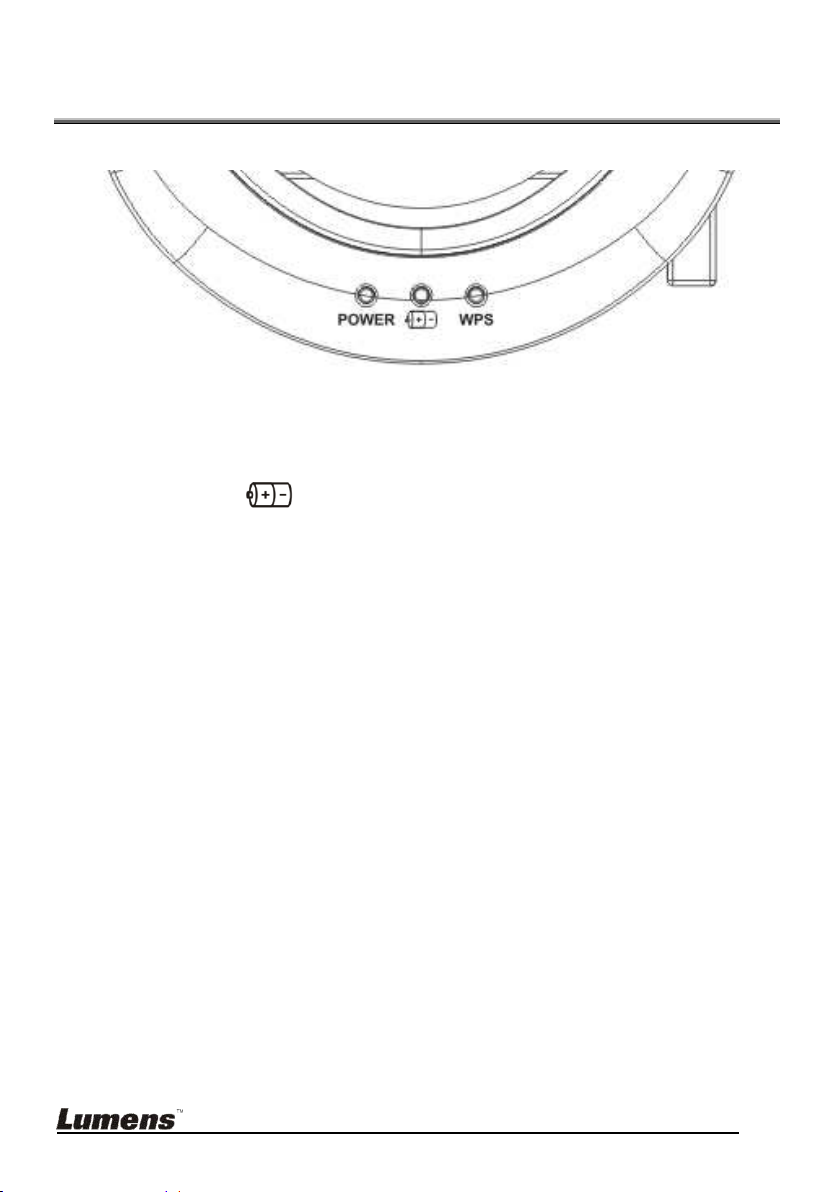
Chapter 8 LED Light Indicators
8.1 POWER : The battery indicator lights blue.
8.2 Battery
8.2.1 Light Off : No Power
8.2.2 Blue : Full Power
8.2.3 Red : Low power
8.2.4 Flashing Blue Light : In Charge
:
8.3 WPS :
8.3.1 Flashing Red Light : Detecting connection
8.3.2 Blue Light : Connection established
English - 34
Page 36
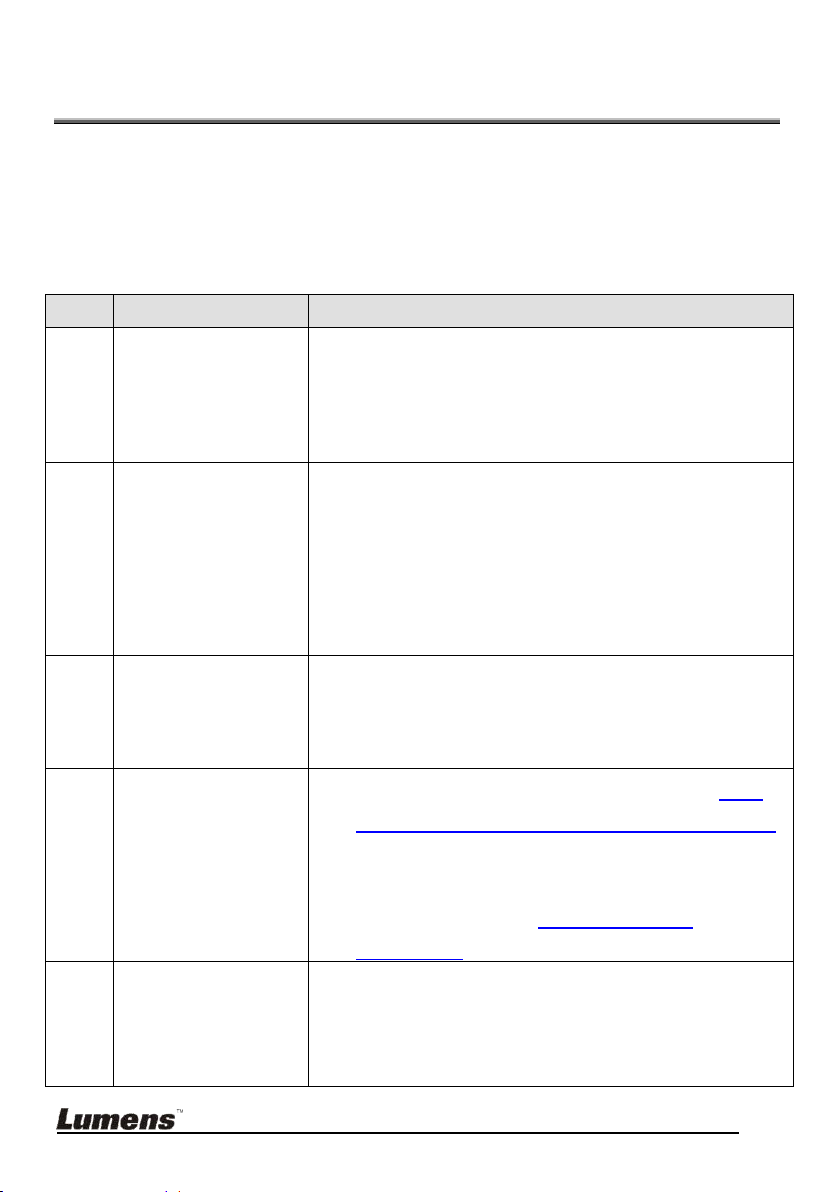
Chapter 9 Troubleshooting
No.
Problems
Solutions
1
LED indicator
light OFF after
DC-A11 is
powered on
Please make sure DC-A11 has enough battery
power (the battery indicator lights blue). If the battery
indicator lights red, please connect the power cord
to charge the device.
2
DC-A11 network
is connected but
malfunctions.
1. Please confirm that the adapter is plugged into
the USB port.
2. Please restart network connection of DC-A11
and make sure that the USB connection
between DC-A11 and DC120 is enabled. Then
start the Ladibug™ software.
3
Password
missing. Failure
to login the admin
page.
Please hold the [Reset] button on DC-A11 for 5
seconds to reset all configurations to factory default
setting.
4
Automatic
connection failed.
1. Check the WPS settings. Please refer to 7.4 I
would like to check the WPS connection setting
2. If the device still fails to connect to the network
automatically, please follow manual connection
steps by referring to
4.5.3.5.2 Manual
Connection.
5
The screen
cannot be
refreshed, and
shows black
screen
1. This issue occurs when you unplug the Dongle
directly while using the Ladibug™.
2. Please close the Ladibug™, and then unplug
the Dongle.
This chapter describes problems you may encounter while using DC-A11. If you
have questions, please refer to related chapters and follow all the suggested
solutions. If the problem still occurred, please contact our distributors or service
center.
English - 35
Page 37

6
The computer
crashes after you
have modified any
settings
1. Please close the Ladibug™, and then modify
the settings.
7
DC-A11 network
connection failed.
1. Please make sure that there’s no obstacle
between the DC-A11 and the wireless Dongle
that interferes with signals. Keep a proper
distance for wireless connection in place for
better reception quality.
2. Please use the wireless Dongle in a ventilated
place so as to prevent it from malfunctioning
caused by overheating.
3. Make sure that DC-A11 network connection is
correctly configured. Please refer to
4.5.3.5
Setup the utility.
4. Use of two or more DC-A11 devices in the same
place might interfere the wireless signals. It is
advised to change the frequency channel of
either one DC-A11 device to a different one in
order to avoid signal interference. Please refer
to
7.3 I would like to change the SSID and
Channel.
5. If WEP encryption is used, check whether
settings or passwords are entered correctly.
English - 36
 Loading...