

Dukane 9137WU-RJ User Manual
LCD Data Video Projector
Concise User’s Manual
MODEL 9137WU-RJ
Information in this Guide may change due to product improvements. To obtain the latest
manuals, literature, and software please visit the Dukane web site at; www.dukane.com/av
and look at the specic model SUPPORT or DOWNLOADS section.
DUKANE CORP AV SERVICE DEPT
2900 Dukane Drive
St Charles, IL 60174
800-676-2487 / 630-762-4032
Fax 630-584-5156
avservice@dukane.com
www.dukane.com/av
403-9137WU-RJ- Concise-00

Projector
9137WU-RJ
User's Manual (concise)
Thank you for purchasing this projector.
WARNING
►Before using this product, be sure to read all manuals for this product. See “Using the
CD manual” (
) to read the manuals in the CD. After reading them, store them in a
13
safe place for future reference.
►The manufacturer assumes no responsibility for any damage caused by mishandling
that is beyond normal usage dened in these manuals of this projector.
Contents
Contents of package .................................. 1
First of all.................................................. 2
Arrangement ............................................. 3
Connecting your devices ........................... 4
Connecting power supply ......................... 5
Turning on the power ................................ 5
Adjusting the projector’s elevator ............. 6
Remote control .......................................... 6
Turning off the power ............................... 8
Lamp ......................................................... 9
Air lter ................................................... 11
Internal clock battery ..............................12
Using the CD manual .............................. 13
Regulatory notices .................................. 14
Specications .......................................... 16
Warranty and after-service ......................17
Displaying the picture ...............................8
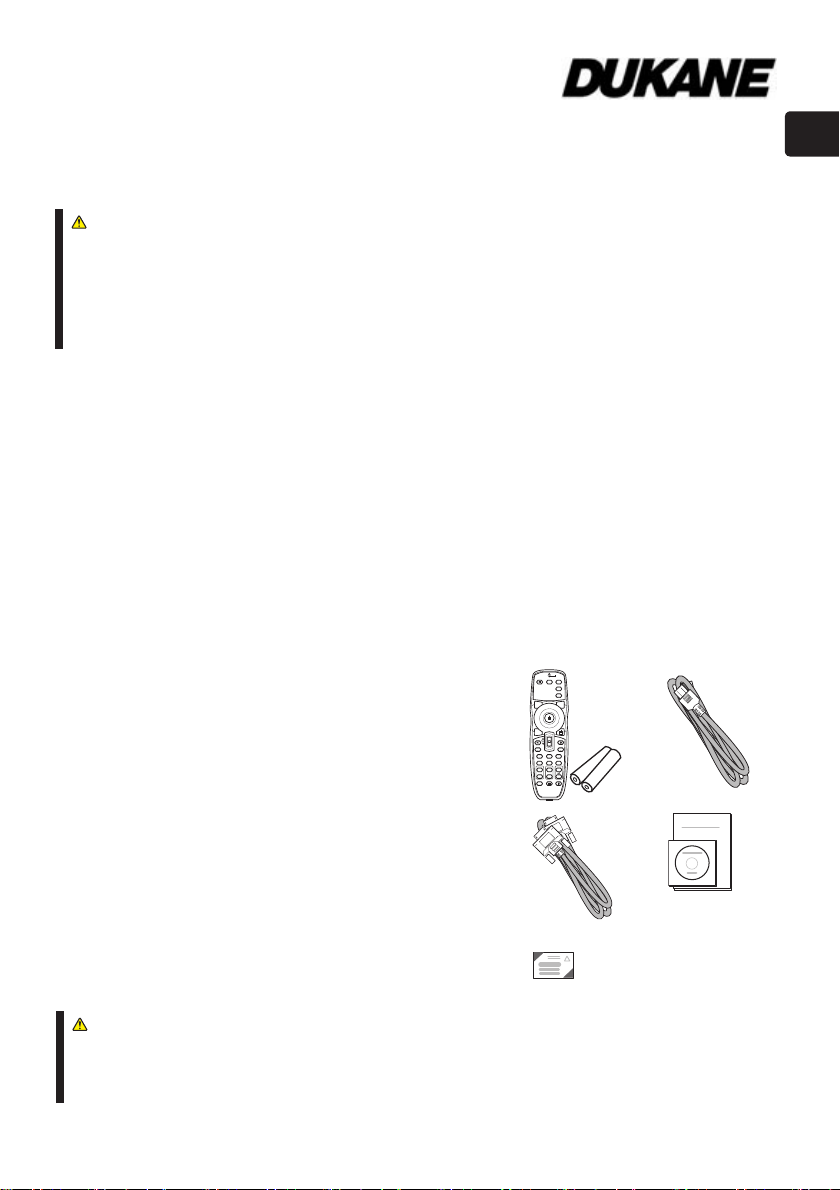
Contents of package
Your projector should come with the items shown below.
Check that all the items are included. Require of your
dealer immediately if any items are missing.
(1) Remote control with two AA batteries
(2) Power cord
(3) RGB cable
(1)
(3)
STANDBY/ON VIDEO RGB
BLANK LASER
ASPECT
PUSH
ENTER
PAGE UP
ESC MENU RESET
POSITION AUTO
MY BUTTON
MAGNIFY
ON
OFF
FREEZE KEYSTONE MUTE
LASER
INDICATOR
MY SOURCE/
DOC.CAMERA
SEARCH
PAGE DOWN
PbyP
VOLUME
1
+
2
-
(2)
(4)
(4) User’s manuals (Book x1, CD x1)
(5) Security label
ENGLISH
(5)
CAUTION
►Keep the original packing materials for future reshipment. Be sure to use the original
packing materials when moving the projector. Use special caution for the lens. Be sure
to use a lens cover.
1

2
First of all
Entries and graphical symbols explanation
The following entries and graphical symbols are used for the manuals and the product as
follows, for safety purpose. Please know their meanings beforehand, and heed them.
WARNING
CAUTION This entry warns of a risk of personal injury or physical damage.
NOTICE This entry notices of fear of causing trouble.
Important safety instruction
The followings are important instructions for safely using the product. Be sure to follow
them always when handling the product. The manufacturer assumes no responsibility for
any damage caused by mishandling that is beyond normal usage dened in these manuals
of this projector.
WARNING ►
smoke, smelling strange, took a liquid or an object inside, broken, etc.) If an abnormality
should occur, unplug the projector urgently.
►Situate the product away from children and pets.
►Do not use the product when there is fear of a thunderbolt.
►Unplug the projector from the power outlet if the projector is not used for the time
being.
►Do not open or remove any portion of the product, unless the manuals direct it. For
internal maintenance, leave it to your dealer or their service personnel.
►Use only the accessories specied or recommended by the manufacturer.
►Modify neither the projector nor accessories.
►Let neither any things nor any liquids enter to the inside of the product.
►Do not wet the product.
►Do not place the projector where any oils, such as cooking or machine oil, are used.
Oil may harm the product, resulting in malfunction, or falling from the mounted position.
►Apply neither a shock nor pressure to this product.
- Do not place the product on an unstable place such as the uneven surface or the leaned
table.
- Do not place the product unstably. Place the projector so that it does not protrude from
the surface where the projector is placed on.
- Remove all the attachments including the power cord and cables, from the projector
when carrying the projector.
►Do not look into the lens and the openings on the projector, while the lamp is on.
►Do not approach the lamp cover and the exhaust vents, while the projection lamp is
on. Also after the lamp goes out, do not approach them for a while, since too hot.
This entry warns of a risk of serious personal injury or even death.
Never use the product in or after an abnormality (ex. giving off
Arrangement
(c) up
(b)
(a)
(c) down
(b)
(c) up
(c) down
(a)
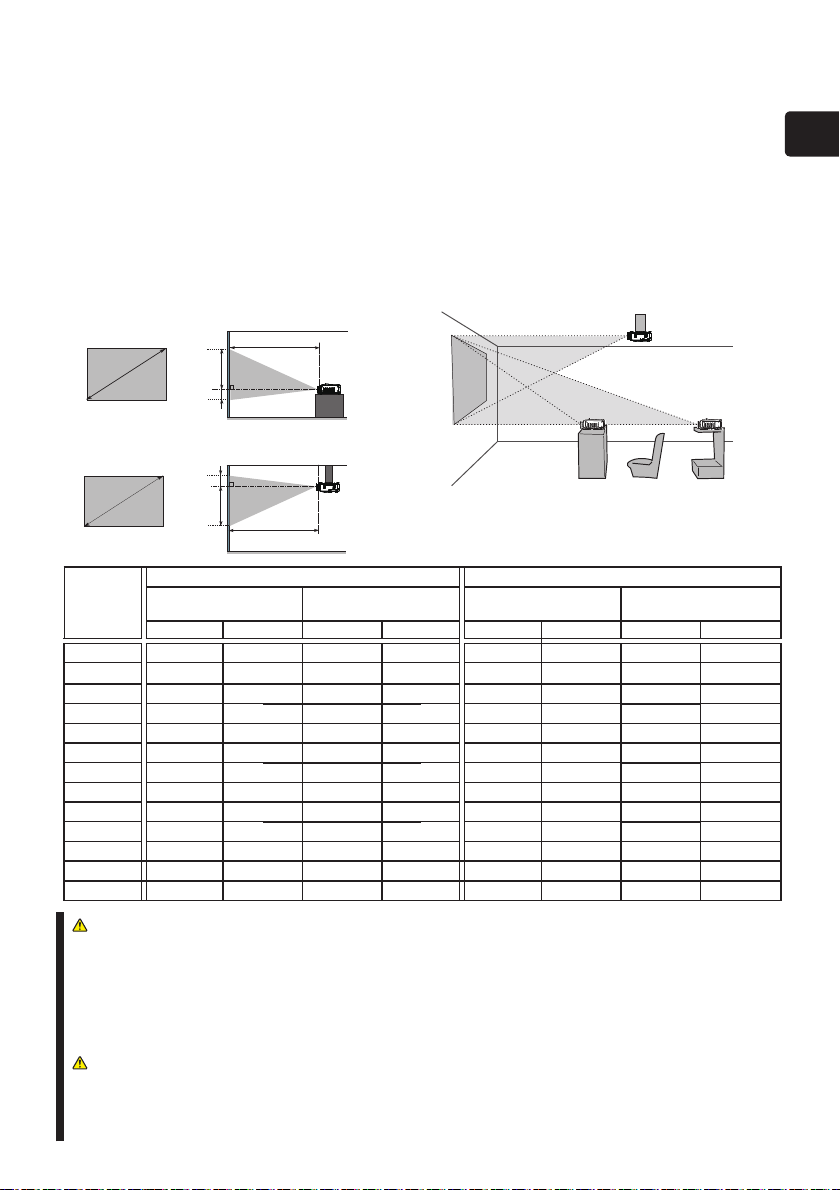
Please arrange the projector and the screen.
Install the projector in a stable, cool and airy place, keeping a space of 30 cm or more between the
sides of the projector and other objects such as walls. Avoid the projector from a hot, humid, dusty,
or smoky place.
Refer to the illustrations and tables below to determine screen size and projection distance.
The values shown in the table are calculated for a full size screen:
(a) Screen size (diagonal)
(b) Projection distance (±10%)
(c) Screen height (±10%), when the vertical lens shift is set full upward.
On a horizontal surface
Suspended from the ceiling
• Consult with your dealer before a
special installation such as suspending
from a ceiling.
(a) Screen
size
[inch (m)]
30 (0.8) 0.9 (37) 1.9 (75) 0 (0) 40 (16) 1.1 (42) 2.1 (84) 0 (0)
40 (1.0) 1.3 (49) 2.5 (100)
60 (1.5) 1.9 (75) 3.8 (150) 0 (0) 81 (32) 2.2 (85) 4.3 (170) 0 (0) 91 (36)
70 (1.8) 2.2 (87) 4.4 (175) 0 (0) 94 (37) 2.5 (99) 5.0 (198) 0 (0) 107 (42)
80 (2.0) 2.5 (100) 5.1 (200) 0 (0) 108 (42) 2.9 (113) 5.8 (227) 0 (0) 122 (48)
90 (2.3) 2.9 (113) 5.7 (225) 0 (0) 121 (48) 3.2 (128) 6.5 (255) 0 (0) 137 (54)
100 (2.5) 3.2 (125) 6.4 (250) 0 (0) 135 (53) 3.6 (142) 7.2 (283) 0 (0) 152 (60)
120 (3.0) 3.8 (150) 7.6 (300) 0 (0) 162 (64) 4.3 (170) 8.6 (340) 0 (0) 183 (72)
150 (3.8) 4.8 (188) 9.5 (376) 0 (0) 202 (79) 5.4 (213) 10.8 (426) 0 (0) 229 (90)
200 (5.1) 6.4 (252) 12.7 (501) 0 (0) 269 (106) 7.2 (285) 14.4 (568) 0 (0) 305 (120)
250 (6.4) 8.0 (315) 15.9 (627) 0 (0) 337
300 (7.6) 9.6 (378) 19.1 (752) 0 (0) 404 (159) 10.9 (428) 21.6 (852) 0 (0) 457 (180)
350 (8.9) 11.2 (441) 22.3 (878) 0 (0) 471 (185) 12.7 (499) 25.2 (994) 0 (0) 533 (210)
(b) Projection distance
[m (inch)]
min. max. down up min. max. down up
16:10 screen 4:3 screen
(c) Screen height
[cm (inch)]
0
(0)
54
1.4 (56) 2.9 (113)
(21)
(132)
9.1 (356) 18.0 (710) 0 (0)
1920x1200
(b) Projection distance
[m (inch)]
(c) Screen height
[cm (inch)]
0
(0) 61 (24)
46 (18)
381 (150)
ENGLISH
WARNING
►Install the projector in a stable horizontal position.
►Place the projector in a cool place, and ensure that there is sufcient ventilation. Do
not place or attach anything that would block the lens or vent holes.
►Do not place the projector any place where it may get wet.
►Do not place the projector where any oils, such as cooking or machine oil, are used.
CAUTION
►Avoid placing the projector in smoky, humid or dusty place.
►Position the projector to prevent light from directly hitting the projector’s remote
sensor.
3
4
VIDEO
CONTROL
AUDIO IN1
AUDIO IN2
AUDIO OUT
RGB
OUT
RGB1
RGB2
HDMI
R L R L
AUDIO IN3 AUDIO IN4
LAN
CB/PB
Y
C
R/PR
B/CB/PB
R/CR/PR
G/Y
H
V
USB
REMOTE
CONTROL
S-VIDEO
RGB OUT
AUDIO OUT
RGB OUT
AUDIO OUT
RS-232C
LAN
RGB IN
BLANK LASER
ASPECT
PUSH
ENTER
PAGE UP
LASER
INDICATOR
MY SOURCE/
DOC.CAMERA
SEARCH
STANDBY/ON VIDEO RGB
PAGE DOWN
ESC MENU RESET
POSITION AUTO
PbyP
MAGNIFY
ON
OFF
MY BUTTON
1
2
VOLUME
+
-
FREEZE KEYSTONE MUTE
AUDIO IN
Y CB/PB CR/PR
COMPONENT VIDEO OUT
R L
AUDIO OUT
VIDEO OUT
S-VIDEO OUT
HDMI
USB-A
R L
AUDIO OUT
R L
AUDIO OUT
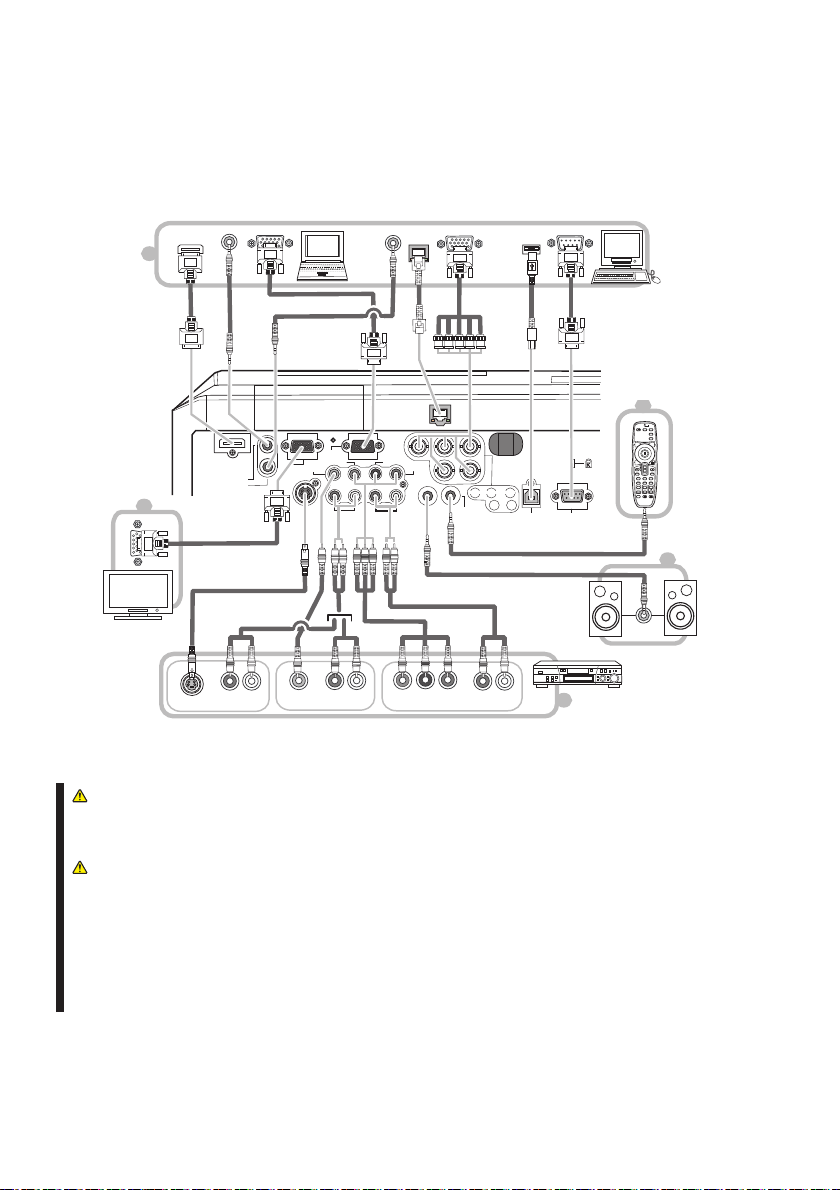
Connecting your devices
Before connecting devices, please read the manuals for all the devices that you want to connect with
this projector, to make sure that the connection is proper and prepare the connectors needed. And
connect them properly according to the manuals.
PC
Remote
control
Monitor
Speakers
(with an
amplier)
VCR/DVD/Blu-ray
Disc player
WARNING
►Do not disassemble or modify the projector and accessories.
►Be careful not to damage the cables, and do not use damaged cables.
CAUTION
►Turn off all devices and unplug their power cords prior to connecting them to
projector.
►Use appropriate accessory or designated cables. Ask your dealer about non-accessory
cables which may be required a specic length or a ferrite core by the regulations. For
cables with a core only at one end, connect the end with the core to the projector.
►Make sure that devices are connected to the correct ports.
 Loading...