

Page 1

1
E
Owner’s manual
Page 2

2
E
Page 3
3
E
Hearty welcome among Ducati fans! Please accept out
best compliments for choosing a Ducati motorcycle. We
think you will ride your Ducati motorcycle for long
journeys as well as short daily trips. Ducati Motor s.p.a
wishes you smooth and enjoyable riding.
We are steadily doing are best to improve our “Technical
Assistance” service. For this reason, we recommend you
to strictly follow the indications given in this manual,
especially for motorcycle running-in. In this way, your
Ducati motorbike will surely give you unforgettable
emotions.
Enjoy your ride!
Ducati Motor S.p.A. declines any liability whatsoever for
any mistakes incurred in drawing up this manual. The
information contained herein is valid at the time of going
to print. Ducati Motor S.p.A. reserves the right to make
any changes required by the future development of the
above-mentioned products.
For your safety, as well as to preserve the warranty,
reliability and worth of your motorcycle, use original
Ducati spare parts only.
Warning
This manual forms an integral part of the
motorcycle and - if the motorcycle is resold - must
always be handed over to the new owner.
Page 4

4
E
TABLE OF CONTENTS
General 6
Warranty 6
Symbols 6
Useful information for safe riding 7
Carrying the max load allowed 8
Identification data 9
Controls 10
Position of motorcycle controls 10
Instrument panel 11
Keys 12
Ignition switch and steering lock 12
Left switch 13
Clutch lever 14
Cold start lever 14
Right switch 15
Throttle twistgrip 15
Front brake lever 15
Rear brake pedal 16
Gear change pedal 16
Setting the gear change and rear brake pedals 17
Main components and devices 18
Location 18
Tank filler plug 19
Seat catch and helmet pin 20
Side stand 21
Shock absorber adjusters 22
Directions for use 23
Running-in recommendations 23
Pre-ride checks 25
Starting the engine 26
Moving off 28
Braking 28
Stopping the motorcycle 29
Refueling 29
Parking 30
Maintenance 31
Tool kit and accessories 31
Routine maintenance 32
Main maintenance operations 35
Lifting the fuel tank 35
Changing air filter 36
Checking brake and clutch fluid level 37
Checking brake pads for wear 38
Lubricating cables and joints 39
Throttle cable adjustment 40
Checking battery liquid level 40
Charging the battery 41
Chain tensioning 42
Page 5

5
E
Chain lubrication 43
Replacing bulbs 43
Headlamp alignment 46
Tyres 47
Checking engine oil level 48
Cleaning and replacing the spark plugs 49
Cleaning the motorcycle 50
Storing the bike away 51
Important notes 51
Technical data 52
Overall dimensions 52
Weights 52
Top-ups 53
Engine 54
Timing system 54
Performance data 55
Spark plugs 55
Brakes 56
Transmission 56
Frame 57
Wheels 57
Tyres 57
Suspensions 57
Electric system 58
Monster versions 62
400 62
Metallic 62
Routine maintenance record 63
Page 6
6
E
GENERAL
Warranty
In your own interest, and in order to guarantee product
reliability, you are strongly advised to refer to our
authorized Dealers and workshops for any servicing
requiring particular technical expertise. Our highly skilled
staff have access to the implements required to perform
any servicing job at best, and use Ducati original spare
parts only as the best guarantee for full
interchangeability, smooth running and long life.
All Ducati motorcycles come with a “Warranty Card”.
However, warranty does not apply to the motorcycles
used in competitions or competitive trials. No motorcycle
part may be tampered with, altered, or replaced with
parts other than original Ducati spare parts during the
warranty period, or the warranty right will be
automatically invalidated.
Symbols
Ducati Motor S.p.A. advises you to read this booklet
carefully so as to become familiar with your motorcycle.
In case of any doubts, please call a Ducati dealer or
authorized workshop. The information contained herein
will prove useful on your trips - and Ducati Motor S.p.A.
wishes you smooth, enjoyable riding - and will help you
keep the performance of your motorcycle unchanged for
a long time. The text is supplemented with schematic
illustrations for quick reference and better understanding
of the subjects concerned.
This manual contains some special remarks:
Warning
Failure to comply with these instructions may put
you at risk and lead to severe injury or death.
Important
Possibility of damaging the motorcycle and/or its
components.
Note
Additional information concerning the job being
carried out.
The terms right and left are referred to the motorcycle
viewed from the riding position.
Page 7

7
E
Useful information for safe riding
Warning
Read this section before riding your motorcycle.
Accidents are frequently due to inexperience. Always
make sure you have your licence with you when riding;
you need a valid licence to be entitled to ride your
motorcycle.
Do not lend your motorcycle to inexperienced riders or
who do not hold a valid licence.
Both rider and pillion passenger must always wear a
safety helmet.
Wear proper clothing, with no loose items or accessories
that may become tangled in the controls or limit your
zone of vision.
Never start or run the engine indoors. Exhaust gases are
poisonous and may lead to loss of consciousness or even
death within a short time.
Both rider and pillion passenger should keep their feet on
the footpegs when the motorcycle is in motion.
Always hold the handlebars firmly with both hands so
you will be ready for sudden changes of direction or in
the road surface. The pillion passenger should always
hold on to the suitable handles at the rear of the seat
with both hands.
Ride within the law and observe national and local rules.
Always respect speed limits where these are posted.
However, always adjust your speed to the visibility, road
and traffic conditions you are riding in.
Always signal your intention to turn or pull to the next
lane in good time using the suitable turn indicators.
Be sure you are clearly visible and do not ride within the
blind spot of vehicles ahead.
Be very careful when tackling road junctions, or when
riding in the areas near exits from private grounds, car
parks or on slip roads to access motorways.
Always turn off the engine when refueling.
Be extremely careful not to spill gasoline on the engine
or on the exhaust pipe when refueling.
Do not smoke when refueling.
While refueling, you may inhale noxious gasoline
vapours. Should any gasoline drops be spilled on your
skin or clothing, immediately wash with soap and water
and change your clothing.
Always remove the key when you leave your motorcycle
unattended.
The engine, exhaust pipes, and mufflers stay hot for a
long time.
Park your motorcycle where no one is likely to hit it and
use the side stand.
Never park on uneven or soft ground or your motorcycle
may fall over.
Page 8

8
E
Carrying the maximum load allowed
Your motorcycle is designed for long-distance riding,
carrying the maximum load allowed in full safety.
Even weight distribution is critical to preserving these
safety features and avoiding trouble when performing
sudden manoeuvres or riding on bumpy roads.
Information about carrying capacity
The total weight of the motorcycle in running order
including rider, pillion passenger, luggage and additional
accessories should not exceed 370 Kg/816 lb.
Try to arrange your luggage or heavy accessories in the
lowest possible position and close to motorcycle centre.
Be sure to secure the luggage to the supports provided
on the motorcycle as firmly as possible. Improperly
secured luggage may affect stability.
Never fix bulky or heavy objects to the handlebar or to
the front mud guard as this would affect stability and
cause danger.
Do not insert any objects you may need to carry into the
gaps of the frame as these may foul moving parts.
Make sure the tyres are inflated to the proper pressure
(see page 47) and that they are in good condition.
Page 9
9
E
Identification data
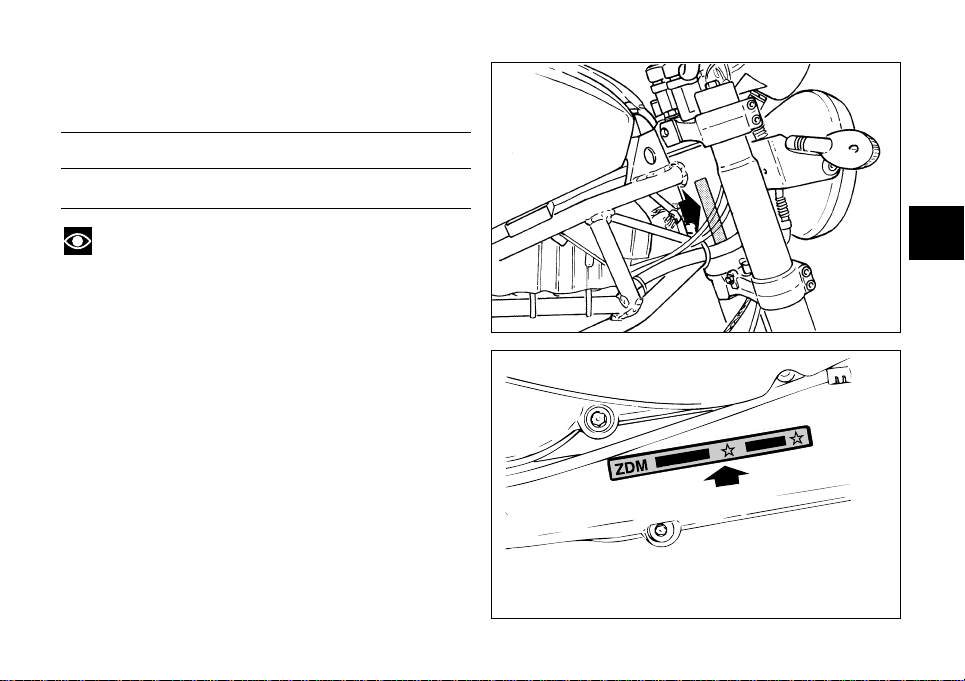
All Ducati motorcycles have two identification numbers,
for frame (fig. 1.1) and engine (fig. 1.2).
Frame number
Engine number
Note
These numbers identify the motorcycle model and
should always be indicated when ordering spare parts.
fig. 1.1
fig. 1.2
Page 10
10
E
CONTROLS
Warning
This section details the position and function of all
the controls you need to drive your motorcycle. Be sure
to read this information carefully before you use the
controls.
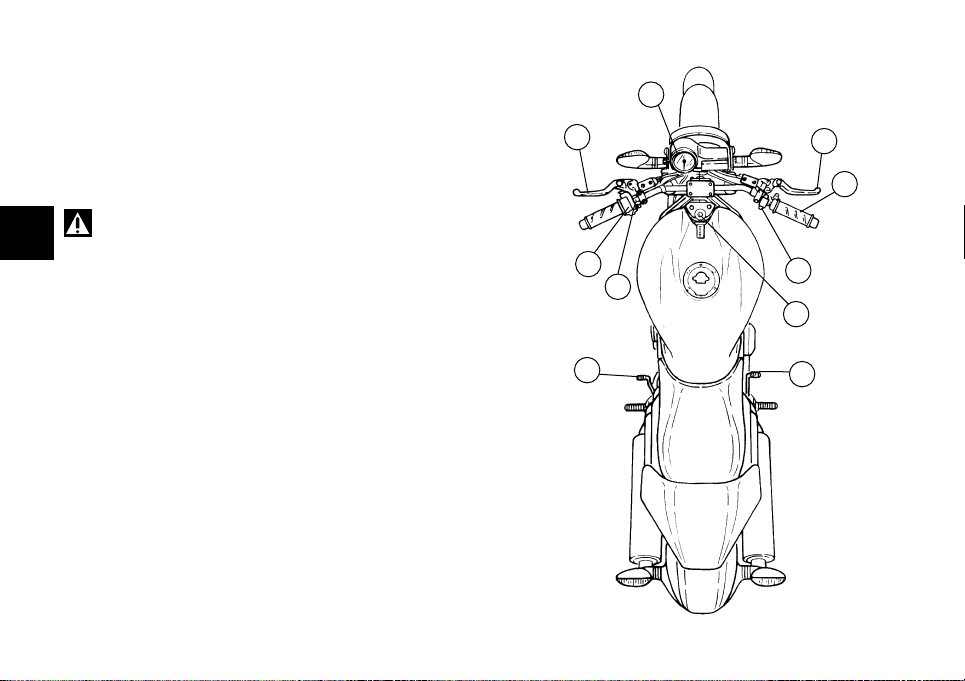
Position of motorcycle controls (fig. 2)
1) Instrument panel.
2) Key-operated ignition switch and steering lock.
3) Left switch.
4) Clutch lever.
5) Fast-idle lever.
6) Right switch.
7) Throttle twistgrip.
8) Front brake lever.
9) Gear change pedal.
10) Rear brake pedal.
1
4
3
5
8
7
6
2
9
10
fig. 2
Page 11
11
E
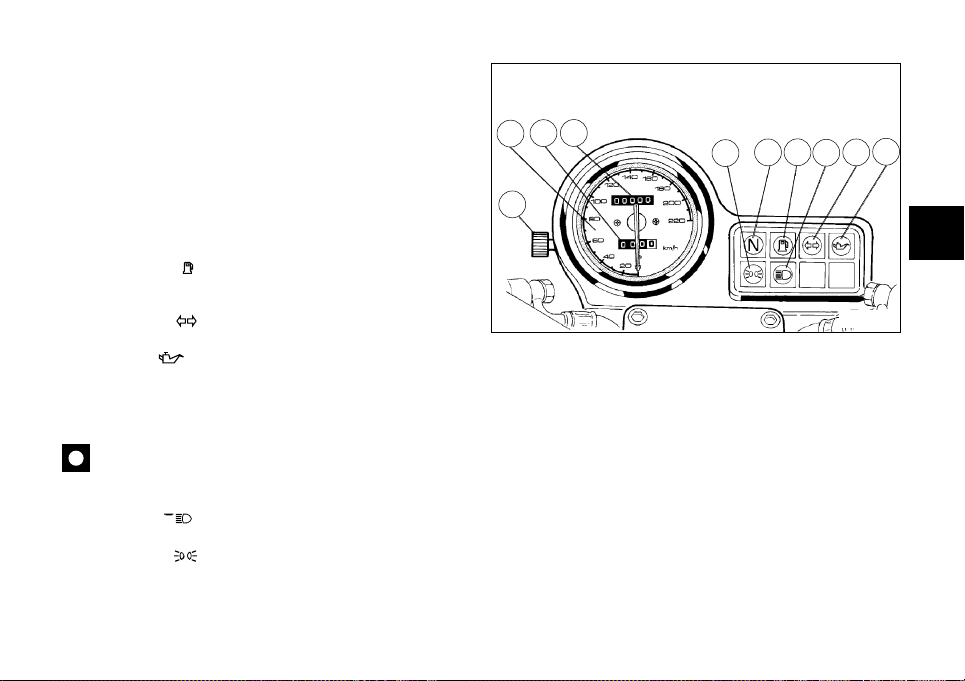
Instrument panel (fig. 3)
1) Speedometer (km/h or mph).
Gives road speed.
a) Odometer (km or miles).
Gives total distance covered.
b) Trip meter (km or miles).
Gives distance covered since last resetting.
c) Trip meter resetting knob.
Turn to reset trip meter to “0000”.
2) Green light N.
Comes on when gearbox is in neutral.
3) Yellow light .
Comes on when there are about 3.5 liters/0.8
U.S.Gallons fuel left in the tank.
4) Green light .
Comes on and flashes when a turn indicator is on.
5) Red light .
Comes on when engine oil pressure is too low. It briefly
comes on when the ignition is switched to ON and
normally goes out a few seconds after engine starts.
Important
If this light stays on, stop the engine or it may
suffer severe damage.
6) Blue light .
Comes on when high beam is on.
7) Green light .
Comes on when parking lights are on.
1
b
c
a
7
2
3
6
4
5
fig. 3
Page 12
12
E
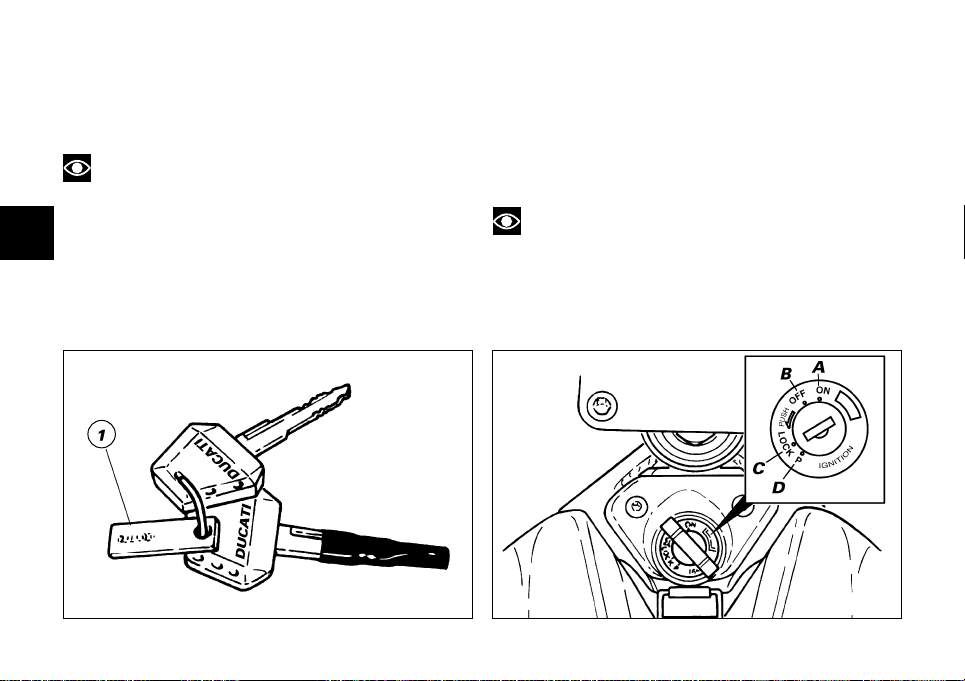
Ignition switch and steering lock (fig. 5)
It is located in front of the fuel tank and has four
positions:
A) ON: lights and engine on;
B) OFF: lights and engine off;
C) LOCK: steering lock;
D) P: parking lights and steering lock.
Note
To move the key to the last two positions, press it
down before turning it. Switching to (B), (C) and (D), you
will be able to take the key out.
fig. 4 fig. 5
Keys (fig. 4)
Your Ducati was delivered with two universal keys for
ignition, steering lock and seat catch and a key
identification plate (1).
Note
Separate the two keys and keep the identification
plate in a safe place .
Page 13
13
E
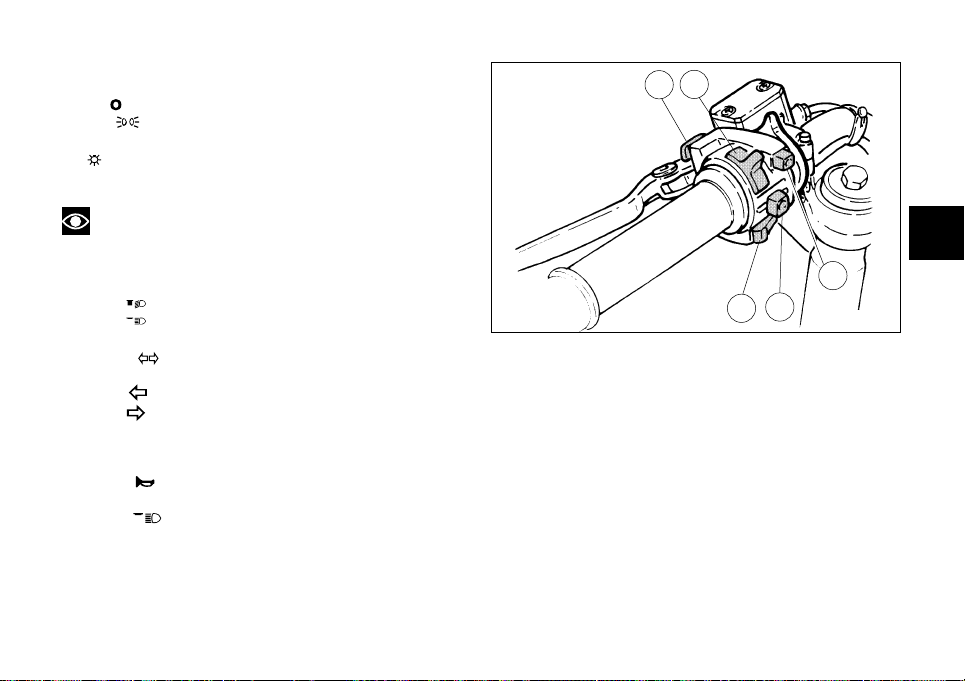
Left switch (fig. 6)
1) Switch, light switch, 3 positions:
Down = light off;
Centre = front and rear parking light, number plate
light and panel lights on;
Up = headlamp, front and rear parking light, number
plate light and panel lights on.
Note
This device is not fitted on the Australia and Japan
versions.
2) Dip switch, light dip switch, two positions:
position = low beam on;
position = high beam on.
3) Switch = 3-position turn indicator:
centre position = OFF;
position = left turn;
position = right turn.
To cancel turn indicators, return switch to central position
and push in.
4) Button = warning horn.
5) Button = high-beam flasher.
4
3
2
1
5
fig. 6
Page 14
14
E
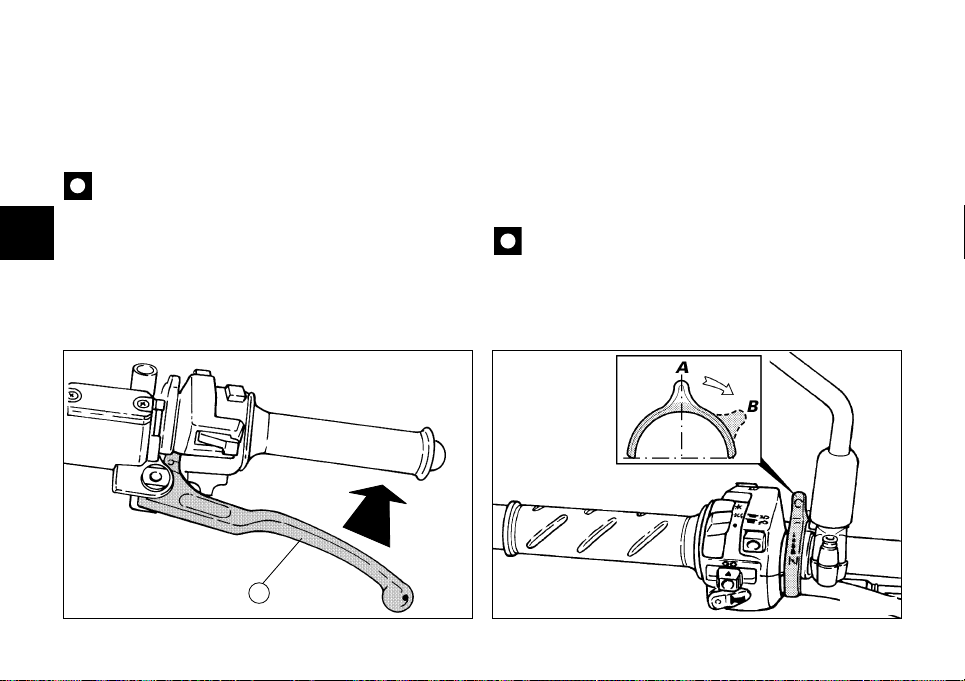
Clutch lever (fig. 7)
When you pull in the lever (1), you will disengage the
engine from the gearbox and therefore from the driving
wheel. Using the clutch properly is essential to smooth
riding, especially when moving off.
Important
Using the clutch properly will avoid damage to
transmission parts and spare the engine.
1
fig. 8 fig. 7
Cold start lever (fig. 8)
Use this device to start the engine from cold. It will
increase the engine idling speed after starting.
Lever positions:
A) (vertical) = closed
B) fully open.
The lever can be opened and closed gradually to adjust
speed until engine is fully warm (see page 26).
Important
Never use the cold start lever when the engine is
warm or leave it open when riding.
Page 15
15
E
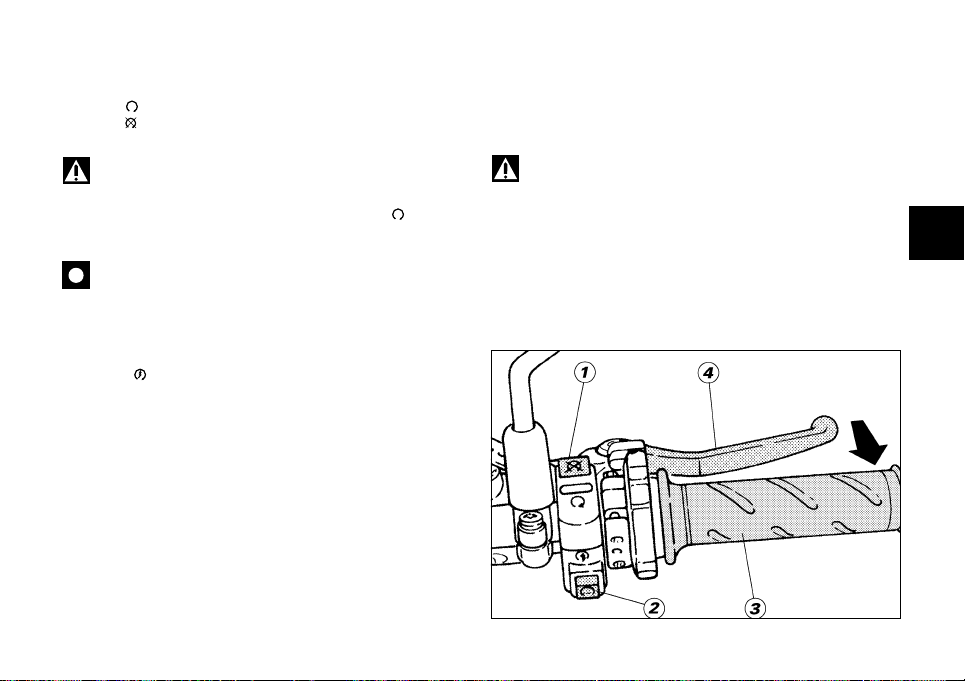
Right switch (fig. 9)
1) Switch for ENGINE STOP, two positions:
position (RUN) = run.
position (OFF) = stop.
Warning
This switch is mainly intended for use in emergency
cases when you need to stop the engine quickly. After
stopping the engine, return the switch to the position
to enable starting.
Important
Riding with the lights on, stopping the engine using
switch (1) and leaving the ignition key in the ON
position, may run the battery flat as the lights will remain
on.
2) Button = engine start.
Throttle twistgrip (fig. 9)
The twistgrip (3) on the right handlebar opens carburettor
shutter. When released, it will spring back to the initial
position (idling speed).
Front brake lever (fig. 9)
Pull in the lever (4) towards the twistgrip to operate the
front brake. The system is hydraulically operated and you
just need to pull the lever gently.
Warning
Please read the instructions on pages 26 and 28
before using these controls.
fig. 9
Page 16
16
E
1
fig. 11.1
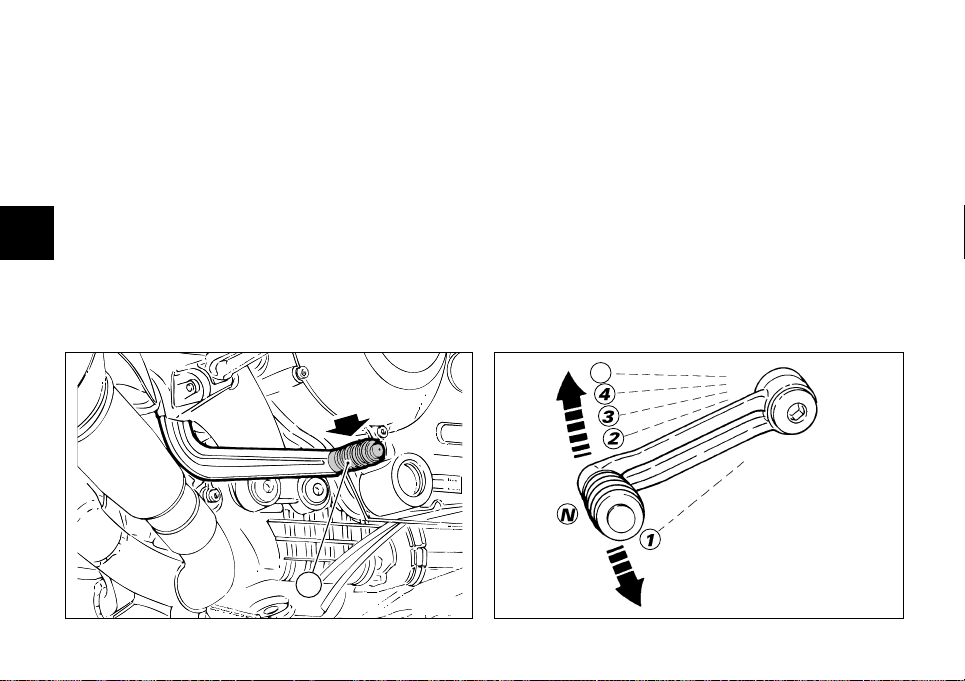
Gear change pedal (fig. 11.1)
The gear change pedal is at rest when in the central
position N, is moved up and down to change gears and
then returns to the central position.
down = push down on the pedal to engage 1stgear and
to shift down. The N light will go out.
up = lift the pedal to engage the 2ndgear and then the
3rd, 4th, 5th.
Each time you move the pedal you will engage the next
gear.
Rear brake pedal (fig. 10)
Push down on the pedal (1) to apply the rear brake.
The system is hydraulically operated.
fig. 10
5
Page 17
17
E
fig. 11.3
Setting the gear change and rear brake pedals
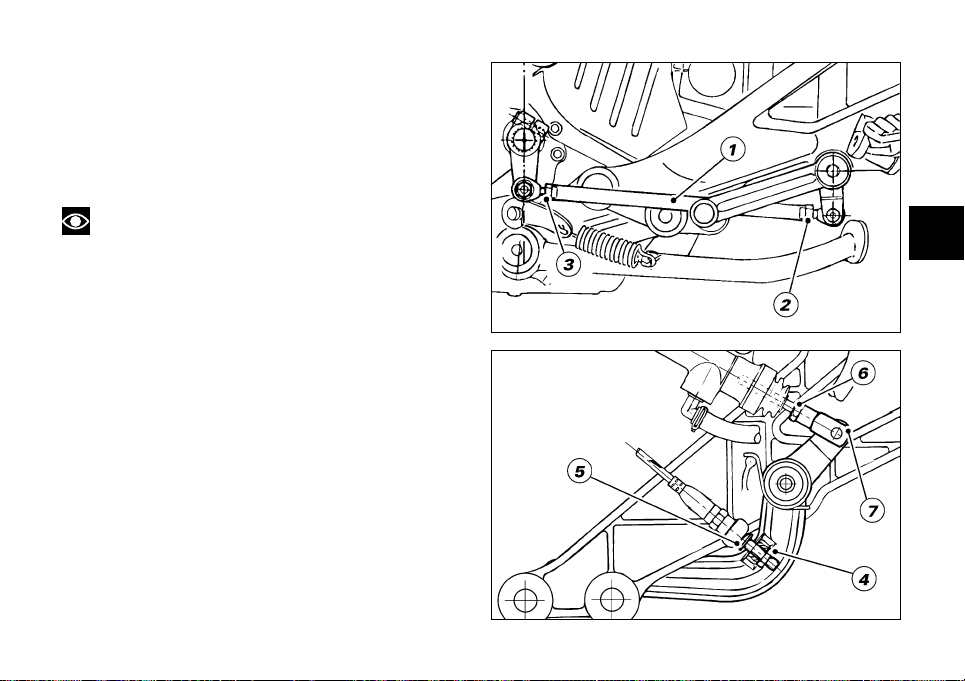
(fig. 11.2, 11.3)
The gear change and rear brake pedals can be adjusted
to suit the preferred riding position of each rider.
To set the gear change pedal,
lock linkage (1) and loosen the check nuts (2) and (3).
Note
Nut (2) has a left-hand thread.
Rotate linkage (1) until setting pedal in the desired
position.
Tighten both check nuts onto linkage.
To set the rear brake pedal,
loosen check nut (4).
Turn pedal travel adjusting screw (5) until pedal is in the
desired position.
Tighten check nut (4).
Work pedal by hand to make sure it has 1.5 - 2
mm/0.059-0.078 in. free play before brake begins to bite.
If not so, set the length of cylinder linkage as follows.
Loosen the check nut (6) on cylinder linkage.
Tighten linkage into fork (7) to increase play, or unscrew
linkage to reduce it.
Tighten check nut (6) and check pedal free play again.
fig. 11.2
Page 18
18
E
MAIN COMPONENTS AND DEVICES
6
9
4
5
1
7
2
3
9
8
10
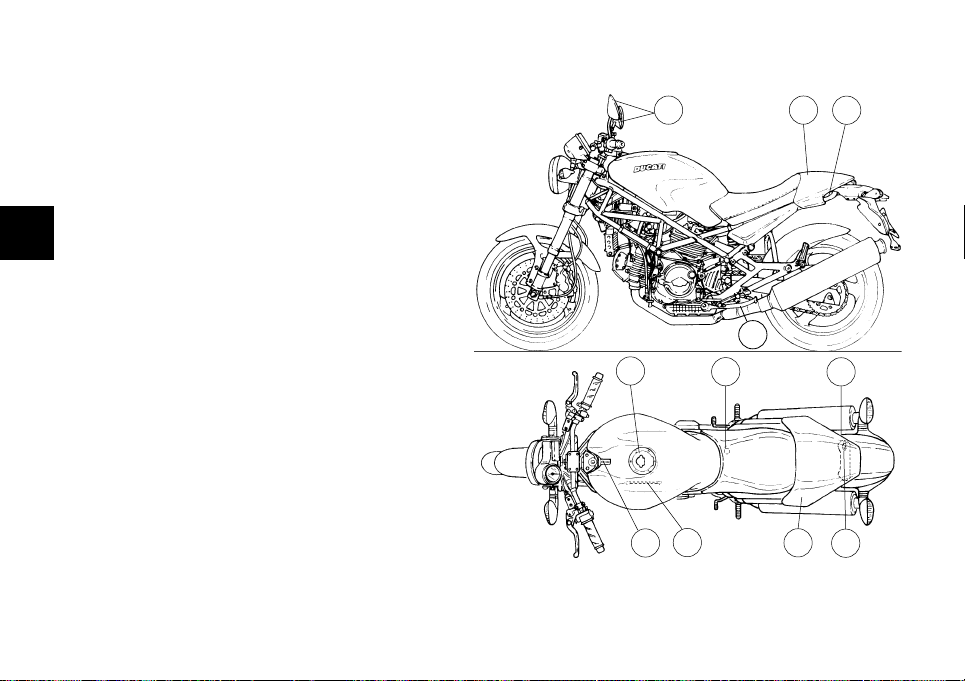
Location (fig. 12)
1) Tank filler plug.
2) Seat catch.
3) Hook for helmet fastening cable.
4) Passenger grab handle.
5) Side stand.
6) Rear view mirrors.
7) Shock absorber adjusters.
8) Fuel tank lifting rod.
9) Seat cover.
10) Fuel tank clip.
fig. 12
Page 19
19
E
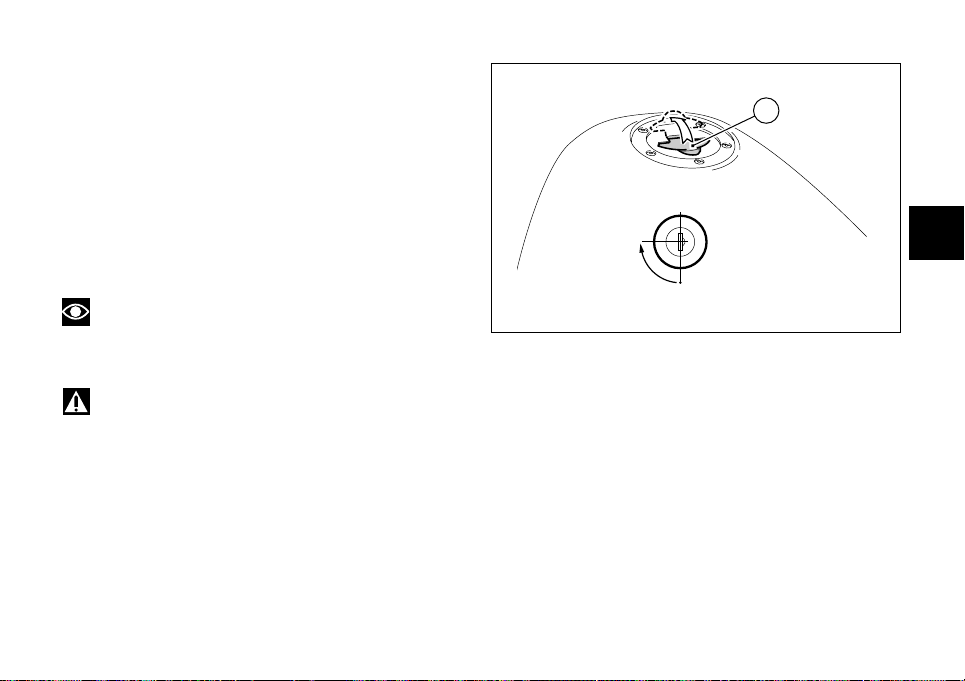
Tank filler plug (fig. 13)
Opening
Lift the protection lid (1) and fit the ignition key into the
lock. Turn the key clockwise 1/4 turn to unlock.
Lift the plug.
Closing
Refit the plug with the key in it and push it down into its
seat. Turn the key anticlockwise to its initial position and
take it out.
Close the lock protection lid (1).
Note
The plug can only be closed with the key in. In turn,
the key can only be taken out after the plug has been
closed.
Warning
Always make sure you have properly refitted (see
page 29) and closed the plug after each refueling.
1/4
0
OPEN
1
fig. 13
Page 20
20
E
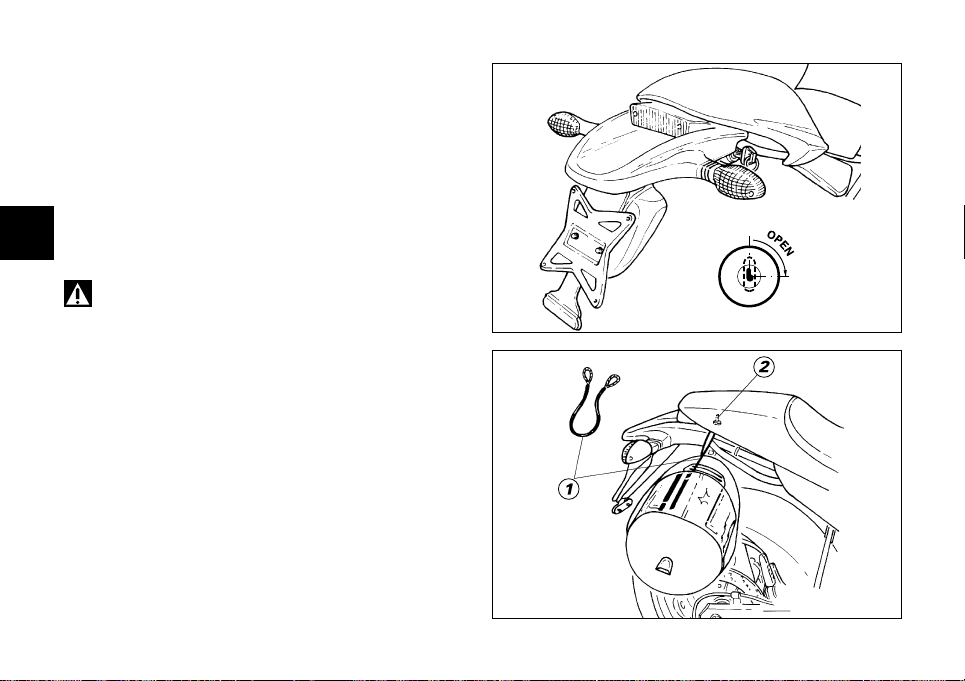
Seat catch and helmet pin
Opening
Fit the ignition key into the lock. Turn the key clockwise
to detach seat from frame. Pull the seat backwards to
slide it off its front holders.
On the rear end of the compartment underneath the
seat, there is the helmet fastening cable (1) (see page
31). Insert the cable into the helmet, slide the end of the
cable onto the pin (2). Leave helmet hanging outside and
refit the seat.
Warning
This system is intended to lock your helmet safely
when you park your motorcycle. Never leave the helmet
hanging outside when riding or it may get in the way and
make you lose control of the motorcycle.
Closing
Make sure that all parts are arranged and secured
properly inside the compartment under the seat. Slide
the front ends of the seat bottom underneath the frame
U-tube and push down on the rear end of the seat until
you hear the catch click. Make sure the seat is firmly
secured to the frame and take the key out of the lock.
0
1
fig. 14.1
fig. 14.2
Page 21
21
E
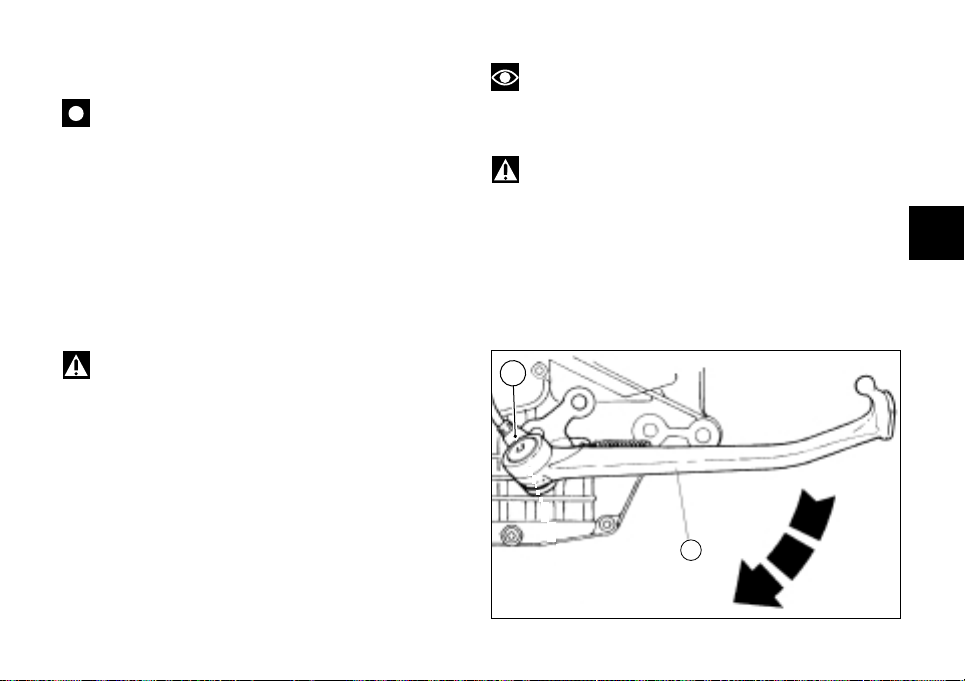
Side stand (fig. 15)
Important
Before lowering the side stand, make sure that the
bearing surface is hard and flat.
Do not park on soft or pebbled ground or on asphalt melt
by the sun heat and similar or the motorcycle may fall
over.
When parking in downhill road tracts, always park the
motorcycle with its rear wheel facing downhill.
To pull down the side stand, hold the motorcycle
handlebar with both hands and push down on the stand
(1) with your feet until it is fully extended. Tilt the
motorcycle until the side stand is resting on the ground.
Warning
Do not sit on the motorcycle when it is supported
on the side stand.
To move the side stand to its rest position (horizontal
position), tilt the motorcycle to the right and, at the same
time, lift the stand (1) with your feet.
1
2
fig. 15
Note
Check for proper operation of the stand mechanism
(two springs, one into the other) and the safety sensor
(2).
Warning
The motorcycle can be started only if the side stand
is in “rest” position as it is equipped with a safety device
preventing engine start if the stand is down.
Page 22
22
E
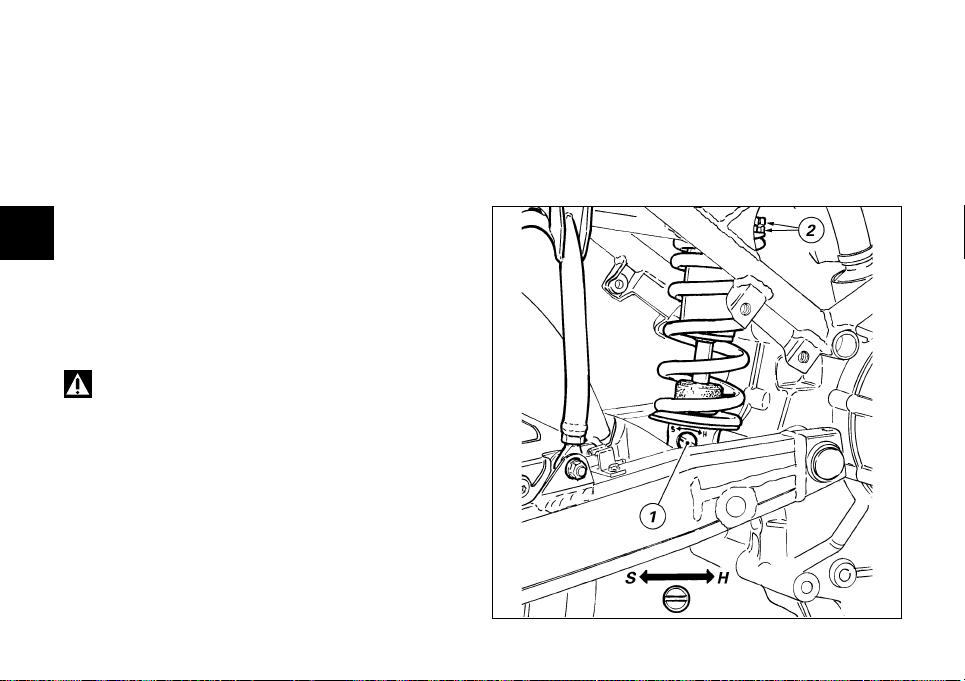
Shock absorber adjusters (fig. 16)
The shock absorber has outer adjusters that enable you
to adjust your motorcycle to the load.
The adjuster (1) located on the right side, on the
connection holding the shock absorber to the swingarm,
controls rebound damping.
Turn the adjuster (1) clockwise to increase damping (H),
anticlockwise to reduce it (S).
STANDARD setting:
turn the adjuster (1) all the way in (clockwise) then
slacken it 8 clicks.
Two ring nuts (2), located on the top section of the shock
absorber is used to adjust the outer spring preload.
To change spring preload, slacken the upper ring nut.
Then tighten or slacken the lower ring nut to increase or
decrease spring preload as required.
Warning
Use a specific pin wrench only to turn the preload
adjusting nut. Be careful when turning the nut with the
wrench, as the pin may slip out of the ring nut recess and
you may hurt your hand hitting motorcycle parts.
The shock absorber is filled with gas under pressure and
may cause severe damage if taken apart by unskilled
persons.
When carrying a passenger and a load, set the rear shock
absorber spring to maximum preload to improve
motorcycle handling and keep safe clearance from the
ground. You may find that rebound damping needs
readjusting.
fig. 16
Page 23

23
E
DIRECTIONS FOR USE
Running-in recommendations
Max. rotation speed
Rotation speed for running-in period and during standard
use (rpm):
1) up to 1000 km - 621 miles;
2) from 1000 to 2500 km - 621 to 1553 miles;
3) after 2500 km - 1553 miles.
Up to 1000 km/621 miles
During the first 1000 km/621 miles, keep the revolution
meter under control. The indicator must not exceed:
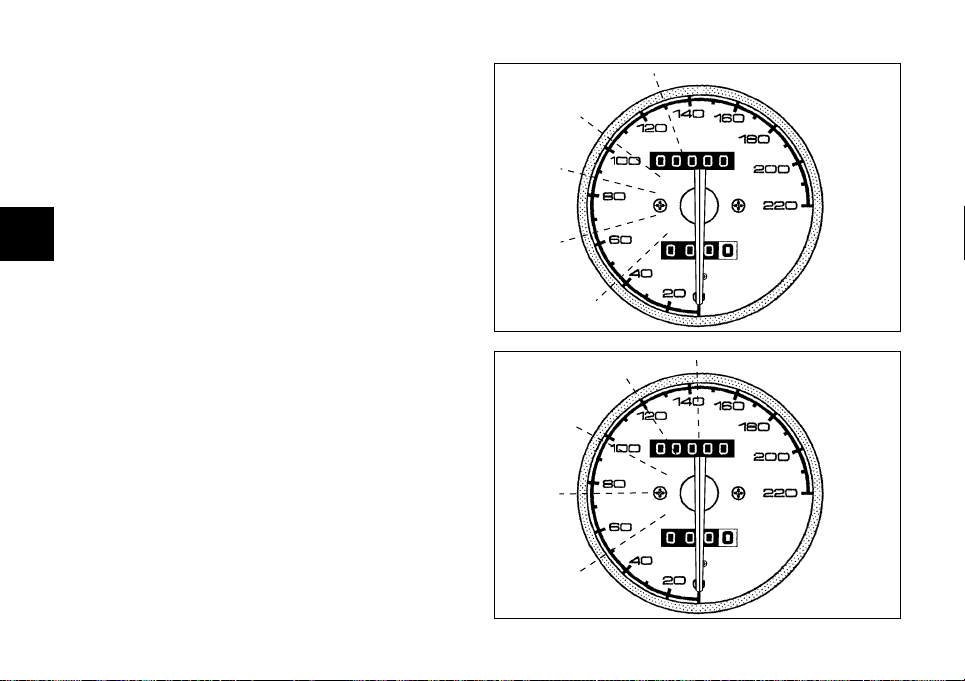
speed as indicated for the each gear (fig. 17.1).
During the first hours of riding, it is advisable to run the
engine at varying load and rpm, though still within
recommended limit.
To this end, roads with plenty of bends and even slightly
hilly areas are ideal for a most efficient running-in of
engine, brakes and suspensions.
For the first 100 km/62 miles, use the brakes gently. Do
not brake violently or keep brake applied for too long.
This will enable a correct break-in of friction material on
brake pads against brake discs.
For all mechanical parts of the motorcycle to adapt to
one another and above all not to adversely affect the life
of basic engine parts, it is advisable to avoid harsh
accelerations and not to run the engine at high rpm for
too long, especially uphill.
Furthermore, the drive chain should be inspected
frequently. Lubricate it as required.
From 1000 to 2500 km/621 to 1553 miles
At this point, you can squeeze some more power out of
your engine, being careful, however, never exceed:
speed as indicated for the each gear (fig. 17.2).
Important
During the whole running-in period, the
maintenance and service rules recommended in this
manual should be observed carefully.
Compliance with the above instructions is a prerequisite
for Warranty validity. Failure to comply with these rules
will release Ducati Motor S.p.A. from any liability
whatsoever for resulting engine damage or shorter
engine life.
Page 24
24
E
After 2500 km/1553 miles
After running-in, never exceed the following values
during the motorcycle standard use:
max. speed allowed for each gear (see page 55).
Strict observance of running-in recommendations will
ensure longer engine life and reduce the likelihood of
overhauls and tune-ups.
5ª
4ª
3ª
2ª
1ª
fig. 17.1
fig. 17.2
2ª
3ª
1ª
4ª
5ª
Page 25

25
E
Pre-ride checks
Warning
Failure to carry out these checks before riding, may
lead to motorcycle damage and injury to rider and
passenger.
Before riding, perform a thorough check-up on your bike
as follows:
Fuel level in the tank
Check fuel level in the tank. Fill tank if needed (page 29).
Engine oil level
Check oil level in the sump through the sight glass. Top
up with recommended oil if needed (page 48).
Brake and clutch fluid
Check fluid level in the relevant reservoirs.
Tyre condition
Check tyre pressure and condition (page 47).
Controls
Work the brake, clutch, throttle and gear change controls
(levers, pedals and twistgrips) and check for proper
operation.
Lights and indicators
Make sure lights, indicators and horn work properly.
Replace any burnt-out bulbs (page 43).
Key-operated locks
Check that fuel filler plug and seat catch locks are closed
firmly.
Side stand
Make sure side stand operates smoothly and is in the
correct position (page 21).
Warning
In case of malfunctioning, do not start the
motorcycle and call a Ducati dealer or authorized
workshop.
Page 26
26
E
Starting the engine
Note
Follow the “High ambient temperature” procedure
to start the engine when it is warm (page 27).
Warning
Before starting the engine, become familiar with
the controls you will need to use when riding.
Never start or run the engine indoors. Exhaust gases are
poisonous and may lead to loss of consciousness or even
death within a short time.
Regular ambient temperature
(10 to 35 °C/50 to 95 °F):
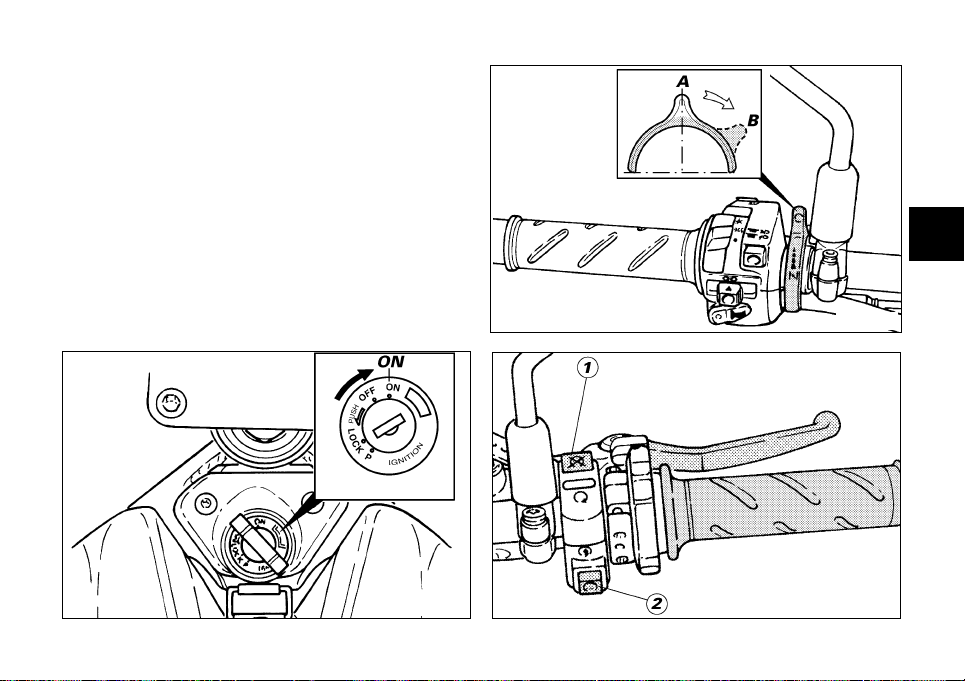
1) Move the ignition key to ON (fig. 18.1). Make sure
both the green light N and the red light on the
instrument panel come on.
Important
The oil pressure light should go out a few seconds
after the engine has started (page 11).
Warning
The side stand must be fully up (in a horizontal
position) as its safety sensor prevents engine start when
down.
2) Move the fast-idle lever to position (B) (fig. 18.2).
3) Check that the stop switch (1, fig. 18.3) is positioned
to (RUN), then press the starter button (2).
Let the engine start without using the throttle control.
Important
Never operate the starter more than 5 seconds at a
time. If needed, allow 10 seconds before attempting to
restart the engine.
4) Move the fast-idle lever towards its vertical position (A,
fig. 18.2) until obtaining the engine speed: idle speed.
Important
Do not rev up the engine when it is cold. Allow
some time for oil to reach all points that need lubricating.
5) Then, as the engine warms up, gradually move the
fast-idle lever until bringing it in a vertical position (A).
When fully warm, the engine should hold idling speed
with the fast-idle device fully closed.
Page 27
27
E
fig. 18.2
fig. 18.3
fig. 18.1
High ambient temperature (over 35 °C/95 °F):
Follow the same procedure, however, do not use the
fast-idle device.
Cold ambient temperature (below 10 °C/50 °F):
Follow the procedure for “Regular ambient
temperature”, however allow 5 minutes for the engine to
warm up (step 5).
In addition, the carburettor floating chambers are
electrically heated through an automatic system.
Page 28
28
E
Braking
Slow down in time, shift down to engine-brake first and
then brake applying both brakes. Pull the clutch lever
before stopping the motorcycle, to avoid sudden engine
stop.
Warning
Use both brake lever and pedal for effective
braking. Using only one of the brakes will give you less
braking power.
Never use brake controls harshly or violently or you may
lock the wheels and lose control of the motorcycle.
When riding in the rain or on slippery surfaces, braking
will become less effective. Always use the brakes very
gently and carefully when riding under these conditions.
Any sudden manoeuvres may lead to loss of control.
When tackling long, high-gradient downhill road tracts,
shift down gears to use engine braking. Apply one brake
at a time and use brakes sparingly. Keeping the brakes
applied all the time would cause the friction material to
overheat and reduce braking power dangerously.
Underinflated tyres reduce braking efficiency, handling
accuracy and stability in a bend.
Moving off
1) Disengage the clutch squeezing the control lever.
2) Push down on gear change lever sharply with the tip
of your foot to engage the first gear.
3) Speed up engine, by turning the throttle twistgrip and
slightly releasing the clutch lever at the same time. The
motorcycle will start moving off.
4) Let go of clutch lever and speed up.
5) To shift to second gear, close the throttle to slow
down engine, disengage the clutch right away, lift the
gear change lever and let go of clutch lever.
Repeat the same procedure to shift to 3rd, 4th, 5thand
6th.
To shift down, release the twistgrip, pull the clutch
control lever, shortly speed up to help gears synchronize,
shift down and release the clutch.
The controls should be used correctly and timely: when
riding uphill do not hesitate to shift down as soon as the
motorcycle tends to slow down, so you will avoid lugging
the engine and stressing the motorcycle abnormally.
Important
Avoid harsh accelerations, as this may lead to
carburettor flooding and transmission snatching. The
clutch lever should not be pulled longer than necessary
after gear is engaged, or friction parts may overheat and
wear out.
Page 29
29
E
Stopping the motorcycle
Slow down gradually, then shift down and release the
throttle twistgrip. Finally change from first to neutral.
Apply brakes and you will bring the motorcycle to a
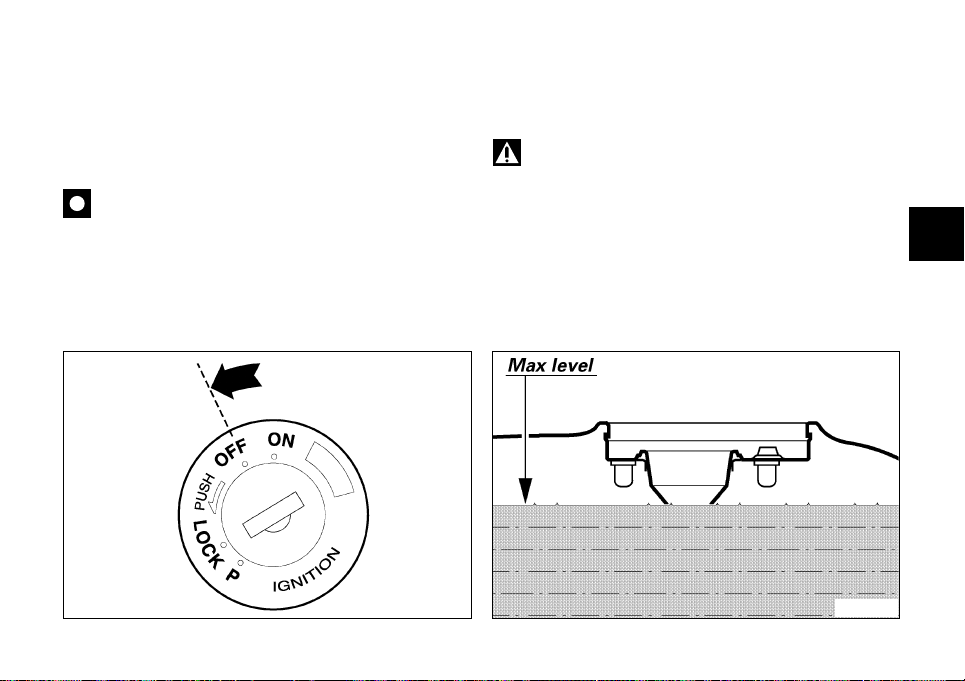
complete stop. To switch the engine off, simply turn the
key to OFF (fig. 19).
Important
Never leave the key in the ON position when
engine is stopped, or this will damage the electric
components.
fig. 19
fig. 20
Refueling
Never overfill the tank when refueling. Fuel should never
be touching the rim of filler recess (fig. 20).
Warning
Be sure there is no fuel trapped in the filler recess.
Page 30
30
E
Parking
Stop the motorcycle, then put it on the side stand to park
it (see page 21).
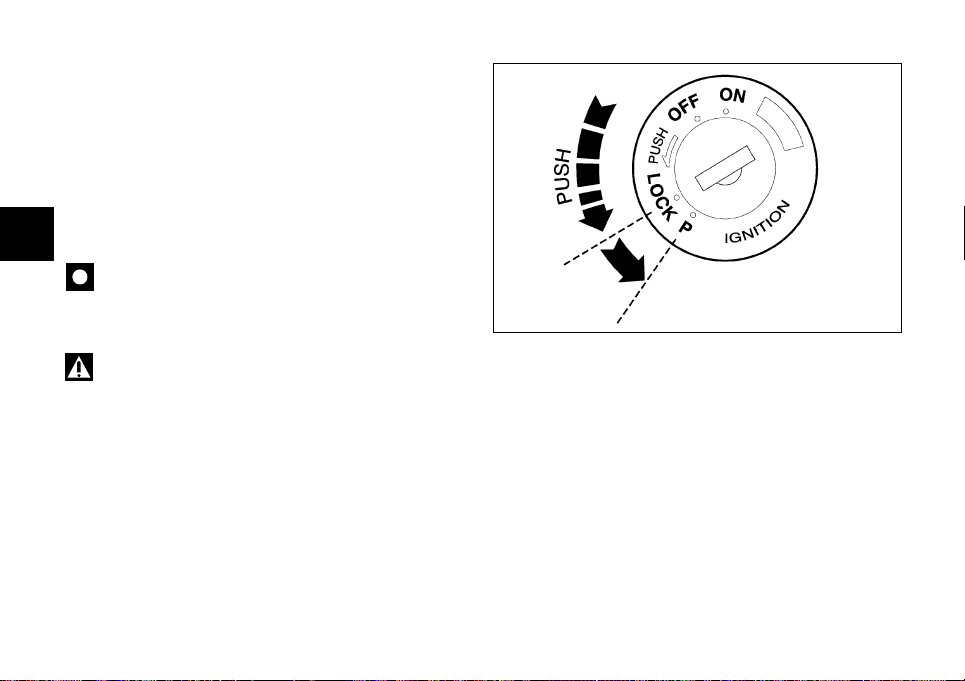
To avoid theft, turn the handlebar fully left and turn the
key to LOCK position.
If you park in a garage or other facilities, make sure that
there is proper ventilation and that the motorcycle is not
near a source of heat or sparks.
If nedeed, you may leave the parking lights on by turning
the key to position P (fig. 21).
Important
Do not leave the key turned to P for long periods or
the battery will run down. Never leave the ignition key in
the switch when you are leaving your bike unattended.
Warning
Using padlocks or other locks designed to prevent
motorcycle motion, such as brake disc locks, rear
sprocket locks, and so on is dangerous and may impair
motorcycle operation and affect the safety of rider and
passenger.
fig. 21
Page 31
31
E
MAINTENANCE
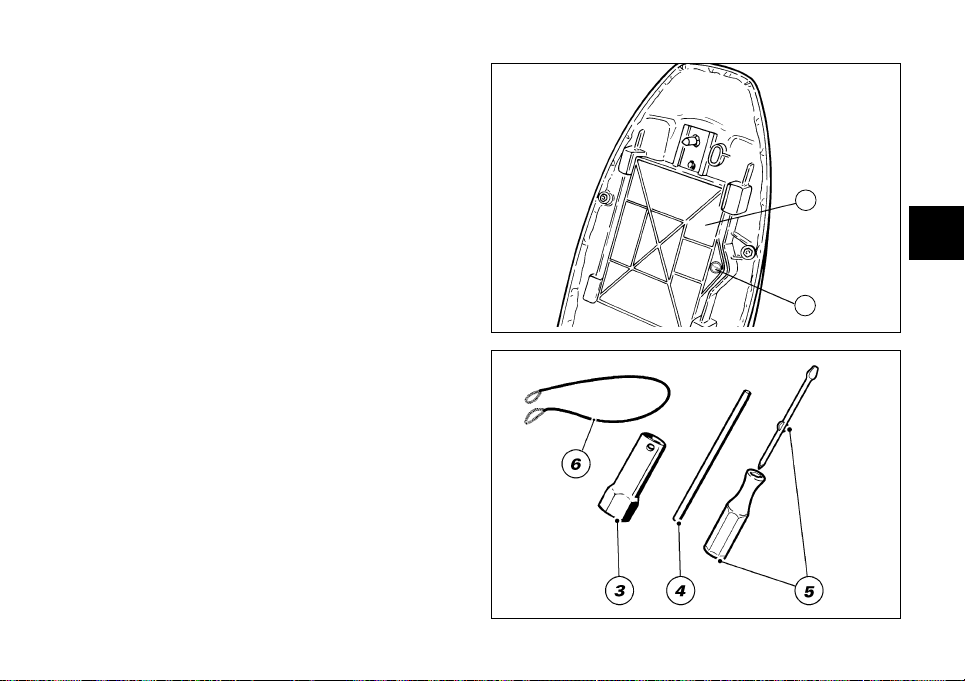
Tool kit and accessories (fig. 22.1)
The compartment under the seat holds:
an Owner’s manual;
a helmet fastening cable;
a tool bag for normal maintenance and checks to be
performed by the user.
To reach this compartment, remove the seat first (page
20) then the protective cover (1). Use a coin to unscrew
its special screw (2).
The tool bag holds (fig. 22.2)
3) box wrench for spark plugs;
4) tommy bar;
5) double-bit screwdriver;
6) helmet fastening cable.
fig. 22.2
1
2
fig. 22.1
Page 32

32
E
Routine maintenance
The maintenance schedule below specifies maintenance
operations to be carried out at regular intervals according
to time (months) or distance covered (km or miles). It
also shows the motorcycle parts requiring special care.
Proper maintenance, as specified in the maintenance
schedule, ensures long life to your motorcycle, top
performance, good reliability and safe riding. The
maintenance intervals indicated here are for motorcycles
that are not used in demanding conditions, such as riding
in town traffic, on dusty ground, long trips on mountain
roads, long trips on motorways at high speed, riding in
bad weather, and so on. In these cases, maintenance
work should be carried out more frequently. Call your
local Ducati Dealer or an authorized workshop to obtain
more information on your special needs.
Operation identification symbols:
■)This symbol indicates that the job in question should
be entrusted to a Ducati Dealer or authorized workshop
where highly trained personnel and special equipment
are available.
C) Check and adjust
L) Lubricate and/or grease
P) Clean
S) Replace
V) Check with engine running
Page 33

33
E
Operations Pre- After 1000 km/ Every Every Every
delivery 621 miles 1000 km/ 10000 km/ 20000 km/
or 6 months 621 miles 6,214 miles 12,427 miles
Spark plugs C S
Carburettor: synchronization and idling C C
adjustment ( ■)
Chain: tensioning and lubrication ( ■) C/L C/L C/L
Timing belts ( ■)CCS
General testing C C C
Flexible cables C C C
Clutch and brake hydraulic controls ( ■)C C C
Cylinder compression ( ■)C
Wheel hub bearings ( ■)C
Steering head bearing clearance ( ■)CC C
Air filter C S
Engine oil intake filter ( ■)P P
Fuel filter ( ■)SS
Engine oil filter ( ■)SS
Page 34

34
E
Operations Pre- After 1000 km/ Every Every Every
delivery 621 miles 1000 km/ 10000 km/ 20000 km/
or 6 months 621 miles 6,214 miles 12,427 miles
Valve clearance ( ■)C
Rear wheel rubber cush drive damper ( ■)C
Signaling and light system V
Battery liquid level C C
General lubrication ( ■)LL L
Clutch and brake control oil ( ■)CC C S
Front fork oil ( ■) S
Engine oil ( ■)CSCS
Wear on brake pads ( ■)CC
Sprocket stop plate ( ■)C
Tyres: wear and pressure C C C
General cleaning P
Fuel tank ( ■) P
Torque of nuts and bolts ( ■)CC C
Page 35
35
E
MAIN MAINTENANCE OPERATIONS
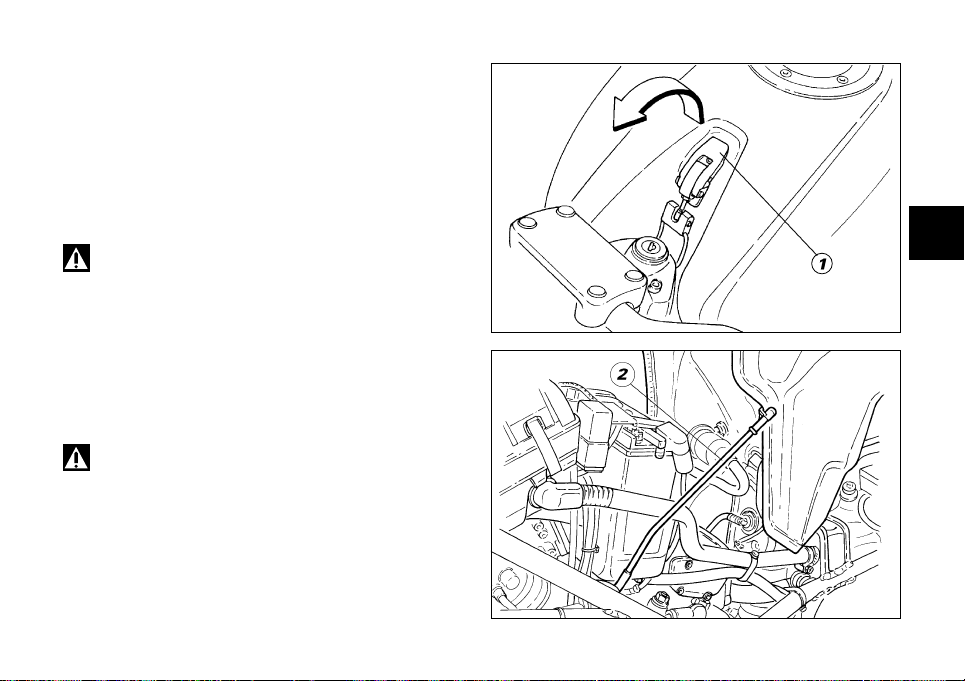
Lifting the fuel tank (fig. 23.1)
Warning
Make sure the fuel in the tank is less than 5
litres/1.3 US.Gal. or fuel may leak out through the filler
plug breather.
Remove the seat (page 20) and lift the hook (1).
Lift the tank and unhook the service rod (2, fig. 23.2)
from the support. Place the tank onto the rod.
When you have finished, reverse the above procedure to
refit.
Warning
When lowering the tank, make sure lines are
properly routed to avoid squeezing.
fig. 23.1
fig. 23.2
Page 36
36
E
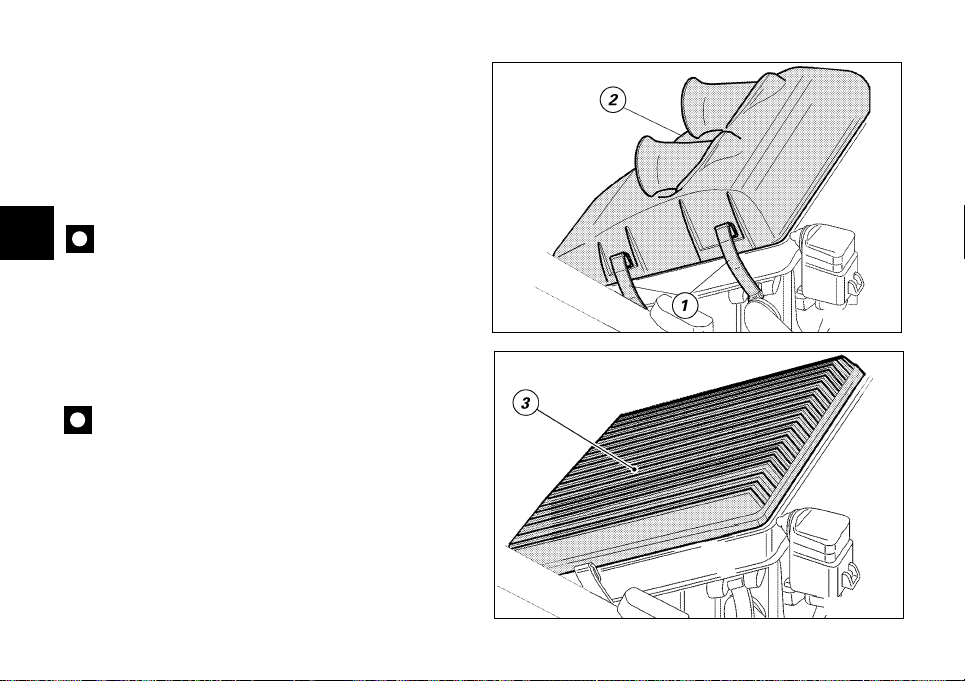
Changing air filter (fig. 24.1)
Replace the air filter at the required intervals shown in
the routine maintenance chart. The air box is accessible
after lifting the fuel tank as described on page 35.
To remove the filter, release the cover clips (1) on both
sides of the air box and take off the cover (2).
Remove the filter cartridge (3, fig. 24.2) and fit a new
one.
Important
A clogged filter will reduce air intake, increase fuel
consumption, reduce engine power, and foul the spark
plugs. Do not use the motorcycle without filter or
suspended matters could get into the engine and cause
damage.
Install the filter into the seat in the air box as shown in
the figure and refit all the parts you have removed.
Important
If you are using the motorcycle on dusty or very
wet roads, replace filter more frequently than
recommended intervals.
fig. 24.1
fig. 24.2
Page 37
37
E
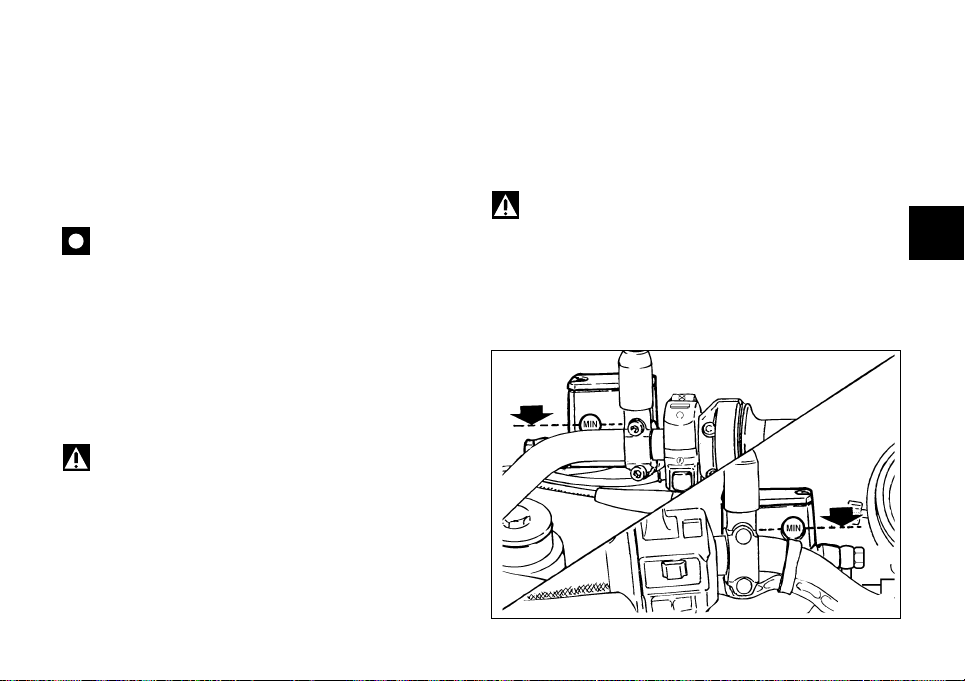
Checking brake and clutch fluid level (fig. 25)
Fluid level should never fall below the MIN mark on each
reservoir.
If level drops below the limit, air might get into the circuit
and affect the operation of the system involved.
Brake and clutch fluid must be topped up and changed at
the intervals specified in the routine maintenance chart
by a Ducati dealer or authorized workshop.
Important
It is recommended all brake and clutch tubes be
changed every four years.
Brake system
If you find exceeding play on brake lever or pedal and
brake pads are still in good condition, contact your Ducati
dealer or an authorized workshop to have the system
inspected and any air drained out of the circuit.
Warning
Brake and clutch fluid and will damage paintwork
and plastic parts if accidentally spilled.
Hydraulic oil is corrosive; it may cause damages and lead
to severe injuries.
Never mix different quality oils.
Check seals for proper sealing.
Fig.25
Clutch system
If the control lever has exceeding play and the
transmission snatches or jams as you try to engage a
gear, it means that there is air in the circuit. Contact your
Ducati dealer or an authorized workshop to have the
system inspected and air drained out.
Warning
Brake fluid level will increase as clutch plate friction
material wears down. Do not exceed specified level
(3 mm/0.12 in. above minimum level).
Page 38
38
E
Fig.26
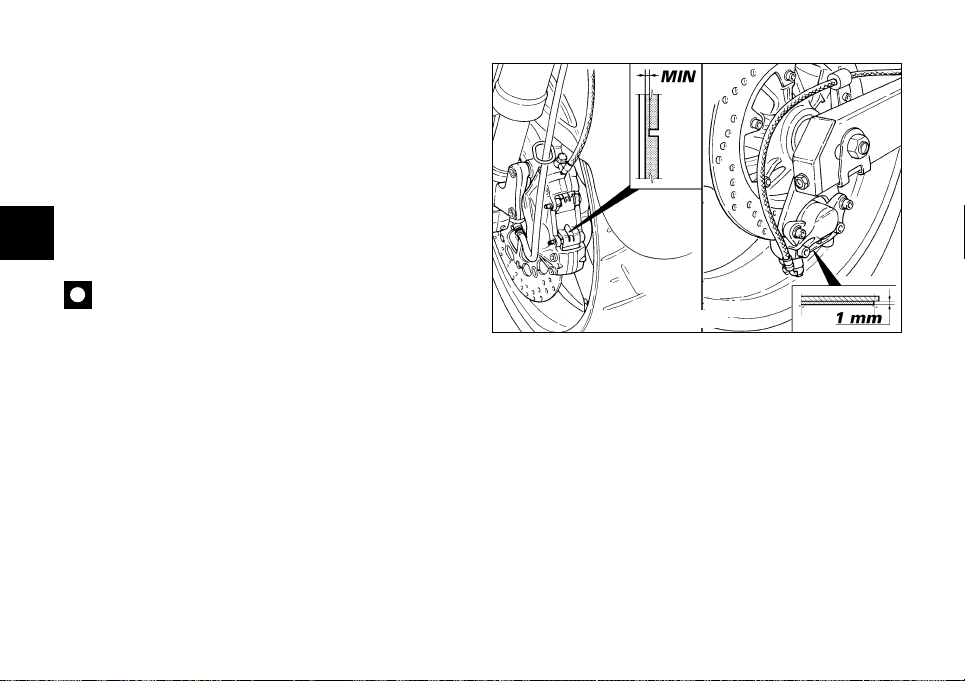
Checking brake pads for wear (fig. 26)
Front brake
To facilitate inspection without removing the pads from
the calipers, brake pads have a wear mark. If the grooves
in the friction material are still visible, the pad is still in
good condition.
Rear brake
Friction material on each pad must be at least 1
mm/0.039 in. thick.
Important
Have the brake pads replaced at your Ducati
dealer's shop or authorized workshop.
Page 39
39
E
fig. 27
Lubricating cables and joints
The condition of the outer sheaths of the throttle and
fast-idle cables should be checked at regular intervals.
The sheaths should show no signs of squeezing or
cracking. Work the controls to make sure the cable slides
smoothly inside the sheath: if you feel any friction or hard
spots, have the cable replaced by your Ducati dealer or
authorized workshop.
To prevent these failures, smear the ends of the flexible
cables with SHELL Advance Grease or Retinax LX2 at
regular intervals.
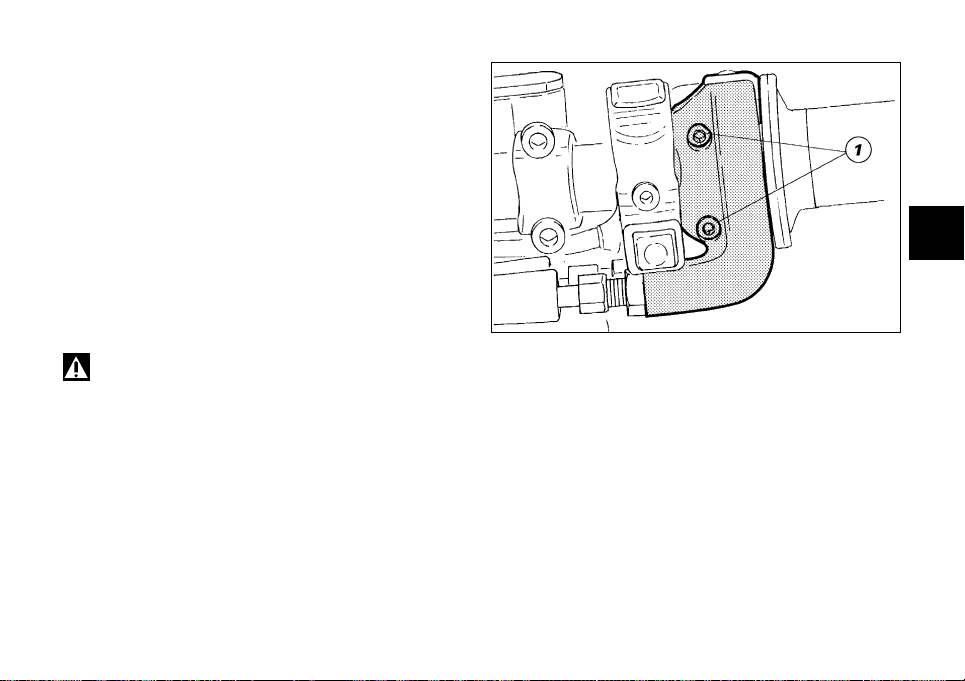
For the throttle cable, it is best to open the device by
unscrewing the two fastening screws (1, fig. 27) and
then grease the cable ends and the pulley.
Warning
Carefully close the device by sliding the cables onto
the pulley.
Refit the cover and tighten the screws (1).
To ensure smooth operation of the side stand joint, clean
off any dirt and apply SHELL Alvania R3 at all points
exposed to friction.
Page 40
40
E
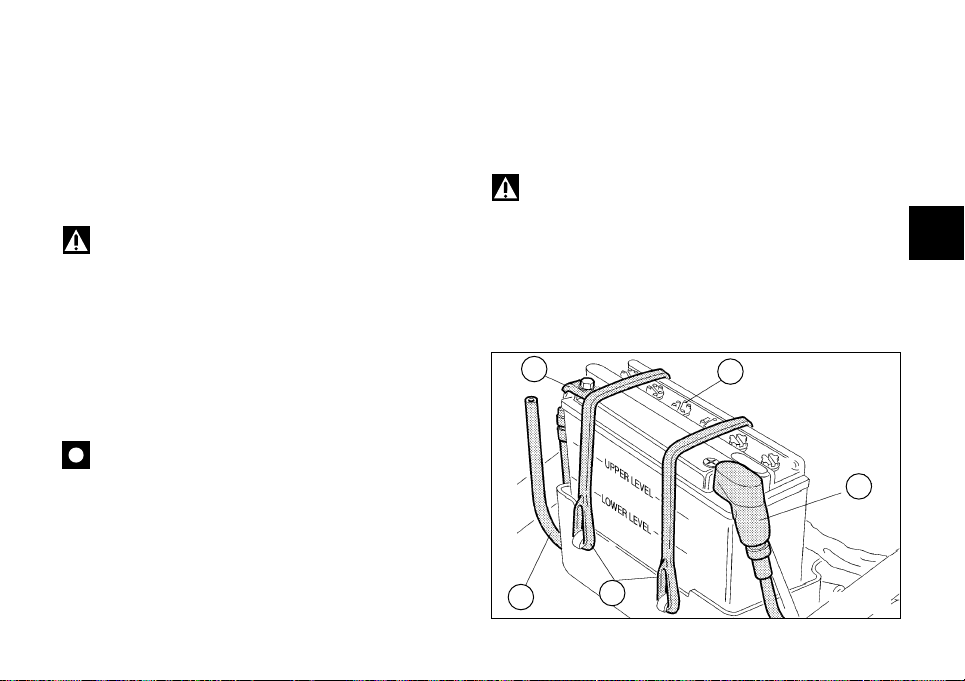
Checking battery liquid level (fig. 29)
Lift the tank to carry out such operation (page 35).
Battery liquid level must be maintained between the
maximum (UPPER LEVEL) and minimum (LOWER
LEVEL) marks on battery front.
If battery liquid level is too low, remove the caps (1) and
top up carefully with distilled water up to the upper level
line, using a small syringe or a plastic funnel.
When adding distilled water, make sure the breather tube
(2) is connected to battery breather outlet. The breather
tube must be so placed that it does not kink or twist.
Important
Add only distilled water to the battery. Tap water
may shorten battery life.
A kinked or twisted breather tube may lead to
overpressure and damage the battery.
Warning
The battery contains sulphuric acid (electrolyte).
Avoid contact with skin and eyes as it may cause severe
burns. If you spill some electrolyte on your skin, wash
the affected area with abundant water and seek medical
advice. Electrolyte is poisonous: if you swallow it
accidentally, drink abundant milk or water, then eat
magnesia, scrambled eggs or drink vegetable oil and
seek medical advice without delay.
Always wear adequate protective clothing and a visor
when handling the battery. Never switch on a lighter or
light a match and so on to check battery fluid level.
Do not reverse terminal polarity.
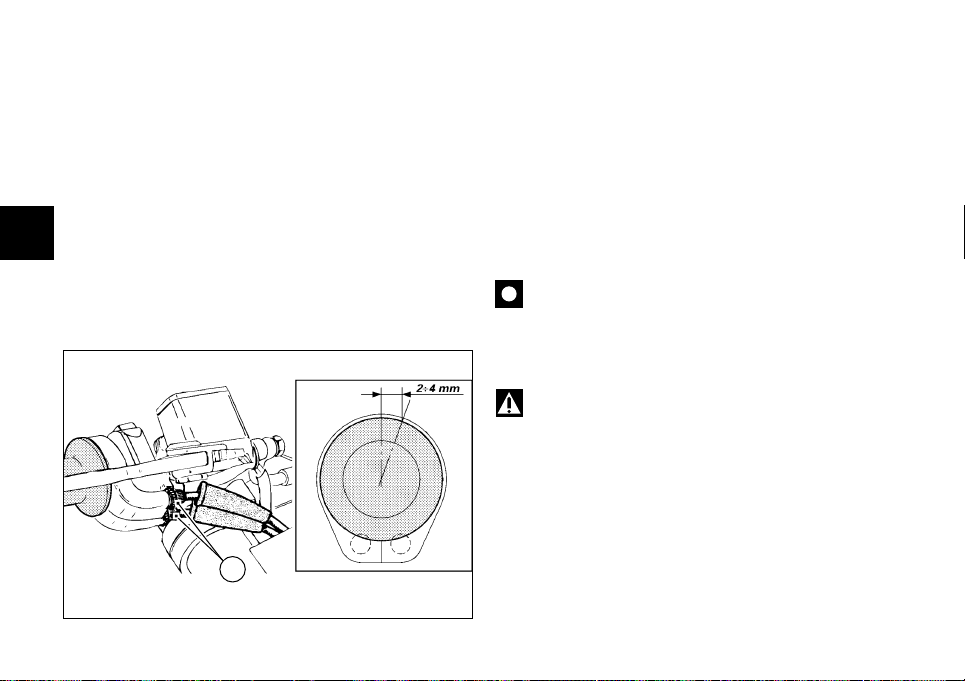
Throttle cable adjustment
The throttle twistgrip must have a free play of 2 - 4
mm/0.08-0.16 in., measured at the edge of the twistgrip
and at all positions of the handlebars. If it needs
adjusting, use the suitable adjusters (1, fig. 28) provided
on the throttle control.
1
fig. 28
Page 41
41
E
Refit the caps (1) on the cells and reinstall the battery on
its mount and clamp the retainers (3).
Reconnect the breather tube (2) and connect the
terminals. Use some grease on the fastening screws to
improve conductive capacity.
Warning
Keep the battery out of the reach of children.
A low battery will degrade soon if not charged promptly.
1
2
3
+
-
fig. 29
Charging the battery (fig. 29)
Before charging the battery, it is best to remove it from
the motorcycle.
Disconnect the breather tube (2). Always disconnect the
black negative terminal (-) first, and then the red positive
terminal (+).
Release the retainers (3) and take the battery out of its
mount.
Warning
Batteries develop explosive gases: keep it away
from heat sources and flames.
Charge the battery in a ventilated room.
Check the battery liquid level in each cell. If level is low in
any of the cells, top up. Note that level should not
exceed the maximum line, as it will rise during charging.
Connect the battery charger leads to the battery
terminals (red to positive terminal (+), black to negative
terminal (-).
Important
Make sure the charger is off when you connect the
battery to it, or you might get sparks at the battery
terminals that could ignite the gases inside the cells.
Always connect the red positive terminal first.
Charge the battery at 1.5 A.
When battery is charged, check electrolyte level in each
cell. If it has dropped, top up with distilled water until
reaching the upper level.
Page 42
42
E
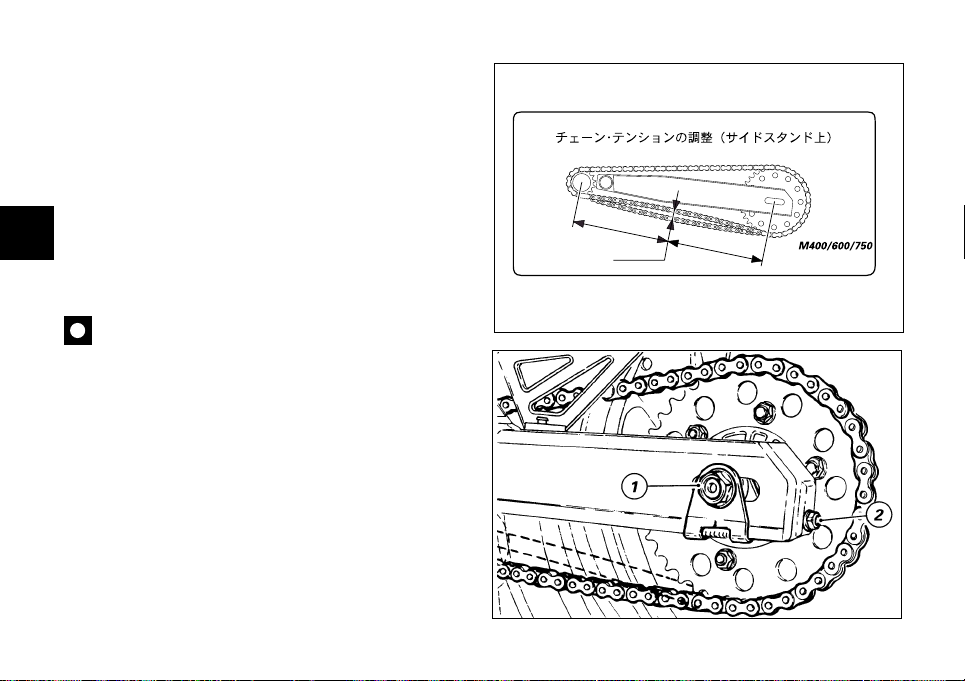
Chain tensioning
Turn the rear wheel slowly until you find the position
where chain tension is highest.
With the motorcycle on the side stand, push the chain up
pressing with a finger at the point where it intersects
with swing arm centerline. The lower portion of the chain
should have a slack as follows (fig. 30.1):
20-25 mm/0.79-0.99 in.
To adjust chain tension, slacken the nut (1, fig. 30.2) of
the wheel spindle. Then tighten similarly the screw (2)
clockwise on both sides of the swing arm to increase or
reduce chain tension. If you are slackening the chain, you
will have to push the wheel forward.
Important
Improper chain tension will lead to early wear of
transmission parts.
Make sure you have adjusted to the same setting marks
on both sides of the swing arm. This will ensure perfect
wheel alignment.
Grease threading of wheel spindle nut (1) with SHELL
Retinax HDX2 and torque up to 72 Nm.
Grease threading of adjuster screws (2) with SHELL
Alvania R3 and torque up to 8 Nm.
.
20÷25 mm
=
=
cod. 433.1.212.1B
fig. 30.1
fig. 30.2
Page 43
43
E
Chain lubrication
The chain fitted on your motorcycle has OR seals that
keep dirt out of and lubricant inside the sliding parts. The
seals might be irreparably damaged if the chain is
cleaned using non-specific solvents or washed using
steam or water jets. Dry the chain using compressed air
or absorbent material and apply SHELL Advance Chain or
Advance Teflon Chain on each link.
Important
Using non-specific lubricants may lead to severe
damage to chain, front and rear sprocket.
Replacing bulbs
Before replacing a burnt-out bulb, make sure that the
new one complies with voltage and wattage as specified
on page 58 - “Electric System”.
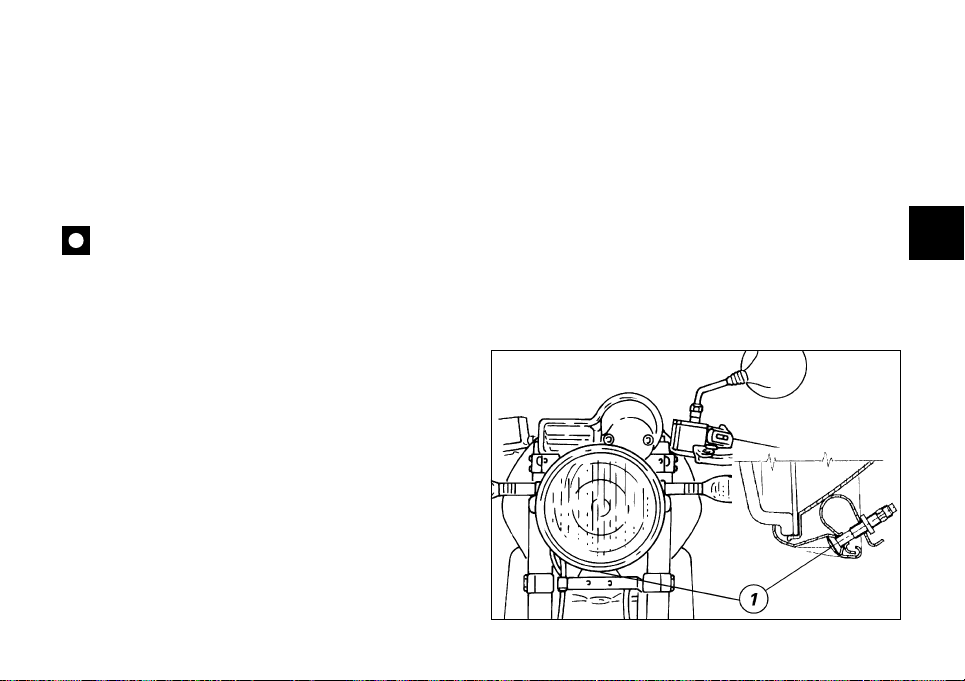
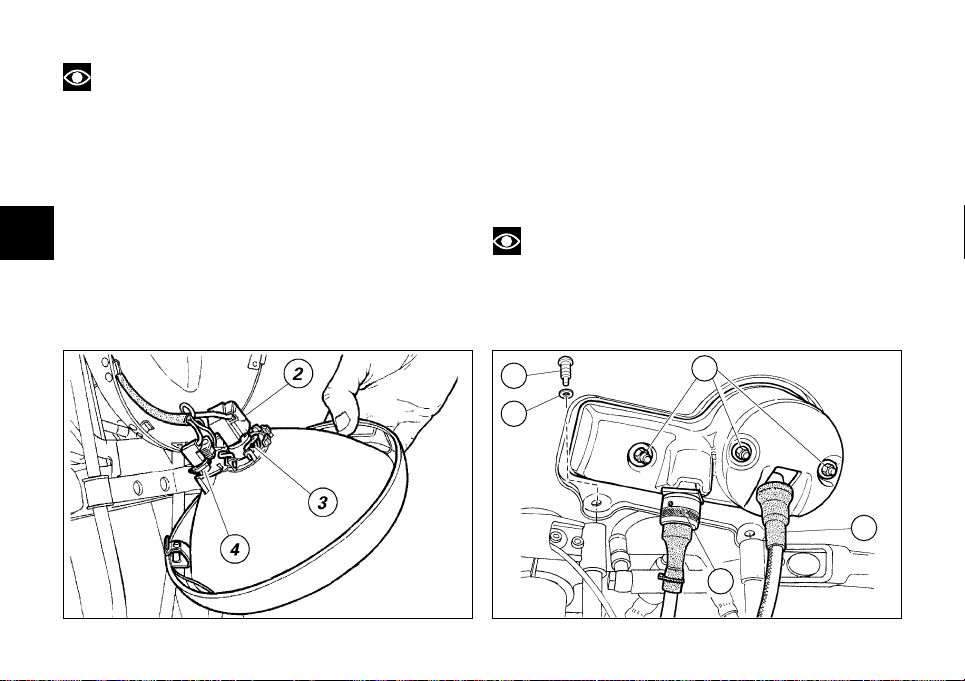
Headlamp (fig. 31.1)
To gain access to headlamp bulbs, slacken the lower
screw (1) holding the rim-reflector assembly to the body
and disconnect the connector (2, fig. 31.2) from the
headlamp. Release the clip (3, fig. 31.2) that secures the
bulb and remove it from the socket.
Replace the bulb.
fig. 31.1
Page 44
44
E
Note
Never touch the transparent body of the new bulb
with your fingers or it will blacken resulting in reduced
bulb brilliancy.
Insert the locating pegs of the bulb base into their seats
to obtain correct alignment; hook the clip (3) to the
headlamp holders.
Reconnect the cables.
To change the parking light bulb, withdraw the bulb
holder (4, fig. 31.2). The bulb is of the bayonet-type:
press and rotate anti-clockwise to remove. Fit the spare
bulb by pressing and turning clockwise until it clicks Fit
the bulb holder again and assemble the rim-reflector
assembly.
Instrument panel (fig. 32)
Disassemble the instrument panel by unscrewing the
two fastening screws (1) with washer (2).
Disconnect the odometer cable (3) and the main wiring
connector (4). Undo the three cap nuts (5) fastening the
rear cover.
Remove the instrument panel and the rear cover.
Replace the burnt bulb with one with equal rating.
Note
Test the new bulb before refitting the instrument
panel elements.
1
2
3
4
5
fig. 32
fig. 31.2
Page 45
45
E
2
A
1
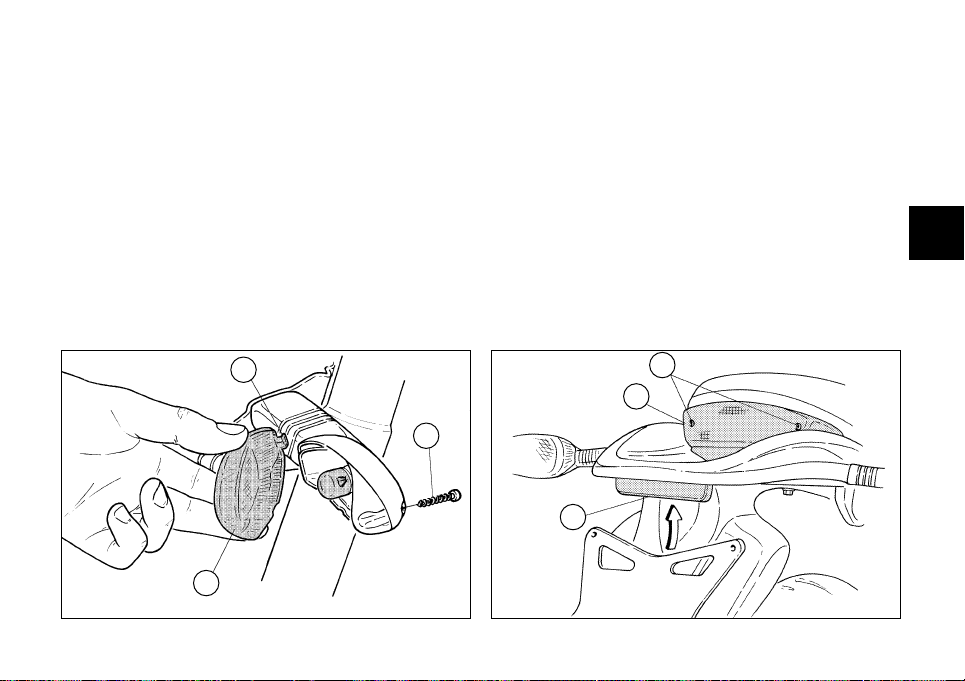
Turn indicators (fig. 33)
Remove the screw (1) and detach the glass (2) from the
body.
The bulb is of the bayonet-type: press and rotate anticlockwise to remove. Fit the spare bulb by pressing and
turning clockwise until it clicks. Refit the glass sliding the
small tab (A) into the suitable slot in the indicator body.
Tighten the screw (1).
fig. 33
2
1
3
fig. 34
Stop light (fig. 34)
To replace the stop and parking light bulb, unscrew the
two screws (1) that secure the glass (2). Remove the
glass. The bulb is of the bayonet-type: press and rotate
anti-clockwise to remove. Fit the spare bulb by pressing
and turning clockwise until it clicks. Refit the glass.
Number plate light (fig. 34)
To expose the number plate bulb, withdraw the lamp
holder from inside (3), then extract the bulb and replace
it.
Page 46
46
E
fig. 35.1
1
fig. 35.2
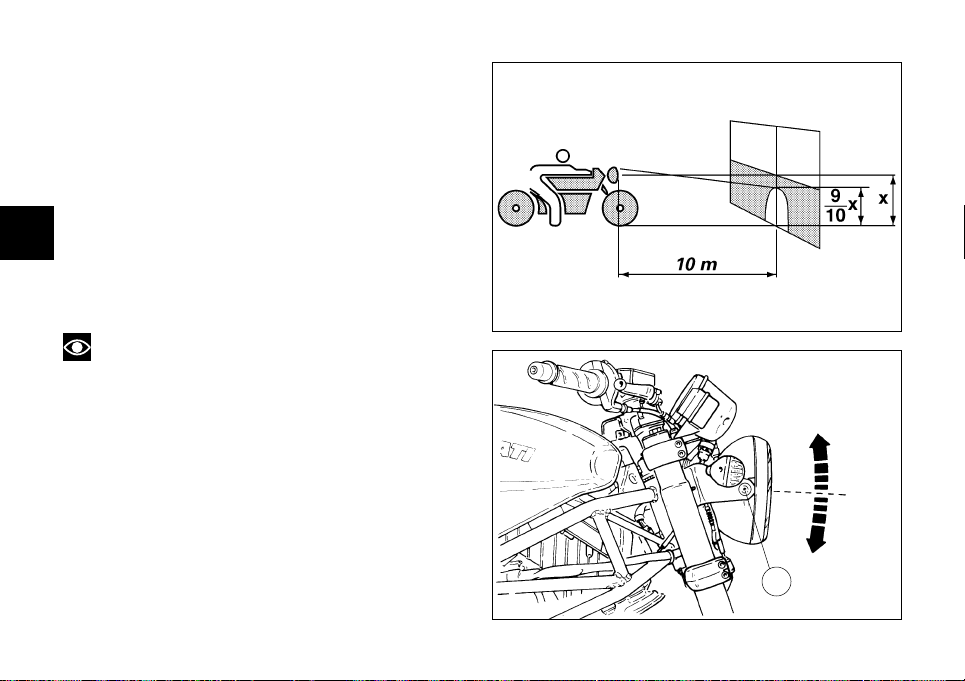
Headlamp alignment (fig. 35.1)
When checking headlamp alignment, put the motorcycle
upright. Tyres should be inflated at the correct pressure
and one person should be sitting astride the motorcycle,
keeping it at right angles to its longitudinal axis and
opposite a wall or a screen, 10 meters/393.7 in. apart
from it. Then draw a horizontal line dictated by headlamp
center and a vertical one in line with the longitudinal axis
of motorcycle.
If possible, perform this check in dim light.
Switch on the low beam:
the height of the light spot (measured at the upper limit
between dark and lighted-up area) should not exceed
9/10thof the height from ground of headlamp center.
Note
The procedure described here is in compliance with
the “Italian Standard” establishing the maximum height
of the light beam.
Owners in other countries will adapt said procedure to
the provisions in force in their countries.
The height of the light beam can be corrected using the
screws (1, fig. 35.2) that secure the headlamp to the side
supports.
Page 47
47
E
Tyres
Front pressure
2.1 bar - 2.3 Kg/sq cm (5.07 lb/sq cm)
Rear pressure:
2.2 bar - 2.4 Kg/sq cm (5.29 lb/sq cm)
As tyre pressure is affected by temperature and altitude
variations, you are advised to check and adjust it
whenever you are riding in areas where ample variations
in temperature or altitude occur.
Important
Check and set tyre pressure when tyres are cold.
To avoid front wheel rim distortion, when riding on
bumpy roads, increase front tyre pressure by 0.2 -0.3 bar.
Tyre repair or replacement
In the event of a tiny puncture, tubeless tyres will take a
long time to deflate, as they tend to keep air inside. If
you find low pressure on one tyre, check the tyre for
punctures.
Warning
A tyre must be replaced when punctured. Replace
tyres using recommended standard tyres only.
Be sure to tighten the valve caps securely to avoid leaks
when riding. Never use tube type tyres. Failure to heed
this warning may lead to sudden tyre bursting and to
serious danger to rider and passenger.
After replacing a tyre, the wheel should be balanced.
Important
Do not remove or shift the wheel balancing
weights.
Note
If tyres need replacing, contact a Ducati Dealer or
authorized workshop to make sure wheels are removed
and refitted correctly.
Page 48
48
E
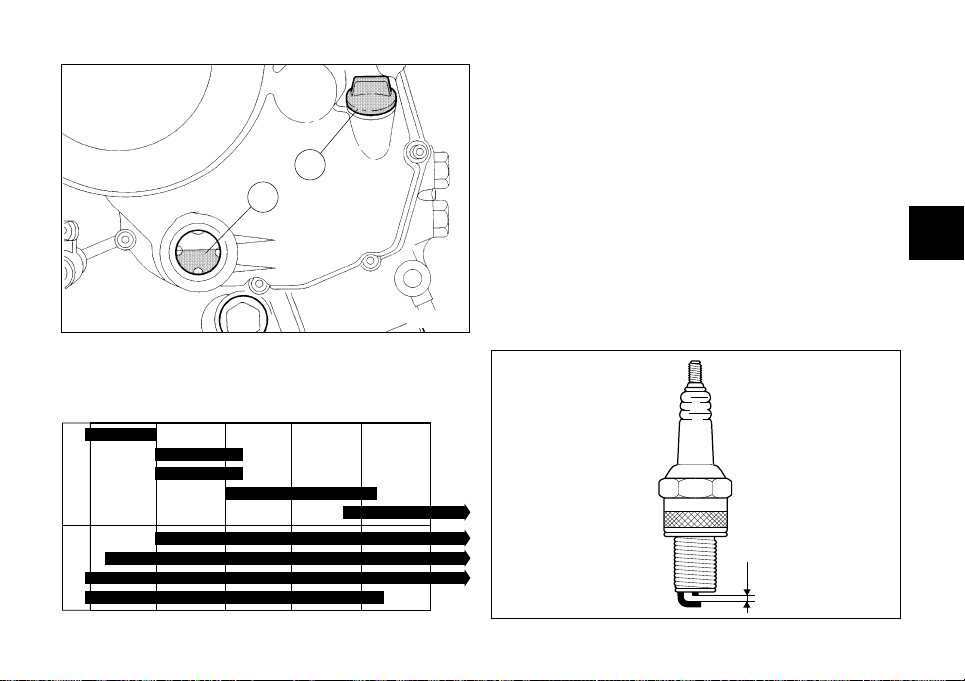
Checking engine oil level (fig. 37)
Engine oil level can be checked through the sight glass
(1) provided on the clutch cover.
When checking oil level, the motorcycle should be
upright and the engine warm. Allow a few minutes for oil
to settle to a steady level after stopping the engine. Oil
level should be between the marks near the sight glass.
Top up oil level with SHELL Advance Ultra 4, if low.
Undo the filler plug (2) and top up to correct level. Refit
the plug.
Important
Engine oil and oil filters must be changed by a
Ducati dealer or authorized workshop at regular intervals,
as specified in the routine maintenance schedule.
Viscosity
SAE 20W-50
The other viscosity degrees indicated in the table can be
used if the local average temperature is within the limits
specified for that oil viscosity.
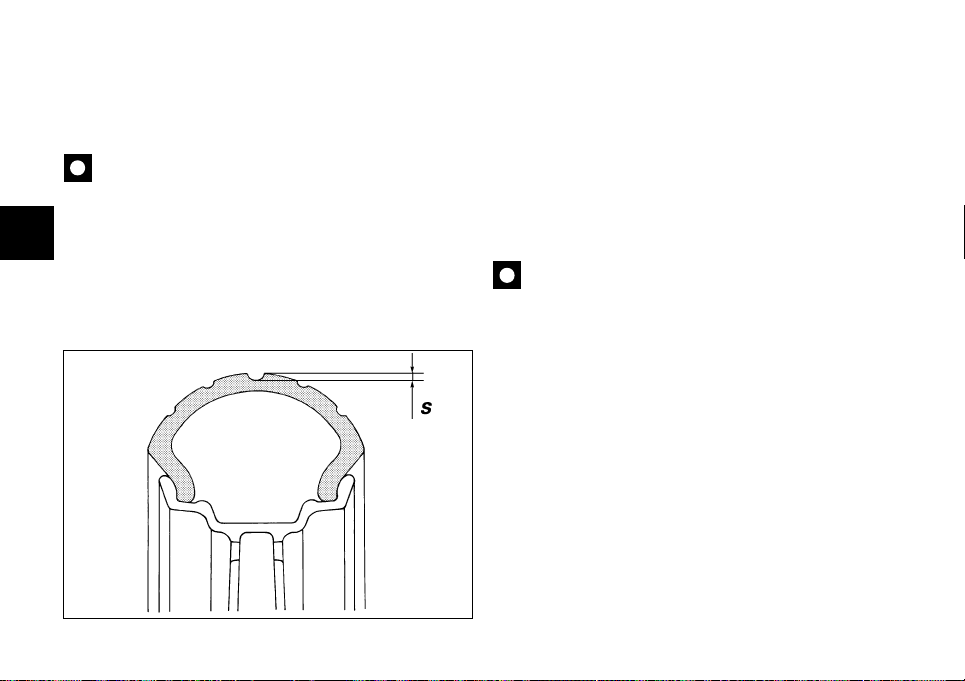
Minimum tread depth
Measure tread depth (S, fig. 36) at the point where tread
is most worn down. It should not be less than 2
mm/0.078 in. and anyway not below the legal limit.
Important
Visually inspect the tyres at regular intervals for
detecting cracks or cuts, on the side walls especially,
bulges or large spots that are indicative of internal
damage. Replace them if badly damaged.
Remove any stones or other foreign bodies caught in the
tread.
fig. 36
Page 49
49
E
–10
Unigrade
Multigrade
010203040°C
40
20W–40 20W–50
15W–40 15W–50
10W–40
10W–30
10W
20W
20
30
2
1
fig. 37
Cleaning and replacing the spark plugs (fig. 38)
Spark plugs are essential to smooth engine running and
should be checked at regular intervals.
This is done quite easily and quickly and provides a good
measure of engine condition.
Remove the spark plug caps from the cylinder head using
the wrench supplied with the bike.
Check the color of the insulating ceramic material of the
central electrode: a light brown, even color is a sign of
good engine condition. If color has altered or you find any
dark deposits, change the spark plug and report this to a
Ducati dealer or authorized workshop.
Check wear on the central electrode. If it looks worn out
or has a vitreous appearance, change the spark plug.
Check electrode gap: it should be 0.6-0.7 mm/0.023-
0.027 in.
0,6
÷
0,7 mm
fig. 38
Page 50
50
E
Cleaning the motorcycle
To preserve the finish of metal parts and paintwork, wash
and clean your motorcycle at regular intervals, anyway
according to the road conditions you ride in.
Use specific products only. Prefer biodegradable
products. Avoid aggressive detergents or solvents.
Important
Do not wash your motorcycle right after use. When
the motorcycle is still hot, water drops will evaporate
faster and spot hot surfaces.
Do not use high-pressure or hot water jets. Using water
cleaners could cause certain parts - such as front fork,
wheel hubs, electric system, front fork seals, air scoops
and exhaust silencers - to seize or malfunction and impair
the safety features of the motorcycle.
Clean off stubborn dirt or exceeding grease from engine
parts using a degreasing agent. Be sure to avoid contact
with drive parts (chain, sprockets, etc.)
Rinse with warm water and dry all surfaces with chamois
leather.
Warning
Braking performance may be impaired immediately
after washing the motorcycle.
Never grease or lubricate the brake discs. Loss of braking
and further accidents may occur. Clean the discs with an
oil-free solvent.
Important
If the gap needs adjusting, be very careful when
bending the side electrode. If gap is too wide or too
close, engine performance will be affected. This could
also cause difficult starting or irregular idling.
Clean the electrode and the insulating material accurately
using a small metal brush and check seal condition.
Clean the seat in the cylinder head. Be careful not to let
any foreign matters fall into the combustion chamber.
Refit spark plug into cylinder head. Snug it finger-tight
until it is fully seated into the head. Tighten the spark plug
at 20 Nm. If you do not have a torque wrench, you can
use the wrench supplied with the tool kit to tighten the
spark plug an additional 1/2 turn.
Important
Never use spark plugs with a heat rating other than
recommended or a thread length other than standard.
Spark plugs should be tightened firmly.
Page 51

51
E
Storing the bike away
If the motorcycle is to be left unridden over long periods,
it is advisable to carry out the following operations before
storing it away:
clean the motorcycle;
plug with its seal and empty the fuel tank;
pour a few drops of engine oil into the cylinders through
the spark plug seats, then crank the engine by hand a
few times so a protective film of oil will spread on
cylinder inner walls;
place the motorcycle on the supplied service stand;
disconnect and remove the battery. Battery should be
checked and charged whenever the motorcycle has been
left unridden for over a month;
protect the motorcycle with a suitable canvas available
from Ducati Spare Parts Department. This will protect
paintwork and let condensate breathe out.
Important notes
Some countries - such as France, Germany, Great Britain,
Switzerland and so on - have compulsory emission and
noise standards.
Carry out any required inspection at regular intervals and
replace any parts using Ducati original spare parts
complying with local law.
Page 52
52
E
TECHNICAL DATA
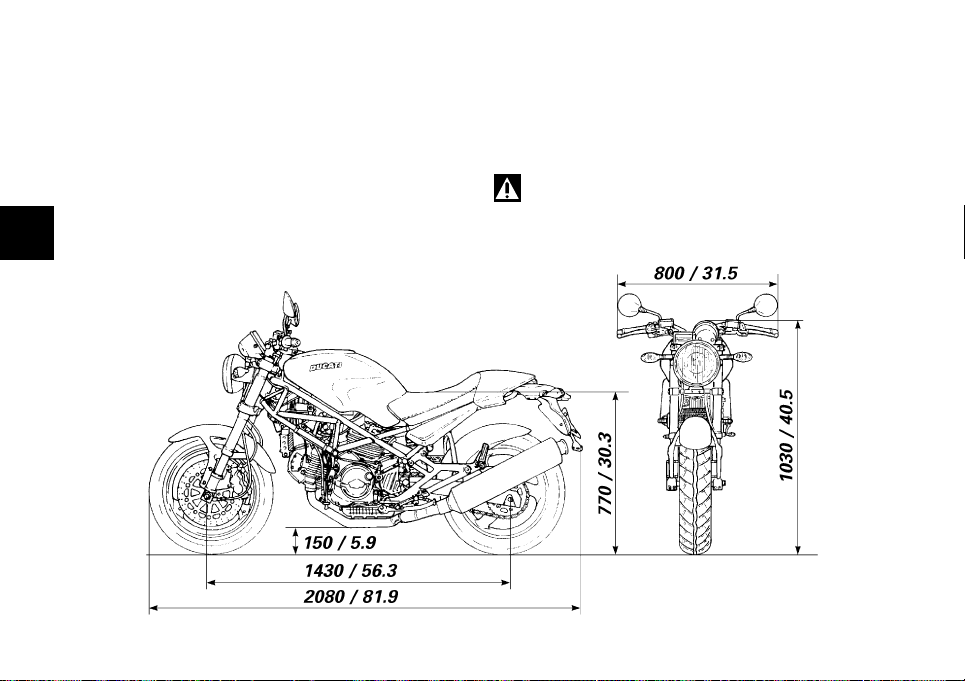
Overall dimensions (mm/in.) (fig. 39)
Weights
Dry weight:
174 Kg / 384 lb.
Carrying full load:
318 Kg / 701 lb.
Warning
Failure to observe weight limits could result in poor
handling and impair the performance of your motorcycle,
and you may lose control of the motorcycle.
fig. 39
Page 53
53
E
Top-ups Type of fluid cu. dm. (liters)/
US Gall.
Fuel tank, including a reserve Gasoline 95-98 RON 16.5
of 3.5 cu dm (liters) / 0.92 US Gall.
Oil sump and oil filter SHELL Advance Ultra 4 3.1 / 0.82
Front/Rear brake and clutch circuits SHELL-Advance Brake DOT 4 –
Protectant for electric contacts SHELL-Advance Contact Cleaner –
Front fork SHELL-Advance Fork 7.5 or Donax TA 0.440 / 0.116
(each leg)
Important
Additives to fuel or lubricants are not allowed.
Page 54
54
E
Engine
Twin cylinder, four-stroke, 90°“L” type, longitudinal.
Bore mm/in.:
70.5 / 2.78
Stroke mm/in.:
51 / 2
Total displacement cu.cm./cu. in.:
398 / 24.29
Compression ratio ±0.5:1:
10.
Max. power at crankshaft (95/1/CE):
31.6 kW - 43HP at 10500 rpm.
Max torque at crankshaft (95/1/CE):
33 Nm at 7500 rpm.
Important
Do not exceed specified speed limits (see page 55)
under any running condition.
1
5
7 8
2
3
4
6
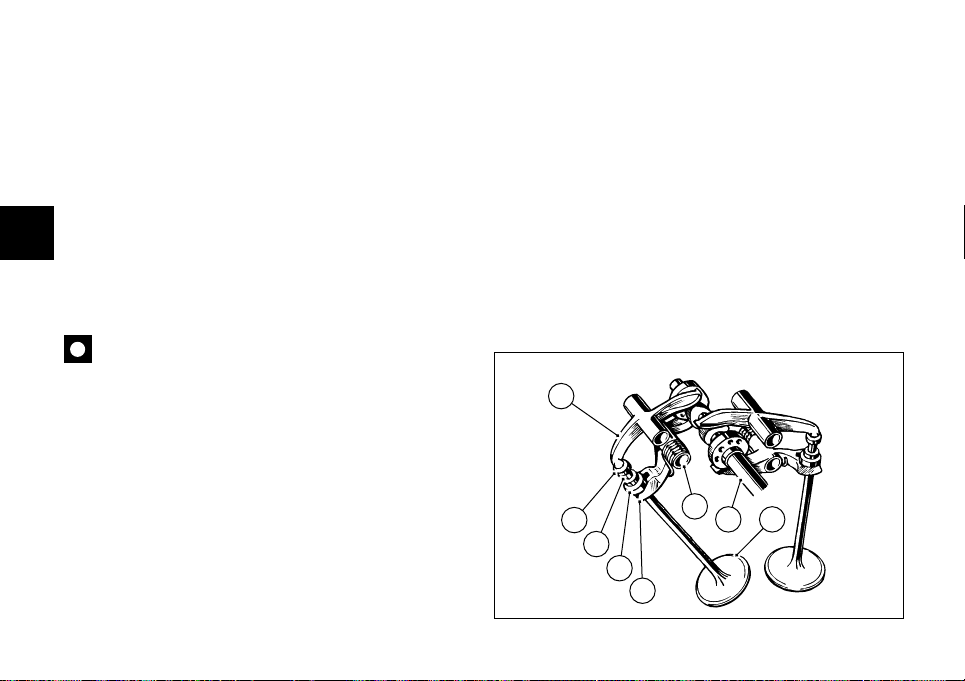
Timing system
Desmodromic (type) with two valves per cylinder,
operated by four rockers (2 opening rockers and 2 closing
rockers) and an overhead camshaft. It is operated by the
crankshaft through spur gears, belt rollers and toothed
belts.
Desmodromic timing system (fig. 40)
1) Opening (or upper) rocker;
2) opening rocker shim;
3) split rings;
4) closing (or lower) rocker shim;
5) return spring for lower rocker;
6) closing (or lower) rocker;
7) camshaft;
8) valve.
fig. 40
Page 55
55
E
Performance data
Maximum speed in any gear should be reached only after
a correct running-in period with the motorcycle properly
serviced at the recommended intervals.
Max. speed (rider alone):
160 Km/h/ - 99 mph;
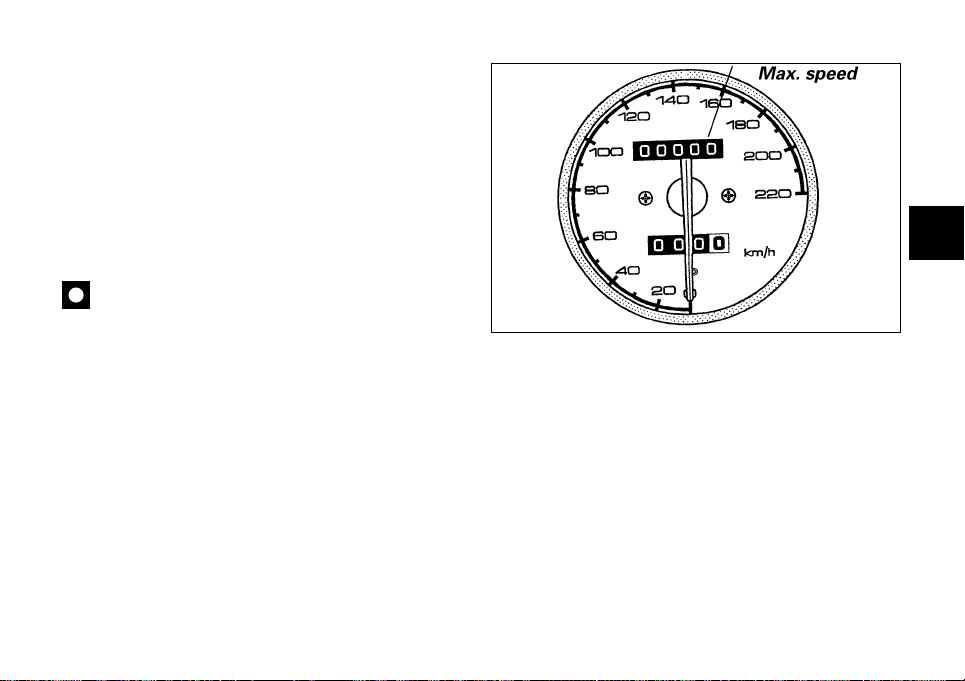
Speed limits for individual gears (fig. 41)
The figure shows the maximum speed limits that can be
reached in each individual gear after the running-in
period.
Important
Failure to comply with these limits releases Ducati
Motor S.p.A. from any liability whatsoever for resulting
engine malfunction.
fig. 41
Spark plugs
Make:
CHAMPION
Type:
RL 82 HC
Page 56

56
E
Transmission
Multiple-disk clutch in oil-bath;
operated by a control lever on left handlebar.
Drive is transmitted from engine to gearbox main shaft
via spur gears.
Ratio: 32/73.
Gearbox: 5-speed;
with constant mesh gears, gear change pedal on left side
of motorcycle.
Front/rear sprocket ratio:14/46.
Total gear ratios:
1stgear 16/40
2ndgear 21/36
3rdgear 24/32
4thgear 27/29
5thgear 29/28
Drive chain from gearbox to rear wheel:
Make: DID
Type: 520 VL2.
Size: 5/8"x1/4"
Links: 102.
Important
The above gear ratios are the homologated ones
and under no circumstances must they be modified.
However, if you wish to tune up your motorcycle for
competitive trials, you may refer to Ducati Motor S.p.A.
who will be glad to provide information about the special
Brakes
Front brake
Type:
drilled steel disc.
1 disc, left side.
Disc diameter: 320 mm/12.6 in.
Hydraulically operated by a control lever on right
handlebar.
Braking surface: 44 sq cm/6.8 sq in.
Brake calipers with separate pistons.
Make and type: BREMBO 30/34-4 pistons.
Friction material: FERIT I/D 450 FF
Master cylinder type: PS 13.
Rear brake
Type: fixed drilled steel disc
Disc diameter: 245 mm/9.64 in.
Hydraulically operated by a pedal on R.H. side
Braking surface: 25 sq cm/3.88 sq in.
Brake caliper: cylinder Ø 32 mm/1.26 in.
Make and type: BREMBO P 2.I05N.
Friction material: FERIT I/D 450 FF.
Master cylinder type: PS 11.
Warning
Brake fluid can dissolve paintwork and cause
severe eye and skin injuries in the event of accidental
spilling. Wash the affected area with abundant running
water.
Page 57

57
E
ratios available. Relevant instructions and original spare
parts are available from your local dealer or authorized
workshop.
Warning
If the rear sprocket needs replacing, contact a
Ducati Dealer or an authorized workshop. If improperly
replaced, this component could seriously endanger your
safety and that or your passenger, and cause irreparable
damage to your motorcycle.
Frame
Tubular trellis frame with upper section made of highstrength steel.
Steering angle (on each side): 29°
Steering head angle: 23°
Trail mm/in.: 94/3.7.
Wheels
Three-spoke, light-alloy rims.
Front wheel
Make: BREMBO
Dimensions: 3.50x17"
Rear wheel
Make: BREMBO
Dimensions: 4.50x17".
Both wheel spindles can be removed.
Tyres
Front tyre
Tubeless, radial tyre.
Size: 120/60-VR17.
Rear tyre
Tubeless, radial tyre.
Size: 160/60-VR17.
Suspensions
Front suspension
Hydraulic upside-down fork.
Stanchion diameter: 43 mm / 1.7 in.
Travel along leg axis: 120 mm /4.72 in.
Rear
Of the progressive type, thanks to a rocker arm
connecting frame and upper pivot point of the shock
absorber and an arch connected at the bottom to
swingarm. The lozer part of shock absorber is connected
via a pivot pin to a steel floating swingarm.The swingarm
hinges on a pivot pin passing through the engine. The
whole system gives the bike excellent stability.
Travel: 65 mm / 2.55 in.
Rear wheel travel: 144 mm / 5.67 in.
Note
Never modify settings which may alter those
technical features which are essential for the motorcycle
homologation.
Page 58
58
E
Electric system
Basic electric items are:
Round headlamp with iodine double filament bulb, 12V55/60W bulb.
Parking light with 12V-5W bulb.
Instrument panel, 12V-1.2W bulbs for warning lights
and 12V-2W bulbs for instrument lights.
Electric controls on handlebar.
Turn indicators, 12V-10W bulbs.
Warning horn.
Stop light switches.
Battery, 12V-16 A.
Generator, 12V-520W.
Electronic voltage regulator, protected by a 40 A fuse.
Starter motor, 12V-0.7 kW.
Tail light, 12V-5/21W double-filament bulb for rear stop
light and tail light, 12V-5W bulb for number plate light.
Note
See “Replacing bulbs” on page 43 for relevant
instructions.
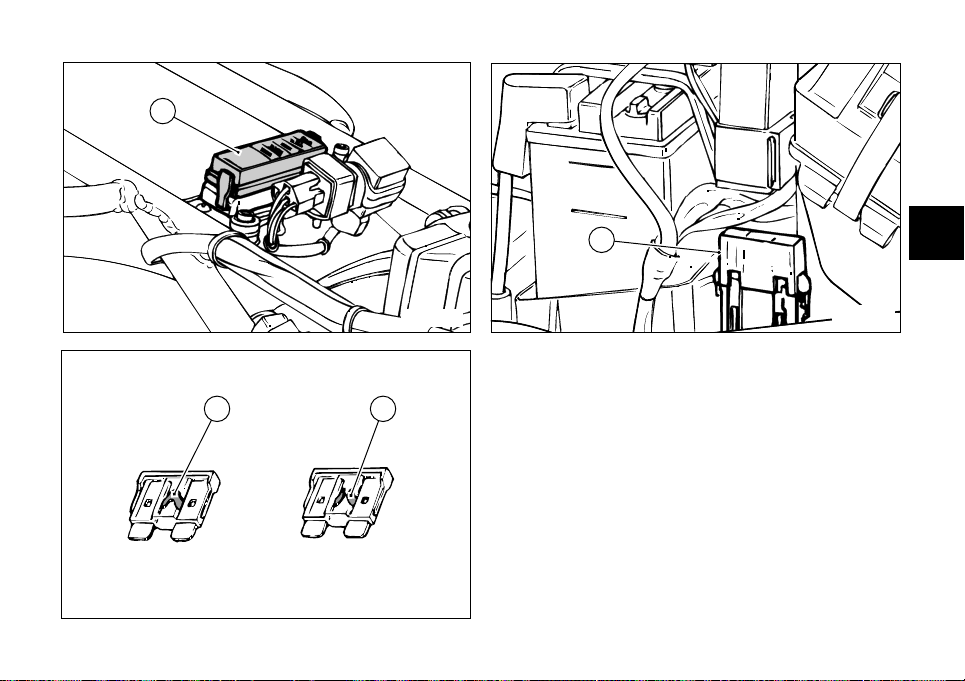
Fuses
The fuse box is located under the seat.
To expose the fuses, take off the box protective cover (1,
fig. 42.1). Mounting position and ampere capacity are
marked on it.
Only 6 of the fuses are connected. There are two spare
fuses.
The fuse located on a side of the battery (fig. 42.3)
protects the electronic regulator.
Remove the fuse cap (2) to expose it.
A blown fuse is identified by the interrupted inner
filament (3, fig. 42.2).
Important
Switch the ignition key to OFF before replacing
the fuse to avoid possible short circuits.
Warning
Never use a fuse with a rating other than specified.
Failure to observe this rule may damage the electric
system or even lead to fire.
Page 59
59
E
IN GOOD CONDITION BLOWN
3 3
1
fig. 42.1
fig. 42.2
2
fig. 42.3
Page 60

31) Starter motor
32) Starter solenoid
33) Battery
34) Main relay
35) Heater
36) Thermal cutout
Wire color coding
P Pink
GR-Bk Grey-Black
Y-G Yellow-Green
G Green
R-G Red-Green
W-R White-Red
O-Bk Orange-Black
V-Bk Violet-Black
Y Yellow
W-B White-Blue
BN Brown
G-W Green-White
O-W Orange-White
R-Bk Red-Black
R-B Red-Blue
GR-R Grey-Red
R Red
G-Bk Green-Black
V Violet
Y-Bk Yellow-Black
GR Grey
G-B Green-Blue
Lb Light blue
Bk Black
60
E
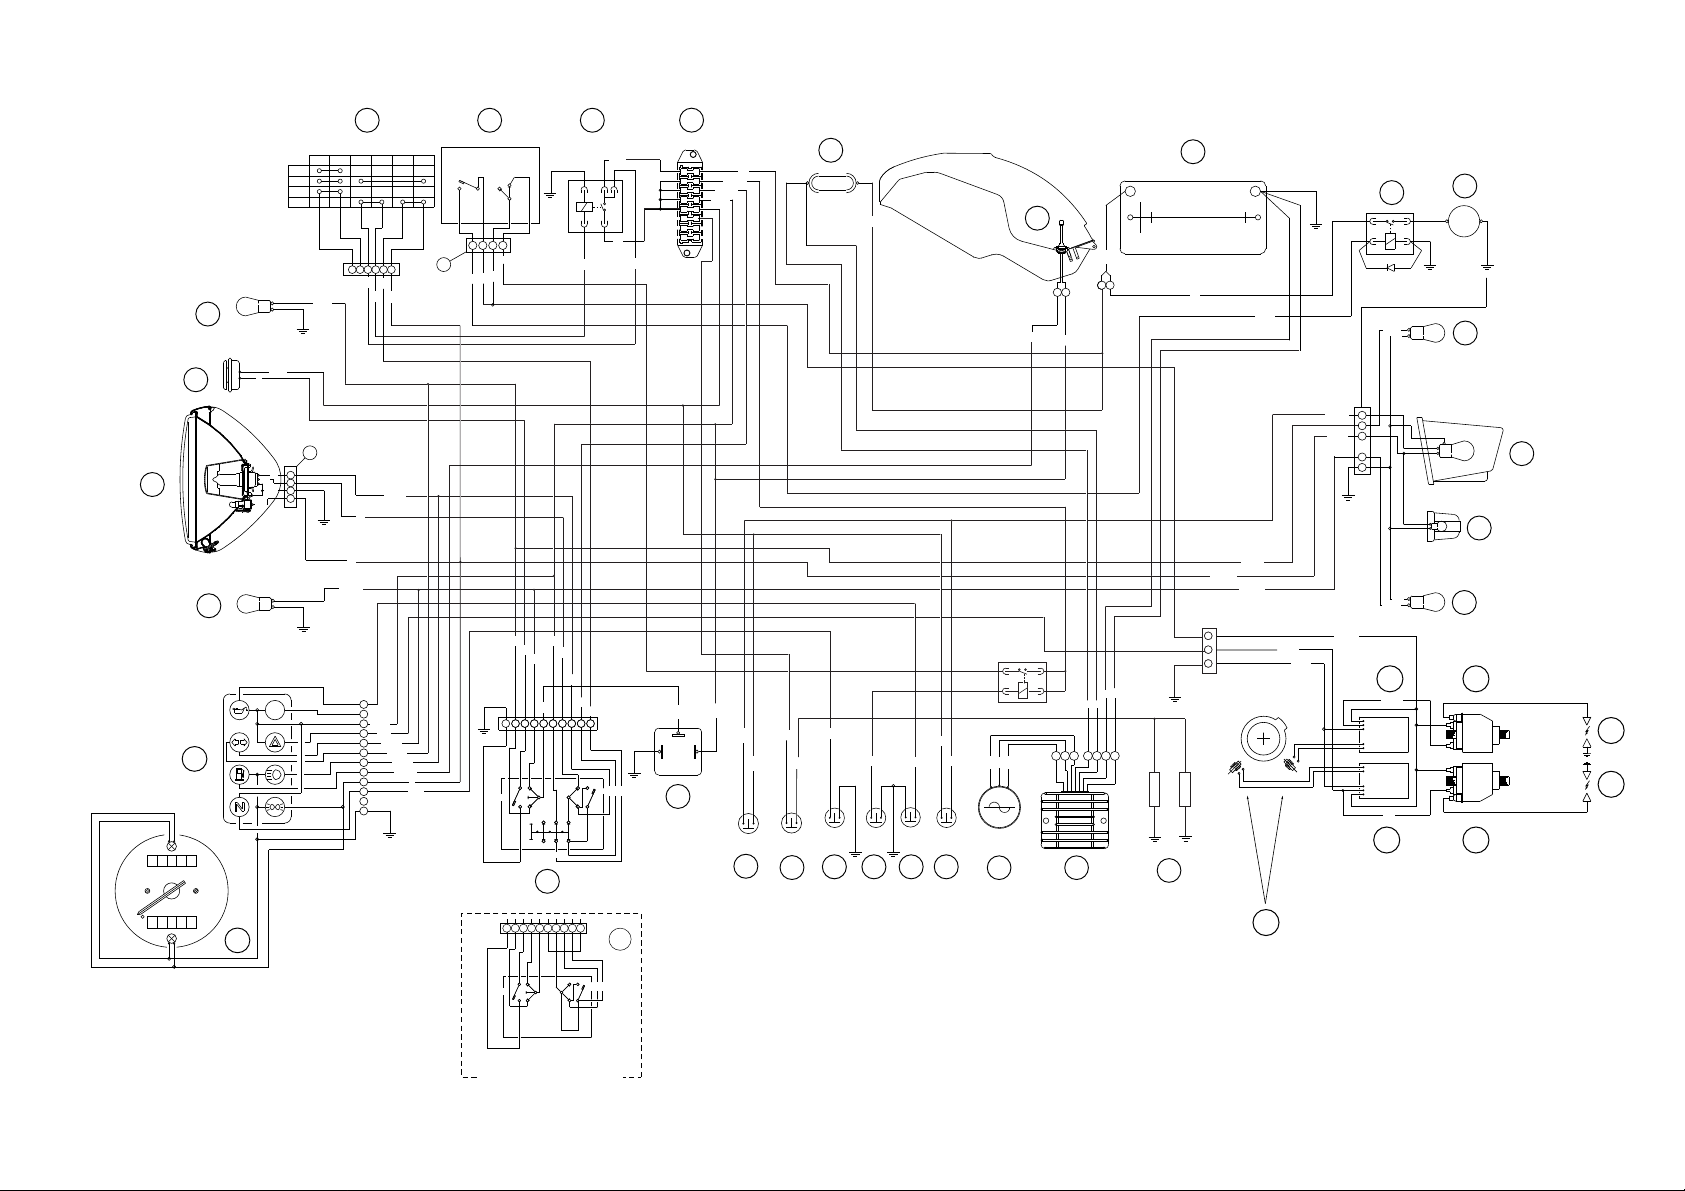
Legend of the wiring diagram of electric
system/ignition
1) Headlamp
2) Front right-turn indicator
3) Front left-turn indicator
4) Horn
5) Number plate light
6) Odometer
7) Instrument panel warning lights
8) Regulator
9) Key-operated switch
10) R.H. twistgrip switch
11) L.H. light switch
12) Front STOP light switch
13) Rear STOP light switch
14) Neutral light switch
15) Oil pressure sensor
16) Side stand switch
17) Fuel level indicator
18) Rear, left-turn indicator
19) Rear, right-turn indicator
20) Flasher
21) Generator
22) Ignition pick-up
23) Ignition module
24) Tail light
25) Fuse holder
26) Horizontal cylinder coil
27) Vertical cylinder coil
28) Horizontal cylinder spark plug
29) Vertical cylinder spark plug
30) Fuse box
61
Page 61

E
Legend of fuse box (30)
Pos. Description Rat.
1-9 Main switch 30 A
2-10 Ignition, regulator 7.5 A
3-11 High and low beams 15 A
4-12 Turn indicators, warning lights, tail 7.5 A
lights and instrument panel lights
5-13 Stop, warning horn 7.5 A
6-14 Carburetor heater 7.5 A
7-15 Spare fuse 30 A
8-16 Spare fuse 7.5 A
Note
Wiring diagram is at the end of this manual.
Page 62

62
E
MONSTER VERSIONS
400
Available in the following colors:
Ducati red 473.101;
yellow 473.201;
metallized grey 291.601;
metallized black 291.500;
metallized blue 291.800.
Golden frame and wheel rims.
Metallic
This version differs from the basic version in the
following features:
- front mudguard painted matt black, not varnished;
- frame, arch and wheel rims come in black.
- footpegs feature no rubber pads;
- seat cover not supplied;
- fuel tank comes in:
- metallic grey;
- metallic black;
- metallic dark blue;
- metallic purple;
- metallic red;
- metallic blue.
Page 63
63
E
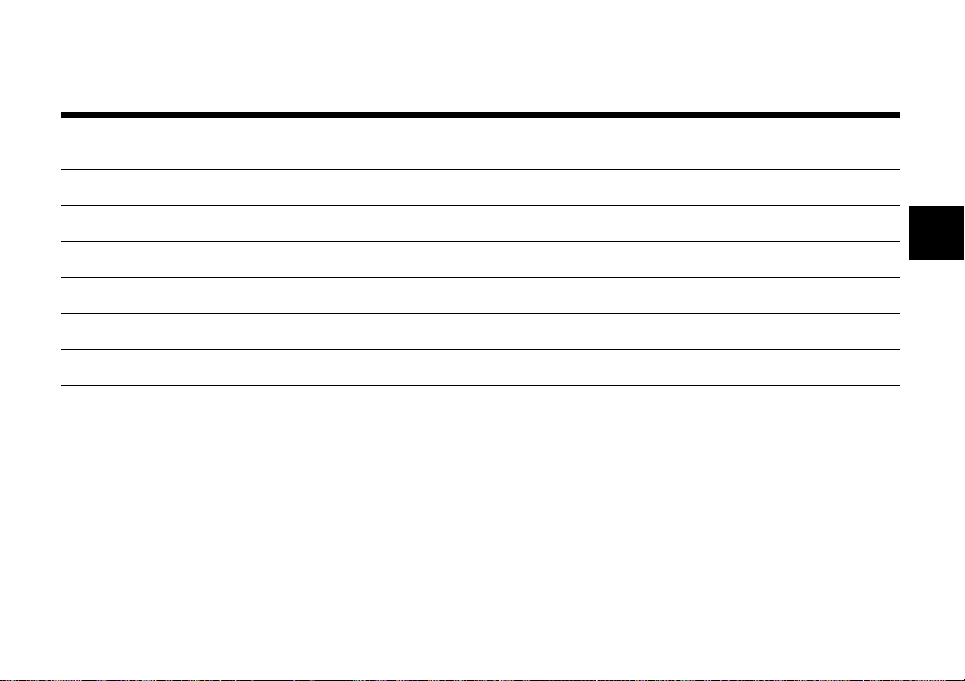
km/miles Ducati Mileage Date
Service Name
1,000/621
10,000/6,214
20,000/12,427
30,000/18,641
40,000/24,855
50,000/31,068
Routine maintenance record
Page 64

64
DUCATIMOTOR spa
Via Cavalieri Ducati, 3
40132 Bologna, Italy
Tel 39.051.6413111
Fax 39.051.406580
Internet: www.ducati.com
913.7.060.1E
Stampato 01/2000
Page 65
1
00000
00000
34109
Lb W/R R G/Bk G/R Y
LOCK
PARK
OFF
ON
C
51 4 3 6 2
R
O
Y
O/B
10 W
2
4
W/G
V/BK
G
OFF
RUN
START
C
D
B A
R/BK
R/B
BN
R/B
F
HI
B
LO
C
GND
D
A
POS
10 W
3
7
Y/BK
W
Y
W/BK
W/G
B/Bk
G
W/BK
B
C
A
B/BK
W/B
J
E
W/BK
F
W/G
D
Y/BK
L
W/Bn
H
Y
G
Y/G
K
M
HORN
P
JCD
K
A
B
TURN
POS.
R/Y
86
87
85
30
BN
O/B
W
Y/BK
Bn/Bk
O
H F
E
G
Lo
PASSING
Hi
11
JCD
H F
K
A
6
B
E
G
11
30
1
9
2
3
4
5
6
7
8
R
P
49a
31 49+
R
10
R/BK
11
Bn/Bk
12
B/Bk
13
14
15
16
B/Bk
GR/R
V/BK
25
40 A
RELE’ SICUREZZE
Y
Y
Y
17
R
B A
W/Bn
B/Bk
Bk
Bk
R
R
R
Y/G
B
B
GR
V/BK
GR/R
W/Y
20
33
+–
YUASA
YB16AL-A2
R
Y
W/BK
1
3
2
32
R/B
W/G
GR
BK
W/G
10 W
BK
4
Gr/R
2
5
Y
1
3
BK
10 W
W/BK
R
23 26
G/BN
MODULO
DI
CONTROLLO
KOKUSAN
MODULO
DI
CONTROLLO
KOKUSAN
GR
23 27
12
14 16 15 13
36
21 8
35
22
400
31
M
19
5/21 W
24
5 W
5
18
CILINDRO
ORIZZONTALE
O
HORIZONTAL
CYLINDER
CILINDRO
VERTICALE
V
VERTICAL
CYLINDER
28
29
Lo
TURN
PASSING
Hi
HORN
U.S.A. - Australia
versions
 Loading...