

Page 1
Operator’s Manual
English
en
Page 2
1
D
F
C
B
G
2
G
H
J
E
A
H
3
G
H
J
2
Page 3
4
A
5 6
D
C
A
10
C
7
B
A
B
A
8
B
9
A
E
A
11
A
E
F
1312
A
B
C
B
C
A
C
B
B
3
Page 4
General Information
This manual contains safety information to make you aware of the hazards and risks
associated with engines and how to avoid t hem. It also contains instructions for the
proper use and care of the engine. Because Ducar Corporation does not
necessarily know what equipment this engine will power, it is important that you read and
understand these instructions and the instructions for the equipment. Save these
original instructions for future reference.
For replacement parts or technical assistance, record below the engine model, type, and
code numbers along with the date of purchase. These numbers are located on your
engine (see the Features and Controls page).
Date of purchase:
MM/DD/YYYY
Engine model:
Model: Code:Type:
Engine Power Rating Information
The gross power rating for individual gas engine models is labeled in accordance with
SAE (Society of Automotive Engineers) code J1940 (Small Engine Power & Torque
Rating Procedure), and rating performance has been obtained and corrected in
accordance with SAE J1995 (Revision 2002 -05). Torque values are derived at 3060
RPM; horsepower values are derived at 3600 RPM. Actual gross engine power will be
lower and is affected by, among other things, ambient operating conditions and
engine-to-engine variability. Given both the wide array of products on which engines are
placed and the variety of environmental issues applicable to operating the equipment,
the gas engine will not develop the rated gross power when used in a given piece of
power equipment (actual “on-site” or net power). This difference is due to a variety of
factors including, but not limited to, accessories (air cleaner, exhaust, charging, cooling,
carburetor, fuel pump, etc.), application limitations, ambient operating conditions
(temperature, humidity, altitude), and engine-to-engine variability. Due to manufacturing
and capacity limitations, Ducar may substitute an engine of higher rated
power for this Series engine.
Operator Safety
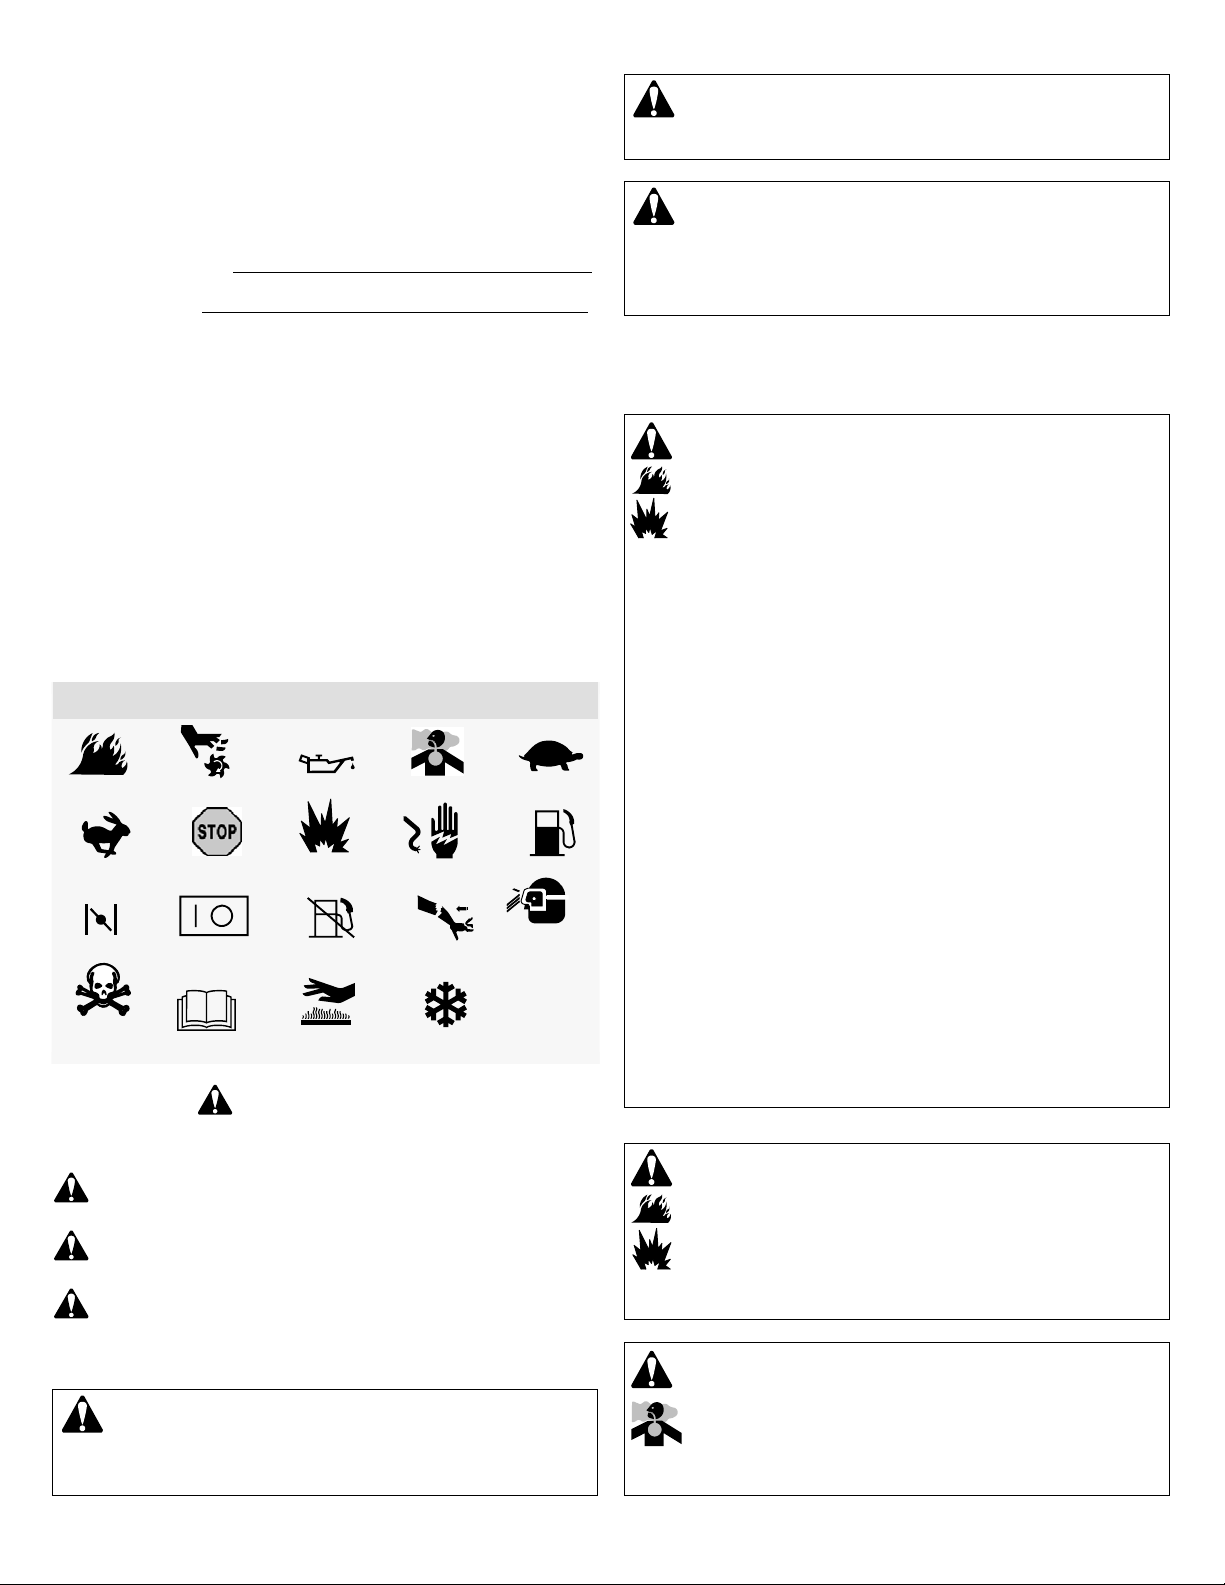
SAFETY AND CONTROL SYMBOLS
Fire
Fast
Choke
Hazardous
Chemical
The safety alert symbol is used to identify safety information about hazards that can
result in personal injury. A signal word (DANGER, WARNING, or CAUTION) is used with the
alert symbol to indicate the likelihood and the potential severity of injury. In addition, a hazard
symbol may be used to represent the type of hazard.
DANGER
serious injury.
WARNING
serious injury.
CAUTION
moderate injury.
Moving Parts
Stop
On Off
Read Manual
indicates a hazard which, if not avoided, will result in death or
indicates a hazard which, if not avoided, could result in death or
indicates a hazard which, if not avoided, could result in minor or
Oil
Explosion
Fuel Shutoff
Hot Surface
Toxic Fumes
Shock
Kickback
Frostbite
Slow
Fuel
Wear Eye
Protection
WARNING
The engine exhaust from this product contains chemicals known to the State of
California to cause cancer, birth defects, or other reproductive harm.
WARNING
All Terrain Vehicles (ATVs), motor bikes, fun/ recreational go-karts, aircraft products,
or vehicles intended for use in competitive events. Use of these engines in such
applications could result in property damage, serious injury (including paralysis), or
even death.
NOTICE:
the engine, make sure you add oil according to the instructions in this manual. If you
start the engine without oil, it will be damaged beyond repair and will not be covered
under warranty.
Ducar does not approve or aut
This engine was shipped from Ducar without oil. Before you start
horize the use of these engines on 3-wheel
WARNING
Fuel and its vapors are extremely flammable and explosive.
Fire or explosion can cause severe burns or death.
When Adding Fuel
• Turn engine off and let engine cool at least 2 minutes before removing the fuel
cap.
• Fill fuel tank outdoors or in well-ventilated area.
• Do not overfill fuel tank. To allow for expansion of the fuel, do not fill above the
bottom of the fuel tank neck.
• Keep fuel away from sparks, open flames, pilot lights, heat, and other ignition
sources.
• Check fuel lines, tank, cap, and fittings frequently for cracks or leaks.
Replace if necessary
• If fuel spills, wait until it evaporates before starting engine.
When Starting Engine
• Ensure that spark plug, muffler, fuel cap and air cleaner (if equipped) are in
place and secured.
• Do not crank engine with spark plug removed.
• If engine floods, set choke (if equipped) to OPEN/RUN position, move throttle
(if equipped) to FAST position and crank until engine starts.
When Operating Equipment
• Do not tip engine or equipment at angle which causes fuel to spill.
• Do not choke the carburetor to stop engine.
• Never start or run the engine with the air cleaner assembly (if equipped) or the
air filter (if equipped) removed.
When Changing Oil
• When you drain the oil from the top oil fill tube, the fuel tank must be empty or
fuel can leak out and result in a fire or explosion.
When Transporting Equipment
• Transport with fuel tank EMPTY or with fuel shut-off valve OFF.
When Storing Fuel Or Equipment With Fuel In Tank
• Store away from furnaces, stoves, water heaters or other appliances that have
pilot lights or other ignition sources because they can ignite fuel vapors.
WARNING
Starting engine creates sparking.
Sparking can ignite nearby flammable gases.
Explosion and fire could result.
• If there is natural or LP gas leakage in area, do not start engine.
• Do not use pressurized starting fluids because vapors are flammable.
NOTICE
indicates a situation that could result in damage to the product.
WARNING
Certain components in this product and its related accessories contain chemicals
known to the State of California to cause cancer, birth defects, or other reproductive
harm. Wash hands after handling.
4
WARNING
Engines give off carbon monoxide, an odorless, colorless, poison gas.
Breathing carbon monoxide can cause nausea, fainting or death.
• Start and run engine outdoors.
• Do not start or run engine in enclosed area, even if doors or windows are open.
Page 5
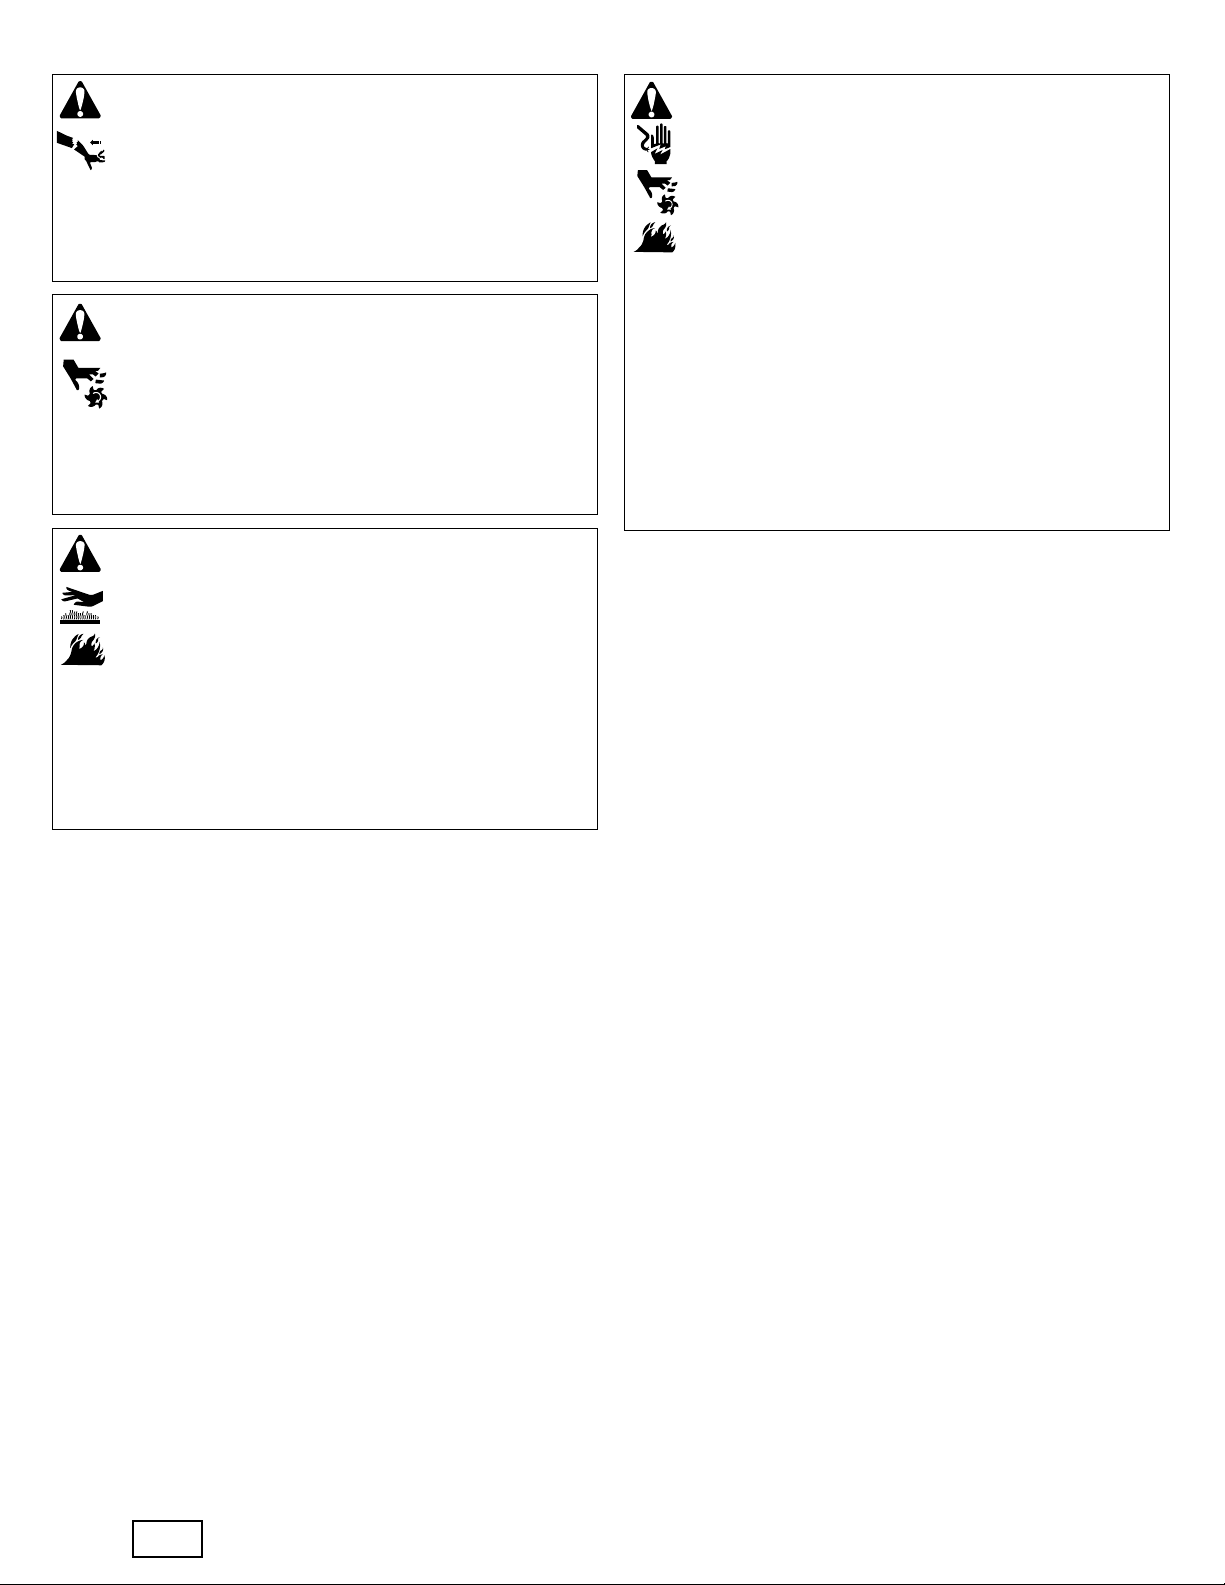
WARNING
Rapid retraction of starter cord (kickback) will pull hand and arm
toward engine faster than you can let go.
Broken bones, fractures, bruises or sprains could result.
• When starting engine, pull the starter cord slowly until resistance is felt and then
pull rapidly to avoid kickback.
• Remove all external equipment/engine loads before starting engine.
• Direct-coupled equipment components such as, but not limited to, blades,
impellers, pulleys, sprockets, etc., must be securely attached.
WARNING
Rotating parts can contact or entangle hands, feet, hair, clothing, or
accessories.
Traumatic amputation or severe laceration can result.
• Operate equipment with guards in place.
• Keep hands and feet away from rotating parts.
• Tie up long hair and remove jewelry.
• Do not wear loose-fitting clothing, dangling drawstrings or items that could
become caught.
WARNING
Running engines produce heat. Engine parts, especially muffler,
become extremely hot.
Severe thermal burns can occur on contact.
Combustible debris, such as leaves, grass, brush, etc. can catch fire.
• Allow muffler, engine cylinder and fins to cool before touching.
• Remove accumulated debris from muffler area and cylinder area.
• It is a violation of California Public Resource Code, Section 4442, to use or
operate the engine on any forest-covered, brush-covered, or grass-covered land
unless the exhaust system is equipped with a spark arrester, as defined in
Section 4442, maintained in effective working order. Other states or federal
jurisdictions may have similar laws. Contact the original equipment
manufacturer, retailer, or dealer to obtain a spark arrester designed for the
exhaust system installed on this engine.
WARNING
Unintentional sparking can result in fire or electric shock.
Unintentional start-up can result in entanglement, traumatic
amputation, or laceration.
Fire hazard
Before performing adjustments or repairs:
• Disconnect the spark plug wire and keep it away from the spark plug.
• Disconnect battery at negative terminal (only engines with electric start.)
• Use only correct tools.
• Do not tamper with governor spring, links or other parts to increase engine
speed.
• Replacement parts must be of the same design and installed in the same
position as the original parts. Other parts may not perform as well, may damage
the unit, and may result in injury.
• Do not strike the flywheel with a hammer or hard object because the flywheel
may later shatter during operation.
When testing for spark:
• Use approved spark plug tester.
• Do not check for spark with spark plug removed.
en
5
Page 6
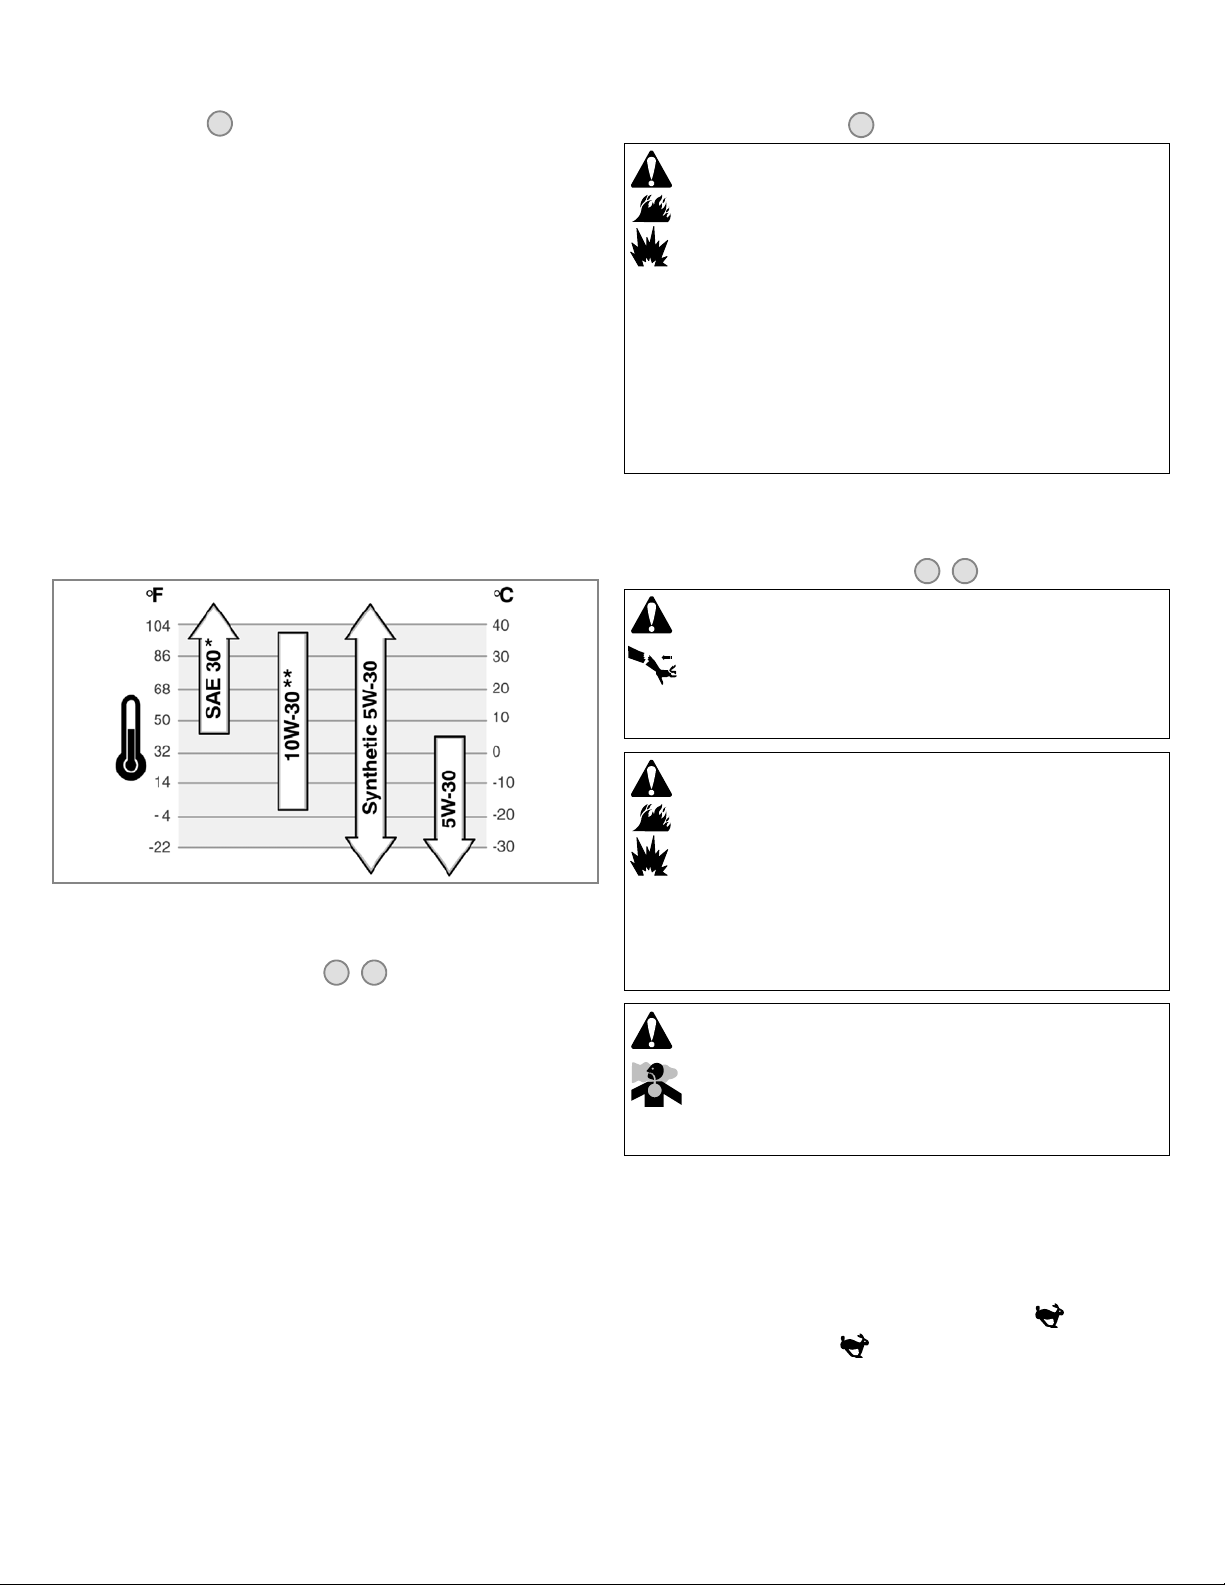
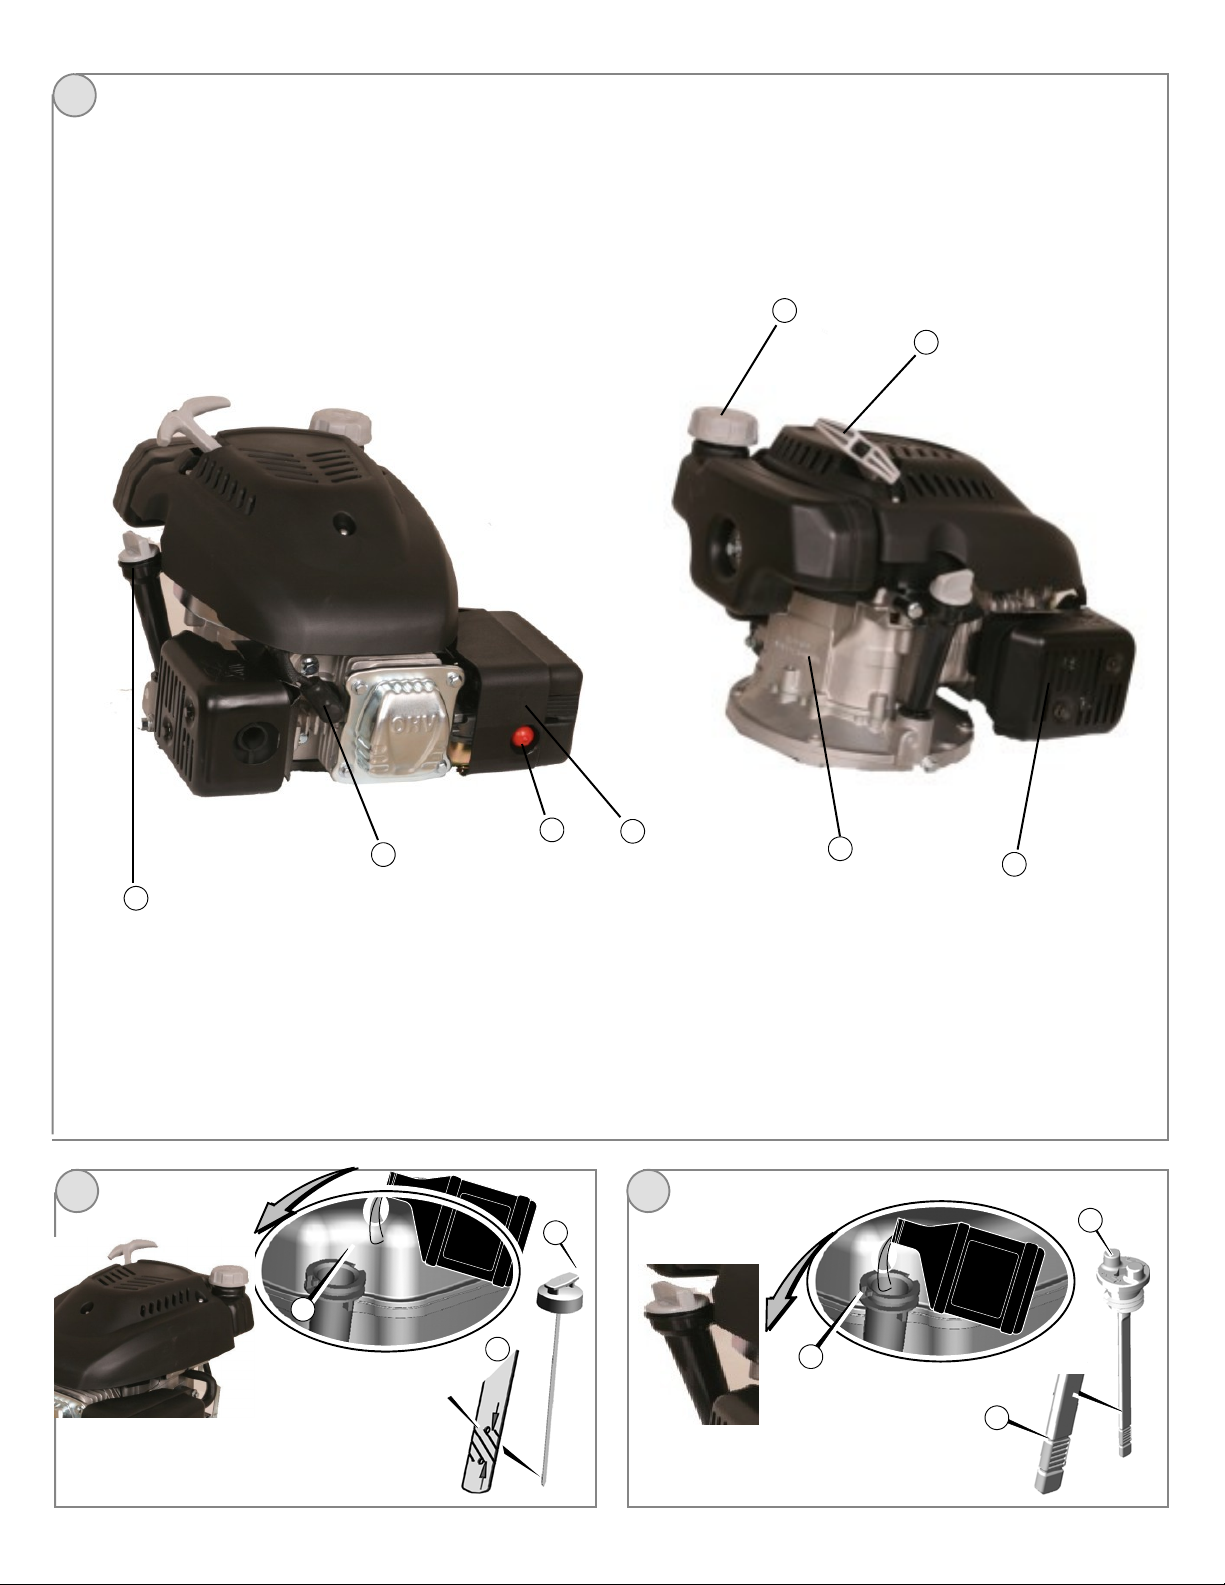
Features and Controls
Compare the illustration
various features and controls.
A. Engine Identification
Model Type Code
B. Spark Plug
C. Primer
D. Fuel Tank and Cap
E. Air Cleaner
F. Starter Cord Handle
G. Dipstick
H. Muffler
Muffler Guard (if equipped)
Spark Arrester (if equipped)
1
with your engine to familiarize yourself with the location of
Operation
Oil capacity (see the Specifications section)
Oil Recommendations
We recommend the use of Ducar Warranty Certified oils for best
performance. Other high-quality detergent oils are acceptable if classified for service SF,
SG, SH, SJ or higher. Do not use special additives.
Outdoor temperatures determine the proper oil viscosity for the engine. Use the chart to
select the best viscosity for the outdoor temperature range expected.
Operation of the engine at altitudes below 2,500 feet (762 meters) with the high altitude
kit is not recommended.
How To Add Fuel - Figure
4
WARNING
Fuel and its vapors are extremely flammable and explosive.
Fire or explosion can cause severe burns or death.
When Adding Fuel
• Turn engine off and let engine cool at least 2 minutes before removing the fuel
cap.
• Fill fuel tank outdoors or in well-ventilated area.
• Do not overfill fuel tank. To allow for expansion of the fuel, do not fill above the
bottom of the fuel tank neck.
• Keep fuel away from sparks, open flames, pilot lights, heat, and other ignition
sources.
• Check fuel lines, tank, cap, and fittings frequently for cracks or leaks.
Replace if necessary
• If fuel spills, wait until it evaporates before starting engine.
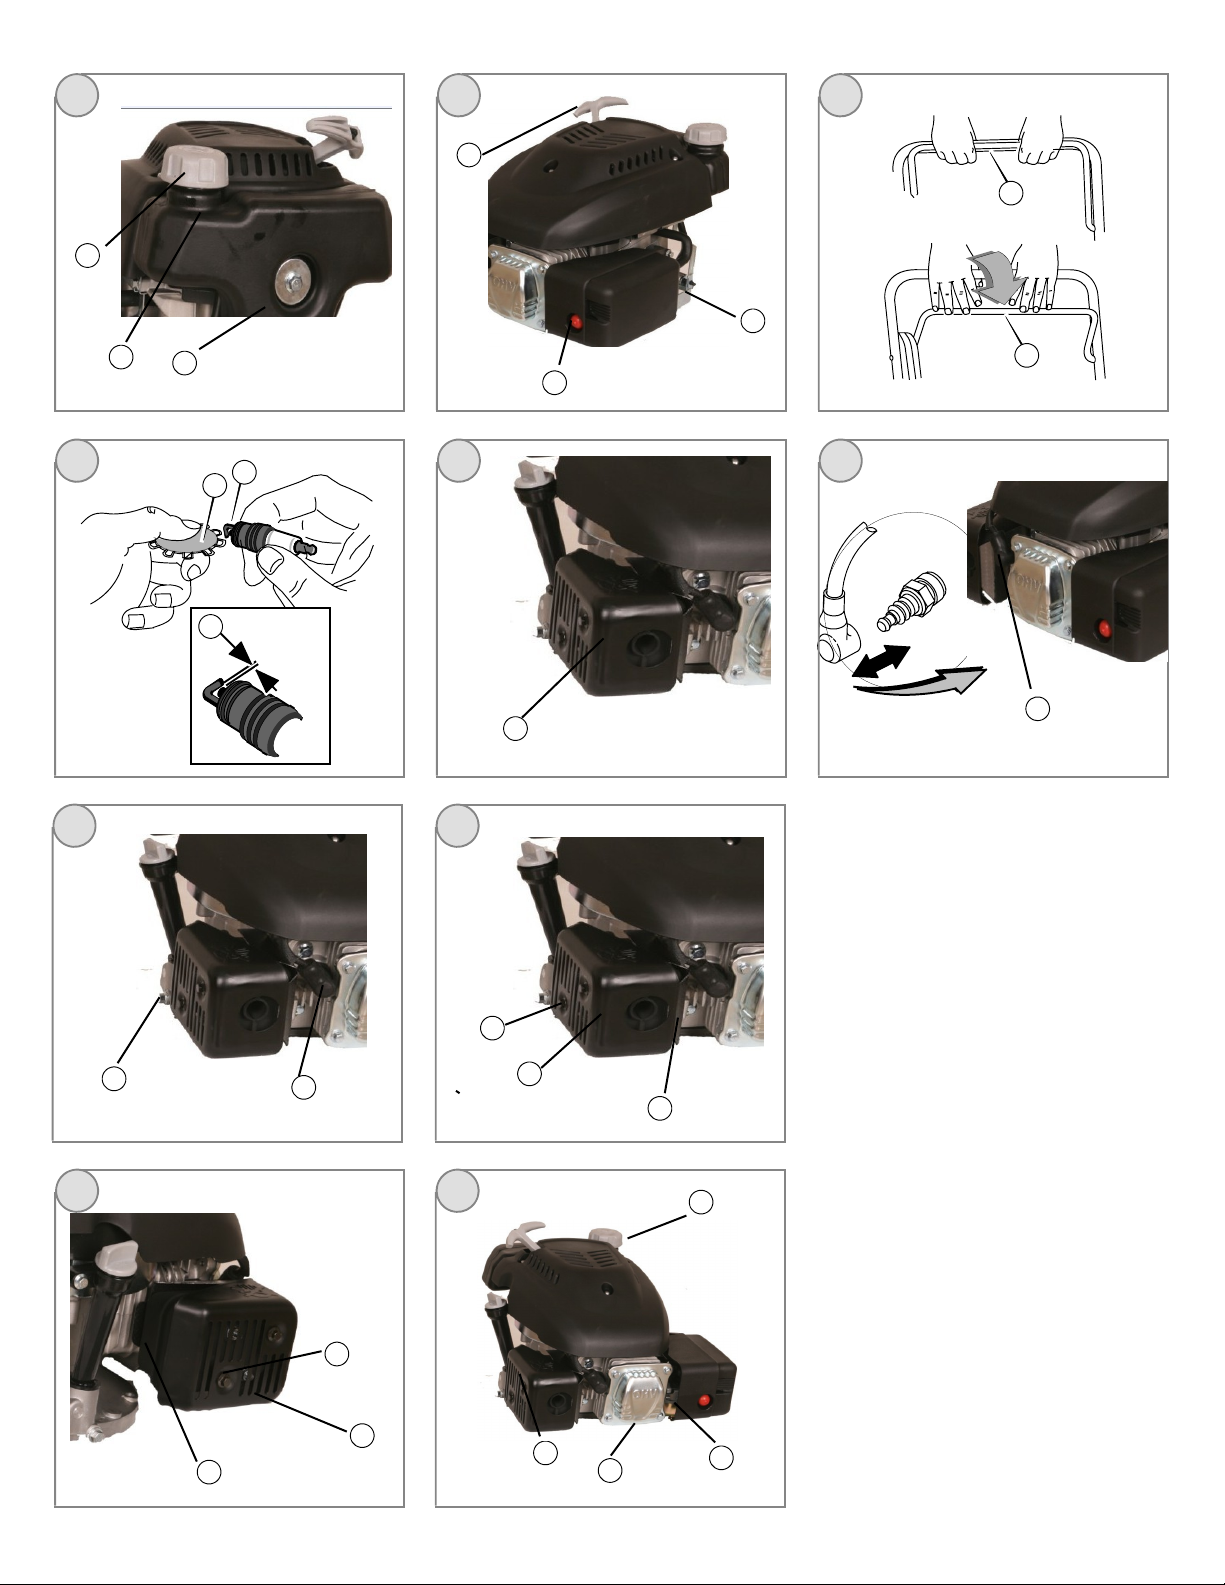
1. Clean the fuel cap area of dirt and debris. Remove the fuel cap (A, Figure 4).
2. Fill the fuel tank (B) with fuel. To allow for expansion of the fuel, do not fill above the
bottom of the fuel tank neck (C).
3. Reinstall the fuel cap.
How To Start The Engine - Figure
5 6
WARNING
Rapid retraction of starter cord (kickback) will pull hand and arm
toward engine faster than you can let go.
Broken bones, fractures, bruises or sprains could result.
• When starting engine, pull the starter cord slowly until resistance is felt and then
pull rapidly to avoid kickback.
* Below 40°F(4°C) the use of SAE 30 will result in hard starting.
** Above 80°F(27°C) the use of 10W-30 may cause increased oil consumption. Check
oil level more frequently.
How To Check/Add Oil - Figure
Before adding or checking the oil
• Place engine level.
• Clean the oil fill area of any debris.
1. Remove the dipstick (G) and wipe with a clean cloth (Figure 2, Figure 3).
2. Insert and tighten the dipstick.
3. Remove the dipstick and check the oil level. It should be at the top of the full indicator
(J) on the dipstick.
4. If low, add oil slowly into the engine oil fill (H). Do not overfill. After adding oil, wait
one minute and then recheck the oil level.
5. Replace and tighten the dipstick.
2 3
Fuel Recommendations
Fuel must meet these requirements:
• Clean, fresh, unleaded gasoline.
• A minimum of 87 octane/87 AKI (91 RON). High altitude use, see below.
• Gasoline with up to 10% ethanol (gasohol) or up to 15% MTBE (methyl tertiary
butyl ether) is acceptable.
CAUTION: Do not use unapproved gasolines, such as E85. Do not mix oil in gasoline or
modify the engine to run on alternate fuels. This will damage the engine components and
void the engine warranty.
To protect the fuel system from gum formation, mix a fuel stabilizer into the fuel. See
Storage. All fuel is not the same. If starting or performance problems occur, change fuel
providers or change brands. This engine is certified to operate on gasoline. The
emissions control system for this engine is EM (Engine Modifications).
High Altitude
At altitudes over 5,000 feet (1524 meters), a minimum 85 octane/85 AKI (89 RON)
gasoline is acceptable. To remain emissions compliant, high altitude adjustment is
required. Operation without this adjustment will cause decreased performance,
increased fuel consumption, and increas
Authorized Dealer for high altitude adjustment information.
ed emissions. See a Ducar
6
WARNING
Fuel and its vapors are extremely flammable and explosive.
Fire or explosion can cause severe burns or death.
When Starting Engine
• Ensure that spark plug, muffler, fuel cap and air cleaner (if equipped) are in
place and secured.
• Do not crank engine with spark plug removed.
• If engine floods, set choke (if equipped) to OPEN/RUN position, move throttle
(if equipped) to FAST position and crank until engine starts.
WARNING
Engines give off carbon monoxide, an odorless, colorless, poison gas.
Breathing carbon monoxide can cause nausea, fainting or death.
• Start and run engine outdoors.
• Do not start or run engine in enclosed area, even if doors or windows are open.
NOTICE:
the engine, make sure you add oil according to the instructions in this manual. If you
start the engine without oil, it will be damaged beyond repair and will not be covered
under warranty.
Note: Equipment may have remote controls. See the equipment manual for location and
operation of remote controls.
1. Check the engine oil. See the How To Check/Add Oil section.
2. Make sure equipment drive controls, if equipped, are disengaged.
3. Move the throttle control (A, Figure 5), if equipped, to the fast
4. When starting a new engine for the first time, firmly push the red primer (B)five
5. If the product is equipped with an engine stop lever (C), hold the engine stop lever
This engine was shipped from Ducar without oil. Before you start
position.
Operate the engine in the fast
times. Then for all future starts, push the primer three times (Figure 5).
Note: If engine runs out of fuel or has been stored for an extended period of time, it
may be necessary to prime 5 times.
Note: Priming is usually unnecessary when restarting a warm engine.
Note: If you push the primer too many times, excessive fuel will flood the engine and
it will be difficult to s tart.
against the handle (Figure 6).
position.
Page 7
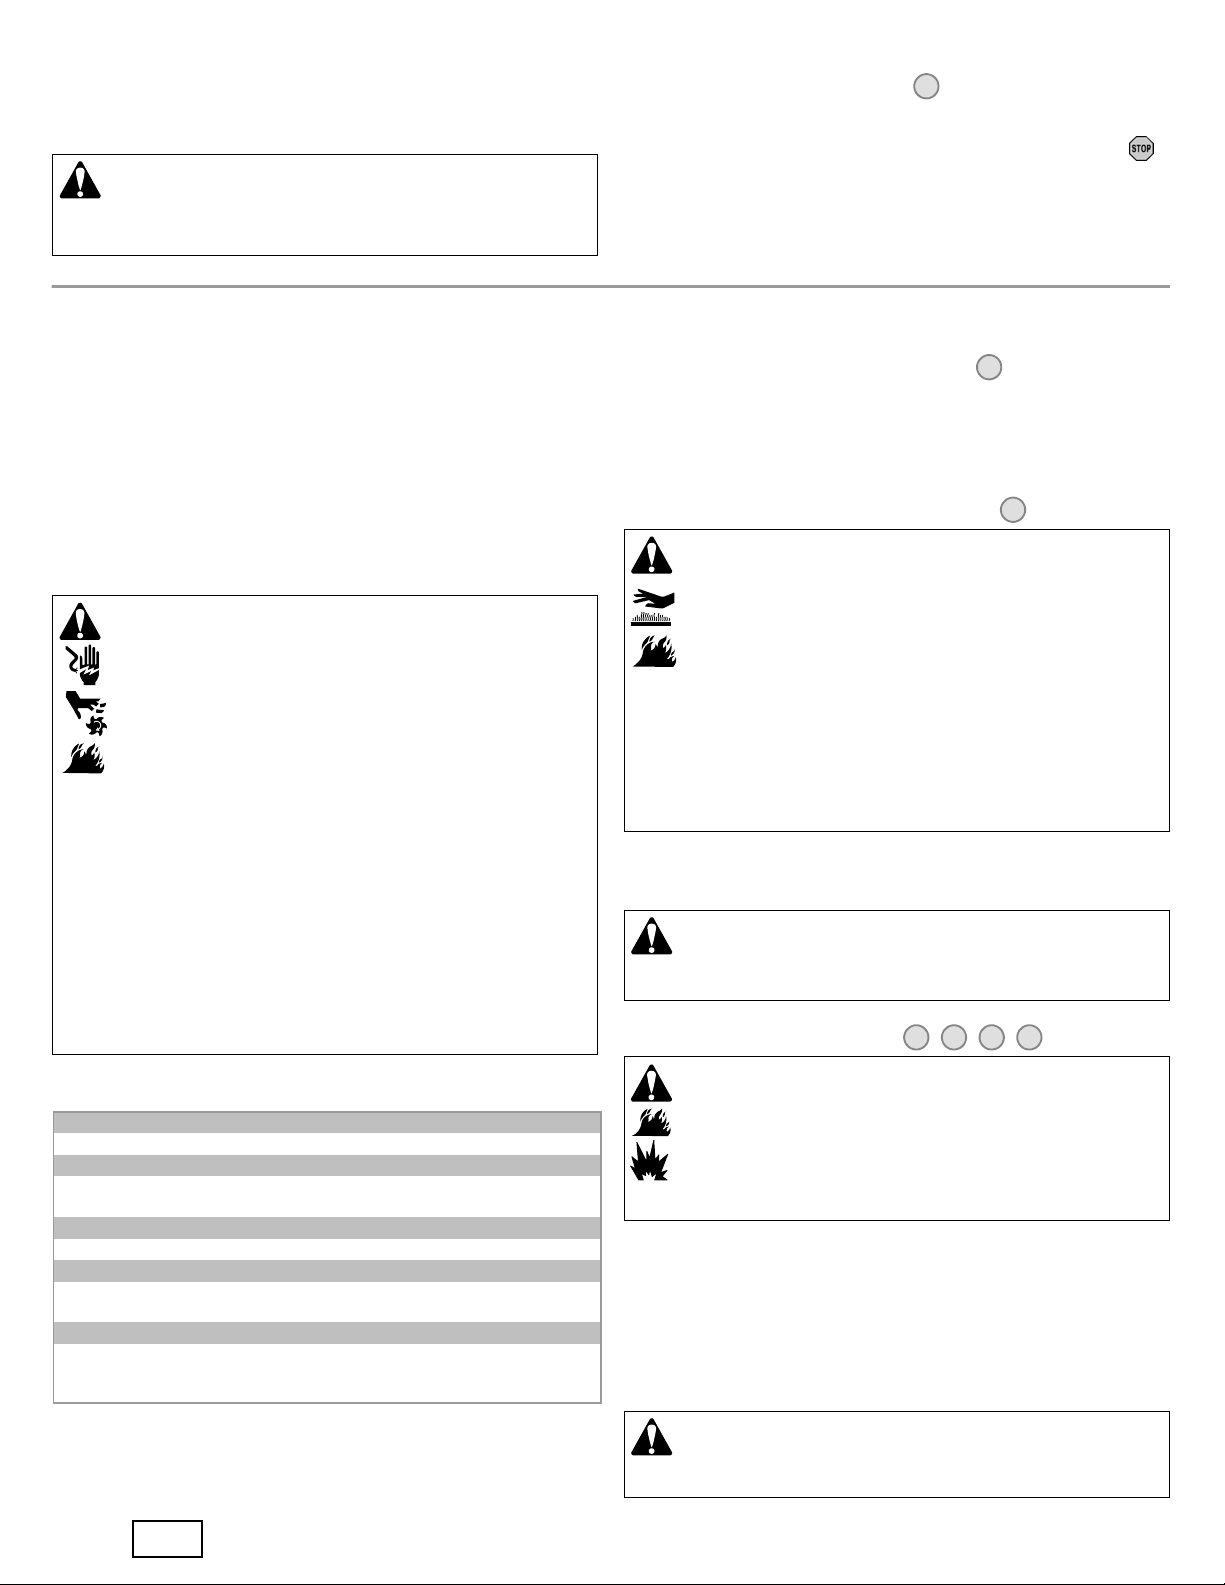
6. Firmly hold the starter cord handle (D). Pull the starter cord handle slowly until
resistance is felt, then pull rapidly (Figure 5).
Note: If the engine does not start after repeated attempts, repeat Steps 4, 5, and 6. If
it still does not start, go to
WARNING:
hand and arm toward the engine faster than you can let go. Broken bones, fractures,
bruises or sprains could result. When starting engine, pull the starter cord slowly until
resistance is felt and then pull rapidly to avoid kickback.
www.ducar.com.cn
Rapid retraction of the starter cord (kickback) will pull your
86-023-87382789
or call
How To Stop The Engine - Figure
Release the engine stop lever (E). SeeFigure6.
Engine with Throttle Control: Move the throttle control (A, Figure 5) to the stop
position.
or
6
Maintenance
NOTICE: If the engine is tipped during maintenance, the fuel tank must be empty and
thesparkplugsidemust be up. If the fuel tank is not empty and if the engine is tipped in
any other direction, it may be difficult to start due to oil or gasoline contaminating the air
filter and/or the spark plug.
We recommend that you see any Ducar Authorized Dealer for all
maintenance and service of the engine and engine parts.
NOTICE: All the components used to build this engine must remain in place for proper
operation.
Emissions Control
Maintenance, replacement, or repair of the emissions control devices and systems
may be performed by any non-road engine repair establishment or individual.
However, to obtain “no charge” emissions control service, the work must be performed
by a factory authorized dealer. See the Emissions Warranty.
WARNING
Unintentional sparking can result in fire or electric shock.
Unintentional start-up can result in entanglement, traumatic
amputation, or laceration.
Fire hazard
Before performing adjustments or repairs:
• Disconnect the spark plug wire and keep it away from the spark plug.
• Disconnect battery at negative terminal (only engines with electric start.)
• Use only correct tools.
• Do not tamper with governor spring, links or other parts to increase engine
speed.
• Replacement parts must be of the same design and installed in the same
position as the original parts. Other parts may not perform as well, may damage
the unit, and may result in injury.
• Do not strike the flywheel with a hammer or hard object because the flywheel
may later shatter during operation.
When testing for spark:
• Use approved spark plug tester.
• Do not check for spark with spark plug removed.
NOTICE: The manufacturer of the equipment on which this engine is installed specifies
the top speed at which the engine will be operated. Do not exceed this speed.
How To Replace The Spark Plug - Figure
Check the gap (A, Figure 7) with a wire gauge (B). If necessary, reset the gap. Install
and tighten the spark plug to the recommended torque. For gap setting or torque, see the
Specifications section.
Note: In some areas, local law requires using a resistor spark plug to suppress ignition
signals. If this engine was originally equipped with a resistor spark plug, use the same
type for replacement.
Inspect Muffler And Spark Arrester - Figure
7
8
WARNING
Running engines produce heat. Engine parts, especially muffler,
become extremely hot.
Severe thermal burns can occur on contact.
Combustible debris, such as leaves, grass, brush, etc. can catch fire.
• Allow muffler, engine cylinder and fins to cool before touching.
• Remove accumulated debris from muffler area and cylinder area.
• It is a violation of California Public Resource Code, Section 4442, to use or
operate the engine on any forest-covered, brush-covered, or grass-covered land
unless the exhaust system is equipped with a spark arrester, as defined in
Section 4442, maintained in effective working order. Other states or federal
jurisdictions may have similar laws. Contact the original equipment
manufacturer, retailer, or dealer to obtain a spark arrester designed for the
exhaust system installed on this engine.
Remove accumulated debris from muffler area and cylinder area. Inspect the muffler (A)
for cracks, corrosion, or other damage.
WARNING:
in the same position as the original parts. Other parts may not perform as well, may
damage the unit, and may result in injury.
How To Change The Oil - Figure
Replacement parts must be of the same design and installed
2 3 9 10
Maintenance Chart
First 5 Hours
• Change Oil
Every8HoursorDaily
• Check engine oil level
• Clean area around muffler and controls
Every 25 Hours or Annually
• Clean air filter *
Every 50 Hours or Annually
• Change engine oil
• Check muffler and spark arrester
Annually
• Replace air filter
• Replace spark plug
• Clean air cooling system *
* In dusty conditions or when airborne debris is present, clean more often.
Carburetor Adjustment
Never make adjustments to the carburetor. The carburetor was set at the factory to
operate efficiently under most conditions. However, if adjustments are required, see any
Ducar Authorized Dealer for service.
en
WARNING
Fuel and its vapors are extremely flammable and explosive.
Fire or explosion can cause severe burns or death.
• When you drain the oil from the top oil fill tube, the fuel tank must be empty or
fuel can leak out and result in a fire or explosion.
Used oil is a hazardous waste product and must be disposed of properly. Do not discard
with household waste. Check with your local authorities, service center, or dealer for safe
disposal/recycling facilities.
Remove Oil
The oil must be drained from the top oil fill tube (E, Figure 10).
1. With engine off but still warm, disconnect the spark plug wire (A) and keep it away
from the spark plug (Figure 9).
2. Remove the dipstick (G, Figure 2).
3. When you drain the oil from the top oil fill tube (E), keep the spark plug end of the
engine (F) up (Figure 10). Drain the oil into an approved container.
WARNING:
must be empty or fuel can leak out and result in a fire or explosion. To empty the fuel
tank, run the engine until it stops from lack of fuel.
When you drain the oil from the top oil fill tube, the fuel tank
7
Page 8
Add Oil
• Place engine level.
• Clean the oil fill area of any debris.
• See the Specifications section for oil capacity.
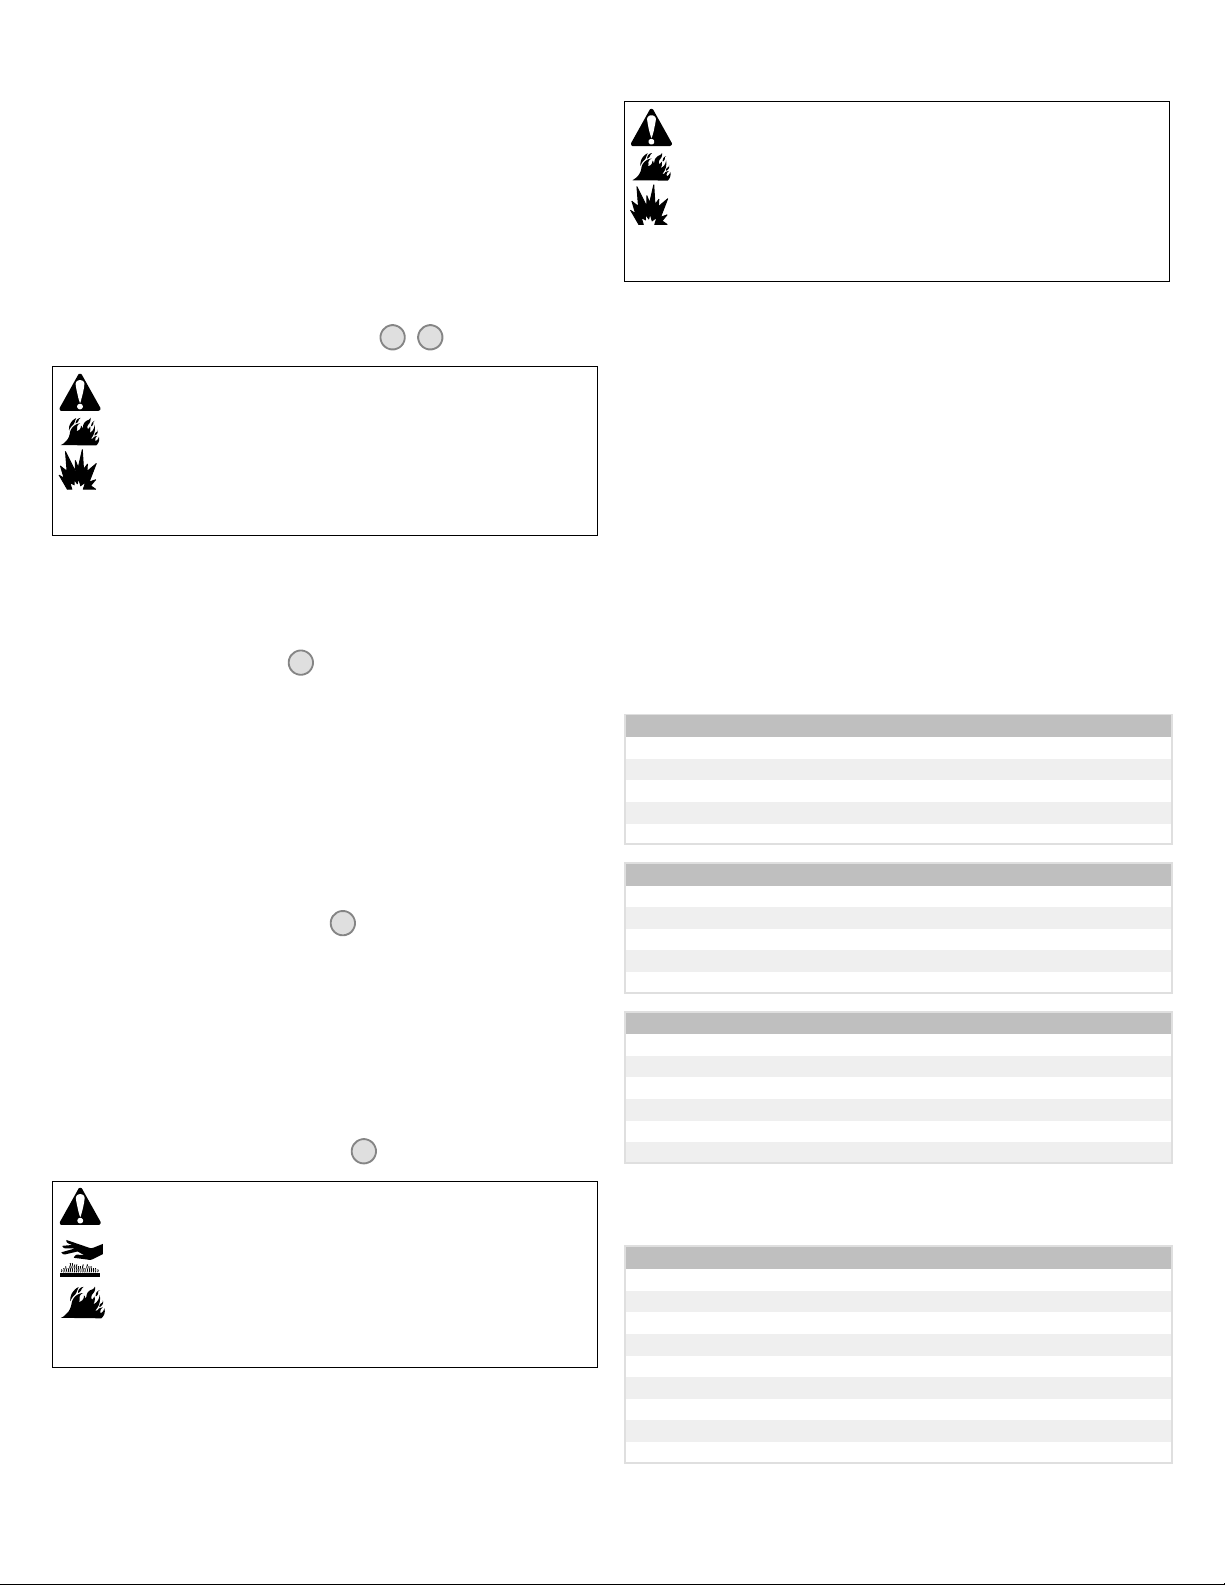
1. Remove the dipstick (G) and wipe with a clean cloth (Figure 2, Figure 3).
2. Pour the oil slowly into the engine oil fill (H). Do not overfill. After adding oil, wait
one minute and then check the oil level.
3. Install and tighten the dipstick.
4. Remove the dipstick and check the oil level. It should be at the top of the full indicator
(J) on the dipstick.
5. Install and tighten the dipstick.
How To Service The Air Filter - Figure
11 12
WARNING
Fuel and its vapors are extremely flammable and explosive.
Fire or explosion can cause severe burns or death.
• Never start or run the engine with the air cleaner assembly (if equipped) or the
air filter (if equipped) removed.
NOTICE: Do not use pressurized air or solvents to clean the filter. Pressurized air can
damage the filter and solvents will dissolve the filter.
Two types of air filter systems are shown, a Standard and a High Capacity. Determine
the type installed on your engine and service as follows.
Standard Air Filter - Figure
The standard air filter uses a foam element that can be washed and reused.
1. Remove the screw (A) from the top of the air filter assembly (B). See Figure 11.
2. To prevent debris from falling into the carburetor, carefully remove the air filter
assembly.
3. Remove the foam element (C) from the air filter base.
4. Wash the foam element in liquid detergent and water. Squeeze dry the foam element
in a clean cloth.
5. Saturate the foam element with clean engine oil. To remove the excess engine oil,
squeeze the foam element in a clean cloth.
6. Install the foam element into the air filter base.
7. Install the air filter assembly onto the carburetor and secure with screw.
High Capacity Air Filter - Figure
The high capacity air filter uses a pleated filter.
1. Remove the screw (A) from the top of the air filter assembly (B). See Figure 12.
2. To prevent debris from falling into the carburetor, carefully remove the air filter
assembly.
3. Remove the pleated filter (C) from the air filter base.
4. To loosen debris, gently tap the pleated filter on a hard surface. If the pleated filter is
excessively dirty, replace with a new filter.
5. Install the pleated filter.
6. Install the air filter assembly onto the carburetor and secure with screw.
Clean Air Cooling System - Figure
11
12
13
WARNING
Running engines produce heat. Engine parts, especially muffler,
become extremely hot.
Severe thermal burns can occur on contact.
Combustible debris, such as leaves, grass, brush, etc. can catch fire.
• Allow muffler, engine cylinder and fins to cool before touching.
• Remove accumulated debris from muffler area and cylinder area.
NOTICE: Do not use water to clean the engine. Water could contaminate the fuel
system. Use a brush or dry cloth to clean the engine.
This is an air cooled engine. Dirt or debris can restrict air flow and cause the engine to
overheat, resulting in poor performance and reduced engine life.
Use a brush or dry cloth to remove debris from the finger guard (A). Keep linkage,
springs and controls (B) clean. Keep the area around and behind the muffler (C)freeof
any combustible debris (Figure 13).
8
Storage
WARNING
Fuel and its vapors are extremely flammable and explosive.
Fire or explosion can cause severe burns or death.
When Storing Fuel Or Equipment With Fuel In Tank
• Store away from furnaces, stoves, water heaters or other appliances that have
pilot lights or other ignition sources because they can ignite fuel vapors.
Fuel System
Fuel can become stale when stored over 30 days. Stale fuel causes acid and gum
deposits to form in the fuel system or on essential carburetor parts. To keep fuel fresh,
use Ducar FRESH START
drip concentrate cartridge.
There is no need to drain gasoline from the engine if a fuel stabilizer is added according
to instructions. Run the engine for 2 minutes to circulate the stabilizer throughout the fuel
system. The engine and fuel can then be stored up to 24 months.
If gasoline in the engine has not been treated with a fuel stabilizer, it must be drained into
an approved container. Run the engine until it stops from lack of fuel. The use of a fuel
stabilizer in the storage container is recommended to maintain freshness.
Engine Oil
While the engine is still warm, change the engine oil.
NOTICE: Store the engine level (normal operating position). If the engine is tipped for
storage, the fuel tank must be empty and the spark plug side must be up. If the fuel
tank is not empty and if the engine is tipped in any other direction, it may be difficult to
start due to oil or gasoline contaminating the air filter and/or the spark plug.
®
fuel stabilizer, available as a liquid additive or a
Troubleshooting
Need assistance? Go to or call .
www.ducar.com.cn
86-023-87382789.
Specifications
Engine Specifications
Model 90000
Displacement 9.02 ci (148 cc)
Bore 2.562 in (65.08 mm)
Stroke 1.750 in (44.45 mm)
Oil Capacity 18 -- 20 oz (0.54 -- 0.59 L)
Engine Specifications
Model 100000
Displacement 9.67 ci (158 cc)
Bore 2.562 in (65.08 mm)
Stroke 1.875 in (47.65 mm)
Oil Capacity 18 -- 20 oz (0.54 -- 0.59 L)
Tune-up Specifications *
Model 90000, 100000
Spark Plug Gap 0.030 in (0.76 mm)
Spark Plug Torque 180 lb-in (20 Nm)
Armature Air Gap 0.006 - 0.010 in (0.15 - 0.25 mm)
Intake Valve Clearance 0.005 - 0.007 in (0.13 - 0.18 mm)
Exhaust Valve Clearance 0.007 - 0.009 in (0.18 - 0.23 mm)
* Engine power will decrease 3.5% for each 1,000 feet (300 meters) above sea level and
1% for each 10° F(5.6° C) above 77° F(25° C). The engine will operate satisfactorily at
an angle up to 15°. Refer to the equipment operator’s manual for safe allowable
operating limits on slopes.
Common Service Parts n
Service Part Part Number
Standard Air Filter 698369
High Capacity Air Filter 797819
Oil -- SAE 30 100005
Fuel Additive 5041, 5058
Resistor Spark Plug 802592, 5095
Long Life Platinum Spark Plug 5062
Spark Plug Wrench 89838, 5023
Spark Tester 19368
We recommend that you see any Ducar Authorized Dealer for all
n
maintenance and service of the engine and engine parts.
Page 9

DUCAR ENGINE OWNER WARRANTY POLICY
July 2010
LIMITED WARRANTY
Ducar Corporation will repair or replace, free of charge, any part(
product submitted for repair or replacement under this warranty must be borne by purchaser. This warranty is effective for and is subject to the time periods and conditions
stated below. For warranty s ervice, find the nearest Authorized Servic
or as listed in the "Yellow Pages."
There is no other expressed warranty. Implied warranties, including those of merchantability and fitness for a particular purpose, are limited to one year from
purchase, or to the extent permitted by law. All other implied warranties are excluded. Liability for incidental or consequential damages are excluded to the
extent exclusion is permitted by law. Some states or countries do not allow limitations on how long an implied warranty lasts, and some states or countries do not allow
the exclusion or limitation of incidental or c onsequential damages, so the above limitation and exclusion may not apply to you. This warranty gives you specific legal rights
and you may also have other rights which vary from state to state and country to country.
Brand/Product Type Consumer Use Commercial Use
Vanguardt
J
Extended Life Seriest; I/C®; Intekt I/C®; Intekt Pro; Commercial Turf Seriest
Professional Seriest with Dura-Boret Cast Iron Sleeve;
850 Seriest with Dura- Boret Cast Iron Sleeve;
Snow Series MAXt with Dura-Boret Cast Iron Sleeve
All Other Briggs & Stratton Engines Featuring Dura-Boret Cast Iron Sleeve
All Other Ducar Engines
* These are our standard warranty terms, but occasionally there may be additional warranty coverage that was not determined at time of publication. For a listing of
current warranty terms for your engine,go to
Y
Home Standby Generator applications: 2 years consumer warranty only. No commercial warranty. This warranty does not apply to engines on equipment used for
prime power in place of a utility. Engines used in competitive racing or on commercial or rental tracks are not warranted.
J
Vanguard installed on standby generators: 2 years consumer use, no warranty commercial use. Vanguard installed on utility vehicles: 2 years consumer use, 2 years
commercial use. Vanguard 3-cylinder liquid cooled: see Briggs & Stratton 3/LC Engine Owner Warranty Policy.
The warranty period begins on the date of purchase by the first retail consumer or commercial end user, and continues for the period of time stated in the table above. “Consumer
use” means personal residential household use by a retail consumer. “Commercial use” means all other uses, including use for commercial, income producing or rental purposes.
Once an engine has experienced commercial use, it shall thereafter be considered as a commercial use engine for purposes of this warranty.
No warranty registration is necessary to obtain warranty on Ducar productions. Save your proof of purchase receipt. If you do not provide proo
purchase date at the time warranty service is requested, the manufacturing date of the product will be used to determine the warranty period.
www.ducar.com.cn
s) of the engine that is defective in material or workmanship or both. Tr
e Dealer in our locate map at
STANDARD WARRANTY TERMS
www.ducar.com.cn
Y
*
3 years 3 years
2 years 1 year
2 years 90 days
or contact your Authorized Ducar Service Dealer.
ansportation charges on
or by calling
86-023-87382789
f of the initial
About Your Warranty
Ducar welcomes warranty repair and apologizes to you for being
inconvenienced. Any Authorized Service Dealer may perform warranty repairs. Most
warranty repairs are handled routinely, but sometimes requests for warranty service may
not be appropriate.
If a customer differs with the decision of the Service Dealer, an investigation will be made
to determine whether the warranty applies. Ask the Service Dealer to submit all
supporting facts to his Distributor or the Factory for review. If the Distributor or the
Factory decides that the claim is justified, the customer will be fully reimbursed for those
items that are defective. To avoid misunderstanding which might occur between the
customer and the Dealer, listed below are some of the causes of engine failure that the
warranty does not cover.
Normal wear: Engines, like all mechanical devices, need periodic parts service and
replacement to perform well. Warranty will not cover repair when normal use has
exhausted the life of a part or an engine. Warranty would not apply if engine damage
occurred because of misuse, lack of routine maintenance, shipping, handling,
warehousing or improper installation. Similarly, warranty is void if the serial number of the
engine has been removed or the engine has been altered or modified.
Improper maintenance: The life of an engine depends upon the conditions under which
it operates, and the care it receives. Some applications, such as tillers, pumps and rotary
mowers, are very often used in dusty or dirty conditions, which can cause what appears
to be premature wear. Such wear, when caused by dirt, dust, spark plug cleaning grit, or
other abrasive material that has entered the engine because of improper maintenance, is
not covered by warranty.
This warranty covers engine related defective material and/or workmanship only
and not replacement or refund of the equipment to which the engine may be
mounted. Nor does the warranty extend to repairs required because of:
1 Problems caused by parts that are not original Briggs & Stratton parts.
2 Equipment controls or installations that prevent starting, cause unsatisfactory engine
performance, or shorten engine life. (Contact equipment manufacturer.)
en
3 Leaking carburetors, clogged fuel pipes, sticking valves, or other damage, caused
by using contaminated or stale fuel.
4 Parts which are scored or broken because an engine was operated with insufficient
or contaminated lubricating oil, or an incorrect grade of lubricating oil (check and
refill when necessary, and change at recommended intervals). OIL GARD may not
shut down running engine. Engine damage may occur if oil level is not properly
maintained.
5 Repair or adjustment of associated parts or assemblies such as clutches,
transmissions, remote controls, etc., which are not manufactured by Briggs &
Stratton.
6 Damage or wear to parts caused by dirt, which entered the engine because of
improper air cleaner maintenance, re-assembly, or use of a non-original air cleaner
element or cartridge. At recommended intervals, clean and/or replace the filter as
stated in the Operator’s Manual.
7 Parts damaged by over -speeding, or overheating caused by grass, debris, or dirt,
which plugs or clogs the cooling fins, or flywheel area, or damage caused by
operating the engine in a confined area without sufficient ventilation. Clean engine
debris at recommended intervals as stated in the Operator’s Manual.
8 Engine or equipment parts broken by excessive vibration caused by a loose engine
mounting, loose cutter blades, unbalanced blades or loose or unbalanced impellers,
improper attachment of equipment to engine crankshaft, over-speeding or other
abuse in operation.
9 A bent or broken crankshaft, caused by striking a solid object with the cutter blade of
a rotary lawn mower, or excessive v-belt tightness.
10 Routine tune-up or adjustment of the engine.
,
11 Engine or engine component failure, i.e., combustion chamber, valves, valve seats,
valve guides, or burned starter motor windings, caused by the use of alternate fuels
such as, liquified petroleum, natural gas, altered gasolines, etc.
Warranty service is available only through authorized service dealers by Ducar
Corportion. Locate your nearest
locator map on
listed in the ‘Yellow Pages’.
www.ducar.com.cn
Authorized Service Dealer in our dealer
or by calling 86-023-87382789, or as
9
Page 10

Califorlia, U.S. EPA,and Ducar Corporation Emissions Control Warranty Statement
Your Warranty Rights And Obligations
November 2010
The California Air Resources Board,U.S. EPA, and Ducar are pleased
to explain the emissions control system warranty on your Model Year 2009 and later
engine/equipment. In California, new small off-road engines and large spark ignited
engines less than or equal to 1.0 liter must be designed, built, and equipped to meet the
State's stringent anti-smog standards. Ducar must warrant the emissions control system
on your engine/equipment for the periods of time listed below provided there has been
no abuse, neglect, or improper maintenance of your engine or equipment.
Your emissions control system may include parts such as the carburetor or fuel injection
system, fuel tank, ignition system, and catalytic converter. Also included may be hoses,
belts, connectors, sensors, and other emissions-related assemblies.
Where a warrantable condition exists, Ducar will repair your engine/equipment at no cost
to you including diagnosis, parts, and labor.
Manufacturer’s Warranty Coverage:
Small off-road engines and large spark ignited engines less than or equal to 1.0 liter are
warranted for two years. If any emissions-related part on your engine/equipment is
defective, the part will be repaired or replaced by Ducar.
Ducar Emissions Control Warranty Provisions
The following are specific provisions relative to your Emissions Cont
Operator’s Manual.
1. Warranted Emissions Parts
Coverage under this warranty extends only to the parts listed below (the emissions
control systems parts) to the extent these parts were present on the engine
purchased.
a. Fuel Metering System
• Cold start enrichment system (soft choke)
• Carburetor and internal parts
• Fuel pump
• Fuel line, fuel line fittings, clamps
• Fuel tank, cap and tether
• Carbon canister
b. Air Induction System
• Air cleaner
• Intake manifold
• Purge and vent line
c. Ignition System
• Spark plug(s)
• Magneto ignition system
d. Catalyst System
• Catalytic converter
• Exhaust manifold
• Air injection system or pulse valve
e. Miscellaneous Items Used in Above Systems
• Vacuum, temperature, position, time sensitive valves and switches
2. Length of Coverage
• Connectors and assemblies
For a period of two years from date of origi
purchaser and each subsequent purchaser that the engine is designed, built, and
equipped so as to conform with all applicable regulations adopted by the Air
Resources Board; that it is free from defects in material and workmanship that could
cause the failure of a warranted part; and that it is identical in all material respects to
the engine described in the manufacturer’s application for certification. The warranty
period begins on the date the engine is originally purchased.
nal purchase, Ducar warrants to the original
rol Warranty Coverage.It is in addition to the Ducar engine warranty for non-regu
Owner’s Warranty Responsibilities:
• As the engine/equipment owner, you are responsible for the performance of the
required maintenance listed in your owner's manual. Ducar recommends that you
retain all receipts covering maint
deny warranty solely for the lack of receipts or your failure to ensure the performance
of all scheduled maintenance.
As te engine/equipment owner, you should however be aware that Ducar may deny
•
you warranty coverage if your engine/equipment or a part has failed due to abuse,
neglect, improper maintenance, or unapproved modifications.
• You are responsible for presenting your
center, servicing dealer, or other equivalent entity, as applicable, as soon as a
problem exists. The warranty repairs should be completed in a reasonable amount of
time, not to exceed 30 days. If you have any questions regarding your warranty
rights and responsibilities, you s
The warranty on emissions-related parts is as follows:
• Any warranted part that is not scheduled for replacement as required
maintenance in the owner’s manual supplied, is warranted for the warranty
period stated above. If any such part fails during the period of warranty
coverage,the part will be repaired or replaced by Ducar at charge to the
owner. Any such part repaired or replaced under the warranty will be warranted
for the remaining warranty period.
• Any warranted part that is scheduled only for regular inspection in the owner’s
manual supplied, is warranted for the warranty period stated above. Any such
part repaired or replaced under warranty will be warranted for the remaining
warranty period.
• Any warranted part that is scheduled for replacement as required maintenance
in the owner’s manual supplied, is warranted for the period of time prior to the
first scheduled replacement point for that part. If the part fails prior to the first
scheduled replacement,the part will be repaired or replaced by Ducar at no
charge to the owner. Any such part repaired or replaced under warranty will be
warranted for the remainder of the period prior to the first scheduled
replacement point for the part.
• Add on or modified parts that are not exempted by the Air Resources Board
may not be used. The use of any non exempted add on or modified parts by the
owner will be grounds for disallowing a warranty claim. The manufacturer will
not be liable to warrant failures of warranted parts caused by the use of a non
exempted add on or modified part.
3. Consequential Coverage
Coverage shall extend to the failure of any engine components caused by the
failure of any warranted emissions parts.
4. Claims and Coverage Exclusions
Warranty claims shall be filled cccording to the provisions of the Ducar engine
warranty policy. Warranty coverage does not apply to failures of emissions parts
that are not original equipment Ducar parts or to parts that fail due to abuse, neglect,
or improper maintenance as set forth in the Ducar engine warranty policy. Ducar is not
liable for warranty coverage of failures of emissions parts caused by the use of
add-on or modified parts.
enance on your engine/equipment, but Ducar cannot
engine/equipment to a Ducar distributon
hould contact Ducar at 86-023-87382789
lated engines found in the
Look For Relevant Emissions Durability Period and Air Index Information
On Your Small Off-Road Engine Emissions Label
Engines that are certified to meet the California Air Resources Board (CARB) small
off-road Emissions Standard must display information regarding the Emissions Durability
Period and the Air Index. Ducar makes this information available to the
consumer on our emissions labels. The engine emissions label will indicate certification
information.
The Emissions Durability Period describes the number of hours of actual running time
for which the engine is certified to be emissions compliant, assuming proper
maintenance in accordance with the Operating & Maintenance Instructions. The
following categories are used:
Moderate:
Engine is certified to be emissions compliant for 125 hours of actual engine running time.
Intermediate:
Engine is certified to be emissions compliant for 250 hours of actual engine running time.
Extended:
Engine is certified to be emissions compliant for 500 hours of actual engine running time.
For example, a typical walk-behind lawn mower is used 20 to 25 hours per year.
Therefore, the Emissions Durability Period of an engine with an intermediate rating
would equate to 10 to 12 years.
10
Ducar engines are certified to meet the United States Environmental
Protection Agency (USEPA) Phase 2 emissions standards. For Phase 2 certified
engines, the Emissions Compliance Period referred to on the Emissions Compliance
label indicates the number of operating hours for which the engine has been shown to
meet Federal emissions requirements.
For engines less than 225 cc displacement.
Category C = 125 hours, Category B = 250 hours, Category A = 500 hours
For engines of 225 cc or more displacement.
Category C = 250 hours, Category B = 500 hours, Category A = 1000 hours
Page 11
 Loading...