

Page 1
INSTALLATION/OWNER'S MANUAL
SBX6502
2-Way Full Range Speaker Box with
two 6.5” Woofers and two 3” Wide Dispersion Horn Tweeters
Page 2
2
Installation
Thank you for purchasing the SBX6502. Although Dual has attempted to make sure all of
the information contained within this manual is accurate, please be aware that any part of
it is subject to change without notice.
The following instructions should be used as a general guideline
only. If you are unsure about performing any of the procedures
listed below, please consult a professional car audio installation
center.
Before installation, please follow these guidelines:
1. Be sure to carefully read and understand the instructions before attempting to install
this product.
2. For safety, disconnect the negative terminal from the battery prior to beginning the
installation.
3. Use the highest quality connectors for a reliable installation and to minimize signal or
power loss.
4. Use caution before you drill or cut! Be careful not to cut or drill into gas tanks, fuel
lines, brake or hydraulic lines, vacuum lines or electrical wiring when working on any
vehicle.
5. Never run wires underneath your vehicle. Running wires inside the vehicle provides
the best protection from exhaust heat and environmental elements.
6. Avoid running wires over, near or through sharp edged surfaces. Use rubber
grommets to protect any wires routed through metal.
7. When running cable from the amplifier, avoid running it near sources of high current
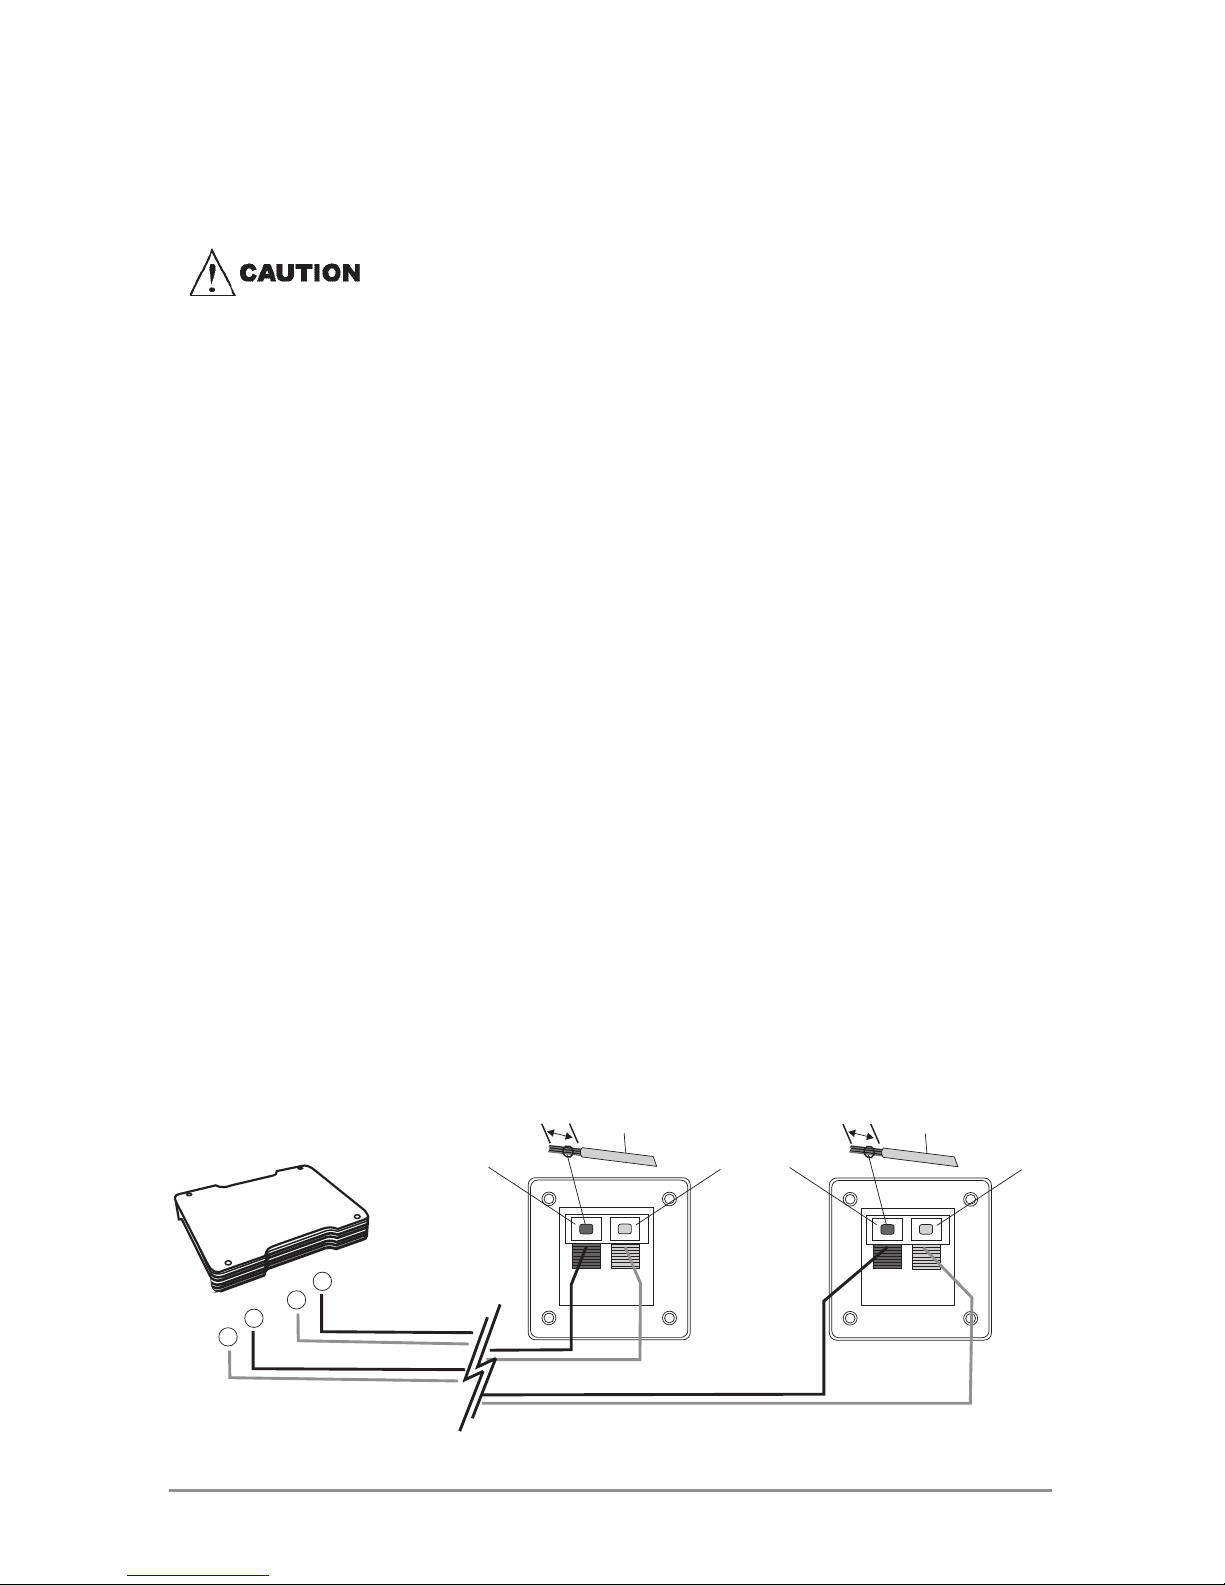
Connection Diagram
+
-
Black
Red
Strip 5/8”
(16mm)
16 AWG
-to-
12 AWG
-
+
Amplifier
Black
Red
Strip 5/8”
(16mm)
16 AWG
-to-
12 AWG
-
+
+
-
Strip 5/8" off the end of the wires, and connect the SBX6502 to an amplifier as shown in
the Connection Diagram below.
Page 3

3
Dimensions & Specifications
This diagram is to be used with the dimensions listed below to provide measurements for
mounting the unit. Design and specifications subject to change without notice.
Dimensions Specifications
Height: 8.78" (223mm)
Width: 24.01"(610mm)
Depth (Top): 5.04" (128mm)
Depth (Bottom): 6.89" (175mm)
Sensitivity: 90dB
Frequency response: 45Hz-25kHz
Nominal impedance: 4 Ohm
RMS power handling: 150 Watts
Peak power range: 300 Watts
Height
Width
Depth
(Top)
Depth
(Bottom)
Installation Diagram
After determining the mounting position, turn the enclosure upside-down and attach
the mounting brackets to the bottom of the enclosure using the enclosed screws.
Each bracket must be positioned properly under the cabinet to allow a screw to easily
pass through it for attachment to the vehicle.If the brackets and screws are not
applicable to your installation,some other means must be used to secure the
enclosure to your vehicle.
Page 4

Dual Electronics Corporation
Toll Free: 1-866-382-5476
Monday-Friday, 9AM-5PM EST
www.dualav.com
©2014 Dual Electronics Corp. All rights reserved.
NSA0214-V1
Printed in China
Limited One Year Warranty
This warranty gives you specific legal rights.
You may also have other rights which vary
from state to state.
Dual Electronics Corp. warrants this product
to the original purchaser to be free from
defects in material and workmanship for a
period of one year from the date of the original
purchase.
Dual Electronics Corp. agrees, at our option,
during the warranty period, to repair any defect
in material or workmanship or to furnish an
equal new, renewed or comparable product
(whichever is deemed necessary) in exchange
without charges, subject to verification of the
defect or malfunction and proof of the date of
purchase. Subsequent replacement products
are warranted for the balance of the original
warranty period.
Who is covered? This warranty is extended
to the original retail purchaser for products
purchased and used in the U.S.A.
What is covered? This warranty covers all
defects in material and workmanship in
this product. The following are not covered:
installation/removal costs, damage resulting
from accident, misuse, abuse, neglect, product
modification, improper installation, incorrect
line voltage, unauthorized repair or failure to
follow instructions supplied with the product,
or damage occurring during return shipment
of the product.
What to do?
1. Before you call for service, check the
troubleshooting guide in your owner’s
manual. A slight adjustment of any custom
controls may save you a service call.
2. If you require service during the warranty
period, you must carefully pack the product
(preferably in the original package) and ship
it by prepaid transportation with a copy of
the original receipt from the retailer to an
authorized service center.
3. Please describe your problem in writing and
include your name, a return UPS shipping
address (P.O. Box not acceptable), and a
daytime phone number with your shipment.
4. For more information and for the location of
the nearest authorized service center please
contact us by one of the following methods:
• Call us toll-free at 1-866-382-5476
• E-mail us at cs@dualav.com
Exclusion of Certain Damages: This warranty
is exclusive and in lieu of any and all other
warranties, expressed or implied, including
without limitation the implied warranties of
merchantability and fitness for a particular
purpose and any obligation, liability, right,
claim or remedy in contract or tort, whether
or not arising from the company’s negligence,
actual or imputed. No person or representative
is authorized to assume for the company any
other liability in connection with the sale of
this product. In no event shall the company be
liable for indirect, incidental or consequential
damages.
 Loading...