

Page 1

Dual Primus Maximus
Direct Drive Turntable
Owner’s Manual
Primus Maximus V1.0-EN
1
Page 2

Introduction
This Owner’s Manual will help you, to install and use the Primus Maximus correctly and safe.
All persons, who install, operate, clean and/or dispose this turntable, should read this manual
carefully before using the turntable.
Please keep this manual stored for later reference or other users.
Please pay special attention to all safety relevant chapters.
These are clearly marked with this sign:
Primus Maximus V1.0-EN
2
Page 3

Table of Content
Section Page
Safety 4
Unpacking 5
Delivery Content 6
Turntable Overview 7
Setup 8-9
Placement of the Turntable 8
Connection of Phono Cable 8
Installation of Platter and Mat 9
Installation of Counterweight 9
Installation of Hinges and Dust Cover 9
Connection of Power Supply 9
Adjustment 10-12
Balancing the Tonearm 10
Tracking Force and Antiskating Setting 11
Tonearm Height Adjustment 11
Azimuth Adjustment 11
Speed Adjustment 12
Operating the Turntable 12
Cleaning and Maintenance 13
Technical Data, Conformity to Directives and Standards 14
Disposal Instructions 14
Primus Maximus V1.0-EN
3
Page 4

Safety
Please read this safety information carefully and do only act according these instructions.
- The turntable and parts of this turntable, like the platter, are very heavy. Please check, if you
can lift the heavy weight of this unit by yourself. Otherwise ask for assistance of another
person.
- Do only use the correct power supply unit.
- Do only connect the power supply to the correct mains voltage, which is stated on the power
supply unit.
- Take care, that all supply cables do not have any damage, to avoid fire hazards and electric
shock.
- Do not expose the turntable or power supply to moisture or water.
- Remove the mains plug from the socket if you do not intend to use the unit for a longer
period.
- If there is a malfunction or smoke coming from the unit, disconnect mains immediately.
- The packing material is no toy. Never allow children to play with this material. There is a high
risk to suffocate, when playing with plastic bags.
Primus Maximus V1.0-EN
4
Page 5

Unpacking
The turntable is delivered in a special designed box, to ensure a safe transport of the turntable.
Inside, there are some layers of damping foam, to cover all the part safely. The following pictures
show the unpacking step by step.
…
We strongly recommend storing the packing box, including the inside packing material for future
transport of the turntable.
After all parts are removed from the packing box, please check the delivery content carefully.
Primus Maximus V1.0-EN
5
Page 6
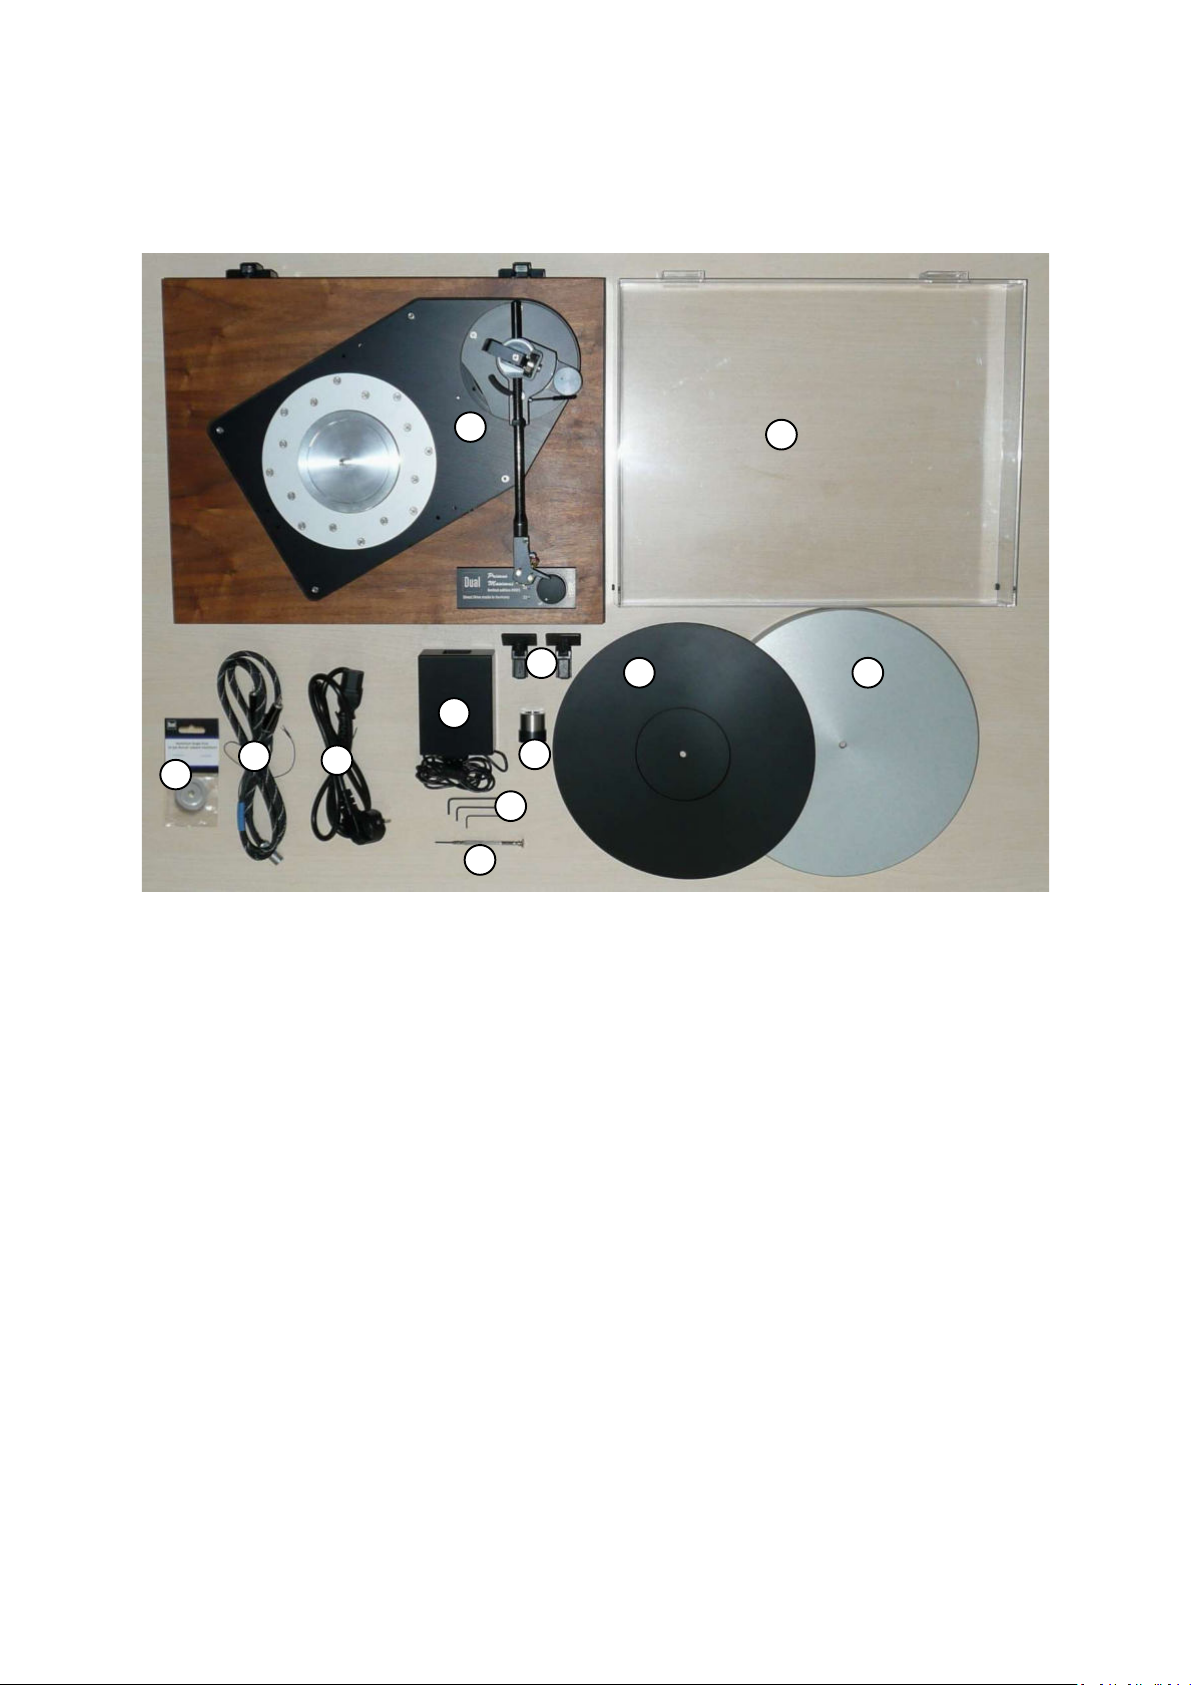
Delivery Content
A Turntable, including tonearm and pickup cartridge
B Dust cover
C Platter
D Platter mat
E Hinge (2x)
F Counterweight
G Power supply
H Mains cable
I Phono cable
J Singe puck
K 3x Allen key: 2,5mm, 2mm, 1.3mm
L Mini Screwdriver
Primus Maximus V1.0-EN
6
Page 7

Turntable Overview
View on top side of the turntable
View on back side of the turntable
Primus Maximus V1.0-EN
7
Page 8

Setup
Placement of t h e Turntable
Select a location, where you would like to place your turntable. Take care that the construction
below the turntable is solid enough to carry the heavy weight of the turntable. Do not place the
turntable close to loudspeakers, to avoid acoustic coupling. There should be also no direct sun to the
turntable. This can cause damage or bleaching of the wooden surface.
For correct horizontal placement, the turntable is equipped with 4 adjustable feet. You can check
placement with a spirit level. The feet have a micro thread. It can be leveled by turning the foot.
Connection o f Phono Cable
The phono cable (item I in the delivery content) must be connected to the tonearm. Below the
tonearm, there is a big hole in the bottom plate of the turntable. Through this hole, you can see the 5
pin connector of the tonearm, refer picture below:
Lift up the turntable, to insert the 5-pin connector of the phono cable into the tonearm connector.
Place the turntable back at your table or rack.
The other end of the phono cable has standard RCA plugs for the left and right stereo channel and an
additional grounding wire. The RCA plugs must be connected to your Amplifier at the “Phono” input.
The grounding wire must be connected to the ground clamp at the phono section of your amplifier.
The turntable is equipped with a low output MC-Cartridge. Please ensure that your phono section
supports low output MC-Cartridges.
Primus Maximus V1.0-EN
8
Page 9

Installation o f Platter and Mat
Now you can place the platter (item C in the delivery content) carefully to the motor sub platter. It is
centered by the motor axle. The platter sits with its own weight on the motor platter and does not
need any fixture. Be careful, when you handle the heavy platter and do not drop it.
The platter mat (item D in the delivery content) can now be placed on top of the platter.
Installation o f Counterweight
The counterweight (item F in the delivery content) must be installed at the backside rod of the
tonearm. By turning it, the position of the weight moves back and forth. Please refer picture below:
Installation o f Hinges and D u s t Cover
There are 2 hinge sockets at the rear side of the turntable (refer schematic of the top view in the
overview section). Here you can insert the 2 hinges (item E in the delivery content). Now you can
place the dust cover. It has 2 fixture slots at the rear side, which fit to the hinges.
Connection o f Power Supply
Important: Please do only use the correct power supply unit (item G in the delivery content)!
The power supply has its own housing and can be placed separately. The DC jack of the power supply
must be connected to the DC input at the backside of the turntable. Refer to the schematic of the
back view in the overview section.
Now you can connect the mains cable (item H in the delivery content) to the power supply. The
mains connector of the cable can now be inserted to a mains socket in your room.
Primus Maximus V1.0-EN
9
Page 10

Adjustment
Balancing the T o nearm
During this procedure it is very important that the stylus of the cartridge does not hit any
part. Otherwise it can be easily damaged or broken!
Please follow this procedure for balancing the tonearm step by step:
Step 1:
Set tracking force scale to “0”.
Step 2:
Set antiskating scale to “0”.
Step 3:
Move lift lever to “lift down” position.
Step 4:
Move the tonearm carefully from the tonearm rest to a
position between tonearm rest and platter.
Attention:
To avoid any damage of the pickup stylus, use one
hand, to hold the headshell in position.
Step 5:
The counterweight can be rotated on its axle.
Depending on the turning direction, it moves forward
or backward (refer upper and middle schematic on the
left). So you can find the position, where the tonearm
is freely levitating in the horizontal position (like in the
lower schematic on the left).
Attention:
Whenever you turn at the counterweight, use one
hand, to hold the headshell in position. So, you avoid
uncontrolled movement. Then release the headshell
carefully, to check the balancing.
Once the tonearm is correctly balanced, move it back to tonearm rest.
Primus Maximus V1.0-EN
10
Page 11

Tracking Forc e and Antiskatin g Setting
Set the tracking force scale to the recommended value of the pickup cartridge. The recommended
tracking force is 2.3g., for the installed Ortofon Quintet Bronze cartridge.
Antiskating setting is depending on the stylus cut of your cartridge. The values on the scale are meant
for conical stylus. For conical stylus cut the antiskating scale should be set to the same value as the
tracking force. For elliptical stylus the values must be increased by ~10%. And for sharp cuts, like
Fine-Line, Micro-Line etc... , the value at the scale must be increased by 30%.
As the Ortofon Quintet Bronze cartridge has a stylus with Fine Line cut, the antiskating scale must be
set to 2.3 +30%. So the correct antiskating value would be ~3.
Tonearm Height A d j ustment
The height of the tonearm can be adjusted. The correct adjustment is already done in the factory for
the installed pickup cartridge Ortofon Quintet Bronze.
But if you intent to use a different cartridge, which might have a different height, you should perform
this height adjustment procedure.
1) Use 2,5mm allen key (item K in the delivery content), to open the screw at the tonearm
clamp. Please open the screw very careful and hold the tonearm in position. Otherwise it will
drop.
2) Move tonearm to the correct height position.
3) The position is correct, when arm tube and record surface are parallel.
Now you can tighten the clamping screw again.
Azimuth Adjust ment
The azimuth adjustment is already done by the factory. But if you have opened the clamping screw at
the headshell, you must perform the azimuth adjustment procedure again.
Open clamp screw at the headshell with an 2mm allen key (item K in the delivery content). Then turn
the headshell until the cartridge stylus is exactly rectangular to the record surface (refer also picture
below). Tighten clamp screw, to fix the headshell position.
11
Primus Maximus V1.0-EN
Page 12

Speed Adjustmen t
Speed adjustment is already done in the factory. But due to temperature change, the platter speed
can drift over a longer timeframe in a small range. This drift has nothing to do with wow&flutter! The
wow&flutter value stays always at the specified range.
You will need a strobe disc and a strobe light with the correct flashing frequency to perform the
speed adjustment. When you use a strobe disc, which works with the mains frequency, you can
normally use the light of a standard light bulb. Modern LED-lights will most probably not work.
All 3 platter speeds can be adjusted independently at the corresponding potentiometer. They are
accessible through holes at the operating terminal (refer picture below). The adjustment
potentiometers can be set with a small “Philips” (cross) screwdriver (item L in the delivery content).
Operating the Turntable
Operating the Primus Maximus is very easy. Please refer to the overview picture on page 7, for
identification of the part names. There is one rotary knob at the operating terminal. This rotary knob
is speed selection and “on/off” switch in one function.
To playback a record, place the record on the platter. The center hole of the record must sit on the
platter axle. If you would like to playback a 7” single, with a large center hole, you must place the
single puck (item J in the delivery content) to the platter axle, before placing the single to the platter.
Select the correct speed (33, 45 or 78) at the speed selection knob. The correct speed is usually
indicated at the record label. After speed selection with the knob, the platter will start spinning. It
will reach the correct speed within some seconds.
Now move the lift lever at the tonearm to the “lift up” position. Then move the tonearm towards the
record and select the exact position, where you would like to start the playback. Now move the lift
lever to “lift down” position. The tonearm will slowly move downwards and the music will start
playing.
To stop playback, move the lift lever to “lift up” position. Move the tonearm to the tonearm rest and
turn the speed selection knob to “off” position.
Primus Maximus V1.0-EN
12
Page 13

Cleaning and Maintenance
Do only use a soft cleaning cloth for cleaning. It should be dry or only a little moist. Never use any
chemicals for cleaning.
The surface of the dust cover can get scratches very easily. So do not apply high pressure, when you
use your cleaning cloth.
The surface of the turntable plinth is real wood. It has got a finish with an oil/wax mixture. Before
using a furniture care product, please check compatibility first at a less obvious section (for example
the back side).
Take special care, when you clean the tonearm section. Especially the stylus can be broken very
easily. But also take care, that you do not misalign the tonearm settings.
There is almost no maintenance needed at the Primus Maximus. Only the condition of the stylus
should be checked regularly. Dust and dirt can be cleaned with a stylus brush. The wear and tear of
the stylus should be checked latest after ~200 hours of operation. This check can only be done by
specialists with the correct microscope equipment.
The stylus of the Ortofon Qunintet Bronze cannot be changed. If the stylus is broken or worn, the
cartridge can be refurbished at the Ortofon facility. Please contact your dealer for details.
Primus Maximus V1.0-EN
13
Page 14

Technical data, conformity to directives and standards
Außenmaße
Breite
Tiefe
Höhe (inkl. Staubschutzhaube)
Gesamtgewicht Overall weight 15 kg
Netzanschluss über separates Netzteil
Außenmaße L x B x H
Weitbereichseingang
Leistungsaufnahme
Maximale Leistungsaufnahme
Leistungsaufnahme im Spielbetrieb
Antrieb
Bürstenloser Direktantriebsmotor mit optoelektronischer Drehzahlerfassung
Elektronische Drehzahlregelung, mit analoger
Schaltung
Plattenteller
Präzisionsgefertigt aus Aluminium
Gesamtmasse mit Tellermatte
Plattenteller-Drehzahlen
Wählbar mit Drehschalter
Justierbar mit je einem Trimmer
Anlaufzeit bei 33 1/3 UPM Speed settling time at 33 1/3 rpm 4-5 s
Gleichlaufschwankungen
(bewertet nach DIN)
Tonarm Daten
- Effektive Tonarmlänge
- Überhang
- Kröpfungswinkel
- Effektive Tonarmmasse (ohne
Tonabnehmer)
This product conforms to the following directivities and standards:
- the Low-voltage Directive (2014/35/EU),
- the EMC Directive (2014/30/EU) and
- Ecodesign Directive 2009/125/EG
- RoHS Directive 2001/65/EU
Outside dimensions
Width
Depth
Height (incl. dust cover)
Mains input with external power supply
Outside dimensions L x W x H
Universal wide range input
Power consumption
Maximum power consumption
Power consumption during playback
Drive
Brushless Direct Drive Motor with optoelectronic speed feedback
Electronic speed control, with analog circuit
type
Platter
Precision manufactured from Aluminum
Weight incl. platter mat
Platter speeds
Selectable with rotary switch
Adjustable with poti for each speed
Wow and flutter
(DIN weighted)
Tonearm Data
- Effective tonearm length
- Overhang
- Offset angle
- Effective tonearm mass (without
cartridge)
450 mm
370 mm
155 mm
100 x 80 x 50mm
90-264VAC / 47-63Hz
30 W
~3 W
EDS104
Ø304 mm
2,7 kg
33 1/3, 45, 78 min-1
< 0.04%
221mm
18.5mm
24°
~ 15g
Disposal Instructions
This chapter is a must, to satisfy the formals. It is kind of ironic.
Old electronic equipment is no trash. It can be recycled.
This turntable is marked according to Directive 2012/19/EU for old electronic
equipment (WEEE). This turntable must not be thrown away to the standard
trash, as shown on the sign. It must be handed to a recycling collecting station.
Precious resource can be separated and recycled. This saves our environment.
Please ask your dealer or local government, where you can leave this turntable
for correct recycling.
Primus Maximus V1.0-EN
14
Page 15

Manufacturer:
DUAL GmbH · Graf-Zeppelin-Str. 7 · D-86899 Landsberg · www.dual.de
Servicehotline: +49-08191 / 915 777 0 · E-Mail: support@dual.de
Primus Maximus V1.0-EN
15
 Loading...