

Page 1
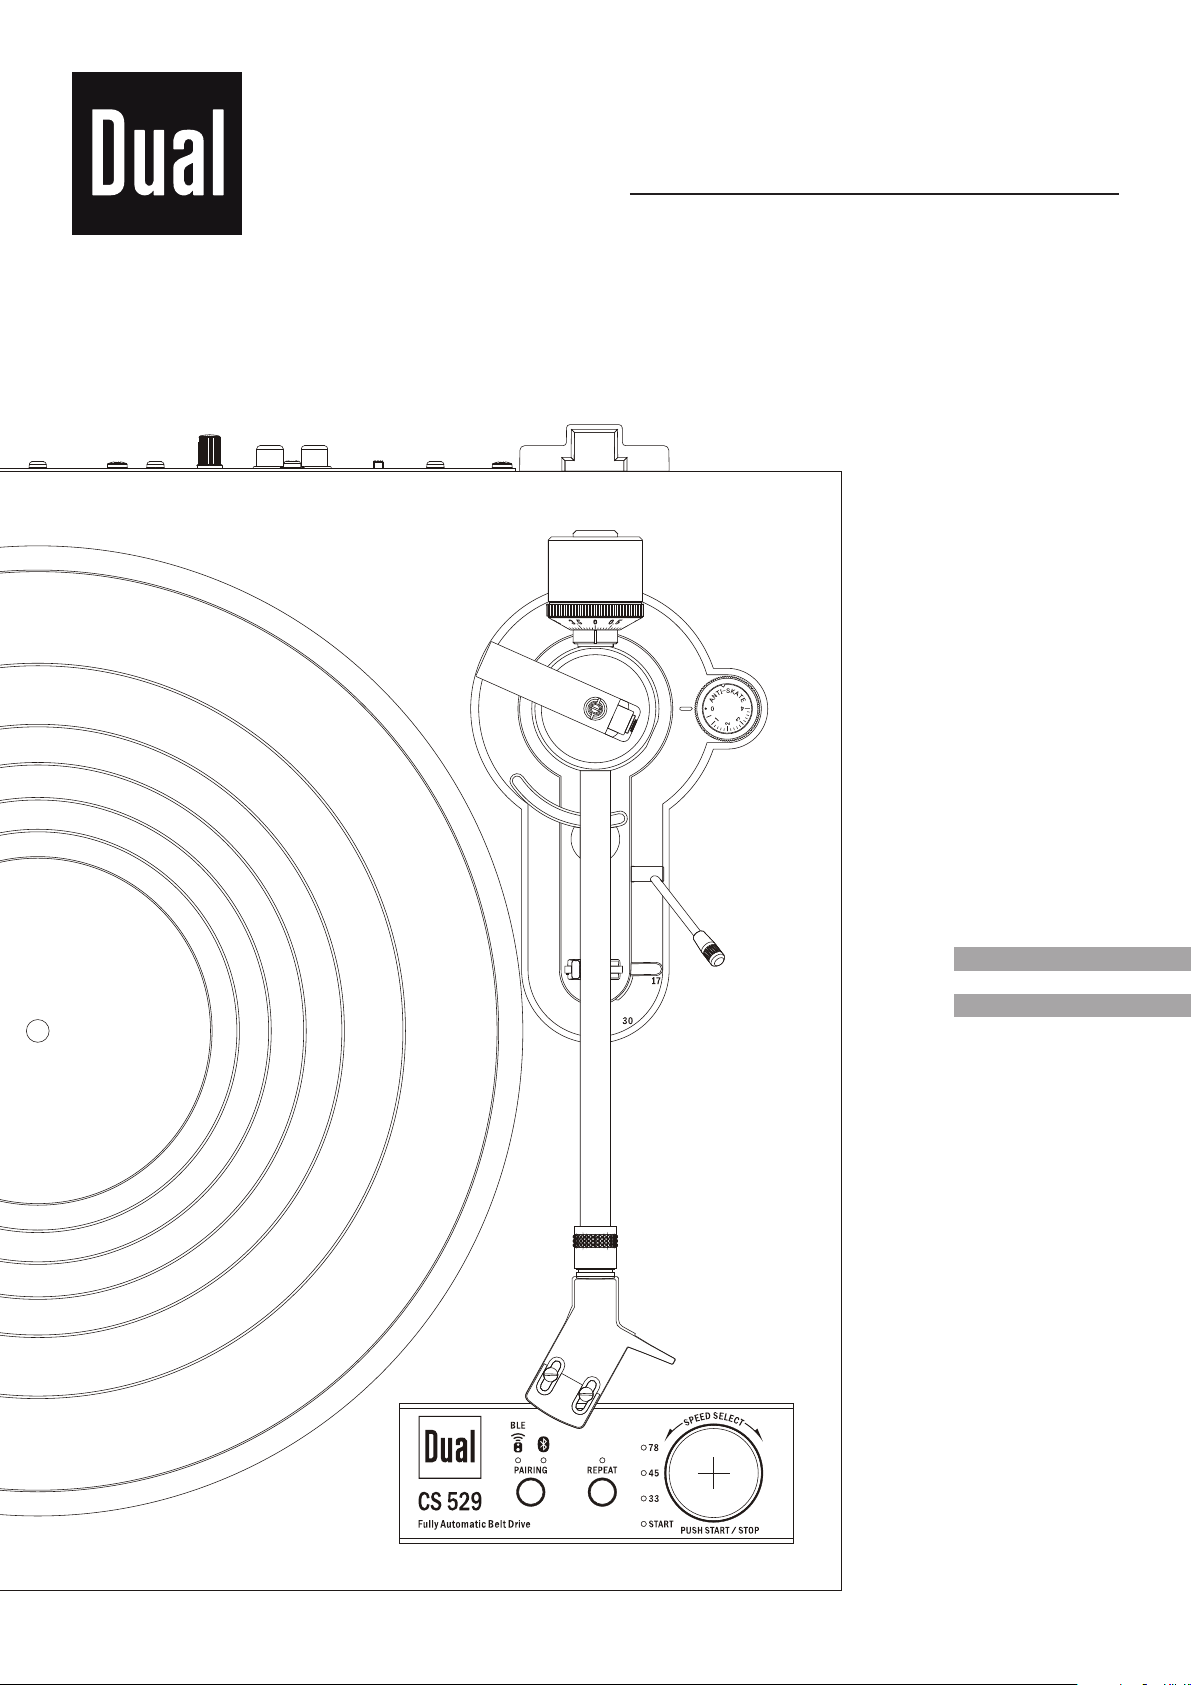
DUAL CS 529
BEDIENUNGSANLEITUNG
OWNERS MANUAL
DE: SEITE 2 – 12
EN: PAGE 13 – 23
BDA CS 529 V1 DE EN
Page 2

2
Inhaltsverzeichnis
Inhalt
Seite
Inhaltsverzeichnis
2
Technische Daten
3
Vorwort
4
Zielgruppe dieser Bedienungsanleitung
4
Warnhinweise
4
Richtlinien und Normen
4
Entsorgungshinweise
4
Hinweise zur Handhabung
5
Sicherheitshinweise
5
Bestimmungsgemäße Verwendung
5
Lieferumfang / Verpacken
6
Geräteübersicht
7
Aufbau
8
Plattenteller mit Riemen montieren
8
Tonarm
8
Tonarmkopf montieren
8
Tonarm-Gegengewicht montieren
8
Tonarm ausbalancieren
8
Auflagekraft einstellen
8
Anti-Skating-Einstellung
8
Abdeckhaube montieren
9
Plattenspieler am Verstärker anschließen
9
Steckernetzteil anschließen
9
Bedienung
10
Abnehmen / Anbringen der Nadelschutzkappe
10
Schallplatte abspielen (manuell)
10
Schallplatte abspielen (automatisch)
10
Drehzahl feineinstellen
10
Wiederholung
10
Nadel am Tonabnehmer auswechseln
10
Bluetooth Bedienung
11
Gerät reinigen
12
Nadel und Platte reinigen
12
Plattenspieler reinigen
12
Fehlerbehebung
12
Ersatzteile & Zubehör
12
Page 3
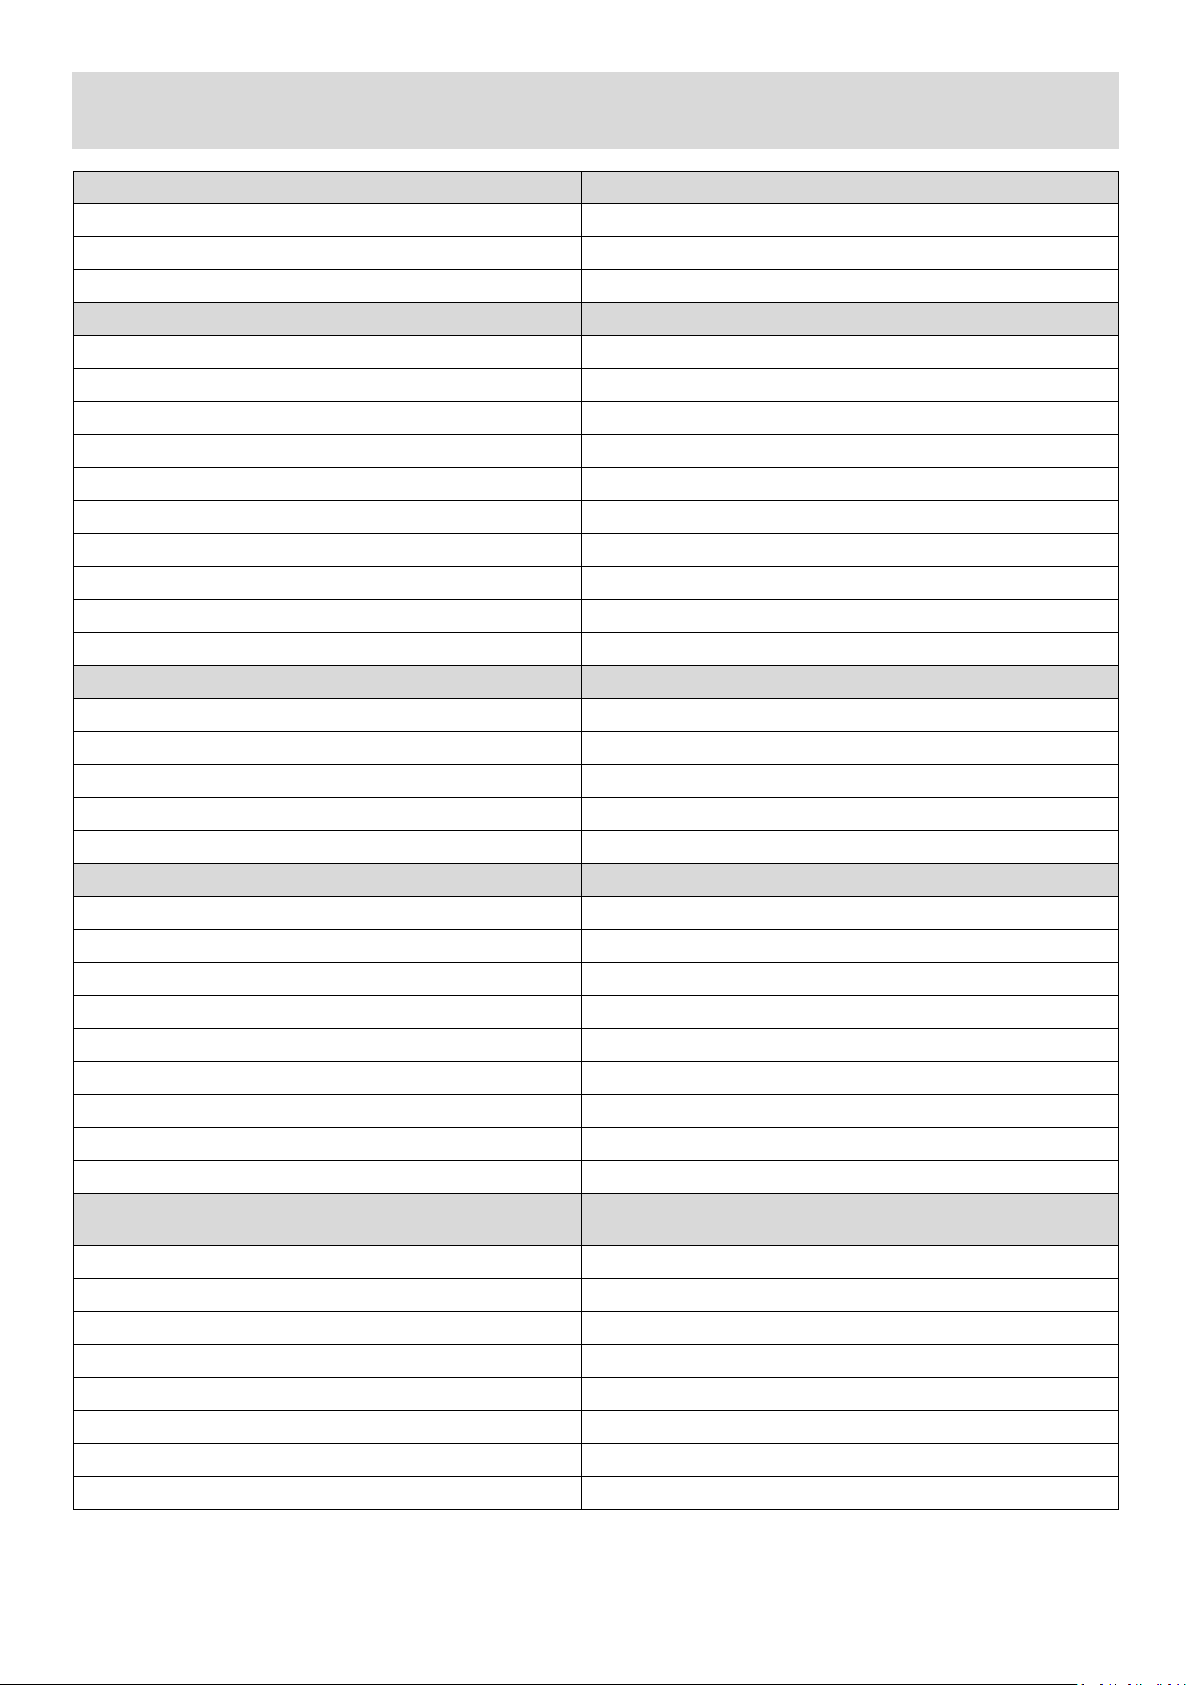
Technische Daten
Technische Änderungen und Irrtümer vorbehalten.
Die Abmessungen sind ungefähre Werte.
Antrieb
Antrieb
Riemen / DC Servo-Motor mit optischer Drehzahlregelung
Drehzahl in U/min
33/45/78
Gleichlaufschwankung
< ±0,08 % (DIN bewertet)
Tonarm
Funktion
Vollautomatische oder manuelle Bedienung aller Funktionen
Lager
Kugelgelagert / Vollkardanisch
Effektive Tonarmlänge
221,5 mm
Kröpfung
25,6°
Überhang
19 mm
Auflagekraft
Statisch, durch Verschiebung des Gegengewichtes
Auflagegewicht
0 bis 4 g
Tonabnehmer verwendbar mit einer Masse von
5 g bis 9 g
Tonabnehmer montiert
Ortofon 2M Red
Ersatz-Tonnadel
Ortofon Stylus 2M Red
Plattenteller
Material
Aluminium-Druckguss
Tellerauflage
Gummi 2,5 mm
Motorlager
Achse aus gehärtetem Stahl, Lagerbuchse aus Messing
Durchmesser
305 mm
Gesamtmasse inkl. Tellerauflage
850 g
Gehäuse
Gehäusematerial
MDF: Vinyl = schwarz / Holz Furnier = Walnuss
Füße
Ø 62 mm / mit Elastomer-Dämpfer
Anschluss
RCA-Buchsen
Anschluss an Phonoeingang
JA
Anschluss an Hochpegeleingang
JA
Digital-Ausgang
Bluetooth
Maße Haube geschlossen
435 x 367 x 148.5 mm
Maße Haube geöffnet
T: 415 mm / H: 400 mm
Gewicht
6,7 kg
Steckernetzteil
Die Effizienzwerte wurden bei einer Eingangsspannung
von 230 V AC, 50 Hz ermittelt.
Typ
FJ-SW1202000N
Eingangsspannung
100 (-10 %) V AC bis 240 (+10 %) V AC
Eingangsfrequenz
50 / 60 Hz
Ausgangsspannung
12 V DC
Ausgangsstrom
2,0 A
Ausgangsleistung
24 W
Durchschnittliche Effizienz im Betrieb
≥ 86.2%
Leistungsaufnahme bei Nulllast
< 0,1 W
3
Page 4
4
Diese Bedienungsanleitung hilft beim bestimmungsgemäßen und sicheren Gebrauch des Gerätes. Die Bedienungsanleitung aufmerksam
durchlesen und für den späteren Gebrauch aufbewahren. Insbesondere die enthaltenen Sicherheits- und Warnhinweise müssen beachtet
werden, um mögliche Gefahren beim Gebrauch des Gerätes abzuwenden.
Vorwort
Zielgruppe dieser Bedienungsanleitung
Die Bedienungsanleitung richtet sich an jede Person, die das Gerät
• aufstellt,
• bedient,
• reinigt oder
• entsorgt.
Warnhinweise
Die Warnhinweise in dieser Bedienungsanleitung sind gemäß nachfolgendem Schema aufgebaut:
Das Signalwort „GEFAHR“ kennzeichnet eine Warnung vor unmittelbarer Lebensgefahr!
Das Signalwort „WARNUNG“ kennzeichnet eine Warnung vor möglicher Lebensgefahr und/oder schweren irreversiblen Verletzungen!
Das Signalwort „VORSICHT“ kennzeichnet eine Warnung vor möglichen mittleren und oder leichten Verletzungen!
Das Signalwort „ACHTUNG“ kennzeichnet mögliche Sachschäden.
Hinweis:
„Hinweis“ kennzeichnet nützliche oder wichtige Informationen zum Produkt.
Richtlinien und Normen
Dieses Gerät entspricht folgenden Richtlinien:
• EMV-Richtlinie 2014/30/EU
• Niederspannungsrichtlinie 2014/35/EU
• Öko-Design Richtlinie 2009/125/EG
• RoHS-Richtlinie 2011/65/EU.
Der vollständige Text der EU-Konformitätserklärung ist auf Anfrage bei Dual erhältlich: [email protected]
Entsorgung der Verpackung
GEFAHR
Lebensgefahr durch Ersticken!
Erstickungsgefahr durch Folien und andere Verpackungsmaterialien. Die Verpackung und deren Teile nicht Kindern überlassen. Das Gerät wurde
beim Transport durch die Verpackung geschützt. Alle eingesetzten Materialien sind umweltverträglich und wieder verwertbar. Die Verpackung
umweltgerecht entsorgen. Beim Händler oder über die kommunale Entsorgungseinrichtung nach Möglichkeiten einer umwelt- und
sachgerechten Entsorgung der Verpackung erkundigen.
Entsorgung des Gerätes
Altgeräte sind kein wertloser Abfall. Durch umweltgerechte Entsorgung können wertvolle Rohstoffe wiedergewonnen
werden. Dieses Gerät ist entsprechend der Richtlinie 2012/19/EU über Elektro- und Elektronik-Altgeräte (WEEE)
gekennzeichnet. Dieses Produkt darf am Ende seiner Lebensdauer nicht über den normalen Haushaltsabfall entsorgt werden,
sondern muss an einem Sammelpunkt für das Recycling von elektrischen und elektronischen Geräten abgegeben werden.
Das Symbol auf dem Produkt, der Gebrauchsanleitung oder der Verpackung weist darauf hin. Die Werkstoffe sind gemäß ihrer
Kennzeichnung wiederverwertbar. Mit der Wiederverwendung, der stofflichen Verwertung oder anderen Formen der
Verwertung von Altgeräten wird ein wichtiger Beitrag zum Schutz der Umwelt geleistet. Beim Händler oder über die
kommunale Entsorgungseinrichtung nach Möglichkeiten einer umwelt- und sachgerechten Entsorgung des Gerätes
erkundigen.
Page 5
5
Hinweise zur Handhabung
Alle Sicherheitshinweise sorgfältig durchlesen und diese Bedienungsanleitung für spätere Fragen aufbewahren.
Alle Warnungen und Hinweise in dieser Bedienungsanleitung befolgen.
Sicherheitshinweise zum Umgang mit dem Steckernetzteil
Das Steckernetzteil darf nur an eine Netzspannung von 100-240 V~, 50/60 Hz angeschlossen werden.
Niemals das Steckernetzteil mit einer anderen Spannung betreiben.
• Nur das mitgelieferte Steckernetzteil verwenden.
• Das Steckernetzteil erst anschließen, nachdem die Installation vorschriftsmäßig beendet ist.
• Das Gerät nur an eine vorschriftsmäßig installierte und geerdete Netzsteckdose anschließen. Die Netzspannung muss mit den Angaben auf
dem Typenschild des Gerätes übereinstimmen.
• Die Steckdose sollte möglichst nah am Gerät sein.
• Die Verwendung von Mehrfachsteckdosen vermeiden. Sicherstellen, dass das Netzkabel oder der Stecker immer leicht zugänglich ist, damit
das Gerät schnell von der Stromversorgung getrennt werden kann.
• Das Netzkabel so verlegen, dass niemand darüber stolpern kann.
• Das Steckernetzteil vollständig in die Steckdose stecken.
• Das Steckernetzteil nicht mit nassen Händen anfassen, Gefahr eines elektrischen Schlages.
• Wenn das Steckernetzteil defekt ist bzw. wenn das Gerät sonstige Schäden aufweist, darf es nicht in Betrieb genommen werden.
• Das Steckernetzteil nicht am Kabel aus der Steckdose ziehen.
• Das Gerät bleibt auch in ausgeschaltetem Zustand mit dem Stromnetz verbunden. Das Steckernetzteil aus der Steckdose ziehen, falls das Gerät
über einen längeren Zeitraum nicht benutzt wird.
Sicherheitshinweise zur Aufstellung des Gerätes
• Um Feuergefahr und die Gefahr eines elektrischen Schlages zu vermeiden, das Gerät weder Regen noch sonstiger Feuchtigkeit aussetzen.
• Gerät nicht in der Nähe von Badewannen, Swimmingpools oder spritzendem Wasser in Betrieb nehmen.
• Keine offenen Brandquellen auf das Gerät stellen, (z. B. brennende Kerzen).
• Keine Behälter mit Flüssigkeit auf das Gerät stellen (z. B. Blumenvasen). Diese könnten umfallen und die auslaufende Flüssigkeit zu
erheblicher Beschädigung bzw. zum Risiko eines elektrischen Schlages führen.
• Fremdkörper dürfen nicht in das Innere des Gerätes gelangen (z. B. Nadeln, Münzen etc.).
• Sollten Fremdkörper oder Flüssigkeit in das Gerät gelangen, sofort den Netzstecker aus der Steckdose ziehen. Das Gerät von qualifiziertem
Fachpersonal überprüfen lassen, bevor es wieder in Betrieb genommen wird. Andernfalls besteht die Gefahr eines elektrischen Schlages.
Sicherheitshinweise zum Betrieb des Gerätes
• Musik nicht mit großer Lautstärke hören. Dies kann zu bleibenden Gehörschäden führen.
• Dieses Gerät ist nicht dafür bestimmt, durch Personen (einschließlich Kinder) mit eingeschränkten physischen, sensorischen oder geistigen
Fähigkeiten oder mangelnder Erfahrung und/oder mangelndem Wissen benutzt zu werden. Ausnahme: Die Personen werden durch eine für
ihre Sicherheit zuständige Person beaufsichtigt oder erhielten von ihr Anweisungen, wie das Gerät zu benutzen ist.
• Kinder niemals unbeaufsichtigt dieses Gerät benutzen lassen.
• Die Anschlusskontakte nicht mit metallischen Gegenständen oder den Fingern berühren. Die Folge können Kurzschlüsse sein.
Sicherheitshinweise zur Reparatur und Wartung
• Reparaturen und Wartungsarbeiten dürfen ausschließlich vom Kundendienst oder durch vom Hersteller autorisiertes Fachpersonal
vorgenommen werden. Durch unsachgemäße Reparaturen können erhebliche Gefahren für den Benutzer entstehen.
• Niemals versuchen, ein defektes Gerät selbst zu reparieren. Immer an eine unserer Kundendienststellen wenden.
• Gerät auf keinen Fall öffnen. Dies darf nur vom Kundendienst oder durch vom Hersteller autorisiertes Fachpersonal vorgenommen werden.
Andernfalls besteht die Gefahr eines elektrischen Schlages.
• Es ist verboten, Umbauten am Gerät vorzunehmen.
• Beschädigte Geräte bzw. beschädigte Zubehörteile dürfen nicht mehr verwendet werden.
• Zur Reinigung des Gerätes und der Schallplatten dürfen nur dafür vorgesehene Reinigungsmittel (antistatisch) verwendet werden. Diese sind
im Zubehörfachhandel erhältlich.
Bestimmungsgemäße Verwendung
Das Gerät dient zum Abspielen von Schallplatten. Das Gerät ist für den privaten Gebrauch konzipiert und nicht für gewerbliche Zwecke geeignet.
Jede andere Verwendung gilt als nicht bestimmungsgemäß und kann zu Sach- oder sogar zu Personenschäden führen.
Der Hersteller übernimmt keine Haftung für Schäden, die durch nicht bestimmungsgemäßen Gebrauch entstanden sind. Vor der Inbetriebnahme
die Bedienungsanleitung aufmerksam durchlesen. Nur so können alle Funktionen sicher und zuverlässig genutzt werden.
Die Bedienungsanleitung aufbewahren und an einen möglichen Nachbesitzer übergeben.
Page 6
6
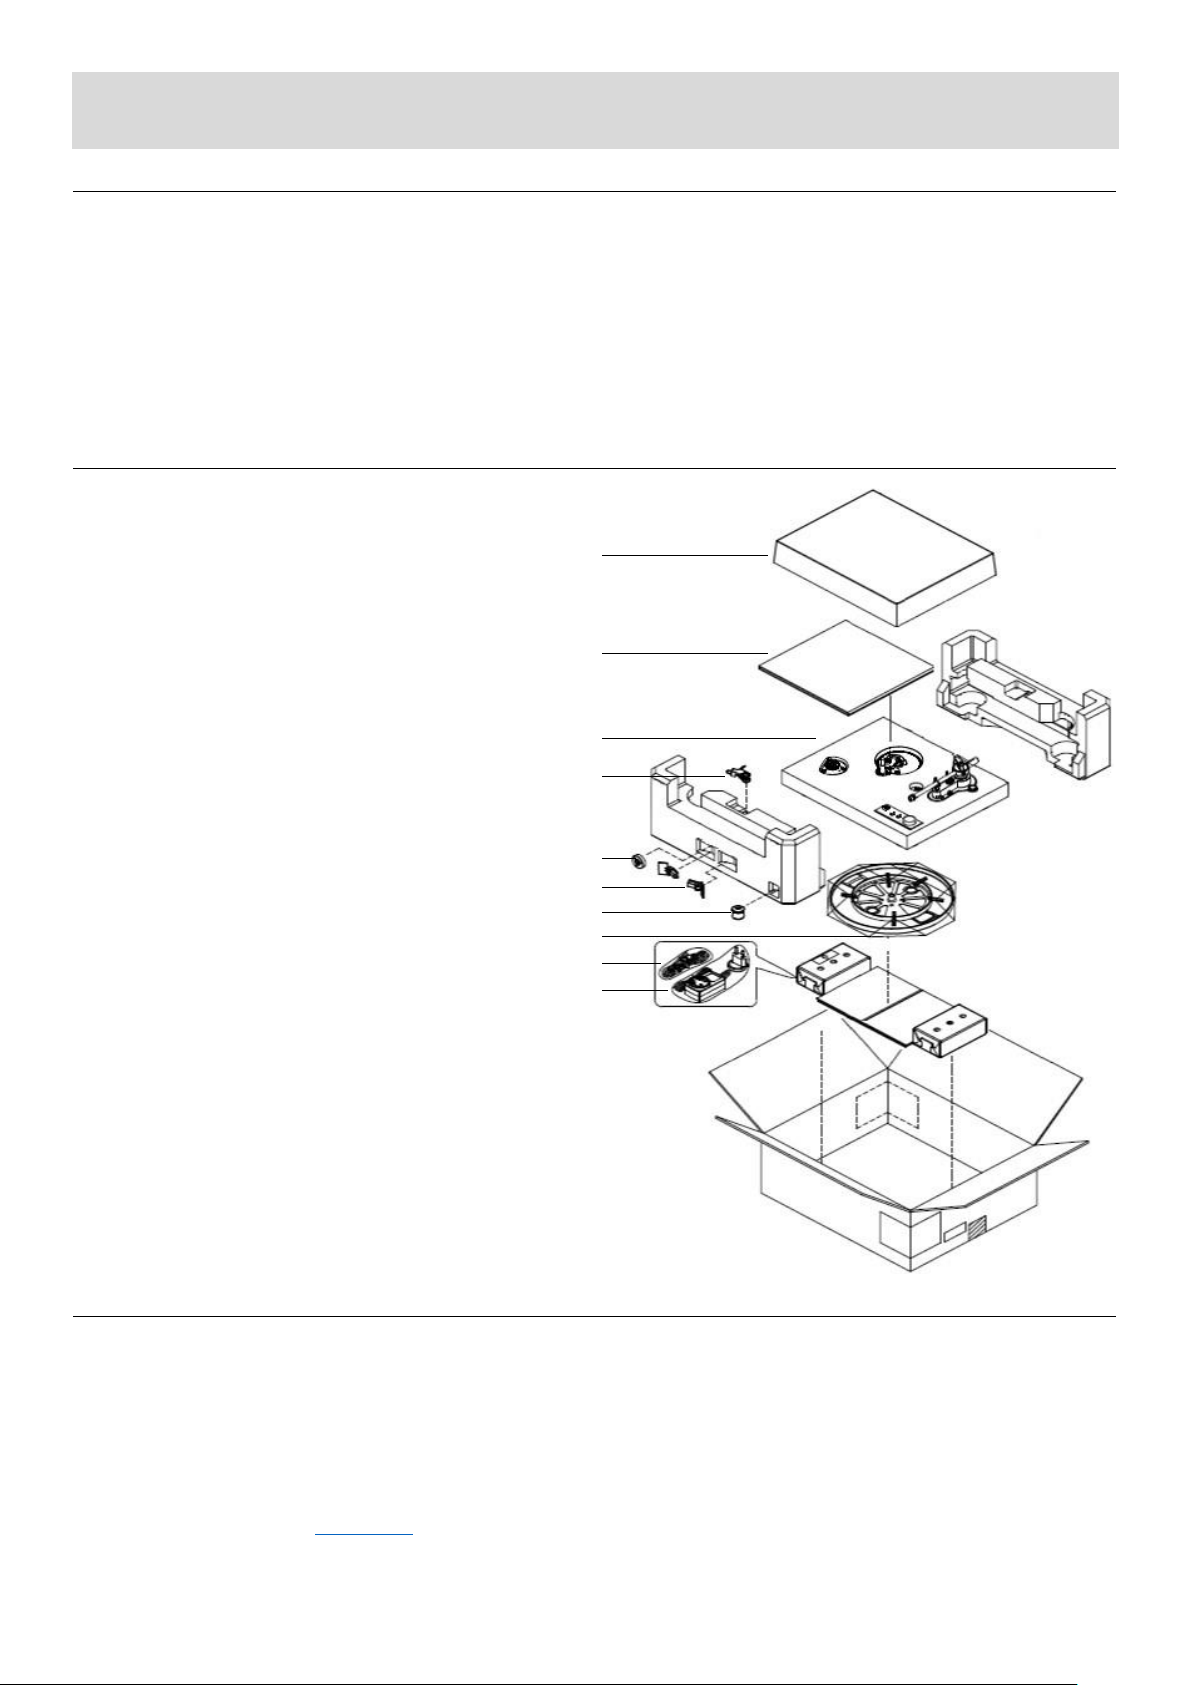
Lieferumfang / Verpacken
Auspacken
1) Bitte erst das Gerät und alle Zubehörteile aus der Verpackung entnehmen.
2) Klebestreifen und Transportbänder entfernen.
3) Sicherstellen, dass alle nachfolgend aufgeführten Teile vorhanden sind:
Hinweis:
• Die Kleinteile befinden sich in den Seiten der Styroporverpackung!
• Die Schutzkappe für die Nadel am Tonarmkopf nicht wegwerfen!
• Behalten sie die Verpackung für zukünftige Transporte!
Lieferumfang
1. Abdeckhaube,
2. Plattentellerbelag,
3. Plattenspieler,
4. Tonarmkopf (vormontiert, Tonabnehmer mit Nadel),
5. Zentrierpuck (Adapter für 7“ EP’s),
6. 2 Scharniere für Abdeckhaube,
7. Gegengewicht,
8. Plattenteller mit Riemen,
9. Cinch-Audiokabel Stereo.
10. Steckernetzteil für Netzanschluss,
Hinweis
Bei unvollständigem Lieferumfang bitte an
den Hersteller wenden.
Einpacken
1) Verpacken sie alle Zubehörteile wieder in die jeweiligen Verpackungen.
2) Das Gegengewicht muss abgenommen werden und in einem der Styroporteile verstaut werden. (mit Klebeband sichern)
3) Nehmen sie den Plattenteller ab (niemals den Plattenspieler mit aufgesetztem Teller transportieren).
4) Sichern sie den Tonabnehmer mit dem Nadelschutz.
5) Sichern sie den Tonarm an der Tonarmablage zusätzlich mit einem Bindestreifen.
6) Stellen sie sicher das keine der Kleinteile oder Zubehörverpackungen innerhalb des Karton sich bewegen können.
Hinweis:
Weitere Anleitungen folgen auf: www.dual.de
1
2
3
4
567
8
9
10
Page 7
7
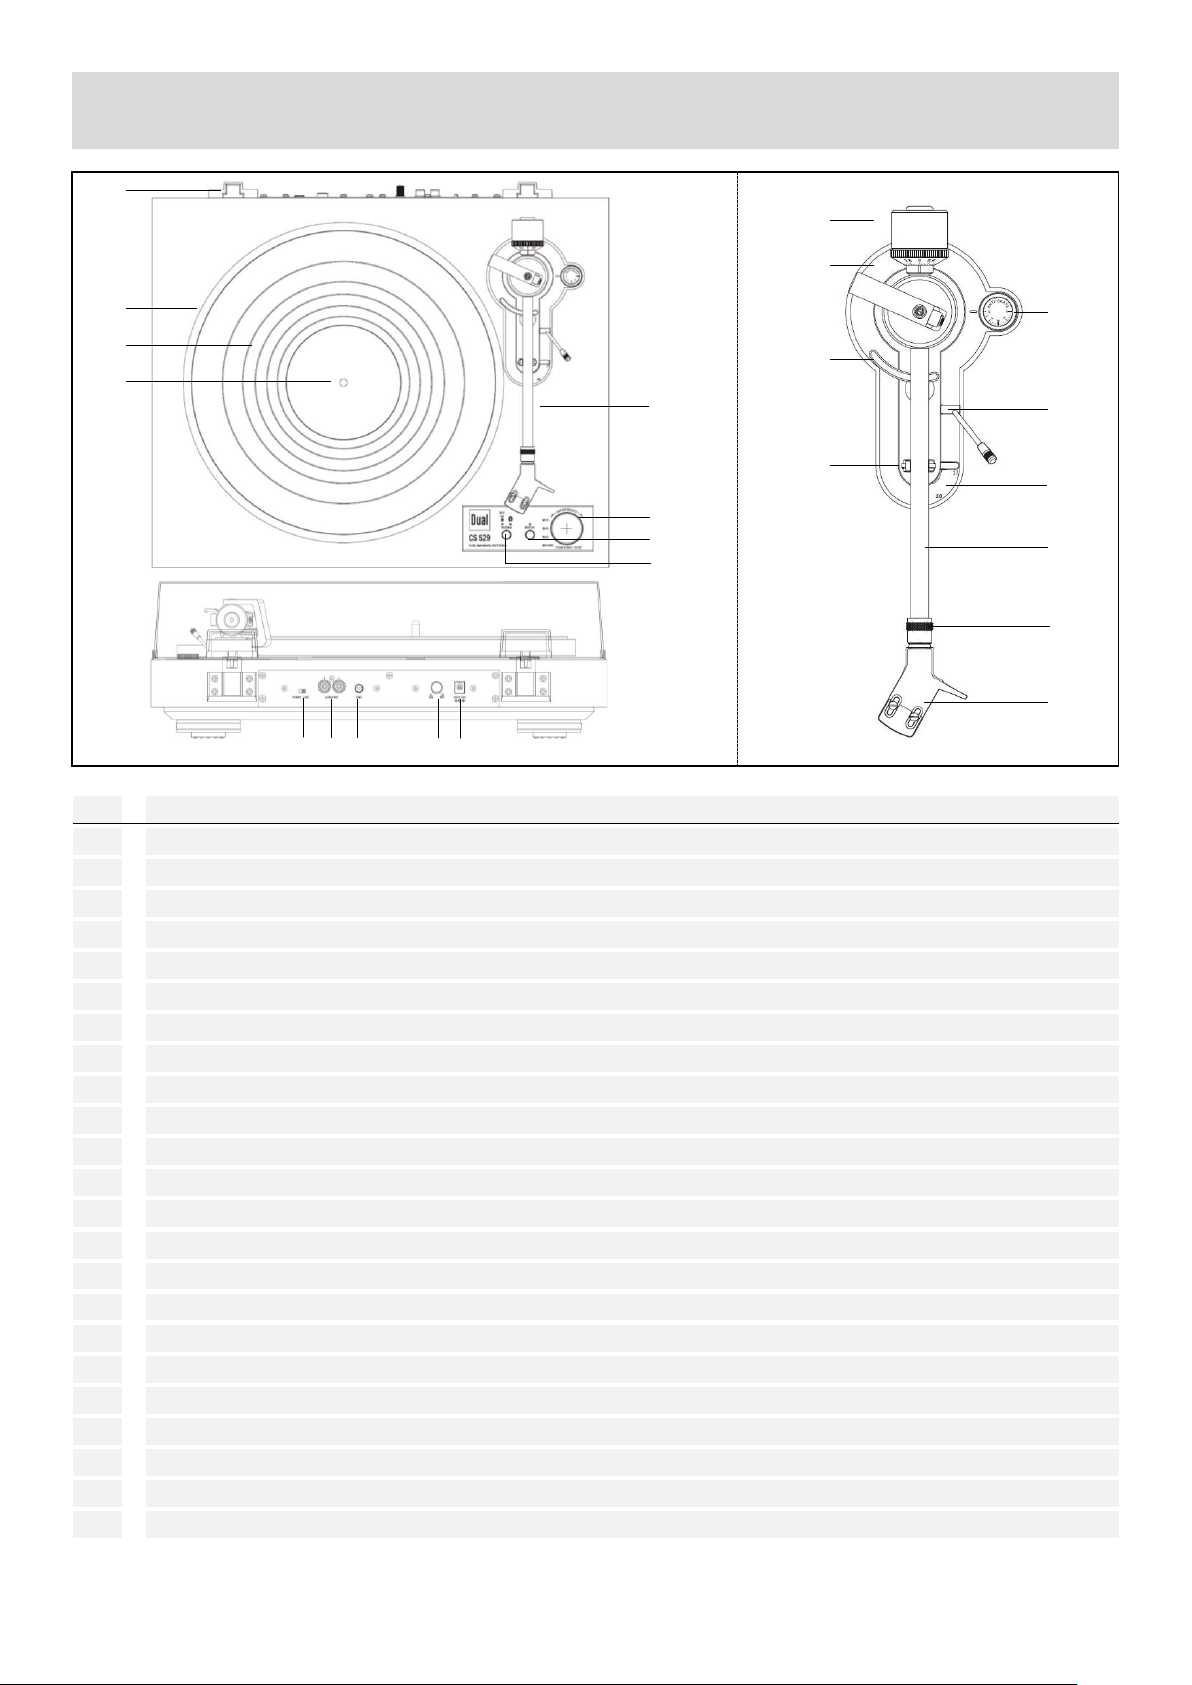
Nr Beschreibung
1 Scharniere der Abdeckhaube (2×)
2 Plattenteller
3 Plattentellerbelag
4 Plattentellerachse
5 Umschalter PHONO / LINE
Phono-Vorverstärker ein-/ausschalten
6 RCA-Audio-Ausgang
rot - rechter Kanal, weiß - linker Kanal
7 GND: Erdung (Masseanschluss)
8 Netzschalter
Ein / Aus
9 DC IN: 12 V-Anschluss für Steckernetzteil
10 Bluetooth Bedienung
11 Wiederholung
12 Start / Stopp & Geschwindigkeitswahl
33, 45, 78
13 Tonarm
14 Gegengewicht
15 Auflagekraftskala
16 Tonarmlift
17 Tonarmablage mit Halteclip
18 Anti-Skating-Einstellung
19 Hebel Tonarmlift
20 Hebel Plattengröße
17, 30
21 Tonarm
22 Überwurfmutter
23 Tonarmkopf
1 2 3 4 5 6 7
16 9 15
14
12
11 8 17
18
19
21
22
23
Geräteübersicht
13
20
10
Page 8
8
Aufbau
Plattenteller mit Riemen montieren
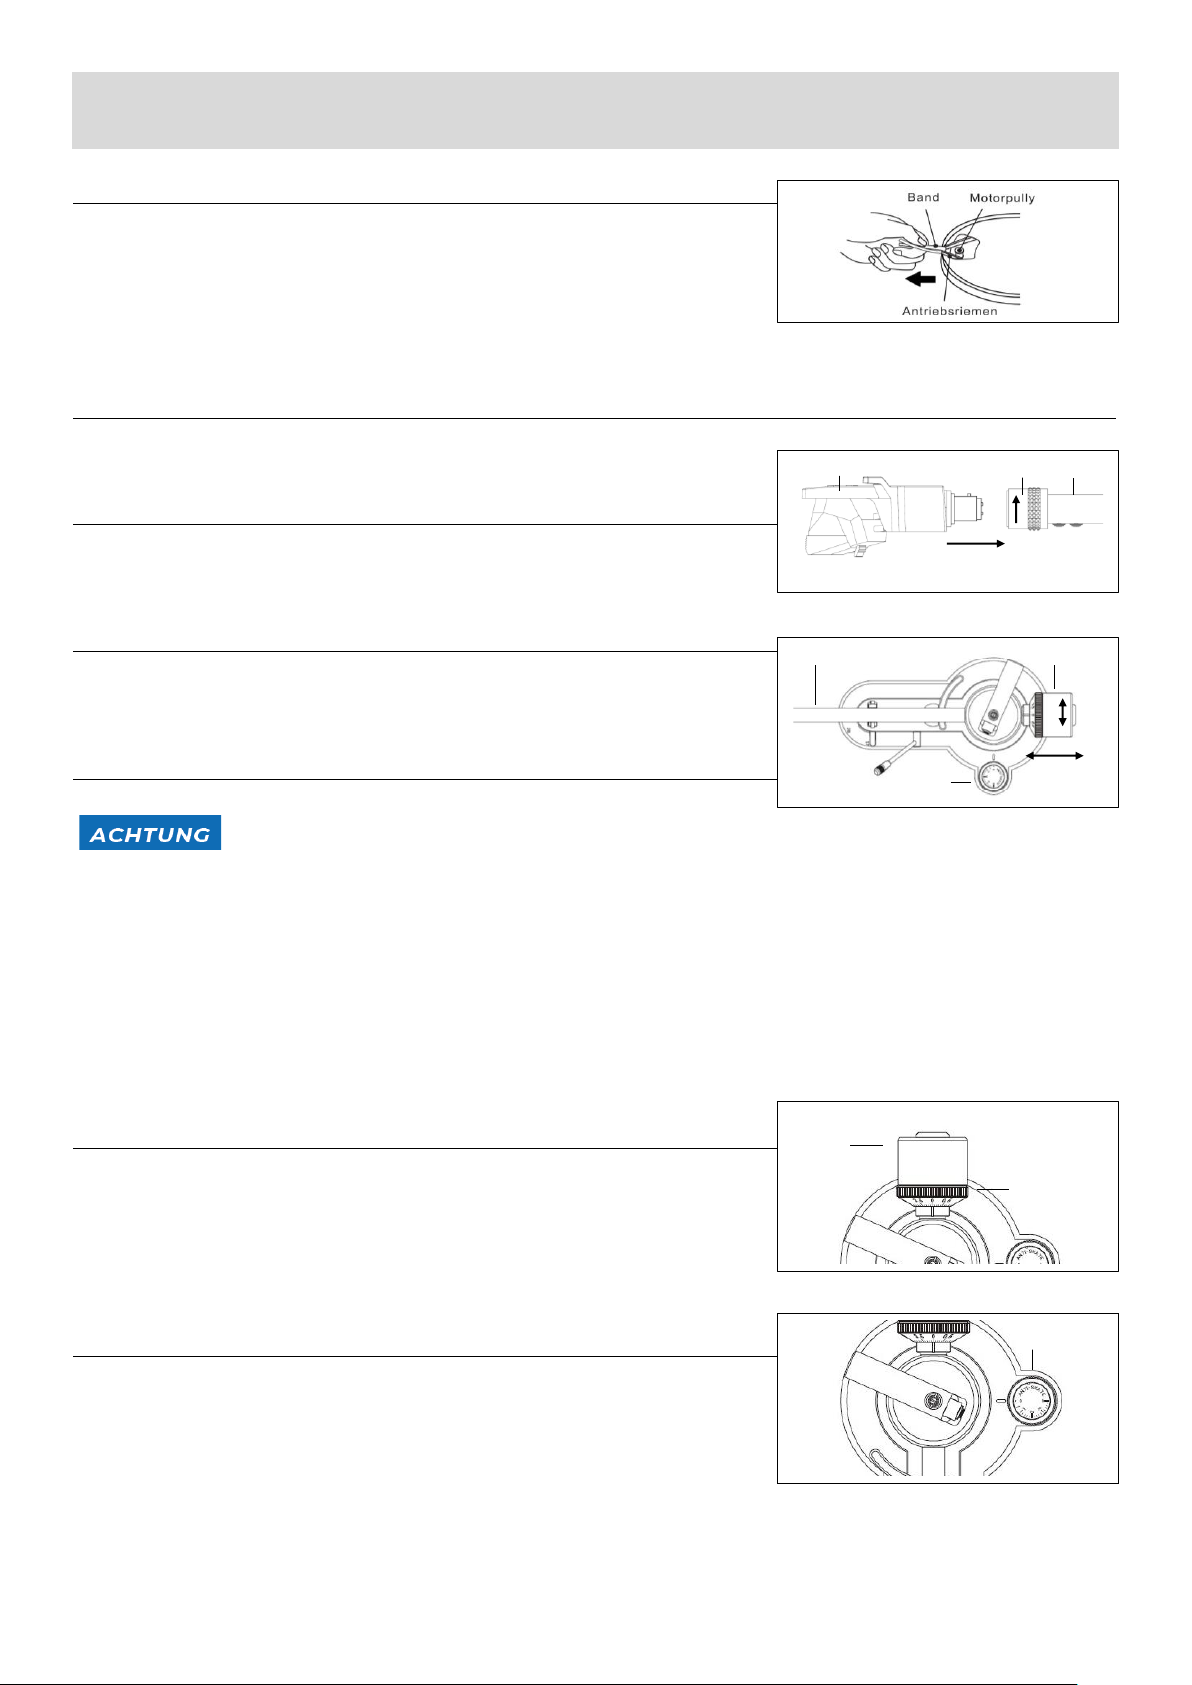
Der Antriebsriemen liegt bereits auf der Riemenlauffläche des Plattentellers auf. Der Riemen
wird mit dem roten Band um die Antriebsrolle des Motors gezogen. (Abb. 1)
1. Den Plattenteller auf die Plattentellerachse aufsetzen. Den Plattenteller so drehen,
dass die Antriebsrolle in der Aussparung erscheint (auf ca. 08.00 Uhr-Position).
2. Ziehen Sie den Riemen mit dem roten Band und legen Sie ihn mittig über die
Antriebsrolle. Entfernen Sie dann das rote Band.
3. Legen sie die Plattentellermatte auf den Plattenteller.
Tonarm
Der Tonarm ist für den Transport mit dem Halteklipp der Tonarmablage gesichert.
Den Halteklipp vor der Verwendung öffnen.
Tonarmkopf montieren
Den Tonarmkopf wie nachfolgend beschrieben am Tonarm montieren: (Abb. 2)
1. Den Tonarmkopf (1) in die Aufnahme (2) am Tonarm (3) stecken.
2. Den Tonarmkopf sichern, dazu die Überwurfmutter (2) in Pfeilrichtung drehen.
Tonarm-Gegengewicht montieren
Das mitgelieferte Gegengewicht (2) muss am Tonarm (1) aufgeschraubt werden. (Abb. 3)
Das Gegengewicht dient dazu, die korrekte Auflagekraft für das Tonabnehmersystem
einzustellen.
Tonarm ausbalancieren
Beschädigung der Abtastnadel!
Sicherstellen, dass die Abtastnadel nicht mit der Tellerauflage,
oder anderen Gegenständen in Berührung kommt.
1. Den Plattenspieler auf eine waagerechte Unterlage stellen.
2. Die Nadelschutzkappe entfernen. (Seite 10)
3. Den Tonarmlift absenken mit dem Tonarmhebel.
4. Den Tonarm zwischen Tonarmablage und Plattenteller positionieren.
5. Den Antiskating-Einstellknopf (3) durch drehen auf "0" stellen. (Abb. 3)
6. Den Tonarm durch hin- und herdrehen des Gegengewichtes (2) waagerecht ausbalancieren.
7. Den Tonarm wieder in der Tonarmablage ablegen und fixieren.
8. Das Gegengewicht jetzt in der eingestellten Position festhalten und die Auflagekraftskala
auf "0"einstellen.
Auflagekraft einstellen
Die Auflagekraft abhängig vom Tonabnehmer-System einstellen: (Abb. 4)
1. Das Gegengewicht auf die empfohlene Auflagekraft einstellen.
2. Die Auflagekraft kann an der Skala abgelesen werden.
Hinweis:
Die empfohlene Auflagekraft für den mitgelieferten Tonabnehmer beträgt 1,6 bis 2,0 g.
Im Zweifelsfall die Empfehlung des Tonabnehmer Herstellers beachten.
Anti-Skating-Einstellung
Der durch die Skating-Kraft verursachte Zug des Tonarmes zum Plattenzentrum bewirkt
eine Erhöhung der Auflagekraft an der inneren Rillenflanke der Platte.
Zur Kompensation der Skating-Kraft und der von Ihr ausgehenden besonders
nachteiligen Wirkung für die Abtastung von Stereo-Schallplatten besitzt das Gerät
eine Anti-Skating-Einrichtung.
• Den Antiskating-Einstellknopf (1) auf den gleichen Wert wie die Auflagekraft einstellen.
(Abb. 5)
Abb. 2
Abb. 3
Abb. 4
Abb. 5
1 2 3
1
2
3
1
1
Abb. 1
2
Page 9
9
Aufbau
Abdeckhaube montieren
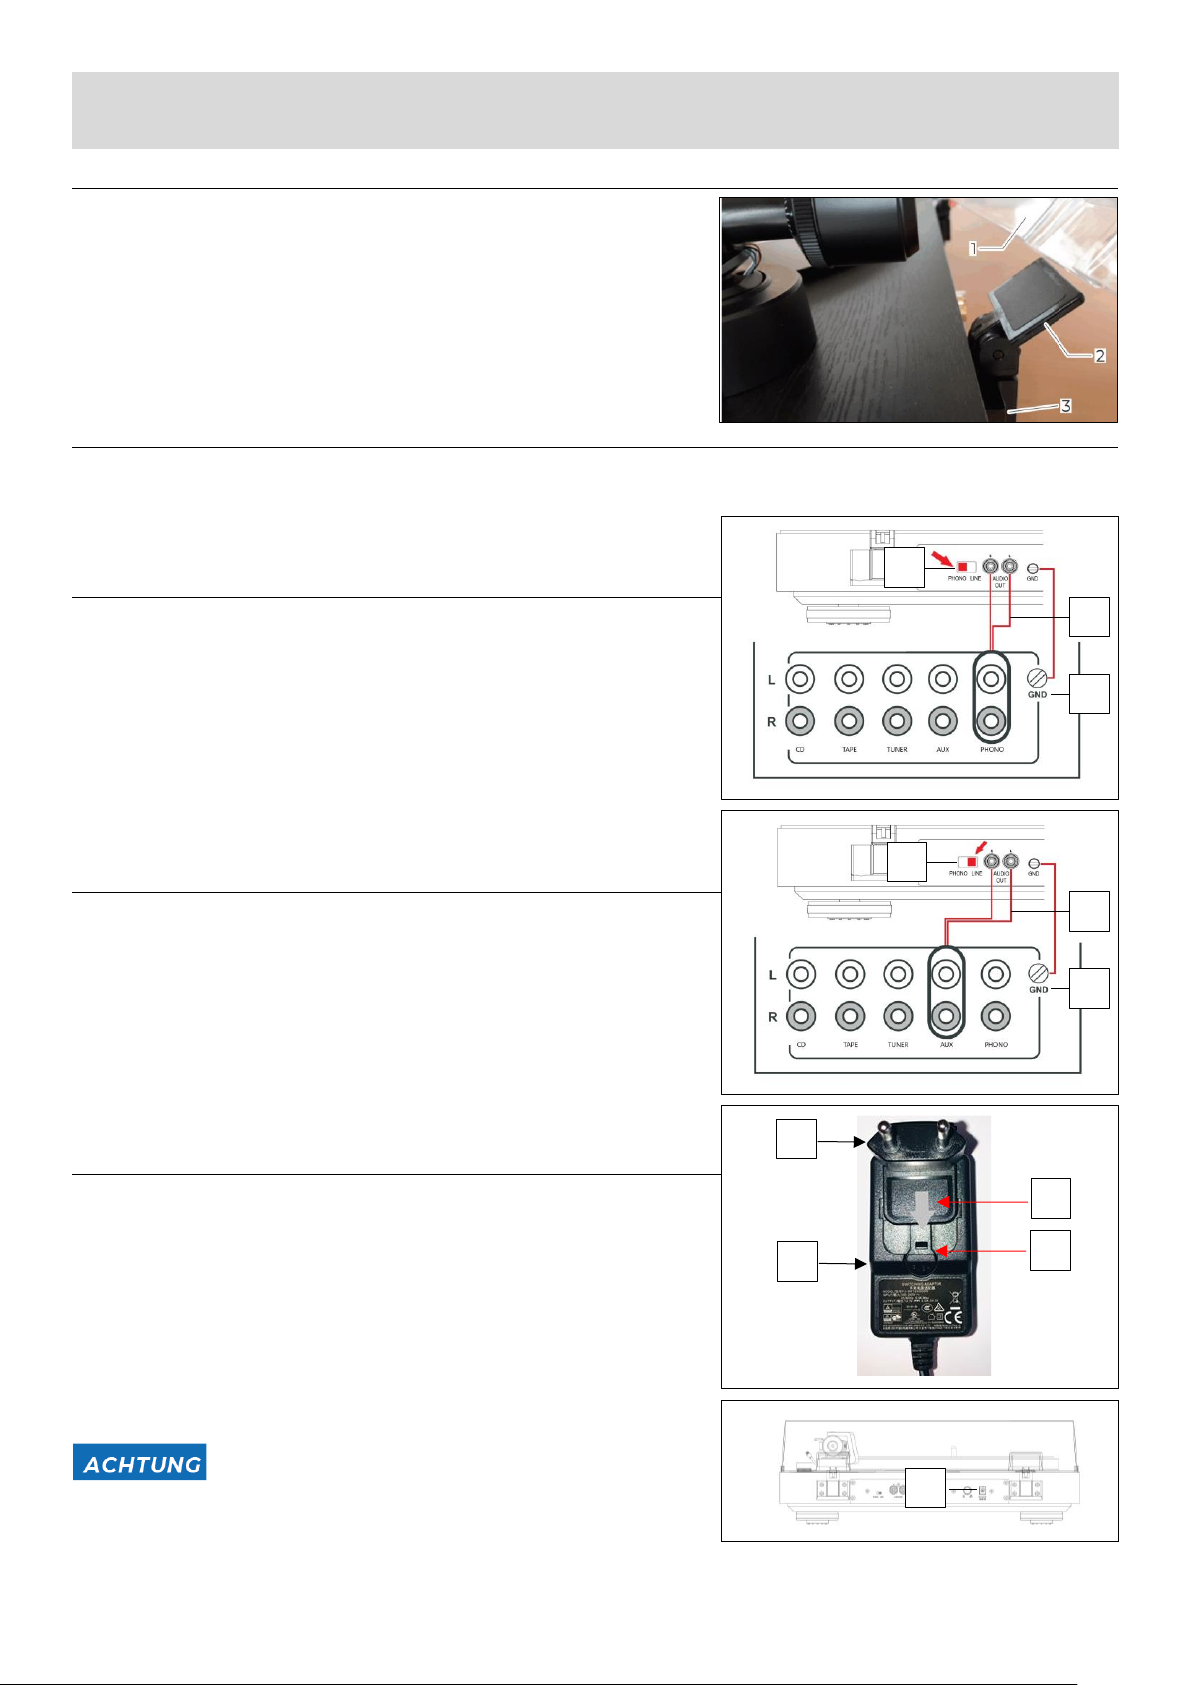
1. Die Scharniere (2) in die Halterungen (3) auf der Rückseite des Gerätes stecken.
2. Die Abdeckhaube (1) dann auf die beiden Scharniere (2) stecken.
Plattenspieler am Verstärker anschließen
Der Plattenspieler verfügt über einen eingebauten Entzerrer-Vorverstärker und kann sowohl an einen Phono-Eingang als auch an einen AudioEingang (AUXIN, LINE) angeschlossen werden. Über einen Schiebeschalter (1) kann der eingebaute Entzerrer-Vorverstärker ein- und
ausgeschaltet werden.
Phono-Eingang
1. Den Audio-Ausgang AUDIO OUT (2) mit einem Cinch-Audiokabel an die
Phono-Buchsen am Verstärker anschließen.
2. Den Schiebeschalter (1) in die Position PHONO schalten.
3. Den Masseanschluss GND (3) mit dem entsprechenden Anschluss am Verstärker
verbinden, um Störgeräusche und Brummen zu vermeiden.
Hinweis:
Dabei auf den richtigen Anschluss des linken und rechten Kanals achten.
(rot = rechter Kanal, weiß = linker Kanal).
Am Verstärker die Option „Phono MM“ auswählen, falls vorhanden.
Line-Eingang
1. Den Audio-Ausgang AUDIO OUT (2) mit einem Cinch-Audiokabel an die
LINE/AUX-Buchsen am Verstärker anschließen.
2. Den Schiebeschalter (1) in die Position LINE schalten.
3. Den Masseanschluss GND (3) mit dem entsprechenden Anschluss am Verstärker
verbinden, um Störgeräusche und Brummen zu vermeiden.
Hinweis:
Dabei auf den richtigen Anschluss des linken und rechten Kanals achten.
(rot = rechter Kanal, weiß = linker Kanal).
Steckernetzteil anschließen
Im Lieferumfang ist ein landesspezifischer Steckeradapter enthalten (1).
Der Steckeradapter muss am Steckernetzteil montiert werden (2).
1. Steckeradapter am Steckernetzteil aufsetzen und in Pfeilrichtung verriegeln (A).
2. Sicherstellen, dass der Steckeradapter korrekt verriegelt ist (B).
3. Das Kabel des Steckernetzteils mit der Buchse DC IN (C) am Gerät verbinden
und dann das Steckernetzteil in die Steckdose stecken.
Hinweis:
Nur das mitgelieferte Netzteil verwenden.
Beschädigung des Gerätes!
Beschädigung des Gerätes durch falsche Netzspannung.
Sicherstellen, dass Netzspannung mit den Angaben auf
dem Steckernetzteil übereinstimmt.
1 C 2 A B
1 1 3
2 2 3
Page 10
10
Bedienung
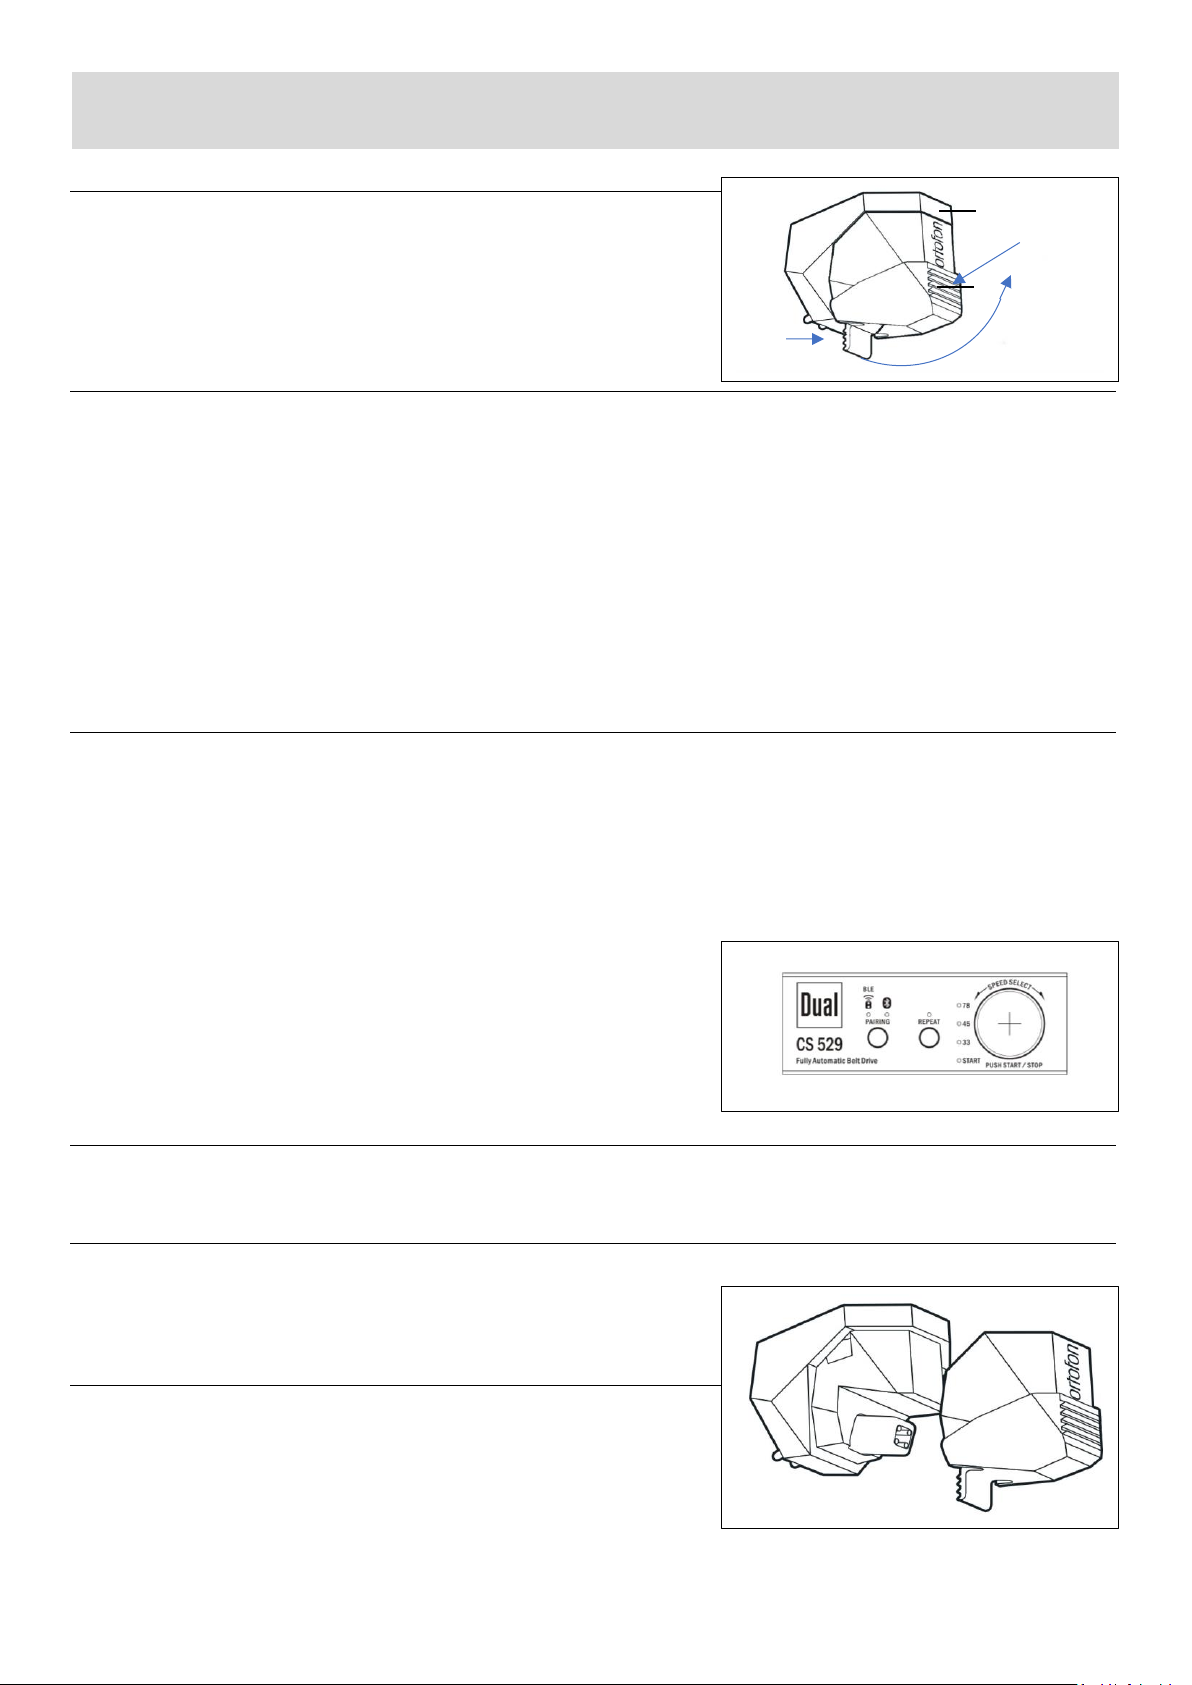
Abnehmen / Anbringen der Nadelschutzkappe
Vor der Wiedergabe einer Schallplatte muss die Nadelschutzkappe
vom Tonabnehmer entfernt werden. (Abb. 1)
1. Die Nadelschutzkappe (2) nach vorne vom Tonabnehmer (1) abziehen.
2. Die Nadelschutzkappe nach der Wiedergabe wieder aufstecken.
Schallplatte abspielen (manuell)
1. Den Netzschalter (8) einschalten. Die LEDs Bluetooth und „33‘“ leuchten rot und blau. (Abb. 2).
2. Platte auflegen, bei Singles den Zentrierpuck aufsetzen.
3. Am Schalter (12) die gewünschte Geschwindigkeit 33, 45, 78 wählen. Die gewählte Drehzahl wird per LED angezeigt.
4. Den Halteclip an der Tonarmablage lösen und den Tonarm mit dem Hebel des Tonarmliftes anheben.
5. Den Tonarm vorsichtig von der Tonarmstütze nehmen und über der Einlaufrille der Platte positionieren. Der Plattenteller dreht sich.
6. Den Tonarm mit dem Hebel des Tonarmliftes absenken.
7. Am Ende der Platte kehrt der Tonarm automatisch zurück zur Tonarmablage und der Motor schaltet sich aus.
8. Der Motor schaltet sich auch aus bei manueller Rückführung des Tonarmes zur Tonarmbasis.
9. Den Tonarm mit dem Halteclip sichern.
10. Nach 30 Minuten Pause (Werkeinstellung kann geändert werden) schaltet das Gerät in den Stand-by-Modus. Die „Start“ LED leuchtet rot.
Hinweis:
Der Tonarm kann an jeder Stelle - auch zur kurzzeitigen Spielunterbrechung - angehoben werden. Der Plattenteller dreht sich weiter.
Schallplatte abspielen (automatisch)
1. Den Netzschalter (8) einschalten. Die LEDs für Bluetooth und „33‘“ leuchten rot und blau. (Abb. 2)
2. Platte auflegen, bei Singles den Zentrierpuck aufsetzen und die Plattengröße einstellen (20).
3. Am Schalter (12) die gewünschte Geschwindigkeit 33, 45; 78 wählen. Die gewählte Drehzahl wird per LED angezeigt.
4. Den Halteclip an der Tonarmablage lösen und den Schalter (12) diesmal drücken.
5. Der Plattenteller beginnt zu drehen. Der Tonarm bewegt sich zur Einlaufrille der Platte und senkt sich automatisch ab. Die grüne „Start“ LED
blinkt während des Vorganges und leuchtet danach während des Abspielens permanent.
6. Der Abspielvorgang kann durch Drücken des Schalters (12) beendet werden. Der Tonarm kehrt zurück zur Ablage. Die „Start“ LED blinkt.
7. Am Ende der Platte kehrt der Tonarm automatisch zurück zur Tonarmablage und der Motor schaltet sich aus.
8. Der Motor schaltet sich auch aus bei manueller Rückführung des Tonarmes zur Tonarmbasis.
9. Den Tonarm mit dem Halteclip sichern.
10. Nach 30 Minuten Pause (Werkeinstellung kann geändert werden) schaltet das Gerät
in den Stand-by-Modus. Die „Start“ LED leuchtet rot.
Hinweis:
Keine Automatik Funktion für Schallplatten mit 25cm (10“) Durchmesser!
Der Tonarm kann jederzeit mit dem Tonarmlift angehoben werden.
Drehzahl feineinstellen
Die Drehzahlregelung des Plattenspielerantriebes wird über einen Prozessor gesteuert. Eine manuelle Einstellung ist nicht möglich.
Wiederholung
Drücken sie die Taste „REPEAT“ (Abb.2) und der Abspielvorgang wiederholt sich automatisch nach dem Ende der Platte.
10 Wiederholungen sind ab Werk eingestellt. Dies kann über die App geändert werden.
Bei manueller Rückführung vom Tonarm muss „Repeat“ vorher ausgeschaltet werden.
Nadel am Tonabnehmer auswechseln
Die Abtastnadel ist durch den Abspielvorgang natürlichem Verschleiß ausgesetzt.
Wir empfehlen daher eine regelmäßige Überprüfung.
1. Die Abtastnadel nach schräg vorne abziehen. (Abb. 3)
2. Die neue Abtastnadel in umgekehrter Weise einsetzen.
Hinweis:
Abgenutzte oder beschädigte Abtastnadeln zerstören die Schallplatten.
B) Drücken
A) Halten
C) Abziehen
1
2
Abb.1
Abb.2
Abb. 3
Page 11
11
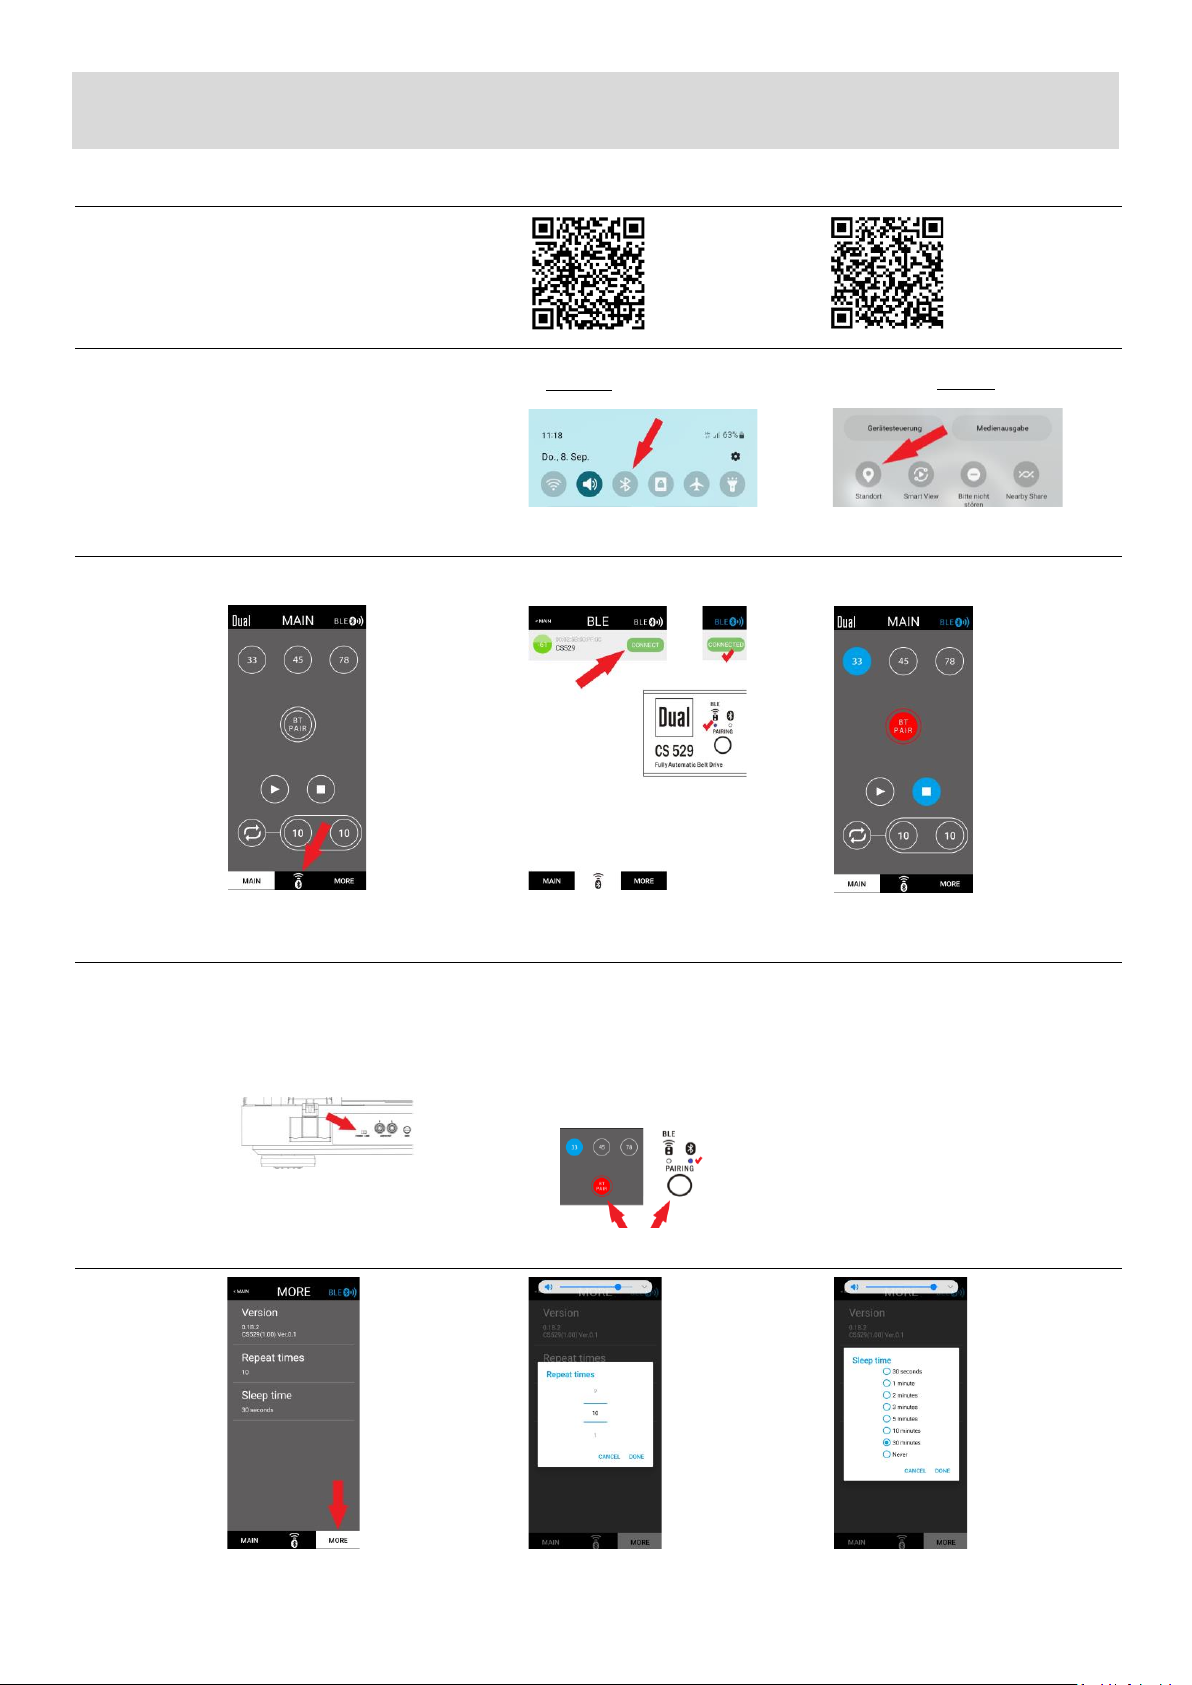
Bluetooth Bedienung
Installation App am Mobilgerät
Android: Apple:
Play Store App Store
Mobilgerät Einstellungen
Verbindung Fernbedienung herstellen
Verbindung mit BT-Lautsprecher / Kopfhörer herstellen
Einstellungen: Wiederholung / Stand-by Verzögerung
1) BLE-Menü öffnen
1) Bluetooth einschalten
2) Für Android: Standort einschalten
2) Connect drücken
3) Bereit = Zustand wird angezeigt
Bluetooth „Pairing“ am
Lautsprecher einschalten.
Den Schalter am Plattenspieler
auf „Line“ schalten.
Neues Gerät erkennen:
- „Pairing“ Taste am Mobilgerät, oder am
Plattenspieler 2x drücken.
- LED und Schaltfläche blinken rot – blau,
während die Verbindung aufgebaut wird.
- LED und Schaltfläche leuchten blau,
wenn die Verbindung steht.
Bestehendes Gerät koppeln:
- „Pairing“ Taste am Mobilgerät, oder am
Plattenspieler 1x drücken.
- LED und Schaltfläche blinken blau,
während die Verbindung aufgebaut wird.
- LED und Schaltfläche leuchten blau,
wenn die Verbindung steht.
Page 12
12
Reinigen und Fehlerbehebung
Nadel und Platte reinigen
Die Nadel und die Platte sollten vor dem Abspielen stets gereinigt werden, um eine vorzeitige Abnutzung zu verhindern.
Beschädigung von Bauteilen!
1. Mit einem Reinigungspinsel von hinten nach vorne über die Nadel streichen.
2. Zur Reinigung der Platte mit einer Carbon- Faserbürste leicht schräg über die Platte wischen.
Hinweis:
Zubehör ist in unserem Shop unter www.dual.de erhältlich.
Plattenspieler reinigen
Gefahr durch elektrische Spannung!
Um die Gefahr eines elektrischen Schlages zu vermeiden, darf das Gerät nicht mit einem nassen Tuch oder unter
fließendem Wasser gereinigt werden. Vor dem Reinigen immer das Steckernetzteil aus der Steckdose ziehen.
ACHTUNG
Beschädigung von Bauteilen!
Keine Scheuerschwämme, Scheuerpulver und Lösungsmittel wie Alkohol oder Benzin zur Reinigung verwenden.
Das Gehäuse nur mit einem weichen, angefeuchteten Tuch, reinigen.
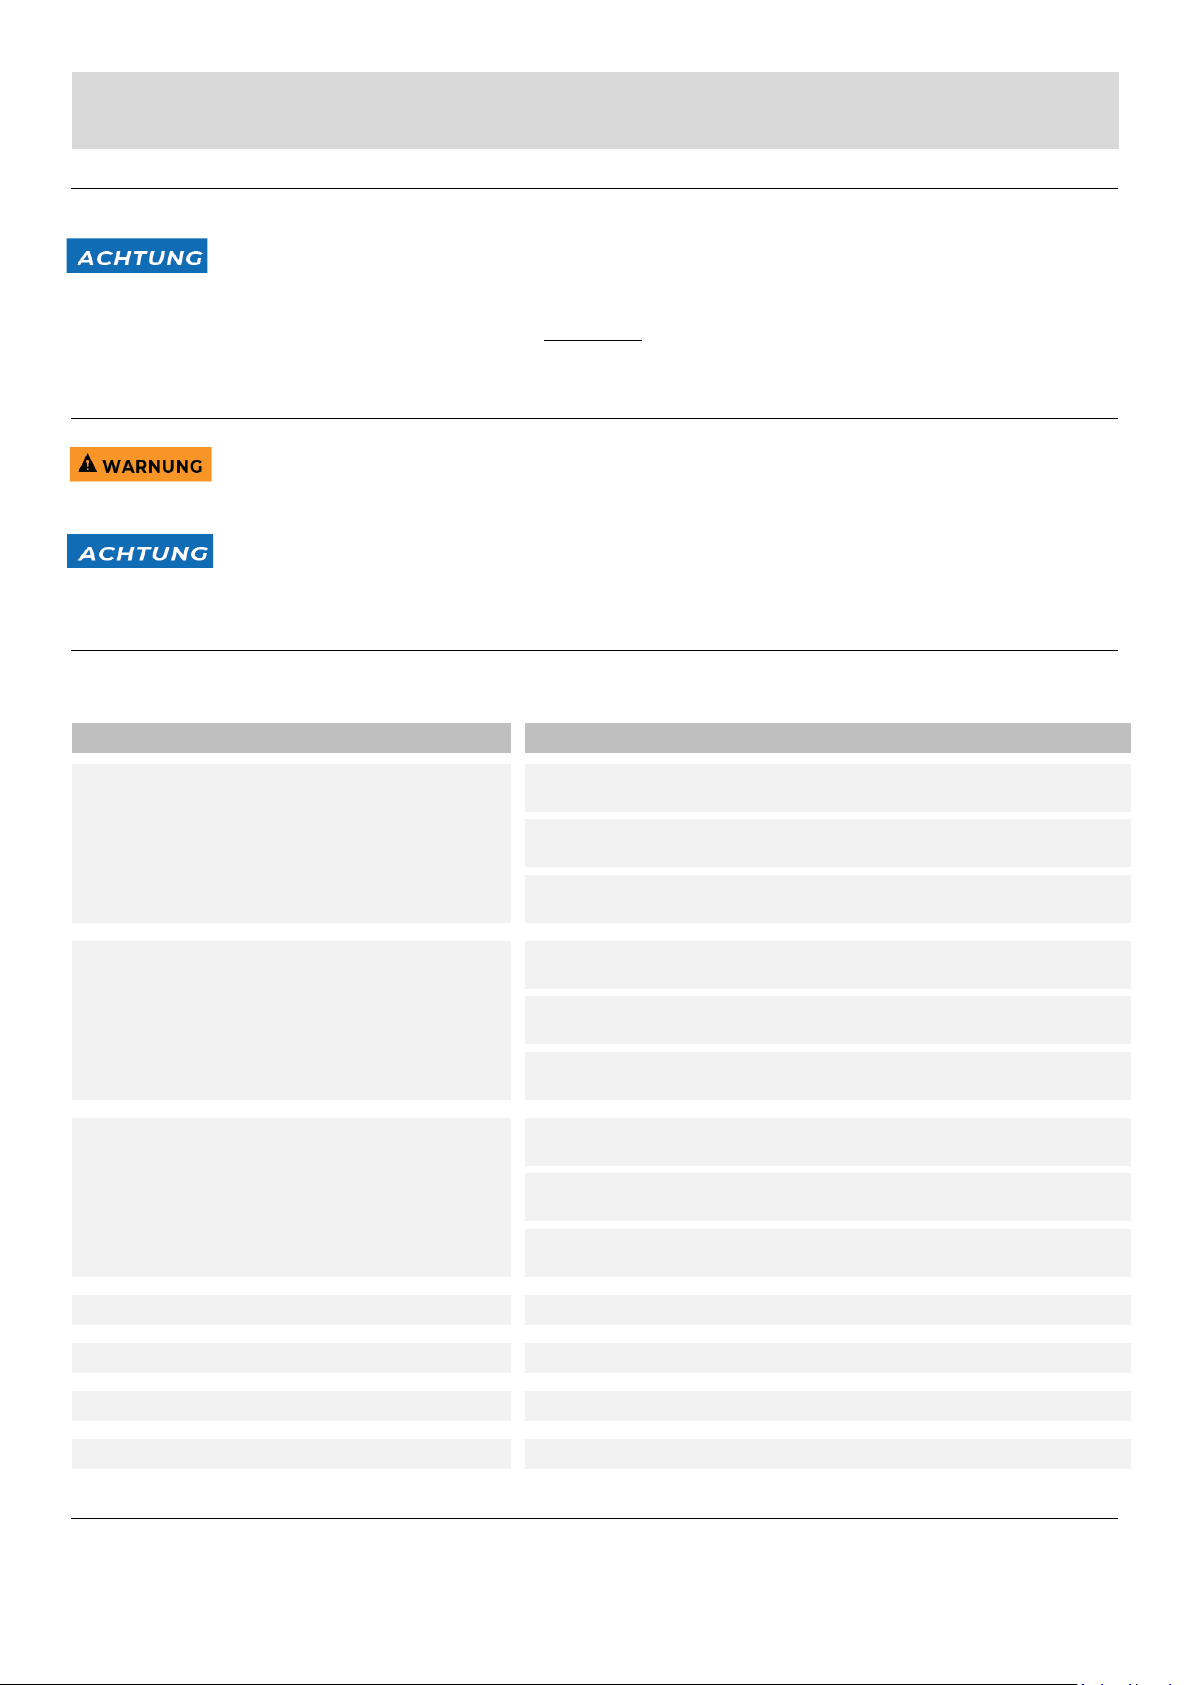
Fehlerbehebung
Bei Fehlfunktionen das Gerät anhand der folgenden Tabellen überprüfen. Wenn die Störung auch nach den beschriebenen Überprüfungen nicht
behoben werden konnte, Kontakt mit dem Hersteller oder Händler aufnehmen.
Ersatzteile & Zubehör
Ersatzteile und Originalzubehör erhalten sie unter www.dual.de
Symptom - Mögliche Ursache
Abhilfe
Der Tonarm überspringt Spuren, gleitet über die Platte
oder bewegt sich nicht.
• Der Plattenspieler steht nicht waagerecht. Den Plattenspieler auf eine
waagerechte Unterlagestellen.
• Die Platte ist verschmutzt oder verkratzt. Die Platte mit einem Plattenreiniger
reinigen oder eine andere Platte abspielen.
• Das Auflagegewicht des Tonabnehmers prüfen und ggf. einstellen, siehe
„Auflagekraft einstellen“ auf Seite 20.
Schlechte Tonqualität, starke Störgeräusche,
Tonaussetzer usw.
• Die Nadel ist verschmutzt. Die Nadel mit einem Pinsel säubern.
• Die Nadel ist defekt. Die Nadel austauschen. Siehe „Nadel am Tonabnehmer
auswechseln“.
• Die Platte ist verschmutzt oder verstaubt. Die Platte mit einem Plattenreiniger
reinigen. Siehe „Nadel und Platte reinigen“.
Der Ton ist zu leise oder laut und verzerrt.
• Der Plattenspieler ist nicht an den richtigen Verstärkereingang angeschlossen.
• Der Schalter für den internen Entzerr-Vorverstärker ist falsch eingestellt.
Siehe „Plattenspieler am Verstärker anschließen“ auf Seite 21.
Der Ton leiert.
• Der Antriebsriemen ist zu locker und muss gewechselt werden.
Die App reagiert nicht
• App schließen und neu starten
Lautsprecher oder Kopfhörer koppeln nicht
• Anleitung des Empfangsgerätes zur Kopplung prüfen
Bluetooth ist gekoppelt und es kommt kein Sound
• Plattenspieler Ausgang von "Phono" auf "Line" umstellen
Page 13

13
Contents
Page
Contents
13
Technical specifications
14
Preface
15
Intended users of this operating manual
15
Warnings
15
Directives
15
Disposal
15
Safety instructions
16
Safety
16
Intended use
16
List of contents / Packaging instructions
17
Product overview
18
Set Up
19
Platter and belt installation
19
Tonearm
19
Fitting the headshell
19
Counterweight fitting
19
Balancing the tonearm
19
Tracking force
19
Anti-Skating-adjustment
19
Dust cover fitting
20
Connection to amplifier
20
Connection to power supply
20
Operating the turntable
21
Removing / Attaching the stylus protection cap
21
To play the record (manually)
21
To play the record (automatically)
21
To set the speed
21
Repeat function
21
Replacing the stylus
21
Operating Bluetooth
22
Cleaning
23
Cleaning the stylus and record
23
Cleaning the record player
23
Troubleshooting
23
Spare Parts & Accessories
23
Page 14

14
Motor
Drive
Belt / DC Servo-controlled Motor with optical speed control
Speed settings
33/45/78
Wow & Flutter
< ±0,08 % (DIN WTD)
Tonearm
Function
All functions can be fully automatic or manually operated
Bearing
Ball-Bearing / Twin Gimbal Mounting
Effective length
221,5 mm
Offset Angle
25,6°
Overhang
19 mm
Type
statically balanced with counterweight
Stylus Pressure Range
0 to 4 g
Cartridge Weight Range
5 g to 9 g
Factory installed Pick-up
Ortofon 2M Red
Replacement Stylus
Ortofon Stylus 2M Red
Platter
Material
Aluminium Die-cast
Mat
Rubber 2,5 mm
Bearing
Hardened Steel Spindle, Brass Bushing
Diameter
305 mm
Weight incl. Mat
850 g
Plinth
Surface Finish
MDF: Vinyl veneer = Black / Wood Veneer = Walnut
Feet
Ø 62 mm / Elastomer Damping Element
Connection
RCA socket
Connection to Phono Input
YES
Connection to Line Input
YES
Digital Output
Bluetooth
Dimension (closed dust cover)
Dimension (open dust cover)
D: 415 mm / H: 400 mm
Weight
6,7 kg
Power Supply
The efficiency readings were taken with an input Voltage
of 230 V AC at 50 Hz
Type
FJ-SW1202000N
Input Voltage
100 (-10 %) V AC to 240 (+10 %) V AC
Frequency
50 / 60 Hz
Output Voltage
12 V DC
Output Current
2,0 A
Output Watt
24 W
Average Efficiency During Operation
≥ 86.2%
Power Consumption at Idle
< 0,1 W
Technical Specifications
435 x 367 x 148.5 mm
Page 15
15
Preface
This instruction manual will help you to operate the turntable in a safe way. Please read this manual and the safety notices carefully before
using the unit and keep them for later use. Be sure to make them accessible to other users and observe all information given here.
Intended users of this operating manual
This operating manual is intended for everyone who:
• sets up,
• operates,
• cleans
• or disposes of the record player.
Warnings
The warning signs in this operating manual are structured as seen below:
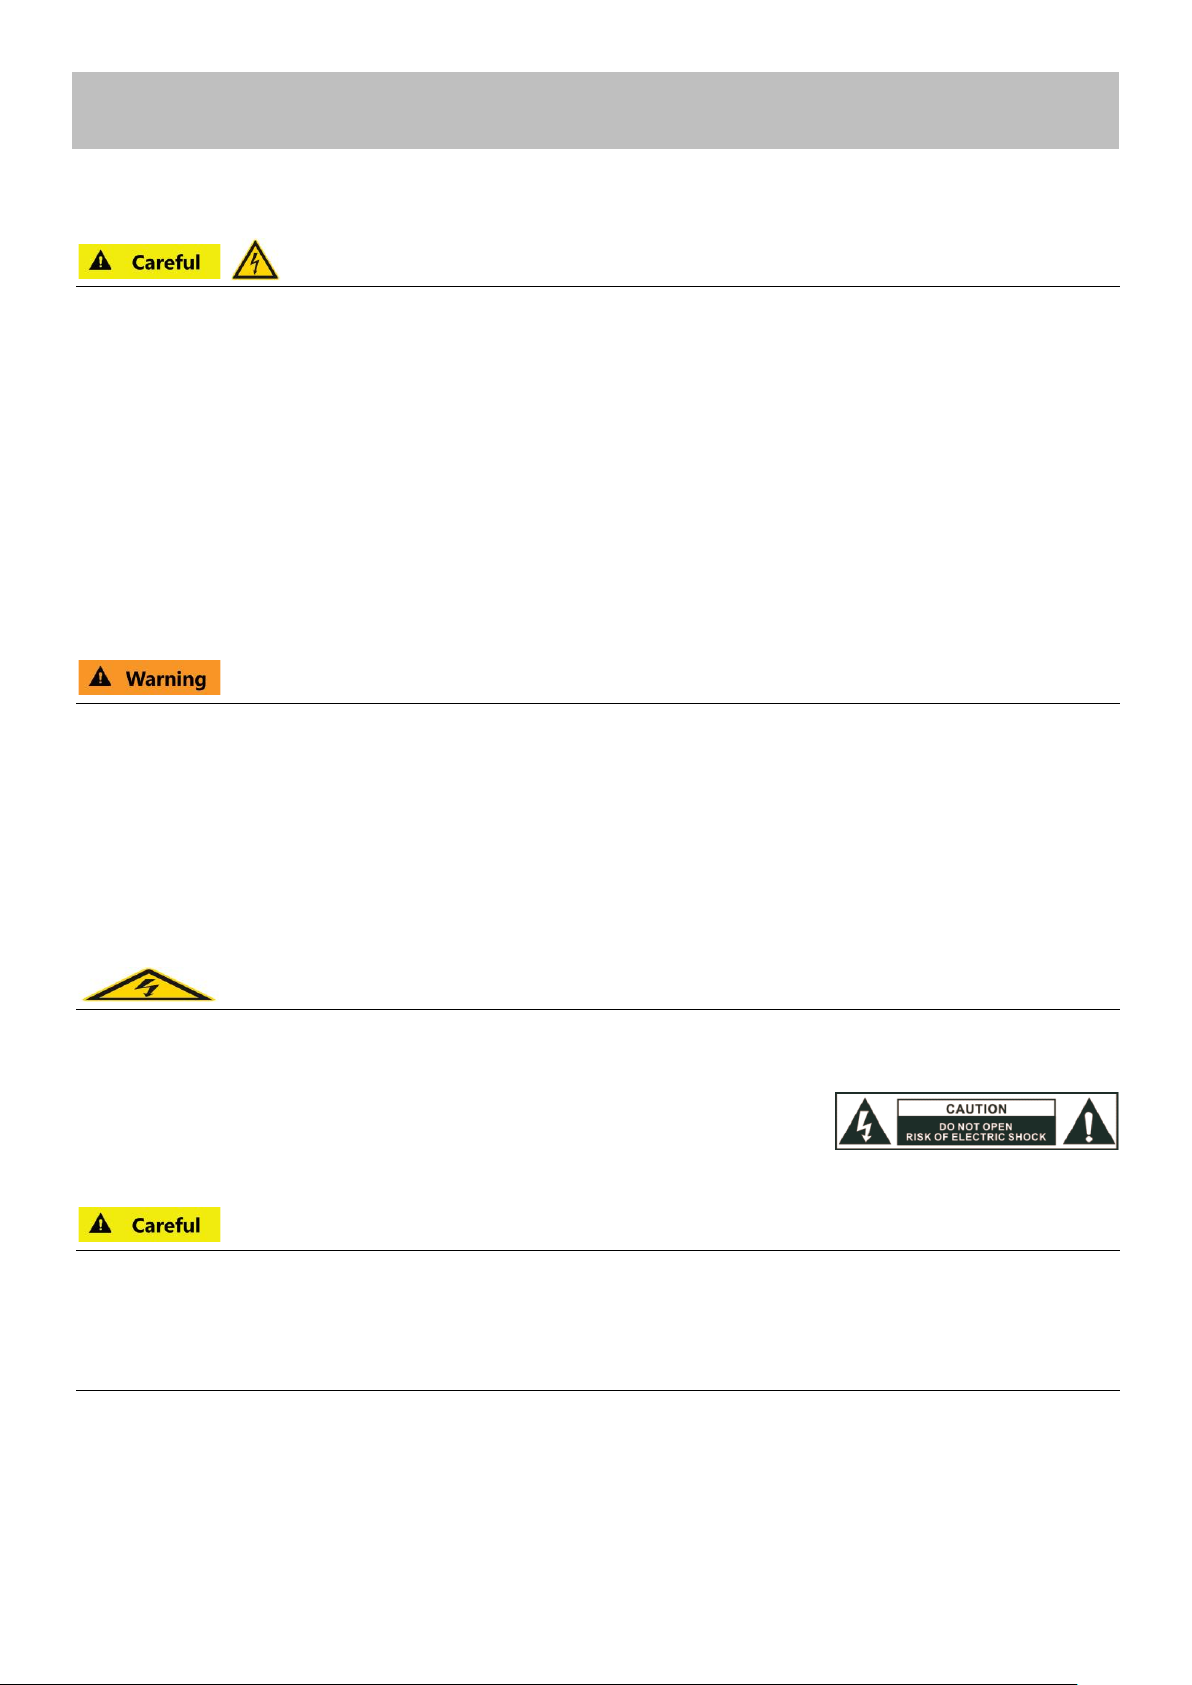
The word „DANGER“ is pointing out an immediate life hazard!
The word „WARNING“ is pointing out a potential life-threatening situation or irreversible injuries!
The word „CAREFUL“ is pointing out the possible threat of medium or light injuries!
The word „ATTENTION“ is pointing out potential damages to the product.
Note:
„NOTE“ provides useful or important information.
Directives and standards
This product conforms to:
• the Low-voltage Directive (2014/35/EU),
• the EMC Directive (2014/30/EU),
• RoHS Directive 2011/65/EU,
• ERP 2009/125/EC and
• CE Marking Directive.
Disposal of packaging
GEFAHR
„Danger“ through suffocation!
Keep the packaging and its parts out of the reach of children. Risk of suffocation from foil and other packaging materials. Your new unit was
protected on its way to you by the packaging. All materials used are environmentally safe and can be recycled. Please help and dispose of the
packaging in an environmentally responsible manner. To learn about current disposal methods, contact your dealer or your local disposal
facility.
Disposal of turntable
Old units are not simply waste. Valuable raw materials can be salvaged through environmentally friendly disposal. For
information about the correct and environmentally friendly disposal of your unit, please contact your local council.
This unit is labelled according to 2002/96/EC, the Waste Electrical and Electronic Equipment Directive (WEEE). This product
must not be disposed of with normal household waste. Instead, it must be deposited at a recycling station for electrical and
electronic devices. The symbol on the product and the instructions for use or the packaging indicate this. The materials can
be recycled in accordance with their marking. By re-using, recycling, or repurposing old units, you make an important
contribution to protecting our environment.
Page 16
16
Safety instructions
Please read through all of the safety instructions carefully and keep them for questions that may arise later. Always
observe all warnings and instructions in this operating manual and on the rear of the unit.
Safety instructions for using the power supply
• The unit should only be connected to a mains voltage supply of 100- 240 V~, 50/60 Hz.
• Never try to operate the unit with a different voltage.
• Only use the supplied power supply or an original Dual alternative.
• The mains plug should only be connected after installation has been completed according to the instructions.
• Use a suitable, easily accessible mains connection and avoid using multiple sockets!
• This socket should be as close to the unit as possible.
• Make sure the power cable or plug is always easily accessible so that the unit can be disconnected quickly from the power supply!
• Lay the mains cable in such a way that no one can trip over it and do not place any heavy objects on the mains cable.
• Fully insert the mains plug into the socket.
• Do not touch the mains plug with wet hands—risk of electric shock!
• If the mains plug of the unit is defective or if the unit shows other damage, it must not be operated.
• When unplugging the mains cable from the socket pull on the mains plug, not on the cable.
• Disconnect the mains plug from the socket if you do not intend to use the unit for a prolonged period. Only pull on the plug itself.
• In the event of malfunctions or smoke and odour coming from the housing disconnect the mains plug from the socket immediately!
• Before a thunderstorm sets in, disconnect the mains plug from the socket.
Safety instructions for the turntable placement
• In order to avoid the risk of fire and electric shock, do not expose the unit to rain or moisture.
• Prevent the unit from coming into contact with water or moisture.
• The appliance should not be sited in rooms with high levels of humidity, e.g. kitchens, bathrooms or saunas, or in the vicinity of swimming
pools indoors or outdoors, as splashing or the formation of condensation on the appliance may damage it.
• Do not place any containers which contain a liquid on the unit, such as a flower vase. These could fall over and the spilled liquid could lead
to severe damage to the unit or the risk of electric shock or fire.
• No open flames, such as burning candles, are permitted to sit on the unit.
• Foreign material, e.g. needles, coins, etc., should not be allowed to enter the unit.
• If any foreign material or liquid enters the unit, disconnect the plug from the socket immediately. Get the unit checked by a specialist
before starting to use it again. Failure to do this will leave you at risk of receiving an electric shock!
Safety instructions for repairs and servicing
• Never attempt to repair a defective unit yourself. Always contact one of our authorised customer service representatives.
• Always leave maintenance to a qualified technician. Failure to do this will put you and others in danger.
• Never open the unit under any circumstances – this should only be undertaken by a specialist.
• Do not open the housing. Doing so will put you at risk of receiving an electric shock!
• Making modifications to the appliance is prohibited.
• Do not continue to use the appliance and/or accessories if they are damaged.
• Use only appropriate cleaning agents (antistatic) to clean the unit and the records. These are available from your specialist retailer.
Safety instruction for operating the turntable
• Do not listen to music or radio broadcasts at very high volumes. Doing so can cause lasting damage to your hearing.
• This appliance should only be operated by a competent owner or persons under direct supervision of the owner or who are deemed by the
owner to be competent to do so.
Intended use and application
The appliance is intended for playing vinyl records. The appliance is designed for use in a private home and is not suitable for commercial use.
Use of any other kind is classed as other than intended and may result in damage to property or even personal injury. The manufacturer accepts
no liability whatsoever for loss or damage arising from use of the appliance in a manner other than that intended.
Before using the appliance for the first time, please read through the safety and installation instructions carefully. Only by doing so will you be
able to use all functions safely and reliably. Keep the installation instructions in a safe place and pass them on to any subsequent owner.
Page 17
17
List of contents / Packing instructions
Unpacking
1) First, remove the appliance and all associated parts from the packaging.
2) Remove all adhesive tapes.
3) Ensure that all listed components are present:
Note:
• The small components are in the side compartments of the polystyrene packaging sections!
• Do not throw the stylus guard for the needle away!
• Retain the packaging for any possible future transportation!
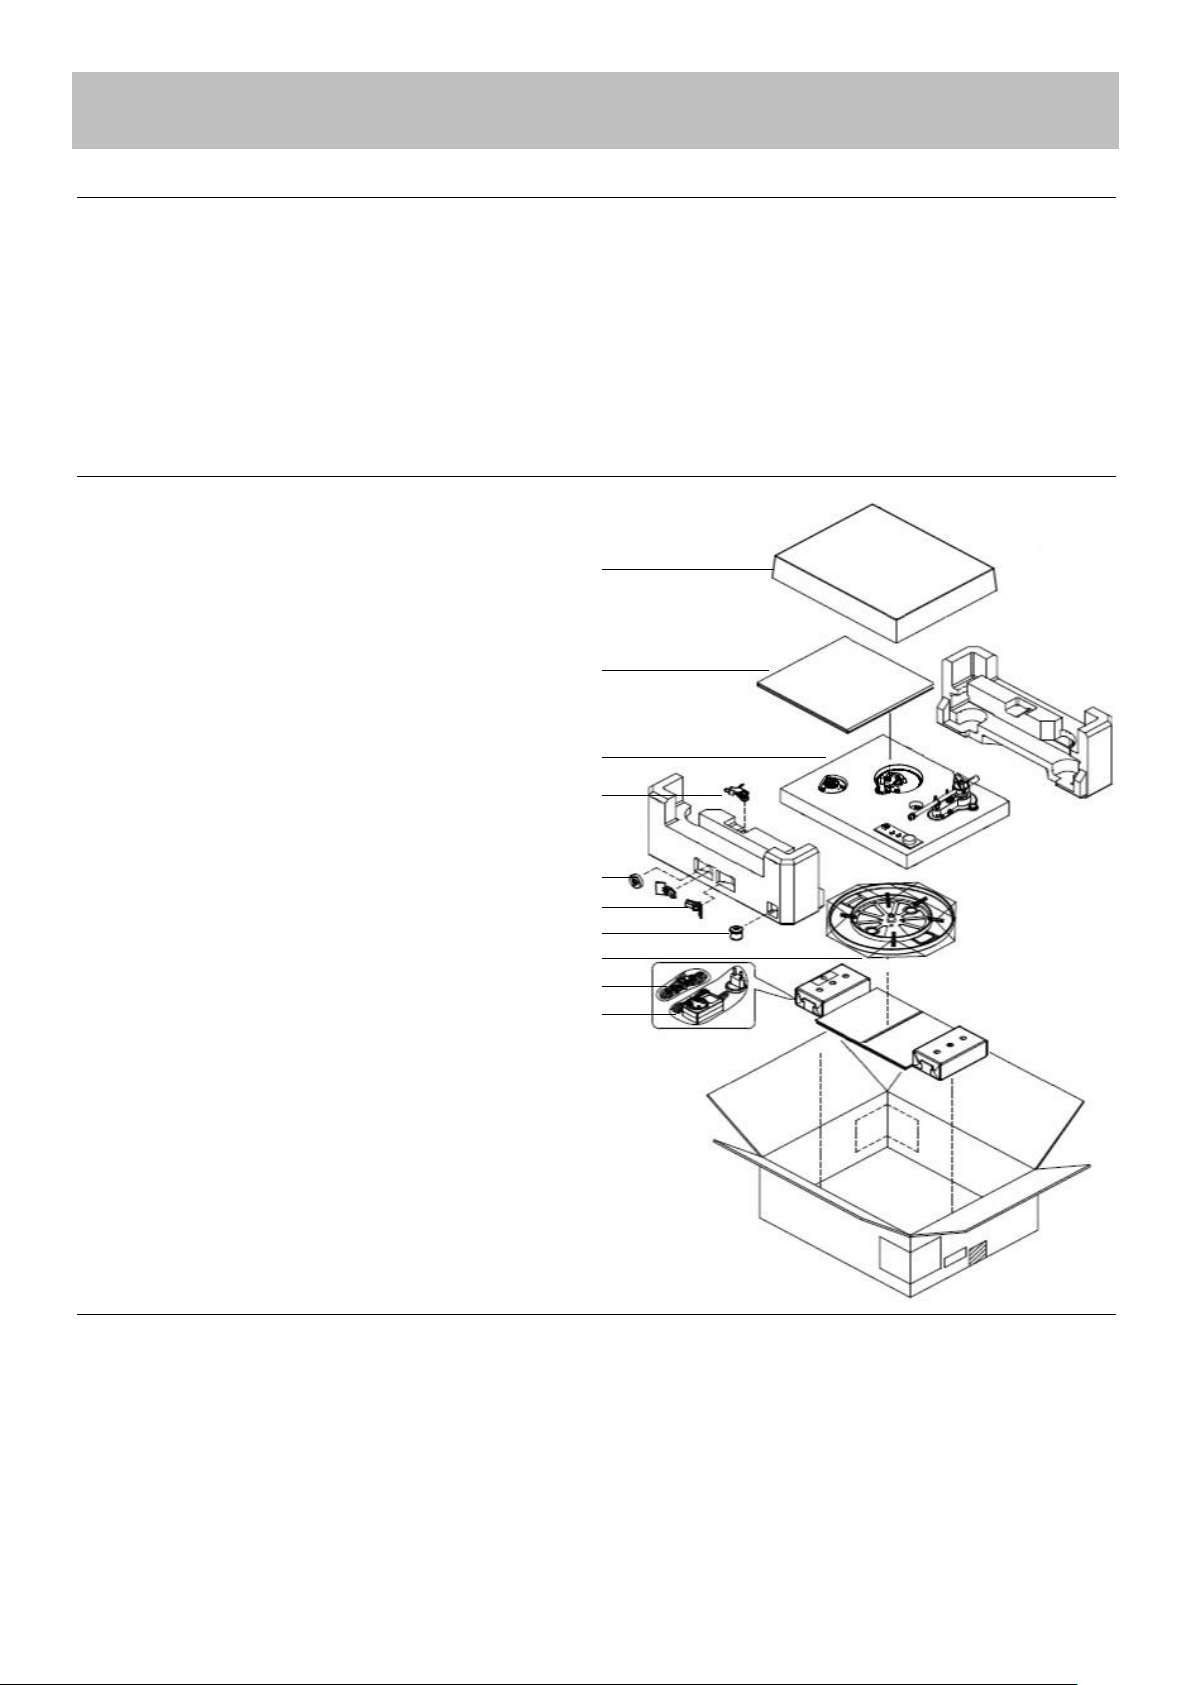
List of contents
1. Dust cover,
2. Platter mat,
3. Record player,
4. Headshell with phono cartridge,
5. Spindle adaptor (for 7” EPs),
6. 2 hinges for the dust cover,
7. Counterweight,
8. Platter including belt,
9. Coaxial stereo audio cable.
10. Power supply for connecting to the main supply,
Note:
If any of these elements are missing,
please contact the supplier.
Repacking
1) Repack all component parts in the corresponding, original packaging.
2) The counterweight must be dismantled and stowed in one of the polystyrene sections (fixed securely with sticky tape)
3) Remove the turntable platter. (Never transport the record player with the platter in position)
4) Secure the stylus with the protective cover for the needle and remove headshell.
5) Attach the tonearm securely to the tonearm rest.
6) Ensure that none of the small parts or associated packaging can move inside the cardboard box.
Note:
For further information, please go to www.dual.de
1 2 3 4 5
6 7 8
9
10
Page 18
18
Product overview
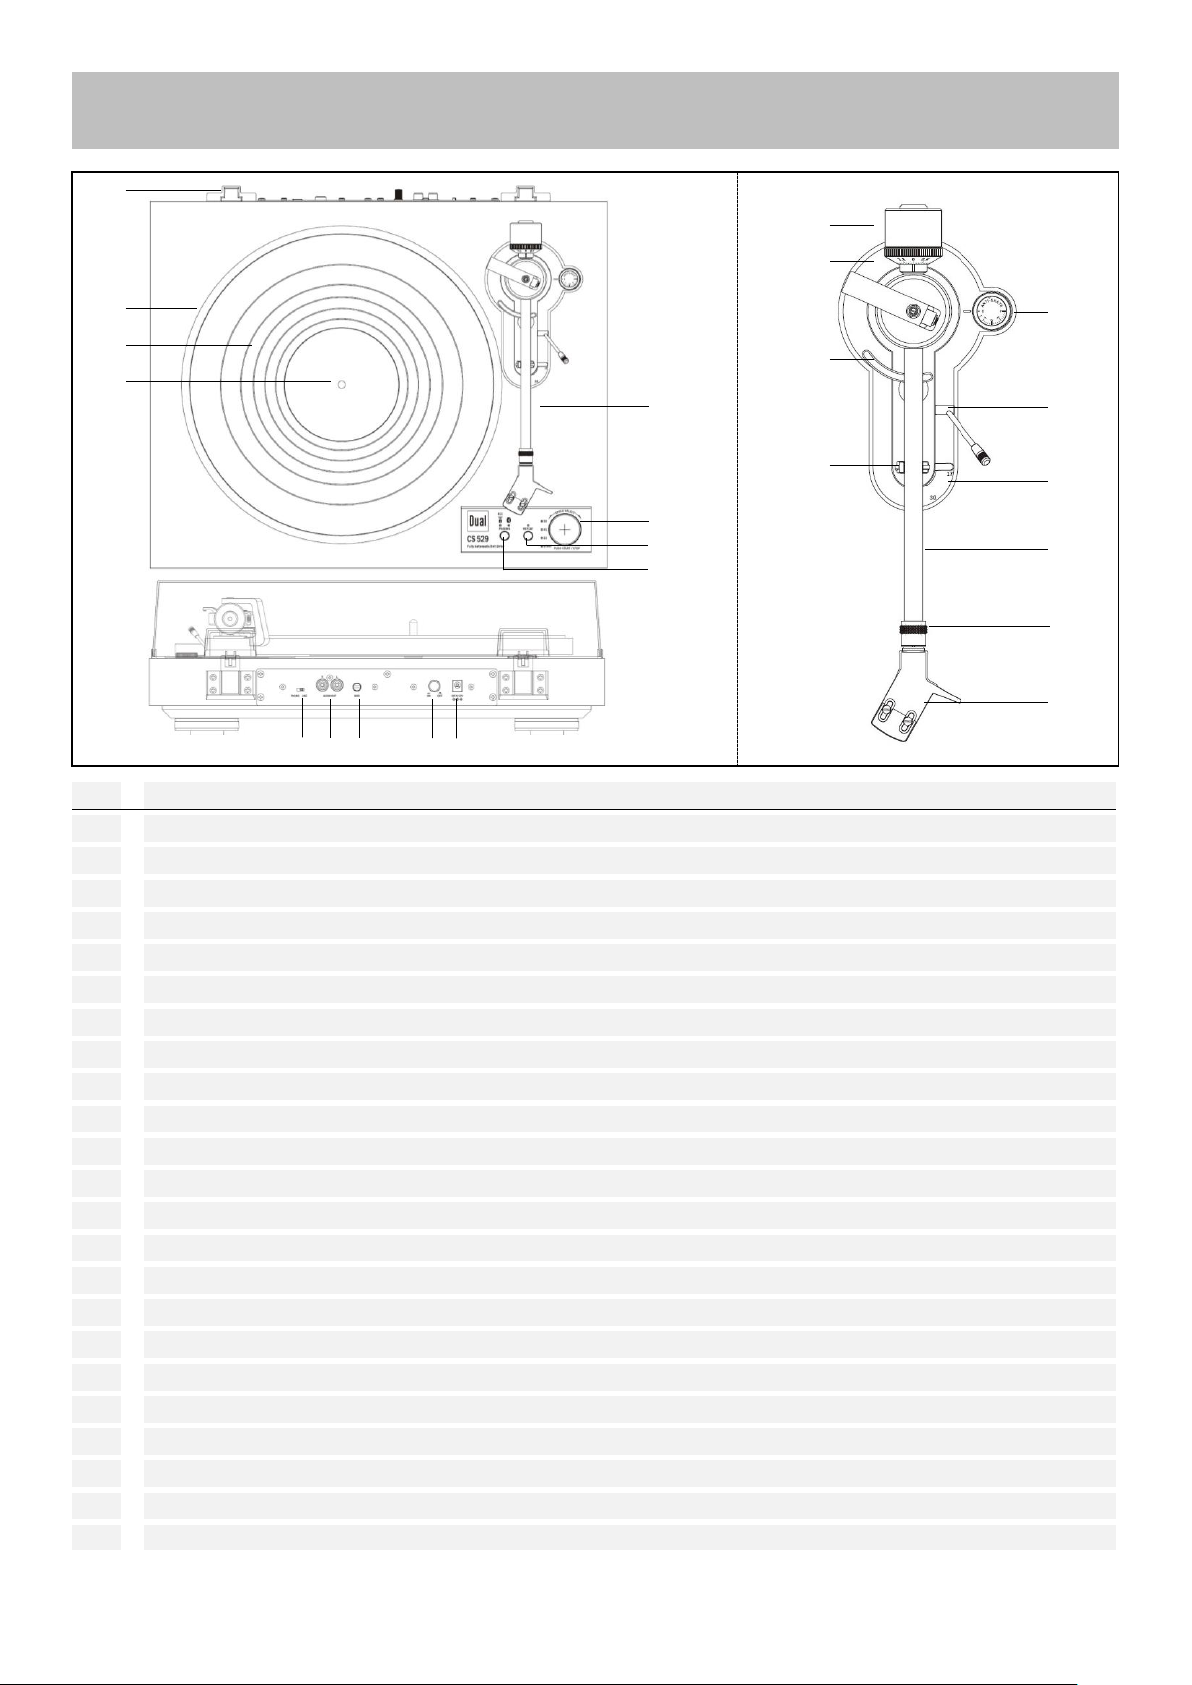
Nr Description
1 Dust cover hinges (2×)
2 Platter
3 Platter mat
4 Platter bearing
5 PHONO / LINE Switch
Phono-preamp on-/off
6 RCA-Audio-Output R / L
red - right channel, white - left channel
7 GND: Ground connection
8 Power switch
ON / OFF
9 DC IN: 12 V-Input for Power supply
10 Bluetooth control
11 Repeat
12 Start / Stop & Speed selector
33, 45, 78
13 Tonearm
14 Counterweight
15 Tracking force dial
16 Tonearm lift
17 Tonearm rest with safety fasterner
18 Anti-Skating-Adjustment
19 Tonearm lift lever
20 Lever record size
17, 30
21 Tonearm
22 Union nut
23
Headshell
16
15
14
13
17
18
19
21 2223
12
1 2 3
4
11
20 5 6 7 9
8
10
Page 19
19
Set Up
Platter and belt installation
The record player is delivered with the drive belt already fitted around the turntable flange.
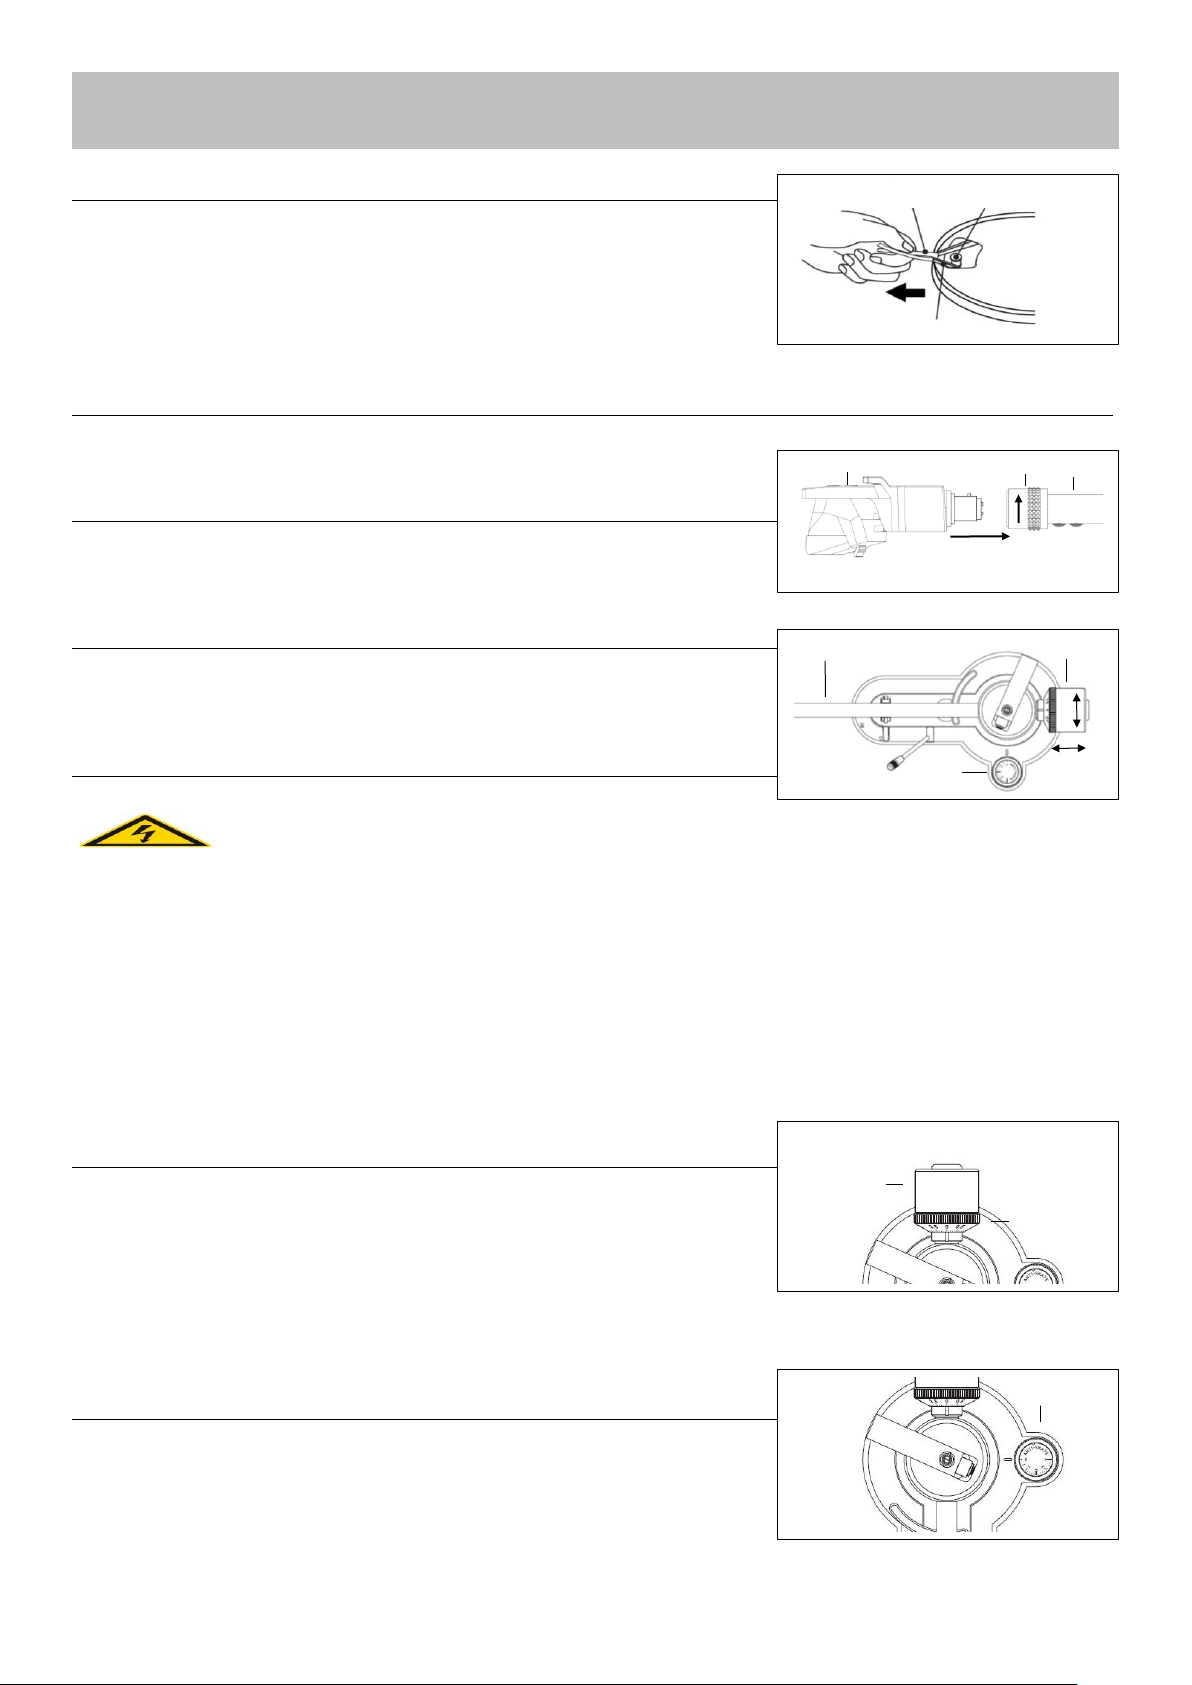
The belt is provided with a red tape so that it can be pulled over the drive motor pulley. (pic. 1)
1. Place the platter on the turntable spindle. Rotate the platter until the cut-out
is positioned over the motor pulley (at about the 8 o'clock position).
2. Using the red tape, pull the drive belt over the motor drive pulley and position
it in the centre of the pulley. Then remove the red tape.
3. Now place the turntable mat on the platter.
Tonearm
The tonearm is secured at the tonearm rest with a coated wire and the safety clip.
Remove and discard the coated wire and open the safety clip to play the record.
Fitting the headshell
Fit the removable headshell onto the tonearm as described below: (pic. 2)
1. Place the headshell (1) into the socket (2) at the end of the tonearm (3).
2. Hold the headshell, while turning the socket (2) in the direction of the arrow.
Counterweight fitting
Fit the supplied counterweight (2) onto the tonearm (1) by screwing it on from behind.
Keep the dial facing forward. The counterweight is used to set the correct tracking force
for the pick-up. (pic. 3)
Balancing the tonearm
Damage to the stylus
Ensure that the stylus does not come in contact with
the platter mat, or any other part of the turntable.
1. Place the turntable on an even horizontal surface.
2. Remove the stylus guard (page 20).
3. Lower the tonearm lift via the tonearm lift lever.
4. Position the tonearm in between the platter and the tonearm rest. (not resting on the stylus)
5. Turn the anti-skating dial (3) to „0” (pic. 3).
6. Turn the counterweight (2) backwards or forwards until the tonearm reaches a horizontal balance.
7. Place the balanced tonearm back onto the tonearm rest and secure it with the clip.
8. (Pic 4) Hold the counterweight (1) in position while turning the tracking force dial (2) to „0“ (12 o’clock position).
Tracking force
The tracking force needs to be adjusted according to the installed pick-up. (pic. 4)
1. Adjust the entire counterweight (1) including the scale to the required weight (2).
2. The tracking force weight can be read from the scale.
Note:
The recommended force / weight for the supplied pick up is between 1,6 g and 2,0 g.
If in doubt, please consult the pick-up manufacturer for recommended values.
Anti-Skating-adjustment
The skating force pulls the tonearm towards the centre of the platter. This increases the
pressure on the inside wall of the groove. The ANTI-Skating force compensates
this movement and ensures the ideal tracking of the stereo information on the vinyl.
• Set the Anti-skating dial (1) to the same value setting as the tracking force. (pic. 5)
Pic. 2
Pic. 3
Pic. 4
Pic. 5
Tape Motorpully
Belt
Pic. 1
1
2 1
2
3
1
1
2
3
Page 20
20
Set Up
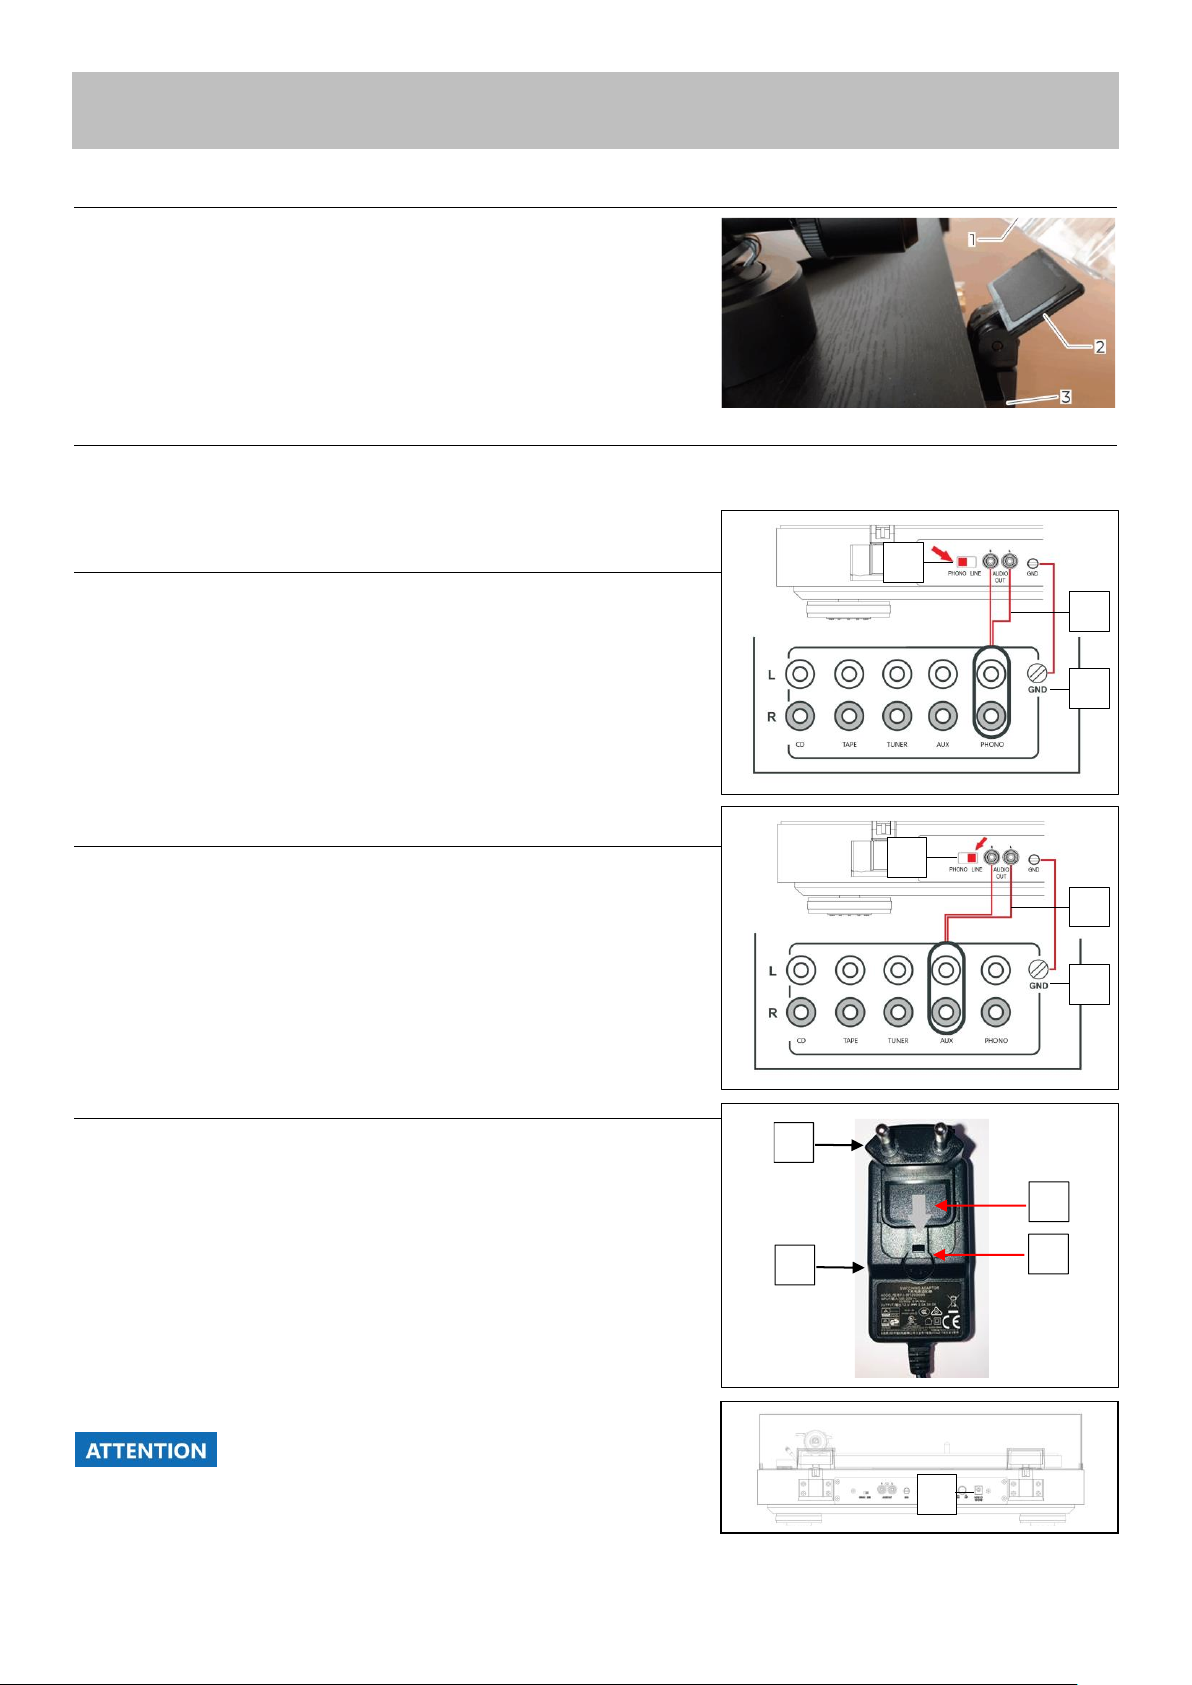
Dust cover fitting
1. Slot both hinges (2) into the housings (3) in the back of the turntable.
2. Uniformly push the right and left dust cover (1) receptacles onto the hinges
Connection to amplifier
The turntable comes with a built-in phono pre-amplifier. It can be either connected to the phono input or the line input at the amplifier.
The built-in phono stage can switched on or off via a switch in the back of the turntable.
Phono-input
1. Connect the RCA cable to the Audio output „AUDIO OUT” (2) at the turntable
and the PHONO input sockets at the amplifier.
2. Move the switch (1) into the position: PHONO.
3. Connect the ground connection GND (3) with the amplifier to avoid noise.
Note:
Ensure the correct connection of the cable.
(red = right channel, white = left channel)
Select “Phono MM” on the amplifier, if available
Line-input
1. Connect the RCA cable to the Audio output „AUDIO OUT” (2) at the turntable
and the LINE / AUX input sockets at the amplifier.
2. Move the switch (1) into the position: LINE.
3. Connect the ground connection GND (3) with the amplifier to avoid noise.
Note:
Ensure the correct connection of the cable.
(red = right channel, white = left channel)
Connection to power supply
Different adapter plugs (1) are included with the product. Find the specific adapter
relevant to your country and socket system. Fit it to the power supply (2).
1. Fit the socket adapter into the power supply and twist in the direction
of the arrow (A).
2. Check that the adapter is locked correctly (B).
3. Plug the power supply into a power socket (C).
Note:
Only use a factory supplied or approved power supply.
Damage to the turntable!
Incorrect voltages can damage the product. Ensure that
the mains voltage is within the stated specification.
C
1 2 A
B
3
2 1 3
2
1
Set Up
Page 21
21
Operating the turntable
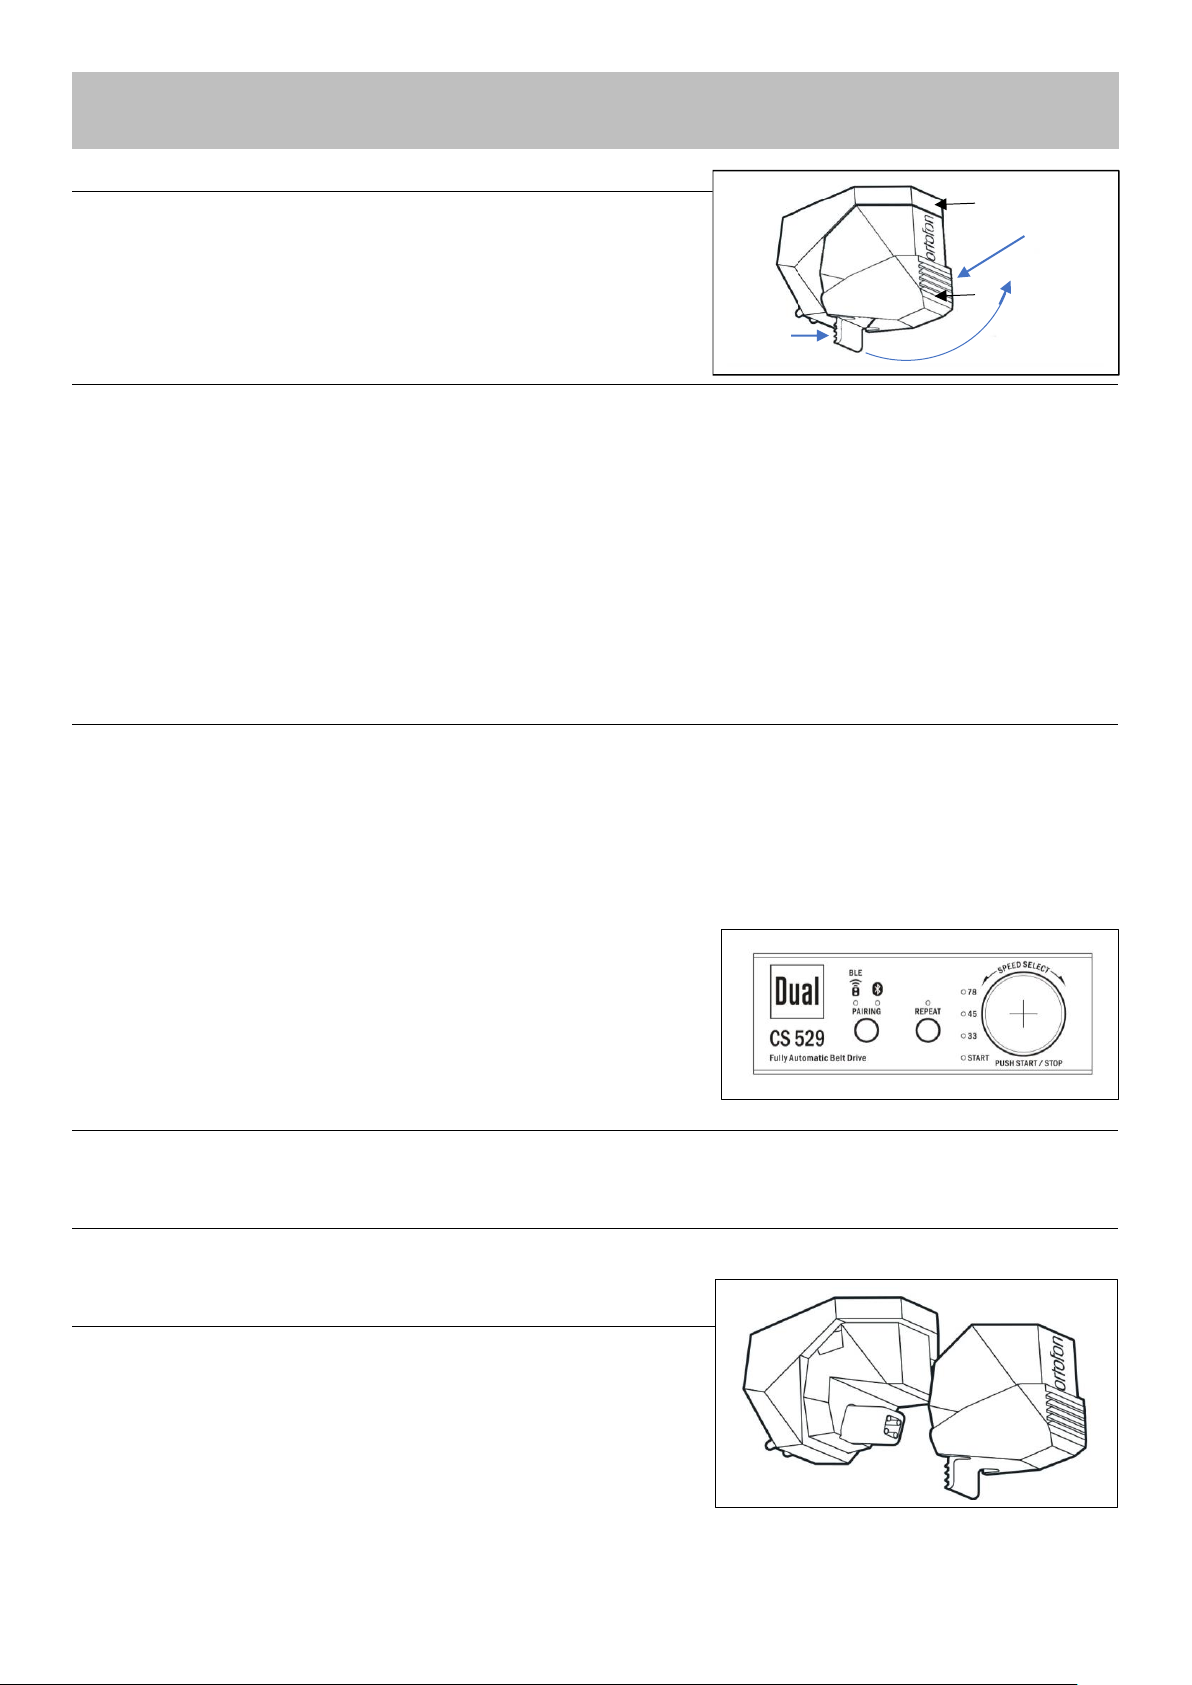
Removing / Attaching the stylus protection cap
Remove the stylus protection cap from the pick-up (1) prior to playing a record. (Pic.1)
1. Push the stylus cap (2) on the bottom (B) as seen in the diagram.
Hold in position (A) while move it up in circular motion (C).
2. Replace the cap after playing the record.
To play the record (manually)
1. Push the power button (8). The LEDs for Bluetooth and “33” will light up red and blue (Pic.2).
2. Place a record on the turntable, use the spindle adaptor to play singles.
3. Turn the speed selector (12) to the required setting: 33, 45 or 78. The selected speed will be indicated via the LED.
4. Release the safety fastener on the tonearm rest and raise the tonearm with the lift lever.
5. Carefully move the tonearm away from the tonearm rest and position it above the first groove on the record. The platter is turning.
6. Lower the tonearm with the lift lever.
7. The tonearm will return to the tonearm rest automatically at the end of the record and the motor will switch off.
8. The motor will switch off automatically when the tonearm is manually returned to the tonearmrest.
9. Secure the tonearm with the safety fastener on the tonearm rest.
10. After 30 minutes of rest (the factory setting can be changed), the unit switches to stand-by mode. The “Start” LED lights up red.
Note:
The tonearm can be raised at any point, even for short periods. The platter will continue to turn.
To play the record (automatically) Pic.2
1. Push the power button (8). The LEDs for Bluetooth and “33” will light up red and blue. (Pic.2)
2. Place a record on the turntable, use the spindle adaptor to play singles and select the record size (20).
3. Turn the speed selector (12) to the required setting: 33, 45 or 78. The selected speed will be indicated via the LED.
4. Release the safety fastener on the tonearm rest and press the START-STOP button (12).
5. The platter will start turning and the arm will move towards the first groove and will be lowered onto the record. The green “Start” LED will
flash during the operation and glow permanently during operation.
6. Stop the operation with the START-STOP button (12). The tonearm will return to the tonearm rest automatically. The “Start” LED will flash.
7. The tonearm will return to the tonearm rest automatically at the end of the record and the motor will switch off.
8. The motor will switch off automatically when the tonearm is manually returned to the tonearmrest.
8. Secure the tonearm with the safety fastener on the tonearm rest.
9. After 30 minutes (setting can be changed) of rest, the unit switches to stand-by mode.
The “Start” LED lights up red.
Note:
No automatic function for records with 25cm (10”) diameter!
The tonearm can be lifted at any time during the automatic playback process.
To set the speed
The exact speed is fixed through an internal processor. There is no further adjustment.
Repeat function
Press the “Repeat” button (Pic. 2) to repeat the playback at the end of the record.
Replacing the stylus
The stylus is naturally exposed to wear and tear by the playback process.
Therefore, we recommend regular inspections.
1. Remove the stylus by pulling diagonally downwards. (Pic. 3)
2. Insert the stylus by doing the performing the reverse action.
Note:
Worn or damaged (splintered) styluses ruin records.
When you need to replace a stylus, use the original type if possible.
1
A- Hold
C- Move
B-Push
2
Pic. 1
Pic. 2
Pic. 3
Page 22
22
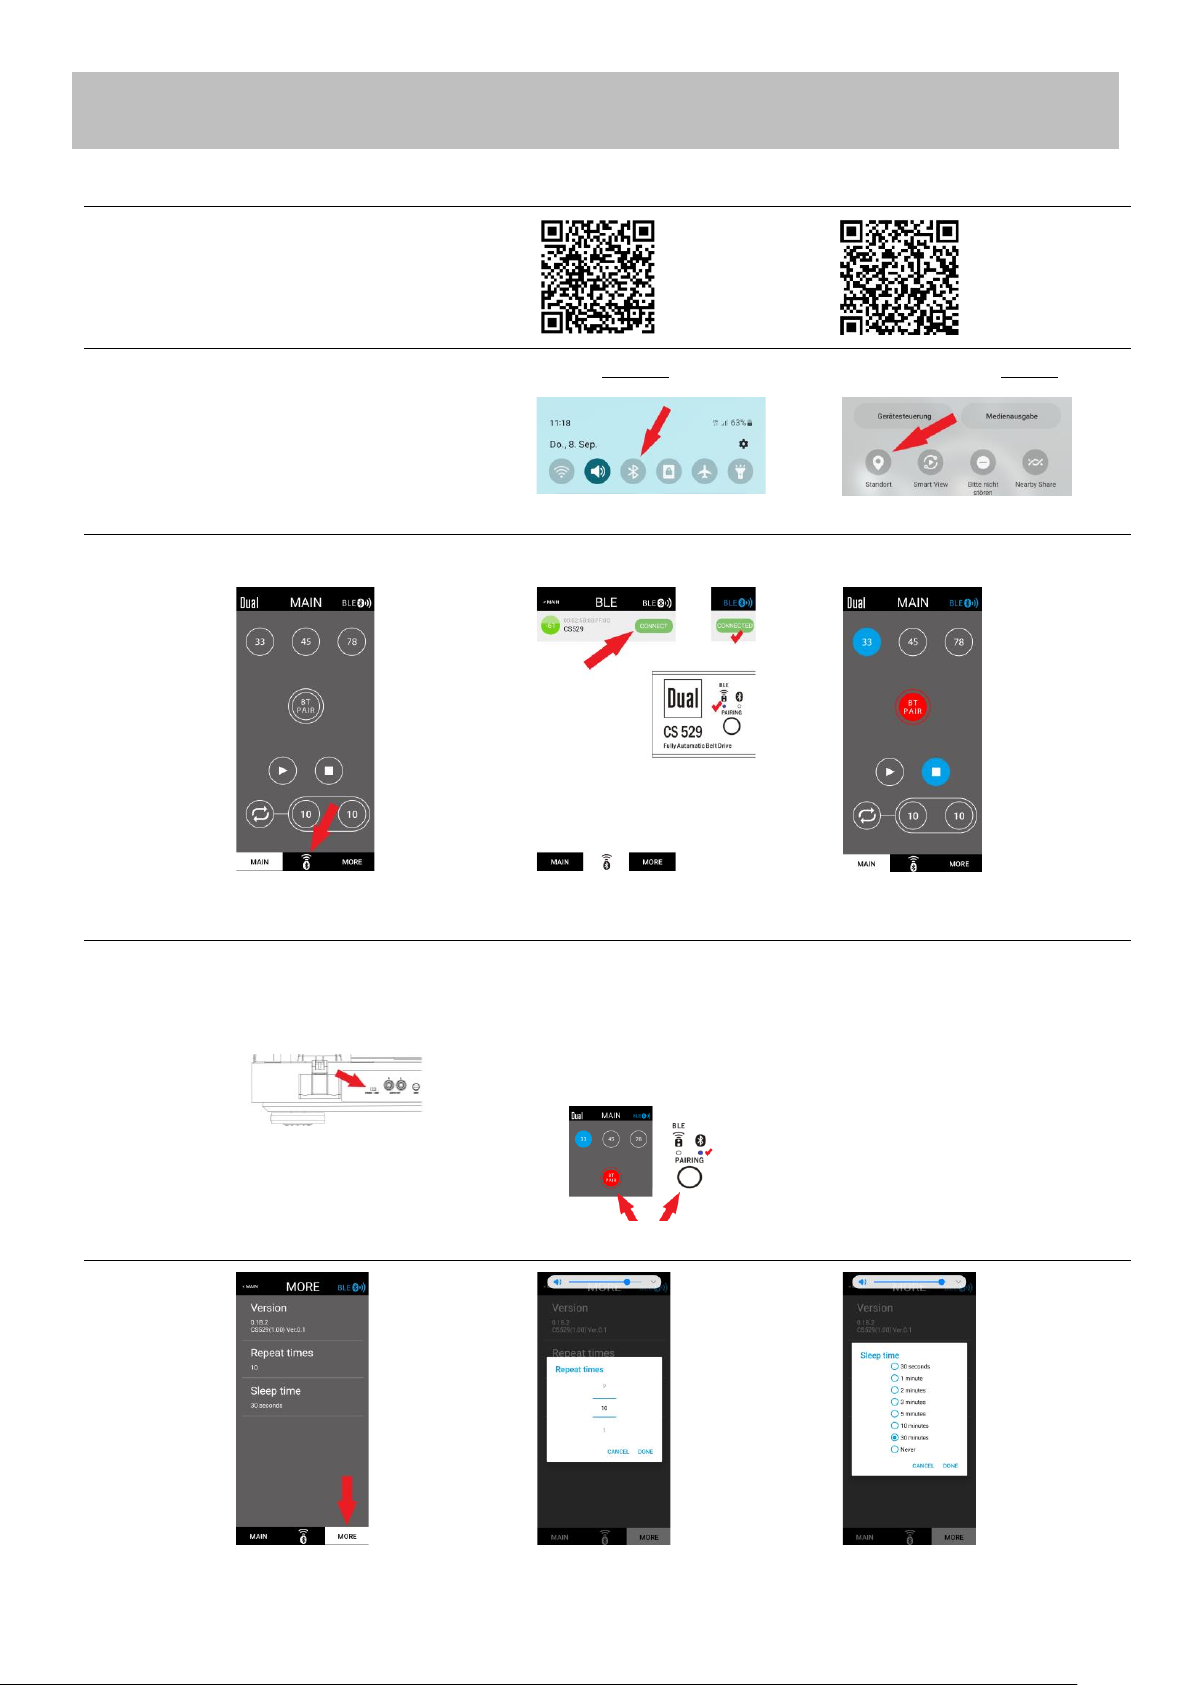
Operating Bluetooth
Install App on Mobile Device
Android: Apple:
Play Store App Store
Mobile Devise Settings
Connect the Remote-Control Function
Connect with Loudspeaker / Headphone
Settings: Repeat times / Stand-by time
Open the BLE-Menu
1) Enable Bluetooth.
2) Android only: Enable Location.
Press Connect
Ready = Status is indicated
Enable Bluetooth „Pairing“ on
the loudspeaker / headphone.
Select „Line“ on the turntable.
Recognise new receiving device
- Press the „Pairing“ button twice on the
mobile device, or the turntable.
- The LED and screen button will flash
red and blue while connecting.
- The LED and screen button remain lit
when connected.
Pairing existing receiving devise
- Press the „Pairing“ button once on
the mobile device, or the turntable.
- The LED and screen button will flash
blue while connecting.
- The LED and screen button remain lit
when connected.
Page 23
Cleaning & Troubleshooting
Cleaning stylus and record
Clean the stylus and record prior to every record played. That minimises premature wear and tear.
Damage to components!
1. Carefully wipe the stylus brush in a front to back motion under the stylus.
2. To clean a record, use a carbon fibre brush to wipe gently and diagonally over the record.
Note:
Brushes and accessories are available in the Dual shop: www.dual.eu
Cleaning the record player
Danger – Electric shock!
To avoid the danger of an electric shock, you must not clean the unit with a wet cloth or under running water.
Pull the power plug prior to any cleaning.
ACHTUNG
Damage to components!
Do not use any scrubbing sponges, cleaning powder or solvents such as alcohol and petrol. To clean the
appliance and the records, only use cleaning agents that are specifically designed for the purpose (antistatic).
Troubleshooting
If the unit does not function as intended, perform checks using the following tables.
If the malfunction cannot be fixed even after these checks, please contact the manufacturer.
Spare parts & Accessories
Spare parts and accessories are available from Dual: www.dual.eu
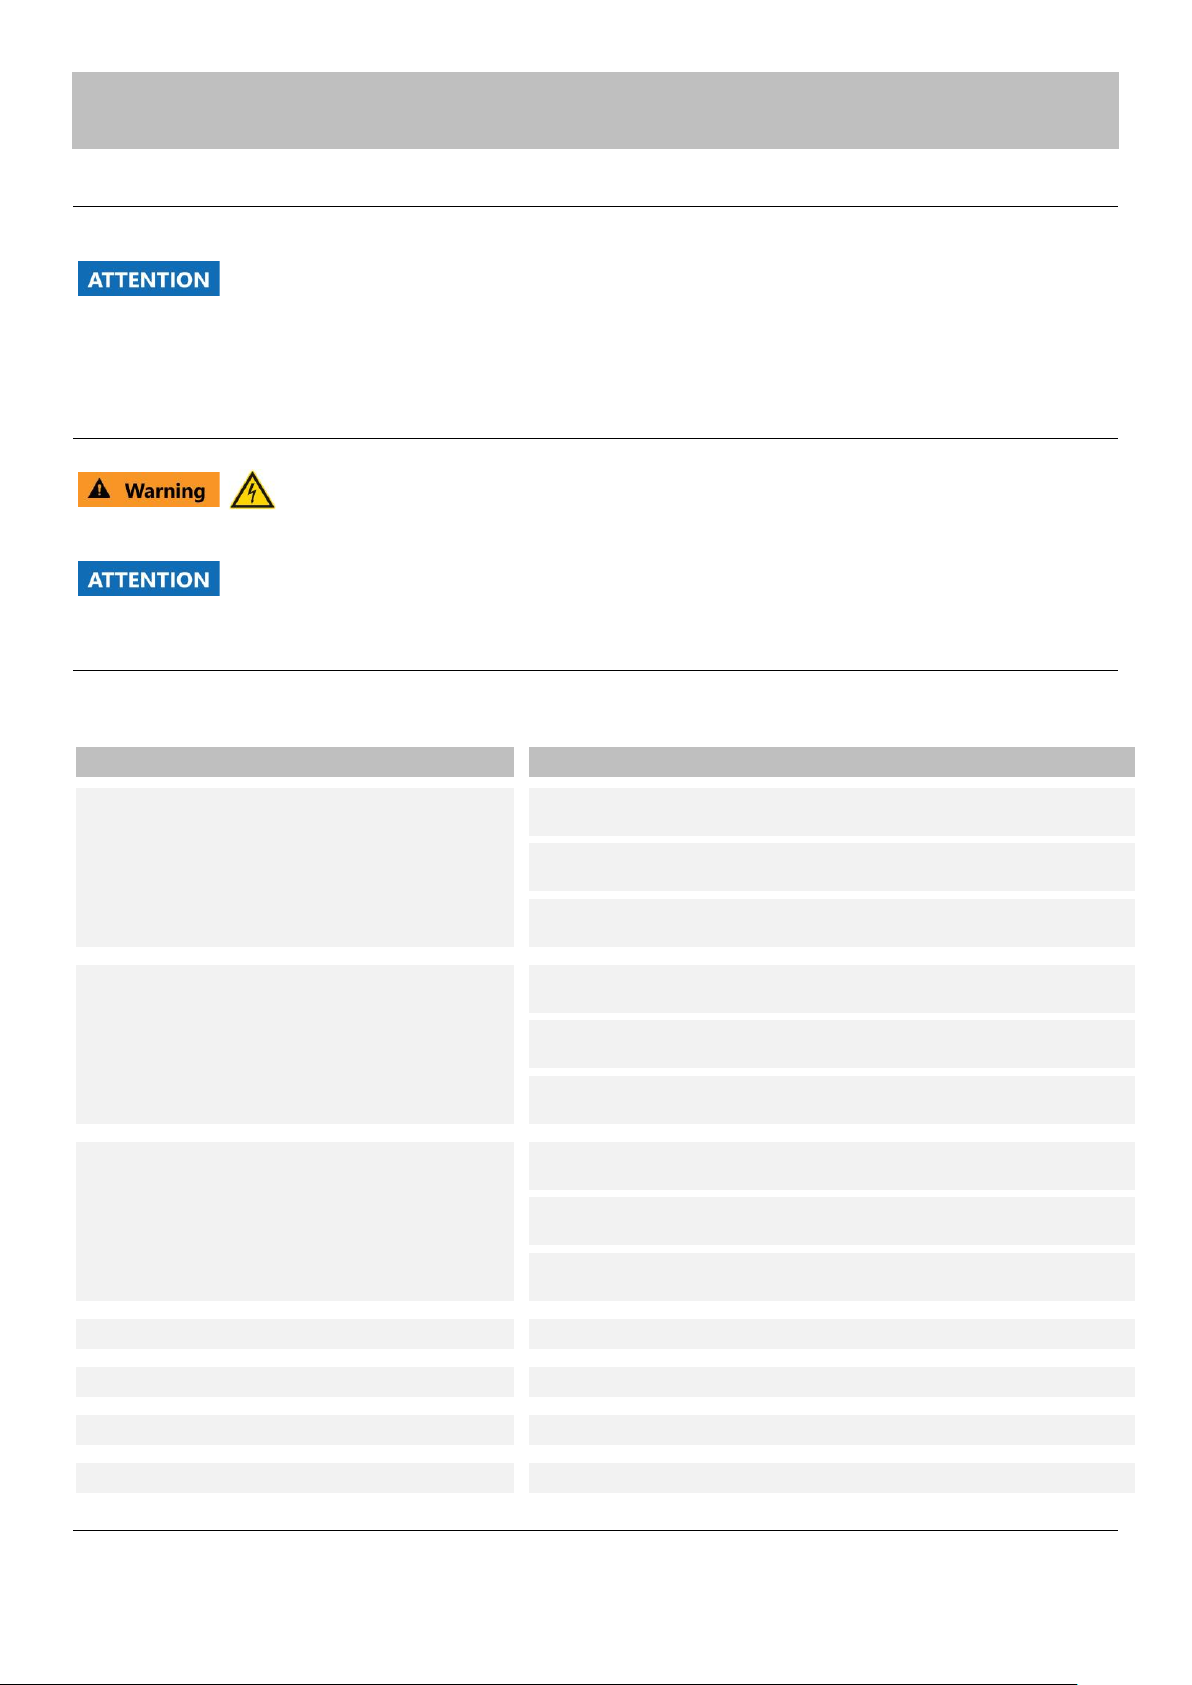
Symptom - Possible causes
Solutions
The tone arm skips grooves, slides over the record or
does not move.
• The record player is not sitting horizontally. Place the record player on a
horizontal base support.
• The record is dirty or scratched. Clean the record with a record cleaner or
change the record.
• The stylus pressure of the tone arm may be too low. Adjust the stylus pressure
and check the anti-skating setting.
Poor sound quality, loud static noise, sound dropouts,
etc.
• The stylus is dirty or worn. Clean the stylus with a brush.
• The stylus may be defective. If necessary, change the stylus.
• The record is dirty or dusty. Clean the record with a record cleaner.
The sound is too quiet or loud and distorted.
• The record player is not connected to the correct amplifier input.
• The internal phono pre-amp is set to the wrong setting. Change the switch
setting in the back of the turntable.
• Consult the manual setting: Set up - Connection to amplifier
The sound drones or the pitch is inconsistent.
The drive belt is too loose and must be replaced.
The app does not respond
• Close the app and restart
Speakers or headphones do not pair
• Check the instructions of the receiving device for pairing
Bluetooth is paired, but there is no sound
• Switch the record player output from "Phono" to "Line
23
Page 24

FCC statement in User’s Manual (for class B) -for FCC 15b devices (15.105)
Federal Communication Commission Interference Statement
This equipment has been tested and found to comply with the limits for a Class B digital device, pursuant to part 15 of the FCC rules. These limits are designed to
provide reasonable protection against harmful interference in a residential installation. This equipment generates, uses and can radiate radio frequency energy and,
if not installed and used in accordance with the Instructions, may cause harmful interference to radio communications. However, there is no guarantee that interference
will not occur in a particular installation. If this equipment does cause harmful interference to radio or television reception, which can be determined by turning the
equipment off and on, the user is encouraged to try to correct the interference by one or more of the following measures:
‐ Reorient or relocate the receiving antenna.
‐ Increase the separation between the equipment and receiver.
‐ Connect the equipment into an outlet on a circuit different from that to which the receiver is connected.
‐ Consult the dealer or an experienced radio/TV technician for help.
FCC/IC Caution:
1. This device complies with Part 15 of the FCC rules/ Industry Canada licence‐exempt RSS standard(s).
Operation is subject to the following two conditions:
1) this device may not cause harmful interference and
2) this device must accept any interference received, including interference that may cause undesired operation.
2. This Transmitter must not be co-located or operating in conjunction with any other antenna or transmitter.
3. Any changes or modifications not expressly approved by the party responsible for compliance could void the user's authority to operate this equipment.
IMPORTANT NOTE: (For Mobile Device Configuration)
FCC Radiation Exposure Statement:
This equipment complies with FCC RF radiation exposure limits set forth for an uncontrolled environment.
This equipment should be installed and operated with a minimum distance of 20 centimeters between the radiator and your body.
ICES-003
This Class B digital apparatus complies with Canadian ICES‐003.
Cet appareil numérique de la classe [B] est conforme à la norme NMB‐003 du Canada.
Industry Canada Caution:
This device complies with Industry Canada license-exempt RSS standard(s).
Operation is subject to the following two conditions:
(1) this device may not cause interference, and
(2) this device must accept any interference, including interference that may cause undesired operation of the device.
Le présent appareil est conforme aux CNR d'Industrie Canada applicables aux appareils radio exempts de licence.
L'exploitation est autorisée aux deux conditions suivantes:
(1) il ne doit pas produire de brouillage et
(2) l’ utilisateur du dispositif doit étre prêt à accepter tout brouillage radioélectrique reçu, même si ce brouillage est susceptible de compromettre le fomctionnement
du dispositif.
IC Déclaration sur la radioexposition : (Pour la configuration du périphérique mobile)
Cet équipement est conforme aux IC RSS-102 des limites d'exposition aux rayonnements définies pour un incontrôlée environnement.
Cet équipement doit être installé et utilisé à une distance minimum de 20 cm entre le radiateur et votre corps.
 Loading...