

Page 1

Strona główna » Dual » Dual CS 418 Belt Drive Manual Gramofon Instrukcja
obsługi
zawartość
1 Dual CS 418 Napęd pasowy Gramofon ręczny
2 Dane techniczne
3 Wstęp
4 Utylizacja opakowań
5 Instrukcje bezpieczeństwa
6 Spis treści / Instrukcje pakowania
6.1 Spis treści
7. Ponowne pakowanie
8 Przegląd produktu
9. Konfiguracja
10 Wyważanie ramienia gramofonu
11 Obsługa gramofonu
12 Czyszczenie i rozwiązywanie problemów
13 Rozwiązywanie problemów
14 Dokumenty/zasoby
14.1 Odniesienia
15 Powiązanych Postów
Instrukcje+
⚙
Page 2
Dual CS 418 Pasek Napędowy Ręczny Gramofon
Dane techniczne
Silnik
Prowadzić
Silnik pasowy/prąd stały sterowany serwomech
anizmem
Ustawienia prędkości 33/45/78
Wow i trzepotanie < ±0,1 % (DIN WTD)
Ramię gramofonu
⚙
Page 3

Łożysko Łożysko kulkowe
Efektywna długość 221,5 mm
Kąt przesunięcia 25,6°
Zwis 19 mm
Typ wyważony statycznie z przeciwwagą
Zakres nacisku igły 0 do 4 gramów
Zakres wagi wkładu 5g do 9g
Pick-up zainstalowany fabrycznie Ortofon 2M Czerwony
Zamienny rysik Rysik Ortofon 2M czerwony
Talerz
Tworzywo Odlew aluminiowy
Mata Guma 2,5mm
Łożysko Hartowana stalowa wrzeciono, tuleja mosiężna
⚙
Page 4

Średnica 305 mm
Waga z matą 850 gramów
Cokół
Wykończenie powierzchni
Składana konstrukcja z płyty MDF z czarną oklei
ną winylową
Stopy Ø 62 mm / Element tłumiący z elastomeru
Połączenie Gniazdo RCA
Podłączenie do wejścia Phono TAK
Podłączenie do wejścia liniowego TAK
Wyjście cyfrowe X
Wymiar (zamknięta osłona przeciwpyłowa) Wymiary: 435 x 367 x 145 mm
Wymiar (otwarta osłona przeciwpyłowa) Głębokość: 415 mm / Wysokość: 400 mm
Waga 5,8kg
⚙
Page 5

Zasilacz
Odczyty wydajności wykonywano przy napięciu
wejściowym
230 V AC przy 50 Hz
Typ HK-CS-120A050-CP
Napięcie wejściowe 100 do 240 V prądu przemiennego
Częstotliwość 50/60 Hz
Napięcie wyjściowe 12 V prądu stałego
Prąd wyjściowy 0,5 A
Moc wyjściowa 6 W
Średnia wydajność podczas pracy ≥ 78,88%
Pobór mocy w stanie spoczynku < 0,1 W
Przedmowa
Niniejsza instrukcja obsługi pomoże Ci bezpiecznie obsługiwać gramofon. Przed użyciem
urządzenia przeczytaj uważnie tę instrukcję i uwagi dotyczące bezpieczeństwa oraz zachowaj je do
późniejszego wykorzystania. Upewnij się, że są dostępne dla innych użytkowników i przestrzegaj
wszystkich podanych tutaj informacji.
⚙
Page 6

Przeznaczeni użytkownicy niniejszej instrukcji obsługi
Niniejsza instrukcja obsługi przeznaczona jest dla wszystkich osób, które:
ustawia,
działa,
czyści
lub pozbywa się gramofonu.
Ostrzeżenia
Znaki ostrzegawcze w niniejszej instrukcji obsługi mają następującą strukturę:
Słowo „NIEBEZPIECZEŃSTWO” wskazuje na bezpośrednie zagrożenie życia!
Słowo „OSTRZEŻENIE” wskazuje na sytuację potencjalnie zagrażającą życiu lub nieodwracalne
obrażenia!
Słowo „OSTROŻNIE” wskazuje na możliwe zagrożenie odniesienia średnich lub lekkich
obrażeń!
The word „ATTENTION“ is pointing out potential damages to the product.
Note: provides useful or important information.
Directives and standards
This product conforms to:
the Low-voltage Directive (2014/35/EU),
the EMC Directive (2014/30/EU),
RoHS Directive 2011/65/EU,
ERP 2009/125/EC and
CE Marking Directive.
Disposal of packaging
„Danger“ through suffocation!
Keep the packaging and its parts out of the reach of children. Risk of suffocation from foil and
other packaging materials. Your new unit was protected on its way to you by the packaging. All
materials used are environmentally safe and can be recycled. Please help and dispose of the
⚙
Page 7

packaging in an environmentally responsible manner. To learn about current disposal methods,
contact your dealer or your local disposal facility.
Disposal of turntable
Old units are not simply waste. Valuable raw materials can be salvaged through environmentally
friendly disposal. For information about the correct and environmentally friendly disposal of your
unit, please contact your local council.
This unit is labelled according to 2002/96/EC, the Waste Electrical and Electronic Equipment
Directive (WEEE). This product must not be disposed of with normal household waste. Instead, it
must be deposited at a recycling station for electrical and electronic devices. The symbol on the
product and the instructions for use or the packaging indicate this. The materials can be recycled
in accordance with their marking. By re-using, recycling, or repurposing old units, you make an
important contribution to protecting our environment.
Safety instructions
Please read through all of the safety instructions carefully and keep them for questions that may
arise later. Always observe all warnings and instructions in this operating manual and on the rear
of the unit.
Safety instructions for using the power supply
The unit should only be connected to a mains voltage supply of 100- 240 V~, 50/60 Hz.
Never try to operate the unit with a different voltage.
Only use the supplied power supply or an original Dual alternative.
The mains plug should only be connected after installation has been completed according to
the instructions.
Use a suitable, easily accessible mains connection and avoid using multiple sockets!
This socket should be as close to the unit as possible.
Make sure the power cable or plug is always easily accessible so that the unit can be
disconnected quickly from the power supply!
Lay the mains cable in such a way that no one can trip over it and do not place any heavy
objects on the mains cable.
Fully insert the mains plug into the socket.
Do not touch the mains plug with wet hands—risk of electric shock!
f the mains plug of the unit is defective or if the unit shows other damage, it must not be
operated.
When unplugging the mains cable from the socket pull on the mains plug, not on the cable.
⚙
Page 8

Disconnect the mains plug from the socket if you do not intend to use the unit for a prolonged
period. Only pull on the plug itself.
In the event of malfunctions or smoke and odour coming from the housing disconnect the
mains plug from the socket immediately!
Before a thunderstorm sets in, disconnect the mains plug from the socket.
Safety instructions for the turntable placement
In order to avoid the risk of fire and electric shock, do not expose the unit to rain or moisture.
Prevent the unit from coming into contact with water or moisture.
The appliance should not be sited in rooms with high levels of humidity, e.g. kitchens,
bathrooms or saunas, or in the vicinity of swimming pools indoors or outdoors, as splashing or
the formation of condensation on the appliance may damage it.
Do not place any containers which contain a liquid on the unit, such as a flower vase. These
could fall over and the spilled liquid could lead to severe damage to the unit or the risk of
electric shock or fire.
No open flames, such as burning candles, are permitted to sit on the unit.
Foreign material, e.g. needles, coins, etc., should not be allowed to enter the unit.
if any foreign material or liquid enters the unit, disconnect the plug from the socket
immediately. Get the unit checked by a specialist before starting to use it again. Failure to do
this will leave you at risk of receiving an electric shock!
Safety instructions for repairs and servicing
Never attempt to repair a defective unit yourself. Always contact one of our authorised
customer service representatives.
Always leave maintenance to a qualified technician. Failure to do this will put you and others in
danger.
Never open the unit under any circumstances – this should only be undertaken by a specialist.
Do not open the housing. Doing so will put you at risk of receiving an electric shock!
Making modifications to the appliance is prohibited.
Do not continue to use the appliance and/or accessories if they are damaged.
Use only appropriate cleaning agents (antistatic) to clean the unit and the records. These are
available from your specialist retailer.
⚙
Page 9

Safety instruction for operating the turntable
Do not listen to music or radio broadcasts at very high volumes. Doing so can cause lasting
damage to your hearing.
This appliance should only be operated by a competent owner or persons under direct
supervision of the owner or who are deemed by the owner to be competent to do so.
Intended use and application
The appliance is intended for playing vinyl records. The appliance is designed for use in a private
home and is not suitable for commercial use. Use of any other kind is classed as other than
intended and may result in damage to property or even personal injury. The manufacturer accepts
no liability whatsoever for loss or damage arising from use of the appliance in a manner other
than that intended.
Before using the appliance for the first time, please read through the safety and installation
instructions carefully. Only by doing so will you be able to use all functions safely and reliably.
Keep the installation instructions in a safe place and pass them on to any subsequent owner.
List of contents / Packing instructions
Unpacking
1. First, remove the appliance and all associated parts from the packaging.
2. Remove all adhesive tapes.
3. Ensure that all listed components are present:
Note:
The small components are in the side compartments of the polystyrene packaging sections!
Do not throw the stylus guard for the needle away!
Retain the packaging for any possible future transportation!
List of contents
Record player,
2 hinges for the dust cover,
Dust cover,
Headshell with a phono cartridge
⚙
Page 10

Turntable platter including belt,
Turntable mat,
Counterweight,
Spindle adaptor (for 7” Eps),
Power supply for connecting to the main supply,
Co-axial stereo audio cable.
Note:
If any of these elements is missing please contact the supplier.
Repacking
1. Repack all component parts in the corresponding, original packaging.
2. The counterweight must be dismantled and stowed in one of the polystyrene sections (fixed
securely with sticky tape)
3. Remove the turntable. (Never transport the record player with the platter in position)
4. Secure the stylus with the protective cover for the needle and remove headshell.
5. Attach the tonearm securely to the tonearm rest.
6. Ensure that none of the small parts or associated packaging can move inside the cardboard
box.
Note:
For further information, please go to www.dual.de
⚙
Page 11
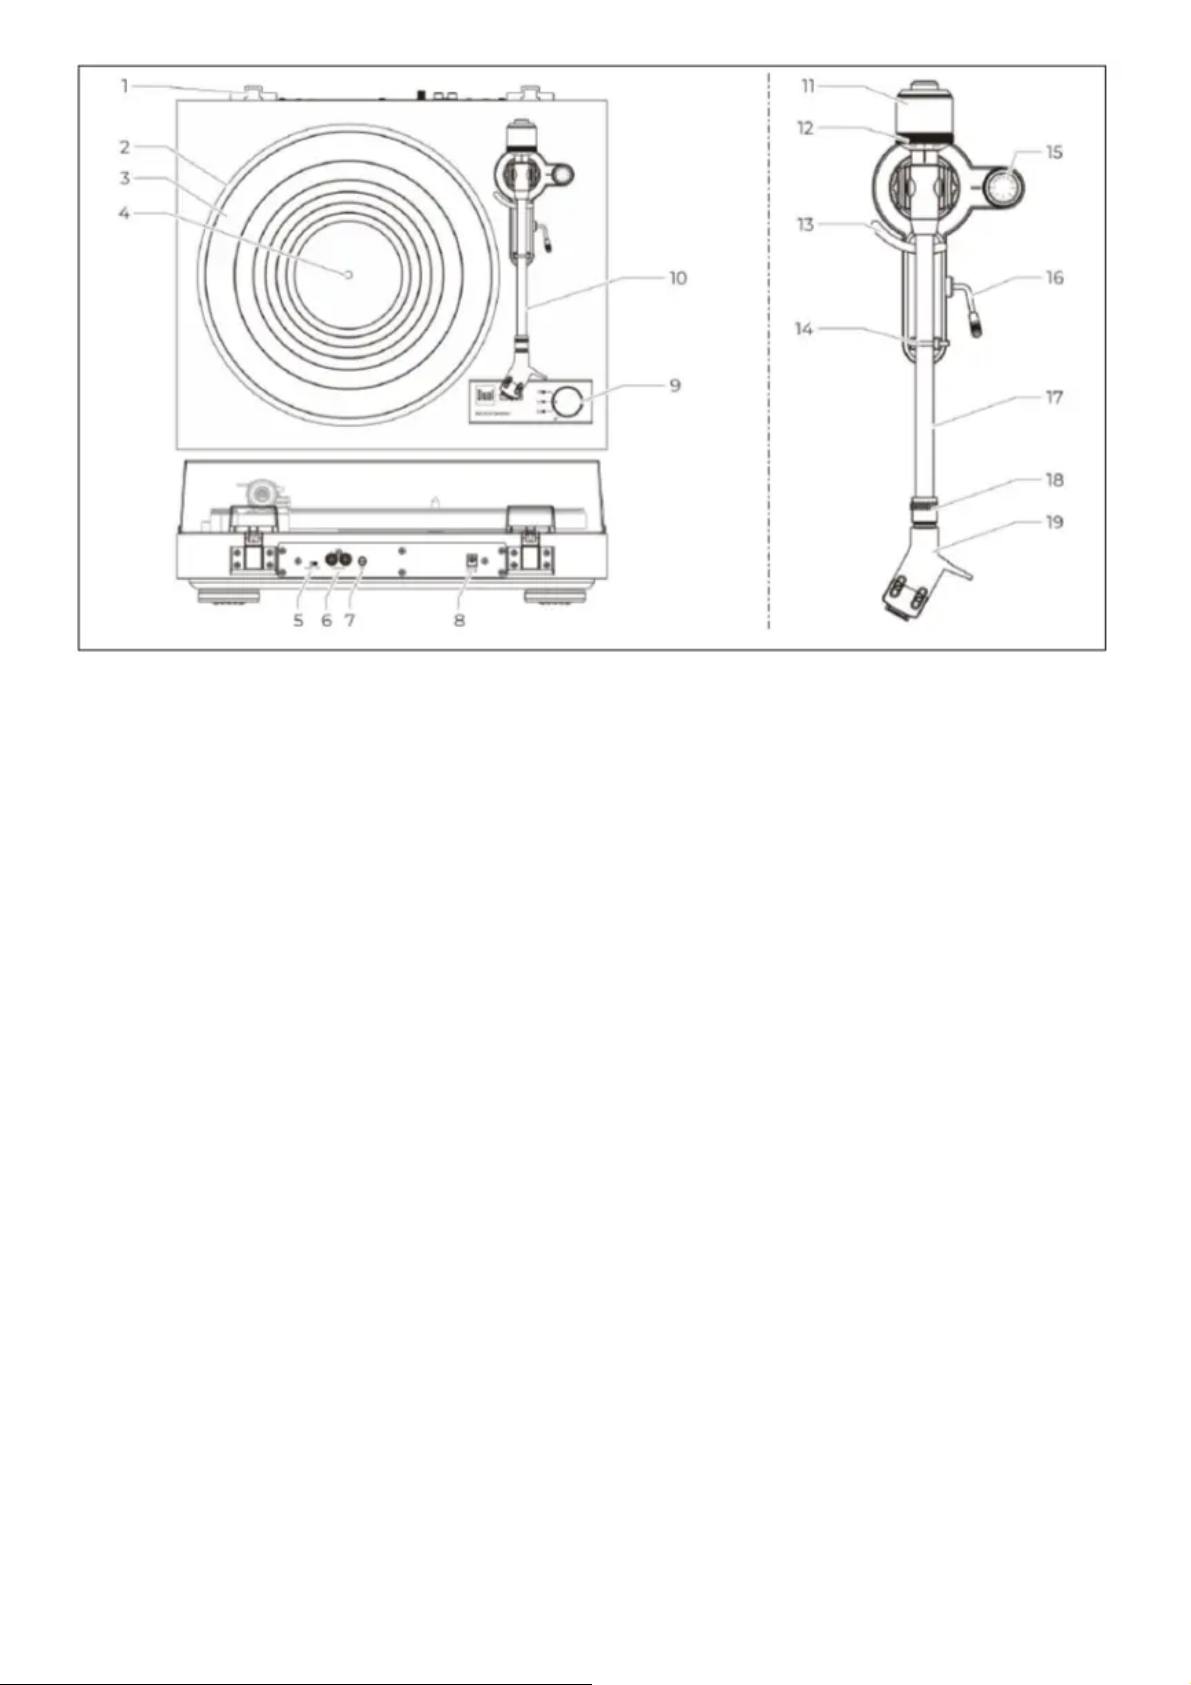
Product overview
Description
1. Dust cover hinges (2×)
2. Platter
3. Platter mat
4. Platter bearing
5. PHONO / LINE Switch Phono-preamp on-/off
6. RCA-Audio-Output R / L red – right channel, white – left channel
7. GND: Ground connection
8. DC IN: 12 V-Input for Power supply
9. Speed selector Off, 33, 45, 78
10. Tonearm
11. Counterweight
12. Tracking force dial
13. Tonearm lift
14. Tonearm rest with safety fasterner
15. Anti-Skating-Adjustment
16. Tonearm lift lever
17. Tonearm
18. Union nut
⚙
Page 12
19. Headshell
Set-Up
Platter and belt installation
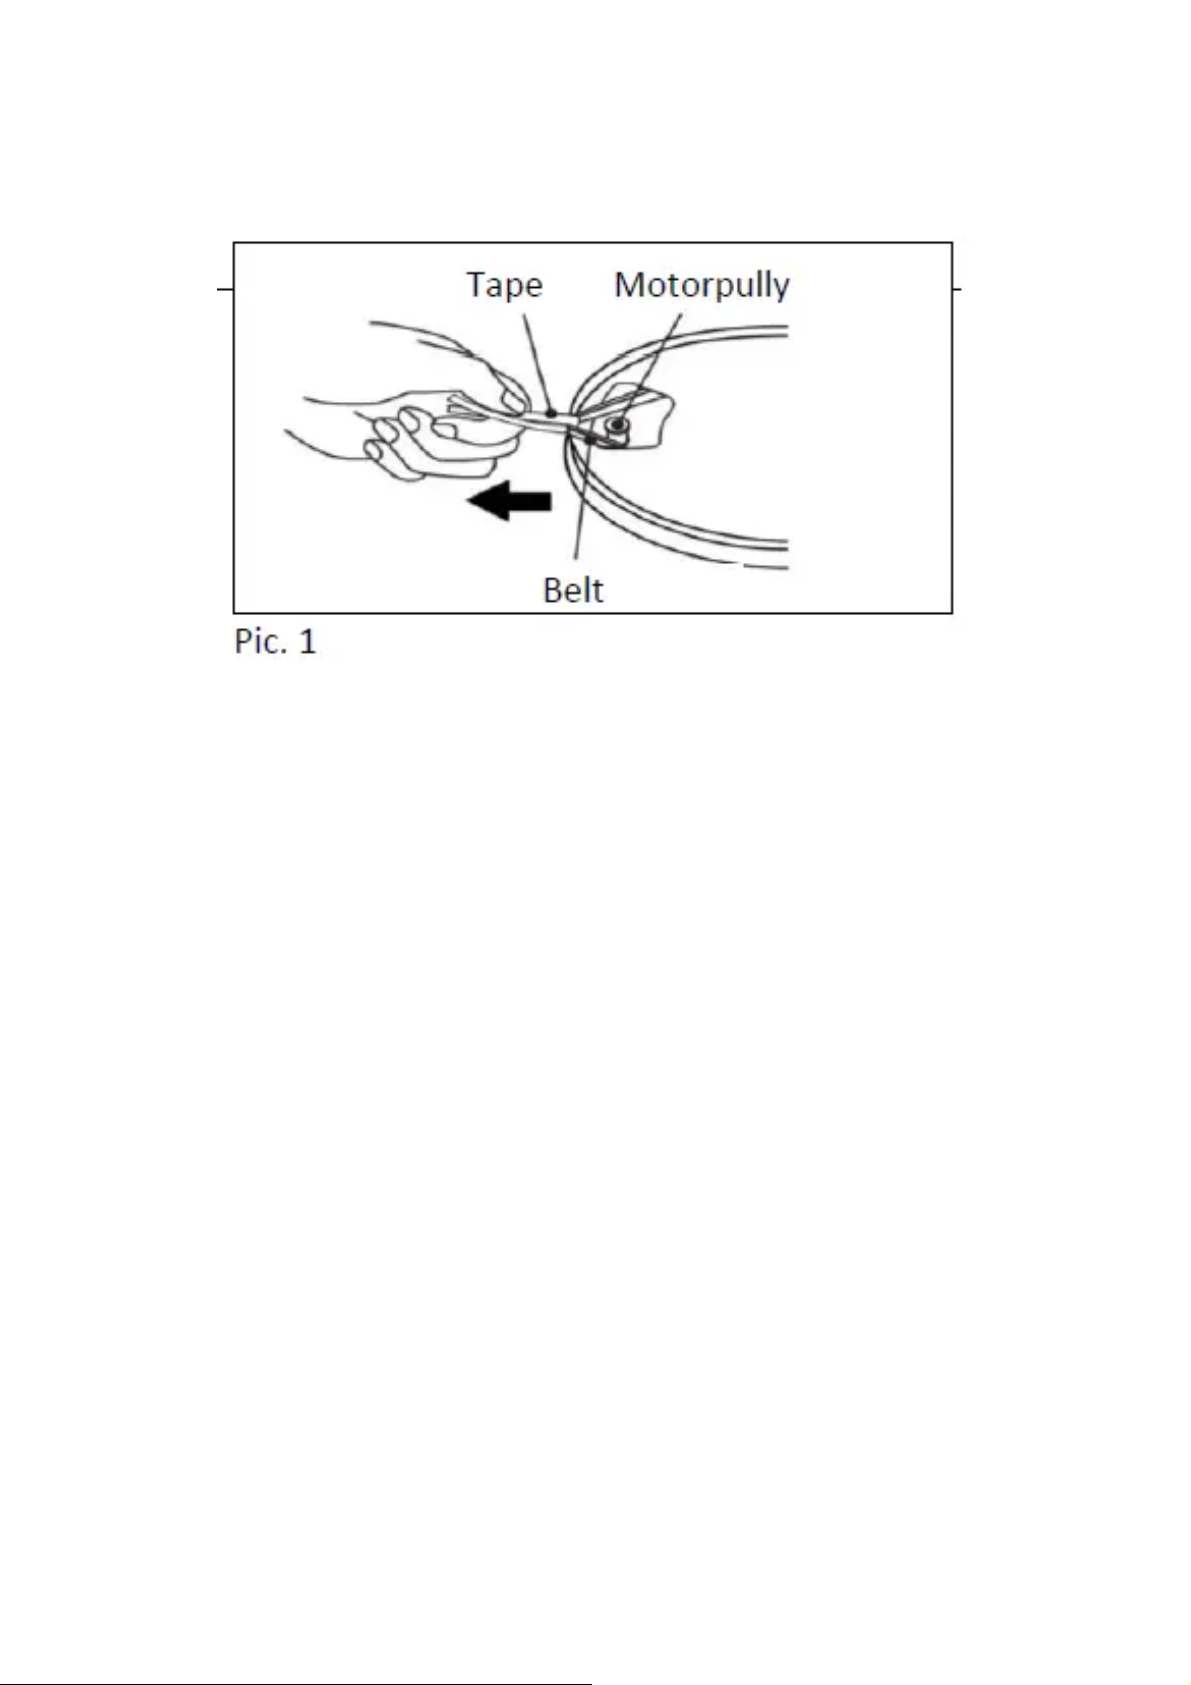
The record player is delivered with the drive belt already fitted around the turntable flange. The
belt is provided with a red tape so that it can be pulled over the drive motor pulley. (pic. 1)
1. Place the turntable on the turntable spindle. Rotate the turntable until the cut-out is positioned
over the motor pulley (at about the 8 o’clock position).
2. Using the red tape, pull the drive belt over the motor drive pulley and position it in the centre
of the pulley. Then remove the red tape.
3. Now place the turntable mat on the turntable.
Tonearm
The tonearm is secured at the tonearm rest with a coated wire and the safety clip. Remove and
discard the coated wire and open the safety clip to play the record.
⚙
Page 13
Fitting the headshell
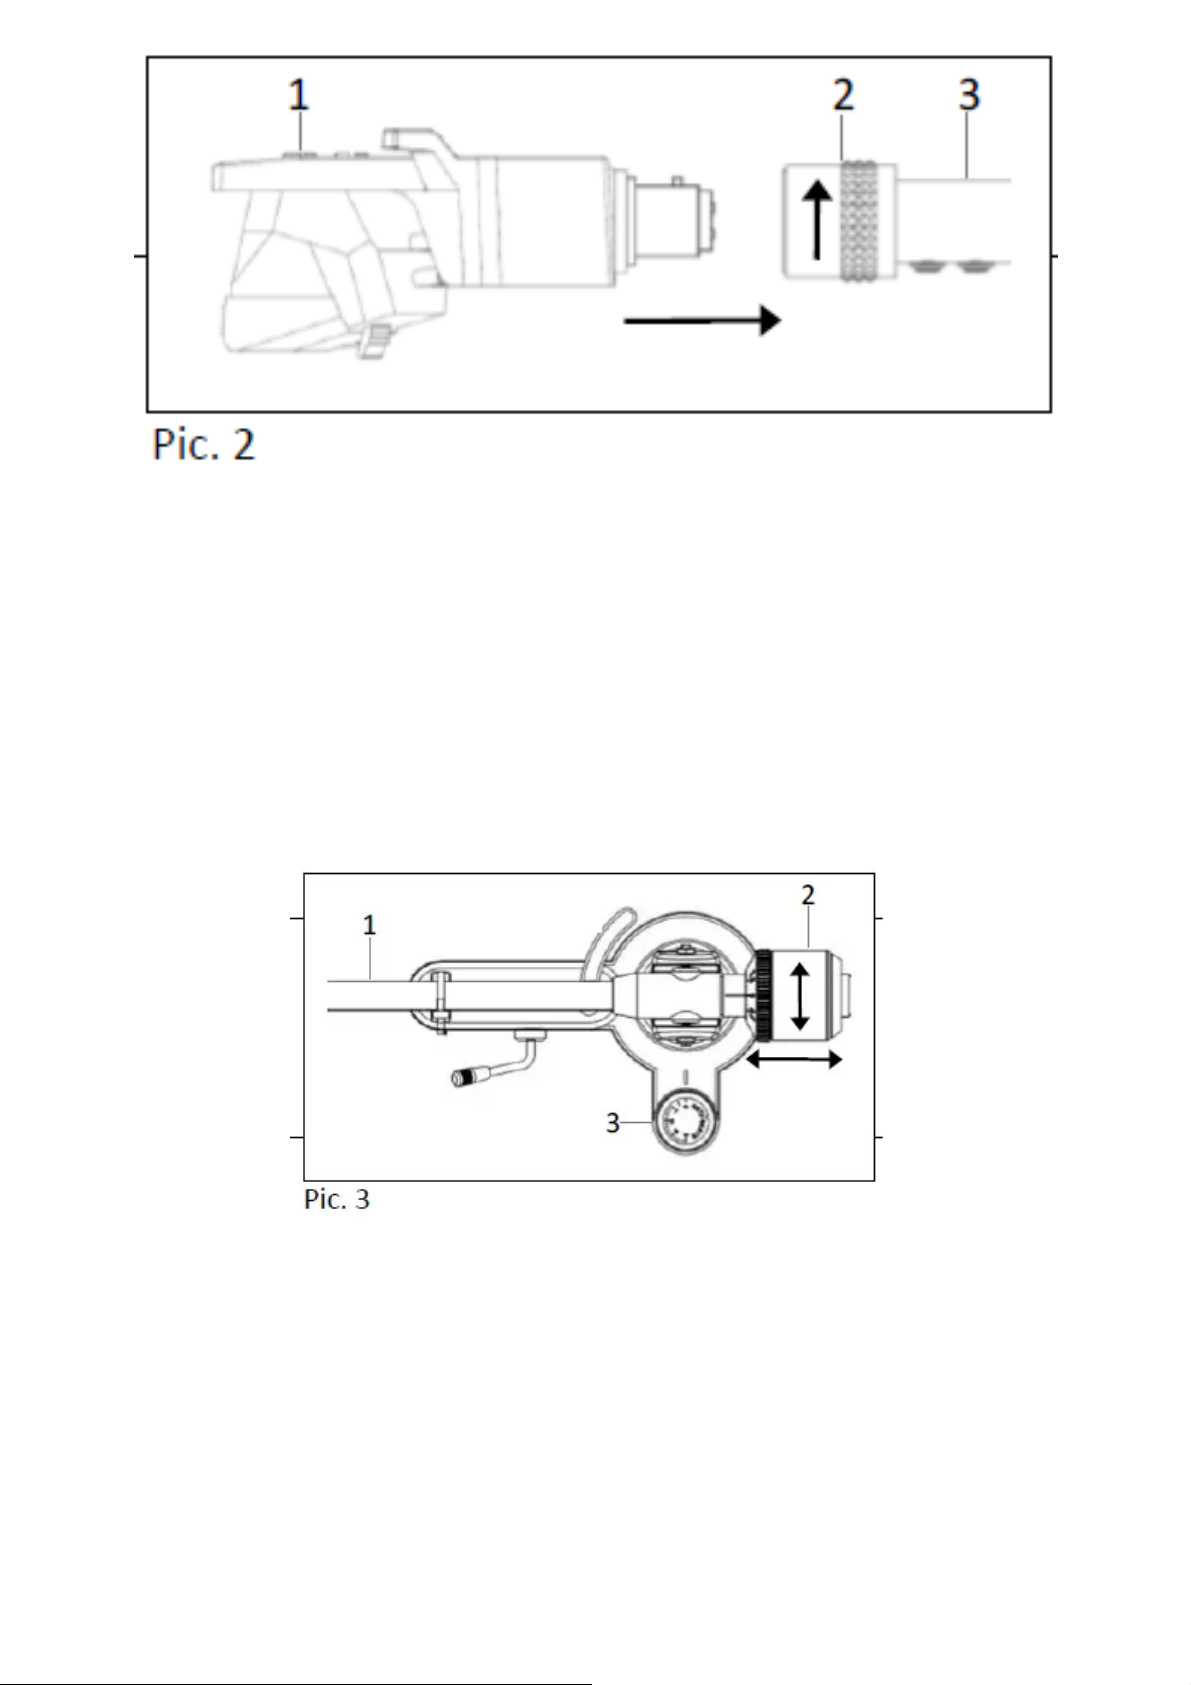
Fit the removable headshell onto the tonearm as described below: (pic. 2)
1. Place the headshell (1) into the socket (2) at the end of the tonearm (3).
2. Hold the headshell, while turning the socket (2) in the direction of the arrow.
Counterweight fitting
Fit the supplied counterweight (2) onto the tonearm (1) by screwing it on from behind. Keep the
dial facing forward. The counterweight is used to set the correct tracking force for the pick-up.
(pic. 3)
⚙
Page 14
Balancing the tonearm
Damage to the stylus
Ensure that the stylus does not come in contact with the platter mat, or any other part of the
turntable.
1. Place the turntable on an even horizontal surface.
2. Remove the stylus guard (page 20).
3. Lower the tonearm lift via the tonearm lift lever.
4. Position the tonearm in between the platter and the tonearm rest. (not resting on the stylus)
5. Turn the anti-skating dial (3) to „0” (pic. 3).
6. Turn the counterweight (2) (pic. 2) backward or forwards until the tonearm reaches a
horizontal balance.
7. Place the balanced tonearm back onto the tonearm rest and secure it with the clip.
8. (Pic 3) Hold the counterweight (1) in position while turning the anti-skating dial (2) to „0“ (12
o’clock position).
Tracking force
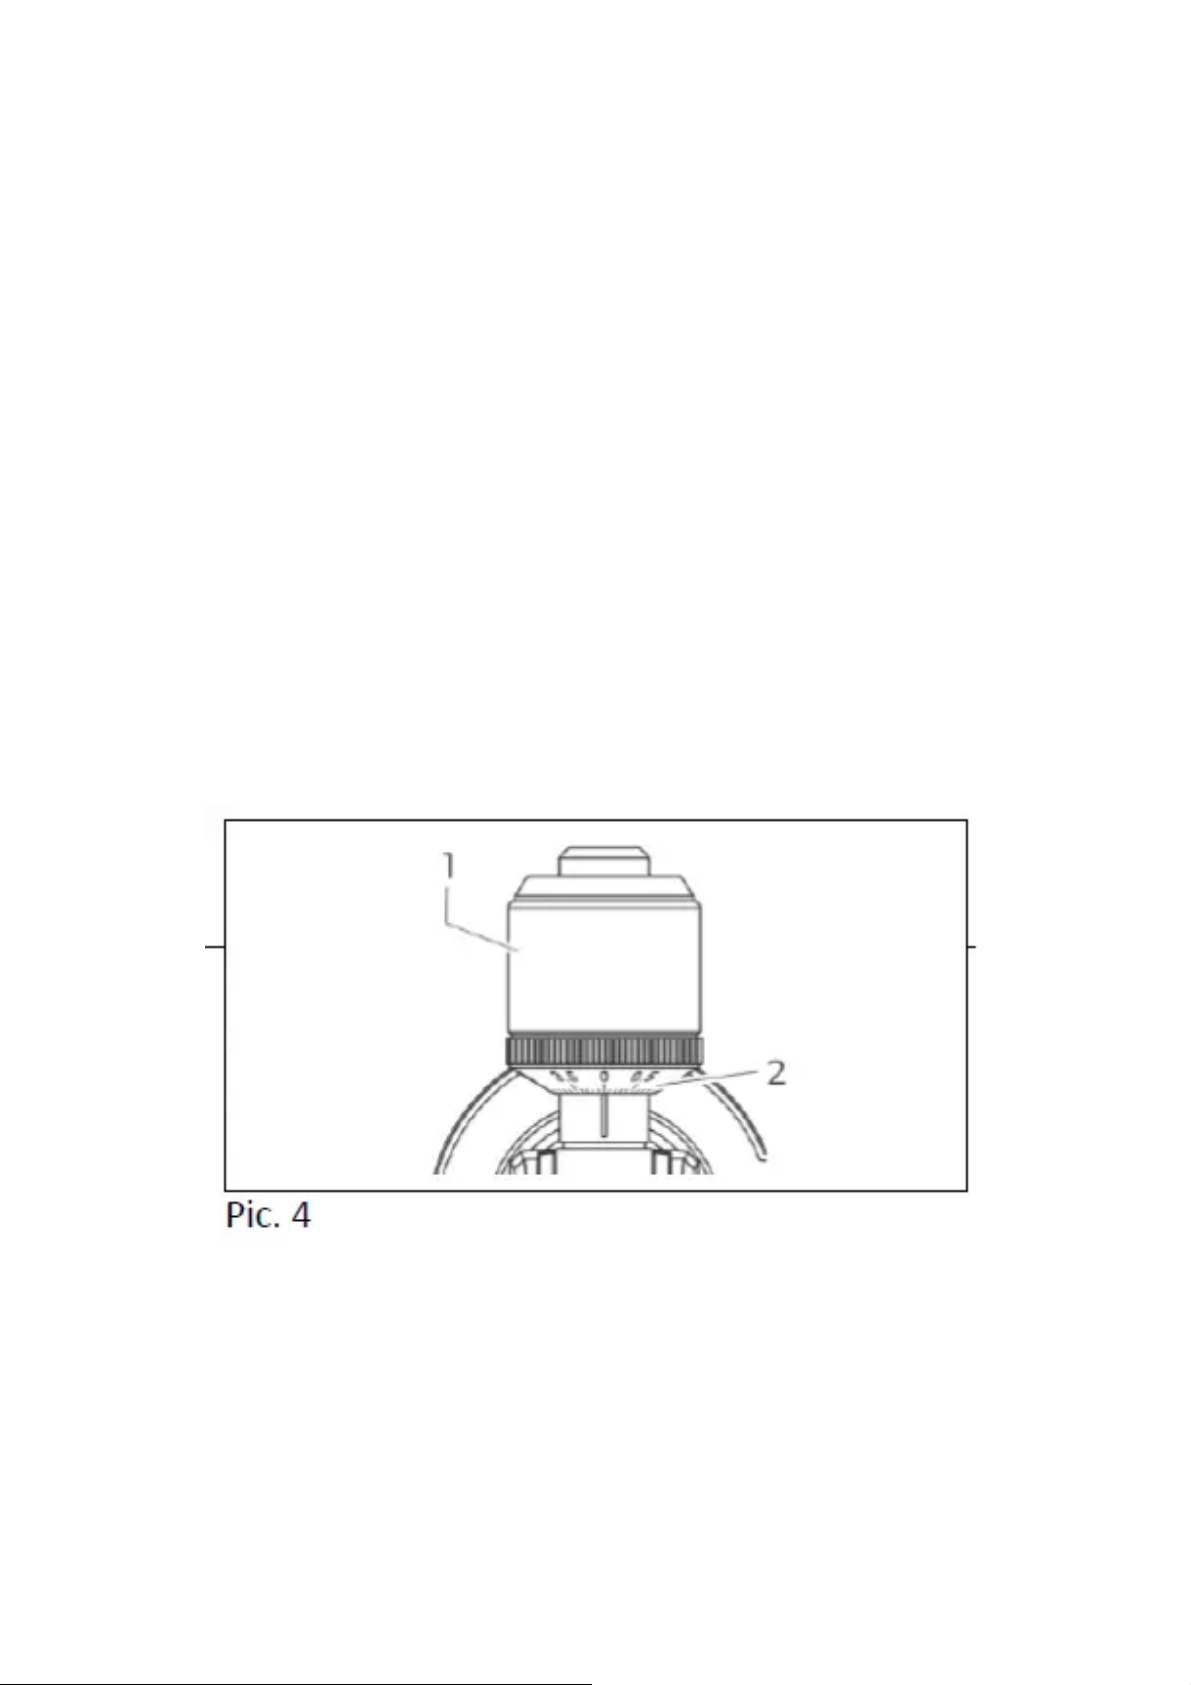
The tracking force needs to be adjusted according to the installed pick-up. (pic. 4)
1. Adjust the entire counterweight (1) including the scale to the required weight (2).
2. The tracking force weight can be read from the scale.
Note:
The recommended force/weight for the supplied pick-up is between 1,8 g and 2,0 g. If in doubt,
please consult the pick-up manufacturer for recommended values.
⚙
Page 15
Anti-Skating-Adjustment
The skating force pulls the tonearm towards the centre of the platter. This increases the pressure
on the inside wall of the groove. The ANTI-Skating force compensates this movement and ensures
the ideal tracking of the stereo information on the vinyl.
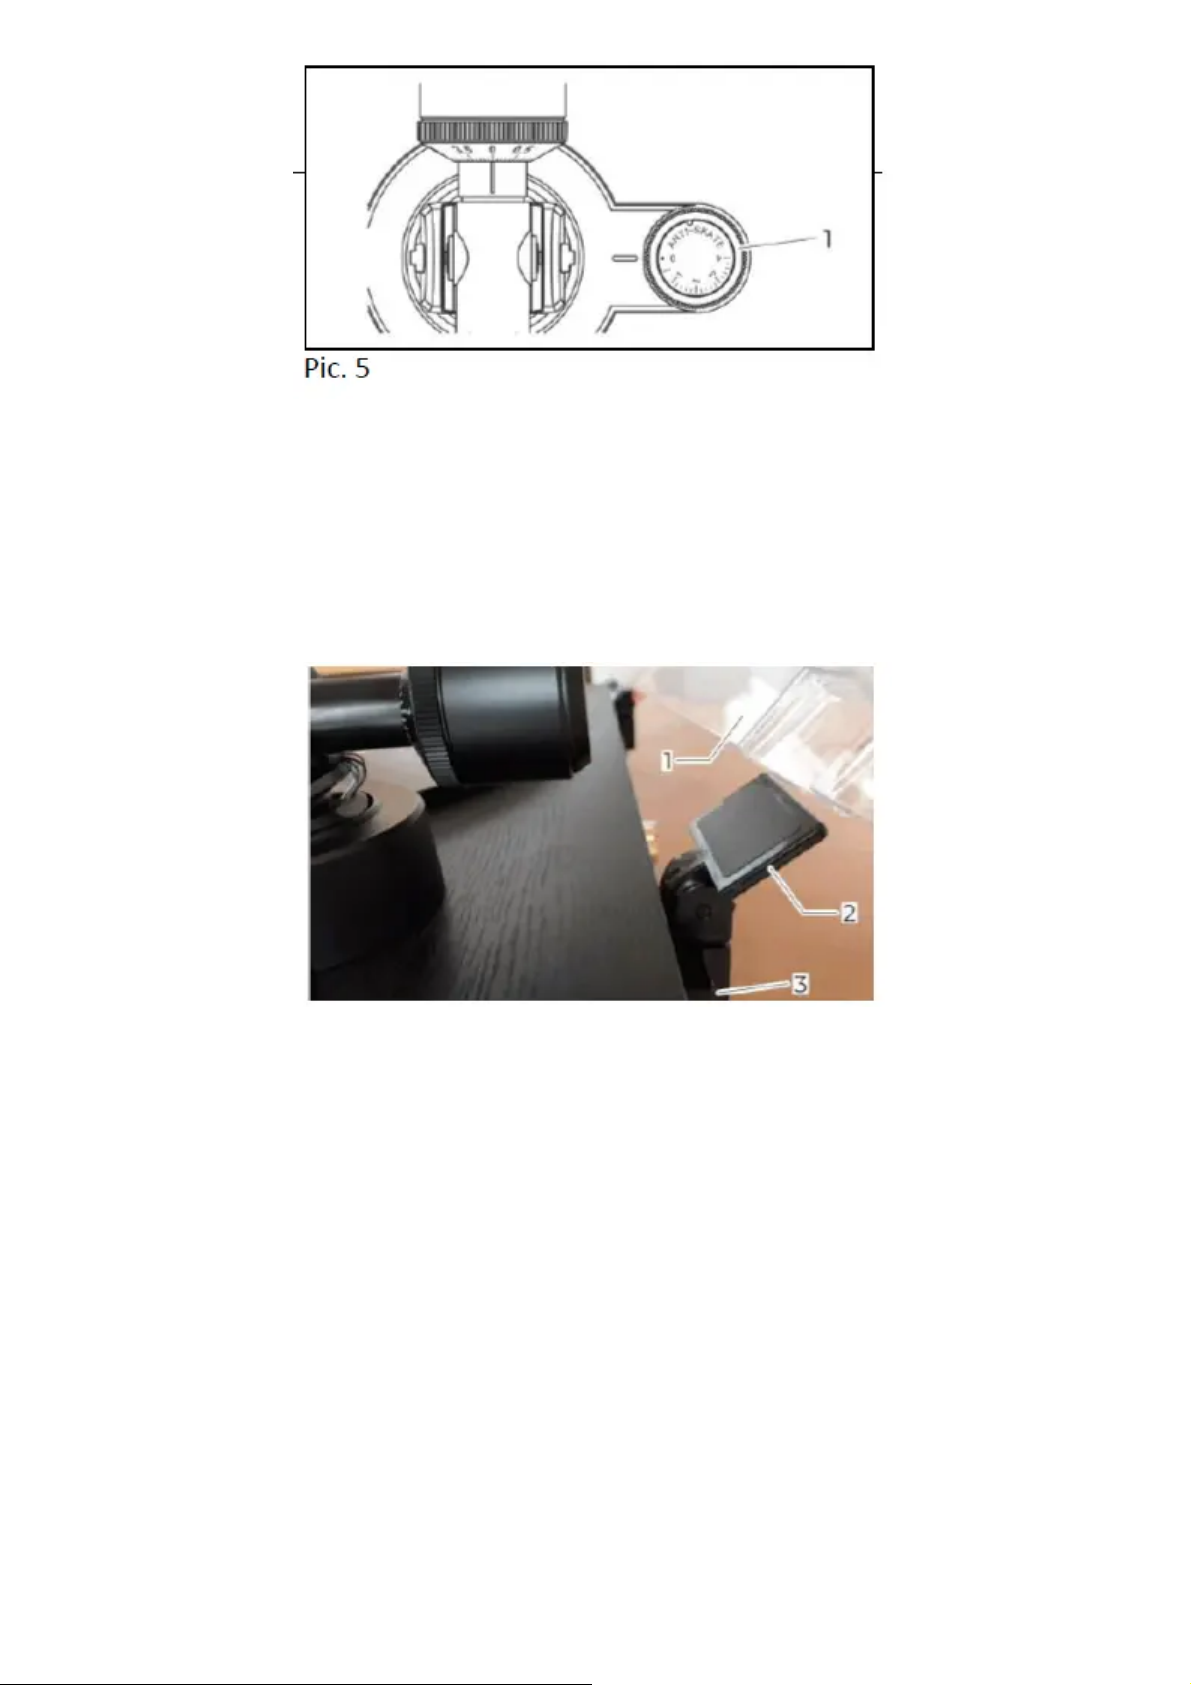
Set the Anti-skating dial (1) to the same value setting as the tracking force. (pic. 5)
Dust cover
1. Slot both hinges (2) into the housings (3) in the back of the turntable.
2. Uniformly push the right and left dust cover (1) receptacles onto the hinges
Connection to Amplifier
The turntable comes with a built-in phono pre-amplifier. It can be either connected to the phono
input or the line input at the amplifier. The built-in phono stage can be switched on or off via a
switch in the back of the turntable.
⚙
Page 16
Phono-Input
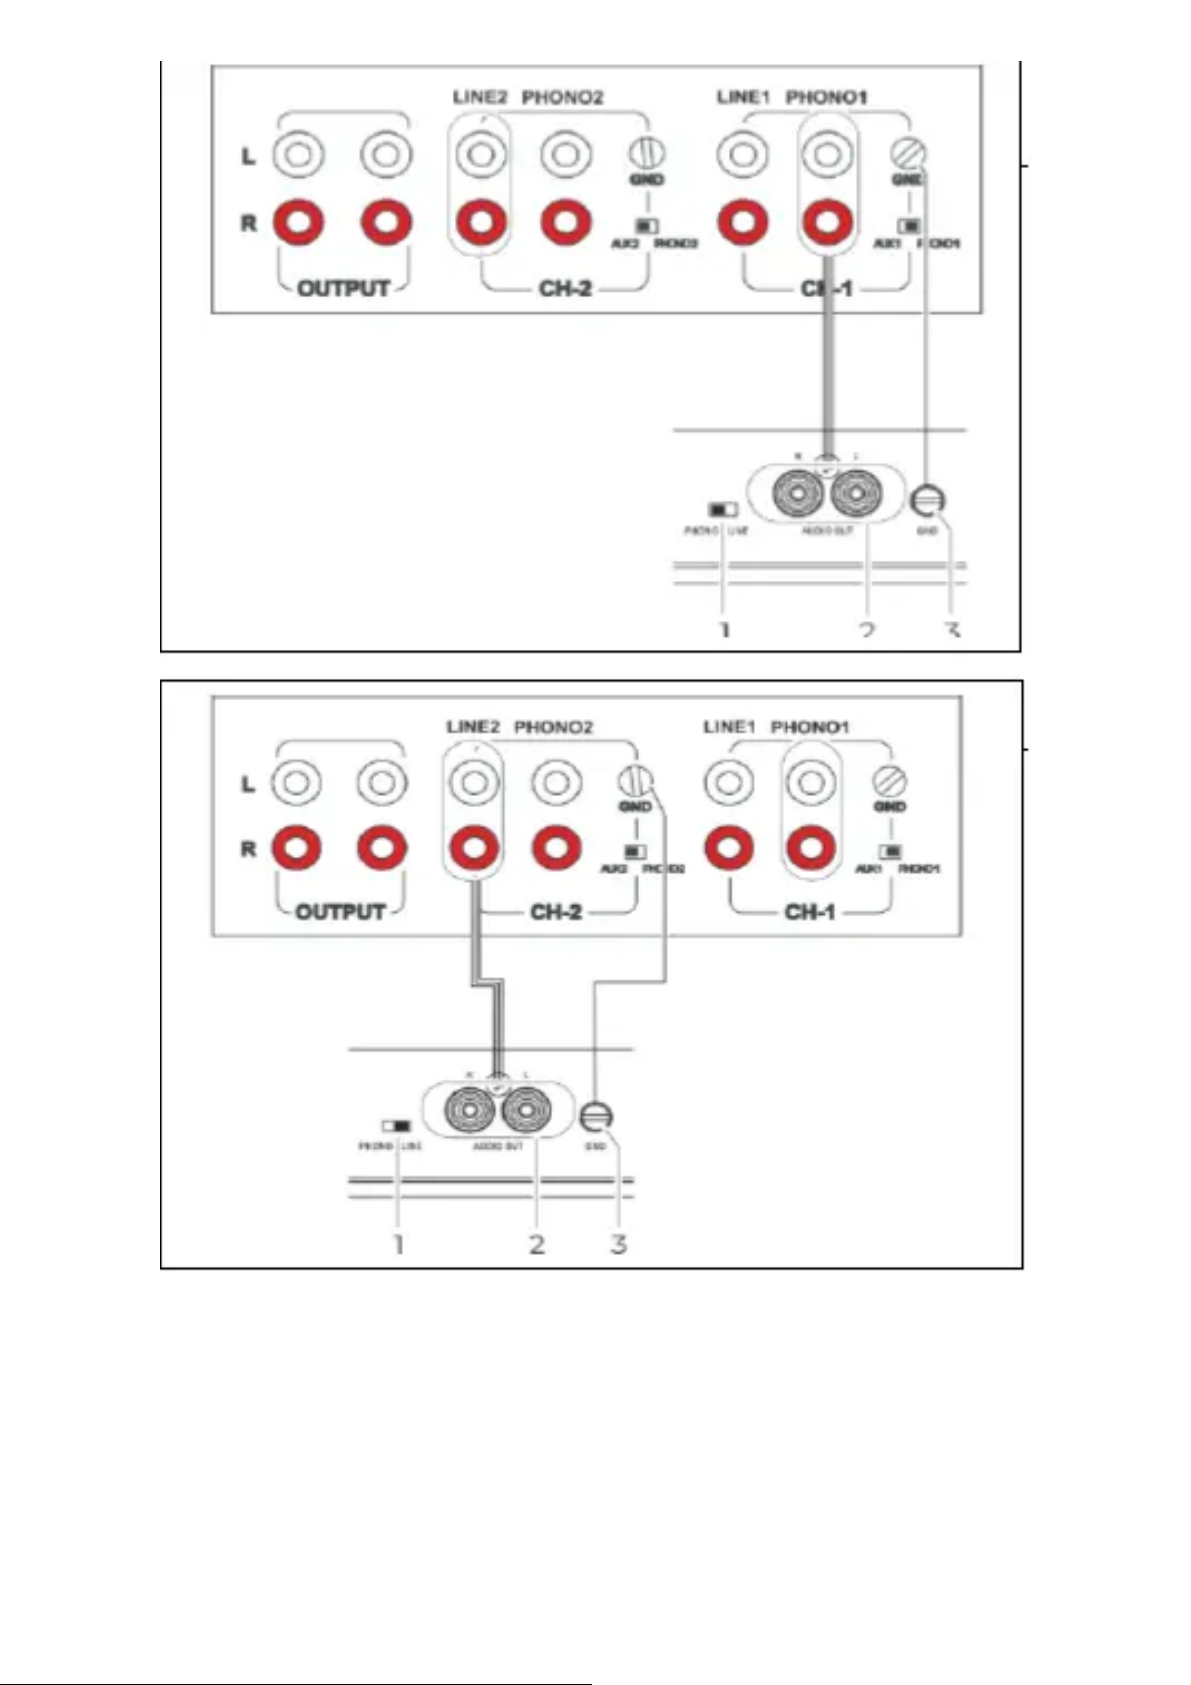
1. Connect the RCA cable to the Audio output „AUDIO OUT” (2) at the turntable and the PHONO
input sockets at the amplifier.
2. Move the switch (1) into the position: PHONO.
3. Connect the ground connection GND (3) with the amplifier to avoid noise.
Note: Ensure the correct connection of the cable. (red = right channel, white = left channel)
⚙
Page 17

Line-Input
1. Connect the RCA cable to the Audio output „AUDIO OUT” (2) at the turntable and the LINE /
AUX input sockets at the amplifier.
2. Move the switch (1) into the position: LINE.
3. Connect the ground connection GND (3) with the amplifier to avoid noise.
Note: Ensure the correct connection of the cable. (red = right channel, white = left channel)
⚙
Page 18
Connection to Power Supply
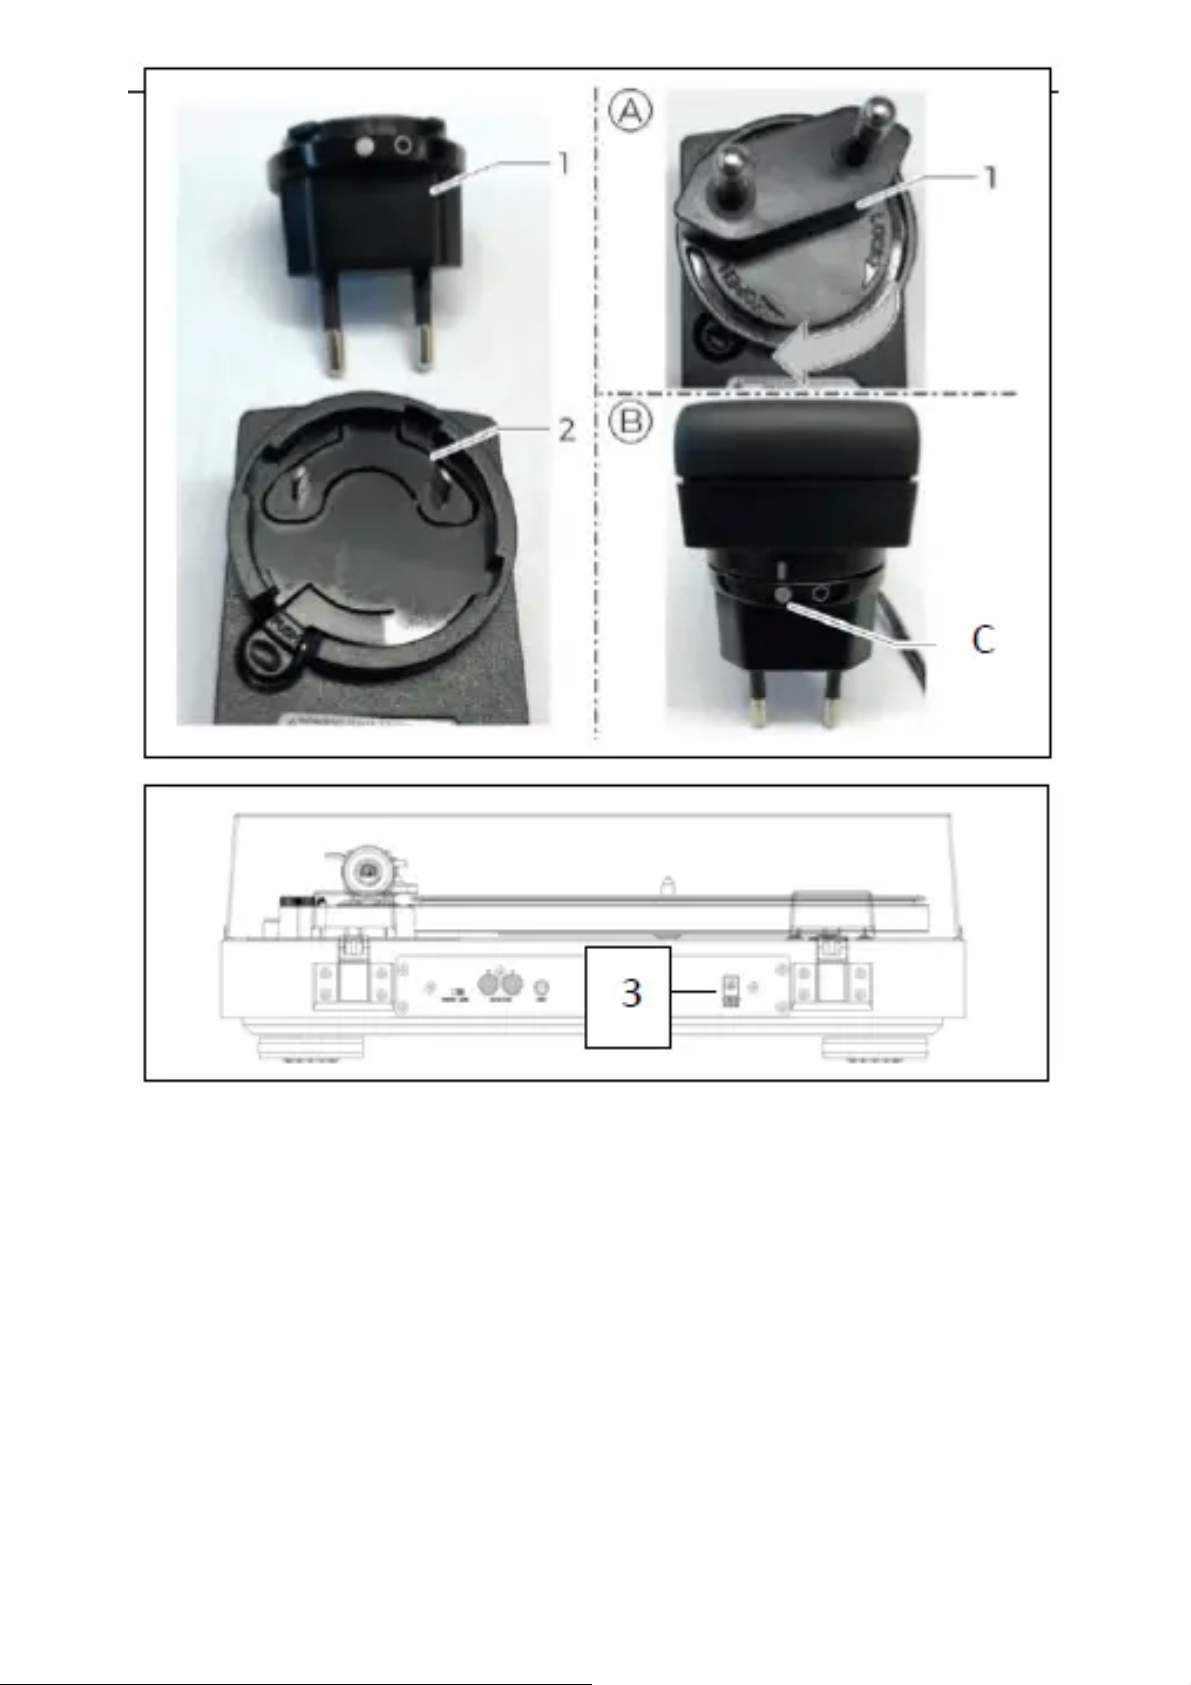
Different adapter plugs (1) are included with the product. Find the specific adapter relevant to
your country and socket system. Fit it to the power supply (2).
1. Fit the socket adapter into the power supply (A) and twist in the direction of the arrow.
2. Check that the adapter is locked correctly (B) and the markings match up (C).
3. Connect the output cable of the power supply with the DC IN (3) socket of the turntable.
4. Plug the power supply into a power socket.
Note: Only use a factory supplied or approved power supply.
Damage to the turntable!
Incorrect voltages can damage the product. Ensure that the mains voltage is within the stated
⚙
Page 19
specification.
Operating the turntable
Removing / Attaching the stylus protection cap
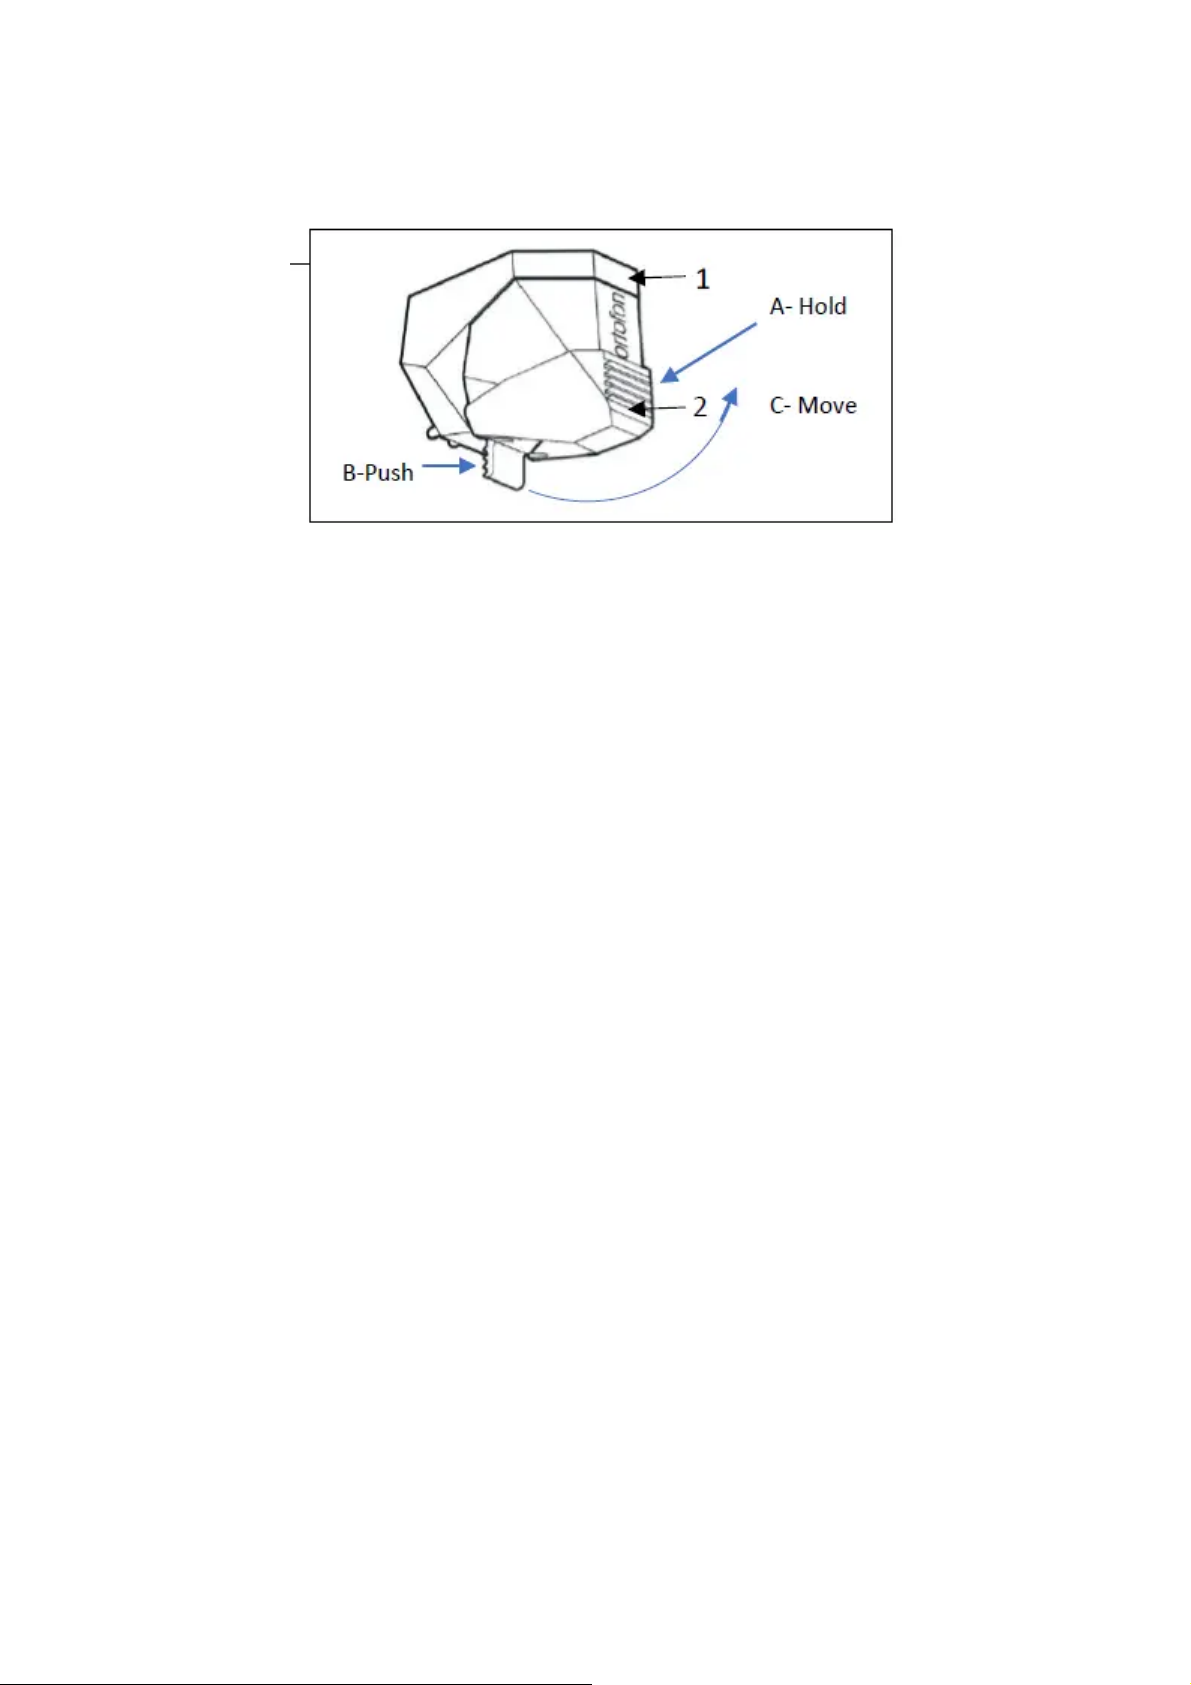
Remove the stylus protection cap from the pick-up (1) prior to playing a record.
1. Push the stylus cap (2) on the bottom (B) as seen in the diagram. Hold in position (A) while
move it up in circular motion (C).
2. Replace the cap after playing the record.
To play the record
1. Place a record on the turntable, use the spindle adaptor to play singles.
2. Turn the speed selector to the required setting: 33, 45 or 78. The platter will start to turn.
3. Release the safety fastener on the tonearm rest and raise the tonearm with the lift lever.
4. Carefully move the tonearm away from the tonearm rest and position it above the first groove
on the record.
5. Lower the tonearm with the left lever.
Note: The tonearm can be raised at any point, even for short periods. The Platter will continue to
turn.
To stop playing the record
1. Use the tonearm lift lever to raise the tonearm.
2. Carefully position the tonearm above the tonearm rest.
3. Lower the tonearm with the lift lever.
4. Secure the tonearm with the safety fastener on the tonearm rest.
⚙
Page 20
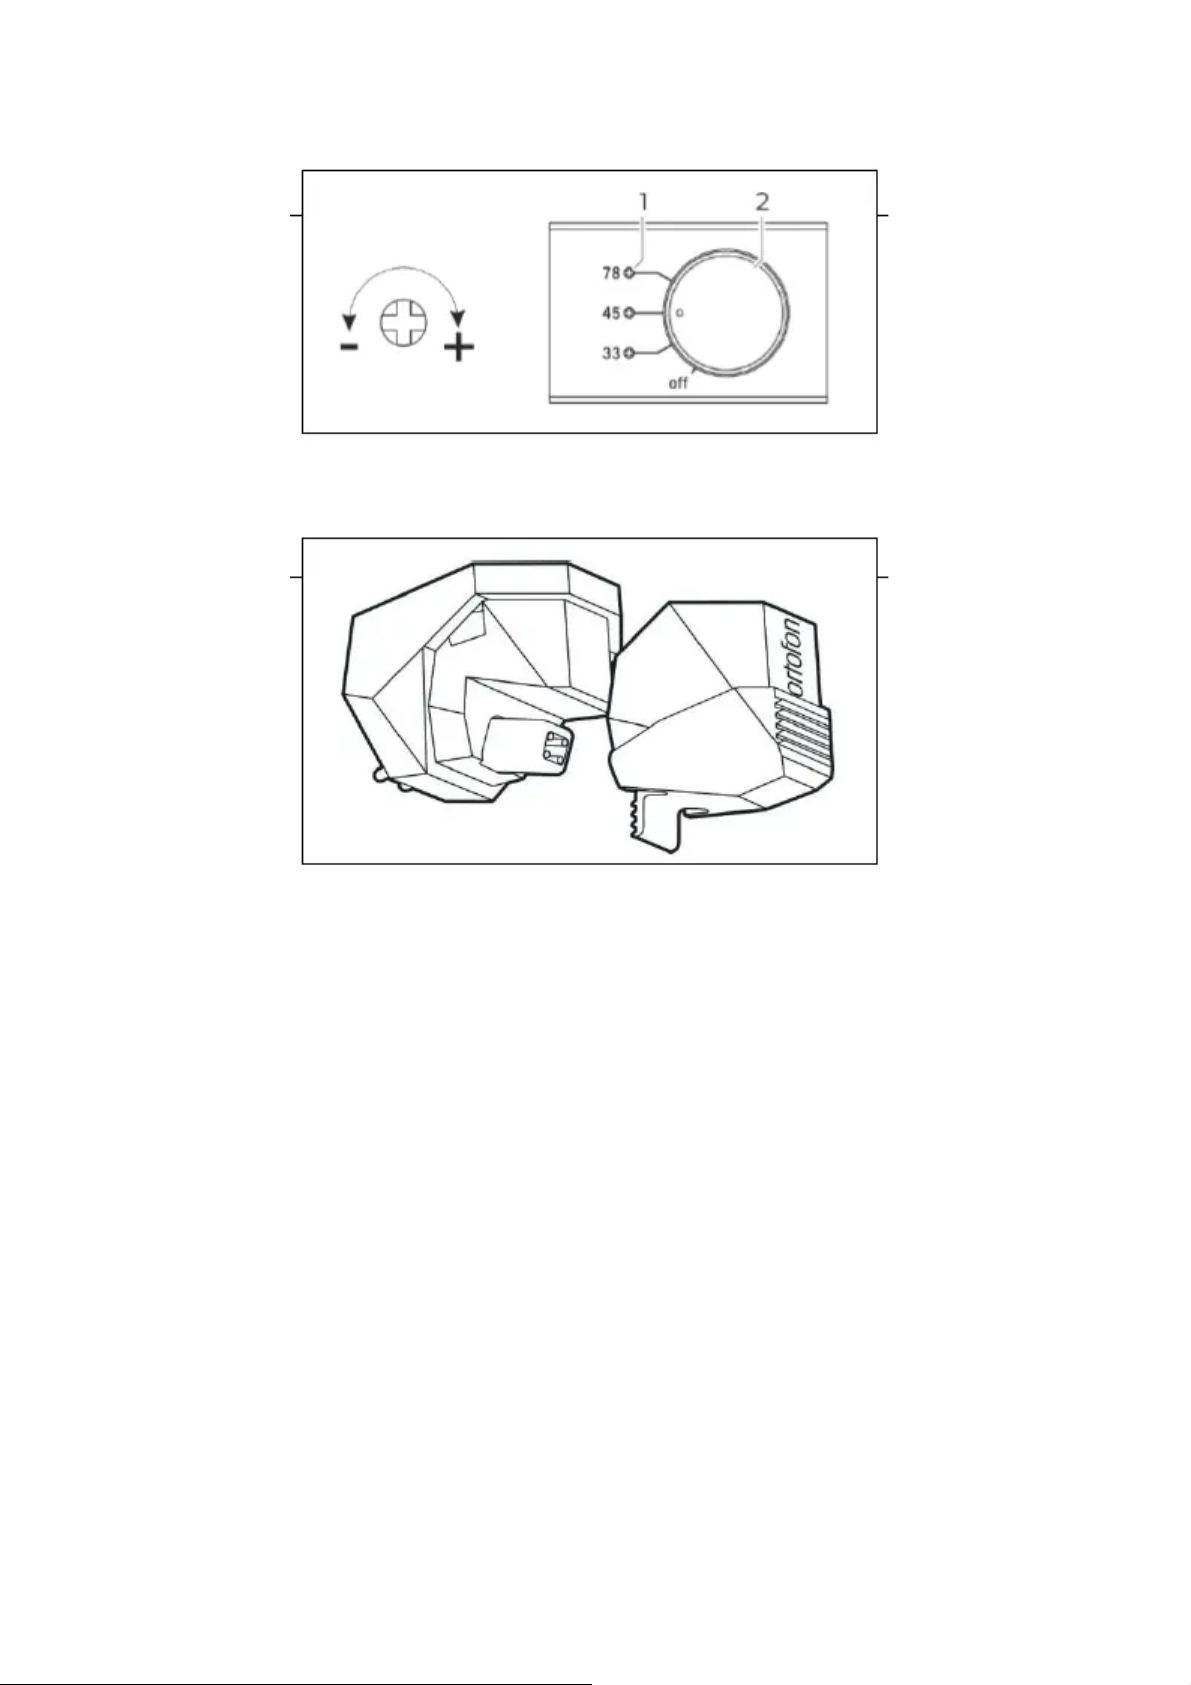
5. Turn the speed selector into the “OFF” position to stop the turntable.
To set the speed
All three-speed settings can be individually adjusted for fine-tuning.
1. Select the required setting with the speed selector knob. (2)
2. Use a small Philips screwdriver to turn the small adjustment screw (1)
Note: The exact speed settings are already pre-set at the factory.
Replacing the stylus
The stylus is naturally exposed to wear and tear by the playback process. Therefore, we
recommend regular inspections.
1. Remove the stylus by pulling diagonally downwards.
2. Insert the stylus by doing the performing the reverse action.
Note: Worn or damaged (splintered) styluses ruin records. When you need to replace a stylus,
use the original type if possible.
⚙
Page 21

Cleaning & Troubleshooting
Cleaning stylus and record
Clean the stylus and record prior to every record played. That minimizes premature wear and tear.
Damage to components!
1. Carefully wipe the stylus brush in a front-to-back motion under the stylus.
2. To clean a record, use a carbon fiber brush to wipe gently and diagonally over the record.
Note: Brushes and accessories are available in the Dual shop: www.dual.de
Cleaning the record player
Danger – Electric shock!
To avoid the danger of an electric shock, you must not clean the unit with a wet cloth or under
running water. Pull the power plug prior to any cleaning.
Damage to components!
Do not use any scrubbing sponges, cleaning powder or solvents such as alcohol and petrol. To
clean the appliance and the records, only use cleaning agents that are specifically designed for the
purpose (antistatic). Keine Scheuerschwämme, Scheuerpulver und Lösungsmittel wie Alkohol
oder Benzin zur Reinigung verwenden.
Troubleshooting
If the unit does not function as intended, perform checks using the following tables.
If the malfunction cannot be fixed even after these checks, please contact the manufacturer.
⚙
Page 22

Symptom – Possible causes Solutions
The tonearm skips grooves, slides ov
er the record or does not move.
• The record player is not sitting horizontally. Place t
he record player on a horizontal base support.
• The record is dirty or scratched. Clean the record wi
th a record
cleaner or change the record.
• The stylus pressure of the tone arm may be too lo
w. Adjust the
stylus pressure and check the anti-skating setting.
Poor sound quality, loud static noise,
sound dropouts, etc.
• The stylus is dirty or worn. Clean the stylus with a b
rush.
• The stylus may be defective. If necessary, change th
e stylus.
• The record is dirty or dusty. Clean the record with a
record
cleaner.
⚙
Page 23
The sound is too quiet or loud and di
storted.
• The record player is not connected to the correct a
mplifier input.
• The internal phono pre-amp is set to the wrong set
ting. Change the switch setting in the back of the tur
ntable.
• Consult the manual setting: Set up – Connection to
amplifier
The sound drones or the pitch is inco
nsistent.
The drive belt is too loose and must be replaced.
Documents / Resources
Dual CS 418 Belt Drive Manual Turntable [pdf] Instruction Manual
CS 418 Belt Drive Manual Turntable, CS 418, Belt Drive Manual Turntable
References
User Manual
⚙
Page 24

Ta strona internetowa jest niezależną publikacją i nie jest ani powiązana, ani popierana przez żadnego z właścicieli znaków towarowych. Znak słowny „Bluetooth®” i logo są
zarejestrowanymi znakami towarowymi należącymi do Bluetooth SIG, Inc. Znak słowny „Wi-Fi®” i logo są zarejestrowanymi znakami towarowymi należącymi do Wi-Fi
Alliance. Jakiekolwiek użycie tych znaków na tej stronie internetowej nie oznacza żadnego powiązania ani poparcia.
⚙
 Loading...