

Page 1
Quick Start Guide
Guide de démarrage rapide
English ● Français
Manufactured under license from Dolby Laboratories.
Dolby and the double-D symbol are trademarks of Dolby Laboratories.
DTS, the Symbol, & DTS and the Symbol together are registered trademarks & DTS 2.0+Digital Out
is a trademark of DTS, Inc. Product includes software. © DTS, Inc. All Rights Reserved.
Page 2

2
Dune HD TV-303D Quick Start Guide
Getting More Information
Due to the regular evolution and the addition of new functionalities,
provided by firmware and software updates, it is impossible to cover
all functionalities in this user's guide. For this reason, we invite you to
visit our online Zappiti Knowledge Base. You will find a large amount
of tutorials and various help topics concerning the use of the media
player and Zappiti applications:
zappiti.uservoice.com/knowledgebase
About Zappiti
Zappiti is a French company based in Paris. Zappiti designs and manufactures only professional grade
Video Management Systems; delivering the highest quality, outstanding performance, and best possible
user experience. The sofware development & enginering, design and support teams are located in
France (Europe).
All of the Zappiti products are designed to provide our end-user customers with convenient and intuitive
access to their entire movie library collection, in stunning 4K, High Definition resolution. The award
winning Zappiti devices are being successfully used to improve the movie watching experience, in
residential and commercial environments all over the globe.
To ensure the ultimate performance, all Zappiti devices are supplied to authorized resellers through a
worldwide network of established and well respected distribution partners.
Zappiti products are distributed in over 40 countries worldwide.
More info: zappiti.com
Page 3

Table of Contents
English
4
Quick Start Guide
4 •
General, Key Features
5 •
Organize your Video Collection with Movie Covers
Package Contents
6 •
Exterior
7 •
8 •
Remote Control, Connect a Computer Keyboard / Mouse
9 •
Getting Started, HDMI Outputs, Black Border Issue (overscan)
10 •
Firmware Upgrade, Audio & Video Settings
11 •
Zappiti Video, Zappiti Music & Zappiti Explorer, Create an Account
Connecting USB Drives, Using Internal Drive, SD / MMC Cards
12 •
Accessing Network Drives and Access to Zappiti Storage
13 •
How to Transfer Your Files Using Zappiti Explorer
13 •
Video And Audio Playback Options, Slideshow Function, Properties
13 •
How to install an App, Add a Shorcut to the Home Page
13 •
Ethernet, Wi-Fi, Bluetooth, Audio/Video Mirroring14 •
Zappiti Music, How to Control Your Zappiti Using your Tablet / Smartphone14 •
How to Create a Movie Collection in Zappiti Video
15 •
16 •
Adding a Movie File, Deleting a Movie File
16 •
How to Identify Unidentified Movies, How to Identify 3D, 4K and UHD File
Parental Control, Personal Categories, Zappiti On Start-Up, Subtitle options17 •
Default Subtitles and Language, User Support, Zappiti Db Community17 •
English
Table of Contents
3
3
Table des matières
16
Français
Guide de démarrage rapide
18 •
Introduction, fonctions clés
19 •
Système de jaquettes intégré
20 •
Contenu de la boîte
21 •
Vues extérieures
22 •
Télécommande, Connectez un clavier ou une souris informatique
23 •
Démarrage, Bordure noire
24 •
Mise à jour firmware, Réglages audio et vidéo
25 •
Zappiti Video, Zappiti Music et Zappiti Explorer, Enregistrement
26 •
Disque dur externe, Périphérique USB, Disque dur interne
26 •
Utilisation de cartes mémoire SD
27 •
Accéder aux dossiers réseau
27 •
Copiez et gérez vos fichiers avec Zappiti Explorer
27 •
Fonction Diaporama, Touche Info, Installer une app, Ajouter un raccourci sur la page d’accueil
28 •
Ethernet, Wi-Fi, Bluetooth, Mirroring audio et vidéo
28 •
Zappiti Music, Contrôlez votre Zappiti via tablette / smartphone
29 •
Créer une collection de films / séries avec Zappiti Vidéo
30 •
Utilisation de Zappiti Vidéo, Film non trouvé, Fichiers 3D et UHD
Contrôle parental, Catégories personnelles, Zappiti au démarrage, Réglages des sous-titres
31 •
31 •
Sous-titres et langue par défaut, Devenir contributeur Zappiti Db
31 •
Installer une application tierce, Ajouter un raccourci sur la page d’accueil
Page 4

4
Quick Start Guide
General
The Zappiti One 4K HDR is an all-in-one solution for video playback with HDMI 2.0, 10-bits, 4K60p,
HEVC, HDR and 3D MVC capabilities.
Key Features
HDR: Display your HDR video content, while also providing increased dynamic range.
●
4K 50/60p: Display your 4K video content in 3840x2160p at 50 Hz or 60 Hz (HDMI 2.0a).
●
MKV Player: Playback SD, HD and UHD video contents in MKV, M2TS, DVD / BD / UHD ISO
●
and other modern video file containers and formats, including top quality HEVC/H.265 video
codec, with very high bit-rates up to 400 Mbp/s.
Dual HDD Rack Option with Hot Swap Function: Easily and quickly insert and exchange internal
●
3.5’’ SATA hard drives.
Network Player: Connect your Zappiti on your local network and enjoy your content from a
●
computer PC/MAC or a NAS via SMB.
USB Ports: Conveniently connect hard drives, USB flash drives, USB card readers, computer
●
mouse / keyboard, and other USB storage devices.
USB Port 3.0 and Type-C: Read or copy your files in ultra high speed.
●
Full Range of A/V Connectors: S/PDIF coaxial and optical audio output, audio analog RCA,
●
RCVBS, HDMI 2.0 CEC, HDMI Audio only, HDMI Input.
Multichannel home cinema audio: Bitstream (RAW), downmix LPCM stereo .
●
Hi-Res Music Playback: Play your Hi-Res Audio quality music files and control them from your
●
smartphone / tablet (iOS/Android) without the need of TV.
Video Output Flexibility: Output video in any resolution and format including SD, 1080p
●
(1920x1080), Ultra HD (3840x2160p) and true 4K (4096x2160p) up to 12-bit by primary color.
Auto Framerate: Auto framerate detection 24/50/60p (compatible 24.000 Hz / 23.976 Hz).
●
Playback Memory: Resume playback from the last position.
●
Advanced File Browser: Convenient file browser with powerful file management (select,
●
select all, copy, cut, past, delete, rename, ...).
Audio playback functions: Album cover art support, folder playback, random, repeat, loop...
●
Photo slideshows: Convenient features to easy create beautiful photo slideshow with music and
●
amazing transition effects.
Backlit Remote Control: High quality remote control with direct access and shortcuts with
●
backlit buttons and recordable buttons to control another device.
Wi-Fi 5 GHz with 2 dual antennas: Playback your video content wirelessly with high bitrate.
●
Vote for Future Features
To propose a new function or vote for an upcoming feature, visit:
zappiti.uservoice.comzappiti.uservoice.com
Page 5
English
5
Organize your Video Collection with Movie Covers
●
Zappiti Video Interface: Browse your movie and TV show collection with cover art and media
information: (subtitles, actors, director, release date...). Zappiti features an automatic category index
of movies and TV shows directly to the player, without requiring a computer.
●
Zappiti Search: Easy access to your movies or TV shows, thanks to Zappiti powerful search engine
combined with smart filters (actor, director, length, rating, release date...).
●
Zappiti Stand-Alone: Add, edit or delete movie covers directly on your Zappiti via the remote
control (no PC required). Change the posters, edit the synopsis, change the associate category,
create and organize your own personal categories, etc.
●
Zappiti on Start-up: Enable/disable start-up for Zappiti Video from system boot by Zappiti setting.
●
Zappiti Collections: Create and manage one collection by each family member or one collection by
HDD and switch easily from one collection to another.
●
Parental control: With the parental control feature, you can designate movies as ‘‘children's’’ and
block access to other movies with a PIN code. Thus, your children can safely access only their
movies! In addition, the child mode provides direct access to movies for greater ease of use.
●
Movie sagas: The saga films are automatically placed in groups and sorted by release date. A saga
cover dedicated to the collection is associated with the group and movies are displayed in a
stunning carousel with great 3D motion effects!
●
Zappiti Off-line: Save a collection locally and use it without any Internet connection.
●
Zappiti Trailers: Watch the trailer of your movies.
●
Zappiti Bonus Live: Watch additional contents such as Making Of, Deleted Scenes, Extracts,
Reviews, Blooper Reel, ... The additional contents are regularly updated for more results.
●
Zappiti Sub: Easily download the subtitle of a movie or TV show episode, directly from the Zappiti.
●
Zappiti Sync: Thanks to Zappiti Sync, your movie collections are automatically synchronized to
your other Zappiti Player 4K (multiroom) and to all your computers MAC and PC!
●
Zappiti Explorer: Zappiti Explorer is the easiest way to launch the playback of most of multimedia
files such as UHD, BD and DVD ISO, BDMV, M2TS, MKV, MP4, MOV, MP3, FLAC, JPG...
Zappiti Explorer makes file exploration so easy!
Page 6
6
Quick Start Guide
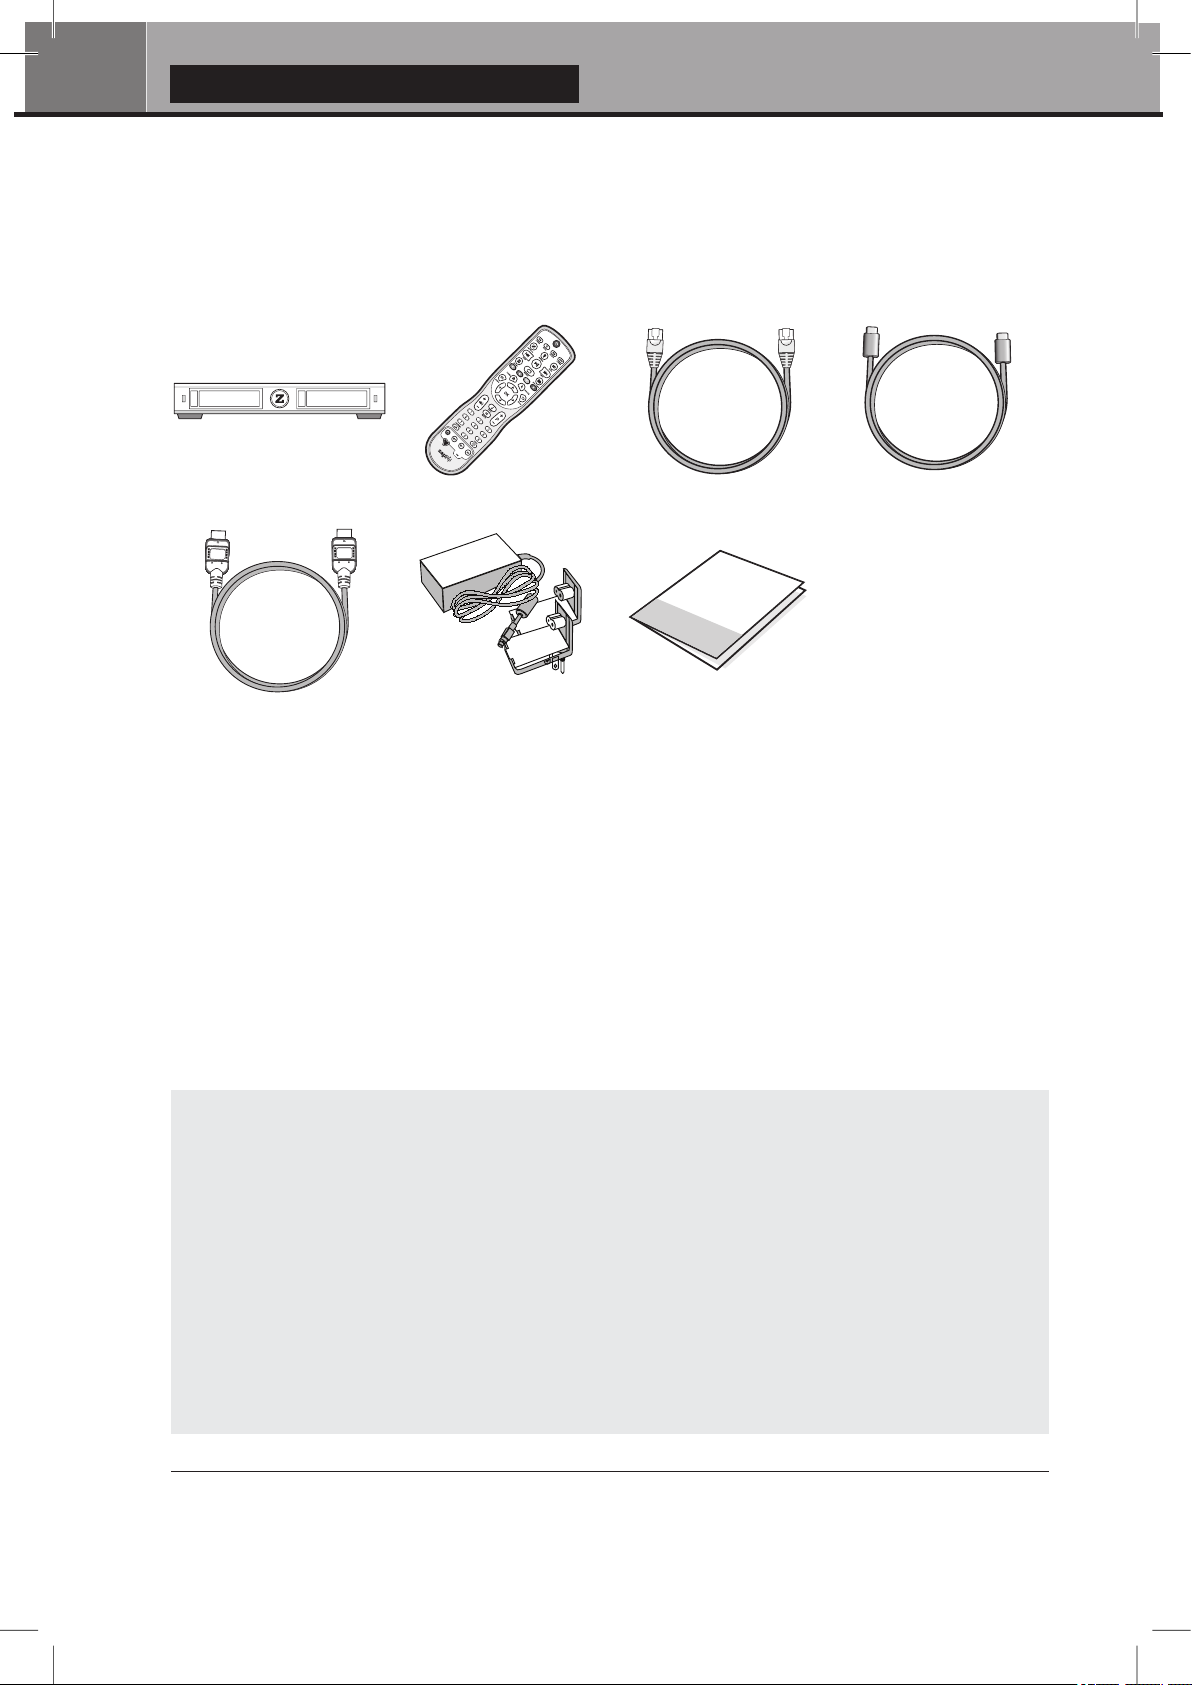
Package Contents
1
5
1. Zappiti Duo 4K HDR
2. IR remote control
3. Ethernet cable
4. USB Type-C cable
5. HDMI 4K cable
6. Power adaptor
7. Quick Install Guide
2
3 4
76
HDMI Cable
The supplied cable is compatible with 4K HDR. For longer lengths, we recommend the
cables offered on store.zappiti.com. All the proposed HDMI cables have been tested
in 3840x2160 resolution at 60 Hz, and in 4:4:4 / 10-bit in real situation on Zappiti 4K
HDR media players. By choosing one of the cables offered by Zappiti, you will have the
insurance of optimal operation. Indeed, a large number of HDMI cables yet certified 4K
60p and 2.0 are not compatible with Zappiti boosted video streams and it can happen
that the picture displays jerks, freezes, white pixels, or a black screen .
NOTE: Additional items (optional) may be included into the package, package, on player configuration, region,
and distributor.
Page 7
English
7
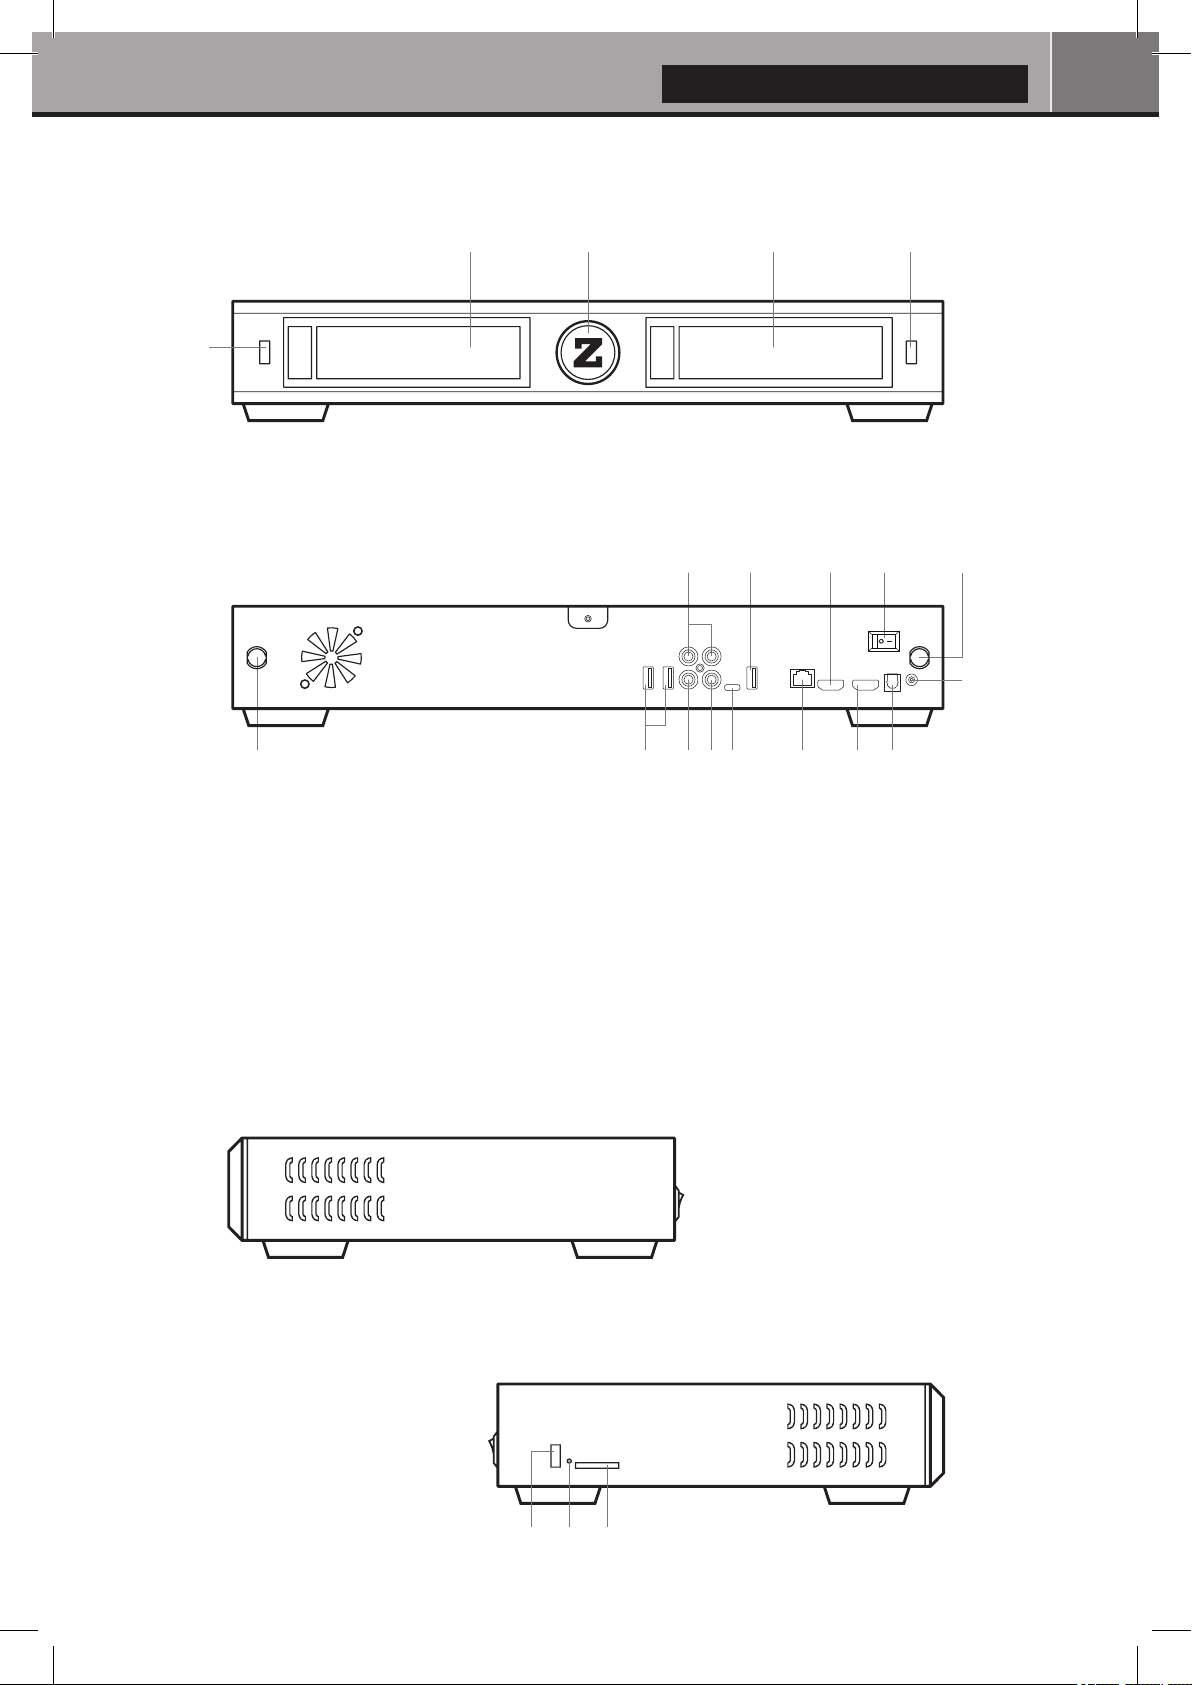
Front View
1
2. LED indicator1. USB 2.0 host 3. HDD Rack Enclosure
Rear View
1 2
1. Wi-Fi Antenna
2. USB 2.0 Host
3. Audio Analog Output L/R
4. Analog video output CVBS
5. Coaxial Digital Audio Output
6. USB Type-C
7. USB 3.0 Host
2 133
3
5 6 8 10 12
4
8. LAN 10/100/1000
9. HDMI 2.0 Output
10. HDMI 2.0 Input
11. Power Switch ON/OFF
12. Optical Digital Audio Output (S/PDIF)
13. DC Power 12V
11 197
13
Side View (Right)
1. USB 2.0 Host
2. Restore
3. SD/MMC Card Reader
Side View (Left)
1 2
3
Page 8
8
Quick Start Guide
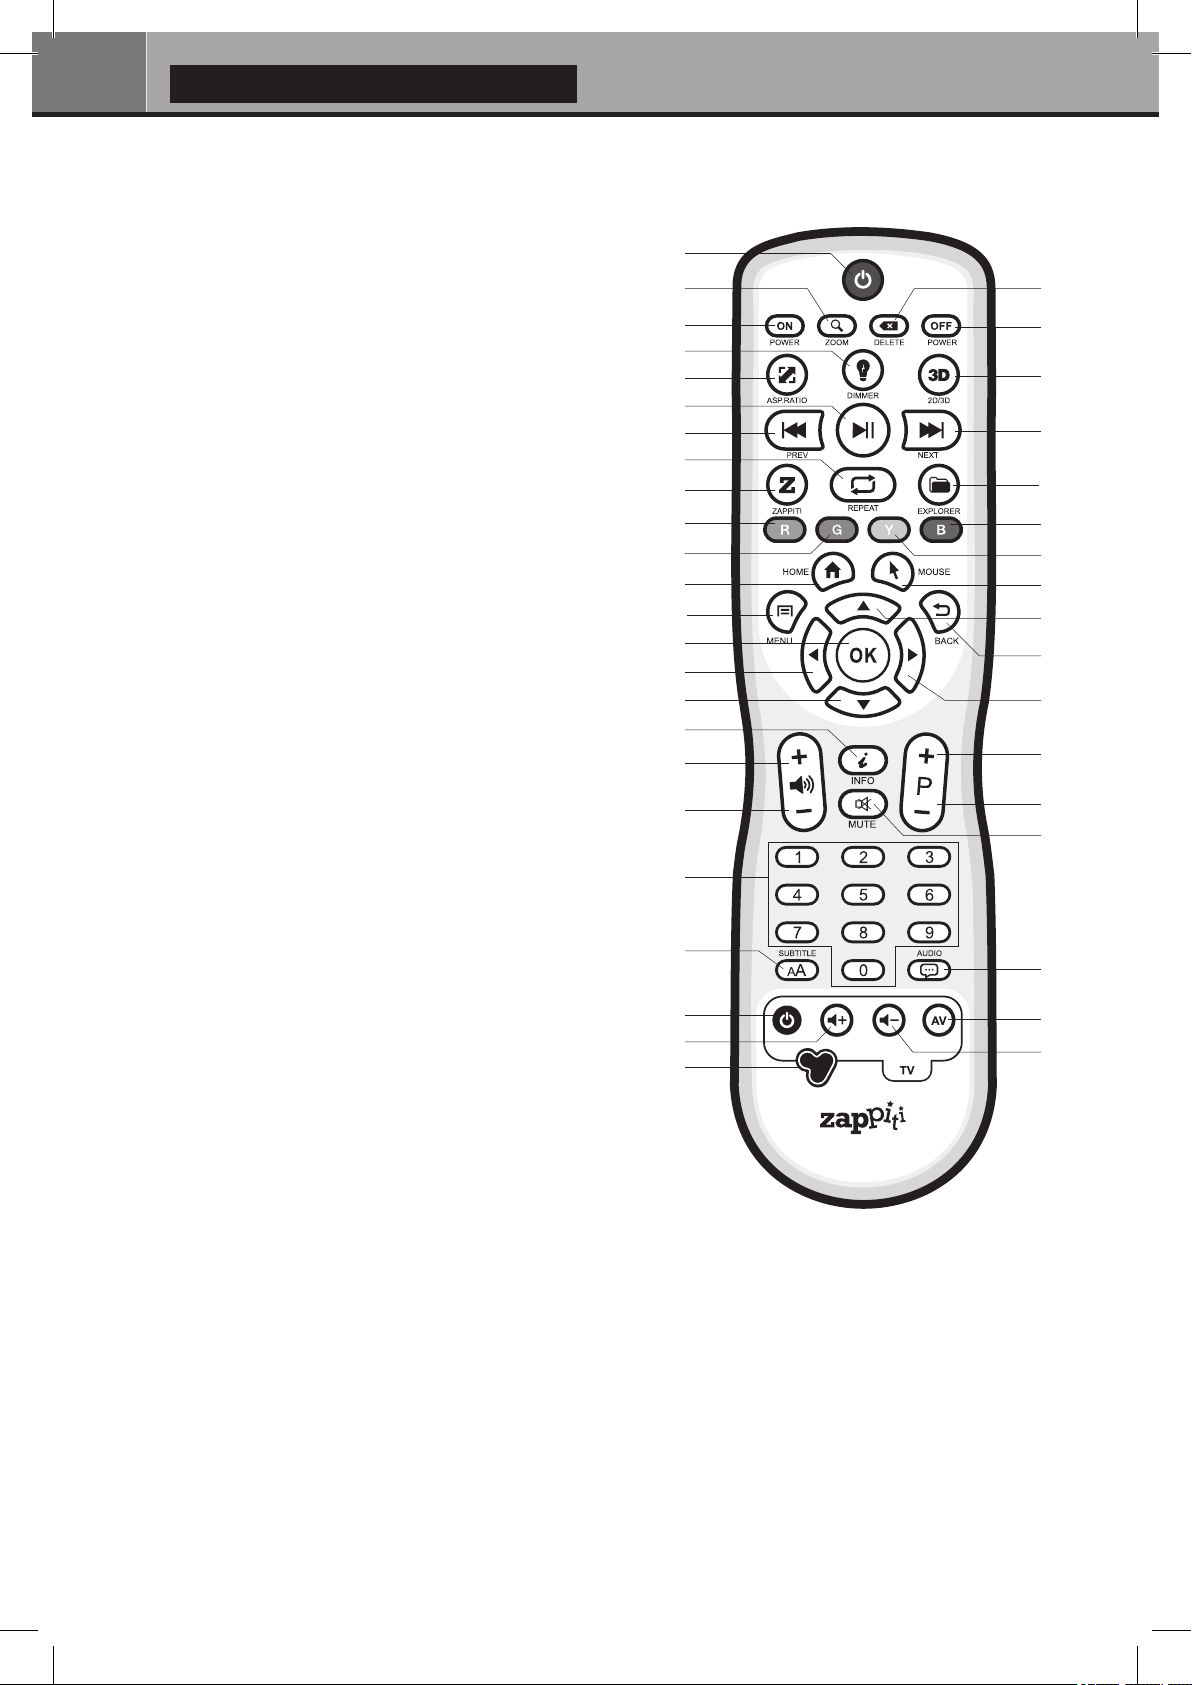
Remote Control
1. POWER: Toggle power ON/OFF.
2. POWER ON: Power ON.
3. ZOOM: Zoom In / Out (overscan).
4. DELETE: Delete / Change home template.
5. POWER OFF: Power OFF.
6. ASP. RATIO: Switch the Aspect Ratio.
7. DIMMER: Toggle Front LED ON/OFF.
8. 3D: Toggle 3D mode (2D / 3D).
9. PREV: Go to the previous chapter.
10. PLAY/PAUSE: Start / Pause playback.
11. NEXT: Go to the next chapter.
12. ZAPPITI: Zappiti Media Center shortcut.
13. REPEAT: Repeat playback (file, all, off).
14. EXPLORER: Zappiti Explorer shortcut.
15. RED: For future function.
16. GREEN: Shortcut to Settings.
17. YELLOW: Shortcut to HDMI IN Recording page.
18. BLUE: Shortcut to Firmware Upgrade page.
19. HOME: Go to Main Menu (Home Page).
20. MOUSE: Switch to the virtual mouse mode.
21. MENU: Show / Hide the pop-up menu.
22. BACK: Return or Stop playback.
23-26. ARROWS: Navigate menu selection.
23,25. UP: Fast forward. DOWN: Fast backward.
24,26. LEFT/RIGHT: Timeline navigation (+/-1 min).
27. OK: Enter or validate the current item.
28-29. VOLUME +/-: Increase / Decrease volume.
30. INFO: Show / Hide the pop-up info (properties).
31-32. PAGE+/-: Timeline navigation (+/-10 sec).
33. MUTE: Mute audio.
34. NUMBER Buttons:
- 1-9: direct playback access to 10 - 90%.
- 0: Restart the playback from the beginning.
35. SUBTITLE: Subtitle switch / settings.
36. AUDIO: Audio track switch.
37-41. TV: TV remote.
37. POWER: Toggle power ON / OFF.
38-39. VOLUME +/-: Increase / Decrease volume.
41. LEARN: Record an external RC.
RC/BACKLIT: Activate backlit.
10
13
12
15
16
19
21
27
24
25
30
28
29
34
35
37
38
41
1
3
2
4
5
7
6
9
8
11
14
18
17
20
23
22
26
31
32
33
36
40
39
LEARN
Programming Buttons
1. Press and hold the LEARN button (41) until the ON button is lit in red (not blinking).
2. Please take the TV remote control then press and hold the button you want to learn (example Vol +) until the
Zappiti remote's ON button flashes red (blinking).
3. Take the Zappiti remote control and press the button (37-40) you want to assign to the programming
(example Vol +).
4. Repeat steps 2 and 3 for the other buttons to be programmed.
5. To finish programming, quickly press the LEARN button (41).
Note: It is possible to connect a keyboard and a computer mouse to the Zappiti. By default, the keyboard is set
in QWERTY. To switch the keyboard recognition to AZERTY or other key position, first connect your keyboard
to one of the available USB ports. Press the GREEN button on the remote control to access the Android settings.
Then, click Languages & input. Finally, choose your language in Current Keyboard section, Android
Keyboard & Physical Keyboard. Warning! The mouse is not compatible with Zappiti Video, Zappiti Music and
Zappiti Explorer apps. But it can be useful for third-party apps downloaded from GooglePlay or AptoideTV.
Page 9
1. USB 2.0 Host
English
● Please use alkaline AA batteries. Please observe polarity when inserting batteries.
● Please Remove the plastic film from the Z logo of the front panel. The IR led is located behind.
● If RC functions only at short distances or stops functioning, make sure to replace the batteries.
● Point the remote control at the Zappiti. There must be no obstacles between the RC and the media player.
● Some RC buttons may be available only in certain player m
odes or only during playback of a certain content.
!
Getting Started
Please make sure there is enough space around the device for proper cooling (10 cm at minimum).
Ensure the remote control has batteries installed. Connect the player to your TV and other A/V equipment in
an appropriate way. Use HDMI connection to get the best possible audio and video quality. Make sure
to power off the player and related A/V equipment before connecting them. Ensure your TV and other
A/V equipment are configured to use proper inputs/outputs. For the best audio & video experience,
please use the HDMI output.
2. Restore
9
SD/MMC Card Reader
3.
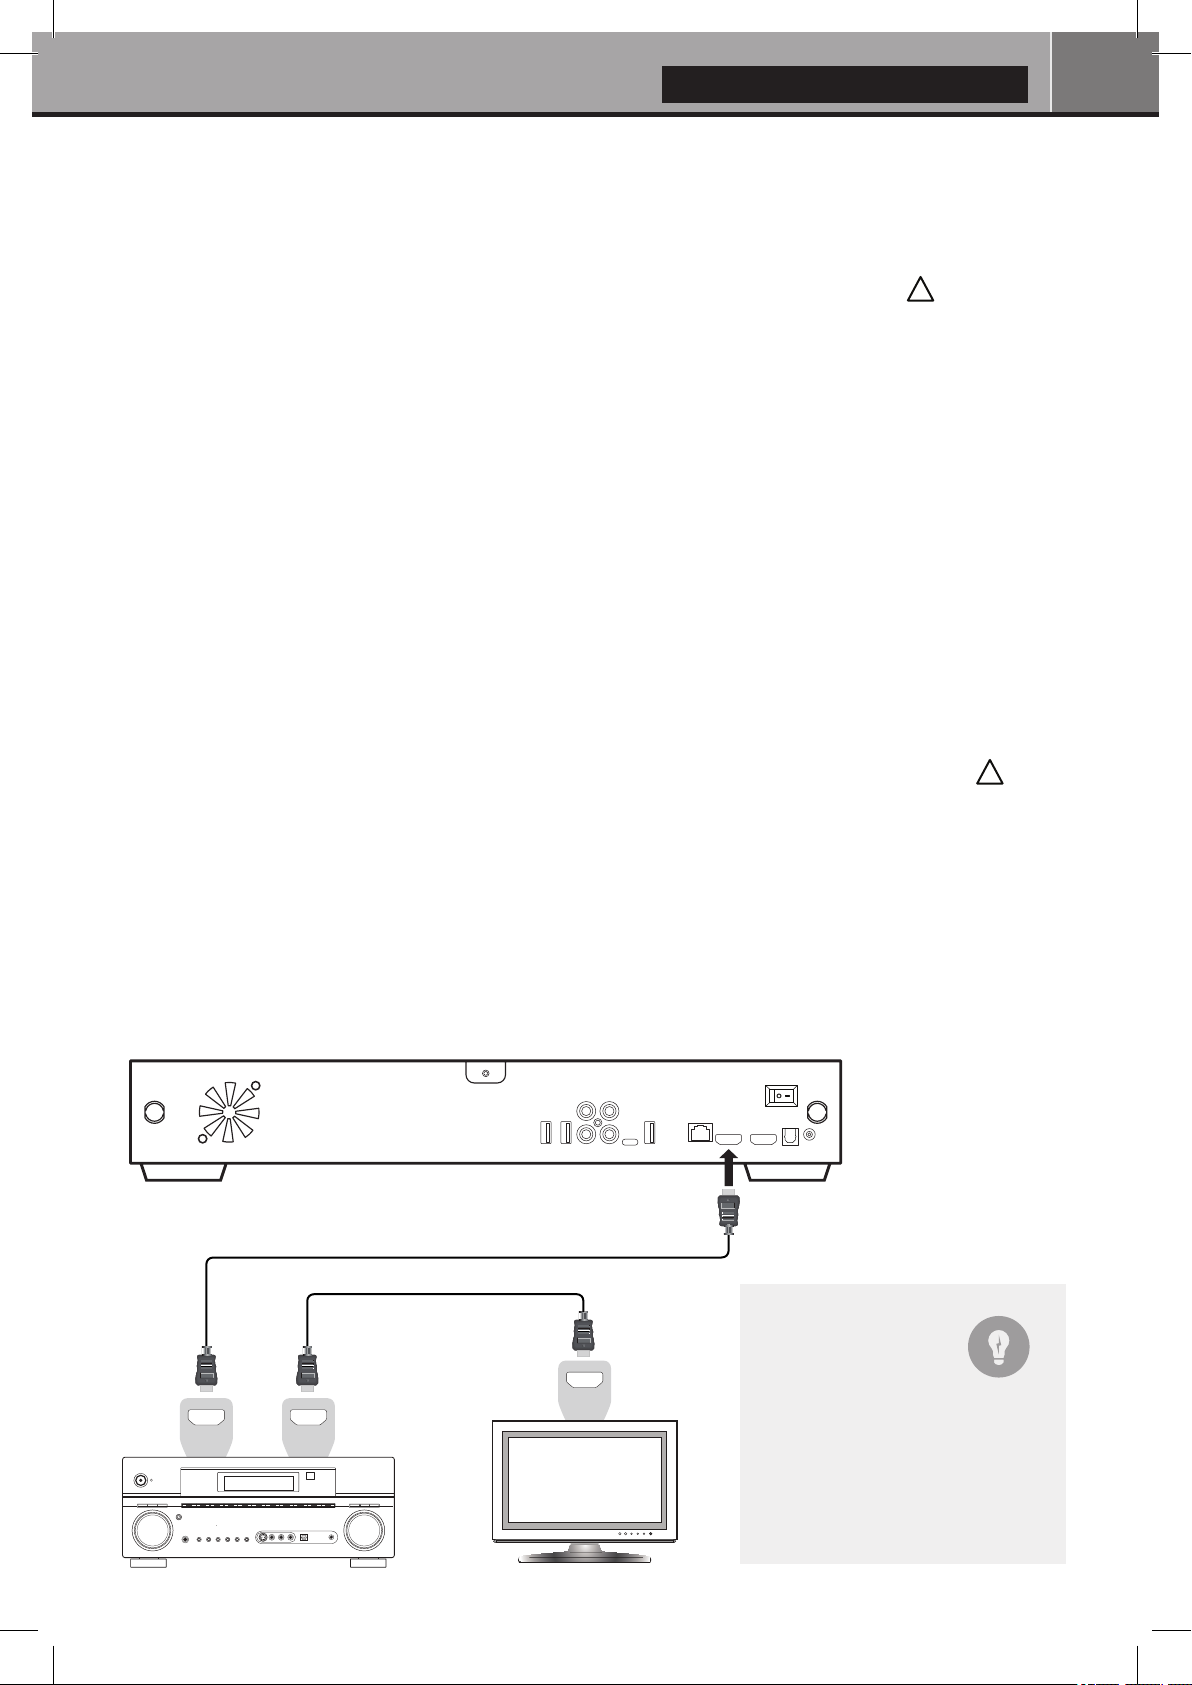
***Please make sure to use HDMI OUT and not HDMI IN connection to link your Zappiti to your
TV or your front projector (or to your AV receiver or soundbar if you are using it).
Switch on the Zappiti. The media player will perform its initial boot up procedure, which may take up to
about 1 minute (depends on apps). During the boot up procedure, “Z” logo is shown on the TV.
***If you have a black screen or no video signal, please visit the Zappiti Knowledge Base.
!
zappiti.uservoice.com/knowledgebase
Finally, you should see the main screen with access to applications Video (Media Center), Music and
Explorer. On the top you’ll find access to the Settings and MyApps.
To adjust the player settings, press the GREEN button of your RC or click on “SETTINGS” item located
on the top of the screen. In particular, you can adjust the following settings: video, audio, and network
configurations. To choose the language of the Android menus, please use: Settings / Personal /
Language & input setting. Zappiti apps use specific language settings. To set Default Audio Language,
during video playback, press the MENU button of your RC, and click on Advance. Then you will be able
to set the Default Audio and Subtitle language.
Zappiti back panel
HDMI Out
HDMI
IN
HDMI
IN
AV Receiver TV / projector
HDMI
OUT
AUDIO/VIDEO MULTI-CHANNEL
RECEIVER
Black Border
& Overscan
If you have a black border
problem all around the screen,
press the "zoom" button on the
remote control (3). You can
also adjust the aspect ratio of
your TV (Fit to Screen option).
Page 10
10
Quick Start Guide
Firmware Upgrade
To access the Firmware upgrade page and update the firmware online or via USB, please press the
BLUE button of the RC. To check the most recent changes, latest firmware versions and get recovery
firmware, please visit our website at: zappiti.com/firmwares
Audio Setup
The Audio section of the Settings Menu allows you to configure preferences for audio output formats.
To access the audio settings, please go to “Settings/Device/Sound and notification”. If you are
using an AV receiver compatible with HDMI and multichannel audio, please set the HDMI output to
“Auto”. If your AV receiver is compatible HDMI but not compatible HDR, please connect your Zappiti
to your AV receiver using the S/PDIF output. You can also force it to “RAW” (Bitstream). If your AV
receiver is not compatible with DTS and Dolby Digital, please set the S/PDIF output to LPCM 2Ch.
Force SD Audio: The S/PDIF does not support HD Audio such as DTS-HD or Dolby TrueHD. To
convert HD audio into SD Audio (DTS-HD to DTS or Dolby TrueHD to Dolby Digital), please switch “ON”
the Force SD Audio option located in Settings/Developer options. More info:
zappiti.uservoice.com/knowledgebase
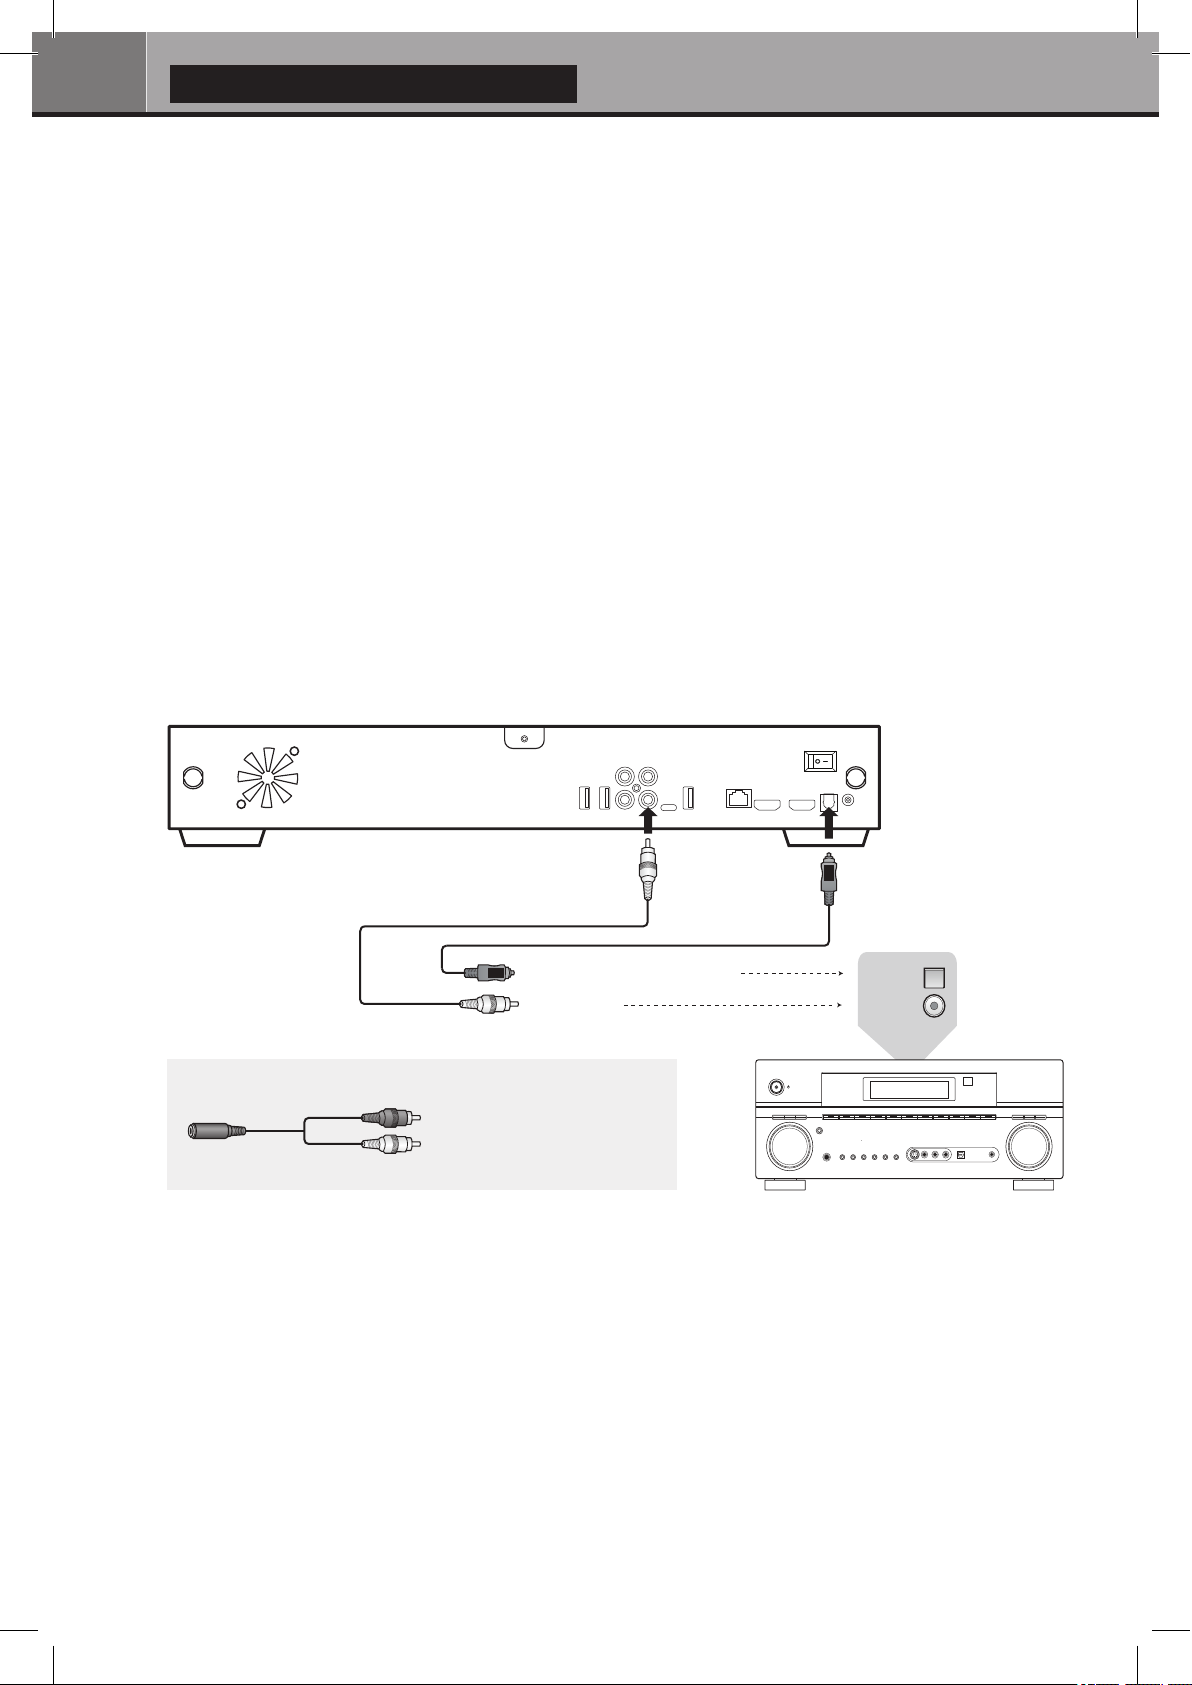
Zappiti back panel
Please connect
one of these cables:
SPDIF Optical (Toshlink) cable
Coaxial cable
Headphones
Zappiti RCA OutputHeadphones
For video playback without audio-video sync issue, please choose a
wireless headphones compatible with Apt-X Low Latency technology.
To connect wired headphones,
please use RCA to 3.5 mm
female adapter. Then, connect
the RCA connectors to the
RCA inputs of the Zappiti.
Coaxial
Optical
Optical In
Coaxial In
AV Receiver
AUDIO/VIDEO MULTI-CHANNEL
RECEIVER
Video Setup
By default, the Zappiti is able to auto adjust the video output. But you can manually select the resolution
and frequency of the GUI. To force the output resolution, please switch “ON” the Ignoring HDMI EDID
option located in Settings/Developer options. Then go back to the general settings by pressing the
BACK button of your RC, and go to “Display”. You will be able to see all the output modes available
in Manual Settings but the Auto mode will be not available anymore. To adjust the Color Space and the
Deep Color (OFF/10/12-Bit), go to Settings/Developer options. For the best performances, we
advise you the following settings: Y’CbCr 4:4:4 / 10-Bit (if your display is compatible).
Note: the auto framerate is still activated even if you force the HDMI output in a specific
resolution/frequency, however, in some cases, the manual resolution mode can generate some issues.
Page 11

English
Use the RC buttons UP, DOWN, LEFT, RIGHT, OK, RETURN to navigate through the player menu.
Use the MENU RC button to show the list of available commands. Use the INFO RC button to show
the INFO panel.
The Home Page features 3 main applications: Zappiti Video, Zappiti Music and Zappiti Explorer.
Zappiti Video
Zappiti Video is a media player, software and entertainment hub, featuring an impressive user interface
with movie covers. With Zappiti Video, you can experience your entire movie and TV series collection,
browse and play your titles from local and network storage media, view cast information, download
subtitles, play trailers and much more.
Zappiti Music
Zappiti Music is an app dedicated to music playback designed for Zappiti players. Listen to your favorite
tracks, and manage your music collection in a simple way. With Zappiti Music you can play your favorite
music stored anywhere on your home network or on a local drive connected to your Zappiti media
player. With Zappiti Music, you can control your music playback through your Zappiti media player,
from your smartphone or tablet (iOS or Android) without the need of TV. Select the Zappiti media player
you want to control and manage your music collection directly from your tablet or smartphone.
11
Zappiti Explorer
Zappiti Explorer is a File Manager. You can easy explore and launch playback of your music, pictures
and video content. But Zappiti Explorer is more than just a file explorer — it also provides many
advanced multimedia features and a complete file management system.
Before to start using the Zappiti apps, you have to create a Zappiti account and register your device.
First, connect your media player to Internet through Wi-Fi or Ethernet. Please launch one app and
select you language. Then, follow the on-screen instructions. If you have never used Zappiti before and
if you don’t have any Zappiti account, please click on Create an account now.
Login
Email
Password
Login
Create an account now
Forgotten password?Return
Then, you’ll be invited to enter your Zappiti Token. The token number is printed on a sticker located
under the Zappiti case. You’ll have to enter it only one time. Then, all the info of your account will be
saved in the internal memory.
Click here to create
a Zappiti account
Note: If you do not have any Internet connection, you can explore your files using:
MyApps/Media Browser.
Page 12

12
Quick Start Guide
External USB Drive
If you are using an external HDD 2.5’’, please use
the USB cable provided with your HDD for best
performance.
Zappiti back panel
External HDD
Using Internal Drive
To insert the internal 3.5’’ SATA HDD, please open the rack door, then insert the drive into the internal
enclosure until 3/4, then complete the installation by closing the door. This operation will complete the
installation of the disk into the rack. The Zappiti media player is compatible with drives formatted in
NTFS, ExFAT, FAT16, FAT32, HFS, EXT2/3. It is not possible to format hard drives via the Zappiti. You
must use a computer for this purpose. In case of NTFS GPT, please use 64 Ko allocation tables. To use
a 2.5" internal drive, please use an adapter box.
Connecting USB Devices
You can connect your USB drives to one of the
available USB ports. If you want to play video
files, USB 2.0 is enough to support very high
bitrate (up to 480 Mbps). If you want to transfer
files, we advise you to use USB 3.0 or USB
Type-C (not available on Zappiti Mini 4K HDR
model).
***Note: A dedicated USB icon located on the
home page can help you to detect if the drive is
connected correctly.
Power provided by USB ports may not be
enough to allow the USB drive to function
correctly; depending on the drive. Please do not
disconnect or switch off the USB drive during
write (copy / transfer) operations.
The Zappiti players are compatible with UASP
HDD docking stations as well as USB hubs.
Note: Please make sure that your hard drive is correctly formatted before you insert it in the tray.
The hard drives dedicated to NAS are not compatible.
More info: zappiti.uservoice.com/knowledgebase
Pre-formated HDDs are
available on sale here:
store.zappiti.com
Zappiti Front Vue
Open the tray and insert the HDD,
keeping the connectors on the front
Using SD / MMC Memory Cards
To use a memory card, insert it in the memory card slot located on the left side of the media player. It will be
detected as USB device (USB icon on the home page). Some SD memory cards may not be recognized by
the player or may work incorrectly ; in such case, please use a different model of memory card.
Page 13

English
Accessing Network Drives and Access to Zappiti Storage
The Zappiti media player features a Samba client (SMB) to explore and playback your videos, pictures
and music, located on your local network (NAS, computers, ...). The SMB Server is activated by default.
You can access your Zappiti using the Zappiti IP address as following: \\192.168.1.15 (example). To find
the IP address of your Zappiti, go to: SETTINGS (GREEN button of the RC) / Ethernet Configuration.
More info about SMB Server, FTP and DLNA Server here: zappiti.uservoice.com/knowledgebase
The Zappiti media player also features a function called Zappiti Share, based on Samba server technology.
This allows you to access your video, pictures and music content, located on internal HDDs (or local drive
connected in USB to the media player) from another Zappiti player 4K or 4K HDR through your local
network. You can playback video contents, in 5 different rooms simultaneously, equipped with Zappiti
media players. Thanks to Zappiti Share, a NAS server or computer is not required to stream your
media content in different rooms of your home. To use Zappiti Share, please select Zappiti Share
instead of Local drive in the Zappiti Video Folder Configuration.
13
How to Transfer your Files Using Zappiti Explorer
Copy
Cut
Paste
Rename
Delete
Zappiti Explorer is a File Explorer, but also a
complete file manager with features such as:
Copy, Cut, Paste, Select, Select All, Delete, and
Rename. Zappiti Explorer is also multi-tasking. To
access these functions and display the task
manager, press the MENU button on the Zappiti's
remote control.
Video And Audio Playback Options
The Zappiti Explorer MENU also provides access
to various video and audio playback options such
as sequencing of file playback, loop playback, ...
Slideshow Function
Zappiti Explorer offers a slideshow function with
cross fades and transition effects. To access the
slide show display settings including the frame
time, transitions and effects, press the MENU
button on the remote control (slide show off). To
add a music to a slide show, simply place an audio
file in the folder containing your pictures. If several
audio files are in the same folder as the photos,
the tracks will be linked one after the other and
played in alphanumeric order.
How to Install a New App
To install a new app, please go to My Apps /
AptoideTV. You’ll find many apps dedicated
to media players that can be controlled by RC.
You can also use GooglePlay but some apps
may be not compatible with the Zappiti. If you
want to install an APK from a USB stick, please
use Zappiti Explorer or MediaBrowser.
Properties
To view the complete technical information of
the file being played, press the INFO button on
the remote control. You will find in particular,
the datarate, framerate, video and audio codec
and format, size, resolution, and more...
How to add an App Shortcut
to the Home Page
To add a shortcut to a favorite app on the
home page, please click on icon and select
your favorite app to add it to the home page.
Page 14

14
Quick Start Guide
Ethernet
The Zappiti provides two network connection methods: through Ethernet cable or through the built-in
wireless LAN adapter. For the fastest and most stable network connection, we recommend using an
Ethernet cable whenever possible. Plug one end of a network cable (straight Ethernet cable) into the
LAN port on the back of the Zappiti (Category 5E or more). Then, plug the other end of the network cable
into a LAN port on the broadband router or modem (or switch if you are using one).
Zappiti rear panel
LAN
Internet Connection
Internet
Ethernet cable
Wi-Fi
To set the wireless feature, please click
on the “Settings” icon located on the
top of the home page, then click on the
Wi-Fi settings. You will be able to select
a wireless network and enter the
security password.
WAN 1 2 LAN 3 4
Router / Modem
Bluetooth
The Zappiti player is compatible with
devices using Bluetooth technology. To
access the list of Bluetooth-enabled
devices, go to Settings / Bluetooth.
Then switch the option to “On”.
Zappiti Music
On the main page of the Zappiti, you will find Zappiti Music, an app dedicated to Music playback. Use the
UP/DOWN button to browse your music folders. Use the RIGHT button to access the additional options.
Press ENTER on Favorite button to mark the current track as Favorite. Press ENTER 2 times on Favorite
button to mark the current track as Excluded track. To create a folder shortcut, select a folder, press MENU
and press ENTER on Create a shortcut. The shortcut will be placed on the Zappiti Music home page. Press
ENTER on to filter a music title by entering a keyword.
Favorite Excluded Unchained Chained Shuffle ABC order Loop Loop Off Playlist
Audio & Video Mirorring
For more info about mirorring audio & video, please search
“mirroring” using the search engine in the Knowledge Base
here: zappiti.uservoice.com/knowledgebase
Add to
playlist
How to Control your Zappiti Using your Tablet / Smartphone
You can also control the Music and Video playback using the dedicated apps named Zappiti Video
Control and Zappiti Music Control available for iOS and Android. To install them, switch on your tablet or
smartphone, then go to the Play Store (Android) or App Store and search them using Zappiti control
keywords. Then, launch the app and enter your zappiti account credentials. You will be access to you
video and music contents and control the music without the need of TV. More info on: zappiti.com
Page 15

English
How to Create a Movie Collection in Zappiti Video
Before starting, you must create a folder named MOVIE on your HDD. Then, place all your movies inside
this folder. If you have TV shows, place them in a dedicated folder named SERIES or TV SHOWS.
Movies
1. On your NAS or HDD, please create a movie folder named MOVIES. Place all your movie files in it.
2. Your files should be named with the title of each movie. For example, the file of the movie "Metropolis"
should be named "Metropolis.mkv". You can create subfolders in the folder MOVIES if you want.
TV Shows / TV Series
1. On your NAS or HDD, please create a folder named SERIES or TV SHOWS .
2. Then, create a subfolder for each TV Show / Series. You can create a subfolder for each season if you
want. Then, place all your TV Show episodes in it.
3. Your episodes must be named as: "Seriename s01e01" ("Seriename 1x01" also supported).
For the special episodes, please name them as: ‘‘s00e01’’.
15
Connection
Start your Zappiti. On the main page,
click on the first button named VIDEO.
Choose your language and enter your
login. If you do not have any Zappiti
account, please report to page 11.
Then, click on the button Connection
located on the bottom of the window.
Zappiti Servers
Collections
my.email@mailbox.comZappiti Accounts
Zappiti Cloud
Collection 1
Connection
On the Folder configuration window, please click on Add a folder containing movies (or TV Shows).
If your files are located on a local storage, please click on Local drives. If you want to share your video
contents with others Zappiti players though your local network, click on Zappiti Share. Then click on the
storage name. Next, browse it and go inside the Movies (or TV Shows) folder. Finally, when you are in
the folder MOVIES (or TV SHOWS) click on OK button.
WARNING! When you are in the folder containing your movies or TV Shows DON'T EXPLORE THE
MOVIE FOLDERS! Just press OK button. If not, Zappiti will analyse only one movie instead of all the
movies. You should add your "MOVIES" folder. Do not add a folder containing only one movie.
Your folder will be added in the MOVIE folder list (or TV SHOW). You can check the path by looking on
the generated path located between "MOVIES" button and "Edit" button. Your path should stop to the
"MOVIES" folder (or "FILMS" folder). If your path is incorrect, you can modify it by using the Edit button.
Press Delete button to delete the folder from Zappiti. (Don't worry! Your movies will not be deleted).
If you want to add another folder containing movies or TV Shows, please click on the dedicated button.
Then, press RETURN if you don’t want to
Folders
Files
Storage ID: fs3sho54suey-ya55h4st7e-syot563lj3a
Add a folder containing movies
Add a folder containing TV shows
EditMovies /storage/HDD/Films
Delete
add another folder containing movies.
Zappiti will start to scan your folders and
analyse your video contents. You can see
the current scan task in a dedicated
panel. To close the current task panel,
press the RETURN button of your RC. If
you close it, you can display it again
through the MENU button of your RC.
Done! Now you can enjoy your Zappiti collection! To access to the settings panel again, press the MENU
button on your remote control. In the settings panel, you’ll find many options such as: language (GUI and
identification), translations, templates, top movie cover, glass effect, parental control, identification on
startup and other options, terms to exclude, token and other account administration.
More info here: zappiti.uservoice.com/knowledgebase
Page 16

16
Quick Start Guide
ALL
In this section you can find all your video contents sorted by
alphabetical order.
/storage/HDD/Films
Storage ID: 000000000000000
MOVIES
In this section you can find all your movies.
TV SHOWS
In this section you can find all your TV Shows and Series Episodes.
RECENT
In this section you can find the most recent video contents.
If you get a wrong storage
ID with « 00000000000 »,
it means that Zappiti
cannot write on the drive
due a defective sector.
Please format it again.
To access to additional features,
press MENU button of your IR
remote control.
CATEGORIES
In this section you can find your video contents sorted by categories.
Adding a Movie File
When you add a movie file to your ‘Movies’ folder, Zappiti will automatically index it during the next restart
of the application. To force the analysis, please use the dedicated option located in the Zappiti Menu.
(Please use the MENU button on the remote).
Deleting a Movie File
When you delete a movie file from your ‘Movies’ folder, Zappiti automatically removes its cover and
descriptive page from your Zappiti collection during the next analysis. You can manually remove a movie
using the Delete option located in the Zappiti menu.
How to Identify Unidentified Movies & TV Shows
Even if your files are not named correctly with the name of the film (or TV show), Zappiti can identify it
but only if a Zappiti user previously identified it manually. If you are living in a country where Zappiti is
not yet popular, which could happened often at the beginning, mostly if you are using a Zappiti NAS Rip
because the generated files are rarely named correctly. But day after day, Zappiti Db will become more
and more reliable as users will manually identify files of movies and TV series.
Press MENU of the RC and select X to Identify. You’ll see the list of the files that are not identified. Then,
click on the button named Identify... On the Identify window, please enter again the movie name.
You can also enter the IMDb, TMDb or TVDb ID code to identify your movie or your TV show. On TMDb,
TVDb or IMDb, the ID code is located in the URL of the movie page. For instance, the URL of the movie
"Metropolis" will be "http://www.imdb.com/title/tt0017136/". Enter the ID number "tt0017136" into the
field instead of the title name. Then press the "Search" button. Zappiti will find the right movie at 100%.
If your movie or TV show does not exist on TMDb or TVDb, you can add it by creating an account on it.
3D, 4K and UHD Files
The 3D BD ISO, UHD ISO and 4K ISO files as well as BDMV folders for 3D and 4K UHD are not identified
automatically. To identify the container, please add the following tags in the name as following:
3D Files: "3D". (For exemple: "Metropolis.3D.iso").
UHD Files: "UHD" or "ULTRAHD" or "ULTRA-HD". (For exemple: "Metropolis.UHD.iso").
4K Files: "4K" or "4096" (For exemple: "Metropolis.2160x4096.iso").
Page 17

English
17
Parental Control
To tag a movie as Allow for children, select a movie (or a group
of movies), then press the MENU button on the RC and click on
Allow for children. Then, enter a 4-digit pin code.
Personal Categories
By default, the movies and TV shows are automatically associated to
categories. But you can create your own categories and associate
manually your movies. To create a category, go the categories, then
press MENU and click on Create a categorie. Then, enter a name and
choose an icon. The contextual menu give also access to additional
options such as: modify the position of the categories, edit or remove.
Zappiti On Start-Up
To activate this function, press MENU, then go to Settings, click on
the second tab and switch ON the option in the list.
Parental code
Please enter a 4-digit pin code.
This code will allow you to lock your collection
and restrict access to movie tagged ‘‘Allowed for
children’’.
7
*
Cancel
Auto-start
Auto launch Zappiti on start-up
Filter and Sort
To sort your movies, press MENU, then go to Filter and sort. Then
click on the first item. Then select the sorting: A to Z, Z to A,
Release date, Duration, Addition... To filter your movies, please
click the following options: Seen, Ongoing, or Not seen.
Subtitle Display Options
To change the subtitle display options such as color, position, or
sync, press the MENU button on the remote control during video
playback, then go to Subtitle and change the desired option. To
change the vertical position of the Blu-ray subtitles (PGS), go to
the ADVANCE section, then click on PGS Subtitle Offset and
decrease or increase the vertical position of the subtitles. To add
external subtitles, please use the same name of the video file as
following: Metropolis.mkv / Metropolis-en.srt / Metropolis-es.srt
User Support & Zappiti Db
For User Support, please contact us at:
tickets@zappiti.uservoice.com
Filter and sort
Decreasing Release date
Seen videos
Ongoing videos
Not seen videos
Third Party
Control
You can control your Zappiti
using third party devices
such as Control4, Crestron,
ProControl, RTI, Logitech,
Pronto, ...
More info:
zappiti.uservoice.com/
knowledgebase
To join the Zappiti Db Community and create movie covers and
fanarts for Zappiti, please contact us at:
contact@zappiti.com
Factory Reset
To reset the Zappiti, go to
MyApps / Factory Reset.
Page 18

18
Guide de démarrage rapide
Introduction
Le Zappiti One 4K HDR est un lecteur multimédia compatible HDMI 2.0, 10-bits, 4K60p, HDR et 3D.
Fonctions clés
HDR : Affichez vos vidéos HDR pour plus de dynamique sur votre écran compatible HDR.
●
4K 50/60p : Affichez vos contenus vidéo de résolution 3840x2160p en 50 Hz/60 Hz.
●
3D : Compatibilité 3D MVC (Frame Packing), SbS et Top Bottom. Conversion 2D/3D.
●
MKV : Lecture de contenu vidéo SD, HD et UHD en format MKV et autres formats de fichiers
●
vidéo récents, tels que HEVC / H.265 pour une qualité supérieure jusqu’à plus de 400 Mb/s.
Rack à disque dur à échange à chaud : Insérez et interchangez facilement vos HDDs.
●
Lecteur réseau : Lisez vos contenus multimédia stockés sur votre réseau local via SMB.
●
Ports USB : Connectez facilement des disques durs, clés USB, et autres périphériques USB.
●
Port USB 3.0 et Type-C : Lisez ou copiez vos fichiers à très haut débit.
●
Connectique A/V complète : Sorties audio numérique S/PDIF coaxiale et optique, audio
●
analogique, HDMI 2.0 CEC, Vidéo Composite, report IR.
Son home cinéma multicanal : Bitstream, downmix stéréo.
●
Zappiti Music Control : Pilotez la musique depuis votre tablette / smartphone sans TV.
●
Flexibilité de sortie vidéo : Affichage vidéo dans différentes résolutions et fréquences, dont
●
SD, 1080p (1920x1080), Ultra HD (3840x2160p) et 4K (4096x2160p) jusqu’à 12 bits.
Auto Framerate : Détection automatique de la fréquence d’image 23,976/24/29,97/30/50/60p
●
Playback Memory : Reprise de lecture automatique depuis la dernière position de lecture.
●
Langue et sous-titres par défaut : Choix automatique de la langue et sous-titres par défaut.
●
Explorateur de fichiers : Explorateur et gestionnaire de fichiers (copier-coller, supprimer, ...).
●
Fonctions de lecture audio : Prise en charge des pochettes d’album et tags, lecture de
●
dossier, lecture mélangée, favoris, répétition, boucle, listes de lecture (playlists).
Diaporama musical : Fonction diaporama musical avec options de transitions dynamiques.
●
Télécommande rétro-éclairée : Télécommande rétro-éclairée avec boutons d’accès directs.
●
Wi-Fi 5 GHz double antennes détachables : Lecture et transfert sans fil à haut débit.
●
Voter pour les futures fonctionnalités
Pour proposer une nouvelle fonctionnalité ou voter pour une fonction à venir, consulter la page
suivante: zappiti.uservoice.com
Page 19

Français
19
Système de jaquettes intégré
●
Jaquettes : Système d’exploration par jaquettes pour vos films et séries TV avec présentation
des informations (sous-titres, acteurs, réalisateur, date de sortie...). Indexation automatique des
films et séries TV par genre. Affichage sur 2, 3, 4 ou 5 lignes de jaquettes.
●
Moteur de recherche : Retrouvez facilement vos films et séries TV - puissant moteur de
recherche, filtres et tris (acteurs, réalisateur, durée, note, date de sortie, …).
●
Édition depuis le lecteur Zappiti : Éditez ou supprimez les fiches de films directement à l'aide
de la télécommande. Changez les posters, éditez les synopsis, modifiez la catégorie, etc.
●
Zappiti au démarrage : Lancez automatiquement Zappiti Video au démarrage du lecteur.
●
Multi collections : Créez une collection de films et séries TV par membre de votre famille ou par
disque dur et passez facilement de l'une à l'autre.
●
Contrôle parental : Grâce à la fonction de contrôle parental, vous pourrez marquer vos films en
tant que « film pour enfant » et verrouiller l'accès aux autres films avec un code PIN. Ainsi, vos
enfants pourront accéder en toute sécurité à leurs films! En plus, le mode enfant propose un
accès direct aux films sans les synopsis pour une plus grande simplicité d'utilisation.
●
Sagas : Les films d’une saga sont automatiquement placés dans un groupe et triés par date de
sortie. Une pochette dédiée à la collection est associée au groupe et les films sont affichés dans
un magnifique carousel 3D du plus bel effet!
●
Zappiti Offline (hors ligne) : Sauvegardez votre collection dans le lecteur pour une utilisation
locale sans connection Internet.
●
Bandes annonces : Visualisez la bande annonce de vos films en langue française.
●
Bonus Live : Accédez aux contenus associés à vos films tels que making of, scènes coupées,
extraits, critiques, bêtisiers, bande originales.
●
Téléchargement automatique de sous-titres : Grâce à Zappiti, vous pouvez télécharger en un
clic les sous-titres d'un épisode de série TV ou d'un film.
●
Zappiti Explorer : Explorez vos dossiers et lancez la lecture de vos fichiers vidéo d'une manière
simple et rapide.
Page 20

20
Guide de démarrage rapide
Accessoires fournis
1. Zappiti Duo 4K HDR
2. Télécommande IR
3. Câble Ethernet
4. Câble USB Type C
5. Câble HDMI 4K
6. Adaptateur secteur
7. Manuel d’utilisation
1
5
2
3 4
76
Câble HDMI
Le câble fourni est compatible 4K HDR. Pour de plus grandes longueurs, nous vous
recommandons les câbles proposés sur le site store.zappiti.com. Tous les câbles
proposés ont été testés en résolution 3840x2160 à la fréquence de 60 Hz, et en 4:4:4 /
10 bits en situation réelle sur des lecteurs Zappiti 4K HDR. En choisissant l’un des
câbles proposés par Zappiti, vous aurez la certitude d’un fonctionnement optimal. En
effet, un grand nombre de câbles HDMI pourtant certifiés 4K 60p et 2.0 ne sont pas
compatibles avec les flux vidéo boostés des lecteurs Zappiti et il peut arriver que
l’image présente des saccades, des pauses, des pixels blancs, ou un écran noir.
NOTE : des accessoires supplémentaires (optionnels) peuvent être inclus dans la boîte en fonction du pays,
du distributeur et de la configuration du lecteur.
Page 21

Français
21
Face avant
1
2. Indicateur LED1. USB 2.0 host 3. Racks à disque dur
Face arrière
1 2
1. Antennes Wi-Fi
2. USB 2.0 Host
3. Sortie audio analogique Gauche/Droite
4. Vidéo Composite
5. Sortie audio numérique coaxiale
6. USB Type-C
7. USB 3.0 Host
2 133
3
5 6 8 10 12
4
8. Ethernet 10/100/1000 (LAN)
9. Sortie HDMI 2.0
10. Entrée HDMI 2.0
11. Bouton d’allumage / extinction (ON/OFF)
12. Sortie audio numérique optique
13. Connecteur d’alimentation 12V / 2A
11 197
13
Côté droit
1. USB 2.0 Host
2. Bouton « Restore »
3. Lecteur de cartes
mémoires SD/MMC
Côté gauche
1 2
3
Page 22

22
Guide de démarrage rapide
Télécommande
1. POWER: Bouton d’Allumage/Extinction.
2. POWER ON: Allumage.
3. ZOOM: Rognage de l’écran (overscan).
4. DELETE: Suppression / Change le thème graphique.
5. POWER OFF: Extinction.
6. ASP. RATIO: Changement de ratio.
7. DIMMER: Allumage/Extinction du logo.
8. 3D: 2D / 3D.
9. PREV: Chapitre précédent.
10. PLAY/PAUSE: Lecture/Pause.
11. NEXT: Chapitre suivant.
12. ZAPPITI: Raccourci Zappiti Media Center.
13. REPEAT: Répétition de lecture (OFF, piste, tous).
14. EXPLORER: Raccourci Zappiti Explorer.
15. ROUGE: Raccourci pour future fonction.
16. VERT: Réglages Android (Settings).
17. JAUNE: Enregistrement HDMI (HDMI IN).
18. BLEU: Mises à jour firmware.
19. HOME: Retour à la page d’accueil.
20. MOUSE: Mode souris virtuelle.
21. MENU: Menu contextuel.
22. BACK: Arrêt de la lecture en cours
ou retour au menu ou mode précédent.
23/25. HAUT/BAS: Avance/Retour rapide.
24/26. GAUCHE/DROITE: Avance/Retour 1 min.
27. OK: Entrer ou valider.
28-29. VOLUME +/-: Modifier le volume.
30. INFO: Affiche le panneau d’infos techniques.
31-32. PAGE+/-: Avance/Retour 10 sec.
33. MUTE: Désactivation/Activation de l’audio.
34. Touches numériques:
- 1-9: accès direct (10 - 90% de la durée).
- 0: Réinitialisation de la position de lecture.
35. SUBTITLE: Changement de sous-titres.
36. AUDIO: Changement de piste audio.
37-41. TV: Touches programmables.
37. POWER: ON/OFF.
38-39. VOLUME +/-: Modifier le volume.
41. LEARN: Programmation des touches.
Pression rapide: Rétro-éclairage des touches.
Note: la télécommande est rétro-éclairée.
10
13
12
15
16
19
21
27
24
25
30
28
29
34
35
37
38
41
1
3
2
4
5
7
6
9
8
11
14
18
17
20
23
22
26
31
32
33
36
40
39
LEARN
Programmation des touches
1. Pressez longtemps le bouton LEARN (41) jusqu'à ce que le bouton ON soit allumé en Rouge (non clignotant).
2. Prenez la télécommande de la TV et pressez longuement la touche à apprendre (ex. Vol+) jusqu’au clignotement
en Rouge du bouton ON de la télécommande Zappiti.
3. Prenez la télécommande Zappiti et pressez l’une des touches programmables à affecter au bouton enregistré
(ex. Vol+).
4. Recommencez les opérations des points 2 et 3 pour les autres touches à programmer (37-40).
5. Pour terminer la programmation, pressez rapidement le bouton LEARN (41).
Note: Il est possible de connecter un clavier et une souris informatique au lecteur. Pour passer la reconnaissance du
clavier en AZERTY, commencez par connecter votre clavier sur l’un des ports USB. Pressez la touche VERTE de
la télécommande pour accéder aux réglages Android. Puis, cliquez sur Langues et saisie. Enfin, choisissez la langue
française dans Clavier actuel, Clavier Android et Clavier Physique. Attention! La souris n’est pas compatible avec
Zappiti Video, Zappiti Music et Zappiti Explorer. Mais elle peut être utile pour des applications tierces (GooglePlay).
Page 23

Français
NOTES :
● Utilisez des piles de type AA et pensez à respecter la polarité des piles lors de l’insertion dans la télécommande.
● Retirez le film plastique de protection situé sur le logo Z en façade du Zappiti. Le récepteur IR est situé derrière.
● Si la télécommande ne fonctionne que sur une courte distance ou ne fonctionne pas du tout, remplacez les piles.
● Certaines touches de la télécommande peuvent avoir plusieurs
● Dirigez bien la télécommande vers le lecteur. Aucun obstacle ne doit se trouver entre la télécommande et le lecteur.
fonctions selon le mode de lecture.
Démarrage
Pour la bonne marche du lecteur, assurez-vous d’avoir au moins 10 cm d’espace libre de part et d'autre
du lecteur. Vérifiez que les piles sont correctement installées dans la télécommande et dans le bon
sens de polarité. Connectez le lecteur Zappiti à votre téléviseur ou à tout autre équipement A/V de
manière appropriée. Préférez l’utilisation de la connexion HDMI pour une qualité d’image et de son
optimale. ATTENTION ! Veillez à bien connecter votre TV sur le connecteur HDMI OUT et non sur le
connecteur HDMI IN du lecteur Zappiti. Le câble HDMI fourni est compatible 4K est nous recommandons
son usage. Si vous souhaitez utiliser un autre cable HDMI, vérifiez qu’il soit bien compatible 4K et
surtout certifié 18 Gb/s (HDMI 2.0). Assurez vous d’éteindre le lecteur ainsi que tous les équipements
audio vidéo avant d’effectuer les branchements. Vérifiez bien que votre téléviseur et vos différents
appareils soient bien configurés au niveau des entrées, puis allumez vos appareils en commencant par
votre téléviseur, puis votre ampli ou votre barre de son et enfin allumez le lecteur Zappiti en commutant
le bouton d’alimentation situé à l’arrière du lecteur sur « ON ». Vous devriez voir un logo « Z » de
chargement puis la page d’accueil s’affichera.
En cas de problème lors de l’allumage, veuillez consulter la base de connaissances en ligne:
zappiti.uservoice.com/knowledgebase
23
Pour configurer le lecteur en Français, allez dans le menu suivant : Settings / Personal / Language
& input. Le bouton Settings (illustré d’un engrenage sur la page d’accueil) vous permettra d’accéder
aux réglages vidéo et audio. Vous pouvez également y accéder directement en pressant le bouton
VERT de la télécommande. Pour configurer la langue et les sous-titres par défaut pour les contenus
vidéo, pressez la touche MENU en cours de lecture vidéo, puis cliquez sur Advance et choisissez la
langue par défaut de votre choix. Pour regarder vos films par défaut en VF, sélectionnez OFF dans les
réglages des sous-titres par défaut. Pour la VOST, choisissez Français pour les sous-titres.
Zappiti : panneau arrière
HDMI Out (sortie HDMI)
Bordure noire
(overscan)
HDMI
IN
HDMI
IN
Ampli Home Cinéma TV / projecteur
HDMI
OUT
AUDIO/VIDEO MULTI-CHANNEL
RECEIVER
Si vous rencontrez un problème
de bordure noire tout autour de
l’écran, pressez la touche
ZOOM de la télécommande (3).
Vous pouvez aussi choisir le
mode Adapté à l’écran dans
les réglages de ratio d’image
de votre TV.
Page 24

24
Guide de démarrage rapide
Mise à jour firmware
Pour accéder à la page de mise à jour firmware (micrologiciel), avec installation en ligne ou via USB,
appuyez sur le bouton BLEU de la télécommande. zappiti.com/FR/zappiti_player_firmwares.html
Réglages audio
La section Audio du menu Paramètres (Settings) vous permet de configurer les préférences pour les
formats de sortie audio. Pour accéder aux paramètres audio, allez dans «Settings / Son et
notification». Si vous utilisez un récepteur AV compatible HDMI et multicanal, réglez la sortie HDMI
sur «Auto». Vous pouvez également le forcer en «RAW» (Bitstream). Si votre récepteur AV n'est pas
compatible HDMI, réglez la sortie S/PDIF sur «RAW» (bitstream) pour une configuration en multicanal,
ou «LPCM 2Ch» pour une configuration en stéréo.
Forcer l’Audio en SD: Le S/PDIF ne prend pas en charge l’audio HD. Pour convertir l’audio HD en
audio SD (DTS-HD en DTS ou Dolby TrueHD en Dolby Digital), activez l’option Forcer l’Audio en SD
située dans Settings / Options développeurs ou en passant par MENU / Advance Settings en cours
de lecture vidéo. En savoir plus: zappiti.uservoice.com/knowledgebase
Panneau arrière du Zappiti
Casque audio
Casque
Zappiti
Connectez l’un des câbles suivants:
Câble SPDIF optique (Toshlink)
Câble coaxial 75 Ohms
Pour connecter un
casque audio filaire, utilisez
un adaptateur RCA vers
Coaxial
Optical
Optical In
Coaxial In
AUDIO/VIDEO MULTI-CHANNEL
RECEIVER
Mini-Jack 3.5 femelle.
Casque sans fil
Pour éviter les problèmes de synchronisation audio-vidéo, lors de la lecture vidéo,
préférez un casque sans fil compatible avec la technologie AptX Low Latency.
Ampli Home Cinéma
Réglages vidéo
Par défaut, le lecteur Zappiti peut ajuster automatiquement la sortie vidéo. Mais vous pouvez sélectionner
manuellement la résolution et la fréquence de sortie. Pour forcer la résolution de sortie, activez l’option
Ignorer l’EDID HDMI dans les options Paramètres/Options pour les développeurs. Ensuite,
revenez aux réglages généraux, en appuyant sur le bouton BACK de votre télécommande, et allez
dans Affichage. Vous pourrez y voir tous les modes de sortie disponibles en activation manuelle, mais
le mode Auto ne sera plus accessible. Pour ajuster l’espace de couleur et le Deep Color (8/10/12-bit),
allez dans Settings/Options pour les développeurs. Si votre TV ou projecteur est compatible, nous
vous conseillons le mode Y’CbCr 4:4:4 / 10 Bits pour les meilleures performances vidéo.
Remarque: l’auto-framerate est toujours actif même si vous forcez une résolution / fréquence
spécifique. D’autre part, le réglage manuel de la résolution peut engendrer des problèmes avec
certains appareils. Nous vous recommandons donc d’utiliser le mode Résolution Auto.
Page 25

Français
Utilisez les touches GAUCHE, DROITE, HAUT, BAS, pour naviguer dans les menus, OK pour
valider et RETURN pour revenir en arrière ou arrêter la lecture en cours. Utilisez la touche MENU de
la télécommande pour afficher la liste des commandes disponibles. Utilisez la touche INFO pour
afficher les informations techniques disponibles en cours de lecture.
La page d’accueil du lecteur Zappiti propose 3 applications, à savoir : Video, Music et Explorer.
Zappiti Video
Zappiti Video est une application de gestion de collections de films et séries TV. Zappiti Video organise
votre collection de vidéos dématérialisées, avec téléchargement automatique des posters, synopsis,
infos, acteurs, fonds d'écran, note, etc., classement automatique par catégorie, filtres de tri, moteur de
recherche, contrôle parental, téléchargement de sous-titres, bandes annonces, etc.
Zappiti Music
Zappiti Music est une application dédiée à la lecture musicale, conçue pour les lecteurs Zappiti. Grâce à
Zappiti Music, vous pouvez profiter pleinement de votre bibliothèque musicale, et organiser vos listes de
lecture de manière simple. Avec Zappiti Music, vous pouvez lire votre musique préférée stockée n'importe
où sur votre réseau domestique ou sur un disque local connecté à votre lecteur multimédia Zappiti. Vous
pouvez aussi contrôler la lecture musicale de votre Zappiti TV éteinte, à l’aide d’une tablette ou d’un
smartphone iOS ou Android.
25
Zappiti Explorer
Zappiti Explorer est un gestionnaire de fichiers. Cette application permet d’explorer et de lancer de
manière simple la lecture de vos fichiers vidéo, photo et audio mais propose également de nombreuses
fonctionnalités multimédia avancées telles que : des fonctions copier, coller, couper, renommer,
supprimer, une fonction de diaporama musical, des fonctions de lecture enchaînée, aléatoire, etc. Pour
utiliser les fonctions avancées, pressez la touche MENU de la télécommande.
Enregistrement
Avant de commencer à utiliser les applications Zappiti, vous devez créer un compte Zappiti et enregistrer
votre appareil. Commencez par connecter votre lecteur multimédia à Internet via Wi-Fi ou Ethernet.
Lancer l’une des applications et sélectionnez votre langue. Ensuite, suivez les instructions à l'écran. Si
vous n’avez jamais utilisé Zappiti auparavant et si vous n'avez pas de compte Zappiti, veuillez cliquer sur
Créer un compte maintenant.
Connexion
Email
Mot de passe
Connexion
Créer un compte maintenant
Mot de passe oublié ?Retour
Cliquez ici pour créer
un compte Zappiti
Ensuite, vous serez invité à saisir votre numéro de Token Zappiti. Le numéro de Token est imprimé sur un
autocollant collé sous le boîtier du lecteur Zappiti. Vous n’aurez à le renseigner qu’une seule fois. Ensuite,
toutes les informations de votre compte seront sauvegardées dans la mémoire interne du lecteur.
Si vous n’avez pas de connexion Internet, vous pouvez explorer vos fichiers via : MyApps / MediaBrowser
Page 26

26
Guide de démarrage rapide
Disque dur externe
Si vous utilisez un disque dur externe 2,5'', veuillez
utiliser le câble USB fourni avec votre disque dur
pour des performances optimales.
Panneau arrière du Zappiti
Disque dur externe
Disque dur interne
Périphérique USB
Vous pouvez connecter vos disques durs ou
clés USB à l'un des 7 ports USB disponibles. Si
vous voulez lire des fichiers vidéo, l’USB 2.0 est
suffisant pour supporter un débit très élevé
(jusqu'à 480 Mbps). Si vous souhaitez transférer
des fichiers, nous vous conseillons d'utiliser les
ports USB 3.0 ou USB Type-C.
Note: Une icône USB située en haut à droite de
la page d'accueil peut vous aider à détecter si le
périphérique est correctement connecté. L’icône
est grisée lorsque aucun matériel USB n’est
reconnu et blanche s’il est reconnu.
L’alimentation fournie par les ports USB peut ne
pas être suffisante pour le bon fonctionnement des
disques durs USB. Veuillez ne pas débrancher ou
éteindre le lecteur USB pendant les opérations
d'écriture (copie).
Les lecteurs Zappiti sont compatibles avec les
stations d’accueil pour disque dur utilisant le protocole
UASP, ainsi qu’avec les multiprises USB (Hub).
Pour insérer un disque dur interne SATA de 3,5 pouces, ouvrez la porte de l’un des rack HDD, puis
insérez-y le disque dur jusqu'au 3/4, puis terminez l'insertion en fermant la porte. Cela aura pour effet de
pousser le disque dur jusqu’à sa connexion au port SATA situé au fond du rack. Le lecteur multimédia
Zappiti est compatible avec les disques durs formatés en NTFS (WINDOWS), ExFAT, FAT16, FAT32,
HFS (MAC OS), EXT 2/3 (LINUX). Pour connecter un disque interne 2.5’’, utilisez un boîtier d’adaptation.
Assurez-vous que votre disque dur est correctement formaté avec des tables d’allocations de 64 Ko.
Attention! Les disques durs dédiés aux serveurs NAS ne sont pas compatible.
Pour plus d’infos, veuillez consulter la base de connaissance: zappiti.uservoice.com/knowledgebase
Des disques durs pré-formatés
sont proposés à la vente sur :
store.zappiti.com
Ouvrez la trappe et insérez le disque,
connecteurs vers le fond.
Face avant
du Zappiti
Utiliser une carte mémoire SD Card / MMC
Pour utiliser une carte mémoire, insérez-la dans la fente dédiée située sur le côté gauche du lecteur.
Elle sera détectée comme périphérique USB (icône USB sur la page d'accueil). Certaines cartes
mémoire SD peuvent ne pas être reconfigurées par le lecteur ou mal fonctionner. Dans ce cas, utilisez
un autre modèle de carte mémoire.
Page 27

Français
Accès réseau
Le lecteur Zappiti est compatible Samba Server (SMB). Vous pouvez ainsi explorer et lire vos vidéos,
images et musiques situées sur votre réseau local (NAS, ordinateurs, ...) en qualité optimale et de
manière fluide. Pour accéder à votre Zappiti en réseau, saisissez son adresse IP dans l’explorateur de
fichiers de votre ordinateur. Par exemple: \\192.168.1.15. Pour connaître l’adresse IP de votre Zappiti,
allez dans Settings / Configuration Ethernet. Pour en savoir plus sur les autres fonctions réseau
telles que FTP Server ou DLNA Server (MiniDLNA / UPnP), consultez la base de connaissance:
zappiti.uservoice.com/knowledgebase
Le lecteur Zappiti propose également la fonction Zappiti Share (SMB Server) pour accéder à vos
fichiers vidéo, photo et audio situés sur le disque dur interne (ou lecteur local connecté en USB au
lecteur multimédia) depuis un autre lecteur multimédia Zappiti (toutes générations) connecté au réseau.
Il est ainsi possible de lire jusqu’à 5 fichiers vidéo en même temps depuis plusieurs pièces de la maison
et cela sans serveur NAS ou ordinateur. Pour profiter de cette fonction, configurez l’accès aux dossiers
de Zappiti Video en choisissant Zappiti Share au lieu de Disque locaux.
Copiez et gérez vos fichiers avec Zappiti Explorer
27
Copier
Couper
Coller
Renommer
Supprimer
Fonction diaporama
Zappiti Explorer propose une fonction diaporama
avec fondus enchaînés et effets de transitions. Pour
accéder aux réglages d’affichage du diaporama dont
la durée d’enchaînement des photos, les transitions
et les effets, pressez la touche MENU de la
télécommande (diaporama arrêté). Pour associer
une musique à un diaporama, placez simplement un
fichier audio dans le dossier contenant vos photos.
Si plusieurs fichiers audio se trouvent dans le même
dossier que les photos, les pistes s’enchaîneront les
unes après les autres dans l’ordre alphanumérique.
Zappiti Explorer est un Explorateur de fichiers,
mais aussi un gestionnaire de fichiers complet
proposant des fonctions telles que: Copier,
Couper, Coller, Sélectionner, Sélectionner tout,
Supprimer, et Renommer. Zappiti Explorer est
aussi multi-tâches. Pour accéder à ces fonctions
et au gestionnaire de tâches, pressez le bouton
MENU de la télécommande du Zappiti.
Options de lecture vidéo et audio
Le MENU de Zappiti Explorer permet également
d’accéder à différentes options de lecture vidéo et
audio telles que l’enchaînement de lecture des
fichiers, lecture en boucle, ...
Installer une application tierce
Pour installer une nouvelle application, allez dans
MyApps / AptoideTV. Vous trouverez de nombreuses
applications dédiées aux lecteurs multimédias qui
peuvent être contrôlées par télécommande. Vous
pouvez aussi utiliser le GooglePlay, mais certaines
applications seront incompatibles avec le Zappiti.
Si vous souhaitez installer un fichier APK depuis une
clé USB, utilisez Zappiti Explorer ou MediaBrowser.
Touche Info
Pour afficher les infos techniques complètes du
fichier en cours de lecture, pressez la touche
INFO de la télécommande. Vous y trouverez
en particulier, le débit, le codec, la résolution...
Ajouter un raccourci
Pour ajouter un raccourci vers une application favorite sur
la page d'accueil, cliquez sur l'icône et sélectionnez
votre application préférée pour l'ajouter à la page d'accueil.
Page 28

28
Guide de démarrage rapide
Ethernet
Pour une connexion réseau rapide et stable, nous vous recommandons d’utiliser la connexion Ethernet.
Branchez une extrémité d’un câble réseau (câble Ethernet droit) dans le port LAN à l’arrière du lecteur
Zappiti (Catégorie 5E ou plus). Ensuite, branchez l’autre extrémité du câble réseau dans le port LAN
de votre box, routeur ou votre switch Ethernet si vous en utilisez un. La configuration est automatique.
Notez que certains switchs réseau peuvent parfois générer des problèmes de saccades vidéo.
Zappiti rear panel
Internet Connection
Internet
Wi-Fi
Une fois le lecteur démarré, allez dans
Settings puis Wi-Fi et commutez le bouton
«Activé». Puis, choisissez votre réseau
personnel dans la liste. Enfin, saisissez
votre clé de sécurité et validez.
Bluetooth
Le lecteur Zappiti est compatible avec
les appareils utilisant la technologie
Bluetooth. Pour accéder à la liste des
appareils accessibles en Bluetooth,
allez dans Settings / Bluetooth. Puis
commutez l’interrupteur sur «Activé».
LAN
Ethernet cable
WAN 1 2 LAN 3 4
Router / Modem
Mirroring audio et vidéo
Pour plus d'informations à propos de la fonction mirorring
audio et vidéo, veuillez rechercher avec le mot clé "mirroring"
en utilisant le moteur de recherche dans la Base de
Connaissance ici: zappiti.uservoice.com/knowledgebase
Ajouter
Zappiti Music
Titre
favori
Titre
exclu
à la Playlist
Lecture
seule
Lecture
enchaînée
Ordre
aléatoire
Ordre
alphab.
Boucle Liste de
Boucle
désactivée
lecture
Sur la page d’accueil du Zappiti, vous trouverez Zappiti Music, une application dédiée à la lecture musicale.
Utilisez les boutons HAUT / BAS pour parcourir vos dossiers musicaux. Utilisez le bouton FLECHE
DROITE de la télécommande pour accéder aux options supplémentaires. Cliquez sur l’icône Favori
pour ajouter la piste choisie aux favoris. Cliquez 2 fois sur l’icône Favori pour marquer la piste en cours
comme piste exclue. Pour créer le raccourci d’un dossier, sélectionnez un dossier, pressez la touche
MENU et cliquez sur Créer un raccourci. Le raccourci sera placé sur la page d'accueil de Zappiti
Music. Cliquez sur pour filtrer un titre musical (ou plusieurs) en saisissant un mot-clé.
Contrôlez votre Zappiti via tablette / smartphone
Vous pouvez aussi contrôler la lecture de musique et de vidéo à l'aide des applications dédiées Zappiti
Video Control et Zappiti Music Control disponibles pour iOS / Android. Installation: Allumez votre
tablette / smartphone, puis rendez-vous sur le Play Store (Android) ou dans l'App Store et recherchez
l’app à l'aide des mots clés « Zappiti control » et installez l’app. Ensuite, lancez l'app et entrez vos
identifiants de compte Zappiti. Vous aurez accès à vos vidéos et pourrez contrôler la lecture musicale
sans avoir besoin d’allumer votre télévision. Plus d'infos sur: zappiti.com
Page 29

Français
Créer une collection de films / séries avec Zappiti Vidéo
Avant de commencer à utiliser Zappiti, vous devez créer 2 dossiers distincts sur votre espace de
stockage dans lequel vous ajouterez tous vos films et tous vos épisodes de séries TV:
Films
1. Créez un dossier « FILMS » et placez-y tous vos films et concerts.
2. Renommez les fichiers de vos films avec le nom exact du film. Par exemple le fichier du film
« Metropolis » au format MKV devra être nommé « Metropolis.mkv ».
Séries
1. Créez un dossier « SERIES » et placez-y toutes vos Séries TV.
2. Vos fichiers d’épisodes doivent être placés dans un dossier dédié à chaque saison. Puis les dossiers
des saisons doivent être placés dans un dossier nommé « SERIES ».
Les fichiers des épisodes doivent être nommés de la manière suivante : « nomserie s01e01 ».
Le format « nomserie 1x01 » est également supporté. Utilisez « s00e01 » pour les épisodes spéciaux.
29
Connexion
Allumez votre lecteur Zappiti. Sur la page
principale, cliquez sur le premier bouton
Zappiti Servers
Collections
my.email@mailbox.comComptes Zappiti
Zappiti Cloud
Collection 1
Connexion
intitulé VIDEO. Choisissez votre langue
et saisissez vos identifiants Zappiti. Si
vous n’avez pas encore de compte
Zappiti, nous vous invitons à en créer un
(voir page 25). Puis, cliquez sur le bouton
Connexion situé en bas de la fenêtre.
Dans l’écran de configuration des dossiers, cliquez sur Ajouter un dossier contenant vos films (ou
séries). Si vos fichiers sont sur un espace de stockage local (disque dur ou clé USB connecté au
Zappiti), choisissez Disques locaux dans la liste. Si vous avez plusieurs lecteurs, choisissez Zappiti
Share. Naviguez ensuite jusqu'au dossier FILMS (ou SERIES), puis cliquez sur le bouton OK au bas
de la fenêtre une fois à l'intérieur du dossier que vous souhaitez ajouter.
Attention! Si vous cliquez sur OK alors que naviguez dans un sous-dossier situé à l'intérieur du
dossier FILMS, seuls les films situés dans ce sous-dossier seront analysés. Il ne faut pas rajouter
chaque dossier contenant un film mais uniquement le dossier principal contenant tous les films,
même si vous avez des sous-dossiers. Zappiti analysera automatiquement les sous-dossiers.
Votre dossier sera ajouté à la liste des dossiers à analyser. Le nom du dossier ajouté doit apparaître
entre le bouton Films (ou Séries) et le bouton Editer. Si le chemin du dossier ne semble pas correct,
vous pouvez utiliser le bouton Editer. Si vous désirez supprimer un dossier de cette liste, cliquez sur
le bouton Supprimer (cela ne supprimera pas vos fichiers sur le disque dur mais uniquement le dossier
d'indexation). Vous pouvez ajouter d'autres dossiers en répétant la procédure ci-dessus.
Une fois ajouté votre ou vos dossiers
Dossiers
Fichiers
Storage ID: fs3sho54suey-ya55h4st7e-syot563lj3a
Ajouter un dossier contenant vos films
Ajouter un dossier contenant vos séries
EditerFilms /Disques locaux/HDD/Films
Supprimer
FILMS, quittez cet écran en pressant la
touche Retour de la télécommande.
Zappiti lancera l’analyse et référencera
tous vos fichiers vidéo situés dans les
dossiers FILMS et SERIES précédemment
référencés. Un panneau d'information
s'affiche ensuite vous indiquant les
différentes tâches en cours. Pour le
quitter, pressez la touche RETOUR. Pour
réafficher le panneau de tâches en cours,
La configuration est terminée. Vous pouvez désormais
profiter de votre collection de films et séries TV.
pressez la touche MENU, puis cliquez sur
Tâches en cours.
Plus d’info: zappiti.uservoice.com/knowledgebase
Pour accéder au panneau de configuration, Pressez le bouton MENU. Vous y trouverez de nombreuses options telles
que: langue, traductions, thèmes, bandeaux, reflet, contrôle parental, identification au démarrage, compte, tokens, etc.
Page 30

30
Guide de démarrage rapide
Utilisation de Zappiti Vidéo
/storage/HDD/Films
TOUS
Vous y trouverez toutes vos vidéos (films et séries TV),
triées par ordre alphabétique.
FILMS
Cette section contient tous vos films.
SÉRIES
Cette section contient toutes vos séries et vos épisodes.
RÉCENTS
Vous y trouverez les dernières vidéos analysées.
CATÉGORIES
Vos vidéos sont classées ici par catégorie (ou genre).
Ajout d'un fichier de film
Lorsque vous ajoutez un fichier de film dans votre dossier "Films", Zappiti l'indexera automatiquement
au prochain redémarrage de l'application. Pour forcer l'analyse, utilisez l'option dédiée située dans le
menu (touche MENU de la télécommande).
Storage ID: 000000000000000
Si le Storage ID indique
«00000000», cela signifie
que Zappiti ne peut pas
écrire sur le disque dur.
Dans ce cas, reformatez
ou remplacez le disque .
Pour accéder à de plus amples
fonctionnalités, pressez la touche
MENU de la télécommande.
Suppression d'un fichier de film
Pour supprimer un film, pressez la touche MENU puis cliquez sur Supprimer.
Film ou épisode non trouvé
Même lorsque vos fichiers ne sont pas nommés correctement avec uniquement le titre du film (ou de
la série TV), Zappiti arrive dans la plupart des cas à identifier les films mais uniquement lorsqu'un
utilisateur Zappiti a déjà précédemment identifié le même fichier que vous. En effet, Zappiti Db est une
base de données propriétaire communautaire et participative. Mais si votre fichier est unique (par
exemple si vous l'avez recompressé) ou qu'il n'a jamais été identifié manuellement par un autre utilisateur
Zappiti, il ne sera pas identifié. Dans ce cas, suivez cette procédure:
Pressez la touche MENU et cliquez sur X à identifier. Vous verrez la liste des fichiers non identifiés.
Puis, cliquez sur le bouton Identifier... Dans le champ de recherche vous pouvez resaisir le nom du
film et cliquer sur Chercher. Mais une autre technique fiable à 100% consiste à saisir le code d'identification
unique du film à la place du nom du film. Le code d’identification IMDb, TMDb ou TVDb se trouve dans
l’URL de la fiche descriptive du film. Par exemple, pour le film Terreur dans le Shanghaï-Express
(1972), l’URL sera : https://www.themoviedb.org/movie/32613-horror-express. L’ID est donc: 32613.
Dans le champ de saisie, entrez le code ID « 32613 », puis validez. Le film sera identifié correctement.
Si un film est incorrectement identifié, sélectionnez-le dans la liste des films, pressez la touche MENU,
puis cliquez sur Identifier de nouveau et utilisez la méthode décrite ci-dessus. Si votre film ou série
n’existe pas sur TMDb ou TVDb, vous pouvez créer une fiche de film ou de série. Il vous suffit pour cela
de créer un compte sur TMDb ou TVDb. Les films ou séries créés seront ensuite visibles par Zappiti.
Fichiers 3D et UHD
Les fichiers ISO BD 3D, ISO UHD et ISO 4K ainsi que les dossiers BDMV pour 3D et 4K / UHD ne sont
pas identifiés automatiquement. Pour identifier le conteneur, ajoutez les balises suivantes dans le nom:
Fichiers 3D: "3D" (exemple: "Metropolis.3D.iso").
Fichiers UHD: "UHD" ou "ULTRAHD" ou "ULTRA-HD" (exemple: "Metropolis.UHD.iso").
Fichiers 4K: "4K" ou "4096" (exemple: "Metropolis.2160x4096.iso").
Page 31

Contôle parental
Pour marquer un film comme Autorisé aux enfants, sélectionnez
un film (ou un groupe), puis pressez le bouton MENU et cliquez sur
Autoriser aux enfants. Entrez ensuite un code PIN à 4 chiffres.
Catégories personnelles
Par défaut, les films et les séries TV sont automatiquement associés
à des catégories. Mais vous pouvez créer vos propres catégories et
associer manuellement vos films. Pour créer une catégorie, allez dans
les catégories, puis pressez la touche MENU de la télécommande et
cliquez sur Créer une catégorie. Saisissez un nom et choisissez
une icône. Le menu contextuel donne également accès à des
options supplémentaires pour les catégories telles que : modifier la
position, éditer ou supprimer.
Français
Code parental
Veuillez saisir un code PIN à 4 chiffres.
Ce code vous permettra de verrouiller votre
collection et restreindre l'accès aux films
marqués en tant que « Autorisé pour enfants ».
7
*
Annuler
31
Zappiti Video au démarrage
Pour activer l’option, lancez Zappiti Vidéo, pressez MENU, allez
dans Configuration/second onglet et activez l'option dans la liste.
Filtres et tris
Pour trier vos films, pressez la touche MENU. Puis, dans section
Filtres et tris, cliquez sur le premier élément. Sélectionnez ensuite
le tri souhaité: A à Z, Date de sortie, Durée, Ajout... Pour filtrer vos
films, cliquez sur l'option suivante: Vu, En cours ou Non vu.
Options d’affichage des sous-titres
Pour modifier les options d’affichage des sous-titres telles que la
couleur, la position, ou la synchro, pressez la touche MENU de la
télécommande en cours de lecture, puis allez dans Subtitle et
modifiez l’option de votre choix. Pour modifier la position verticale des
sous-titres Blu-ray (PGS), allez dans la section ADVANCE, puis
cliquez sur PGS Subtitle Offset et modifiez la position des sous-titres.
Démarrage automatique
Ouvrir Zappiti Video automatiquement
au démarrage du lecteur
Filtres et tris
Date de sortie décroissante
Vidéos vues
Vidéos en cours
Vidéos non vues
Codes IR / IP
Vous pouvez contrôler votre
lecteur multimédia Zappiti en
utilisant des périphériques
tiers tels que RTI, ProControl,
Control4, Crestron, Logitech...
Assistance utilisateur et Zappiti Db
Vous pouvez contacter l’assistance utilisateur à l’adresse:
tickets@zappiti.uservoice.com
Pour rejoindre la communauté Zappiti Db et participer à la création
graphique de posters, contactez-vous via : contact@zappiti.com
Plus d’info:
zappiti.uservoice.com/
knowledgebase
Mode usine
Pour réinitialiser le lecteur:
MyApps / Factory Reset.
Page 32

zappiti.com / zappiti.uservoice.com/knowledgebase
 Loading...