

Page 1
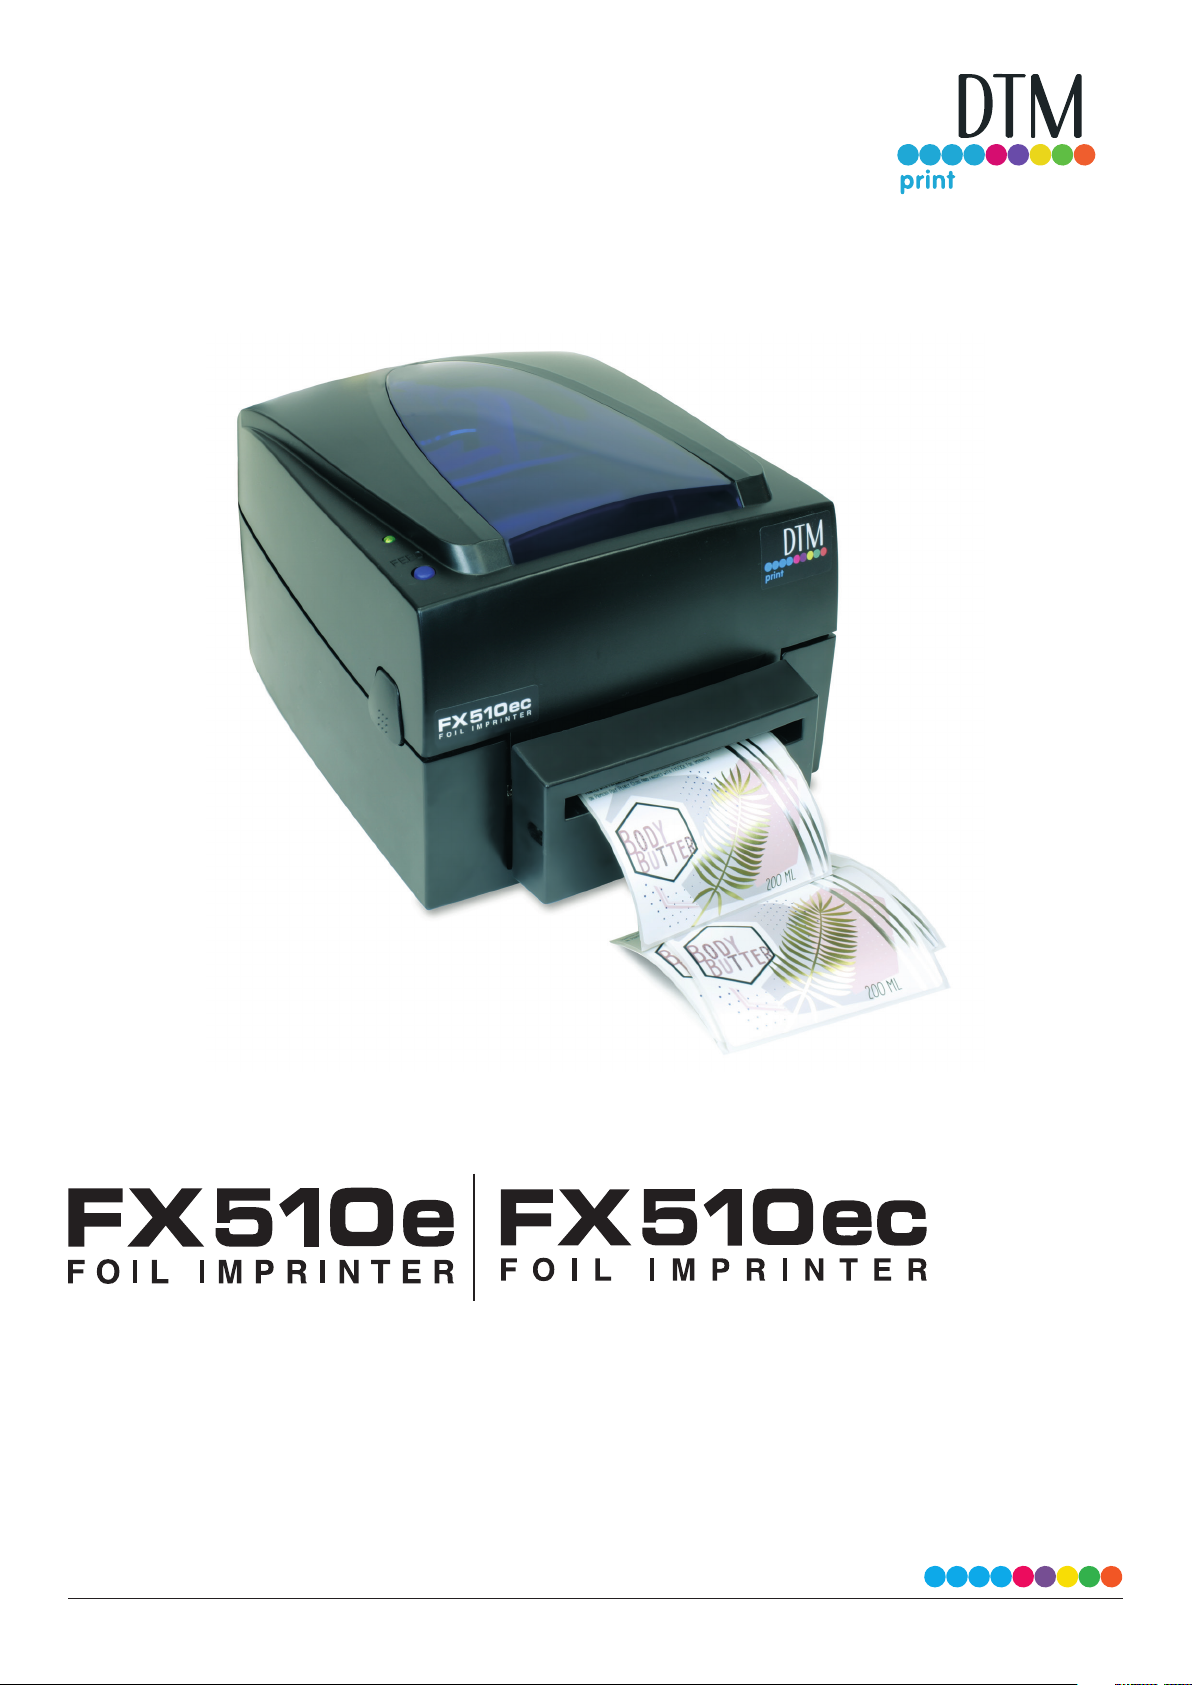
User’s Manual
©2019, DTM Print GmbH. All rights reserved
For the most recent version of this manual please visit
http://dtm-print.eu/europe/manuals.html
Page 2

Notices
The information in this document is subject to change without notice. No warranty of any kind is made with regard to this
material, including, but not limited to, the implied warranties of merchantability and tness for a particular purpose. No
liability is assumed for errors contained herein or for incidental or consequential damages in connection with the furnishing,
performance, or use of this material. This document contains proprietary information that is protected by copyright. All rights
are reserved. No part of this document may be photocopied, reproduced, or translated into another language without prior
written consent.
Trademark Acknowledgements
Windows is a registered trademark of Microsoft Corporation. All other trademarks are the property of their respective owners.
Printing History
Edition 1.0, #190305, Copyright 2019, DTM Print GmbH. All rights reserved.
FCC Compliance Statement
This equipment has been tested and found to comply with the limits for a CLASS A digital device, pursuant to Part 15 of the
FCC Rules. These limits are designed to provide reasonable protection against harmful interference when the equipment is
operated in a commercial environment. This equipment generates, uses, and can radiate radio frequency energy and, if not
installed and used in accordance with the instructions, may cause harmful interference to radio communications. Operation
of this equipment in a residential area is likely to cause harmful interference in which case the user will be required to correct
the interference at own expense.
EMS and EMI Compliance Statement
This equipment has been tested and passed with the requirements relating to electromagnetic compatibility based on the
standards EN 55022:1998+A1:2000+A2:2003, CISPR 22 , Class A EN 55024:1998+A1:2001+A2:2003,
IEC 61000- 4 Series EN 61000-3-2 / 2000 & EN 61000-3-3 / 1995. The equipment also tested and passed in accordance with
the European Standard EN55022 for the both Radiated and Conducted emissions limits.
Caution
» Danger of explosion if battery is incorrectly replaced
» Replace only with the equivalent type recommended by the manufacturer.
» Dispose of used batteries according to the manufacturer’s instructions.
» Only use with designated power supply adapter model.
» Changes or modications not expressly approved by the party responsible for compliance could void the user’s au-
thority to operate the equipment.
Safety Instructions
Please read the following instructions carefully
» Keep the equipment away from humidity.
» Before you connect the equipment to the power outlet, please check the voltage of the power source.
» Make sure the printer is o before plugging the power connector into the power jack.
» It is recommended that you connect the printer to a surge protector to prevent possible transient over voltage damage.
» Be careful not to get liquid on the equipment to avoid electrical shock.
» For safety and warranty reasons, ONLY qualied service personnel should open the equipment.
» Do not repair or adjust energized equipment under any circumstances.
Page 3

Table of Contents
Section 1: Getting Started ...................................................................................................................................................... 5
1 A Choosing a Good Location .................................................................................................................................................................5
1 B Box Content ................................................................................................................................................................................................5
1 C Getting to Know Your Printer ............................................................................................................................................................5
Section 2: Printer Setup .......................................................................................................................................................... 8
2 A Open the Printer Cover .........................................................................................................................................................................8
2 B Open the Printing Mechanism ........................................................................................................................................................8
2 C Loading the Ribbon ............................................................................................................................................................................... 8
2 D Loading the Label Roll .......................................................................................................................................................................10
2 E Installing the Label Supply Hub .................................................................................................................................................. 11
2 F Sensor Position .......................................................................................................................................................................................12
2 G Connecting the Printer to the Host Computer .................................................................................................................. 12
2 H Installing The Driver ............................................................................................................................................................................ 12
Section 3: Operation Panel ..................................................................................................................................................14
3 A LED Operation Panel ..........................................................................................................................................................................14
3 B Label Size Calibration and Self Test Page ............................................................................................................................... 14
3 C Error Alerts ................................................................................................................................................................................................ 15
Section 4: Printing ...................................................................................................................................................................16
4 A Adding Highlights to a Label with NiceLabel ...................................................................................................................... 16
4 B Printing from NiceLabel .....................................................................................................................................................................19
4 C Sealing Labels with Clear Film ....................................................................................................................................................... 19
4 D Printer Driver Settings ......................................................................................................................................................................... 20
4 E Printing from other Programs ........................................................................................................................................................ 23
Section 5: Troubleshooting and Maintenance .............................................................................................................24
5 A Cleaning the Print Head ................................................................................................................................................................... 24
5 B Adjusting the Print Head Pressure .............................................................................................................................................. 24
5 C Adjusting the Print Line .................................................................................................................................................................... 25
5 D Adjusting the Cutter (FX510ec Model only) ......................................................................................................................... 25
5 E Troubleshooting ....................................................................................................................................................................................26
5 F Creating a Full Bleed Print (Clear Film Sealing) ....................................................................................................................26
5 G Miscellaneous .......................................................................................................................................................................................... 27
5 H Technical Support .................................................................................................................................................................................27
Section 6: Label and Ribbon Specifications .................................................................................................................. 28
6 A Label Sensing Methods .................................................................................................................................................................... 28
6 B Label Specifications ..............................................................................................................................................................................29
6 C Ribbon Specifications ......................................................................................................................................................................... 29
Section 7: Technical Specifications ....................................................................................................................................30
Page 4

Page 5
Section 1: Getting Started
Thank you…
… for choosing an FX510e/FX510ec Foil Imprinting System. The FX510e Foil Imprinter adds brilliant, shiny highlights to
your pre-printed or blank labels. This User’s Manual is your complete step-by-step guide to quickly and easily setting up and
printing with your new Foil Imprinting System.
1 A Choosing a Good Location
» Place the printer on a at surface in a location with adequate air circulation to prevent internal heat build up.
» Do not place the printer near heat sources such as radiators or air ducts, or in a place subject to direct sunlight, excessive
dust, mechanical vibration or shock.
» Allow for adequate clearance in front of the printer to accommodate the printed label stock as it is leaving the printer
to avoid the possibility of binding or jamming of the label stock.
» Allow for adequate overhead clearance for opening the top cover to allow easy access to the label stock and ribbons.
» When using the Passive Label Unwinder make sure you have an appropriate depth of up to 60 cm
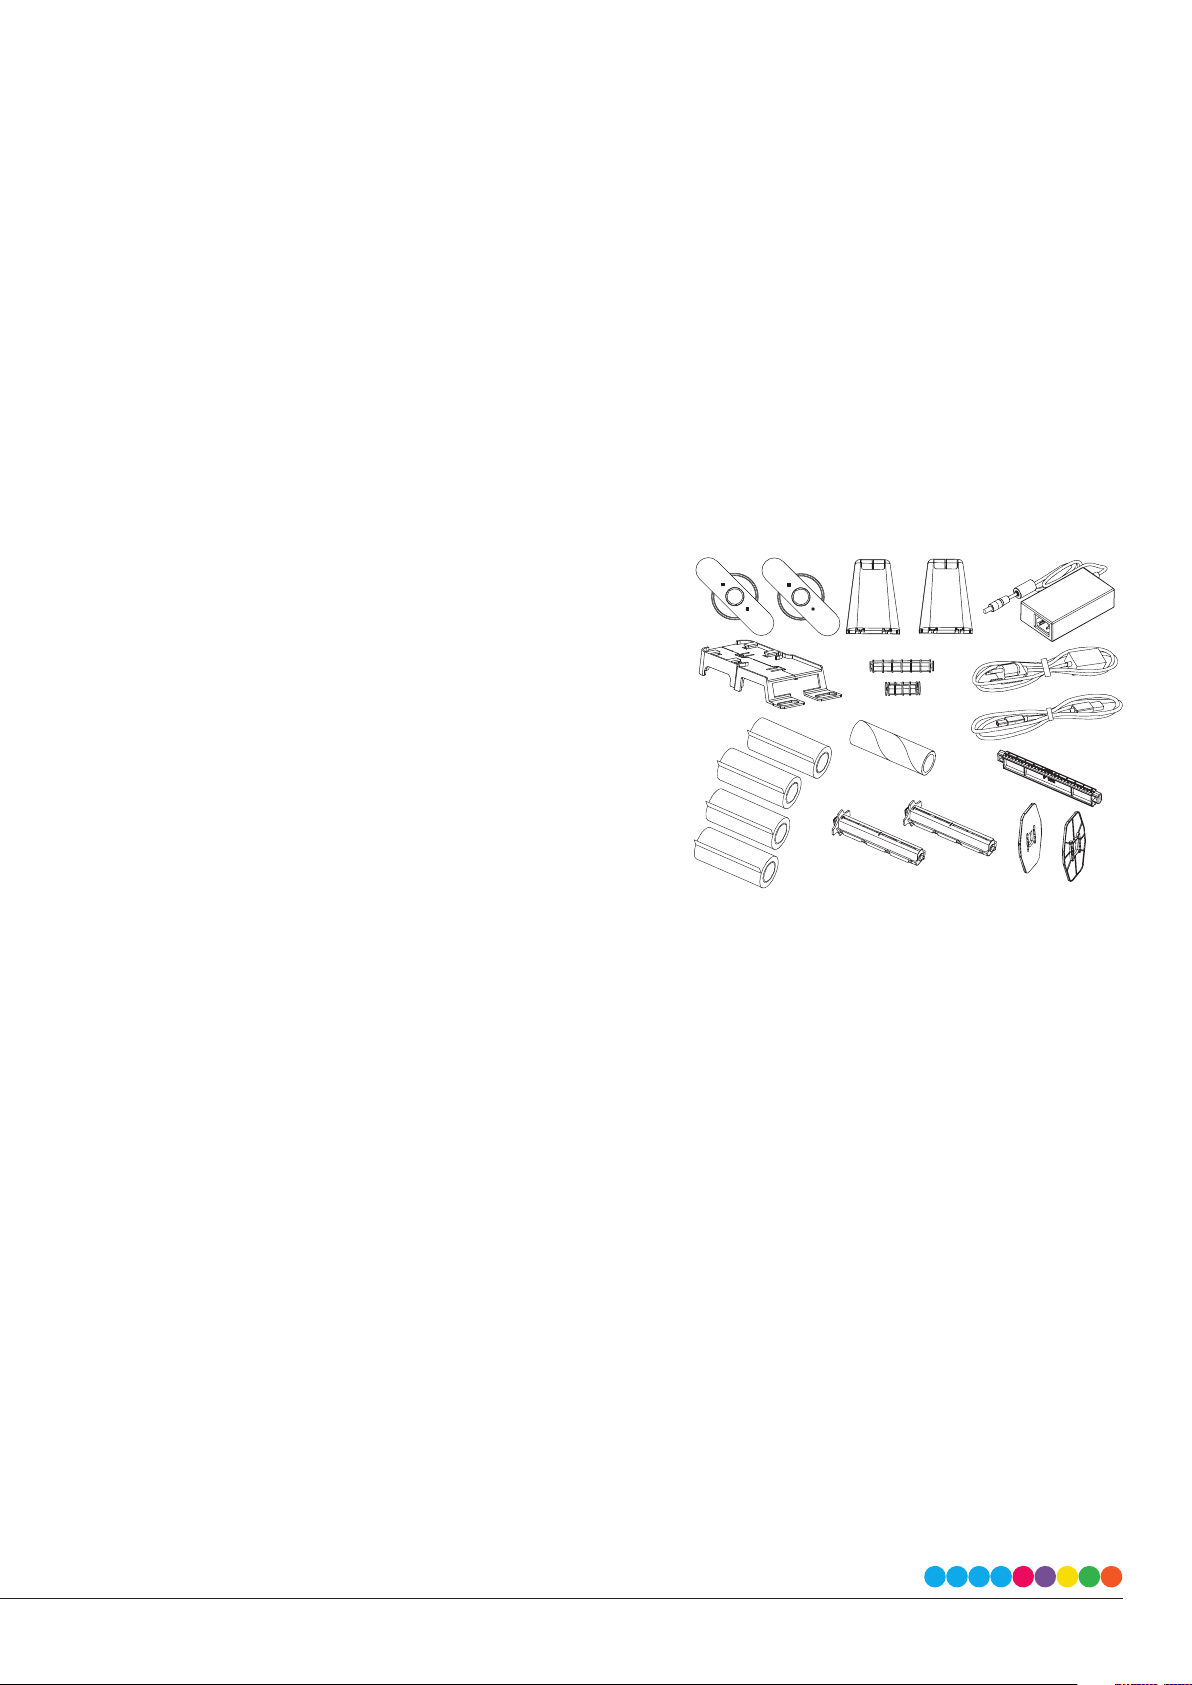
1 B Box Content
Please check that all of the following items are included with your
printer.
» FX510e Foil Imprinter
» Power Cord
» AC Adapter
» USB Cable
» 4 Sample Ribbons (Red, Gold, Silver, Blue Metallic)
» Black Ribbon Hubs (set of 2)
» Brown empty Ribbon Core
» Blue Internal Label Supply Hub with blue Label Guide Plates
(set of 2)
» Passive Label Unwinder with 2” and 4” wide Supply Hubs
» Quickstart Guide
Save the carton and packaging materials. They will come in handy when transporting the printer.
5 | Getting Started
Page 6
1 C Getting To Know Your Printer
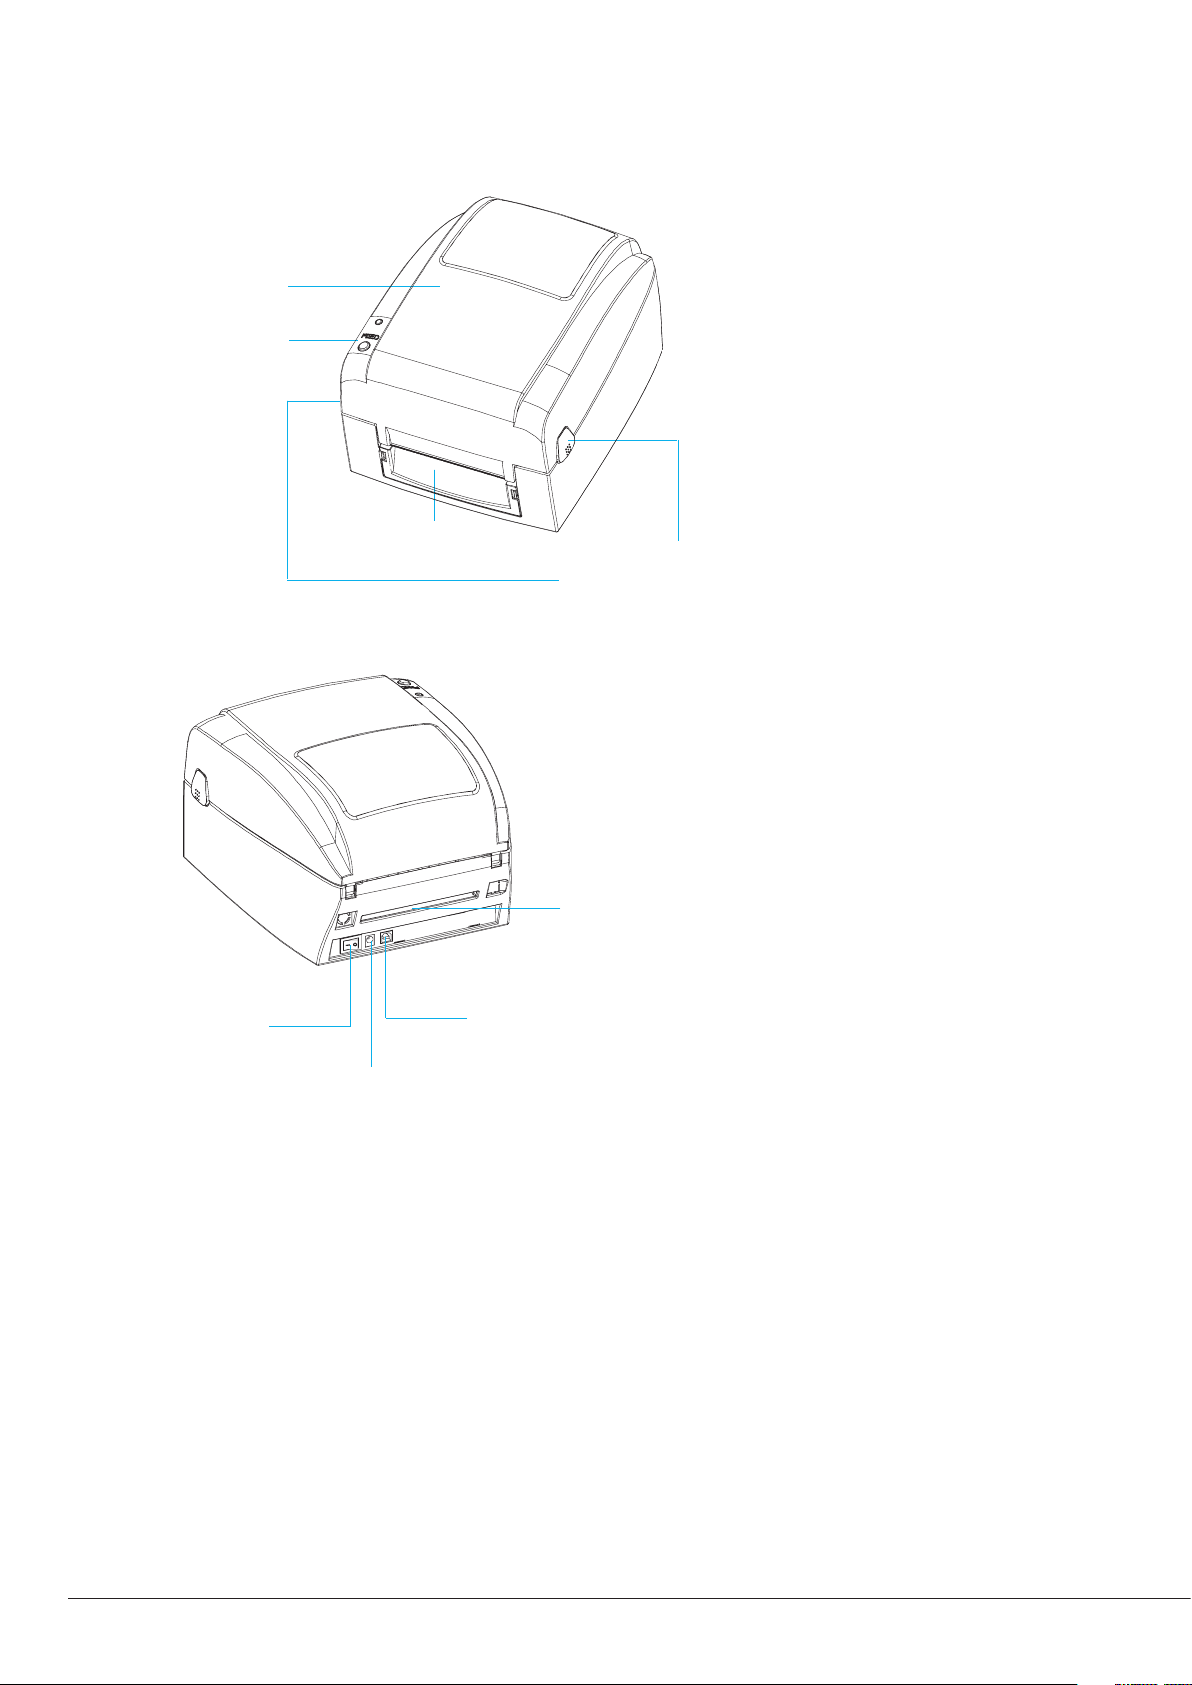
FX510e Overview
Front View. This illustration shows the front of the printer with its control buttons and LED indicator light.
Top Cover
Operation Panel
Front Cover
Cover Open Buttons
Release buttons for opening the
printer cover
Rear View. This illustration shows the USB input port and power switch found on the rear panel of the printer.
Fan-Fold Label Insert
Feed slot for external label
feeding
Power Switch
USB Port
Power Jack
6 | Getting Started
Page 7
Open The Printer Cover
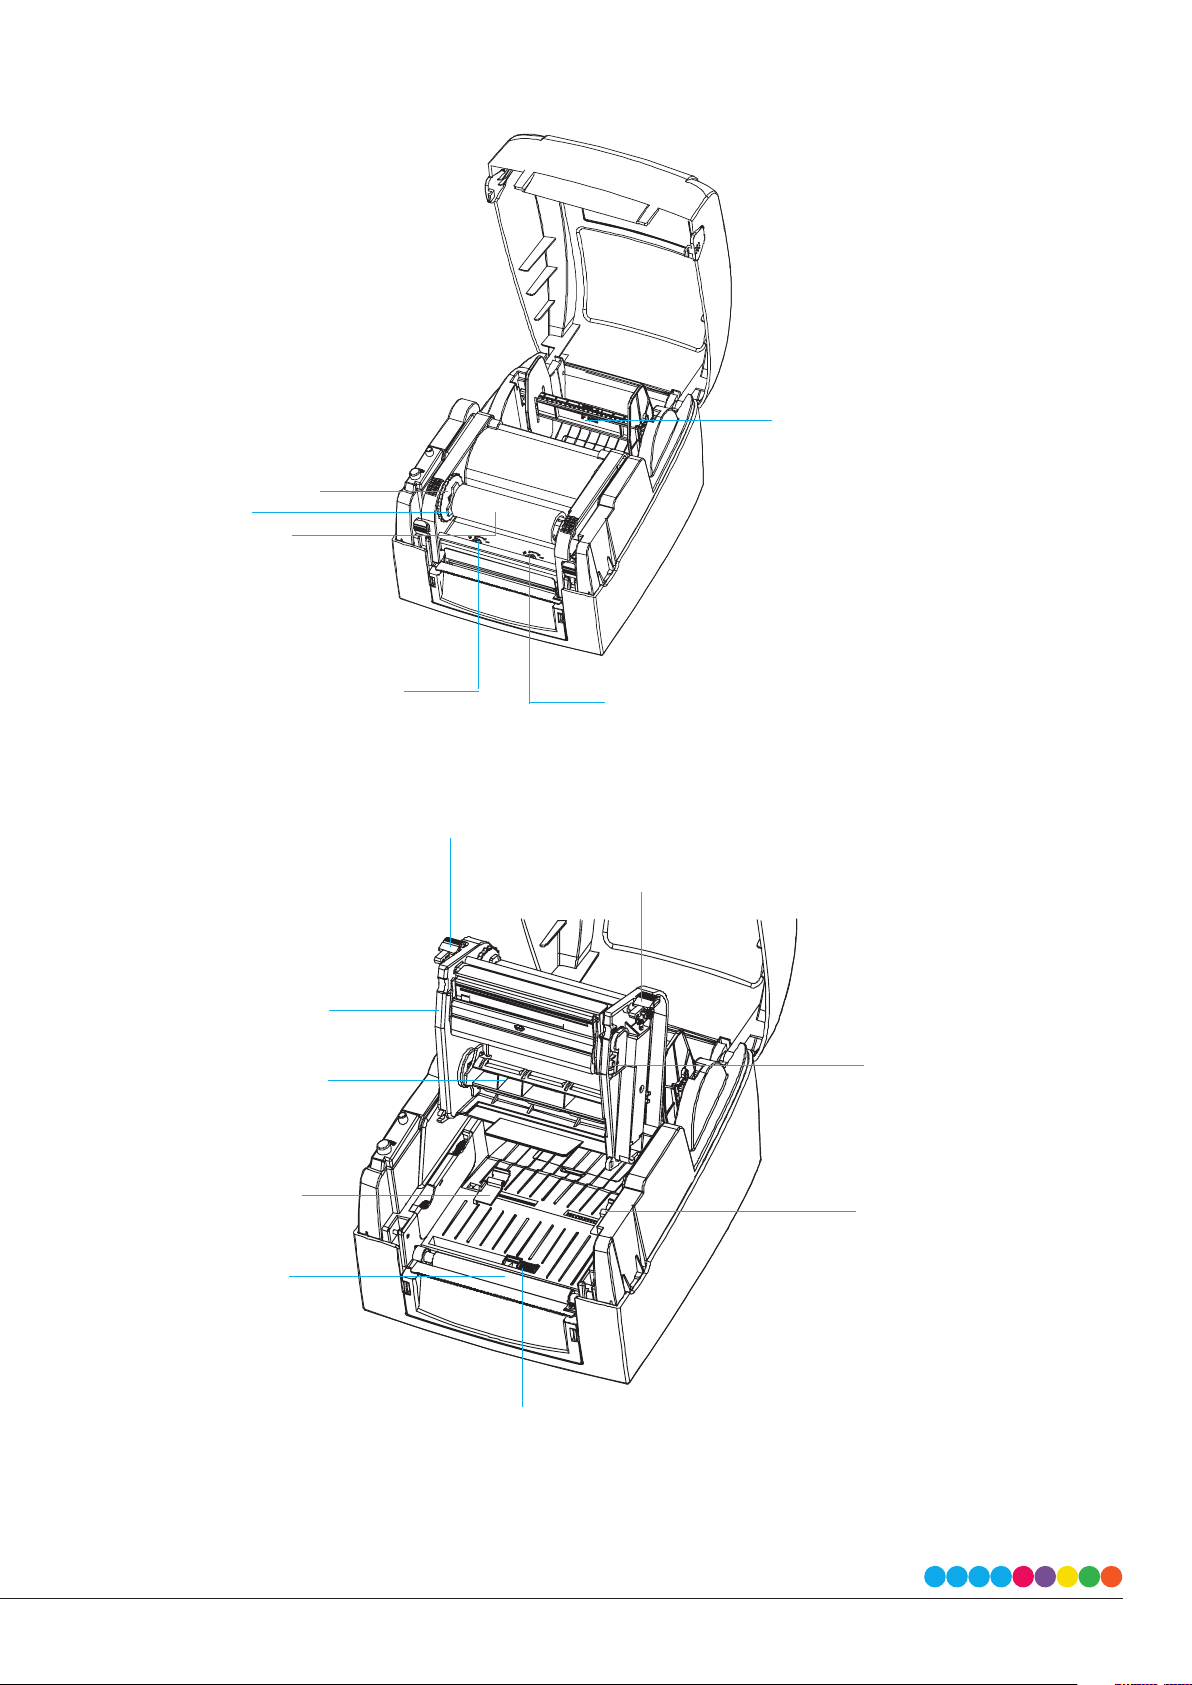
This illustration shows the interior view of the printer.
Ribbon Module
- Ribbon feed mechanism
- Ribbon hub
- Empty ribbon core
Label Supply Module
- Label Supply Hub
- Label Guide Plates (set of two)
Adjustment Screw (Left)
Screw for adjusting the print head pressure
Adjustment Screw (Right)
Screw for adjusting the print head pressure
Open The Printing Mechanism
This illustration shows the print head and ribbon mechanism.
Release Catch (Left)
Release Catch (Right)
Printing Mechanism
Ribbon Supply Hub
Label Guide (Left)
Adjustment Screw
Screw for adjusting the print line
Label Guide (Right)
Platen
Label Sensor
Movable
7 | Getting Started
Page 8
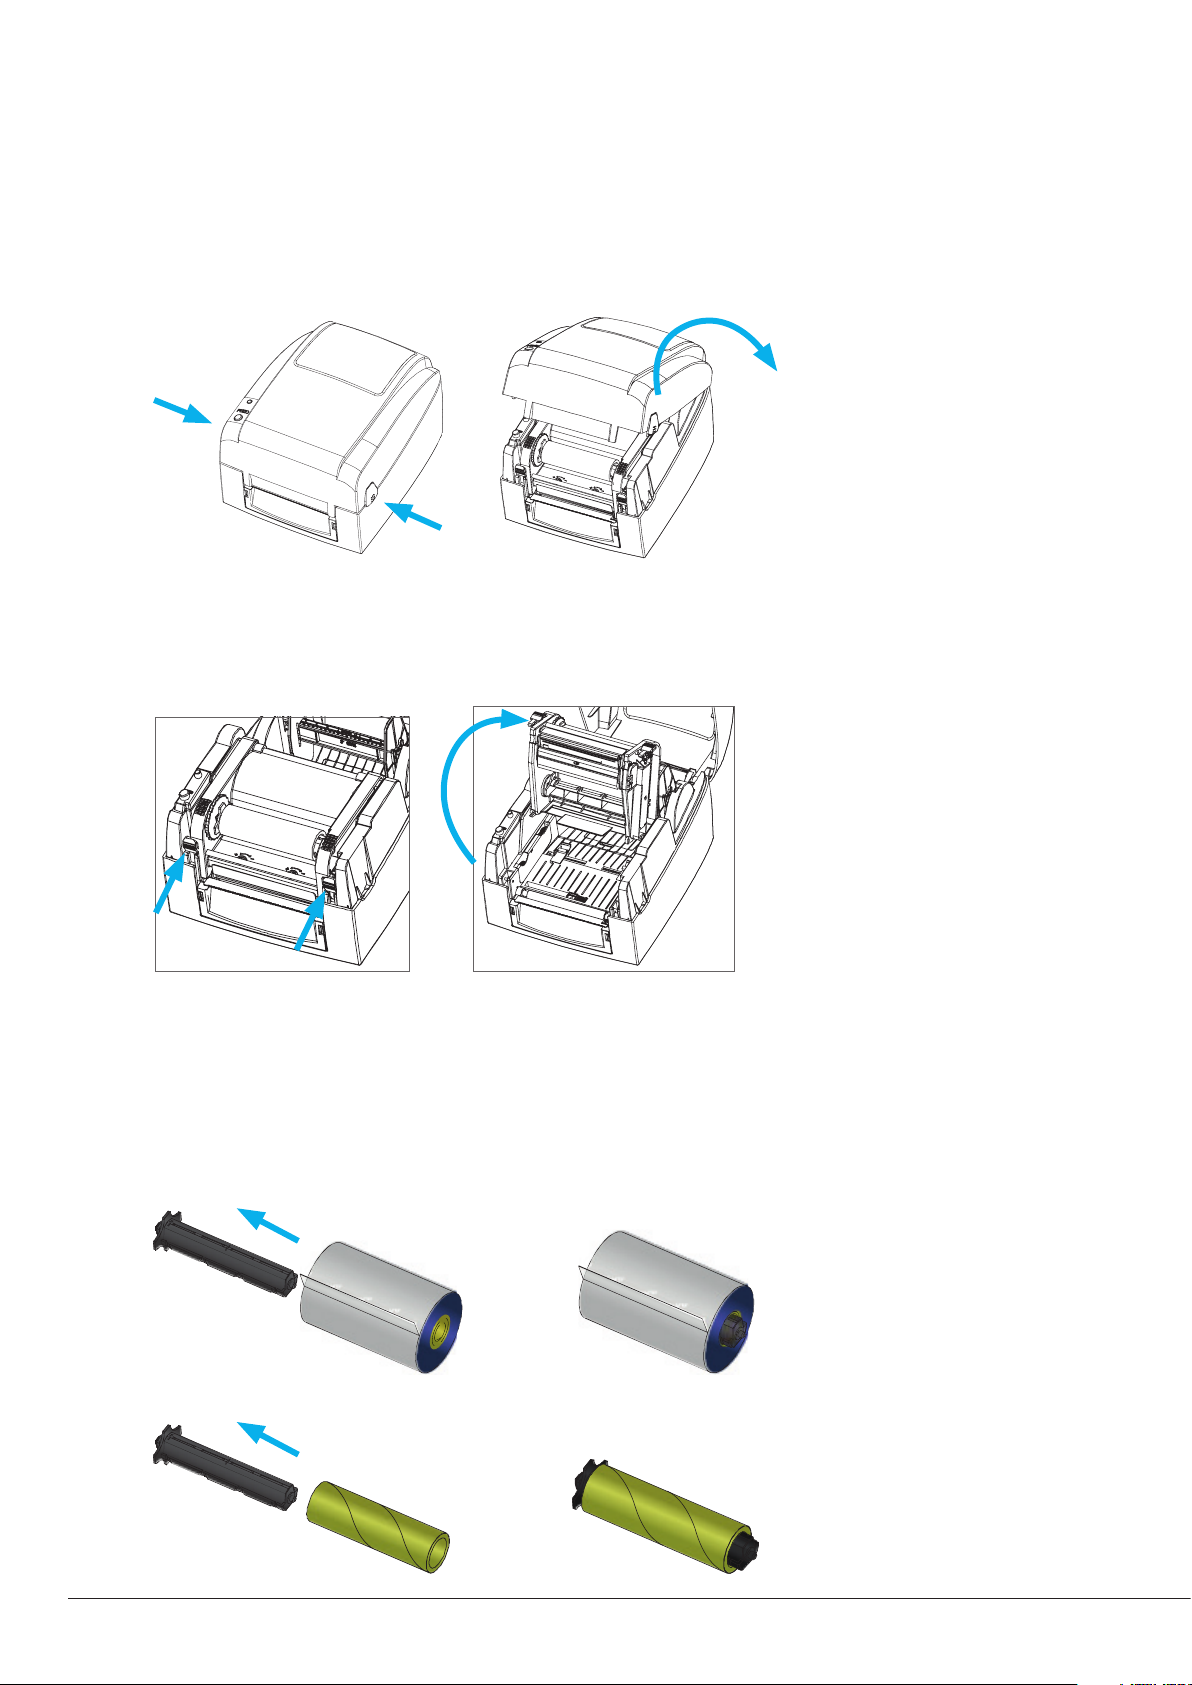
Section 2: Printer Setup
2A Open The Printer Cover
Pressing The Cover Open Buttons
Place the printer on a at surface. Open the printer cover by pressing the release buttons on both sides of the printer housing
and lift the printer cover backward.
2B Open The Printing Mechanism
Pressing The Release Catches
Release and lift the printing mechanism.
2C Loading The Ribbon
The following steps only apply to thermal transfer printing mode. Direct thermal does not need ribbon to be installed.
Note: Media and ribbon types should be matched to provide with optimal print results. Always use ribbon that is wider than the
media to protect the print head from wear. For direct thermal printing, do not load ribbon in the printer.
A New Ribbon Module Installation
Place the new ribbon on the hub which forms a ribbon supply hub.
Place the empty ribbon core on the hub which forms a ribbon rewind hub.
8 | Printer Setup
Page 9
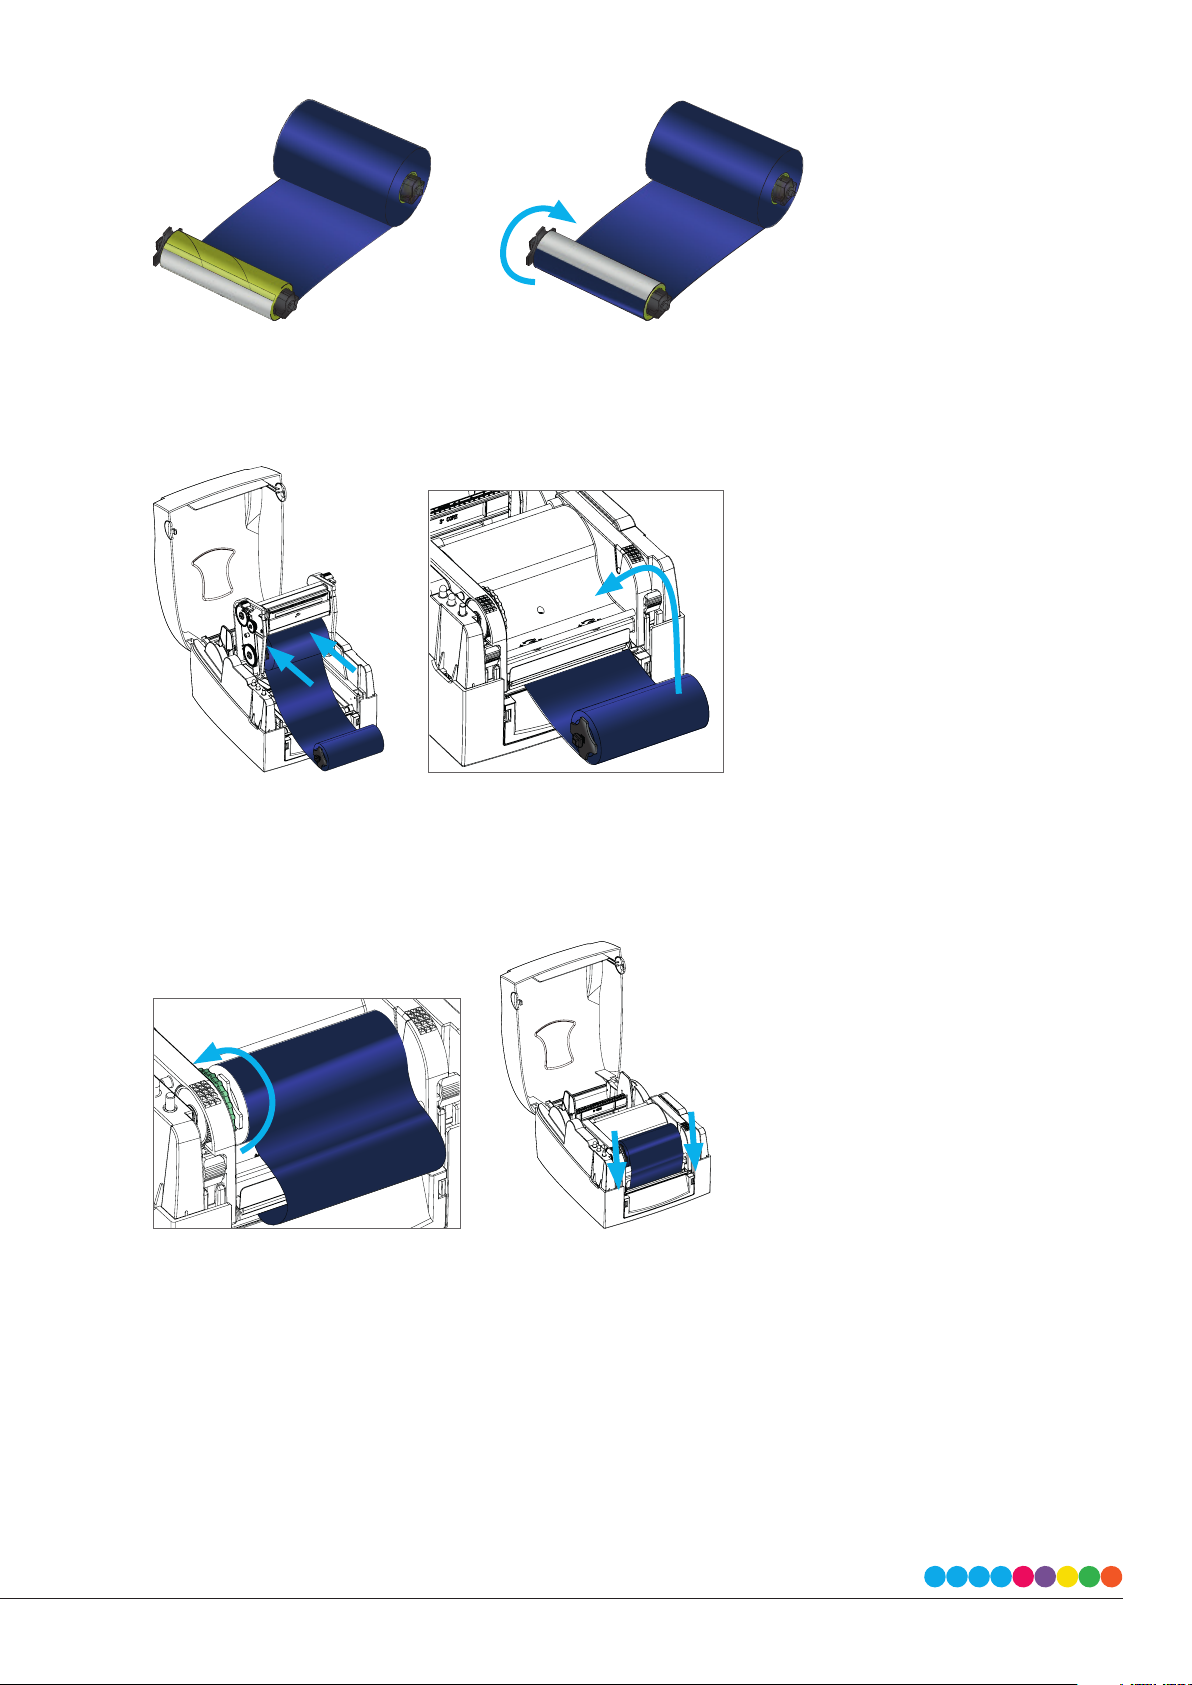
Stick the ribbon supply hub on the ribbon rewind hub and wind the rewind hub 2~3 circles.
Install The Ribbon On The Printer
Place the ribbon supply hub at the back of the printing mechanism. Pass the ribbon supply hub under the print head.
Note: The ribbon supply hub accepts the coated side of ribbon to be wound ink-inside IN or wound ink-side OUT. You will need to
wind it ink-inside IN.
Insert the ribbon rewind hub on the ribbon feed mechanism.
Note: The ribbon rewind hub accepts the coated side of ribbon to be wound ink-inside IN or wound ink-side OUT. We recommend
to wind it ink-inside IN.
Wind the ribbon to the back.
Close the printing mechanism, making sure that it clicks into place.
9 | Printer Setup
Page 10
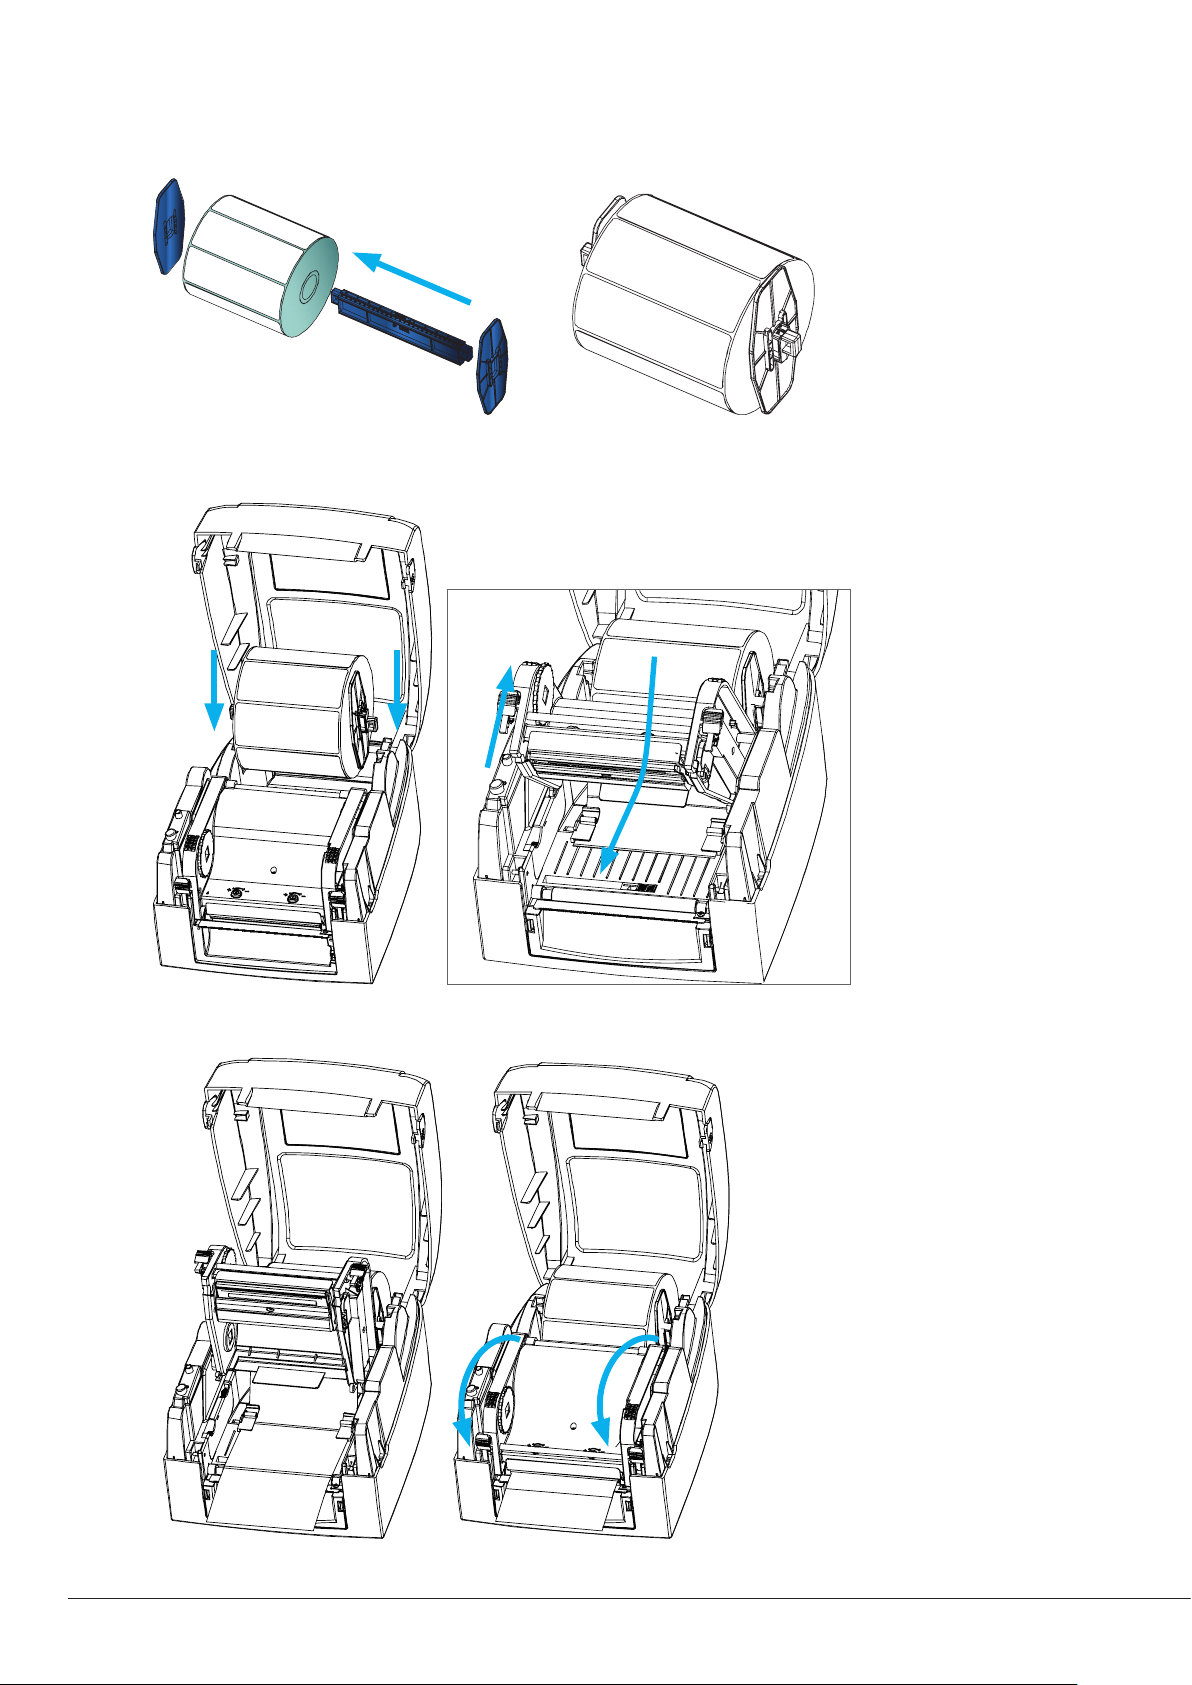
2 D Loading The Label Roll
A New Label Roll Module Installation
Place the label stock on the label supply hub, attach the guide plates to the label stock holder.
Install The Label Roll Module On The Printer
Now load the label stock into the printer. Release the printing mechanism and lift it.
Pass the labels through the label guides up to the tear-o plate. Adjust the label guides to the label width. Close the printing
mechanism.
10 | Printer Setup
Page 11
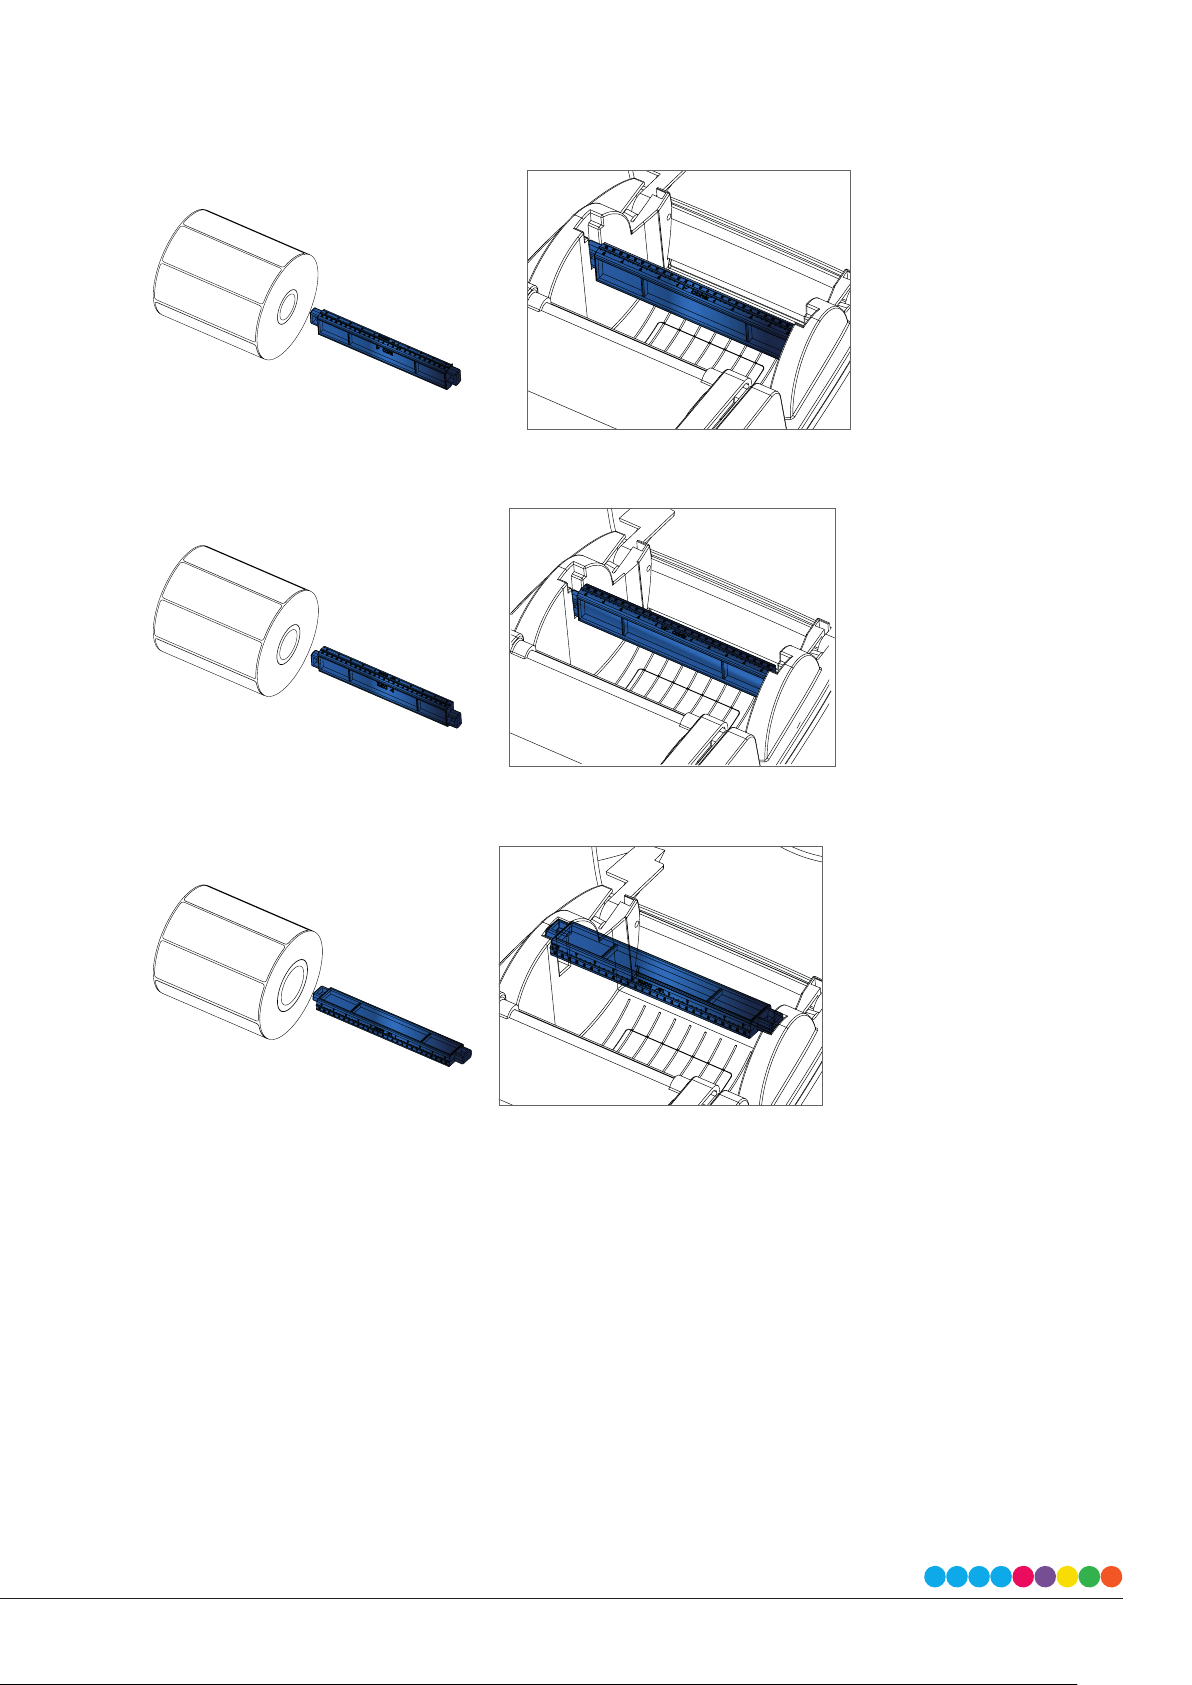
2 E Installing The Label Supply Hub
1” Cores
Installing the label supply hub for 1” cores.
1.5” Cores
Installing the label supply hub for 1.5” cores.
3” Cores
Installing the label supply hub for 3” cores.
11 | Printer Setup
Page 12
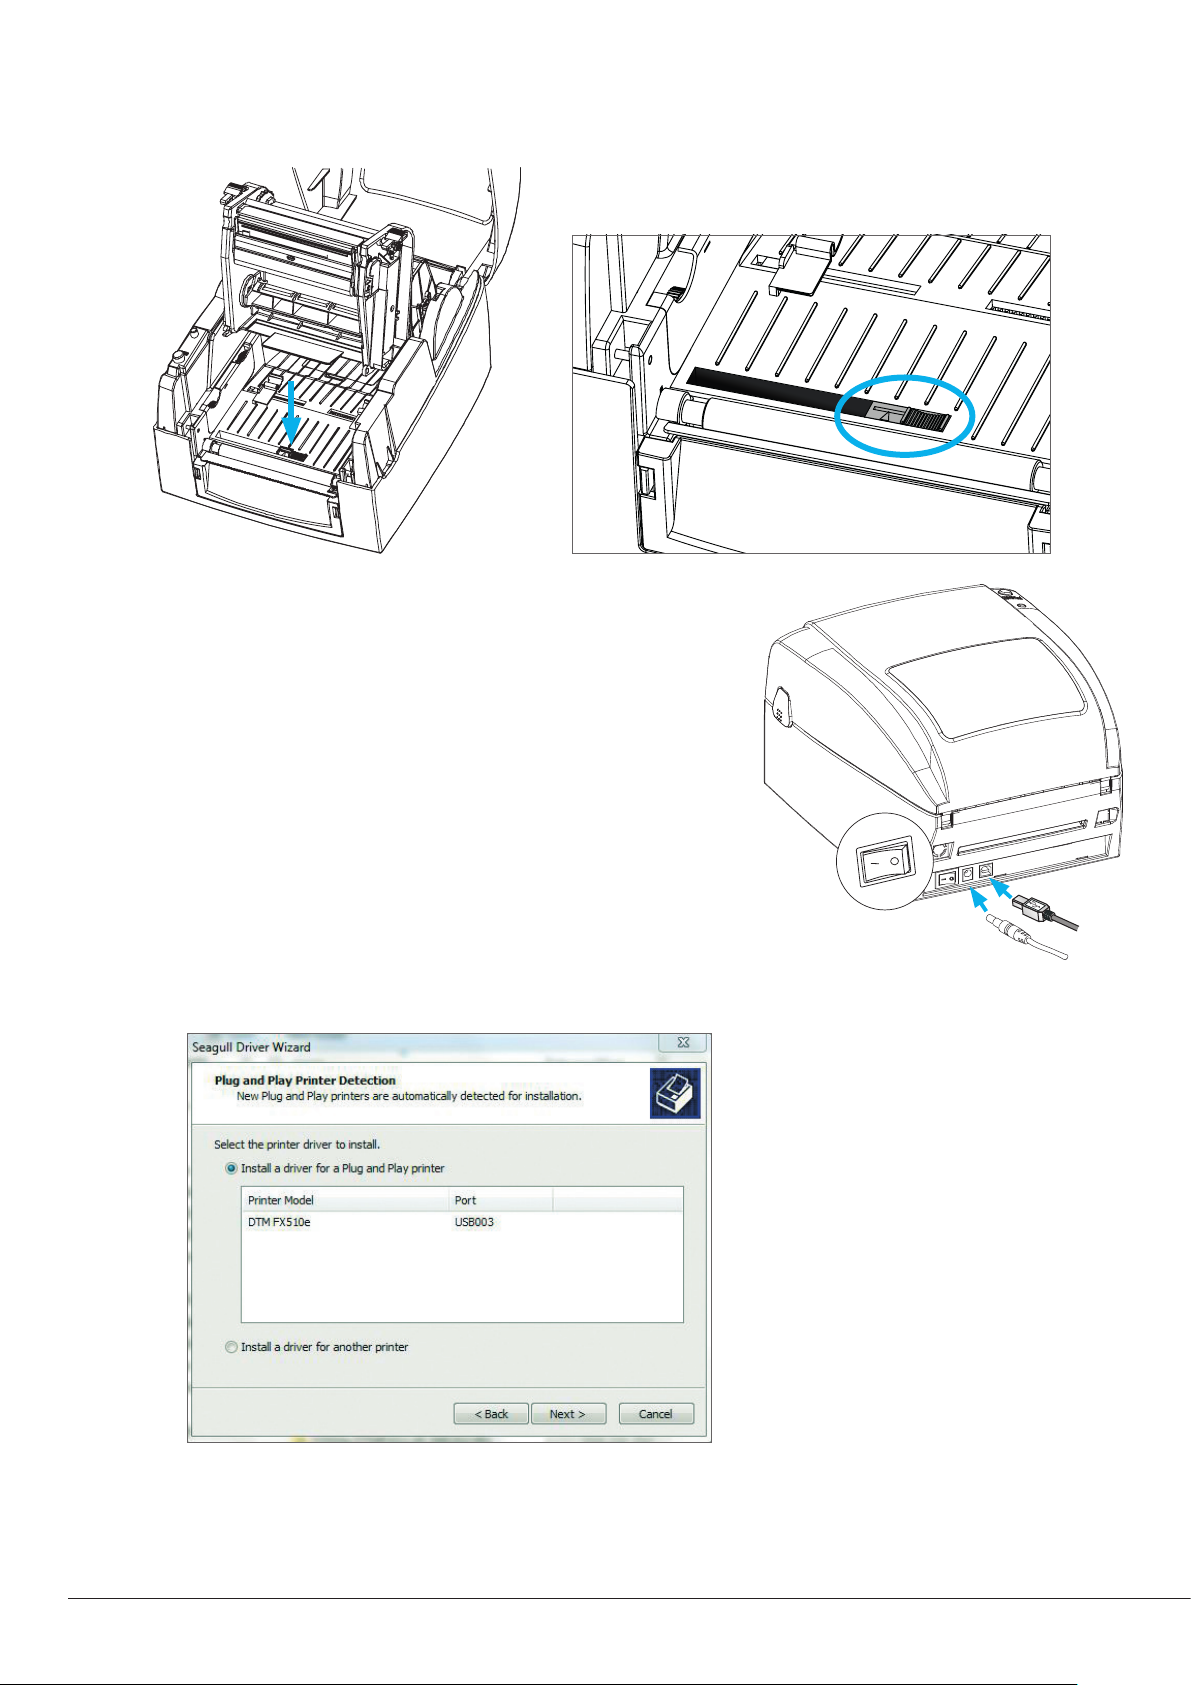
2 F Sensor Position
The sensor position can be moved, e.g. if the black mark is only at one side. During adjustment, the sensor must therefore be
positioned directly below the black mark line. The black mark should be at least 3 mm thick to ensure correct functioning.
2 G Connecting The Printer To The Computer
1. Make sure the printer is switched o.
2 Connect the power cord to the AC adapter and connect the adapter
to the printer.
3. Connect the USB cable to the printer and host computer.
4. Switch on the printer, the LED indicator should now lights up.
2 H Installing The Driver
1. Download the driver at fx510e.dtm-print.eu.
2. Select the icon for the driver le and double-click to start the installation.
3. Follow the instructions on the screen. The Driver Wizard guides you
through the installation procedure.
4. Select “Install printer drivers”.
5. Choose “DTM FX510e”
12 | Printer Setup
Page 13
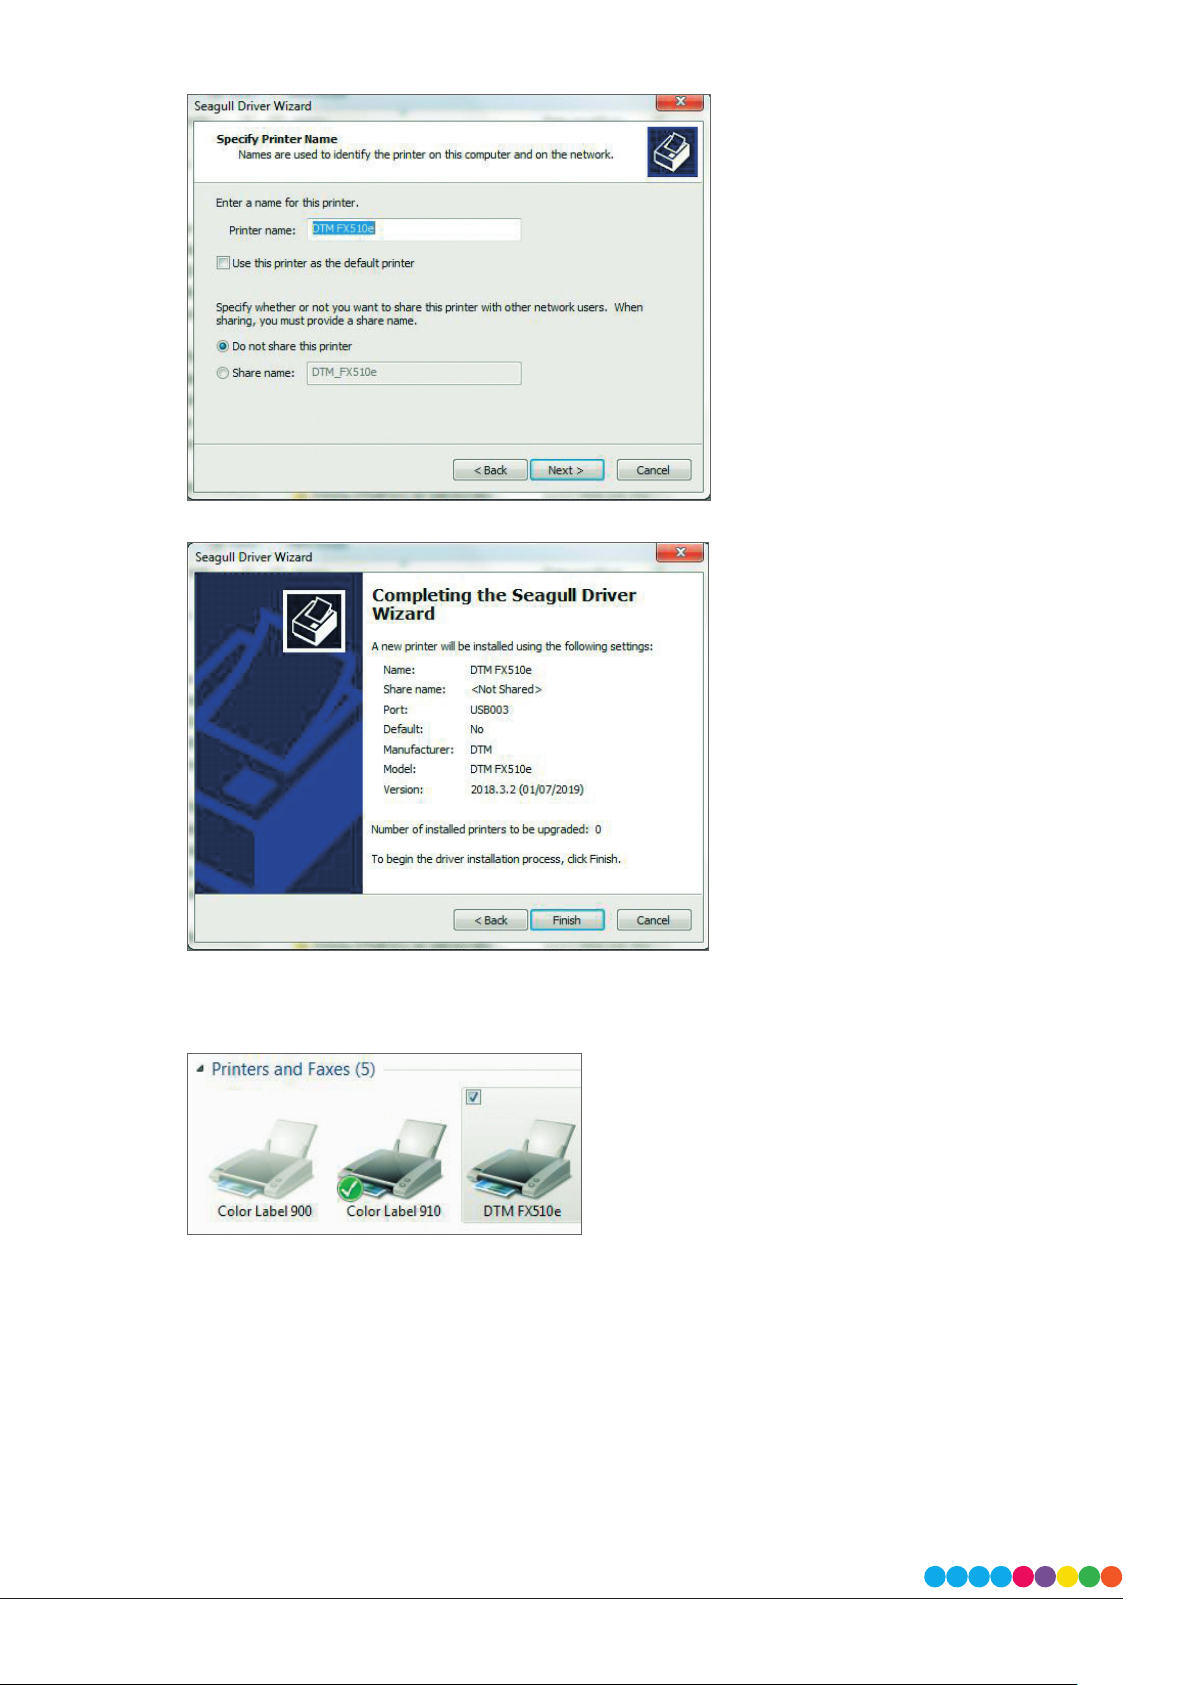
6. Enter a printer name and assign the appropriate rights.
7. Once the installation is complete, a summary of the printer settings is displayed.
8. Check whether the printer settings are correct and click “Finish” to start copying the driver les.
9. Wait until copying is complete, then nish the installation.
10. Once the driver installation is complete, the new printer should appear in the “Devices and Printer” folder.
13 | Printer Setup
Page 14
Section 3: Operating Panel
3 A LED Operation Panel
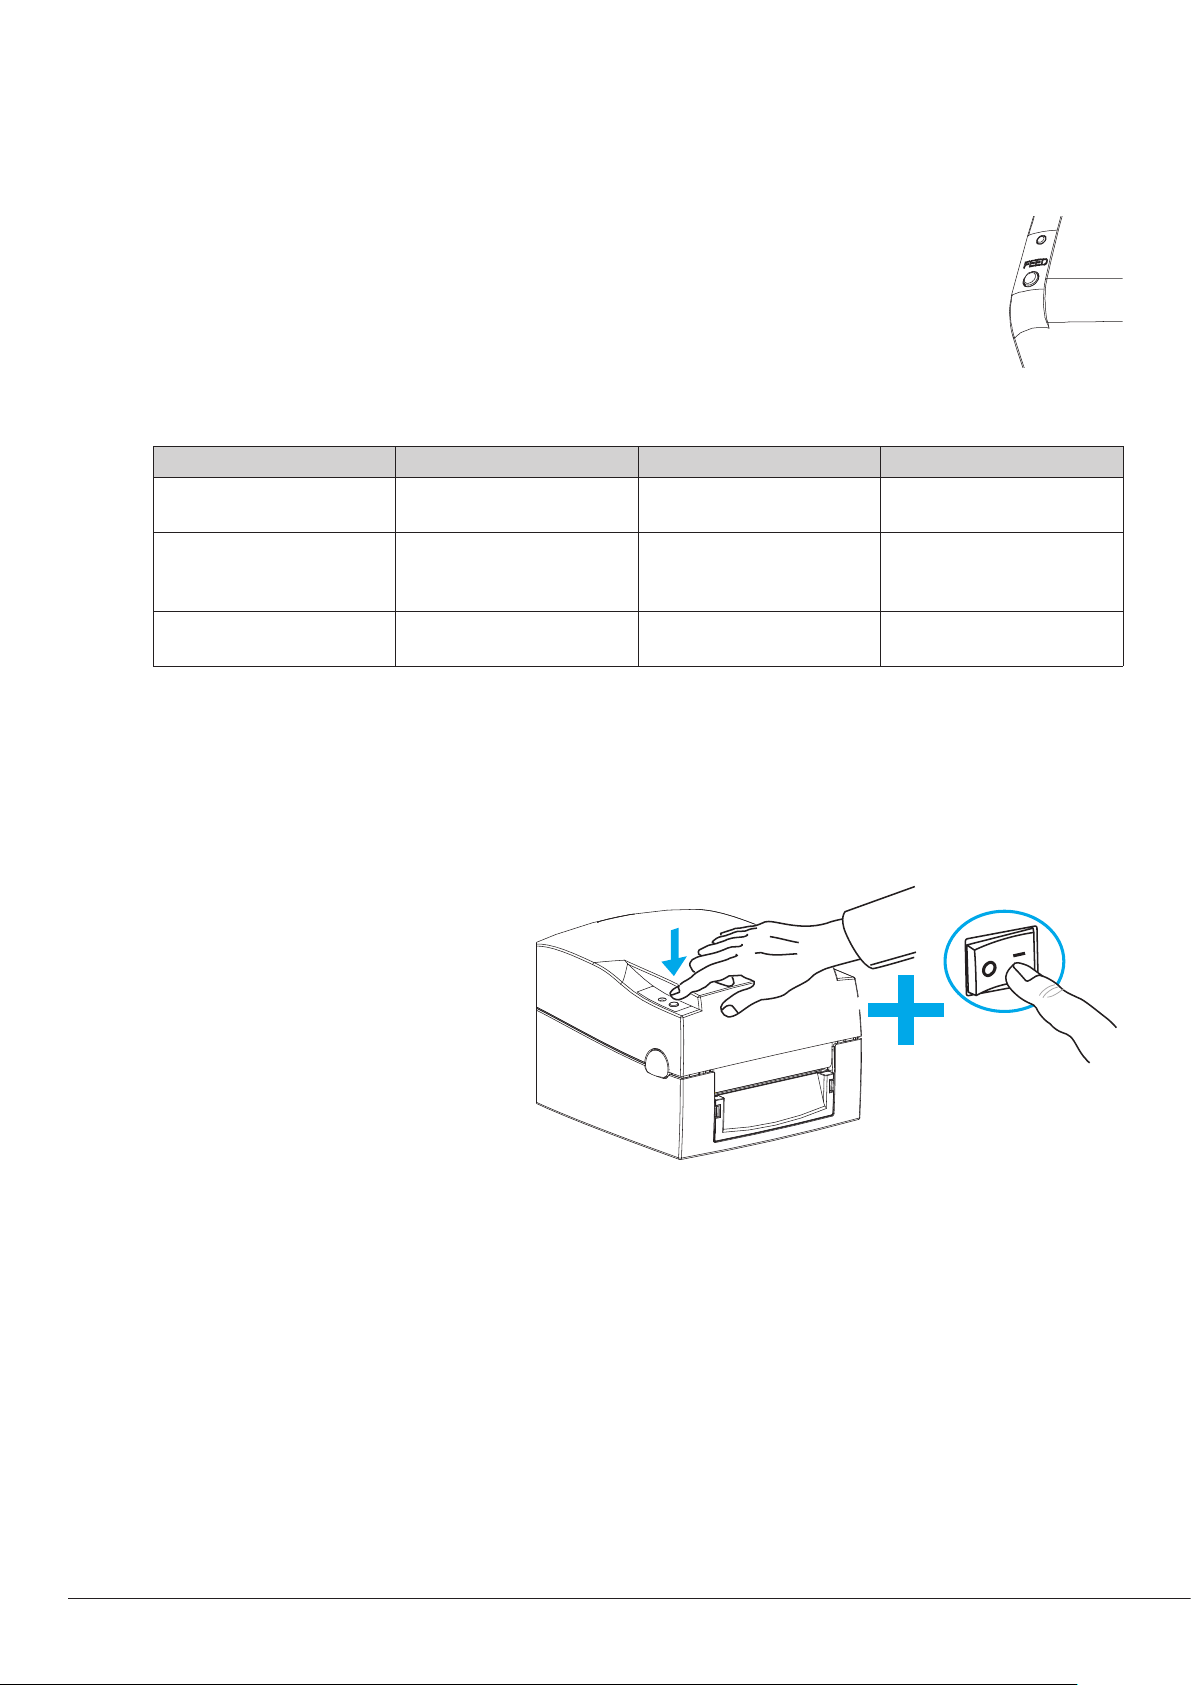
Feed Button
When you press the FEED button, the printer moves the label to the dened stop position. If you are using
continuous labels, pressing the FEED button will move label stock until you release the button again. If
you are using individual labels, pressing the FEED button will move only one label. If the label does not
stop at the correct position, please run the auto calibration (See Section 3 B. for the label size calibration
function) on the label stock.
LED Indicators
LED Indicator Beeps Status Description
LED ON (Green) none Standby mode
2x 2 beeps
LED ON (Red)
LED OFF non O-line mode
2x 3 beeps
2x 4 beeps
Error mode
The FX510e is ready for
operation
The printer has detected
an error. See Section 3 C for
Error alerts.
The printer is not connected
to the power supply.
3 B Label Size Calibration and Self Test Page
The printer can automatically detect and store label height. That means the host computer does not need to transmit the
label height to the printer. And the self-test function lets you check whether the printer is functioning normally.
Here is how you run the label size calibration and self test:
1. Check that the label stock is loaded correctly.
2. Switch o the printer.
3. Switch the printer on again, keeping
the FEED button pressed. When the LED
starts to ash red and you hear 3 beeps,
release the FEED button. The printer will
now measure the label stock and store
the label height.
4. Once the printer has successfully measured the label stock, it will print a self-test
label.
14 | Operation Panel
Page 15
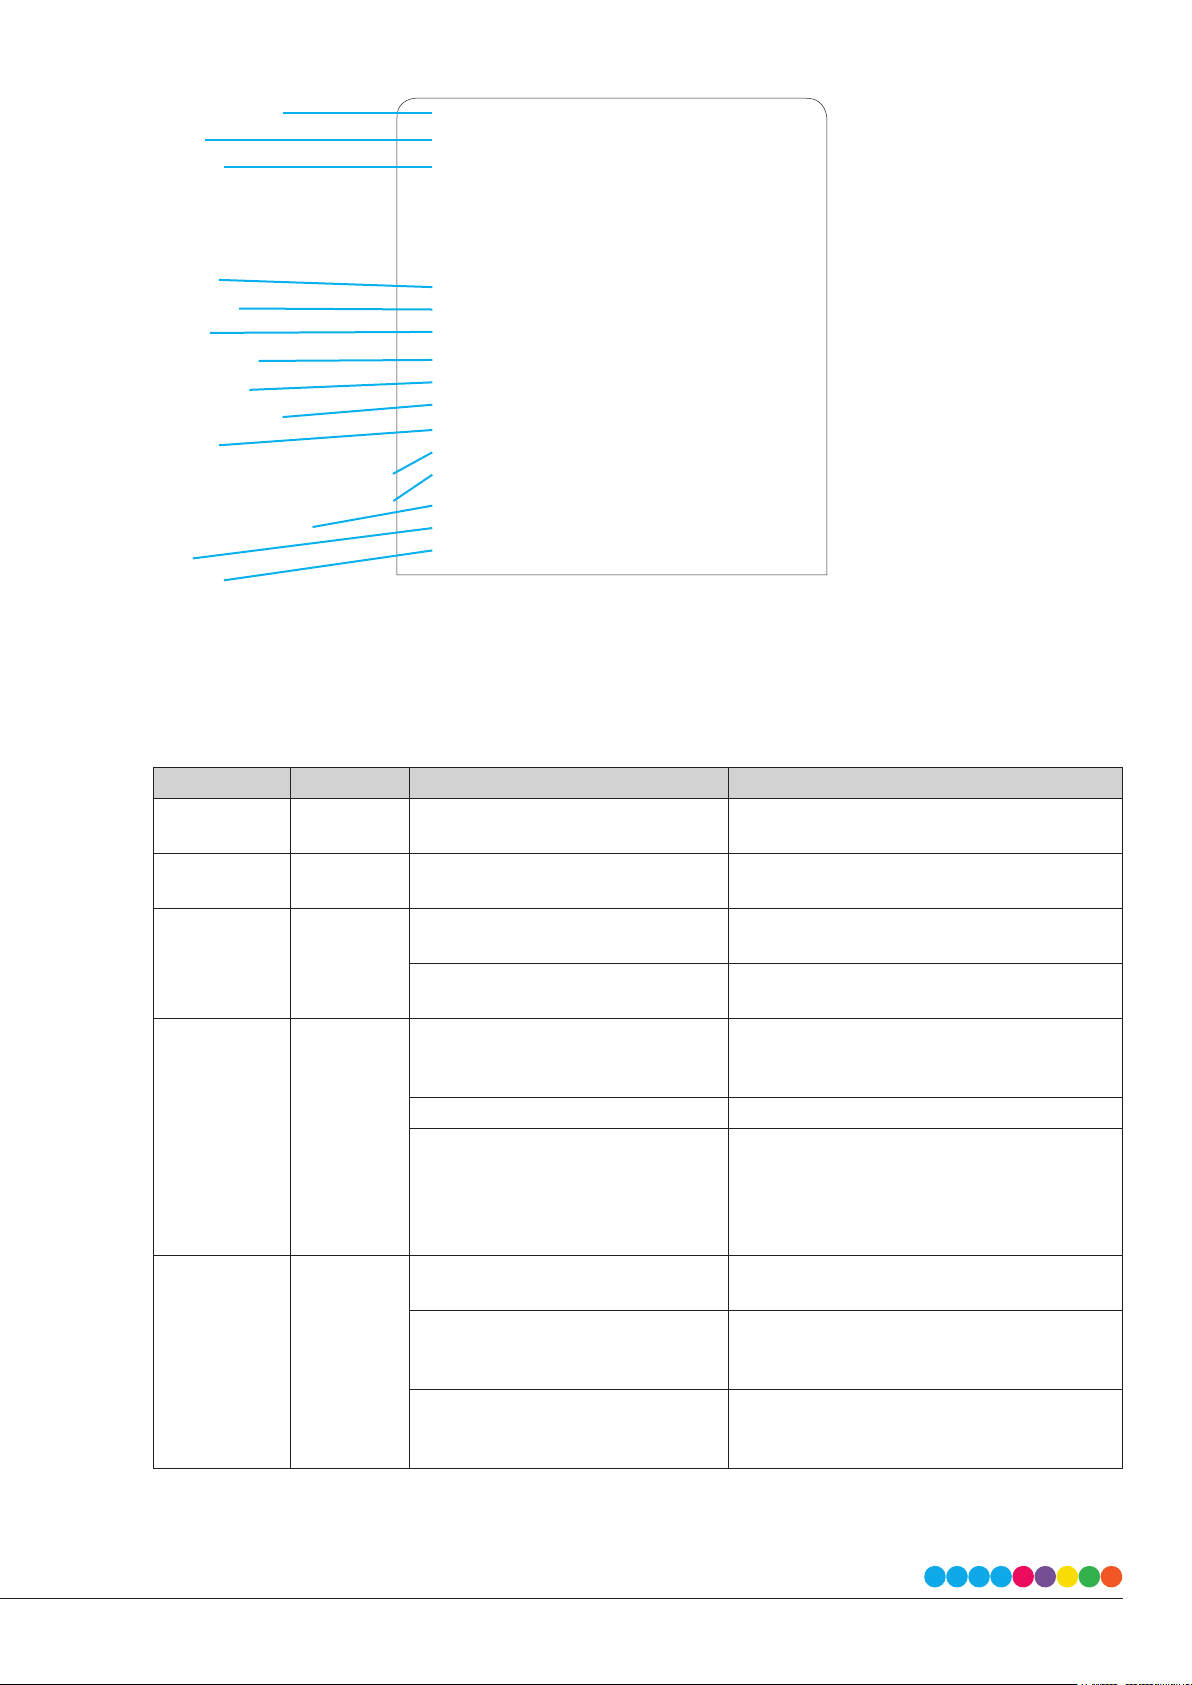
The contents of a self-test printout are listed below.
Model & Firmware Version
USB Port Setting
Serial Port Setting
Number of Forms
Number of Graphics
Number of Fonts
Number of Asian Fonts
Number of Databases
Number of Scalable Fonts
Free Memory Size
Speed, Density, Ref. Point, Print Direction
Label Width, Form Length, Stop Position
Cutter, Label Dispenser, Mode
Sensor Setting
Code Page Setting
3 C Error Alerts
In the event of a problem that prevents normal functioning of the printer, you will see the LED indicates an error message
with a red light and some additional beep signals. Please refer to below table for the error alerts.
FX510e DTMFX1U.XO
USB S/N: XXXXXXXX
Serial port: 96, N, 8, 1
Card Status: Not detected [00]
PORT State L S E U B
1 1 1 1 1
###############################
0000 FORM(S) IN MEMORY
0000 GRAPHIC(S) IN MEMORY
000 FONT(S) IN MEMORY
000 ASIAN FONT(S) IN MEMORY
000 DATABASE(S) IN MEMORY
000 TTF(S) IN MEMORY
4073 KB FREE MEMORY
ˆS3 ˆH8 ˆR000 ~R200 ~Q+0
ˆW102 ˆQ75,4 ˆE18
Option: ˆD0 ˆO0 ˆAT
See. : 2.0 3.1 2.6 [1.2_27]
Code Page: 850
LED Indicator Beeps Description Solution
LED On 2x 4 beeps
LED Flashing none High temperature at the print head.
LED On 2x 3 beeps
LED On 2x 2 beeps
LED On 2x 2 beeps
The printing mechanism is not correctly closed.
No ribbon is installed and the printer
displays an error.
The ribbon is nished or the label
supply hub is not moving.
No paper is detected.
Paper is nished. Replace the label roll.
Printer feed problem.
The memory is full. The printer prints
the message “Memory full”.
Unable to nd le. The printer prints
the message “Filename cannot be
found”
A le of the same name already exists.
The printer prints the message “Filename is repeated”.
Open the print mechanism and close it again.
Once the print head has cooled down, the
printer switches to standby mode.
Make sure that the printer is set to direct thermal printing mode.
Replace the ribbon roll.
Make sure that the label sensor is positioned
correctly. If the sensor still does not detect the
paper, run the auto-detection function again
Possible reasons: the print medium has
become trapped around the rubber roll; the
sensor cannot detect a gap or black mark between the labels; there is no paper. Please reset
the sensor.
Delete unnecessary data or install additional
memory.
Use the “~X4” command to print all les. Then
check whether the les exist and whether the
names are correct.
Change the name of the le and try storing it
again.
15 | Operation Panel
Page 16
Section 4: Printing
Your printer ships with a version NiceLabel Free 2019 DTM Edition. These easy-to-use software’s are designed to allow you
to create label designs with text, shapes or bar codes quickly and simply. The following is a tutorial to guide you through
creating and printing a sample label in NiceLabel.
Download NiceLabel at fx510edownload.dtm-print.eu and follow the installation process. Launch NiceLabel from your
computer’s Start Menu.
Note: You are not required to print from the NiceLabel software. You can print from any application that prints to a Windows
Printer, such as Adobe Acrobat. In some cases it can be even easier to print with a software that supports multiple layers.
4 A Adding highlights to a label with NiceLabel
Load a colour, clear or metallic ribbon. For instructions see Section 2 C.
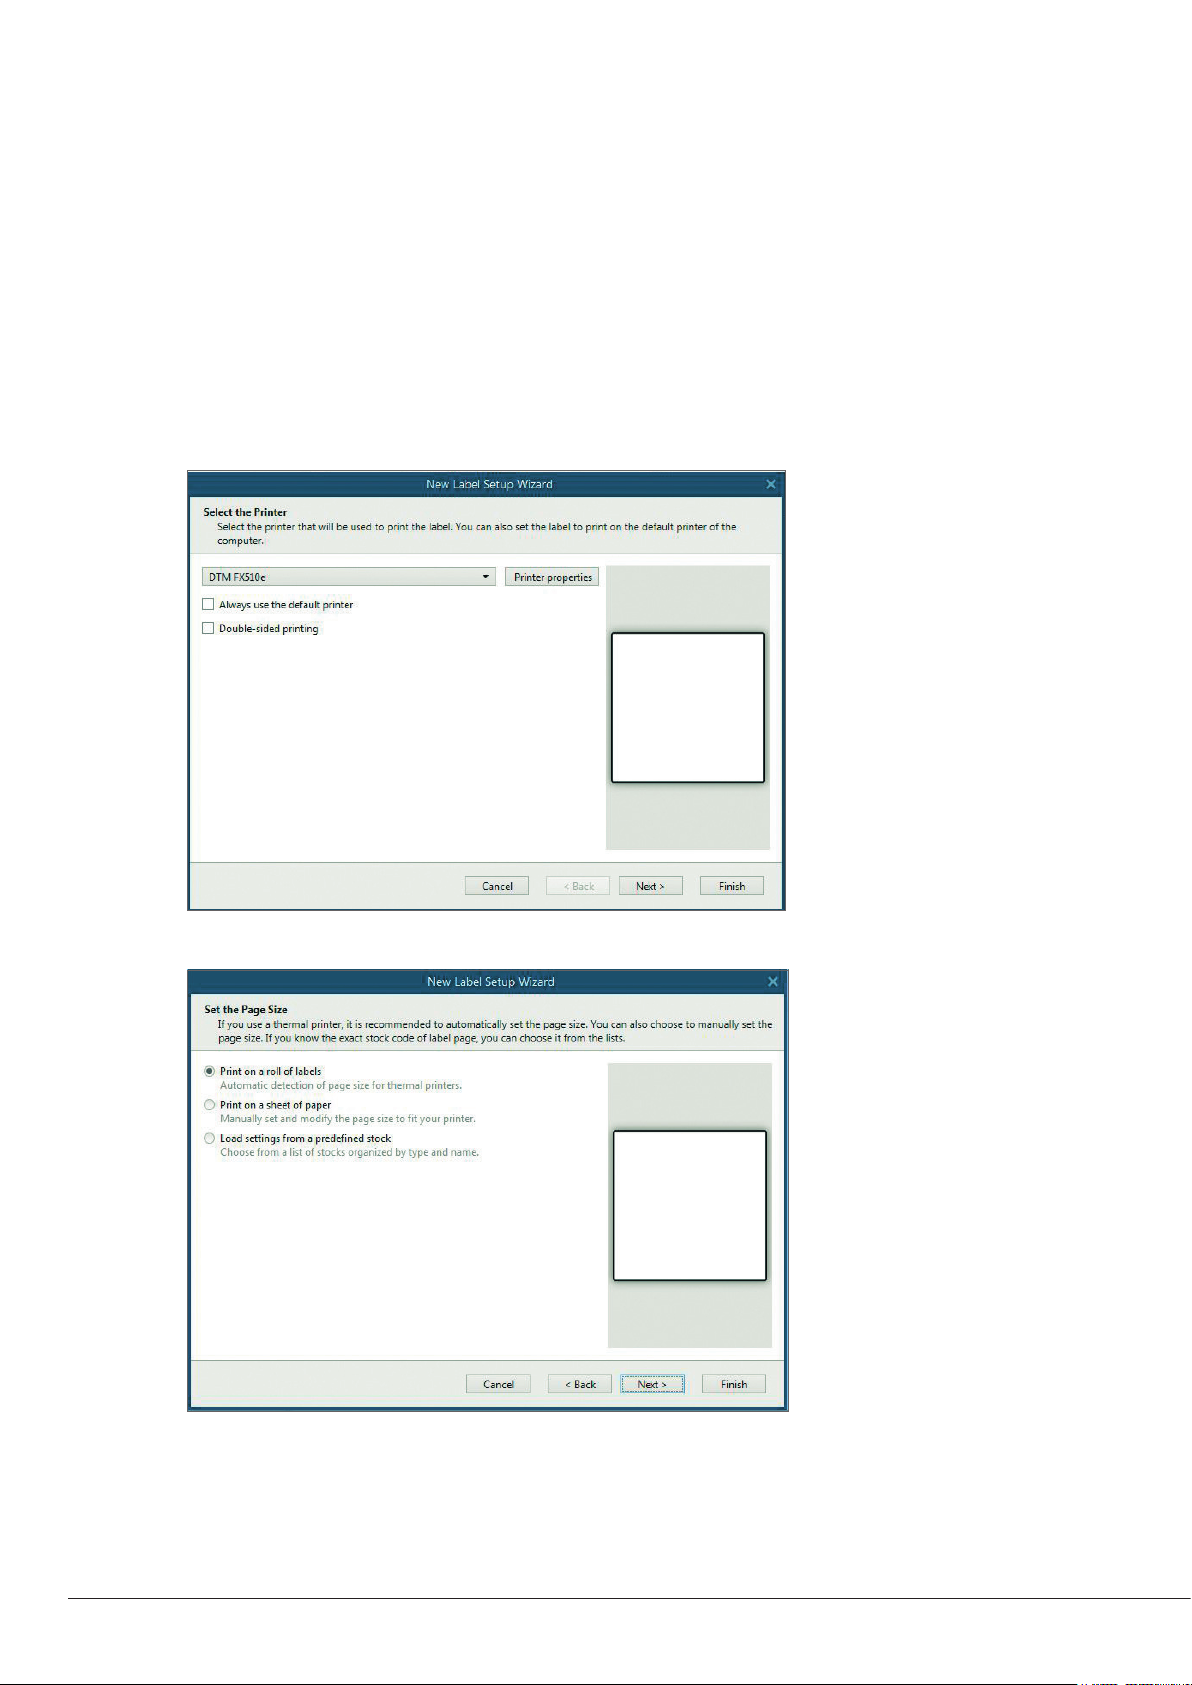
1. Select “New Label”. Select the Printer “DTM FX510e”. Click “Next”.
2. Select “Print on a roll of labels”. Click “Next”.
16 | Printing
Page 17
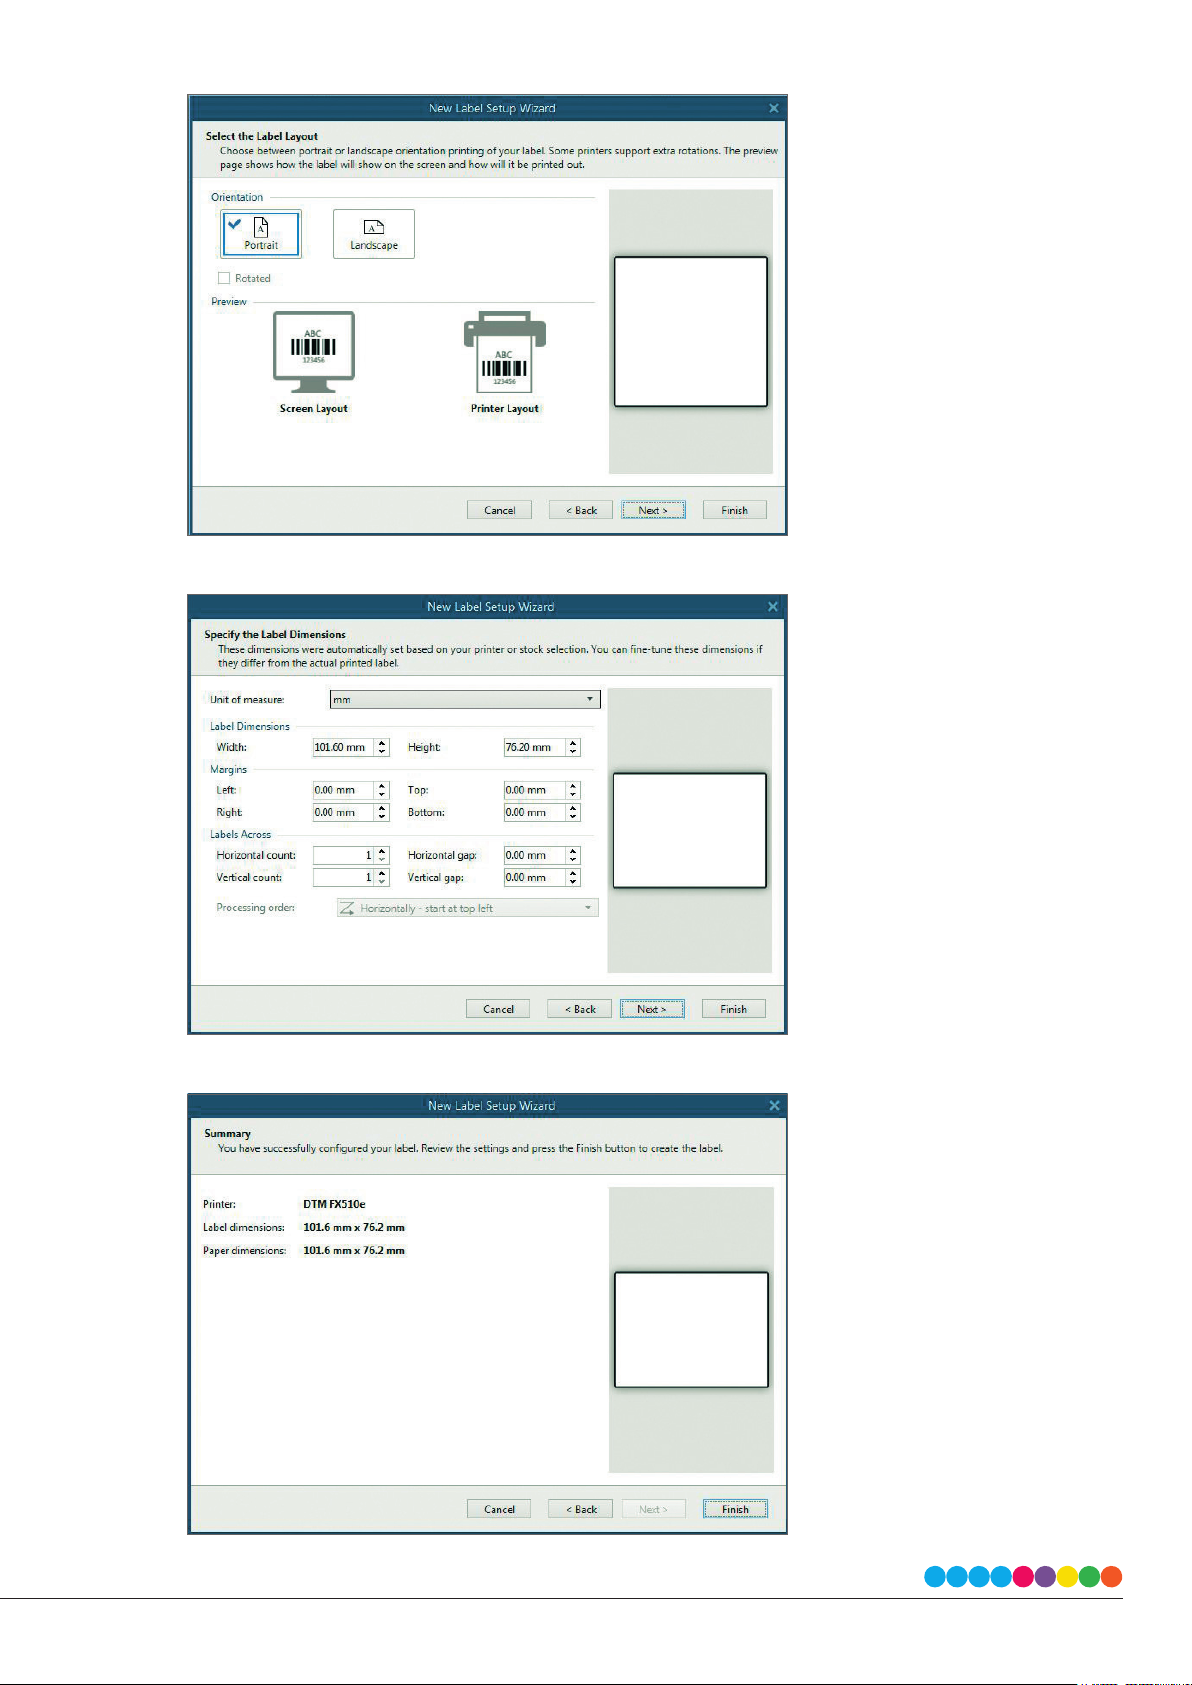
3. Choose Orientation. Click “Next”.
4. Set the dimensions of your label and unit of measure. Click “Next”.
5. Review the label setup summary. If it is correct, click “Finish”. Your blank label will be displayed.
17 | Printing
Page 18
After you click “Finish”, you can always go back and change any of these “Label Properties” settings, by going to the Menu
Bar and select “Document Properties” or double click on the blank label.
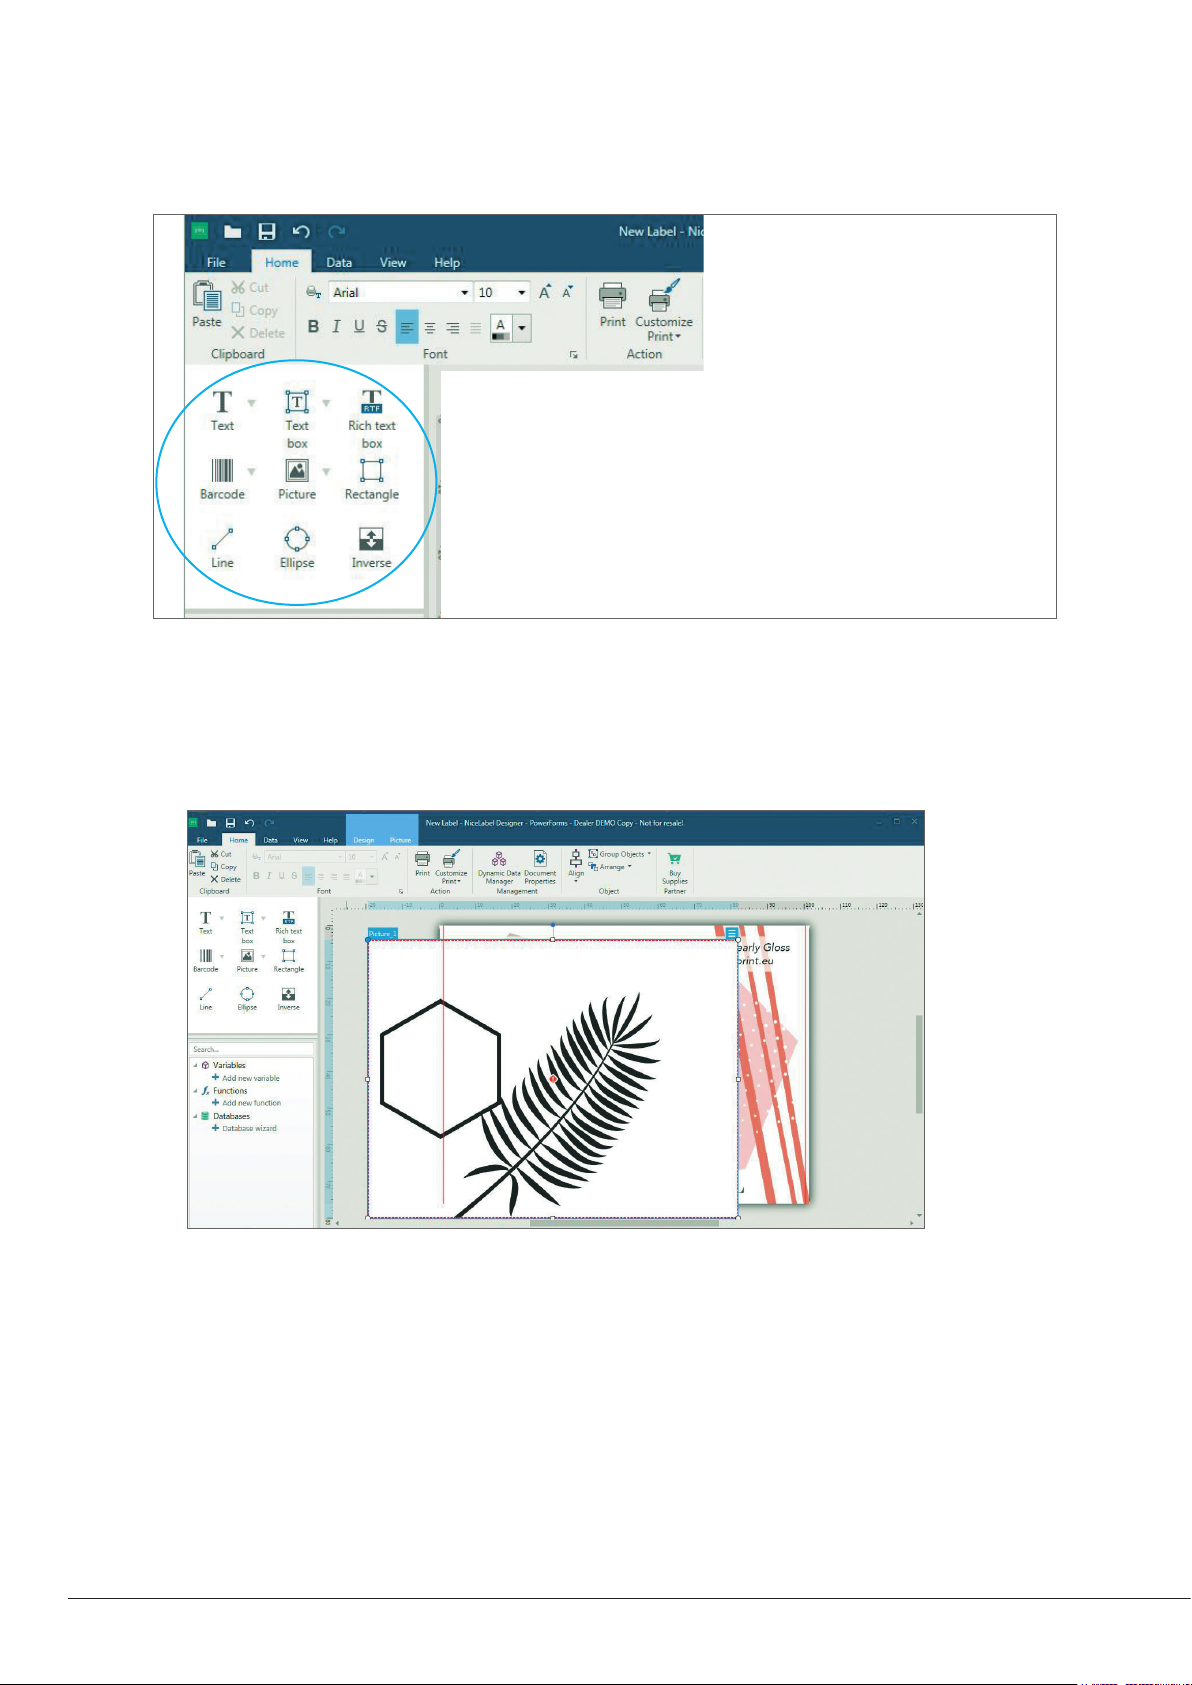
Once you have created your label size you can start to design your label using tools from the tool box/button bar. You will
need to add text, rectangles, lines and/or graphics. This can be done using one of the buttons on the button bar at the top
left screen.
Click the Text buttons to add text to your labels. Edit the text on screen
or double click to open up text settings to change font, size and other
settings.
Click the Picture button to add graphic. Click anywhere on the label. A
pop-up window will open to browse to the image/graphic and select it
with “Open”.
Click the Rectangle, Line and Ellipse button to add geometrical shapes.
Click the Barcode button to add a bar code. Double click the bar code to
choose the bar code type.
Tip 1: Double-click any object to open settings for that object.
Tip 2: Go to the Help tab to access the NiceLabel Manual and Tutorials
If you are adding metallic or colour highlights to a pre-printed label you can open the label le that you have used to print
the labels. Afterward you can add the black and white picture or any black text or shape you want to imprint.
1. Add a text, picture/graphic or shape to the desired position on the label
18 | Printing
Page 19
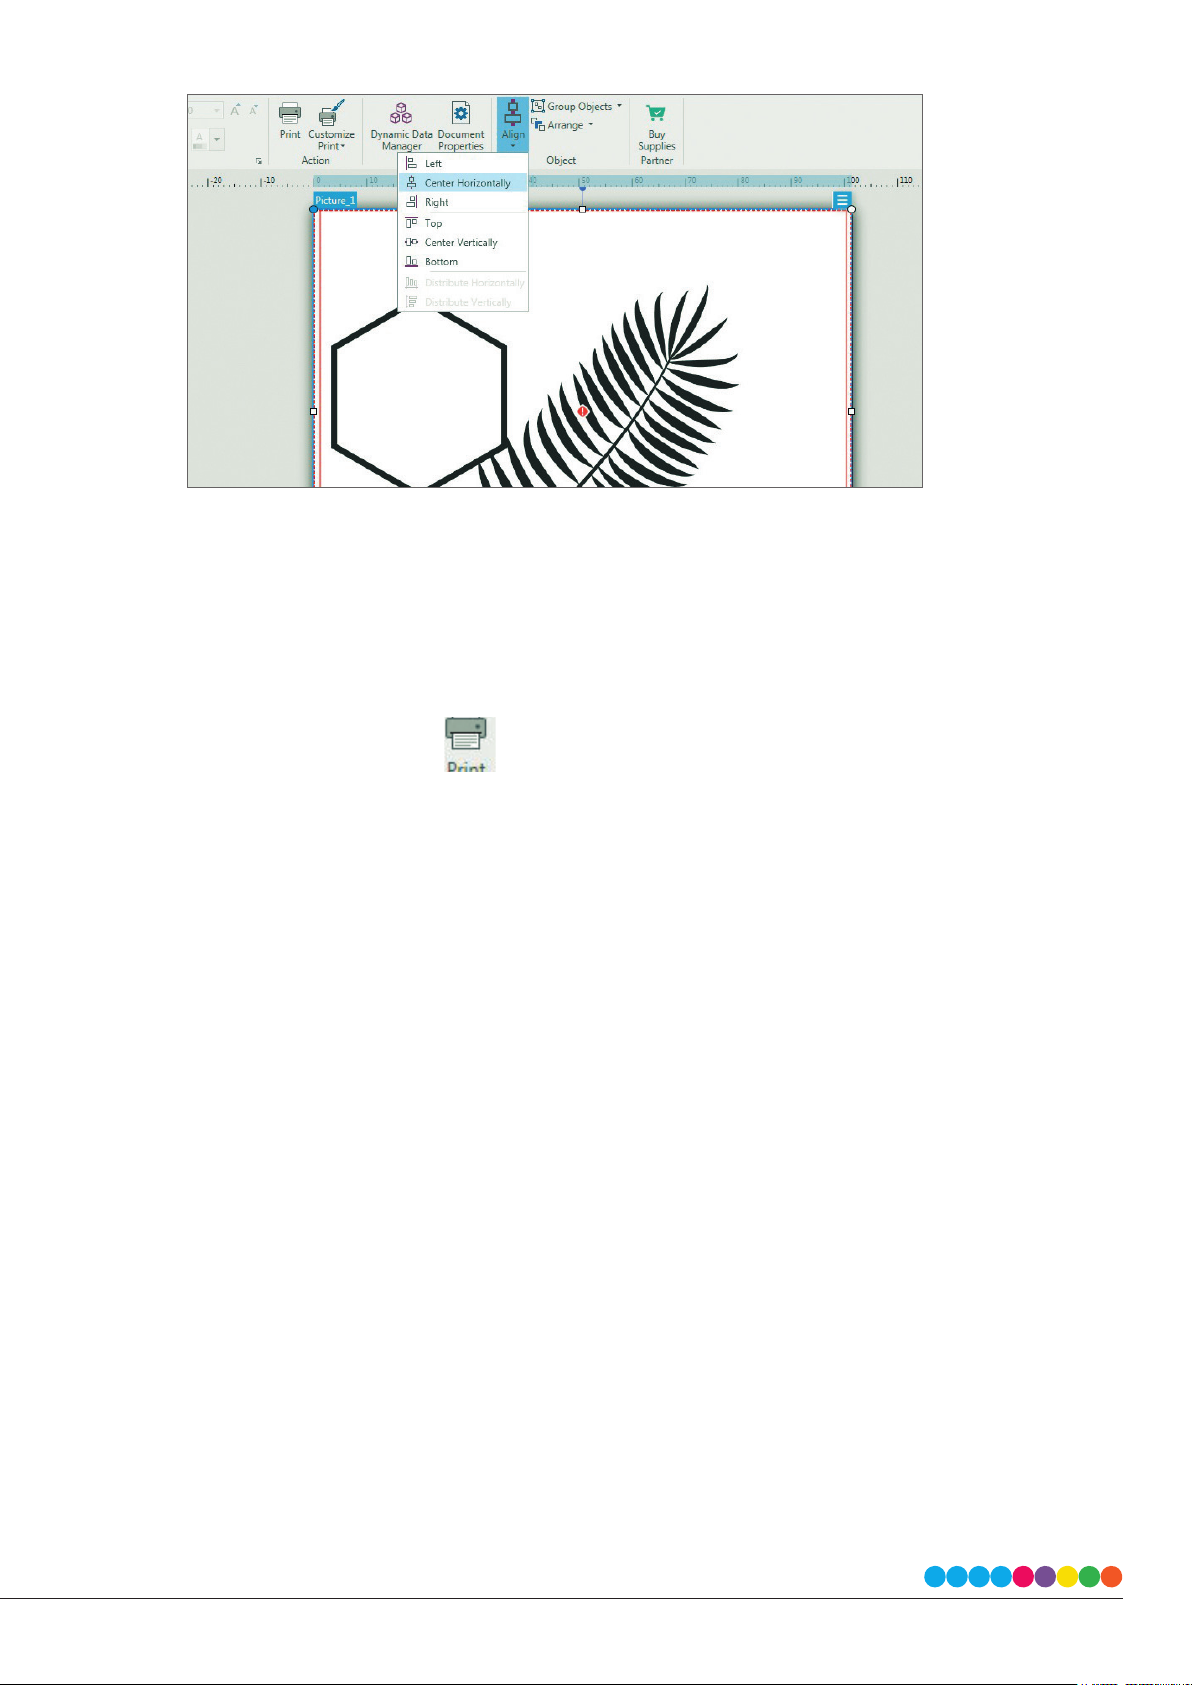
2. Easily align your text, shape or picture/graphic with the Align button in the top tool bar.
When the picture/graphic is covering the whole label, you can leave the label underneath the highlights box.
If the original label is still visible you should delete it after positioning the text, shapes or graphics.
You are now ready to print your label.
Note: Objects will be layered in the order they are added to your document. To change the layering order right click on the object,
choose “Arrange” and “Order”.
4 B Printing from NiceLabel
1. To print, click the Print button or go to the File Menu and select “Print”. The Print Dialogue window will appear.
2. Select the “DTM FX510e”.
3. Set the number of copies.
4. Click “Printer Settings” to adjust darkness, speed, etc. These settings are explained in Section 4 D
5. Click “Print”.
Congratulations! You have successfully created and printed your rst label. The rest of this section will explain how to seal
labels with clear lm and the printer settings. Also, you can nd more tips and hints by simply clicking Help in the main menu
4 C Sealing labels with clear film
Clear lm is also available for FX510e. It lets you produce labels with a higher resistance to water and UV or other environmental factors.
1. Load a clear lm ribbon. For instructions see Section 2 C.
2. Create a “Blank Template” in the Label Setup Wizard. Follow the steps in Section 4 A.
3. Click the Rectangle Button, then click on a corner of the label and pull the rectangle to the other corner of the label.
Then double click on the rectangle and select solid ll style and black background colour under “Rectangle Properties”.
Make sure the whole label is completely covered from edge to edge if you want to seal it.
4. You are now ready to print your label. Click the Print button or go to the File Menu – “Print” to select “Printer Settings”
to adjust darkness, speed, etc. See Section 4 B for more information. Choose your number of copies and click Print.
Note: Keep in mind that sealing a full covered label heats up the print head a lot. Therefore short breaks (cool down lapse) between
each printed label are necessary to cool down the print head. If the printer is not automatically generating these cool down
lapse please contact our support team to adjust them accordingly.
19 | Printing
Page 20
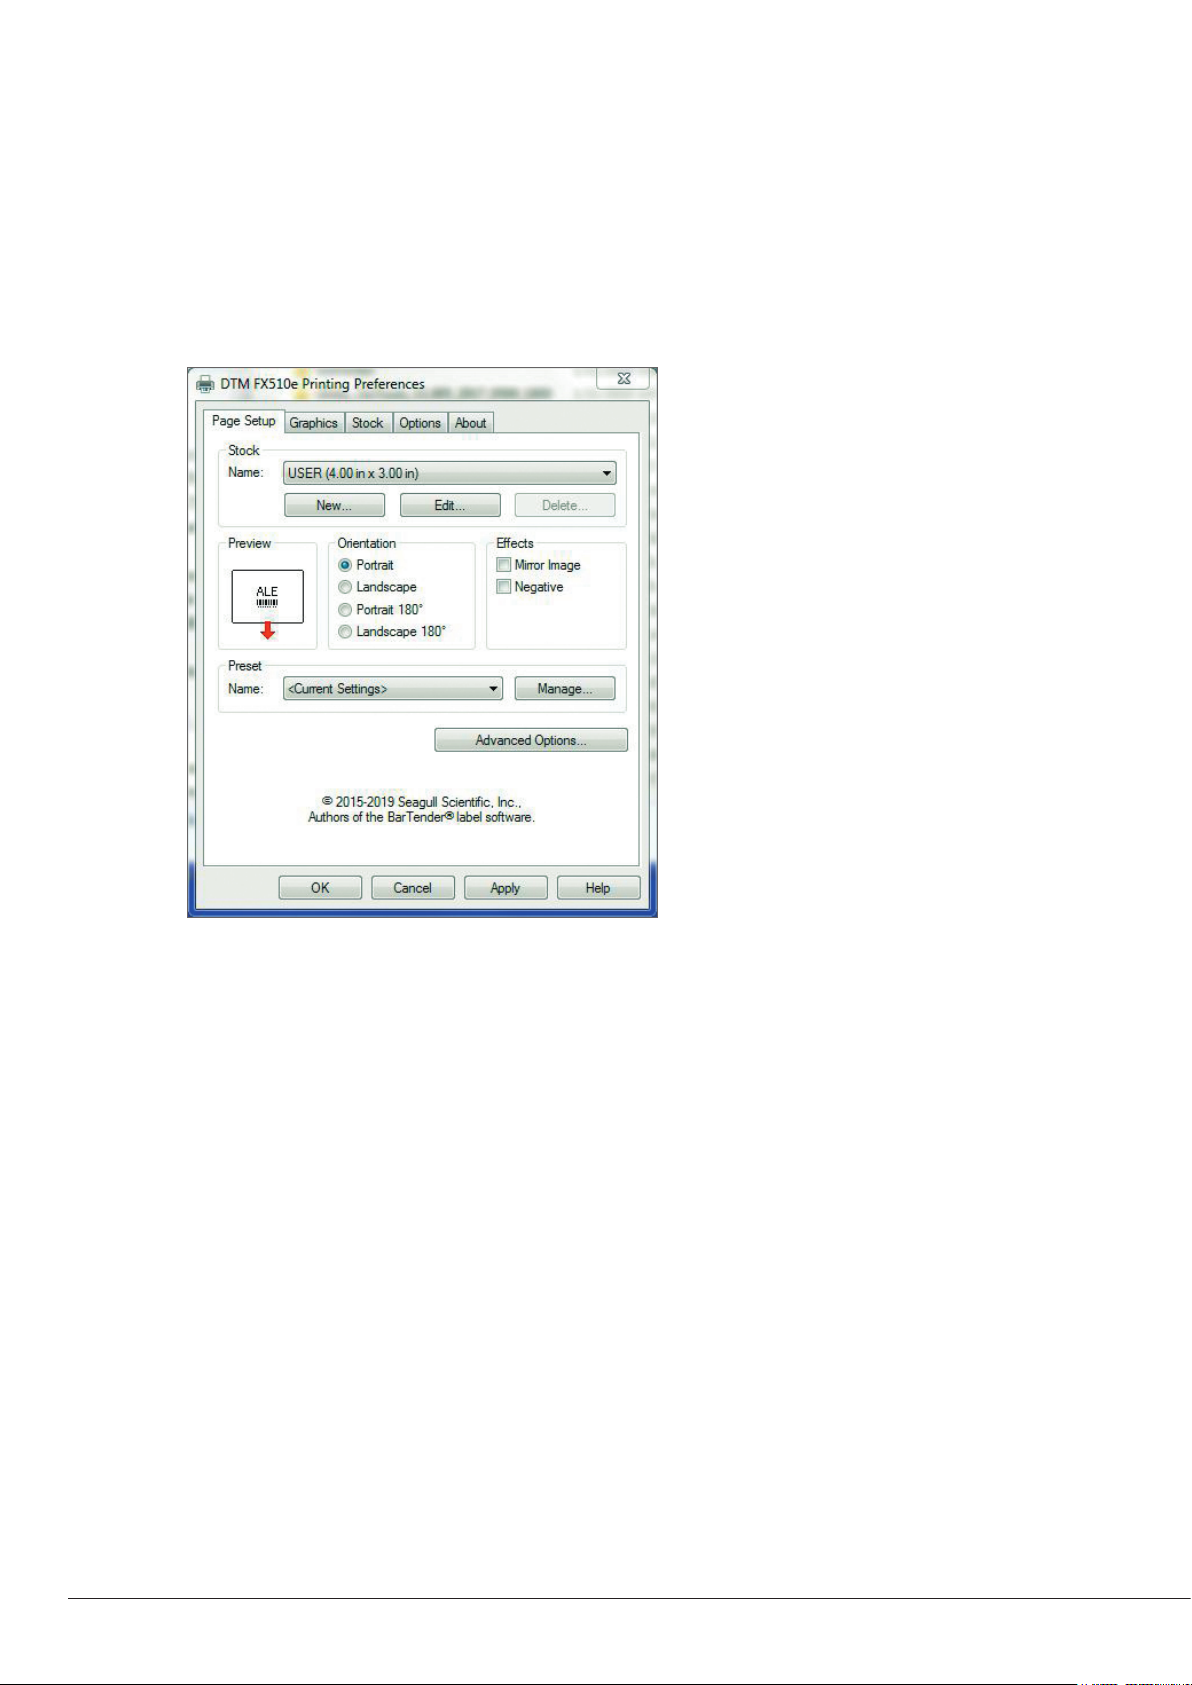
4 D Printer Driver Settings
Once the printer driver has been successfully installed, you will need to setup the driver with the appropriate print options.
Refer to the following steps to change or verify your default printer driver preferences. These settings will apply to all new
designs created in NiceLabel or other programs after the preferences were changed. Existing labels saved in NiceLabel will
not be aected since the preferences are saved with the label. To change these preferences you will have to change printer
preferences through NiceLabel (File Menu – “Print” – “Printer Settings”)
Find Driver Settings in Windows:
Click the Windows Start Menu button, search for “Devices & Printers” and click on “DTM FX510e”. Choose “Manage” and a new
window opens up. Select “Printing preferences”.
The preferences screen will appear.
Note: Most applications allow you to change these same printing preferences from their “Print” and/or “Printer Setup” screens. Some
applications such as NiceLabel save your settings with the label, others use settings only for the current print job just sent to the printer.
The Printing Preferences menu includes plenty of options, but not all of them are really necessary to change or they even
don’t have any eects. This is because the driver was originally designed for extended professional use. So only the involved
options will be explained.
20 | Printing
Page 21
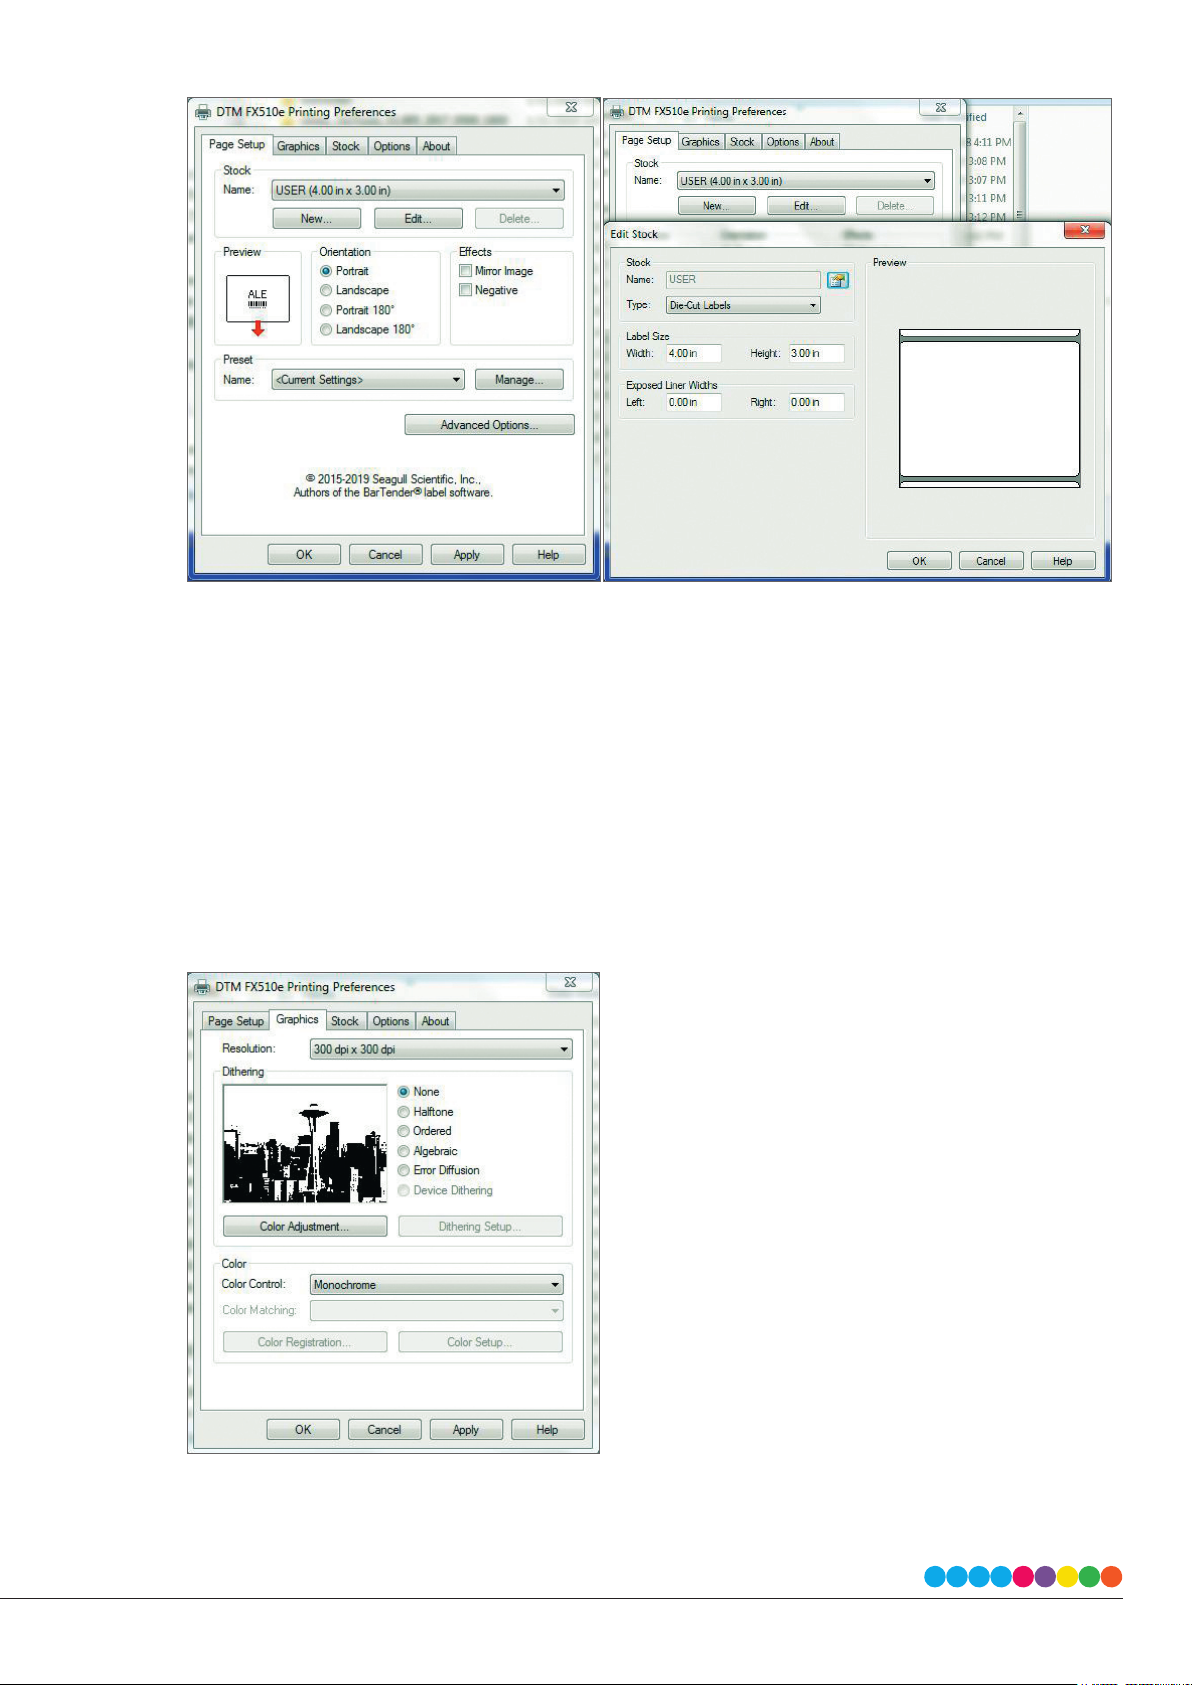
Page Setup Tab
In the rst area you can pre-dene settings for specic label stock. The pre-dened settings are available in the Stock – Name
drop-down menu.
The button Edit… opens the window to edit stock. Choose the Sensor Type your label is using (“Die-Cut Labels” for labels
that are die-cut with or without a black mark in the back and “Continuous (Fixed Length)” for continuous label stock
without any sensor marks). Set the “Label Size” to the size of your label and set the “Exposed Liner Width” to “0”.
There are two settings for orientation, Portrait and Landscape. If your text and graphics print left to right or as shown on the
screen, select portrait. If you wish your printing to rotate 90° from what you see on the screen so it is printing horizontally,
select landscape as orientation.
Remember: This does not change the width and height in the Paper Size setting. It is only a tool for viewing a label upright on
screen that will be printed sideways on the printer.
Once you’ve done all settings in the following tabs, you want to come back to this tab for saving the present. Therefore
choose “Manage…” in the bottom area of this Page Setup Tab.
Graphics Tab
Adjust the Dithering type to your needs. For imprinting the foil as clear/smooth as possible to the label, choose the standard
option “none”.
21 | Printing
Page 22
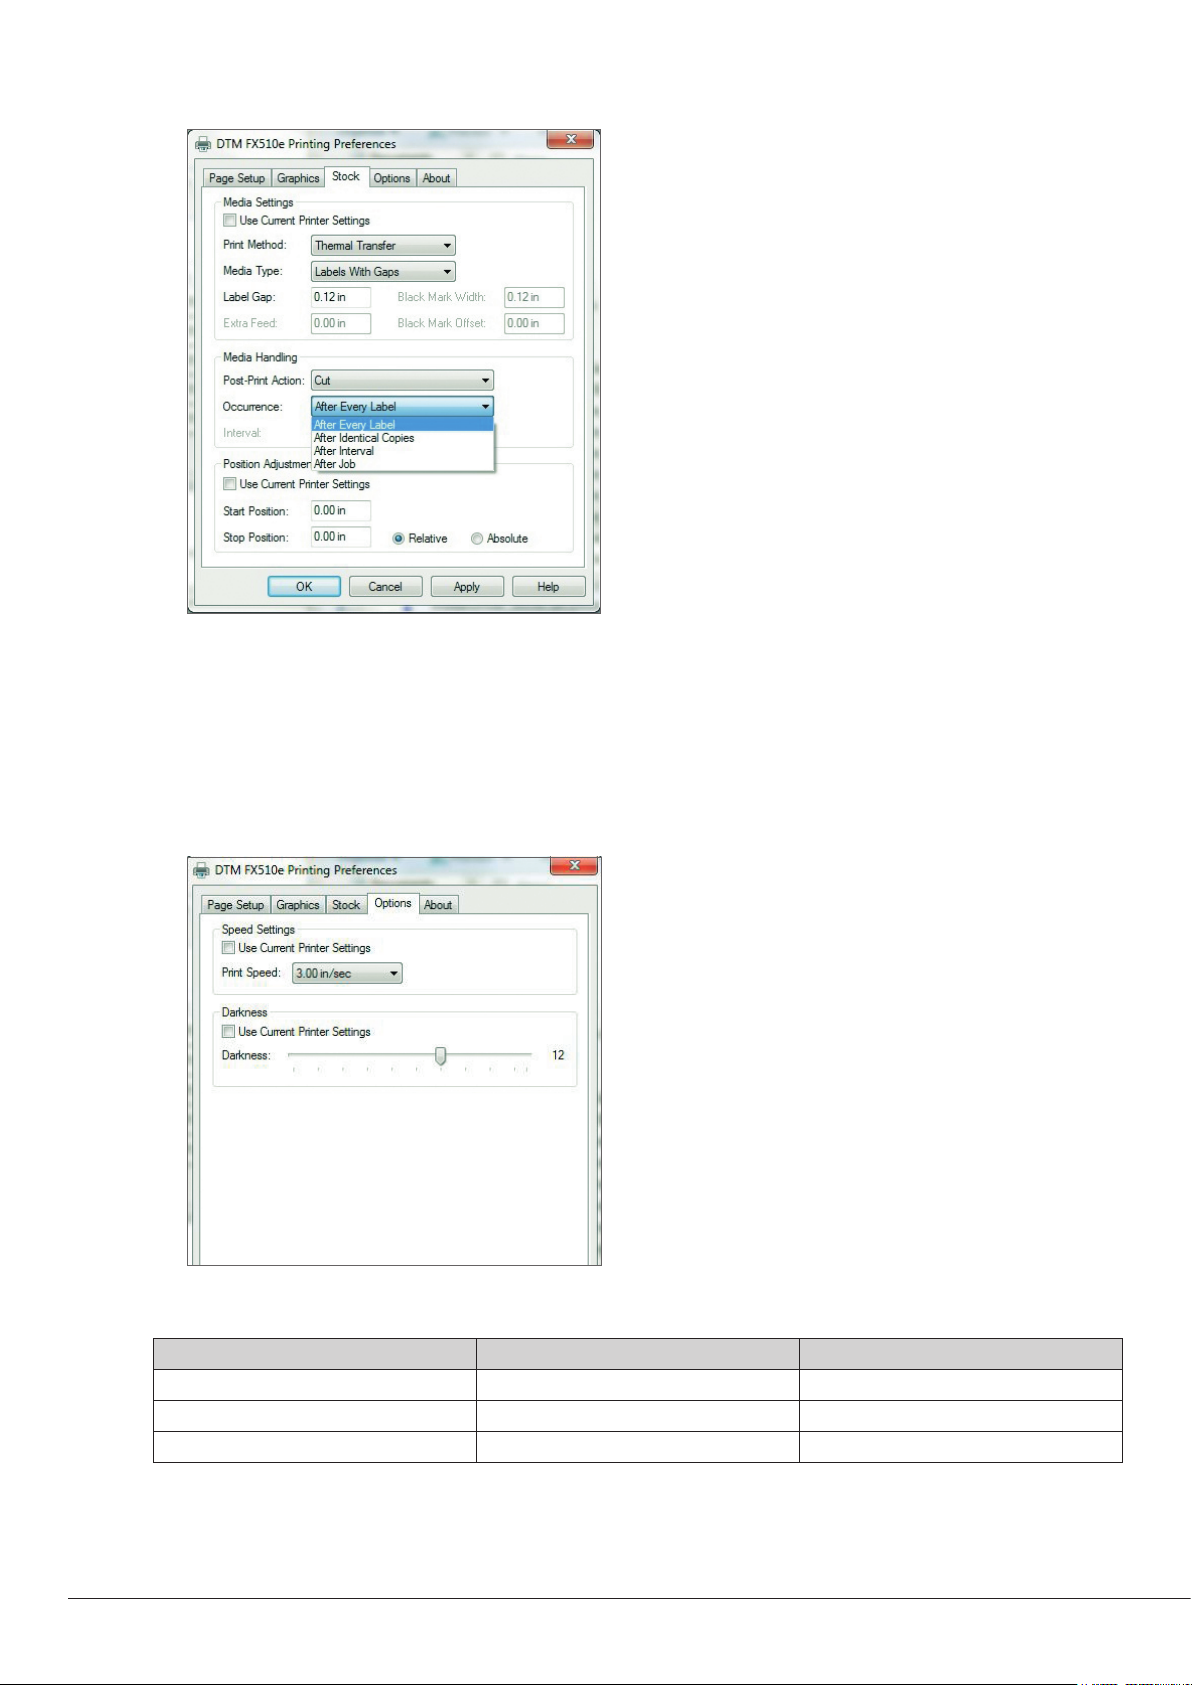
Stock Tab
In this tab you can set your media settings.
Choose “Direct Transfer” as print method, when you’re using direct thermal labels that don’t require a transfer ribbon. These
labels have a special heat-activated layer where a black print image is formed on the label as heat from the print head is
applied. Choose “Thermal Transfer” as print method, when you’re using usual pre-printed or blank label stock in combination
to one of DTM’s certied metallic, clear or spot colour ribbons.
With FX510ec you have the option to cut your media horizontally. Choose “Cut” in the Post-Print Action and select the right
occurrence. It’s obligatory to set the Stop Position in the Position Adjustments to “Relative” to get the best cut position. You
may want to change the cut position by editing the values for Start and Stop Position.
Options Tab
Either use the Current Printer Settings or choose your own Darkness and Speed Settings. Adjust these values to your needs.
Recommended settings on Genuine DTM certied ribbon foils:
Ribbon Darkness Speed
Gold/Silver Metallic 8-9 3.00 in/sec
Blue/Red Metallic 8-9 3.00 in/sec
Clear Transparent 9-10 2.00 in/sec
This is only a recommendation. If the printout doesn’t meet your requirements, try to reduce or increase the darkness and/
or speed settings.
22 | Printing
Page 23

4 E Printing from Other Programs
Since this printer uses a standard Windows printer driver you can print from any application you would like. There are just a
few things to remember that will make it much easier.
1. Set the Page/Label Size in the driver. NiceLabel automatically prompts you for the size of the label that you are
using. When printing from any other program you must do this manually.
2. Check the image or document size. The image size or document size should correspond to the Page/Label Size set
in the driver.
3. Choose the right printing program. There are many dierent applications that are capable of printing to the FX510e.
However there are only a few that are ideal printing applications. For example, Adobe Illustrator or Photoshop is an
excellent design program but is not always the best printing program. It can be dicult to nd the printing preferences or to know the exact size of the art board. It is best to save as a PDF le and print from Adobe Reader or export
as a 300 dpi JPG and print from NiceLabel..
23 | Printing
Page 24
Section 5: Troubleshooting and Maintenance
5 A Cleaning The Print Head
Dirt on the print head or ribbon, or glue residue from the label stock may result in inadequate print quality. The printer cover
must therefore always be closed during printing. Keeping dirt and dust away from the paper or labels ensures a good print
quality and a longer lifespan of the print head.
Cleaning Steps
Here is how you clean the print head.
1. Switch o the printer.
2. Open the printer cover.
3. Release the printing mechanism and lift it.
4. Remove the ribbon.
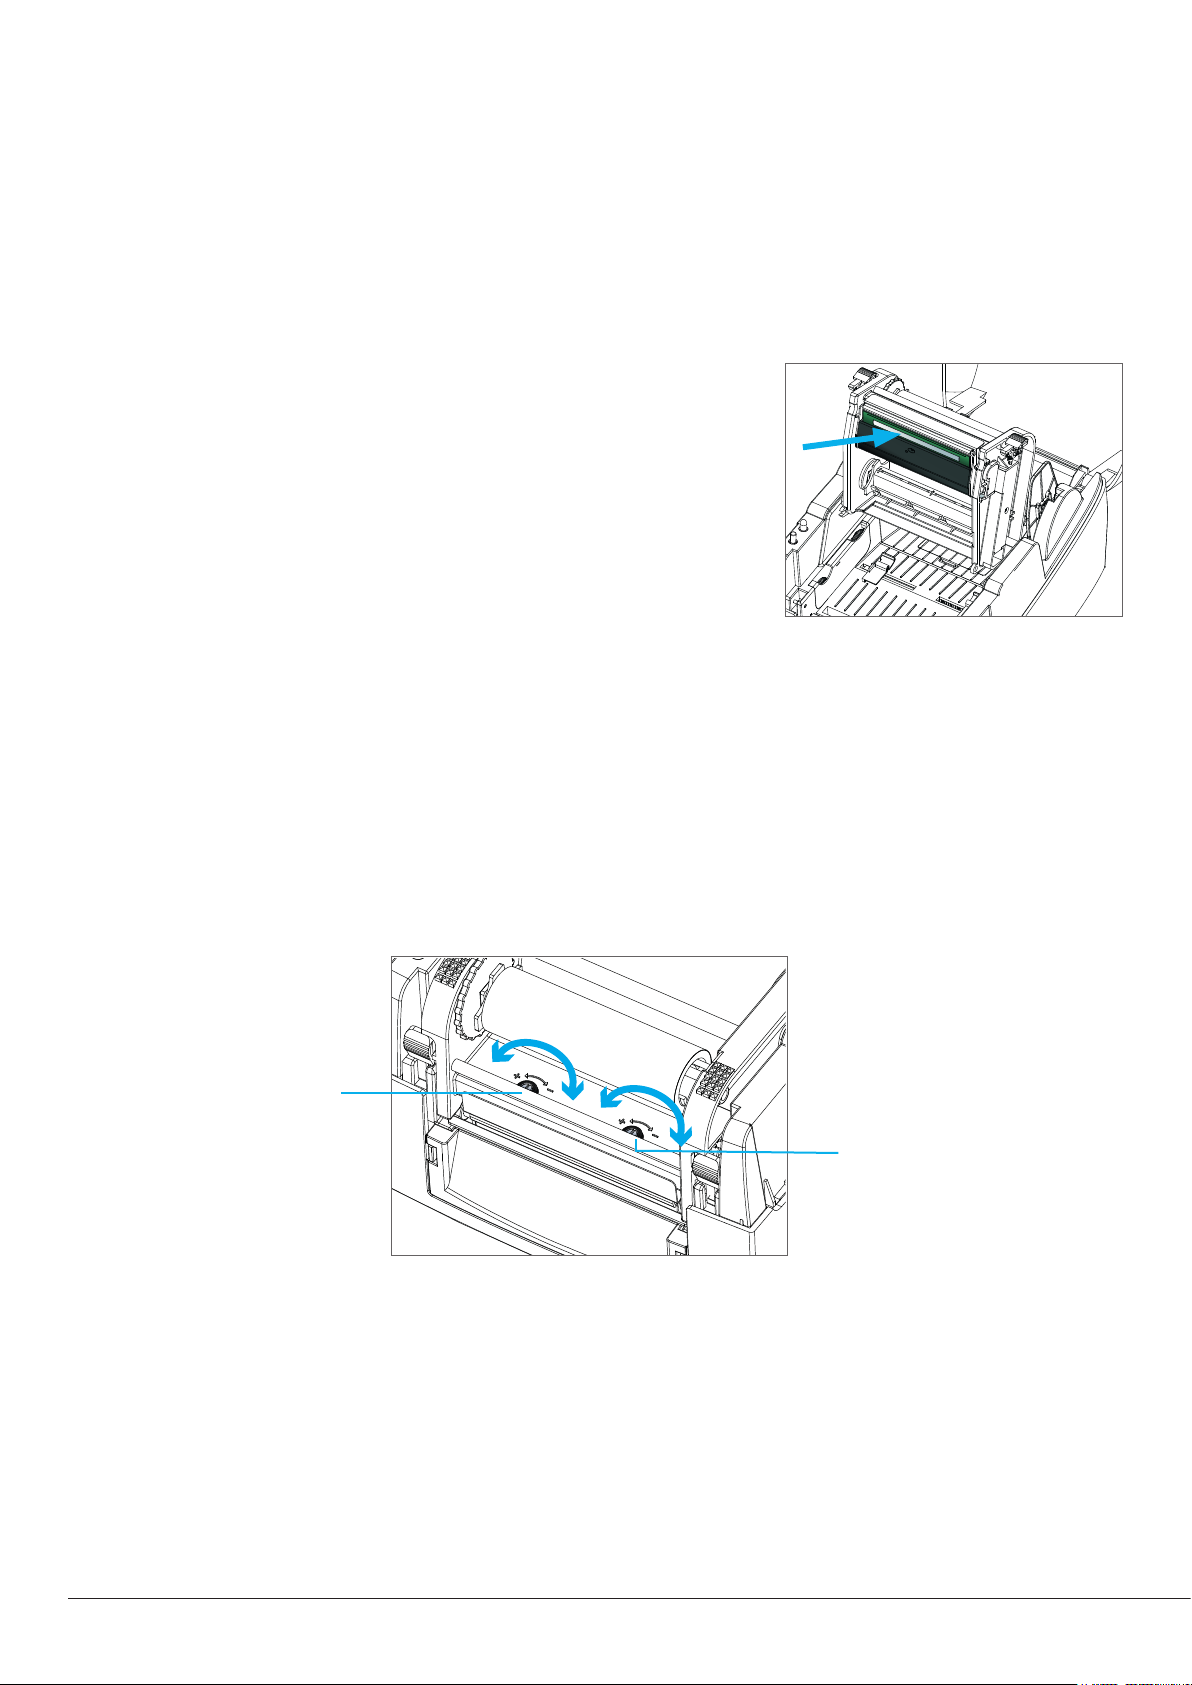
5. To remove any label residue or other dirt from the print head (see blue
arrow), please use a soft lint-free cloth dipped in isopropyl alcohol.
Note: The print head should be cleaned once a week. Please make sure that there
are no metal fragments or other hard particles on the soft cloth used to clean the print head.
5 B Adjusting The Print Head Pressure
When printing on special media (with varying material thickness), the print quality may suer. You will then need to adjust
the print head pressure.
Adjustment Steps
1. Open the printer cover.
2. Remove the ribbon.
3. Use a screw driver and slowly turn the adjustment screws for the print head to increase or reduce the print head
pressure.
Screw (left side)
Screw for adjusting the
print head pressure on
left side
Screw (right side)
Screw for adjusting the
print head pressure on
right side
24 | Troubleshooting and Maintenance
Page 25
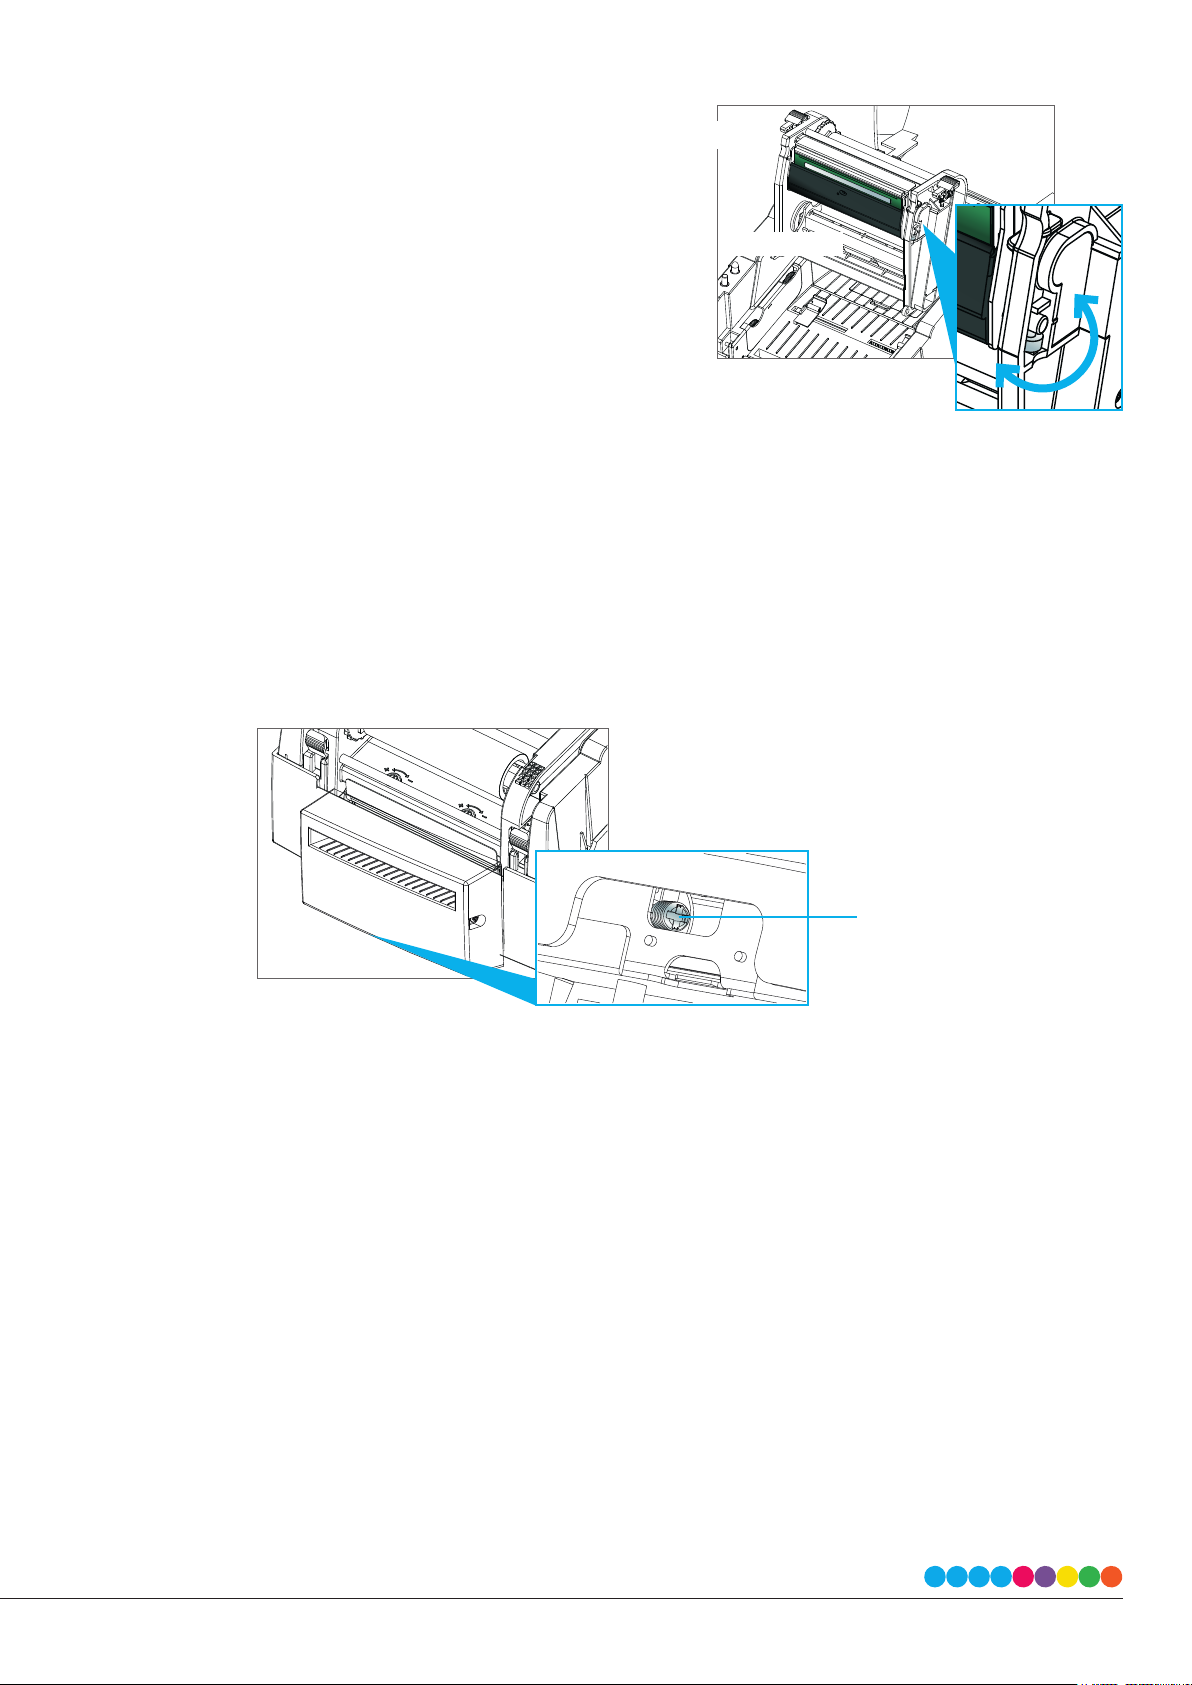
5 C Adjusting The Print Line
When the print line is incorrectly set, the print quality on one
side of the medium may suer. In such a case, the print line must
be adjusted so it is positioned parallel to the paper feed roller
Adjustment Methods
1. To move the print head in direction A as indicated by the
blue arrow, turn the adjustment wheel anticlockwise
(see arrow 1).
2. To move the print head in direction B as indicated by
the blue arrow, turn the adjustment wheel clockwise
(see arrow 2).
Direction A
Direction B
5 D Adjusting The Cutter (FX510ec Model Only)
While using the cutter, paper jams may occur. Please follow the below steps to clean the paper jam. A socket head screw for
adjusting the cutter is located on the bottom of cutter module, as shown in below illustration.
Cleaning Steps:
1. Switch o the printer.
2. Use a Phillips (cross-head) screwdriver to turn the socket head screw and release the knife.
3. When you have cleared the paper jam, switch on the printer again. The cutter will automatically reset.
Note: Labels should be at least 30 mm high to ensure correct functioning of the cutter.
Socket Head Screw
25 | Troubleshooting and Maintenance
Page 26
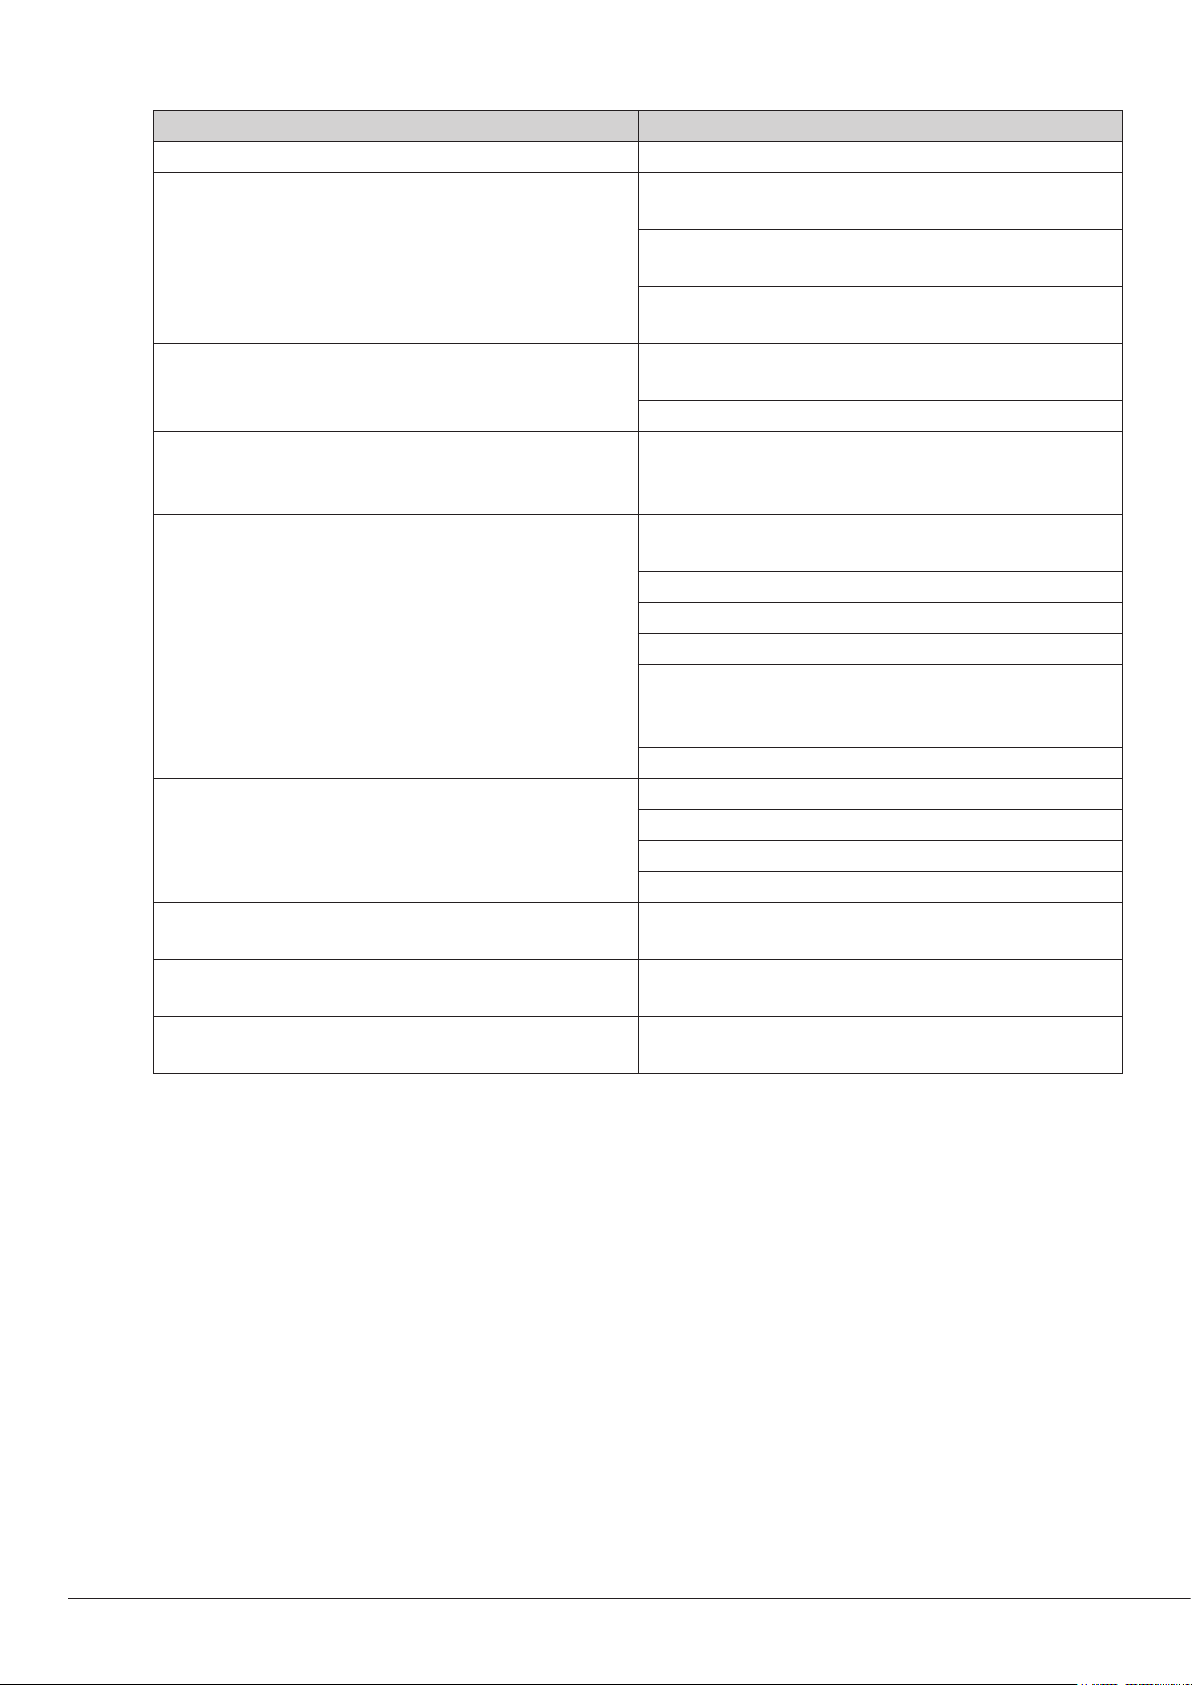
5 E Troubleshooting
Problem Solution
The printer is switched on but the LED does not light up Check the power supply.
The LED lights up red and printing is interrupted
The label stock passes through the printer but no image is
printed.
The label stock jams during printing.
There is no printed image on part of the label or the image
is blurred.
The printed image is positioned incorrectly or a label is
missed out during printing.
The cutter does not cut o the labels completely
(FX510ec only).
The cutter does not cut o the labels completely
(FX510ec only).
When using the cutter, the labels are not fed through
or cut o incorrectly. (FX510ec only).
Check the software settings (driver settings) or command
codes.
Look for the error alert in the table in Section 3C Error
alerts.
Check whether the cutter is functioning normally and
whether it is cutting at all. (FX510ec only)
Please make sure that the label stock is loaded the right
way up and that it is suitable material.
Please make sure that the ribbon is loaded correctly.
Clear the paper jam. Remove any label material left on the
thermal print head and clean the print head using a soft
lint-free cloth dipped in alcohol
Check the thermal print head for dust or other dirt (label
material or ribbon residue).
Check for errors in the application software.
Check the ribbon for wrinkles.
Check the power supply.
Run a self test (Section 3B ) and check the test print pattern to see whether the print head prints over the entire
width of the medium.
Check the quality of the print medium
Run the Label size calibration function. (Section 3 B)
Check the label height setting.
Check whether there is paper or dust covering the sensor.
Check the paper guide settings.
Check whether the label stock is positioned straight
Check whether the label is more than 0.2 mm thick
Check whether the paper guides are functioning correctly.
5 F Creating a Full Bleed Print (Clear Film Sealing)
1. If you are having trouble making the rectangle cover the entire label, rst make sure the image is printing at least as
big as the label size you have selected. To accomplish this using NiceLabel, make the image a few millimeters larger
than the label by dragging the image over the edge of the label on all sides. The bounding box around the image
will turn red when it is over the edge of the label. Try printing again to see if it covers the entire label. If not, move on
to step two.
2. Adjust these settings in the printer driver preferences:
Size. Increase the height and/or width of the size in the Options tab a little bit. If you are using NiceLabel, simply
change the size under the Document Properties or double click the blank label. Increase the size of the image to
t the new larger page size. If you are using other graphics programs you will need to change the page size in the
application and in the printer driver preferences.
Position Adjustment. Decrease the Start Position by approximately -2mm (-0.08”). This will cause the printer to start
printing before the label and ensure a fully printed label.
Note: Over bleeding too much will cause the printer to skip labels. This is because the printer stops printing too late to sense the
next label.
26 | Troubleshooting and Maintenance
Page 27

5 G Miscellaneous
Vertical streaks in the printout usually indicate a dirty or faulty print head. (Refer to the following examples.)
Clean the print head as described in Section 5 A. If the problem persists, replace the print head.
Poor printout quality:
» The ribbon may not be qualied.
» The media may not be qualied.
» Adjust the Darkness (heat temperature).
» Slow down the print speed.
» Refer to Section 5A and clean the print head.
5 H Technical Support
If you have diculties in operating your printer, the procedures in this manual and the software User’s Guide should, in most
cases, solve the problem. If you still have diculty, feel free to contact the DTM Print Support Team using one of the methods
listed below. This service is free for all DTM Print customers:
NiceLabel Free DTM Edition: Open the software. Click on the “Help” tab in the upper right.
Email Support: [email protected]
Phone Support: +49 611 92777-0 (Mon- Thu 9:00 - 17:00, Fri 9:00 - 15:00 CET)
Chat Support: http://dtm-print.eu – look for the chat prompt on the lower right
27 | Troubleshooting and Maintenance
Page 28
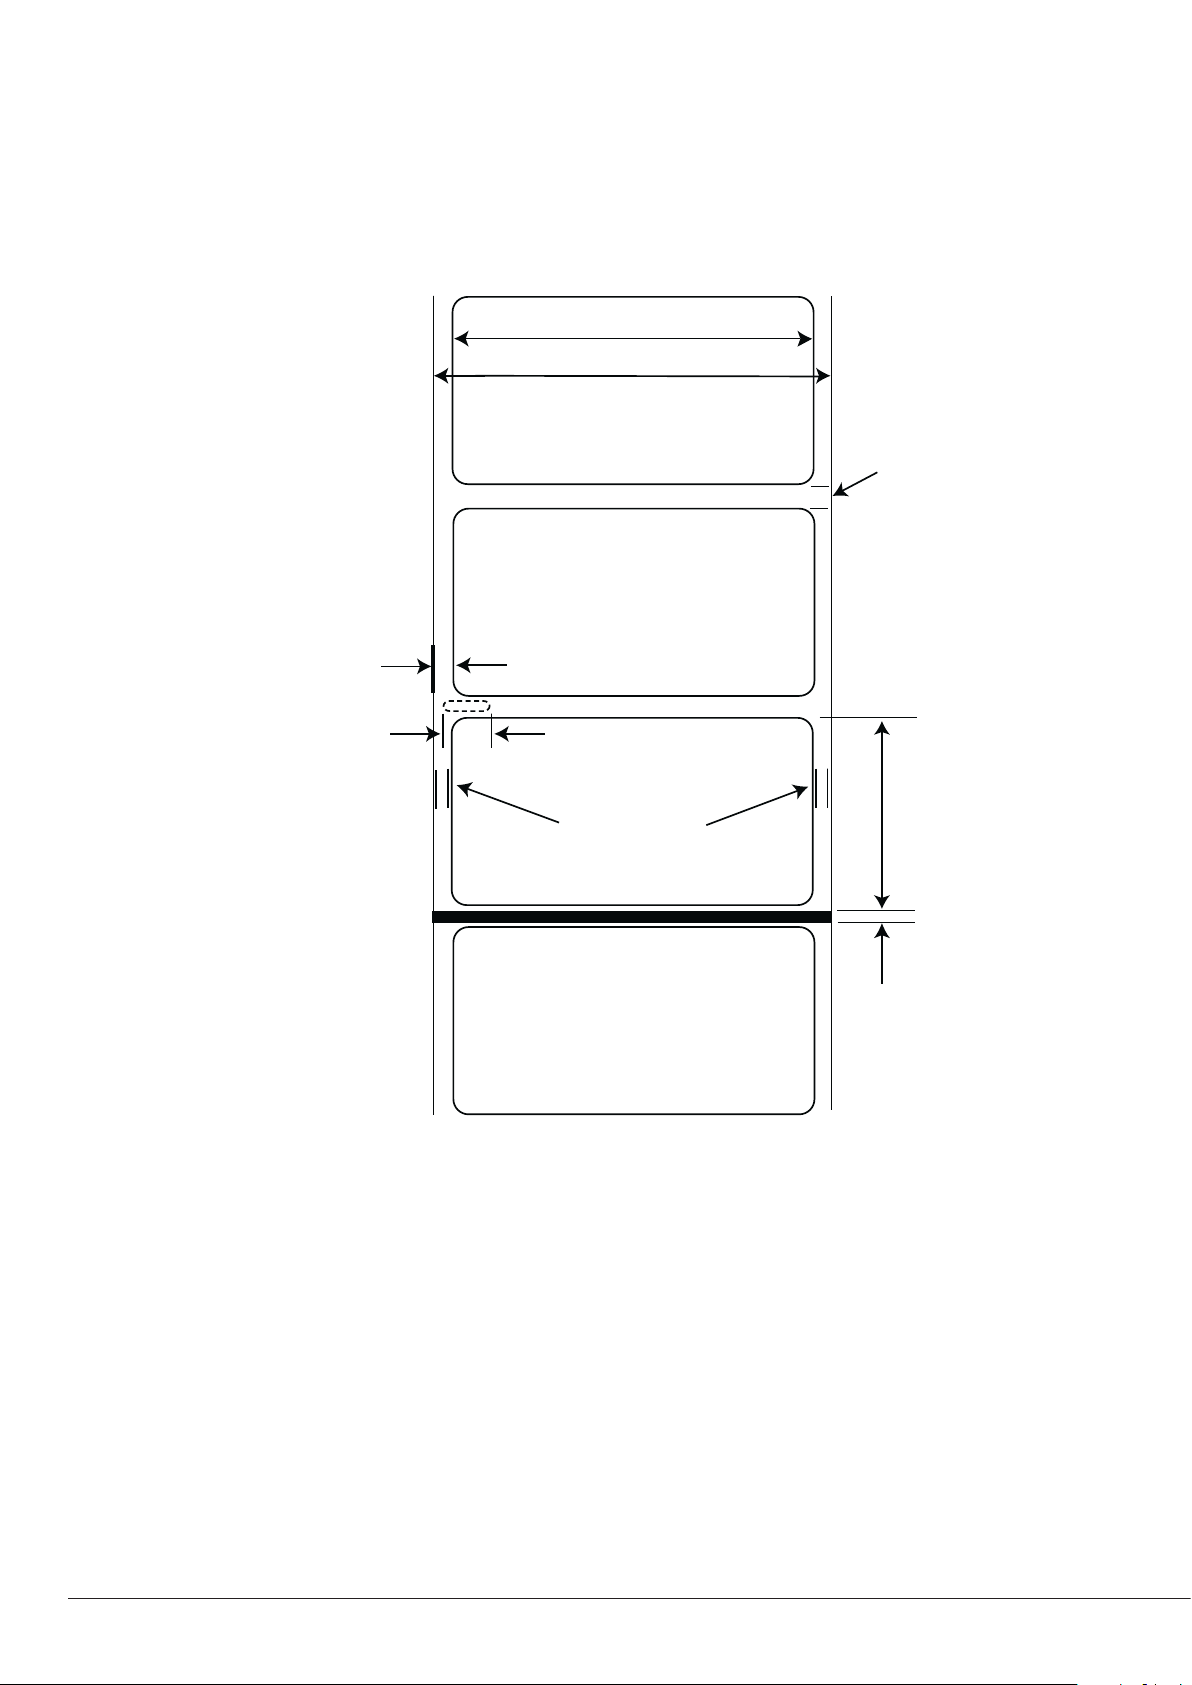
Section 6: Label and Ribbon
Specications
6 A Label Sensing Methods
Label Width
Liner Width
Gap Between
Method 1: Label
Gap Sensing
Method 2: Thru-Hole
Sensing
Distance from
edge of Media
Width of Opening
Labels
Distance from
edge of Media
to edge of Label
Method 3: Reective/Black
Mark Sensing
(Black Mark must be printed
on back side of label stock)
Note: See table below for Max and Min values in inches and mm.
Important: Test all custom made label stock with the intended printer before ordering large quantities! DTM Print will only assume
responsibility for custom label stock ordered from DTM Print.
Label Height
Black Mark
Width
28 | Label and Ribbon Specications
Page 29
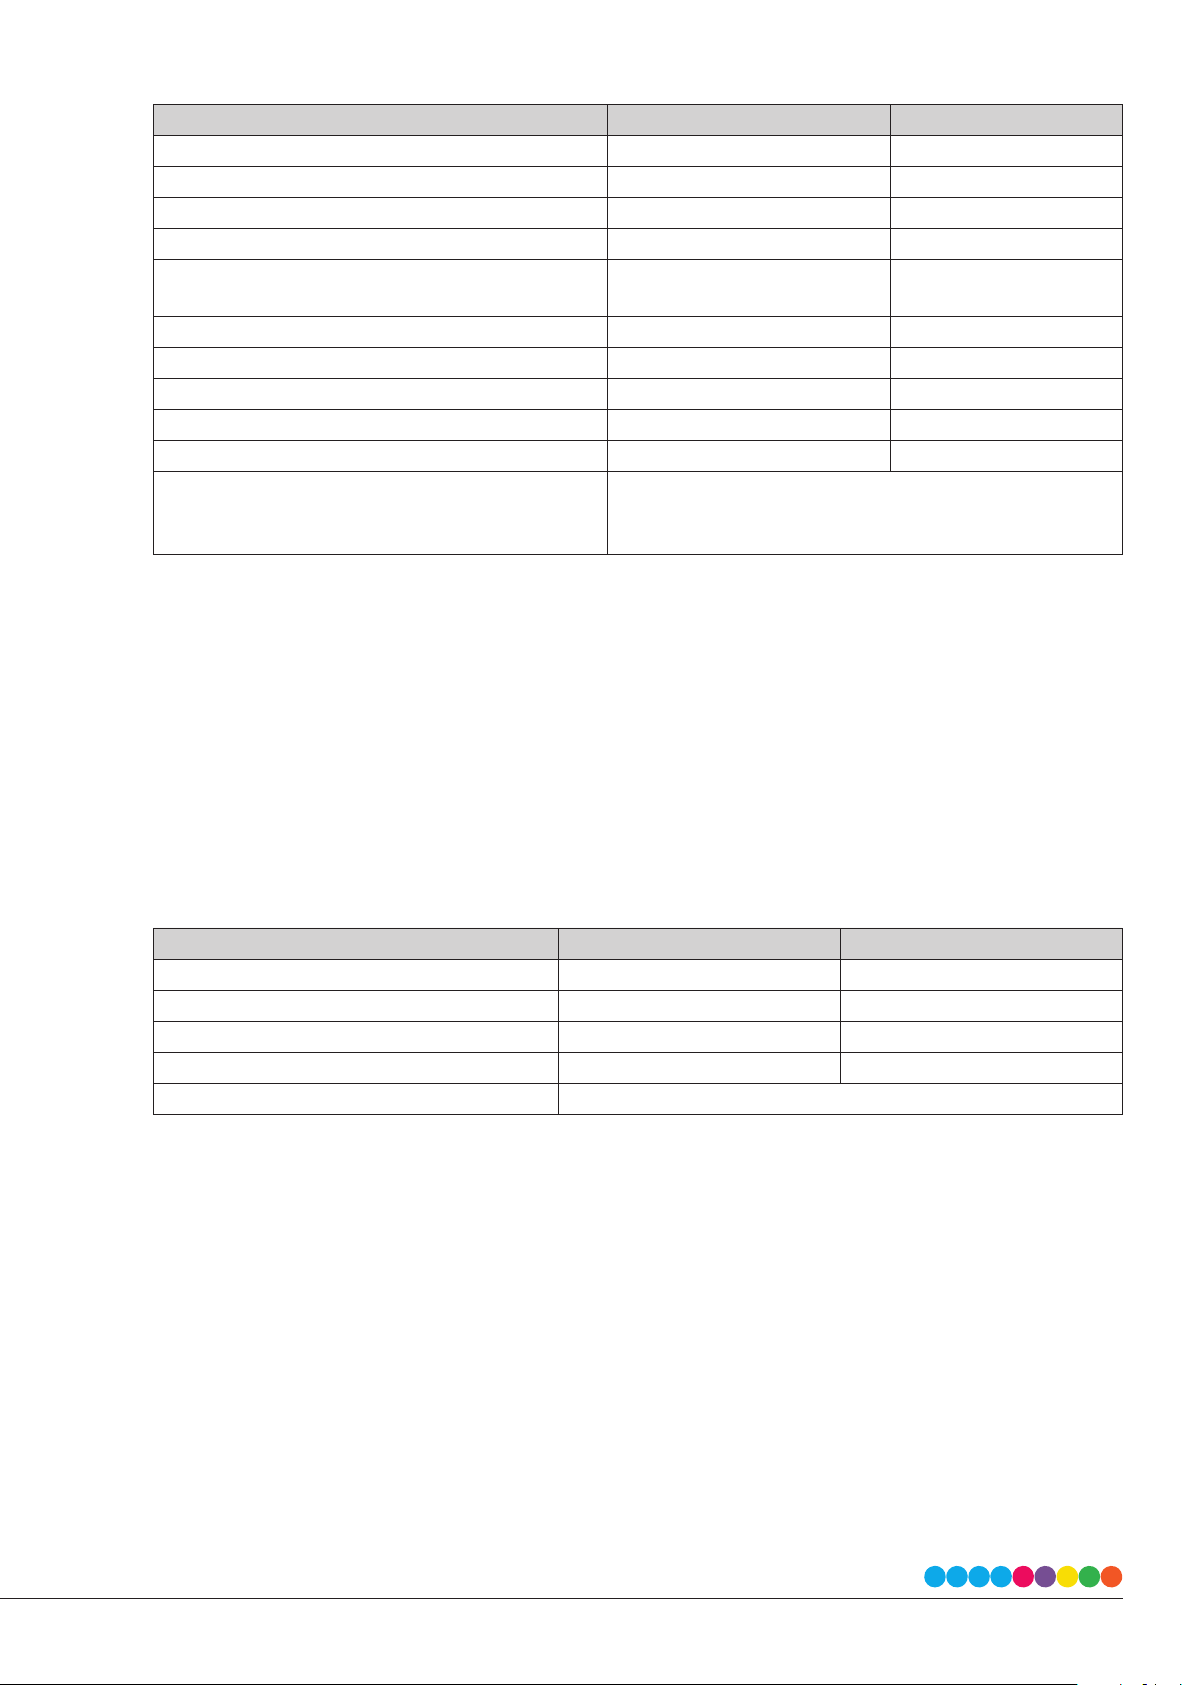
6 B Label Specifications
Max Min
Label/Print Width 105.7 mm (4.16") N/A
Liner Width 118 mm (4.64") 25.4 mm (1")
Label/Print Height/Length 762 mm (30") 4 mm (0.16")
Gap between labels 19 mm (0.75") 2.5 mm (0.10")
Distance from edge of media to edge of thru-hole 48.3 mm (1.90") 5.1 mm (0.20")
Reective/Black Mark Width* Equal to distance between labels 25.4mm (1")
Max. Outer Diameter (OD) internal feed 127 mm (5.0") N/A
Max. Outer Diameter (OD) Passive Label Stand 250 mm (10.0") N/A
Inner Core Diameter (ID) 76 mm (3") 25.4 mm (1.0")
Stock Thickness** 0.25 mm (10 mil) 0.06 mm (2.4 mil)
Distance from edge of media to edge of label Printer driver assumes 2 mm gap. However, this is adjustable
via the Printing Preferences “Stock” – “Media Settings” – “Label
Gap”
* The Reective/Black Mark should be opaque to infrared light. The mark should be between the labels. The end of the mark
should correspond with the beginning of the next label.
**This is the recommended maximum. There are two factors that determine whether the printer will accept any particular
stock thickness.
1. The ability for the printer to pull the paper through the print area.
2. The ability for the sensor to read through the backing if the sensor is set to die-cut.
If you are printing in continuous or reective label sensing mode number 2 does not apply. The fact that the printer must read
through the backing in die-cut mode will limit the thickness much more than the printer’s ability to pull the paper through
the print area. However, if you adjust opacity level of the liner enough to allow the label to be seen by the stock sensor, the
thickness will only be limited by the printer’s ability to pull it through the printer area. For these reasons the weight or thickness of the liner is a variable that can not easily be dened. DTM Print recommends and uses 70# liner with most label stock.
6 C Ribbon Specifications
Ribbon Length 300 m (981’) N/A
Ribbon Width 110 mm (4.33") 30 mm (1.18")
Max. Outer Diameter (OD) 68 mm (2.67”) N/A
Inner Core Diameter (ID) 25.4 mm (1”) 25.4 mm (1”)
Supported Ribbon Types Wax, wax/resin, resin
Max Min
29 | Label and Ribbon Specications
Page 30
Section 7: Technical Specications
Print Method: Thermal transfer & direct thermal
Print Resolution: 300 dpi (12 dots/mm)
Max. Print Speed: 101.6 mm (4”) per second
Max. Print Width: 105.7 mm (4.16”)
Print Length: 4 - 792 mm (0.16” - 30”)
Media Width: 25.4 - 118 mm (1”- 4.64“)
Media Thickness: 0.06 - 0.25 mm (0.003” - 0.01”)
Media Types: Roll-fed continuous, die-cut or black
mark labels or tags, roll-fed tags with
punched hole; label length set by
auto sensing or printer driver settings
Media Sensing: Movable reective sensor and two
xed and central aligned transmissive
sensors
Supply Media Roll: Internal: 127 mm (5”) OD, anything
from 25.4 - 76.2 mm (1” - 3”) ID
External: 254 mm (10”) OD, anything
from 25.4 - 76.2 mm (1” - 3”) ID
Certications: CE, FCC Class A, RoHS
Operating Environment: 5°C - 40°C (41°F - 104°F) at 30-85%
non-condensing humidity
Storage Environment: -20°C - 50°C (-4°F - 122°F) at 10-90%
non-condensing humidity
Weight: 2.5 kg (5.51 lbs)
Dimensions: 226 mmW x 171 mmH x 285 mmD
(8.9”W x 7.32”H x 11.2”D)
Foil Supplies: Thermal transfer ribbons in metallic
colours (gold, silver, blue, red),
spot colours and clear foil
Note: Colour label printers are not included
in the price of the FX510e Foil
Imprinting System.
Options: FX510e
FX510ec (with cutter module)
RW-7 Passive Label Rewinder
Manufacturer: DTM Print GmbH
Max. Ribbon Width: 30 - 110 mm (1.18” - 4.33”)
Max. Ribbon Length: 300 m (981’)
Supply Ribbon Roll: 25.4 mm (1”) ID core with max. 68
mm (2.67”) OD
Ribbon Types: Wax, wax/resin, resin
Recommended Ribbons: DTM Print
certied thermal transfer ribbons in
metallic colours (gold, silver, blue,
red), spot colours and clear foil
Included: Passive Label Stand for 25/76 mm
(1”/3”) cores with max. 254 mm (10”)
OD and media max. 114 mm (4.5”)
wide
Data Interface: USB 2.0
Electrical: AC input: 100-240 VAC, 50/60 Hz
DC output: 24 VDC, 2.4A
Software (included): NiceLabel Free 2019 DTM Edition
Specications are subject to change without notice. All company and/or product names are trademarks
and/or registered trademarks of their respective owners.
Minimum print height specication compliance can be dependent on non-standard material variables
such as label type, thickness, spacing, liner construction, etc. DTM Print is pleased to test non-standard
materials for minimum height printing capability.
Operating Systems: Windows 7/10
Printer Language: EZPL, GEPL, GZPL
Indicator Lights: One bi-colour status-LED
Controls: Feed Button
30 | Technical Specications
Page 31

FX510E-190305
Page 32

DTM Print GmbH
Mainzer Strasse 131
65187 Wiesbaden
Germany
Phone: +49 611 92777-0
Mail: [email protected]
http://dtm-print.eu
 Loading...