

Page 1
HANDBOOK - DS 4
Page 2

On-line handbook
Select one of the following means of access to view your handbook
on-line.
Find your handbook on the DS AUTOMOBILES, website, under
"MyDS".
This personal and customisable space allows you to establish direct
and special contact with the manufacturer.
If the "MyDS" function is not available on the DS public website for
your country, you can nd your handbook at the following address:
http://service.dsautomobiles.com
Select:
the language,
the vehicle, its body style,
the print edition of your handbook appropriate for the date of
registration of your vehicle.
Scan this code for direct access to your handbook.
Referring to the handbook on-line also gives you access to the latest
information available, easily identied by the bookmark, associated
with this symbol:
Page 3

This handbook covers all of the variations in
equipment available across the whole DS 4 range.
Your vehicle will be fitted with only some of the
equipment described in this document, depending
on its trim level, version and the specification for
the country in which it was sold.
The descriptions and illustrations are given as
indications only.
The manufacturer, represented by Automobiles
CITROËN reserves the right to modify the technical
characteristics, equipment and accessories without
having to update this edition of the handbook.
We thank you for choosing a DS 4.
This handbook has been designed to help
you to make the most of your vehicle in all
circumstances and in complete safety.
Contents
1
This document forms an integral part of your
vehicle. Remember to pass it on to the new owner
in the event of the sale of the vehicle.
Key
safety warning
additional information
contributes to the protection of the environment
Please take the time to read through it.
Happy motoring!
Page 4

2
Contents
Overview
02
Access
Lighting and visibility
04
Eco-driving
Instruments
01
14 Instrument panels
Rev counter
16
17
Indicator and warning lamps
Indicators
33
43
Manual test
Customising the instrument panel colours
46
47
Monochrome screen C
Touch screen tablet
51
56
Trip computer
64 Remote control key
70
"Keyless Entry and Starting"
Doors
80
81
Boot
Alarm
83
87
Electric windows
Ease of use and comfort
03
92 Front seats
Rear seats
98
99
Steering wheel adjustment
Mirrors
100
104
Manual air conditioning
Dual-zone digital air conditioning
106
110
Front demist - defrost
Rear screen demist - defrost
111
112
Front ttings
Panoramic windscreen
114
115 Centre consoles
117 Front armrest
121 Rear ttings
122 Boot ttings
128
Lighting control
Automatic illumination of headlamps
132
133
Welcome lighting
Headlamp beam height adjustment
134
135
Directional lighting
Wiper control
137
138
Automatic rain sensitive wipers
Courtesy lamps
142
143
Interior mood lighting
Boot lamp
144
Safety
05
148 General safety recommendations
Hazard warning lamps
149
149
Horn
Emergency or assistance
150
154
Braking assistance systems
Trajectory control systems
155
157
Front seat belts
161 Airbags
166 Child seats
168 Deactivating the passenger's front airbag
175 ISOFIX child seats
180 Child lock
Page 5

Contents
3
Driving Technical dataPractical information
06 09
184 Driving recommendations
Starting / Switching off the engine
186
with the key
189 Starting / Switching off the engine with
Keyless Entry and Starting
192 Manual parking brake
193
Electric parking brake
Manual gearbox
197
198
Automatic gearbox
Hill start assist
202
203
Gear efciency indicator
Tyre under-ination detection
204
206
Stop & Start
Lane departure warning system
209
210
Blind spot monitoring system
Memorising speeds
213
215
Speed limiter
Cruise control
218
221
Parking sensors
Reversing camera
223
07
227 Fuel
229
Misfuel prevention (Diesel)
Snow chains
231
232
Very cold climate screen
Towbar with quickly detachable towball
233
238
Towing a trailer
Energy economy mode
239
240
Fitting roof bars
Changing a wiper blade
241
242
Bonnet
Petrol underbonnet layout
243
244
Diesel under the bonnet
Checking levels
245
250
Checking components
®
AdBlue
253
08
Temporary puncture repair kit
260
271 Spare wheel
279 Changing a bulb
288 Changing a fuse
292 12 V battery
296 Towing the vehicle
298 Running out of fuel (Diesel)
and SCR system (BlueHDi
Diesel)
In the event of a breakdown
302
302
307
308
313 7-inch touch screen tablet
377
406 Alphabetical index
Engines
Weights
Dimensions
Identication markings
Audio and telematics
Audio system
Page 6
4
Overview
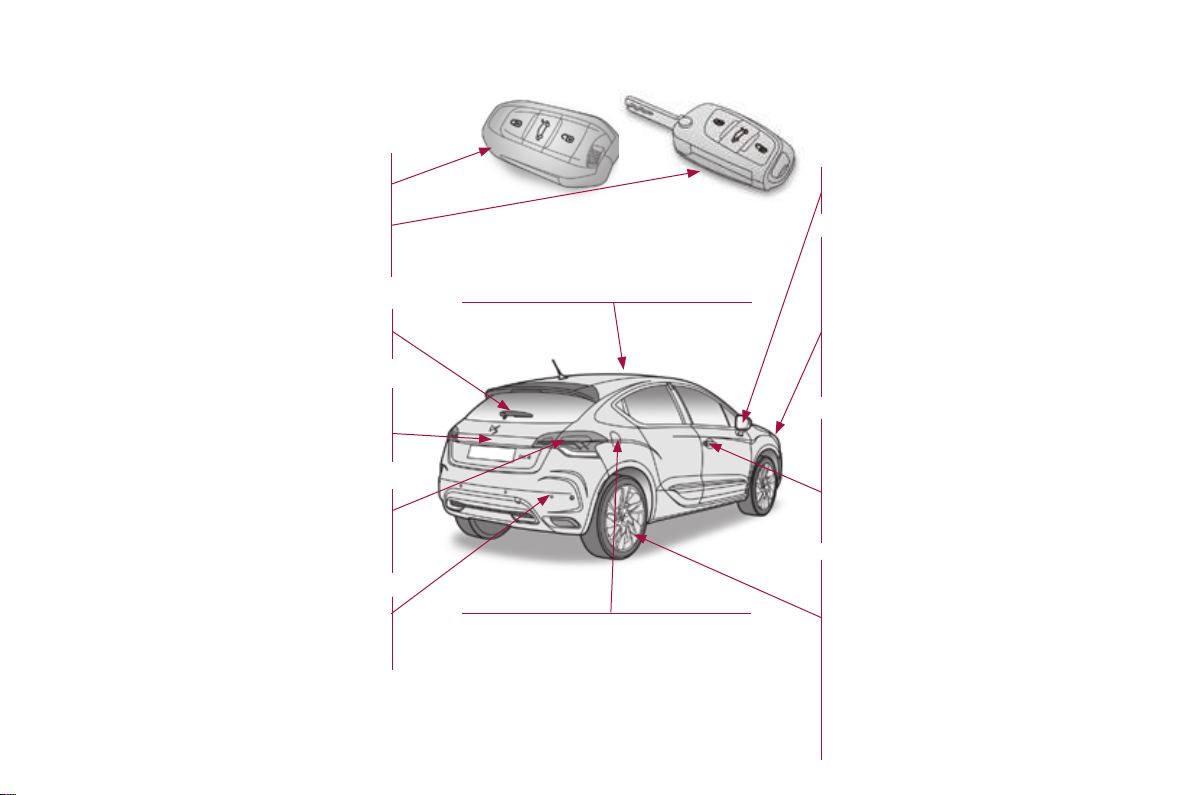
Exterior
Keyless Entry and Starting 70-77
Remote control 64- 69, 77
- opening / closing
- back-up control
- battery
Alarm 83-86
Wiper control
Changing a wiper blade 241
Boot
Reversing camera 223
AdBlue, topping up 37-42, 254-256
Changing bulbs
- rear lamps
- 3rd brake lamp
- number plate lamp
Parking sensors
Towbar 185, 238
Quickly detachable towball 233-237
Towing 296-297
137-141
65, 70, 81-82
285-287
221-222
Roof bars
Fuel tank
Misfuel prevention 229
240
227-230
Door mirrors
Blind spot sensors 210-212
Lighting control 128-132
Headlamp adjustment 134
Guide-me-home lighting 131, 132
Welcome lighting 133
Directional lighting systems 135-136
Changing bulbs 279-284
- front lamps
- front foglamps
- side repeaters
Doors 78-79, 80
Keyless Entry and Starting 70-77
- opening / closing
- back-up control
Manual child lock 180
Electric windows 87-88
Braking assistance 154-155
Trajectory control 155-156
Tyre under-inflation detection
Tyre pressures 204, 266, 270, 308
Snow chains 231
Temporary puncture
repair kit 260-270
Changing a wheel 271-278
- tools
- removing / refitting
100-101
204-205
Page 7
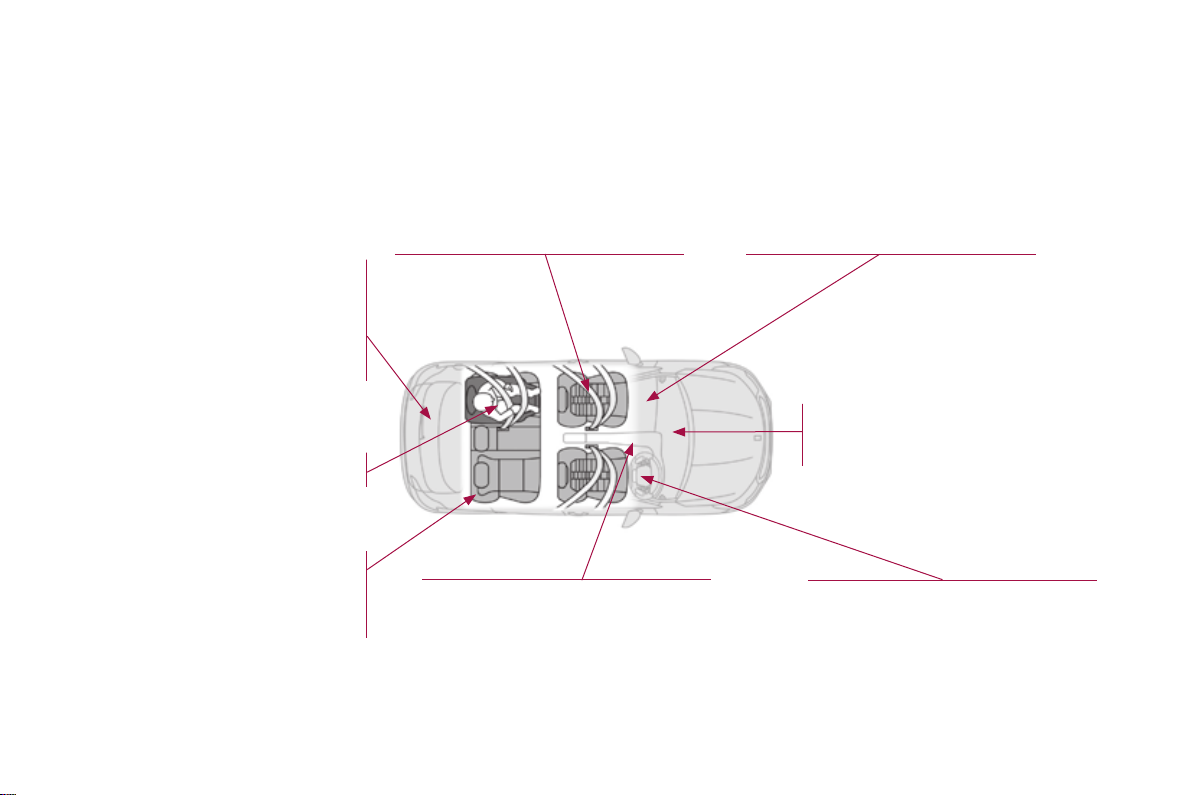
Interior
Overview
5
Boot fittings 122-124
- rear parcel shelf
- hooks
- 12 V socket
- torch
- lashing eyes
Child seats
ISOFIX mountings 175-179
Rear seats
Rear fittings 121
-
12 V socket
- rear armrest
- ski flap
166-179
98-99
Front seats
Seat belts 157-160
92-97
Front fittings
- auxiliary socket / USB port
- 12 V socket
- front armrest
- 230 V / 50 Hz socket
- mats
- storage drawers
112-113, 115-120
Glove box
Deactivating the passenger's front
112
airbag 163, 168-170
Panoramic windscreen
- blinds
- sun visor
Airbags
161-165
114
Page 8
6
Overview
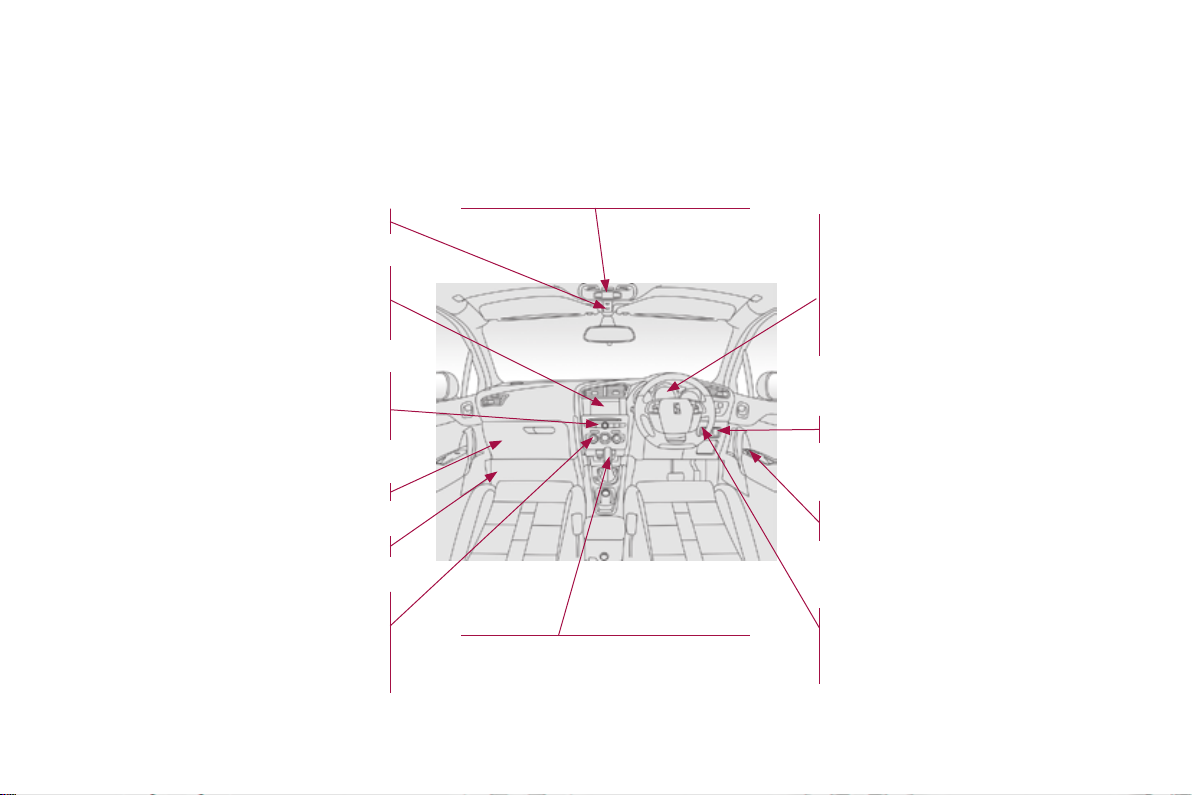
Instruments and controls
Interior mood lighting 143
Monochrome screen 47-50
Seat belt / front passenger airbag
warning lamp display 158-159, 163
Reversing camera 223
Audio system 377-404
Setting the date / time 50
Touch screen tablet 51-54, 313-376
Setting the date / time 55
Rear view mirror 102
Courtesy lamps 142
Instrument panels 14-16
Warning lamps
Indicators 33-42
Manual test
Setting buttons
- trip distance recorder
dashboard lighting dimmer / black panel
-
-
customisation of dials and screens
Adjusting headlamps
17-32
43
44-46
134
Dashboard fuses
Opening the bonnet 242
Ventilation 103
Manual air conditioning 104-105
Digital air conditioning 106-109
Front Demisting / Defrosting 110
Demisting / Defrosting the
rear screen 111
288-290
Manual gearbox 197
Automatic gearbox 198-201
Parking brake 192
Electric parking brake 31-32, 193-196
Door mirrors
Electric windows
Ignition switch / Steering lock /
Starting with the key 186-188
Steering lock / Starting with
the START/STOP button 186, 189-191
100-101
87-88
Page 9
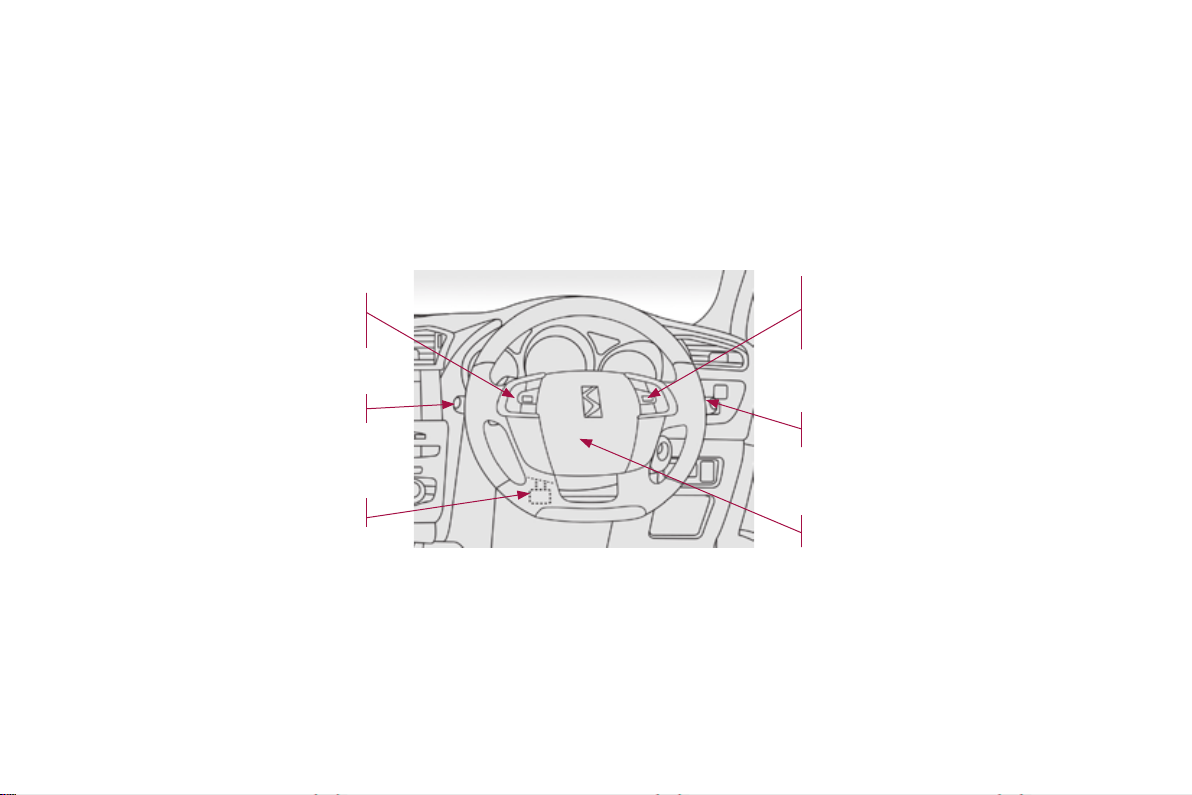
Instruments and controls
Multifunction steering wheel
Overview
7
Speed limiter 215-217
Cruise control 218-220
Memorising speeds 213-214
Lighting controls 128-132
Adjusting the steering wheel
99
Audio and telephone controls for the
Audio system
Audio and telephone controls for
the touch screen tablet 316
Wiper controls 137-141
Trip computer 56- 60
149
Horn
379
Page 10
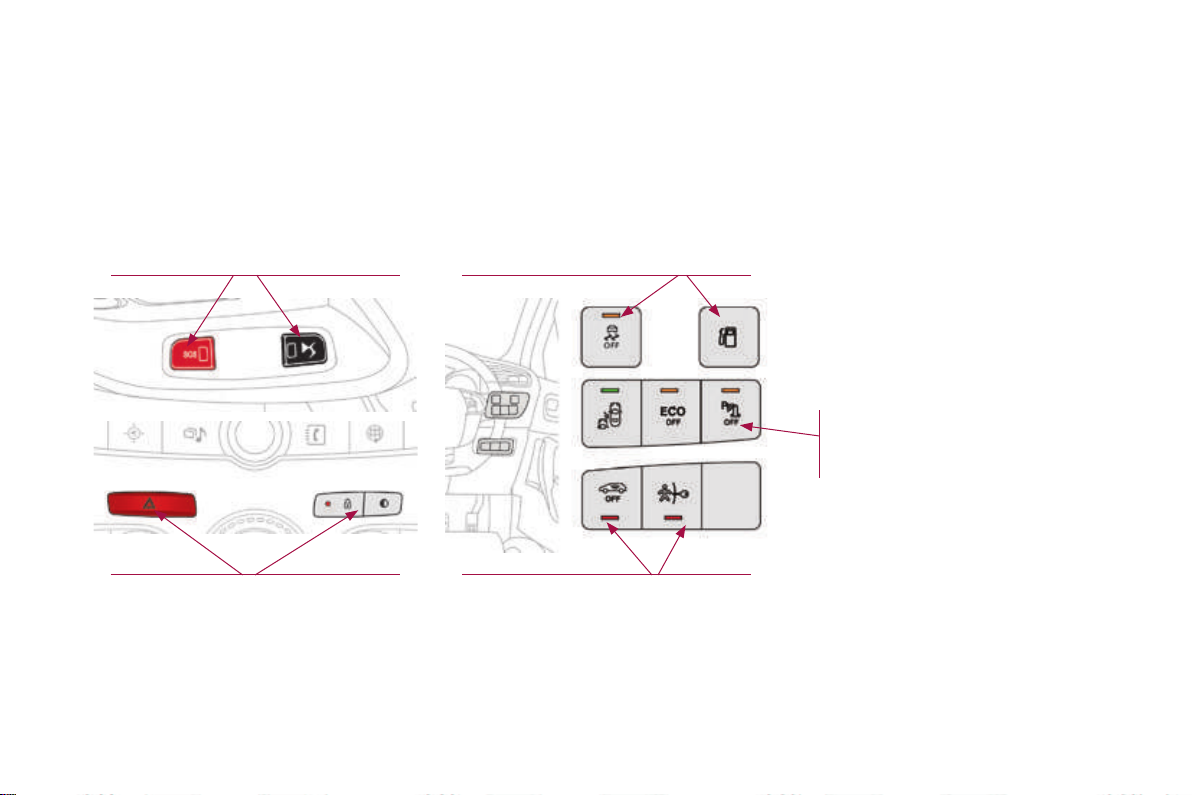
8
Overview
Instruments and controls
Side switch panelsCentral switch panels
Emergency call 150-153
Assistance call 150-153
Hazard warning lamps 149
Central locking 78-79
Black panel
(comfortable night-driving display) 46
Fuel filler flap 227-230
DSC/ASR system 155-156
Parking sensors 221-222
Stop & Start 206-208
Blind spot sensors 210-212
Lane departure warning system 209
Alarm volumetric monitoring 83-86
Electric child lock 181
Page 11
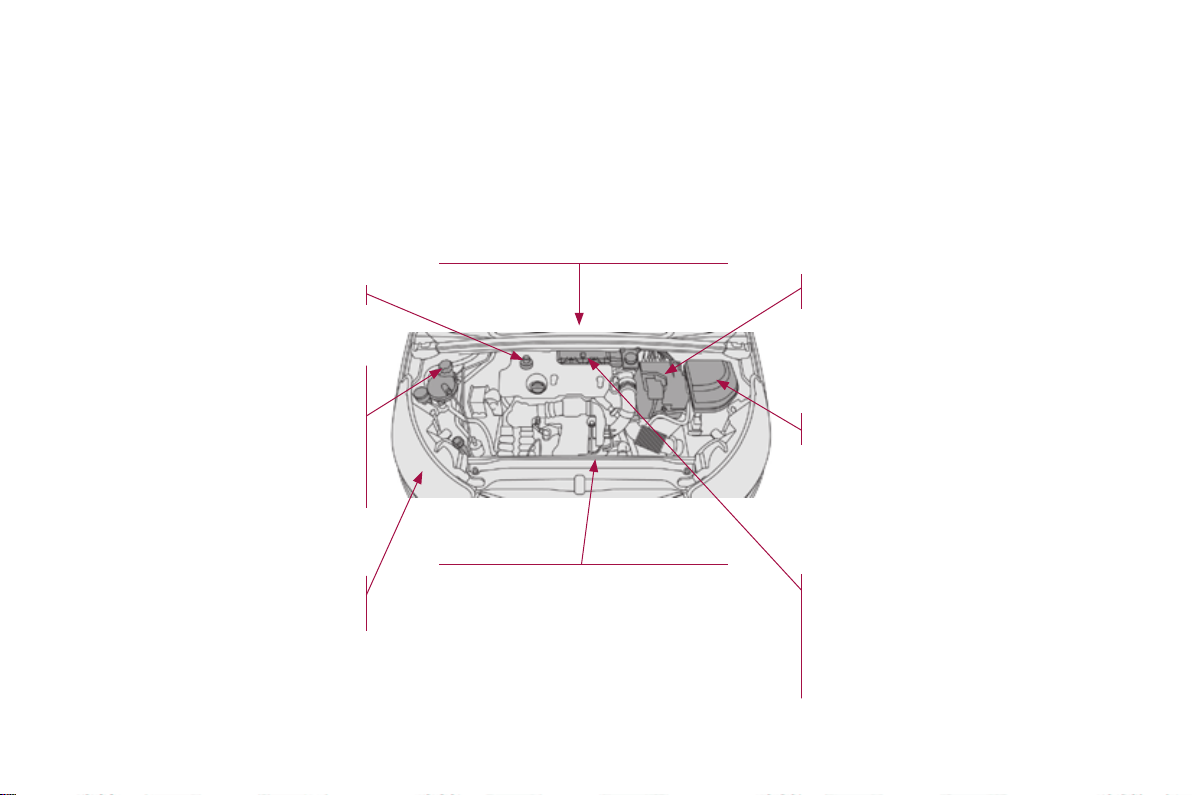
Technical data - Maintenance
Overview
9
Running out of Diesel fuel 298
Checking levels
- oil
- brake fluid
- coolant
- power steering fluid
- screenwash / headlamp wash fluid
- additive (Diesel with particle filter)
AdBlue 253-256
Changing bulbs
front
-
- rear
245-249
279-287
Petrol engines
Diesel engines 302, 305-306
Dimensions 307
Identification markings 308
Bonnet 242
Petrol underbonnet
Diesel underbonnet 244
302-304
243
Battery
292-295
Energy economy mode 239
Engine compartment
288-289, 291
fuses
Checking components 250-252
- battery
- air filter / passenger compartment filter
- oil filter
- particle filter (Diesel)
- brake pads / discs
Page 12

10
Eco-driving
Eco-driving
Eco-driving is a range of everyday practices that allow the motorist to optimise their fuel consumption and CO2 emissions.
Optimise the use of your
gearbox
With a manual gearbox, move off gently and
change up without waiting. During acceleration
change up early.
With an automatic gearbox, give preference
to automatic mode and avoid pressing the
accelerator pedal heavily or suddenly.
The gear efficiency indicator invites you to
engage the most suitable gear: as soon as the
indication is displayed in the instrument panel,
follow it straight away.
For vehicles fitted with an automatic gearbox,
this indicator appears only in manual mode.
Drive smoothly
Maintain a safe distance between vehicles,
use engine braking rather than the brake
pedal, and press the accelerator progressively.
These practices contribute towards a reduction
in fuel consumption and CO
also help reduce the background traffic noise.
If your vehicle has cruise control, make use of
the system at speeds above 25 mph (40 km/h)
when the traffic is flowing well.
emissions and
2
Control the use of your
electrical equipment
Before moving off, if the passenger compartment
is too warm, ventilate it by opening the windows
and air vents before using the air conditioning.
Above 30 mph (50 km/h), close the windows and
leave the air vents open.
Remember to make use of equipment that can
help keep the temperature in the passenger
compartment down (sunroof and window
blinds...).
Switch off the air conditioning, unless it has
automatic regulation, as soon as the desired
temperature is attained.
Switch off the demisting and defrosting
controls, if not automatic.
Switch off the heated seat as soon as possible.
Switch off the headlamps and front foglamps
when the ambient light level does not require
their use.
Avoid running the engine before moving off,
particularly in winter; your vehicle will warm up
much faster while driving.
As a passenger, if you avoid connecting
your multimedia devices (film, music, video
game...), you will contribute towards limiting
the consumption of electrical energy, and so
of fuel.
Disconnect your portable devices before
leaving the vehicle.
Page 13

Eco-driving
11
Limit the causes of excess
consumption
Spread loads throughout the vehicle; place the
heaviest items in the bottom of the boot, as
close as possible to the rear seats.
Limit the loads carried in the vehicle and
reduce wind resistance (roof bars, roof rack,
bicycle carrier, trailer...). Use a roof box in
preference.
Remove roof bars and roof racks after use.
At the end of winter, remove snow tyres and
refit your summer tyres.
Observe the recommendations
on maintenance
Check the tyre pressures regularly, when cold,
referring to the label in the door aperture,
driver's side.
Carry out this check in particular:
- before a long journey,
at each change of season,
-
-
after a long period out of use.
Don't forget the spare wheel and the tyres on
any trailer or caravan.
Have your vehicle serviced regularly (engine
oil, oil filter, air filter, passenger compartment
filter...) and observe the schedule of operations
recommended in the manufacturer's service
schedule.
With a BlueHDi Diesel engine, if the SCR
system is faulty your vehicle becomes
polluting; go to a CITROËN dealer or a
qualified workshop without delay to have the
emissions of nitrogen oxides brought back to
the legal level.
When refuelling, do not continue after the third
cut-off of the nozzle to avoid any overflow.
At the wheel of your new vehicle, it is only after
the first 1 800 miles (3
will see the fuel consumption settle down to a
consistent average.
000 kilometres) that you
Page 14

ON-BOARD INSTRUMENTS
Page 15

01
Page 16
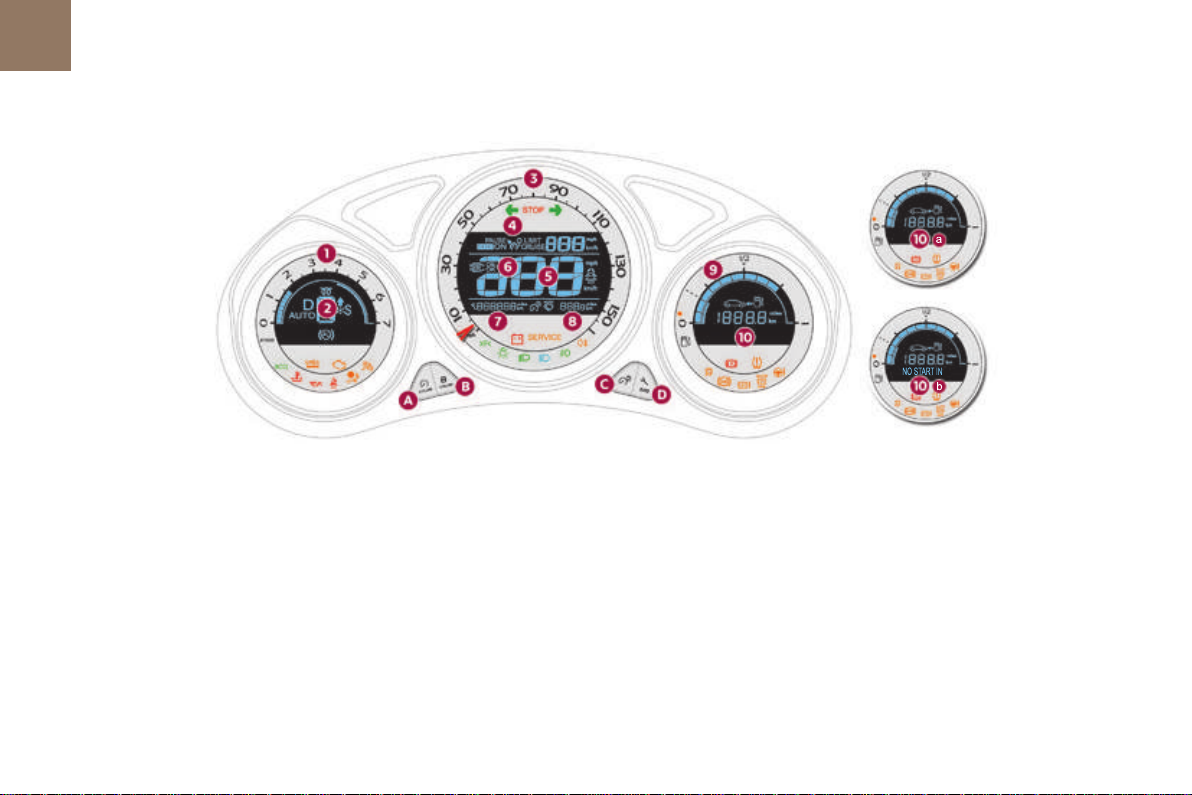
01
14
Instruments
Customisable colour instrument panel - Type 1
Dials and screens Control buttons
Dial COLOUR: customisation of the
1. Rev counter (x 1 000 rpm or tr/min).
2.
Gear efficiency indicator or gear lever
position and gear for an automatic
gearbox.
Analogue speedometer (mph or km/h).
3.
4.
Cruise control or speed limiter setting.
5. Digital speedometer (mph or km/h).
6. Engine oil level indicator*.
* Depending on version.
7. Service indicator
(miles or km) then,
total mileage recorder.
These two functions are displayed
successively on switching on the ignition.
Lighting dimmer setting (when making an
adjustment).
8. Trip mileage recorder (miles or km).
9. Fuel gauge and associated low fuel
warning lamp.
10. Range (miles or km) for the fuel (a) or the
AdBlue additive and SCR system (b).
A.
background colour of the dials.
B. Screen COLOUR: customisation of the
background colour of the screens.
C. Lighting dimmer (available in night mode).
D.
Reset the service indicator or the trip
mileage recorder.
Page 17
Customisable colour instrument panel - Type 2
Instruments
15
01
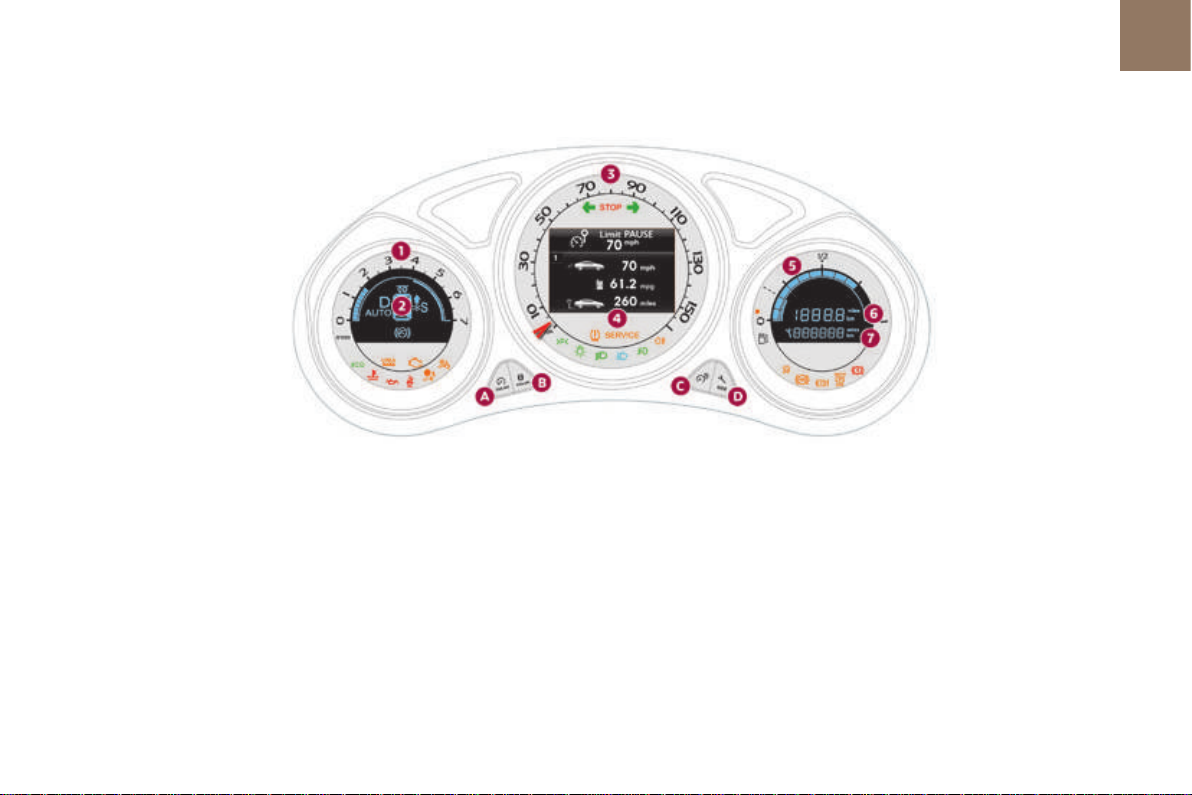
Dials and screens
1. Rev counter (x 1 000 rpm or tr/min).
2.
Gear efficiency indicator or gear lever
position and gear for an automatic
gearbox.
Speedometer (mph or km/h).
3.
4.
Central screen.
5. Fuel gauge and associated low fuel level
warning lamp.
6. Trip mileage recorder (miles or km).
7.
Service spanner (if a service is due or
missed),
total mileage recorder (miles or km).
Control buttons
A. Dial COLOUR: customisation of the
background colour of the dials.
B. Screen COLOUR: customisation of the
background colour of the screens.
C. Dashboard lighting dimmer (in night mode).
D.
Start a manual test (procedure for checking
the status of systems and display of vehicle
aler ts).
Reset service indicator or trip mileage
recorder.
Page 18
01
16
Instruments
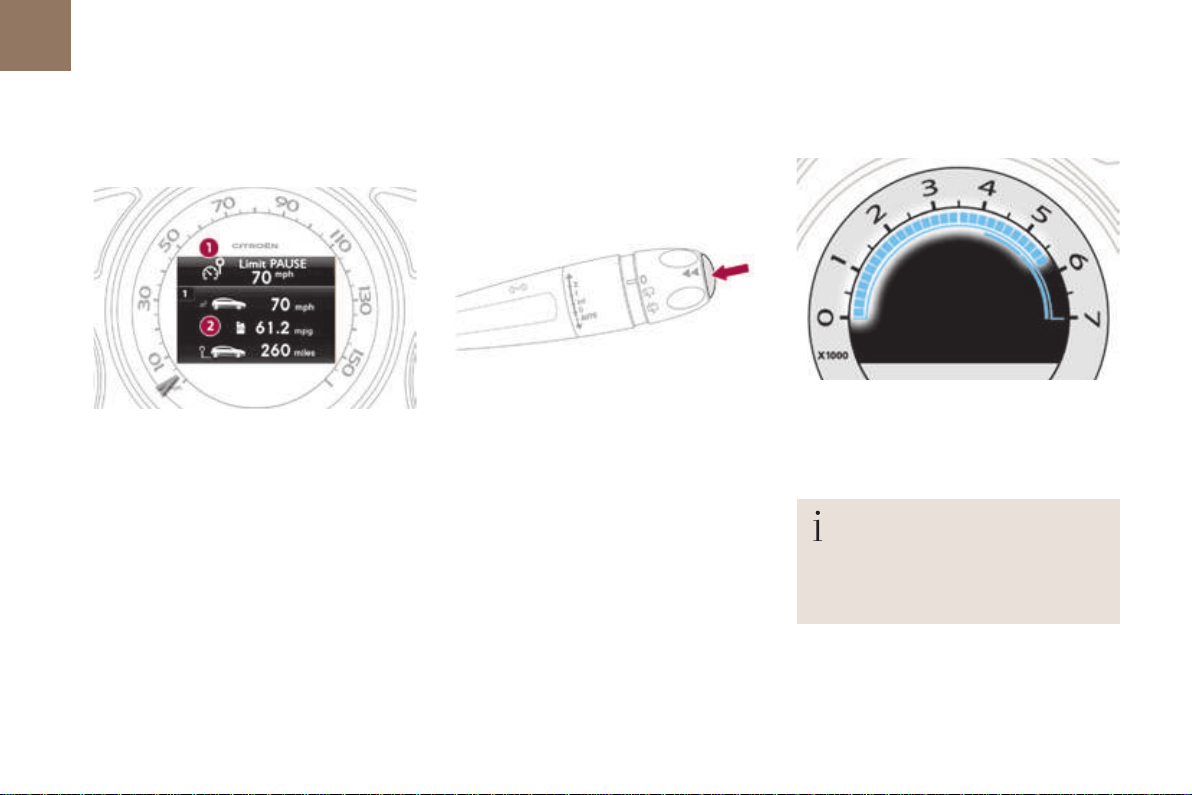
Type 2 instrument panel central screen and controls
Display zones
1. Speed limiter or cruise control settings.
2.
Engine oil level indicator*.
Service indicator.
Range indicators (miles or km) related to
the AdBlue additive and the SCR system
(BlueHDi).
Trip computer.
Current audio source playing.
Repeat of the navigation instruction.
Repeat of the vehicle's speed.
Alert or information messages can also be
displayed temporarily.
Control
Press the button on the end of the wiper control
stalk to cycle through the different active
functions available (trip computer, current audio
source, navigation...).
Rev counter
Approaching the maximum engine speed, the
bars flash to indicate to you the need to change
up a gear.
When switching the ignition on or off,
the speedometer needle and the bars
of the rev counter and fuel gauge carry
out a full sweep and then return to 0.
* Depending on version.
Page 19
Indicator and warning lamps
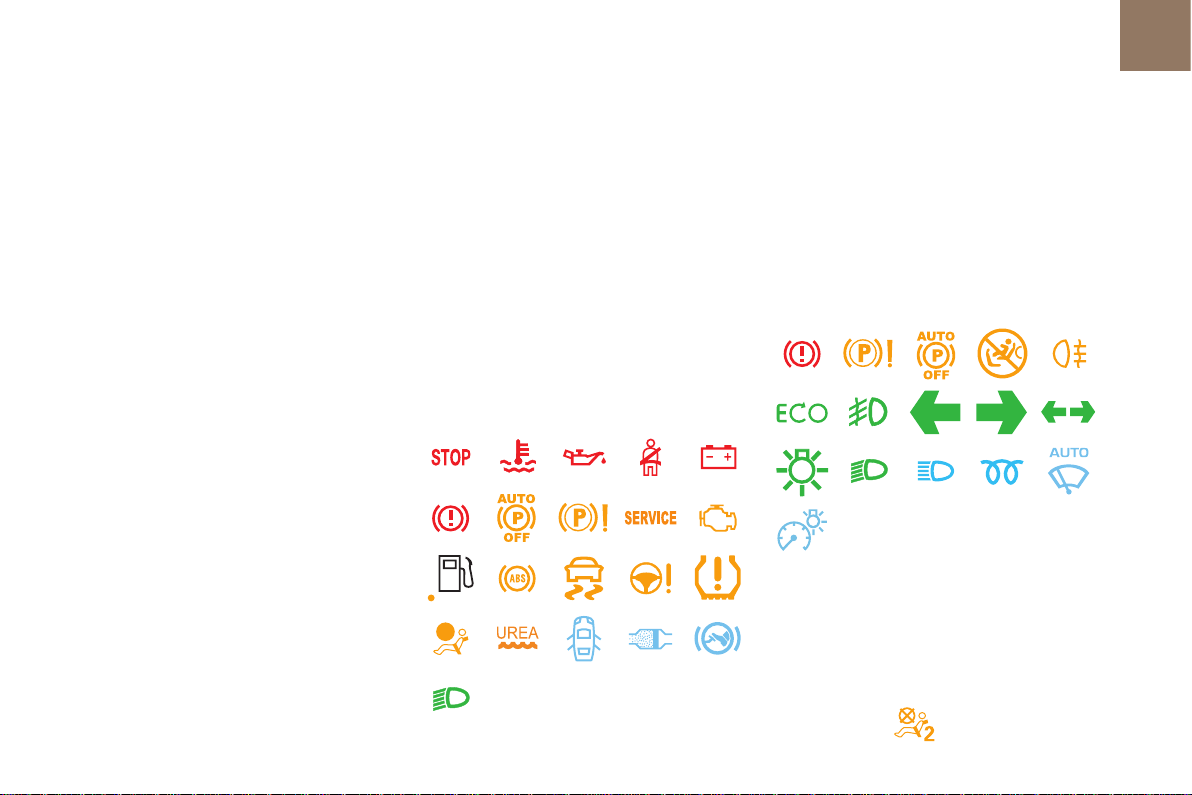
Visual indicators informing the driver that a system is in operation or is switched off (indicator lamp),
or has a fault (warning lamp).
When the ignition is switched on
Certain warning lamps come on for a few
seconds when the vehicle's ignition is
switched on.
When the engine is started, these same
warning lamps should go off.
If they remain on, before moving off, refer to the
information on the warning lamp concerned.
Associated warnings
Certain warning lamps may come on in one of
two modes: fixed (continuous) or flashing.
Only by relating the type of illumination to the
operation of the vehicle can it be determined
whether the situation is normal or a fault has
occurred. In the event of a fault, the illumination
of the warning lamp may be accompanied by
an audible signal and/or a message.
Warning lamps
When the engine is running or the vehicle is
being driven, illumination of one of the following
warning lamps indicates a fault which requires
action on the part of the driver.
Any fault resulting in the illumination of a
warning lamp must be investigated further
using the associated message.
If you encounter any problems, contact a
CITROËN dealer or a qualified workshop.
Instruments
Operation indicator lamps
If one of the following indicator lamps comes on
in the instrument panel and/or instrument panel
screen, this confirms that the corresponding
system has come into operation.
Deactivation indicator lamps
If one of the following indicator lamps comes
on, this confirms that the corresponding system
has been switched off intentionally.
This is may be accompanied by an audible
signal and the display of a message.
17
01
Page 20
01
18
Instruments
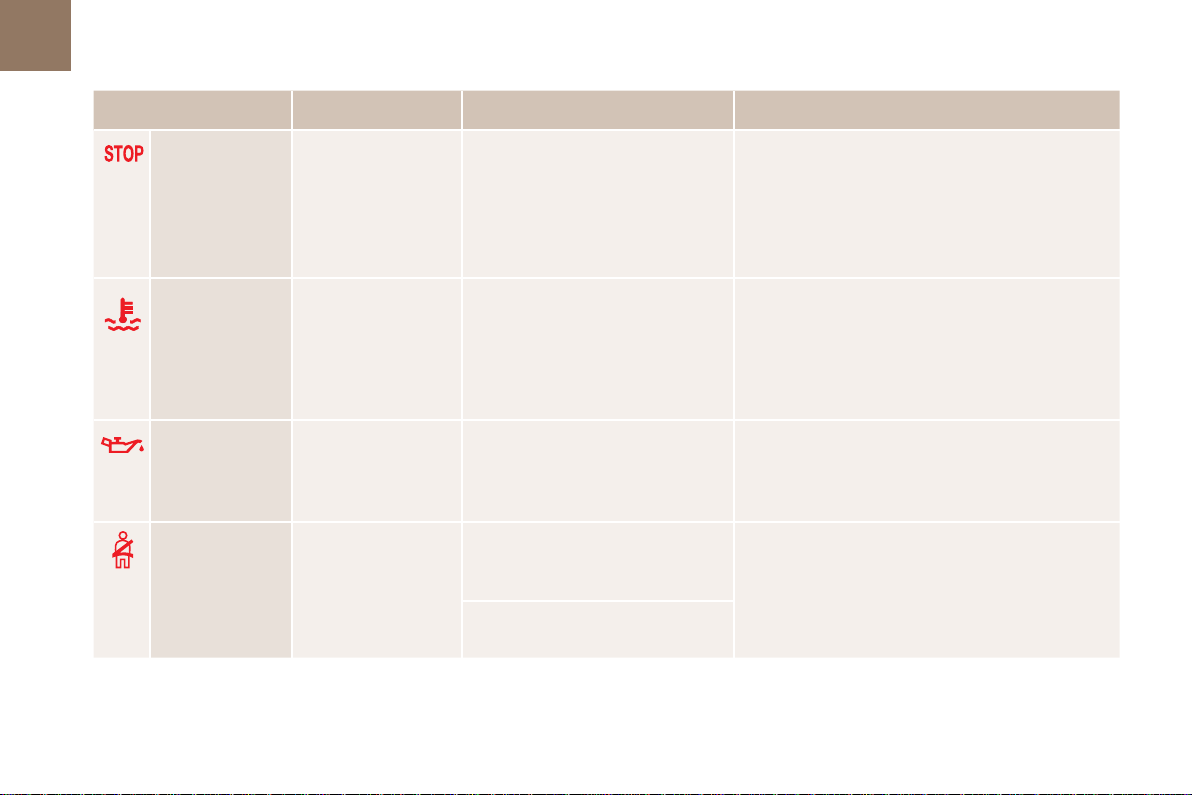
Warning/indicator lamp is on Cause Action/Observations
STOP fixed, alone or
Maximum coolant
temperature
Engine oil
pressure
Seat belt not
fastened /
unfastened*
associated with
another warning lamp,
accompanied by an
audible signal and a
message in the screen.
fixed. The temperature of the cooling system
fixed. There is a fault with the engine
fixed, then flashing,
accompanied by an
increasing audible
signal.
Illumination of this warning lamp is
associated with a serious fault with
the braking system, power steering,
engine lubrication system or cooling
system.
is too high.
lubrication system.
The driver or front passenger has not
buckled or has unbuckled their seat
belt.
At least one rear passenger has
unbuckled their seat belt.
Stop as soon as it is safe to do so as there is a risk that
the engine will cut out while driving.
Park, switch off the ignition and contact a CITROËN
dealer or a qualified workshop.
Stop as soon as it is safe to do so.
Wait until the engine has cooled down before toppingup the level, if necessary.
If the problem persists, contact a CITROËN dealer or
qualified workshop.
You must stop as soon it is safe to do so.
Park, switch off the ignition and contact a CITROËN
dealer or a qualified workshop.
Pull on the belt in question and insert the tongue in the
buckle.
This warning repeats the seat belt information given by
the roof console warning lamps.
* Depending on country of sale.
Page 21
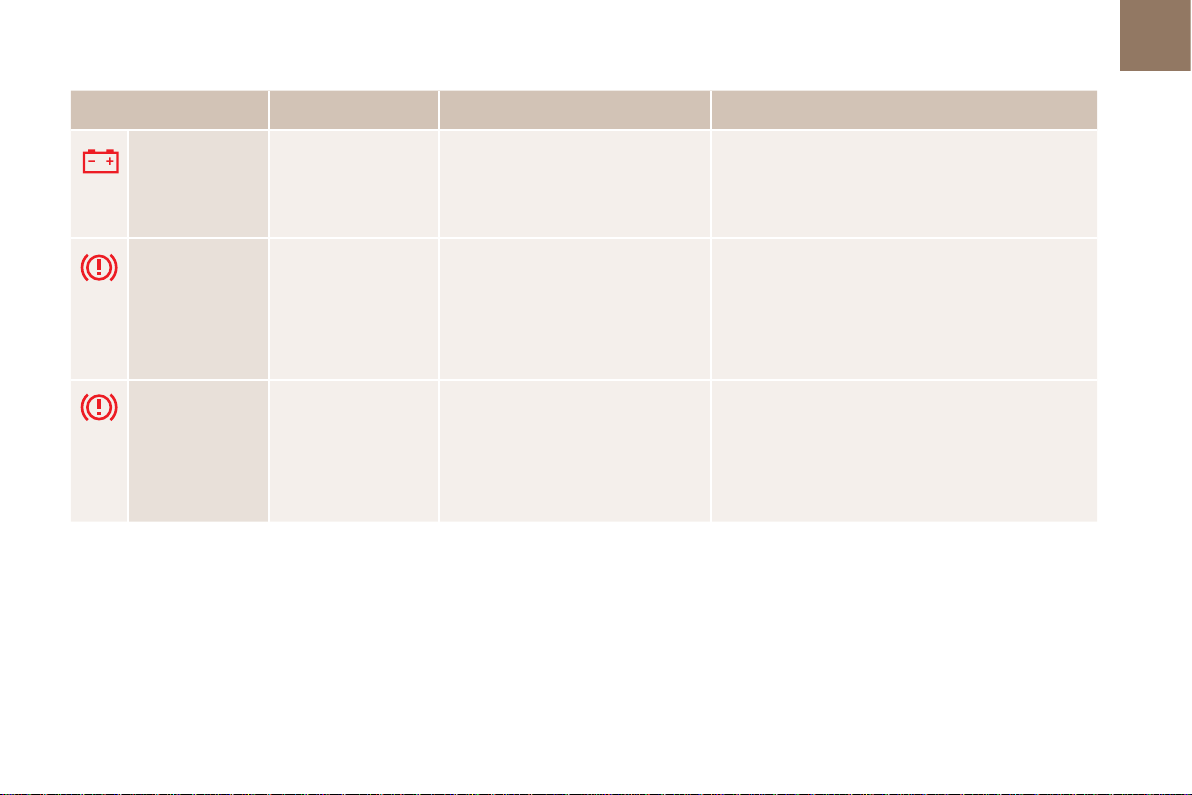
Warning/indicator lamp is on Cause Action/Observations
Instruments
19
01
Battery charge fixed. The battery charging circuit has a fault
Parking brake fixed. The parking brake is applied or not
Electric parking
brake
flashing. The electric parking brake is not
(dirty or loose terminals, slack or cut
alternator belt,
properly released.
applied automatically.
The application/release is faulty.
...).
The warning lamp should go off when the engine is
started.
If it does not go off, contact a CITROËN dealer or a
qualified workshop.
Release the parking brake to switch off the warning
lamp, keeping your foot on the brake pedal.
Observe the safety recommendations.
For more information on the manual or electric parking
brake, refer to the corresponding section.
You must stop as soon as it is safe to do so.
Park on flat level ground, engage a gear (or place the
lever in position P for an automatic gearbox), switch
off the ignition and contact a CITROËN dealer or a
qualified workshop.
Page 22
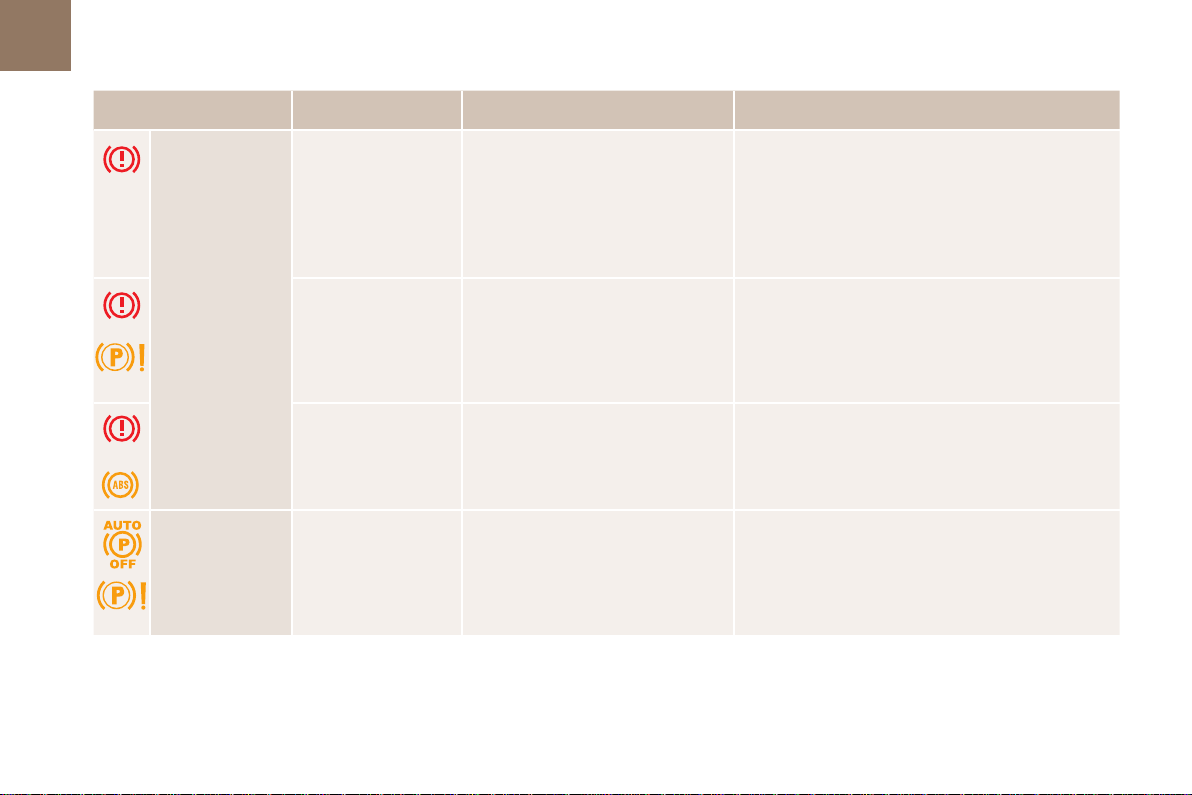
01
20
Instruments
Warning/indicator lamp is on Cause Action/Observations
Braking fixed, associated with
+
+
Electric parking
brake fault
the STOP warning
lamp.
fixed, associated with
the electric parking
brake malfunction
warning lamp, if the
parking brake is
released.
fixed, associated with
the STOP and ABS
warning lamps.
fixed. The electric parking brake has a fault. Contact a CITROËN dealer or a qualified workshop
The braking system fluid level has
dropped significantly.
The braking system has a fault. You must stop as soon as it is safe to do so.
The electronic brake force distribution
(EBFD) system has a fault.
You must stop as soon as it is safe to do so.
Top up with brake fluid recommended by CITROËN.
If the problem persists, have the system checked by a
CITROËN dealer or a qualified workshop.
Park, switch off the ignition and contact a CITROËN
dealer or a qualified workshop.
You must stop as soon as it is safe to do so.
Have it checked by a CITROËN dealer or a qualified
workshop.
without delay.
For more information on the Electric parking brake,
refer to the corresponding section.
Page 23
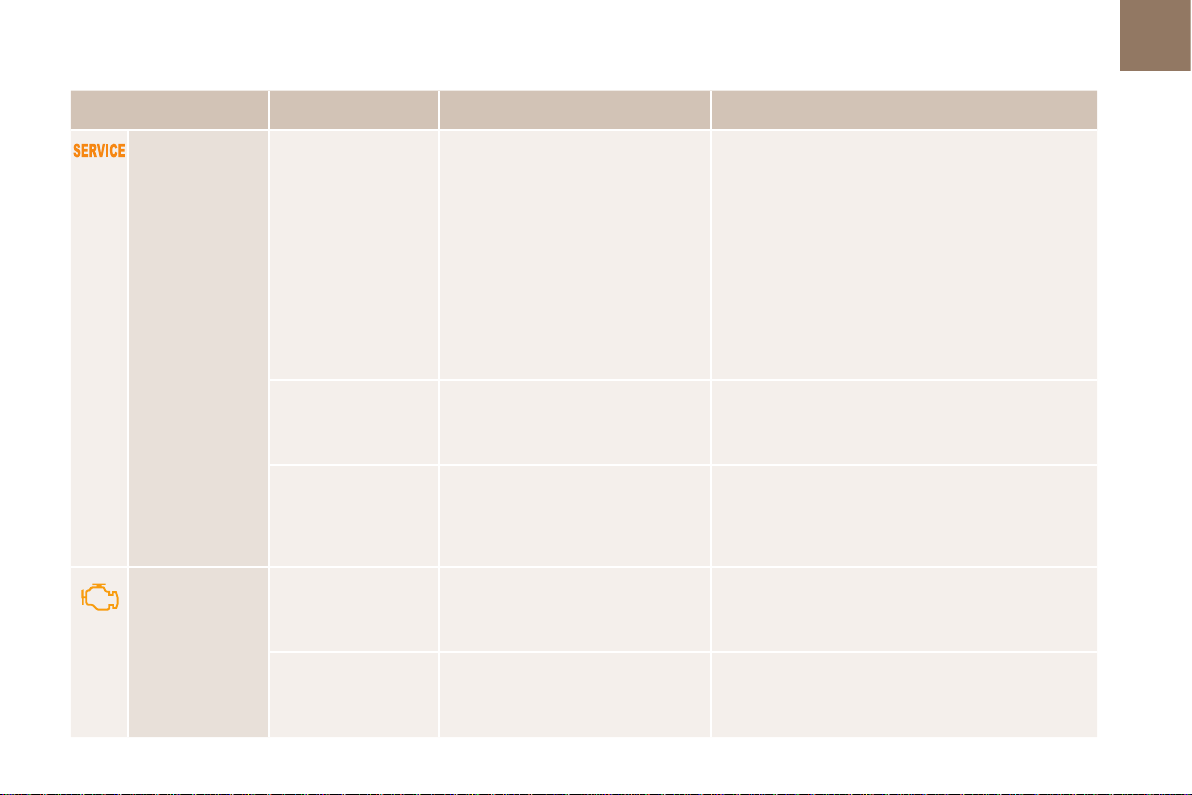
Warning/indicator lamp is on Cause Action/Observations
Instruments
21
01
Service temporarily,
Engine selfdiagnosis system
accompanied by a
message.
fixed, accompanied by
a message.
fixed, associated with the
flashing and then fixed
display of the service
indicator spanner.
flashing. The engine management system has
fixed. The emission control system has a
One or more minor faults for which
there is no specific warning lamp
have been detected.
One or more major faults for which
there is no specific warning lamp
have been detected.
The servicing interval has been
exceeded.
a fault.
fault.
Identify the cause of the fault using the message
displayed in the screen.
You can deal with some problems yourself, such as a
door open or the start of saturation of the particle filter
(as soon as the traffic conditions allow, regenerate
the filter by driving at a speed of at least 40 mph
(60 km/h), until the warning lamp goes off).
For any other problems, such as a fault with the tyre
under inflation detection system, contact a CITROËN
dealer or a qualified workshop.
Identify the cause of the fault using the message
displayed in the screen; you must then contact a
CITROËN dealer or a qualified workshop.
Only on BlueHDi Diesel versions.
Your vehicle must be serviced as soon as possible.
Risk of destruction of the catalytic converter.
Have it checked by a CITROËN dealer or a qualified
workshop.
The warning lamp should go off when the engine is started.
If it does not go off, contact a CITROËN dealer or qualified
workshop without delay.
Page 24
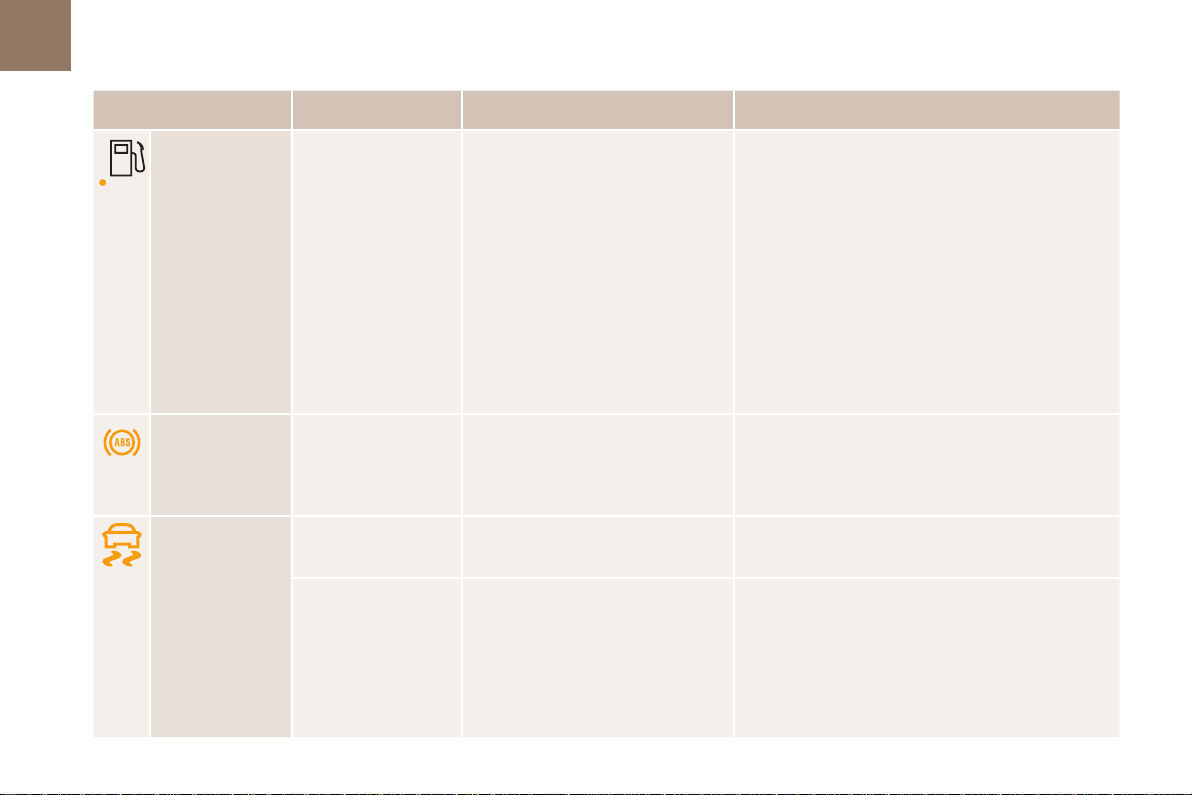
01
22
Instruments
Warning/indicator lamp is on Cause Action/Observations
Low fuel level fixed, accompanied by
Anti-lock Braking
System (ABS)
Dynamic stability
control
(DSC/ASR)
and audible signal and
a message.
fixed. The anti-lock braking system has
flashing. Regulation by the system is active. The system optimises traction and improves the
fixed, associated with
illumination of the
indicator lamp in the
deactivation button,
accompanied by an
audible signal and a
message.
When it first comes on there remains
approximately 6 litres of fuel in the
tank.
At this point, you begin to use the fuel
reserve.
a fault.
The DSC/ASR or hill start assist
system has a fault.
Refuel as soon as possible to avoid running out of
fuel.
Until sufficient fuel is added, this warning lamp will
come on every time the ignition is switched on,
accompanied by an audible signal and a message.
This audible signal and message are repeated
with increasing frequency as the fuel level drops
towards
"0".
Fuel tank capacity: approximately 60 litres.
Never continue to drive until you run out of fuel,
as this could damage the emission control and
injection systems.
The vehicle retains conventional braking.
Drive carefully at reduced speed and contact a
CITROËN dealer or a qualified workshop without delay.
directional stability of the vehicle.
Have it checked by a CITROËN dealer or a qualified
workshop.
Page 25
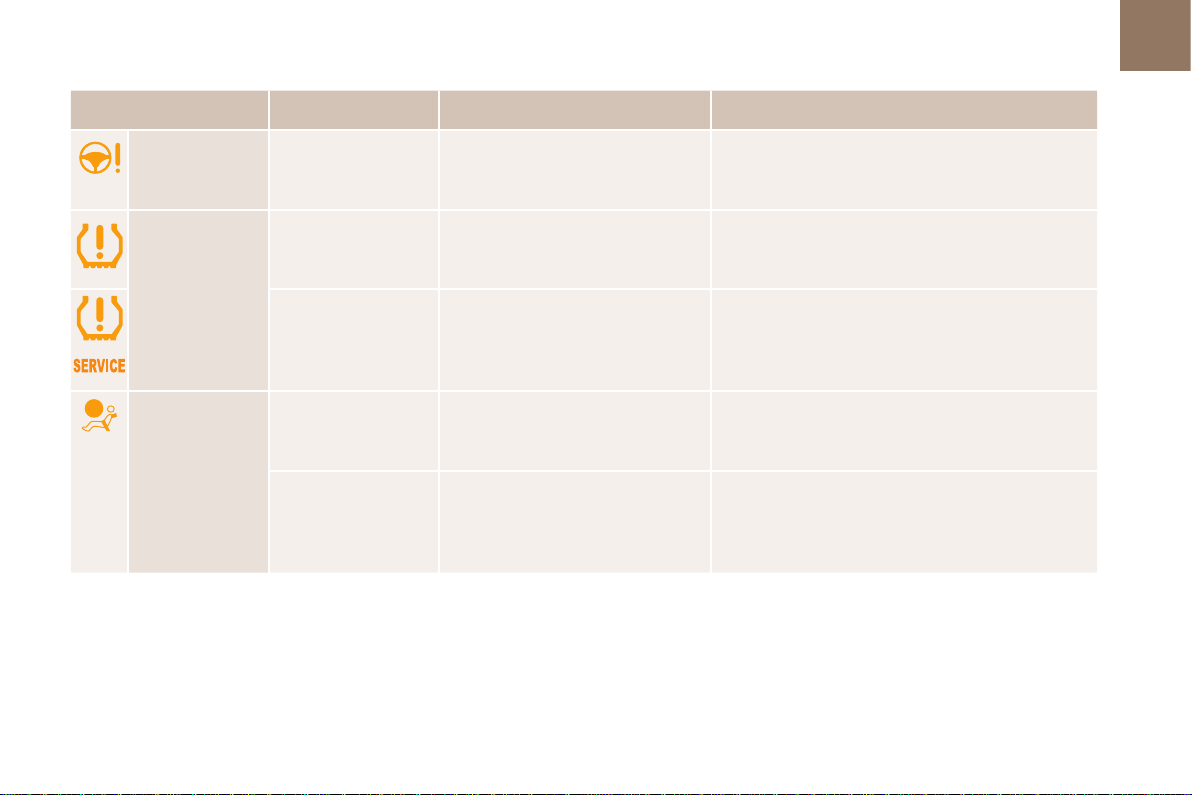
Warning/indicator lamp is on Cause Action/Observations
Power steering fixed. The power steering has a fault. Drive carefully at reduced speed.
Have it checked by a CITROËN dealer or a qualified
workshop.
Instruments
23
01
Under-inflation fixed. The pressure in one or more wheels
flashing then fixed,
accompanied by the
+
Airbags on temporarily. This warning lamp comes on for a
Service warning lamp.
fixed. One of the airbag or seat belt
is too low.
The tyre pressure monitoring system
has a fault or no sensor is detected
on one of the wheels.
few seconds when you turn on the
ignition, then goes off.
pretensioner systems has a fault.
Check the pressure of the tyres as soon as possible.
This check should preferably be carried out when the
tyres are cold.
Under-inflation detection is not assured.
Have the system checked by a CITROËN dealer or a
qualified workshop.
This warning lamp should go off when the engine is started.
If it does not go off, contact a CITROËN dealer or a qualified
workshop.
Have them checked by a CITROËN dealer or a
qualified workshop.
Page 26
01
24
Instruments
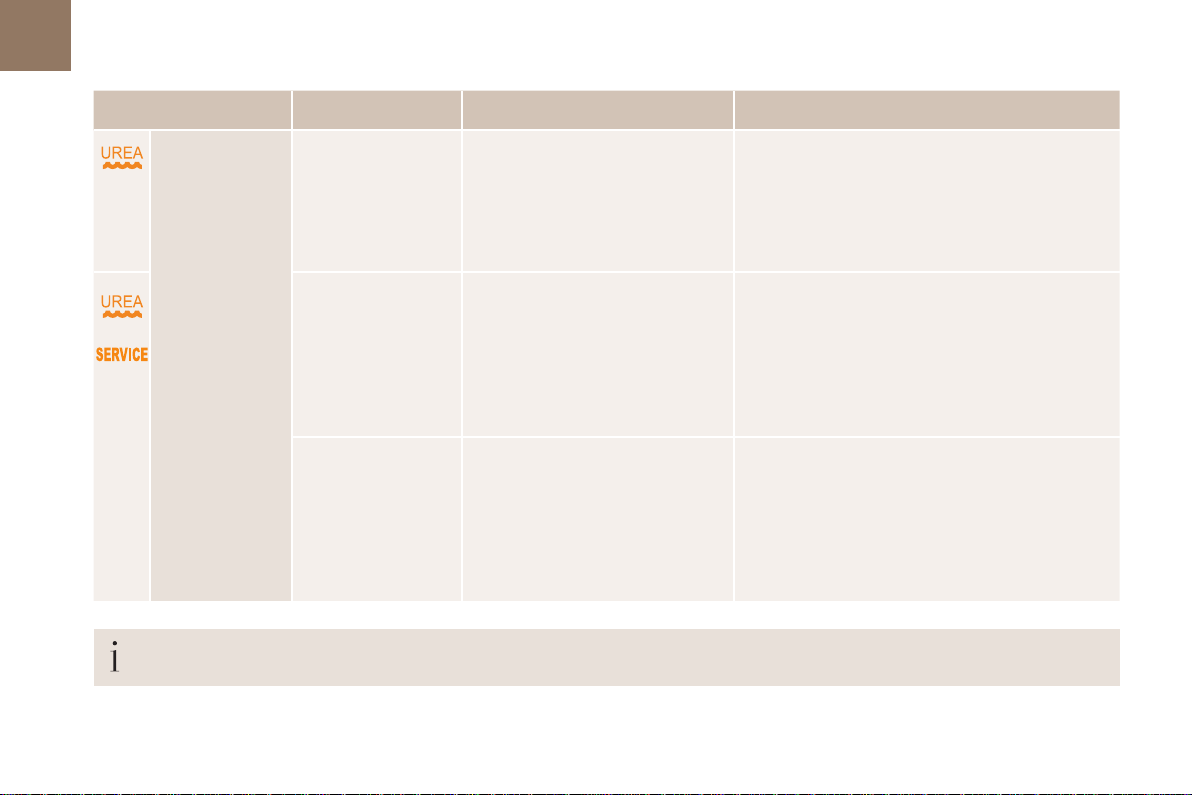
Warning/indicator lamp is on Cause Action/Observations
®
AdBlue
(BlueHDi Diesel)
fixed, on switching
on the ignition,
accompanied by an
audible signal and a
The remaining driving range is
between 350 miles (600 km) and
1500 miles (2400 km).
Top-up the AdBlue
CITROËN dealer or a qualified workshop.
message indicating
the remaining driving
range.
flashing, associated
with the SERVICE
+
warning lamp,
accompanied by an
The remaining driving range is
between 0 and 350 miles (600 km).
You must top-up the AdBlue
or go to a CITROËN dealer or a qualified workshop.
audible signal and a
message indicating
the remaining driving
range.
flashing, associated
with the SERVICE
warning lamp,
accompanied by an
audible signal and a
message indicating
The AdBlue
®
tank is empty: the
starting inhibition system required
by legislation prevents starting of the
engine.
To be able to start the engine, you must top-up the
®
AdBlue
or call on a CITROËN dealer or a qualified
workshop.
It is essential to add at least 3.8 litres of AdBlue
the fluid tank
that starting is
prevented.
®
as soon as possible or go to a
®
to avoid a breakdown
®
to
For topping-up or for more information on AdBlue
®
and the SCR system, refer to the corresponding section.
Page 27
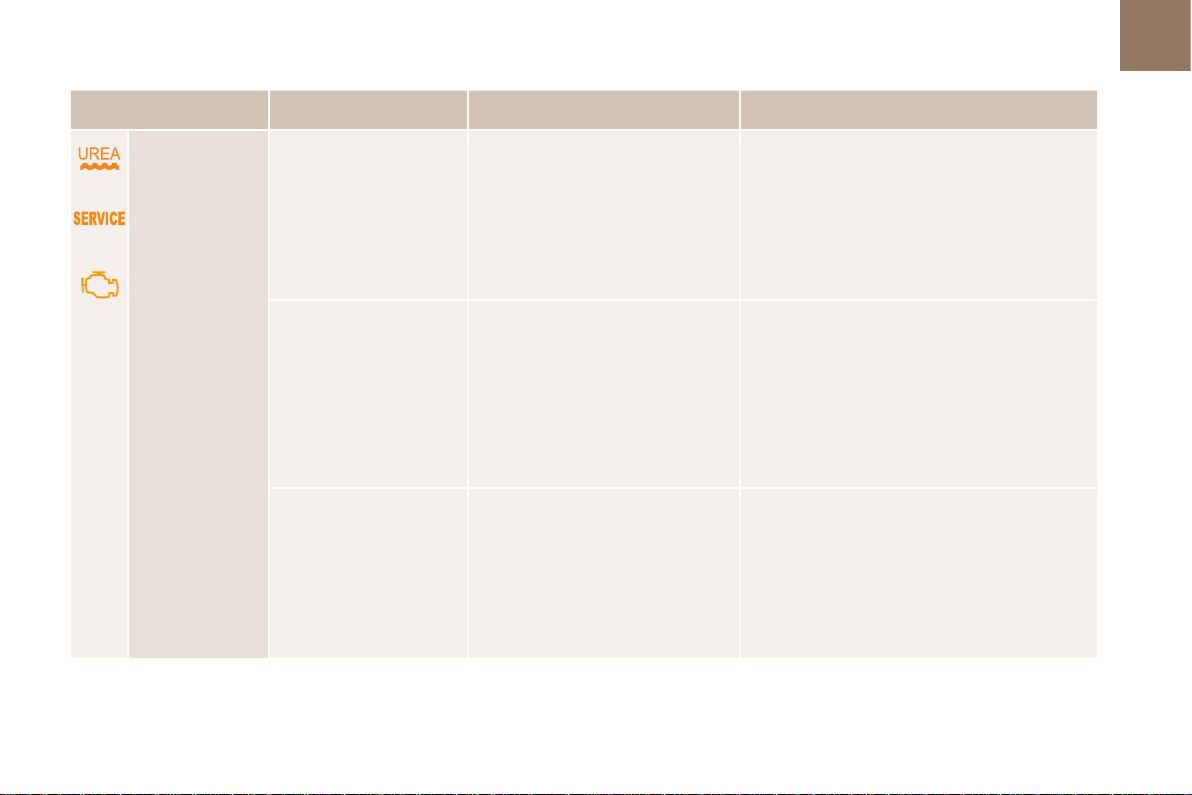
Warning/indicator lamp is on Cause Action/Observations
Instruments
25
01
SCR emissions
control system
(BlueHDi Diesel)
+
+
fixed, on switching on
the ignition, associated
with the SERVICE and
engine diagnostic warning
lamps, accompanied by
an audible signal and a
message.
flashing, on switching on
the ignition, associated
with the SERVICE and
engine diagnostic warning
lamps, accompanied by
an audible signal and a
message indicating the
remaining driving range.
flashing, on switching on
the ignition, associated
with the SERVICE and
engine diagnostic warning
lamps, accompanied by
an audible signal and a
message.
A fault with the SCR emissions
control system has been detected.
After confirmation of the fault with the
emissions control system, you can
drive for up to 650 miles (1 100 km)
before the engine starting inhibition
system is triggered.
You have exceeded the authorised
driving limit following confirmation
of a fault with the emissions control
system: the engine starting inhibition
system prevents starting of the
engine.
This alert disappears once the exhaust emissions
return to normal levels.
Contact a CITROËN dealer or a qualified
workshop without delay, to avoid a breakdown.
To be able to start the engine, you must call on a
CITROËN dealer or a qualified workshop.
Page 28
01
26
Instruments
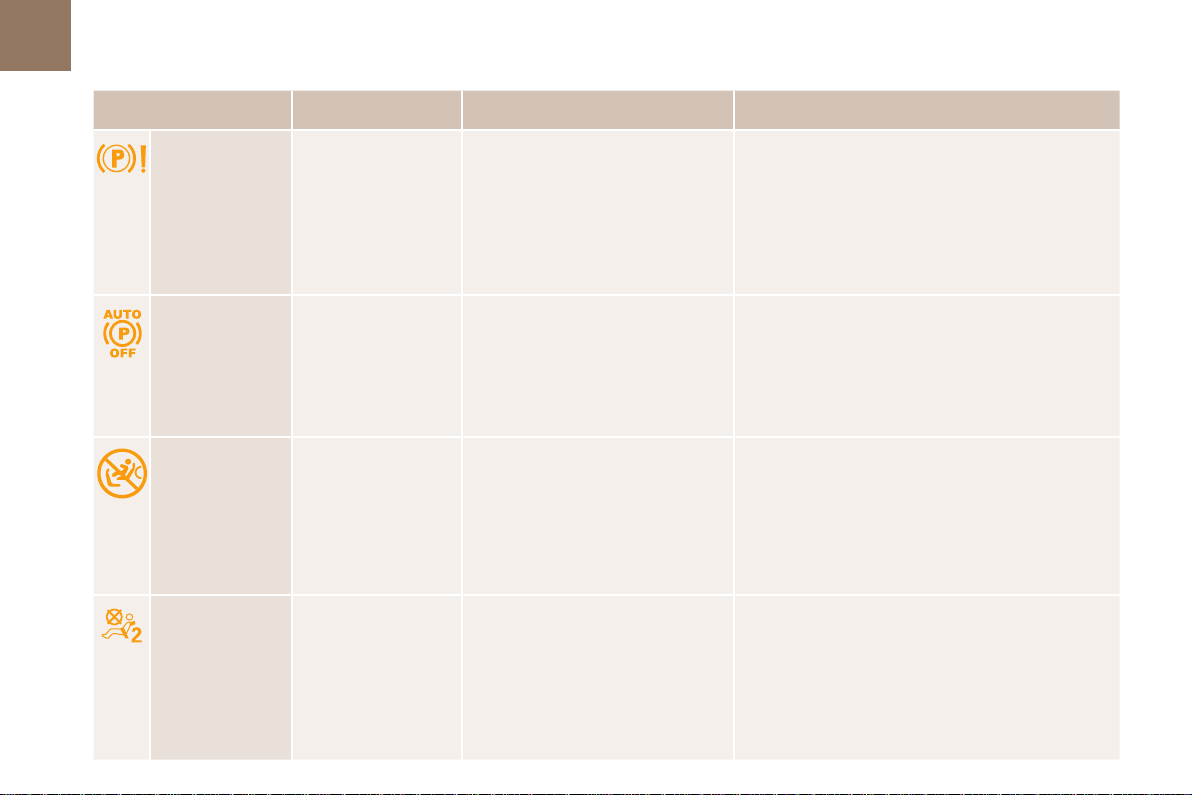
Warning/indicator lamp is on Cause Action/Observations
Electric parking
brake
Deactivation of
the automatic
functions of the
electric parking
brake
Passenger's
airbag system
Passenger's
airbag system
fixed. The electric parking brake is applied. Release the electric parking brake to switch off the
fixed. The "automatic application" (on
fixed in the seat belt
and passenger's front
airbag warning lamps
display.
fixed in the instrument
panel and/or seat belt
and front passenger's
airbag warning lamps
display.
switching off the engine) and
"automatic release" functions are
deactivated or faulty.
The control switch, located in the
glove box, has been placed in the
"ON" position.
The passenger's front airbag is
activated.
The control switch, located in the
glove box, is set to the OFF position.
The passenger's front airbag is
deactivated.
warning lamp: with your foot on the brake pedal, pull
the electric brake control.
Observe the safety recommendations.
For more information on the Electric parking brake,
refer to the corresponding section.
Activate the function (depending on the country of
sale) via the vehicle configuration menu or contact a
CITROËN dealer or a qualified workshop.
In this case, do not install a rearward facing child seat
on this seat.
Move the control switch to the "OFF" position to
deactivate the passenger's front airbag. In this case,
you can install a rearward facing child seat, unless
there is a fault with the airbags (airbag warning
lamp on).
You can install a rearward facing child seat, unless
there is a fault with the airbags (airbag warning
lamp
on).
Set the control to the "ON" position to activate the
passenger's front airbag. In this case, do not install a
rearward facing child seat on this seat.
Page 29
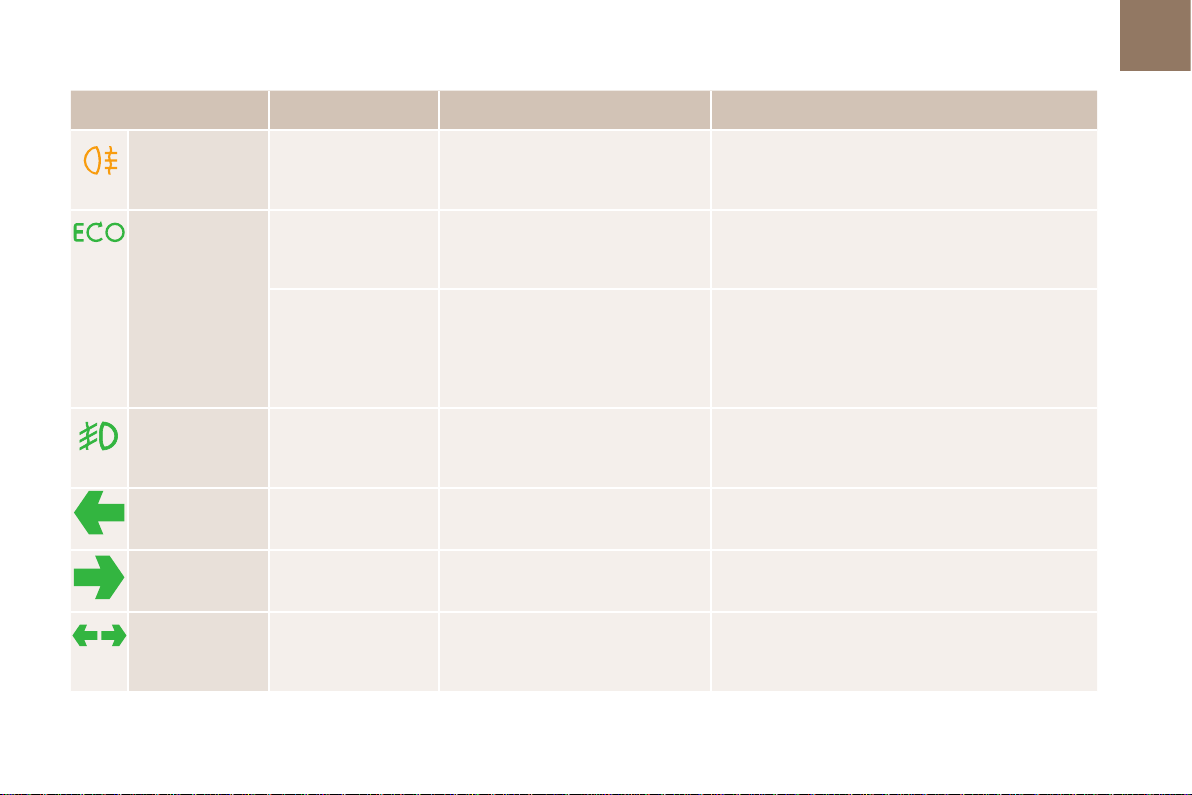
Warning/indicator lamp is on Cause Action/Observations
Instruments
27
01
Rear foglamps fixed. The rear foglamps have been
Stop & Start fixed. When the vehicle stops (red lights,
flashes for a few
seconds, then goes
off.
Front foglamps fixed. The front foglamps are switched on
Left-hand
direction indicator
Right-hand
direction indicator
Hazard warning
lamps
flashing with buzzer. The lighting stalk has been
flashing with buzzer. The lighting stalk has been pushed up.
flashing with audible
signal.
switched on using the ring on the
lighting control stalk.
traffic jams,
has put the engine into STOP mode.
STOP mode is temporarily
unavailable,
or
START mode is invoked
automatically.
using the ring on the lighting control
stalk.
pushed down.
The hazard warning lamps switch,
located on the dashboard, has been
operated.
...) the Stop & Start system
Turn the ring on the lighting control stalk rearwards to
switch off the rear foglamps.
The warning lamp goes off and the engine restarts
automatically in START mode, as soon as you want to
move off.
For more information on Stop & Start, refer to the
corresponding section.
Turn the ring on the lighting control stalk rearward
twice to switch off the front foglamps.
The left-hand and right-hand direction indicators and
their associated indicator lamps flash simultaneously.
Page 30
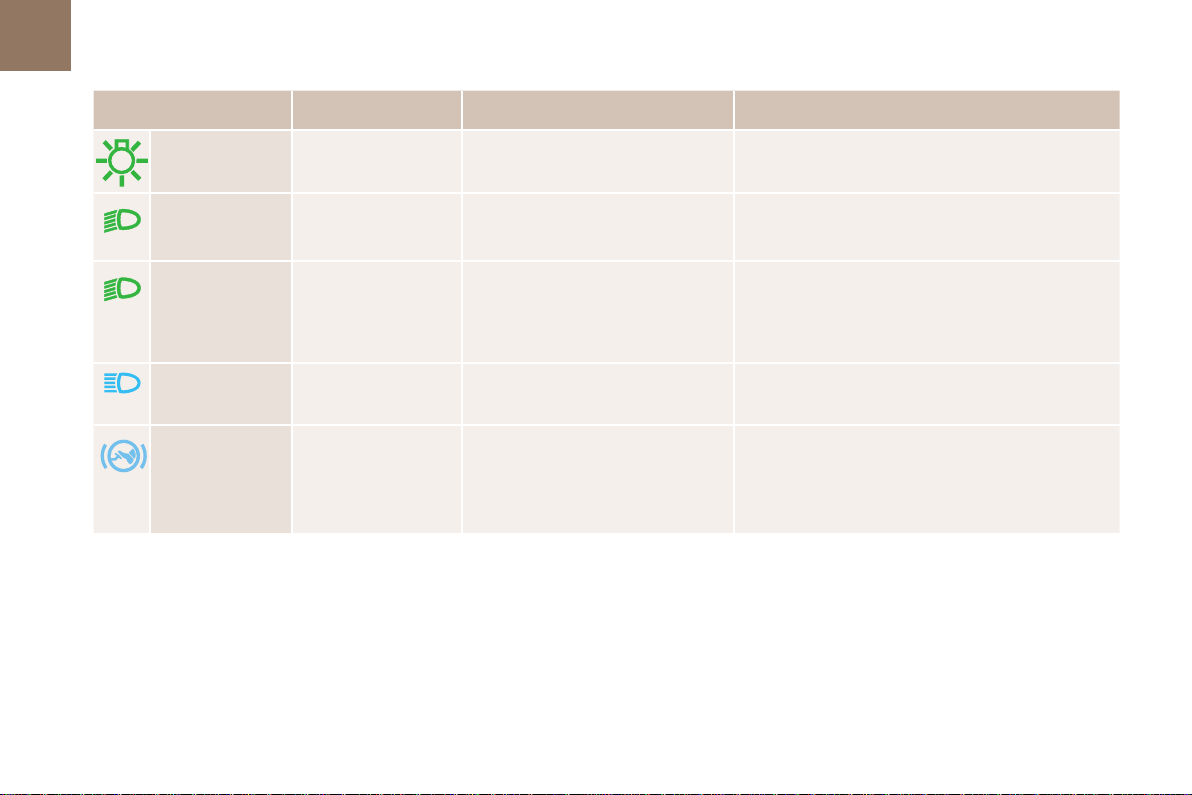
01
28
Instruments
Warning/indicator lamp is on Cause Action/Observations
Sidelamps fixed. The lighting stalk is in the "Sidelamps"
position.
Directional
headlamps
Dipped beam
headlamps
Main beam
headlamps
Foot on the brake
pedal
flashing. The directional headlamps system
has a fault.
fixed. The lighting stalk is in the "Dipped
beam headlamps" position or in the
"AUTO" position in conditions of low
light.
fixed. The lighting stalk is pulled towards
you.
fixed. With an automatic gearbox, you have
forgotten to press the brake pedal to
come out of the P postion.
Have it checked by a CITROËN dealer or a qualified
workshop.
Pull the stalk again to return to dipped beam
headlamps.
With the engine running, before releasing the parking
brake you must press the brake pedal to unlock the
the automatic gear selector lever and come out of
the P position.
Page 31
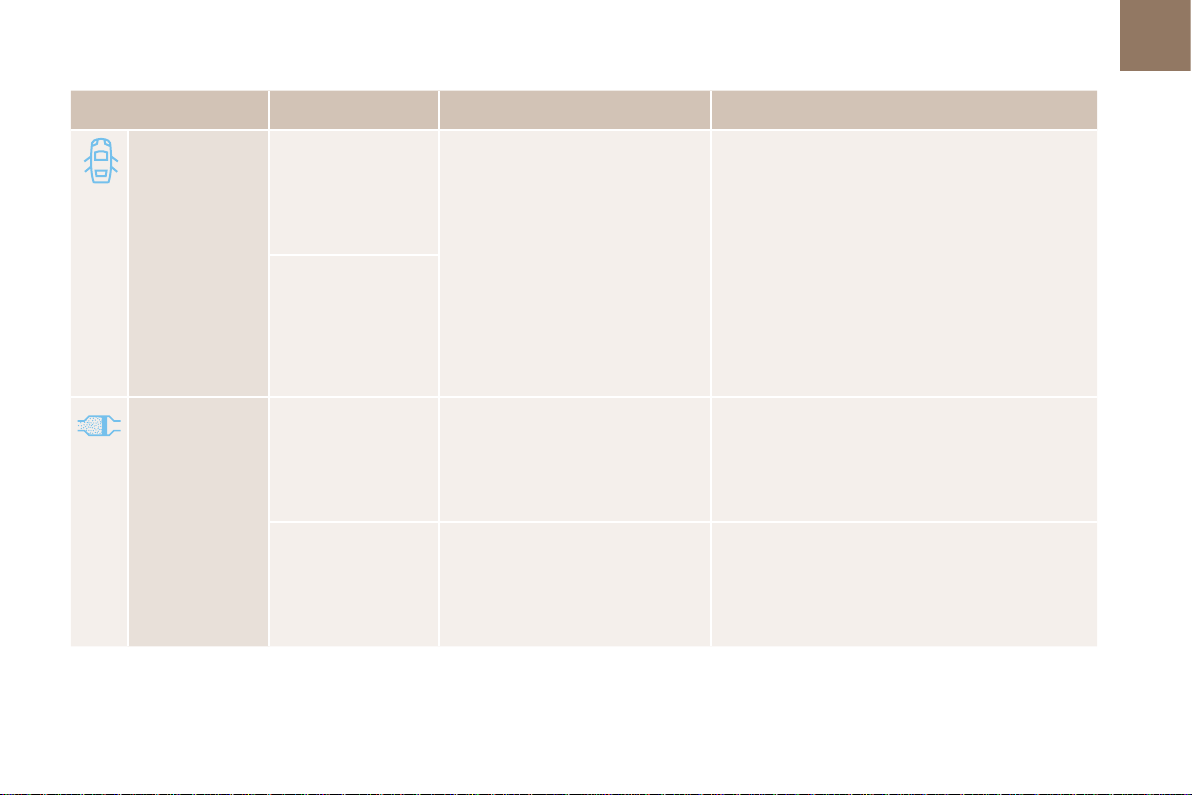
Warning/indicator lamp is on Cause Action/Observations
Door(s) open fixed, associated with
a message identifying
the door, if the speed is
below 6 mph (10 km/h).
fixed, associated with a
message identifying the
door, together with an
audible signal if the speed
is above 6 mph (10 km/h).
A door or the boot is still open. Close the door or boot.
Instruments
29
01
Particle filter
(Diesel)
fixed, accompanied
by an audible signal
message on the risk of
blockage of the particle
fi lter.
fixed, accompanied by
an audible signal and
a message that the
particle filter additive
level is too low.
This indicates that the particle filter is
starting to become saturated.
This indicates the low level of the
additive reservoir.
As soon as driving conditions allow, regenerate the
filter by driving at a speed of at least 35 mph (60 km/h)
until the warning lamp goes off.
Have the reservoir topped-up as soon as possible by a
CITROËN dealer or a qualified workshop.
Page 32
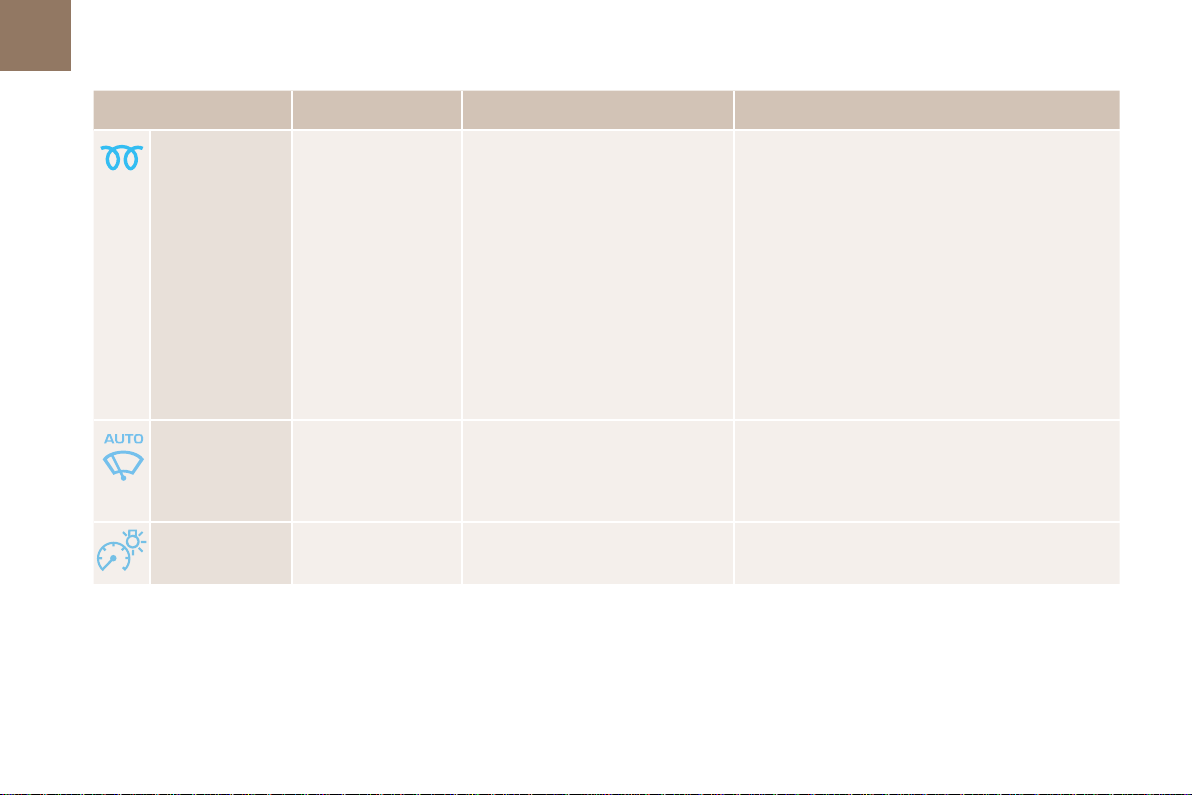
01
30
Instruments
Warning/indicator lamp is on Cause Action/Observations
Diesel engine
pre-heating
Automatic wiping fixed. The wiper control stalk has been
Lighting dimmer fixed. The lighting dimmer is making an
fixed. When the ignition is switched on
with a key in the ignition switch or a
starting instruction made using the
"START/STOP" button, the engine
temperature makes engine preheating necessary.
pushed down.
Automatic front wiping is activated.
adjustment.
The period of illumination of the indicator lamp is
determined by the ambient conditions (up to about
thirty seconds in severe winter conditions).
With an ignition switch and key, wait until the indicator
lamp goes off before starting.
With Keyless Entry and Starting, once it goes off,
starting is immediate, on condition that the brake
pedal remains pressed with an automatic gearbox, or
the clutch pedal is pressed fully down with a manual
gearbox.
If the engine does not start, switch the ignition off and
then on, wait until the indicator lamp goes off again,
then start the engine.
To deactivate automatic wiping, push the wiper control
stalk down again or put the wiper control stalk in
another position.
You can adjust the level of illumination of the
instruments between 1 and 16.
Page 33
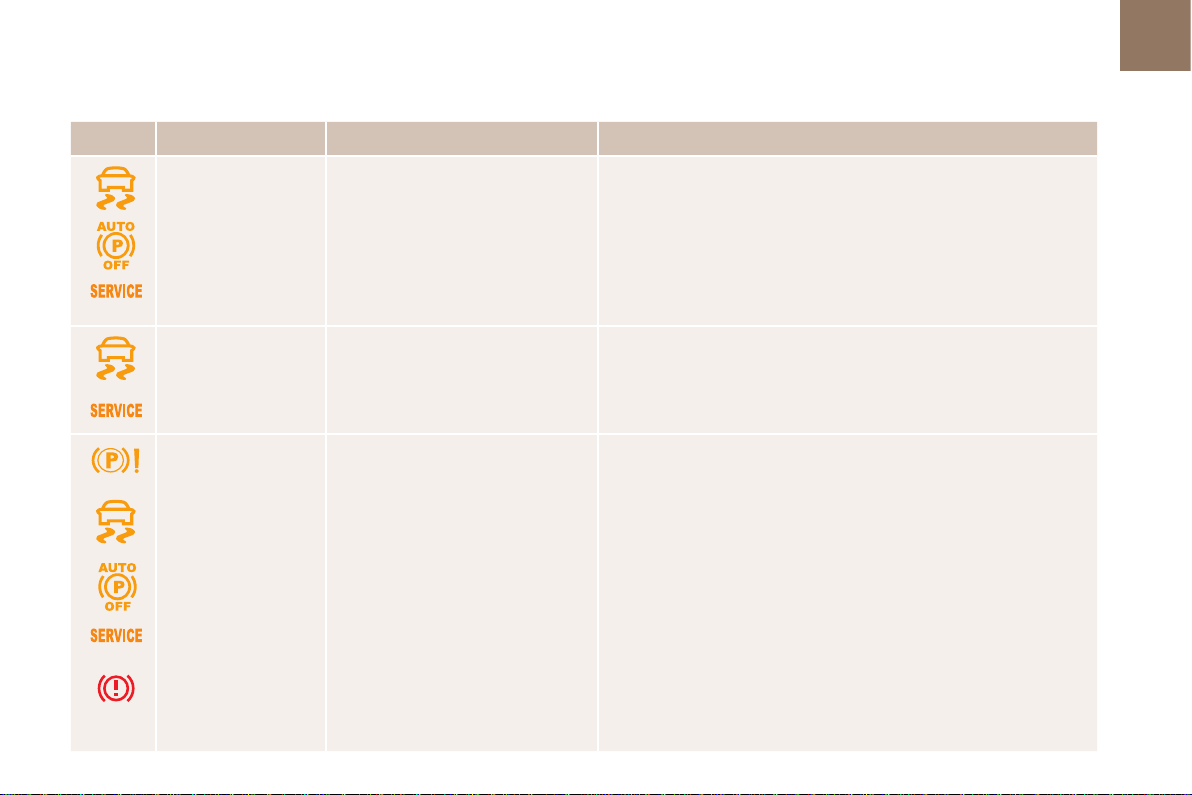
Electric parking brake
Instruments
31
01
Warning lamps
Status Causes Actions / Observations
They are on and
accompanied by
the displaying of the
message "Parking
brake fault".
They are on and
accompanied by
the displaying of the
message "Parking
brake fault".
They are on and
accompanied by
the displaying of the
message "Parking
brake fault".
Manual release of the electric parking
brake is only available by pressing
the accelerator pedal and releasing
the electric parking brake lever.
The hill start assistance is not
available.
The automatic functions are
deactivated.
The hill start assistance is not
available.
The automatic functions are
deactivated.
The hill start assistance is not
available.
The automatic functions and manual application are still available.
Contact a CITROËN dealer or a qualified workshop.
The electric parking brake can only be used manually.
Contact a CITROËN dealer or aqualified workshop.
To apply the electric parking brake:
-
immobilise the vehicle and switch off the ignition.
pull the control for at least 5 seconds or until application is
complete.
- switch on the ignition and check the switching on of the electric
parking brake warning lamps.
The application is slower than during normal operation.
To release the electric parking brake:
-
switch on the ignition.
- pull the control and hold it for approximately 3 seconds then
release it.
If the braking warning lamp is flashing or if the warning lamps do not
come on with the ignition on, these procedures will not work.
Place the vehicle in a safe condition (on level ground, gear engaged)
and have it checked by a CITROËN dealer or a qualified workshop.
Page 34
01
32
Instruments
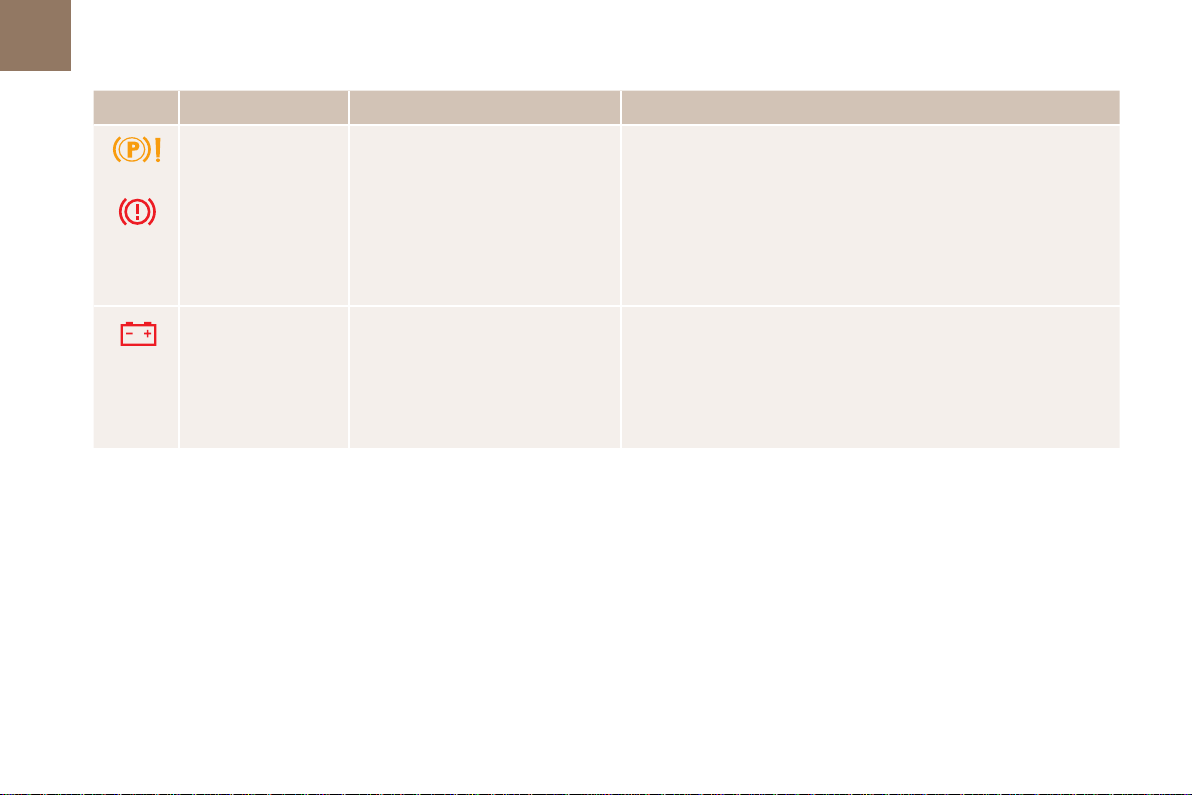
Warning lamps
Status Causes Actions / Observations
They are on and
accompanied by
the displaying of the
message "Parking
brake fault".
It is on. A discharged battery no longer
Only the automatic application
when the engine is switched off and
automatic release on acceleration
functions are available.
Manual application / release of
the electric parking brake and the
emergency braking are not available.
permits use of the electric parking
brake.
Contact a CITROËN dealer or a qualified workshop.
Stop as soon as the traffic conditions permit.
Place the vehicle in a safe condition (on level ground, gear engaged,
chocks under the wheels).
Apply the electric parking brake before switching off your engine.
Contact a CITROËN dealer or a qualified workshop.
Page 35
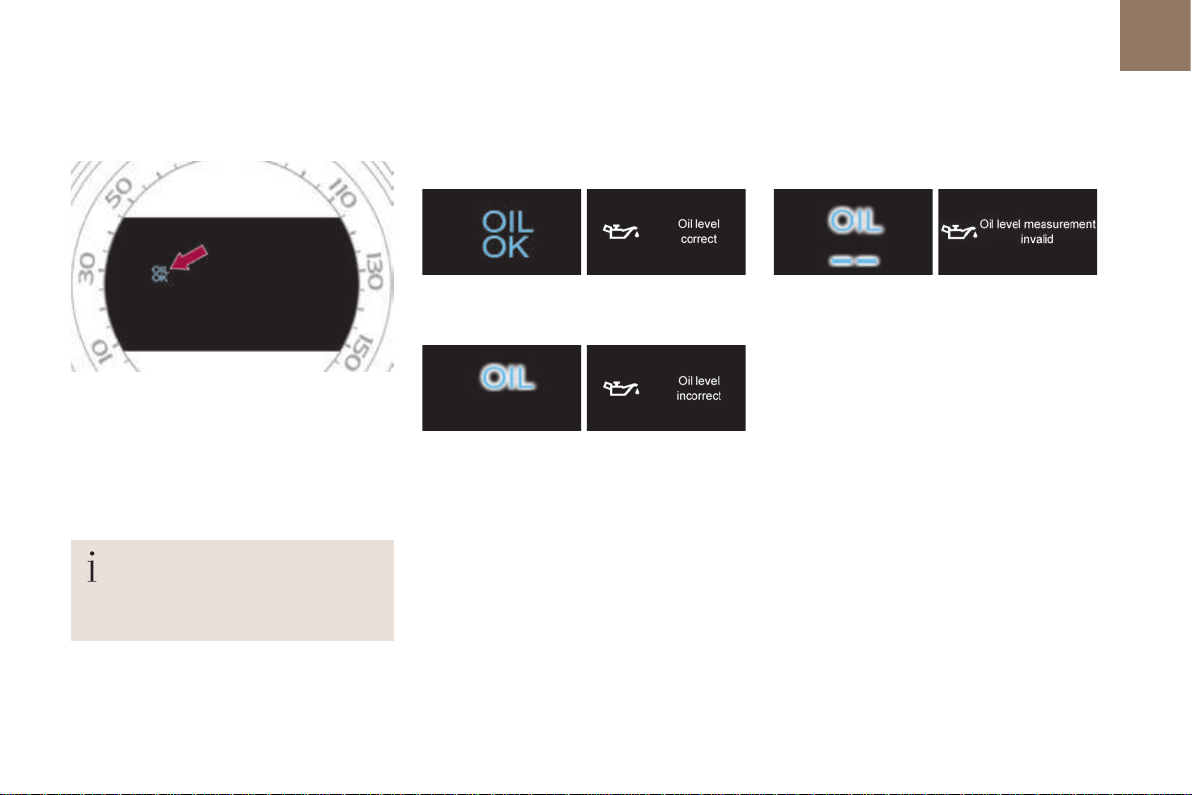
Engine oil level indicator*
On versions fitted with an electric oil level
indicator, the state of the engine oil level is
displayed in the instrument panel for a few
seconds, at the same time as the servicing
information.
The level read will only be correct if
the vehicle is on level ground and the
engine has been off for more
than 30 minutes.
Oil level correct
Oil level incorrect
This is indicated by the flashing of "OIL" or the
display of a message, accompanied by the
service warning lamp and an audible signal.
If the low oil level is confirmed by a check using
the dipstick, the level must be topped up to
avoid damage to the engine.
For more information on Checking the levels
and in particular the oil level, refer to the
corresponding section.
Instruments
Oil level indicator fault
This is signalled by the flashing of "OIL--" or
the display of a message.
Contact a CITROËN dealer or a qualified
workshop.
In the event of a fault with the electric indicator,
the oil level is no longer monitored.
If the system is faulty, you must check the
engine oil level using the manual dipstick
located under the bonnet.
For more information on Checking the levels
and in particular the oil level, refer to the
corresponding section.
33
01
* Depending on version.
Page 36
01
34
Instruments
Service indicator
System that informs the driver when the
next service is due, in accordance with the
manufacturer's service schedule.
The point at which the service is due is
calculated from the last service indicator zero
reset, according to the distance covered and
the time elapsed since the last service.
For BlueHDi Diesel versions, the level of
deterioration of the engine oil may also be
taken into account, depending on the country
of sale.
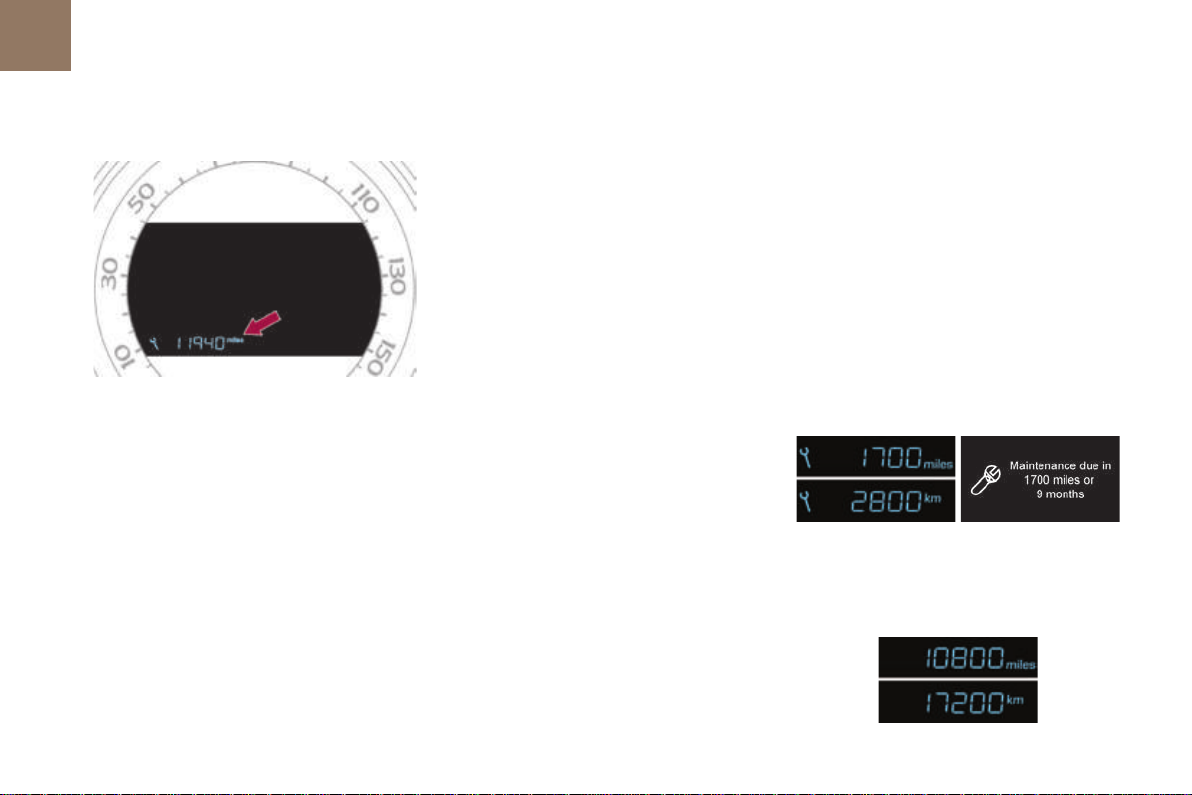
More than 1800 miles (3000 km) remain
before the next service is due
When the ignition is switched on, no service
information appears in the instrument panel
central screen.
Between 600 miles (1 000 km)
and 1800 miles (3 000 km) remain
before the next service is due
For a few seconds after the ignition is switched
on, the spanner symbolising the service
operations comes on. The distance recorder
display line or a specific message in the
instrument panel central screen indicates the
distance remaining before the next service is due.
For example: 1 700 miles (2 800 km) remain
before the next service is due.
For a few seconds after the ignition is switched
on, the screen indicates:
A few seconds after the ignition is switched on,
the spanner goes off; the distance recorder
resumes its normal operation. The screen then
indicates the total and trip distances.
Page 37
Instruments
35
01
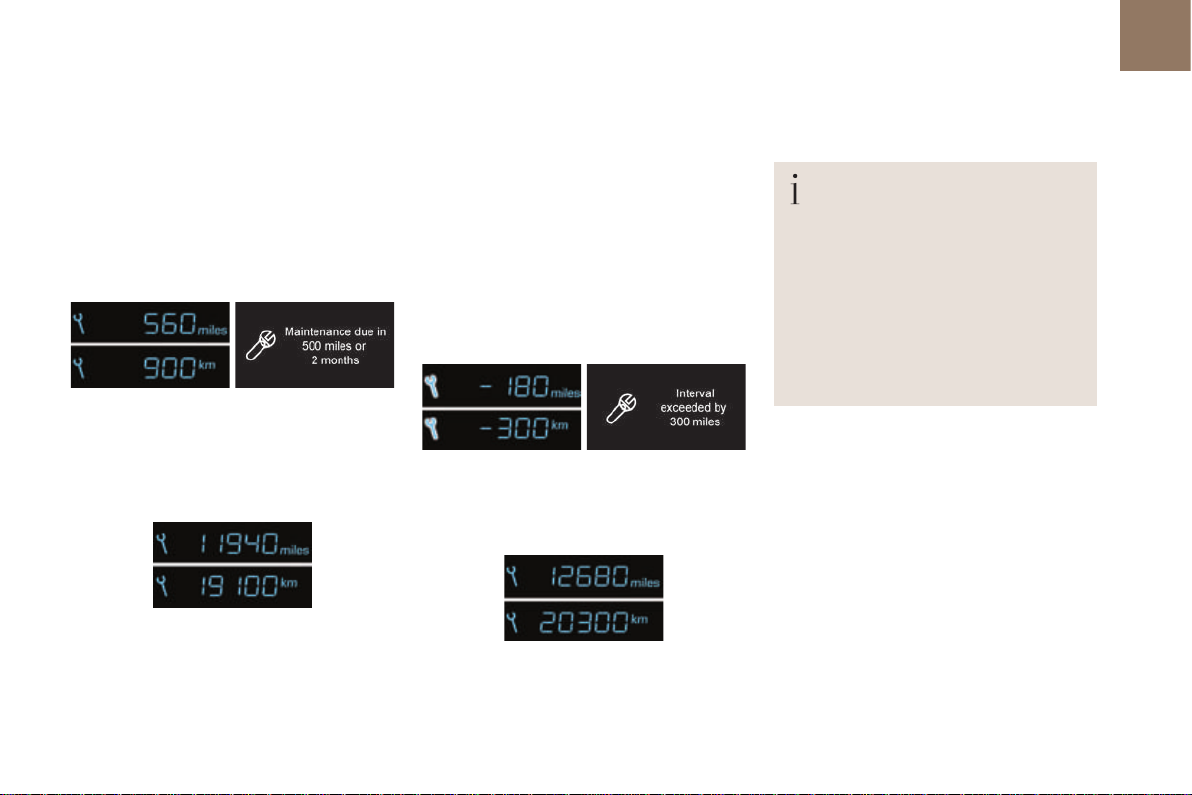
Less than 600 miles (1 000 km) remain
before the next service is due
Example: 560 miles (900 km) remain before
the next service is due.
For a few seconds after the ignition is switched
on, the screen indicates:
A few seconds after the ignition is switched
on, the distance recorder resumes its normal
operation. The spanner remains on to
indicate that a service must be carried out
soon.
Service overdue
For a few seconds after the ignition is switched on,
the spanner flashes to indicate that the service
must be carried out as soon as possible.
Example: the service is overdue by 180 miles
(300 km).
For a few seconds after the ignition is switched
on, the screen indicates:
A few seconds after the ignition is switched
on, the distance recorder resumes its normal
operation. The spanner remains on.
For BlueHDi Diesel versions, this alert is also
accompanied by the fixed illumination of the
Service warning lamp when the ignition is
switched on.
The spanner comes on if you have
exceeded the specified time interval
since the last service, as indicated in
the manufacturer's service schedule.
For BlueHDi Diesel versions,
the
spanner may also come on before
the normal service point, according to
the level of deterioration of the engine
oil, which depends on the driving
conditions in which the vehicle is used.
Page 38
01
36
Instruments
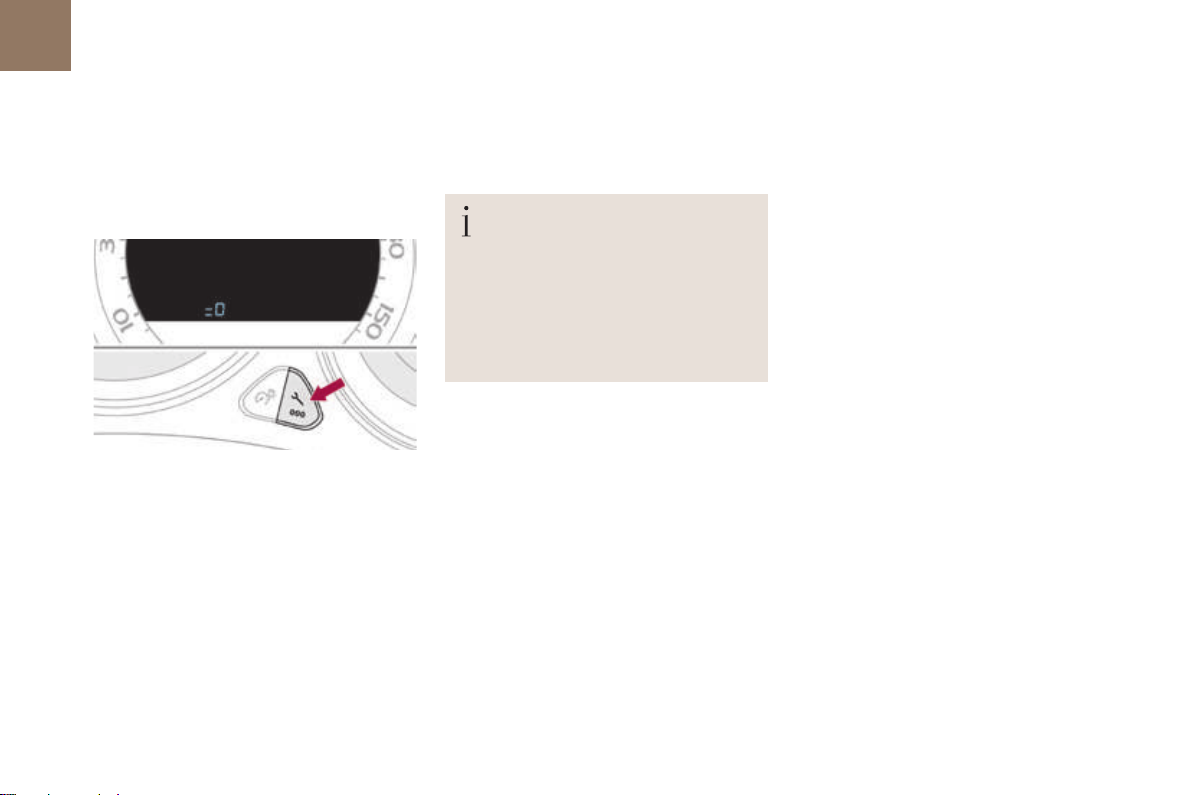
Service indicator zero reset
After each service, the service indicator must
be reset to zero.
If you have carried out the service on your
vehicle yourself:
F switch off the ignition,
F
press and hold the ".../000" trip distance
recorder zero reset button,
F switch on the ignition; the distance recorder
display begins a countdown,
when the screen indicates "=/0" and the
F
spanner disappears, release the button.
This operation cannot be carried
out while a reminder of the servicing
information is being displayed.
Following this operation, if you wish to
disconnect the battery, lock the vehicle
and wait at least five minutes for the
zero reset to be registered.
Recalling the service information
(type 2 instrument panel)
You can recall the service information at any
time.
F Briefly press the ".../000" trip distance
recorder zero reset button.
The service information is displayed for a
few seconds in the central screen of the
type 2 instrument panel.
Page 39
AdBlue® fluid range indicators
Once the AdBlue® tank is on reserve or after
detection of a fault with the SCR emissions
control system, when the ignition is switched
on an indicator displays an estimate of the
distance that can be covered, the range, before
engine starting is prevented.
In the event of simultaneous system fault and
low AdBlue
the one displayed.
Range greater than 1 500 miles (2 400 km)
When the ignition is switched on, no
information on range is displayed automatically
in the instrument panel.
Above 3 000 miles (5 000 km), the value is not
specified.
®
level, the shortest range figure is
With the type 2 instrument panel,
pressing this button temporarily
displays the driving range.
In the event of the risk of non-starting related to a lack of AdBlue
The engine start prevention system
required by regulations is activated
automatically once the AdBlue
is empty.
®
tank
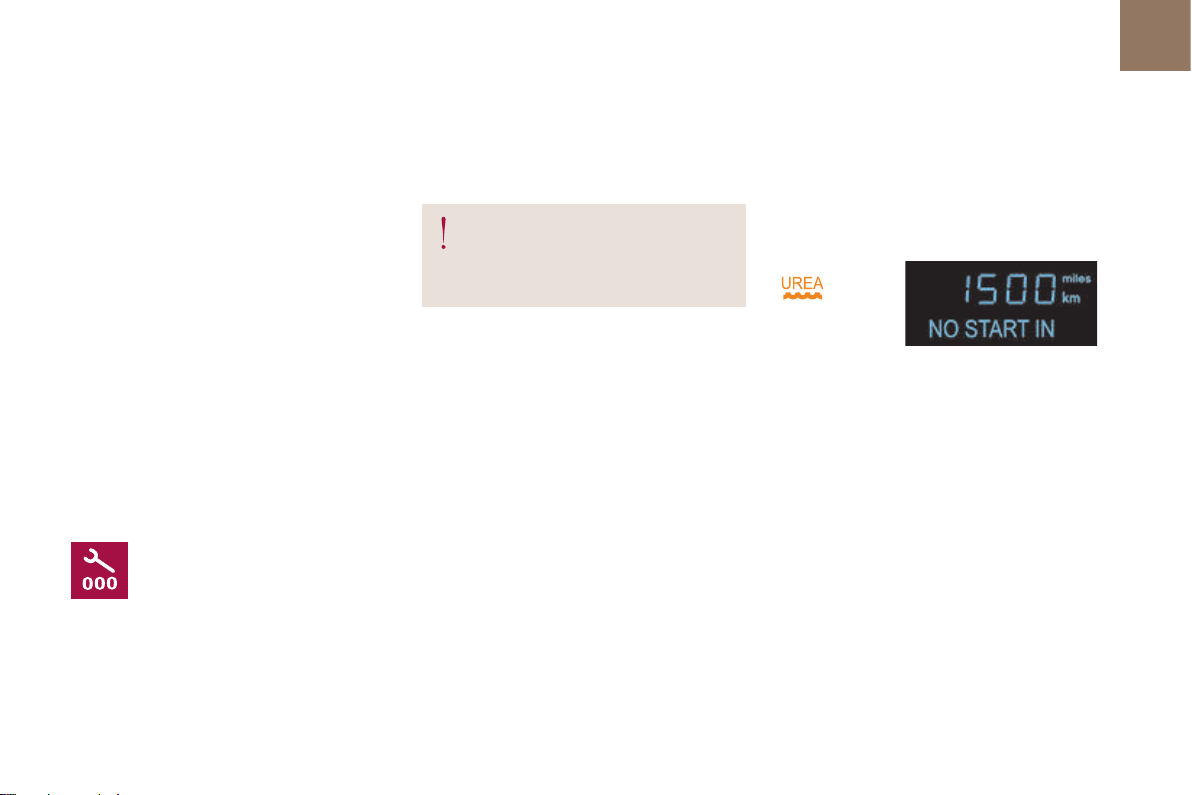
Type 1 instrument panel
Remaining range between 350 and 1 500 miles (600 and 2 400 km)
When switching on the ignition, the UREA
warning lamp comes on, accompanied by an
audible signal and the temporary display in
the instrument panel of "NO START IN" and
a distance, indicating the remaining range
expressed in miles or kilometres before
engine starting is prevented (e.g. "NO START
miles" means that starting will be
IN 900
prevented in 900 miles).
When driving, the message is displayed every
190 miles (300 km) until the AdBlue tank has
been topped up.
The reserve level has been reached; it is
recommended that the tank be topped up as
soon as possible.
It is recommended that no more than 10 litres
of AdBlue
For more information on AdBlue
system, and in particular on topping up, refer
to the corresponding section.
®
are added.
Instruments
®
®
and the SCR
37
01
Page 40
01
38
Instruments
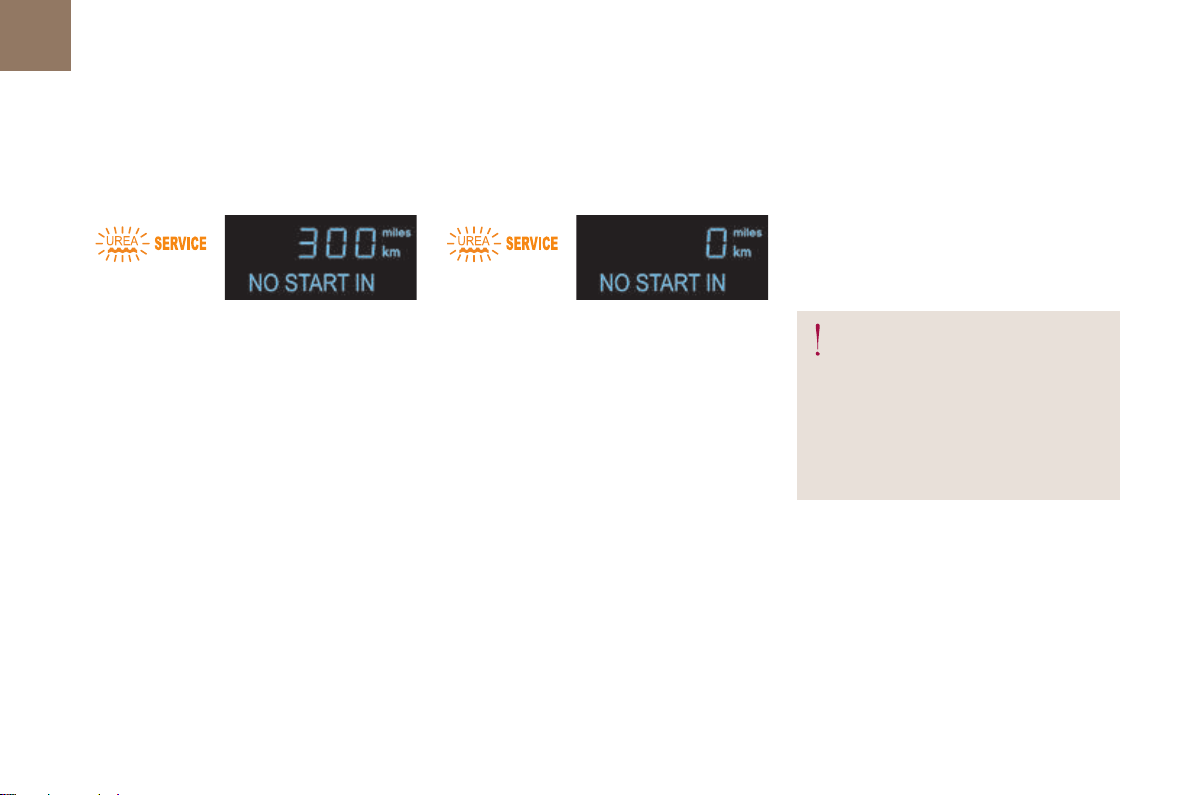
Remaining range between 0 and 350 miles (0 and 600 km)
When switching on the ignition, the SERVICE
warning lamp comes on and the UREA warning
lamp flashes, accompanied by an audible signal
and the temporary display in the instrument
panel of "NO START IN" and a distance,
indicating the remaining range expressed in
miles or kilometres before engine starting is
prevented (e.g. "NO START IN 180 miles"
means that starting will be prevented
in 180 miles).
When driving, the message is displayed every
30 seconds until the AdBlue tank has been
topped up.
It is essential to top up the tank as soon
as possible before it is completely empty;
otherwise, the engine may no longer start.
For more information on AdBlue
system, and in particular on topping up, refer
to the corresponding section.
®
and the SCR
Breakdown related to a lack of AdBlue
When switching on the ignition, the SERVICE
warning lamp comes on and the UREA
warning lamp flashes, accompanied by an
audible signal and the temporary display in the
instrument panel of "NO START IN" and 0 km
or miles ("NO START IN 0 miles" means that
starting is prevented).
The AdBlue tank is empty: the system required
by regulations prevents engine starting.
®
To be able to start the engine, it is
essential to add at least 3.8 litres of
®
AdBlue
to the tank.
For more information on AdBlue
the SCR system, and in particular on
topping up, refer to the corresponding
section.
®
and
Page 41
Instruments
39
01
Type 2 instrument panel
Remaining range between 350 and 1500 miles (600 and 2 400 km)
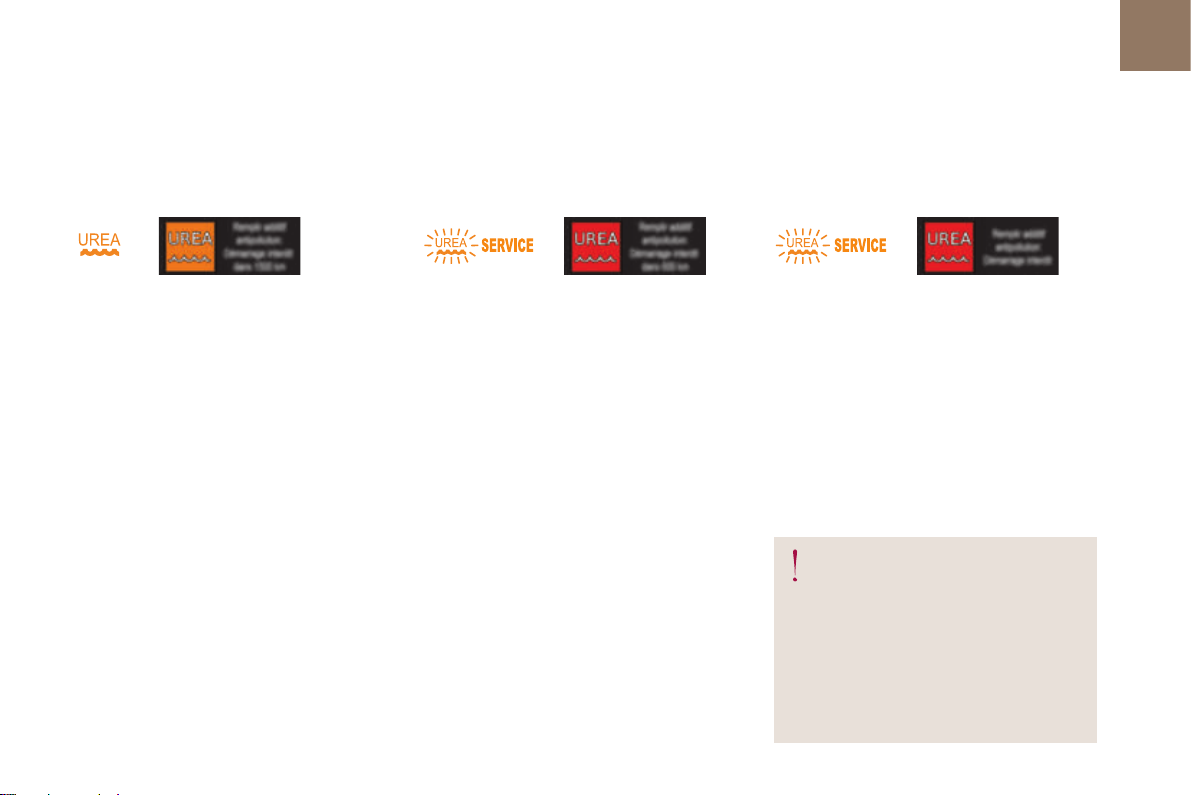
When switching on the ignition, the
warning lamp comes on, accompanied
UREA
by an audible signal and the display of a
message (e.g. "Top-up emissions additive:
Starting prevented in 900 miles") indicating
the remaining range expressed in miles or
kilometres.
When driving, the message is displayed every
200 miles (300 km) until the fluid has been
topped-up.
Go to a CITROËN dealer or a qualified
workshop to have the AdBlue
You can also top-up the tank yourself.
For more information on AdBlue
system, and in particular on topping-up the
®
AdBlue
, refer to the corresponding section.
®
topped-up.
®
and the SCR
Remaining range between 0 and 350 miles (0 and 600 km)
When switching on the ignition, the SERVICE
warning lamp comes on and the UREA warning
lamp flashes, accompanied by an audible
signal and the display of a message (e.g.
"Top-up emissions additive: Starting prevented
in 350 miles") indicating the remaining range
expressed in miles or kilometres.
When driving, the message is displayed every
30 seconds until the fluid has been topped-up.
Go to a CITROËN dealer or a qualified
workshop to have the AdBlue
®
topped-up.
You can also top-up the tank yourself.
Otherwise you will not be able to restart your
engine.
For more information on AdBlue® and the SCR
system, and in particular on topping-up the
®
AdBlue
, refer to the corresponding section.
Breakdown related to a lack of AdBlue
®
When switching on the ignition, the SERVICE
warning lamp comes on and the UREA warning
lamp flashes, accompanied by an audible
signal and the display of the message "Top-up
emissions additive: Starting prevented".
The AdBlue
®
tank is empty: the system required
by regulations prevents engine starting.
To be able to start the engine,
we recommend that you call on
a CITROËN dealer or a qualified
workshop for the top-up required.
If you carry out the top-up yourself, it
is essential to add at least 3.8 litres of
®
AdBlue
to the tank.
Page 42
01
40
Instruments
In the event of a fault with the the SCR emissions control system
Type 1 instrument panel
A system that prevents engine starting is activated automatically from 650 miles (1 100 km) after confirmation of a fault with the SCR emissions
control system. Have the system checked by a CITROËN dealer or a qualified workshop as soon as possible.
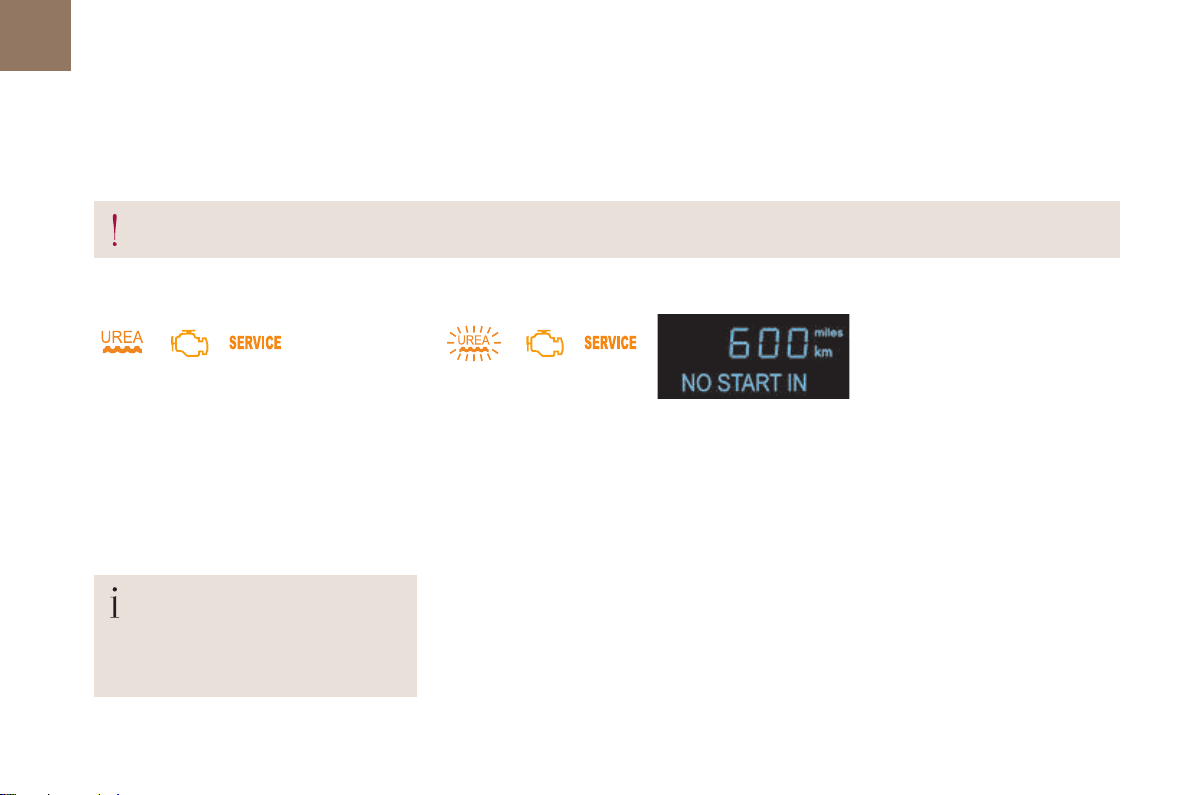
In the event of the detection of a fault
The UREA, SERVICE and diagnostic warning
lamps comes on, accompanied by an audible
signal and the display of the message
"Emissions fault".
The alert is triggered when driving, when
the fault is detected for the first time, then
when switching on the ignition for subsequent
journeys, while the fault persists.
If it is a temporary fault, the alert
disappears during the next journey,
after a self diagnosis test of the SCR
emissions control system.
During an authorised driving phase
(between 650 miles and 0 miles) (1 100 km and 0 km)
If a fault with the SCR system is confirmed
(after 30 miles (50 km) covered with the
permanent display of the message signalling
a fault), the SERVICE and engine diagnostic
warning lamps come on and the UREA
warning lamp flashes, accompanied by an
audible signal and the temporary display in
the instrument panel of "NO START IN" and
a distance, indicating the remaining range
express in miles or kilometres before engine
starting is prevented - (e.g.: "NO START IN
350 miles" means "Starting will be prevented in
350 miles").
While driving, this display appears every
seconds while the fault with the SCR system
30
persists.
The alert is repeated when switching on the
ignition.
You should go to a CITROËN dealer or a
qualified workshop as soon as possible.
Otherwise, you will not be able to restart your
engine.
Page 43
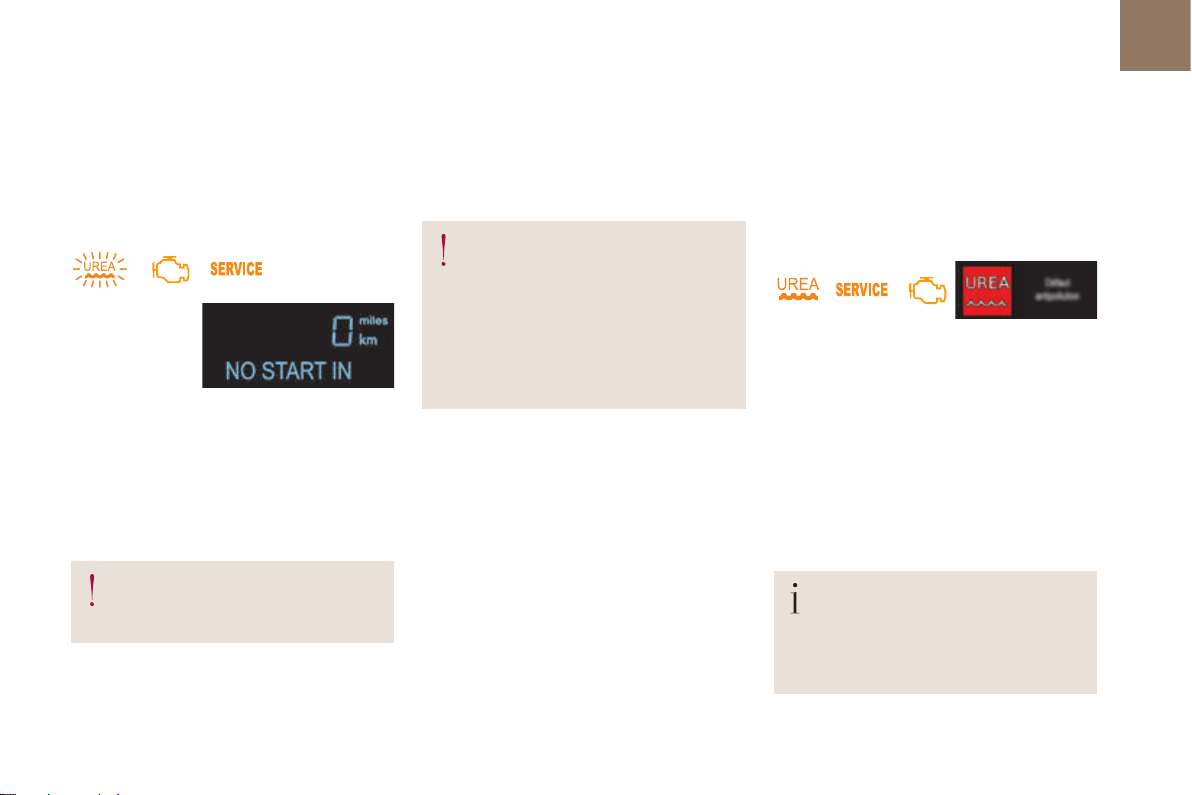
Starting prevented
Every time the ignition is switched on, the
SERVICE and engine diagnostic warning
lamps come on and the UREA warning lamp
flashes, accompanied by the temporary display
of "NO START IN" and 0 miles or kilometres
("NO START IN 0 miles" means "Starting
prevented").
-
In the event of a fault with the SCR emissions control system
Type 2 instrument panel
A system that prevents engine
starting is activated automatically
from 650 miles (1 100 km) after
confirmation of a fault with the SCR
emissions control system. Have the
system checked by a CITROËN dealer
or a qualified workshop as soon as
possible.
In the event of the detection of a fault
The UREA, SERVICE and diagnostic warning
lamps comes on, accompanied by an audible
signal and the display of the message
"Emissions fault".
The alert is triggered when driving when the
fault is detected for the first time, then when
switching on the ignition for subsequent
journeys, while the fault persists.
Instruments
41
01
You have exceeded the authorised
driving limit: the starting prevention
system inhibits engine starting.
To be able to start the engine, you must call on
a CITROËN dealer or a qualified workshop.
If it is a temporary fault, the alert
disappears during the next journey,
after self-diagnosis of the SCR system.
Page 44
01
42
Instruments
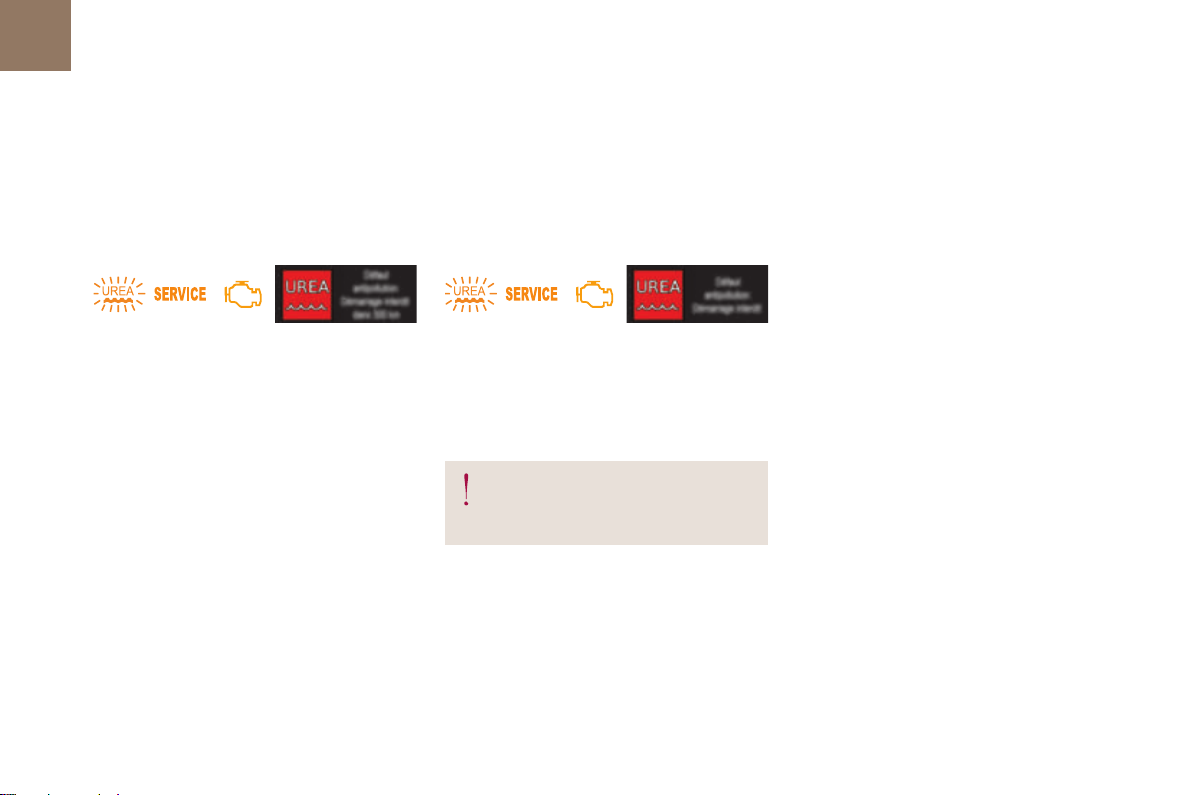
During an authorised driving phase (between
650 miles and 0 miles) (1 100 km and 0 km)
If a fault with the SCR system is confirmed
(after 30 miles (50 km) covered with the
permanent display of the message signalling
a fault), the SERVICE and engine diagnostic
warning lamps come on and the UREA
warning lamp flashes, accompanied by an
audible signal and the display of a message
(e.g.: "Emissions fault: Starting prevented in
150 miles") indicating the remaining range
express in miles or kilometres.
While driving, the message is displayed every
30 seconds while the fault with the SCR system
persists.
The alert is repeated when switching on the
ignition.
You should go to a CITROËN dealer or a
qualified workshop as soon as possible.
Otherwise, you will not be able to restart your
engine.
Starting prevented
Every time the ignition is switched on, the SERVICE
and engine diagnostic warning lamps come on and
the UREA warning lamp flashes, accompanied by
an audible signal and the display of the message
"Emissions fault: Starting prevented".
You have exceeded the authorised
driving limit: the starting prevention
system inhibits engine starting.
To be able to start the engine, you must call on
a CITROËN dealer or a qualified workshop.
Page 45
Instruments
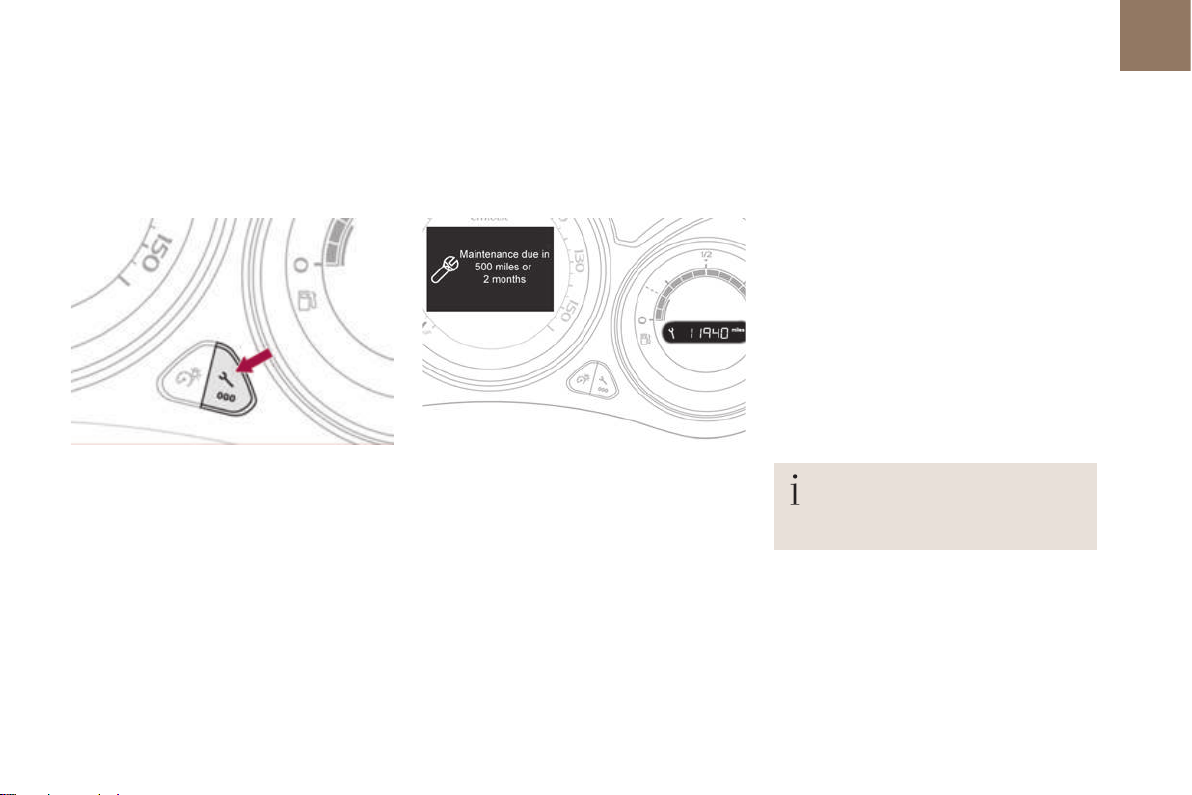
Manual test in the type 2 instrument panel central screen
This function allows you to check the status of the vehicle systems (reminder of the "activated" / "deactivated" status of the configurable functions) and
to display the alerts log.
43
01
F With the engine running, to start a manual
test, briefly press the ".../000" button on
the instrument panel.
The following information appears successively
in the instrument panel central screen:
- engine oil level indicator,
service indicator,
-
current warnings and alert messages, if
-
any,
- the range for the AdBlue additive and the
SCR system for BlueHDi Diesel versions,
-
status of configurable functions.
This information also appears every
time the ignition is switched on
(automatic test).
Page 46
01
44
Instruments
Distance recorders
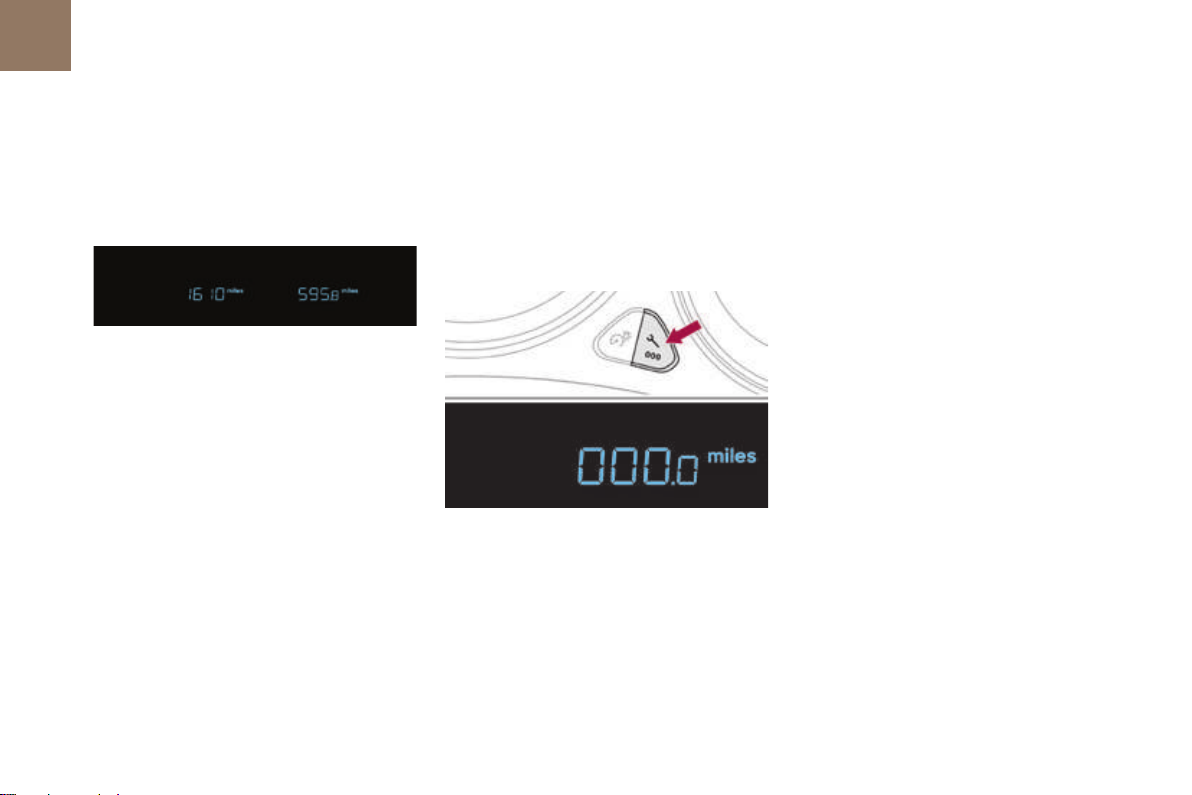
The total and trip distances are displayed for thirty seconds when the ignition is switched off, when
the driver's door is opened and when the vehicle is locked or unlocked.
Total distance recorder Trip distance recorder
Measures the distance travelled since it was
last reset to zero by the driver.
Measures the total distance travelled by the
vehicle since its first registration.
F With the ignition on, press and hold this
button until zeros appear.
Page 47
Lighting dimmer
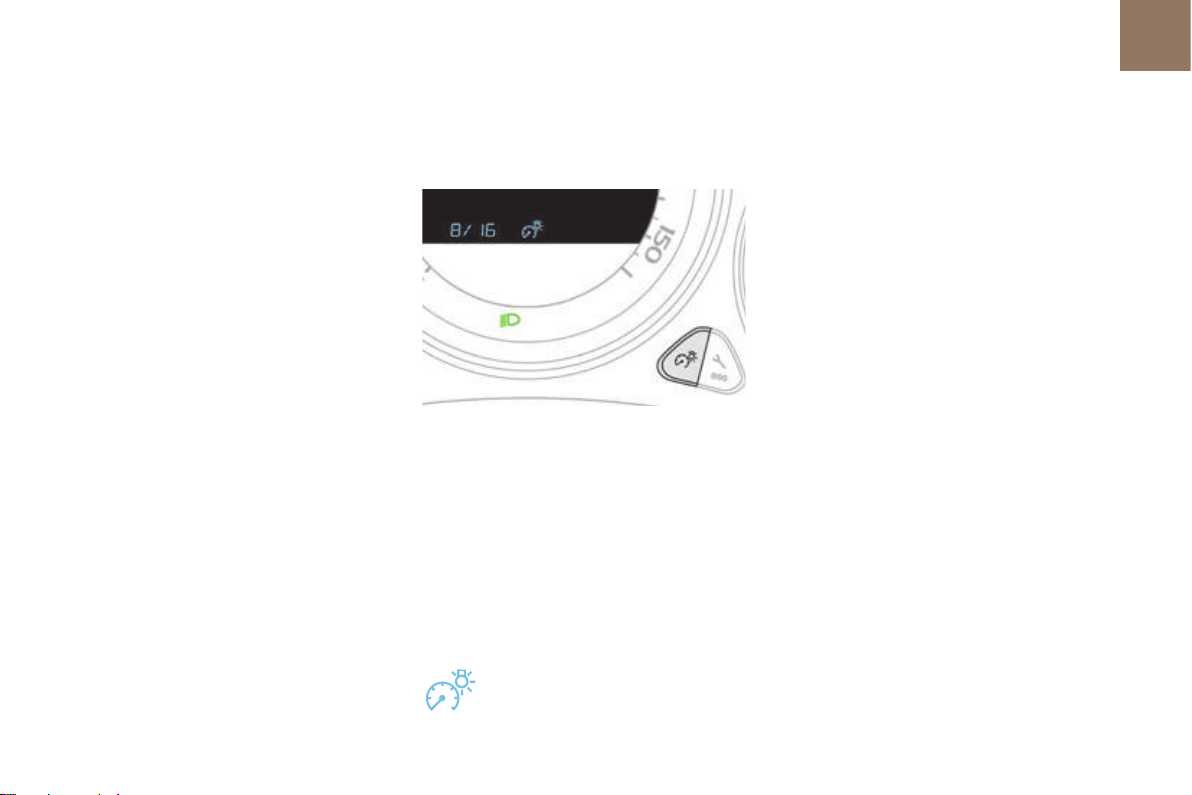
Permits manual adjustment of the brightness of
the instruments and controls to suit the ambient
light level. Only operates when the vehicle
lighting is on in night mode.
Activation
F Press this button to change the brightness
of the instruments and controls.
F When the lighting reaches the minimum
setting, release this button, then press
again to increase it.
or
F When the lighting reaches the maximum
setting, release this button, then press
again to reduce it.
When the lighting reaches the level of
F
brightness required, release this button.
Instruments
Deactivation
When the vehicle lighting is off, or in day mode
(daytime running lamps on), pressing the button
does not have any effect.
45
01
This indicator and the lighting
value appear in the middle of the
instrument panel during adjustment
to show the setting from the 16 levels
available.
Page 48
01
46
Instruments
Black panel (comfortable night
driving display)
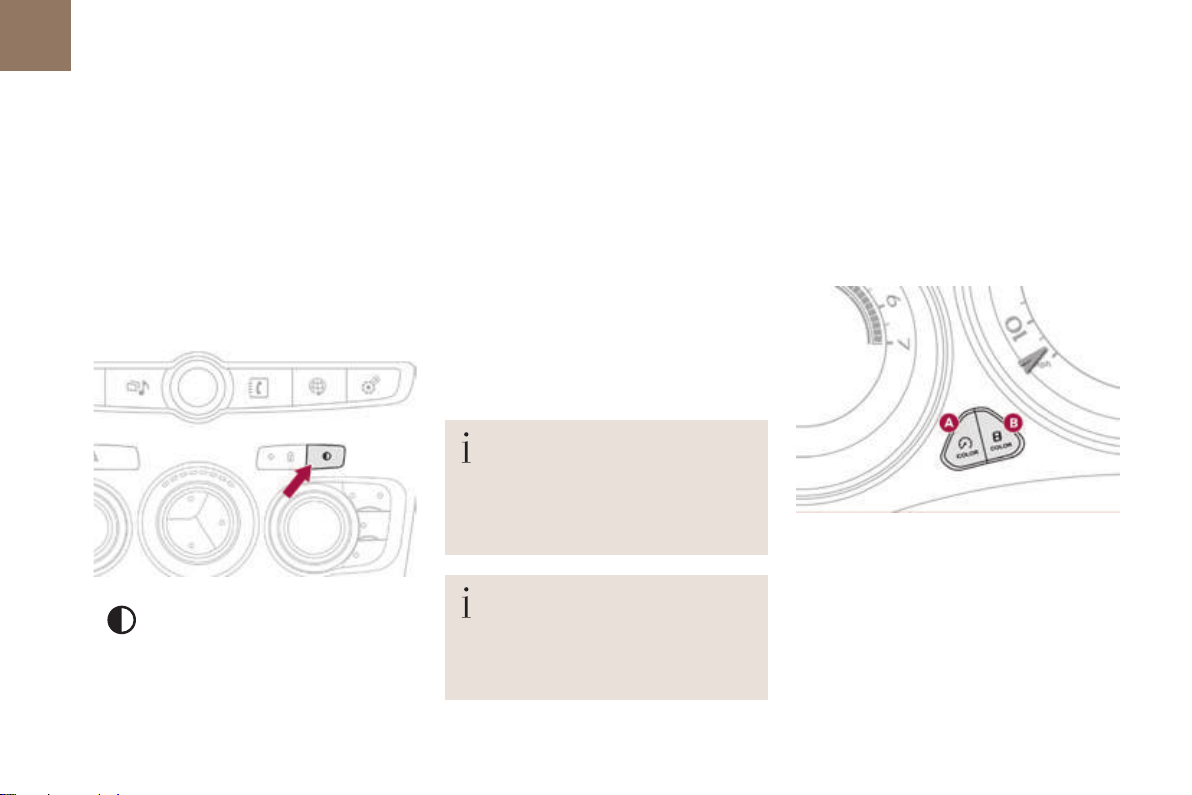
When driving at night, it allows certain
instrument panel displays to be switched off so
as to reduce visual fatigue for the the driver.
The essential driving information, such as
the vehicle speed, warning lamps, automatic
gearbox gear selected, cruise control or speed
limiter information, remains on in the instrument
panel.
F With the vehicle lighting on,
press this button again to
activate the function.
F Press this button again to
deactivate the function.
Touch screen tablet
You can returns to the current display
at any time by pressing the black
screen or one of the menu buttons.
In automatic illumination of headlamps
mode, the "Black panel" function is
automatically deactivated once the
ambient light level attains an adequate
level.
Customising the instrument
panel colour s
In the instrument panel, you can change the
colour of its dials independently from that of the
display screens.
There are five colour variants, from white to
blue.
F Press the appropriate button as many
times as needed to obtain the desired
colour.
A.
For the dials.
B. For the display screens.
Page 49
Monochrome screen C
Instruments
47
01
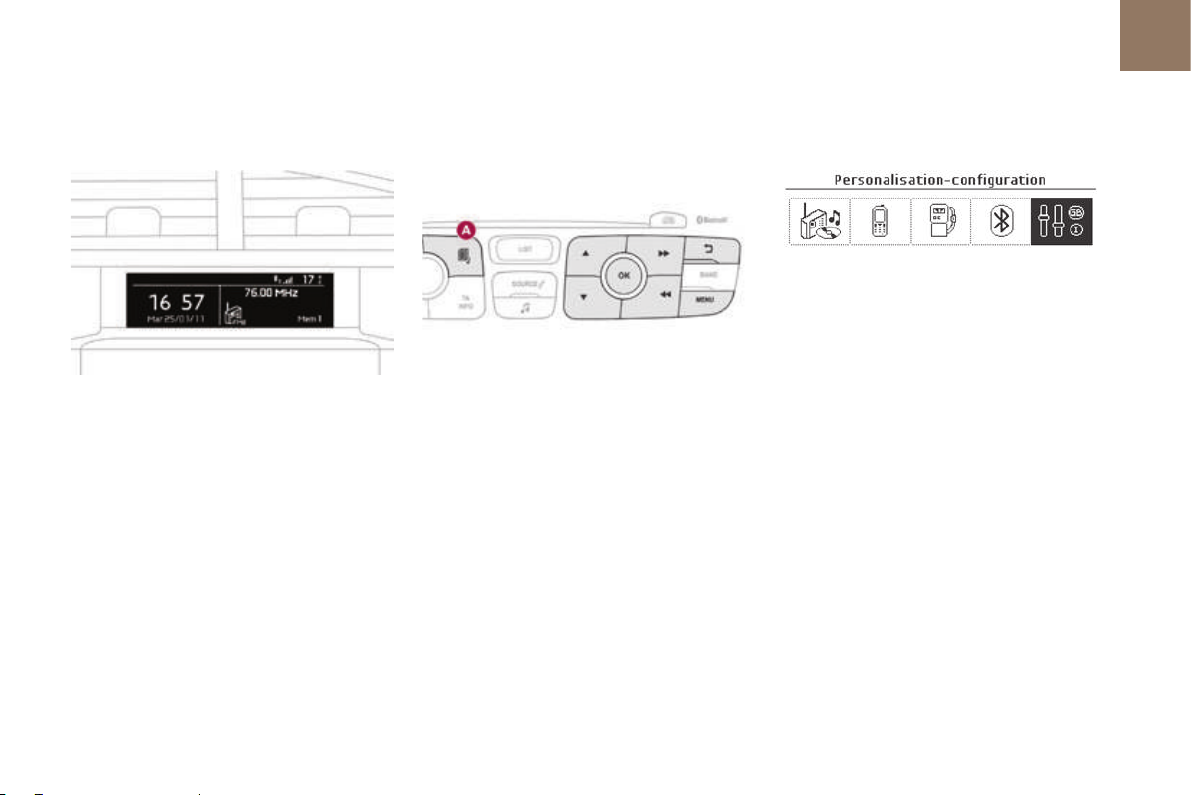
Displays in the screen
This displays the following information:
time,
-
-
date,
ambient temperature (this flashes if there is
a risk of ice),
- parking sensor information,
-
current audio source,
telephone or Bluetooth system information,
-
-
trip computer,
alert messages,
-
-
settings menus for the screen and the
vehicle equipment.
Controls
From the control panel of your audio system,
you can press:
F button A to chooses between the display
of audio information in full screen or the
shared display of audio and trip computer
information,
F the "MENU" button for access to the main
menu,
F the "5" or "6" buttons to scroll through the
items on the screen,
the "7" or "8" buttons to change a setting
F
value,
F the "OK" button to confirm,
or
F the "Back" button to abandon the
operation in progress.
Main menu
F Press the "MENU" button for access to the
main menu:
- "Multimedia",
"Telephone",
-
-
"Trip computer",
"Bluetooth connection",
-
-
"Personalisation-configuration",
Press the "7" or "8" button to select the
F
menu required, then confirm by pressing
the "OK" button.
Page 50

01
48
Instruments
"Multimedia" menu "Trip computer" menu
With the audio system switched on, this
menu allows you to activate or deactivate the
functions associated with use of the radio
(RDS, DAB
(TXT) display) or to choose the media play
mode (Normal, Random, Random all, Repeat).
For more information on the "Multimedia"
menu, refer to the Audio and telematics
section.
/ FM auto tracking, RadioText
"Telephone" menu
With the audio system switched on, this menu
allows you to make a call or view the various
telephone directories.
For more information on the "Telephone" menu,
refer to the Audio and telematics section.
This menu allows you to view information on
the status of the vehicle.
Warning log
This summarises the status and warning
messages for systems (active, not active or
faulty), displaying them in succession in the
multifunction screen.
F Press the "MENU" button for access to the
main menu.
F Press the arrows, then the "OK" button to
select the "Trip computer" menu.
F In the "Trip computer" menu, select the
"Warning log" line and confirm.
"Bluetooth connection"
menu
With the audio system on, this menu allows
a Bluetooth device (telephone, media player)
to be connected or disconnected and the
connection mode to be defined (hands-free,
playing audio files).
For more information on the "Bluetooth
connection" menu, refer to the Audio and
telematics section.
Page 51
"Personalisation-configuration" menu
Instruments
49
01
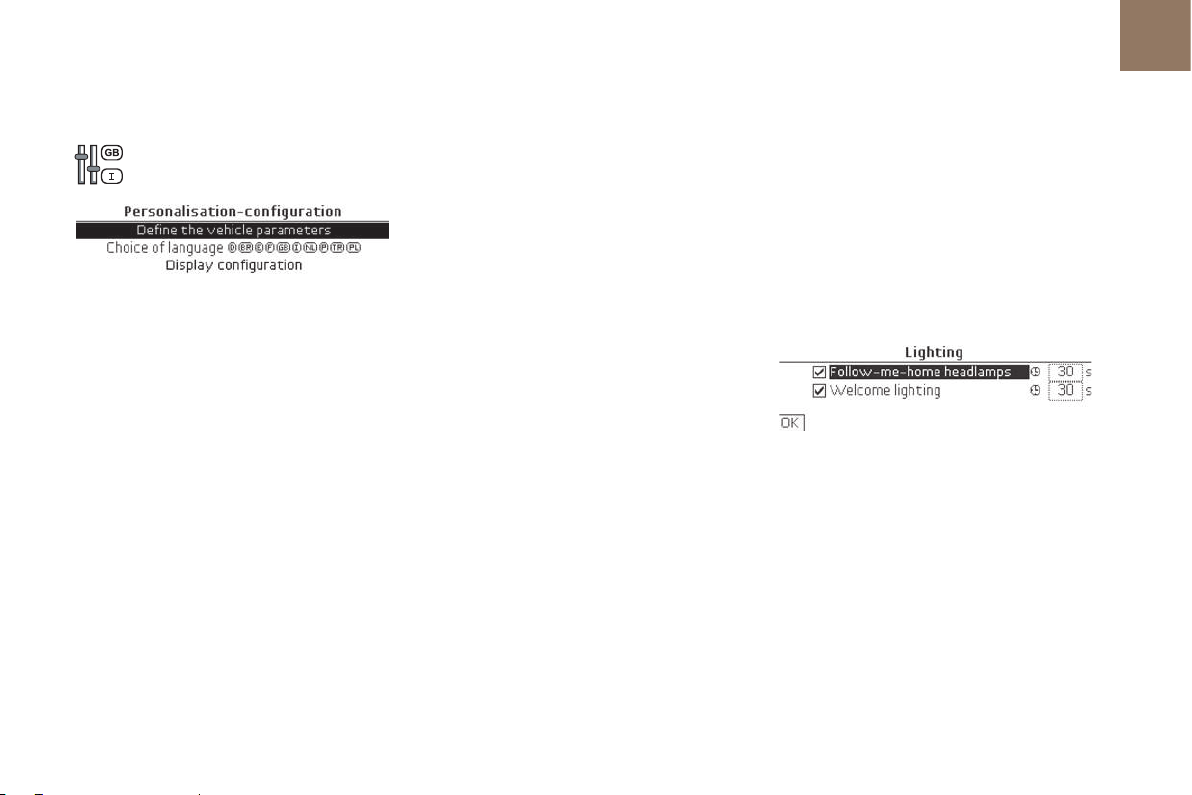
This menu gives access to the following
functions:
- "Define the vehicle parameters",
-
"Choice of language",
"Display configuration",
-
Dene the vehicle parameters
This menu allows you to activate or deactivate
the following equipment, classified in different
categories.
For more information on any of this equipment,
refer to the corresponding section.
-
"Access to the vehicle":
● "Plip action" (Selective unlocking of the
driver's door),
● "Unlocking boot only" (Selective
unlocking of the boot).
- "Driving assistance":
"Parking brake automatic" (Automatic
●
electric parking brake),
● "Rear wipe in reverse gear" (Rear wiper
coupled to reverse gear),
● "Speeds memorised" (Memorising
speeds).
- "Vehicle lighting":
●
"Directional headlamps" (Main /
additional directional lighting),
- "Interior lighting":
"Follow-me-home headlamps"
●
(Automatic operation of headlamps after
switching off the ignition),
●
"Welcome lighting" (Exterior and interior
welcome lighting).
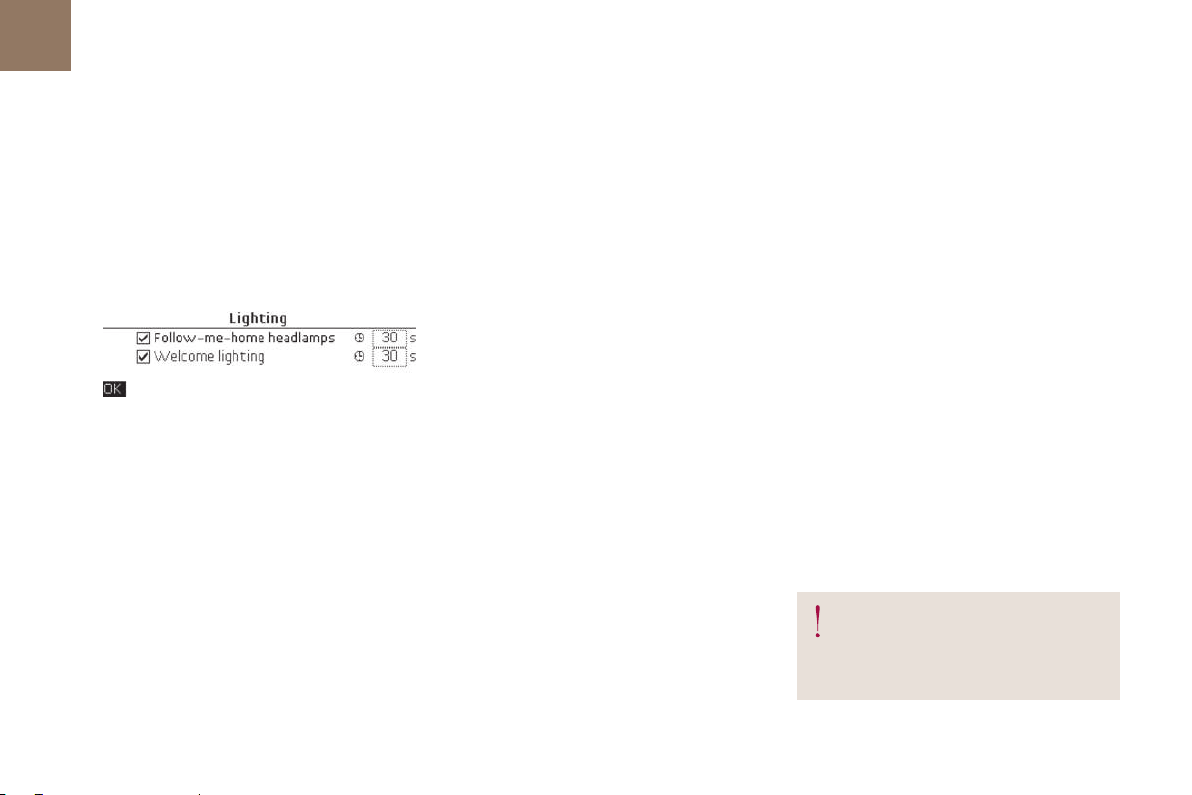
For example: setting of the duration of the
"follow-me-home" lighting
Press the "7" or "8" buttons, to select the
F
"Define the vehicle parameters" menu,
then the "OK" button.
F Press the "5" or "6" buttons to select
the "Interior lighting" line, then the
"OK" button; then follow the same
procedure to select the "Follow-me-home
headlamps" line.
Page 52
01
50
Instruments
F Press the "7" or "8" buttons to set the
value required (15, 30 or 60 seconds), then
press the "OK" button to confirm.
F
Press the "5" or "6" buttons, then the
"OK" button to select the "OK" box and
confirm or press the "Back" button to
cancel.
Choice of language
Once this menu has been selected, you can
choose the language used by the display from
a pre-defined list.
Display conguration
This menu gives access to the following
settings:
- "Choice of units",
"Date and time adjustment",
-
-
"Display parameters",
"Brightness".
-
Adjusting the date and time
F Press the "7" or "8" button to display the
"Display configuration" menu, then press
"OK".
Press the "5" or "6" button to select the
F
"Date and time adjustment" button, then
press "OK".
F
Press the "7" or "8" button to select the
setting to modify. Confirm by pressing
"OK", then modify the setting and confirm
again to save the modification.
F Adjust the settings one by one, confirming
with the "OK" button.
F Press the "5" or "6" button, then the "OK"
button to select the "OK" box and confirm
or the "Back" button to cancel.
As a safety measure, configuration of
the multifunction screen by the driver
must only be done when stationary.
Page 53
Touch screen tablet
This system gives access to:
-
menus for adjusting settings for vehicle
functions and systems,
- audio and display settings menus,
audio system and telephone controls and
-
the display of associated information.
- the display of the ambient temperature
(a blue snowflake appears if there is a risk
of ice),
-
the display of the trip computer.
And, depending on equipment, it also allows:
the display of visual parking sensors
-
information,
- access to the controls for the navigation
system and Internet services, and the
display of associated information.
General operation
Recommendations
It is necessary to press firmly, particularly for
"flick" gestures (scrolling through lists, moving
the map...). A light wipe is not enough.
The screen does not recognise pressing with
more than one finger.
This technology allows use at all temperatures
and when wearing gloves.
Do not use pointed objects on the touch screen
tablet.
Do not touch the touch screen tablet with wet
hands.
Uses a soft clean cloth to clean the touch
screen tablet.
Instruments
Principles
Press the virtual buttons in the touch screen
tablet.
Each menu is displayed over one or two pages
(primary page and secondary page).
Use the "O
secondary page.
PTIONS" button to go to the
After a few moments with no action on
the secondary page, the primary page
is displayed automatically.
Use this button for access to
additional information and to the
settings for certain functions.
51
01
As a safety measure, the driver
should only carry out operations
that require close attention, with the
vehicle stationary.
Some functions are not accessible
when driving.
Use this button to confirm.
Use this button to quit or to return to
the primary page.
Page 54
01
52
Instruments
Menus
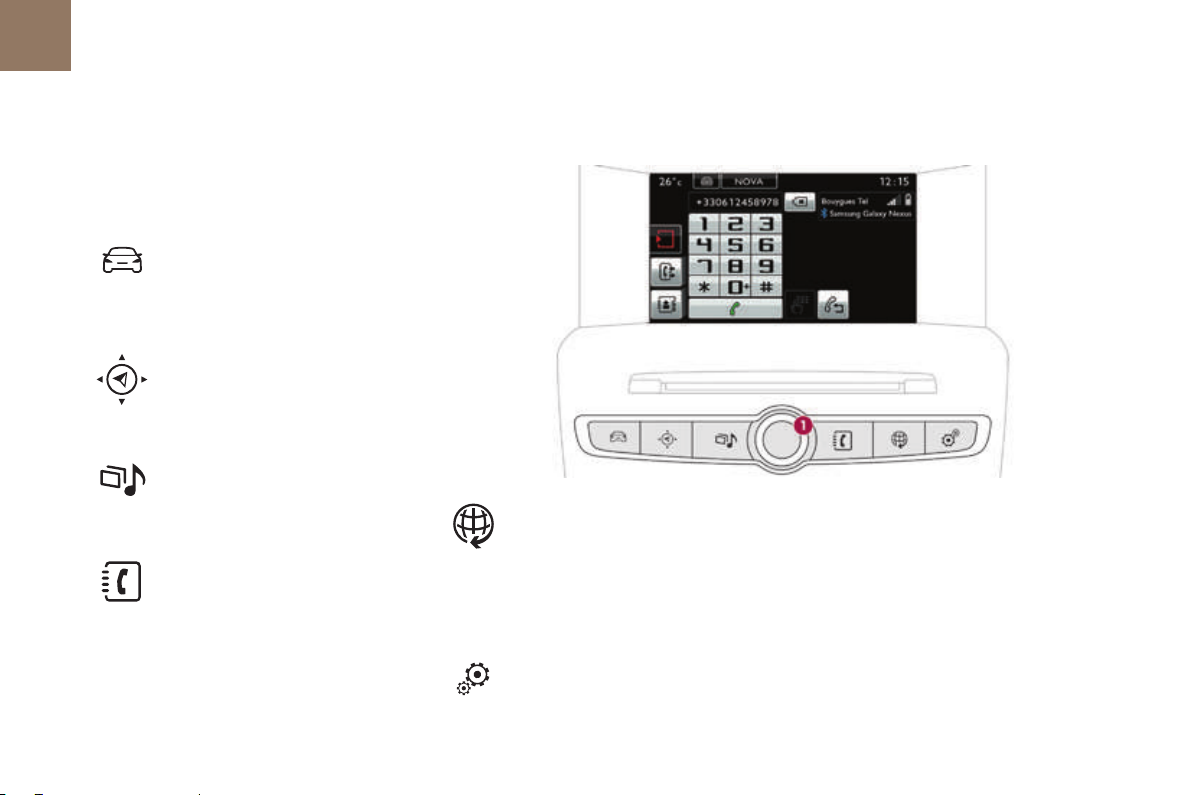
Press one of the buttons on the control panel
for direct access to a particular menu.
Driving
Gives access to the trip computer
and, depending on version, allows
settings to be adjusted for certain
functions.
Navigation
Radio Media
Telephone
Connected services
The connected services are
accessible via Bluetooth,
Wi-Fi, CarPlay™ or MirrorLink™
connections.
Settings
Allows configuration of the display
and the system.
1.
Volume / mute.
For more information on the touch screen
tablet, refer to the Audio and telematics
section.
Page 55
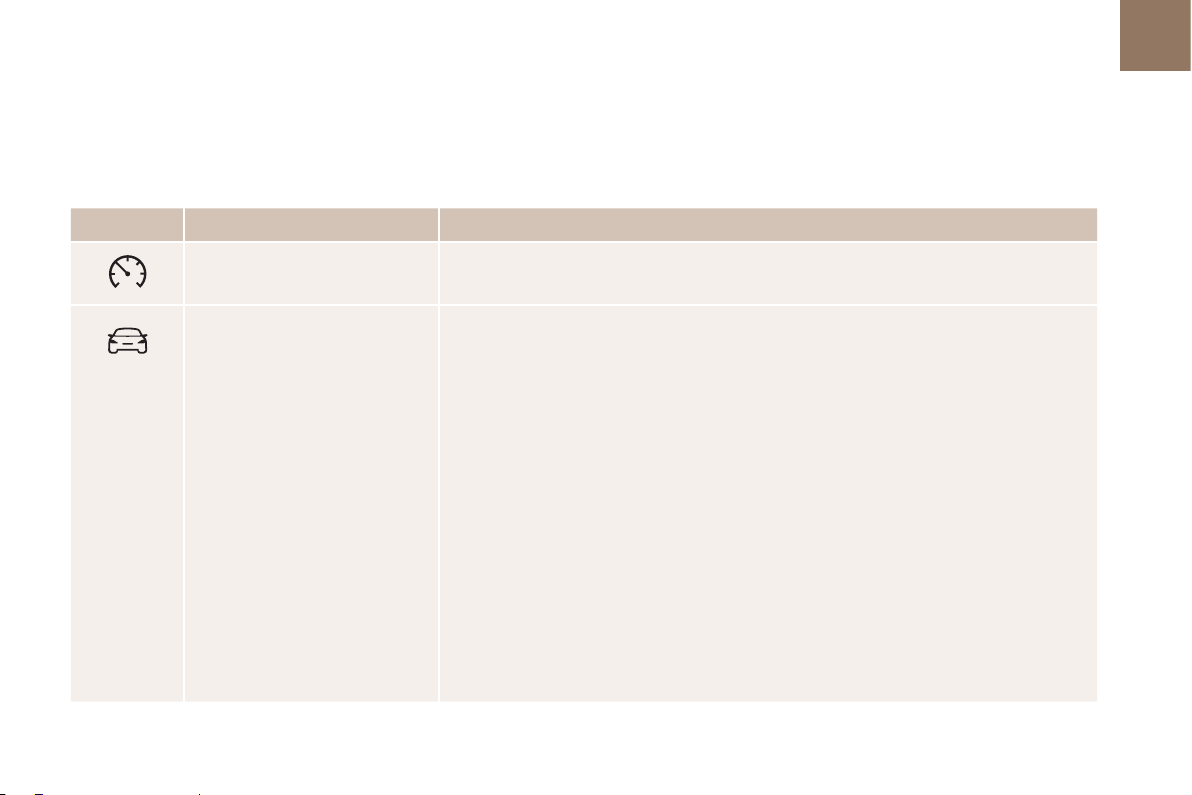
"Driving" menu
The systems with settings that can be adjusted are detailed in the table below.
For more information on one of these functions, refer to the corresponding section.
Button Corresponding function Comments
Speed settings Memorisation of speeds for use with the speed limiter or cruise control.
Instruments
53
01
Vehicle settings Access to other functions with settings that can be adjusted. The functions are grouped
together under three tabs:
- "[Driving assistance]"
"[Automatic parking brake]": activation/deactivation of the electric parking brake
automatic mode,
- "[Automatic rear wiper in reverse]": activation/deactivation of rear wiper coupled to
reverse gear.
- "[Lighting]"
-
"[Guide-me-home lighting]": activation/deactivation and configuration of the duration of
the automatic guide me home lighting,
- "[Welcome lighting]": activation/deactivation of the exterior welcome lighting,
"[Adaptive lighting]": activation/deactivation of the directional lighting or of the static
intersection lighting,
- "[Vehicle access]"
-
"[Driver plip action]": activation/deactivation of the selective unlocking of the driver's
door,
- Unlock boot only": activation/deactivation of the selective unlocking of the boot.
Select or deselect the tabs at the bottom of the screen to filter the functions required.
Page 56
01
54
Instruments
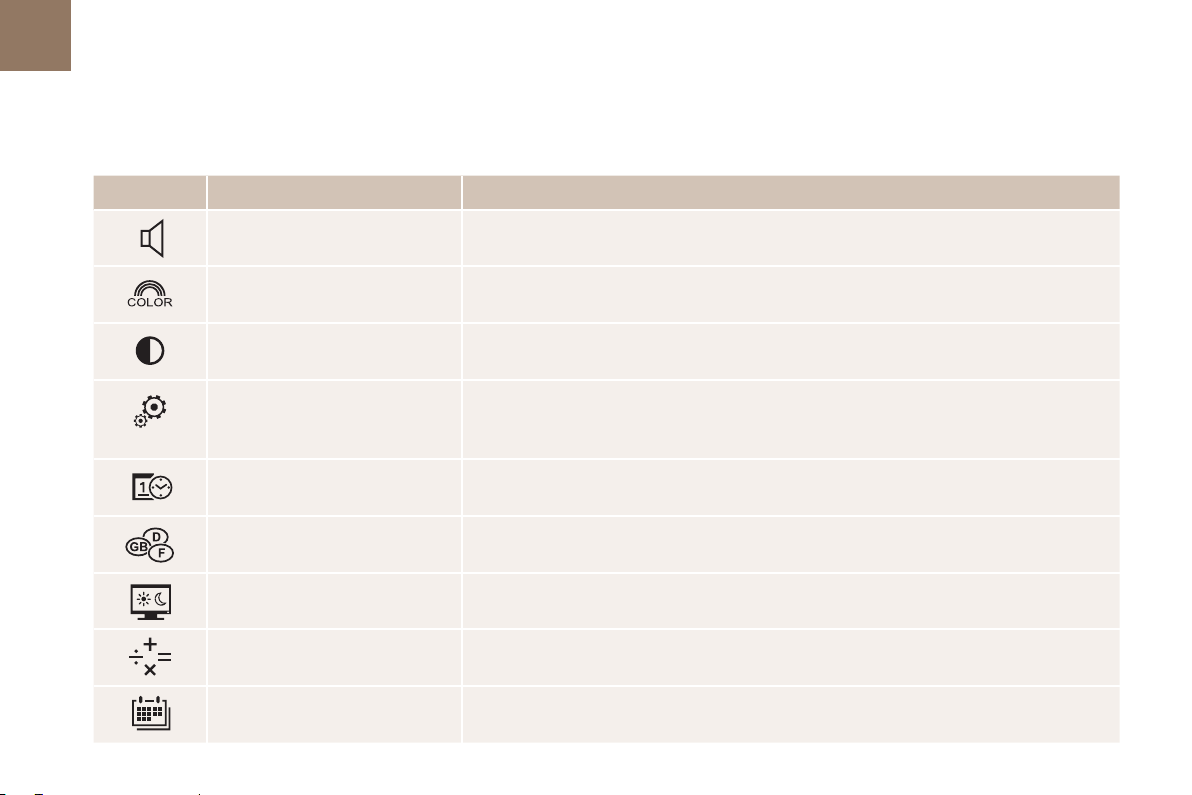
"Settings" menu
The functions available through this menu are detailed in the table below.
Button Corresponding function Comments
Audio settings Adjustment of volume, balance...
Color schemes Choice of colour scheme.
Turn off screen Turns off the display in the the touch screen tablet (black screen).
System Settings Choice of units:
Time/Date Setting the date and time.
Languages Choice of language used: French, English, Italian, Spanish, German, Dutch, Portuguese,
Screen settings Adjustment of the display settings (scrolling of text, animations...)
Calculator Display the calculator.
Calendar Display the calendar.
Pressing the black screen restores the display.
- temperature (°Celsius or °Fahrenheit)
distance and fuel consumption (l/100 km, mpg or km/l).
-
Polish, Turkish, Russian, Serb, Croat, Hungarian.
Page 57
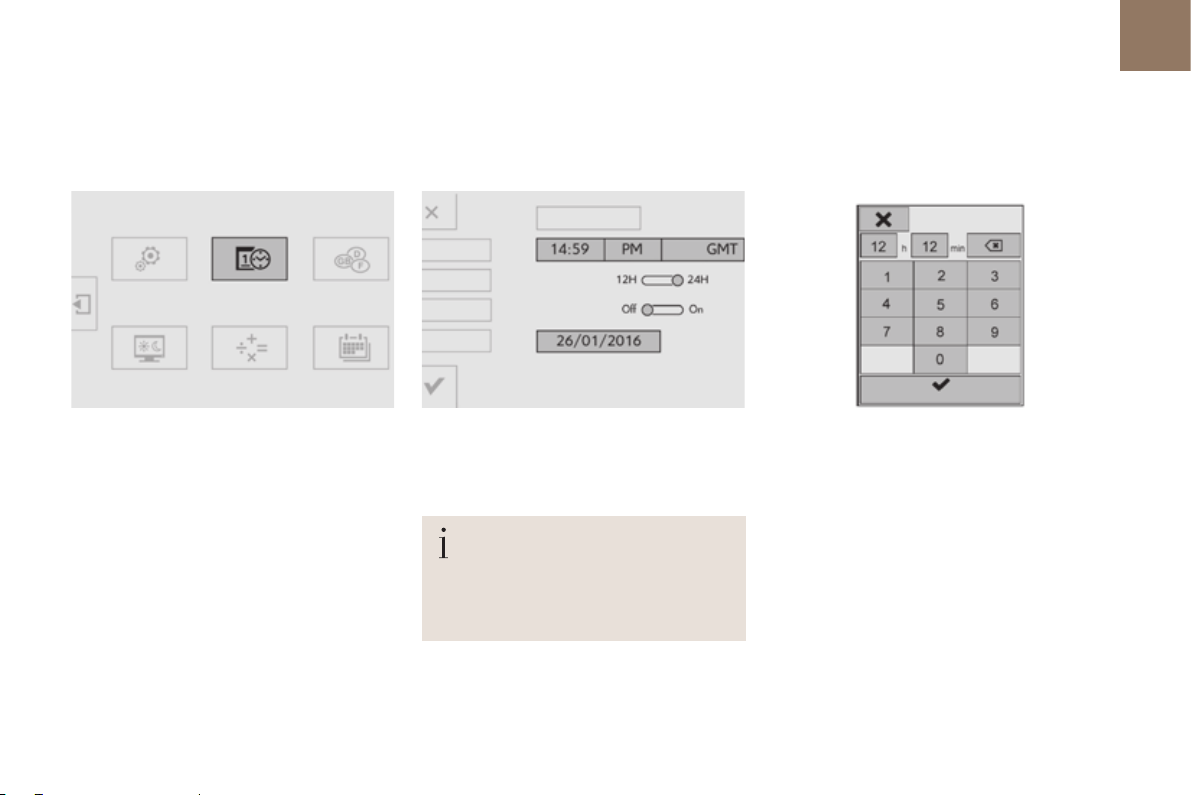
Setting the date and time
Instruments
55
01
F Select the "Settings" menu.
F In the secondary page, press on "Time/
Date".
F
Select "Adjust time" or "Adjust date".
When setting the time, you can select
"Satellite synchronisation", so that
the time is adjusted automatically by
satellite reception.
F Modify the settings using the number
keypad, then confirm.
F Press "Confirm" to save and quit.
Page 58
01
56
Instruments
Trip computer
System that gives you information on the current journey (range, fuel consumption…).
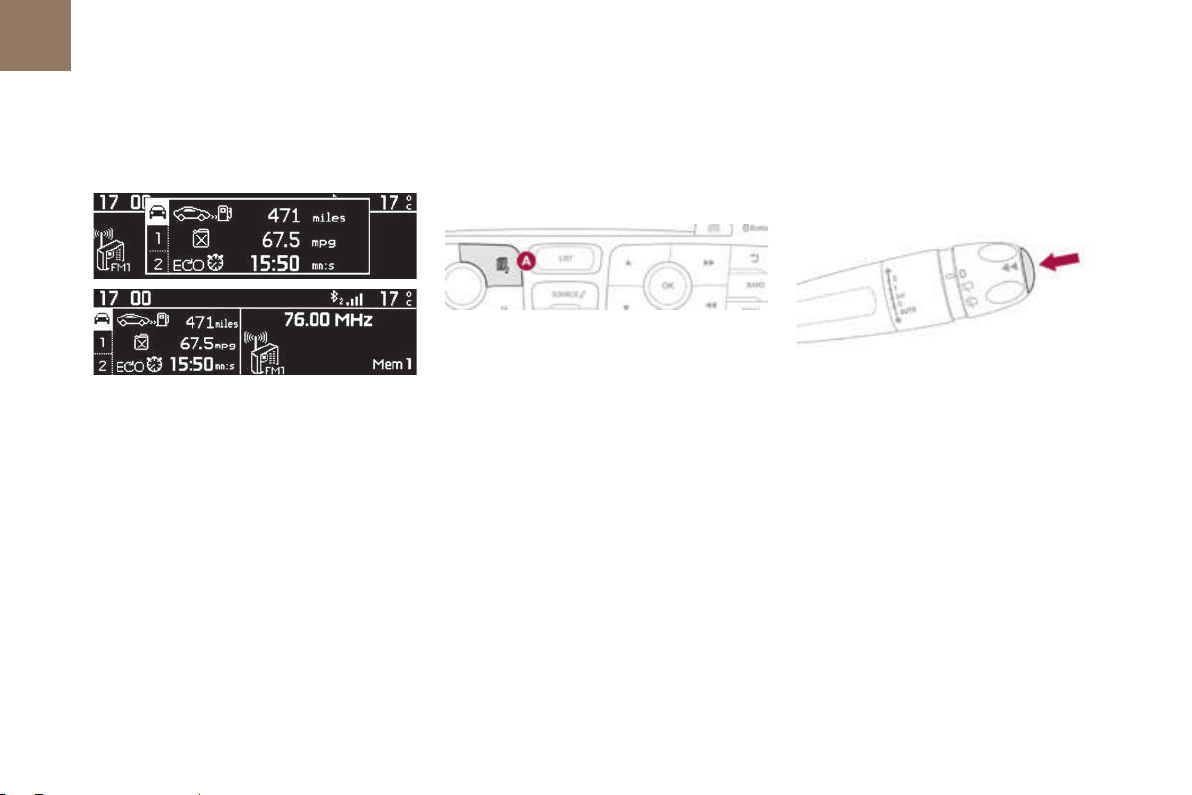
Monochrome screen C
Information displays
You can choose between two types of display
by pressing button A:
- the trip computer information appears
temporarily above the audio information,
displayed permanently in full screen,
or
- the trip computer and audio information
both appear permanently in a shared
screen.
F Press the button, located at the end of
the wiper stalk, to display the various trip
computer tabs in succession.
Page 59
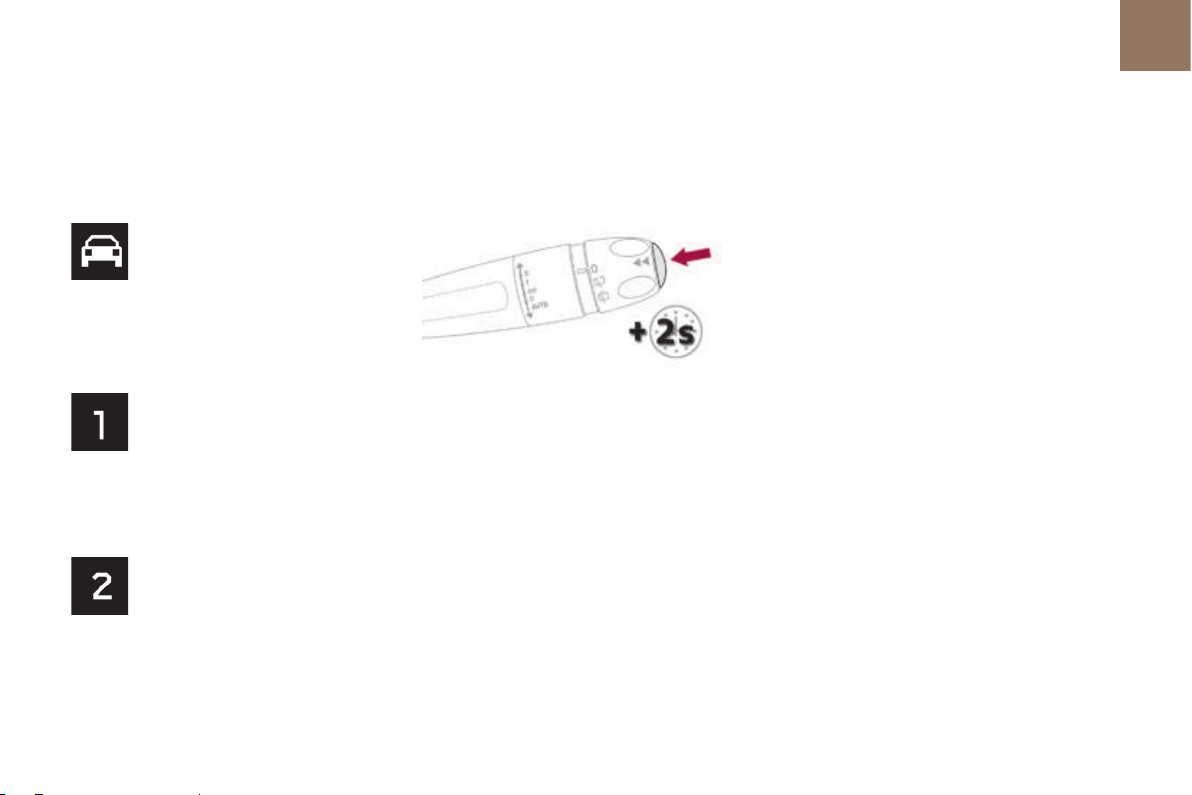
- the current information tab with:
the range,
●
●
the current fuel consumption,
the Stop & Start time counter.
●
- the trip "1" tab with:
●
the distance travelled,
the average fuel consumption,
●
●
the average speed,
for the first trip.
- the trip "2" tab with:
the distance travelled,
●
●
the average fuel consumption,
● the average speed,
for the second trip.
Trip zero reset
When the trip required is displayed, press
F
the button on the end of the wiper stalk for
more than two seconds.
Trip s "1" and "2" are independent but their use
is identical.
For example, trip "1" can be used for daily
figures, and trip "2" for monthly figures.
Instruments
57
01
Page 60
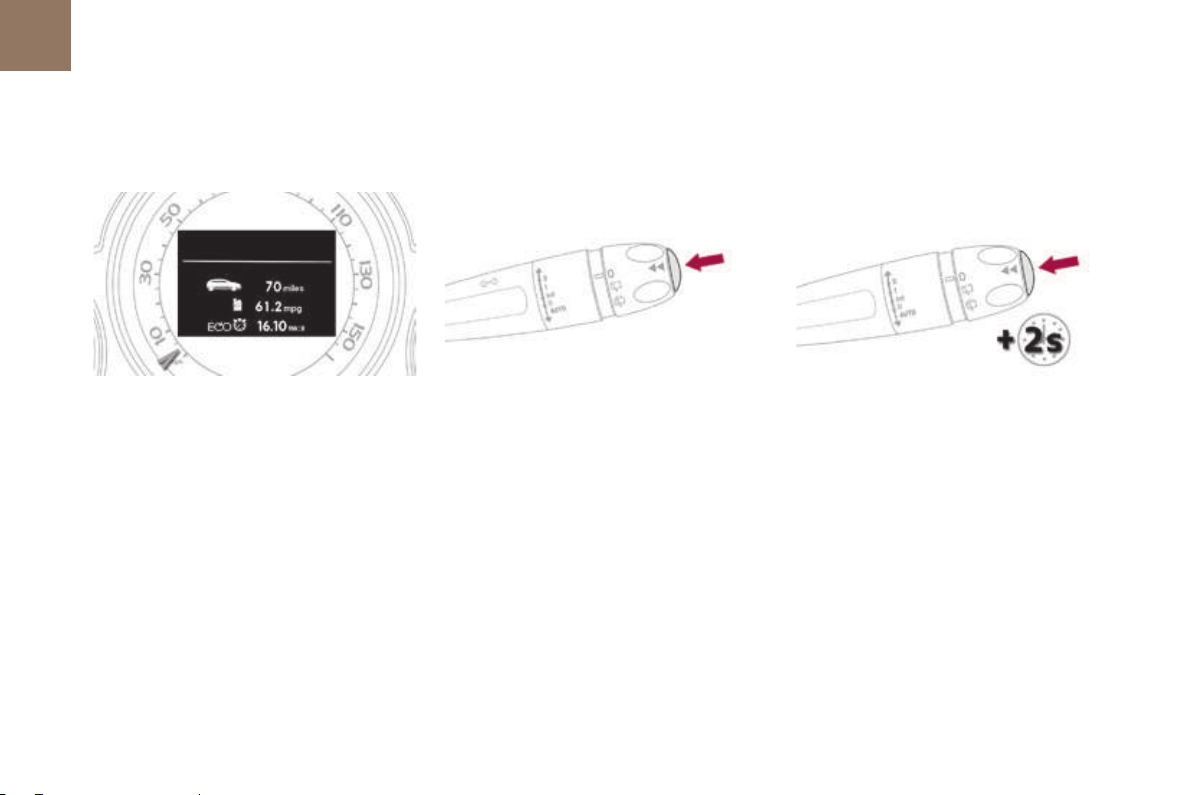
01
58
Instruments
Type 2 instrument panel central screen
Information displays
Trip zero reset
Press the button, located on the end of
F
the wiper stalk to display the following
information in turn:
●
reminder of the speed,
instantaneous information,
●
●
trip "1",
trip "2",
●
●
information on the current audio source,
black screen,
●
●
navigation instructions.
- Display of instantaneous information with:
the range,
●
●
the current fuel consumption,
Stop & Start time counter,
●
-
Display of trip "1" with:
the distance travelled,
●
●
the average fuel consumption,
the average speed,
●
for the first trip.
- Display of trip "2" with:
●
the distance travelled,
● the average fuel consumption,
● the average speed,
for the second trip.
F When the required trip is displayed, press
the button on the end of the wiper stalk for
more than two seconds.
Trip s "1" and "2" are independent but their use
is identical.
For example, trip "1" can be used for daily
figures and trip "2" for monthly figures.
Page 61
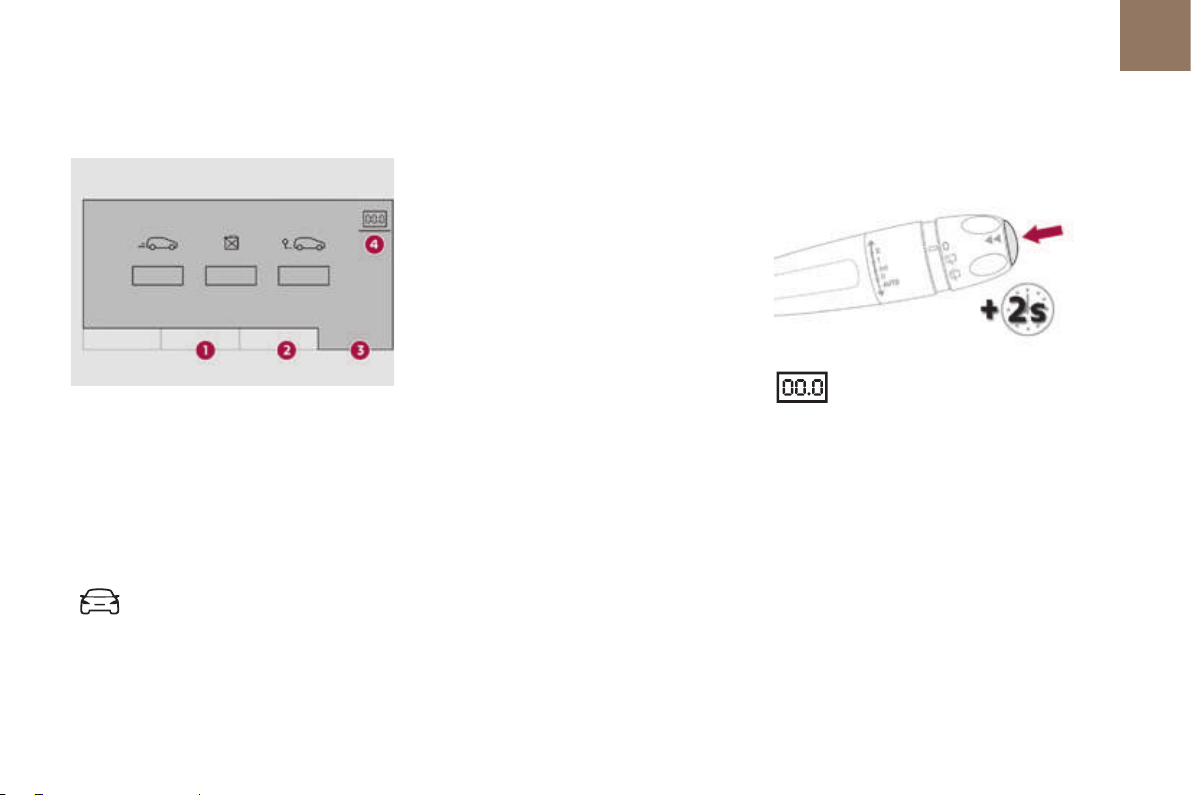
Touch screen tablet
1. "Instantaneous".
"Trip 1".
2.
3.
"Trip 2".
"00.0 / Reset".
4.
Display of information
Permanent display:
F Select the "Driving" menu.
The trip computer information is displayed in
the primary page of the menu.
F
Press one of the buttons to display the
desired tab.
Temporary display in a new window:
F Press the end of the wiper control stalk for
access to the information and display the
different tabs.
The current instantaneous fuel consumption tab with:
- the range,
-
the current fuel consumption,
the Stop & Start time counter.
-
The trip "1" tab with:
-
the distance travelled.
the average fuel consumption,
-
-
the average speed,
for the first trip.
The trip "2" tab with:
-
the distance travelled.
the average fuel consumption,
-
-
the average speed,
for the second trip.
Instruments
Trip reset
F
When the desired trip is
displayed, press the reset button
or press and hold the end of the
wiper control stalk.
Trip s "1" and "2" are independent but their use
is identical.
For example, trip "1" can be used for daily
figures, and trip "2" for monthly figures.
59
01
Page 62
01
60
Instruments
A few definitions…
Range
(miles or km)
The distance which can still be travelled with
the fuel remaining in the tank (at the average
fuel consumption seen over the last few miles
(kilometres) travelled).
This value may vary following a change
in the style of driving or the relief,
resulting in a significant change in the
current fuel consumption.
When the range falls below 20 miles (30 km),
dashes are displayed.
After filling with at least 5 litres of fuel, the
range is recalculated and is displayed if it
exceeds 60 miles (100 km).
If dashes are displayed continuously
while driving in place of the digits,
contact a CITROËN dealer or a
qualified workshop.
Current fuel consumption
(mpg or l/100 km or km/l)
This function is only displayed from
mph (30 km/h).
20
Average fuel consumption
(mpg or l/100 km or km/l)
Calculated since the last trip computer reset.
Average speed
(mph or km/h)
Calculated since the last trip computer reset.Calculated over the last few seconds.
Distance travelled
(miles or km)
Calculated since the last trip computer reset.
Stop & Start time counter
(minutes / seconds or hours /
minutes)
A time counter calculates the time spent in
STOP mode during a journey.
It resets to zero every time the ignition is
switched on.
Page 63

Instruments
61
01
Page 64

ACCESS
Page 65

02
Page 66
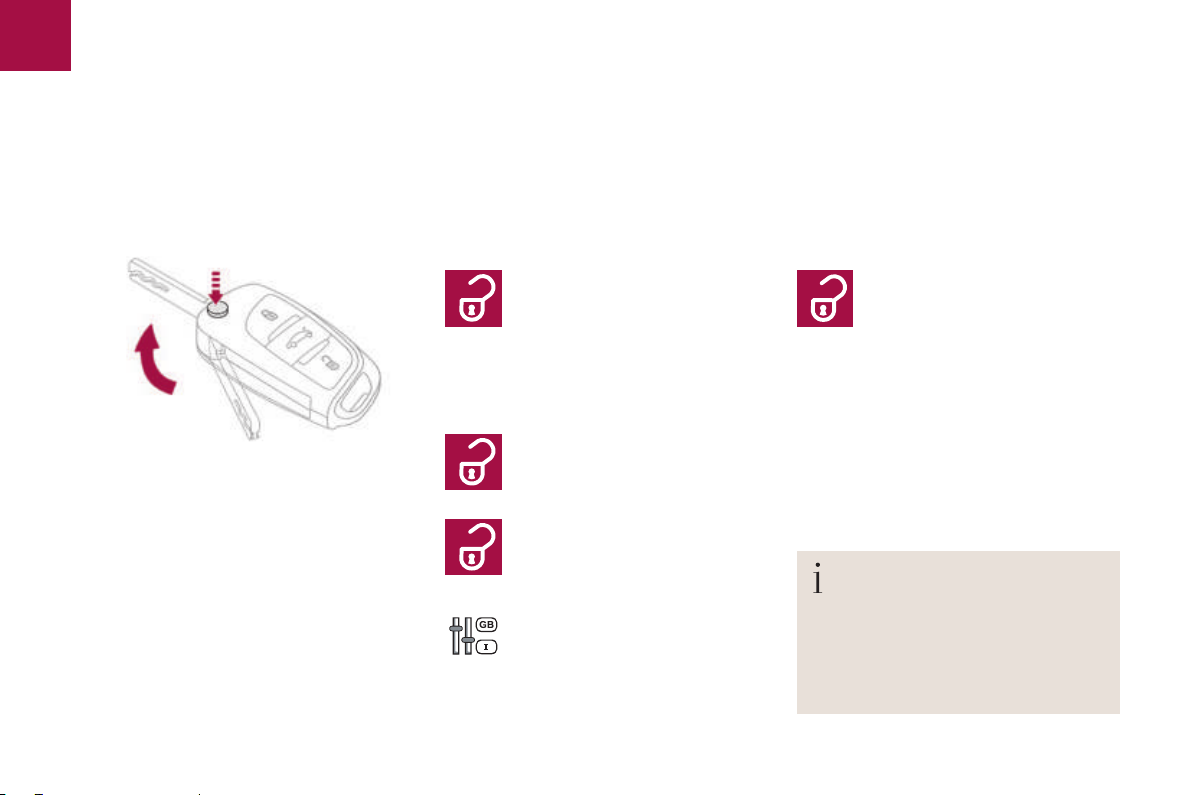
02
64
Access
Remote control key
System which permits central unlocking or locking of the vehicle using the door lock or from a distance. It is also used to locate and start the vehicle,
as well as providing protection against theft.
Unlocking the vehicle
Unfolding the key
F Press this button to unfold the key.
Complete unlocking using
the remote control
F Press the open padlock to unlock
the vehicle completely.
Selective unlocking using
the remote control
F
Press the open padlock once to
unlock the driver's door only.
Press the open padlock again to
F
unlock the other doors and the
boot.
The complete or selective door
unlocking parameter is set via the
vehicle configuration menu.
Opening the windows using
the remote control
F Maintain the press on the open
padlock until the desired position
is obtained. The windows stop as
soon as you release the button.
Unlocking using the key
F Turn the key forwards in the driver's door
lock to unlock the vehicle completely.
The direction indicators flash for a
seconds.
few
The spotlamps in the door mirrors
come on.
Depending on version, the door mirrors
unfold, the welcome lighting comes on,
the alarm is deactivated.
Page 67
Locking the vehicle
Access
65
02
Selective unlocking of the boot
F Press the central button on the
remote control to unlock the
boot. The doors remain locked.
If selective unlocking of the boot is deactivated,
pressing this button also unlocks the doors.
Don't forget to lock the boot again by
pressing the closed padlock button.
The complete or selective boot
unlocking parameter is set via the
vehicle configuration menu.
Selective unlocking of the boot is
activated by default.
Normal locking using the remote
control
F Press the closed padlock to lock
the vehicle.
Normal locking using the key
F Turn the key towards the rear in the driver's
door lock to lock the vehicle.
The direction indicators flash for a
few
seconds.
Depending on version, the door mirrors fold,
the alarm is activated.
If one of the doors or the boot is still
open, the central locking does not take
place.
However, the alarm (if present) will
be completely activated after about
seconds.
45
If the vehicle is unlocked inadvertently
and with no action on the doors or
boot, the vehicle will lock itself again
automatically after about 30 seconds.
If the alarm had previously been
activated, it will not be reactivated
automatically.
The folding and unfolding of the door
mirrors using the remote control can be
deactivated by a CITROËN dealer or a
qualified workshop.
Page 68

02
66
Access
Deadlocking using the remote
control
F Press the closed padlock to lock
the vehicle completely.
F Press the closed padlock again
within five seconds to deadlock
the vehicle.
Deadlocking using the key
Turn the key to the rear in the driver's door
F
lock to lock the vehicle completely.
F
Turn the key to the rear again within five
seconds to deadlock the vehicle.
Deadlocking is confirmed by fixed lighting
of the direction indicators for approximately
two seconds.
According to version, the door mirrors fold at
the same time.
In low light, deadlocking also brings on the
guide-me-home lighting.
For more information on the guide-me-home
lighting, refer to the corresponding section.
Deadlocking renders the exterior and
interior door controls inoperative.
It also deactivates the central locking
control button.
Therefore, never leave anyone inside
the vehicle when it is deadlocked.
Page 69
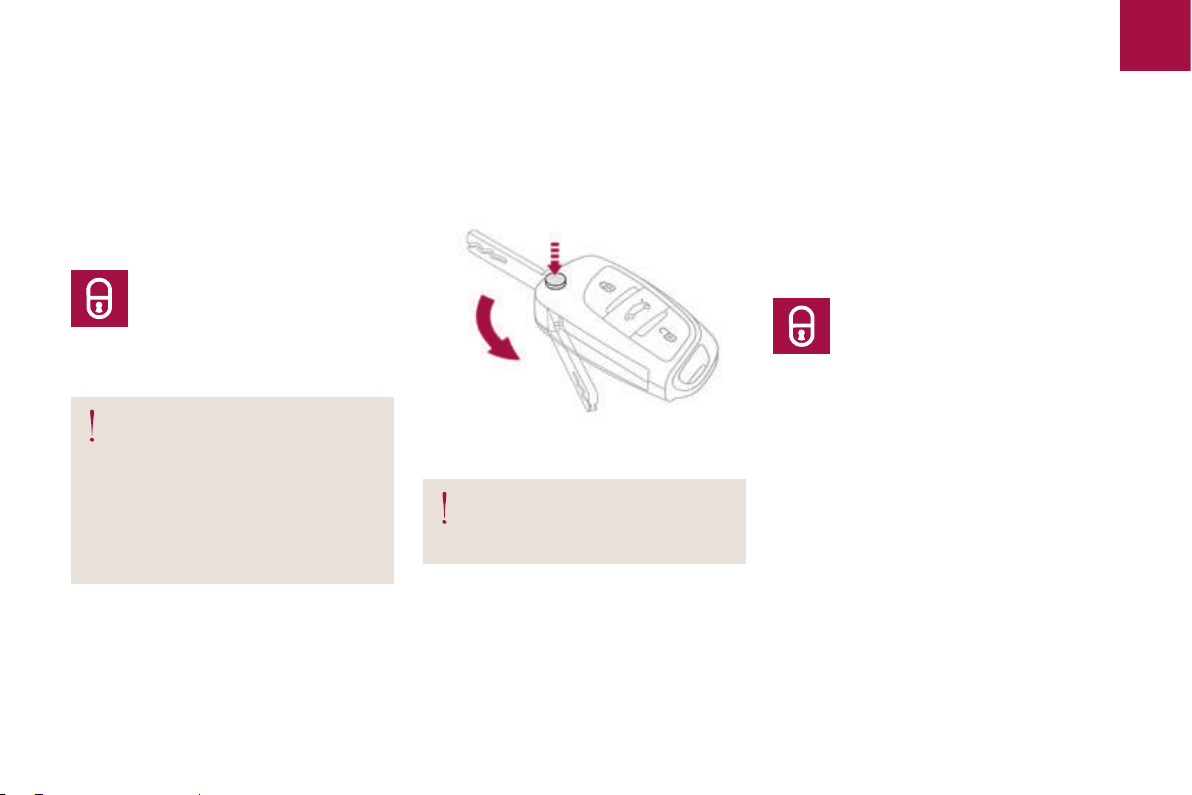
Access
67
02
Closing the windows using
the remote control
F Press and hold the closed
padlock button until the desired
position is obtained. The
windows stop when you release
the button.
When closing the windows using the
remote control you must ensure that
nothing prevents them from closing
correct ly.
If you want to leave the windows
partly open, you must deactivate the
volumetric alarm monitoring.
Folding the key
F
Press this button before folding the key.
If you do not press the button, there is a
risk of damaging the remote control.
Locating your vehicle
This function allows you to identify your vehicle
from a distance, particularly in poor light. Your
vehicle must be locked.
F Press this button.
This will switch on the courtesy lamps and
the direction indicators will flash for around
seconds.
ten
Page 70
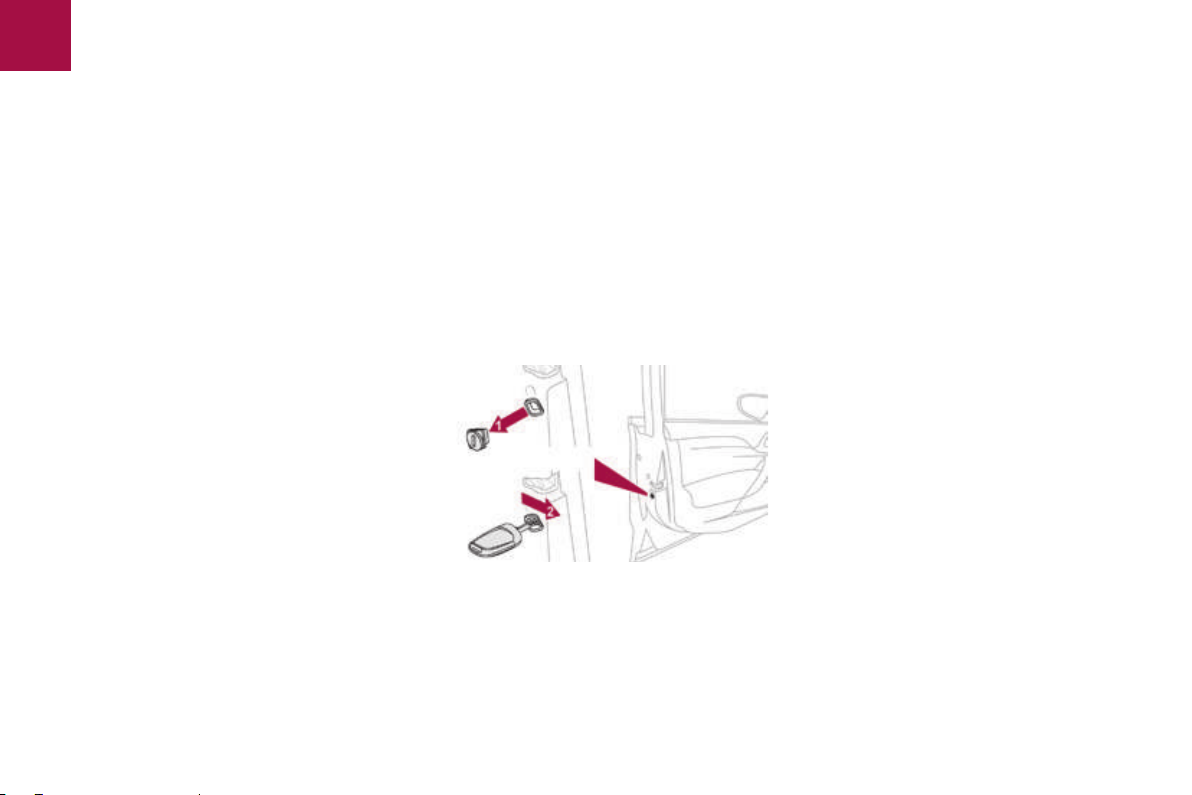
02
68
Access
Back-up control
System allowing the doors to be locked and
unlocked manually in the event of a malfunction
of the central locking system or battery failure.
Locking the driver's door
F Insert the key in the door lock, then turn it
to the rear.
You can also apply the procedure described for
the passenger doors.
Unlocking the driver's door
F Insert the key in the door lock, then turn it
to the front.
Locking the passenger doors
Open the doors.
F
F
On the rear doors, check that the child lock
is not on.
For more information on the Child lock, refer
to the corresponding section.
F Remove the black cap, located on the edge
of the door, using the key.
F
Insert the key in the socket without forcing
it, then without turning it, move the latch
sideways towards the inside of the door.
F Remove the key and refit the cap.
F Close the doors and check that the vehicle
has locked correctly from the outside.
Unlocking the passenger doors
F Pull the interior door opening control.
Page 71
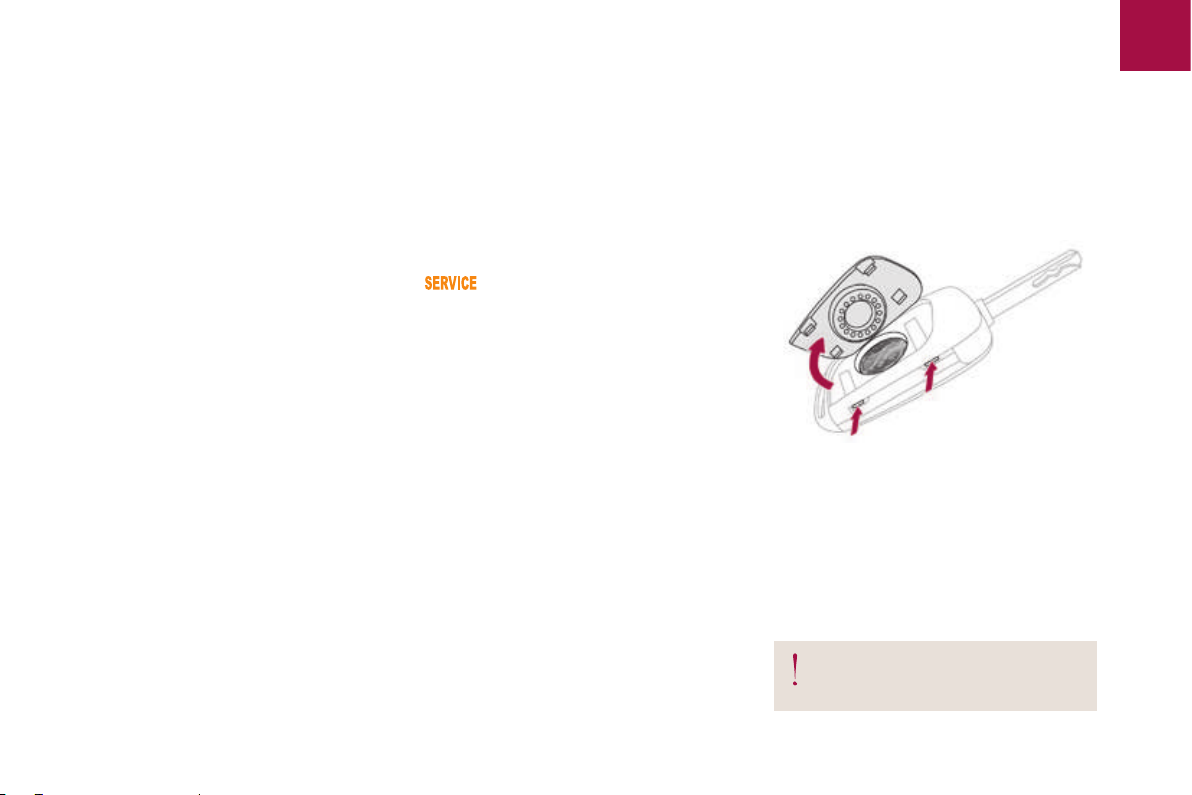
Fault with the remote control
In the event of a malfunction with the remote
control, you can no longer unlock, lock or
locate your vehicle.
F
First of all, use the key in the lock to unlock
or lock your vehicle.
F Then, reinitialise the remote control.
Reinitialisation
F Switch off the ignition and remove the
ignition key.
F Press the closed padlock immediately for a
few seconds.
F Turn the key to position 2 (Ignition on).
F
Switch off the ignition and remove the key
from the ignition switch.
The remote control is fully operational again.
Changing the battery
Battery ref.: CR2032/3 volts.
If the battery is flat, you are informed
by illumination of this warning lamp,
an audible signal and a message in
the screen.
F
Unclip the cover using a small screwdriver
at the two cutouts.
F Lift off the cover.
Remove the flat battery from its location.
F
F
Fit the new battery into its location
observing the original direction of fitment.
F Clip the cover onto the casing.
Access
69
02
If the problem persists, contact a
CITROËN dealer as soon as possible.
Page 72
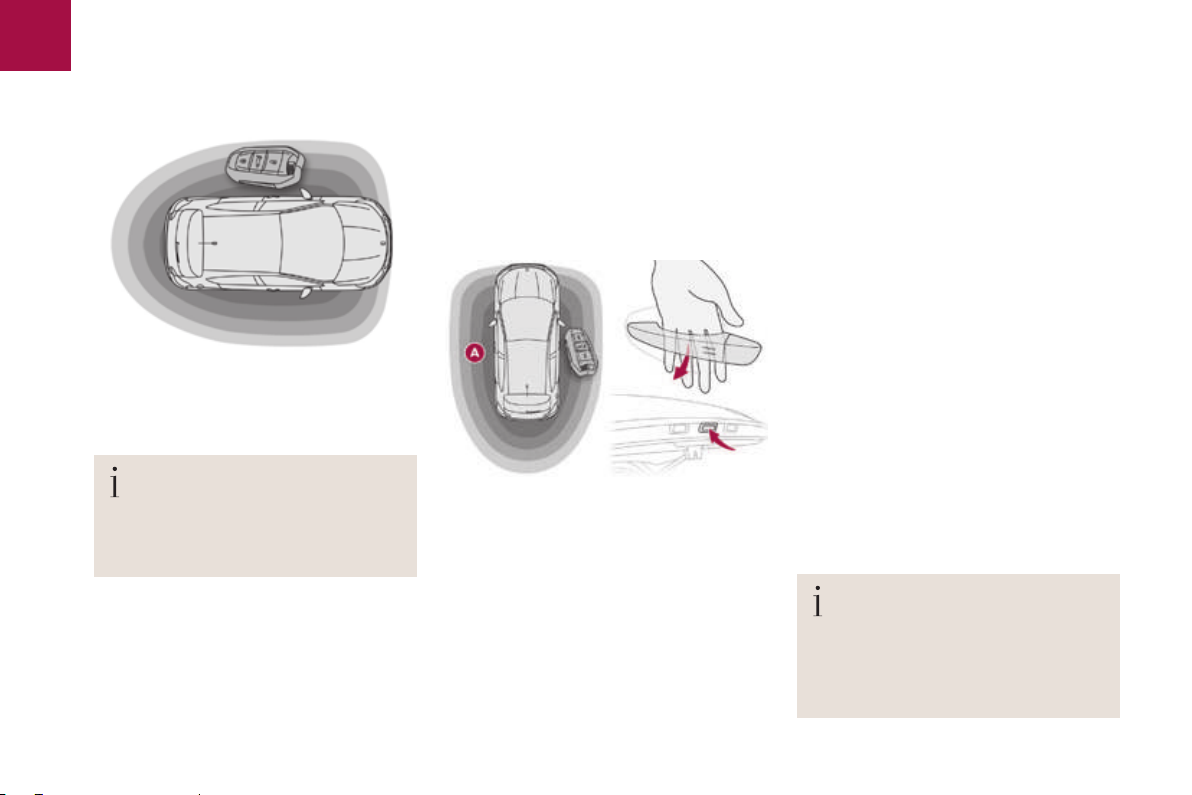
02
70
Access
"Keyless Entry and Starting"
Unlocking the vehicle
The vehicle or just the driver's door is unlocked,
depending on the setting.
Complete unlocking
System which permits the unlocking, locking
and starting of the vehicle while keeping the
electronic key on your person.
Selective unlocking
F To unlock only the drivers door, with the
electronic key on your person, pass your
hand behind the driver's door handle.
F
To unlock the complete vehicle, pass your
hand behind one of the door handle of the
front passenger door with the electronic
key close to the passenger door, or
press the tailgate opening control with
the electronic key close to the rear of the
vehicle.
The electronic key can also be used as
a remote control.
For more information on the Remote
control key, refer to the corresponding
section.
With the electronic key on your person and
F
in the recognition zone A, pass your hand
behind the door handle of one of the front
doors to unlock the vehicle or press the
tailgate opening control.
Activation or deactivation of the selective
unlocking is done in the "Driving" menu, then
"Vehicle settings".
By default, complete unlocking is activated.
The direction indicators flash for a few
seconds.
Depending on version, the door mirrors
unfold, the welcome lighting comes on,
the alarm is deactivated.
Page 73

Access
71
02
If one of the doors or the boot is still
open or if the electronic key for the
Keyless Entry and Starting system has
been left inside the vehicle, the central
locking does not take place.
However, the alarm (if fitted) will be
fully activated after about 45 seconds.
If the vehicle is unlocked by mistake
and with no action on the doors or boot,
the vehicle will lock again automatically
after about 30 seconds.
If fitted to your vehicle, the alarm will
also be reactivated automatically.
The automatic folding and unfolding
of the door mirrors can be deactivated
by a CITROËN dealer or a qualified
workshop.
As a safety measure (children on
board), never leave the vehicle without
taking the electronic key for the Keyless
Entry and Starting system with you,
even for a short period.
Be aware of the risk of theft when the
electronic key for the Keyless Entry and
Starting system is in one of the defined
zones with the vehicle unlocked.
In order to preserve the battery in the
electronic key and the vehicle's battery,
the "hands-free" functions are put into
long-term standby after 21 days without
use. To restore these functions, press
one of the remote control buttons or
start the engine with the electronic key
in the reader.
For more information on starting with
Keyless Entry and Starting, refer to
the corresponding section.
Page 74
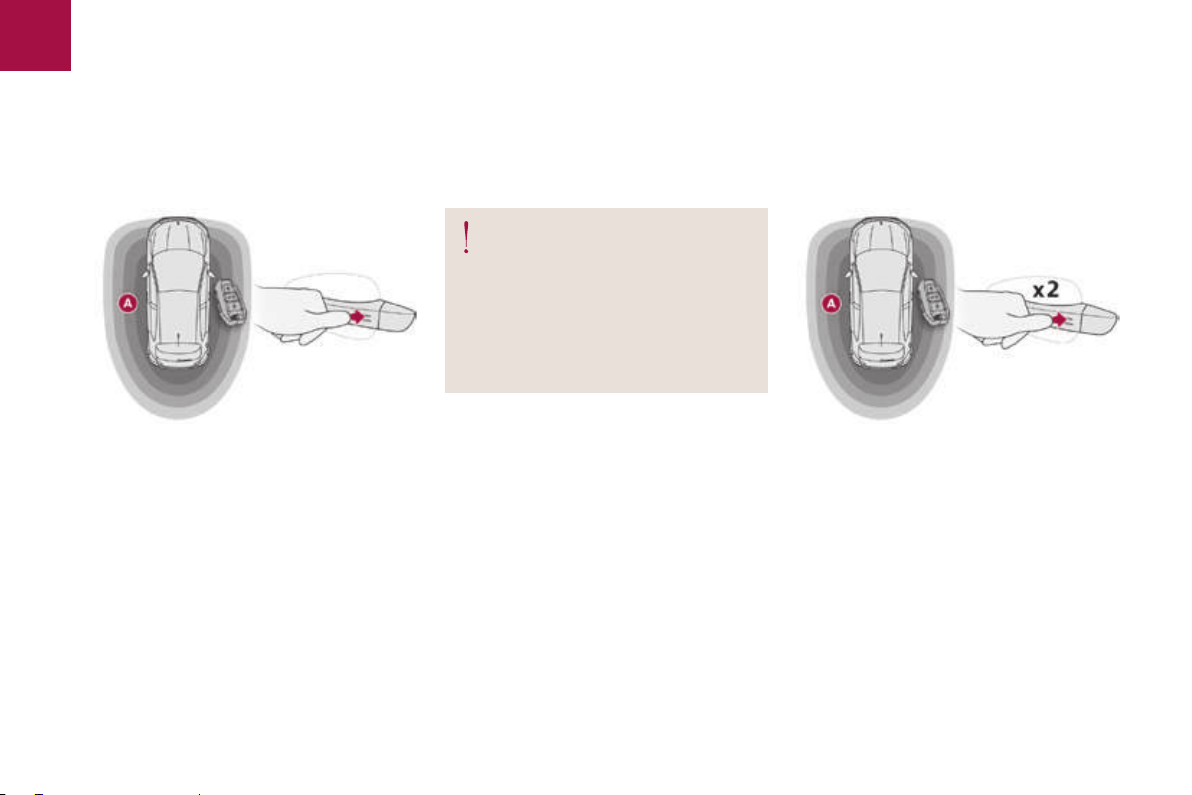
02
72
Access
Locking the vehicle
Normal locking
F With the electronic key on your person
and in the recognition zone A, press with a
finger or thumb on one of the door handles
(at the markings).
Maintaining pressure allows the windows to be
raised to the desired position.
Deadlocking
Deadlocking renders the interior door
controls inoperative.
It also deactivates the central locking
button.
Therefore, never leave anyone inside
the vehicle when it is deadlocked.
By the doors:
F
With the electronic key in the recognition
zone A, press a finger or thumb on one of
the front door handles (at the markings) to
lock the vehicle.
F Within five seconds, press the door handle
again to deadlock the vehicle.
Page 75
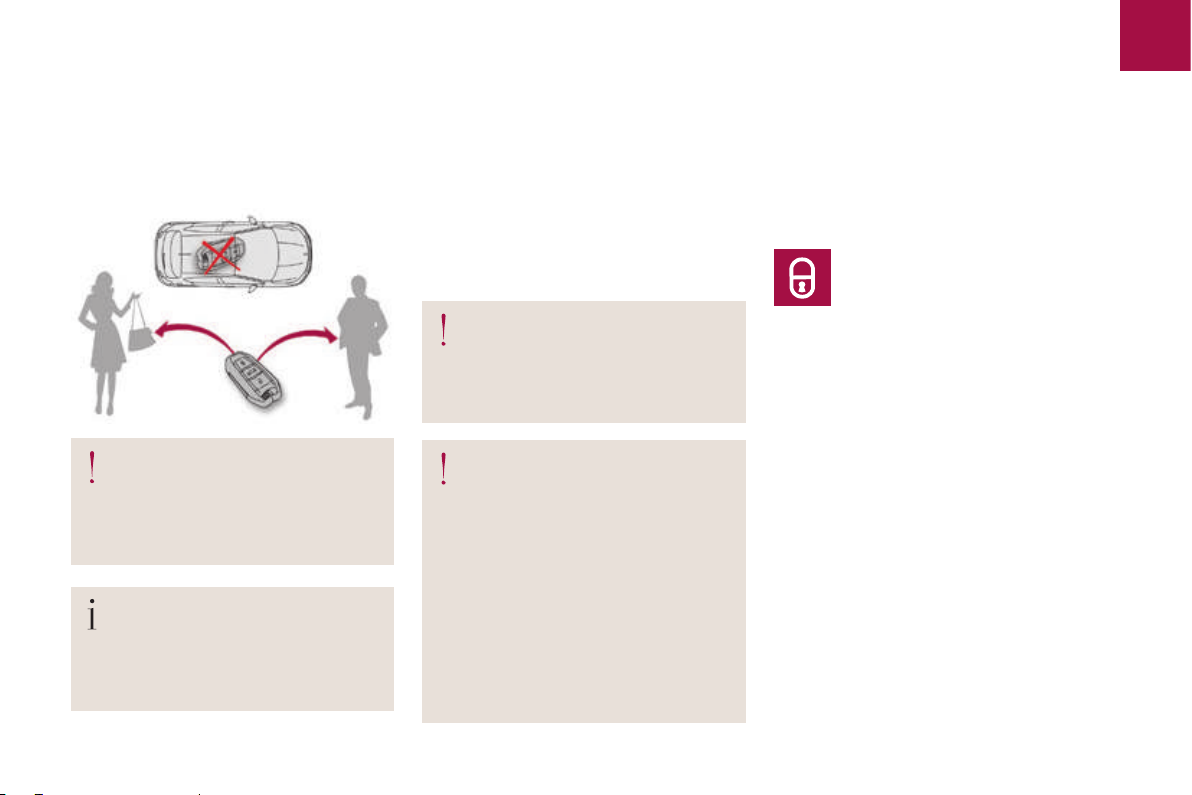
Access
Locating your vehicle
This function allows you to identify your vehicle
from a distance, particularly in poor light. Your
vehicle must be locked.
F Press this button.
73
02
Ensure that nothing could prevent the
correct operation of the windows.
Be particularly aware of children when
operating the windows.
The direction indicators come on for a
few seconds.
Depending on your version, the door
mirrors fold, the alarm is activated.
For reasons of safety and theft protection,
do not leave your electronic key in the
vehicle, even when you are close to it.
It is recommended that you keep it on
your person.
Accumulations (water, dust, grime,
salt...) on the inner surface of the door
handle may affect detection.
If cleaning the inner surface of the door
handle using a cloth does not restore
detection, contact a CITROËN dealer
or a qualified workshop.
A sudden splash of water (stream of
water, high pressure jet washer, …)
may be identified by the system as the
desire to open the vehicle.
This will switch on the courtesy lamps and
the direction indicators will flash for around
ten
seconds.
Page 76
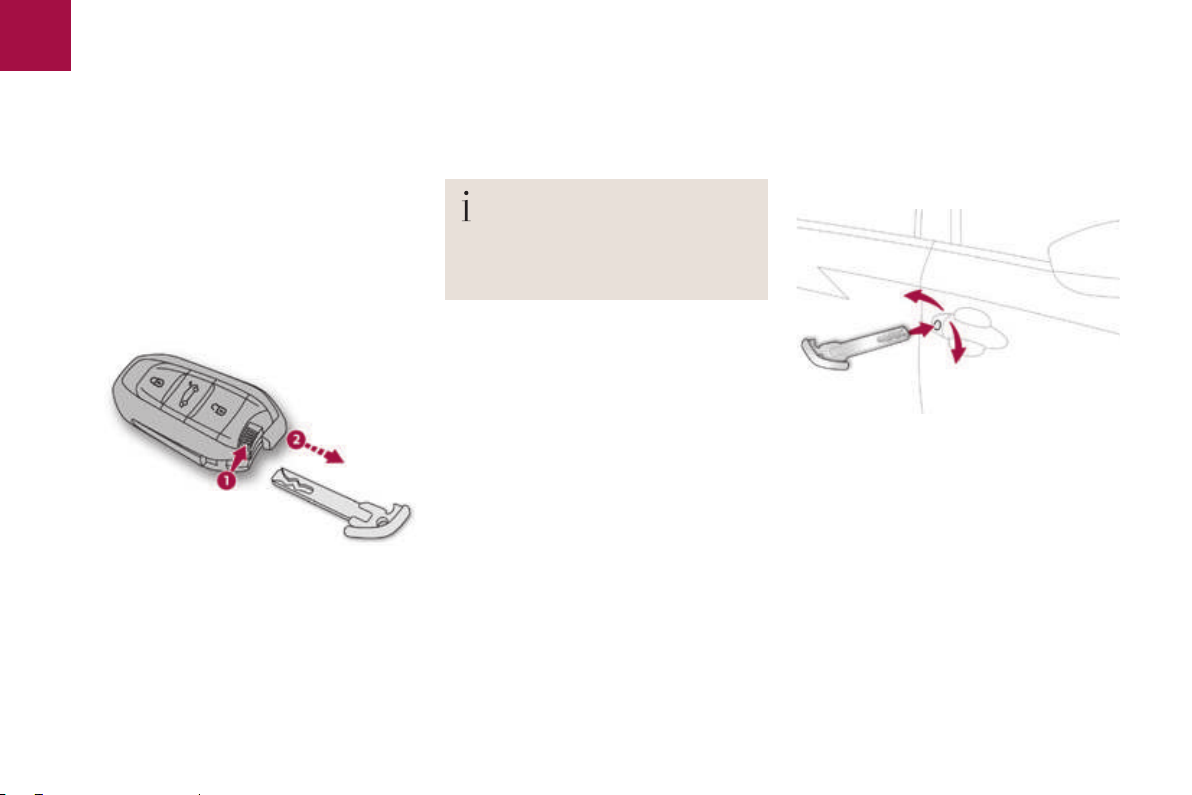
02
74
Access
Back-up key integrated in the Keyless Entry and Starting
The integral key is used to lock and unlock the
vehicle when the electronic key cannot operate:
- battery flat, vehicle battery discharged or
disconnected,
vehicle located in an area with strong
-
electromagnetic signals.
F Maintain a pull on button 1, to extract the
integral key 2.
...
If the alarm is activated, the audible
signal triggered on opening a door
with the key (integral with the remote
control) will stop when the ignition is
switched on.
Locking the driver's door
F
Insert the integral key in the door lock, then
turn it to the rear.
Unlocking the driver's door
F Insert the integral key in the door lock, then
turn it to the front.
Page 77
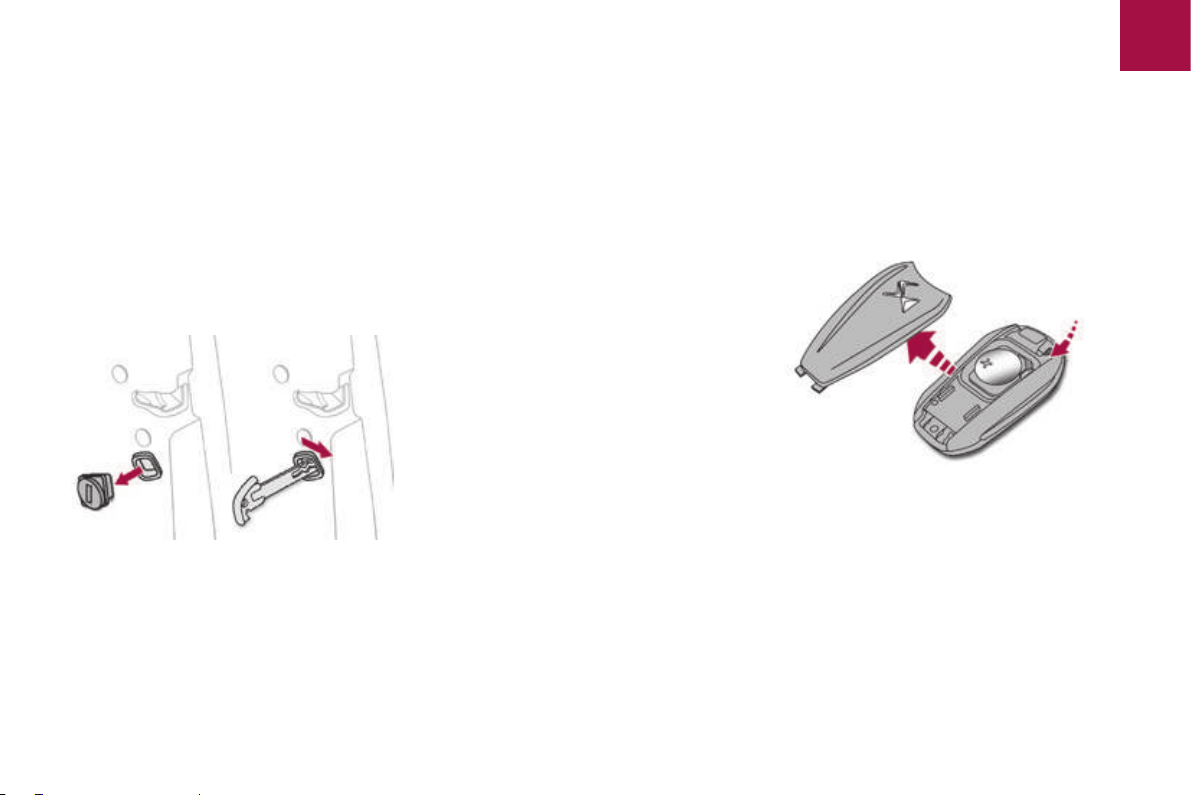
Changing the battery
Access
75
02
Locking the passenger doors Unlocking the passenger doors
F Open the doors.
F
On the rear doors, check that the child lock
is not on.
For more information on the Child lock, refer
to the corresponding section.
F Remove the black cap, located on the edge
of the door, using the integral key.
F Insert the integral key in the socket without
forcing it, then without turning it, move the
latch sideways towards the inside of the
door.
F Remove the integral key and refit the cap.
F Close the doors and check that the vehicle
has locked correctly from the outside.
F Pull the interior door opening control.
Battery ref.: CR2032 / 3 volts.
Battery replacement is signalled by the display
of a message.
Unclip the cover using a small screwdriver
F
at the cut-out.
F Lift off the cover.
F
Remove the flat battery from its location.
Fit the new battery into its location
F
observing the original direction of fitment.
F Clip the cover onto the casing.
Page 78
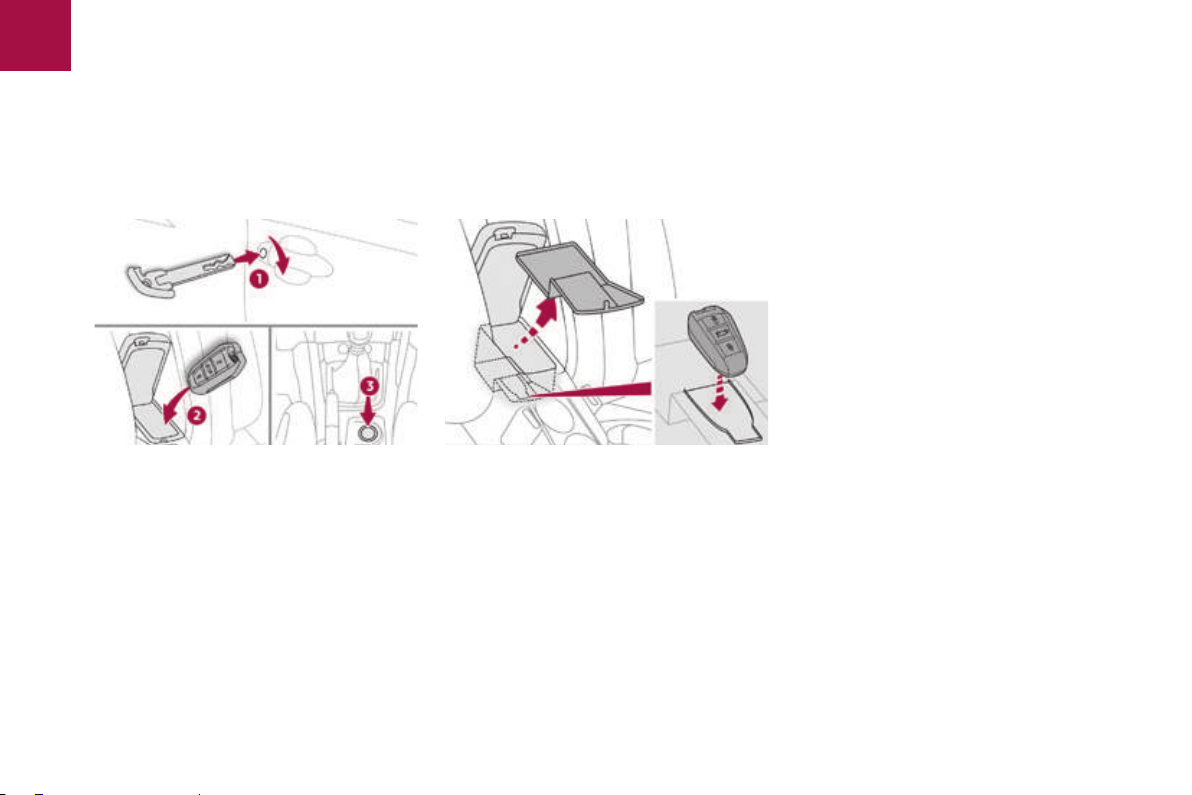
02
76
Access
Remote control problem / reinitialisation
Following disconnection of the vehicle battery, replacement of the remote control battery or in the
event of a remote control malfunction, you can no longer unlock, lock or locate your vehicle.
Open the front armrest.
F
Place the back-up key (integral with the
remote control) in the lock to unlock your
vehicle.
F
●
Raise the mat by its tongue and remove
it.
● Place the electronic key on the back-up
reader.
F Switch on the ignition by pressing
"START/STOP" button.
the
The electronic key is fully operational again.
Remember to refit the mat below the armrest
after removing the reinitialised electronic key.
If the problem persists, contact a CITROËN dealer
or a qualified workshop as soon as possible.
Page 79
Access
77
02
Lost keys, remote control,
electronic key
Visit a CITROËN dealer with the vehicle's
registration certificate, your personal
identification documents and if possible,
the label bearing the key code.
The CITROËN dealer will be able to
retrieve the key code and the transponder
code required to order a new key
Remote control
The high frequency remote control is a
sensitive system; do not operate it while
it is in your pocket as there is a possibility
that it may unlock the vehicle, without you
being aware of it.
Do not repeatedly press the buttons of your
remote control out of range and out of sight
of your vehicle. You run the risk of stopping
it from working and the remote control
would have to be reinitialised.
The remote control does not operate when
the key is in the ignition, even when the
ignition is switched off.
Locking the vehicle
Driving with the doors locked may make
access to the passenger compartment by
the emergency services more difficult in an
emergency.
As a safety precaution (with children on
board), remove the key from the ignition or
take the electronic key when you leave the
vehicle, even for a short time.
Electrical interference
The Keyless Entry and Starting electronic
key may not operate if close to certain
electronic devices: telephone, laptop
computer, strong magnetic fields,
...
Anti-theft protection
Do not make any modifications to the
electronic engine immobiliser system; this
could cause malfunctions.
For vehicles with an ignition switch, do
not forget to remove the key and turn the
steering to engage the steering lock.
When purchasing a secondhand vehicle
Have the key codes memorised by a
CITROËN dealer, to ensure that the
keys in your possession are the only
ones which can start the vehicle.
Do not throw the remote control
batteries away, they contain metals
which are harmful to the environment.
Take them to an approved collection
point.
Page 80
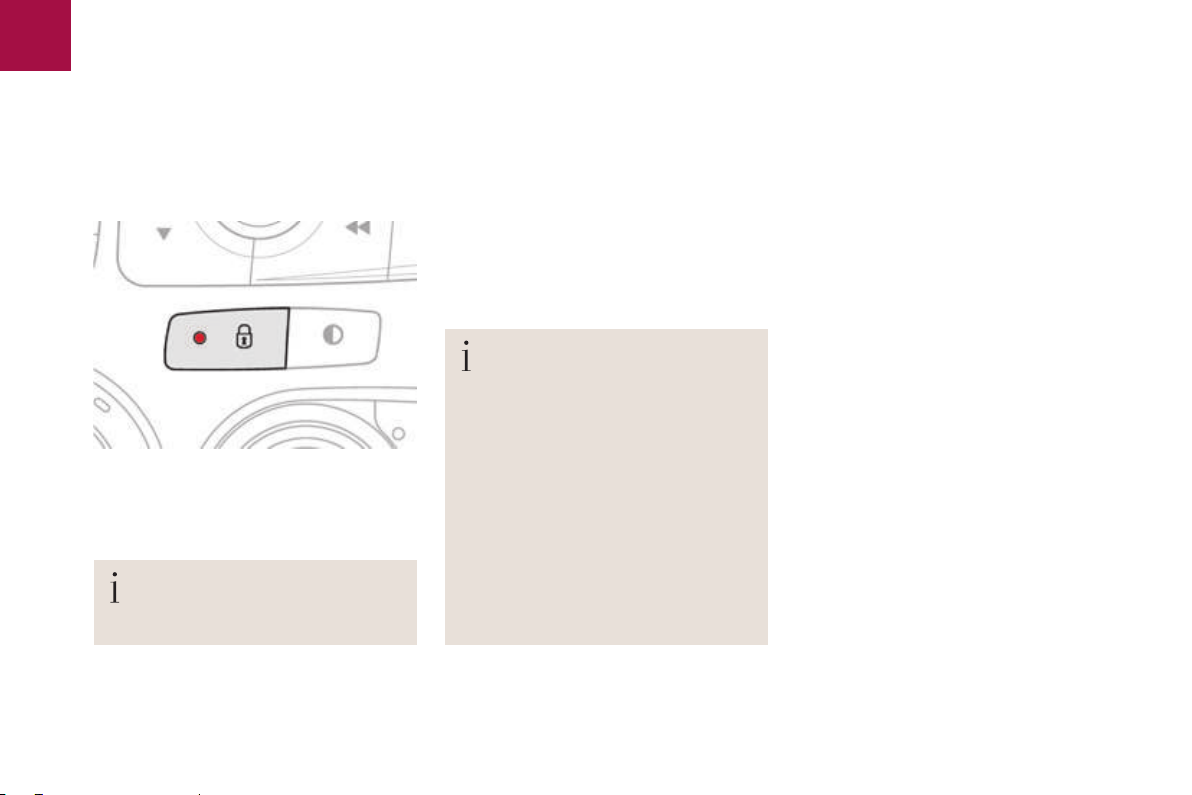
02
78
Access
Central locking control
This control allows the simultaneous locking or unlocking of the doors and boot from inside the
vehicle.
UnlockingLocking
F Press the button again to unlock the
vehicle.
The red indicator lamp in the button goes off.
When locking / deadlocking
from the outside
When the vehicle is locked or
deadlocked from the outside, the red
warning lamp flashes and the button is
F Press this button to lock the vehicle.
The red indicator lamp in the button comes on.
If one of the doors is open, central
locking from the inside does not take
place.
inoperative.
F With normal locking, pull the
interior door control lever to unlock
the vehicle.
With deadlocking, you have to use
F
the remote control or the key to
unlock the vehicle.
Page 81
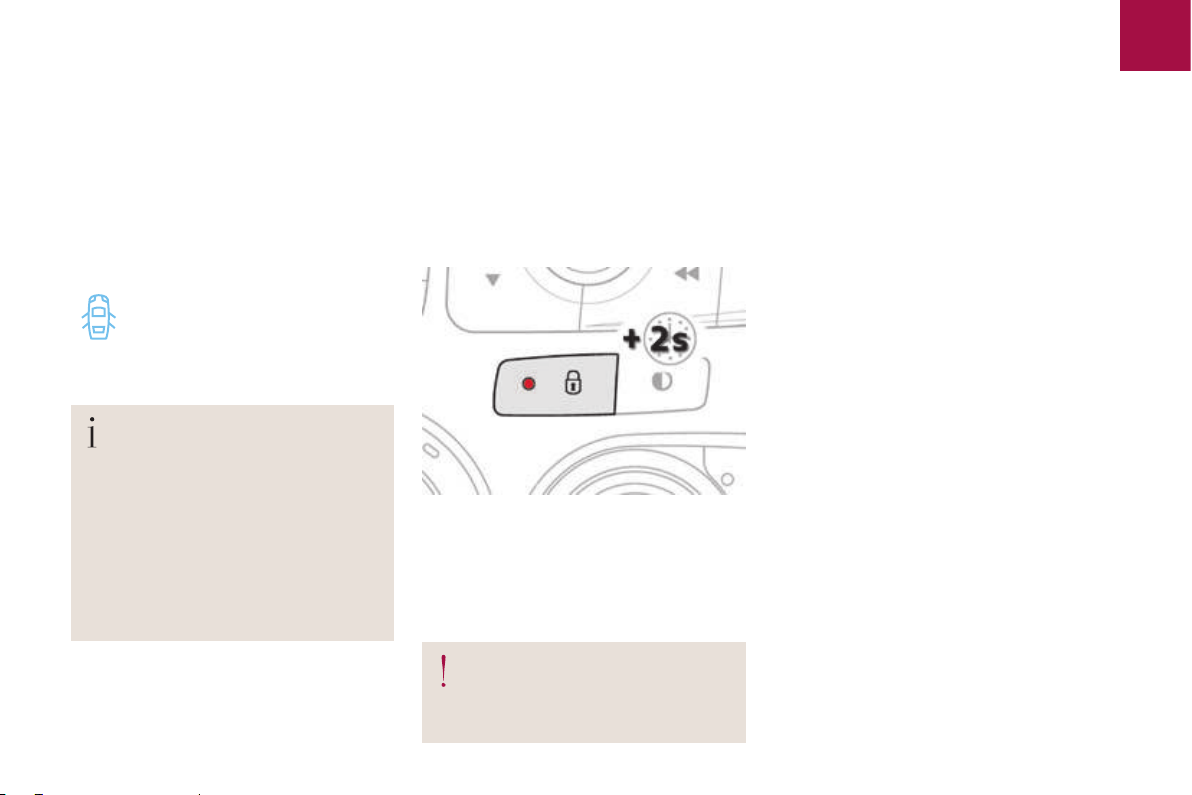
Anti-intrusion security
This system allows automatic simultaneous locking of the doors and boot as soon as the speed of
the vehicle exceeds 6 mph (10 km/h).
Operation Activation / Deactivation
If one of the doors or the boot is open, the
automatic central locking does not take place.
This is signalled by the sound of
the locks rebounding, accompanied
by illumination of this symbol in the
instrument panel, an audible signal
and the display of an alert message.
Carrying long or
voluminous objects
If you want to drive with the boot open,
you should press the central locking
button to lock the doors. Otherwise,
every time the speed of the vehicle
exceeds 6 mph (10 km/h), the locks
will rebound and the alerts mentioned
above will appear.
You can activate or deactivate this function
permanently.
F
With the ignition on, press this button
until an audible signal starts and a
corresponding message is displayed.
The state of the system stays in memory when
switching off the ignition.
Access
79
02
Pressing the central locking button unlocks the
vehicle.
Above 6 mph (10 km/h), this unlocking is
temporary.
Driving with the doors locked may
render access for the emergency
services difficult in an emergency.
Page 82
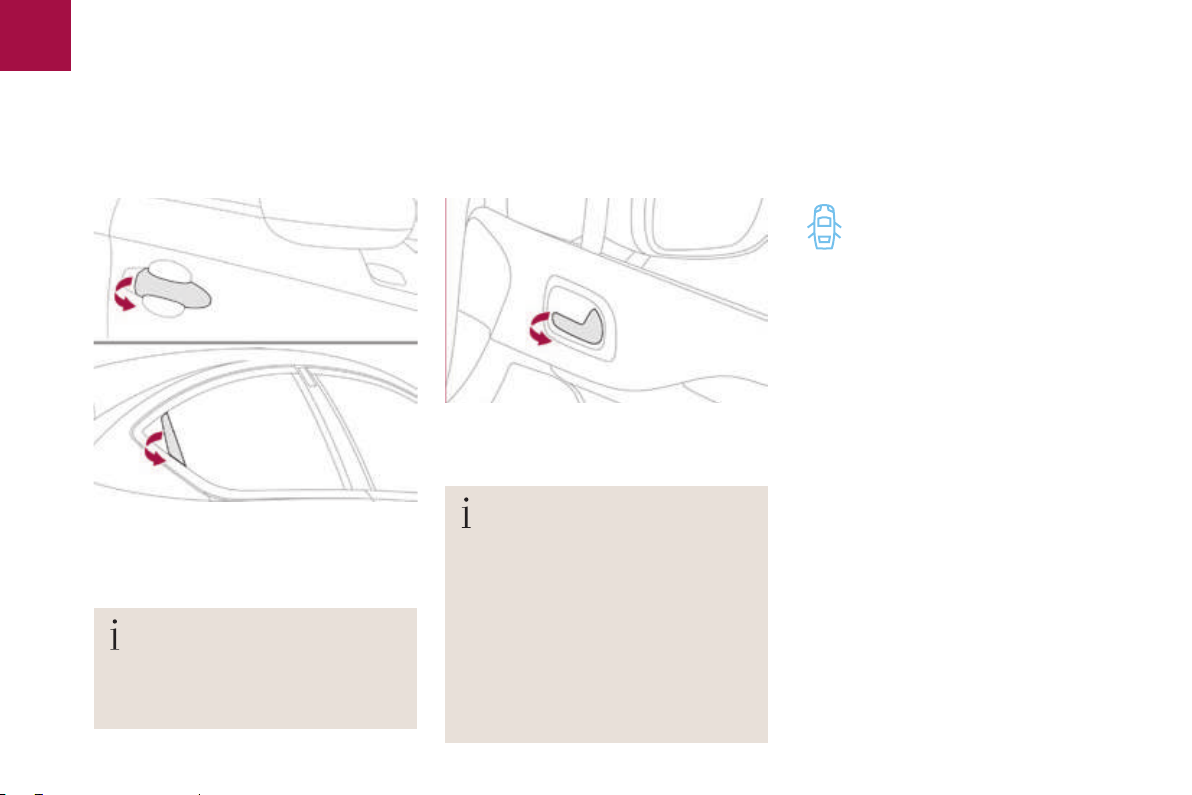
02
80
Access
Doors
Opening
From outside From inside
F Pull the interior control lever of a front door;
this unlocks the vehicle completely.
F After unlocking the vehicle or with the
electronic key of the Keyless Entry and
Starting system in the recognition zone,
pull the door handle.
When the selective unlocking is
activated, the first press of the remote
control unlocking button permits
unlocking of the driver's door only.
With the selective unlocking activated:
- opening the driver's door unlocks
the driver's door only (if the vehicle
has not already been completely
unlocked).
opening the passenger's door
unlocks the rest of the vehicle.
The interior door controls do
not operate when the vehicle is
deadlocked.
Closing
When a door is not closed correctly:
- with the engine running or the
vehicle moving (speed below
6 mph (10 km/h)), this warning
lamp comes on, accompanied
by an alert message for a few
seconds.
with the vehicle moving (speed above
6
mph (10 km/h)), in addition to the warning
lamp and alert message, there is an
audible signal for a few seconds.
Page 83
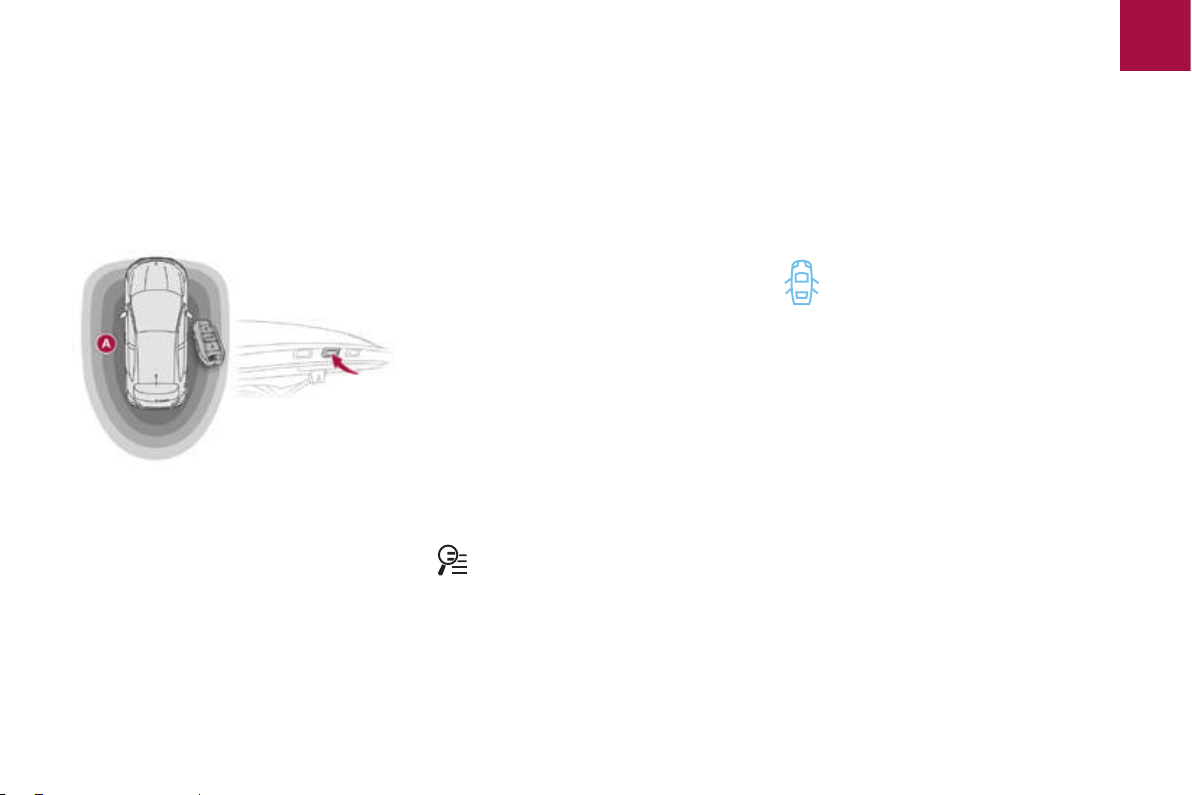
Boot
The vehicle or just the boot is unlocked,
depending on the setting.
Complete unlocking
F After unlocking the vehicle or the boot with
the Keyless Entry and Starting system
electronic key on your person in the
recognition zone A, press the boot opening
control then raise the tailgate.
Selective unlocking
By default, complete unlocking is activated.
This setting is done in the "Driving" menu,
then "Vehicle settings" and "Vehicle
access".
When unlocking of the boot only is activated:
With the electronic key on your person and
F
in the recognition zone A, press the boot
unlocking control to unlock just the boot,
then raise the tailgate.
Unlocking is signalled by rapid flashing of the
direction indicators for a few seconds.
Use this button for access to
additional information.
Access
ClosingOpening
F Lower the tailgate using one of the interior
grab handles.
If the boot is not closed correctly:
with the engine running or the
vehicle moving (speed below
6 mph (10 km/h)), this warning
lamp comes on, accompanied by
the display of an alert message
for a few seconds.
-
with the vehicle moving (speed above
mph (10 km/h)), in addition to the warning
6
lamp and alert message, there is an an
audible signal for a few seconds.
81
02
Page 84
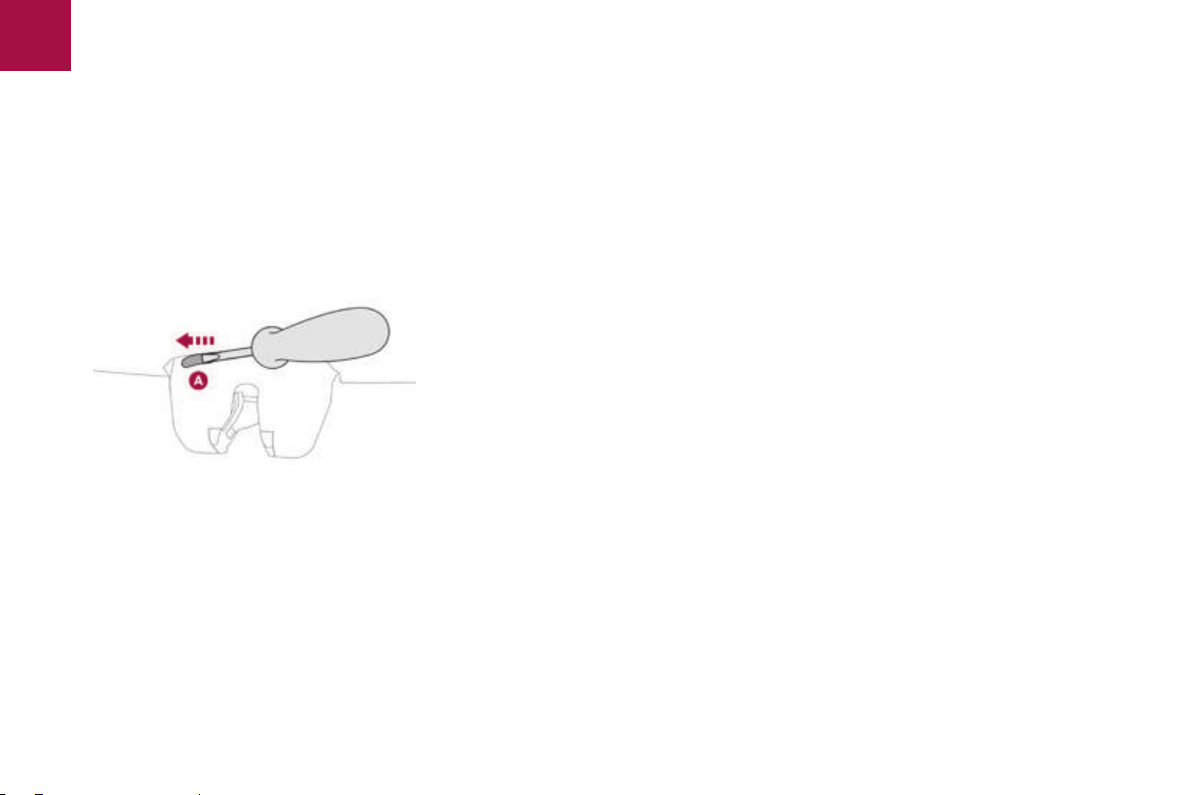
02
82
Access
Back-up release
To manually unlock the boot in the event of a
battery or central locking failure.
Unlocking
F Fold back the rear seats to gain access to
the lock from inside the boot.
F Insert a small screwdriver into hole A of the
lock to unlock the tailgate.
F Move the latch to the left.
Locking after closing
If the fault persists after closing again, the boot
will remain locked.
Page 85

Alarm*
System which protects and provides a deterrent against theft and break-ins. It provides the following types of monitoring:
- exterior perimeter
The system checks for opening of the vehicle.
The alarm is triggered if anyone tries to open a
door, the boot, the bonnet...
- tilt
The system checks for any change in the
attitude of the vehicle.
The alarm is triggered if the vehicle is lifted,
moved or knocked.
For all work on the alarm system,
contact a CITROËN dealer or a
qualified workshop.
Access
83
02
- interior volumetric
The system checks for any variation in the
volume in the passenger compartment.
The alarm is triggered if anyone breaks a
window, enters the passenger compartment or
moves inside the vehicle.
Self-protection function
The system checks for the putting out of
service of its components.
The alarm is triggered if the battery, the central
control or the siren wiring are put out of service
or damaged.
* Depending on the country of sale.
Page 86
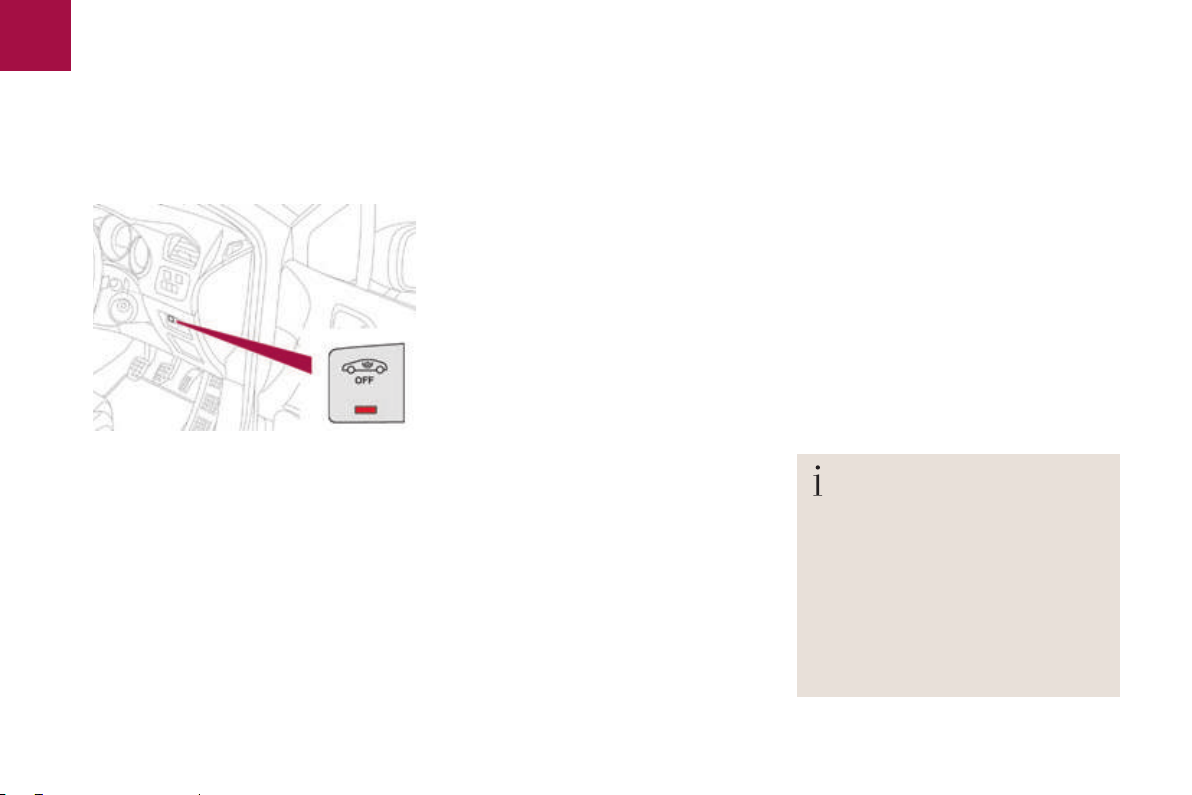
02
84
Access
Locking the vehicle with full alarm system
Activation
F Switch off the ignition and get out of the
vehicle.
F Lock the vehicle with the remote control.
or
F Lock the vehicle with the "Keyless Entry
and Starting" system.
The monitoring system is active: the indicator
lamp in the button flashes once per second
and the direction indicators come on for about
2 seconds.
Following an instruction to lock the vehicle,
the exterior perimeter monitoring is activated
after a delay of 5 seconds and the interior
volumetric and anti-tilt monitoring after a delay
of 45
seconds.
If an opening (door, boot...) is not closed
fully, the vehicle is not locked but the exterior
perimeter monitoring will be activated after a
delay of 45 seconds at the same time as the
interior volumetric and anti-tilt monitoring.
Deactivation
F Press the unlocking button on the remote
control.
or
Unlock the vehicle with the "Keyless Entry
F
and Starting" system.
The monitoring system is deactivated: the
indicator lamp in the button goes off and the
direction indicators flash for about 2 seconds.
When the vehicle automatically locks
itself again (as happens if a door or
boot is not opened within 30 seconds of
unlocking), the monitoring system is not
reactivated automatically. To reactivate
the system, it is necessary to unlock
the vehicle and then lock it again using
the remote control or the "Keyless
Entry and Starting" system.
Page 87
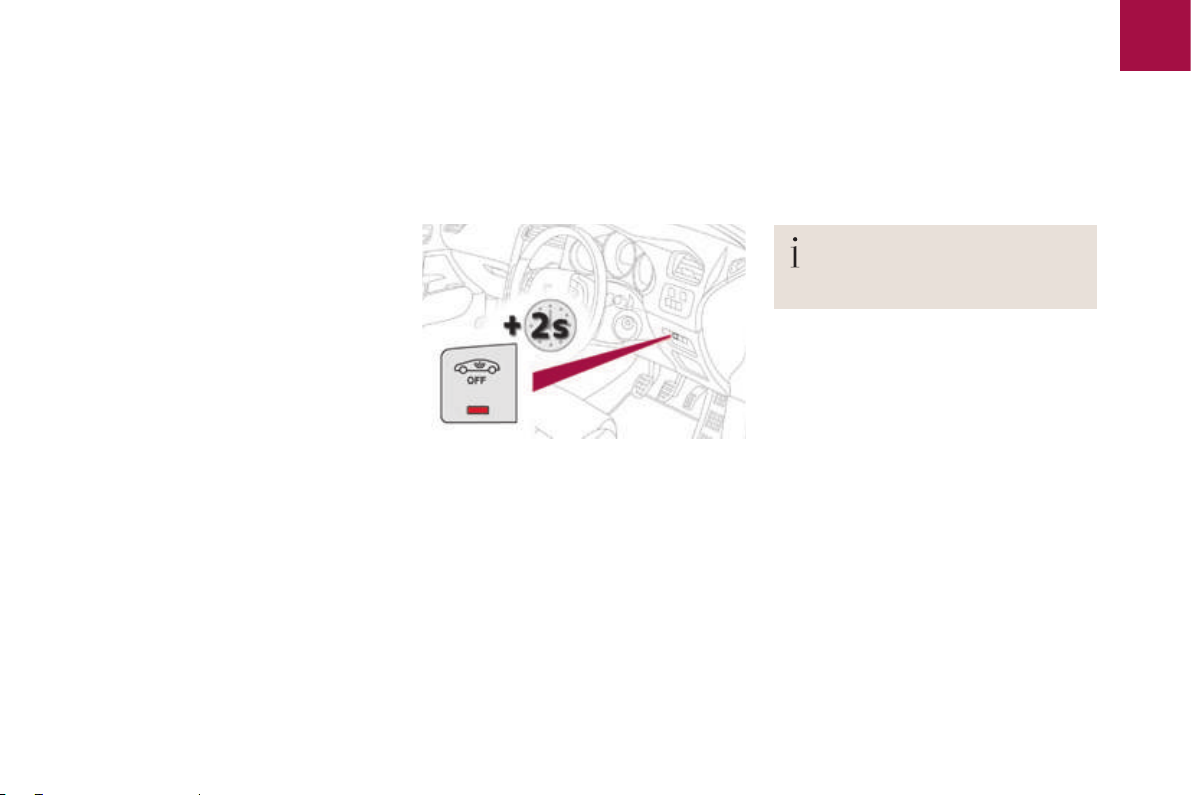
Locking the vehicle with exterior perimeter monitoring only
Deactivate the interior volumetric and anti-tilt
monitoring to avoid unwanted triggering of the
alarm in certain cases such as:
leaving a pet in the vehicle,
-
-
leaving a window partially open,
washing your vehicle,
-
-
changing a wheel,
having your vehicle towed,
-
-
transport by sea.
Deactivating the interior volumetric
and anti-tilt monitoring
F Switch off the ignition and within
seconds, press the button until the
ten
indicator lamp is on continuously.
F Get out of the vehicle.
F
Immediately lock the vehicle using the
remote control or the Keyless Entry and
Starting system.
The exterior perimeter monitoring alone is
activated: the indicator lamp in the button
flashes once per second.
Access
To be effective, this deactivation must
be carried out each time the ignition is
switched off.
Reactivating the interior volumetric
and anti-tilt monitoring
F Deactivate the perimeter monitoring by
unlocking the vehicle with the remote
control or the Keyless Entry and Starting
system.
The indicator lamp in the button goes off.
Reactivate all monitoring by locking the
F
vehicle with the remote control or the
Keyless Entry and Starting system.
The indicator lamp in the button flashes
once per second again.
85
02
Page 88

02
86
Access
Triggering of the alarm
This is indicated by sounding of the siren
and flashing of the direction indicators for
thirty seconds.
The monitoring functions remain active until
the alarm has been triggered eleven times in
succession.
When the vehicle is unlocked using the remote
control or the Keyless Entry and Starting
system, rapid flashing of the indicator lamp
in the button informs you that the alarm was
triggered during your absence. When the
ignition is switched on, this flashing stops
immediately.
Failure of the remote control
To deactivate the monitoring functions:
F unlock the vehicle using the key (integral to
the remote control) in the driver's door lock,
F open the door; the alarm is triggered,
F
switch on the ignition; the alarm stops; the
indicator lamp in the button goes off.
Locking the vehicle without
activating the alarm
F Lock or deadlock the vehicle using the
key (integral to the remote control) in the
driver's door lock.
Operating fault
When the ignition is switched on, fixed
illumination of the indicator lamp in the button
indicates a fault with the system.
Have it checked by a CITROËN dealer or a
qualified workshop.
Page 89
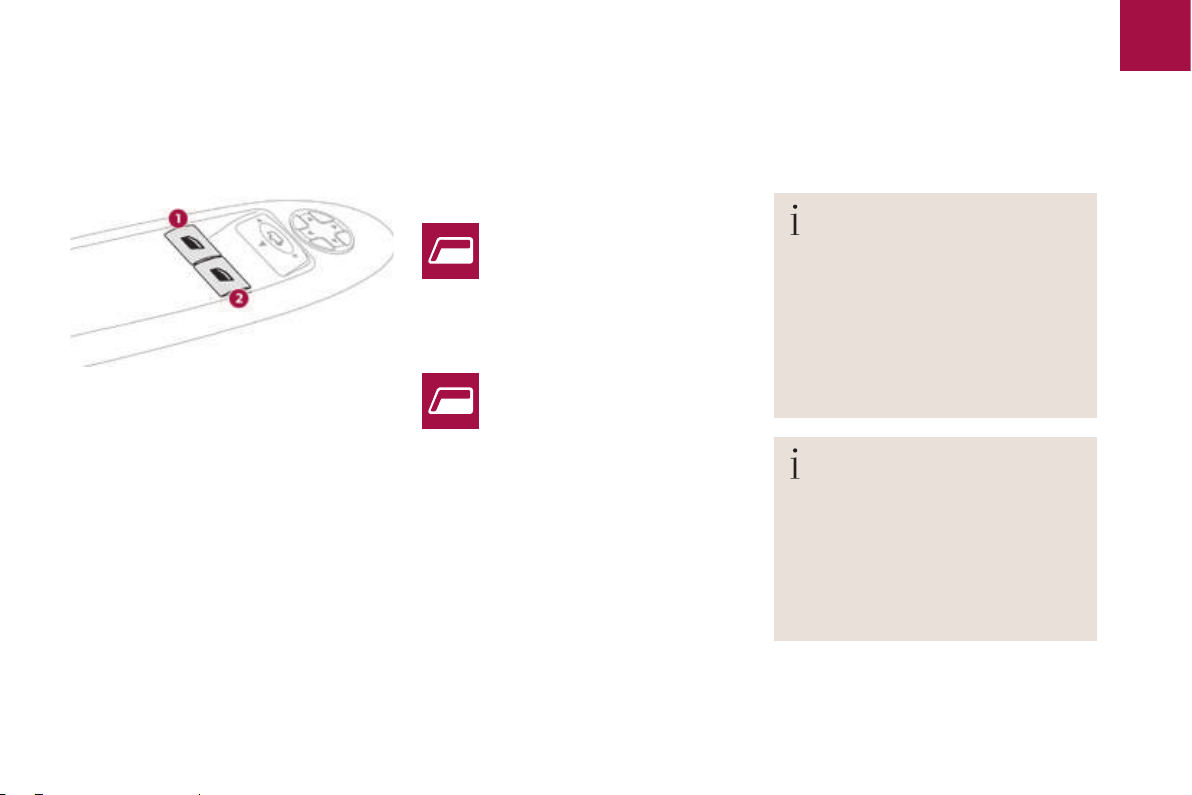
Electric windows
Fitted with a safety anti-pinch system.
One-touch electric windows
Access
87
02
1. Left hand front window control.
2.
Right hand front electric window control.
Manual mode
F
Press or pull the control gently.
The window stops when the
control is released.
Automatic mode
F Press or pull the control firmly.
The window opens or closes fully
when the control is released.
Pressing the control again stops
F
the movement of the window.
The electric window controls remain
operational for approximately
seconds after the ignition is
45
switched off or until the vehicle is
locked after a door is opened.
If the passenger 's window cannot be
operated from the driver's door control
panel, carry out the operation from the
passenger's door control panel, and
vice versa.
After approximately ten consecutive
complete opening/closing movements
of the window, a protection function is
activated which only authorises closing
of the window to prevent damage to the
electric window motor.
Once the window is closed, the controls
will become available again after
approximately 40 minutes.
Page 90

02
88
Access
Safety anti-pinch
When the window rises and meets an obstacle,
it stops and partially lowers again.
If the window cannot be closed (for
example, in the presence of ice), once
the window has lowered:
F
press and hold the control until the
window opens fully,
F then pull the control immediately
and hold it until the window closes,
F continue to hold the control for
approximately one second after the
window has closed.
The safety anti-pinch function is not
operational during these operations.
Reinitialisation
If a window does not rise automatically, its
operation must be reinitialised.
F Pull the control until the window stops.
F
Release the control and pull it again until
the window closes fully.
F Continue to hold the control for
approximately one second after the window
has closed.
Press the control to lower the window
F
automatically to the low position.
F When the window has reached the low
position, press the control again for
approximately one second.
The safety anti-pinch function is not
operational during these operations.
If an obstacle is encountered during
operation of the electric windows, you
must reverse the movement of the
window. To do this, press the control
concerned.
When the driver operates the
passenger's electric window control,
they must ensure that nothing is
preventing the windows closing
correct ly.
The driver must ensure that the
passengers use the electric windows
correct ly.
Be particularly aware of children when
operating the windows.
Be aware of passengers and/or other
persons present when closing the
windows with the key or the "Keyless
Entry and Starting" system.
Always remove the key from the ignition
when leaving the vehicle, even for a
short time.
Page 91

Access
89
02
Page 92

ERGONOMY AND COMFORT
Page 93

03
Page 94
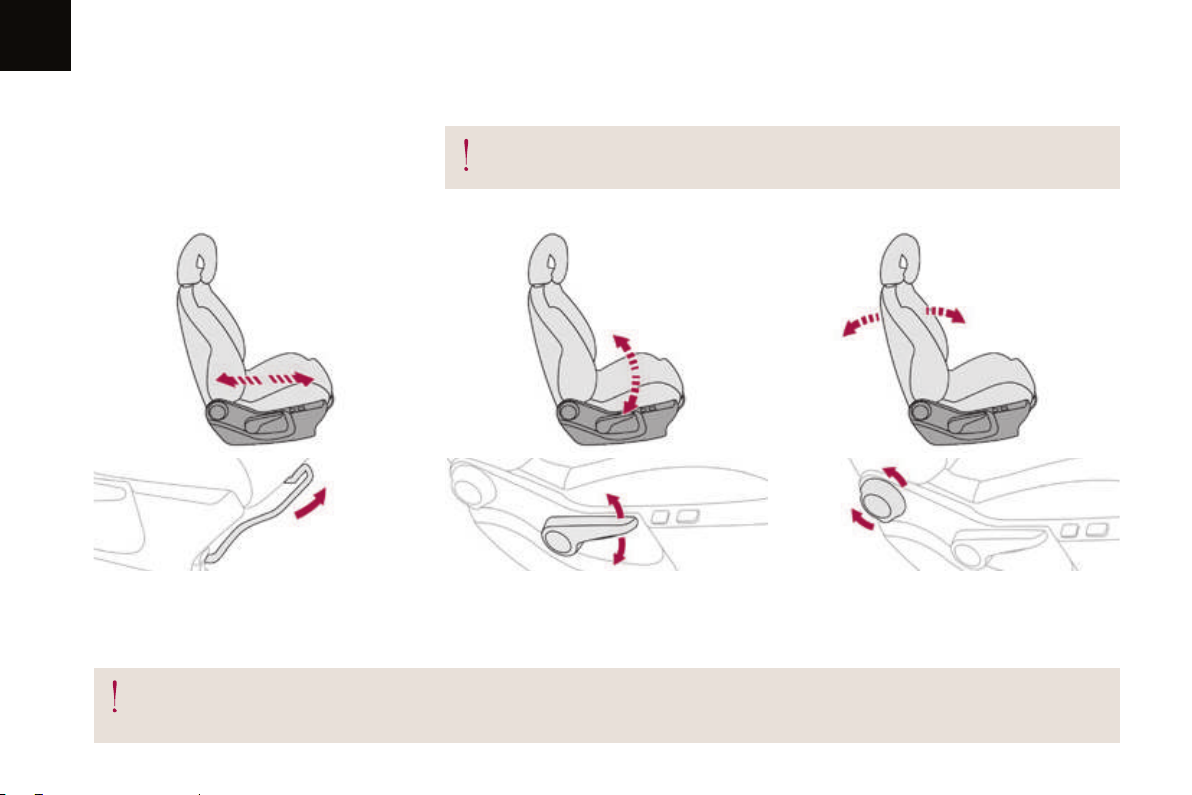
03
92
Ease of use and c o mfo rt
Front seats
Manual adjustments
Forwards-backwards Seat height Seat backrest angle
F Raise the control and slide the seat
forwards or backwards.
F Release the control to lock the position.
As a safety measure, seat adjustments should only be done when stationary.
F
Pull the control upwards to raise or push
F
it downwards to lower, as many times as
necessary, to obtain the position required.
Turn the control knob to adjust the seat
backrest angle.
Before moving the seat backwards, ensure that there is nothing that might prevent the full travel of the seat.
There is a risk of trapping or pinching passengers if present in the rear seats or jamming the seat if large objects are placed on the floor behind
the seat.
Page 95
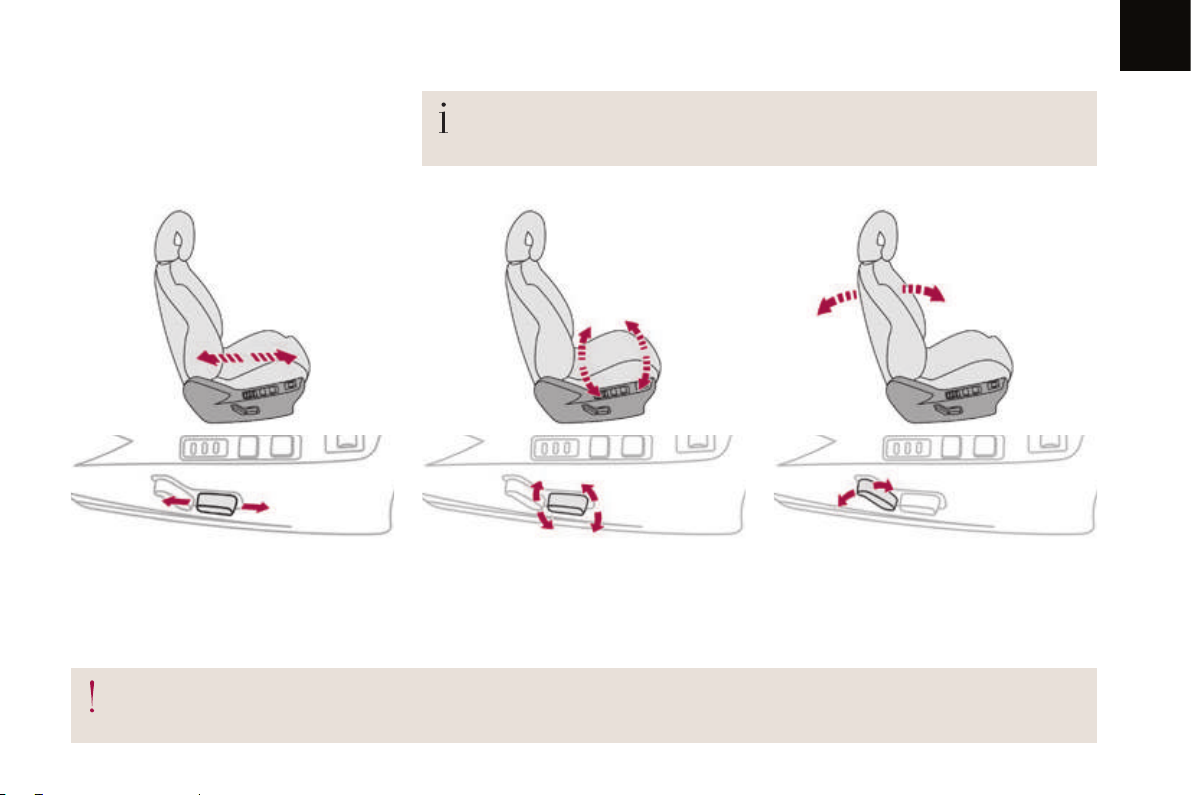
Ease of use and c o mfo rt
93
03
Driver's seat electric
adjustments
The electrical functions of the driver's seat are deactivated approximately one minute after
the ignition is switched off.
To reactivate them, switch on the ignition.
Forwards-backwards Cushion height and angle Seat backrest angle
F Push the control forwards or rearwards to
slide the seat.
Tilt the rear part of the control upwards or
F
downwards to obtain the required height.
F
Tilt the front part of the control upwards or
downwards to obtain the required angle.
F
Tilt the control forwards or rearwards to
adjust the angle of the seat backrest.
Before moving the seat backwards, ensure that there is nothing that might prevent the full travel of the seat.
There is a risk of trapping or pinching passengers if present in the rear seats or jamming the seat if large objects are placed on the floor behind
the seat.
Page 96
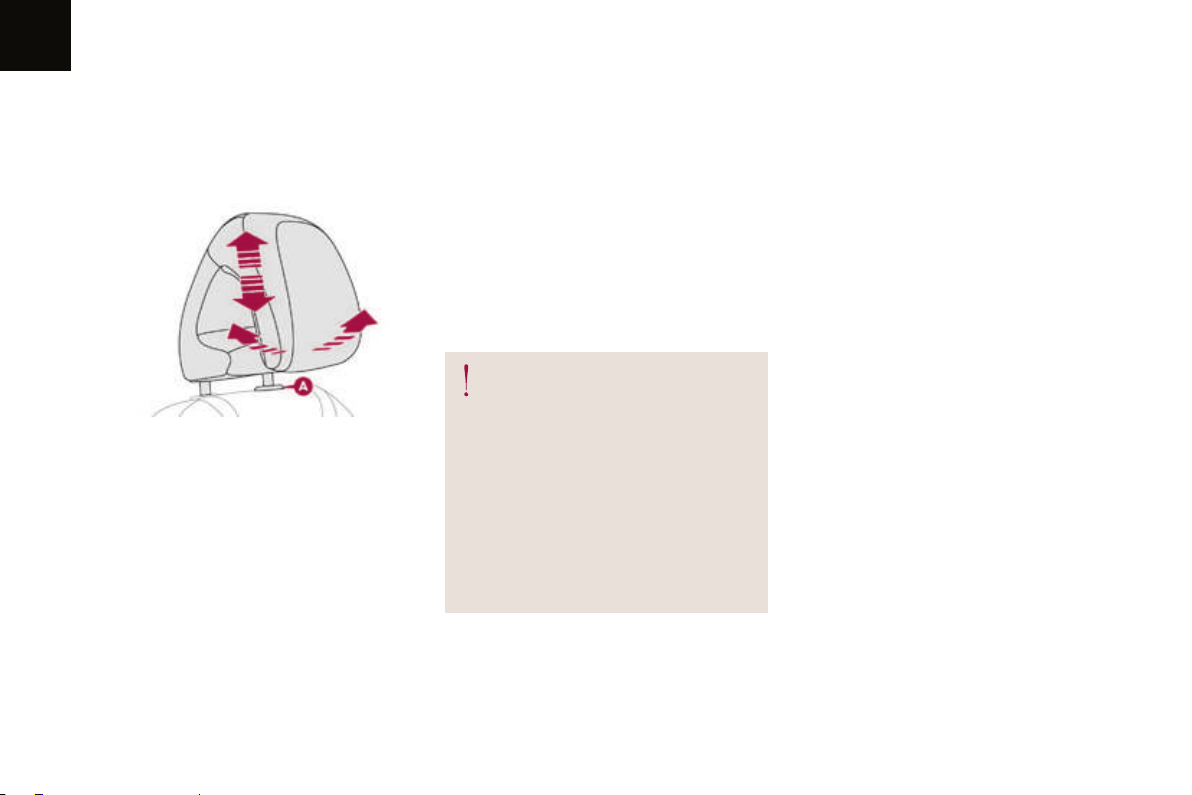
03
94
Ease of use and c o mfo rt
Additional adjustments
Head restraint height and angle
F To raise a head restraint, pull it upwards.
F
To lower the head restraint, press the lug A
and the head restraint at the same time.
F To adjust the angle of the head restraint, tilt
its lower part forwards or rearwards.
Removing a head restraint
F To remove the head restraint, press the
lug
A and pull the head restraint upwards.
To put the head restraint back in place,
F
engage the head restraint stems in the
openings keeping them in line with the seat
back and press the lug A at the same time.
The head restraint is fitted with a frame
with notches which prevents it from
lowering; this is a safety device in case
of impact.
The adjustment is correct when the
upper edge of the head restraint is
level with the top of the head.
Never drive with the head restraints
removed; they must be in place and
adjusted correctly.
Page 97
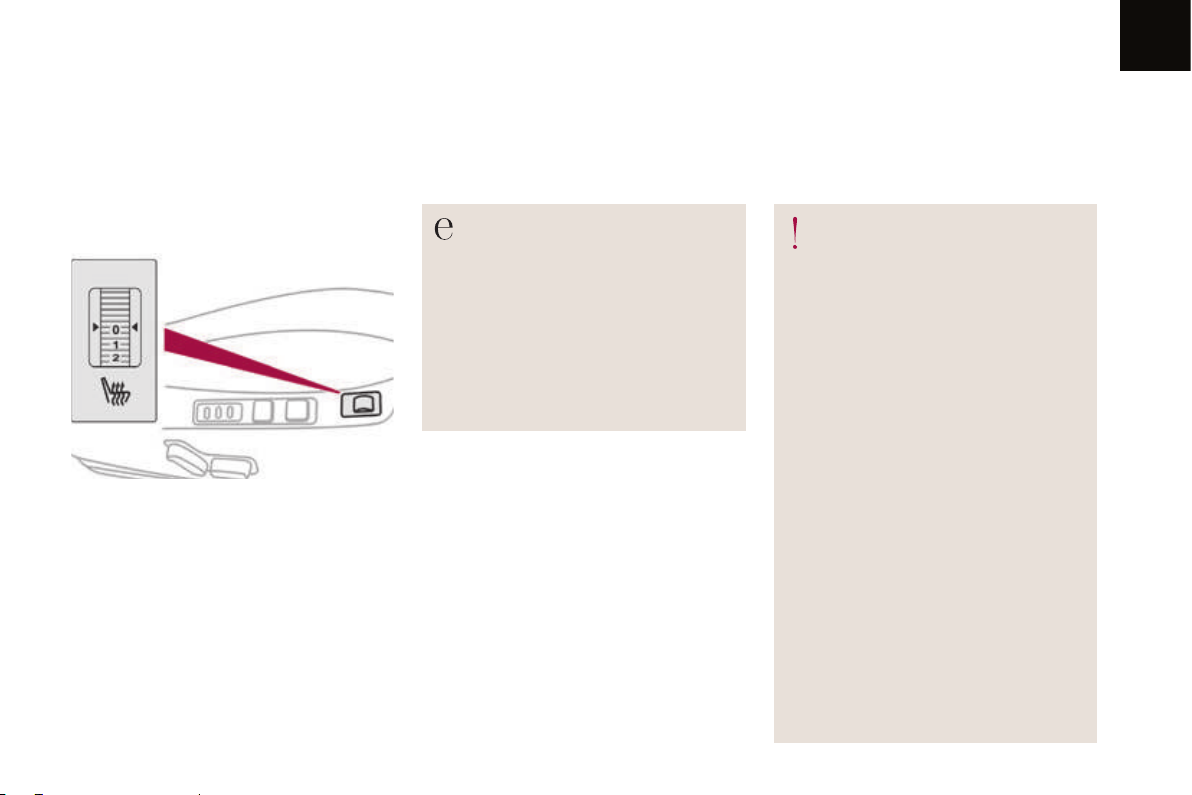
Heated seats control
With the engine running, the front seats can be
heated separately.
F
Use the adjustment dial, placed on the side
of each front seat, to switch on and select
the level of heating required:
0: Off.
1: Low.
2: Medium.
3: High.
Do not use the function if the seat is not
occupied.
Reduce the level of heating as soon as
possible.
Once the seat and passenger
compartment are at a comfortable
temperature, you can switch off the
function; reducing electric current
consumption also reduces fuel
consumption.
Ease of use and c o mfo rt
Prolonged use at the highest setting
is not recommended for those with
sensitive skin.
There is a risk of burns for those that
do not have normal perception of heat
(illness, taking medicines, ...).
There is a risk of overheating the
system if material with insulating
properties is used, such as cushions or
seat covers.
Do not use the system:
- if wearing damp clothing,
-
if child seats are fitted.
To avoid breaking the heating element
in the seat:
do not place heavy objects on the
-
seat,
- do not kneel or stand on the seat,
-
do not place sharp objects on the
seat,
do not spill liquids onto the seat.
To avoid the risk of short-circuit:
- do not use liquid products for
cleaning the seat,
- never use the heating function
when the seat is damp.
95
03
Page 98
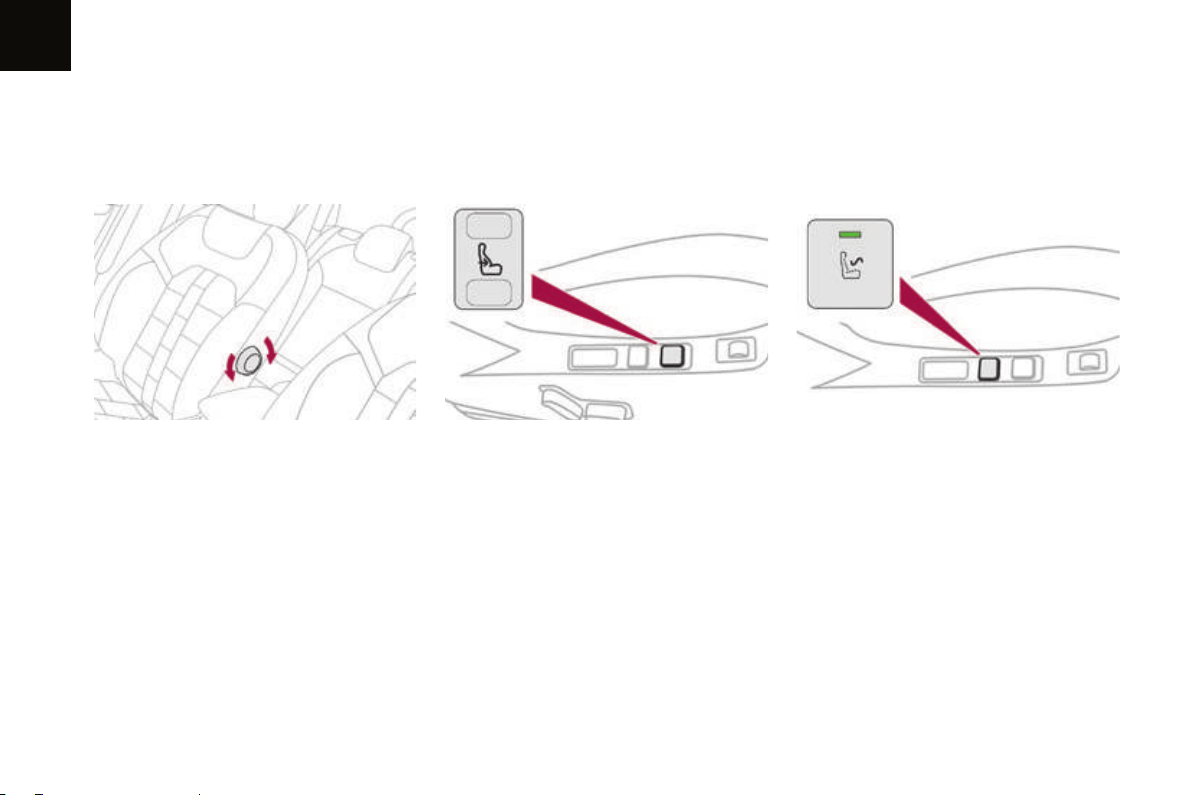
03
96
Ease of use and c o mfo rt
Manual lumbar adjustment Electric lumbar adjustment
F Turn the knob to obtain the desired level of
lumbar support.
F Press the front or rear of the control to
obtain the desired lumbar support.
Massage function
This function provides a back massage; it only
operates when the engine is running.
Press the switch to activate the function.
F
The warning lamp on the switch comes on and
the massage function is activated for a period
of 60
minutes. During this time, massage is
performed in 6 cycles of 10 minutes each cycle
(6 minutes of massage followed by 4 minutes
break).
After an hour, the function is automatically
deactivated. The warning lamp in the switch
goes off.
Deactivation
You can deactivate the massage function at
any time by pressing the switch. The movement
in progress continues until the initial nonmassage position is reached.
Page 99
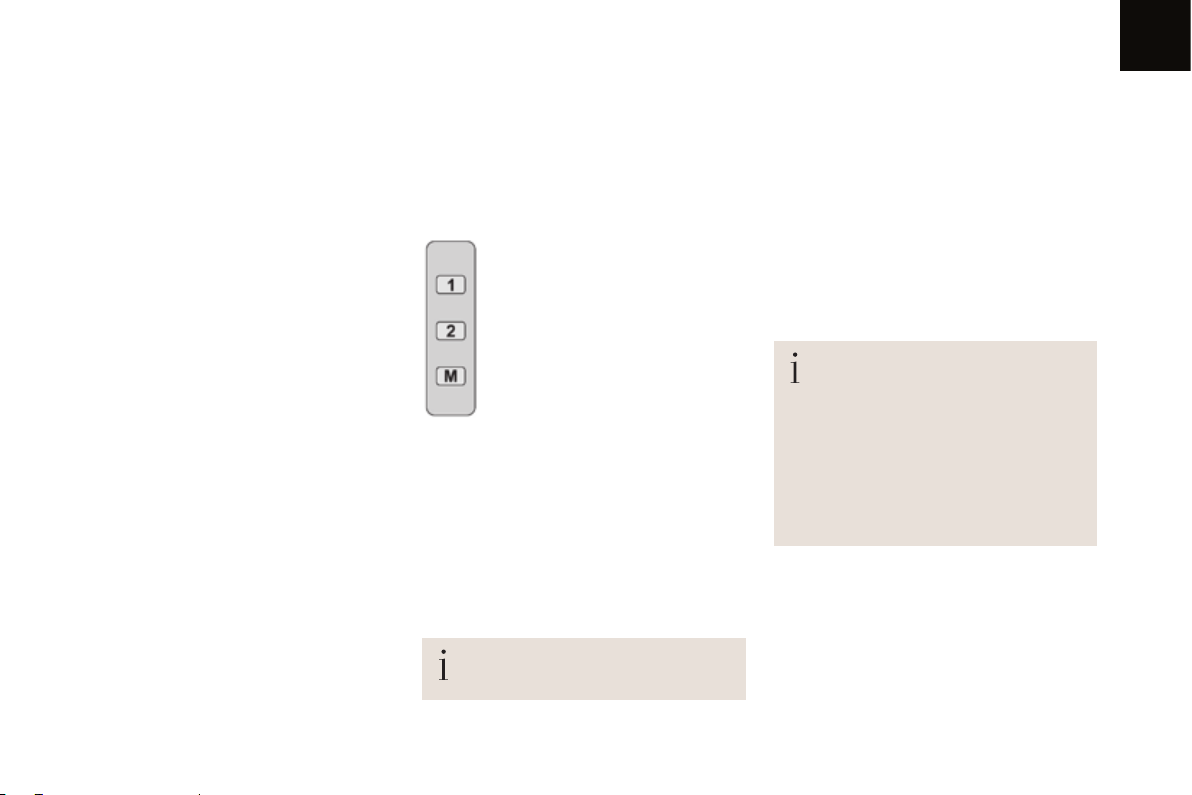
Storing driving positions
System which registers the electrical settings
of the driver's seat and door mirrors. It enables
you to store and recall two positions using the
buttons on the side of the driver's seat.
Storing a position
Using buttons M / 1 / 2
F Switch on the ignition.
F
Adjust your seat and the door mirrors.
Press button M, then press button 1 or 2
F
within four seconds.
An audible signal indicates that the position
has been stored.
Ease of use and c o mfo rt
Recalling a stored position
Ignition on or engine running
F Press button 1 or 2 to recall the
corresponding position.
An audible signal confirms that adjustment
is complete.
You can interrupt the current movement
by pressing button M, 1 or 2 or by using
one of the seat controls.
A stored position cannot be recalled
while driving.
Recalling stored positions is
deactivated 45 seconds after switching
off the ignition.
97
03
Storing a new position cancels the
previous position.
Page 100
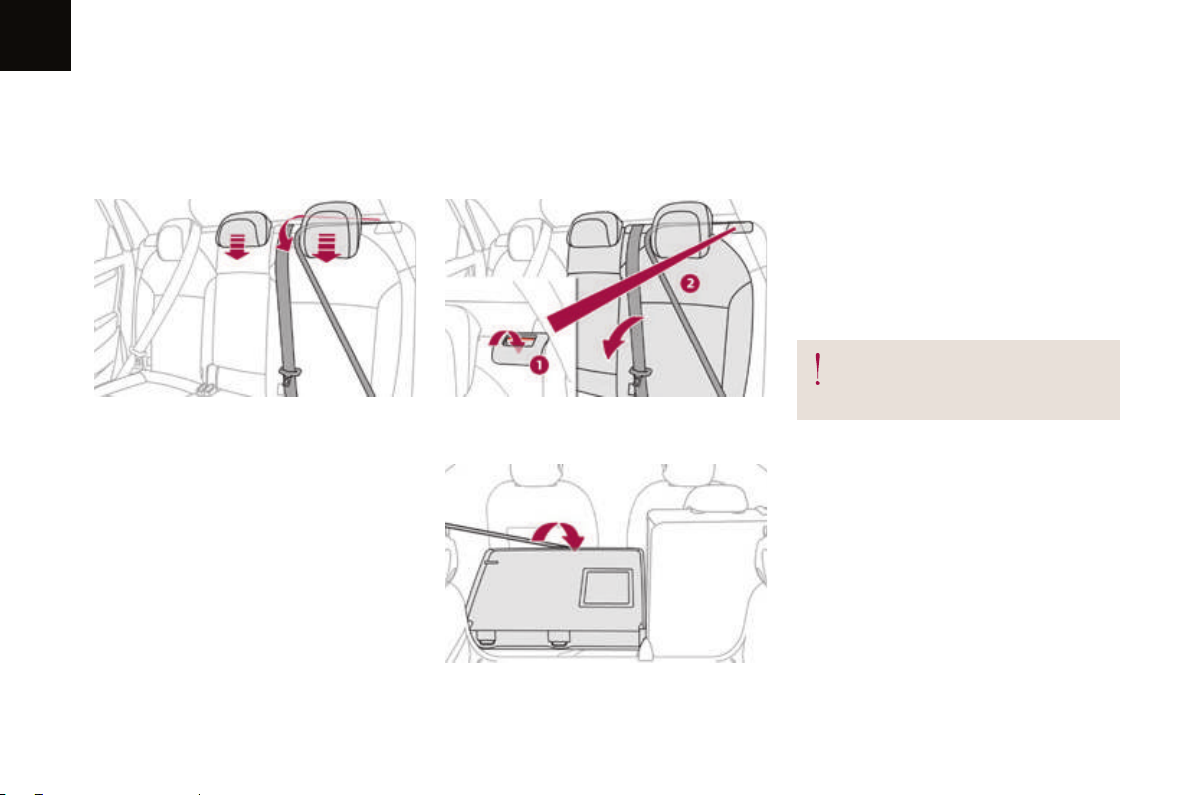
03
98
Ease of use and c o mfo rt
Rear seats
Bench seat with fixed one-piece cushion and split backrests (1/3 - 2/3) which can be folded individually to adapt the load space in the boot.
Folding the backrest
F
Move the corresponding front seat forward
if necessary.
Position the seat belt between the outer
F
and centre head restraints to avoid
trapping the belt when repositioning the
seat backrest.
F Place the head restraints in the low
position.
F Pull control 1 forwards to release the seat
back 2.
Fold the seat back 2 on to the cushion.
F
Repositioning the seat backrest
F Straighten the seat back 2 and secure it.
Check that the red indicator, located next to
F
the control 1, is no longer visible.
F Put the seat belt back in place on the side
of the seat backrest.
When repositioning the seat backrest,
take care not to trap the seat belts.
 Loading...