

Page 1
www.drivemedical.co.uk
Viper Scooter
User Manual
Dealer Stamp
Drive Medical Limited
Ainleys Industrial Estate, Elland
West York shi re, HX5 9J P
Tel: +44 (0) 1422 314 488
Fax: +44 (0) 1422 314 489
Email: info @drivemedical.co.uk
www.drivemedical.co.uk
The Team at Drive Medical develops its
products to give our customers the freedom
to live independen tly. This enc ompasses t heir
daily home life and provides them with the
opportunity to enjoy an outing with family
and friends. Our goal is to develop a range
that will provide individuals with a chance
to enjoy every day life.
Page 2

Viper Electric Scooter Page 1 of 16 Owner’s Handbook (Code: Viper_IFU)
In the event of a fault being detected, the 3 left most
LEDs on the battery gauge will flash green followed by
the 3 right most LEDs flashing red. This sequence will
continue for approximately 15 seconds until the fault is
displayed by one of the LEDs flashing.
The battery gauge will continue flashing until the fault is
rectified and the key switch has been cycled
1st LED solid RED
2ndd LED flash RED
**-----
Low battery, battery voltage has dropped
below 23.3v. Recharge batteries as soon as
possible.
1st Led flash RED
*------
Battery voltage too low. Voltage has
dropped below 16.5v. Recharge batteries
then check the battery, connections and
wiring.
All LEDs Flash
*******
Battery voltage too high. Unplug charger
from scooter. Turn the scooter off and on.
Reduce speed down any gradients to
minimize regenerative charging.
2ndd LED flash RED
-*-----
Current limit time-out/controller too hot.
The scooter may have stalled. Turn the
scooter of and leave for a few minutes
before turning back on. Check connections
3rd LED Flash RED
--*----
Brake fault. either a park brake release
switch or the park brake is faulty, check
brake and all connections, ensure the
freewheel lever is in DRIVE
4th LED Flash AMBER
---*---
Out of neutral at power up. Return wigwag
paddle to neutral then turn off and on
again.
5th LED Flash GREEN
----*--
Speed pot Error. Wigwag paddle or its
wiring is faulty. Check for open or short
circuits and wigwag paddle is calibrated
6th LED Flash GREEN
-----*-
Motor volts Error. Motor or its wiring is
faulty. Check paddle is calibrated and
check for open or short circuits.
7th LED Flash GREEN
------*
Internal controller fault. Check all
connections and wiring. If problem persists,
contact Drive Medical Ltd
CONTENTS
1. PREFACE 3
2. SAFETY NOTICE 4
2.1 Before Driving
2.2 Whilst Driving
2.3 Labelling
2.4 Electromagnetic Interference
3. PARTS INTRODUCTION 9
4. OPERATION
4.1 Control Panel
4.2 How to Operate Your Scooter
5. DRIVING ON THE ROAD 15
6. BATTERY CHARGING AND CARE 16
7. INSPECTION AND MAINTENANCE 19
7.1 Checks
7.2 Service Record
7.3 Battery Pack and Tyres
7.4 Cleaning
7.5 Storage
7.6 Moving About
8. TROUBLESHOOTING 24
9. SPECIFICATION 25
10. WARRANTY 26
11. APPENDIX: SERVICE RECORD
Page 3

Viper Electric Scooter Page 2 of 16 Owner’s Handbook (Code: Viper_IFU)
1. PREFACE AND INTRODUCTION
Please carefully read this owner’s handbook before
using the scooter to ensure that you operate the
scooter safely. Improper use of the scooter could
result in damage, injury or traffic accidents.
This handbook also advises how to get the most out
of your scooter by giving comprehensive operating,
assembly and maintenance instructions for the
scooter.
A repair and maintenance record chart and
warranty information is included with this
handbook. Please keep it in a safe place or with the
scooter.
If someone else uses the scooter make sure that you
provide him or her with this handbook for their
consideration.
As designs change some of the illustrations and
pictures in the manual may not correspond to the
scooters that you purchased. We reserve the right
to make design modifications.
The Viper scooter has been designed and
manufactured to provide a comfortable and secure
yet affordable solution for some mobility
requirements. It is suitable for mainly road and
outdoor use and has a top speed of 8mph. It can be
used indoors and on the pavement where the
environment permits and when the scooter is set to
the indoor speed setting. It is a class 3 scooter as
defined by the Road Traffic Act 1988.
2. SAFETY
Before Driving
The user needs to be familiar with the use and
operation of this scooter before driving.
The scooter may only be driven on the pavement or
pedestrian areas at speeds up to 4mph (6.4kph). Use
the High / Low button on the lower setting to ensure
you do not exceed this speed. The scooter may be
driven on single carriage roads with the button set to
High. This will allow speeds up to 8mph (12.8kph).
Be aware of traffic and other road users when
crossing or using roads.
Never ride on motorways or dual carriageways.
Use extreme caution when driving your scooter in
busy areas such as shopping malls.
Do not drive the scooter under the influence of
drink or drugs, or when you are tired. Driving under
the influence of alcohol or drugs may be an offence
under the Road Traffic Act.
Be careful when using the scooter in low light.
Before using the scooter in busy or hazardous
environments, familiarise yourself with the
operation of the scooter. Practice in an open and
safe area which is free from hazards and other
people. Reduce your speed to a minimum for your
initial practice.
Practice operating your vehicle
Before using the scooter in busy or potentially
dangerous areas, familiarize yourself with the
operation of your scooter. Please practice in a wide
and open area like a park. In order to avoid
accidents with your scooter whilst driving, bear in
mind driving motions such as accelerating, braking,
turning, reversing and gradients.
1. Reduce your speed to a minimum for your initial
practice
2. For safety, ensure somebody accompanies you
when driving on the road for the first time
3. Only use the higher speed setting when you are
confident that you can easily operate and
control your scooter
Page 4
Viper Electric Scooter Page 3 of 16 Owner’s Handbook (Code: Viper_IFU)
The Viper scooter can only be used by one person
at a time. Do not carry passengers on your scooter
(including children)
Maximum user mass (weight capacity)
The maximum weight that can be carried is
160kg / 25 stone (including occupant and any
goods).
Do not use the scooter to carry or haul goods.
Whilst Driving
Do not move your body out of the vehicle whilst moving
Such action may cause you to lose your balance
and risk injury from falling
Pay attention that your clothing and other
garments do not get tangled or caught in the
wheels
Do not use your vehicle in the following environments
On roads with heavy traffic or roads that are
muddy, gravelly, bumpy, narrow, snowed over
or icy.
Places where you might get the wheels stuck.
On canal towpaths which are not guarded by
any fence or hedge.
Do not drive at night or if it is raining heavily,
snowing, misty or windy.
Do not drive your vehicle in an ‘S’ pattern or
make erratic turnings.
Do not take the scooter onto escalators.
Under no circumstances should the scooter be
used as a seat in a motor vehicle (e.g. cars,
buses, trains, etc)
Gradients and Drops
Do not drive on roads with large drops or
potholes. Such drops or potholes may cause
damage and/or injury.
Do not cross wide water gutters where there is
a risk of getting the wheels stuck.
Always use a low speed setting when ascending
or descending a gradient.
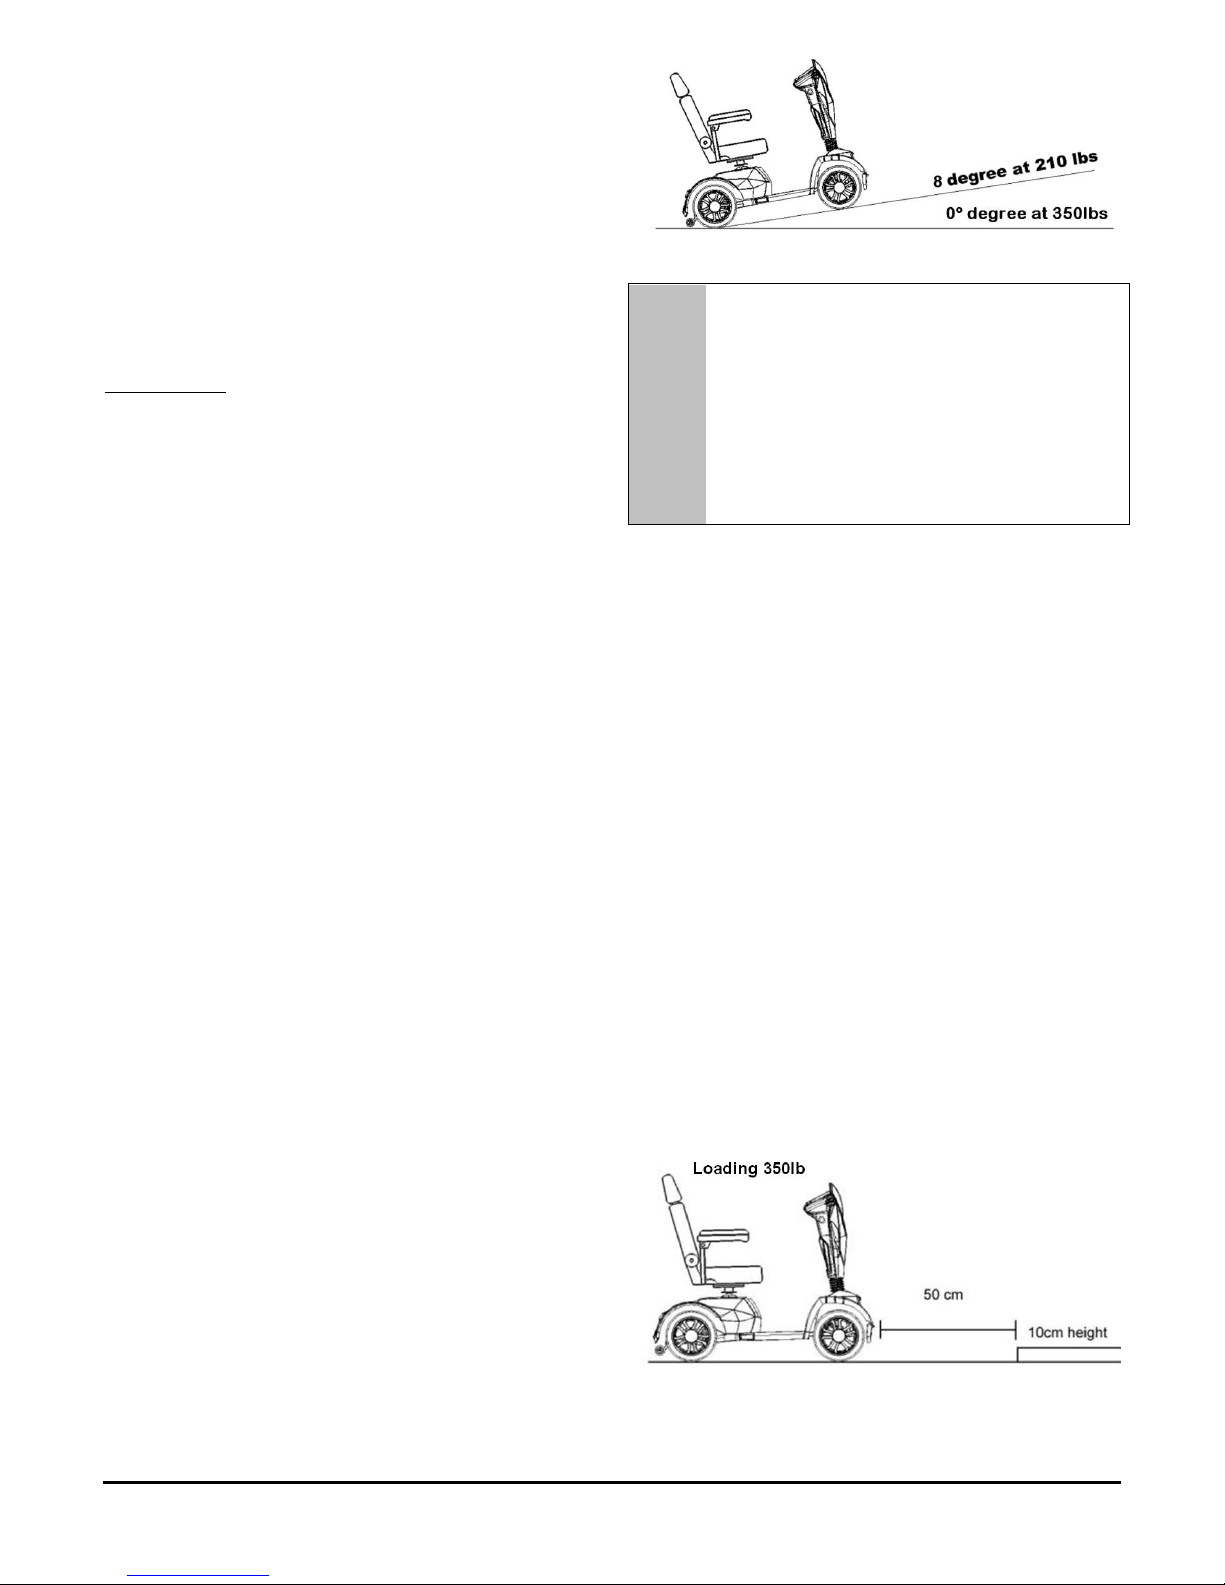
Do not drive on gradients steeper than those
stated on the diagram below:
Warning
Do not set in freewheel mode when driving on
a gradient.
Always re-engage the anti-freewheel device
before use. Failure to do so may result in
injury.
To protect your safety, the power will
automatically cut off and the electromagnetic
(EM) brake will activate while you are driving
down gradients over 15º. This will limit the
speed to a safe level. Switch the power off and
on again to restart your scooter.
Step and Obstacle Climbing
The scooter is capable of climbing an 80mm (3”)
obstacle from a stationary start or a 100mm (4”)
obstacle from a moving start.
The ground clearance of the scooter is 100mm
(4”).
To climb an obstacle when moving, start moving
at least 50cmm (20”) from the obstacle and
mount the obstacle head on (not at an angle).
However, this method is not recommended as
this may cause damage and/or injury.
Page 5
Viper Electric Scooter Page 5 of 16 Owner’s Handbook (Code: Viper_IFU)
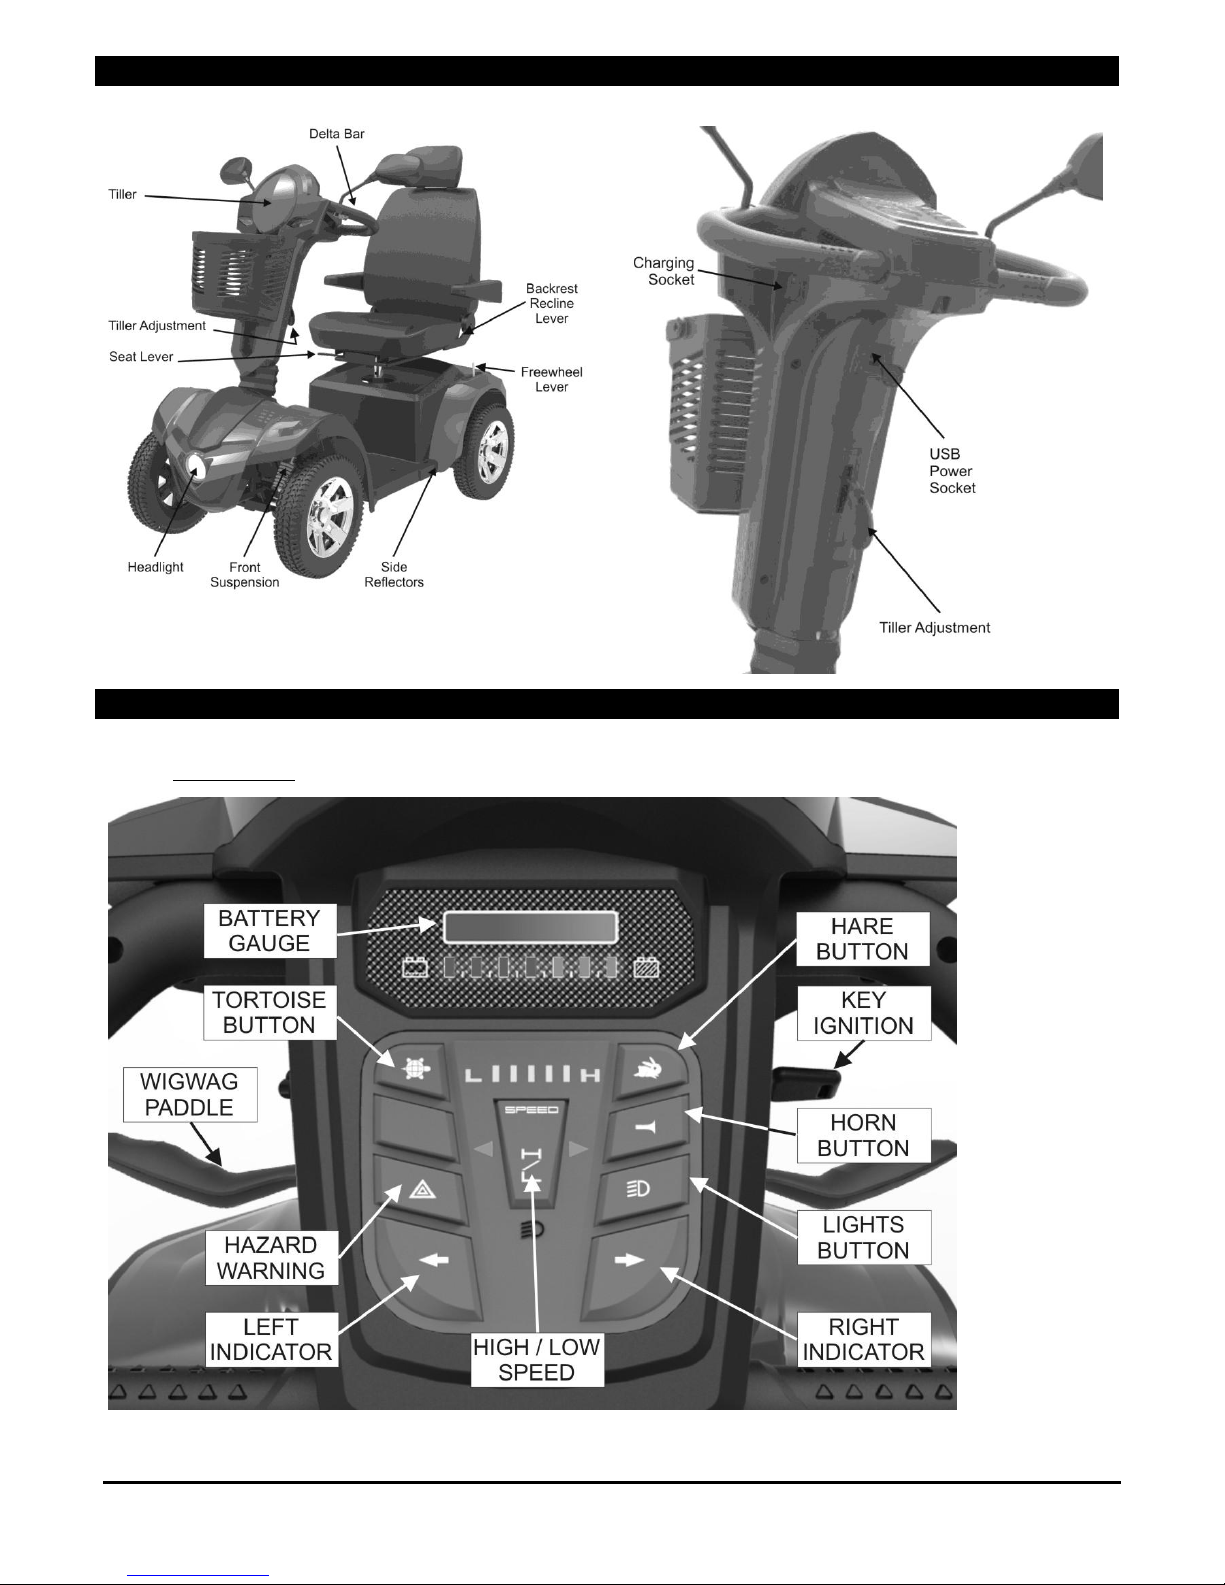
3. PARTS INTRODUCTION
4. OPERATION
4.1 Control Panel
Page 6

Viper Electric Scooter Page 6 of 16 Owner’s Handbook (Code: Viper_IFU)
4.2 How To Operate Your Scooter
Key Ignition. The key ignition acts as the power
switch for the scooter. To switch the power on, turn
the key clockwise and control panel should
illuminate. To switch the power off, turn the key
anticlockwise, after which the control panel should
switch off and the key can be removed.
Do not turn the ignition off whilst driving
as this will lead to an emergency stop and
possible risk of damage or injury.
Wigwag Paddle. The scooter is propelled by the
user operating the wigwag paddle at the bottom of
the control panel. To move the scooter forward,
move the right hand side of the paddle towards the
user. To reverse the scooter, move the left hand
side of the lever. The further the paddle moves, the
faster the scooter will travel. To stop the scooter,
release the wigwag paddle and the
electromagnetic brake will apply automatically.
Warning
Do not push both left and right hand
sides of the wigwag simultaneously. You
will not be able to control the scooter.
Braking. The electromagnetic brake will stop the
scooter when the wigwag paddle is released. The
brake is also automatically applied when the
scooter is switched off. In the event of an
emergency, the user can stop the scooter by
operating the hand brake located on the left hand
side of the tiller handlebars.
When on a gradient, never set the vehicle
to freewheel mode. The brakes will not be
applied.
Top Speed Setting. The top speed of the scooter
can be increased by pressing the Hare button, or
reduced by pressing the Tortoise button. The top
speed is displayed on the control panel. The more
segments of the display that are lit, the faster the
scooter will go.
Do not adjust the speed setting whilst
driving as this could result in loss of
control. Do not set the highest speed
whilst driving indoors.
High / Low Speed Setting. When the scooter is
used indoors or in pedestrian environment (such as
on the pavement or in a shopping mall) the Low
speed setting should be engaged. When the scooter
is used on the road, the high speed setting may be
engaged.
To engage the Low Speed Setting, press the bottom
half of the button (marked ‘L’) and this will limit the
scooter’s top speed to 4mph.
To engage the High Speed Setting, press the top
half of the button (marked ‘H’) and this will allow the
scooter to have an 8mph top speed.
Warning
Always engage the Low Speed setting
when travelling indoors or the
pavement. This is a legal requirement.
Horn Button. Press the horn button to sound the
horn, Release the button to stop the horn.
Indicator Buttons. Use the relevant indicators when
making a turn to show your direction of travel. Press
the Right or Left Indicator button once to operate
the relevant indicators. Press the same button
again to stop the indicators.
Lights Button. Press the Lights button once to
switch on the lights. Press the button again to
switch off the lights.
Hazard Warning Button. Press the Hazard Warning
button once to switch on the warning function.
Press the button again to switch off the function.
When operating the Hazard Warning will flash all
of the indicators and sound the horn.
Battery Gauge. The amount of power remaining in
the battery is shown by this gauge. A fully charged
battery will show all the segments of the gauge lit,
and the number of segments lit will reduce as the
power decreases.
If the battery gauge flashes but the scooter will still
drive, then this indicates low battery power and the
batteries should be recharged immediately. If it is
not driving the check flash codes on page 1.
Page 7
Viper Electric Scooter Page 7 of 16 Owner’s Handbook (Code: Viper_IFU)
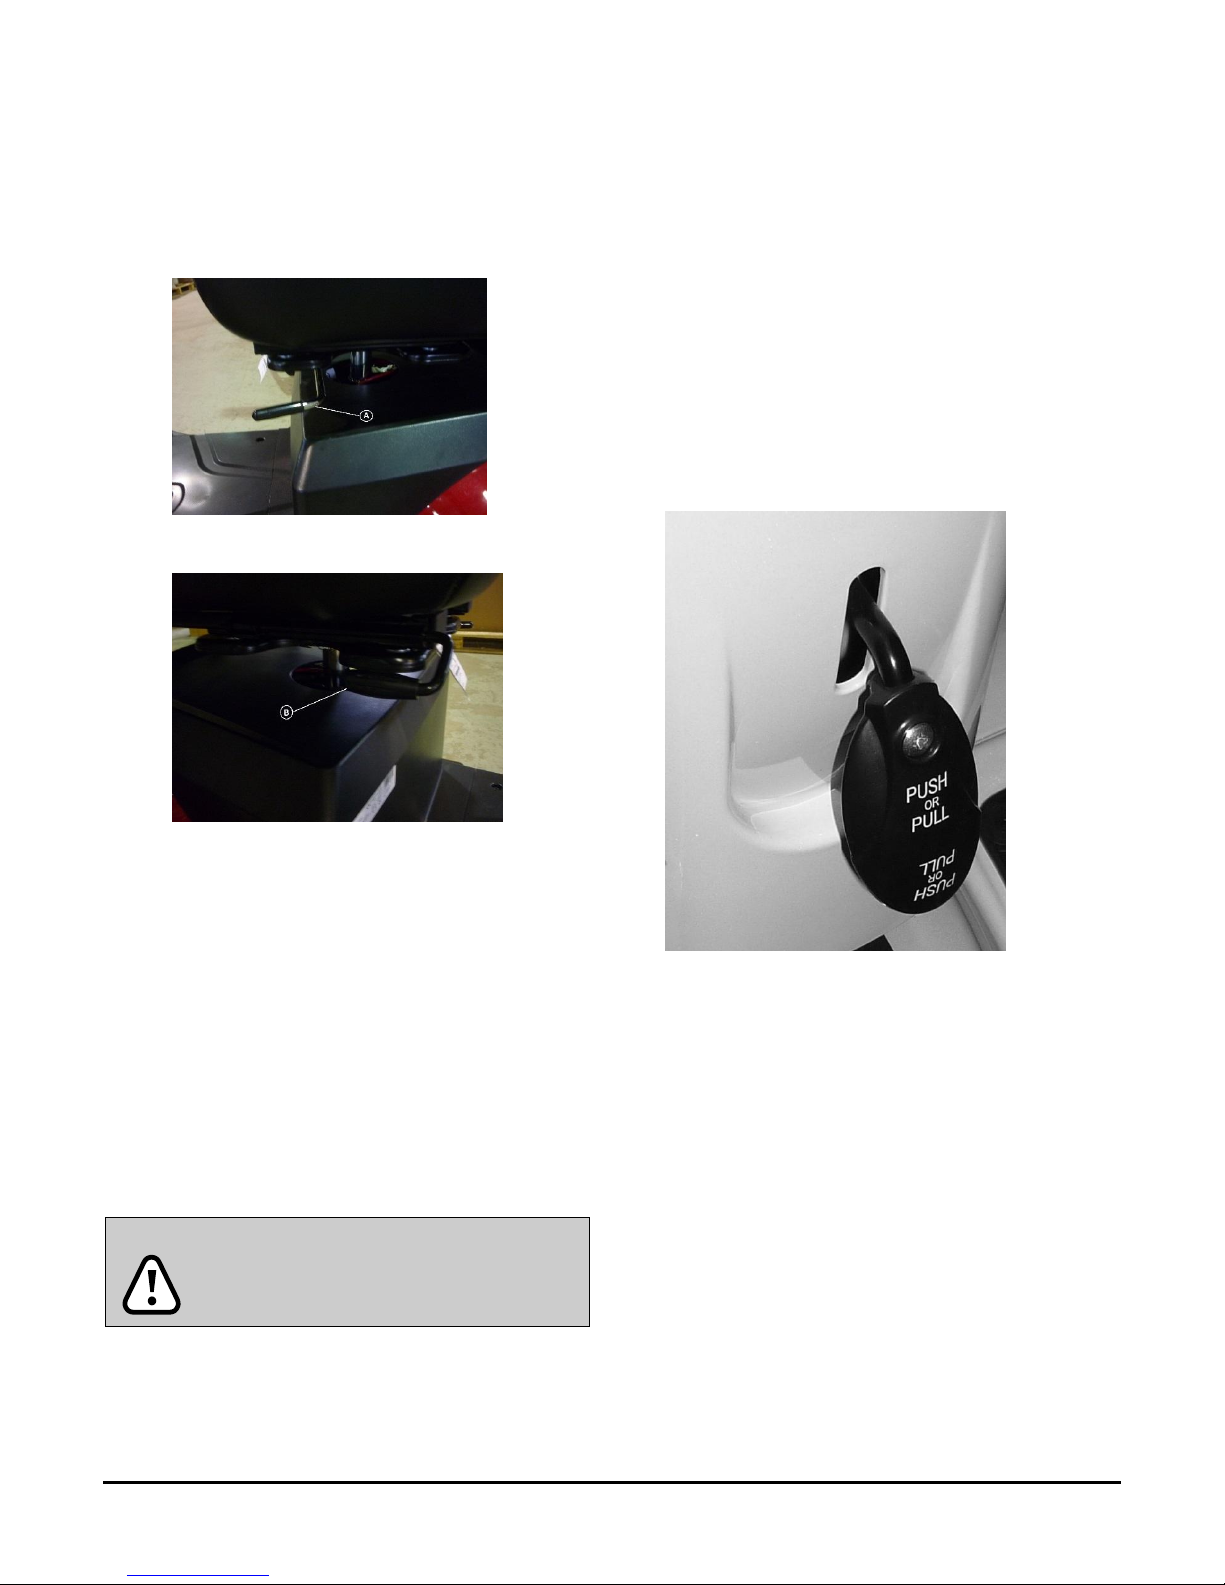
Seat.
The seat can rotate 360° and locks in 45° settings. To
rotate, lift up the lever (A) located underneath the
left hand side of the seat and swivel seat. Release
the lever and carry on swiveling the seat until it locks
in position.
You can adjust the amount of legroom on the
scooter by sliding the seat back and forth. To slide
the seat, lift up the seat sliding handle (B). Located
on the right of the seat. Then adjust the seat to
correct position, release the handle and continue
sliding the seat until it locks in position.
To alter the backrest angle, pull up on the seat
recline lever, then adjust the backrest to the
required position and release the lever. Please note
if nobody is using the backrest when the lever is
operated, it will automatically spring the backrest
forward to fold the seat.
Attention.
Return the seat to the forward position
before driving.
Armrest Adjustment.
To adjust the height of the armrest, loosen the
adjustment knob on the side of the armrest by
Turning anticlockwise. Adjust the armrest to the
required height and tighten the adjustment knob by
turning clockwise.
To adjust the angle of the armrest, flip up the
armrest and reposition the jam nut with a spanner to
alter the angle of the armrest.
Tiller Adjustment
The tiller can be adjusted into several positions.
1. Push (or pull) the lever on the scooter tiller
(shown below) to adjust the tiller to the position
you require.
2. Release the lever to lock the tiller.
Circuit Breaker.
The circuit breaker may trip when the scooter is
under excessive load or when travelling on steep
inclines. It will be more prone to tripping when the
scooter is low on battery charge. Under normal
conditions the circuit breaker button will protrude
by 2mm – 3mm. If the circuit breaker has tripped the
button will protrude by 7mm. To reset the circuit
breaker, push the button in and the scooter should
operate as normal.
The circuit breaker is located on the left hand side
of the rear of the frame, behind the back bumper.
Page 8
Viper Electric Scooter Page 8 of 16 Owner’s Handbook (Code: Viper_IFU)
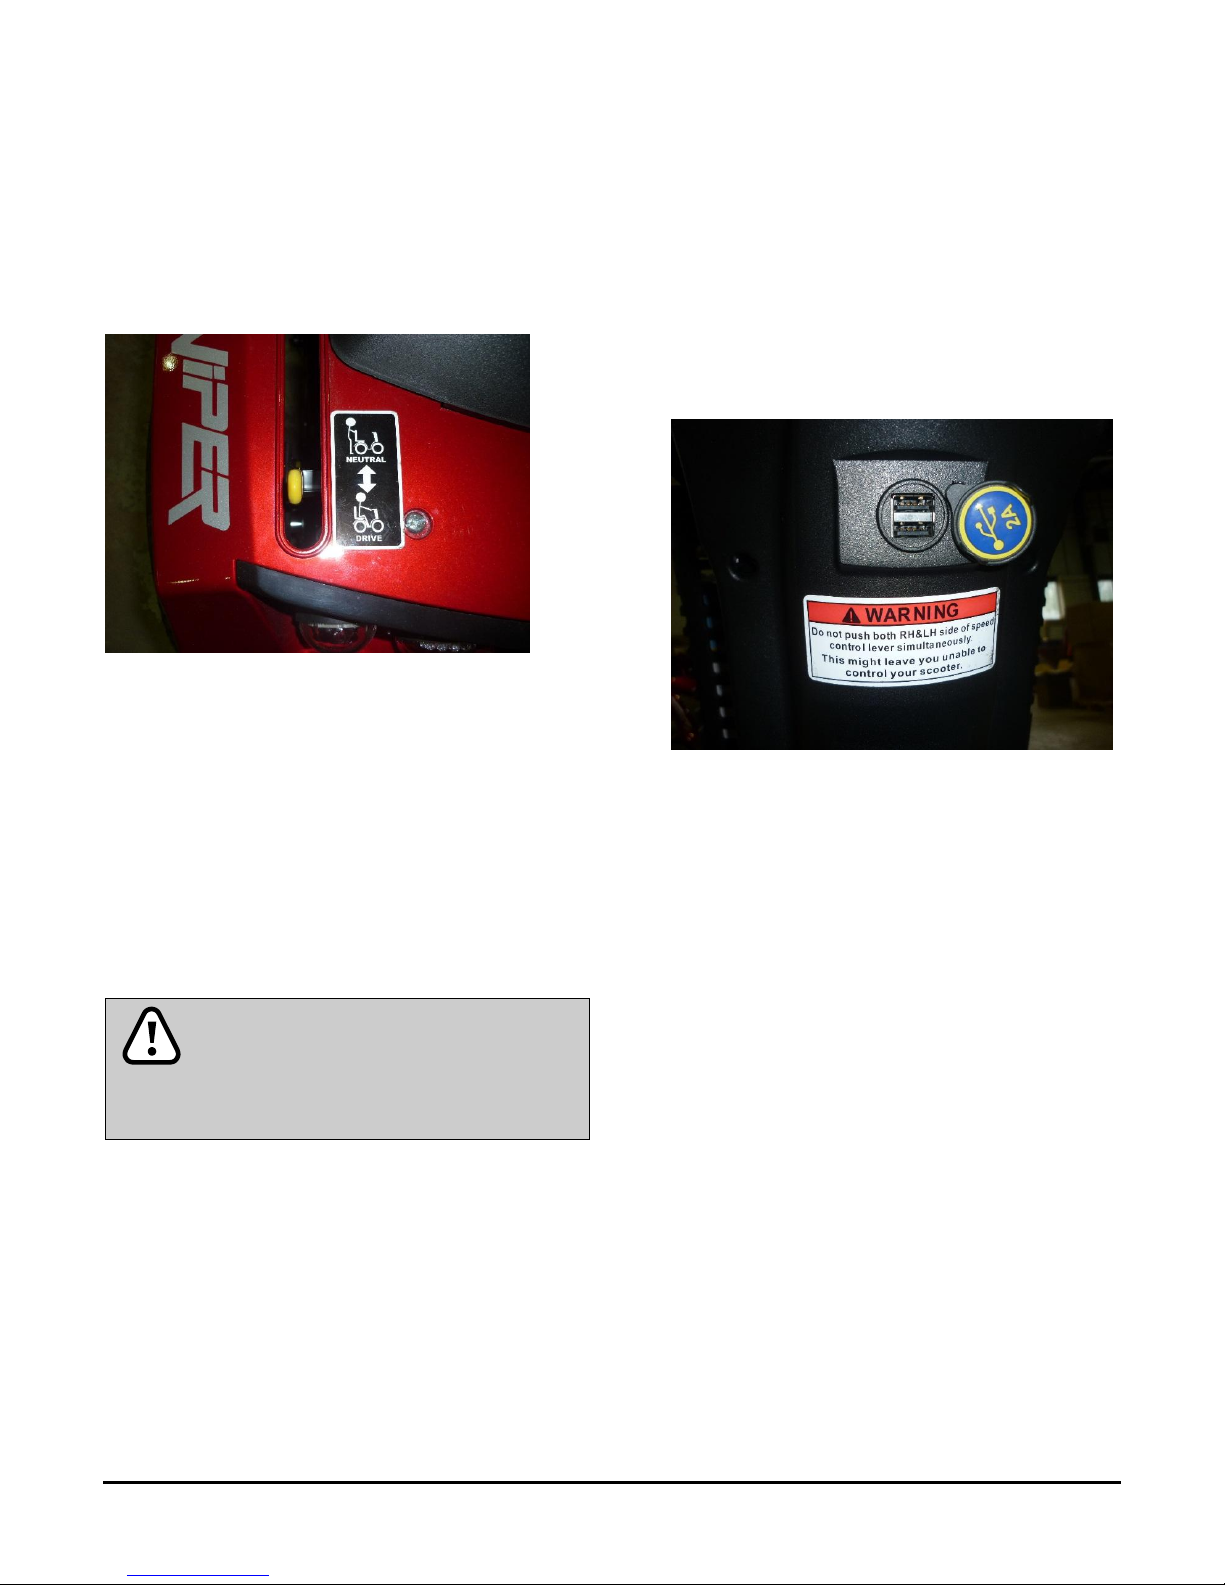
Freewheel Lever
The freewheel levers allows the automatic brake to be
disengaged so the scooter can be manually pushed
and/or manoeuvred. When in freewheel mode the
brakes are not applied so it should not be used when:
1. Somebody is sat on the scooter
2. If the scooter is left unattended
3. When the scooter is on a gradient
Engaged (Drive) Mode:
Pull the lever BACK completely and the scooter can be
driven by the motor.
Freewheel Mode:
Push the lever FORWARDS and switch the scooter off.
The scooter can now be pushed / moved manually.
Warning
The lever should only be set to
FREEWHEEL when on flat ground and
unoccupied by the user. Otherwise, there
is a risk of damage or injury.
.
Using the USB power socket
The scooter features a double USB power socket
which can be used to power or charge numerous
small devices such as satellite navigation systems,
tablet computers and MP3 players for example
The power socket is located in the front of the tiller.
To use facility, first rotate the cover as shown by the
arrow in the photo below. Then insert the USB cable
from the device in to the socket and switch on the
scooter.
Please note the USB sockets only operate when the
scooter is switched on.
Page 9

Viper Electric Scooter Page 9 of 16 Owner’s Handbook (Code: Viper_IFU)
5. DRIVING ON THE ROAD
Starting and Driving
1. Ensure the seat is installed correctly and in the
forwards position.
2. Ensure the tiller and seat are adjusted for a
comfortable driving position.
3. Fold down the armrests so you can place your
arms on them.
4. Switch the ignition on. If necessary, switch on the
headlights.
5. Check the battery indicator to see if there is
enough power for your trip. If you have any doubt
about the remaining power, please recharge the
batteries before departure.
6. Set the speed dial to a setting you are safe and
comfortable with.
7. Check the wigwag paddle works correctly.
8. Check the electromagnetic brake works correctly.
9. Ensure it is safe around you before you drive on
the street or road. Engage the low speed setting if
you are driving on the pavement or indoors.
Attention
1. Do not push both sides of
the wigwag paddle
simultaneously. This may
leave you unable to control
your scooter, and could
cause damage or injury.
2. Do not switch the ignition
off while driving as this will
lead to an emergency stop
and possible risk of
damage or injury.
3. Do not set to the highest
speed setting whilst driving
indoors.
4. Do not adjust the speed
setting whilst driving. A
sudden change in speed
may cause danger to
yourself and others, and
may cause damage to your
scooter.
5. Do not place magnetic
devices near the scooters
electrical parts as this
could affect the safe
operation of the scooter.
6. Be careful while driving in
heavy traffic or in crowded
areas.
7. Whilst reversing the
vehicle, beware of people
or objects behind you.
When reversing, the
scooter will sound an
audible warning alarm.
Page 10

Viper Electric Scooter Page 10 of 16 Owner’s Handbook (Code: Viper_IFU)
6. BATTERY CHARGING AND CARE
Follow the procedure below:
1. Switch the ignition off.
2. Connect the charger power cord in to the
mains socket.
3. Open the charging socket cap on the scooter
tiller. Then connect the charger round plug in to
the scooter charging socket located on the left
hand side of the tiller.
4. Switch the charger on at the mains.
5. Both the charger’s red and orange LEDs will be
lit when charging commences. The charging
duration will be around 12 hours. To ensure
optimum performance an 18 hour charge is
recommended. We do not recommend the
scooter be charged for longer than 24 hours.
6. Both the charger’s LEDs will be lit during the
charging process. The orange LED will turn
green when bulk charging is complete after
which the charger trickle charges the batteries.
Trickle charging optimises the batteries and is
necessary to maintain or improve battery
performance.
7. Switch off the charger, disconnect the power
cord and round plug from the charger socket on
the scooter.
ATTENTION
If only a red LED is lit on the charger,
then the scooter is not connected.
If no LEDs are lit on the charger, then
the charger is not connected to the
power or it is defective.
Please only use a charger supplied with
the scooter. You may damage the
battery and / or scooter if you use an
incorrect charger.
Always charge the battery to its full
capacity every time.
Do not charge in temperatures below
–10ºC or above +50ºC as the charger
may not work efficiently and the
batteries may become damaged.
WARNING
Keep away from flammable objects
while charging as it may lead to fire or
battery explosion.
Do not smoke while charging as the
battery may release hydrogen gas.
Always charge the batteries in a well
ventilated environment which is not in
direct sunlight. Do not charge in
surroundings where it is humid, wet or
damp.
Do not handle the charger, scooter or
mains socket with wet hands, as this
could lead to electric shock.
Battery Care
1. You should recharge the batteries after each
time the scooter is used to ensure maximum
battery range. The batteries should be charged
at least once a week even if the scooter is not
used.
2. After charging or replacing a new battery,
drive the scooter for a short period to ensure
battery capacity is sufficient.
3. In cold environments, the battery may respond
more slowly and range will be reduced.
4. When driving on gradients, the battery gauge
will fluctuate. This is a normal occurrence.
5. Battery range is reduced when driving up
gradients or on rough terrain, as the scooter
uses more power.
6. The batteries should not be charged for more
than 24 hours.
7. The batteries are sealed, and so do not need
topping up with water.
8. The batteries should be checked periodically
for cleanliness. Please refer to the section later
in the handbook.
Battery Replacement
It is natural for the battery capacity to reduce with
time, even if the battery is charged as directed above.
When the battery range is about half of its peak
performance we recommend that the batteries are
changed. Continuing to use an old battery will result in
a rapid reduction in the range of the scooter and can
cause excessive wear and tear on other parts of the
scooter. It is recommended that batteries are replaced
in pairs, and that these are fitted by your dealer.
Page 11
Viper Electric Scooter Page 11 of 16 Owner’s Handbook (Code: Viper_IFU)
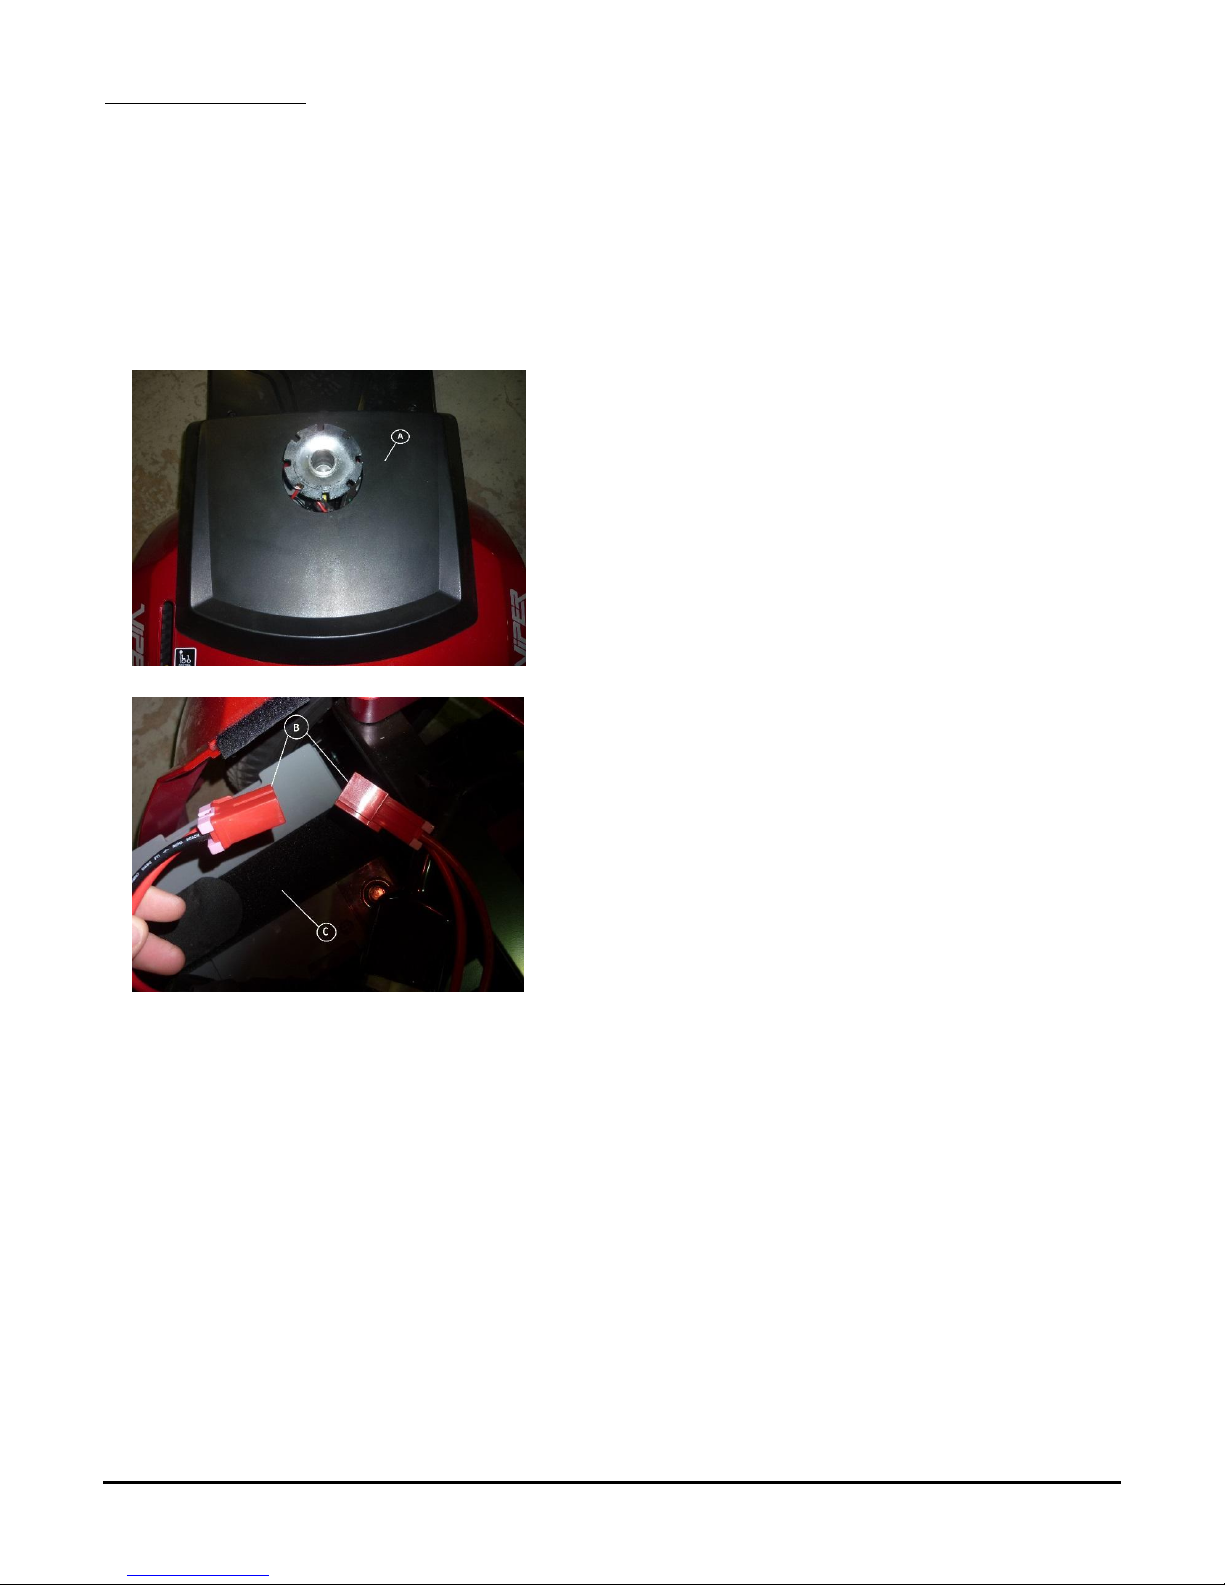
Removing the Batteries
1. Switch off the scooter at the ignition and
remove the seat.
2. Lift up the battery cover (A)
3. Disconnect the Red battery connectors (B)
and Red battery connectors.
4. Remove the Velcro straps (C) from the
battery and pull the battery out.
Cleaning the Battery
If the batteries are contaminated by water, battery acid,
dust or other substances, they will discharge quickly.
The batteries supplied with the scooter are sealed and
as such are maintenance free with no risk of battery
leakage. Please follow the steps below to clean the
battery:
1. Remove the batteries following the procedure
above.
2. Clean the battery with a clean cloth. If the
terminal is covered by white powder, wipe it
clean using warm water.
Page 12
Viper Electric Scooter Page 12 of 16 Owner’s Handbook (Code: Viper_IFU)
7. INSPECTION AND MAINTENANCE
7.1 Checks and Maintenance
Your power scooter is designed for minimal
maintenance. However, like any motorized vehicle it
requires routine maintenance. To keep your scooter for
years of trouble-free operation, we recommend you
follow the following maintenance checks as scheduled.
Weekly Checking
Check the following items weekly or before driving. If
you find anything abnormal contact your Drive Medical
Dealer for further inspection or advice.
Tiller. Ensure it is not loose and can turn smoothly
Speed control dial. Ensure it adjusts freely.
Wigwag paddle. Ensure scooter moves when lever
is pressed, and stops when lever released.
Motor. Check for any abnormal noise and
electromagnetic brakes work correctly.
Freewheel Lever. Ensure it works correctly.
Seat. Ensure it swivels and locks easily.
Tyres. Check tyre tread depth and for any signs of
damage such as cracking.
Monthly Checks
Visually inspect the controller harnesses. Make sure
that they are not frayed, cut or have any exposed wires.
Make sure you keep the controller clean whilst
protecting it from rain or water. Never hose off
your scooter or place it in direct contact with
water.
Keep wheels free from lint, hair, sand and carpet
fibres.
Visually inspect the tyre tread. If less than 1mm
(1/32”), please have your tyres replaced by your
local dealer.
All upholstery can be washed with warm water
and mild soap. Occasionally check the seat and
back for sagging, cuts and tears. Replace if
necessary. Do not store your scooter in damp or
humid conditions as this will lead to mildew and
rapid deterioration of the upholstery parts.
All moving mechanisms will benefit from simple
lubrication and inspection. Lubricate using petroleum
jelly or light oil. Do not use too much oil, otherwise small
drips could stain and damage carpets and furnishings
etc. Always perform a general inspection of the
tightness of all nuts and bolts.
Semi-Annual Checks
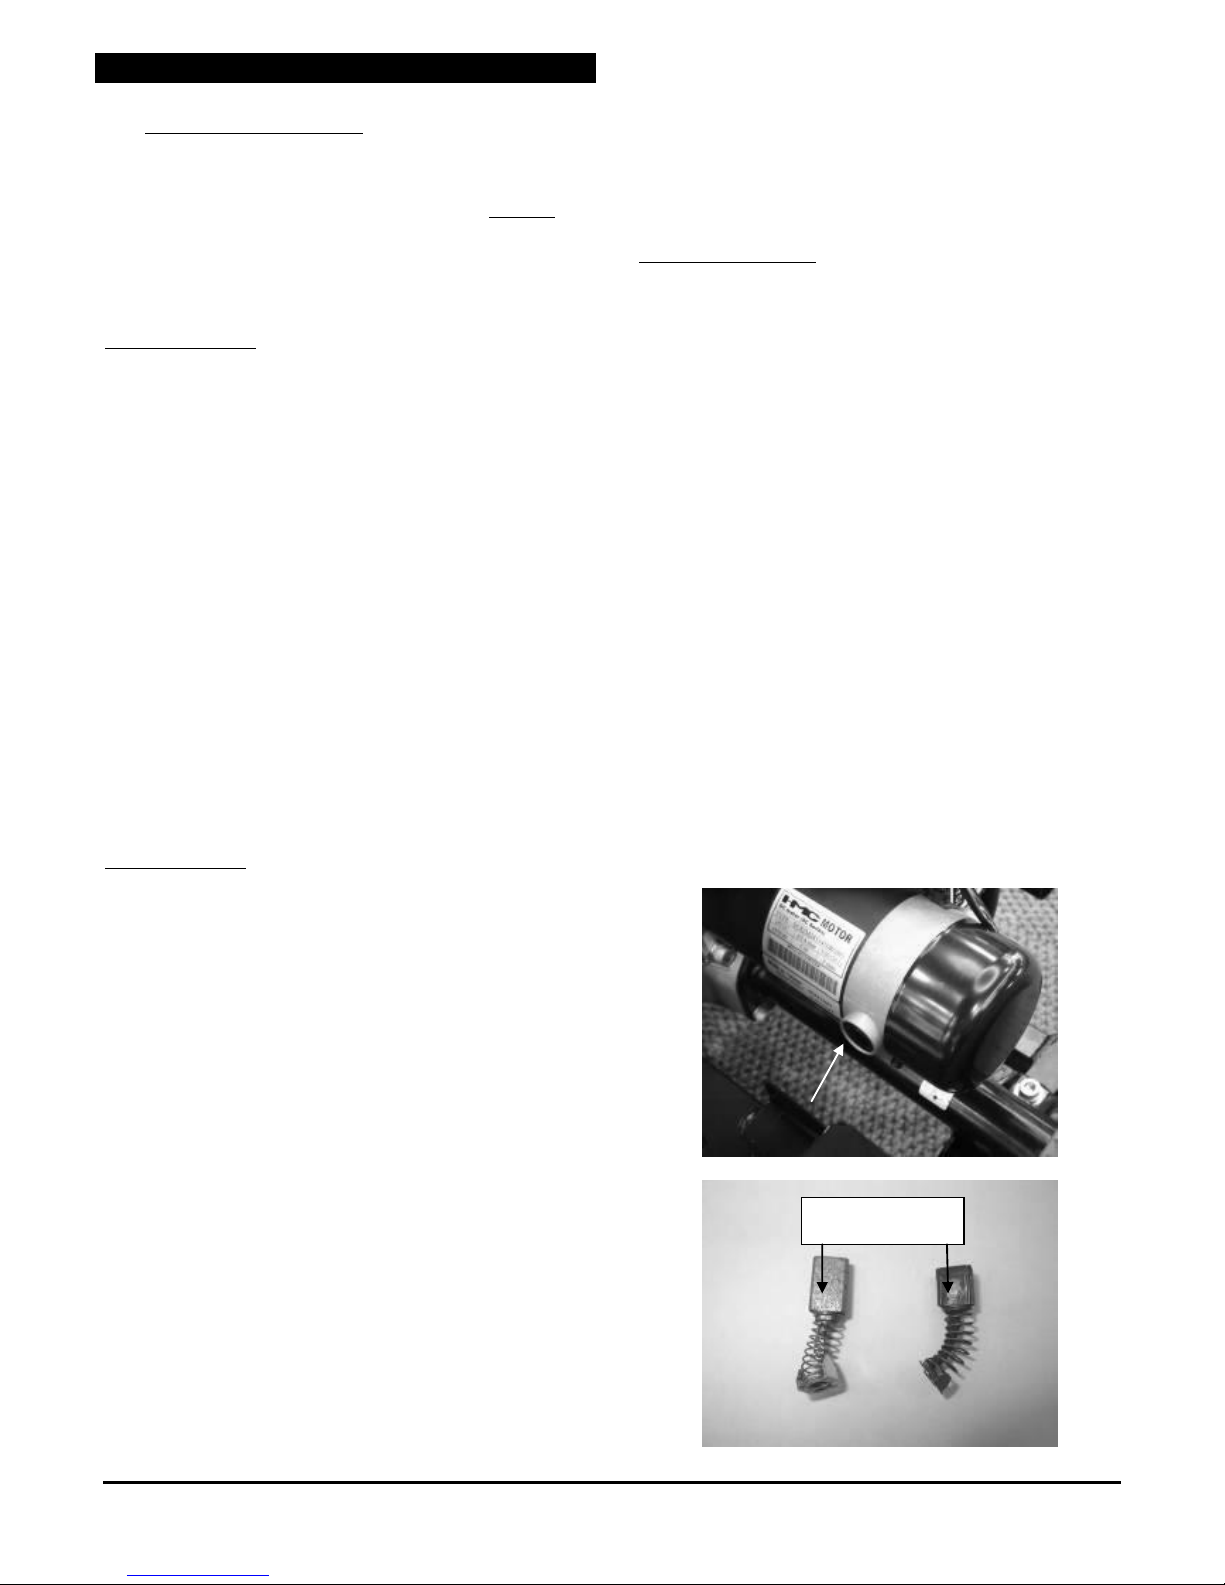
Check the motor brushes. We recommended that your
authorized dealer inspects the brushes every six
months or sooner if your power scooter is not operating
smoothly. If inspection determines excessive wear on
the brushes, they must be replaced or motor damage
will result.
The brushes should be inspected for wear and colour of
the braiding inside the spring. If the braiding is dark
brown, red, silver, purple or gold then the brush needs
replacing.
Warning! Failure to maintain the brushes could void the
power scooter warranty.
To inspect or replace the motor brushes:
1. Unscrew the motor brush caps (by using a
screwdriver on the caps shown by the white
arrow).
2. Remove the brushes.
3. Inspect the brushes for wear (replace if less
than 9mm)
4. Replace the brushes if necessary.
Less than 9mm
Page 13

Viper Electric Scooter Page 13 of 16 Owner’s Handbook (Code: Viper_IFU)
Inspect the state of the battery terminals every six
months. Make sure that they are not corroded and
the connections are tight. Periodically apply a thin
film of petroleum jelly on the surface of terminals
to guard against corrosion.
7.2 Service Record
To ensure your scooter is correctly serviced take it to
your Drive Medical dealer for regular servicing. We
recommend that scooters are serviced at least annually,
and your dealer may charge a fee for this.
A copy of the service record is at the back of this
handbook. Copies of the servicing schedule are
available from Drive Medical to authorised parties on
request.
Even if the scooter has not been used, it
should still be serviced annually.
7.3 Battery Pack and Tyres
For information on the battery pack, please read
section 6 on Battery Charging and Care.
Tyre condition will be affected by how you drive
the scooter and what terrain it is driven on.
The Viper comes with pneumatic tyres, with a
recommended inflation pressure of 26 psi (1.8bar)
The tyre pressure should be periodically checked.
7.4 Cleaning
The scooter should be cleaned periodically,
especially if you tend to drive on sand, gravel or in
other adverse environments.
Use a soft, wrung dry cloth to keep your scooter
clean and dust free. Use a damp cloth and mild
detergent to clean the scooter.
Warning
Do not use a hose pipe or splash water
directly on to the scooter.
Do not use petrol, solvents or vaporising
solutions as these may damage body
panels. Do not use wax
Ensure the charger is unplugged and the
scooter switched off before cleaning the
scooter.
7.5 Storage
Ensure the scooter is stored with the seat set in
the forward position, the scooter switched off with
the battery pack removed and charger
disconnected.
Store the scooter in environments which are
free from direct sunlight and water or
moisture.
7.6 Moving About
1. Switch off the scooter using the ignition key and
dismount from the scooter. We also recommend
removing the seat and batteries prior to moving.
2. Lift the scooter by the chassis only.
3. For your safety ask for help if required. You will
need two or more people when moving or lifting
the scooter as a whole.
Never lift the scooter by the bumpers or
body panels, as this can cause injury or
damage.
Page 14

Viper Electric Scooter Page 14 of 16 Owner’s Handbook (Code: Viper_IFU)
8 TROUBLESHOOTING
Problem: Scooter will not switch on
Symptoms:
Batteries not connected
Circuit breaker has tripped
Remedy:
Check batteries connected
Push circuit breaker to reset
Problem: Scooter will switch on but will not run
Symptoms:
Flat batteries
Charger plugged in
Motor in freewheel mode
Remedy:
Recharge battery
Unplug charger from scooter
Push down freewheel lever
Problem: Scooter appears slow
Symptoms:
Flat batteries
Speed setting slow
Remedy:
Recharge battery
Turn up speed dial
Problem: Seat moves whilst in use
Symptoms:
Seat not locked in position
Remedy:
Slowly rotate the seat until it
drops in place and is secure.
Problem: Horn sounds involuntarily / automatically
Symptoms:
The scooter has diagnosed a
fault
Remedy:
Ensure the wigwag paddle is
released and switch the scooter
off and on.
Recharge batteries if error
persists.
9 SPECIFICATION
Model Reference
Viper
Dimension
(L x W x H)
143 x 56 x 132cm
56” x 26” x 52”
Total weight
Without battery
120kg (264 lb)
90kg (200 lb)
Propulsion motor
800W / 1.1 hp
Battery
12V 50ah x 2
Charger
24V 5A
Controller
Dynamic Rhino II 120A
Front Suspension
2x shock absorber
Rear Suspension
1x shock absorber
Front Tyre
3.00 x 8 x 2
(14” / 36cm diameter)
Rear Tyre
3.00 x 8 x 2
(14” / 36cm diameter)
Anti-tip Wheel
2.75”/ 7cm diameter
Top Speed (Forward)
12.8kph / 8.0mph
Climbing angle
8º
Cruising range (see note)
40km / 25 miles
Min. turning radius
134cm (53”)
Ground clearance
10cm (4”)
Kerb climbing ability
9cm (3.5”)
Obstacle climbing ability
9cm (3.5”)
Max. load weight
(including goods)
160kg / 25 stone
Remark:
Drive Medical reserves the right to modify the
specification if necessary. The final specification is
subject to the individual scooter you purchase from
your dealer.
Note:
The maximum driving distance is based on an ambient
temperature of 20ºC, a 100kg driver, a fully charged
battery and a constant driving speed at 12.8kph/h with
70% battery power discharged. The surface is flat and
even.
Page 15

Viper Electric Scooter Page 15 of 16 Owner’s Handbook (Code: Viper_IFU)
10 VIN NUMBER
To ensure the correct after sales service and warranty
service support, please write down the scooter serial
number. The serial number is located on the back right-
hand side of the frame.
VIN Number
Motor S/No.
Controller S/No.
Also, note your Drive Medical dealer below:
Dealer
Address
Postcode
Telephone
11 WARRANTY
There is a comprehensive twelve-month warranty from
the date on which your new scooter is delivered. The
warranty covers the scooter for repairs or replacement
during this period. For more detail, please see the
Warranty Conditions below.
Warranty Conditions:
1. Any work or replacement part installation must be
carried out by an authorized Drive Medical dealer
/ service agent.
2. To apply the warranty should your scooter require
attention please contact the designated service
agent listed above.
3. Should any part of the scooter require repair or full
or part replacement, as a result of a manufacturing
or material defect within twelve months of
receiving the scooter, replacement parts will be
supplied free of charge.
Note: This guarantee is not transferable
4. Any repaired or replaced parts will be covered by
this warranty for the balance of the warranty
period on the scooter.
5. Consumable items supplied will not generally be
covered during the normal warranty period unless
such items require repair or replacement clearly as
a direct result of a manufacturing or material
defect.
Such items include (among others):
upholstery, tyres and batteries.
6. The above warranty conditions apply to brand new
scooters purchased at the full retail price. If you
are unsure whether your scooter is covered, check
with the service agent.
7. Under normal circumstances, no responsibility will
be accepted where the scooter has failed as a
direct result of:
a) The scooter or part not having been
maintained in accordance with the
manufacturer’s recommendations.
b) Failure to use the manufacturer’s specified
parts
c) The scooter or part having been damaged due
to neglect, accident or improper use
d) The scooter or part having been altered from
the manufacturer’s specifications or repairs
having been attempted before the service
agent is notified
Please note your local service agent’s contact details
in the previous box. In the event of your scooter
requiring attention, contact them and give all relevant
details so they can act quickly.
The manufacturer reserves the right to alter without
notice any weights, measurements or other technical
data shown in this manual. All figures, measurements
and capacities shown in this manual are approximate
and do not constitute specifications.
Page 16

Viper Electric Scooter Page 16 of 16 Owner’s Handbook (Code: Viper_IFU)
Appendix A: Service Record
YEAR
1 2 3 4 5
YEAR
1 2 3 4 5
Service Dates
Service Dates
Controller
Upholstery
On/off switch
Seat
Control Lever
Back
Braking
Armrests
Recharge point
Electrics
Batteries
Connections
condition
Levels
Lights
Connections
Test run
Discharge test
Forwards
Wheels and
Tyres
Reverse
Wear
Emergency stop
Pressure
Left turn
Bearings
Right turn
Wheel nuts
Slope test
Motors
Over obstacles
Wiring
List Items repaired
Noise
Connections
Brake
Brushes
Chassis
Condition
Steering
 Loading...