

Page 1
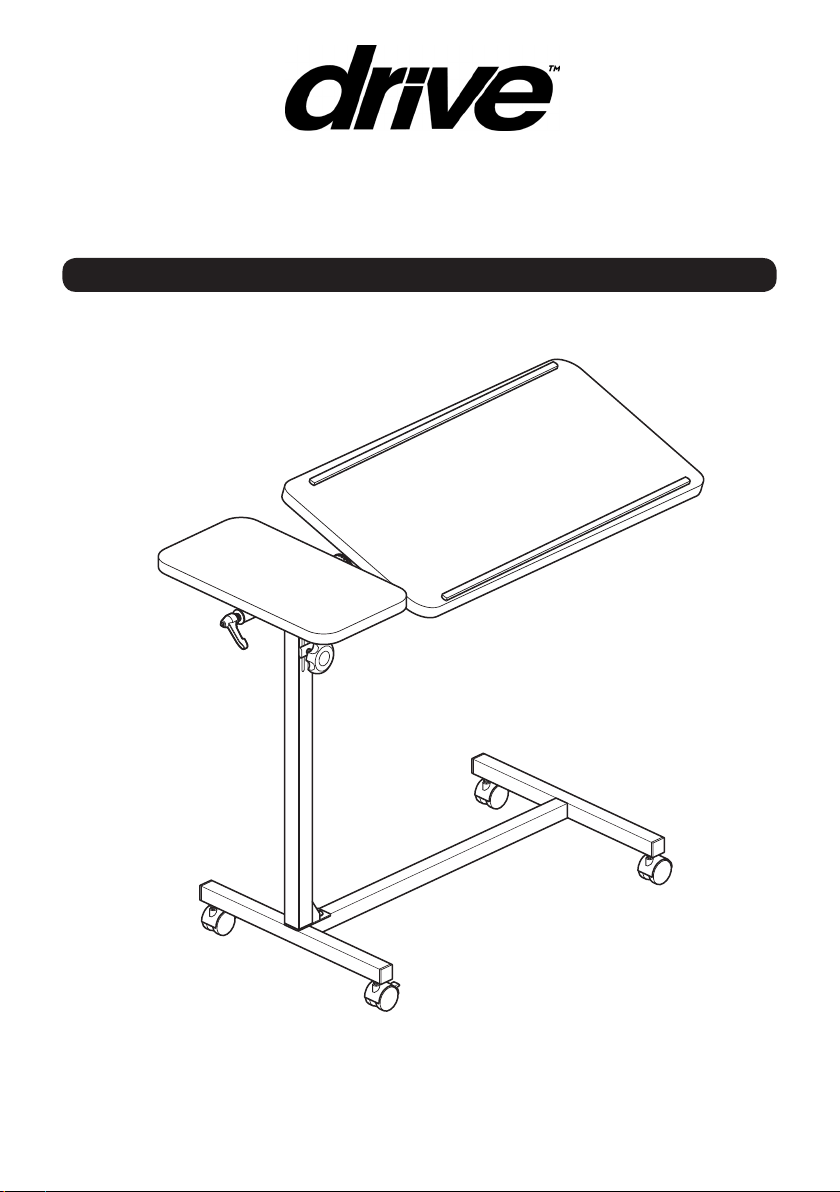
Twin Top Overbed Table (948)
Assembly & User Instructions
Please read these instructions carefully before assembling or using this product.
Ensure you are familiar with all of the safety and user instructions.
Retain all packaging until you have accepted the product.
Page 2

Introduction
The Twin Top overbed table can be used in conjunction with a bed or a chair, and is ideal
for reading, writing, using a laptop computer, etc.
It has two height adjustable tabletops, the larger of which is angle adjustable and has
two lips to help prevent items slipping off the table.
The table is also highly portable, with a lightweight yet sturdy steel frame.
Drive Medical is an ISO 9001 certied company.
For more details about our products please see your local dealer.
Important Safety Information
Please read all of these instructions fully before assembly or using.
• Unpack and check that you have all of the parts shown.
• To avoid risk of suffocation to children or animals, dispose of the plastic bags correctly.
• Remove all packing materials and dispose of correctly, once the product has
been accepted.
• Parts of the assembly are best carried out by 2 people.
• Ensure that only Drive parts are used on the table.
• The weight limit on the table is 15kg (33lb).
• The maximum advised height of the table is 94cm. Do not exceed this.
• When adjusting the table height/angle, the table will drop unless it is supported.
• For maximum stability, always try to keep heavy items near the centre of the
table tops.
• The table is not suitable for leaning on, standing on, sitting on or any other similar
load-bearing function.
• Periodically visually inspect the xings and retighten if necessary.
• It is recommended that you remove any items on the table tops before moving it.
• This product should not be discarded with household waste. Take to your local
authority waste disposal centre.
Keep these instructions for future reference.
1
Page 3
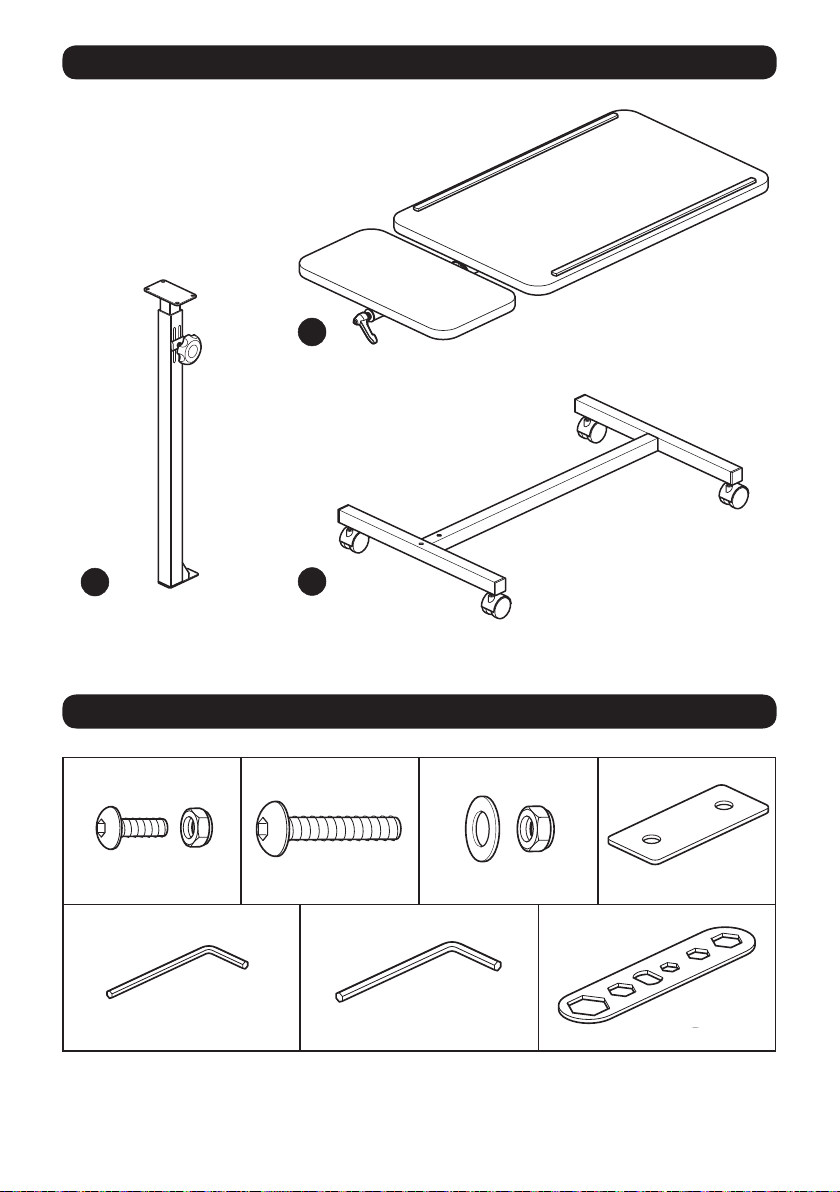
A
Table top
Parts
B
Table upright
1
15mm Allen bolt x 4
5
4mm Allen key x 1
C
Table base
2
40mm Allen bolt x 2
6
Hardware
3
Washer & nut x 1
5mm Allen key x 1
4
Base plate x 1
7
Spanner x 1
2
Page 4
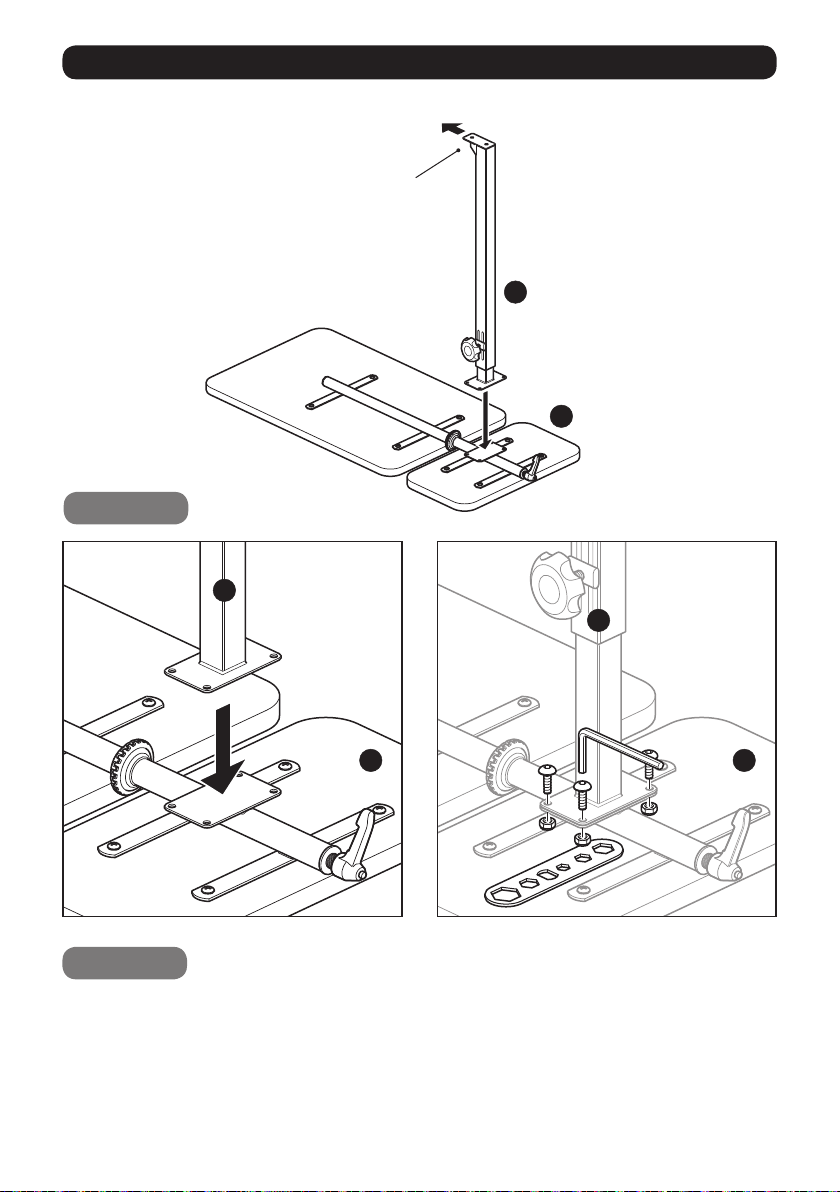
Table Assembly
Ensure the ‘plate’ on
the bottom of the table
upright (B) is positioned
in the direction shown.
Step 1
a: b:
B
B
A
B
A
Step 1
Attach the table upright (B) to the table
top (A).
a: Position the table upright (B) onto the
plate on the underside of the table top (A).
3
5
1
1
1
7
b: Attach using 4 x 15mm allen bolts and
nuts (1). Tighten using the supplied 4mm
allen key (5) and spanner (7).
A
Page 5
Step 2
Table Assembly
C
B
a: b:
C
4
6
2
B B
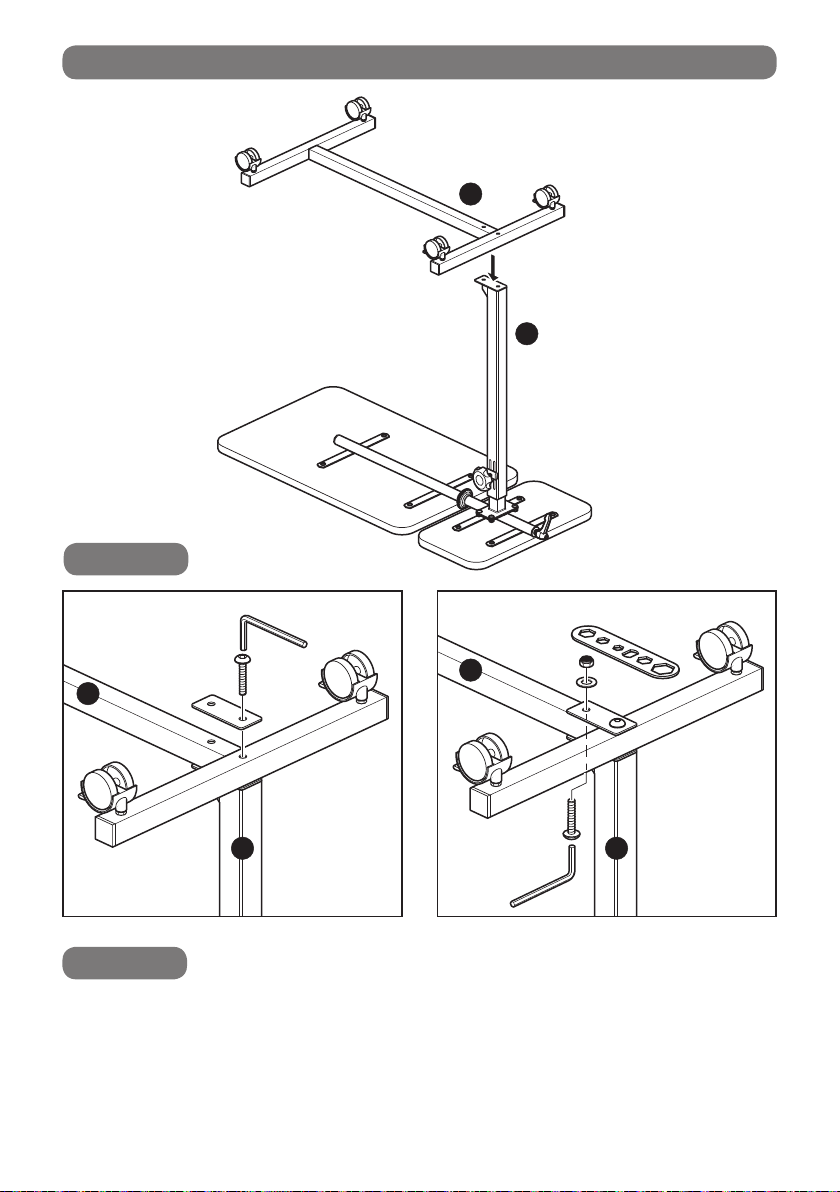
Step 2
With help, attach the table base (C) to the
table upright (B).
a: Insert the 1st 40mm allen bolt (2)
through the base plate (4), table base
(C) and into the table upright (B). Tighten
using the supplied 5mm allen key (6).
7
C
b: Insert the 2nd 40mm allen bolt (2) up
through the table upright (B) and table
base (C), x using the washer and nut (3).
Tighten using the supplied 5mm allen key
(6) and spanner (7).
Assembly is now complete.
3
2
6
4
Page 6
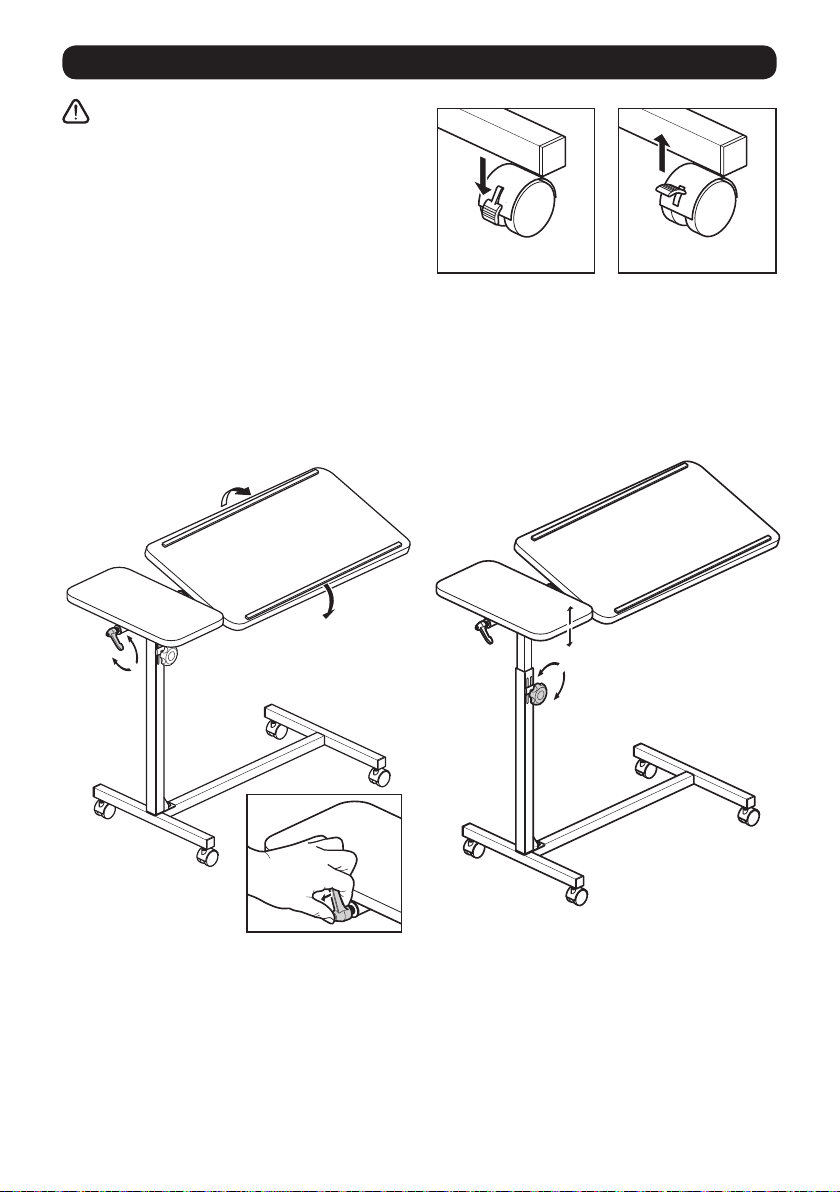
Table Adjustment
Push Down to Lock
Lift up to unLock
Lift up to unLock
Caution:
• Remove all items from the table tops
before any adjustments.
• When adjusting the table height/
angle, the table will drop unless it is
supported.
• Do not force the main table when
adjusting the angle.
a: Lock b: Unlock
Locking / unlocking the wheels
a: To lock the wheels: Push the break
catch down on each wheel.
b: To unlock the wheels: Lift the break
catch up on each wheel.
Side
lever
Table angle adjustment
Loosen the side lever (2 complete turns
anti-clockwise). Adjust the angle as
required and re-tighten the lever (turn
clockwise) to lock in position.
Note: To rotate the lever out of the way
(without loosening), press the button, pull
out the lever and rotate as required.
5
Knob
Table height adjustment
Loosen the knob (turn anti-clockwise).
Adjust to the height required and retighten the knob (turn clockwise) to lock
in position.
Page 7

Battery
Spares Available
Z948 HGT: Height adjustment knob
Z948 ANG: Angle adjustment knob
Z948 BC: Castor (Braked)
Z948 UC: Castor (Unbraked)
Care and Maintenance
• The table can be wiped down with a warm damp cloth and mild disinfectant.
Do not use hot water or abrasive cleaners as these can damage the table.
• The wooden parts of the table tops may be cleaned with a duster or dry cloth.
Polish should not be used as this can cause abrasion of the wood.
• Periodically visually inspect the xings and retighten if necessary.
Specifications
Model number: 948
Overall table dimensions:
45cm (D) x 77cm (W) x 66 - 94cm (H)
17¾” (D) x 30½” (W) x 26 - 37” (H)
Main tabletop dimensions:
45cm (D) x 60cm (W)
17¾” (D) x 23¾” (W)
Main tabletop dimensions:
45cm (D) x 15cm (W)
17¾” (D) x 6” (W)
Maximum load weight:
15kg (33lb)
Warranty
The overbed table carries a twelve-month warranty from date of purchase.
This covers manufacturing and design defects. It does not cover wear and tear and
accidental damage. Please see your dealer for full details of the warranty.
This does not affect your statutory rights.
Information on Disposal of old Equipment
This symbol indicates that equipment
with this symbol should NOT be disposed
of as general household waste. If you
want to dispose of the product,
please consider the collection
systems or facilities for
appropriate recycling.
Products
6
Page 8

Drive Medical Ltd
Ainley’s Industrial Estate, Elland, West Yorkshire HX5 9JP
Web: www.drivemedical.co.uk
 Loading...