

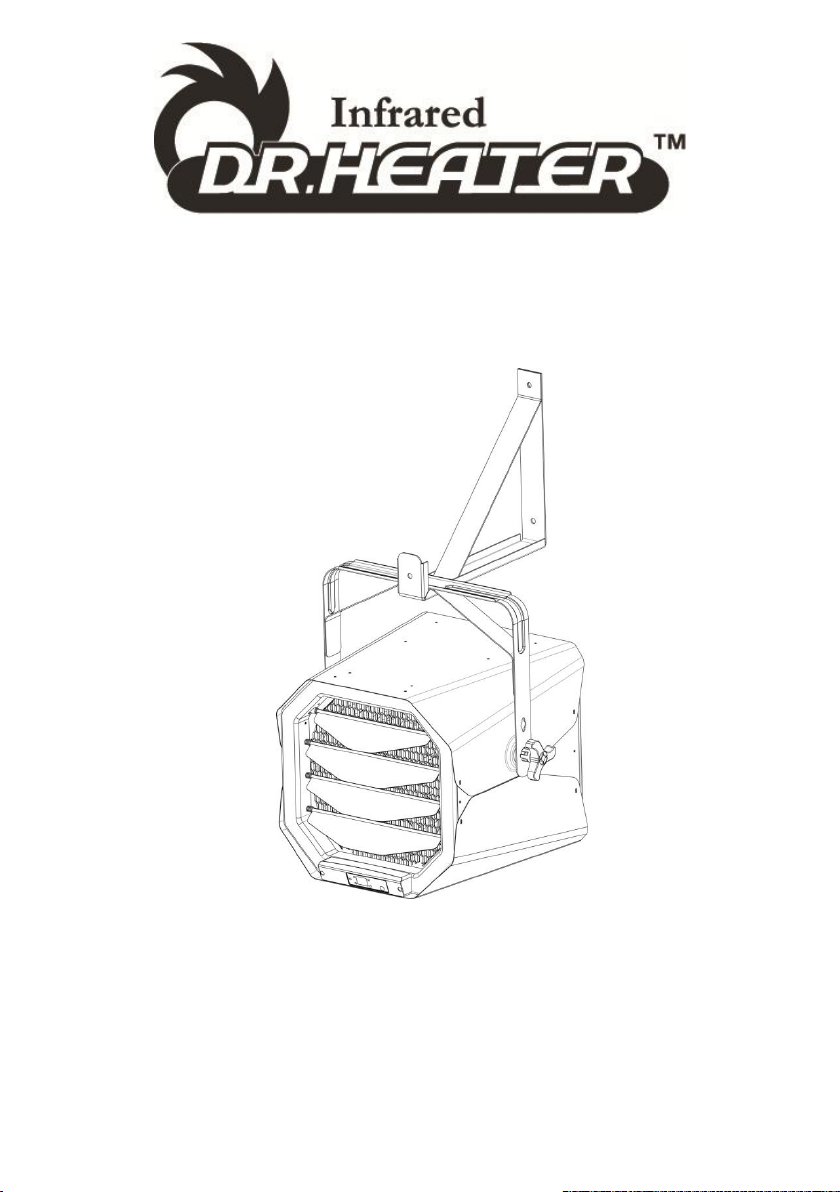
10,000W/240V WALL / CEILING MOUNTED
GARAGE HEATER
OWNER’S MANUAL
Model No.: DR-910F
10,000W 240V 60Hz
IMPORTANT INSTRUCTIONS
READ & SAVE
1

TABLE OF CONTENTS
Important Instructions……………………………………….3-4
Installing Instructions………………………. ……………… 5-10
Specifications and Wiring Diagram ………………………. 11
Parts of the Heater……………………….…………..……...12-13
Operating Instructions……………………….………....….. 14-17
Maintenance and Cleaning……………………………….. . 18
Troubleshooting……………………………………………. . 19
2

IMPORTANT INSTRUCTIONS
PLEASE READ ALL INSTRUCTIONS BEFORE USING THIS
HEATER
NOTE: There may be a trace of smoke or odor when unit is first
operated. Don’t be alarmed. This indicates that a drop of oil
fell on the heating coil during the manufacturing process. It will
quickly evaporate and should not re-occur.
Make sure that the room in which the appliance is located is
well ventilated during this operation. It is normal for the
appliance to emit small cracking sounds when you turn it on
for the first time. Do not be alarmed.
WHEN USING ELECTRICAL APPLIANCES, BASIC
PRECAUTIONS SHOULD ALWAYS BE FOLLOWED TO REDUCE
RISK OF FIRE, ELECTRICAL SHOCK AND INJURY TO
PERSONS OR DAMAGE TO PROPERTY, INCLUDING THE
FOLLOWING:
1) Read all instructions before using this heater.
2) This heater is hot when in use. To avoid burns, do not let bare
skin touch hot surfaces. Keep combustible materials, such as
furniture, pillows, bedding, papers, clothes, and curtains at least 3
feet (0.9 m) from the front of the heater and keep such materials
away from the sides and rear.
3) Extreme caution is necessary when any heater is used by or
near children or disabled persons and whenever the heater is left
operating and unattended.
4) Always switch off the heater when not in use.
5) Do not operate any heater after the heater malfunctions or has
been dropped or damaged in any manner. Disconnect power at
service panel and have heater inspected by a certified/licensed
electrician before reusing.
6) Do not use outdoors.
7) To disconnect heater, turn off power to circuit breaker at main
disconnect panel.
3

8) This heater should be installed at least 8 feet (2.4 m) from the
floor and no closer than 1 foot (0.3 m) from any adjacent surfaces
or walls. Keep at least 4.5 inches (0.12m) from the back wall,
regardless of whether the wall mount bracket is used.
9) Do not insert or allow foreign objects to enter any ventilation or
exhaust opening as this may cause an electric shock or fire and
potentially damage the heater.
10) To prevent a possible fire, do not block air intakes or exhaust in
any manner.
11) A heater has hot and arcing or sparking parts inside. To reduce
the risk of fire, do not use it in areas where gasoline, paint, or
flammable vapors and liquids are used or stored.
12) Use this heater only as described in this manual. Any other use
not recommended by the manufacturer may cause fire, electric
shock, or injury to persons.
13) This product must be installed by a certified/licensed electrician,
in accordance with applicable local codes.
14) For supply cables, use 6 AWG (13.3 mm2) copper wires.
SAVE THESE INSTRUCTIONS
WARNING – RISK OF FIRE, DO NOT USE AS A RESIDENTIAL
OR HOUSEHOLD HEATER.
4

INSTALLATION INSTRUCTIONS
WARNING: All wiring must be installed by a certified/licensed
electrician.
The heater must be grounded in accordance with applicable
national and local building codes.
WARNING: To reduce the risk of fire, do not store or use gasoline
or other flammable vapors and liquids in the vicinity of the heater.
All wiring procedures and connections should be in
accordance with applicable national and local codes.
NOTE: Compatible with a 240V Line Voltage Double Pole Wall
Thermostat. Must be installed by a certified/licensed electrician.
Before installation:
Disconnect the main supply connection.
Supply cables should be 6 AWG (13.3 mm2) copper wires.
The heater must be connected to an individual branch circuit protected
by a 60 Amp circuit breaker only.
Supply cables must be equipped with a dual pole circuit breaker rating
at least 240V 60A/pole as main cut-off switch of power to the heater.
Wiring compartment for accommodating supply cables and pigtail
leads are adequate and measured free space of 2524.67 cm3.
Tools/ Materials Needed (Not Included):
·Regular Screwdriver Set
·Spanner
·Impact Drill with 12mm Drill Bit
Recommended Accessories:
·DR-001: Thermostat
Unpacking Contents:
·Heater
·Owner's Manual
·Warranty Card
·Heater Handle
·Mounting Bracket
·Tilt Adjustable Knob x 2
5
·Remote Control
Screw Kit Contents
Qty
Description
2
M10 Explosion Screw
1
M10x80mm Screw
2
M10 Nut
2
Ф10 Washer
2
Ф10 Spring Washer
2
Ф10 Rubber Pad
Wall Mount
Ceiling Mount
·Battery x 2
·Screw Kit
WARNING: To reduce the risk of fire, do not store or use gasoline
or other flammable vapors and liquids in the vicinity of the heater.
INSTALLATION INSTRUCTIONS:
1. This heater should be installed at least 8 feet (2.4 m) from the
floor. This minimum distance must be maintained.
2. Do not install closer than 1 foot (0.3 m) from any adjacent
surfaces or walls.
3. Keep at least 4.5 inches (0.12m) from the back wall, regardless
of whether the wall mount bracket is used.
4. Mark the drill-hole positions on the wall or ceiling for the
mounting bracket.
5. Drill the required holes with diameter fitted to the anchor provided
for positioning the mounting bracket.
6. Insert the anchors.
6
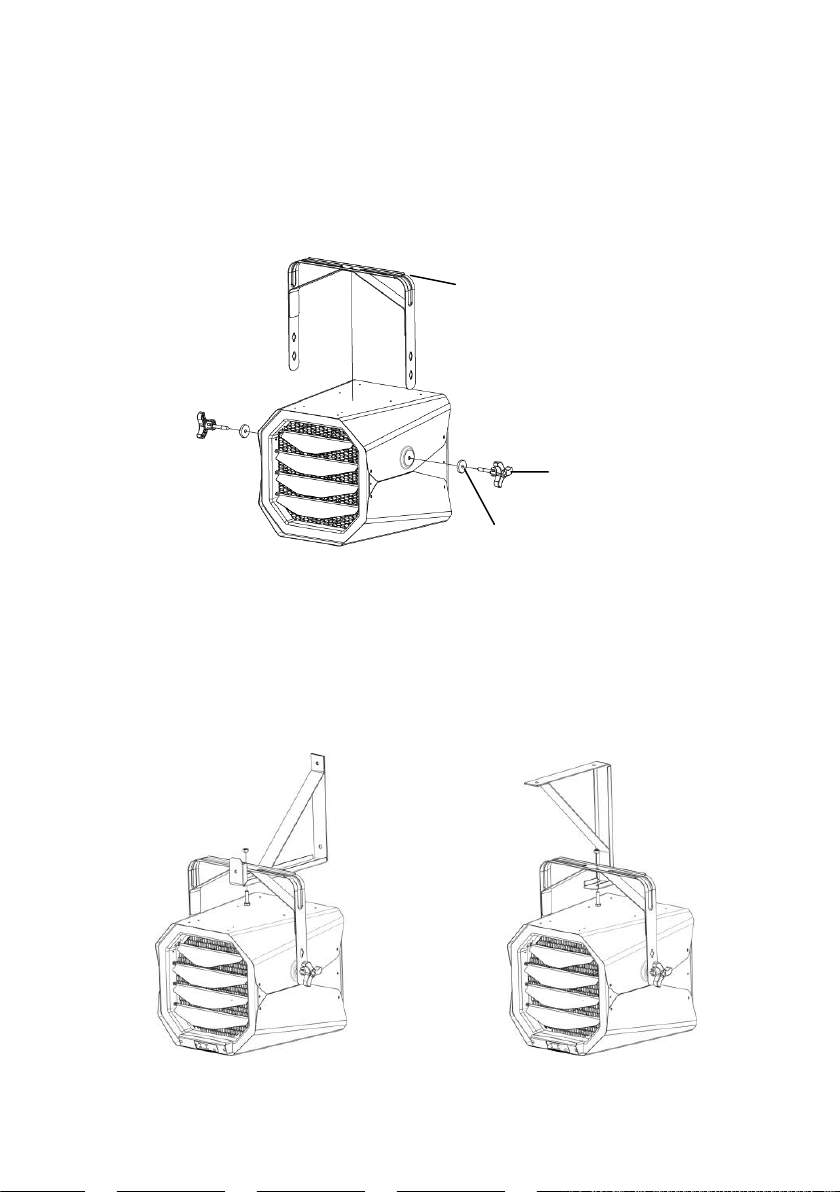
7. Attach the mounting bracket to the wall and secure with mounting
Hang Bracket
Knob
Rubber Pad
Wall Mount
Ceiling Mount
screws.
8. Loosen the tilt adjustment knobs; remove the cart.
9. Align the Hang Bracket to the knob screw holes.
10. Re-insert the knob and tighten.
11. Hook the unit to the mounting bracket and let the unit hang from
the mounting bracket.
12. Insert the bolt provided through the mounting bracket and the
heater handle. Tighten with the nut and washer.
7

13. Loosen the screw to remove the wiring compartment/connection
Watch
Window
For Wiring
cover in the rear of the heater. There are three pigtail leads, both
Black (L1) and Red (L2) are for power connection; Green is for
grounding connection.
14. Run the electrical power supply cable in flexible conduit and
connect to the wiring compartment via the knock-out at back
side of the unit. The rectangle hole is watch window for wiring.
15. Make the connections properly with connectors which are
suitable for the conductor size, including grounding wirings. And
after making the connections, arrange the pigtail leads of unit
and power supply wires in the wiring compartment.
16. You can select Inside or Wall thermostat. If you intend to use
Inside Thermostat, press the rocker switch to INSIDE
THERMOSTAT.
17. How to install Wall Thermostat. (DR-001 Not Included.)
A. Install Thermostat Outlet Box to the wall. Open the knock-out
on the right. Run line voltage wires to the thermostat location
via the knock-out.
8

B. Press the rocker switch to WALL THERMOSTAT, insert two
TERMINAL A
16AWG WIRES
Affixed with insulating tape
Connect with the
16AWG Black wire
Connect with the
16AWG Red wire
Black
Red
16AWG wires to Terminal A inside the heater. Make sure to
tighten the screws in Terminal A.
C. Connect the other side of the two 16AWG wires to the wall
thermostat as indicated below:
9

D. Insert wires into the Thermostat Outlet Box, and screw up the
thermostat.
E. Cover the thermostat.
10

SPECIFICATIONS
Red
10,000W/240V WALL / CEILING MOUNTED GARAGE HEATER
Model: DR-910F
Voltage: 240 V
Watts: 10,000 W
Frequency: 60 Hz
Recommended Heating Capacity: 1.25watts / ft³ (0.03m³)
11

PARTS OF THE HEATER
A
E B C
D F G
H I J
N M L
K
A. Wall Mount Bracket
B. Ceiling Bracket
C. Upper Housing
D. Louver for air direction
E. Tilt Adjustable Knob
F. Lower Housing
G. Front Exhaust Grill
H. ON/OFF Switch
12
I. Internal/Wall
Thermostat Switch
J. Control Panel
K. Alarm LED
L. Power LED
M. Timer LED
N. Heat LED

P
Q
R
S
O. Increase Temperature
button
P. Decrease Temperature
button
Q. Thermostat button
R. Timer button
S. Power button
O
13

OPERATING INSTRUCTIONS
WARNING - The heater must be properly installed before it is
used.
HAZARD OF ELECTRIC SHOCK, EXPLOSION, OR
ARC FLASH:
Apply appropriate personal protective equipment (PPE)
and follow safe electrical work practices. See NFPA 70.
A circuit breaker must be installed and serviced only by
qualified electrical personnel.
Always use a properly rated voltage sensing device to
confirm power is off.
The switch on the heater is to start the Fan and Heater.
Use the circuit breaker as power ON/OFF for the
heater. The circuit breaker is to be installed by a
certified/licensed electrician and should be located in
line of sight from the heater location or should be
capable of being locked in open position. Follow the
operating instructions to reduce the risk of fire,
electric shock, injury, or death to persons.
How to select INSIDE/WALL thermostat?
Identify the ON/OFF switch and the thermostat rocker switch
located on the rear of the heater.
You can select Inside or Wall Thermostat to control the heater
temperature by using ON/OFF and thermostat rocker switches.
CAUTION! Risk of malfunction & Damage: You must turn the
ON/OFF switch to OFF before selecting the
INSIDE/WALL thermostat.
14

Selecting Inside Thermostat:
1 Turn the ON/OFF switch to OFF position, and then turn the
thermostat rocker switch to INSIDE THERMOSTAT as
indicated below:
2 Turn the ON/OFF switch to ON position again, the heater will
work on the inside thermostat mode.
Selecting Wall Thermostat:
1 Turn the ON/OFF switch to OFF position, and then turn the
thermostat rocker switch to WALL THERMOSTAT as indicated
below:
2 Turn the ON/OFF switch to ON position, the heater will work
on the wall thermostat mode.
CAUTION! Risk of malfunction & Damage: You can not change
the INSIDE/WALL THERMOSTAT when the heater is running,
you must turn the ON/OFF switch to OFF and then select the
INSIDE/WALL thermostat mode.
15

Insert the batteries into the remote control as shown below:
NOTE: Remove the batteries if the remote control is not to be
used for a month or more. Batteries left in the remote may leak
and cause damage.
DO NOT MIX OLD AND NEW BATTERIES! DO NOT MIX
ALKALINE, STANDARD (CARBON-ZINC) OR
RECHARGEABLE (NICKEL-CADMIUM) BATTERIES!
TURNING THE HEATER ON
To turn the heater ON, press the ON/OFF rocker switch to ON
position, the power LED will turn on and display the room
temperature.
The factory setting temperature is 70℉, If you set the
thermostat switch to Inside Thermostat, and the room
temperature is lower or equal to 68℉, the heater will turn to
High mode and will turn off when the room temperature is
higher or equal to 72℉.
SETTING THE TEMPERATURE (with the remote control)
Note: You need to set the thermostat to INSIDE THERMOSTAT
and then set the desired temperature:
Press the Thermostat button, and then press the + button to
increase the temperature or the -button to decrease the
temperature.
You can also press the + button until the numeric temperature
starts flashing. Press+ button again to increase the
temperature or the - button to decrease the temperature.
After setting the desired temperature, the heater will run on
heating when the room temperature is equal to or lower than
16

the setting temperature - 2℉, and will turn off when the room
temperature is equal to or greater than the setting
temperature+2℉.
Note: If you set the thermostat switch to WALL THERMOSTAT,
press the + and - button cannot set the temperature, the heater
will run in ON or OFF heating according the wall thermostat
setting temperature.
SETTING THE TIMER (with the remote control)
Press the TIMER button until Set Time starts flashing. The
default value is 3 hours.
Press the“+”button to increase the set time or the “–” button to
decrease the set time. The timer can be set from 1 to 12 hours.
The timer will set and execute after the LED display stops
flashing. The heater will shut OFF automatically when the set
time is reached.
To turn the timer OFF, press the TIMER button, and then
pressing the “–” button to set the time to 0. The timer feature
will turn off when the LED stops flashing.
To turn off the heater, switch off the circuit breaker.
The circuit breaker serves as the power
disconnection means.
This heater includes a visual alarm to warn that parts of the
heater are getting excessively hot. If the alarm flashes,
immediately turn the heater OFF and inspect for any objects, on
or adjacent to the heater that may cause high temperatures. DO
NOT OPERATE THE HEATER WITH THE ALARM FLASHING.
To reset the heater, switch the circuit breaker OFF, and wait five
to ten minutes for the unit to cool down before turning the heater
on.
17

MAINTENCE AND CLEANING
No user maintenance on this heater should be undertaken except
regular cleaning as described below. All other servicing or
maintenance should be performed by qualified service personnel.
Before any cleaning, make sure that:
1. Power supply is disconnected at the source. Switch off the
circuit breaker.
2. Wait 60 minutes to ensure the heating element has cooled down.
Your heater is now ready for cleaning.
Regular Cleaning:
1. Do not spray chemicals or other cleaning liquids on the heater.
2. Interior dust can often be removed by using a vacuum cleaner
with a crevice tool attachment.
3. To clean enclosure, use a clean, soft, and lightly damp cloth to
gently wipe off the dirt from the surface of the unit. Make sure
the heating element and the switches do not get wet. Allow the
unit to dry completely before use.
CAUTION: DO NOT ALLOW WATER TO RUN INTO THE
INTERIOR OF THE HEATER AS THIS COULD CREATE A FIRE
OR ELECTRIC SHOCK HAZARD, DAMAGING THE UNIT.
18

Problem
Probable Cause
Solution
Unit is not
heating.
Overheat protection has
temporarily deactivated the
heater.
Turn the heater OFF. Switch
off the circuit breaker. Wait
10 minutes before turning on
the heater.
Breaker/Fuse has been
tripped.
Check your electrical box to
confirm the breaker has not
been blown. This may occur if
the receptacle is shared with
other high consumption
appliances.
The heater is
producing a
burning
smell.
Check & ensure there are no
combustible materials within
0.9 meters (3 feet) surrounding
the heater.
Remove any combustible
items from the vicinity of the
heater.
A drop of oil fell on the heating
coil during the manufacturing
process. It will quickly
evaporate and should not
occur again.
Ensure room in which heater is
situated is well ventilated.
Ensure a minimum clearance
of 1ft (12 inches) from both
sides, and 4.5 inches from the
back.
Reposition the heater so there
is enough space between the
heater and the any adjacent
surface/wall.
TROUBLESHOOTING
If your heater fails to operate, please follow these procedures:
This heater is intended to be a wall/ceiling-mounted heater. It has a
thermal cut-off protection. If the thermal cut-off protection trips,
switch off the power. Switch off the circuit breaker. The unit
should reset automatically after 10 minutes. If the thermal cut-off
protection trips again, consult a certified/licensed electrician to
determine the reason for overheating.
PLEASE DO NOT ATTEMPT TO OPEN OR REPAIR THE HEATER
YOURSELF. DOING SO COULD CAUSE DAMAGE TO THE
HEATER OR PERSONAL INJURY.
19

QUESTIONS AND ANSWERS
Why can’t I change the set temperature by press the + - button
on the remote? Please follow the steps below:
1 Turn the ON/OFF switch to OFF position
2 Turn the thermostat rocker switch to INSIDE THERMOSTAT
3 Turn the ON/OFF switch to ON position.
4 Press the POWER button on the remote to turn the heater ON.
5 Press the THERMOSTAT button.
6 Press the “+” “-“ button to set your desired temperature.
Why the wall thermostat can not control the temperature?
Please follow the steps below:
1 Turn the ON/OFF switch to OFF position
2 Turn the thermostat rocker switch to WALL THERMOSTAT
3 Turn the ON/OFF switch to ON position
4 Press the POWER button on the remote to turn the heater ON.
5 Adjust the wall thermostat knob to set your desired temperature.
How long is the warranty?
This heater comes with a ONE-YEAR LIMITED COMPONENT WARRANTY. If
your unit does not appear to be working properly, please contact our service
center by calling 1-800-317-1688. Prior to your call, we encourage you to visit our
service related website www.DrHeaterUSA.com for troubleshooting tips and
service instructions if needed.
20

Warranty Information
Register your product at our website:
Or visit DrHeaterUSA.com/register-your-heater
Feedback
Love it? Help us make the product more for you.
Let us know with a customer review.
Please visit: https://www.amazon.com/review/review-your-purchases#
At Dr. Heater USA, we are committed to bringing top quality alternative & supplemental
heating products to our customers.
Dr. Heater USA
9293 Beatty Dr,
Sacramento, CA 95826
Tel: 1-800-317-1688
EMAIL: SERVICE@DRHEATERUSA.COM
Dr Heater USA
@DrHeaterUSA
Dr. Heater USA
Dr. Heater USA
21
 Loading...