

Page 1

PPF31
INSTRUCTION BOOK
User Guide
Page 2

CONTENTS
Getting Started
Package Contents Desc
ription of Each Part Po
wer Management Char
ging
Connections Firm
ware Upgrade
_01
02
03
05
06
07
12
Using the Device
Basi c Operations
Home Screen N
otification Bar
Purchasing Music from Store
AK CONNECT
Listening to Music
Manage Playlist
USB DAC Installation
How to Use USB Audio
Automatic CD Ripping
Using Bluetooth Setti
ngs
Connecting to Wi-Fi
Equalizer Setup
Miscellaneous
Safety cautions Troubl
eshooting Copyright C
ertifications Registere
d Trademarks Disclai
mers Specifications
_02
_03
13
17
19
22
23
29
32
35
36
37
39
41
46
47
50
52
53
54
54
54
55
Page 3
User Guide
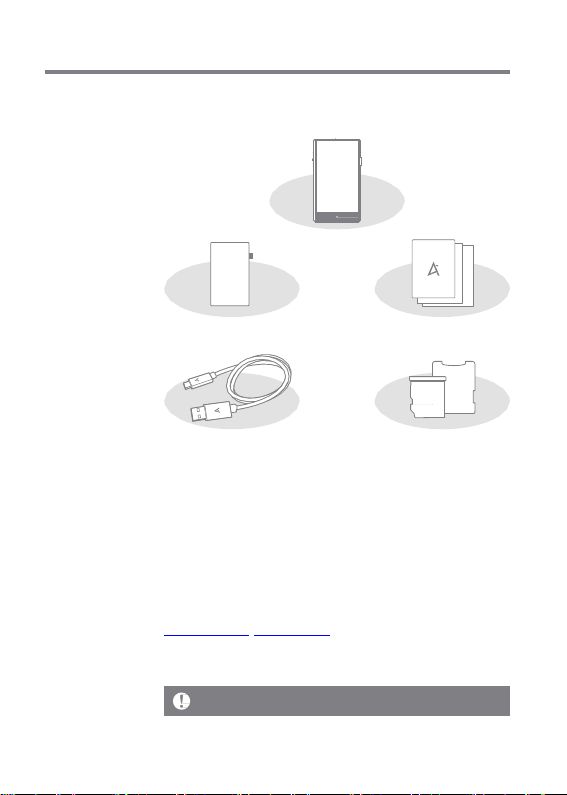
Package
Contents
Contents m ay be chang ed without prio r notice to improve the
perform ance or quality of the product.
PPF31
Protective Film
Type-C USB Cable
Protective Film: Pro tects the product’s scr een.
Type-C USB Cable: Connects the product to the PC or
charges the product.
Quick Start Guide: It desc ribe s t he bas ic me thod of usi ng
the product.
Warranty Card: The war ranty card is requ ired for cust omer
service s. Keep the w arr anty car d for te chnical support .
User Guide: The U ser Guide can be downloa ded fr om the
Aste ll&Ker n website.
[http://www.a stellnkern.com/ > Supp ort > Download]. Micr
o SD Card Slot Cover: Prot ects the mic ro SD card s lot wh
en not in use . It is inst alled on the product by default.
The product does not include any micro USB cable.
Quick Start Guide
& Warranty Card
Micro SD Card Slot Cover
Getting Started 2
Page 4
User Guide
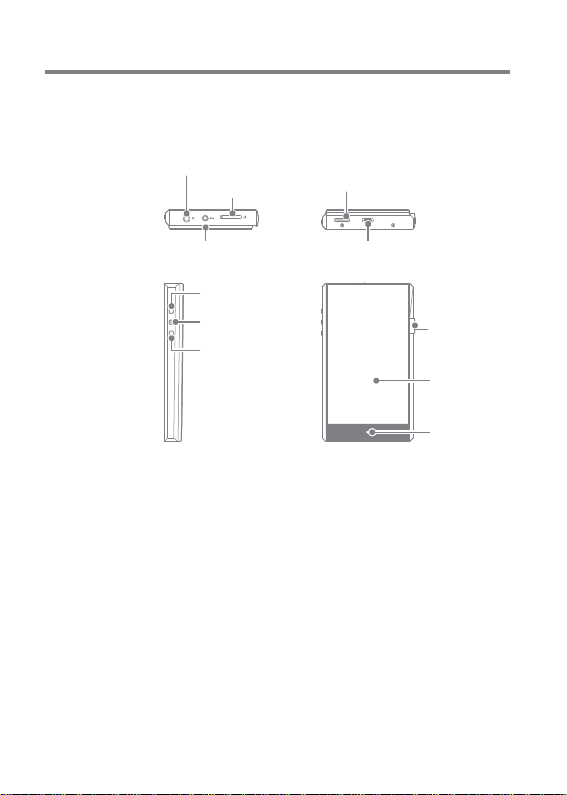
Description
of Each
Part
The appearance of the product as well as the printed and
engraved information may vary depending on the model.
3.5mm Unbalanced Port
microSD card slot
Balanced Port for
External Devices
2.5mm Balanced Port
Next/FF
Replay/Pause
Previous/
Rewind
Type-C USB Port
Power/
Volume
LCD
Touchscreen
3.5mm Unbalanced Port: Connects to the earphones and the
headphones with 3.5mm unbalanced ports.
2.5mm Balanced Port: Connects to earphones and headphones
with 2.5mm balance ports for audio output.
Balanced Port for External Devices: Provides balanced output
when connected with an external device.
Micro SD Card Slot: Reads the files on the inserted micro SD card.
Type-C USB Port: Connect to a computer or recharge the device.
Power/Volume: Turn the wheel to adjust the volume of the sound.
Click: Turns the screen on and off.
LCD Touchscreen: Display the screen, and touch it to start.
Clic k and Hold - Turns the device on and off.
Home Button
Getting Started 3
Page 5

User Guide
Previous/Rewind:
Short press - Plays the previous song or restarts the song.
Long press - Rewinds.
Play/Pause: Short press - Plays/pauses.
Long press - Returns to the playback screen.
Next/FF: Short press - Plays the next music.
Long press - Fast-forwards.
Home Button: Returns to the home screen.
Getting Started 4
Page 6

User Guide
Power
Manage-
ment
Turning on/off Power
1. Long-press the [Power/Volume] to turn on the device.
2. While the device is on, long-press the [Power/Volume] to
shut down the device. A confirmation message will appear.
3. Press [Confirm] to turn off the device.
This device has an automatic shutdown feature to save battery po
wer. The device will turn off if there is no user input during the pe
riod defined in [Menu - Power - Automatic Shutdown] (See Page 4
5.)
Turn the Screen On/Off
1. While the screen is on, press the [Power/Volume] to turn
off the screen.
2. Press [Power/Volume] again to turn it on.
This device has an automatic timeout feature to save battery power.
The screen will turn off if there is no user input during the period
defined in [Menu - Power - Screen Timeout]. (See Page 45.)
Reset Function
1. In cases of unexpected device failure or freeze, press
[Power] for 12 seconds to force a shutdown.
The device can be restarted after a shutdown.
Resetting the device will not affect the stored data or time setting.
Do not use the reset function while the product is in use. Doing so
may corrupt the data on the device.
Getting Started 5
Page 7

User Guide
Charging
Charging Via PC
1. Connecting to PC via Type-C USB cable will also charge
the product.
Charging Time: Maximum 8 hours (Completely run-down and pow
er-off) Depending on the PC specifications, the charging process
may require turning on the PC.
When charging via PC connection, the charging time may vary dep
ending on whether the device is turned on or off.
Some PCs in power-saving mode may not charge the device.
The built-in battery will gradually lose capacity over time with rep
eated charging/running-down.
Do not use cables other than Type-C USB cable and micro USB ca
ble. Doing so may cause a malfunction.
Charging Via Adapter
1. Commercially available 9V 1.67A adapters may be used f
or charging.
Fast charging: Maximum 2 hours (Completely run-down, Power-off,
9V 1.67A adapter) / Normal charging: Maximum 2 hours (Complet
ely run-down, Power-off, 5V 2A adapter)
A fast c harger of 9V 1.67A may be used. Using a 12V adapter will not
charge the product and may cause malfunctions.
Getting Started 6
Page 8

User Guide
Connec-
tions
3.5mm Unbalance Port
1. Connect earphones or headphones to the 3.5mm
unbalanced port.
OR
Connect to the 2.5mm Balanced Port
1. Connect earphones and headphones to the 2.5mm balance port.
OR
Balanced Audio Device
1. Connect to an external audio device by using the Earphones
port and Balanced port in conjunction.
Earphones Balanced Port (LR)
Port (Ground)
Astell & Kern balanced cable (PEF12, PEF21) is not supported.
Getting Started 7
Page 9
User Guide
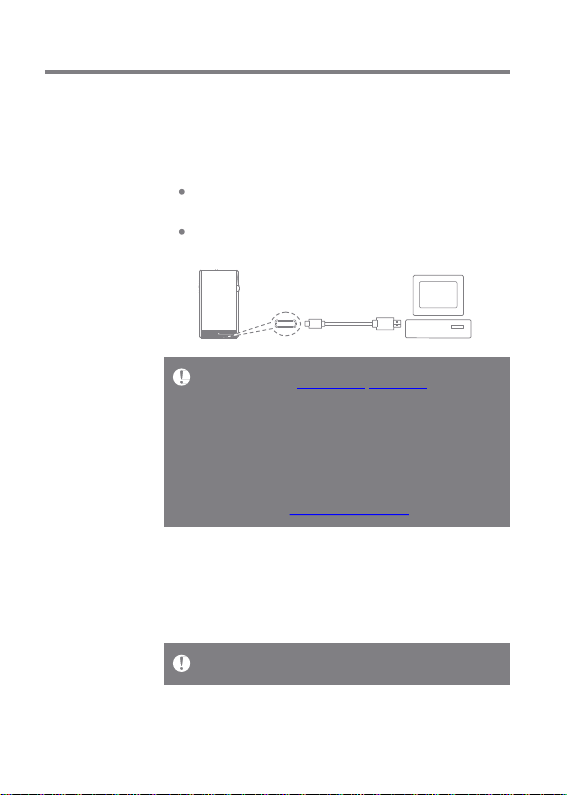
Connecting to PC
1. Turn on the device and your PC.
2. Connecting the product to PC using Type-C USB cable will
follow the [Menu - USB Connection] settings.
Media Device (USB Drive): Transfer files from a PC to the
device.
DAC Input: Listen to music on a connected PC through
the device. (See Page 36.)
Mac users need to download and install the MTP program from the
Astell&Kern website. [http://www.astellnkern.com > Support > Do
wnload]
For an optimal connection, quit any unnecessary programs before
connecting the device to the computer.
Do not use cables other than the Type-C USB cable provided with the
product.
Windows XP users require Service Pack 2 and Windows Media Pla
yer 10 to be installed for the computer to recognize the USB device. Do
wnload Windows Media Player and required Service Packs from th
e Microsoft website. http://www.microsoft.com
Disconnecting from the Computer
1. Disconnect the Type-C USB cable after the transfer
between the product and PC is completed.
Disconnecting the device from the computer during an operation (
e.g., file transfer) may corrupt data on the device.
Getting Started 8
Page 10
User Guide
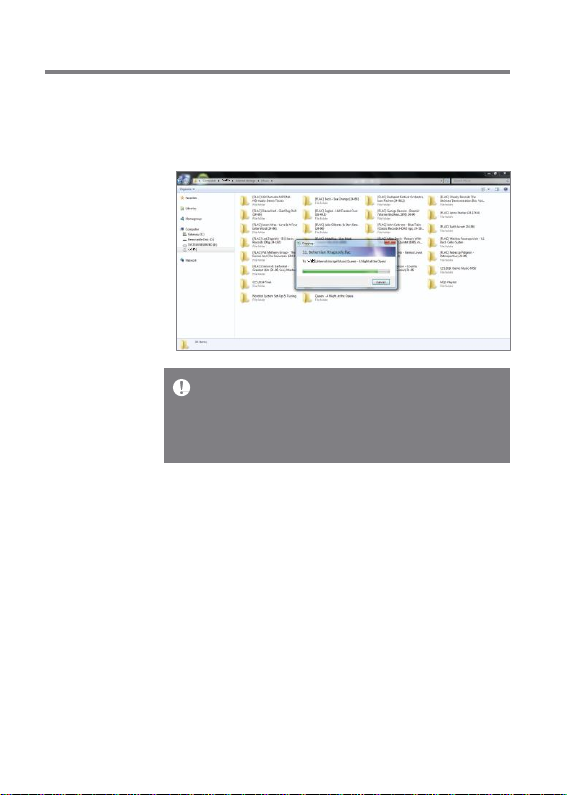
Copy Files (Folders) to the Product
1. To copy files/folders from your computer, select the desired
files/folders and drag & drop them into the USB device.
Connect the Type-C USB cable correctly.
Turning off the product or disconnecting the Type-C USB cable while
copying or moving files/folders may cause serious damage to the
memory.
File transfer speeds may be affected by the computer and/or the OS
environment.
Getting Started 9
Page 11
User Guide
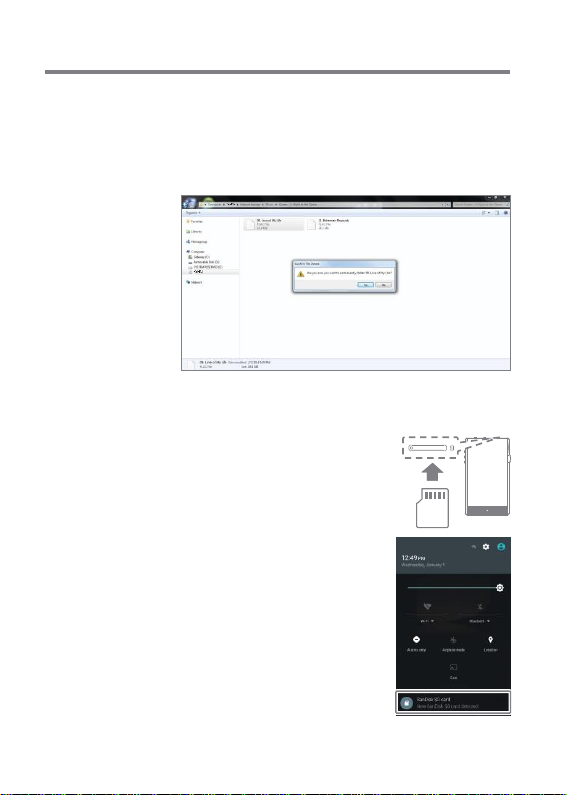
Delete Files (or Folders) from the Product
1. Right-click the desired file/folder, and then select [Delete].
2. Select [Yes] in the [Confirm File/Folder Deletion] window
to delete the selected files/folders.
Insert/Remove a Micro SD Card
1. Refer to the diagram and gently
insert a micro SD card into the
micro SD card slot.
2. To safely remove a micro SD
card, select [Safely remove SD
card] from the Notification Bar
or select [Dismount SD card]
from [Menu - System Informa
tion].
3. Gently press the micro SD card
to release it from the slot.
Getting Started 10
Page 12

User Guide
Recommended micro SD Cards
Micro SD: SanDisk, Transcend
Maximum Capacity: 256GB
Notes on In serting Micro SD Card
When inserting the micro SD card, do not use excessive force.
This may cause the product and the card to malfunction.
Do not repeatedly insert/remove the micro SD card.
If the card is improperly inserted, it may become immovable or
cause damage to the device.
Notes on removing a micro SD card
Be sure to safely dismount and remove the micro SD card from
the device. Not following the proper procedure may corrupt data
and cause serious damage to the system.
Do not disconnect the micro SD card during use. Doing so may
damage the micro SD card, corrupt or delete data and cause the
device to malfunction.
Notes on Using Micro SD Card
If the micro SD card is not recognized or is not functioning
properly, format the card, preferably in FAT32 system.
Using cards other than the recommended micro SD card may
cause malfunctions.
A micro SD card is not included in the product package. Purchase
a micro SD card separately.
Getting Started 11
Page 13

User Guide
Firmware
Upgrade
Wi-F i Update / OTA (Ov er-the -Ai r)
1. Connect to a wireless network.
2. When a new firmware version is available, the screen will
display a Firmware Update Guide window.
3. Select [Update] and choose the items for update.
4. Follow the on-screen instructions and proceed with the
firmware upgrade.
Fo r Wi-Fi connec tions, se e Pag e 47.
The firm ware up grade may not initia lize if the batt ery lev el is too l
ow. (A min imum bat tery leve l of 50% is require d.)
Moving to another scree n dur ing a file downlo ad will ca ncel the do
wnload .
Do not disc onnect from the wirele ss ne twork whi le downlo ading a f
irmw are u pgrade. Doing so may cause data c orruption and/or d am
age to the sys tem.
If an e rror occ urs or the notice in the Not ification Bar disap pears d
urin g an upgrade, download the fir mware update aga in thr ough [M
enu - Upd ate - Syst em Update] .
Getting Started 12
Page 14
User Guide
Basic
Operations
LCD Touchscreen
1. This device features an LCD touchscreen that allows you
to perform operations by touch.
Interact with the device by touching the screen to access
various features.
To prevent damage to the screen, do not use a sharp object or exce
ssive force.
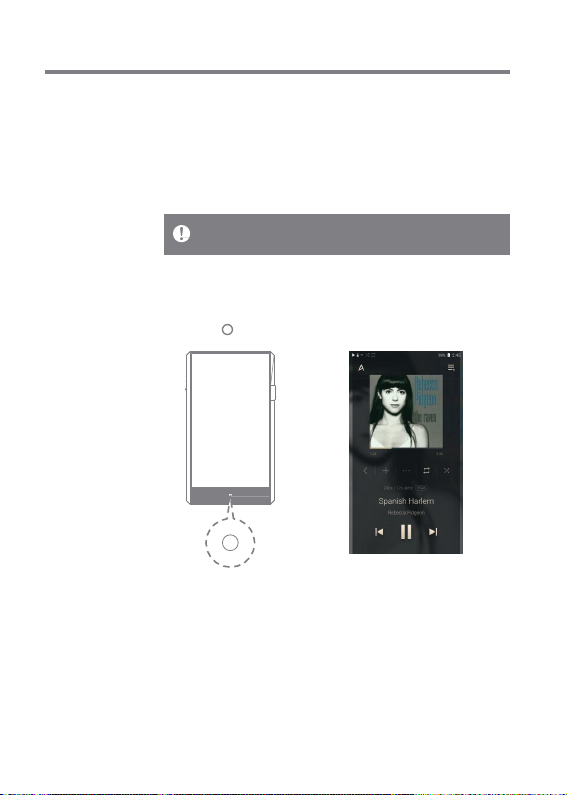
Return to the Home Screen
1. Press [ ] to go to the Home Screen.
Home Screen
Using the Device 13
Page 15
User Guide
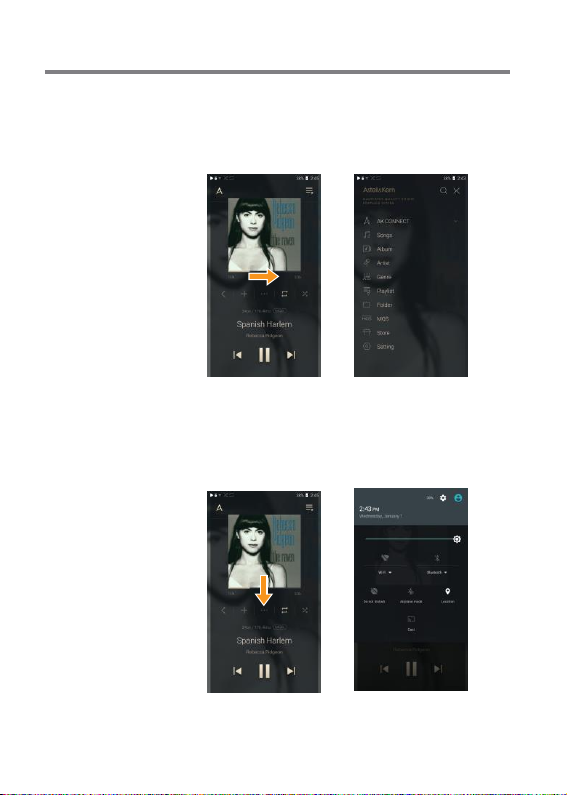
Menus
1. Touch and drag to the right and left in the home screen to
display menus.
Notification Bar
1. Touch and drag up and down on the home screen to display
the notification bar.
Using the Device 14
Page 16
User Guide
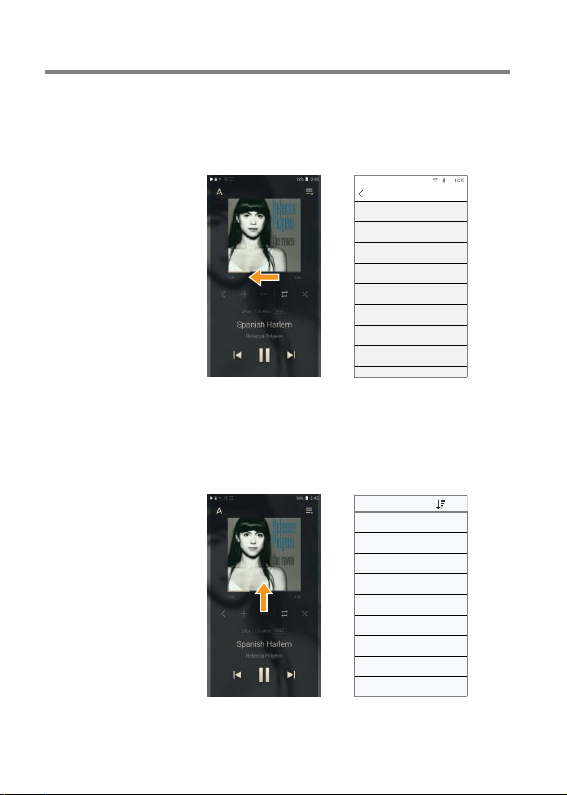
View Current Playlist
1. Touch and drag right and left on the home screen to display
the current playlist.
Now Playing
Title Text
Sub text
Title Text
Sub text
Title Text
Sub text
Title Text
Sub text
Title Text
Sub text
Title Text
Sub text
Title Text
Sub text
Title Text
Sub text
Title Text
View Past Playlists
1. Touch and drag up and down on the home screen to display
previous playlists.
Play Histor y
Title Text
Sub text
Title Text
Sub text
Title Text
Sub text
Title Text
Sub text
Title Text
Sub text
Title Text
Sub text
Title Text
Sub text
Title Text
Sub text
Title Text
Sub text
Using the Device 15
Page 17

User Guide
Moving Up/Down on the List
1. Scroll through the list by dragging
up and down.
Now Playing
Title Text
Sub text
Title Text
Sub text
Title Text
Sub text
Title Text
Sub text
Title Text
Sub text
Title Text
Sub text
Title Text
Sub text
Title Text
Sub text
Title Text
Using the Device 16
Page 18
User Guide
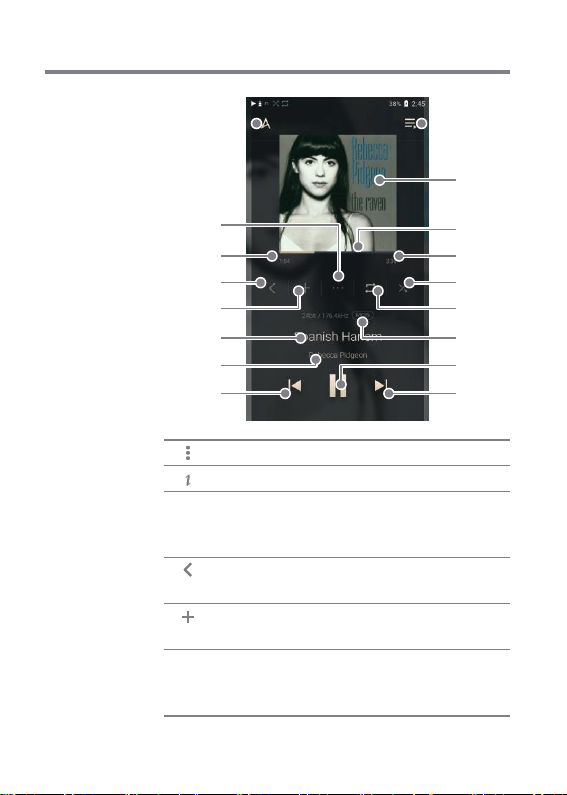
Home
Screen
1
2
3
4
5
6
7
8
1
Menus
Details
2
Song Duration
3
4
Current Album Goes to the album of the current
Add to Playlist Add the selected song to the
5
6
Title
Displays menus.
Displays current song information.
Indicates the song’s total duration.
Pres s to switch from elapsed time
to remaining time.
song.
playlist.
Song title information.
File name is displayed when
ID3Tag is unavailable.
9
10
11
12
13
14
15
16
17
Using the Device 17
Page 19

User Guide
Artist/Album
7
Previous/
8
Rewind
9
Playback Screen Displays the playback screen.
Album Cover
10
Progress Ba r
11
12
Song Duration
Play Mode
13
14
Repeat Mode
15
Details
16
Play/Pause
Next/FF
17
Displays the artist and the album.
Short press: Plays the previous
Long press: Rewinds the current
Display album covers. P ress the
album cover to view the lyrics.
Shows the progress bar. Drag the
indicator to move to the desired
track time.
Indicates the song’s total duration.
Pres s to switch from elapsed time
to remaining time.
Pres s [ ] to set the play mode.
:Sequential playback.
:Shuffle playback.
Press [ ] to set the Repeat mode.
:Repeat the entire playlist.
:Repeat the current song.
:Cancel repeat.
Displays bit rate and sampling
frequency data.
Plays or pauses the current song.
Short press: Plays the next song.
Long press: Fast-forwards the c
urrent song.
song.
song.
Using the Device 18
Page 20

User Guide
Notifi-
cation
Bar
1 2 3 4 5 6 7 8 9 10
DA C
11
12
13
00:00 15:24
Flicking
Line Out Balanced Out
CD ripping connected
Clear
16bit / 44.1kHz
143
14
Title
Artist / Album title
Using the Device 19
Page 21

User Guide
1
ON/
2
3
4
default.
5
Wi-Fi
Bluetooth
AK CONNECT
EQ
PC Connection
Mode
6
USB Audio
CD Ripping
7
Line-out
8
Screen Lock
9
Gapless Playback Pre ss [
Pres s [ ] to turn Wi-Fi
OFF.
Pres s [ ] to turn Bluetooth
Set AK Connect.
Pres s [ ] to turn the EQ
ON/OFF. The most recent EQ
settings are applied by
Select the mode to use when
connected to a PC.
:Listen to music on the
DAC
device through a con
nected PC.
:Enables transfer of
DISK
media files.
Plea se turn ON/OFF US B au
dio output after connecting t
o the portable US B DAC. (Se
e page ??.)
Turn ON/OFF automatic CD
ripping. (See page ??.)
Turns ON/OFF the line-out.
Pres s [ ] to turn the screen
lock ON/OFF. The volume wh
eel is disabled when the scre
en is locked.
] to turn Gapless
Playback ON/OFF.
Using the Device 20
Page 22

User Guide
10
Displays
11
Use
control
12
Adjust
volume
13
Notification
displayed
14
Deletes
Settings
Brightness
Volume
Notification
s Display
Delete Notifications
[
corresponding screen.
/
/ / / ] Long-press them to move to the
a list of settings.
the adjustment bar to
the display brightness.
the volume with the
control.
contents are
in this area.
the notifications.
Using the Device 21
Page 23

User Guide
Purchasing
Music fro
m Store
Conveniently purchase music from the Store when connected
to a wireless network.
Purchasing Music
1. Connect to a wireless network.
2. Select [Store] from the menu.
3. Select the desired store.
4. Check the user guide or help menu within each store for
detailed information.
Select [Menu > User Guide] within the Groovers Store
for instructions.
For Wi-Fi connections, see Page 47. Stor
e is currently available.
Show
Menu
User
Guide
Using the Device 22
Page 24

User Guide
AK C ON
NECT
The PPF 31 can a cces s a nd play b ack musi c files stored on a
P C on the s ame netw ork as well a s output sound throu gh A
stell&K ern spea ker s.
MQS Streaming Server Installation
1. Visit the Astell& Ker n website and download the server
inst aller that cor res pond s to your ope rating system. [h
ttp://w ww.as tellnkern.com > Suppor t > Download].
2. Run the downloaded in staller a nd follow the on-s creen
inst ruction s.
3. Ch eck the Us er Guide within the progr am for detailed
information on usi ng the MQS S tre amin g S erver.
Please refer to the following P C/Mac minimum system requireme
nts.
Minimum PC Requirements
OS: Windows XP, Windows 7/8/10 (32 & 64-bit)
Mac Requirements
OS X 10.7 (Lion) or later
Connecting to the AK Connect Server/Speakers
1. Turn on the ser ver and connec t
to the sa me networ k as the PP F31.
Run the MQS st reaming serve r
on your PC .
2. Turn on [AK Conne ct] from th
e device sett ings.
3. P re ss [AK Co nnec t] on the menu.
Using the Device 23
Page 25

User Guide
4. A list of servers on the same
network as the PPF31 will be
displayed.
AK Connect
Library
Local
icon
iriverN ASserver
icon
AK 380
icon
Speaker
Local
icon
T1
icon
5. Select the search option on the
home menu to display the music
list.
Songs
Title Te xt
Sub text
Title Te xt
Sub text
Title Te xt
Sub text
Title Te xt
Sub text
Title Te xt
Sub text
Title Te xt
Sub text
Title Te xt
Sub text
Title Te xt
Sub text
Title Te xt
For Wi-Fi connections, see Page 47.
Using the Device 24
Page 26

User Guide
Streaming and Downloading from the Music Server
1. Select the search option on the
server menu to display the m
usic list.
2. Select a song to begin streaming.
3. Press [ ] button at the upper-
right corner of the music list.
4. Select the desired music, and pr
ess [ ] on the top to download the
music.
A message on the Notification
Bar will indicate a completed
download.
Depending on network conditions, song loading may be slow or st
reaming may stutter.
Server response may be slow when the server computer is busy.
If you do streaming and download at the same time, it may slow the
device’s response time depending on the speed of the Wi-Fi network
or server.
Terminating music streaming or pressing the item being downloa
ded within the Notification Bar will stop the downloading.
Title Text
Sub text
Title Text
Sub text
Title Text
Sub text
Title Text
Sub text
Title Text
Sub text
Title Text
Sub text
Title Text
Sub text
Title Text
Sub text
Title Text
Using the Device 25
Page 27

User Guide
AK Connect Usa ge Examples
Case 1
LIBRARY SPE AKER
AK T1 PPF31
Case 2
AK500N
LIBRARY REMOTE SPE AKER
AK T1 PPF31
Using the Device 26
Page 28

User Guide
Case 3
PPF31
REMOTE & LIBRARY
AK500N
SPE AKER
Case 4
AK T1 PPF31 AK500N
LIBRARY SPE AKER
REMOTE
Using the Device 27
Page 29

User Guide
Case 5
PPF31
LIBRARY
or
AK500N
LIBRARY
AK Connect APP
REMOTE
AK T1
SPE AKER
Using the Device 28
Page 30

User Guide
Listening
to Music
Selecting Music
1. Select a search option at the bottom of the home screen
to display the playlist.
2. Select a song from the list to begin playback.
Select [Folder] to search music by folder.
Continuous Playing Time: Approximately 12 hours (Music: FLAC, 1
6bit, 44khz, Unbalanced, LOW Gain, Volume 50, EQ Off, LCD Off) Su
pported Formats: PCM [8~384kHz(8/16/24/32bit)]
DSD [2.9/5.6/11.2MHz]
Lis te ning t o Music
Pres s [ ] on the menu list and enter the title. The search
result wil l be displayed.
Press [ ] on the past playlist. The music will be displayed
from the most frequently played selections.
Select [MQS] and press [ ] on top. The music wil l be
displayed from the highest quality selections.
Select [Folder] as the music searc h option to copy/move
the music files.
Pres s [ ] on the music list to add all music to the
current playlist.
Pres s [ ] on top of the music list to view the options. :
: Add the file to the end of the list or next to the
current song.
: Add the selected file to the playlist.
: File selection box
: Delete the selected file.
: Exit
Turn the [volume wheel] to adjust the volume.
Using the Device 29
Page 31

User Guide
Pres s [ ] during playback to pause and [ ] to resume
playback.
Pres s [ / ] during playback for the previous/next song. Lo
ng-press [ / ] during playback to rewind/fast-forward. Drag
the indicator to the desired location during playback. Pres
s the Album Cover during playback to show lyrics.
Pres s the [ ] to go to Home Screen.
Select an album cover from the home screen to begin
playback.
Using the Device 30
Page 32

User Guide
1
Previous
Return
2
Playlist
Displays
3
Music
Displays
4
Play
Play
Playlist Screen
1
3
4
2
Options
All
to the previous screen.
the playlist for the current location.
all music options.
all songs from the current playlist.
Using the Device 31
Page 33

User Guide
Manage
Playlist
Creating a Playlist
1. Press [Playlists] on the Home
screen to view the playlists.
2. Press [ ] on the upper-right
corner, and select [+ Add].
3. Enter a name for the playlist,
and then press [Add] to create
a new playlist.
Adding a Song to a Playlist
1. Pres s [Playlists] to display the
list of playlists.
2. Select a playlist and press
[+ Add] to display a list of songs.
3. Select a song, and pr ess [Add]
to add the song to the selected
playlist.
새로 만들기
01 재생목록(Title Text)
1곡 / 최근 추가목록 (Sub text)
02 재생목록(Title Text)
18곡
03 재생목록(Title Text)
18곡
04 재생목록(Title Text)
18곡
05 재생목록(Title Text)
02 재생목록
Album
Song Title
Art
아티스트 이름
Image
Album
Song Title
Art
아티스트 이름
Image
Album
Song Title
Art
아티스트 이름
Image
Album
Song Title
Art
아티스트 이름
Image
Album
Song Title
Art
아티스트 이름
Image
Album
Song Title
Art
아티스트 이름
Image
Art
아티스트 이름
Image
음원 추가
Using the Device 32
Page 34

m
m
m
m
m
m
m
m
m
m
User Guide
Removing a Song from a Playlist
1. Press [Playlists] to display the
list of playlists.
2. Select the playlist, and then press
[ ] at the top of the screen.
3. Select music, and press [ ] on t
op to delete the music from the
playlist.
Editing the Playlist Order
1. Press [ ] next to the playlist t
o change the playlist order.
Playing a Playlist
1. Select the desired playlist for
playback.
2. Press [ ] on top of the playlist t
o move it to the end of the current
list or next to the current song.
Albu
Song Title
Art
아티스트 이름
Image
Albu
Song Title
Art
아티스트 이름
Image
Albu
Song Title
Art
아티스트 이름
Image
Albu
Song Title
Art
아티스트 이름
Image
Albu
Song Title
Art
아티스트 이름
Albu
Song Title
Art
아티스트 이름
Image
Albu
Song Title
Art
아티스트 이름
Image
Albu
Song Title
Art
아티스트 이름
Image
Albu
Song Title
Art
아티스트 이름
Image
Albu
Song Title
Art
아티스트 이름
새로 만들기
01 재생목록(Title Text)
1곡 / 최근 추가목록 (Sub text)
02 재생목록(Title Text)
18곡
03 재생목록(Title Text)
18곡
04 재생목록(Title Text)
18곡
05 재생목록(Title Text)
80곡
Using the Device 33
Page 35

User Guide
Renaming a Playlist
1. Press [Playlists] to view the
playlists, and press [ ].
2. Select a playlist to be renamed.
3. Press [ T ] at the top of the screen
to display the renamed window.
4. Enter a name for the playlist, and
then press [Rename] to save the
playlist under a new name.
Deleting a Playlist
1. Press [Playlists] to view the
playlists, and press [ ].
2. Select the playlist to be deleted.
3. Press [ ] at the top of the screen t
o delete the selected playlist.
새로 만들기
01 재생목록(Title Text)
1곡 / 최근 추가목록 (Sub text)
02 재생목록(Title Text)
18곡
03 재생목록(Title Text)
18곡
04 재생목록(Title Text)
18곡
05 재생목록(Title Text)
80곡
06 재생목록(Title Text)
18곡
새로 만들기
01 재생목록(Title Text)
1곡 / 최근 추가목록 (Sub text)
02 재생목록(Title Text)
18곡
03 재생목록(Title Text)
18곡
04 재생목록(Title Text)
18곡
05 재생목록(Title Text)
80곡
06 재생목록(Title Text)
18곡
Using the Device 34
Page 36

User Guide
US B DAC
Installation
The USB DAC allo ws PP F31 to be rec ogni zed as a soun d card
on a PC . Music from the PC is played through the device
ear phon es port for an en hanc ed list enin g exper ience.
USB DAC Specifications
Supp orted OS
Windows XP(32bit) / Windows 7(32bit/64bit) /
Windows 8(32bit/64bit) / Windows 10(32/64bit)
MAC OS 10.7
US B DAC Suppor t Spec ifications
Supp orted Format s: PCM [8~384kHz(8/16/24/32bit)]
DS D [2.8/5.6/11.2MHz]
Cont rol the vo lume with the P PF31 ’s volume wheel.
Playback is unavailable when settings exceed the support formats.
Volume control is unavailable when the LCD screen is turned off d
uring USB DAC connection.
The Previous, Play, and Next buttons are unavailable during USB
DAC connection.
Playback may stutter when computer performance is slow or the
USB connection is experiencing heavy usage.
There may be issues with audio-to-video synchronization during vi
deo playback depending on the sound quality and operating enviro
nment.
Volume cannot be adjusted via the Windows volume control. The v
olume wheel on the device or volume control on the appropriate
program must be used to adjust the volume.
Using the Device 35
Page 37

User Guide
How to
Use USB
Audio
Enjoy USB audio by connecting a portable amp and DAC
available on the market.
How to Link Portable USB DAC
1. Connect the device’s micro USB jack with the portable
USB DAC with dedicated cable.
2. Press [ ] after scrolling down the notification bar.
3. Once [ ] is activated, you can enjoy the music through t
he portable USB DAC’s audio output jack.
The USB Type-C cable provided with the product is to be used to c
onnect to the PC or to charge the product.
For instructions on the dedicated cable, please refer to the manual
of the portable USB DAC manufacturer.
How to Change USB Audio DSD Output Type
You can change the output type of DSD data output from USB
audio.
1. Select a DSD output type on [Menu - USB audio].
PCM : The device’s DSD is converted into PCM and is
output through USB audio.
DoP : The device’s DSD is converted into DoP and is
output through USB audio.
The portable USB DAC must be able to receive digital input through
the micro USB’s OTG.
Output may not be optimum depending on the digital input specs of
the micro USB of the portable USB DAC. This is not a defect in the
device and not a reason for exchange or refund.
In the case of using DoP as a DSD output type, no sound may be o
utput except noise depending on the specs of the portable USB DAC.
Using the Device 36
Page 38

User Guide
CD
Ripping
Connect the AK Ripper (sold separately) to rip CDs.
Turning the AK Ripper ON/OFF
1. Connect the micro USB port and the AK ripper of PPF31,
and press [ ] to use the AK ripper.
2. While the AK Ripper is turned on, p ull down the notification
bar and press the CD ripping icon to stop the AK Ripper
operation.
Automatic CD Ripping
1. Connect the AK Ripper and insert a CD.
2. The metadata (ID3 tags) for the inserted CD will be retrieved
via Gracenote.
3. CD ripping will begin automatically after the metadata has
been retrieved.
4. When finished, press [OK] on the results prompt to complete
automatic CD ripping.
Manual CD Ripping
1. When the AK Ripper is connected and a CD is inserted, the
[CD Ripping] menu will be activated on the home screen.
2. Press the [CD Ripping] menu and select the desired file
format (FLAC or WAV).
3. The Gracenote database will be searched for matching CD
metadata after the file format is selected.
4. When the database search is complete, press [Start] to
begin CD ripping.
5. Rip only selected songs.
Using the Device 37
Page 39

User Guide
CD Ripping Results
: Indicates that CD ripping is complete, or that although
an error occurred, CD ripping was successfully completed
via error correction.
: Indicates that the song currently being ripped can be
canceled via user input.
: Indicates that CD ripping failed due to a scratch on the
CD or other similar reasons. Also indicates that CD r
ipping was canceled due to user interruption.
To search the Gracenote database, the device must be connected to
Wi-Fi. The database access time may vary depending on the netwo
rk environment.
Please note that metadata for certain CDs may not be available on
the Gracenote database.
You may not access the Home screen while CD ripping is in progre
ss.
The AK Connect service will be disabled during CD ripping. The se
rvice will automatically restart when CD ripping is completed.
Music playback will be disabled during CD ripping, and tracks that
have been ripped will not be available for playback until the entire
CD has been ripped.
You can set the desired file format and ripping speed from the [Me
nu - CD Ripping] menu.
Several attempts at correction will be made for data with errors w
hen the feature is enabled under [Menu - CD Ripping - Error Corr
ection]. Please note that the CD ripping speed will be affected wh
en this feature is enabled.
Using the Device 38
Page 40

User Guide
Using Bl
uetooth
Connect a Bluetooth device to listen to music wirelessly.
Turning Bluetooth ON/OFF
A Bluetooth device must be paired
with the AK320 prior to use. Refer
to the Bluetooth device's instruction
manual for details.
1. Select [ ] from the home screen,
or select [ON/OFF] from [Menu -
Bluetooth].
Bluetooth Pairing
1. Select the appropriate Bluetooth device from the list of
available devices.
Terminating a Bluetooth Connection
1. Press the connected Bluetooth
device and confirm the message
prompt to disconnect the device.
Using the Device 39
Page 41

User Guide
Removing a Bluetooth Pairing
1. Press [ ] to the right of the pa
ired device to go to settings.
2. Select [Remove Pairing] to
complete the process.
Bluetooth Support Specifications
Profile: A2DP, aptX HD
Device performance may be affected during a Hi-Fi playback.
Do not turn off the device while connected to Bluetooth.
Power cycle the Bluetooth device in case of malfunction.
Pairing methods may differ for each individual Bluetooth device. A
lways refer to the respective instruction manual for details.
When connecting the product to a Bluetooth device, the distance b
etween the two must be within 20 cm. Audio quality will degrade
with longer distances, and the pairing may disconnect at a distance
of 2 m (6.5 ft) or more. (Distances may vary depending on device and
environment.)
Crosstalk may be heard while using Bluetooth.
For multi-point devices, make the necessary connections prior to use.
Car audio Bluetooth connections are not supported.
Malfunction, noise, and other undesirable effects may occur due to
the device's battery level and the environment.
If signal interference affects data transmission. (e.g., holding the
device while wearing a Bluetooth device, holding the device while
holding another electronic device, etc.)
If the device or Bluetooth headset's radio transmitters are
touching parts of the body.
If the transmission strength is affected by walls, corners,
partitions, etc.
If devices using the same frequencies cause interference. (e.g.,
medical devices, microwave ovens, Wi-Fi, etc.)
Areas with an excessive amount of interference or weak si gnals.
(e.g., elevators, underground, etc.)
Using the Device 40
Page 42

User Guide
Settings
Set up the device according to the user's needs. The settings
menu may vary depending on the firmware version.
Setup
1. Select [ ] on the notification bar of the home screen.
2. Select the desired item for setup.
Wi-Fi
Change wireless network settings and turn Wi-Fi ON/OFF.
See page 47 of the manual for more information on setting Wi-Fi.
Bluetooth
Connect a Bluetooth device to listen to music wirelessly.
See [Using Bluetooth] on page 40 for more information.
AK CONNECT
Set whether to use AK Connect.
Using the Device 41
Page 43

User Guide
Equalizer
Set the equalizer according to the user's preferences. PR
O EQ: Preset EQ recommended by professionals. U SER
EQ: Adjust the frequencies according to the user's prefe
rences.
Supported Formats for EQ: PCM [8 ~ 192kHz(8/16/24bit)], DSD [2.
9/5.6/11.2MHz]
Using the equalizer may negatively affect device performance.
See pages 48 - 50 for more information on using the equalizer.
Gapless Playback
Play the next song without any interruptions/silence.
Gapless playback is only supported between two files
with identical bit rates, sample rates, and channels.
Line-out
The volume through Line Out cannot be adjusted.
Do not use earphones with the Line Out feature enabled. Doing so
may cause permanent hearing loss.
Left-Right Balance
Adjust the left-right balance for earphones/headphones.
Playback Setting
Set the destination to add the selected music.
Using the Device 42
Page 44

User Guide
Amp
The AMP output may be set LOW/HIGH.
CD Ripping
Set the automatic CD ripping function as well as the file
format and ripping speed.
USB Connection
Media Device (USB Drive): Select the mode to use when
connected to a PC.
DAC Input: Listen to music on the device through a connected PC.
USB Audio
It sets up the output type of DSD being output through the
portable USB DAC.
Screen Brightness
Adjust screen brightness settings.
Date & Time
Set the current date and time.
Device Name
Set the name of the device.
The maximum name length is 30 characters.
Using the Device 43
Page 45

User Guide
Language
Select the display language.
Supported languages: English, Korean, Japanese,
Chinese (Simplified/Traditional), French, Russian,
German
Keyboard
키Select the keyboard language.
Supported languages: Korean, English, Japanese,
Chinese (Simplified/Traditional), Russian
Power
Automatic power off: If a certain amount of time passes
while there is no operation of the product and buttons, i
t will be automatically powered off.
Turning off the screen: Screen Timeout: The screen will
turn off after a defined period when there is no user input.
Set Sleep Timer: Music playback will stop, and the device
will turn off after a defined period.
Download
Select a folder for downloaded files.
The default folder is set when using AK Connect to download files.
When [Select Folder] is selected, the user is prompted to choose a
download folder each time a file is downloaded.
Using the Device 44
Page 46

User Guide
Update
System Update: Update the system when a new version is
available.
Application Update: Update the default applications (
including the Store) when new versions are available.
System Information
System Information: View model number, firmware version,
and data storage information. The micro SD card can be
mounted/dismounted, and data can be deleted.
Formatting the micro SD card will delete all data on the memory c
ard. Be sure to backup any important files before formatting.
When formatting the micro SD card from a computer, be sure to s
elect the FAT32 system.
System Restore
DB Restore: Resets the internal database. The database
initialization time may vary depending on the number of
files stored on the device.
Reset: Resets all user settings back to the default setting.
Factory Reset: Delete all user data and restore the device
to its original factory settings.
Using the Device 45
Page 47

User Guide
Connecting
to Wi-Fi
Connecting to a Network
1. Long press [ ] from the Notifica
tion Bar or select [Menu
- Settings - Wi-Fi] to display a
list of Access Points (AP).
2. Select the desired AP to connect
to the wireless network.
Additional information such as
key index and network key may
be required depending on AP
settings.
3. Long-press the network name
and select [Network Settings]
to edit specific network settings.
Networks requiring browser or other additional certifications are
not supported.
Channels 1 through 13 are supported (but channels 12 and 13 are no
t supported for FCC).
Using the Device 46
Page 48

User Guide
Equalizer
Setup
Equalizer Setup
1. Se lect [Menu - Sett ing - Equa lizer] .
2. P res s [Pro EQ] an d se lect [ + ].
3. Adjus t the f requenc ies up and
down acc ording to the use r's
prefere nces.
4. The numb er valu es at the lower-
left c orner of the s creen can be
adjuste d for fine -tunin g.
Equalizer
Gain Q
Pro EQ
PRO EQ는 변경 하실 수
없습니다.
Equalizer
Gain
User EQ 01
0 0 0 0 0 0 0 0 0 0
1 2
1 2 3 5 7
1 . 2 .
8 5 8 0 5
K 5 K 5
0 0 0 0 0
K K
30
60
Gain
45
18
Freq. 150
210
0
Q
Using the Device 47
Page 49

User Guide
5. Press [Q] tab on top to view the
PEQ setting screen.
6. Press [Save] on the bottom. Set
the equalizer name, and select
[Save].
Resetting the Equalizer
1. Select the desired EQ setting and
press [ ] at the top of the screen t
o revert the EQ to its default setti
ngs.
Equalizer
Gain
User EQ 01
Freq. 30
0.
0.3
0.4 0.04
Gain
5 05
2.
Q 1.9
2.1
0
Equalizer
Gain
User EQ 01
Freq. 30
0.
0.3
0.4 0.04
Gain
5 05
2.
Q 1.9
2.1
0
저장
Equalizer
Gain
User EQ 01
0 0 0 0 0 0 0 0 0
1
2 3 5
3 4 6 9
18
2
5 8 0
0 5 0 0
0
0 0 0 0
30
60
Gain
45
Freq.
150 180 210
0.
0.
Q
0.06
Q
0.06
Q
Using the Device 48
Page 50

User Guide
Deleting Equalizer
1. Press [Pro EQ] at the upper-left
corner of the screen.
2. Press [ ] next to the desired i
tem to delete the selected eq
ualizer.
Renaming an Equalizer
1. Press [Pro EQ] at the upper-left
corner of the screen.
2. Press [ ] next to the desired it
em and enter a new name for
the selected equalizer.
3. Press [Rename] to apply the
changes.
Using the Device 49
Page 51

User Guide
Safety
cautions
Device
When a plug is inserted into the earphones, balanced, or
USB port, do not apply any force or impact to the plug.
Do not insert any metal objects (coins, hairpins, etc.) or
flammable debris into the device.
Do not place heavy objects on the device.
In case the device gets wet (rain, water, chemicals, medicine,
cosmetics, sweat, moisture, etc.), do not power on the de
vice and allow it to dry thoroughly. Contact the nearest iri
ver Customer Support Center. (Malfunctions due to expo
sure to liquids wil l be repaired for a fee regardless of the
warranty period and such damage may not be repairable.) Avo
id exposing the device to direct sunlight or extreme temp
eratures (-10℃ ~ 50℃) such as the inside of a car during t
he summer.
Do not store or use in hot and humid places such as saunas.
Avoid places with excess moisture, dust, or smoke.
Do not use for extended period on blankets, electric
blankets, or carpet.
Do not place near a fire or in a microwave.
Never attempt to disassemble, repair, or alter the product.
Do not store for extended periods in a confined space with
the power on.
Do not place the device near magnetic objects (magnets,
televisions, monitors, speakers, etc.).
Never use chemicals or cleaning products on the device
since they can damage the paint and surface coating.
Avoid dropping or subjecting the device to a strong impact
(excessive vibration, etc.).
Do not press multiple buttons simultaneously.
Do not disconnect the Type-C USB cable during data transfer.
Miscellaneous 50
Page 52

User Guide
When connecting the Micro-USB cable, use a USB port on
the back of the PC. Connecting to a defective or damaged
USB port may damage the device.
Displaying one image for an extended period may cause
screen burn-in (afterimage).
Using poor quality protective films or adhesive stickers on
the screen may cause damage.
Do not insert any foreign objects into the earphones port.
When playing for extended periods, consider that the device
can become hot.
Other
Do not use earphones/headphones or use the product while
operating any type of vehicle. It is not only dangerous but
may be a violation of the law in certain regions.
Do not use the product during physical activities (driving,
walking, hiking, etc.).
Always use in a safe environment to avoid the risk of accidents.
Always be aware of your surroundings when using the d
evice while moving.
Avoid using the device during thunderstorms to reduce
the possibility of electric shock.
If there is a ringing in the ears during or immediately after
use, reduce the volume or discontinue using the product
and obtain medical advice.
Do not listen to music at excessive volumes for extended periods.
Do not use the earphones/headphones at excessive volumes.
Be careful not to get the earphones/headphones caught in
other objects.
Do not sleep with earphones in your ears or leave them in
for extended periods.
Miscellaneous 51
Page 53

User Guide
Trouble-
shooting
Check for solutions to common problems.
1. The device won't turn on.
The battery may need to be recharged. Charge the device
for at least one hour and try again.
Reset the device and try again. (See Page 5.)
2. The device wi ll not charge when connected to a computer
via USB cable.
Connect to the PC using the Type-C USB cable. C
onnecting to the PC via a micro USB cable will not
charge the product.
Connect the adapter using the Type-C USB cable.
3. The computer won't recognize the device or an error occurs
when connected.
Use a USB port on the back of the computer.
Check that the Type-C U SB cable is properly connected.
For Windows XP, verify that Service Pac k 2 (or higher)
and Windows Media Player 10 (or higher) are installed.
Check if the device connects properly on a different computer.
4. The screen turns off repeatedly.
The screen turns off automatically after a defined period
to reduce battery consumption. Set the time at [Menu-
Power Saving - Screen Timeout].
5. The screen does not display images properl
y. Check the screen for debris.
6. There is no sound, or there is static/interferenc
e. Check that the volume setting is above [0].
Check that the earphones are plugged in properly, and
make sure debr is isn't obstructing the port connection.
Verify that the music file is not corrupted.
Verify that the audio settings have been properly set.
(Balanced out, line out, etc.)
Miscellaneous 52
Page 54

User Guide
7. A file does not play, or the product is unstable when a c
ertain file is used.
The following may occur due to the condition of the file: P
layback is unstable or difficult.
The product may not work normally.
The file may sound different from a computer. The
re may be a difference in the performance of play
back or other functions.
There may be differences in the playable specs.
A file conversion or use of a different file is recommended.
Copyright
iriver Limited retains the rights to patents, trademarks, copyri
ghts, and other intellectual property rights related to this man
ual. No contents of this user manual may be duplicated or re
produced in any format or by any means without the prior ap
proval of iriver.
Using or reproducing, in whole or part, the contents of this doc
ument is subject to penalties. Software, audio, video, and any
other copyrighted contents are protected in accordance with r
elevant copyright laws.
The user accepts all legal responsibility for the unauthorized re
production or distribution of the copyrighted contents from this
product.
Companies, organizations, products, people, and events used i
n the examples are not based on actual data. iriver has no inten
tion to be associated with any company, institution, product, per
son, or incident through this instruction manual, and no such in
ference should be made. It is the responsibility of the user to co
mply with applicable copyright laws.
©1999~2017 iriver Limited. All rights reserved.
The PPF31 was designed and audio-tuned under the
advisement of MSD.
Miscellaneous 53
Page 55

User Guide
Certifica-
tions
Registered
Trademarks
Disclai-
mers
KC / FCC / CE / TELEC
Class B Device (Communication equipment for residential use):
This is a Class B Device and is registered for EMC requirements
for residential use. This device can be used in residential a
reas and all other areas.
FCCID: QDMPPF31
This device complies with Part 15 of the FCC Rules, Operation is su
bject to the following two conditions: (1) this device may not cause h
armful interference, and (2) this device must accept any interfere
nce received, including interference that may cause undesired ope
ration.
Windows 2000, Windows XP, Windows 7, Windows 8, Windows
10, and Windows Media Player are registered trademarks of
Microsoft corp.
The manufacturer, importer, and distributor shall not be liable
for damages including accidental and personal injury due to
the improper use or operation of this product. The information
in this user manual was written based on current product s
pecifications. The manufacturer, iriver Limited, is adding ne
w complementary features and will continue to apply new te
chnologies in the future. All specifications may be changed
without prior notice. There is no warranty against data loss
due to the use of this product.
The device must be used minimum 5mm away from the human (body) in
normal use conditions.
Miscellaneous 54
Page 56

User Guide
RISK OF EXPLOSION IF BATTERY IS RE
CAUTION
PLACED BY AN INCORRECT TYPE. DIS
POSE OF USED BATTERIES ACCORDIN
G TO THE INSTRUCTIONS.
FCC Caution
Any changes or modifications not expressly approved by the pa
rty responsible for compliance could void the user's authority to
operate this equipment.
Miscellaneous 55
Page 57

User Guide
Model
DAC
LCD
NAND
XMOS
Battery
Key
Audio
Data
Charging
Material
Operating
Frequency
Maximum Output
Specifi
- catio
ns
PPF31
AK4497 x 2 (Dual DAC)
5.0inch HD 720 x 1280 touch screen
Interface
Format
Interface
Temperature
Band
0.5TB (256GB x2)
New version (xCore-200)
3,700mAh (3.8V Li-Polymer Battery) / TBD
Click wheel (Power on/off, Volume up/down)
Home touch key (Front)
Play/Pause, Next, Back Key (Left)
WAV, FLAC, WMA, MP3, OGG, APE, AAC, ALAC,
AIFF, DFF, DSF
USB 3.0 C type, microSD slot x1
USB 3.0 C type (quick charger)
Stainless Steel
-10℃ ~ + 50℃
2.4GHz
Level
2.2Vrms
Miscellaneous 56
 Loading...