

Page 1

Convenient functions
Menu-Basicoperation
EnterSubMenu
5-14
Menu-Basicoperation
Convenient functions
Basicoperation
5-13
Main menu Sub menu sub menu settings
l Press and hold the NAVI/MENU button to display the menu system.
l The MENU system is composed of 6 main menus with sub-menus.
Push the NAVI/MENU button to the
or direction to select menu.
Click the NAVI/MENU button.
Long Click
Previous
Next
Push
Click
You can set, cancel or change sub menu by pushing the NAVI/MENU button toward or
or VOL +, VOL -.
Push the MENU/NAVI button to the
or (VOL + or VOL -) direction to select sub menu.
Push the MENU/NAVI button to confirm.
Click the PLAY/STOP button to return Main
MENU at the sub-menu setting.
Exit sub menu
Exit main menu
Click the PLAY/STOP button to exit Main
Menu.
Toselect MainMenu
1
1
2
2
ExitSub Menu ExitMain Menu
Previous
Next
Push
Up
Down
Click
Previous
Next
Push
Up
Click
Click
Click
Page 2

Convenient functions
Menu-General
5-16
Menu-General
Convenient functions
General
5-15
ON : Playback resumes from the previous location in a song
when the player is stopped or powered off.
OFF : Playback begins from the first track after the player is
stopped or powered off.
Initialize menus to the original factory settings.
The button’s operation order is as below.
Click NAVI/MENU (select default menu)
or VOL+ (select
YES)
Press NAVI/MENU (select YES : Initialization)
Support 40 languages
Song title and ID3 tag information is dependent on the version of
the PC operating system that was used to create it. (For
example, if an MP3 file is created in a English version of
Windows, the language setting should be English for the proper
title display)
Resume
Language
LoadDefault
Page 3
Convenient functions
Menu-Display
ScrollSpeed
5-18
Menu-Display
Convenient functions
Display
5-17
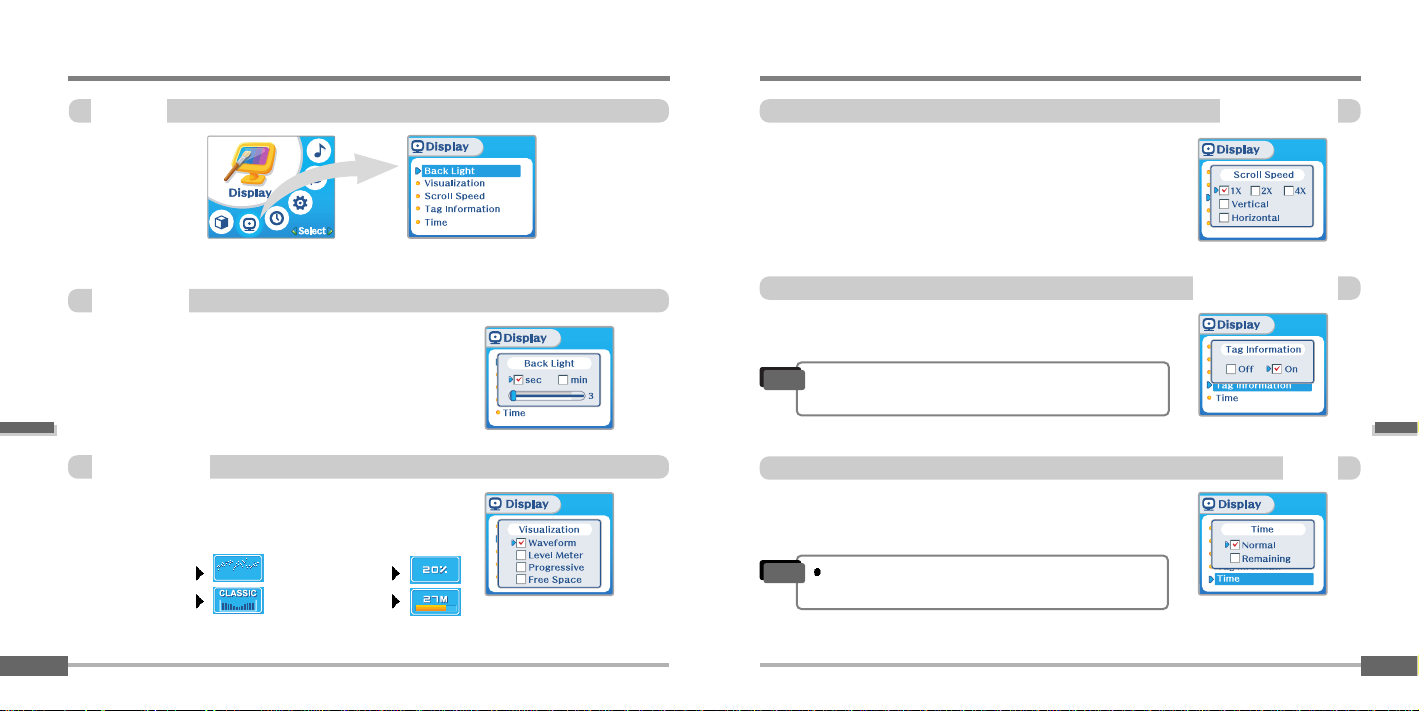
You can adjust the time that the Backlight stays on.
SEC : Backlight stays on from 3 to 30 seconds.
MINUTE : Backlight stays on from 1 to 30 minutes.
Press the NAVI/MENU button to set SEC/MINUTE.
BackLight
During playback, you can display visualizations, the
elapsed time of the track, or the free memory on your
player.
Normal : display elapsed time.
Remain : display remaining time.
On : Display track with ID3 tag information
Off : Display track with file name
Adjust scroll speed by 1x / 2 x / 4x / Vertical / Horizontal.
Vertical : The scroll goes up and down
Horizontal : The scroll goes from the left to the right.
Visualization
Waveform
Level Meter
Progressive
Free Space
TagInformation
Time
"
File name will be displayed by default for songs
with no ID3 information
Note
Time display may not be accurate for files encoded
in Variable Bit Rate formats.
Note
Page 4
Convenient functions
Menu-Timer
SetTime
5-20
Menu-Timer
Convenient functions
Timer
5-19
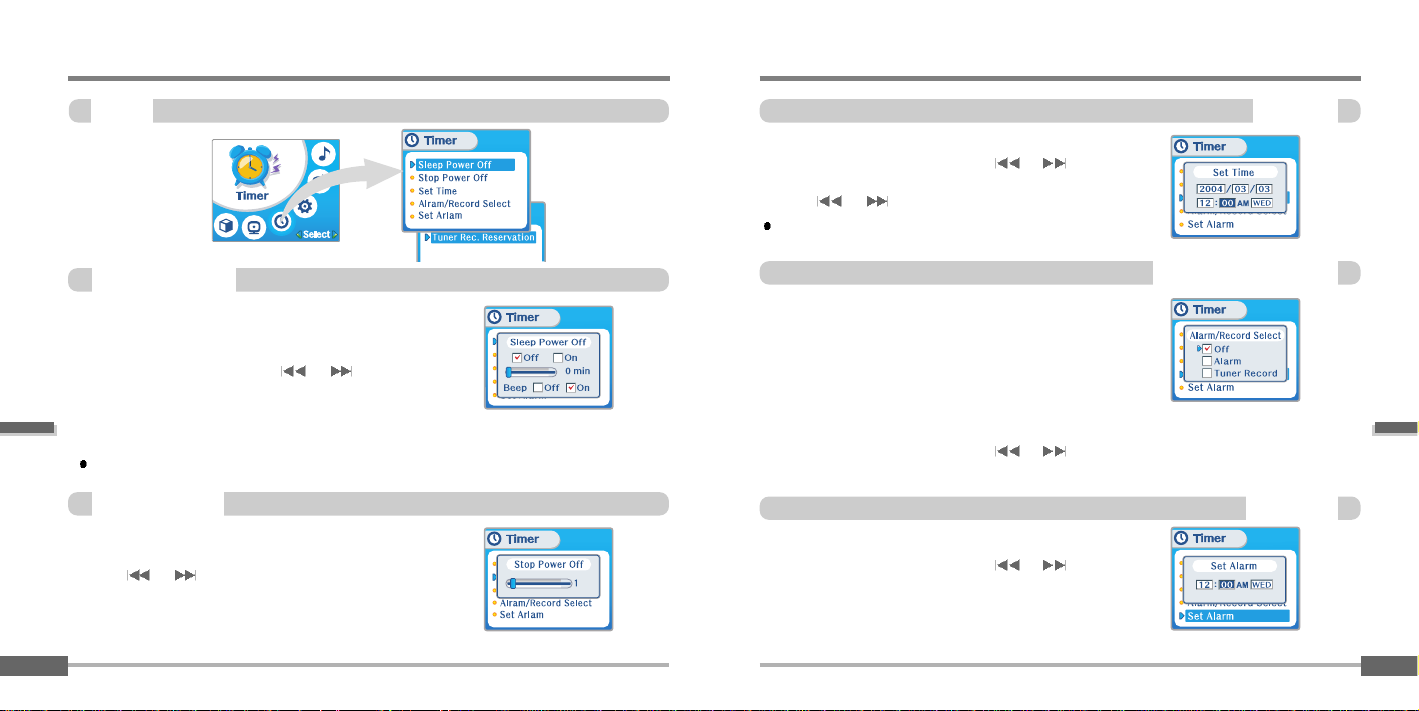
Automatically turns the power off at the stop mode.
(Time range can be set from 1 to 60 minutes by a minute)
Use the
or switch to adjust time.
Automatically turns the power off after a fixed time.
(Time range canbe set from 0to 180 minutes by oneminute increments.)
You can listen to the beep sound at 1 minute before powering off
by setting BEEP to ON. Use the
or switch to adjust
time. Set BEEP ON/ OFF by pressing the NAVI/MENU button.
ON : A beep sound will play one minute before the player shuts
off.
OFF : No beep sound is played.
Once powered off, the sleep timer will reset to 0.
min
SleepPower Off
StopPower Off
Alarm/RecordSelect
SetAlarm
Set the current time.
Push the NAVI/MENU switch toward
or to select the
item and toward VOL + or VOL - to set the clock.
Use the
or switch to adjust time.
A day of the week is automatically set.
OFF : The Alarm and Tuner Record functions are disabled and
the player will not power on at either indicated time.
ALARM : At the time indicated in the "Set Alarm" setting (see
below) the player will power on and begin music playback."
TUNER RECORD : At the time indicated in the "Tuner Rec.
Reservation" setting (see page 5-21) the player will power on
and begin recording from the selected radio station.
Push the NAVI/MENU switch toward
or (VOL+or
VOL - ) to select the item.
Set the working time of alarm.
Push the NAVI/MENU switch toward
or to select the
item and toward VOL + or VOL - to set the alarm.
DAY : Alarm rings at the set time of the set day repeatedly.
ALL : Alarm rings at the set time everyday.
Page 5
Menu-Timer
Convenient functions
TunerRec. Reservation
5-21
Convenient functions
MENU-Control
Control
5-22
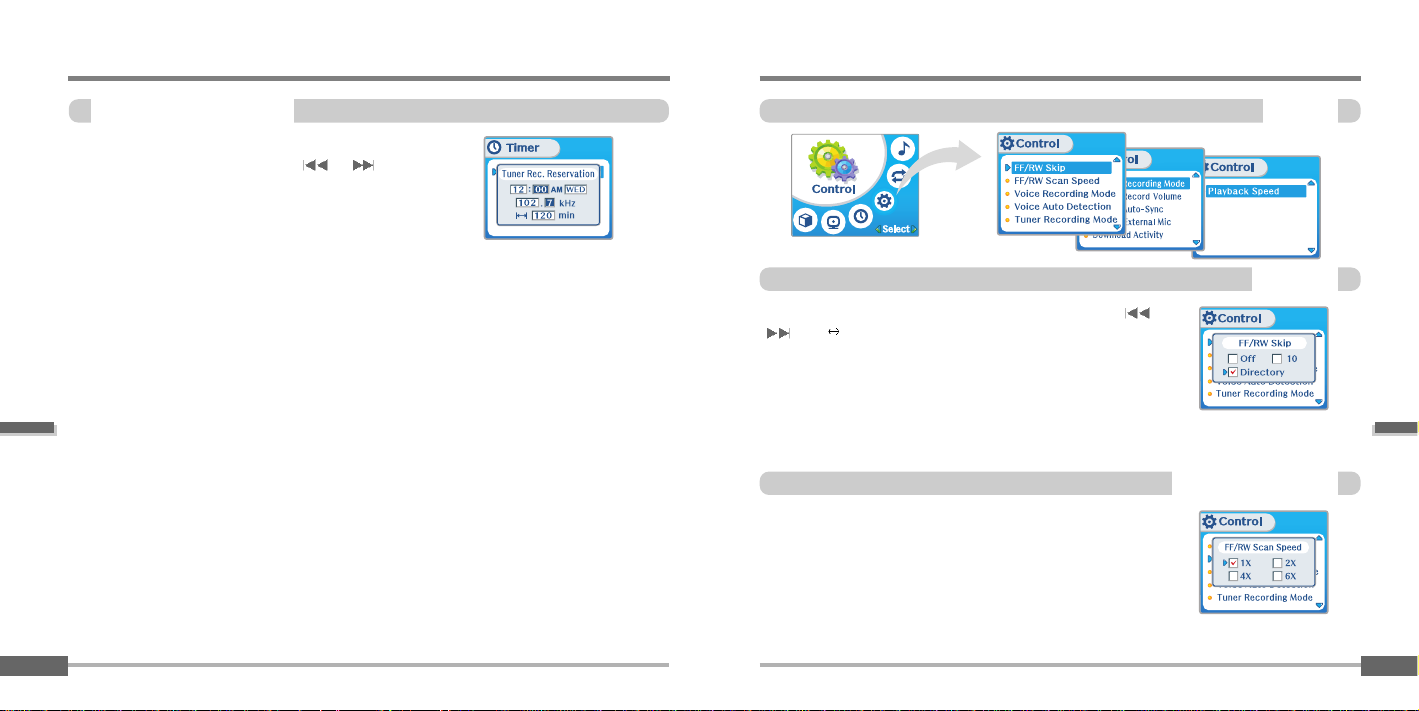
The fast scan speed can range from 1x/ 2x/ 4x/ 6x.
This defines the operating method of short or long click of or
lever.
OFF : Skip doesn’t activate.
10 : Skip 10 tracks at time.
DIRECTORY : Skip to previous or next folder.
FastSkip
FF/RWScan Speed
Set the time and station to be recorded.
Push the NAVI/MENU switch toward
or to select the
item and toward VOL + or VOL - to set the recording time.
DAY : Tuner recording is started at the same time of the set day
repeatedly.
ALL : Tuner recording is started at the set time every day.
End Time :Cansettherangeofrecordingtimefrom10Min.to
240 Min.
Page 6
Convenient functions
MENU-Control
Line-inRecording Mode
5-24
MENU-Control
Convenient functions
VoiceRecording Mode
5-23
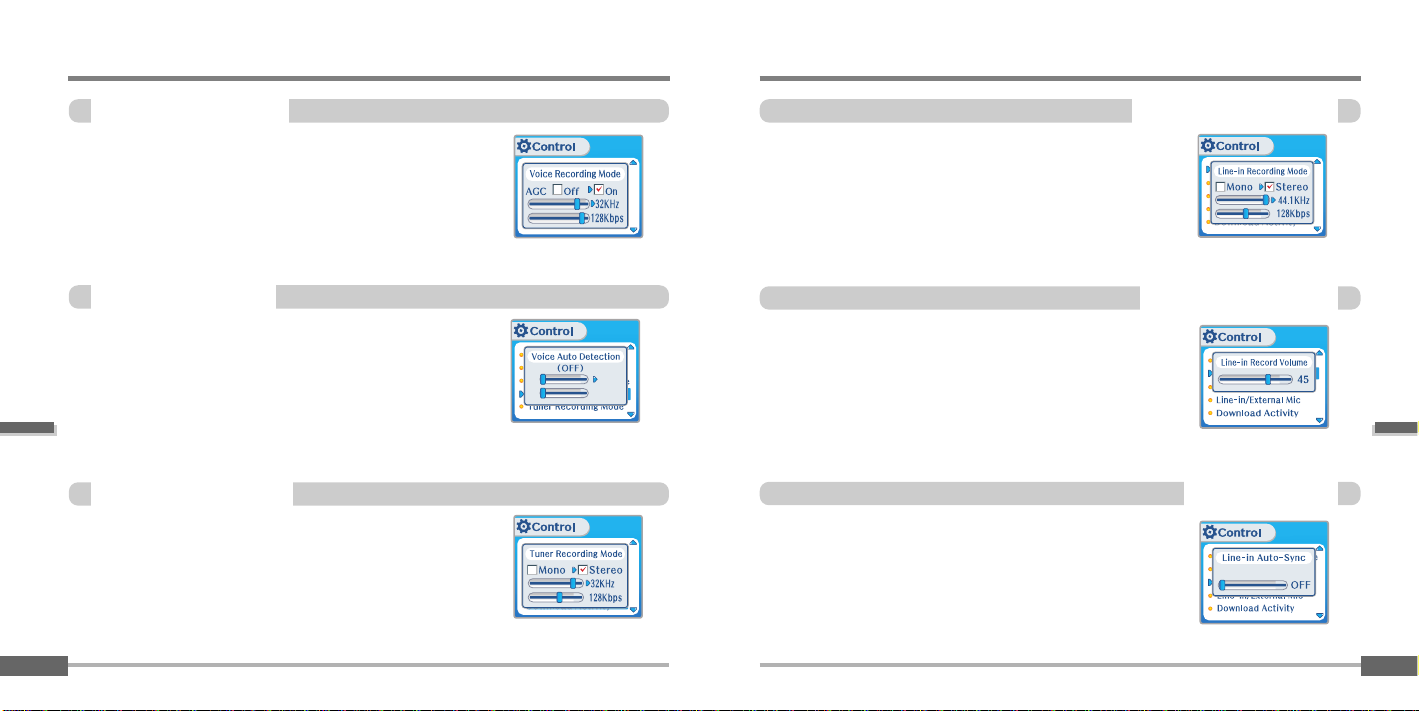
You can adjust recording quality when recording voice.
ON : When recording voice, the recording level is automatically
controlled and recordings from long distances are enhanced.
OFF : AGC(Automatic Gain Control) not activated.
Bit Rate : 8Kbps~160Kbps
Sampling Frequency : 11.025KHz ~44.1KHz
The voice recording mode will automatically pause during
silence. This is useful for recording over a long period of time to
save memory.
OFF : Voice Auto Detection is disabled.
Voice Auto Detection : Set the relative level of sound needed to
activate the recorder. (Level 1- Level 10).
Recordpausetimesetting: Set the number of seconds of silence to
record before pausing.(1-10 sec)
OFF
OFF
VoiceAuto Detection
You can adjust recording quality when recording from the FM
Tuner.
Mono : Recorded to Mono sound.
Stereo : Recorded to Stereo sound.
Bit Rate : 8Kbps~320Kbps
Sampling Frequency : 11.025KHz ~44.1KHz
TunerRecording Mode
You can adjust recording level when recording from External
equipment.
(You can set from 0 to 64.)
Line-inRecord Volume
You can adjust recording quality when recording from external
equipment.
Bit Rate : 8Kbps~320Kbps
Sampling Frequency : 11.025KHz ~44.1KHz
Line-In, a new file will be created for each track on the CD
automatically.
-OFF: Audio signal detection is disabled.
- Audio signal detection time (1-5 seconds) : The amount of
silence the player will use to determine when a track has ended
and to start a new file.
Line-inAuto Sync
Page 7
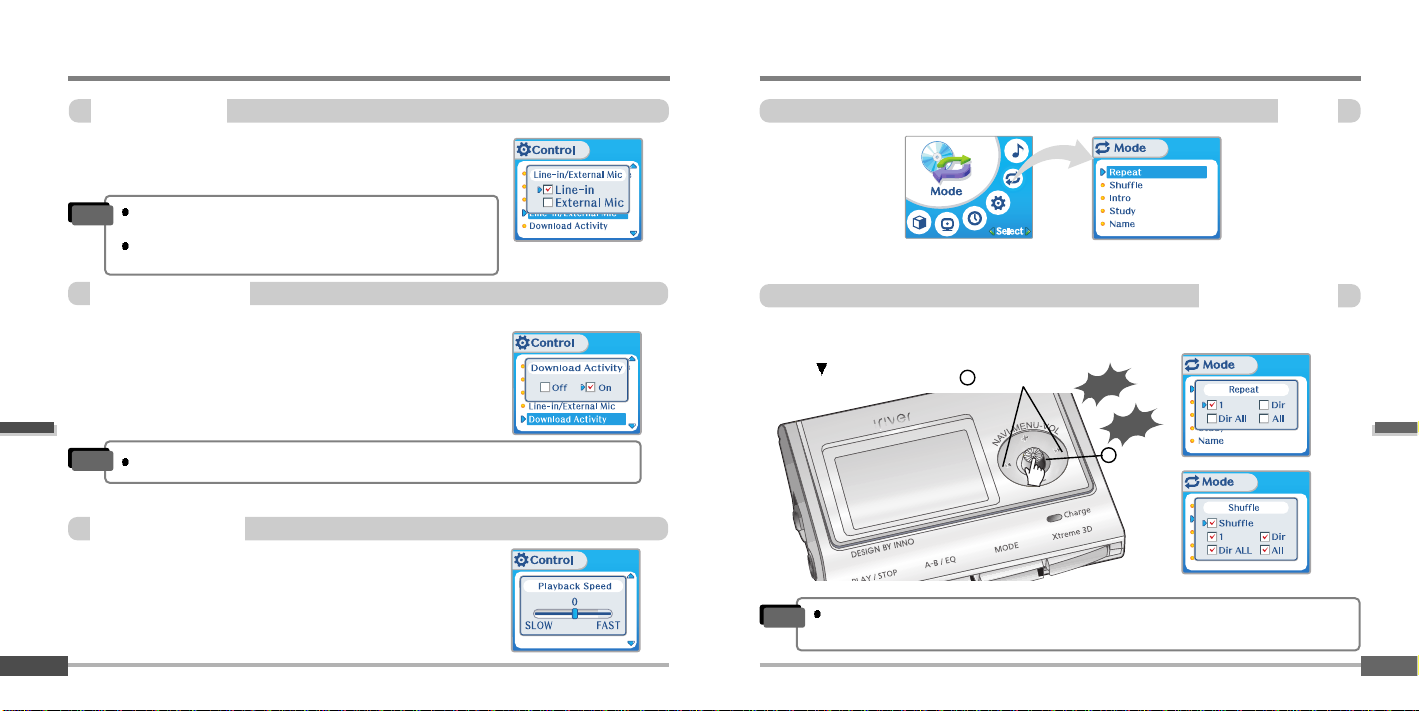
Menu-Control
Convenient functions
Line-in/Ext.Mic
5-25
Convenient functions
Menu-Mode
Mode
5-26
While an audio file is playing, press the MODE/REC button to activate selected playback
mode, such as Repeat or Shuffle. (Multi selecting available)
How to select
Push
Previous/Next
Click
On/Off
1
2
Repeat/Shuffle
Select whether the player is operated for a music playback or file
transferring while the player is attached to the PC.
OFF : The player will playback audio files while connected to the PC
(to save battery life).
ON : The player to show “Connected to USB” on the screen and you
can transfer files to the player.
DownloadActivity
When the player turns off and on, Download Activity is always set to ON.
Note
You can select external microphone or line-in when recording.
Line-In : To record through Line-In
Ext. Mic : To record through an external microphone
To record from an external microphone, chose the LINE-IN
recording mode.
The recording quality level will be set to the values chosen
for LINE-IN recording.
Note
Adjust the playback speed.
The value of Playback Control goes on to FAST, playback speed is
faster, it goes on to SLOW, playback speed is slower.
The default value is “0” and the music is played as normal speed.
PlaybackControl
Only the selected play mode will be available when you press the MODE/REC button
(For details, please refer to page 5-5)
Note
Page 8
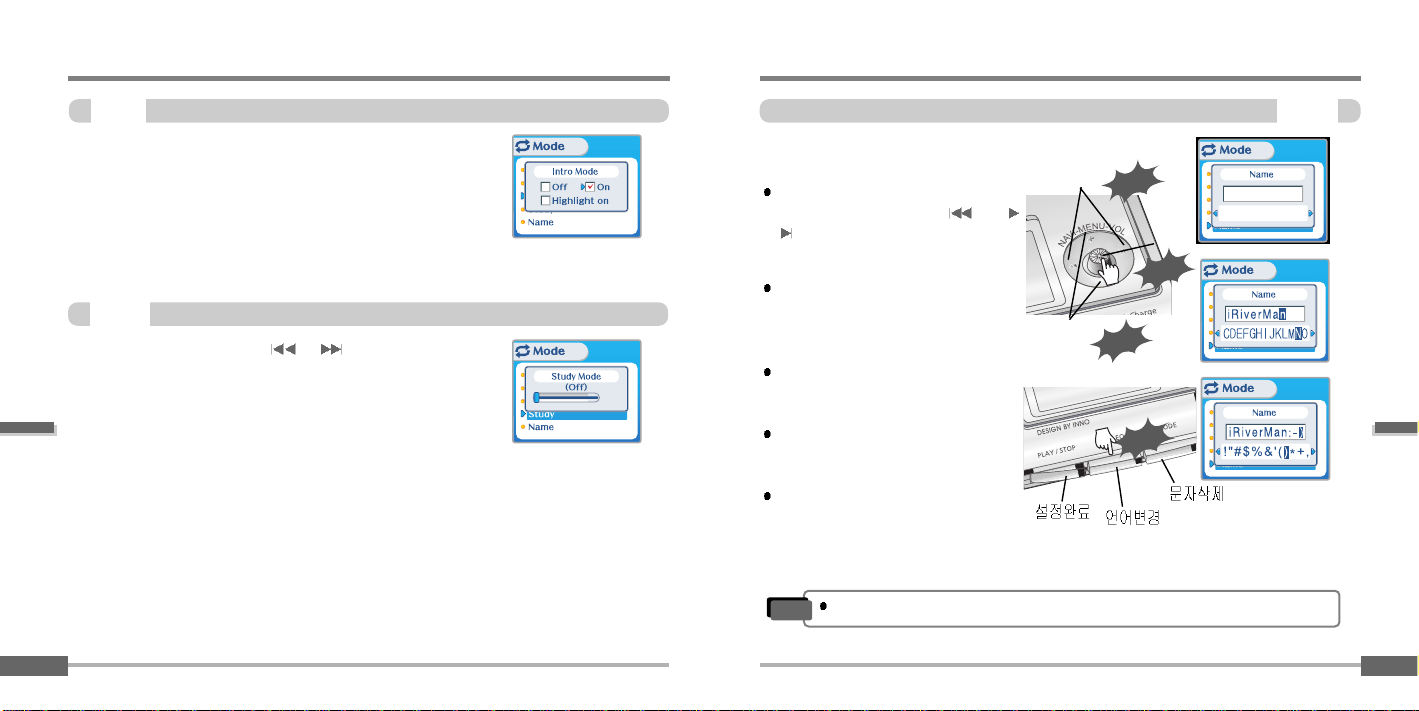
Convenient functions
Menu-Mode
Name
5-28
Menu-Mode
Convenient functions
Intro
5-27
Intro : Plays the beginning 10 seconds of each track.
Intro Highlight : Plays 10 seconds from 1 minute into each track in
sequential order.
While playing, short slide of the or lever will skip the
current track set time ahead.
OFF : Study Mode is disabled.
The range is 1~60 seconds.
You can input your name or custom text displayed at th stop
mode.
Select the character by pushing the
NAVI/MENU button toward
and
and press Navi/Menu button to input
the character.
To delete the character, press the
MODE
To scroll between English and your
preferred language, use the
MEMORY/EQ button.
To move the cursor in the name
window, push the NAVI/MENU button
toward VOL + or VOL -.
Press the PLAY/STOP button to save
and exit.
Study
Push
Characte
Push
Click
Enter
Type position
Click
Chinese and Chinese characters are not supported in the Name feature.
Note
Page 9
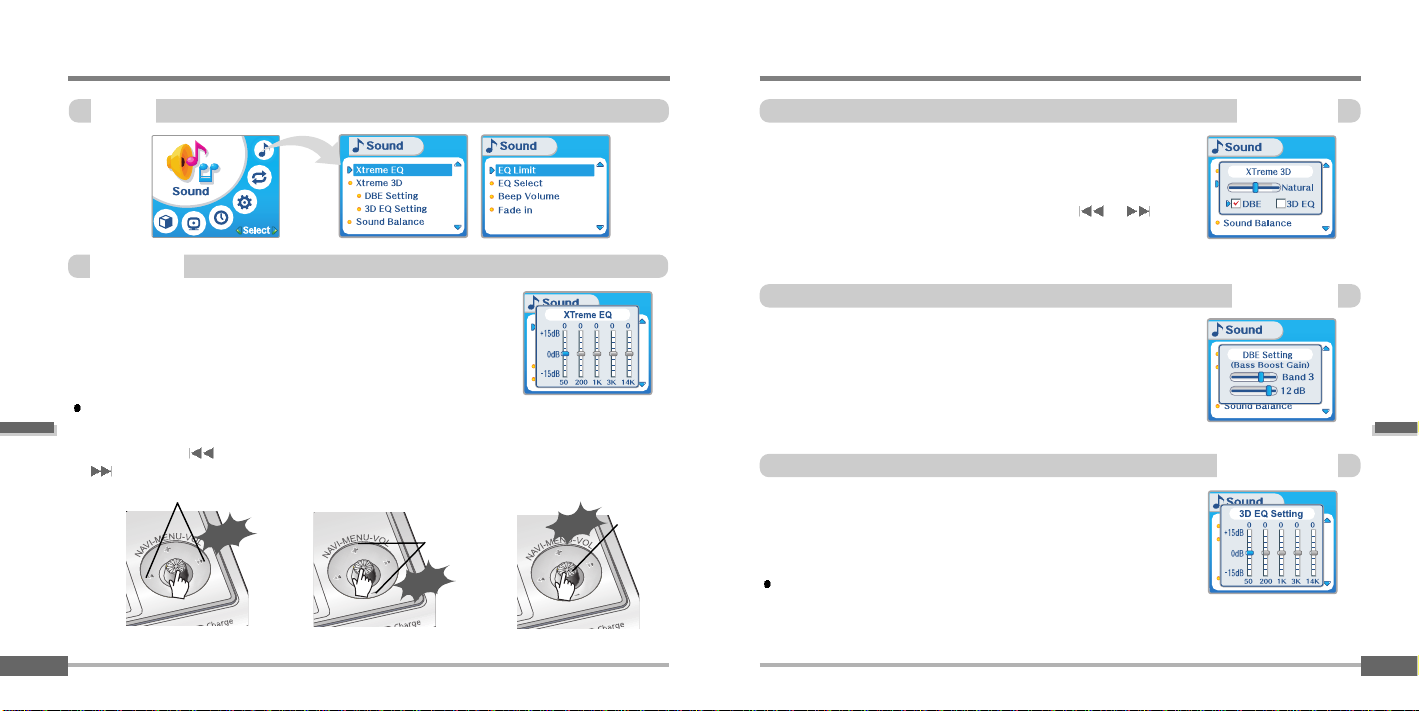
Convenient functions
Menu-Sound
Xtreme3D
5-30
Menu-Sound
Convenient functions
Sound
5-29
You can adjust the sound to your preference.
There are 5 band frequency steps, set from -15dB to +15dB by
3dB step.
1. Select the Frequency step
to set using the
or
switch.
2. Adjust the level using the
VOL + or VOL - switch.
3. To exit Xtreme EQ setting
Push
Select the frequency
Push
Adjust level
You can adjust the level of 3D sound (minimum, Natural, and
Maximum).
You can extend 3D sound by selecting Bass Boost or 3D EQ.
You can also adjust the level of 3D sound with the
or lever.
Select DBE or 3D EQ with the NEVI/MENU button.
DBE (Dynamic Bass Enhancement) enhances Low & Middle
frequencies and only operates when using Xtreme 3D.
You can select the Bass Center Band level from Band 1 to 4.
You can also set the Bass Boost gain from 0 dB to 15dB by 3dB step.
Set EQ to User EQ to use 3D EQ.
You can adjust the sound to your preference.
There are 5 band frequency steps, set from -15dB to +15dB by 3dB
step.
The way of 3D EQ setting is similar to that of setting Xtreme 3D.
XtremeEQ
How to set Xtreme EQ
DBESetting
3DEQ Setting
Click
Exit
Page 10
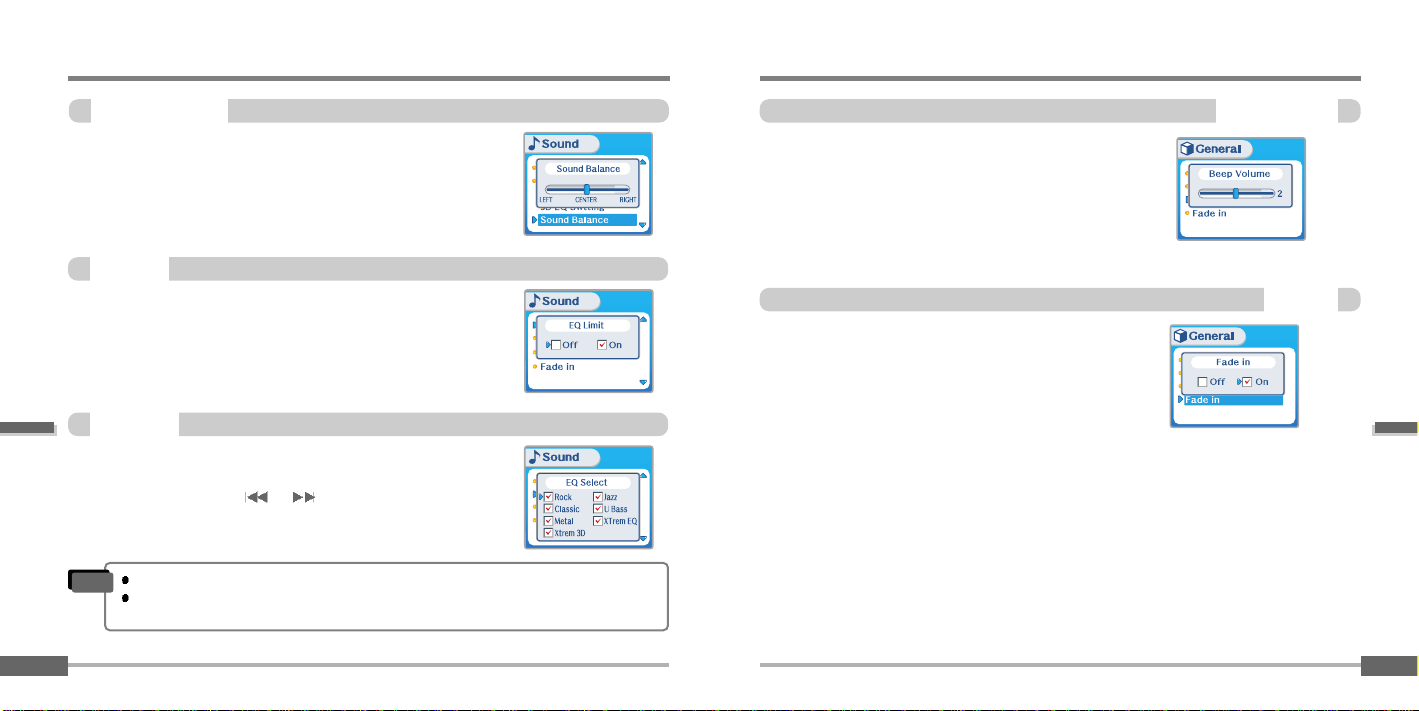
Convenient functions
Menu-Sound
BeepVolume
5-32
Menu-Sound
Convenient functions
5-31
SoundBalance
Balance your sound to the right or left or keep it in the center
according to your preference. When Sound Balance bar is moved to L
(Left, 20),the sound outputs at the left earphone. When the lever is
moved to R (Right, 20) the sound outputs at the right earphone.
The default value is 0 and the sound outputs the same level at both
earphones.
ON : Limit the control of equalizer frequency to prevent distortion of
sound.
OFF : You can enjoy the original sound though distortion of sound
may occur.
0
You can select various EQ modes.
Press the NAVI/MENU button after selecting EQ by pushing the
NAVI/MENU button toward
or (VOL +, VOL -) direction.
EQLimit
EQSelect
You can not select Normal EQ.
If you do not select Xtrm EQ or Xtrm 3D, Xtrm EQ or Xtrm 3D modes will not be
available during playback in spite of adjusting the values.
Note
Set beep volume level.
Set to "0" for OFF.
Fadein
When activated, volume increases gradually at playback
mode to prevent the sudden loudness.
Page 11
Contents
Additional
Information
6
Trouble shooting
Precautions
Accessories
Specifications
6-1
6-2
6-3
6-4
6-5
AdditionalInformation
5-33
Page 12
ForSafety
Additional
Information
Precautions
6-6-2
Onheadphones andearphones
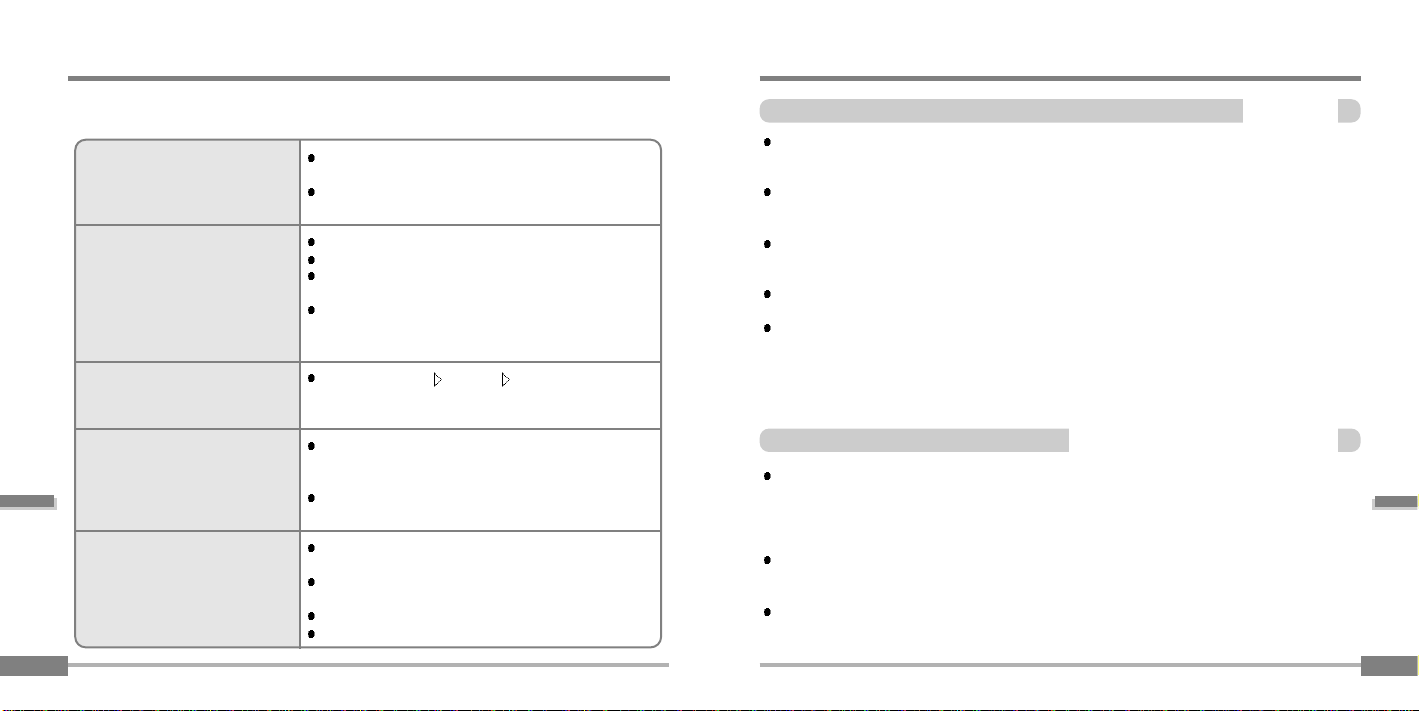
Troubleshooting!
6-1
Should any problem continue after you have checked these symptoms,
please contact iRiver customer support.
No Power
No sound or distortion during
playback.
Characters in LCD are
corrupted.
Poor FM Reception.
Failed download of MP3 file
Check whether the HOLD switch on the player is ON
(Switch to OFF position)
Battery may be discharged. Charge it after connecting
the USB cable between the PC and the player.
Check whether VOLUME is set to "0".
Connect the earphones plug firmly.
Checkwhethertheplugisdirty.Cleantheplugwithadry
and soft cloth.
Corrupted MP3 or WMA files may make a static noise
and the sound may cut off. Listen to your files
on the PC to see if they are corrupted.
Check out Menu
General Language and confirm
whether the right language has been selected.(Refer to
page 5-15)
Adjust the position of the player and earphones.
Turn off the power of other electric devices near the
player.
The Earphone cord functions as the antenna, they must
be plugged in for best reception.
Check to see if the battery is discharged, charge if
necessary.
Check the connection between your computer and the
player to ensure that the cable is secure.
Check the Manager program to make sure it is operating.
Check whether the player’s memory is full.
Additional
Information
Avoid dropping or impacting the player.
The player is designed to operate while walking or running,but dropping or excessively impacting
the player maybe causedamage.
Avoid contacting the player with water.
Damage to the internal parts of the player may occurif the player comes into contactwith water.
If your playergets wet, dry the outside with asoft cloth as soon as possible.
Do not leave the player in a location near heatsources, or in a place subjectto direct
sunlight, excessive dust or sand, moisture, rain, Mechanical shock, unleveledsurface, or in
a car with its windows closed.
Remove the battery if player is unused for long periodsof time.
Battery left in theplayer for a long time cancorrode and damage the device.
All data stored on this device may be erased by a excessive impact, a thunder oran
electricity failure, etc. on the device.
The manufacturer doesnot warrant and will notbe held responsible in anyway for damages or loss
of data, includingloss of data stored onthis device, resulting from aexcessive impact, a thunder or
an electricity failure,You will be responsible forsafe-guarding all data stored onthis device.
Road Safety
Do not useheadphones/earphones while driving, cycling, or operating anymotorized vehicle.
It may create a traffic hazard and is illegal insome areas. It can also be potentially dangerous to
play your headsets athigh volume while walking, especially atpedestrian crossings.
You should exercise extreme caution or discontinue use in potentiallyhazardous situations.
Preventing hearing damage
Avoid using headphones/earphonesat high volume. Hearing expertsadvise against continuously
loud and extendedplay. If you experience aringing in your ears, reducevolume or discontinue use.
Consideration for others
Keep the volumeat a moderate level. This will allow you to hearoutside sound and to be
considerate of thepeople around you.
Page 13
Accessories
Additional
Information
6-3
Additional
Information
Specifications
6-4
Memory
Model No
256MB
iFP-990
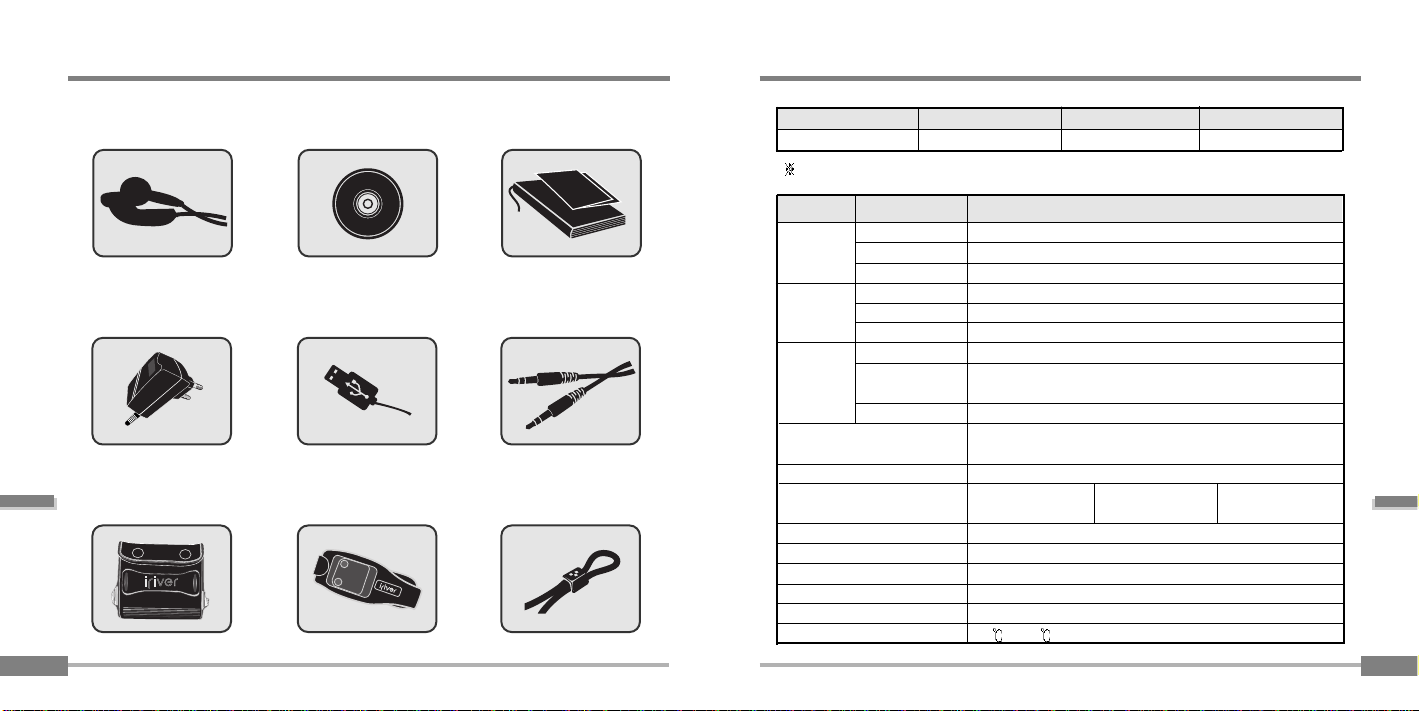
Earphone/ Earphone cover
Installation CD
Arm Band
USB cable
Carrying Case
User Manual/ Warranty
card/Quick Start Guide
Audio Cable
1
1
2
2
3
3
4
4
5
5
6
6
7
7
8
8
Neck strap for carrying
9
9
Adapter
512MB
iFP-995
1GB
iFP-999
Memory is not expandable.
Audio
FM Tuner
File
Support
20 Hz ~ 20 KHz
(L)18 mW + (R)18 mW (16 Ohm) max. Volume
90 dB(MP3)
87.5 MHz ~ 108 MHz
60 dB
Headphone/Earphone-Cord Antenna
MPEG 1/2/2.5 Layer 3, WMA, OGG, ASF
8 Kbps ~ 320 Kbps
(OGG : 44.1KHz, 96Kbps ~ 225Kbps)
ID3VI,ID3V22.0,ID3V23.0,ID3V24.0
260,000 Color Graphic LTPS(Low Temperature Poly Silicon)
LCD with Backlight
40 Languages
Approx. 40hours (128 kbps,MP3, Volume :20, EQ Normal,LCD off)
USB 1.1(Full speed supported)
91.1(W) x 34(H) x 31.3(D) mm
63 g (Battery included)
Rechargeable Battery
-5
~40
Category Item
Specifications
LCD
Language
Voice Recording
Max. Playtime
USB
Dimension
Weight
Battery
Operational Temperature
Frequency range
Headphone Output
S/N ratio
FM Frequency range
S/N ratio
Antenna
File Type
Bit Rate
Tag Info
Approx. 18:00 hrs
(32kbps, 256 MB)
Approx. 36:00 hrs
(32kbps, 512 MB)
Approx. 372:00 hrs
(32kbps, 1GB)
Page 14

THIS DEVICE COMPLIES WITH PART 15 OF THE FCC RULES. OPERATION
IS SUBJECT TO THE FOLLOWING TWO CONDITIONS: (1) THIS DEVICE MAY
NOT CAUSE HARMFUL INTERFERENCE, AND (2) THIS DEVICE MUST
ACCEPT ANY INTERFERENCE RECEIVED, INCLUDING INTERFERENCE THAT
MAY CAUSE UNDESIRED OPERATION.
NOTE: THE MANUFACTURER IS NOT RESPONSIBLE FOR ANY
RADIO OR TV INTERFERENCE CAUSED BY UNAUTHORIZED
MODIFICATIONS TO THIS EQUIPMENT. SUCH MODIFICATIONS
COULD VOID THE USER'S AUTHORITY TO OPERATE THE EQUIPMENT.
NOTE: This equipment has been tested and found to comply with the
limits for a Class B digital device, pursuant to part 15 of the FCC
Rules. These limits are designed to provide reasonable protection
against harmful interference in a residential installation. This
equipment generates, uses and can radiate radio frequency energy
and, if not installed and used in accordance with the instructions, may
cause harmful interference to radio communications. However, there
is no guarantee that interference will not occur in a particular
installation. If this equipment does cause harmful interference to
radio or television reception, which can be determined by turning the
equipment off and on, the user is encouraged to try to correct the
interference by one or more of the following measures:
- Reorient or relocate the receiving antenna.
- Increase the separation between the equipment and receiver.
-Connect the equipment into an outlet on a circuit different from that
to which the receiver is connected.
-Consult the dealer or an experienced radio/TV technician for help
 Loading...