

Page 1
I 4 Detailed Operation I
Detailed Operation
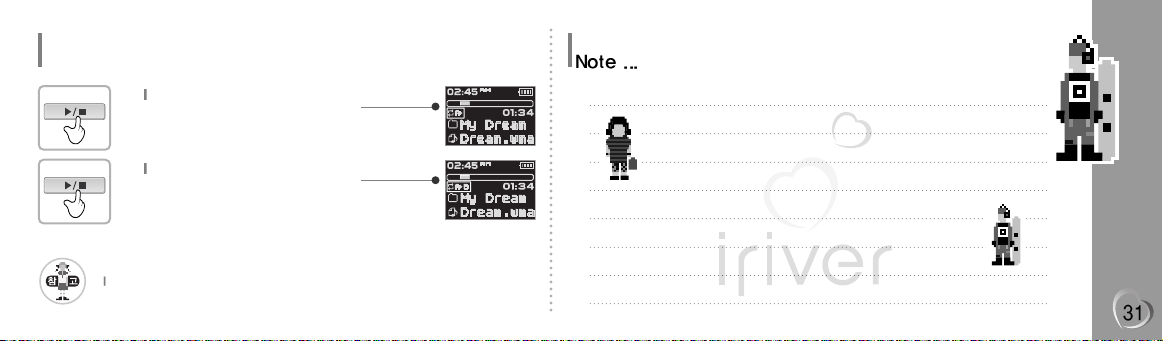
Interval Repeat (A-B)
The Reservation Function allows you to queue one song to play after the current song has ended.
Select the (A) point
Press the <MENU> button while playing to
select the beginning (A) point.
1
Select the (B) point
Press the <MENU> button again to select
the end (B) point.
- The interval (A to B) will be repeated.
2
Play a selected interval repeatedly during play.
Page 2
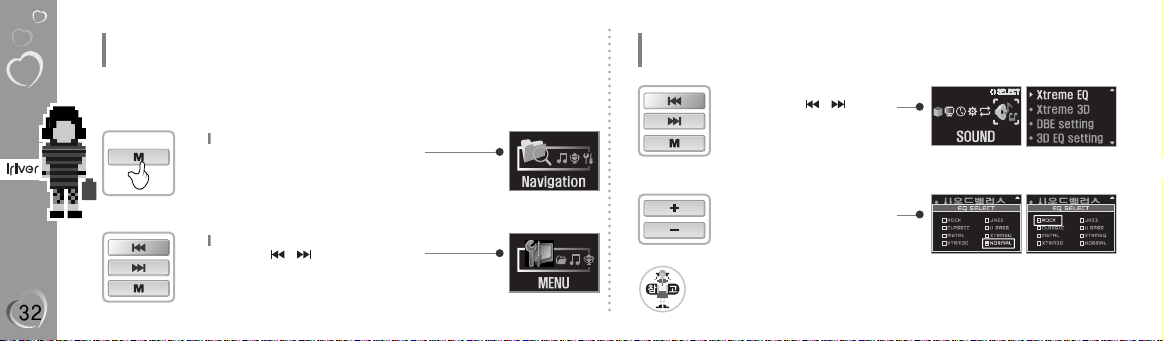
EQ
Press the <MENU> button.
1
Select the MENU
Press the < / > button.
Press the <MENU> button.
2
Detailed Operation
EQ
Detailed Operation
EQ
Press the < / > button
to display the current EQ
selection.
Press the <MENU> button.
3
Press the <+/-> button to the
available EQ options.
4
l
ROCK, JAZZ, CLASSIC, U BASS, METAL, XTRMEQ, XTR3D, NORMAL
Page 3

I 4 Detailed Operation I
Detailed Operation
EQ
Select <ROCK>
After press the < MENU>
button to finish EQ.
Press the <+/-> button to check.
5
Refer to MENU setup for setting the Xtrm EQ and Xtrm 3D.
Page 4

Detailed Operation
Program Mode Program Mode allows you to program a list of songs to play.
Program Mode
When stopped (no songs are playing)
press the <MENU> button.
1
Add and Change to Program list
Press the <+/-> button.
2
Detailed Operation
Program Mode
Select Program list
After press the <MENU or (+/-)> button.
3
Select add and Change to song
Press the <MENU> button.
After selecting a folder to save,then press the <MENU> button to save all files in the folder.
Sub folders are not added.
4
Page 5

I 4 Detailed Operation I
Detailed Operation
Program Mode
Program Playback
After programming, press <PLAY/STOP>
button to play the tracks in sequential order.
1
Detailed Operation
Program Mode
Cancel Program Mode
When stopped (no songs are playing)
press and Hold the < - > button.
- Program playback is cancelled and
normal playback is started.
1
To remove files from the program list
Press and Hold the <MENU> button after
selecting the file to be deleted using the
<MENU> button.
The program list is automatically changed.
1
Press and Hold
Press and Hold
Page 6

Page 7

I Menu setup I
MENU 38
Moving MENU 39
Setting up the User s function
39
Exiting from submenu 40
General
41
Display 42
Timer
44
Control 45
Mode 48
Sound
50
Chapter
5
Page 8

Menu setup
Menu
Userscanconfiguretheirownsettings.
Functionsaresubjecttochangewithdifferentfirmwareversions.
GENERAL
RESUME
LANGUAGE
LOAD DEFAULT
DISPLAY
Back-light
LCD Control
Screen Saver
Scroll Speed
Tag Information
Play Time Info
TIMER
SleepPowerOff
StopPowerOff
SetTime
SetAlarm
Control
FastSkip
FF / RWScanSpee
VoiceRecordingMode
VoiceAutoDetection
MODE
MODE
IntroMode
IntroMode
Name
SOUND
Xtreme EQ
Xtreme 3D
DBESetting
3DEQSetting
SoundBalance
EQLimit
EQSelect
BeepVolume
SoundFadein
Page 9

Switching between Menus
< / > button to
display the main menu system.
: Moves to the previous Menu
: Moves to the next Menu
5 Menu setup
Menu setup
Entering sub menu
Menu setup
Switching between Menus
Menu
MENU button or the,
< / > button to display the
main menu system.
The MENU system is composed of 6main
menus with sub-menus.
Long Click
1
<>
<>
<>
<>
<>
2
MAIN menu
Press the <MENU> button to display
the main menu system.
1
SubMenu
Press the <MENU> button to display
the main Sub menu system.
2
기능설정
<>
SELECT
화면설정
모드설정
<>
<>
SELECT
SELECT
타이머
음향설정
<>
<>
SELECT
SELECT
Page 10

Menu
Exiting from sub menu
Press the PLAY / STOP button
to return Main MENU
atthe sub-menu setting.
1
Exiting from main menu
Press the PLAY / STOP button
again to exit the Main Menu.
2
Entering sub menu
Specific features
<MENU> button to view andchange
settings for the Specific features feature.
3
Specific features
<+ / -> used to change
settings in each feature.
4
Page 11

5 Menu setup
Menu operation - Menu
GENERAL
RESUME (Resume)
ON : Playback resumes from the previous location
in a song when the player is stopped or powered
off.
OFF : Playback begins from the first track after the
player is stopped or powered off.
1
Menu operation - Menu
GENERAL
LANGUAGE (Language)
Supports40languages
Song title and ID3 tag information for the MP3 files is
dependent on the version of the PC operating system
that was used to create it.
(
For example, if an MP3 file is created in a English version of Windows,
the language setting should be English for the proper title display
)
2
Load Default Value(Load Default Value)
InitializeMenustotheoriginalfactorysettings.
Buttonoperationorderisasbelow.
<MENU>button (select default menu)
< > button (selectYES)
<PLAY/STOP> button (selectYES:Initialization)
3
Page 12

Menu operation - Menu
DISPLAY(Display)
Back-Light (Back-Light)
You can adjust the time that the Backlight stay son.
SEC:Backlight stay son from 0 to 30 seconds.
MINUTE:Backlight stay son from 0 to 30 minutes.
Press the NAVI / MENU button to set SEC / MINUTE.
1
Menu operation - Menu
DISPLAY(Display)
LCDContrast (LCD Contrast)
You can adjust the time that the Backlight stay son.
SEC:Backlight stay son from 0 to 30 seconds.
MINUTE:Backlight stay son from 0 to 30 minutes.
Press the NAVI / MENU button to set SEC / MINUTE.
2
Screen Saver (Screen Saver )
??
3
<>
SELECT
<>
SELECT
화면설정
Page 13

5 Menu setup
Menu operation - Menu
DISPLAY(Display)
ScrollSpeed (Scroll Speed)
Adjustscrollspeedby1x/2x/4x/Vertical/Horizontal.
- Vertical : Thescrollgoesupanddown.
- Horizontal : Thescrollgoesfromtheleftto
4
Tag Information (Tag Information)
ON : DisplaytrackwithID3taginformation
OFF : Displaytrackwithfilename
- File name will be displayed by default for songs
with no ID3i nformation.
5
Menu operation - Menu
DISPLAY(Display)
Time (Time)
NORMAL : display elapsed time.
REMAIN : display remaining time.
Note:Time display may not be accurate for
files encoded in Variable Bit Rate formats.
6
Page 14

Menu operation - Menu
TIMER (Timer)
Sleep Power Off (Sleep Power Off)
Automatically turns power off after a fixed
time.(Time range can be set from 1to U setheI
180 minutes by one minute increments.)
< / or+ / -> I(VOL + or VOL -)buttontoadjusttime.
Set BEEP ON / OFF by pressing the NAVI / MENUbutton.
- Once powered off, the sleep timer will reset to 0.
1
Menu operation - Menu
TIMER (Timer)
Stop Power Off (Stop Power Off)
Automatically turns power off at stop mode.
(Time range can be set from 1 to 60 minutes by one
minute increments.)
2
SetTime (Set Time)
Push the NAVI / MENU switch towardI
< / or + / -> to select the item and toward
VOL + or VOL - to set the clock.
3
<>
SELECT
<>
SELECT
타이머
Page 15

5 Menu setup
Menu operation - Menu
TIMER (Timer)
SetAlarm (Set Alarm)
Set the working time of alarm.
SUN ~ SAT : Alarm rings in the same time of the
set day repeatedly.
ALL : Alarm rings in the set time everyday.
4
Menu operation - Menu
CONTROL (Control)
Fast Skip
OFF : Fast SkipFast Skip
10 : Skip 10 tracks at time.
DIRECTORY : Skip top revious or next folder.
1
SELECT
<>
SELECT
기능설정
Page 16

Menu operation - Menu
CONTROL (Control)
FF / RW Scan Speed
The fast scan speed can range from
1x/2x/4x/6x.
2
Menu operation - Menu
CONTROL (Control)
Voice Recording Mode
You can adjust recording quality when recording Voice.
AGC ON : When recording voice, the recording level is
Automatically controlled and the sound from a
long distance Is normally recorded.
AGC OFF : AGC Control not activated.
3
Page 17

5 Menu setup
Menu operation - Menu
CONTROL (Control)
Voice Auto Detection
The voice recording mode will automatically pause
During silence. This is useful for recording over a long
Period of time to save memory.
OFF : Voice Auto Detection is disabled.
Voice Auto Detection(firstslider) : Set the relative level Of sound
needed to activate the recorder.(Level1-10).
Recordpausetime(secondslider) : Set the number of seconds of
silence to record before pausing.(1-10Sec)
4
Menu operation - Menu
CONTROL (Control)
Play Back Speed
5
Page 18

Menu Setup
Mode
Menu Setup
Mode
Mode (Repeat / Shuffle)
1
Intro Mode
Intro : Plays the beginning10 seconds of each track.
Intro Highlight : Plays 10 seconds from 1minute
into each track in sequential order.
2
STUDY MODE
While playing, short slide of the < / >I
(orVOL +, VOL -) lever will skip the current
track set time ahead.
OFF:Study Mode is disabled.
The range is1~ 60 seconds.
3
<>
SELECT
<>
모드설정
SELECT
Page 19

5 Menu setup
Menu operation - Menu
Mode
Name
Use with
character
selection.
5
Usewith
character entry
Use with
character
deletion
Store
character / exit
Use with other
character
selection
Cursor movement
Note ...
Page 20

Menu operation - Menu
Sound
1. Select the
Frequency
3. Toexit Xtreme EQ
setting
Menu operation - Menu
Sound
How to set Xtreme EQ
Xtreme EQ
You can adjust the sound to your preference.
There are 5band frequency steps, set from
-15dBto+15dBby 3dB step.
1
<>
SELECT
2. Adjust the level
<>
SELECT
음향설정
Page 21

5 Menu setup
Menu operation - Menu
Sound
Xtreme 3D
You can adjust the level of 3D sound
(minimum, Natural, and Maximum).
You can extend 3D sound
By selecting Bass Boost or 3D EQ. You can also
2
DBE Setting
You can select the Bass Center Bandl evel from Band 1 to 4.
You can also set the Bass Boost gain from 0 dB to 15dB by 3dB step.
DBE(Dynamic Bass Enhancement)enhances
Low & Middle frequencies and only operates when
using Xtreme 3D.
3
Menu operation - Menu
Sound
Set EQ to User EQ to use 3D EQ.
You can adjust the sound to your preference.
There are 5 band frequency steps, set from -15dB
4
Sound Balance
Balance your sound to the right or left or keep it in the center according
to your preference.When Sound Balance bar is moved to L(Left,20),the
sound outputs at the left earphone.When the lever is moved to R
(Right,20)the sound outputs at the right earphone.The default value is 0
and the sound outputs the same level at both earphones.
5
Page 22

Menu operation - Menu
Sound
EQ Limit
ON : Limit the control of equalizer frequency
to prevent distortion of sound.
OFF : You can enjoy the original sound
though distortion of sound may occur.
6
EQ Select
You can select various EQ modes.
Press NAVI/MENU button after selecting EQ by
using or (or VOL +,VOL -)switch.
7
Menu operation - Menu
Sound
Page 23

5 Menu setup
Menu operation - Menu
Sound
Beep Volume
Set beep volume ON / OFF or level.
Set to "0"for OFF.
8
Sound Fade in
When activated,volume increases gradually at
playback mode to prevent sudden loudness.
9
Note ...
Page 24

Page 25

I Additional Information I
Handling Precautions for Safety 56
Troubleshooting 59
Specifications 60
Chapter
6
Page 26

Additional Information - Handling Precautions for Safety
Product Please read before using for your safety.
Additional Information - Handling Precautions for Safety
Product Please read before using for your safety.
Do not place objects inside
the device other than CD s.
It can cause a damage to your
player because of improper usage.
Keep away from harsh
environments including humid,
dusty, and smoky areas.
Do not place heavy objects
the device.
Avoid contact with water and
other liquids and dry
immediately with a soft cloth
should contact occur.
It can cause a damage to your
player because of improper usage.
Do not clean with chemical or
detergent. It damages the
surface and scraps paint.
Do not use water or chemicals
to clean the player. Clean the
surface with a soft cloth.
It can cause a damage to your
player because of improper usage.
It can cause a damage to your
player because of improper usage.
It can cause a damage to your
player because of improper usage.
It can cause a damage to your
player because of improper usage.
Page 27

6 Additional Information
Additional Information - Handling Precautions for Safety
Product Please read before using for your safety.
Additional Information - Handling Precautions for Safety
Product Please read before using for your safety.
Do not use excessive force
on the buttons or attempt to
disassemble the device.
Do not drop or subject the
device to impact.
Keep out of direct sunlight
and extreme heat and cold.
Keep the player away from
strong magnets.
Do not disassemble or modify
the product.
It can cause a damage to your
player because of improper usage.
It can cause a damage to your
player because of improper usage.
It can cause a damage to your
player because of improper usage.
It can cause a damage to your
player because of improper usage.
Page 28

Additional Information - Handling Precautions for Safety
Others Please read before using for your safety.
Do not use headphones /
earphones while cycling,
driving, or operating any
motorized vehicle.
Reduce volume or stop using
the player if you experience a
ringing in your ears.
Reduce volume while
walking, especially at
pedestrian crosswalk.
Do not use headphone /
earphones at high volume.
Keep headphones / earphones
cords under control at all times
Cords may get caught on a
variety of objects and cause
damage or injury.
Do not use at high volume for
continuous listening.
Hearing experts advise against
listening to continuous, loud and
extended play.
Additional Information - Handling Precautions for Safety
Others Please read before using for your safety.
Hearing experts advise against
listening to continuous, loud and
extended play.
Hearing experts advise against
listening to continuous, loud and
extended play.
It is dangerous and is illegal in
some areas.
Page 29

6 Additional Information
Additional Information
Troubleshooting
Trouble
Solution
No Power.
Check whether the rechargeable batteries are not charged or the
batteries are drained.
No sound or distortion
during playback.
Check whether VOLUMEis set to "0".
Check whether the plug is dirty.
Corrupted MP3 or WMA files may make a static noise and
the sound may cut off. Listen to your files on the PC to
see if they are corrupted.
Characters in LCD are
corrupted.
MENU General Language (Refer to ??page)
Trouble
Solution
Failed download of
MP3 file.
Check the connection between your computer and the player to
ensure that the cable is secure.
Batteries do not
charge.
Fully charged rechargeable battery will not accept additional charge.
Is the USB casbel correctly plugged in?
Additional Information
Troubleshooting
Page 30

Additional Information
Specifications
Additional Information
Specifications
Category Item Specifications
20 Hz ~ 20 KHz
(L)18 mW + (R)18 mW (16 Ohm) max. Volume
(L) 9 mW + (R) 9 mW (32 Ohm) max. Volume
90 dB(MP3)
MPEG 1/2/2.5 Layer 3, WMA, ASF
8 Kbps ~ 320 Kbps
ID3 VI, ID3 V2 2.0, ID3 V2 3.0, ID 3 V2 4.0
Full Graphic 4 Line with Backlight
40 Language
Approx. 40 hours (128 kbps, MP3, Volume : 20, EQ Normal,
LCD: OFF, Alkaline AA 2400mAh)
Audio
FILE
SUPPORT
Tag Info
LCD
Language
Voice Recording
Max. Playtime
Frequency range
Headphone Output
S/N ratio
File Type
Bit Rate
36:00
(8kbps, 128 MB)
36:00
(8kbps, 128 MB)
36:00
(8kbps, 128 MB)
36:00
(8kbps, 128 MB)
Category Item Specifications
27(W) x 13.2(D) x 62.5(H) mm
65 g (Battery included)
-5 …C ~ 40 …C
Dimension
Weight
Battery
Operational Temperature
Page 31

THIS DEVICE COMPLIES WITH PART 15 OF THE FCC RULES. OPERATION
IS SUBJECT TO THE FOLLOWING TWO CONDITIONS: (1) THIS DEVICE MAY
NOT CAUSE HARMFUL INTERFERENCE, AND (2) THIS DEVICE MUST
ACCEPT ANY INTERFERENCE RECEIVED, INCLUDING INTERFERENCE THAT
MAY CAUSE UNDESIRED OPERATION.
NOTE: THE MANUFACTURER IS NOT RESPONSIBLE FOR ANY
RADIO OR TV INTERFERENCE CAUSED BY UNAUTHORIZED
MODIFICATIONS TO THIS EQUIPMENT. SUCH MODIFICATIONS
COULD VOID THE USER'S AUTHORITY TO OPERATE THE EQUIPMENT.
NOTE: This equipment has been tested and found to comply with the
limits for a Class B digital device, pursuant to part 15 of the FCC
Rules. These limits are designed to provide reasonable protection
against harmful interference in a residential installation. This
equipment generates, uses and can radiate radio frequency energy
and, if not installed and used in accordance with the instructions, may
cause harmful interference to radio communications. However, there
is no guarantee that interference will not occur in a particular
installation. If this equipment does cause harmful interference to
radio or television reception, which can be determined by turning the
equipment off and on, the user is encouraged to try to correct the
interference by one or more of the following measures:
- Reorient or relocate the receiving antenna.
- Increase the separation between the equipment and receiver.
-Connect the equipment into an outlet on a circuit different from that
to which the receiver is connected.
-Consult the dealer or an experienced radio/TV technician for help
 Loading...