

INSTRUCTION BOOK
Tuned by

제품 사용 전 사용자 설명서를 잘 읽어 주시기 바랍니다.
KOREAN
구성품
UO Cube Speaker S Micro USB 케이블 사용자 설명서
각 부의 명칭
볼륨 -/+
전원 ON/OFF
배터리 충전용 Micro USB 단자
재생/일시 정지
상태 표시 LED
블루투스 페어링 해제/TWS 연결
AUX (3.5 pi) 입력 단자
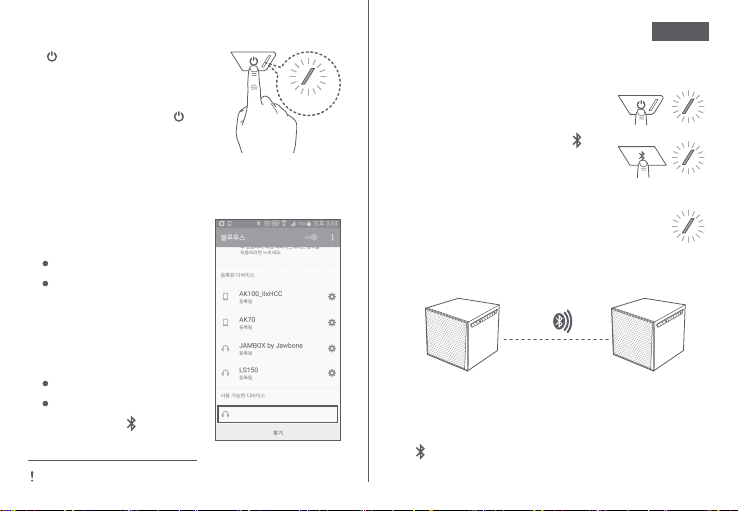
전원 켜기/끄기
1. [ ]를 길게 누르면 [Power on] 음성과
함께 LED가 파란색으로 점멸하며 전원
이 켜집니다.
2. 전원이 켜져있는 상태에서, [ ]를
길게 누르면 [Power off] 음성이
출력되고 전원이 꺼집니다.
블루투스 페어링 하기
1. 전원이 켜지면 자동으로 페어링
대기 모드로 전환됩니다.
LED: 파란색 점멸
음성: Bluetooth Input Ready
2. 감지된 장치가 디바이스에 [SKT
_CS100-XXXXX]로 표시됩니다.
3. [SKT_CS100-XXXXX]를 선택
하면 페어링이 완료됩니다.
LED: 파란색 켜짐
음성: Bluetooth Connected
4. 페어링 상태에서 [ ]를 길게
누르면 페어링이 해제됩니다.
최대 사용범위 : 10M
SKT_CS100-XXXXX
파란색 점멸
TWS(True Wireless Stereo) 연결하기
KOREAN
TWS는 두개의 스피커를 연결하여 각각 왼쪽 채널과
오른쪽 채널로 분리하여 출력하는 기능입니다.
1. TWS로 연결하려는 두개의 스피커 전원을
켜 페어링 대기상태로 준비합니다.
2. 왼쪽 채널로 설정하려는 스피커의 [ ]를
파란색 점멸
누르면 연결 시작음과 함께 TWS 연결이
진행되고, 다른 스피커는 자동으로 오른쪽
파란색 켜짐
채널로 설정되며 파란색 LED가 켜집니다.
3. 연결이 완료되면, 왼쪽 채널 스피커는 [Left
Channel] 음성과 함께 파란색 LED가 점멸합니다.
4. 디바이스에서 검색을 하면 [SKT_CS100-XXXXX]
파란색 점멸
왼쪽 채널 기기만 표시됩니다.
TWS
왼쪽 채널
오른쪽 채널
TWS 및 블루투스 상태 초기화
1. [ ]를 길게 누르면 TWS 및 모든 블루투스 상태가 초기화됩니다.
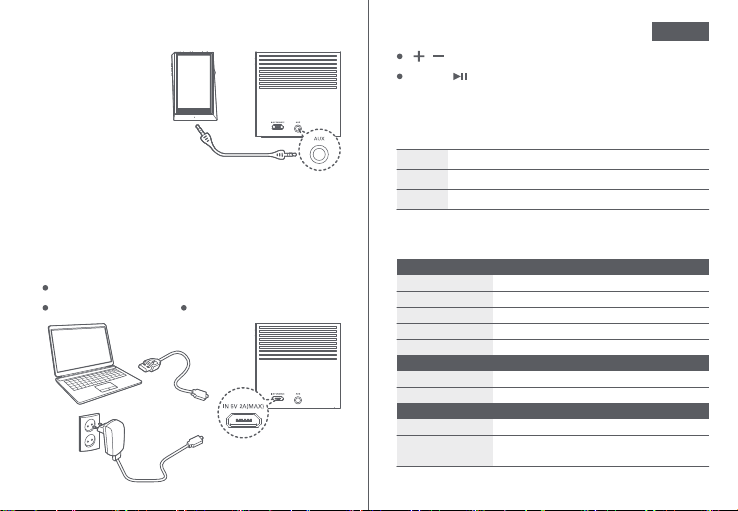
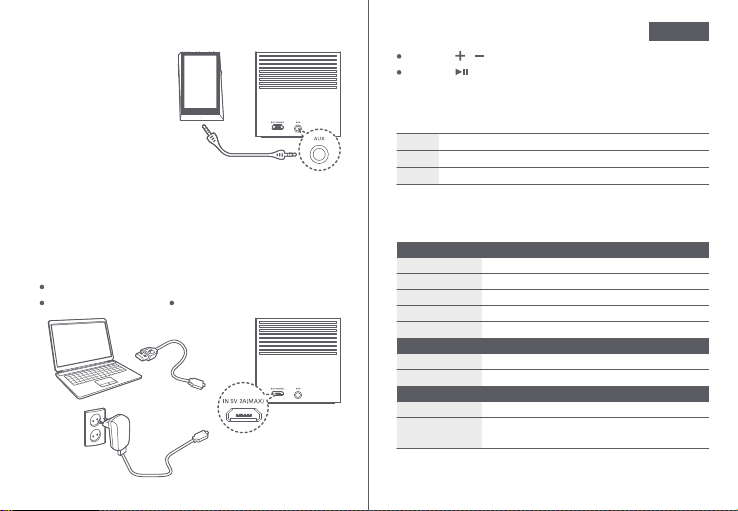
외부기기 연결하기
1. 오디오 케이블(3.5mm/
별매품)을 이용하여
[AUX 입력 단자]와
외부기기를 연결합니다.
충전하기
1. 스피커 뒷면의 [배터리 충전용 Micro USB 단자]에 함께 제공된
Micro USB 케이블을 이용하여 충전기/PC와 연결하면 충전이
시작됩니다.
배터리 잔량 부족 : 적색 LED 점멸
충전 중 : 적색 LED 켜짐 충전 완료 :적색 LED 꺼짐
음악 듣기
KOREAN
[ / ]를 눌려 볼륨을 조절합니다.
재생 중 [ ]를 누르면 일시 정지하고, 다시 한번 누르면 재시작
합니다.
LED 사양
블루투스 연결 상태를 표시
랑
색
파
간
색
배터리 상태를 표시
빨
라
색
보
배터리 상태와 블루투스 상태를 동시에 표시
제품 사양
System Specification
Speaker Unit
Battery Capacity
Operation Time
Charging time
Dimension
IO Port Specification
Power
Input
UI Specification
LED
Button UI
모델에 따라 제품의 외관 및 색상, 인쇄, 각인 내용이 변경될 수 있습니다.
40mm X 1
2,000mAh
20 hours (When set Mid-ranage volume)
4 hours
60mm x 60mm x 60mm
microUSB maximum input current 5V 2A
Bluetooth 4.0 / 3.5 pi Stereo Jack
1 LED (Blue, Red)
Power on/off, Play/Pause,
Volume UP/Down, Bluetooth/TWS Pairing

품질보증서
보증서의 소정 항목에 기재되지 않은 사항이 없는지 확인해 주십시오.
서비스를 받으실 때에는 이 보증서와 함께 영수증을 꼭 제시하시기 바랍니다.
이 보증서는 재발행되지 않으므로 잘 보관하여 주시기 바랍니다.
제품 구입 후 반드시 내용을 기입하시고, 별도 보관하여 주시기 바랍니다.
보증서비스
제품 구입 후 1년간 고객센터에서 보증 서비스를 받을 수 있습니다.
보증서비스 제외
보증기간이 경과하였거나 보증기간 이내일지라도 고객 과실에 의한 고장, 파손
발생 시 수리비용을 부담해 주셔야 합니다. (충격 및 이물질 투입으로 인한 손실)
고객센터에서 수리한 내용이 아니라 개인적인 수리나 개조에 의한 고장 발생
시 수리비용을 부담해 주셔야 합니다.
액세서리 종류나 고장, 파손 상태에 따라 수리비용은 최대 새 액세서리 구입
비용과 동일할 수 있습니다.
이어폰 및 USB 케이블 등 케이블이 사용되는 액세서리의 경우 단선으로 인한 고장
에 대해서는 무상 수리 또는, 리퍼비시 액세서리 무상 교환에 해당되지 않습니다.
천재지변에 의한 제품 손상 시 수리비용을 부담해 주셔야 합니다.
Please read the instruction manual before using this product.
Package Contents
UO Cube Speaker S Micro-USB Cable Instruction
UO Cube Speaker S at a Glance
Volume -/+
Power ON/OFF
Micro-USB Port (Battery Charging)
ENGLISH
Manual
모델명
성명
고객란
주소
점명
주소
판매점
판매일 년 월 일
고객 서비스 : (주)SK텔레콤
서비스 센터 안내 : 전국 어디서나 지역번호 없이 1670-0110
www.uo.co.kr 고객지원 A/S 안내 및 신청 A/S 이용방법 안내
S/N
전화번호
전화번호
판매자
Play/Pause
Bluetooth Pairing OFF / TWS Connection
Status LED
AUX Input (3.5 pi)
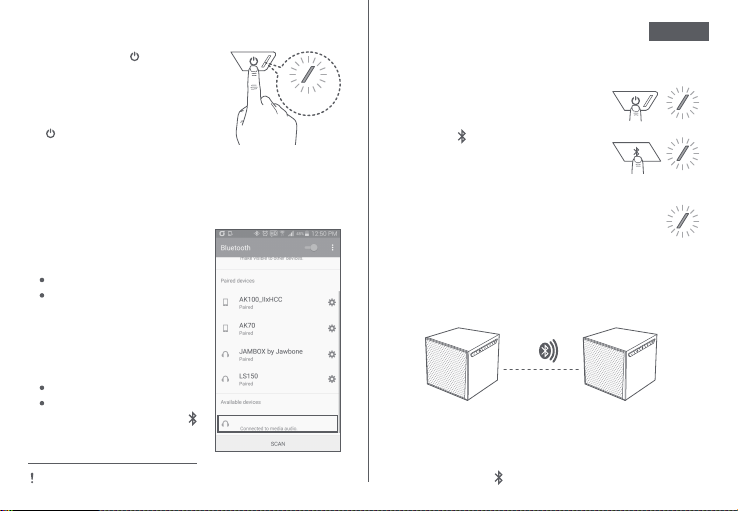
Power ON/OFF
1. Press and hold the [ ] button to turn
on the device. The [Power On] sound will
play indicating that the device is on, and
the status LED will flash blue.
2. While the device is on, press and hold the
[ ] button to turn off the device. The
[Power Off] sound will play indicating
that the device is off.
Bluetooth Pairing
1. When the power is turned on, the
device will automatically switch to
pairing standby mode.
LED: Flashing Blue
Sound: Bluetooth Input Ready
2. When detected, the speaker will
appear as [SKT_CS100-XXXXX] on
a Bluetooth-enabled device.
3. Select [SKT_CS100-XXXXXX] on your
device to complete the pairing.
LED: Solid Blue
Sound: Bluetooth Connected
4. When paired, press and hold the [ ]
button to disconnect from a Bluetooth
-enabled device.
Maximum Range: 10 m (32.8 ft.)
SKT_CS100-XXXXX
Flashing
Blue
TWS (True Wireless Stereo) Connection
ENGLISH
TWS is a method of wirelessly connecting two independent speakers to
output discrete stereo sound separately to the left and right channels.
1. Turn on the power of two speakers you
want to connect via TWS to set them in
pairing standby mode.
2. Press the [ ] button of the speaker you
Flashing Blue
want to set as the left channel to begin
the TWS connection process with the
signal tone. The other speaker will
Flashing Blue
automatically be set as the right channel,
and the LED light will be solid blue.
3. When the connection is complete, the left channel speaker will play the [Left Channel]
Flashing Blue
sound, and the LED light will flash blue.
4. When you search for the speakers from
a compatible device, only the [SKT_CS100-
XXXXX] left-channel speaker will be displayed.
TWS
Left Channel
Right Channel
Reset TWS and Bluetooth
1. Press and hold the [ ] button to reset all TWS and Bluetooth settings.
Auxiliary Input Connection
1. Use an audio cable (3.5 mm
/ sold separately) to connect
an external device to the
[AUX Input Port].
Listening to Music
Press the [ / ] buttons to adjust the volume.
Press the [ ] during playback to pause and press again to resume.
ENGLISH
LED specification
Displays Bluetooth connection status
Blue
Displays the battery status
Red
Displays status of Bluetooth and battery at the same time.
Violet
Charging
1. Connect one end (Micro-B) of the included Micro-USB cable to the
[Micro-USB] port on the back of the speaker, and then connect the
other end (type-A) to a charger/computer using to charge the device.
Low Battery: Flashing Red LED
Charging: Solid Red LED Charged: Red LED Off
Product Specifications
System Specification
Speaker Unit
Bater Capacity
Charging Time
Operation Time
Dimension
IO Port Specification
Power
Input
UI Specification
LED
Button UI
The appearance of the product as well as the printed and engraved
information may vary depending on the model.
40mm X 1
2,000mAh
20 hours [Wen set Mid-ranage volume
4 hours
60mm x 60mm x 60mm
micro USB maximum input current 5V 2A
Bluetooth 4.0 / 3.5pi Stereo Jack
1 LED [Blue, Red]
Power on/off, Play/Pause,
Volume UP/Down, Bluetooth/TWS Pairing

Warranty Card
Make sure that all required information on the warranty card has been filled out.
The warranty card and product receipt must be presented when requesting
repair services.
Do not misplace the warranty card since it will not be re-issued.
Be sure to fill out all information after purchasing the product, and store it
separately in a safe place.
Warranty Service
Warranty service is valid for a period of one year from the date of purchase.
Services Not Covered by Warranty
A repair or service fee will be charged if the warranty period has expired or the
repairs in question correspond to conditions for billable repairs even during a
valid warranty period. (e.g. Damage due to impact or insertion of foreign objects.)
A repair or service fee will be charged for product tampering or repairs/
modifications by the user or an unauthorized service center.
Depending on the failure, damage, or type of accessory, repair costs may be
equal to the maximum cost of buying a new accessory.
Damage or breakage of cable accessories such as earphones and USB cables
is not valid for warranty coverage or free replacement with a refurbished unit.
A repair or service fee will be charged for product damage caused by natural disasters.
Model
Name
Customer
Address
Store Name
Address
Retailer
Date of Purchase YY MM DD
Service Guide : www.uo.co.kr
S/N
Phone
Phone
Salesperson

NOTE: This equipment has been tested and found to comply with the limits for a
Class B digital device, pursuant to part 15 of the FCC Rules. These limits are
designed to provide reasonable protection against harmful interference in a
residential installation. This equipment generates uses and can radiate radio
frequency energy and, if not installed and used in accordance with the instructions,
may cause harmful interference to radio communications. However, there is no
guarantee that interference will not occur in a particular installation. If this
equipment does cause harmful interference to radio or television reception, which
can be determined by turning the equipment off and on, the user is encouraged to
try to correct the interference by one or more of the following measures:
- Reorient or relocate the receiving antenna.
- Increase the separation between the equipment and receiver.
-Connect the equipment into an outlet on a circuit different from that to which the
receiver is connected.
-Consult the dealer or an experienced radio/TV technician for help
Changes or modifications not expressly approved by the party responsible for compliance
could void the user's authority to operate the equipment. This device complies with Part
15 of the FCC Rules. Operation is subject to the following two conditions:
(1) this device may not cause harmful interference, and
(2) this device must accept any interference received, including interference that may
cause undesired operation.
 Loading...