


Bedienungsanleitung
Garantieschein
Einbauschein HDD
Linux OS SetTopBox mit PCMCIA-Schnittstelle
für CA-Module zum Empfang von
freien und verschlüsselten ASTRAund EUTELSAT DVB-Programmen.
Anschluss für interne Festplatte
Compact Flash Reader
Grafisches Display
Linux OS Set-top box with PCMCIA interface for
CA modules, for receiving clear and encoded
ASTRA and EUTELSAT DVB programmes.
Connector for internal hard disk
Compact Flash reader
Graphical display
Instruction Manual
Warranty card
HDD installation card
Mode d'emploi
Carte de garantie
Certificat pour montage de Disque dur
Récepteur numérique Linux OS avec emplacement
PCMCIA pour modules d’accès à la réception de
programmes DBV libres et cryptés
ASTRA et EUTELSAT.
Support pour disque dur interne
Lecteur Compact Flash
Afficheur graphique
3
1. Fernbedienung, 1. Remote control, 1. Télécommande
1. Fernbedienung, 1. Remote control, 1. Télécommande
3. Inhalt
3. Inhaltsverzeichnis
3. Inhalt
5
Kapitel Seite
1. Fernbedienung . . . . . . . . . . . . . . . . . . . . . . . . . . . . . . . . . . . . . . . 3
2. Ansichten . . . . . . . . . . . . . . . . . . . . . . . . . . . . . . . . . . . . . . . . . . . 4
2.1 Frontansicht . . . . . . . . . . . . . . . . . . . . . . . . . . . . . . . . . . . . . . . . . 4
2.2 Rückansicht . . . . . . . . . . . . . . . . . . . . . . . . . . . . . . . . . . . . . . . . . 4
3. Inhalt . . . . . . . . . . . . . . . . . . . . . . . . . . . . . . . . . . . . . . . . . . . . . . . 5
4. Sicherheitshinweise . . . . . . . . . . . . . . . . . . . . . . . . . . . . . . . . . . 6
4.1 Betriebspausen . . . . . . . . . . . . . . . . . . . . . . . . . . . . . . . . . . . . . . 7
4.2 Zusätzliche Sicherheitshinweise . . . . . . . . . . . . . . . . . . . . . . . . . 7 - 8
5. Inbetriebnahme . . . . . . . . . . . . . . . . . . . . . . . . . . . . . . . . . . . . . . 9
5.1 HiFi Verstärker . . . . . . . . . . . . . . . . . . . . . . . . . . . . . . . . . . . . . . . 9
5.1.1 Analog . . . . . . . . . . . . . . . . . . . . . . . . . . . . . . . . . . . . . . . . . . . . . . 9
5.1.2 Digital . . . . . . . . . . . . . . . . . . . . . . . . . . . . . . . . . . . . . . . . . . . . . . 9
5.2 Serielle Schnittstelle RS 232 . . . . . . . . . . . . . . . . . . . . . . . . . . . . 10
5.3 Ethernet . . . . . . . . . . . . . . . . . . . . . . . . . . . . . . . . . . . . . . . . . . . . 10
6. Entsorgungshinweise . . . . . . . . . . . . . . . . . . . . . . . . . . . . . . . . . 10
7. Wichtige Hinweise zur Bedienung . . . . . . . . . . . . . . . . . . . . . . . 10
8. Hauptmenü . . . . . . . . . . . . . . . . . . . . . . . . . . . . . . . . . . . . . . . . . . 11
8.1 Info-Menü . . . . . . . . . . . . . . . . . . . . . . . . . . . . . . . . . . . . . . . . . . . 12
8.2 Setup-Menü . . . . . . . . . . . . . . . . . . . . . . . . . . . . . . . . . . . . . . . . . 12
8.2.1 Kanäle . . . . . . . . . . . . . . . . . . . . . . . . . . . . . . . . . . . . . . . . . . . . . . 13
8.2.2 Netzwerk . . . . . . . . . . . . . . . . . . . . . . . . . . . . . . . . . . . . . . . . . . . . 13-14
8.2.3 OSD . . . . . . . . . . . . . . . . . . . . . . . . . . . . . . . . . . . . . . . . . . . . . . . . 14
8.2.4 LCD . . . . . . . . . . . . . . . . . . . . . . . . . . . . . . . . . . . . . . . . . . . . . . . . 15
8.2.5 Fernbedienung . . . . . . . . . . . . . . . . . . . . . . . . . . . . . . . . . . . . . . . 15
8.2.6 Video . . . . . . . . . . . . . . . . . . . . . . . . . . . . . . . . . . . . . . . . . . . . . . . 16
8.2.7 Skin . . . . . . . . . . . . . . . . . . . . . . . . . . . . . . . . . . . . . . . . . . . . . . . . 16
8.2.8 Sprache . . . . . . . . . . . . . . . . . . . . . . . . . . . . . . . . . . . . . . . . . . . . . 17
8.2.9 Common Interface . . . . . . . . . . . . . . . . . . . . . . . . . . . . . . . . . . . . 17
8.2.10 EPG . . . . . . . . . . . . . . . . . . . . . . . . . . . . . . . . . . . . . . . . . . . . . . . . 18
8.2.11 Timer . . . . . . . . . . . . . . . . . . . . . . . . . . . . . . . . . . . . . . . . . . . . . . . 18-19
8.2.12 Festplatte . . . . . . . . . . . . . . . . . . . . . . . . . . . . . . . . . . . . . . . . . . . 19
9. Infobar . . . . . . . . . . . . . . . . . . . . . . . . . . . . . . . . . . . . . . . . . . . . . 20
10. Kanalliste . . . . . . . . . . . . . . . . . . . . . . . . . . . . . . . . . . . . . . . . . . . 20-21
11. Standby, Dreambox herunterfahren und Reset . . . . . . . . . . . . 21
12. Setup „TV-Steuerungsmodus“ . . . . . . . . . . . . . . . . . . . . . . . . . . 22
13. TV Geräteliste . . . . . . . . . . . . . . . . . . . . . . . . . . . . . . . . . . . . . . . 23-32
Notizen . . . . . . . . . . . . . . . . . . . . . . . . . . . . . . . . . . . . . . . . . . . . . . . . . . . 33
Garantieschein . . . . . . . . . . . . . . . . . . . . . . . . . . . . . . . . . . . . . . . . . . . . . 74
Einbauschein HDD . . . . . . . . . . . . . . . . . . . . . . . . . . . . . . . . . . . . . . . . . 75
4
2. Ansichten
2. Ansichten
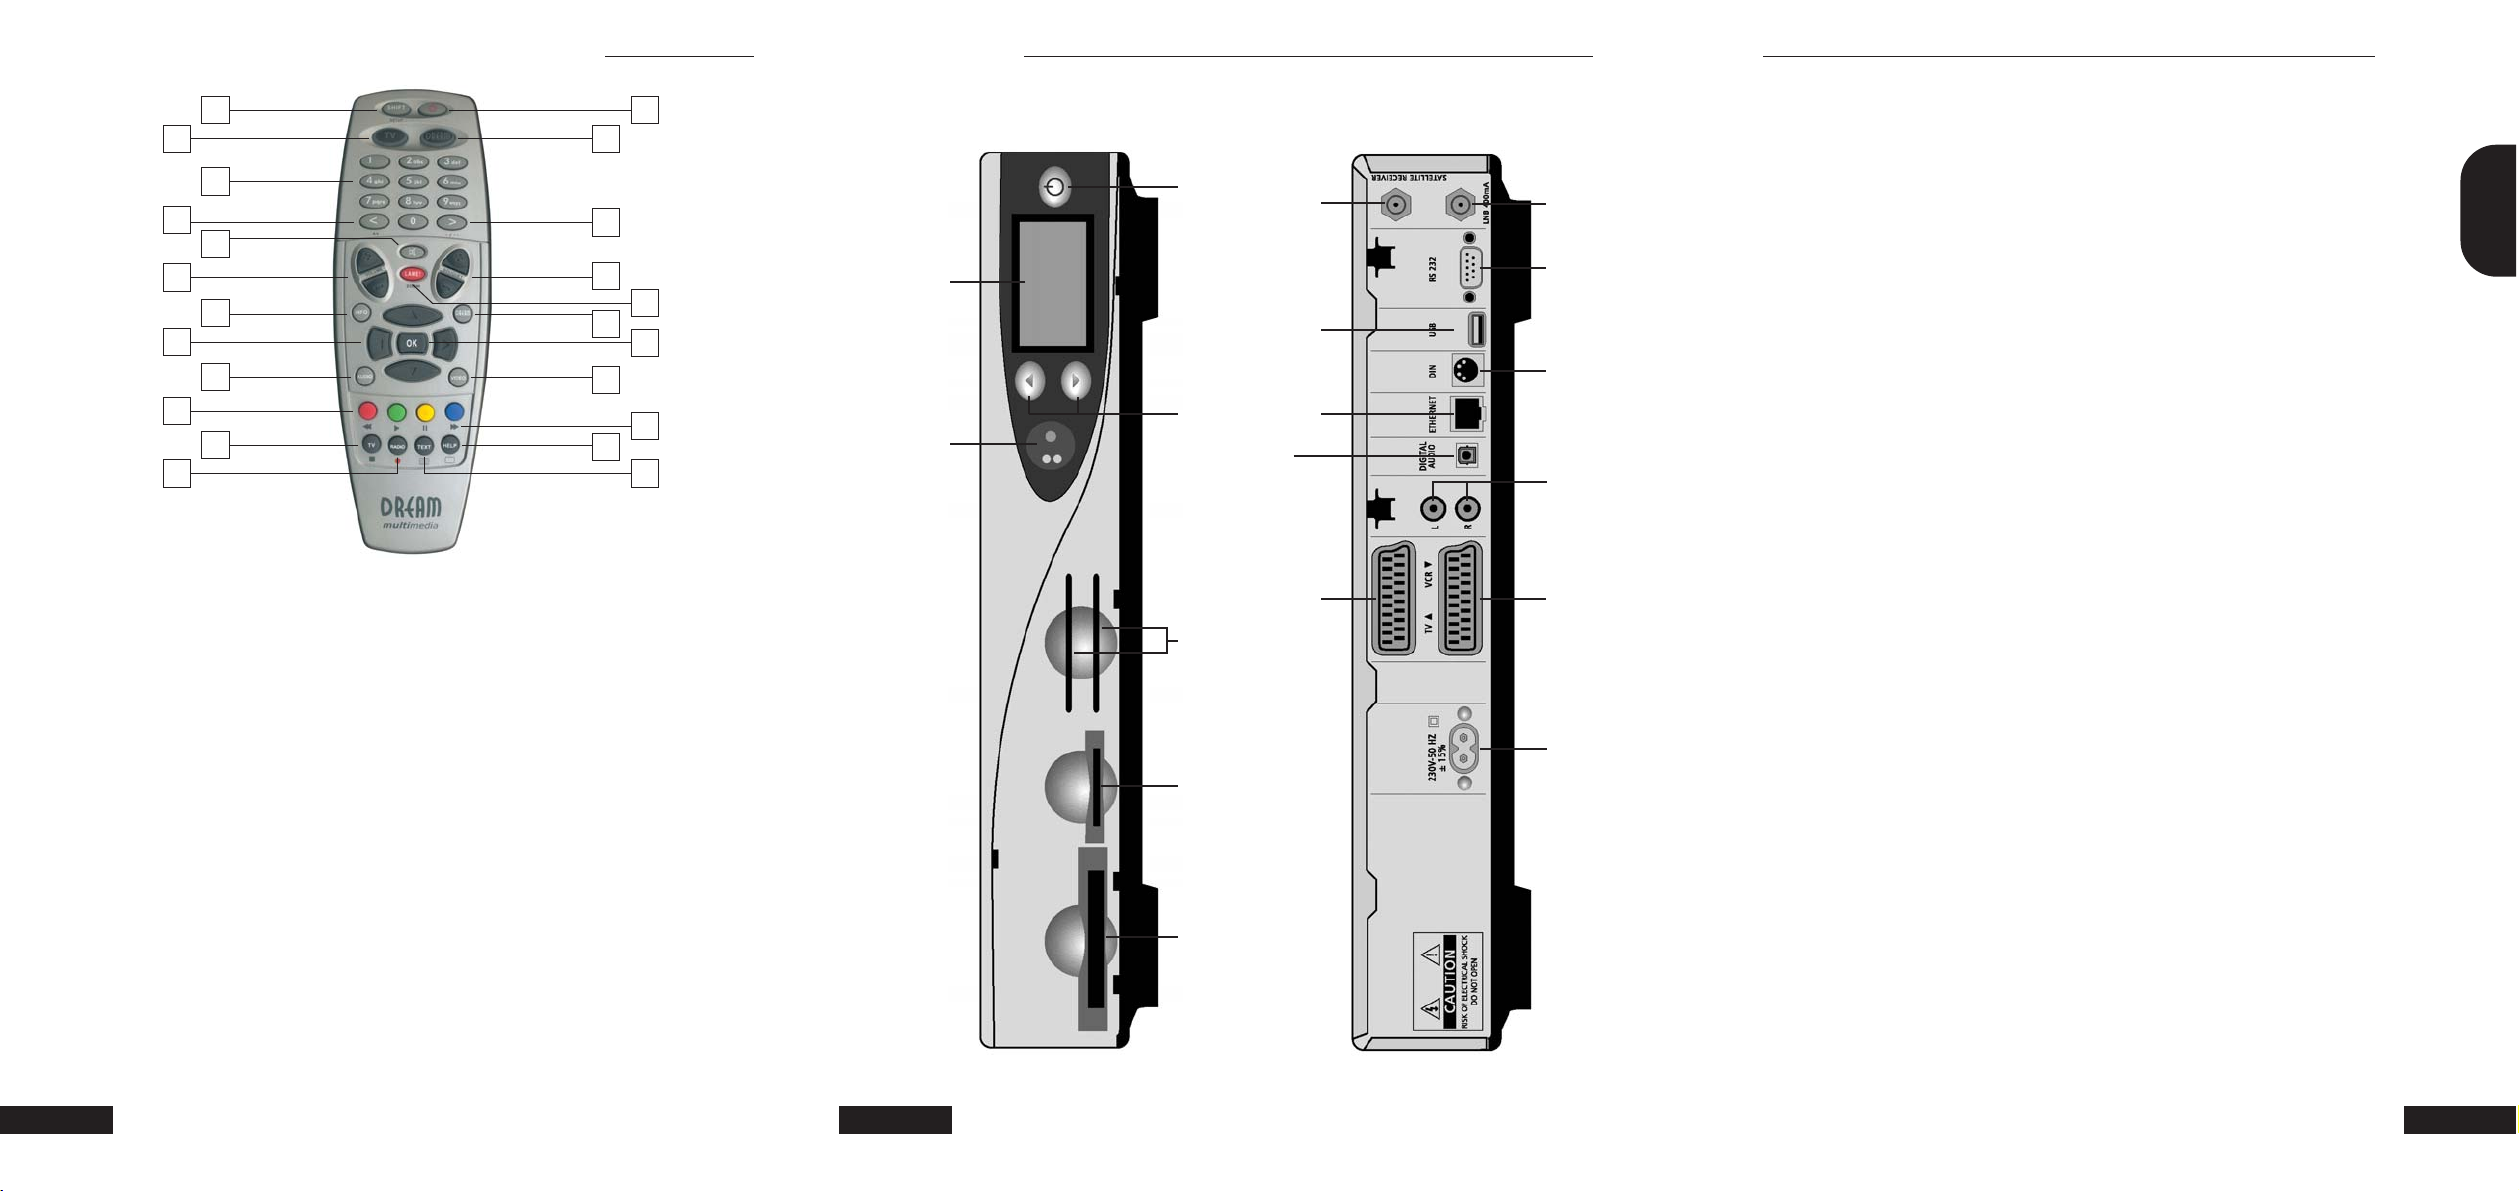
2.1 Frontansicht
2.2 Rückansicht
DEUTSCH
DisplaySende- / Empfangsdioden
Power an/aus
Kanal auf/abSmartcardleserCompact FlashCI-Schacht
DEUTSCH
1. Shift/Setup Funktion
2. TV-Steuerungsmodus
3. Zehner Tastatur
4. Rückwärts blättern
5. Mute-Modus
6. Lautstärke +/-
7. Kanalinfo
8. Richtungstasten
9. Audiomenü
10. Optionstasten
rot, grün, gelb, blau
11. TV-Modus
12. Radiomodus
13. Ein / Standby
14. Dreambox-Steuerungsmodus
15. Vorwärts blättern
16. Bouquet Auswahl
17. LAME!
18. Hauptmenü
19. OK (Auswahl)
20. VCR-Menü
(Videorecorder)
21. VCR-Steuerung
22. Hilfemenü
23. Videotext
ENGLISH
1. Shift/Set-up function
2. TV control mode
3. Numeric keypad
4. Page back
5. Mute mode
6. Volume +/-
7. Channel information
8. Direction keys
9. Audio menu
10. Option keys
red, green, yellow, blue
11. TV mode
12. Radio mode
13. On / standby
14. Dreambox control
mode
15. Page forwards
16. Bouquet selection
17. LAME!
18. Main menu
19. OK (selection)
20. VCR menu
(video recorder)
21. VCR control
22. Help menu
23. Videotext
FRANÇAIS
1. Fonction Shift/Setup
2. Mode commande TV
3. Bloc numérique
4. Défiler vers l'arrière
5. Mode Silence
6. Volume +/-
7. Info Chaîne
8. Touches de direction
9. Menu audio
10. Touches d'options
rouge, verte, jaune, bleue
11. Mode TV
12. Mode Radio
13. Marche / arrêt
14. Mode de commande
Dreambox
15. Défiler vers l'avant
16. Sélection Bouquet
17. LAME!
18. Menu principal
19. OK (sélection)
20. Menu VCR
(magnétoscope)
21. Commande VCR
22. Menu Aide
23. Télétexte
Audio Out
analog
Videorekorder
Mini DIN RS 232 LNB Out
TV Anschluss
AC3 audio Out
Ethernet
USB Port LNB In
Netzanschluss
230 V / 50 HZ
1.
3.
5.
7.
9.
11.
6.
8.
10.
12.
4.
2.
13.
17.
19.
23.
16.
18.
21.
20.
22.
15.
14.

4. Sicherheitshinweise
4. Sicherheitshinweise
4. Sicherheitshinweise
Bevor Sie Ihre DM 7000 in Betrieb nehmen, sollten Sie zu Ihrem Schutz die
Sicherheits-Hinweise durchlesen. Der Hersteller übernimmt keine Haftung für
Schäden, die durch unsachgemäße Handhabung und durch Nichteinhaltung
der Sicherheitsvorkehrungen entstanden sind.
•Das Gerät muss so aufgestellt werden, daß es ausreichend belüftet wird.
• Der Deckel des Gerätes darf nicht abgedeckt werden und muss ausreichenden Abstand zu anderen Geräten haben. Die Lüftungsschlitze des
Gerätes müssen immer frei bleiben, um die Wärmeabfuhr aus dem inneren
des Gerätes zu gewährleisten.
• Stellen Sie keine Vasen oder andere mit Flüssigkeit gefüllten Behältnisse
auf das Gerät. Das Gerät darf keinem Tropf- oder Spritzwasser ausgesetzt
werden.
• Es dürfen keine brennbaren Gegenstände wie Kerzen oder Öllampen auf
das Gerät gestellt werden.
• Das Gerät darf nur in gemäßigtem Klima betrieben werden.
• Niemals das Gerät selber öffnen! Es besteht die Gefahr eines Elektroschocks. Sollte es einmal erforderlich sein das Gerät zu öffnen, wenden
Sie sich bitte an geschultes Personal.
ACHTUNG!
Umbauten oder Modifikationen des Gerätes führen
zum Garantieverlust, wenn diese nicht von einem
Fachhändler durchgeführt werden und
schriftlich bescheinigt werden.
ACHTUNG!
Wir empfehlen den Einbau einer Festpalte durch den
Fachnändler. Bei unsachgemäßem Einbau der
Festplatte erlischt die Garantieleistung.
4.1 Betriebspausen
• Wird das Gerät längere Zeit nicht betrieben, sollte es ganz vom Netz
getrennt werden.
• Während eines Gewitters sollte das Gerät ebenfalls vom Netz getrennt
werden.
4.2 Zusätzliche Sicherheitshinweise
• Anschluss an die Außeneinheit (LNB)
Ziehen Sie das Netzkabel der DM 7000 aus der Netzdose, bevor Sie das
Kabel des LNB’s anschließen oder entfernen.
DEUTSCH
• Anschluss an den Fernseher
Ziehen Sie das Netzkabel der DM 7000 aus der Netzdose, bevor Sie das
SCART-Kabel an Ihren Fernseher anschließen.
• Stecken Sie niemals irgendwelche fremden Metallgegenstände in die
Einschübe oder Lüftunkschlitze des Gerätes.
• Der Ein- oder Umbau einer Festplatte darf nur von geschultem Personal
oder einem dafür ausgebildeten Fachhändler erfolgen.
6
4. Sicherheitshinweise
• Das Gerät ist umgehend vom Netz zu trennen, wenn das Stromkabel oder
der Netzstecker Beschädigungen aufweisen.
• Das Gerät ist umgehend vom Netz zu trennen, wenn es Feuchtigkeit aus
gesetzt wurden oder Feuchtigkeit eingedrungen ist.
• Das Gerät ist umgehend vom Netz zu trennen, wenn starke äußere
Beschädigungen festgestellt werden.
4. Sicherheitshinweise
7

4. Sicherheitshinweise
5. Inbetriebnahme
5. Allgemeine Hinweise
Setzen Sie Ihre Dreambox nicht direkter Sonnenbestrahlung, Blitzen oder
Regen aus.
Erdung: Das LNB - Kabel muss geerdet werden.
Das Erdungssystem muss dem SABS 061 entsprechen
Reinigung: Ziehen Sie das Netzkabel der Dreambox aus der Netzdose, bevor
Sie Ihre Dreambox reinigen. Benutzen Sie einen leicht angefeuchteten Lappen
ohne Reinigungsmittel.
Schließen Sie Ihre DM 7000 nur an Steckdosen an die hierfür auch geeignet
sind. Hierbei darf es nicht zu Überlastungen kommen.
Allgemeines:
Umgebungstemperatur +15°C ... +35°C
Luftfeuchtigkeit < 80%
Abmessungen (B x T x H): 374 mm x 230 mm x 63 mm
Gewicht: 1,8 kg ohne HDD
Prüfen Sie die Lieferung auf Vollständigkeit. Im Lieferumfang sind enthalten:
1 Receiver
1 Netzanschlusskabel
1 Fernbedienung
1 Bedienungsanleitung
1 Garantiekarte
2 Batterien (1,5V Mikrozelle)
Zusätzlich erhältlich:
2 Festplatteneinbaurahmen
1 IDE Anschlusskabel
1 Stromanschlusskabel für Festplatte
1 Keyboard Infrarotübertragung
- Legen Sie die beiliegenden Batterien unter Berücksichtigung der Polarität
in das Batteriefach der Fernbedienung ein.
- Bevor Sie den Receiver anschließen, lesen Sie bitte zunächst die
Sicherheitshinweise unter Punkt 2.
- Schließen Sie die Außeneinheit (Spiegel, LNB) über einen F-Stecker an den
LNB-Eingang am Receiver an.
-Verbinden Sie den Receiver über ein Scartkabel mit Ihrem Fernsehgerät
(Scartbuchse TV) und falls vorhanden mit einem Videorecorder oder DVDPlayer (Scartbuchse VCR).
- Stecken Sie das Netzanschlusskabel in den Receiver und anschließend in
eine geeignete Steckdose 230V / 50Hz.
DEUTSCH
5.1 HiFi-Verstärker
5.1.1 Analog
Um Ihre Dreambox mit Ihrem HiFi-Verstärker zu verbinden, benutzen Sie bitte
ein geeignetes Chinch-Kabel und schließen Sie dies am Receiver an AUDIO
R/L an und an einen freien Eingang (z.B. AUX oder CD) an Ihrem HiFi-Verstärker.
5.1.2 Digital
Sollte Ihr Verstärker über einen entsprechenden optischen Eingang verfügen,
so verbinden Sie die Buchse DIGITAL AUDIO am Receiver über ein optisches
Kabel mit dem optischen Eingang Ihres Verstärkers. Es stehen die Abtastraten von 16, 22.05, 24, 32, 44.1 und 48 kHz zur Verfügung. Ebenso steht an
diesen Ausgang, falls gesendet, das Dolby Digital-Signal (AC3) zur Verfügung.
Die RS 232-Schnittstelle dient zum Update der Betriebssoftware und der
8
4. Sicherheitshinweise
Vorprogrammierung mittels PC.
5. Inbetriebnahme
9
5. Inbetriebnahme, 6. Entsorgungs-, 7. Bedienungshinweise
8. Hauptmenü
5.2 Serielle Schnittstelle RS 232
Die RS 232-Schnittstelle dient zum Update der Betriebssoftware und der
Vorprogrammierung mittels PC.
5.3 Ethernet
Die Ethernet-Schnittstelle dient zum Update der Betriebssoftware und der
Vorprogrammierung mittels PC.
6. Entsorgungshinweise
Die Verpackung der DM 7000 besteht ausschließlich aus wieder verwertbaren
Materialien. Bitte führen Sie diese entsprechend sortiert dem “Dualen
System” zu.
Achten Sie darauf, dass die leeren Batterien der Fernbedienung sowie
Elektronikschrott nicht in den Hausmüll gelangen, sondern sachgerecht entsorgt werden (Rücknahme durch den Fachhandel, Sondermüll).
7. Wichtige Hinweise zur Bedienung
Über ein OSD (On Screen Display) wird die Bedienung der Dreambox stark
vereinfacht. Alle möglichen Optionen werden über 4 farbige Punkte (rot, grün,
gelb, blau) angezeigt und können über die Fernbedienung aktiviert werden.
Je nach Menü können die Optionen wechseln und werden in jedem Menü
entsprechend bezeichnet.
8. Hauptmenü
DEUTSCH
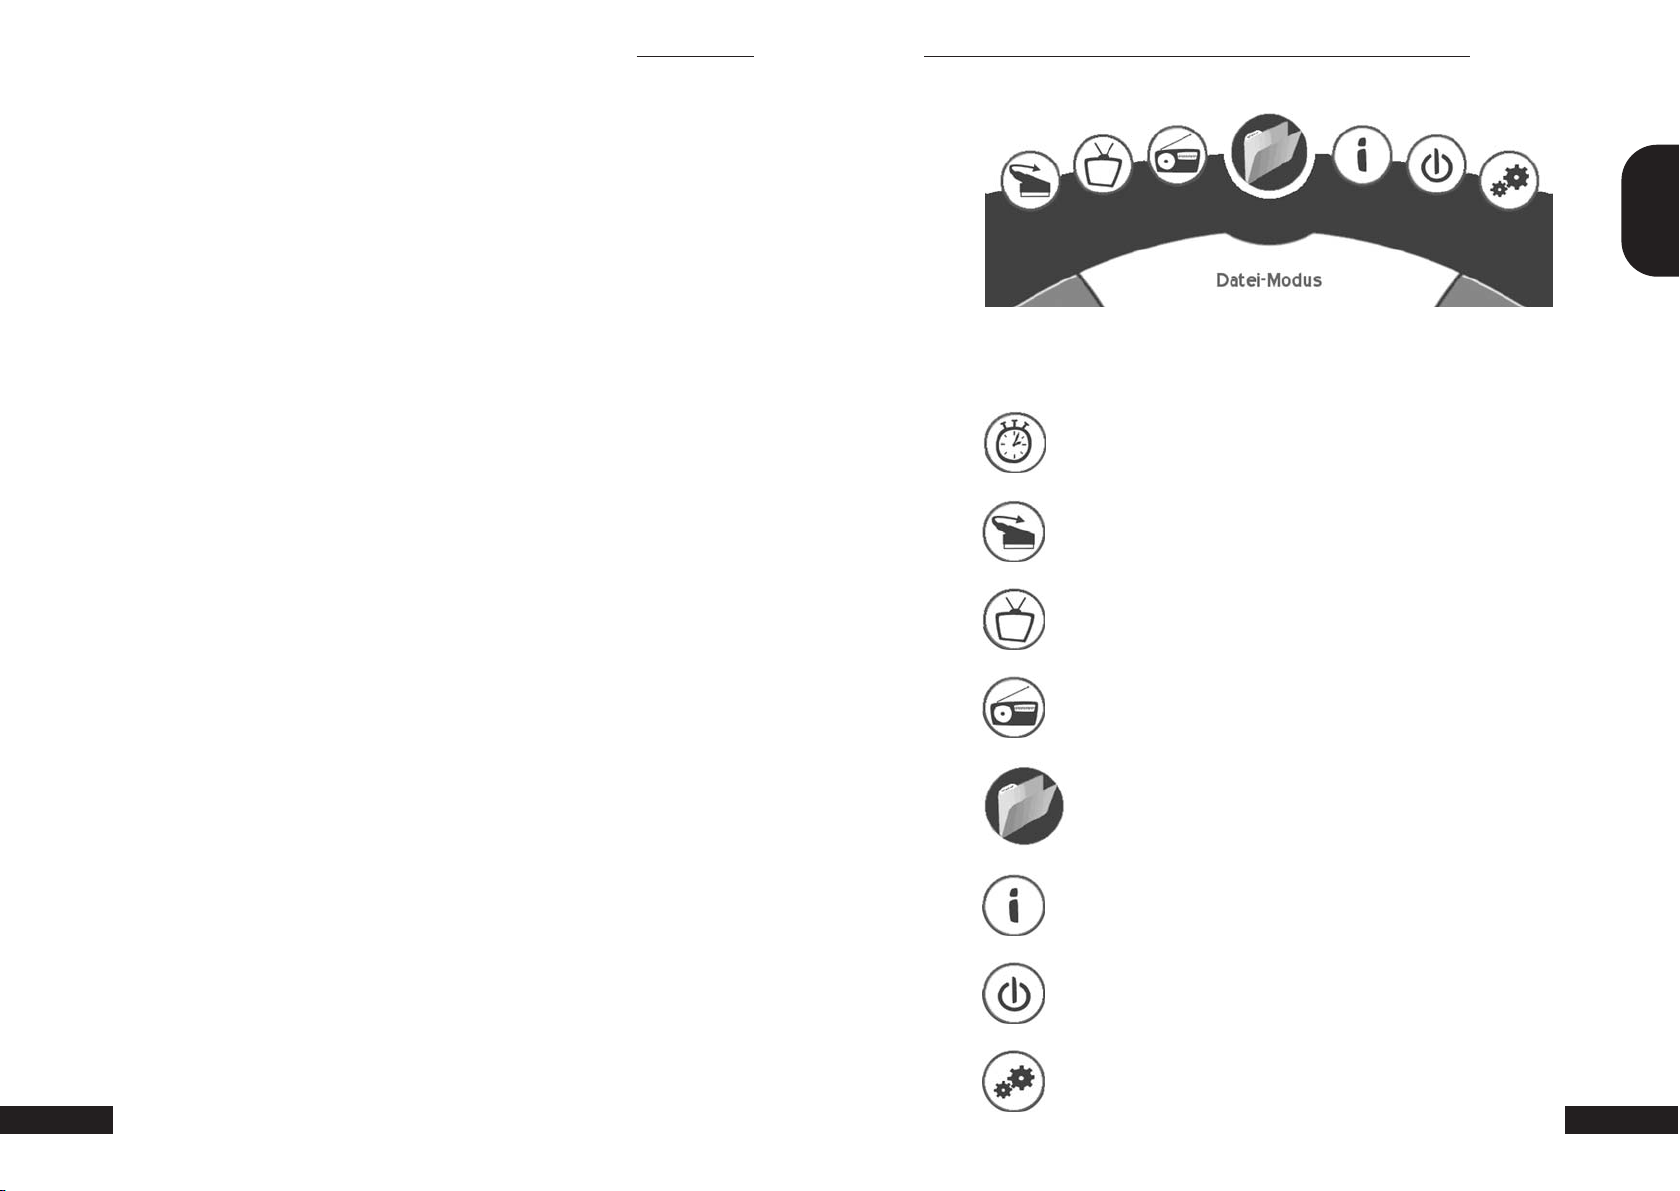
Über dieses OSD (On Screen Display) gelangt man in die einzelnen
Untermenüs.
TIMER - Menü
Schaltet in den Timer-Modus.
SCART - Menü
Schaltet den Scart um auf Videoein/-ausgang.
TV - Mode
Schaltet in den TV-Modus.
Radio - Mode
Schaltet in den Radio-Modus.
10
Alle Menüs und Kanallisten können über die LAME!-Taste wieder verlassen
werden.
5. Inbetriebnahme, 6. Entsorgungs-, 7. Bedienungshinweise
File – Mode
Schaltet in den Datei-Modus.
Info – Menü
Schaltet in das Info-Menü.
Power Off – Mode
Fährt die Dreambox in den Deep-Standby.
Setup – Menü
Schaltet in das Setup-Menü.
8. Hauptmenü
11
8. Hauptmenü
8.1 Info-Menü
8. Hauptmenü
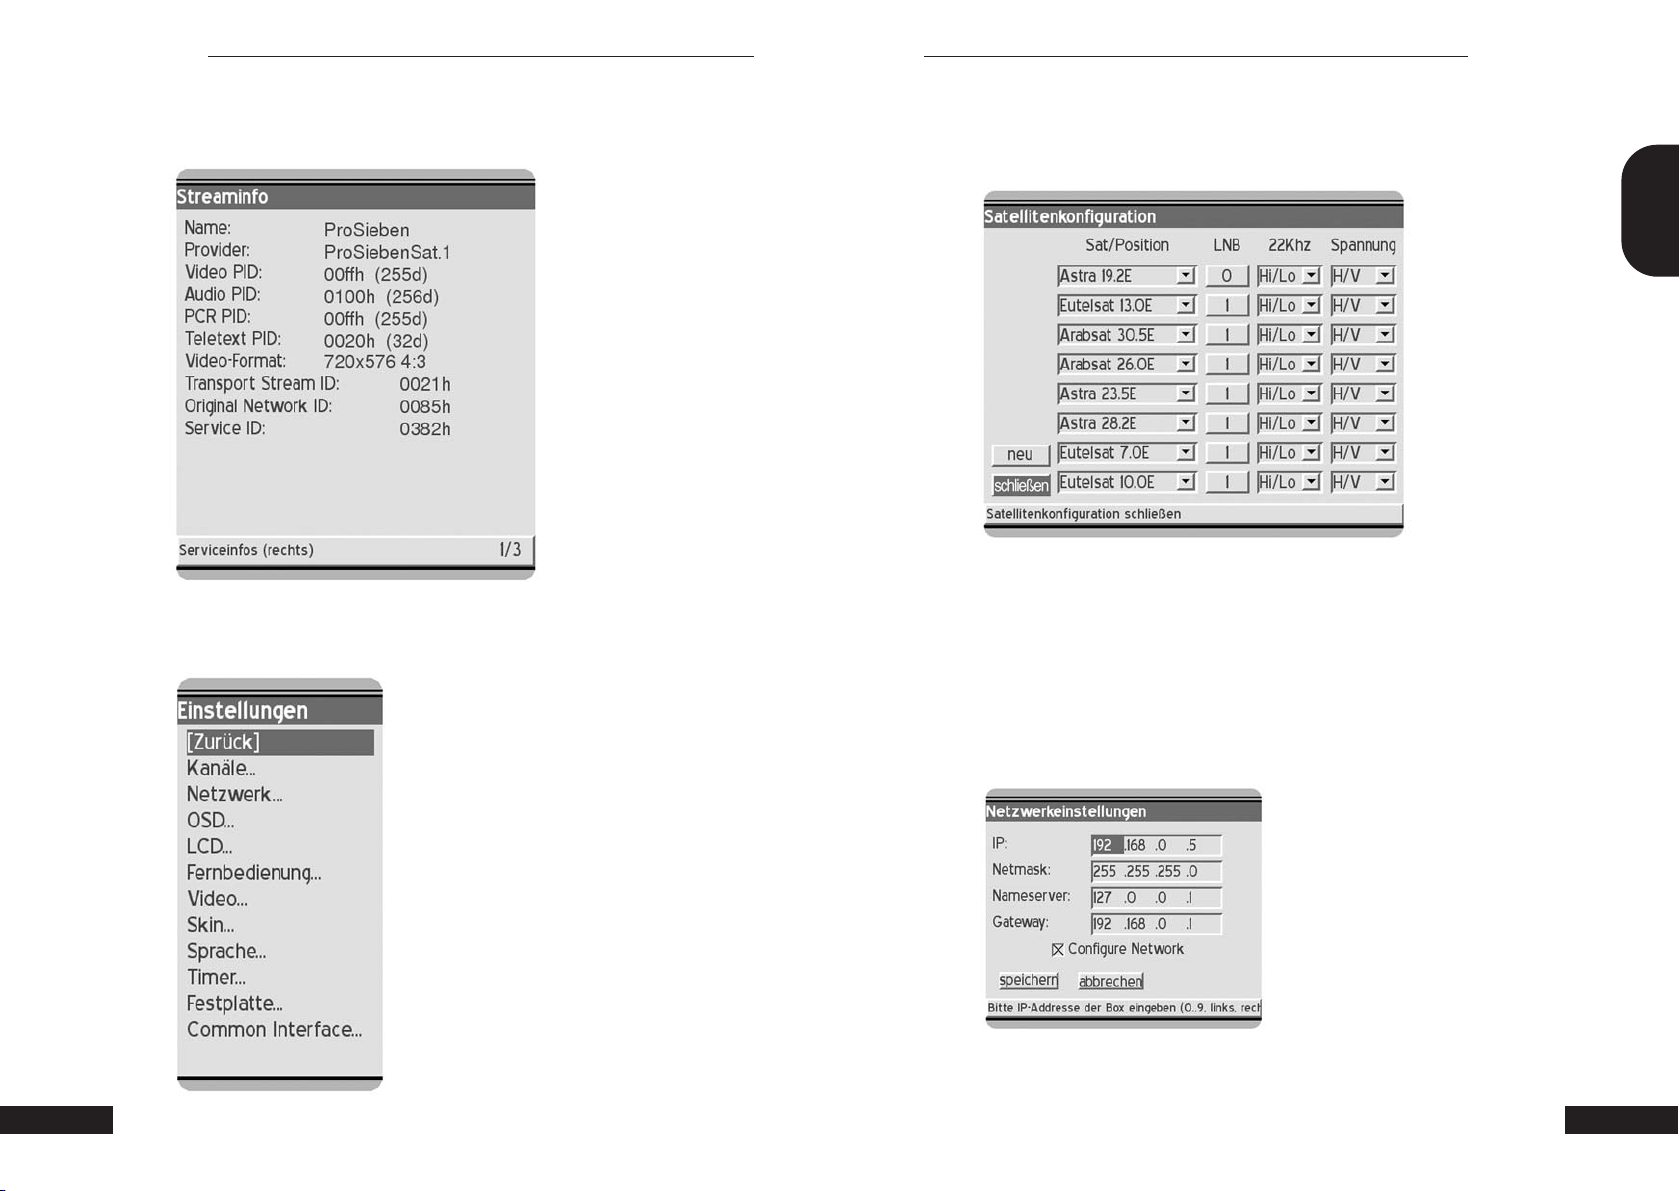
Streaminfo:
8.2 Setup-Menü
8.2.1 Kanäle:
Hier finden Sie die Einstellungen der Satelliten und die Kanalsuche.
DEUTSCH
Über das Sattelitenmenü können Sie Satelliten hinzufügen und editieren.
Hinzufügen eines Satteliten über „neu“,
editieren über die jeweilige Auswahl.
Verlassen Sie dieses Menü über „schließen“ oder über „LAME!“
12
8.2.2 Netzwerk
Hier finden Sie die Einstellungen für Ihr Netzwerk
IP: Tragen Sie hier die IP-Adresse Ihrer Box ein (z.B 192.168.0.5).
Netzmask: (z.B. 255.255.255.0).
8. Hauptmenü 8. Hauptmenü
13
8. Hauptmenü
8. Hauptmenü
Nameserver: Tragen Sie hier einen Nameserver ein.
Gateway: Tragen Sie hier den Standart Gateway ein (z.B. 192.168.0.1).
Nach den Einstellungen bitte über „speichern“ sichern, ansonsten abbrechen.
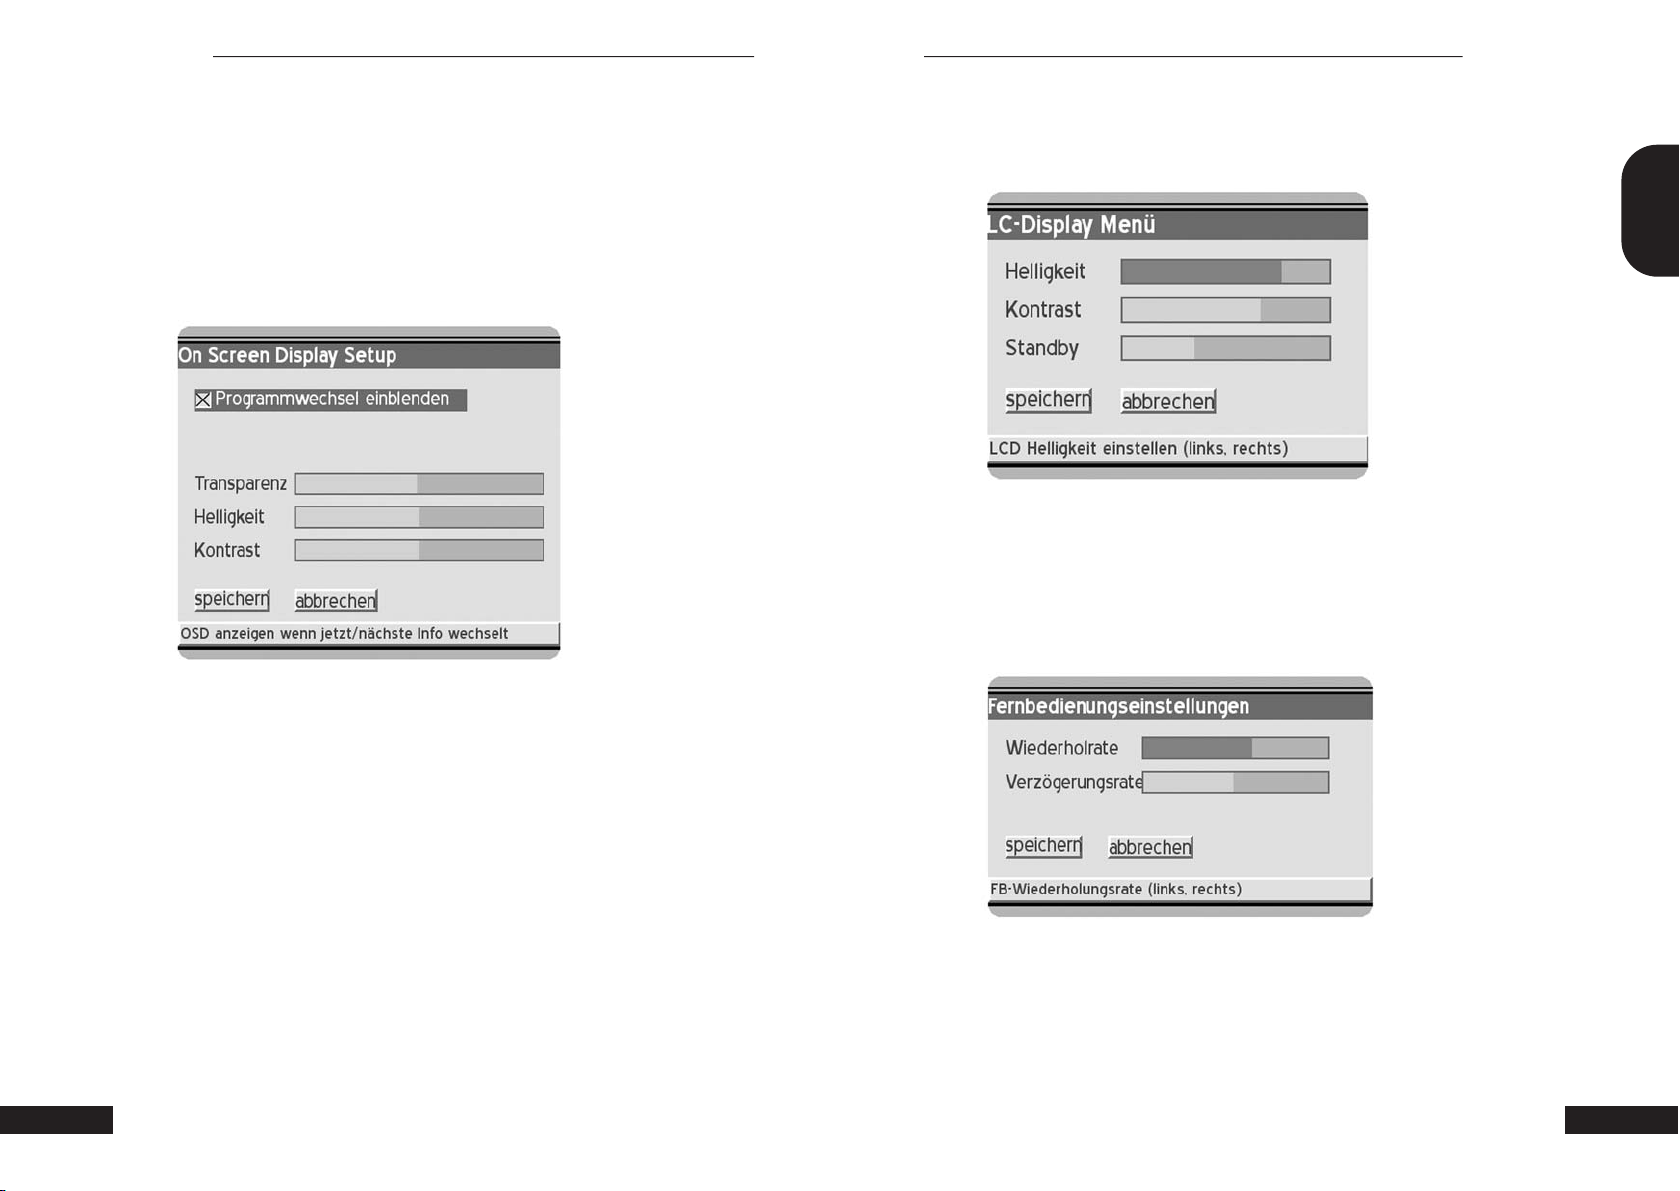
8.2.3 OSD
Hier finden Sie die Einstellungen für das OSD (On Screen Display)
Transp.: Wählen Sie hier die Transparenz Ihres OSD
Helligkeit: Stellen Sie hier die Helligkeit Ihres OSD ein
Kontrast: Stellen Sie hier den Kontrast Ihres OSD ein
8.2.4 LCD
Hier finden Sie die Einstellungen für das Display der Dreambox.
DEUTSCH
Hier können Sie Helligkeit, Kontrast und Standby-Helligkeit einstellen.
Nach den Einstellungen bitte über „speichern“ sichern, ansonsten abbrechen.
8.2.5 Fernbedienung
Hier finden Sie die Einstellungen für Ihre Fernbedienung
14
Nach den Einstellungen bitte über „speichern“ sichern, ansonsten abbrechen.
8. Hauptmenü
Hier können Sie die Wiederholrate und Verzögerungsrate einstellen.
Nach den Einstellungen bitte über „speichern“ sichern, ansonsten abbrechen.
8. Hauptmenü
15
8. Hauptmenü
8. Hauptmenü
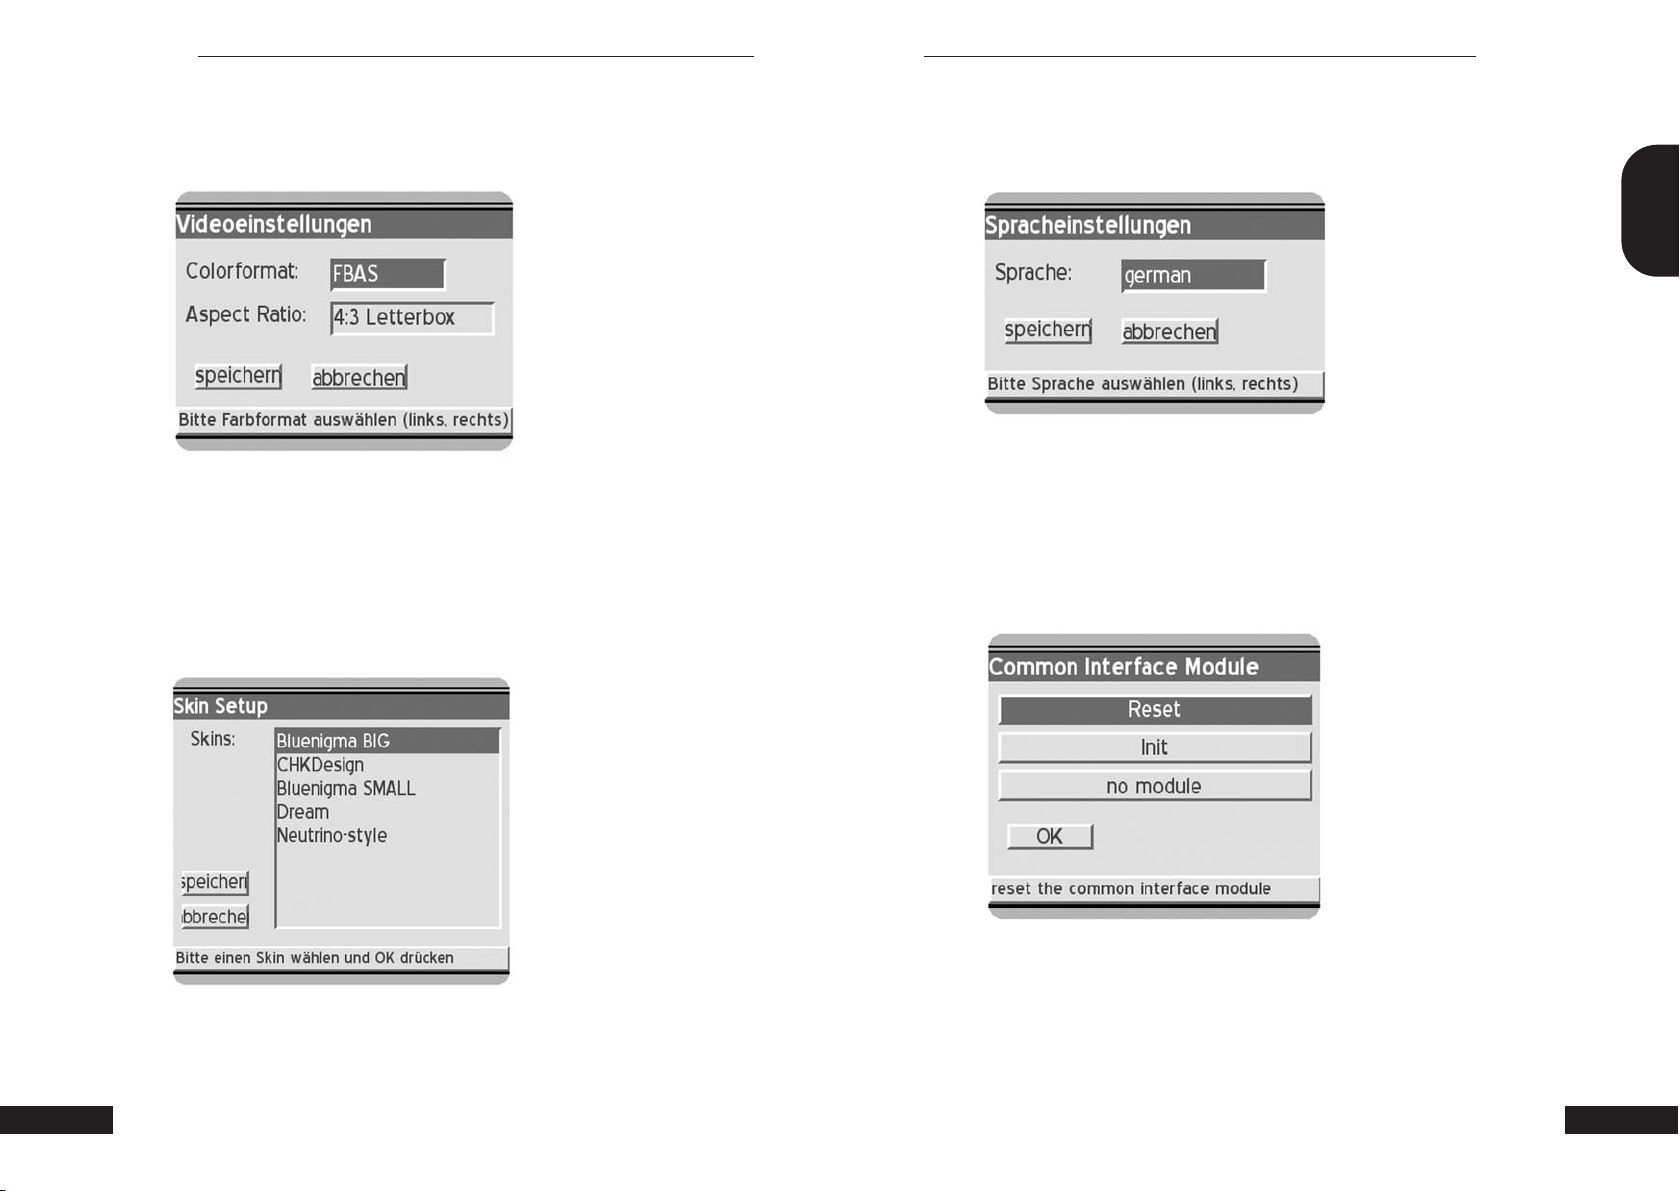
8.2.6 Video
Hier finden Sie die Einstellungen für Ihre Videoeinstellungen
Colorformat: Wählen Sie zwischen RGB, SVideo oder FBAS
Aspect Ratio: Wählen Sie zwischen 4:3 letterbox, 4:3 panscan oder 16:9 (PIN8)
Nach den Einstellungen bitte über „speichern“ sichern, ansonsten abbrechen.
8.2.7 Skin
Hier können Sie zwischen verschiedenen OSD-Skins wählen
8.2.8 Sprache
Hier finden Sie die Einstellungen für die OSD - Sprache
DEUTSCH
Sprache: Wählen Sie hier die OSD-Sprache.
Nach den Einstellungen bitte über „speichern“ sichern, ansonsten abbrechen.
Eine neue Sprache wird erst nach einem Reboot aktiv!
8.2.9 Common Inerface
16
Nach den Einstellungen bitte über „speichern“ sichern, ansonsten abbrechen.
Ein neuer Skin wird erst nach einem Reboot aktiv!
8. Hauptmenü
Reset: Hier können Sie das Common Interface resetten.
Init: Hier können Sie das Common Interface neu initialisieren.
8. Hauptmenü
17
8. Hauptmenü
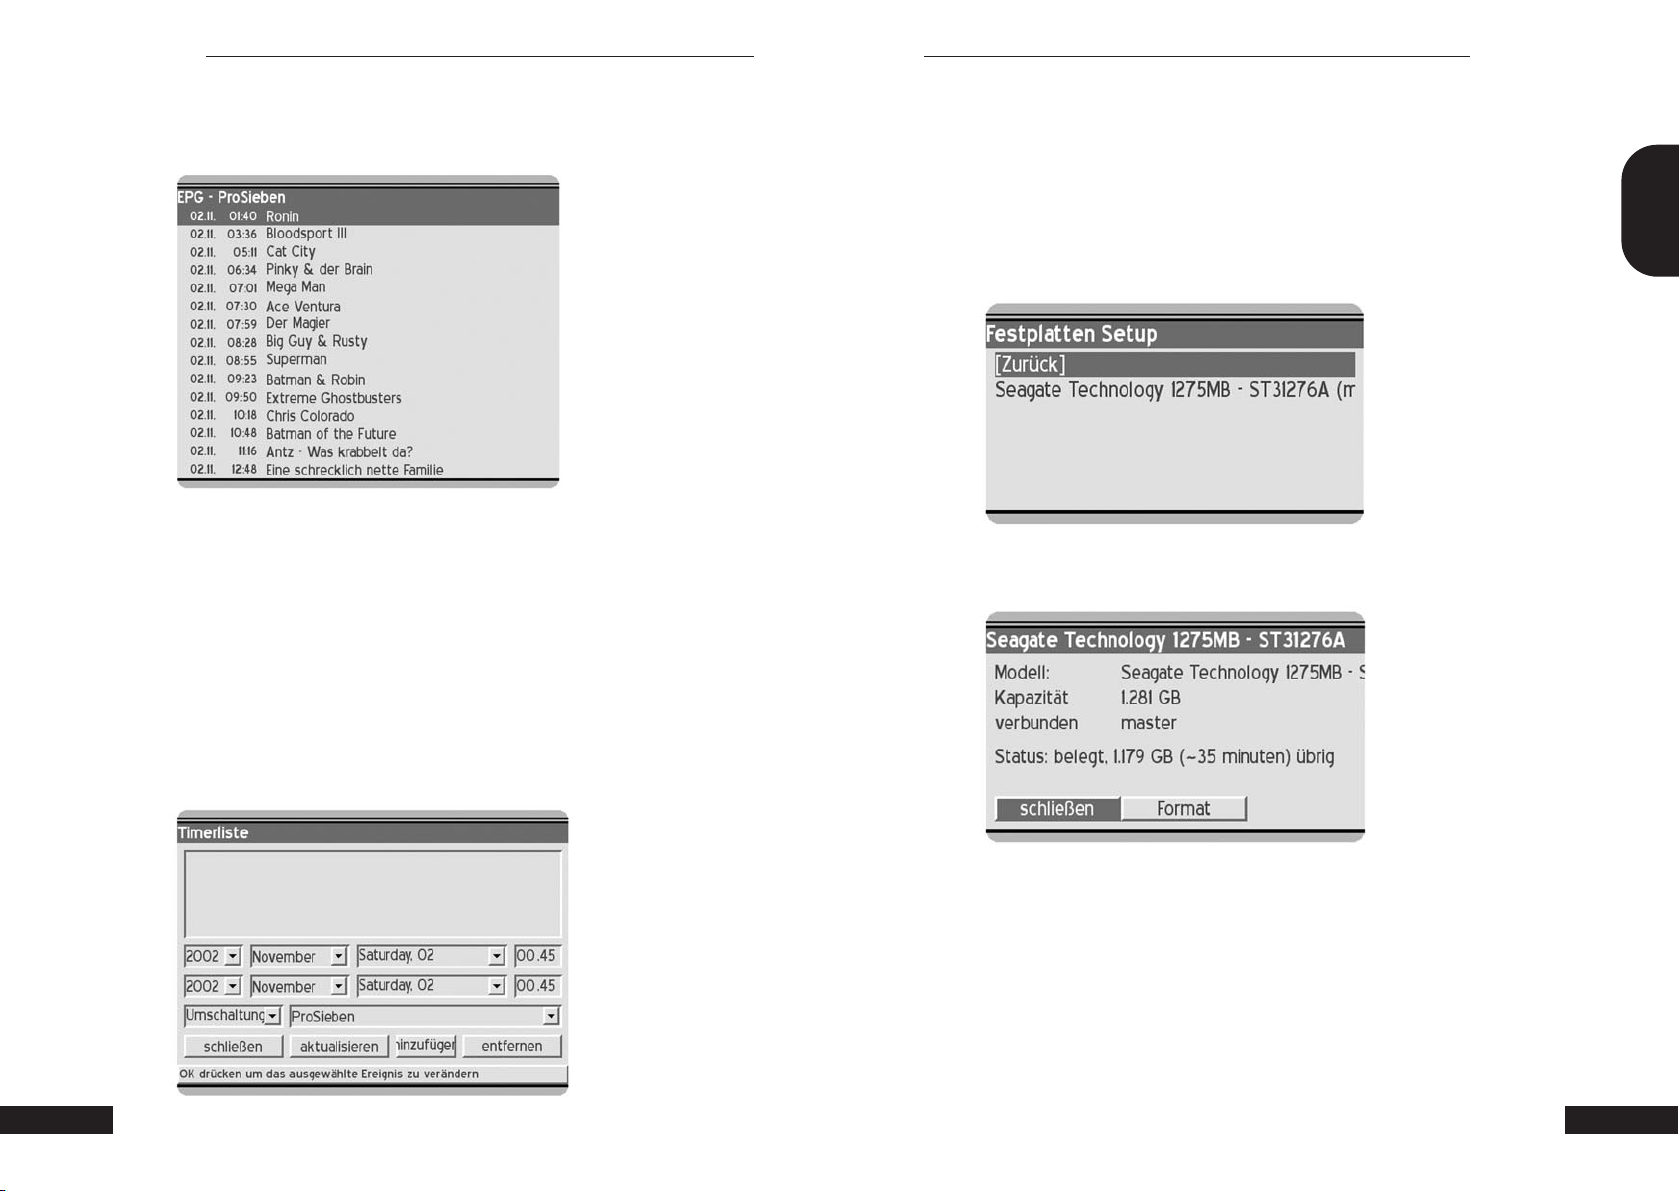
8.2.10 EPG Tragen Sie hier Kanäle mit den Aufnahmeoptionen manuell ein oder editieren
8. Hauptmenü
Sie Ihre Aufnahmeliste. Aufnahmeoptionen aus dem EPG können hier über
„remove“ auch gelöscht werden.
Über die rote Auswahltaste der Fernbedienung gelangen Sie in die EPGListen.
Sie haben nun die Möglichkeit sich über die „OK“ Taste weitere Infos zur
Sendung anzusehen.
Über die grüne Auswahltaste nehmen Sie die Sendung in Ihre Aufnahmeliste
auf.
8.2.11 Timer
Hier finden Sie die Einstellungen für Ihre Aufnahmeliste
8.2.12 Festplatte
Hier finden Sie die Einstellungen für Ihre eingebaute Festplatte.
Wählen Sie als erstes die gefundene Festplatte aus und drücken Sie „OK“ um
sich die Infos zur Platte anzusehen oder die Platte neu zu formatieren.
DEUTSCH
18
Im folgenden Menü wird Ihnen angezeigt:
Modell: Gefundene Festplatte.
Capacity: Hier wird Ihnen die Kapazität der angeschlossenen Festplatte
angezeigt.
Connected: Port Master oder Slave.
Status: Hier wird Ihnen der Status Ihrer Festplatte angezeigt.
Um eine neue Festplatte einzurichten oder komplett zu löschen wählen Sie
bitte „Format“, ansonsten wählen Sie „schließen“.
8. Hauptmenü 8. Hauptmenü
19
9. Infobar, 10. Kanalliste
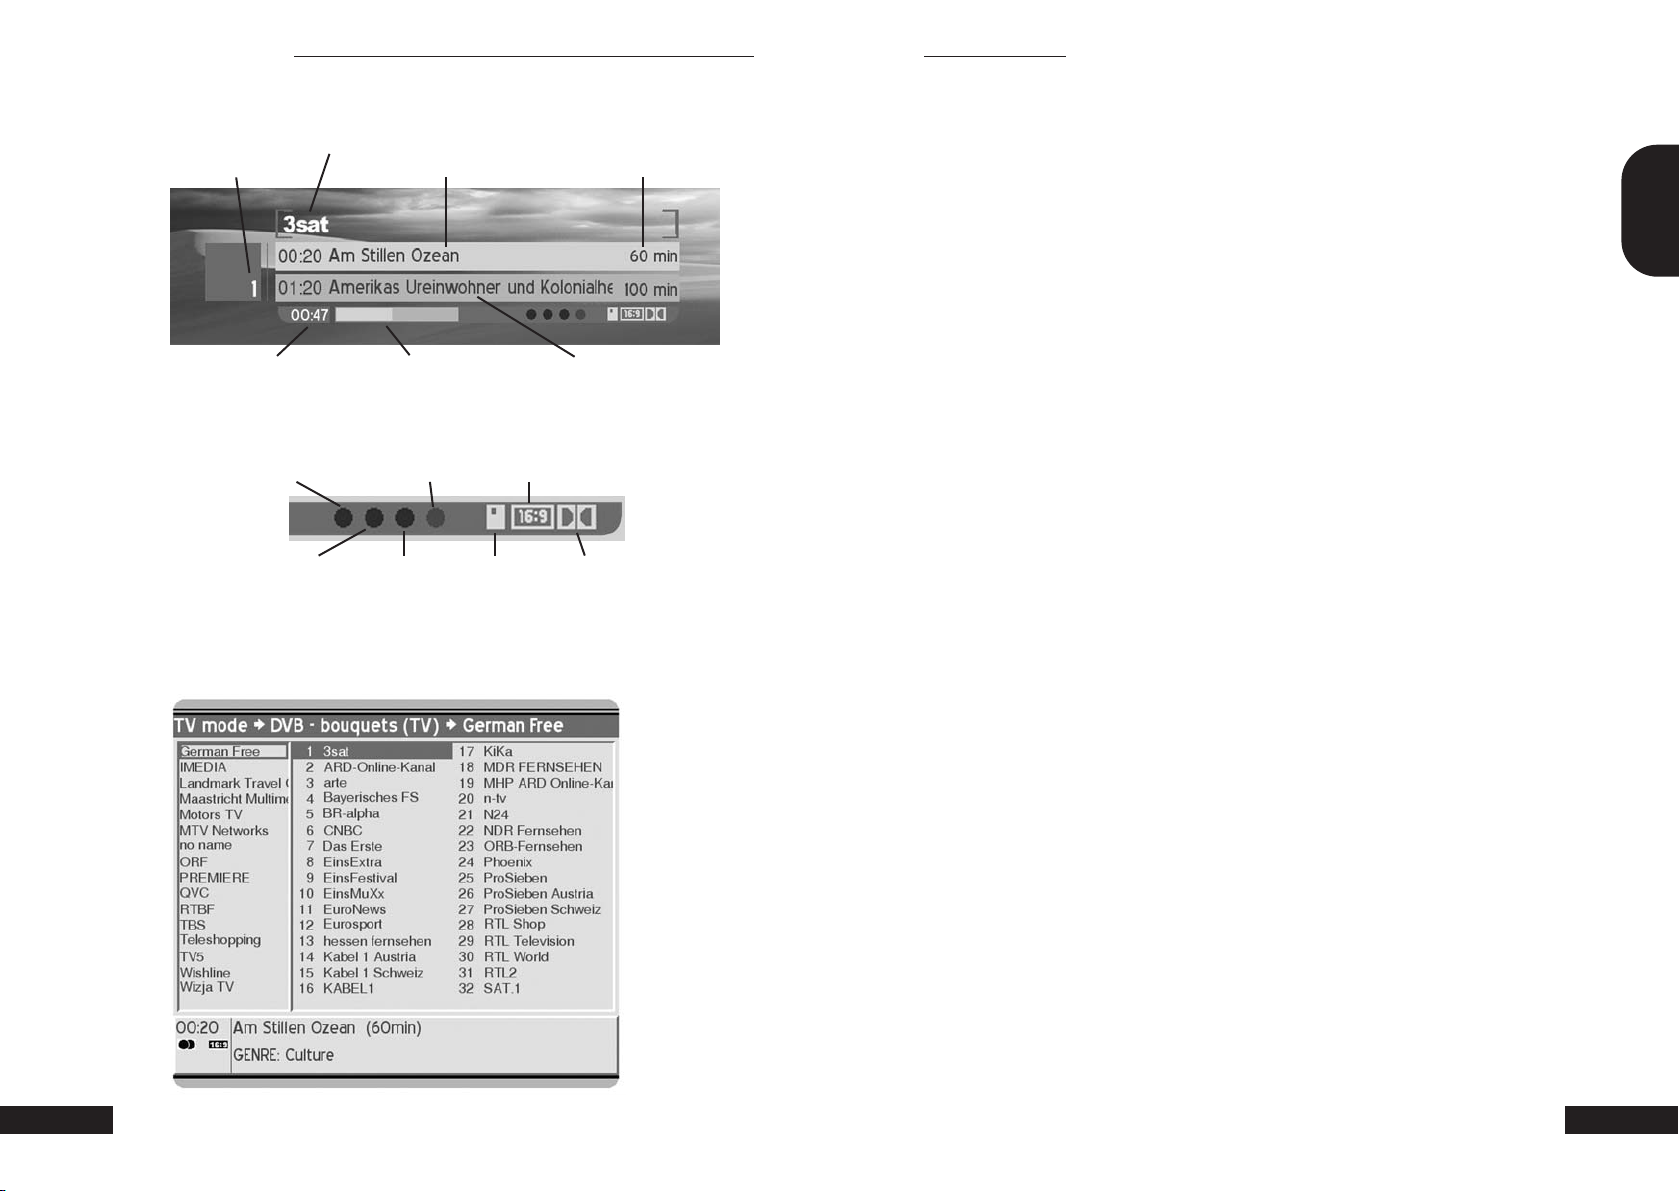
9. Infobar
10. Kanalliste, 11. Standby, Dreambox herunterf. u. Reset
Kanalnummer
10. Kanalliste
Kanalname
Aktuelle Uhrzeit
EPG verfügbar
(rot)
(grün)
Aktuelle Sendung Gesamte Laufzeit
Verstrichene Zeit Nächste Sendung
Videotext
(blau) 16:9 / 4:3
Audio
(gelb)
Verschlüsselt Dolby DigitalKanaloptionen
In der Kanalliste können Sie über die Taste „Dream“ zwischen verschieden
Darstellungen der Kanalliste auswählen:
• einfache Kanalliste
•dreispaltige Kanalliste
• Kanalliste mit Bouquetliste
Wählen Sie einen Kanal und drücken Sie die „OK“-Taste.
Mit die gelbe Auswahltaste können Sie zwischen dem rechten und linken
Fenster wechseln.
Mit der roten Auswahltaste können Sie den Kanal in Ihre Favouritenliste übernehmen oder zur Playliste hinzufügen.
Mit der blauen Auswahltaste gelangen Sie in das Favouriten-Menü.
11. Standby, Dreambox herunterfahren und Reset
Um Ihre Dreambox in den Stanby-Modus zu fahren drücken Sie bitte einmal
kurz die Powertaste auf Ihrer Fernbedienung.
Um Ihre Dreambox in den Deep-Standby zu fahren gehen Sie bitte in das
Hauptmenü und wählen Sie die Option „Herunterfahren“ und bestätigen Sie
dies mit der „OK“-Taste.
DEUTSCH
20
9. Infobar, 10. Kanalliste
Alle Einstellungen werden nun gespeichert und die Box fährt in den DeepStandby, oder drücken Sie die Powertaste auf Ihrer Fernbedienung für 5 sec.
Für einen Reset drücken Sie an der Dreambox alle 3 Tasten gleichzeitig.
10. Kanalliste, 11. Standby, Dreambox herunterf. u. Reset
21
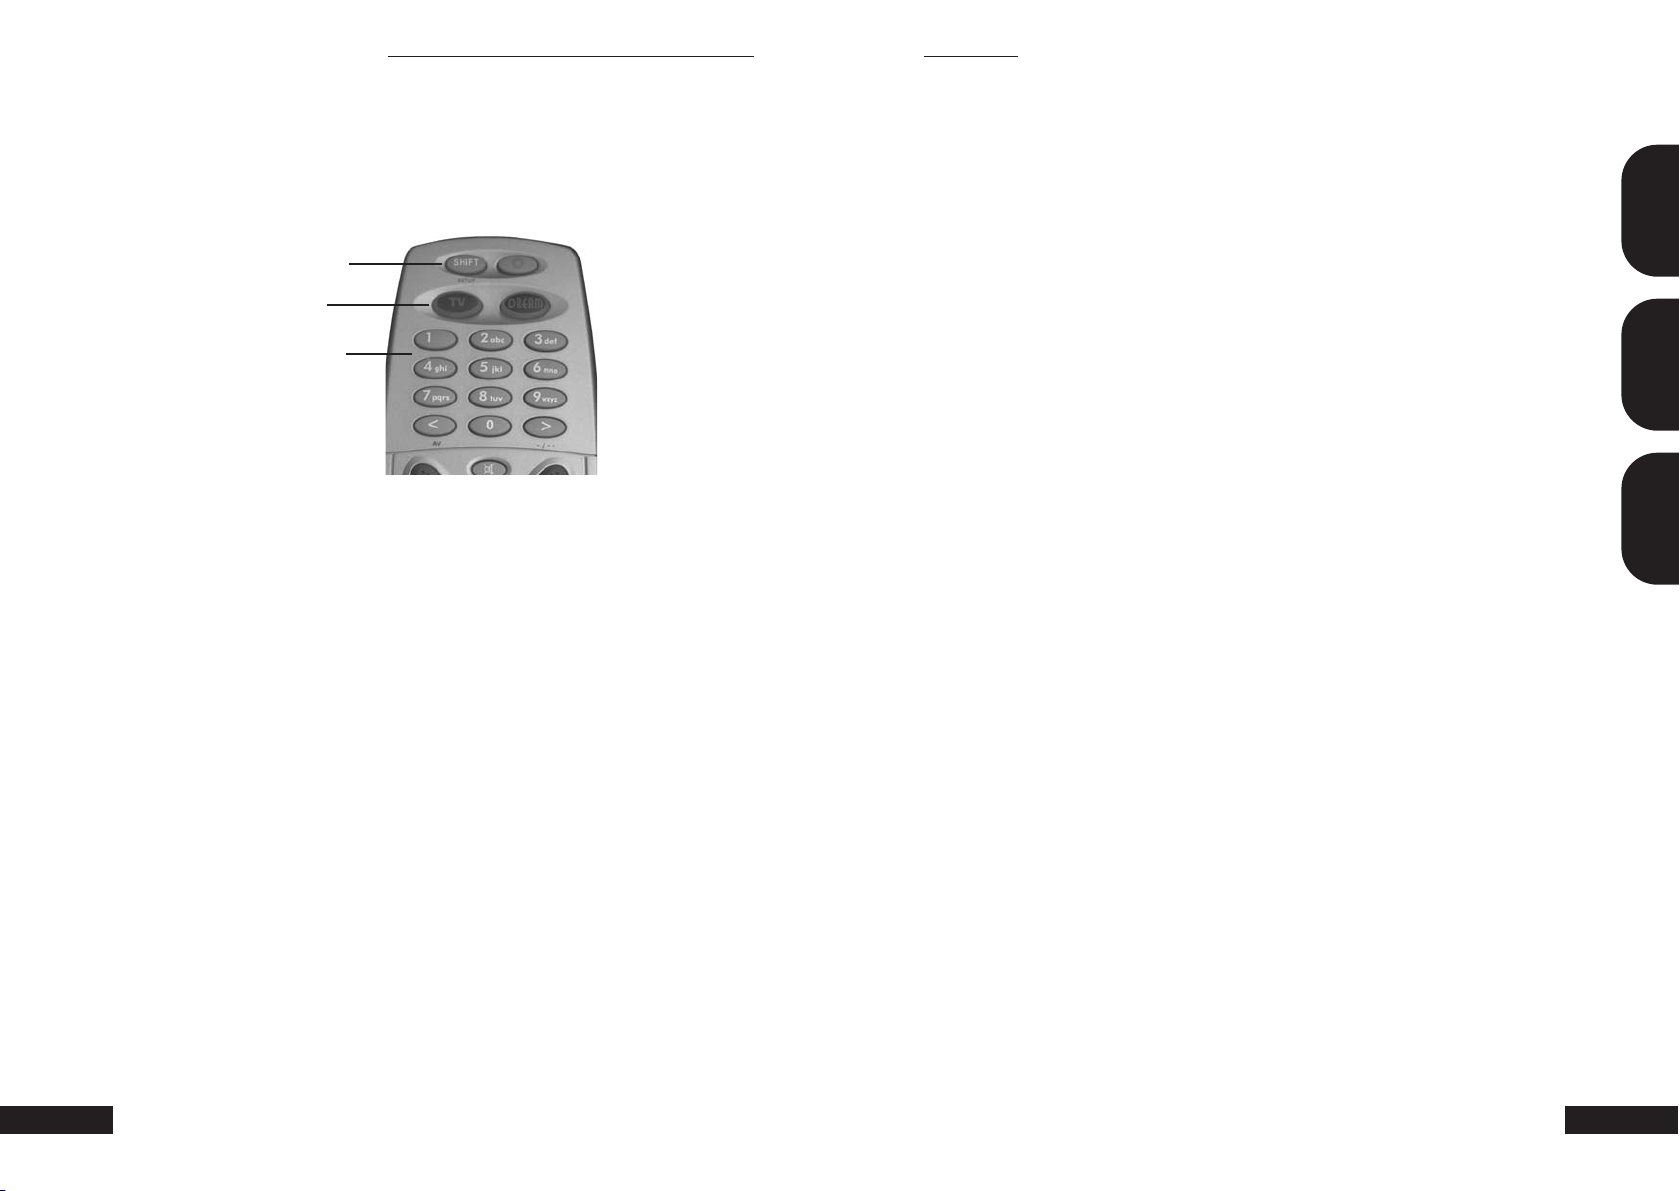
12. Setup „TV-Steuerungsmodus“
13. TV-Geräteliste / 13. TV model list / 13. Liste d'appareils TV
12. Setup „TV- Steuerungsmodus“
Ein vierstelliger TV-Geräte-Code wird aus der TV-Geräteliste aus der Tabelle
im Kapitel 13 ausgewählt und eingegeben.
Mode TV -> <<SETUP>> -> Ziffer -> Ziffer -> Ziffer -> Ziffer
Programmierablauf:
1. Einmaliges kurzes drücken der TV-Taste.
2. SHIFT/Setup-Taste für 3 sec drücken die TV-Taste sollte zweimal blinken.
3. Eingabe des TV-Codes über den Ziffernblock auf der Fernbedienung.
Jede eingegebene Zahl wird über ein einmaliges blinken der TV-Taste
quittiert.
Nach Eingabe der vierten Ziffer wird ein gültiger Code durch zweimaliges
blinken der TV-Taste quittiert.
4. Die Fernbedienung verlässt nun automatisch den Programmiermodus.
5. Wird 10 sec lang kein Code eingegeben verlässt die Fernbedienung
automatisch den Programmiermodus.
22
12. Setup „TV-Steuerungsmodus“
<<SETUP>>
Mode TV
Ziffernblock
13. TV-Geräteliste / 13. TV model list / 13. Liste d'appareils TV
A.R. Systems 0067 0382
Accent 0067
Admiral 0117 0123 0448 0243 0294
Adyson 0247 0246
Agashi 0246
Agazi 0294
AGB 0546
Agef 0117
Aiko 0246 0039 0067 0401 0065 0463
0102 0391 0221 0294 0247
Aim 0067
Akai 0391 0238 0401 0067 0463 0221
0065 0039 0102 0248 0193
0546 0586 0578 0510 0247
0661 0246 0294
Akiba 0248 0312 0485 0067
Akura 0248 0389 0312 0039 0442 0294
0067
Alba 0248 0265 0039 0448 0400 0385
0401 0067 0246 0277 0193
0517 0066 0698 0609
Alcyon 0106
Allorgan 0236 0324 0247
Allstar 0067
Amplivision 0247 0430 0350 0400
Amstrad 0039 0546 0294 0248 0401 0463
0442 0067
Anglo 0039 0294
Anitech 0039 0106 0294 0067
Ansonic 0400 0132 0039 0067 0404 0193
0353 0441 0289 0277 0042
0458
Apollo 0503
Arc en Ciel 0429 0531 0139 0226 0363 0228
Arcam 0246 0429 0247
Aristona 0067 0586 0042
Arthur Martin 0193 0430
ASA 0135 0376 0100 0134 0117
Asberg 0067 0106
Asora 0039
Asuka 0248 0294 0246 0312 0247
Atlantic 0067 0246 0236 0289 0350
Atori 0039
Auchan 0193 0430
Audiosonic 0067 0139 0247 0400 0367 0294
0248 0458
Audioton 0247 0400 0294
Ausind 0106
Autovox 0117 0236 0267 0106 0379 0247
0277 0366
Awa 0041 0066 0039 0187 0404 0442
0067
Ayomi 0268
Baird 0139 0373 0102 0247 0238
Barco 0410 0193
Basic Line 0248 0039 0404 0067 0597 0193
0312
Bastide 0247
Baur 0333 0225 0542 0067 0221 0391
0379 0535 0040
Bazin 0247
13. TV-Geräteliste / 13. TV model list / 13. Liste d'appareils TV
DEUTSCH
ENGLISHFRANÇAIS
23

13. TV-Geräteliste / 13. TV model list / 13. Liste d'appareils TV
13. TV-Geräteliste / 13. TV model list / 13. Liste d'appareils TV
Beko 0400 0067
Beon 0067 0448
Best 0367 0400
Bestar 0067 0400 0404
Binatone 0247
Black Star 0277
Blacktron 0312
Blackway 0312
Blaupunkt 0221 0225 0230 0243 0357 0358
Blue Sky 0248 0312 0485 0067 0517 0698
Blue Star 0312
Bondstec 0277
Boots 0247
BPL 0312 0067
Brandt 0531 0139 0429 0235 0267 0363
Brinkmann 0448 0067 0549
Brionvega 0067 0117
Britannia 0246 0247
Brother 0294
Bruns 0117
BSR 0193 0324
BTC 0248
Bush 0248 0265 0193 0379 0039 0066
Capsonic 0294
Carad 0640 0067
Carena 0485 0067
Carrefour 0066 0100
Cascade 0039 0067
Cathay 0067
CCE 0067
Centurion 0067
Century 0117 0243 0277 0268
CGE 0104 0114 0336 0106 0277 0193
Cimline 0039 0265 0248
City 0039
Clarivox 0448 0100
Clatronic 0248 0294 0400 0401 0247 0106
Clayton 0415
CMS Hightec 0247
Concorde 0039
Condor 0246 0277 0312 0350 0067 0400
Contec 0246 0039 0187 0041 0066
Continental Edison 0531 0139 0267 0226 0228 0429
Cosmel 0039 0367
Crezar 0243
Crosley 0117 0277 0104 0114 0106 0193
Crown 0039 0400 0106 0067 0389 0609
CS Electronics 0277 0246 0248
CTC 0277
24 25
13. TV-Geräteliste / 13. TV model list / 13. Liste d'appareils TV
0348
0226 0228 0317 0365
0312 0067 0385 0401 0404
0549 0294 0391 0517 0238
0324 0247 0698
0448 0400
0277 0067 0039 0132 0350
0609
0039 0132 0441 0448
0363 0235 0317 0517
0243
0448 0238 0517
Cybertron 0248
Daewoo 0039 0067 0246 0404 0248 0247
Dainichi 0248 0246
Dansai 0067 0294 0065 0246
Dansette 0442
Dantax 0400
Datsura 0238
Dawa 0067
Daytron 0039 0404 0067
Decca 0102 0546 0067 0247
Deitron 0067
Denko 0294
Desmet 0350 0067
Diamant 0067
Digiline 0067
Dixi 0039 0067 0277 0247
Domland 0424
Drean 0067
DTS 0039
Dual 0379 0247 0373 0289 0366 0549
0067 0382 0424 0429 0333
Dumont 0117 0134 0132 0243 0247 0100
0102
Dux 0067 0042
Dynatron 0067
Elbe 0465 0268 0289 0400 0193 0067
0248 0221 0441 0640
Elcit 0117 0277 0546 0132 0193
Elekta 0294 0312
Elin 0246 0067 0135 0134 0578 0391
0379 0193 0039
Elite 0248 0067
Elman 0132
Elta 0039 0294
Emerson 0243 0117 0277 0067 0401 0100
0312 0350
Emperor 0312
Erres 0067 0042
Etron 0067 0039 0193
Euro-Feel 0294
Europa 0067
Europhon 0067 0546 0132 0243 0247 0277
0193
Expert 0236 0430 0289 0193
Exquisit 0067 0277
Fenner 0404 0039
Ferguson 0317 0365 0268 0139 0590 0655
Fidelity 0246 0401 0193 0294 0067
Filsai 0247
Finlandia 0238 0376 0389 0578 0391
Finlux 0135 0134 0067 0376 0247 0102
0193 0106 0546 0100 0117
0132 0441 0661 0522
Firstline 0324 0351 0246 0067 0404 0415
0277 0039 0193 0132 0247
0441 0379 0561 0268 0102
0265 0698 0238
Fisher 0134 0247 0066 0238 0400 0585
0117 0187 0391 0193 0333
0379 0102
Flint 0067 0485 0102 0248
13. TV-Geräteliste / 13. TV model list / 13. Liste d'appareils TV
DEUTSCH
ENGLISHFRANÇAIS

13. TV-Geräteliste / 13. TV model list / 13. Liste d'appareils TV
13. TV-Geräteliste / 13. TV model list / 13. Liste d'appareils TV
FNR 0132
Formenti 0117 0243 0246 0350 0193 0106
Fortress 0123 0117
Fraba 0400 0067
Friac 0039 0067 0132
Frontech 0277 0294 0379 0247 0039
Fujitsu 0236 0102 0132 0247 0193
Fujitsu General 0039
Funai 0294 0324
Galaxi 0132 0067
Galaxis 0400 0448 0067 0132
GBC 0243 0193 0039 0404 0248
GE 0590 0139 0317 0365 0373
Geant Casino 0193 0430
GEC 0102 0193 0391 0235 0546 0067
Geloso 0243 0277 0039 0193 0404
General 0139 0317 0501
General Technic 0039
Genexxa 0248 0067 0442
Germanvox 0243
Goldhand 0246
Goldline 0367
GoldStar 0067 0400 0039 0247 0277 0246
Goodmans 0066 0102 0067 0039 0294 0546
Gorenje 0400
GPM 0248
Gradiente 0067 0083
Graetz 0391
Granada 0067 0430 0256 0389 0042 0102
Grandin 0312 0248 0430 0067 0039 0350
Gronic 0247 0132
Grundig 0225 0221 0517 0100 0106 0235
Halifax 0294 0246 0247
Hampton 0246 0247
Hanimex 0324
Hanseatic 0067 0312 0379 0193 0391 0424
Hantarex 0039 0243 0067 0132
Hantor 0067
Harwood 0039 0442 0067
HCM 0294 0039 0312 0442 0247 0248
Hema 0247 0039
Hemmermann 379
Hifivox 0531 0139 0226 0429
Hikona 0248
HiLine 0294 0067
Hinari 0238 0066 0067 0248 0039 0193
Hisawa 0312 0248 0430 0485
26 27
13. TV-Geräteliste / 13. TV model list / 13. Liste d'appareils TV
0247 0379
0193 0391
0404 0517 0401 0586 0373
0265 0065 0510 0590 0247
0365
0138 0238 0247 0106 0066
0546 0503 0365 0590
0193 0485 0609 0640
0267 0067 0586
0243 0350 0458 0400 0039
0324 0247 0549
0448 0067
385 0473 0517 0265 0324
Hit 117
Hitachi 0255 0066 0379 0503 0193 0373
0226 0228 0247 0336 0224
0546 0102 0067 0135 0586
0180 0578
Hitsu 039 0485 0248
Hornyphone 0067 0042
Hoshai 0248 0485
Huanyu 0404 0246
Hygashi 0247 0246
Hyper 0039 0246 0247 0277
Hypersonic 0391
Hypson 0067 0294 0247 0312 0485 0430
268
Iberia 067
ICE 294 0247 0067 0401 0248 0246
039
Ices 248 0246
Imperial 0067 0277 0400 0448 0193 0561
104 0114 0106 0379 0226
Indesit 267 0243
Indiana 0067
Ingelen 0517 0640
Inno Hit 0039 0102 0067 0248 0247 0106
546 0277
Innovation 0549
Interactive 0441
Interbuy 0039 0294 0277
Matsui 0265 0039 0385 0041 0102 0066
067 0586 0517 0247 0324
401 0463 0473 0609 0485
379 0546 0065 0193 0238
225 0221 0365
Mediator 0067 0586 0042
Medion 0067 0698 0549
Megas 0640
Melvox 0430
Memorex 0039
Memphis 0367 0102 0039 0415
Mercury 0067 0039
Metz 0117 0225 0243 0221 0397
Micromaxx 0067 0698
Minerva 0517 0225 0100 0106 0221 0267
Minoka 0442 0067 0389
Mitsubishi 0138 0180 0542 0067 0117 0066
267
Mivar 0400 0106 0246
Monaco 0039
Motion 0106
MTC 0400 0379 0542
Multistandard 0132
Multitec 0067 0698
Multitech 0247 0379 0039 0246 0277 0132
400 0067
Murphy 0134 0246 0102 0193
NAD 0391
Naiko 0067
Nakimura 0404 0067
National 0267 0244 0256
NEC 0066 0350 0485 0039 0404 0247
0067
13. TV-Geräteliste / 13. TV model list / 13. Liste d'appareils TV
DEUTSCH
ENGLISHFRANÇAIS

13. TV-Geräteliste / 13. TV model list / 13. Liste d'appareils TV
13. TV-Geräteliste / 13. TV model list / 13. Liste d'appareils TV
Neckermann 0067 0221 0400 0535 0040 0230
NEI 0067 0367 0401
Nesco 0277
Network 0367
Neufunk 0067 0039 0586 0640
New Tech 0067 0039 0586 0373 0247
New World 0248
Nicamagic 0246
Nikkai 0102 0248 0067 0247 0294 0065
Noblex 0067 0294
Nobliko 0132 0106 0100 0246
Nogamatic 0429 0531 0139 0226
Nokia 0391 0193 0510 0379 0578 0522
Nordmende 0139 0531 0317 0429 0226 0373
Novatronic 0067 0135
Oceanic 0597 0193 0430 0391 0324 0238
Okano 0400 0067 0294 0102
Omega 0294
Onwa 0401 0248 0463
Opera 0067
Orbit 0067
Orion 0265 0324 0350 0385 0041 0067
Orline 0067 0248
Ormond 0415 0698
Osaki 0102 0248 0247 0294 0067 0442
Osio 0067
Oso 0248
Osume 0187 0102 0066 0248
Otto Versand 0040 0535 0066 0123 0542 0067
Pael 0246
Palladium 0400 0067 0221 0535 0040 0230
Palsonic 0294 0442 0067
Panama 0039 0247 0294 0246 0067 0277
Panasonic 0256 0680 0280 0244 0243 0391
Panavision 0067 0441
Pathe Cinema 0193 0268 0246 0430 0350 0379
Pathe Marconi 0235 0243 0531 0139 0226 0228
Pausa 0039
Perdio 0102 0350 0193 0067
Perfekt 0067
Pershin 0430
Philco 0117 0114 0104 0448 0106 0243
28 29
13. TV-Geräteliste / 13. TV model list / 13. Liste d'appareils TV
0586 0193 0357 0448 0379
0117 0243 0277 0247 0441
0367 0246 0039 0066
0389 0503 0238 0404 0661
0376
0228 0243 0605 0590 0225
0067 0365
0039 0351 0132 0473 0586
0685 0294 0442
0404
0586 0225 0379 0221 0391
0265 0139 0243 0324 0256
0277 0333 0350 0247
0448 0586 0277 0357 0379
0117 0193 0243 0247 0441
0685
0267 0397 0546 0067 0193
0578
0363 0429 0267
Philharmonic 0247
Philips 0586 0067 0042 0353 0221 0117
Phoenix 0067 0117 0350 0400 0415 0246
Phonola 0067 0586 0042 0117 0246
Pioneer 0067 0458 0400 0373 0391 0139
Pionier 0400
Plantron 0067 0294 0039
Playsonic 0247
Poppy 0039
Portland 0404
Prandoni-Prince 0277 0546 0391 0243 0106
Precision 0247
Prima 0039 0294
Prinz 0102 0379 0224
Profex 0039 0193
Proline 0351 0102 0067 0042 0655
Prosonic 0067 0244 0246 0400 0404 0609
Protech 0067 0247 0039 0277 0379 0132
Provision 0067
Pye 0067 0586 0042 0117
Pymi 0039
Quadra Vision 0430
Quasar 0277
Quelle 0067 0040 0041 0531 0139 0542
Questa 0066
R-Line 0067
Radialva 0139 0248 0193 0067
Radiola 0067 0586 0042 0353
Radiomarelli 0117 0546 0277 0067
RadioShack 0067
Radiotone 0039 0067 0458 0400 0609 0448
Rank 0100
RCA 0590 0655 0365
Recor 0067
Rediffusion 0391 0578 0066
Redstar 0067
Reflex 0067
Revox 0067 0400
Rex 0236 0441 0277 0193 0289
RFT 0117 0400 0458 0102 0294
Roadstar 0039 0294 0248 0448
Robotron 0117
Royal Lux 0400 0442
Saba 0317 0243 0117 0429 0193 0139
Sagem 0485 0640 0312
Saisho 0265 0546 0039 0041 0247 0193
Salora 0224 0379 0193 0389 0391 0546
0277 0193 0400 0067
0373
0193 0102
0401
0294 0448 0367 0698
0379 0221 0391 0066 0247
0277 0104 0114 0357 0336
0100 0134 0135 0187 0225
0230 0243 0294 0698
0294 0442
0531 0546 0373 0391 0528
0226 0228 0365 0235 0655
0578
0294
0578
13. TV-Geräteliste / 13. TV model list / 13. Liste d'appareils TV
DEUTSCH
ENGLISHFRANÇAIS

13. TV-Geräteliste / 13. TV model list / 13. Liste d'appareils TV
13. TV-Geräteliste / 13. TV model list / 13. Liste d'appareils TV
30
Sambers 0243 0546 0106 0132
Samsung 0067 0586 0617 0039 0247 0400
0294 0246 0102 0238
Sandra 0246 0247
Sanela 0268
Sansui 0067 0401
Sanyo 0238 0187 0066 0041 0400 0102
0246 0247 0134 0243 0039
0193 0067 0585
Save 0067
SBR 0067 0586 0042
Schaub Lorenz 0379 0578
Schneider 0067 0586 0042 0333 0379 0549
0424 0382 0366 0289 0353
0373 0247 0277 0401 0248
0391 0193 0698
SEG 0247 0294 0039 0277 0066 0132
0193 0067 0246 0698 0517
SEI 0117 0132 0040 0193 0546 0379
0243 0324 0236 0067
Seleco 0236 0289 0193 0441
Sencora 0039
Sentra 0065 0248 0039
Serino 0485 0640
Sharp 1223 0123 0187 0066 0324 0683
0083
Shorai 0324
Siam 0067
Siarem 0193 0117 0132 0243
Siemens 0221 0230 0225 0243 0357 0358
0187 0067
Sierra 0067 0586 0042
Siesta 0400
Silva 0246 0067
Silver 0066 0391
Singer 0117 0132 0277 0430 0465 0039
Sinudyne 0117 0265 0132 0243 0324 0193
0391 0546 0379 0040 0236
0067
Sogera 0350
Solavox 0391 0102 0193 0578
Sonitron 0238 0400 0247
Sonneclair 0067
Sonoko 0067 0039 0294 0312 0247
Sonolor 0238 0597 0193 0430 0535 0040
0578
Sontec 0067 0400 0324
Sony 1535 1040 1681 0535 0040 0041
0030 0066 0132 0681 0104
Sound & Vision 0132 0248 0404
Soundwave 0067 0350 0448
Ssangyong 0039
Standard 0248 0039 0247 0350 0067 0404
Starlite 0039 0193 0067 0294
Stenway 0312 0248
Stern 0236 0289 0193
Strato 0067 0294 0039
Sunkai 0324 0385 0351 0485 0248 0265
0067 0517
Sunstar 0401 0067 0039
Sunwood 0067 0039
13. TV-Geräteliste / 13. TV model list / 13. Liste d'appareils TV 13. TV-Geräteliste / 13. TV model list / 13. Liste d'appareils TV
Superla 0546 0246
Supertech 0039 0067 0246 0586
Supra 0404 0039
Susumu 0365
Sutron 0039
Swissline 0277
Sydney 0246 0247
Sytong 0246
Tandberg 0397 0441 0139 0367 0226 0391
Tandy 0248 0102 0247 0277 0123
Tashiko 0066 0247 0246 0389 0193
Tatung 0102 0546 0247 0067 0041
Teac 0067 0542 0485 0294 0039 0442
TEC 0247 0039 0277 0501 0365 0367
Tech Line 0067 0698
Technema 0350
Technisat 0685
Tedelex 0247
Teleavia 0139 0531 0317 0226 0429 0235
Telecor 0067 0193 0248 0247 0289 0424
Telefunken 0139 0531 0528 0501 0429 0317
Telefusion 0067
Telegazi 0067 0193 0289 0248 0294
Telemeister 0350 0067
Telesonic 0067
Telestar 0067
Teletech 0039 0277 0367 0067 0698
Teleton 0247 0236 0193 0379 0289 0066
Televideon 0350 0193 0246
Televiso 0430
Temco 0324
Tempest 0039
Tensai 0134 0248 0067 0247 0324 0350
Tenson 0350 0039
Tevion 0549 0067
Texet 0247 0404 0039
Thomson 0317 0429 0139 0531 0363 0501
Thorn 0268 0104 0114 0067 0134 0365
Tokai 0102 0067 0367 0193 0247 0404
Tokyo 0246 0065
Tomashi 0312 0248
Toshiba 0065 0538 0273 0066 0100 0132
Towada 0379 0132 0247
Trans Continens 0247 0067
Trident 0546 0247
Tristar 0248
Triumph 0546 0376 0586 0067 0273
Uher 0106 0067 0236 0350 0333 0404
0379
0289
0363 0520
0104 0114 0131 0365 0292
0336 0373 0226 0067 0655
0039 0135 0404 0401 0277
0365 0226 0228 0235 0267
0373 0067 0520 0590 0655
0542 0389 0404 0065
0039
0247
0448 0400 0289
DEUTSCH
ENGLISHFRANÇAIS
31

13. TV-Geräteliste / 13. TV model list / 13. Liste d'appareils TV
Notizen
Ultravox 0117 0132 0404 0277 0246 0193
0243 0067
Unic Line 0067 0503
United 0067
Universum 0376 0135 0225 0503 0391 0277
0522 0510 0400 0230 0448
0041 0542 0324 0066 0187
0100 0193 0294 0134 0067
0441 0104 0336 0243 0357
0358 0040 0535 0106 0379
0247 0531 0139 0367 0661
0698
Univox 0367 0117 0067 0193 0268
Vestel 0067 0193 0247
Vexa 0039 0067
Videologique 0246 0248 0247
VideoSystem 0067
Videotechnic 0246 0350 0247
Videoton 0193
Vidikron 0132
Viper 0367
Visiola 0246
Vision 0067 0350
Vistar 0236 0391
Vortec 0067
Voxson 0117 0106 0067 0448
Waltham 0247 0448 0317 0415 0067
Watson 0067 0350 0193 0248 0243 0609
0549 0424 0039 0698
Watt Radio 0243 0132 0379 0193 0246
Wega 0243 0066 0117 0067
Wegavox 0039
Weltblick 0067 0350
White Westinghouse 0350 0246 0067 0367
Winco 0442
Windstar 0312
Xrypton 0067
Yamishi 0312 0485 0248 0067 0247
Yokan 0067
Yoko 0247 0067 0248 0294 0039 0400
0246
Yorx 0248
Zanussi 0236 0247
DEUTSCH
ENGLISH
FRANÇAIS
32
13. TV-Geräteliste / 13. TV model list / 13. Liste d'appareils TV Notizen
33

2. Views
DisplaySend/receive diodes
Power on/of
Channel up/downSmartcard readerCompact FlashCI-module
USB Port LNB In
Ethernet
AC3 audio Out
TV connector
RS 232 LNB Out
Mini DIN
analog
Audio Out
Video recorder
230 V / 50 HZ
Mains power supply
3. Table of Contents
Chapter Page
1. Remote control . . . . . . . . . . . . . . . . . . . . . . . . . . . . . . . . . . . . . . 3
13. TV model list . . . . . . . . . . . . . . . . . . . . . . . . . . . . . . . . . . . . . . . . 23-32
2. Views . . . . . . . . . . . . . . . . . . . . . . . . . . . . . . . . . . . . . . . . . . . . . . 34
2.1 Front view . . . . . . . . . . . . . . . . . . . . . . . . . . . . . . . . . . . . . . . . . . 34
2.2 Rear view . . . . . . . . . . . . . . . . . . . . . . . . . . . . . . . . . . . . . . . . . . . 34
3. Contents . . . . . . . . . . . . . . . . . . . . . . . . . . . . . . . . . . . . . . . . . . . 35
4. Safety instructions . . . . . . . . . . . . . . . . . . . . . . . . . . . . . . . . . . . 36
4.1 Periods of non-use . . . . . . . . . . . . . . . . . . . . . . . . . . . . . . . . . . . 37
4.2 Additional safety notes . . . . . . . . . . . . . . . . . . . . . . . . . . . . . . . 37-38
5. Getting started . . . . . . . . . . . . . . . . . . . . . . . . . . . . . . . . . . . . . . . 39
5.1 Hifi amplifier . . . . . . . . . . . . . . . . . . . . . . . . . . . . . . . . . . . . . . . . . 39
5.1.1 Analog . . . . . . . . . . . . . . . . . . . . . . . . . . . . . . . . . . . . . . . . . . . . . 39
5.1.2 Digital . . . . . . . . . . . . . . . . . . . . . . . . . . . . . . . . . . . . . . . . . . . . . 39
5.2 RS 232 serial interface . . . . . . . . . . . . . . . . . . . . . . . . . . . . . . . . 40
5.3 Ethernet . . . . . . . . . . . . . . . . . . . . . . . . . . . . . . . . . . . . . . . . . . . 40
6. Disposal notes . . . . . . . . . . . . . . . . . . . . . . . . . . . . . . . . . . . . . . 40
7. Important notes on operation . . . . . . . . . . . . . . . . . . . . . . . . . . 40
8. Main menu . . . . . . . . . . . . . . . . . . . . . . . . . . . . . . . . . . . . . . . . . 41
8.1 Info menu . . . . . . . . . . . . . . . . . . . . . . . . . . . . . . . . . . . . . . . . . . 42
8.2 Set-up menu . . . . . . . . . . . . . . . . . . . . . . . . . . . . . . . . . . . . . . . . 42
8.2.1 Channels . . . . . . . . . . . . . . . . . . . . . . . . . . . . . . . . . . . . . . . . . . . 43
8.2.2 Network . . . . . . . . . . . . . . . . . . . . . . . . . . . . . . . . . . . . . . . . . . . . 43-44
8.2.3 OSD . . . . . . . . . . . . . . . . . . . . . . . . . . . . . . . . . . . . . . . . . . . . . . . 44
8.2.4 LCD . . . . . . . . . . . . . . . . . . . . . . . . . . . . . . . . . . . . . . . . . . . . . . . . 45
8.2.5 Remote control . . . . . . . . . . . . . . . . . . . . . . . . . . . . . . . . . . . . . . 45
8.2.6 Video . . . . . . . . . . . . . . . . . . . . . . . . . . . . . . . . . . . . . . . . . . . . . . . 46
8.2.7 Skin . . . . . . . . . . . . . . . . . . . . . . . . . . . . . . . . . . . . . . . . . . . . . . . 46
8.2.8 Language . . . . . . . . . . . . . . . . . . . . . . . . . . . . . . . . . . . . . . . . . . 47
8.2.9 Common Interface . . . . . . . . . . . . . . . . . . . . . . . . . . . . . . . . . . . 47
8.2.10 EPG . . . . . . . . . . . . . . . . . . . . . . . . . . . . . . . . . . . . . . . . . . . . . . . 48
8.2.11 Timer . . . . . . . . . . . . . . . . . . . . . . . . . . . . . . . . . . . . . . . . . . . . . . . 48-49
8.2.12 Hard disk . . . . . . . . . . . . . . . . . . . . . . . . . . . . . . . . . . . . . . . . . . . 49
9. Infobar . . . . . . . . . . . . . . . . . . . . . . . . . . . . . . . . . . . . . . . . . . . . . 50
10. Channel list . . . . . . . . . . . . . . . . . . . . . . . . . . . . . . . . . . . . . . . . . 50-51
11. Standby, Power down Dreambox and Reset . . . . . . . . . . . . . . 51
12. Set up “TV control mode” . . . . . . . . . . . . . . . . . . . . . . . . . . . . . 52
3. Contents
ENGLISH
2.1 Front view
34
2. Ansichten
2.2 Rear view
Notes . . . . . . . . . . . . . . . . . . . . . . . . . . . . . . . . . . . . . . . . . . . . . . . . . . . 53
Warranty card . . . . . . . . . . . . . . . . . . . . . . . . . . . . . . . . . . . . . . . . . . . . . 74
HDD installation card . . . . . . . . . . . . . . . . . . . . . . . . . . . . . . . . . . . . . . . 75
3. Contents
35

4. Safety instructions
4. Safety instructions
4. Safety instructions
For your protection, please read the safety instructions thoroughly before
starting to use your DM 7000. The manufacturer accepts no responsibility for
damage which occurs as a result of incorrect handling or from failure to
observe the safety instructions.
• The unit must be positioned such that it is sufficiently ventilated.
• The cover of the unit must not be covered, and there must be sufficient
distance from other equipment. The ventilation ports of the unit must
always remain unobstructed, so that the warm air can be carried away
from the interior of the unit.
• Do not place any vases or other containers with fluids in them on the unit.
Water must not be allowed to drip or to spray onto the unit.
• No burning objects, such as candles or oil lamps, may be placed on the
unit.
• The unit must only be operated in moderate climactic conditions.
• Never open the unit yourself! There is a risk of electric shocks.
Should it become necessary to open the unit, this must be carried out by
qualified personnel.
WARNING!
Conversion or modification of the unit leads to loss of
warranty if not carried out by a specialist dealer and
certified in writing.
WARNING!
We recommend that the hard disk be installed by the
specialised dealer. An incorrect installation of the hard
disk results in you losing all of your rights under the
guarantee.
ENGLISH
4.1 Periods of non-use
• If the unit is not operated for longer periods of time, it should be
completely disconnected from the mains power supply.
• The unit should also be disconnected from the mains supply during
electrical storms.
4.2 Additional safety precautions
• Connection to the external device (LNB)
Remove the power cable of the DM 7000 from the mains socket before
you connect or remove the cable of the LNB.
36
• Never introduce foreign metal objects into the slots or the ventilation
ports.
• Installation or exchange of a hard disk drive may only be carried out by
qualified personnel, or a dealer trained for the purpose.
4. Safety instructions
• Connection to the television
Remove the power cable of the DM 7000 from the mains socket before
you connect the SCART cable to your television.
• The unit must immediately be disconnected from the mains power supply
if the power cable or socket show any signs of damage.
• The unit must immediately be disconnected from the mains power supply
if it is exposed to dampness or if dampness penetrates it.
• The unit must immediately be disconnected from the mains power supply
if substantial external damage is discovered.
4. Safety instructions
37

4. Safety instructions
5. Getting started
5. General notes
Do not expose your Dreambox to direct sunlight, lightning or rain.
Earthing: the LNIB cable must be earthed.
The earthing system must conform to SABS 061.
Cleaning: remove the power cable of the Dreambox from the mains socket
before you clean the Dreambox. Use a slightly damp cloth without cleaning
agents.
Connect your Dreambox only to sockets which are intended for the purpose.
Do not allow the unit to become overloaded.
General:
Environmental temperature +15°C ... +35°C
Atmospheric humidity < 80%
Dimensions (W x D x H): 374 mm x 230 mm x 63 mm
Weight: 1.8 kg without HDD
Check that everything has been delivered. You should have received the
following:
1 receiver
1 power cable
1 remote control
1 Instruction Manual
1 guarantee card
2 batteries (1.5V microcell)
Optionally available:
2 hard disk installation frames
1 IDE cable
1 power cable for the hard disk
1 infrared keyboard
-Check the battery polarity carefully and install the batteries supplied in the
battery compartment of the remote control.
- Before you connect the receiver, please read the safety instructions under
point 2.
- Connect the external device (Spiegel, LNB) with an F plug to the LNB input
on the receiver.
- Connect the receiver with a Scart cable to your television (Scart socket
TV), and to a video recorder or DVD player (Scart socket VCR).
- Plug the mains cable into the receiver and then into a suitable power
socket 230V / 50Hz.
ENGLISH
38
4. Safety instructions
5.1 Hifi amplifier
5.1.1 Analog
To connect your Dreambox to a hifi amplifier, please use a suitable phono
cable Connect this to the receiver at AUDIO R/L and to a free input (e.g. AUX
or CD) on your hifi amplifier.
5.1.2 Digital
If your amplifier has a suitable optical input, connect the DIGITAL AUDIO
socket on the receiver to the optical input of the amplifier with an optical
cable. Sampling frequencies of 16, 22.05, 24, 32, 44.1 and 48 kHz are available. This output also provides the Dolby Digital-Signal (AC3) when this is
broadcast.
5. Getting started
39

5. Getting started, 6. Disposal notes, 7. Operating notes
8. Main menu
5.2 RS 232 serial interface
The RS 232 interface is used to update the operating software and for preprogramming with a PC.
5.3 Ethernet
The Ethernet interface can be used to update the operating software and for
pre-programming with a PC.
6. Disposal notes
The packaging of the DM 7000 consists exclusively of recyclable materials.
Please dispose of these appropriately.
Take care that dead batteries from the remote control and electronic scrap
are not disposed of in ordinary rubbish, but are properly disposed of (return
to the specialist dealer, or special waste disposal).
7. Important notes on operation
The operation of the Dreambox is greatly simplified with an OSD (On Screen
Display). All available options are displayed over 4 coloured dots (red, green,
yellow, blue) and can be activated with the remote control.
The options change depending on the menu, and are labelled appropriately in
each menu.
8. Main menu
This OSD (On Screen Display) is used to navigate to the individual submenus.
TIMER - mode
Switches to file mode.
SCART - menu
Switches the Scart between video input and output.
TV - mode
Switches to TV mode.
RADIO - mode
Switches to radio mode.
ENGLISH
40
You can leave all menus and channel lists with the LAME! key.
5. Getting started, 6. Disposal notes, 7. Operating notes
FILE - mode
Switches to file mode.
INFO - menu
Switches to the Info menu.
POWER OFF - mode
Puts the Dreambox into deep standby.
SET-UP - menu
Switches to the Set-up menu.
41

8. Main menu
8.1 Info-menu
8. Main menu
Streaminfo:
8.2 Set-up-menu
8.2.1 Channels:
This allows you to set up the satellites and the channel search.
The satellite menu allows you to add and edit satellites.
Add a satellite with “new”, or edit the selections displayed.
Leave the menu with “close” or with “LAME!”
Brauche hierfür
noch Bild
in ENGLISCH
ENGLISH
42
8.2.2 Network
This shows the set-up for your network.
IP: Enter the IP address of your Box here (e.g. 192.168.0.5).
Network mask: (e.g. 255.255.255.0).
8. Main menu 8. Main menu
43

8. Main menu
8. Main menu
Name server: Enter a name server here.
Gateway: Enter the standard gateway here (e.g. 192.168.0.1).
After entering your set-up, save your settings with “save”, or „abort“.
8.2.3 OSD
This allows you to configure the OSD (On Screen Display).
Transp.: Select the transparency of your OSD.
Brightness: adjust the brightness of your OSD.
Contrast: adjust the contrast of your OSD.
8.2.4 LCD
This allows you to set up the display of the Dreambox.
ENGLISH
You can adjust brightness, contrast and stand-by brightness.
After entering your set-up, save your settings with “save”, or „abort“.
8.2.5 Remote control
This allows you to configure your remote control.
44
After entering your set-up, save your settings with “save”, or „abort“.
8. Main menu
You can adjust the repeat rate and the delay rate.
After entering your set-up, save your settings with “save”, or „abort“.
8. Main menu
45

8. Main menu
8. Main menu
8.2.6 Video
This allows you to configure your video set-up.
Colour format: Choose between RGB, SVideo and FBAS.
Aspect ratio: Choose between 4:3 letterbox, 4:3 panscan or 16:9 (PIN8).
After entering your set-up, save your settings with “save”, or „abort“.
8.2.7 Skin
This allows you to choose between different OSD skins.
8.2.8 Language
This allows you to choose the language for the OSD.
Brauche hierfür
noch Bild
in ENGLISCH
ENGLISH
Language: select the language for the OSD.
After entering your set-up, save your settings with “save”, or „abort“.
A new language becomes active the next time you reboot.
8.2.9 Common Inerface
46
After entering your set-up, save your settings with “save”, or „abort“.
A new skin becomes active the next time you reboot.
8. Main menu
Reset: this allows you to reset the Common Interface .
Init: this allows you to re-initialise the Common Interface.
8. Main menu
47

8. Main menu
8. Main menu
8.2.10 EPG
The red selection key on the remote control takes you into the EPG lists.
With “OK”, you can see further information on programmes.
With the green selection key, you can add a programme to your recording list.
8.2.11 Timer
This allows you to set up your recording list.
8.2.12 Hard disk
This allows you to configure your installed hard disk.
ENGLISH
First select the hard disk found and press “OK” to view information about the
disk, or to re-format the disk.
48
Enter the channels manually with the record options, or edit your recording
list. You can also delete recording options from the EPG list here with
“remove”.
8. Main menu
The next menu shows you:
Model: the hard disk found.
Capacity: this displays the capacity of the hard disk connected.
Connected: port master or slave.
Status: this shows the status of your hard disk.
To configure a new hard disk or to delete all data from the disk, please select
“format”, otherwise select “close”.
8. Main menu
49

9. Infobar, 10. Channel list
9. Infobar
10. Channel list, 11. Standby, power down Dreambox, reset
Channel number
10. Channel list
Channel name
Current time
EPG available
(red)
(green)
Current programme Total running time
Time elapsed Next programme
Videotext
(blue) 16:9 / 4:3
Audio
(yellow)
Encoded Dolby DigitalChannel options
In the channel list you can select from the different representations of the
channel list with the “Dream” key:
• simple channel list
• three-column channel list
• channel list with bouquet list
Select a channel and press “OK”.
The yellow selection key allows you to switch between the left and right windows.
With the red selection key, you can enter the channel into your list of
favourites, or add it to the playlist.
The blue selection key takes you to the favourites menu.
11. Standby, Power down Dreambox and Reset
To put your Dreambox into standby mode, briefly press the power key on
your remote control once.
To put your Dreambox into deep standby, go to the main menu, select the
“power down” option, and confirm this with the “OK” key.
All settings are now stored and the Box goes into deep standby, or press the
power key on the remote control for 5 seconds.
ENGLISH
50
9. Infobar, 10. Channel list
For a reset, press all 3 buttons on the Dreambox at the same time.
10. Channel list, 11. Standby, power down Dreambox, reset
51

12. Set up “TV control mode”
12. Set up “TV control mode”
A four-digit TV device code is selected from the TV model list in the table in
Chapter 13 (pages 23 - 32) and entered.
TV mode -> <<Set-up>> -> number -> number -> number -> number
<<Set-up>>
TV mode
Numeric keypad
Programming sequence:
1. Briefly press the TV key once.
2. Press the SHIFT/Set-up key for 3 seconds. The TV key should blink twice.
Notes
ENGLISH
52
3. Enter the TV code with the numeric keypad on the remote control.
Each number input is acknowledged by the TV key blinking once.
After the fourth digit has been input, a valid code is acknowledged by the
TV key blinking twice.
4. The remote control now automatically leaves programming mode.
5. If no code is input for 10 seconds, the remote control automatically leaves
programming mode.
12. Set up “TV control mode” Notes
53

2. Vues
AfficheurDiodes Emission/Réception
Alimentation marche / arrêt
Chaîne +/-Lecteur de carte à puceCompact FlashEmplacement PCMCIA
Port USB LNB in
Ethernet
AC3 audio out
Raccord TV
RS 232 LNB out
Mini DIN
analogique
Sortie Audio
Magnétoscope
230 V / 50 HZ
Branchement au secteur
3. Sommaire
Chapitre Page
1. Télécommande . . . . . . . . . . . . . . . . . . . . . . . . . . . . . . . . . . . . . . 3
13. Liste d'appareils TV . . . . . . . . . . . . . . . . . . . . . . . . . . . . . . . . . . 23-32
2. Vues . . . . . . . . . . . . . . . . . . . . . . . . . . . . . . . . . . . . . . . . . . . . . . . 54
2.1 Vue avant . . . . . . . . . . . . . . . . . . . . . . . . . . . . . . . . . . . . . . . . . . . 54
2.2 Vue arrière . . . . . . . . . . . . . . . . . . . . . . . . . . . . . . . . . . . . . . . . . . . 54
3. Sommaire . . . . . . . . . . . . . . . . . . . . . . . . . . . . . . . . . . . . . . . . . . . 55
4. Consignes de sécurité . . . . . . . . . . . . . . . . . . . . . . . . . . . . . . . . 56
4.1 Arrêts de fonctionnement . . . . . . . . . . . . . . . . . . . . . . . . . . . . . . 57
4.2 Consignes de sécurité supplémentaires . . . . . . . . . . . . . . . . . . . 57-58
5. Mise en service . . . . . . . . . . . . . . . . . . . . . . . . . . . . . . . . . . . . . . 59
5.1 Amplificateur hi-fi . . . . . . . . . . . . . . . . . . . . . . . . . . . . . . . . . . . . . 59
5.1.1 Analogique . . . . . . . . . . . . . . . . . . . . . . . . . . . . . . . . . . . . . . . . . . 59
5.1.2 Numérique . . . . . . . . . . . . . . . . . . . . . . . . . . . . . . . . . . . . . . . . . . 59
5.2 Interface série RS 232 . . . . . . . . . . . . . . . . . . . . . . . . . . . . . . . . . 60
5.3 Ethernet . . . . . . . . . . . . . . . . . . . . . . . . . . . . . . . . . . . . . . . . . . . 60
6. Recyclage . . . . . . . . . . . . . . . . . . . . . . . . . . . . . . . . . . . . . . . . . . . 60
7. Consignes d'utilisation importantes . . . . . . . . . . . . . . . . . . . . . 60
8. Menu principal . . . . . . . . . . . . . . . . . . . . . . . . . . . . . . . . . . . . . . 61
8.1 Menu Info . . . . . . . . . . . . . . . . . . . . . . . . . . . . . . . . . . . . . . . . . . . 62
8.2 Menu Configuration . . . . . . . . . . . . . . . . . . . . . . . . . . . . . . . . . . 62
8.2.1 Chaînes . . . . . . . . . . . . . . . . . . . . . . . . . . . . . . . . . . . . . . . . . . . . 63
8.2.2 Réseau . . . . . . . . . . . . . . . . . . . . . . . . . . . . . . . . . . . . . . . . . . . . . 63-64
8.2.3 Affichage sur écran . . . . . . . . . . . . . . . . . . . . . . . . . . . . . . . . . . . 64
8.2.4 Afficheur à cristaux liquides (ACL) . . . . . . . . . . . . . . . . . . . . . . . 65
8.2.5 Télécommande . . . . . . . . . . . . . . . . . . . . . . . . . . . . . . . . . . . . . . 65
8.2.6 Vidéo . . . . . . . . . . . . . . . . . . . . . . . . . . . . . . . . . . . . . . . . . . . . . . . 66
8.2.7 Habillage . . . . . . . . . . . . . . . . . . . . . . . . . . . . . . . . . . . . . . . . . . . 66
8.2.8 Langue . . . . . . . . . . . . . . . . . . . . . . . . . . . . . . . . . . . . . . . . . . . . . 67
8.2.9 Common Interface . . . . . . . . . . . . . . . . . . . . . . . . . . . . . . . . . . . 67
8.2.10 Programme électronique (EPG) . . . . . . . . . . . . . . . . . . . . . . . . . 68
8.2.11 Minuterie . . . . . . . . . . . . . . . . . . . . . . . . . . . . . . . . . . . . . . . . . . . . 68-69
8.2.12 Disque dur . . . . . . . . . . . . . . . . . . . . . . . . . . . . . . . . . . . . . . . . . . 69
9. Barre de renseignements . . . . . . . . . . . . . . . . . . . . . . . . . . . . . 70
10. Liste de chaînes . . . . . . . . . . . . . . . . . . . . . . . . . . . . . . . . . . . . . 70-71
11. Veille, éteindre la Dreambox, et réinitialisation . . . . . . . . . . . . 71
12. Configuration „Mode commande TV“ . . . . . . . . . . . . . . . . . . . . 72
3. Sommaire
FRANÇAIS
54
Notices . . . . . . . . . . . . . . . . . . . . . . . . . . . . . . . . . . . . . . . . . . . . . . . . . . 73
2.1 Vue avant
2. Vues 3. Sommaire
2.2 Vue arrière
Carte de garantie . . . . . . . . . . . . . . . . . . . . . . . . . . . . . . . . . . . . . . . . . . 74
Carte de montage HDD . . . . . . . . . . . . . . . . . . . . . . . . . . . . . . . . . . . . . 75
55

4. Consignes de sécurité
4. Consignes de sécurité
4. Consignes de sécurité
Avant la mise en service de votre DM 7000, veuillez lire attentivement les consignes de sécurité. Le fabricant décline toute responsabilité pour les dommages résultant d'une manipulation incorrecte ou du non-respect des précautions de sécurité prescrites.
• L'appareil doit être installé de telle sorte qu'il soit suffisamment ventilé.
• Le couvercle de l'appareil ne doit en aucun cas être recouvert et doit être
suffisamment éloigné d'autres appareils. Les grilles d'aération de l'appareil
doivent toujours être libres afin de garantir la dissipation de la chaleur qui
se forme à l'intérieur de l'appareil.
• Ne posez aucun vase ou tout autre récipient rempli de liquide sur
l'appareil. Veillez à ne pas exposer l'appareil à des gouttes ou à des jets
d'eau.
•Veillez à ne déposer aucun objet inflammable, tel que les bougies ou
lampes à huile, sur l'appareil.
•Veiller à utiliser l'appareil uniquement dans un climat modéré.
• N'ouvrez jamais l'appareil vous-même! Vous encourez le risque de choc
électrique. S'il s'avère indispensable d'ouvrir l'appareil, veuillez faire appel
à un personnel dûment qualifié.
ATTENTION!
Les transformations ou modifications de l'appareil
entraîneront la perte de la garantie si elles ne sont pas
effectuées et attestées par écrit par
un revendeur spécialisé.
ATTENTION!
Afin de ne pas perdre le bénéfice de la garantie en cas
de montage incorrect. Il est conseillé de confier le
montage d’un disque dur par un professionnel.
4.1 Arrêts de fonctionnement
• Si vous avez l'intention de ne pas utiliser l'appareil pendant une durée
prolongée, il est conseillé de le débrancher du secteur.
• Pendant une tempête, l'appareil devrait également être débranché du
secteur.
4.2 Consignes de sécurité supplémentaires
• Raccordement à la parabole (LNB): débranchez le câble d'alimentation de
la DM 7000 de la prise de secteur avant de brancher ou de débrancher le
câble du LNB.
FRANÇAIS
56
•N'introduisez jamais des objets métalliques étrangers quelconques dans
les tiroirs ou les grilles d'aération de l'appareil.
• L'installation ou la transformation d'un disque dur doit impérativement être
effectué(e) par un technicien qualifié ou un revendeur spécialisé formé à
cet effet.
4. Consignes de sécurité
• Raccordement au téléviseur: débranchez le câble d'alimentation de la
DM 7000 de la prise de secteur avant de brancher le câble péritel sur votre
téléviseur.
• Déconnectez immédiatement l'appareil du secteur si le câble
d'alimentation électrique ou la prise de courrant est endommagé.
• Déconnectez immédiatement l'appareil du secteur s'il a été exposé
à l'humidité ou si de l'humidité s'y est infiltrée.
• Déconnectez immédiatement l'appareil du secteur si vous constatez des
dommages extérieurs importants sur ce dernier.
4. Consignes de sécurité
57

4. Consignes de sécurité
5. Mise en service
5. Instructions générales
N'exposez pas votre Dreambox au rayonnement direct du soleil, aux éclairs
ou à la pluie.
Mise à la terre: le câble du LNB doit être mis à la terre.
Le système de mise à la terre doit être conforme à la norme SABS 061.
Nettoyage: Débrancher le câble d'alimentation de la Dreambox de la prise du
secteur avant de procéder au nettoyage de votre Dreambox. Utilisez à cet
effet un chiffon légèrement humide sans produit de nettoyage.
Branchez votre DM 7000 uniquement à des prises appropriées. Il ne doit alors
y avoir aucune surcharge.
GénéralitésÊ:
Te mpérature ambiante +15°C … +35°C
Humidité de l'air < 80%
Dimensions (l x p x h): 374 mm x 230 mm x 63 mm
Poids: 1,8 kg sans disque dur
Assurez-vous de l'intégralité de la livraison. Les composants suivants sont
fournis:
1 récepteur numérique DM 7000
1 câble de branchement au secteur
1 télécommande
1 mode d'emploi
1 carte de garantie
2 batteries (piles rondes type R6 1,5 V)
Egalement disponibles en option:
2 cadres de montage de disque dur
1 câble de raccordement IDE
1 câble d'alimentation électrique pour disque dur
1 clavier à transmission par infrarouges
- Introduisez les batteries fournies dans le compartiment à batteries de la
télécommande en veillant à ce que la polarité soit correcte.
-Avant de raccorder le récepteur, veuillez lire les consignes de sécurité
données au chapitre 2.
- Raccordez l'unité externe (antenne à réflecteur, LNB) à l'aide d'une fiche F
à l'entrée LNB du récepteur.
- Raccordez le récepteur à l'aide d'un câble péritel à votre téléviseur (prise
péritel du téléviseur) et, le cas échéant, à un magnétoscope ou lecteur de
DVD (prise péritel VCR).
- Branchez le câble de raccordement au secteur sur le récepteur, puis dans
une prise 230V / 50Hz appropriée.
FRANÇAIS
58
4. Consignes de sécurité
5.1 Amplificateur hi-fi
5.1.1 Analogique
Veuillez utiliser un CINCH approprié pour connecter votre Dreambox à votre
amplificateur hi-fi, puis raccordez-le à la prise AUDIO R/L du récepteur et à
une entrée libre (p. ex. AUX ou CD) de votre amplificateur hi-fi.
5.1.2 Numérique
Si votre amplificateur est équipé d'une entrée optique, veuillez raccorder la
prise DIGITAL AUDIO du récepteur à l'entrée optique de votre amplificateur à
l'aide d'un câble optique. Vous pouvez choisir parmi les vitesses de balayage
16, 22.05, 24, 32, 44.1 et 48 kHz. En outre, le signal Dolby Digital (AC3) sera
disponible à cette sortie s'il a été transmis. L'interface RS 232 s'utilise pour la
mise à jour du logiciel d'exploitation et la programmation à l'aide d'un PC.
5. Mise en service
59

5. Mise en service, 6. Recyclage, 7. Consignes d'utilisation
8. Menu principal
5.2 Interface série RS 232
L'interface RS 232 s'utilise pour la mise à jour du logiciel d'exploitation et la
programmation à l'aide d'un PC.
5.3 Ethernet
L'interface Ethernet s'utilise pour la mise à jour du logiciel d'exploitation et la
programmation à l'aide d'un PC.
6. Recyclage
L'emballage de la DM 7000 se constitue exclusivement de matériaux recyclables. Veuillez les trier en conséquence avant de les jeter.
Veillez à ce que les batteries déchargées de la télécommande et les ferrailles
électroniques ne soient pas mélangées aux déchets domestiques, mais plutôt
éliminées correctement et conformément aux règles en vigueur (reprise par le
commerce spécialisé, déchets spéciaux).
7. Consignes d'utilisation importantes
Un affichage sur écran (OSD - On-Screen Display) simplifie considérablement
la commande de la Dreambox. Toutes les options disponibles sont indiquées
par 4 points de couleur (rouge, vert, jaune, bleu) et peuvent être activées à
l'aide de la télécommande. Les options peuvent varier en fonction du menu et
seront désignées en conséquence dans chaque menu.
8. Menu principal
Cet affichage sur écran permet d'accéder aux différents sous-menus.
Menu Minuterie
Menu SCART (Péritel)
Commute la prise péritel sur entrée/sortie vidéo.
FRANÇAIS
Mode TV
Commute en mode TV.
Mode Radio
Commute en mode Radio.
60
Vous pouvez quitter tous les menus et toutes les listes de chaînes en appuyant sur la touche LAME!.
5. Mise en service, 6. Recyclage, 7. Consignes d'utilisation
Mode Fichier
Commute en mode Fichier.
Menu Info
Commute en mode Info.
Mode Désamorçage
Met la Dreambox en mode de veille profonde (deep stand-by)
Menu Configuration
Ouvre le menu de configuration.
61

8. Menu principal
8.1 Menu Info
8. Menu principal
Streaminfo:
8.2 Menu Configuration
8.2.1 Chaînes:
Vous trouverez ici les réglages des satellites et la syntonisation des chaînes.
Brauche hierfür
noch Bild
in ENGLISCH
FRANÇAIS
Le menu Satellite vous permet d'ajouter ou d'éditer un satellite.
Sélectionner „Nouveau“ pour ajouter un satellite,
sélectionnez l'option souhaitée pour l'éditer.
Pour quitter ce menu, sélectionnez „Fermer“, ou „LAME!“.
62
8.2.2 Réseau
Vous trouverez ici les paramètres de réglage pour votre réseau.
IP: indiquez ici l'adresse IP de votre DREAMBOX (p. ex. 192.168.0.5).
Masque de réseau: (p. ex. 255.255.255.0).
8. Menu principal 8. Menu principal
63

8. Menu principal
8. Menu principal
Name server: Enter a name server here.
Serveur DNS: indiquez ici un serveur de noms de domaine (serveur DNS).
Après avoir procédé à tous les réglages, les sauvegarder avec „Enregistrer“
(save), ou les annuler (abort).
8.2.3 Affichage sur écran (OSD)
Vous trouverez ici les paramètres de réglage pour l'affichage sur écran (OSD On-Screen Display).
8.2.4 Afficheur à cristaux liquides (ACL)
Vous trouverez ici les paramètres de réglage pour l'afficheur de la DREAMBOX.
Vous pouvez ajuster ici la luminosité, le contraste et la luminosité en veille.
Après avoir procédé à tous les réglages, les sauvegarder avec „Enregistrer“
(save), ou les annuler (abort).
8.2.5 Télécommande
Vous trouverez ici les paramètres de réglage pour votre télécommande.
FRANÇAIS
64
Transp.: sélectionnez ici la transparence de votre affichage sur écran.
Luminosité: ajustez ici la luminosité de votre affichage sur écran.
Contraste: ajustez ici le contraste de votre affichage sur écran.
Après avoir procédé à tous les réglages, les sauvegarder avec „Enregistrer“
(save), ou les annuler (abort).
8. Menu principal
Vous pouvez ajuster ici la fréquence de répétition et le temps de retardement.
Après avoir procédé à tous les réglages, les sauvegarder avec „Enregistrer“
(save), ou les annuler (abort).
8. Menu principal
65

8. Menu principal
8. Menu principal
8.2.6 Vidéo
Vous trouverez ici les paramètres de réglage pour votre configuration vidéo.
Format de couleur: sélectionnez RGB, SVideo ou FBAS.
Rapport de l'image: sélectionnez 4:3 letterbox, 4:3 panscan ou 16:9 (PIN8)
Après avoir procédé à tous les réglages, les sauvegarder avec „Enregistrer“
(save), ou les annuler (abort).
8.2.7 Habillage
Vous pouvez choisir ici entre divers habillages pour l'affichage sur écran.
8.2.8 Langue
Vous trouverez ici les paramètres de réglage pour la langue d'affichage sur
écran.
Brauche hierfür
noch Bild
in ENGLISCH
Langue: sélectionnez ici la langue d'affichage sur écran.
Après avoir procédé à tous les réglages, les sauvegarder avec „Enregistrer“
(save), ou les annuler (abort).
Une nouvelle langue ne sera effective qu'après le relancement du système!
FRANÇAIS
8.2.9 Common Inerface
66
Après avoir procédé à tous les réglages, les sauvegarder avec „Enregistrer“
(save), ou les annuler (abort).
Un nouvel habillage ne sera effectif qu'après avoir redémarré le système!
8. Menu principal
Réinitialisation: Vous pouvez réinitialiser ici le port PCMCIA.
Init: Vous pouvez initialiser ici le port PCMCIA.
8. Menu principal
67

8. Menu principal
8.2.10 Programme électronique (EPG) 8.2.12 Hard disk
Appuyez sur la touche de sélection rouge de la télécommande pour accéder
aux listes de programme électronique.
Vous avez alors, en appuyant sur la touche „OK“, la possibilité de visionner
des informations supplémentaires sur l'émission.
Vous pouvez également adopter l'émission dans votre liste d'enregistrements
en appuyant sur la touche de sélection verte.
8. Menu principal
Vous trouverez ici les paramètres de réglage pour le disque dur installé dans
votre système.
Sélectionnez tout d'abord le disque dur détecté, puis appuyez sur „OK“ afin
de visionner les informations sur le disque dur ou reformater le disque dur.
Dans le menu qui s'affiche alors, vous trouverez les informations suivantes:
FRANÇAIS
68
8.2.11 Minuterie
Vous trouverez ici les paramètres de réglage pour votre liste d'enregistrements.
Modèle: disque dur détecté
Capacité: la capacité du disque dur installé est indiquée ici.
Connecté: Port Master ou Slave.
Etat: l'état de votre disque dur est indiqué ici.
Sélectionnez „Format“ pour configurer un nouveau disque dur ou effacer
complètement un disque dur; sinon, sélectionnez „Fermer“ (format).
Inscrivez ici manuellement les chaînes avec les options d'enregistrement correspondantes, ou éditez votre liste d'enregistrements. Les options d'enregistrement du programme électronique peuvent également être effacées à
l'aide de „Effacer“ (remove).
8. Menu principal 8. Menu principal
69

9. Barre de renseignements, 10. Liste de chaînes
9. Barre de renseignements
10. Liste de chaînes, 11. Veille, éteindre la Dreambox, et réinitialisation
Numéro de chaîne
Heure actuelle
EPG disponible
10. Liste de chaînes
Nom de chaîne
(rouge)
(vert)
Emission actuelle Durée totale
Temps écoulé Prochaine émission
Télétexte
(bleu) 16:9 / 4:3
Audio
(jaune)
Programme
crypté
Dolby DigitalOptions Chaînes
Dans la liste de chaînes, vous pouvez utiliser la touche „Dream“ pour
sélectionner diverses représentations de la liste de chaînes:
• simple liste de chaînes
• liste de chaînes en trois colonnes
• liste de chaînes avec liste de bouquets
Sélectionnez une chaîne, puis appuyez sur la touche „OK“.
Vous pouvez alterner entre la fenêtre droite et gauche à l'aide de la touche de
sélection jaune.
La touche de sélection rouge vous permet d'adopter la chaîne dans votre
liste de favoris ou de l'ajouter à la liste de lecture.
La touche de sélection bleu vous permet d'accéder au menu Favoris.
11. Veille, éteindre la Dreambox, et réinitialisation
FRANÇAIS
Pour mettre votre Dreambox en mode de veille, appuyez une fois brièvement
sur le bouton Marche/Arrêt (Power) de votre télécommande.
Pour mettre votre Dreambox en mode de veille profond, ouvrez le menu
principal, puis sélectionnez l'option „Désamorcer“ et confirmez votre
sélection en appuyant sur la touche „OK“.
70
9. Barre de renseignements, 10. Liste de chaînes
To us les paramètres ajustés sont alors enregistrés, et la Box se met en mode
de veille profond, ou appuyez à cet effet pendant 5 s sur le bouton
Marche/Arrêt de votre télécommande.
Pour réinitialiser la Dreambox, appuyez simultanément sur toutes les 3
touches.
10. Liste de chaînes, 11. Veille, éteindre la Dreambox, et réinitialisation
71

12. Configuration „Mode commande TV“
12. Configuration „Mode commande TV“
Sélectionner un code d'appareils de TV à quatre chiffres dans la liste
d'appareils donnée au chapitre 13 (page 23 - 32) et l'entrer.
Mode TV -> <<SHIFT/Set-up>> -> Chiffre -> Chiffre -> Chiffre -> Chiffre
<<SHIFT/Set-up>>
Mode TV
Bloc numérique
Procédure de programmation:
Notices
72
1. Appuyer une fois brièvement sur la touche TV.
2. Appuyer pendant 3 s sur la touche SHIFT/Setup; la touche TV devrait
alors clignoter deux fois.
3. Entrer le Code TV à l'aide du bloc numérique de la télécommande.
Chaque chiffre entré est confirmé par un clignotement unique de la touche
TV.
Après avoir entré le quatrième chiffre, un code valide est confirmé par
double clignotement de la touche TV.
4. La télécommande quitte alors automatiquement le mode de
programmation.
5. Si aucun code n'est entré pendant 10 s, la télécommande quitte
automatiquement le mode de programmation.
12. Configuration „Mode commande TV“ Notices
FRANÇAIS
73

Garantieschein, Warranty card, Carte de garantie
WICHTIG!
Bei Reklamationen, Garantiefällen u.Ä. das Gerät bitte zu dem Händler schicken/geben, bei
dem es erworben wurde. NICHT AN DREAM MULTIMEDIA TV GMBH SCHICKEN!
Falls Ihre DREAMBOX mit einer HDD nachgerüstet wurde, legen Sie bitte unbedingt den
ausgefüllten und gestempelten EINBAUSCHEIN HDD dem GARANTIESCHEIN bei!
IMPORTANT!
In case of complaints or warranty claims, please return the unit to the dealer from whom it
was purchased. DO NOT RETURN IT TO DREAM MULTIMEDIA TV GMBH!
If your Dreambox has been equipped with a HDD, it is most important that you include the
HDD installation card, filled in and stamped, with the warranty card!
IMPORTANT!
En cas de réclamations, de revendication de prestations de garantie et autres semblables,
veuillez expédier/remettre l'appareil au revendeur chez qui vous l'avez acheté.
PRIERE DE NE PAS L'EXPEDIER A DREAM MULTIMEDIA TV GMBH!
Si votre DREAMBOX a été ultérieurement dotée d'un disque dur (HDD), veuillez impérative-
ment joindre la CARTE DE MONTAGE HDD remplie et cachetée à la CARTE DE GARANTIE!
Einbauschein HDD, HDD installation card, Carte de montage HDD
Gerätetyp / Device type / Type d'appareil:
Ser.-Nr. / Ser. No. / N° de série:
Service Bericht / Service Report / Rapport de maintenance:
Einbaudatum / Installation date / Date de montage:
Gerätetyp / Device type / Type d'appareil:
Ser.-Nr. / Ser. No. / N° de série:
Service Bericht / Service Report / Rapport de maintenance:
Adresse des Endkunden / Address of customer / Adresse du client final:
Name / Name / Nom:
Straße / Street / Rue:
PLZ / Postcode / Code postal: Ort / Town / Ville:
Land / Country / Pays:
Adresse des Händlers / Address of dealer / Adresse du revendeur:
Name / Name / Nom:
Straße / Street / Rue:
PLZ / Postcode / Code postal: Ort / Town / Ville:
Festplattentyp / Hard disk type / Type de disque dur:
Neue Siegelnummer / New seal number / Nouveau numéro de sceau:
Sonstiges / Other / Divers:
Adresse des Endkunden / Address of customer / Adresse du client final:
Name / Name / Nom:
Straße / Street / Rue:
PLZ / Postcode / Code postal: Ort / Town / Ville:
Land / Country / Pays:
Adresse des Händlers / Address of dealer / Adresse du revendeur:
Name / Name / Nom:
Straße / Street / Rue:
PLZ / Postcode / Code postal: Ort / Town / Ville:
Land / Country / Pays:
Stempel / Stamp / Cachet: Kaufdatum / Date of purchase / Date d'achat:
Unterschrift / Signature:
Land / Country / Pays:
Stempel / Stamp / Cachet: Kaufdatum / Date of purchase / Date d'achat:
Unterschrift / Signature:

76

 Loading...