

Page 1
DRAWMER
CONTENTS
Warranty
Safety Consideration
Radio Frequencies Statement
. . . . . . . . . . . . . . . . . . . . . . . . . . . 3
. . . . . . . . . . . . . . . . . . 3
. . . . . . . . . . . 3
Chapter 1 - Introduction
Introduction
Ins talla tion
Power Con nection
Portable Applinace Testing
Audio Connection
Typical Con nection Guide
Chapter 2 - Control Description
Contol Description Intro
MC2.1 Controls
Monitor Calibra tion
Mix Checking Tips
Chapter 3 - General Information
If a fault develops
Contacting Drawmer
Specification
Block Diagram
. . . . . . . . . . . . . . . . . . . . . . . . 4
. . . . . . . . . . . . . . . . . . . . . . . . . 6
. . . . . . . . . . . . . . . . . . . . . 7
. . . . . . . . . . . . . . . 7
. . . . . . . . . . . . . . . . . . . . . 8
. . . . . . . . . . . . . . . . 9
. . . . . . . . . . . . . . . . 10
. . . . . . . . . . . . . . . . . . . . . . 11
. . . . . . . . . . . . . . . . . . . 16
. . . . . . . . . . . . . . . . . . . 20
. . . . . . . . . . . . . . . . . . . . 23
. . . . . . . . . . . . . . . . .23
. . . . . . . . . . . . . . . . . . . . . . . 23
. . . . . . . . . . . . . . . . . . . . . . 24
Page 2

DRAWMER
2
Page 3
Thi s m a nual is c op yri gh ted © 20 13 by Drawmer El ec t r on ic s Ltd. W ith all r i g hts rese rved. Un der copyright
laws, no part of t hi s public ation may b e reproduce d, transmitted, stored in a retrieval syste m or translated
into any language in any form by any means, mechanical, optical, electronic, recording, or otherwise,
witho ut th e w ri tte n p ermiss io n of Dr awm e r E le c tr oni c s Lt d.
ONE YEAR LIMITED WARRA NTY
COPYRIGHT
Drawmer Electr on ics Ltd. , warr ants the D ra wmer MC2 .1 Mon itor
Controller to conform substantially to the specifications of this
manual for a period of one y ear fr om the or iginal dat e of purcha se
when used in accordance with the specifications detailed in t his
manual. In the case of a valid warranty claim, your sole and exclusive
remedy and Drawmer’s entire liability under any theor y of liability will
be to, at Drawmer’s discretion, repair or replace the product without
charge, or, if not possible, to refund the purchase price to you. This
warranty is not transferable. It applies only to the original purchaser
of the product.
For warranty service please call your local Drawm er dealer.
Alternatively call Drawmer Electronics Ltd. at +44 (0)1709 527574.
Then ship the defective product, with transportation and insurance
charges pre -paid, to Dr awmer Electr onics Ltd., Cole man Street,
Parkgate, Rotherham, S62 6EL UK. Write the RA number in large
letters in a pr ominent position on the shipping bo x . Enclose y our
name, address, telephone number, copy of the original sales invoice
and a detailed description of the problem. Drawmer will not accept
responsib ility fo r loss or damage durin g tra nsit.
This warranty is void if the product has been damaged by misuse,
modification, unauthorised repair or installed with other equipment
that proved to be faulty.
THIS WARRANTY I S IN LI EU OF ALL WARRANTIES, WHETHER
ORAL O R WRIT TE N, EXPRES SED, I MPL I ED OR STA T U TO R Y .
DRAWMER MAKES NO OTHER WARRANTY EITHER
EXPRESS OR IMPLIED, INCLUDING, WITHOUT LIMITATION,
ANY IMPLIED WARRANTIES OF MERCHANT ABILIT Y, FI TN ESS
FOR A PARTICULAR PURPOSE, OR NON-INFRINGEMENT.
PURCHASER’S SOLE AND EXCLUSI VE REMEDY UNDER TH IS
WARRANTY SHALL BE REPAIR OR REPLACEMENT AS
SPECIFIED HEREI N.
IN NO EVENT W ILL DRAW MER ELECTRONICS LTD. BE LIABLE
FOR ANY DIRECT, INDIRECT, SPECIA L, INCIDENTAL OR
CONSEQUENTIAL DAMAGES RES ULTING FROM ANY
DEFECT IN THE PRODUCT, INCLUDING LOST PROFITS,
DAMAGE TO PRO PERT Y, AN D, T O T HE EXT ENT PERMIT T ED
BY LAW, DAMAGE FOR PERSONAL INJURY, EVEN IF
DRAWMER HAS BEEN ADVISED OF THE POSSIBILITY OF
SUCH DAM AGE S.
Some states and specific coun tries do no t allow the exclusion of
implied warranties or limitations on how long an implied warranty may
last, so the above limitations may not apply to y ou. T his warranty giv es
you specific legal rights. You may hav e additional rights that var y from
state to state, and country to country .
FEDERAL COMMUNICA TI ONS COMMISSION RADIO
FREQUENCY INTERFERENCE ST A TE MENT
This equipment has been tested and found to comply with the limits
for a Class B digital device, pursuant to Part 15 of the FCC Rules.
These limits are designed to provide reasonable protection against
harmful interfere nce in a residenti al installation. T his equipment
generates, uses and can radiate radio frequency energy and, if not
installed and used in accordance with the instructions, may cause
harmful interference to radio communications. However, there is no
guarantee that interference will not occur in a particular installation.
If this equipment does cause interference to radio or television
reception, which can be determined by turning the equipment off an
on, then the user is encouraged to try to correct the interference by
one or more of the following measures:
Re-orient or relocate the receiving antenna.
Increase the separation between the equipment and the receiver .
Connect the equipment into an outlet on a circuit different from that
to which the receiver is connected.
Consult the dealer or an exper ienced radio/TV technician for help.
Unauthorised changes or modification to this system can void the
users’ authority to operate this equipment.
This equipment requires shielded interface cables in order to meet
FCC class B limit .
CLASS B NOTICE
This digital apparatus does not exceed the Class B limits for radio
noise emissions set out in the Radio Interference Regulations of the
Canadian Department of Communications.
CLASSE B AVIS
Cet appareil numérique ne dépasse pas les limites de la classe B au
niveau des émissions de bruits radioélectriques fixés dans le
Règlement de s signaux pa rasite s par l e ministère Cana dien d es
Communications.
For the USA
For Canada
SAFETY CONSID ERA T
DO NO T O PEN. RE FER A LL SE RVICING TO QUALI FIED SER VICE PERSO NNE L.
TO REDU CE RISK OF FIRE/ELECTRIC SHOCK DO NOT EXPOS E THIS EQUIPMENT TO MOIST URE.
DO NOT A TTEMPT TO CHANGE OR TAMPER WITH THE SUPPLIED MAINS CABLES.
TO R EDU CE T H E R ISK O F FIRE REPL AC E T HE MAINS FUSE S ONLY WIT H A FUSE T H AT
CONFORMS TO IEC127-2 . 2 50 VO LT W OR KIN G, TIME DE LAY TYPE AND BO DY SIZE OF 2 0m m x
5mm . THE MAINS INPUT FUSE MUST BE RAT ED AT T31 5mA at 115V and T16 0mA at 315V.
CAUTION - SERVICING
WARNING
WARNING
WAR NING
IONS
In the interests of product development, Drawmer reserve the right to modify
or improve specifications of this product at any time, without prior notice.
MC2.1 - Monitor Controll er
3
Page 4
DRAWMER
CHAPT ER 1
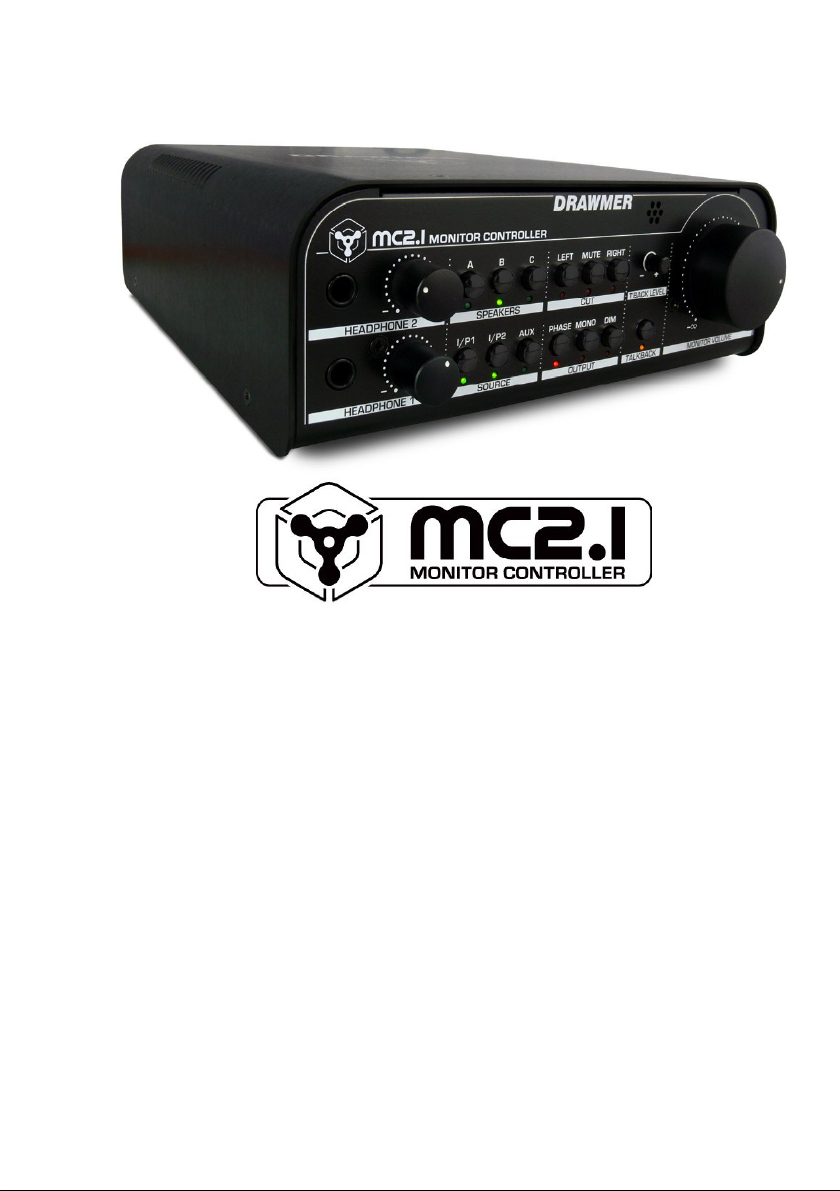
MC2.1 Monitor Controller
With the Drawmer MC2.1 Monitor Controller incorporated into your system you
combine the clarity, fidelity and transparency of th e highest quality monitoring circuit
with the complexity of a host of mix checking features. It is versatile and intuitive, but
above everything else, where the Drawm er MC2.1 excels is in it’s accuracy and
ability to faithfully reproduce what has been recorded.
The MC2.1 incorp orates fo ur inputs with three stereo balanced speaker outputs,
plus a dedicated mono speaker/sub-woofer output each with individual left/right
trims under the u nit to provide complete control over level matching. T he active
circuit has been designed to faithfully produce the audio signal whilst removing
many of the problems that a passive circuit will bring. In addition, it has a host of
mix checking features not often found on other controllers, such as individual left/
right c ut, as well as two separat e headphone amplifiers and a talkback fac ility,
making the MC2.1 a true engineers tool.
Drawmer MC2.1 Monitor Controller Features at a Glance:
Ultra low noise and transparent circuit design. Linear power supply with low
hum toro id al transformer and internal voltage selector switch.
3 stereo balanced speaker outputs, plus a dedicated mono speaker/sub-woofer
output. All have individual left & right trims under the unit to provide complete
control over level matching.
Timed relay protection on all speaker outputs to prevent p ower u p/down bangs.
Comprehensive mix checking facilities including Left/Rig ht Cut, Phase Reverse,
Mono, Dim, Mute.
Paralleled custom quad pots on main and headph one level controls for exc ellent
chann el matching and smooth feel.
Four inputs including balanced Neutrik XLR, balanced Neutrik XLR/JACK COMBI,
and shared aux p hono or 3.5mm jack.
Two headpho ne amplifiers with individ ual level co ntrols.
Built in talk back microphone with level control, mono output jack and internal
headphone routing.
Rugged steel chassis and stylish black brushed aluminium cover. Can be stacked
and is rack mountable (using a 2U mounting kit).
Dimension s: L 272mm x W 215mm x H 81mm. W eight: 2.5kg.
4
Page 5

Wh ether you’re m astering a cd/dvd, recording, checking a mix for balance and e.q,
doing A/B comparisons, plus a mu ltitude of other tasks, you’ll have spent weeks
designi ng the perfect studio envir onment and a fortune on acti ve speakers , dynamics
processors, various microphone and preamplifier combinations as well as a whole
room full oth er gear, one thing is for sure - a monitor controller is central to every
recording setup and probably the most important element of the entire signal
chain - providing the ‘reference’ listening signal that enables the user to achieve
the optimal mic placements, the perfect balance and EQ etc. There is one thing
that should always be abso lutely guaranteed - that you can rely on the accuracy of
your monitor controller.
It is imperative that what you’ve recorded is exactly what you hear - this is the
philosophy that is at the heart of the design of the MC2.1. A monitor controller
should certainly not degrade the quality of a recording in any way, but it should not
artificially improve it either, otherwise how are you supposed to trust anyth ing that
you’re recording. You may have come across the term WYSIWYG as used in web
design - ‘what you see is what you get’ - we would like to thin k that the MC2.1 is the
audio equivalent to this term - ‘What You R ecord Is W hat You Get’.
Active vs. Passive Circuits
Th ere is a great deb ate as to whic h is b est - a pass ive or act ive mon itor co ntr ol
circuit. The theory is that passive monitor controllers must be best, sinc e th ey
do not add transformers or other components to the signal p ath, along with the
noise a nd dis t ort i on tha t t hey ca n br ing, howe ver they hav e severe dis advantages
over active circuits. The most significant is that the output impedance of the
connected source equipment and the input impedance of the power amp or
active speaker will affect th e working s of the passive c ontroller - each needs
buffering to remain r eliable and consistent, otherwise level matching problems
will be inevitable. Since even the best cables have capacitance, it is extremely
important to keep cable lengths to an ab solute min imum (i.e. less than a couple
of meters) to avoid signal degradation especially in high frequency signals.
Lo ng c able s will a ct lik e a sim ple lo w fr equ ency f ilter.
Furthermore, it is incredibly difficult to get a m ono sig nal from a passive circuit
without affecting the sound so any kind of reliable mix checking becomes near
imp os sib le.
Active designs make it easier and more reliable to guarantee a high performance
level as the signal attenuation and switching is actively buffered, as well as
providing complete control over distortions, crosstalk, frequency response, and
transient fidelity. Moreover, cable lengths of tens of meters should not be an
issue. Fu rthermore, it makes it possible to introduce mix checking features th at
would otherwise be missing. The disadvantage with active monitor con trollers
is that the electronics have the potential to introduce noise and distortion.
Designing a clean monitor control system is far from simple, however, using
only the very best components and clever circuit design, with the Drawmer
MC2.1 we have overcome all of these problems and managed to combine the
best of both - whilst retaining the transparency and responsiveness that a
passive circuit would bring with the advantages of an active one.
MC2.1 - Monitor Controll er
5
Page 6
DRAWMER
INSTALLATION
The MC2.1 is a free standing, desktop unit, with c ontrols and headphone jacks on
the front panel and all other inputs and outputs on the rear. Multiple units can be
stacked whilst sitting on the desk, however, the MC2.1 c an be screwed to the desk
or into a stand ard 19” rack (using a 2U mounting kit).
Note that whether fixing to a desk or to a rack the speaker trims on the base of the
unit will not be accessible and so the calibration procedure should be carried out
before fastenin g the MC2.1 in plac e (see ‘Monitor Calibration’).
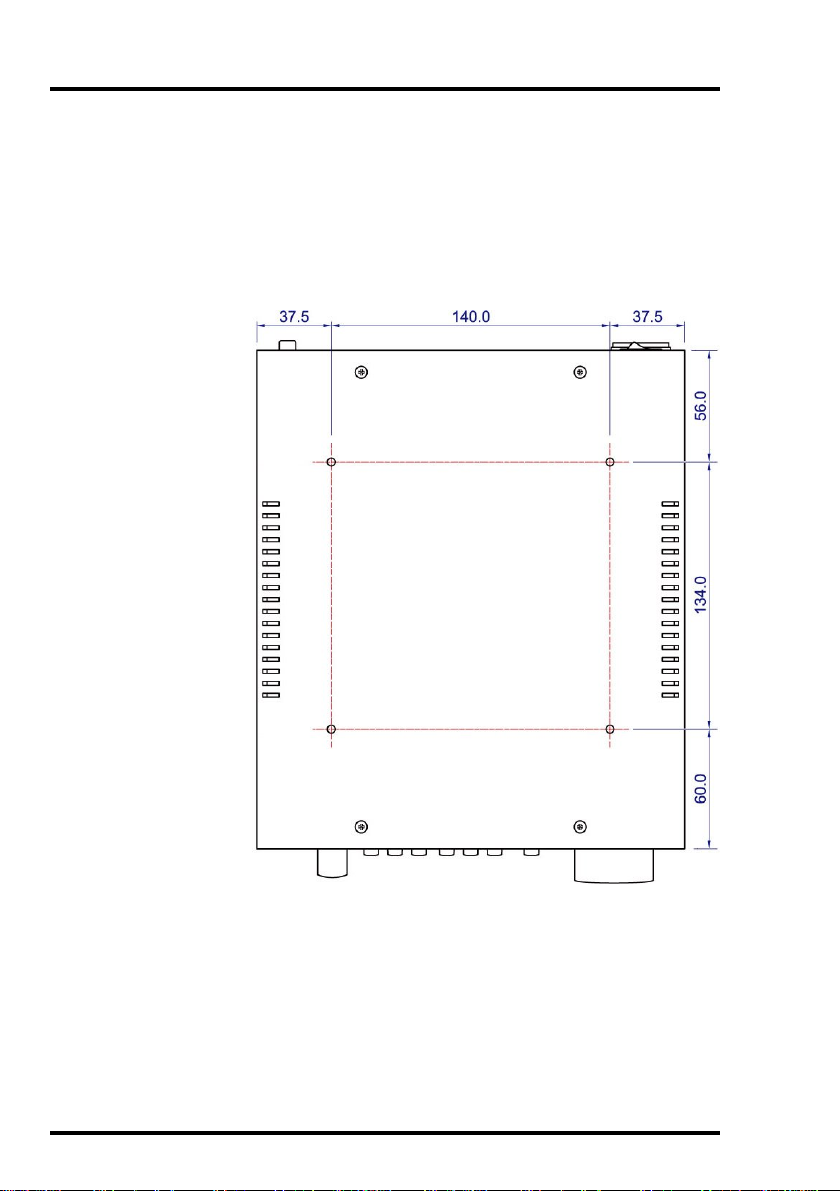
Screwing the MC2.1 to
a desk.
Rather than having the
MC2.1 free standing it
can be fastened down to
a desk by utilising the
holes that hold the
rubber feet to the
underside.
Drill four holes into the
desk, at 4mm in
diameter and to the
dimensions as sh own in
the diagram. (Note th at
the diagram is viewed
fro m above).
Pushing four screws
through the under-side
of the desk screw the
MC2.1, including the
rubber feet, to the panel
to secure. The screws
should be M3 and have
a length of 14mm plus
the thickness of the panel.
6
Page 7

The MC2.1 unit will be sup plied with a power c ab le suitable for domestic power
POWER CONNECTION
outlets in your country. For your own safety, it is important that you use this cable to
connect to the mains supply earth. The cable must not be tampered with or modified.
The power supply socket has an integral fuse drawer containing the power fuse of
the same value, to suit the mains voltage for which the unit has been supplied.
Removal of the drawer is only possible with the power cord removed. The fuse
should never blow under normal operation. If the fuse is suspected of having blown,
then a fault will have occurred and this fault condition should be inspected by a
qualified service engineer. When replacing the fuse, always comply with the Safety
Instructions.
If the unit is to be used with a mains input operating voltage different to that for which
the unit is supplied, the following procedure must be carried out b y a techn ically
competent p erson :
1: Disconnect the unit from the mains.
2: Using a number 1 size pozidrive screwdriver, remove the eig ht screws that
retain the top cover. Two screws are found along each side and four on the top.
3: W ith the cover removed slide the voltage change-over switch (S14) until the
correct (or nearest) mains input voltage is visible on the switch actuator. The
switch is located to the top right of the main circuit board between the mains
I.E.C. and toroidal transformer.
For conversion to 115V olt AC
(previously set to 230V olt AC).....
4a: Exchange the 160mA fuse below the mains
socket for a similar type rated at 315mA
For conversion to 230Volt AC
(previously set to 115V olt AC).....
4b: Exchange the 315mA fuse below the mains
socket for a similar type rated at 160mA
In all cases:
5: Repla ce the top cover usi ng the eight scr ews.
6: Re-connect to mains power source.
PORTABLE APPLIANCE TESTING
To undergo a Portable Appliance Testing proceedure (commonly known as "PAT",
"PAT Inspection" or "PAT Testing") use any one of the screws that hold the feet to the
bottom of the unit. These screws connect directly to the chassis and provide the
earthing point. If required, the foot can be removed and the cavity probed, or the
screw can be replaced for something more suited to the job, such as a spade
terminal with a M3 thread.
MC2.1 - Monitor Controll er
7
Page 8
DRAWMER
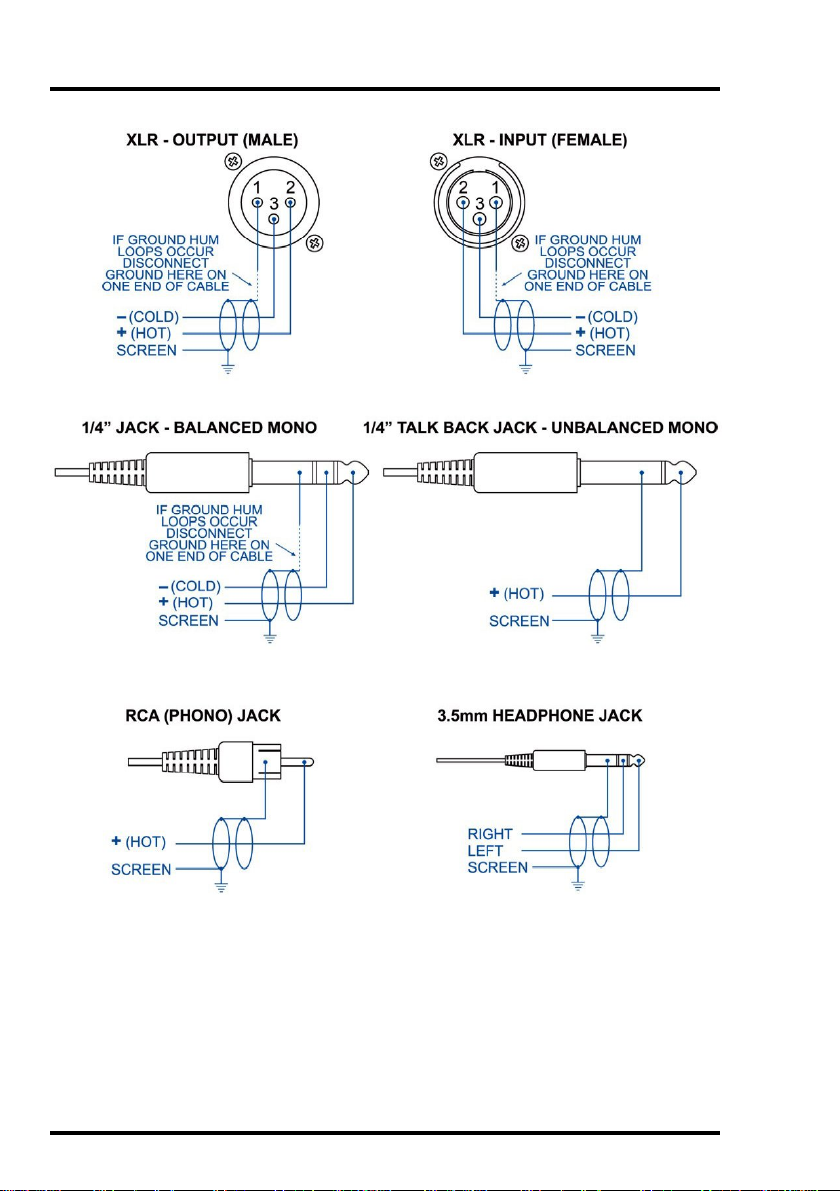
AUDIO CONNECTIONS
• Interference:
If the unit is to be used where it maybe exposed to high levels of disturbance
such as found close to a TV or radio transmitter, we advise that the unit is
operated in a balanced c onfiguratio n. The screens of the signal cables should
be connected to the chassis connection on the XLR connector as opposed to
connecting to pin1. The MC2.1 conforms to the EMC standards.
• Ground Loops:
If ground loop problems are encountered, never disconnect the mains earth,
but instead, try disconnecting the signal screen on one end of each of the
cables connectin g the o utputs of the MC2.1 to the patchbay. If such measures
are necessary, balanced op eration is recommend ed.
8
Page 9

TYPICAL CONNECTION GUIDE
MC2.1 - Monitor Controll er
9
Page 10

DRAWMER
CHAPT ER 2
CONTROL DESCRIPTION
As well as a transparent and precise signal path the MC2.1 Monitor Controller
incorporates many impressive features which are invaluable to the sound engineer
when listening to and examining the quality of the audio:
Three stereo balanced speaker outputs, plus mono speaker/sub-woofer output.
with individual level control for level matching.
Comp rehensive mix check ing facilities.
Four simultaneously selectable inputs.
Two headpho ne amplifiers with individ ual level co ntrols.
Built in talk back microphone with level control, mon o output jack and internal
headphone routing.
10
Page 11

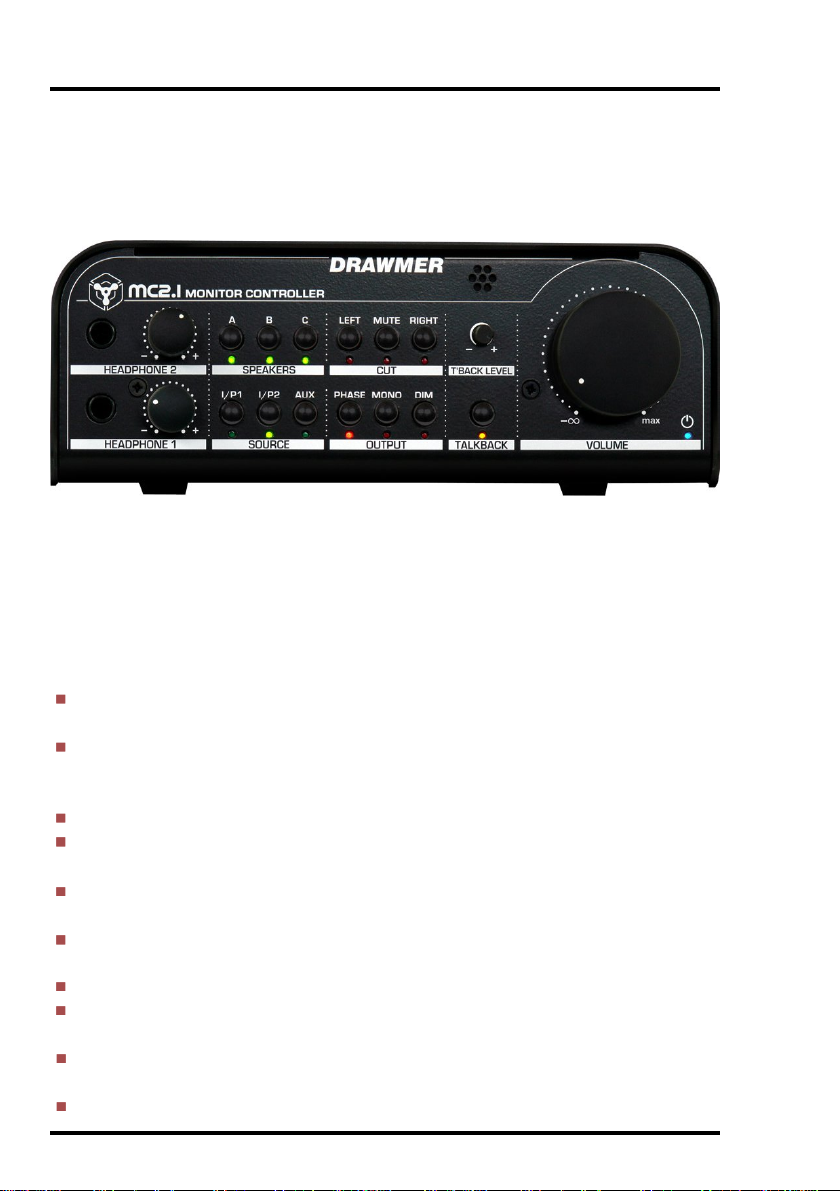
The MC2.1 Controls
1
SOURCE
Three switches select which of I/P1, I/P2 and AUX is heard (see ). Each can be
operated individually or simultaneously and in any combination. When operated
simultaneously the individual signals are summed into a single stereo signal.
Note that the MC2.1 does not provide in dividual level trims for the inputs and so any
level matching should be applied before it reaches the MC2.1.
2
SPEAKERS
Three switches select which of the three speaker outputs A (plus additional mono
output), B or C are heard (see ).
Each switch can be operated individu ally or simultan eously and in any combination
and is perfect for performing A/B comparisons b etween various mo nitor setups. As
the switches do not toggle between outputs when doing A/B comparisons both of
those switches s hould be pressed at the same time i.e. to compare speakers A
and C, with A active press both the A and C switc hes to swap the output to C active,
and then again to r eturn to the previous setting - this method can be used between
all three outputs if required.
An additional benefit is derived when using a sub-bass. If the sub-bass is attached
to output A, delivering the lower frequencies, outputs B and C could deliver the
higher frequencies and allow for A/B (or in this c ase B+Sub/C+Sub ) comparisons
between the two monitor setups by pressing the B and C switches simultaneously
and leaving A always active.
Note that each speaker output has individual level trimming on the base of the unit
so that precise monitor level matching can be achieved - see sections &
and also the ‘Monitor Calibration’ section.
9
8
9
12
3
MIX CHECKI NG
The mix checking section comes under two headings, Cut and Output, an d wh en
used in conjunction with each other is a very thorough and versatile checking tool.
Under the Output heading three switches have been incorporated provid ing Phase
Reverse, Mono and Dim.
Phase Reverse : Inverts the polarity of the signal on the Left Channel and is used
primarily to outlin e any phase problems that may be occurring in the mix/recording
such as phase cancellation, or an unbalanced stereo signal. As the switch is
toggled any phase issues will b ecome m ore apparen t and easier to id entify.
Mono: With the switch active both Left and Right stereo signals are combined into
a single mono signal.
It is necessary when testing the audio to not only listen to the sign al in stereo but
also in m ono. It helps to outline problems in the mix, but also when testin g for use
on non-standard applications such as for broadcast or mobile phone.
Dim: With the switch active the output level is attenuated by 20dB’s. It enables you
to lower the volume without adjusting any of the settings.
MC2.1 - Monitor Controll er
11
Page 12

DRAWMER
Mix Checking cont....
Under the Cut heading three switches have been incorporated - Left Cut, Mute and
Right Cut.
Left Cut: Mutes the Left channel signal allowing only the right signal to be h eard,
Right Cut: Mutes the Right channel sign al allowing only the left signal to be heard,
Mute: Cuts both channels (especially useful in an emergency). If Left Cut and Right
Cut ar e bo th act ive it is ju st th e same as M ute b eing ac tive.
Note that Cut/Mute d oes no t aff ect th e he adp h one s ( see ) in th e sa me w ay as
it does the speakers (see ). With the Mute switch active the headph ones will still
pass audio in just the same way as if it was off, th ey are not affected. This allows for
someone to edit audio usin g headphones whilst a co nversation is occurring in the
control room, for example.
Also, no te that, when activating Left or Right Cut whilst using headphones the
signal is not 100% panned one way or the other - i.e. the signal centre moves to the
side but is not completely removed from the opposite ear of the headphone - this
is so that the Left/R ig ht Cut sound s a little mo re natural, after all, if listening throu gh
speakers with only the left speaker active some of the signal well reach the right
ear a few milliseconds later.
4
HEADPHONES
The MC2.1 has two dedicated headphone outputs, via 1/4” TRS jacks, each with
individual level control - Note that they have their own level control and are not
affected by the main larg e m onitor volume knob.
In addition, note that th e headphones are not alw ays affected by the switches in the
same way as the monitor outputs. The Source Controls (I/P1, I/P2 and Aux.) and
Output controls (Phase Rev, Mono and Dim) affect the headphones in just the
same way as the speakers, however, the Mute and L/R Cu t switch es affect th em
differently (see above).
Warning:
It is advisable to unplug the headphones before switching the MC2.1 on or off.
It is also recommended that you turn the headphone level down before inserting
the jack, and turn it up to your desired listening level - these measures will not
only prevent your ears from being damaged b ut also the headphone’s drivers.
Also, note that these are high quality circuits and have been designed for
professional headphones, so care must be taken when using lower standard,
consumer quality headphones, such as earbuds or ipod phones etc, as damage
could occur.
9
4
5
TALKBACK
The MC2.1 has a dedicated talkback function including inbuilt microphone and
gain level contr ol.
Talkback Switch: W hen active engages the inbuilt microphone and routes the
operator’s voice through the headphones and also to the output on the rear of the
unit. The switch is non-latching and so must be held in to be active.
12
Page 13

Talkback Level. The knob adjusts the gain level of the talkb ack microphone. It can
be adjusted to compensat e for the di stance that the operat or is from the microphone,
how loud his voice is, or the volume of the underlying music played, as well as
several other factors.
TalkBack Microphone. An electret condenser microphone as been incorporated
into the MC2.1 and is located above the Talkback Level on the front panel.
Activatin g the Talkback automatically eng ages the D im switch (i.e. attenuates the
volume by 20dB) for the headphones and also the speaker outputs making
it possible for the artist to clearly hear the instruction.
As well as the headphones the talkback signal is also routed to the direct talkback
output jack on the rear of the unit to be routed at the engineers discretion.
To operate talkb ack press the talkback switch and then turn the gain level up until
all those wishin g to hear the operator’s voice can. Talkback is only active whilst the
switch is held in and will de-activate once the finger is removed.
6
MONITOR VOLUME
The Monitor Volume control adj usts the signal level of both stereo channels for all
speaker outputs. The Vo lume knob affects the volume of the monitors A (plus the
mono), B, & C only and does not have a bearing on any other output such as the
headphones or talkback jack .
Because the circuitry is active it allows for the signal level to be increased, rather
than only attenuated, making subtle problems with in the mix (such as noise at low
levels, or unwanted harmonics, for example) more obvious and easier to iron out,
especially during musical passages that would normally be quiet.
The volume knob circuit design incorporates a parallelled custom quad
potentiometer, for excellent channel matching and a smooth feel, with a range from
Off (-infinity) to + 12dB of gain.
10
4
9
Before you can make fu ll effective use of the Volume c ontrol it is necessary to
calibrate the entire monitoring system (see the ‘Monitor Calibration’ section) - this
allows for accurate level control, as well as left/right balance throughout the knob’s
range. Note that the actual output levels, including the maximum output level and
the position of unity gain (0d B) aro und the knob, will alter depending on the
calibration of the monitors.
WARNING:
It is recommended that you turn the volume control down to a lo wer level before
turning the MC2.1 off - this is to ensure that a sudden volu me increase when
turning on does not damage your sp eak ers or your hearing
In addition, do not use excessive force at either end of the volume knob - it’s
size would mean th at damaging the potent iometer is possible.
7
POWER LED
A lit 2mm LED indicates that the unit is switched on. To turn the MC2.1 on see the
mains inp ut section .
11
MC2.1 - Monitor Controll er
13
Page 14

DRAWMER
8
INPUTS
The MC2.1 has four inputs comprising a I/P1 - a balanced Neutrik XLR, I/P2 - a
balanced Neutrik XLR/jack combi (combining a 3 pole XLR receptacle and ¼"
phone jac k in one XLR housing), and also AUX. - a shared input comprising of
stereo RCA’s and a 3.5mm stereo jack.
Each input is activated by the Source switches (see )
Note that AUX is a shared input and if both inputs are used simultaneously the
signal w ill be summed into one stereo sign al, however level matching will need to
be controlled prior to the MC2.1.
1
9
OUTPUTS
Three stereo balanced speaker outputs- A, B and C, plus a dedicated mono speaker/
sub-woofer output - MONO - are found on the rear of the unit, all in the form of Neutrik
3 pin XLR’s. Each of these outputs has an individual Left/Right/Mono trim
potentiometer on the underside of the unit to enable easy and accurate mon itor
level/room matching throug hout (see ‘Monitor C alibratio n’).
Each output is activated by the Spe akers switches (see ) - and can be activated
individually or simultaneously and in any configuration.
10
TALKBACK
A dedicate d ta lkback output can be found on the rea r panel, in the form of a ¼" jack,
so that, as well as being routed through the headphones, a talkback signal can be
routed to other devices at the engineers discretion. This could usually be patched
into the live-room active monitor speakers for conven ience when recording acoustic
ensembles where the performers may not wish or need to wear headphones. It
could also be used as an added channel on a mixing desk to be patched into a
multiple headphone amplifier alon g with the stereo mix, for example. The jack also
allows for routing in to a separate channel of a DAW, or other recording facility, to
allow for information overdubs to be added to a recordin g.
14
2
Page 15

11
MAINS I .E .C. AND POW ER SWI TCH
The mains inlet, I.E.C., which also incorporates the internal mains fuse, can be
found on the rear of the unit. A mains lead will have been p rovided with the MC2.1
to suit the mains configuration for the country of yo ur purchase.
The power switch is located above the I.E.C. and is used to switch the unit on and
off. This is a hard boot switch (as opposed to a soft stand-by switch) and so when
in the off position the MC2.1 will draw no mains power.
Note that a timed relay protection circuit has been incorporated into the MC2.1 to
prevent bangs and other potentially harmful artifacts from occurring during power up
and power down.
12
SPEAKER CALIBRATION TRIM CONTROLS
On the under-side of the MC2.1 there are seven rotary controls that allow the
individual speaker level calibration of your system. Each speaker output has a
control, including the mono/sub. To alter the speaker level use a small screwdriver
to turn - counter-clockwise turns the speaker level down, and clockwise up.
For the calibration process see the “Monitor Calibration” section of this manual.
Once the system has been c alibrated these trims should not be touched.
MC2.1 - Monitor Controll er
15
Page 16

DRAWMER
Wh ether you are installing on e, tw o or three sets of speakers it is imperative that
your system is calibrated, not only to centre the stereo image and to ensure that all
speaker levels are the same, but also to ensure that you are m ixing your music at
industry standard listening levels. The MC2.1 can calibrate the speakers of any
system as it has individu al ro tary level trim controls for every speaker attached
(found on the under-side of the product).
The follo wing method is by no means the only way to calibrate your system, and a
quick look on the internet will soon find many others, but is a good starting point.
Before begin ning the procedure there are a couple of things that you will require:
Sound Pressure Level (SPL) Meter:
Unfortunately, it is virtually impossible to measure the level
of sound from each speaker by ears alone. A good
instrument that does a more accurate job is a Sound
Pressure Level meter.
SPL Meters come in two varieties: with an analog meter or
with a digital display, either works well, just choose your
prefered type. You can purchase an SPL meter from most
electronic stores, or search the internet in stores such as
Amazon, with pri ces rangi ng from £25 to £800. Radio Shack
is a good source for reasonably priced SPL meters in the
USA, though to get better results, you may consider a mo re
expensive SPL meter, suc h as Galaxy, Gold Line, Nady,
etc.
The ideal meter should have the industry standard “Cweighted” curve, slow setting. Refer to your meter’s manual
to learn how to select these settings.
If all else fails there are iph one/Android apps that claim to
be SPL meters - whilst these are no-where near the quality
of a dedicated meter they are better than nothing.
MONITOR CALIBRATION
Test files:
Test tones can either be generated through your DAW (such as the Signal
Generator plug-in in Pro Tools), but you can also download test/calibration
files from the internet if you search around: wav files are prefered to mp3’s due
to the compression/limited frequency range of mp3’s. You c an also purchase
good quality reference CD’s/DVD’s from various stores.
The tones required for this calibration process are:
1. 40Hz to 80Hz bandwidth limited pink-noise file reco rded at -2 0dBFS.
2. 500Hz to 2500Hz bandwidth lim ited pink-noise file recorded at -20dBFS.
3. Full-bandwidth pink-noise file recorded at -20dBFS.
16
Page 17

Holding the SPL - Set the meter to C weighted and on the slow scale. St art by sitting
in your normal mixing position, hold the SPL m eter at arm’s length and at chest
level with the microphone of the meter facing toward the monitor to be calibrated.
Maintain this position throughout the calibration process - this could be easier if it
is fixed via a stan d and brac ket, and m oved on ly to p oint at the relevan t sp eaker.
The following method sets the sound pressure level to 85dB - the standard listening
level for film, tv and music, however, due to the sound being altered by the size of
the room, this c an alter, essentially, the smaller yo ur room is, the lower your listening
level should be, down to around 76dB. The following table should give an idea of
the sound pressure level to use for your environment.
Room Size
Cubic Feet
>20,000
10,000 to 19,999
5,000 to 9,999
1,500 to 4,999
<1,499
Listening at appropriate levels for your specific enviro nment will help maintain t he
integrity of your mixes as they move from one system to another, in rooms of varying
sizes.
Cubic Metres
>566
283 to 565
142 to 282
42 to 141
<41
SPL Reading
85dB
82dB
80dB
78dB
76dB
MC2.1 - Monitor Controll er
17
Page 18

DRAWMER
The Procedure:
1. Begin by turning off the monitoring system and ensuring that all inputs and
spe akers ar e corr ectly co nnec ted.
2. Set all DAW/System controls to 0dB/unity gain - this should be left at this setting
from now on. Remove all e.q. and dynamics from the signal path.
3. If you have active speakers with their o wn level control, or speak ers with an
amplifier, set all of these to m aximum, so that they do not attenuate the signal.
4. On the underside of the MC2.1 yo u will find the speaker calibration trims - using
a screwdriver initially set all of them to their full attenuation position by rotating
each fully counter-clockwise. (See photo, opposite page).
5. Set the large volu me on the front of the MC2.1 to 12 0’c lock and leave it there
throughout the calibration procedure - this will be the position that provides the
85dB listening level from now on.
6. Turn the system on and play the 500 Hz – 2.5 kHz bandwidth-limited pink noise
at -20 dBFS. Sele ct the requi re d Source on the f r ont of the MC2.1 - I /P1, I /P2 or AUX.
You should not hear it, yet.
7. Activate the A Speaker by having only the Speaker A switch active in the speakers
section on the front panel.
8. In order to hear only the Left A speaker remove the right speaker by activating the
Righ Cut switch.
9. On the underside of the MC2.1 rotate the Left A trim clock-wise. You will now start
to hear the sign al, but only for that speaker. Rotate until the SPL meter reads 85d B.
10. In order to hear o nly the Right A speaker switch in Left Cut and deactivate the
Right Cut.
18
Page 19

1 1. On the underside of the MC2.1 rotate the Right A trim clock-wise until the SPL
meter reads the desired level.
12. To calib rate each speaker rep eat steps 7 to 11 - replacing the speaker on step
7 for each set - A,B or C.
13. To calib rate the sub - play the 40-80Hz signal, but this time have only Speaker
A active - Left and Right Cut need not be active as the frequency of the sig nal is
limited to only the sub.
14. On th e u nderside of the MC2.1 increase the Mono trim increasing the volume of
the sub until the desired SPL meter reading is reached.
15. Repeat steps 7 to 12 whilst playing the full b andwidth pink noise and adjusting
to suit. The readings should be pretty clo se an d only require fine adjustment.
16. You are finished and the calibration p rocess has been c ompleted.
The volume control will have a few dB’s of headroom so care must be taken to both
your hearing and system when increasing the volume passed the 12 o’clock
position.
As with all things that are calibrated it’s a good idea to regularly check the calibration
of your monitors to ensure that nothing has changed.
MC2.1 - Monitor Controll er
19
Page 20

DRAWMER
Mix Ch ecking Tips
Due to the versatility of the MC2.1, and it’s thorough array of controls, some very
useful techniques for checkin g your mix can easily be achieved, that can help
improve the balance within a mix, pinpoint stereo width, phase and mono problems,
and also aid when monogising.
The following are a few handy tips to help eradicate problems and bring about a
balance within the mix:
Not t oo loud. ..
Give your ears a break. Do not have the volume too loud - frequent monitoring at
anything above 90dB will only make your ears tired, mean ing that you won’t really
hear the problems that may be occurring, and give you a false sense that the mix
sounds nice and loud. Also, constant listening at anything above 100dB will probably
have a long term detrimental effect on your hearing.
Shhhh...
Get into a habit of listening to your mix at very low levels quite often. Remember that
not everyone listening to your song has music blasting out. As well as giving your
ears a break, it will heighten problems in the mix - Do the key elements have a
good balance, or are some instruments more prominent than they should be? If
something is too quiet or loud adjust its volume or use E.Q. to fix it. If the mix
sounds good at low levels it’s likely that it will when lou d.
Note that on the MC2.1 it is better to lower the volume level using the DIM switch
and then turn the volume up, rather than only turning the volume down, as you
maintain greater control over the volume as well as better left/right channel
matching.
Increase the Volume of Quiet Passages.
Because the MC2.1 circuitry is active it allows for the signal level to b e increased,
rather than only attenuated, making subtle problems within the mix, such as noise
at low levels, or unwanted harmonics, more obvious and easier to iron out, especially
during passages that wo uld normally be quiet.
Here, There and Everywhere......
Listen to your mix on as many systems as possible. The three monitor outputs
allows for the addition of a non standard testing setup i.e. the system could be
forced to emulate low-quality domestic reproduction systems as well as car speakers
or a portable radio, by incorporating limited-bandwidth speakers to output C. In such
conditions you may find that an instrument drops out of the mix, or another is too
prominent, an d adjustment to the mix n eed to be made. For best results calibrate
the speakers to match the output level of the rest of the system.
20
Page 21

Cut It Out...
Using the left and right cut switches will highlight the stereo balance of each
channel. In ster e o the mix sounds ok, however, it may be t hat you want an instrument
to be panned so far left that it doesn’t occur at all in the right channel, by cutting the
left and only hearing the right channel you will hear whether the instrument bleeds
across, and panning ad justment can be made.
Phase Reverse...
Make use of the phase reverse switch. If the sound do esn't become less focussed
when the p olarity is flipped then there is something wrong som ewhere. Not only
will the switch help confirm that the monitor speakers are wired up in the correct
polarity, phase inversion on a particular instrument can at times improve the way
the instrument interacts with the rest of the mix by removing the phase cancellation.
Monogising
Check your mix in mono - often! Just because a mix sounds good in stereo doesn't
mean it will sound good when the left and right channels are combined. Why should
you care if your mix sounds good in mono? Well, most live music venues and dance
club sound systems are mono - running the PA or sound system in mono is common
practice to ensure music sounds good everywhere in the room because it removes
the ‘sweet spot’ and the complex phase issues of stereo. In many cases the low
frequencies will be put through a crossover and summed to mono before being
sent to the sub, su ch as in a home theatre system, for example. Monogisin g is also
necessary when testing the aud io for use on non -standard applications such as
for broadcast or mobile phone.
In addition, monogising will highlight phase problems. In some cases, when you
activate the Mono switch you may hear comb-filtering, which will colour the sound of
your mix and cause peaks and dips in its frequency response. W hen a stereo mix is
combined into mono any elements that are out of phase will drop in level or may
even disappear c ompletely. T his could be because left and right outputs are wired
out of phase but its more likely to be due to phase cancellation.
W hat causes phase c ancellation?
Many stereo widening effects and techniques, such as chorus;
Simultaneous direct box and mic recording - If you've ever recorded a guitar
simultaneously through a direc t box an d a microphone, you may have noticed
the time alignment problems this causes. This type of situation can often be
fixed by careful mic placement, or realigning the waveform in a DAW;
Any situation where more that one microphone is used to record a source - on a
multi-miked drumkit two mics may pick up exactly the same signal and cancel
each other out. It may sound unlikely but one handy tip is to adjust the panning of
your drums whilst in mono - suddenly all the phase cancellation of the drums will
improve, and sound even better when reverted back to stereo.
MC2.1 - Monitor Controll er
21
Page 22

DRAWMER
Listening in mono also highlights problems with the stereo width and balance of
the mix and is more apparent when you use a lot of stereo-widening or widthenhancing techniques and tools. Switching mono in and out fairly quickly may
make it apparent that the centre of the mix is shifting to the left or right, something
that may go unno ticed if o nly working in stereo.
True Mono
As a mono signal would normally originate from a single source it would be wrong
to simply activate the mono switc h - as both left and right speakers are still active.
Wh en you listen to a mono signal on two speakers, you hear a false or 'phanto m'
image which is derived mid way betw een th e speak ers, bu t becau se bo th sp eakers
are contributing to the sound, the level of the bass seems to be over-inflated. To
truly hear a monogised sig nal via on e speaker (the way everyone else will hear it)
the mono switch should be active but also eith er Left Cut or Right Cut should also
be activated (depending on preference/location) to derive the signal from a single
location.
Listen to the ‘Stereo difference’ or side signal
A very useful facility of the MC2 .1 is the ability to listen to the ‘stereo difference’ or
side signal, very quickly and easily. The side signal is the difference between the
two channels, and describes those elements that contribute to the stereo wid th.
Hearin g the stereo difference is so simple using the MC2.1: with the stereo signal
playing, activate the Phase Reverse switch, and then sum the left and right channel s
using the Mono switch (in other words Left-Rig ht). It’s that simple.
Being able to audition the ‘side’ signal is particularly useful for judging the quality
and quantity of any ambience or reverberation in a stereo mix. It is also an invaluable
facility if the stereo recording has timing differences between c hannels (such as
cause d by an azi muth error on a tape machine) , or for aligning a pair of desk channels
for use with X-Y stereo mic pairs. In both cases, listening for a deep canc ellation
null, as the two signals cancel each other out, is a very fast and accurate way of
matching levels in each ch annel, which is the basis of accurate alignment.
22
Page 23

MC2.1 GENERAL INFORMATION
IF A FAULT DEVELOPS
For warranty service please call Drawmer
Electronic s Ltd. or their nearest authorised
service facility, giving full details of the difficulty.
A lis t of all main dealers can b e found on the
Drawmer webpages. On receipt of this
information, service or shipping instr uctions
will be forwarded to you.
No equipment should be returned under the
warranty wit hout prior cons ent from Dr awmer
or th eir authorised represent ative.
For service claims under the warranty
agreement a s ervice Return s Authoris ation
(RA ) number will be is sued.
W rite this RA number in large letter s in a
prominent position on the shipping box.
Enclose your name, address, telephone
number, copy of the original sales invoice and
a detailed des cripti on of the probl em.
Authorised returns s hould be prepaid and must
be insured.
All Drawmer products are packaged in
spec ially des igned contai ners f or prot ection .
If the u nit is to be returned, the original
container must be used. I f t his container is n ot
available, then the equipment should be
packaged in substant ial shock-proof material,
capable of withstanding the handling for the
transit.
CHAPT ER 3
SPECIFICA TION
Note: These specfications are provisional
and may alter slightly upon product
release.
INPUT
Maximum Input Level 21dB u
OUTPUT
Maximum Output Level
before clipping 27dBu
DYNAMIC RANGE
@ unity gain 118dB
CROSS TALK
L/R @ 1kHz >85dB
Adjacent Input >95dB
THD & NOISE
unity gain 0dBu input
0,0014%
FREQUENCY RESPONCE
20Hz-20kHz +/- 0.2dB
PHASE RESPONSE
20Hz-20kHz +/- 2degrees max
CONTACTING DRAWMER
W e will b e pleased t o answer all appl icati on
qu est ions to en hanc e your us age of Dr awmer
equipment .
Pleas e address c orrespond ence to:
DRAWMER Electroni cs LTD
Colem an Street
Par kgat e
Rotherham
South Yorkshire
S62 6EL
United Kingdom
Telephone: +44 (0) 1709 527574
Fax: +44 (0) 1709 526871
Cont act via E- mail: tech@drawmer.com
Further information on all Drawmer products,
dealers, Authoris ed service departments
and oth er c ontac t inf ormat ion c an be f ound
on our website: www.drawmer.com
MC2.1 - Monitor Controll er
POWER REQUI REME NTS
1 15V or 230V at 50- 60Hz , 20VA
Voltage set by internal voltage switch
FUSE RATI NG
@ 1 15V T315mA
@ 230V T 16 0m A
Conforming to IEC 127-2
FUSE TYPE
20mm x 5mm, Class 3 Slo-Blo,
250Volt working
CASE SI ZE
Depth (with C ontrol s
& Sockets) 272mm
Width 215mm
Height (with Feet) 81mm
WEIGHT 2.5kg
23
Page 24

DRAWMER
BLOCK DIAGRAM
24
Ref:1v01E 08-04- 14
 Loading...