

Page 1

2 TONNE
TROLLEY
JACK
28497
EN
Original Instructions
Version 1
Page 2

1. Preface
These are the original product instructions. This
document is part of the product; retain it for the life
of the product, passing it on to subsequent holders.
Read this manual in full before attempting to
assemble, operate, or maintain this product.
This Draper Tools manual describes the purpose
of the product and contains all the necessary
information to ensure its correct and safe use.
Following all the instructions and guidance in
this manual will ensure the safety of both the
product and the operator and increase the
lifespan of the product.
1.1 Product Reference
User Manual for: 2 Tonne Trolley Jack
Stock No: 28497
Part No: TJ2-LE
1.2 Revisions
Version 1: March 2022
First release
As our manuals are continually updated, always ensure
that the latest version is used.
Download the latest version from:
drapertools.com/manuals
All photographs and drawings within this manual are
supplied by Draper Tools to help illustrate correct
operation of the product.
Every eort has been made to ensure the
information contained in this manual is accurate.
However, Draper Tools reserves the right to amend
this document without prior warning. Always use the
latest version of the product manual.
1.3 Understanding the Safety Content
WARNING! – Situations or actions that may result in
personal injury or death.
CAUTION! – Situations or actions that may result in
damage to the product or surroundings.
Important: – Information or instructions of particular
importance.
1.4 Copyright © Notice
Copyright © Draper Tools Limited.
Permission is granted to reproduce this manual for
personal and educational use ONLY. Commercial
copying, redistribution, hiring, or lending is strictly
prohibited.
No part of this manual may be stored in a retrieval system
or transmitted in any other form or means without written
permission from Draper Tools Limited.
In all cases, this copyright notice must remain intact.
– 2 –
Page 3

2. Contents
EN
1. Preface 2
1.1 Product Reference 2
1.2 Revisions 2
1.3 Understanding the Safety Content 2
1.4 Copyright © Notice 2
2. Contents 3
3. Warranty 4
4. Product Introduction 5
4.1 Scope 5
4.2 Specication 5
5. Health and Safety Information 6
5.1 General Health and Safety Precautions 6
5.2 Preparing the Vehicle to be Lifted 6
5.3 Correct Use of the Jack 7
6.IdenticationandUnpacking 8
6.1 Product Overview 8
6.2 What’s in The Box? 9
6.3 Packaging 9
7. Operating Instructions 10
7.1 Preparing the Jack 10
7.2 Raising a Load 11
7.3 Lowering a Load 11
8. Maintenance 12
8.1 General Maintenance 12
8.2 Checking and Replacing the Oil 12
8.3 Storing the Jack 12
8.4 Troubleshooting 13
9. Disposal 14
10. Explanation of Symbols 15
– 3 –
Page 4

3. Warranty
Draper Tools products are carefully tested and inspected
before shipment and are guaranteed to be free from
defective materials and workmanship.
Should the tool develop a fault, return the complete tool
to your nearest distributor or contact Draper Tools
directly. Contact information can be found at the back of
this manual.
Proof of purchase must be provided.
If, upon inspection, it is found that the fault occurring is
due to defective materials or workmanship, repairs will
be carried out free of charge.
parts and labour for 12 months from the date of purchase.
Where tools have been hired out, the warranty period
covers 90 days from the date of purchase.
This warranty does not apply to any consumable parts,
batteries or normal wear and tear, nor does it cover any
damage caused by misuse, careless or unsafe handling,
alterations, accidents, or repairs attempted or made by
any personnel other than the authorised Draper Tools
repair agent.
In all cases, to make a claim for faulty workmanship or
materials within the standard warranty period, please
contact or return the product to the place of purchase.
Proof of purchase may be required.
This warranty period covers
If the place of purchase is no longer trading or if you
experience any diculties with your warranty, please
contact Customer Services with the product details and
your proof of purchase. Contact details can be found at
the back of this manual.
If the tool is not covered by the terms of this warranty,
repairs and carriage charges will be quoted and charged
accordingly.
This warranty supersedes any other guarantees
expressed or implied and variations of its terms are not
authorised.
Your Draper Tools guarantee is not eective until you can
produce, upon request, a dated receipt or invoice to
verify your purchase within the guarantee period.
Please note that this warranty is an additional benet
and does not aect your statutory rights.
Draper Tools Limited
– 4 –
Page 5

4. Product Introduction
EN
4.1 Scope
This trolley jack is designed for the elevation of vehicles
of up to the stated maximum weight limit (3 tonnes) as
part of domestic and light-duty commercial use. Any
other application beyond the conditions established for
use will be considered misuse. Draper Tools accepts no
responsibility for improper use of this product.
4.2 Specication
Stock No. 28497
Part No. TJ2-LE
Capacity 2,000kg
Max. lifting range 85–430mm
Saddle diameter 100mm
Handle length 1,000mm
Chassis length 575mm
Net weight 23.5kg
Thisproductcomplieswiththerequirementsdened
by EN 1494.
WARNING! This product is not a toy and must be
respected.
Read this manual in full before attempting to assemble,
operate or maintain the product, and retain it for later use.
– 5 –
Page 6
5. Health and Safety Information
EN
Important: Read all Health and Safety instructions
before attempting to operate, maintain or repair this
product. Non-compliance with these instructions may
result in injury or damage to the user, the product or the
vehicle to be lifted. Draper Tools accepts no
responsibility for improper use of this jack.
5.1 General Health and Safety Precautions
• Only authorised personnel who have carefully read
and understood this manual should operate this
product.
• Always wear adequate protective footwear when using
the jack.
• Always ensure that the working area is well
illuminated and free from obstructions.
• Keep bystanders at a safe distance during operation.
• Allow a minimum distance of 0.5m between the
vehicle and surrounding objects to allow the vehicle
to tip when lifted.
• The wheels of this product DO NOT lock.
− Ensure that the jack will not roll once positioned
for use.
• Care must be taken when handling and lifting.
− Dropping the jack may result in damage to the
product or personal injury.
• DO NOT modify this product in any way.
• Stay alert to external interference that may cause the
raised load to rock during preparation and operation.
• When not in use, lower the lifting arm, put the handle
shaft into an upright position and twist it clockwise
until strong resistance is felt.
− This prevents the handle shaft from creating a trip
hazard and holds it in the upright position.
− Alternatively, lower the lifting arm, remove the
handleshaftandlayitatontheoor.
• This jack does not emit noise that exceeds a level of
70dB(A) during operation.
5.2 Preparing the Vehicle to be Lifted
WARNING! DO NOT lift the vehicle if it may result in the
spillage of dangerous substances, including fuel or
battery acid.
• Ensure that there is no one inside the vehicle.
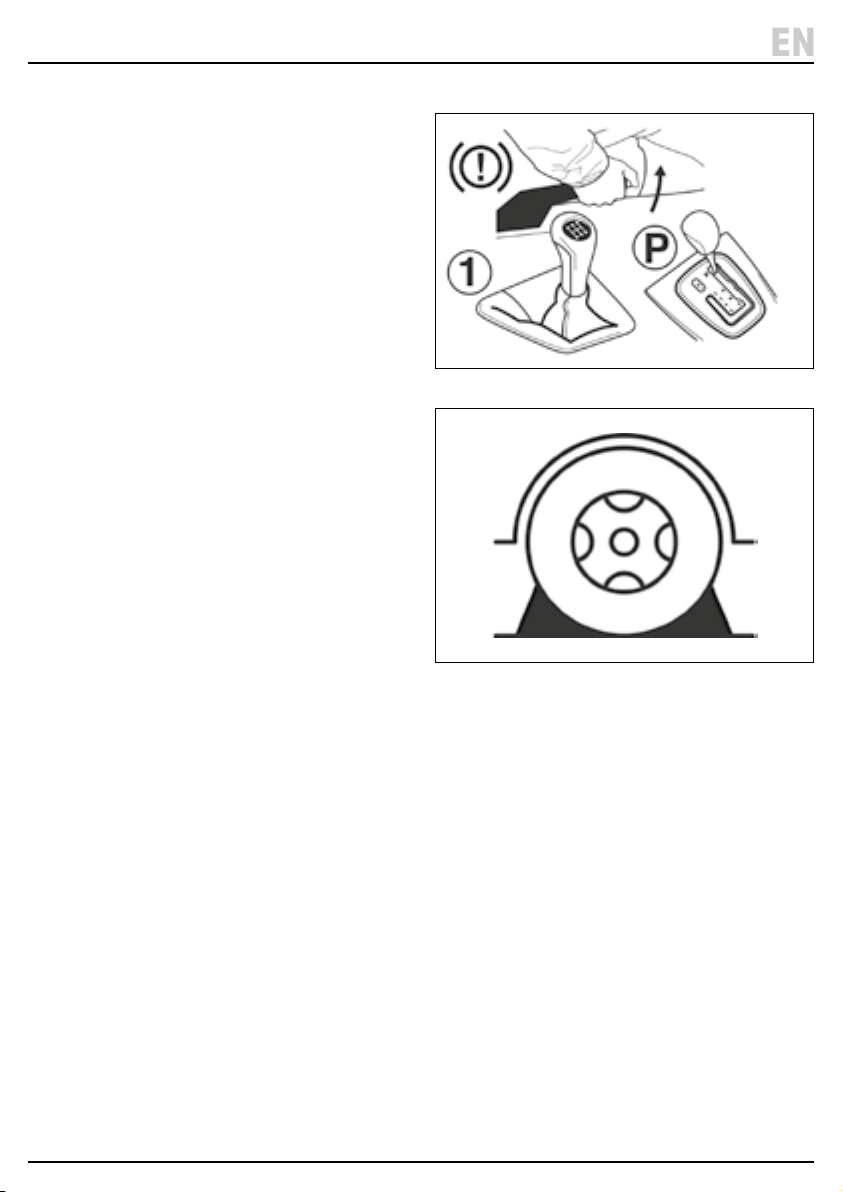
• Switchotheengineandapplythehandbrake.
• Put the vehicle into gear (for manual transmission) or
“Park” (for automatic transmission).
• Take any necessary precautions to prevent the vehicle
from sliding.
− Grounded wheels should be securely blocked with
wheel chocks (Stock No. 54500).
– 6 –
Page 7
5. Health and Safety Information
EN
5.3 Correct Use of the Jack
Important: The jack is a lifting device ONLY and should
never be used to move the vehicle. The vehicle to be
lifted should never exceed the rated capacity of the jack.
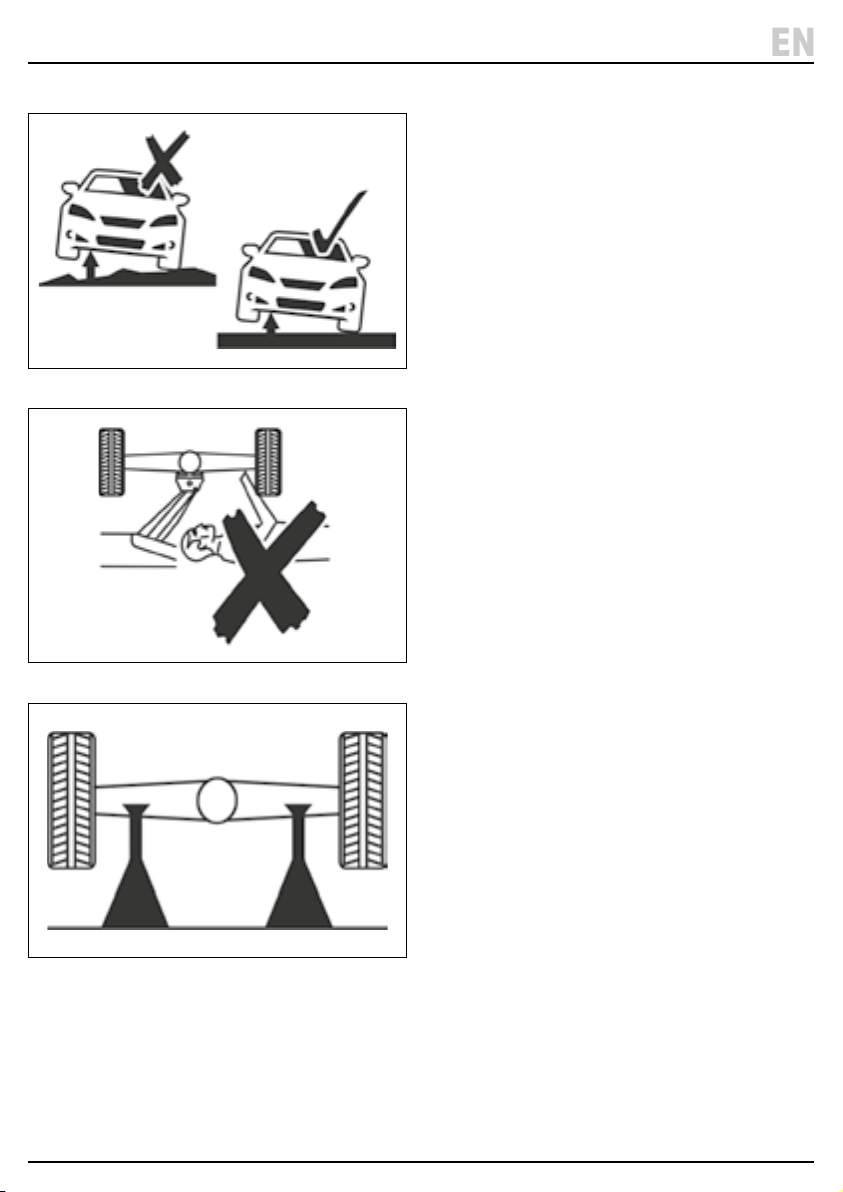
• ALWAY S bleed the jack piston before use.
• ONLY operate the jack on solid, level and horizontal
surfaces.
− A concrete surface is recommended,
where possible.
− All four wheels of the jack should be in contact
with the operating surface when in use.
WARNING! Never use the jack on any surface that is
slippery or may sink or rock.
• When positioning the jack, ALWAYS use the
manufacturer’s recommended lifting point.
− These points vary between vehicles; consult the
manufacturer’s manual or the Haynes workshop
manualforthespecicvehicleinformation.
• Ensure that the lifting point is not dirty, greasy or
corroded.
• The lifting point must remain centred over the saddle
duringraisingandlowering;o-centredloadsmay
slip and cause injury.
• Position the jack so that no part of the operator is
required to be underneath the vehicle at any time
during lifting or lowering.
• Keep clear of all movable parts of the jack mechanism
when in use.
• Topreventoverloading,thejackisttedwithan
overload valve set at the factory.
Important: The overload valve should not be adjusted
under any circumstances. If the capacity of the jack is
exceeded, the valve will prevent the lifting operation.
• Take all precautions to prevent movement of the
vehicle during raising and lowering.
− Beawarethattracandotherexternalforcesmay
cause the load to rock if used at the roadside.
• Remain alert and observe the load at all times during
operation.
− Should any dangerous conditions occur, including
unexpected movement of the vehicle, cease all
operationuntiltheseconditionshavebeenrectied.
• NEVER work under a raised vehicle without using the
correct axle supports or other appropriate supporting
methods.
• DO NOT enter the vehicle or start the engine while it is
supported on the jack or axle stand.
• NEVER leave the jack unattended when in use.
• NEVER detach the handle shaft while the jack is
under load.
• ALWAY S ensure that there are no persons or
obstacles beneath the vehicle before lowering.
– 7 –
Page 8
6. Identication and Unpacking
EN
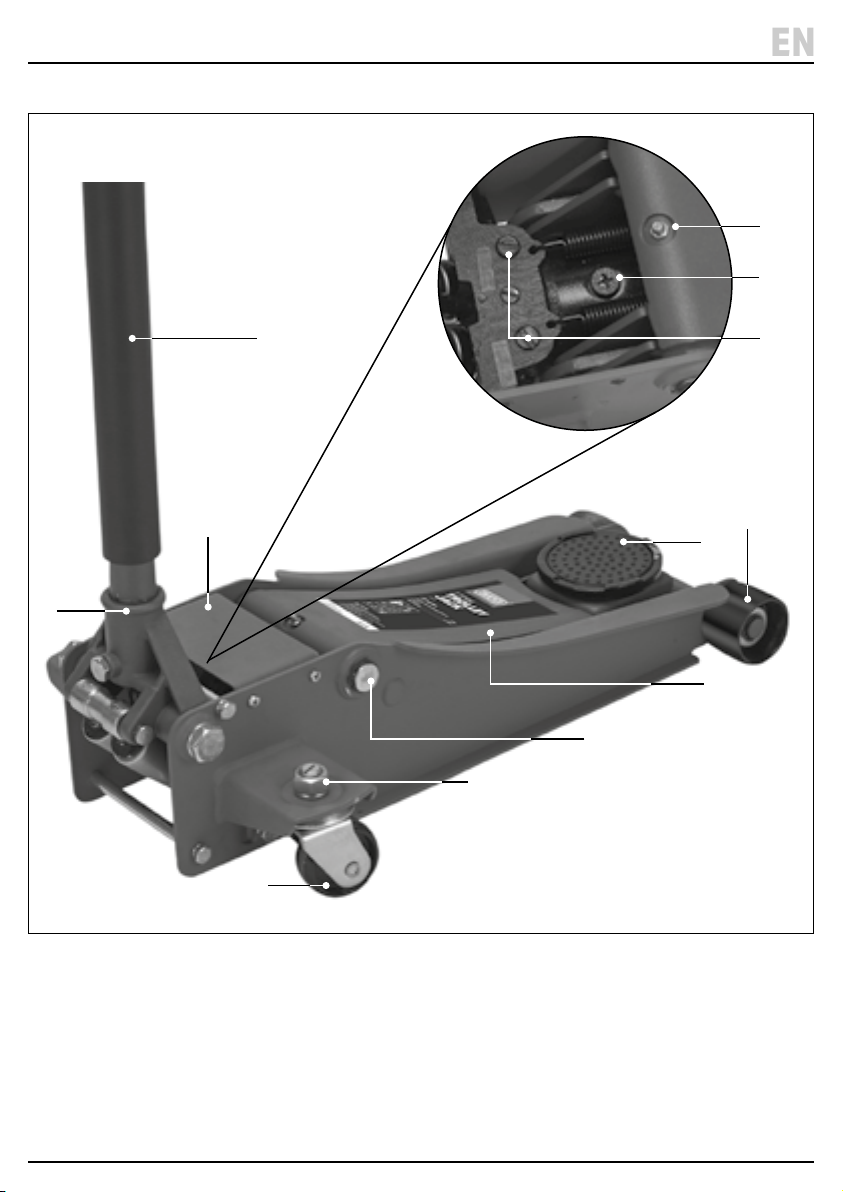
6.1 Product Overview
(5)
(7)
(2)
(9)
(11)
(1)
(8)
(11)
(4)
(3)
(6)
(10)
(1) Handle shaft
(2) Handle socket
(3) Lifting arm
(4) Saddle
(5) Grease nipple
(6) Fulcrum bar
(7) Oilllerplug
(8) Overload valve screws
(9) Pump cover plate
(10) Caster bolts
(11) Wheels
– 8 –
Page 9
6. Identication and Unpacking
EN
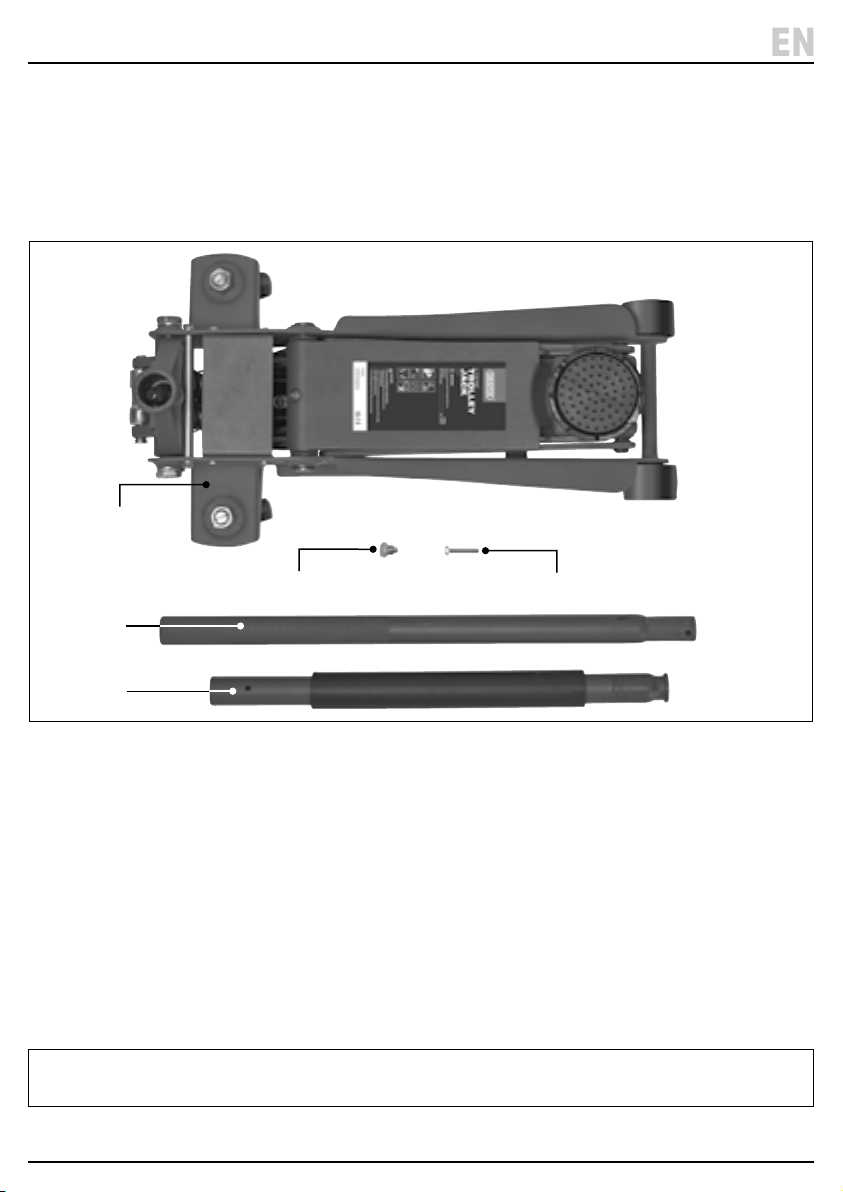
6.2 What’s in The Box?
Carefully remove the product from the packaging and
examine it for any signs of damage that may have
occurred during shipment.
(A)
Before assembling the product, lay the contents out and
check them against the parts shown below. If any part is
damaged or missing, do not attempt to use the product.
Please contact the Draper Helpline; contact details can
be found at the back of this manual.
(E)
(C)
(B)
(A) 1 x Base unit
(B) 1 x Upper handle shaft
(C) 1 x Lower handle shaft
6.3 Packaging
Keep the product packaging for the duration of the
warranty period for reference should the product need to
be returned for repair.
Please visit drapertools.com for our full range of accessories and consumables.
(D)
(D) 1 x M10 x 35mm hex bolt
(E) 1 x M17 x 15mm hex bolt
WARNING! Keep packaging materials out of reach of
children. Dispose of packaging correctly and
responsibly and in accordance with local regulations.
– 9 –
Page 10
7. Operating Instructions
EN
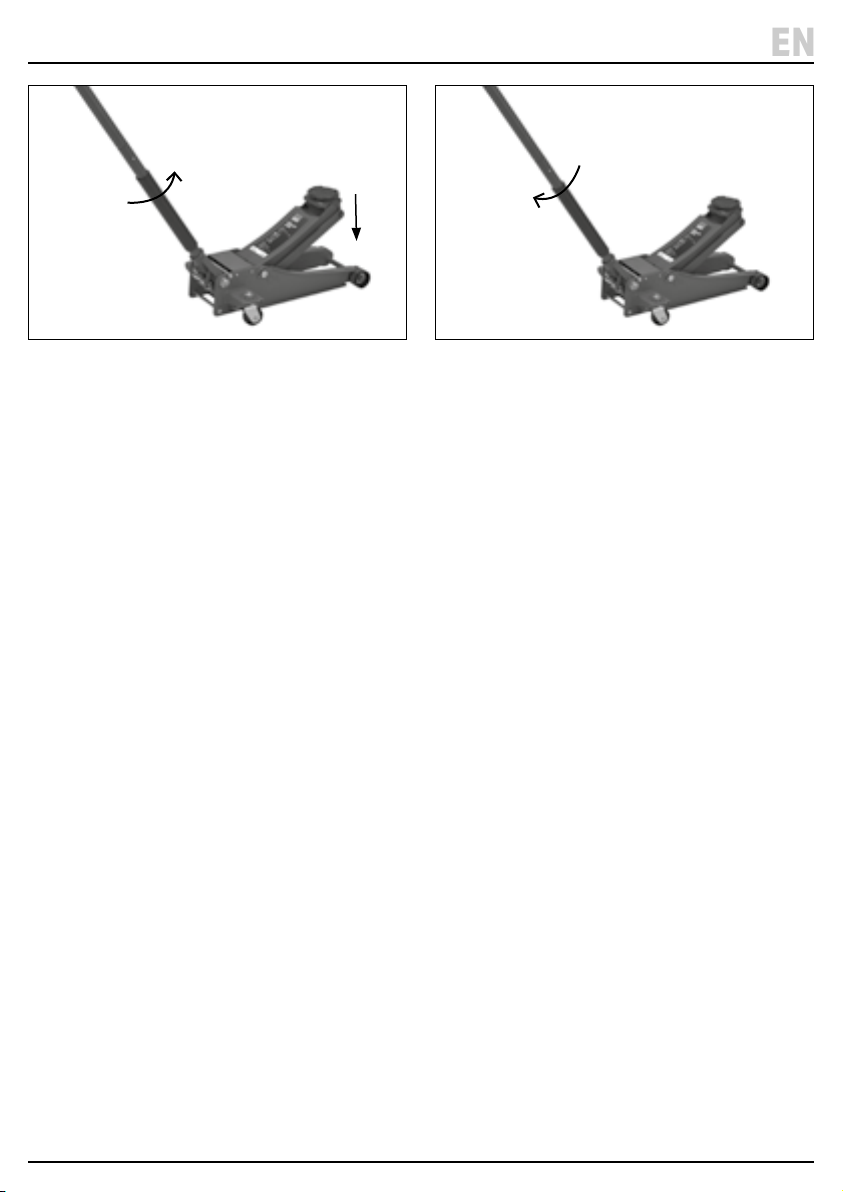
Twisting the handle shaft anticlockwise opens the
release valve and lowers the lifting arm (Fig. 1).
7.1 Preparing the Jack
Prepare the jack correctly before each use:
1. Check the jack for bent, broken, cracked or loose parts,
and oil leaks; ensure that the wheels (11) rotate freely
and that the caster bolts (10) are tightly fastened.
WARNING! Do not use the product if defects are
present. If it is suspected that the jack has been
subjected to abnormal loads or has suered any
knocks, withdraw it from service until the product
has been repaired.
2. Assemble the handle shaft:
a. Attach the upper (B) and lower (C) sections of the
handle shaft and secure with bolt (D).
b. Insert the complete handle shaft into the handle
socket (2) and secure with bolt (E).
Important: The handle shaft should be securely
fastened but able to be twisted without excessive
force. Overtightening may prevent movement of
the handle.
3. Bleed the jack piston:
a. Twist the handle shaft (1) anticlockwise and allow
the lifting arm to drop to its lowest position.
b. Pump the handle shaft down and up at least ten
times using the full stroke range to lubricate the
piston and expel any accumulated air.
c. Twist the handle shaft clockwise until strong
resistance is felt to seal the release valve.
2 Fig.1 Fig.
Twisting the handle shaft clockwise closes the release
valve (Fig. 2).
4. Test the jack:
a. Pump the handle shaft down and up to raise the
lifting arm to its highest position.
b. Obser ve the saddle to check that it does not drop.
5. If the lifting arm begins to drop without intervention:
a. Twist the handle shaft anticlockwise and allow the
lifting arm to drop to its lowest position.
b. Unscrew and remove the pump cover plate (9).
c. Slightlyloosentheoilllerplug,toallowanyairto
escape the chamber.
Escaping air will hiss as it leaves the chamber.
d. Tightentheoilllerplug.
6. Test the jack again by raising the lifting arm and
ensuring that it does not drop without intervention.
Repeat this process if necessary. If the issue is not
resolved after several attempts, contact Draper Tools
for assistance.
The jack is now ready for use.
– 10 –
Page 11
7. Operating Instructions
EN
3 Fig.
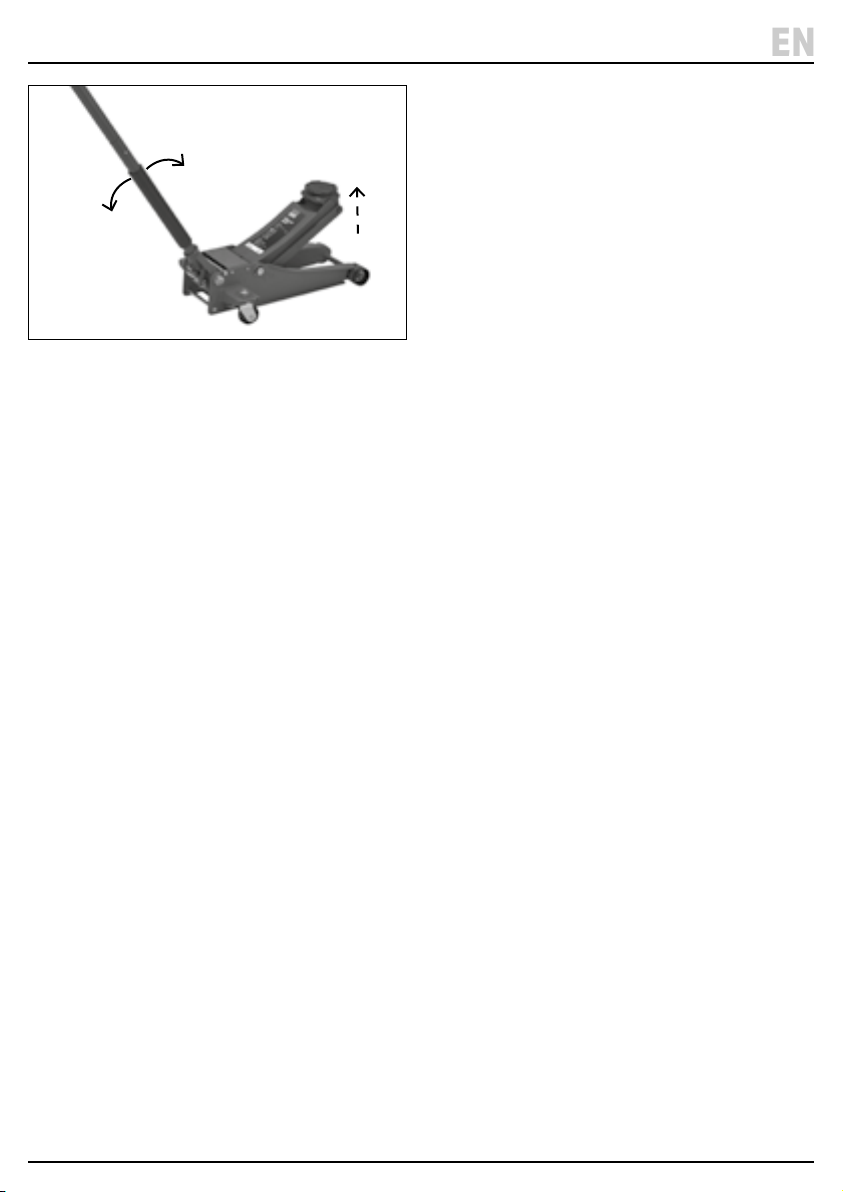
Pumping the handle shaft down and up raises the lifting
arm if the release valve is closed (Fig. 3).
7.2 Raising a Load
1. Position the jack directly beneath the approved
vehicle lifting point.
See the vehicle manufacturer information for the
approved lifting points.
2. Twist the handle shaft (1) clockwise until strong
resistance is felt.
3. Pump the handle shaft down and up until contact is
made with the vehicle and check that the saddle (4) is
positioned correctly.
4. Pump the handle shaft down and up to lift the vehicle.
Use the full stroke range to lift more quickly.
Important: If the jack drops under load, safely lower
the load (see 7.3) and bleed the piston chamber
(see 7.1).
5. Immediately secure the raised vehicle with an
appropriate axle stand, placing it as instructed in the
manufacturer information.
7.3 Lowering a Load
WARNING! Always ensure that there are no persons or
obstacles beneath the vehicle before lowering.
1. Gently pump the handle shaft (1) to raise the vehicle
slightly and allow the axle stand to be removed safely.
2. When the axle stand is clear, carefully twist the pump
handle anticlockwise to gently lower the load.
Do not turn the handle shaft more than a half turn at
a time during lowering.
– 11 –
Page 12

8. Maintenance
EN
Important: Maintenance and repair of the jack must
onlybeperformedbyqualiedpersonnelwith
sucientknowledgeofthehydraulicssystemsused
in these devices.
8.1 General Maintenance
• Keep the jack clean and regularly lubricate all
moving parts.
− Dust and debris may cause components to
become clogged or jammed, and the product
may not perform at its best.
− Use a grease gun (Stock No. 47807) on the grease
nipple (5) to lubricate the lifting arm fulcrum bar
(6) – see the dedicated product manual for
instruction on its use.
• Protect the jack and its components from adverse
environmental and weather conditions, both during
use and when stored.
− The components may rust if exposed to damp air
for prolonged periods.
• Use only spare parts supplied by Draper Tools.
• Before each use, check for bent, broken, cracked or
loose parts, and ensure that the wheels rotate freely.
8.2 Checking and Replacing the Oil
To extend the working life of the product, keep the oil at
an appropriate level and replace it after periods of
prolonged intensive use.
CAUTION! Use AW 22 hydraulic oil. Never use brake or
engine oil.
WARNING! Oil spillage may cause the operating
surface to become slippery. Do not operate the jack on
oily surfaces.
Tocheck,drainandrelltheoilcapsule:
5. If the oil is dirty or needs replacing:
a. Drain any remaining contents into a container.
b. Rellthechamberwithnewoilasrequired,
keeping the oil free of dirt.
CAUTION! Excessive quantities of oil may render
the jack inoperable.
6. Screw the pump cover plate back into place and
return the handle shaft to an upright position.
7. Return the handle shaft to an upright position.
Always drain the jack of oil before disposal.
Dispose of oil according to local regulations.
8.3 Storing the Jack
When the jack is not in use:
• Remove bolt (E) and detach the handle shaft (1).
• Ensure that the lifting arm (3) is fully lowered
and apply an anti-corrosion product to the pistons
if appropriate.
• Store the jack in a clean and dry location, out of reach
of children.
1. Place the jack on a level, horizontal surface.
2. Fully lower the lifting arm (3) and handle shaft (1).
3. Unscrew and remove the pump cover plate (9).
4. Removetheoilllerplug(7)andchecktheoillevel.
Important: The correct oil level is 5mm below the
llerplughole.
– 12 –
Page 13

8. Maintenance
EN
8.4 Troubleshooting
Problem Possible Cause Remedy
The lifting arm does not raise when
the handle shaft is pumped.
The saddle drops once lifted. The release valve is not fully closed. Twist the handle shaft clockwise
The handle shaft cannot be
operated or raises the saddle slowly.
The handle shaft cannot
be twisted.
The release valve is not fully closed. Twist the handle shaft clockwise
The maximum load has been
exceeded.
The lifting arm fulcrum bar is
not lubricated.
The piston system is corroded. DO NOT use the jack. Contact
The hydraulics mechanism
is damaged.
The piston system is not
appropriately lubricated.
The attaching bolt has been
overtightened.
until strong resistance is felt and
bleed the piston if necessary.
Use an appropriately rated jack or
reduce the weight of the load.
DO NOT adjust the overload valve.
Use a grease gun to apply oil to the
grease nipple.
Draper Tools to discuss repair or
replacement options.
until strong resistance is felt
and bleed the piston if necessary.
DO NOT use the jack. Contact
Draper Tools to discuss repair or
replacement options.
Follow steps in section 7.1.
Slightly loosen the attaching bolt.
– 13 –
Page 14
9. Disposal
EN
At the end of its working life, or when it can no longer be
repaired, dispose of the jack according to local
regulations.
Contact your local authority for details of collection
schemes in your area.
In all circumstances:
• DO NOT dispose of this product with domestic waste
• DO NOT incinerate
• Before decommissioning, drain and dispose of the oil
from the jack in line with local authorities.
• DO NOT abandon in the environment.
– 14 –
Page 15
10. Explanation of Symbols
EN
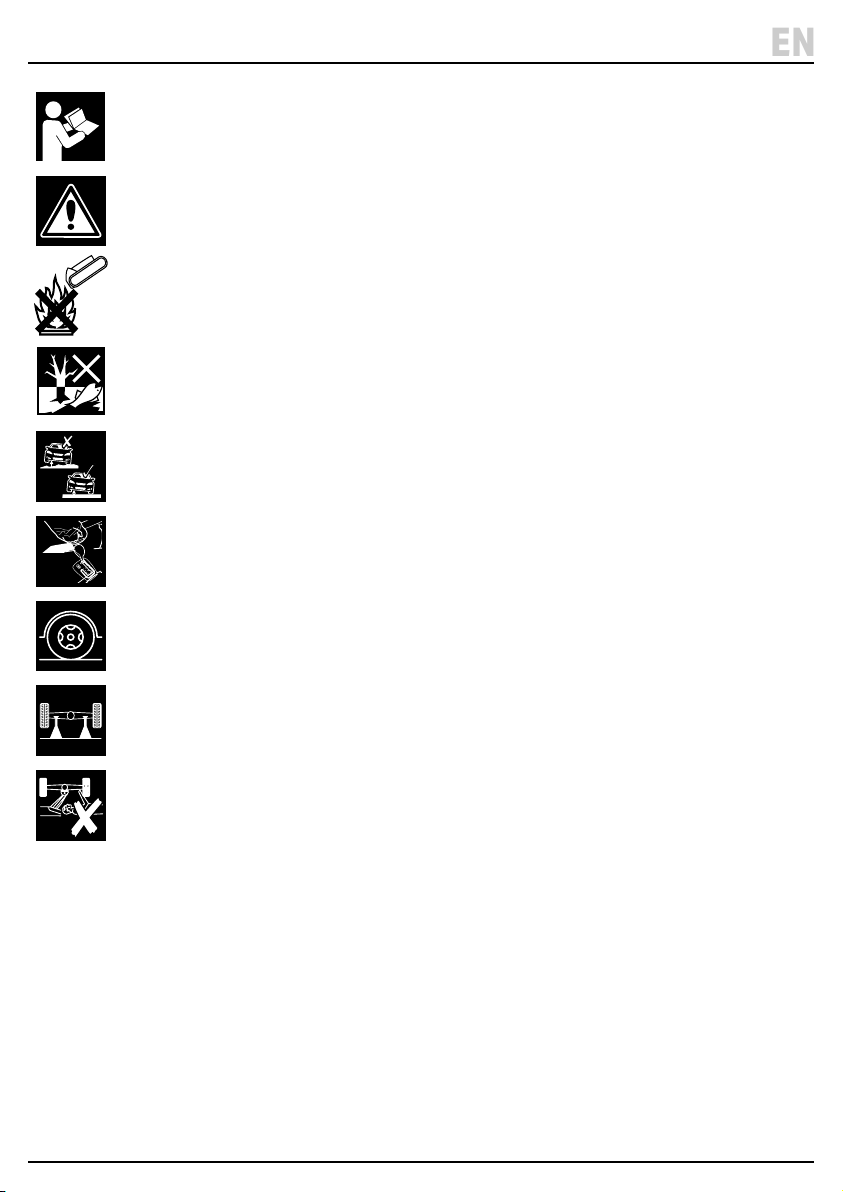
Read the instruction manual
Warning!
Donotincinerateorthrowontore
Do not abandon in the environment
Use only on level surfaces
Apply the handbrake and put the vehicle
in gear
Chock all grounded wheels
Support raised vehicles with axle stands
Do not work under vehicles when
supported only by a jack
– 15 –
Page 16

Contact Details
Draper Tools
Draper Tools Limited
Hursley Road
Chandler’s Ford
Eastleigh
Hampshire
SO53 1YF
UK
Website: drapertools.com
Email: [email protected]
Product Helpline: +44 (0) 23 8049 4344
Telephone Sales Desk: +44 (0) 23 8049 4333
General Enquiries: +44 (0) 23 8026 6355
General Fax: +44 (0) 23 8026 0784
Service / Warranty Repair Agents
For aftersales servicing or warranty repairs, please contact the Draper Tools Product
Helpline for details of an agent in your area.
Delta International
Delta International BV
Oude Graaf 8
6002 NL
Weert
Netherlands
© Published by Draper Tools Limited
 Loading...