

Page 1
Page 2

TABLE OF CONTENTS
General Specifications
I General Description
II Installation Instructions
A.
Unpacking
Location
B.
C. Power Requirements
D. Antenna Requirements
Speaker Requirements
E.
F.
Anti-VOX
G. Muting
III Control Functions
Front
A.
Rear Jacks
B.
Side Controls
c.
IV Operation
&
Jacks
3
5
6
6
6
6
6
7
7
7
9
9
11
12
13
A.
B.
c.
D.
E.
F.
G.
H.
I.
J.
V Theory
A*
B.
c.Second Converter
D.
E. Detector Systems
F. Audio Output
G.AVC System
H.
I.
J.
K.
Preliminary Control Settings
Single Sideband or Double Sideband Suppressed
Carrier Reception
C. W. Reception
AM Reception
RTTY Reception
Adjusting Dial Calibration
Noise Blanker Operation
Operation of Notch Control
Accessory Frequency Coverage
Fixed Frequency Operation
of Operation
R. F. Amplifier
First Mixer and Premixer System
50 KC I. F. System
S Meter
Noise Blanker
Crystal Calibrator
Power Supply
13
13
13
14
14
15
15
16
17
20
21
21
21
22
22
22
24
24
24
25
25
25
-l-
Page 3

VI Service Data
27
A, Removing Top Cover
Removing Bottom Cover
B.
C. Tube Replacement
D. Troubleshooting
VII Alignment Instructions
50KC Oscillator Alignment
A.
50KC I. F. Alignment
B.
Crystal Filter and Filter Match Transformer
c.
Alignment
5595 KC Oscillator Alignment
D.
Antenna RF, and Injection Circuit Alignment
E.
100 KC Calibrator Alignment
F.
V.F.O. Adjustment
G.
Notch Filter Alignment
H.
Passband
I.
Bias and S-meter adjustment
J.
Tuner Alignment
27
27
27
27
32
32
32
33
33
34
35
35
35
35
36
Fig.# 1
Fig.
#
Fig.#
Fig.
#
Fig.
#
Fig.
#
Fig.
#
Fig.
#
Fig.
#
#
#
#
10
11
12
13
Fig.
Fig.#
Fig.,
Fig.
CHARTS AND ILLUSTRATIONS
Connecting R-4A to TR-4 Transceiver
Viewing Angle Option
2
Rear View
3
Crystal Freg. Chart
4
Pre selector Chart
5
Selectivity C urve s
6
Notch Curves
7
Block Dia gram
8
Voltage Chart
9
Resistance Chart
Top View
Bottom View
Schematic Diagram
8
8
12
18
19
23
23
26
28
29
30
31
37
-2-
Page 4

GENERAL
SPECIFICATIONS
FREQUENCY COVERAGE:
and 28.5-29.0 MC with crystals supplied.
3.5-4.0 MC,
7.0-7.5Mc,
14.0-14.5,
Ten accessory crystal sockets
21.0-21.5,
are provided for coverage of any 10 additional 500 KC ranges between 1.5
and 30 M
SELECTIVITY: Drake tunable
C with the exception of 5.0-6.0 MC.
passband
.4
KC at 6 DB down and 2.6 KC at 60 DB down
filter provides:
1.2 KC at 6 DB down and 4.8 KC at 60 DB down
2.4 KC at 6 DB down and 8.2 KC at 60 DB down
4.8 KC at 6 DB down and 20 KC at 60 DB down
Selectivity switching is independent of detector and AVC switching.
I. F . FREQUENCIES:
First I. F.
-
5645 KC crystal lattice filter; second I.F.
50 KC tunable L/C filter.
STABILITY: Less than 100 cycles after warm up.
Less than 100 cycles for 10%
line voltage change.
SENSITIVITY: Less than
.5
uv for 10 DB signal plus noise to noise on all
amateur bands.
MODES OF OPERATION: SSB, CW, AM, RTTY
DIAL
5 KC
CALIBRATION: Main dial calibrated
divisions. Vernier dial calibrated 0
0 to 500
KC
to 25 KCin
and500 to 1000
1 KC
divisions.
KC
CALIBRATION ACCURACY: Better than 1 KC when calibrated at nearest 100
KC point.
AVC: Amplified delayed AVC having slow
(.
75
sec
.) or fast (. 025 sec.)
discharge; less than 100 microsecond charge. AVC can also be switched
off. 3 DB change in AF output with 60 DB change in RF input.
AUDIO OUTPUT: 1.4 watts max. and .5 watts at AVC threshold.
AUDIO OUTPUT
IMPEDANCE: 4 ohms and hi impedance for anti-vox.
ANTENNA INPUT: Nominal 52 ohms.
SPURIOUS RESPONSES: Image rejection more than 60 DB. I. F. rejection
more than 60 DB on ham ranges.
Internal spurious responses in ham ranges
less than the equivalent 1 uv signal on the antenna.
in
-3-
Page 5

TUBES AND SEMICONDUCTORS:
TUBE
12BZ6
12BA6
6HS6
6HS6
12BE6
12BA6
12BA6
2N3394
2
-
2N3394
6EH5
12BA6
12AX 7A
2N706
2N3858
2N3394
lN714
0B2 and lN483A
2
-
lN3194
lN3194
lN270
2
lN483A
lN483A
2 -lN270
-
lN483A
and
2N3394
FUNCTION
R.F. amp.
100 KC calibrator
1st mixer
Premixer
2nd mixer and xtal oscillator
50 KC I.F.
50 KC I.F.
AVC amp./AVC det.
Audio amp.
Audio output
Noise blanker amp.
Noise blanker amp. /shaper
VFO
VFO buffer
Xtal oscillator
Voltage regulator
Voltage regulator
Power supply rectifiers
Bias rectifier
AM detector
Noise blanker pulse clippers
Noise blanker gate
Switching
Prod. det.
FRONT PANEL CONTROLS: Main tuning, AF gain, RF gain, SSB/CW-AM
with slow AVC, fast AVC, or AVC off, function switch, band
switch, passband tuning and selectivity, preselector, notch, and head-
phone jack.
REAR AND SIDE JACKS AND CONTROLS: S-meter zero, notch adjust,
antenna jack, speaker jack, mute jack, anti-vox jack,
jack, accessory power socket,crystal lock socket, xtal/VFO switch,
ground post ,
POWER CONSUMPTION: 60 watts,
DIMENSIONS:
overall length
and fuse post.
5-l/2”
12-l/4”,
high,
weight 16 lbs.
l0-3/4”
120/240
wide, cabinet depth
VAC,
T4/T4X
50/60
switch,xtal
injection
cycles.
ll-5/8”,
-4-
Page 6

I GENERAL DESCRIPTION
The DRAKE R-4A is an extremely versatile communication receiver de-
signed to bring you every feature desirable for the ultimate in the
reception of all modes of amateur communications.
It provides a linear permeability-tuned solid state VFO with 1 KC
readability, and premixed injection with crystal controlled high frequency
oscillator for stability on all bands.
A 100 KC crystal calibrator is built-in.
An improved
passband
tuner/filter with four selectivity positions, and
a built-in notch filter are incorporated to provide the desired selectivity
and interference rejection,
and a noise blanker is built-in for elimination
of most noise on CW, SSB and AM.
As supplied, the unit gives complete coverage of 80, 40,
20, and 15
meter bands as well as the 28.5 MC to 29 .O MC portion of 10 meters.
Ten accessory crystal sockets are provided for coverage of other 500
KC frequency ranges between 1.5 and 30 MC such as 160 Meters, MARS
frequencies,WWV, short wave broadcast, etc. These sockets can be
programed to give up to 5 MC of continuous coverage for convenient use
with V. H. F. converters.
The R-4A also includes time proven DRAKE AVC with
fast-attack/slowrelease for SSB or AM and fast-attach fast-release for CW. If desired,
the AVC can be completely disabled for CW reception.
Complete AVC action and accurate S-meter indication can be obtained,
on all modes.
A crystal-lattice filter following the first mixer provides
excellent overload characteristics by providing selectivity before gain
producing stages.
When used with our T-4 Reciter, transceive operation may be obtained,
and when used with the T-4X transmitter, either transceive or independent
receive and transmit functions are possible.
-5-
Page 7

II INSTALLATION INSTRUCTIONS
A.
UNPACKING
Carefully remove your R-4A from the packing carton and examine it closely
for signs of shipping damage. Should any be apparent, notify the delivering
carrier immediately, stating the full extent of the damage.
Fill out and mail the enclosed warranty registration card so that your
warranty will be effective.
Save the packing material.
You may need it later for reshipment or storage.
Inspect the packing material closely before putting it away to be sure that
you have not overlooked any accessory hardware.
B.
LOCATION
In general the location of the R-4A is not critical. However, care should be
taken to insure that space is allowed around the unit for adequate air
circulation. Extremely hot locations,
units,should be avoided.
papers,
or pieces of equipment,as overheating may result.
Do not cover the top of the R-4A with books,
such as near radiators or heating
c.
POWER REQUIREMENTS
The R-4A is supplied with a dual-primary power transformer and can be
operated from 120 or 240 volt
50/60
it is wired for 120 volt operation.
cycle AC. As supplied from the factory,
If 240 volt operation is desired, it will
be necessary to remove the black/yellow and black/green power transformer
primary wires from the terminals to which they are now connected and
connect them together at the unused terminal on the same terminal strip.
75 amp fuse supplied with the
It will also be necessary to replace the
.4
unit with a
amp Slo-Blo fuse for adequate protection at the increased
.
voltage (see schematic diagram).
D.
ANTENNA REQUIREMENTS
The R-4A is designed to give best results when used with an antenna resonant
on the operating frequency and having an impedance from 50 to 75 ohms.
This requirement is most easily met using a center-fed dipole antenna cut
to the desired frequency and fed with
RG58A/U
cable. However, there are
many other antennas which will fulfill this requirement. For a more detailed
de scription on antennas ,
we suggest you refer to the ARRL Antenna Book or
The Radio Amateur’s Handbook.
-6-
Page 8

Antenna connection to the R-4A is provided at the jack on the rear of the
chassis marked ANT.
It is recommended that when the R-4A is used with a transmitter, the transmitting antenna be used; change-over being accomplished by an antenna
relay.
This function is provided
internally in our model T-4 and T-4X
Transmitters.
E.
SPEAKER REQUIREMENTS
A good quality 4 ohm speaker should be connected to the jack on the rear
of the chassis marked SPKR.
If one lead of the speaker is grounded to its
cabinet, its connection should be to the chassis of the R-4A.
Our accessory speaker model MS-4 provides the correct match, correct
tonality for good communications audio, correct connector, and is
patible in appearance with the R-4A.
It will also house our model AC-4
com-
power supply which is needed in conjunction with our model T-4 and T-4X
Transmitters.
ANTI -VOX
F.
A high impedance output is provided at the ANTI-VOX jack on the rear of
the R-4A chassis for use with our T-4 and T-4X transmitters and other
transmitters having voice control capabilities. The impedance at this
terminal is approximately 5000 ohms.
If the transmitting equipment
requires a lower impedance it may be necessary to attach a matching
transformer between the ANTI-VOX terminal on the R-4A and the ANTIVOX input terminal of the transmitter,
or to use the speaker output.
G.
MUTING
The Mute jack on the rear of the R-4A is connected so that when the
function switch is in EXT-MUTE position the receiver will operate only
when the inner-conductor of this jack is shorted to ground, and the
R-4A
will mute when the inner-conductor is open with respect to ground.
The inner-conductor should, therefore, be connected to a relay contact in
the transmitter or antenna relay which is normally open when transmitting
and grounded when receiving.
It is recommended that a shielded wire be
used between the mute terminal and the relay such as is provided with our
model T-4 and T-4X Transmitters.
If external muting is not desired, the STBY and ON positions of the function
switch can be used.
Jack to obtain N. B. and CAL functions.
It is necessary to insert a shorted plug in the Mute
Such a plug is installed in each
R-4A when shipped.
-7-
Page 9
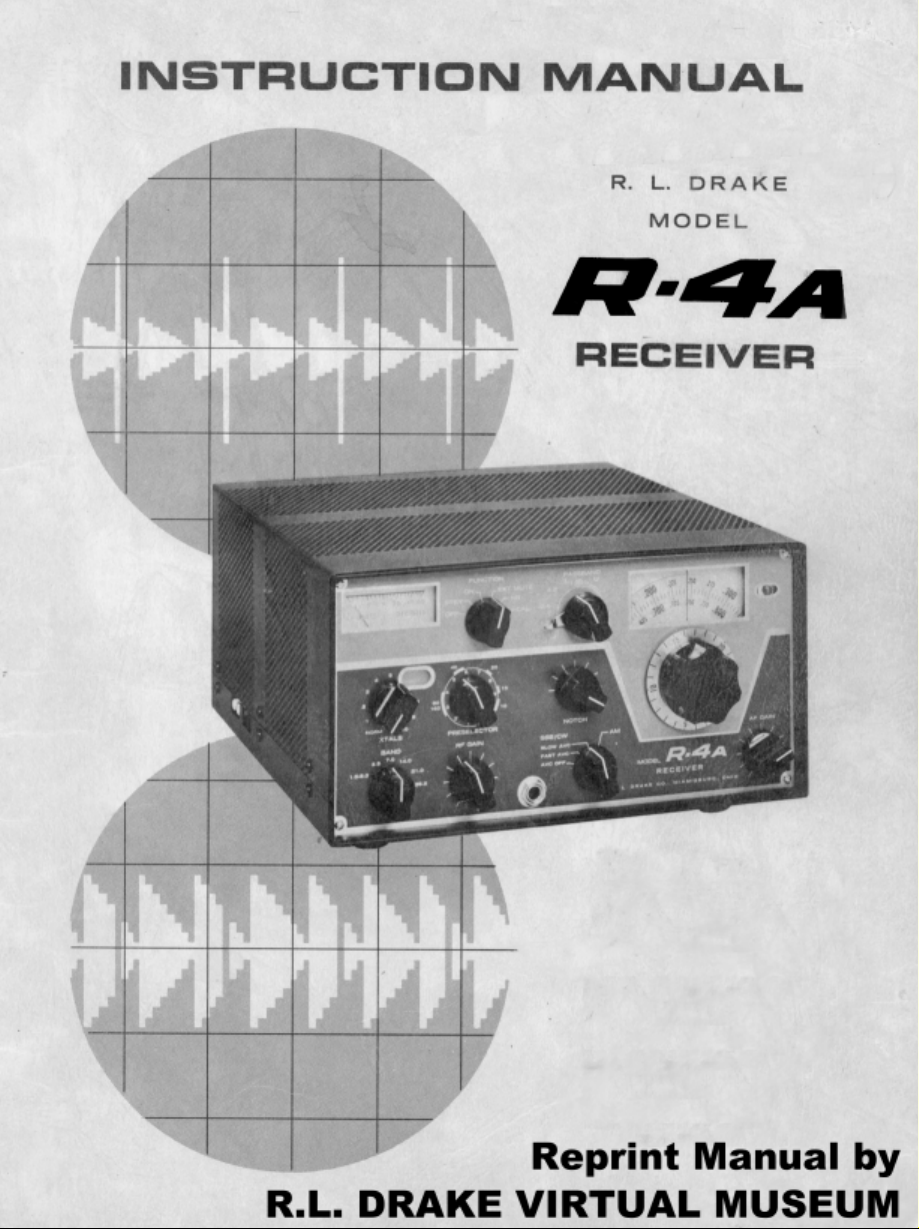
TR-4
y---
This switch must be
in the TCVR position
for transceiving and
in the
position for separate
receiver use.
lower
Cable
~___.____
Speaker Cable
--
_~---
Mute Line
--
RCVR
-
---I
~__-
AC-4/MS-4
or RV-4
I
R-4A
FIG.
USING
1
____--_-_____.p
THE R-4A WITH THE TR-4 TRANSCEIVER
Receiver Antenna Cable
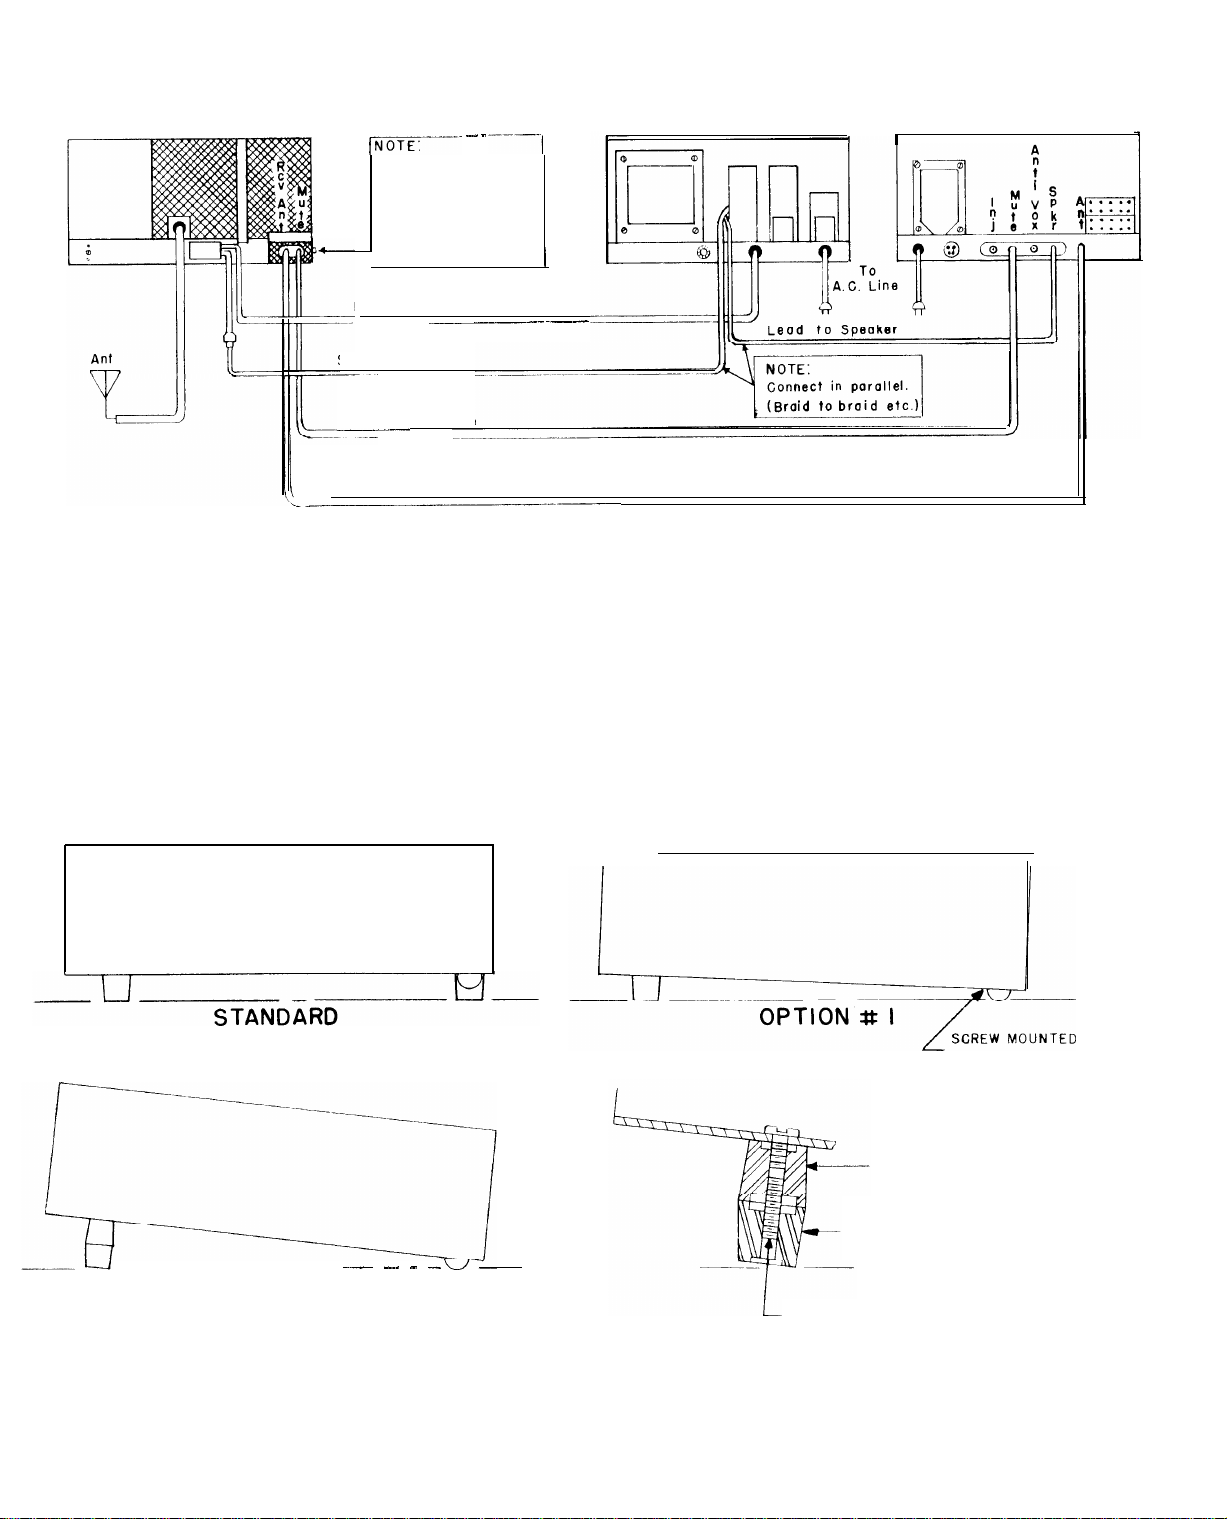
VIEWING
J
ANGLE OPTIONS
REAR
FE ET REMOVED
OPTION
# 2
~__
___
_
_
FIGURE 2
-8-
INVERTED FRONT FEET
FEET REMOVED FROM REAR OF
STUD* 10x24 x
SUPPLIED WITH UNIT
5/8
BASE
LONG
Page 10

A. FRONT
III CONTROL FUNCTIONS
MAIN TUNING - The MAIN
1.
TUNING
knob of the R-4A determines the
frequency on which you are receiving. The vernier skirt around this
knob is calibrated in KC’s from 0 to 25. The main dial is calibrated
in five KC divisions and has two scale
Use the 0 to
.500
S .
for bands 7.000-7.500, 14.000-14.500, 21.000-21.500, etc.; use
.500
the
to 1.000 scale for bands 1.500-2.000,
3.500-4.000,
29.000, etc. The small red knob just to the right of the dial scale
is for adjusting the position of the indicator line for calibrating the
main dial. The knob skirt is also adjustable by pushing it in slightly
and rotating it in the desired direction while holding the main tuning
knob stationary.
-
2.
BAND
The BAND control is a six position switch used to select the
amateur band desired or to switch the RF circuits to the correct tuning
range when tuning accessory frequency ranges.
The frequency range
which may be tuned for each setting of the band switch control is
given on the chart on page 16.
-
3.
XTAL
The XTAL switch is an eleven position switch used to determine
which crystal socket will be inserted in the circuit. When it is in the
normal position,
crystal selection is accomplished by means of the
band switch (with the exception of the 1.5 setting). When this switch
is set on any of the other positions 1 through 10, the crystal inserted
in the corresponding crystal socket will be inserted in the circuit for
accessory band operation.
The BAND switch must then be set in ac-
cordance with the information given on the crystal frequency chart
for reception of the frequency desired.
scale
28.500-
-
PRESELECTOR
4.
The PRESELECTOR control permeability-tunes the antenna,
RF, and premixer coupling coils to the desired frequency. The logging
scale on this control is calibrated from 0 to 10 with markings showing
the correct settings for the 160 through 10 meter amateur bands.
-
FUNCTION
5.
The FUNCTION switch is a six position switch used to
select the method of operating the R-4A.
When in the OFF position the power transformer primary is opened,
thus turning the unit off.
When in the STBY position, the power
is connected, thus allowing the filament and B+ to operate but the
receiver is muted regardless of external connection. When in the
ON position,
connection.
the receiver is unmuted regardless of external muting
When in the EXT-MUTE POSITION, the receiver is
muted or unmuted depending upon whether or not the mute connection
on the rear of the chassis is grounded,
-9-
thus permitting external control
Page 11

by
the transmitter.
is energized,
and when in the CAL position, the noise blanker is
When in the N. B. position the noise blanker
switched off and the calibrator is switched on. In these last two
positions the muting function is the same as if the switch were in
the EXT-MUTE position,
so if external muting is not used, a shorted
plug must be inserted in the Mute jack to obtain these functions.
6.
SSB/CW-AM- This switch determines the detector which is used and
the AVC mode.
When in the AM position,
a diode detector is incorporated, the BFO is switched off, and the AVC with a slow time constant
is used.
a product detector with the BFO.
delay time is about
imately
The other three positions under the heading SSB/CW employ
In the SLOW AVC position the AVC
.7
.025
seconds.
5 seconds.
In the AVC OFF position no AVC is generated.
In the FAST AVC position it is approx-
The SLOW AVC position should normally be used with single sideband
and CW and the fast position should normally be used for break-in
CW and RTTY. The AVC OFF position should be used only on CW
under difficult conditions in conjunction with the RF gain control.
7.
8.
9.
10
AF GAIN
The A. F. GAIN knob controls the audio output level of
-
the receiver.
RF GAIN
The R.F. GAIN knob varies the bias applied to the AVC
-
controlled tubes thus controlling the R. F. gain of the unit.
NOTCH
the receiver’s
carriers .
side the receiver’ s pa ssband.
direction from the center as
-
The NOTCH control tunes a highly selective notch across
passband
for the purpose of eliminating interfering
When turned to the OFF position, the Notch is moved out-
Rotation of this control is in the same
PASSBAND
control; i. e. If
PASSBAND
set to the left side (lower sideband) then heterodynes will be removed
with NOTCH set left of center.
PASSBAND- The
?)
band selector lever and the
PASSBAND
control is composed of two parts; the
passband
tuning knob. The selector lever
is calibrated in numbers representing the band widths in KC’s at 6 DB
down(.4,
The length and position of the lines which make up the
1.2, 2.4,
and 4.8KC).
passband
calibration indicate the relative band widths and their positions with
respect to each other.
The pointer on the
Passband
tuning knob repre-
sents the relative position of the fixed 50 KC BFO with respect to the
movable passbands.
rect settings of the
The dots at the ends of the lines indicate the cor-
PASSBAND
tuning knob for single sideband reception.
All of the left hand dots are for lower sideband and all of the right hand
dots are for upper sideband.
-
is
pass-
tuning
-lO-
Page 12

11.
For CW reception on the .4 position the signal is tuned for most
pleasing note with the frequency knob and is then peaked with the
PASSBAND
changing the
at maximum signal strength will be correct.
PHONE JACK
private listening when desired.
speaker output when headphones are plugged in. While the headphone
impedance is not critical (adequate output is available for most commercially available phones) more output is obtained on lower impedance
phones .
Trimm type 56
tuning knob. You can then tune other stations without
PASSBAND
-
A PHONE JACK is provided on the front of the R-4A for
We recommend a good set of 600 ohm phones, such as the
-
06.
tuning knob setting. The audio frequency
The jack automatically mutes the
12.
B. REAR CONTROLS
S-METER
ceived signal.
S-9. Each S-unit equals about 5 DB and S-9 is about 30 microvolts
at the ANT terminal.
1.
INJ. JACK
system of the R-4A to the T4 or T4X transmitters so that
operation with these units can be obtained.
SPEAKER JACK
2.
connection of a 4 ohm speaker such as our MS-4.
MUTE JACK
3.
receiver.
EXT-MUTE, N. B.,
this jack is open from ground.
returns the receiver to the receive condition.
4.
ANTI-VOX JACK
JACK for use in energizing the ANTI-VOX circuit of a transmitter used
with the unit such as our T-4 and T-4X.
-
The S-METER indicates relative signal strength of the re-
-
-
The receiver is muted when the FUNCTION switch is in the
It is calibrated in S-units from S-l to S-9 and DB over
&
JACKS
The INJ. jack provides a means of coupling the
-
The SPEAKER JACK on the rear of the chassis is for the
The MUTE JACK is for externally muting and unmuting the
and CAL positions and when the center conductor of
Shorting the center conductor to ground
-
High impedance audio is brought out the ANTI-VOX
premixer
transceive
5.
ANTENNA JACK
the R-4A to an antenna.
mately 52 ohms and can be used with antennas having impedances
between 50 and 75 ohms.
6.
POWER SOCKET
for operating external accessories.
5AB2
connector.
@ 30 ma.
-
The ANTENNA JACK provides a means for connecting
The input impedance at this point is approxi-
-
A POWER SOCKET is provided on the rear of the R-4A
This plug mates with a Cinch Type
Maximum load is 6.3 VAC @
-11-
.75
amp and
+150
VDC
Page 13

SIDE CONTROLS & JACKS
C.
S-METER ZERO
1.
This control is the front-most adjustment on the
-
right side of the R-4A chassis and is for the purpose of setting
the S-meter needle to S-l under no signal conditions.
-
NOTCH ADJ.
2.
The NOTCH ADJ. control located on the right side
of the chassis is a balancing device whichdetermines the amount
of attenuation obtained with the T-notch filter. This control needs
to be set very rarely.
For the proper adjustment, see operating
instructions .
XTAL/VFO
3.
SWITCH
This switch, located on the left side of the
chassis, allows the operator to select between normal VFO operation
or crystal control, using a crystal plugged into the CRYSTAL LOCK
SOCKET.
-
CRYSTAL LOCK SOCKET
4.
The R-4A may be crystal locked to a
specific frequency by installing a crystal of the required frequency
in this socket and setting the
position.
For details. see “Fixed Frequency Operation” in the
XTAL/VFO
operation instructions. THIS SWITCH MUST
SWITCH to the XTAL
BE IN THE VFO POSITION
FOR NORMAL OPERATION.
Figure
#3
REAR VIEW
-12-
Page 14

IV OPERATION
A. Preliminary Control Settinqs
For all modes of operation set these controls as follows:
FUNCTION
BAND
XTALS
PRESELECTOR
NOTCH
R.F. Gain
A.F. Gain
Single Sideband or Double Sideband Suppressed Carrier Reception
B.
Set the
1.
knob to the dot at the end of the third line from the top corresponding to the sideband desired.
Set the SSB/CW-AM switch to Slow AVC.
2.
Tune in a station with the main tuning for pleasing audio
3.
characteristics.
Passband
selector lever to 2.4 KC and set the
--
On
--
Set to desired amateur band (see
“accessory frequency coverage” for
information concerning coverage of
other frequencies)
--
NORM
--
Peaked for maximum S meter reading
on operating frequency
--
Off
--
Fully clockwise
--
Comfortable level
Passband
If noise is a problem,switch the Function switch to N. B. (see function
switch and noise limiter explanation).
If interference from undesired stations is a problem, adjust the PASS-
BAND selector lever to the 1.2 KC position and readjust the
knob to the dot at the second line from the top corresponding to the
desired sideband.
A heterodyne from a nearby carrier can be eliminated with the Notch
control. A more detailed description of the use of this control follows
under “Operation of Notch Control.
C . C . W. Reception
Set the
1.
knob to either of the dots at the ends of the second line from the
top.
Set the SSB/CW-AM switch to Slow AVC.
2.
Tune in a station for pleasing audio pitch with the main tuning
3.
knob and readjust the
Passband
selector lever to 1.2 KC and set the
Passband
knob for maximum S-meter reading.
-13-
PASSBAND
Passband
Page 15

Under crowded band conditions it will be advantageous to use the
4 KC selectivity position and
.
reposition
the
Passband
knob for
maximum S-Meter reading on a signal tuned in to the desired pitch.
After the
Passband
control is adjusted thus, simply tune in a CW
signal for maximum S-Meter reading and it will automatically be the
correct pitch.
It will sometimes be to your advantage to shift the
passband
of the
receiver to the other side of the BFO frequency for better copy under
crowded band conditions. This can be accomplished simply by re-
positioning the
Passband
knob to the alternate dot and retuning the
station with the main tuning knob.
Noise and strong interfering signals can be attenuated using the N .B.
and Notch functions as described later in this section.
Many operators prefer no AVC on CW. If this is your preference,
turn the SSB/CW-AM switch to the AVC OFF position, turn the A.F.
Gain fully clockwise and regulate receiver gain with the
---
R,
F. Gain
control.
D. AM Reception
1.
Set the
Passband
selector lever to 4.8 KC and set the
Passband
tuning knob to the middle of the longest line.
2.
Set the SSB/CW-AM switch to AM.
Tune in a signal with the main tuning knob.
3.
Interfering heterodynes can now be eliminated using the Notch control,
and noise can be reduced or eliminated by turning the Function switch
to N. B. A detailed description of these functions follows.
RTTY Reception
E.
1.
Set the
the
Passband
Passband
selector lever to the 1.2 KC position and set
knob to the right of the dot corresponding to lower
sideband.
Set the SSB/CW-AM switch to Fast AVC.
2.
Tune in a signal with the main tuning knob for correct indication
3.
on your terminal unit tuning indicator and adjust
Passband
tuning
knob for equal S-Meter reading of both mark and space.
If the station you are copying is sending upside down (mark low-space
high) turn the pa ssband control to the left of the “upper” dot and retune
the station with the main tuning dial.
If noise is a problem,turn the Function switch to N. B.
Interfering
heterodynes can be eliminated using the Notch control.
-14--
Page 16

Adjustinq Dial Calibration
F.
The calibration of the main tuning dial on the R-4A may vary slightly
from band to band due to the tolerance limits of the various crystals.
Therefore, the main tuning dial index has been made adjustable by
means of the small red knob to itsright.
To set the calibration on
a given band, proceed as follows:
Set Band Switch, Preselector,
1.
and Xtal switch to the desired
band.
Set Function switch to CAL.
2.
Set SSB/CW-AM switch to Slow AVC.
3.
Tune in 100 KC crystal calibrator signal for zero beat at the 100
4.
KC point nearest the desired operating frequency.
Slide the red knob at the right of the dial scale until the index
5.
line coincides with the 100 KC dial calibration.
While holding the main tuning knob, push in on its calibrated
6.
“0”
skirt and turn until the
mark coincides with the indicator
line.
Noise Blanker Operation
G.
The noise blanker in the R-4A is an I. F. device which turns off the
receiver during a noise pulse. It is equally effective on all modes
of operation and greatly attenuates most impulse noise.
For normal operation under
”
no noise” conditions, the Function switch
should be positioned in other than the N. B. settinq. However, if noise
becomes a problem,simply switch to N.B. It will be noticed that the
noise blanker functions only when needed: that is when the noise is
greater than the desired signal.Due to the effect of AVC in giving
constant AF output, the noise may not appear to
decrea
se. However,
signals down in the noise will come up and can be copied which were
undetectable previously.
It will also be noted that the N.B. works best on noise pulses which
are very short in duration and which are separated widely in time, (i.e.
The closer the pulses are together, the
automobile ignition noise
) .
less effective the N. B. will be since the noise detector circuitry has
more and more difficulty distinguishing the noise from the desired signal.
-15-
Page 17

H.
Operation of NOTCH control
The notch control on the R-4A consists of a permeability-tuned T-notch
filter in the 50 KC I.
which can be tuned across the receiver’s I. F. for the elimination of
interfering carriers in all modes of operation.
In order to obtain optimum results using this control, it is first necessary
to set the “notch adjust” control located on the side of the chassis as
de scribed here.
Preset R-4A controls as follows:
1.
This filter is capable of producing a deep notch
F.
FUNCTION
PASSBAND
BAND
XTALS
R.F.
GAIN
A.F. GAIN
SSB/CW-AM
NOTCH
With the main tuning knob, tune in the crystal calibrator for low
2.
pitched audio note and peak the preselector for maximum S-Meter
reading.
Advance the Notch control until some reduction in S-meter reading
3.
is observed.
4.
Adjust Notch Adjust (located on right side of chassis) for further
attenuation.
Alternately adjust Notch and Notch Adjust for minimum S-meter
5.
reading.
justment should rarely be necessary.
In order to eliminate an unwanted carrier on any mode of operation,
tune the Notch control across the
carrier drops into the notch and is thus eliminated.
as easy to notch out the desired carrier so a little practice will be necessary to enable the operator to use the control most effectively.
This is the optimum setting for notching and further ad-
-- Cal
-- Selector 2.4 or 4.8, Knob upper or lower
-- 3.5 MC
-- NORM
-- Fully clockwise
-- Comfortable level
-- Fast AVC
-- Off
Passband
of the receiver until the
Note that it is just
Rotation of the Notch control is in the same direction from center as
Pa ssband control.
sideband) then heterodynes will be removed with the Notch control set
to left of center.
That is, if
Passband
-16-
is set to the left side (lower
Page 18

I. Accessory Frequency Coverage
In addition to reception on 80, 40, 20, 15, and the 28.5 - 29.0 portion
of 10 meters, the R-4A can be programed to receive any ten 500 KC-wide
ranges between 1.5 and 30.0 mc (excluding 5.0 to 6 .O mc) by inserting
the appropriate crystal in one of the ten accessory crystal sockets.
These sockets face out the rear of the unit on the left side of the chassis.
In order to determine the correct crystal frequency, simply add 11.1 to the
lowest frequency of the 500 KC range to be covered. For example; assume
you wanted to receive 1.5 to 2.0 M
C for reception of the 160 meter amateur
band. The crystal frequency would be the lowest frequency of the desired range (1.5 M
C) plus 11.1 which would equal 12.6 MC. This crystal
can then be inserted in any one of the ten accessory crystal sockets
provided.
IMPORTANT: Only series resonant crystals should be used. Accessory
crystals may be ordered direct from the R.L. DRAKE COMPANY for $5.00
each. When ordering,
be sure to specify that the crystals you desire are
for accessory frequency operation in the R-4A.
XTAL
In order for the desired band to be received,the
Switch must be turnea
to the number corresponding to the crystal socket in which the crystal in
question is inserted.
The lowest frequency of the range made available
may then be written in the range window with pencil for future reference.
If crystals are changed you may erase the previously inscribed numbers
easily.
The BAND switch must now be turned to a position which will allow the
PRESELECTOR to tune the desired range.
Recommended ranges are as
follows:
BAND
PRESELECTOR TUNING RANGE (MC)
1.5-3.0 1.5- 3.0
-
3.5 3.0
5.0
7.0 6.0-10.0
14.0 10.0-16.0
21.0 16.0-23.0
28.5 23.0-30.0
’
)
In our example,the BAND switch should be placed in the 1.5 position and the
preselector should be peaked on the 160 meter portion of its scale.
A chart showing the preselector frequency vs. log scale setting for each
Band switch position is shown on page 19.
-17-
Page 19

The following table shows the correct crystal frequency, and Band
setting for ranges between 1.5 and 30 mc (excluding 5.0
NOTE that if you intend to
in the
When receiving ranges starting with an even megacycle, the 0.000 to
.
ranges starting with a half megacycle, use the
T4/T4X
500 range on the main tuning dial may be used and when receiving
book should be followed instead.
transceive
with the R-4A, the crystal chart
,500
to 1.000 mc scale.
-
6.0 mc)
FREQ. RANGE
-
1.5
2.0
2.5
3.0
3.5
4.0
4.5
6.0
6.5
7.0
7.5
8.0
8.5
9.0
9.5
10.0
10.5
11.0
11.5
12.0
12.5
13.0
13.5
14.0
14.5
15.0
15.5
16.0
2.0
-
2.5
-
3.0
-
3.5
-
4.0
-
4.5 15.1
-
5.0
-
6.5
-
7.0
-
7.5
-
8.0
-
8.5
-
9.0
-
9.5 20.1 7.0
-
10.0
-
10.5
-
11 .o 2 1.6 14.0
-
11.5
-
12.0
-
12.5
-
13.0
-
13.5
-
14.0 24.6
-
14.5
-
15.0 25.6
-
15.5
-
16.0 26.6
-
16.5
Figure
#4
CRYSTAL FREQUENCY CHART
CRYSTAL
12.6 1.5 - 3.0
13.1 1.5
13.6 1.5
14.1
14.6*
15.6 3.5
17.1
17.6
18.
l*
18.6
19.1 7.0
19.6
20.6
21.1
22.1 14.0
22.6 14.0
23.1 14.0
23.6 14.0
24.1 14.0
25.1
26.1 +
27.1
*+
+
+
BAN D
-
-
3.5
3.5
3.5
7.0
7.0
7.0
7.0
7.0
7.0
14.0
14.0
14.0
14.0
14.0
14.0
21.0
3.0
3.0
FREQ. RANGE
16.5
17.0
17.5
18.0
18.5
19.0
19.5
20.0
20.5
21.0
21.5
22.0
22.5
23.0
23.5
24.0
24.5
25.0
25.5
26.0
26.5
27.0
27.5
28.0
28.5
29.0
29.5
*
-
17.0
-
17.5 28. 1
-
18.0
-
18.5
-
19.0
-
19.5
-
20.0
-
20.5
-
21.0
-
21.5
-
22.0
-
22.5
-
23.0
-
23.5
-
24.0
-
24.5 35.1 28.5
-
25.0
-
25.5
-
26.0
-
26.5 37.1 28.5
-
27.0 37.6 28.5
-
27.5 38. 1 28.5
-
28.0 38.6 28.5
-
28.5
-
29.0
-
29.5
-
30.0
Supplied with receiver
CRYSTAL
27.6 2 1.0
28.6
29.1
29.6
30.1
30.6
31. 1 2 1.0
3 1.6
32.
l*
32.6
33.1
33.6
34.1 28.5
34.6 28.5
35.6 28.5
36. 1 28.5
36.6 28.5
39.1 28.5
39.6*
40.1
40.6
BAND
2 1.0
2 1.0
2 1.0
2 1.0
2 1.0
2 1.0
2 1.0
2 1.0
2 1.0
2 1.0
2 1.0
28.5
28.5
28.5
+ The se ranges not recommended for
-18-
6 meter convertors.
Page 20

Page 21

Fixed Frequency Operation
J.
The R-4A can be locked to a specific frequency by plugging the
appropriate crystal in the crystal lock socket, located on the left
side of the chassis, and positioning the
XTAL position.
When the switch is so positioned, the R-4A VFO and crystal oscillator
system will no longer control the frequency.
Crystals for this application should be of the parallel resonant
fundamental variety with HC-6/U holders. The frequency of the
crystal to be used in this socket should be equal to the desired
operating frequency +5645 KC or to
EXAMPLES:
Desired operating freq. 7155KC + 5645 KC =
or
Desired operating freq.
(crystal frequency)
21,145KC
+ 5645KC = 26,790KC / 2 =
XTAL/VFO
l/2
of this value if it exceeds 15mc.
switch to the
12.800KC
(crystal frequency)
13,395KC
A trimmer capacitor is provided directly below the crystal socket for
”
pulling” the crystal slightly in order to get exactly on the desired
frequency.
The PRESELECTOR and BAND switch should be positioned as described
under “Accessory Frequency Coverage”
T4X
is being used, placing the
T4X
will result in the
Placing this switch in the RCVR position will lock the
lock frequency.
If the switch is placed on XMIT, the
transmit frequencies.
effect.
Crystals for fixed frequency
the R. L. Drake Company.
crystal you are ordering is for fixed frequency operation with the R-4A.
being VFO controlled while the R-4A is xtal locked.
The lock crystal in the R-4A will then have no
T4X
TRANSCEIVE switch on SEP.CONT.
R-4A
operation may be ordered direct from
When ordering, be sure to specify that the
for the desired frequency. If a
T4X
on the R-4A
T4X
controls both receive and
-2o-
Page 22

V THEORY OF OPERATION
A. R.F. Amplifier
A signal entering the antenna is applied to the grid of the low noise
12BZ6
coil
R. F. amplifier tube
Tl
and capacitors C21 through C31.
(Vl)
through the tuned circuit formed by the
Here it is amplified and the output is tuned by the circuit formed by
coil T2 and capacitors Cl through C11.
the grid of the
6HS6
first mixer (V2).
The signal is then applied to
B. First Mixer and Premixer System
A signal from the premixer system is applied to the cathode of the
6HS6
first mixer tube (V2), 5645 KC above the incoming signal frequency
applied to its control grid.
This results in 5645 KC I.F. output.
The premixer system consists of a 4955KC to 5455KC solid state
permeability tuned VFO T13, a switchable overtone crystal oscillator
Ql,
the premixer
V8, and
the premixer output circuitry composed of
T3 and T4 and their tuning and coupling capacitors.
The VFO signal is applied to the cathode of the premixer V8 and the
Ql,
output of the crystal oscillator
is applied to the grid.
The crystal frequencies are selected so that the difference frequency
output of the premixer is 5645 KC above the frequency of the desired
incoming signal.
For example, on 80 meters a 14.6 mc crystal is used in the crystal
-
oscillator. This frequency and the 4955
5455 KC VFO output combine in the premixer stage to give output from 9145 KC to 9645 KC.
This signal is applied to the first mixer cathode through coils T3 and T4 and
their associated tuning and coupling capacitors to beat with the incoming
3.5-4.0 M
C signal.
Note that the RF coils
This results in 5645 KC output.
Tl
and T2 and premixer output coils T3 and T4 are
premeability tuned, and are ganged together. They are tuned by means
of the PRESELECTOR control.
-21-
Page 23

Second Converter
c.
The 5645 KC output of V2 is applied to the grid of the
converter (V3) through a crystal filter.
ulation and overload characteristics by providing selectivity before the
gain producing stages.
The
cathode, control grid and screen grid are connected in a Pierce
oscillator configuration controlled by a 5595 KC crystal. The
IF
signal
the crystal oscillator signal to produce 50 KC output.
50 KC I.F. System
D.
The 50 KC output of the second converter V3 is applied to the grid of the
12BA6
its associated circuitry.
Output of V4 is applied to the grid of the last
through the
The
Passband
four coils, and variable selectivity is accomplished by changing the
coupling between the four tuned circuits.
is applied to the signal grid of this tube where it beats with
IF amplifier tube V4 through the T-Notch Filter composed of T8 and
passband
passband
tuner consists of four LC circuits with high Q.
tuning is accomplished by ganged permeability tuning of the
tuner T9.
This gives excellent cross mod-
12BA6
12BE6
second
5645 KC
IF amplifier (V-5)
E.
DETECTOR SYSTEMS
The amplified signal
of diode D7 and
detector diodes through the IF transformer,
When the SSB/CW-AM switch is in the SSB/CW position, the BFO, Q6,
is turned on applying 50 KC voltage to the product detector diodes, and
beats with the IF signal to produce an audio signal across the AF GAIN
potentiometer.
When the SSB/CW-AM switch is in the AM position, the BFO is turned
off, the AM detector is turned on and its output is connected to the AF
GAIN potentiometer.
from V5 is applied to the AM detector composed
to the AVC amplifier Q4 and to the product
Q5,
Tl0.
-22-
Page 24

cn
ii
3
W
0
20
30
40
50
FREQUENCY
-8 -6
NOTE‘
PASSBANDS
CONTINUOUSLY
MOVABLE ABOVE
AND BELOW
FREQUENCY.
ARE
EIFO,
-4
-2
BFO
0
2
4
KILOCYCLES
6
8
IO
60
FIGURE X 6 - SELECTIVITY CURVES
(6
FO)
-I
0
-2
KILOCYCLES
I
2
3
4
\
\
5
6
\
60
FIGURE # 7-EFFECT OF NOTCH ON 2.4 KC SELECTIVITY CURVE
-23-
Page 25

F,GAudio Output
Audio signal from the AF GAIN potentiometer is applied to the grid of the
6EH5
audio output tube V-7 through two stages of AF amplifiers consisting
of Q7 and Q8 and associated circuits.
The audio output from this tube is then applied to the speaker or phones
through audio output transformer T16.
directly to the plate of V7 through
The ANTI-VOX jack is connected
C122.
AVC System
The 2N3394 AVC amplifier(Q-4) is biased past cut-off to provide AVC delay.
When sufficient R. F. voltage from V5 is applied to its base, collector current
flows during part of the cycle.
appear across its load resistor R83 thus charging
switch is in the fast AVC position and both
This causes amplified negative voltage to
Cl08
when the SSB/CW-AM
Cl08
and
Cl09
when the switch
is in the slow AVC position.
The capacitor or capacitors then discharge through R83 to provide a time
constant of about
fa st AVC
.
When the switch is in the AVC off position the load resistor
.75
seconds on slow AVC and about
.025
seconds on
R83 is shorted, thus preventing AVC voltage from being developed.
AVC voltage is applied to the grid of
Vl,
V4, V5, and Noise Blanker IF
amplifier V9.
Rotating the RF Gain control counter clockwise applies increasingly
more negative bias to the AVC controlled tubes thus limiting their gain.
Adjustment of the receiver sensitivity control
(R87)
varies the minimum
bias on the AVC controlled tubes under no signal conditions with RF Gain
control at maximum.
When the mute line is opened from ground, the bias voltage rises to
-28 volts, thus cutting off the AVC controlled tubes.
S-Meter
H.
The S-Meter operates in a bridge circuit with the plates of V-4 and V-5
V2
on one leg and
and V3 on the other leg,
When AVC voltage is applied to the grids of V-4 and V-5, the tubes
draw less current, thus unbalancing the bridge and causing the S-Meter
to read up scale,
Adjustment of S-Meter zero pot (R42) allows the bridge balance to be
varied for zeroing the meter.
Zero adjustment holds under varying line
voltage conditions due to current characteristics of V-2 and V-3.
-24-
Page 26

The S-Meter sensitivity control R-40 varies the sensitivity of the meter
for calibration purposes by varying the resistance in series with it.
I. Noise Blanker
The noise blanker in the R-4A attenuates a received noise pulse by
shunting to ground the output of V-4 during the time interval of the
pulse.
The 50 KC I. F. output of the second converter V3 is fed into the grid of the
12BA6
Here it is amplified to a level sufficient to operate the pulse detector and
separation circuit composed of
This circuit operates in such a way that when a noise pulse is received of
a level higher than the received signal, a negative pulse is presented to
the grid of the noise shaper
a negative pulse causes a large positive pulse to appear at the plate.
In other words, the receiver is turned off during the pulse.
Noise Blanker IF amplifier V9.
Dl
and D2 and their associated circuitry.
Vl0A.
This stage is normally conducting and
This pulse is applied to the grid of the pulse amplifier
The 18 K resistor R66 and the 100 K resistor R65 form a voltage divider
Vl0B
which applies positive cathode bias to
both from conducting.
When a positive pulse is applied to the grid of
causing both
ground the output of V4 through
J. Crystal Calibrator
The cathode, grid
are connected in a Pierce oscillator circuit which operates at 100 KC.
The operating point of the plate of this tube is such that it is quite rich
in harmonics.
capacitor
The cathode is disconnected from ground in all but the CAL position of
the FUNCTION switch, thus disabling the stage.
C118.
Vl0B
and D3 to conduct. When D3 conducts, it shunts to
Cl04
and
#l,
and grid
This harmonic output is coupled to the antenna jack through
#2,
of the
and diode D3 preventing
Vl0B,
C105.
12BA6
crystal calibrator (V12)
Vl0B.
the bias is overcome
Power Supply
K.
The full wave power supply uses two IN3194 diodes. Condenser input
is used with +140 and +160 volts output.
-25-
Page 27

The negative bias supply uses a IN3194 diode to provide -60 volts
to the AVC system for minimum bias, muting, and control of RF Gain.
An
OB2
voltage regulator VII is incorporated to provide 108 volts regulated for
A
operation of the xtal calibrator.
IN714
zener diode, in conjunction with
provides 10 volts regulated for the VFO and H .F. oscillator.
V11
The power transformer has a dual primary.
in parallel for 120 volt operation.
To operate at 240 volts, it will be
As supplied, it is connected
necessary to remove the GRN/BLACK and YEL/BLACK wires from their
present terminals and connect them together at the remaining terminal
of the terminal strip.
This places the windings in series.
It will also be necessary to remove the.75 amp fuse and replace it with
.4
amp slo-blo fuse.
a
m
r
--
Figure #8
-26-
Page 28

VI
We will check and factory align your R-4A for a nominal fee of $10 .OO plus
transportation charges if the set has not been tampered with. If repairs
are necessary,
tampered with or misaligned,
only.
Removinq Top Cover
A.
an additional charge will be made. Units that have been
SERVICE DATA
will be repaired on a time and material basis
Remove the three top screws on each side of the
1.
Remove cover by first pulling up on the rear and then on the
2.
front of the cabinet.
Removinq Bottom Cover
B.
Remove the six bottom screws from the sides of the R-4A
1.
Lift R-4A chassis out of bottom cover.
2.
Tube Replacement
c.
In general, most trouble encountered in radio equipment of good design
is due to tube failure.
ment can be done without need for realignment. The best method of
finding defective tubes is direct substitution. It is best not to rely too
heavily on a tube checker.
Troubleshooting
D.
Careful consideration has been given in the design of the R-4A to keep
maintenance problems to a minimum.
that some problem will arise which cannot be cured by tube substitution.
If this occurs, we suggest that you either return the unit to your dealer,
or write direct to our Service Department, describing your problem in
detail. Include full information concerning external connections, control
settings, tubes substituted, etc.
The R-4A has been designed so that tube replace-
However, it is quite possible
R-4A.
DO NOT RETURN EQUIPMENT TO THE FACTORY WITHOUT PRIOR
AUTHORIZATION.
The voltage and resistance charts which follow should be valuable in
isolating minor problems.
service the R-4A unless you are thoroughly familiar with electronic
circuitry and servicing technique.
CARE SHOULD BE TAKEN NOT TO DISTURB THE LEAD DRESS IN THE
R-4A SINCE SEVERAL CIRCUITS ARE QUITE CRITICAL IN THIS REGARD!
However, no attempt should be made to
-27-
Page 29

Figure #9
VOLTAGE CHART
Number
Vl
v2
v3
v4
v5
v7
V8
v9
Vl0
Vll
Type
OB2 110
1
12BZ6
6HS6
12BE6
12BA6
12BA6
6EH5
6HS6
12BA6
12AX7A 70 -* 5
-1.1 1.66
0 0
-11.5 2.7
-1.1
-1.2
2.9
-.8
-1.29
2 3 4 5 6
0 0
0
0
0 0
0
N.C.
0
6.3*
12.6*
12.6*
12.6*
12.6*
0
N.C.
12.6*
12.6*
0
12.6*
0
6.3*
6.3*
0
0
N.C.
140
140
140 132
136
110
0
145 120
128 110
12.6*
110
129
80
93
80
91
148
N.C.
7
0
2.8
0
2
0
140
2.2
0
0
.7
2.7 N.C.
9
v12
Notes:
l
12BA6
*
1.
Function switch is in NB position except for
2.
is used.
R.F. and A.F. gain controls are fully clockwise. Side controls are set
3.
for normal operation.
Band switch is on 3.5 and Preselector is peaked on 80 meter noise with ant.
4. disconnected.
5. The position of other controls is unimportant.
plug must be inserted in the MUTE jack.
-44
Indicates AC voltage.
0 0
SSB/CW-AM
Xtal switch is on NORM.
12.6*
switch is in Slow-AVC position.
-28-
44 45
V12
measurements where CAL position
However, the shorted mute
7
Page 30

Number
Type
Figure #l0
-
3
-
RESISTANCE CHART
4
5
6
7
8
9
Vl
v2
v3
v4
V5
v7
V8
v9
VlO
Vll
v12
12BZ6
6HS6
12BE6
12BA6
12BA6
6EH5
6HS6
12BA6
12AX7.
OB2
12BA6
4.4M
2.2M
4.2M
3.7M
100
500K
350K
2.6M
A
158K
5K
1M
700K
0
0
Fil
Fil
0
Fil
Fil
0
Fil
0
INF
0
Fil
Fil
0
Fil
0
Fil
Fil
0
0
700K
Fil
6K
6.5K
6.5K
6.5K
10K
500K
4.7K
6.5K
Fil
5K
390K
6.5K
228K
6.5K
9K
12K
16.1K
25K
8.3K
4.5K
INF
125K
0
2.2K
0
330
0
7.2K
500
0
3.2M
9*
1K
20K*
Fil
Note s:
* This resistance will vary greatly on various Ohm meter ranges due to the
1.
characteristics of diode D3.
V12
2. Function switch is in NB position for all but
where CAL position is used.
3. SSB/CW-AM switch is on slow-AVC, and AF and RF Gain controls are fully
clockwise.
4. All side controls are in their normal operating positions.
5.
The position of other controls is unimportant. However,
the shorted mute
plug must be inserted in the MUTE jack,
-29-
Page 31

Page 32

Page 33

VII ALIGNMENT INSTRUCTIONS
Alignment of the R-4A will require the following equipment.
1.
A reasonably stable signal generator having a frequency range
from 1.5 to 30
2.
An 11 megohm vacuum tube volt meter (VTVM)
A 12.6 mc series resonant crystal.
3.
A WWV crystal for the WWV frequency most reliable in your
4.
area ( see
An alignment load consisting of a
5.
capacitor in series with a 1000 ohm
resistor.
mc and variable output level.
.0
”
accessory frequency coverage”)
.005
mfd disk ceramic
l/2
watt composition
Small alligator clips connected to each end would
be a great help.
6.
7.
Two
10K l/2
watt resistors and one 68 ohm resistor.
An accurate rule with
l/32”
divisions.
Before alignment is attempted,
to operate for at least one half hour.
50 KC Oscillator Aliqnment
A.
Set the SSB/CW-AM switch to fast AVC.
1.
Set Function switch to CAL.
2.
Connect a 6” lead to your alignment load and connect it from
3.
pin 5 of the
Advance A.F. gain control so that an audio beat note can easily
4.
12BA6 (V5)
be heard.
5.
Adjust
Note:
Tll
for zero beat.
Do not be concerned that 100 KC calibrator has not yet
been set.
It cannot be “pulled”
to be of any consequence for this purpose.
Remove alignment load.
6.
50 KC I. F. Aliqnment
B.
1.
Set the
Passband
selector lever to 4.8 KC and set the
tuning knob to the middle of the longest line.
Attach the signal generator to pin 7 of V3 and adjust the frequency
2.
to approximately 5645 KC.
hear a loud beat note in the speaker.
be adjusted for zero beat.
Adjust the generator output for an S meter reading of approximately
3.
s-9.
Adjust T7 and
4.
Tl0
for maximum S meter reading. Note that
tuning of these cans will be quite broad.
Attach a
5.
Adjust T14 for maximum positive voltage on VTVM (Do not remove
6.
VTVM from TP- 1 yet)
VTVM
to TP-1.
.
the R-4 should be turned on and allowed
to pin 5 of the crystal calibrator
(V12).
far enough off frequency
Passband
As 5645 KC is approached you should
The generator frequency should
Page 34

C. Crystal Filter and Filter Match Transformer Aliqnment
Attach signal generator to pin
1.
to 5645 KC.
Set level so that an S-Meter reading of approximately S-9 is obtained.
2.
Passband
Set
3.
it points horizontally to the left.
Adjust signal generator frequency for peak S-Meter reading. A high
4.
pitched audio tone should be audible from the speaker.
Adjust generator frequency so that the tone increases in pitch. You
5.
will notice that the S-Meter reading will start to drop. Continue
shifting the generator frequency until the S- Meter reading drops 20
DB. (If the meter reads S-9 at peak, it should now read S-5).
Adjust T5 and T6 for maximum S-Meter reading.
6.
Return
7.
center of longest line.
Set generator frequency to image frequency at 5545 KC and adjust
8.
generator output level until a signal is heard from the speaker.
Note the wires wrapped around pins on the base of the crystal filter
9.
can
is obtained. (Note:
increase rather than a decrease in this signal). If much adjustment
is necessary here,steps 1 through 6 should be repeated.
Passband
(T6).
selector switch to 2.4 KC and set
selector lever to 4.8 and return
Unwrap one of these wires until minimum signal strength
Unwrapping the wrong wire will result in an
#l
of V2 and set generator frequency
Passband
Passband
knob until
knob to
5 59 5 KC 0 scilla tor Aliqnment
D.
Return
1.
to the center of the longest line.
With signal generator still attached to pin 1 of V2, and VTVM still
2.
attached to TP-1, adjust the generator frequency for maximum positive
voltage.
3.
Observe this peak voltage and tune the generator in either direction
from the point until the voltage drops 50%. Observe the generator
frequency reading at this point.
4.
Now tune the generator in the opposite direction until the voltage is
once again 50% of peak and observe the frequency.
5.
Set the generator exactly half way between these two points and
adjust C61 for zero beat from the speaker.
Disconnect generator and VTVM.
6.
NOTE:
If
R4A
is to be used with T4 or
required.See
Passband
This frequency should be very near 5645 KC.
T4/T4X
selector lever to 4.8 KC and
T4X,
a more accurate adjustment of
instruction book.
Passband
tuning knob
C61
will be
-33-
Page 35

Antenna, RF, and Injection Circuit Aliqnment
E.
Turn off receiver and temporarily connect a
1.
S
the side rotor contact of
S5D
contact of
to the nearby terminal strip terminal to which the
5 C to ground,and from the corresponding
red and white striped B+ wire is attached.
10K
resistor from
S5C
and S5D are the
third and fourth bandswitch waffers as viewed from the front of the
receiver.
You will note that each of these switches have two rotor
contacts . The ones in question are the most easily accessible. All
rotor contacts are green in color.
Disconnect the antenna and connect the 68 ohm resistor across
2.
the antenna jack.
Install the 12.6 mc crystal in one of the R4 accessory sockets for
3.
alignment of the 160 meter band.
4.
Turn the PRESELECTOR fully clockwise and carefully measure the
distance from the top of the white sleeves protruding from the
top of
Tl, T2,
distance should be exactly
to this setting.
T3 and T4 to the tops of their respective slugs. This
9/16”.
If necessary, adjust the slugs
(This was done at the factory and should be correct.
Check measurements carefully before altering the position of any of
the se slugs
.)
Turn on receiver and tune in the crystal calibrator signal at 28.5 mc.
5.
Set the PRESELECTOR knob so that the slugs are
15/32”
above the
white sleeves.
Adjust all four trimmers marked 28.0 for maximum S-meter reading.
6.
(If the S-meter reading is insufficient to produce an adequate
S-meter indication, it will be necessary to use the
external
generator. Set the generator output level for an S-meter reading
of about S7 and set the generator frequency to 28.5 mc.
Repeat steps 5 and 6 for each band using the slug measurements and
7.
frequencies given in the following chart.
BAND
28.5
SLUG HEIGHT
15/32”
21 .o
14.0
1
7.0
3.5
1.5
0 (flush with sleeve)
0 (flush with sleeve)
7/1
6”
l/3
2”
3/1
6”
FREQUENCY
28.5 mc
21.3 mc
14.3 mc
7.3 mc
3.8 mc
1.9 mc
signal
NOTE that for the 1.5 BAND adjustment the XTAL switch must be in
a position corresponding to the socket in which the 12.6 mc crystal
is inserted.
This completes the alignment. Turn off the receiver and
remove the 10 K and 68 ohm resistors installed in steps 1 and 2.
-34-
Page 36

100 KC Calibrator Alignment
F.
Attach the antenna to the R-4A and tune in WWV at the frequency
1.
most reliable in your area.
on page 18.
Set the Function switch to CAL. (A shorted plug must be inserted
2.
in the Mute jack).
Adjust the calibrator adjust trimmer (C119) for zero beat with the
3.
unmodulated WWV carrier.
Note that Cl19 is located under the chassis on the component board
on which the 100 KC crystal is mounted, and is accessible through a
hole if bottom cover is in place.
V.F.O. Adjustment
G.
The permeability tuned VFO was carefully adjusted at the factory and
should require no further alignment.
If the VFO does not appear to track from one end of the range to the
other, it should be returned to our plant for alignment. Maximum
calibration error is 1 KC when calibrated at nearest 100 KC point.
For crystal selection see the chart
If you notice the same error from one end of the band to the other and
you cannot correct it with the movable dial index, the main dial may
be slipped on its shaft enough to bring the calibration back into range.
H.
Notch Filter Aliqnment
Tune in the crystal calibrator signal at any frequency for zero beat.
1.
2.
Set the Notch control to the center of its range.
3. Adjust the slug in T8 for minimum S-Meter reading.
Pas sband Tuner Alignment
I.
Turn
1.
travel of the four slugs visible from the rear of the tuner.
2. When these slugs are nearest the rear of the receiver, the Pass-
Passband
tuning knob through its rotation and observe the
-35-
Page 37

band tuning knob should be pointing horizontally to the left as
viewed from the front.
and reposition the knob.
Tune in a crystal calibrator signal at 3.8 mc for zero beat.
3.
Set the
4.
knob to the center of the shortest line.
Attach a VTVM to the AVC test point (TP-2) and adjust the four slugs
5.
on the rear of the
IMPORTANT
spring when turned and this must be taken into consideration when the
slugs are adjusted so as to obtain a true peak.
Passband
-
The
selector lever to
passband
passband
If it is not, loosen the knob set screw
.4
and set the
tuner for maximum AVC voltage.
tuner slugs have a considerable amount of
Passband
tuning
Set the
6.
calibrator.
Turn the
7.
of the received noise.
tuner until the pitch of the noise is the same at the extreme ends
of the control travel. (Pointer pointing horizontally to the left and
to the right.)
Set the
8.
the pitch of the noise at the dots at the ends of the second line
from the bottom.
If it is not, turn the knob to the left dot and observe the pitch.
9.
Then rotate the control to the right until the pitch is the same.
10.
J.
Loosen the knob set screw and rotate the knob until it is halfway
between its position at step 9 and the right dot.
Tighten set screw.
11.
Bias and S-Meter Adjustment
Attach a VTVM to TP-2 and with the Preselector detuned and the
1.
antenna disconnected, adjust the RCVR SENS control, located
on a component board directly behind
Remove the VTVM and adjust the S-Meter Zero control, located on
2.
the side of the chassis,
Rotate the R.F. Gain control fully counter clockwise and adjust the
3.
S-Meter Cal adjustment (R40) located on the component board
mounted directly behind V5 for an S-Meter reading of 60DB over S-9.
4.
Recheck
necessary.
Passband
Passband
Passband
steps 2
selector switch to 1.2 KC and turn off the crystal
knob through its range while observing the pitch
Adjust the small screw on the rear of the
selector lever to the 2.4 KC position and observe
The pitch should be the same at either dot.
Tll
, for
-
1.3 5 volts.
for a reading of S-l on the S-Meter.
and 3 with the unit sitting upright. Readjust if
-36-
Page 38

Page 39

 Loading...