

Page 1
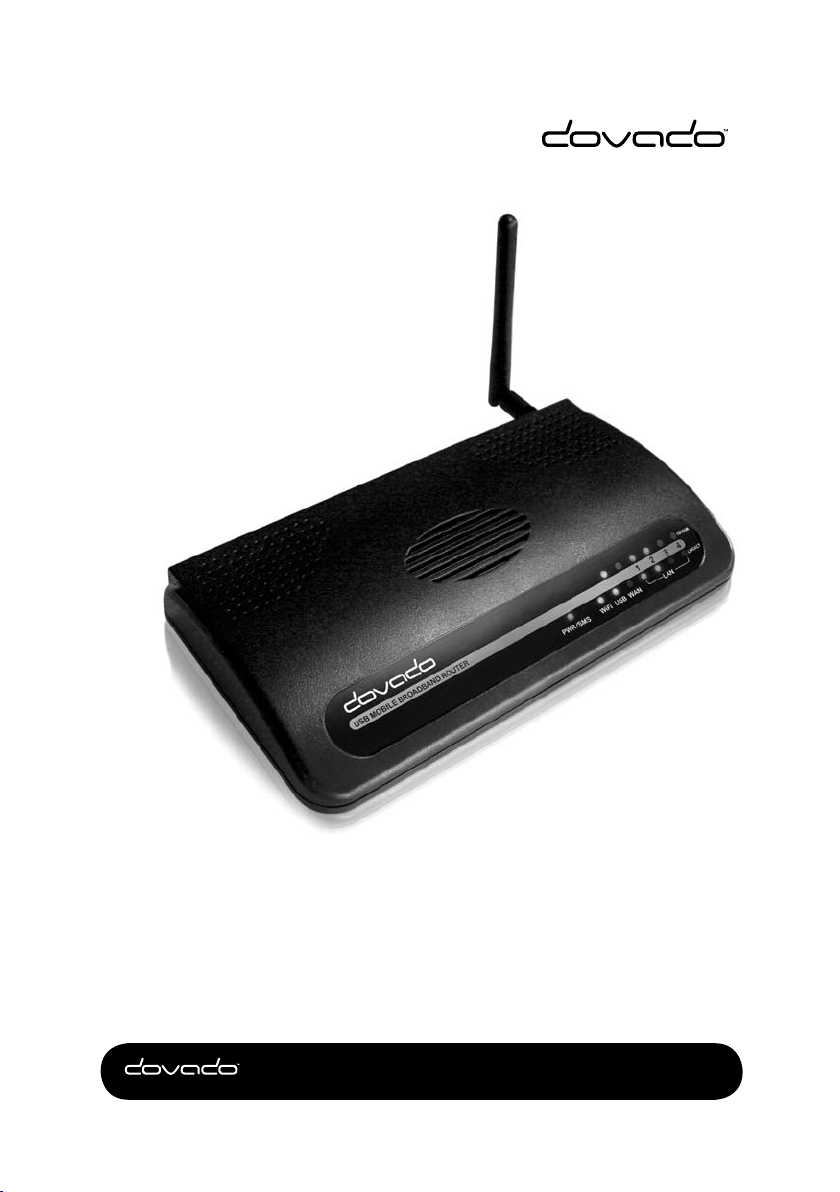
USB Mobile Broadband Router
Reference Manual
& Quick User Guide
The Mobile Choice for your Broadband Internet
Page 2

Other names of companies, products, or standards are the trademarks or registered trademarks of their
respective owners.
Page 3

Table of Contents
Introduction 3
Package contents 3
Additional required items 3
Quick Installation Guide 4
Hardware installation 4
Reset button 5
Connecting by Ethernet cable 6
Connecting by Wireless LAN (WLAN/WiFi) 6
Accessing the UMR 7
Wizard Conguration 8
Modem 14
SMS Conguration 16
Advanced Settings 17
WLAN Settings 18
LAN Settings 21
System Settings 23
Internet 25
Upgrading the rmware 29
Troubleshooting 31
Internet 31
Support 33
Technical specifications 34
Guidelines for safe and efficient use 35
Product care and maintenance 35
Limited warranty 36
Table of Contents 1
Page 4

Page 5

Introduction
Thank you for choosing the Dovado USB Mobile Broadband Router
(UMR). This quick user guide will help you set up your UMR to
access the Internet.
Package contents
Before continuing to the next section, make sure all of the listed items
below are included in your package. If something is missing, kindly
contact your reseller.
• USB Mobile Broadband Router (UMR)
• Wireless LAN antenna
• Power supply
• Quick User Guide
• 4 rubber feet
Additional required items
In addition to the items above you will need a mobile broadband USB
modem in order for the product to work. This modem provides the
wireless link to your operator’s network and is sold separately. To use the
Internet you need a computer.
Introduction 3
Page 6
Quick Installation Guide
With the Dovado UMR you can access the Internet wirelessly. In
addition to the UMR you need a computer. The product can be set up
using a common web browser.
Hardware installation
Before continuing, you will need to
install the necessary hardware;
1. Connect the WLAN antenna
to the UMR unit.
2. If you do not intend on wall
mounting your UMR, then
add the included rubber feet
to the designated points on the
base of your UMR.
3. Insert the USB Modem into the
UMR.
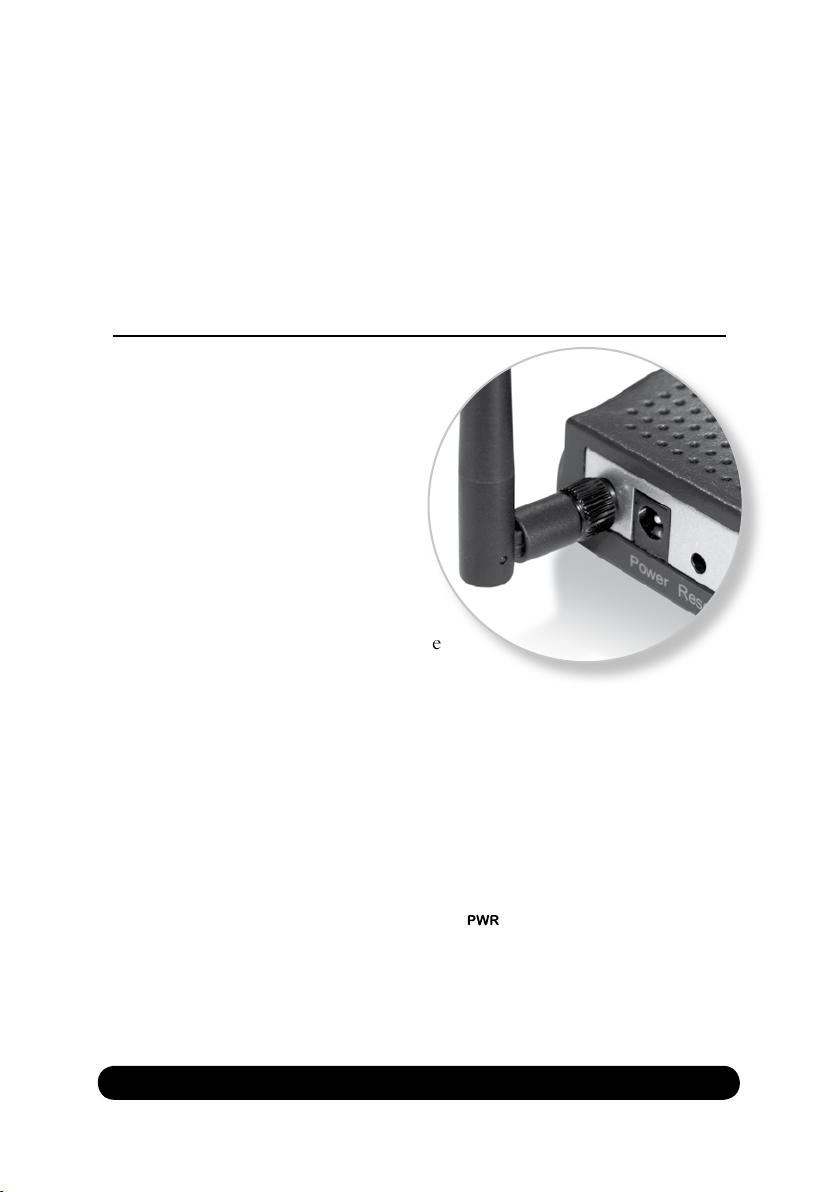
4. Connect the power supply to a wall socket and to the PWR
connector located at the back of the UMR.
5. Please note that the USB modem should not be replaced during
operation, if you need to replace the modem, power off the UMR
first.
6. Peel off the protective layer from the front panel.
A solid green light on the power LED ( ) indicates that the unit is
working.
Quick Installation Guide 4
Page 7
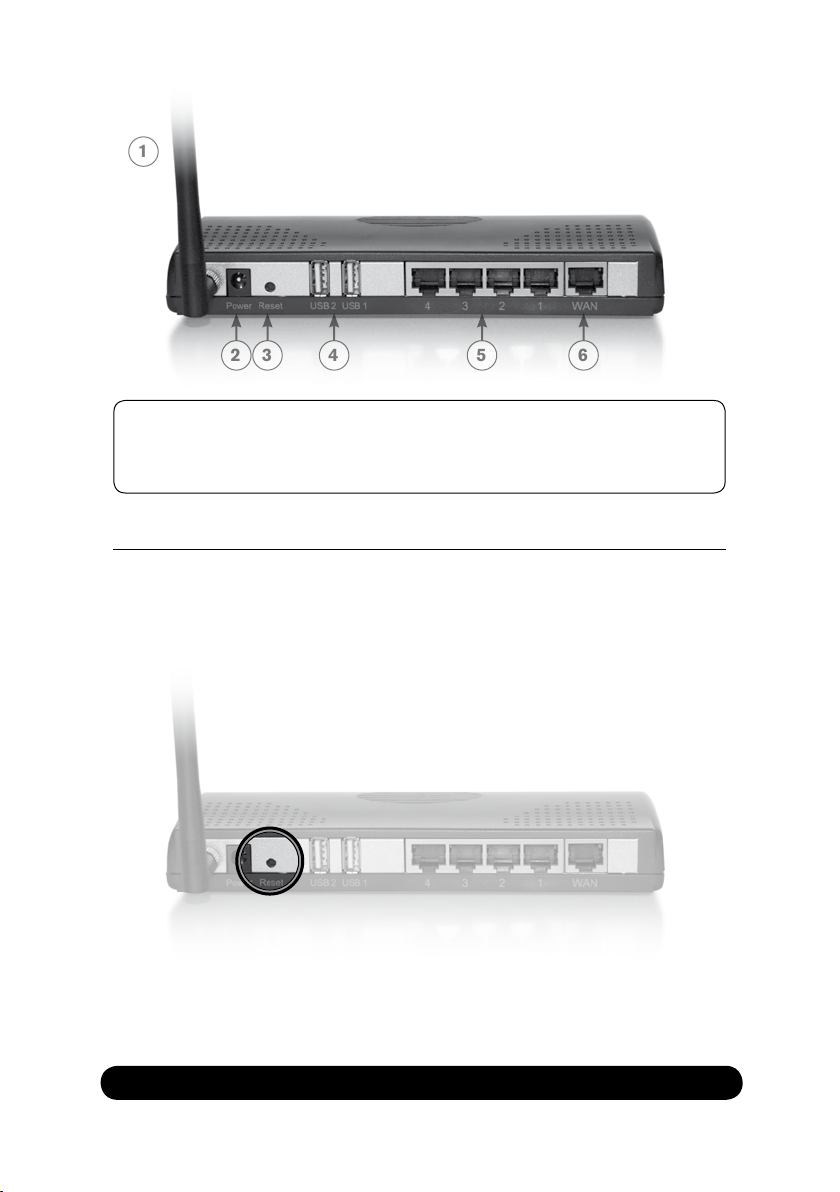
1. Wireless LAN (WLAN) antenna
1
64325
2. DC Power Input
3. Reset button
4. USB ports 1-2
5. LAN ports 1-4
6. WAN port (reserved for future use)
The reset button
The location of the reset button is at the back of the UMR. If you
need to erase all the inserted parameters and password, along with
restoring the factory defaults settings, then hold down the reset button
for approximately 8 seconds.
Quick Installation Guide 5
Page 8

Connecting by Ethernet cable
Make sure your computer and UMR are turned on. Connect one end
of the Ethernet cable to the Ethernet port on your computer and the
other end to one of the LAN ports on the UMR. A connection will
now automatically be established and when ready, it will be indicated
by a solid green light on the LAN LED.
Connecting by Wireless LAN (WLAN/WiFi)
Ensure that your computer and UMR are turned on and that the Wireless
LAN (WLAN/WiFi) is activated on your computer. Establish a Wireless
LAN connection to the UMR (this process should be described in detail
within the product manual for your computer or for the Wireless LAN
network card). The Wireless LAN name (SSID) is DOVADO.
If these steps did not yield any results, then please verify that the network
(LAN or WLAN) interface on your computer is using a dynamic
(DHCP) IP address.
Quick Installation Guide 6
Page 9
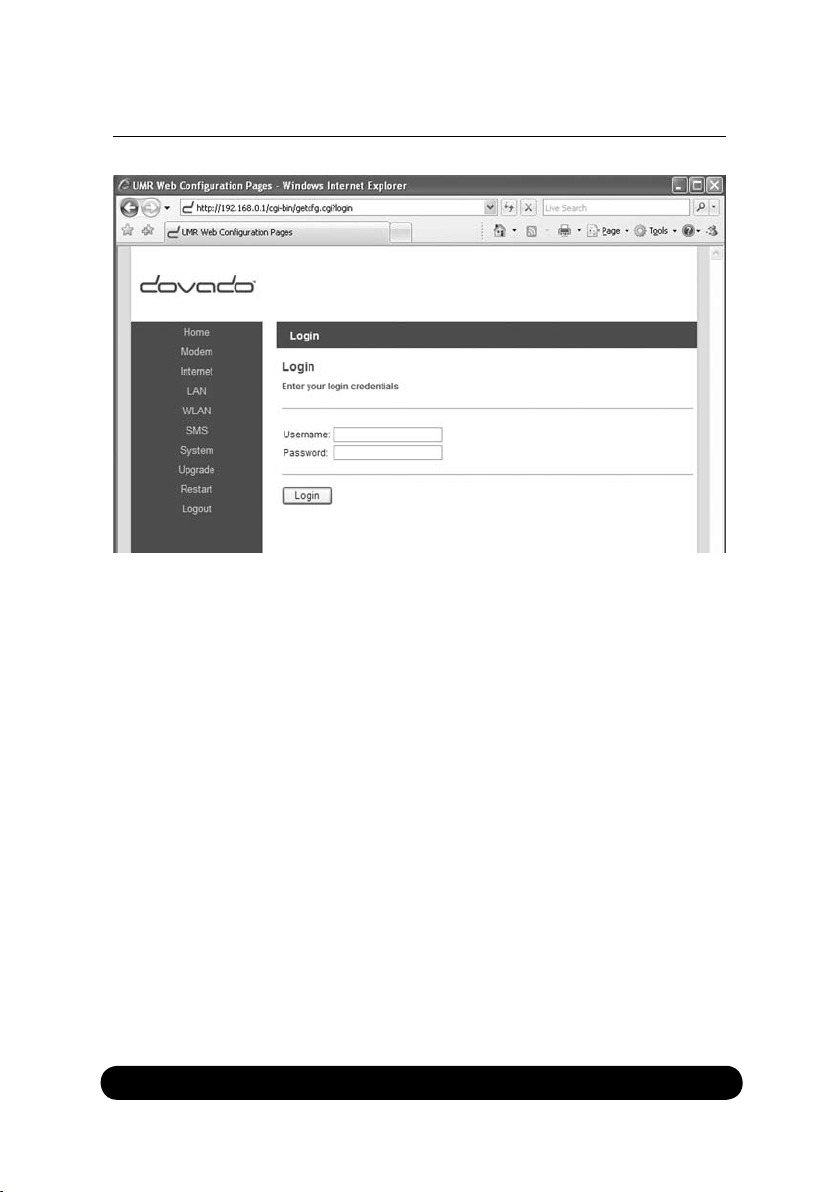
Accessing the UMR
Once you have connected a computer with either an Ethernet cable
or by Wireless LAN, open your web browser and access the following
website:
Address: http://192.168.0.1/
Username: admin
Password: password
After clicking on Login, you will be taken to the Home page which will
display all the information about your UMR.
Quick Installation Guide 7
Page 10
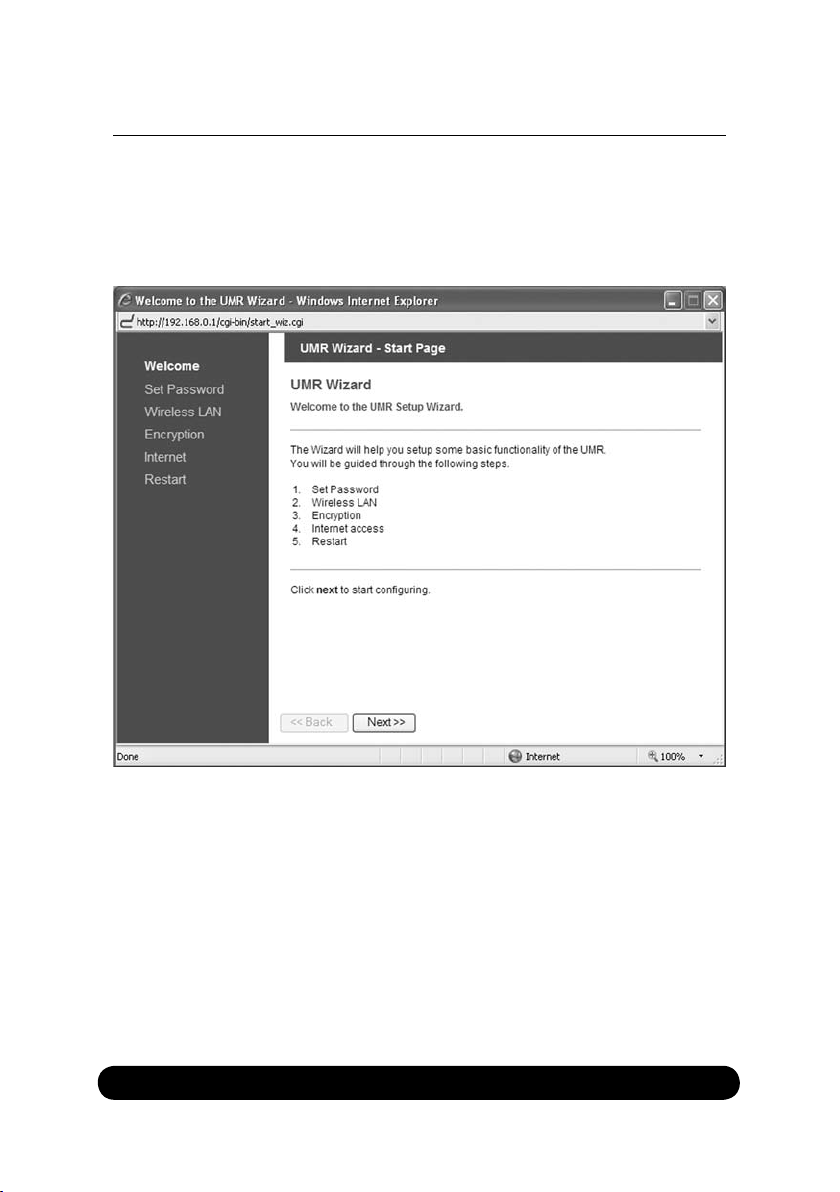
Wizard Configuration
Go to Home and then click on Start Wizard link to start the setup
wizard. It will be opened in a new window. Follow the steps below to
finish the installation.
Welcome
The welcome screen presents the steps that you will be guided through.
Click on Next to continue.
Quick Installation Guide 8
Page 11
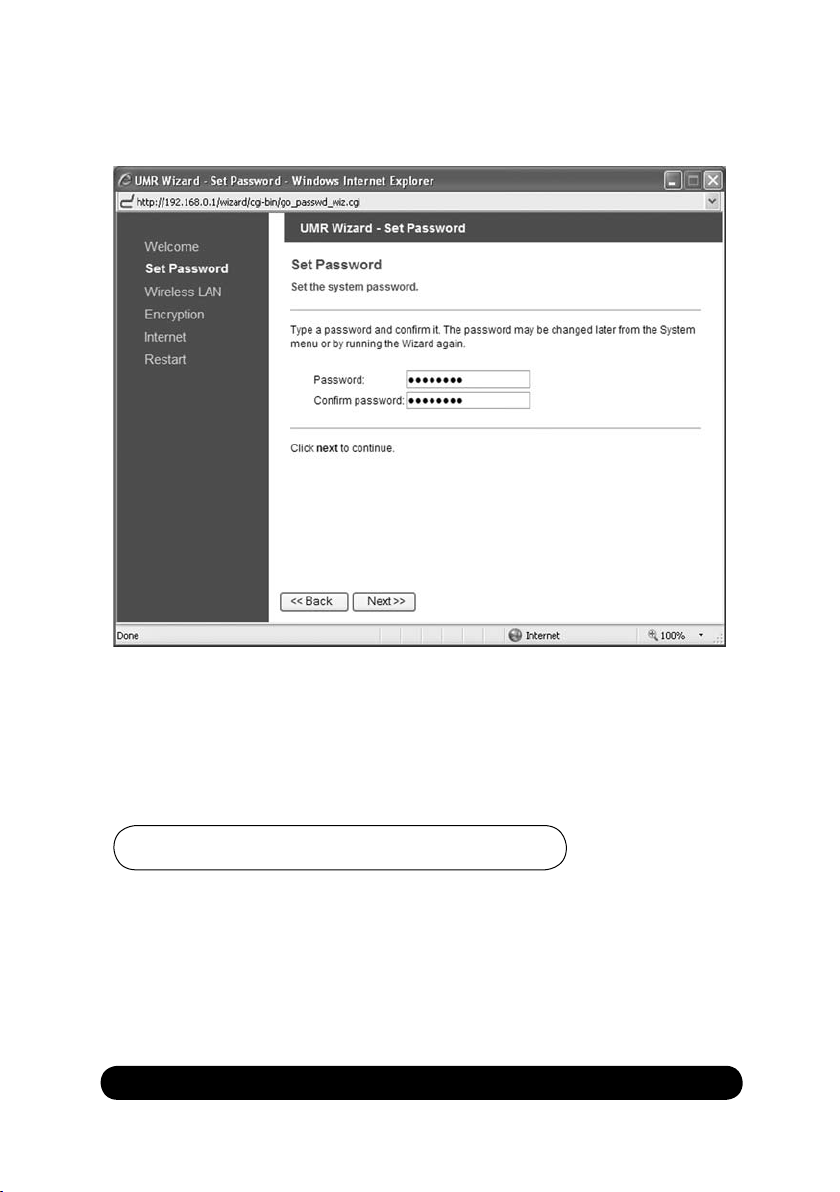
Set Password
It is recommended that you now change the default password for the
UMR configuration pages. Type in the new password and confirm it,
then click on Next to continue.
Here is a space to write down your new password:
Quick Installation Guide 9
Page 12

Wireless LAN
If you do not have any devices using Wireless LAN, choose disable for
the Wireless LAN option, and then click on Next to continue (this will
skip the encryption page). If you have a device using wireless LAN,
enable Wireless LAN. You can also change the SSID, which is displayed
in the client when a network search is performed. When you are done,
click on Next to continue.
Quick Installation Guide 10
Page 13
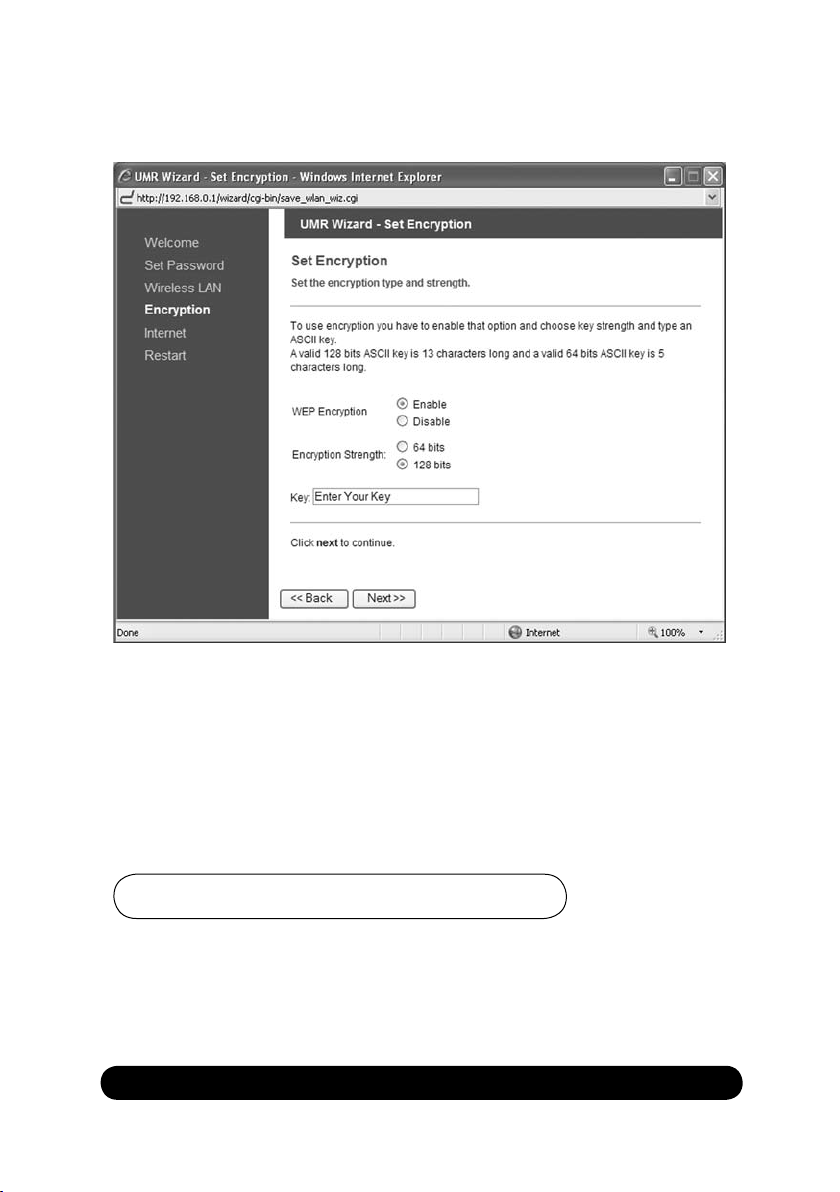
Encryption
Here you can activate encryption if you would like to restrict access
of wireless users onto your private network. Choose Enable to enable
encryption, it is recommended that you select 128 bits as Encryption
Strength and then type in a key. The key is needed by all Wireless LAN
clients to access your private network. Click on Next to continue.
Here is a space to write down your new key:
Quick Installation Guide 11
Page 14

Configure Internet
This section configures the mobile USB modem you are to use with
the UMR. If the SIM card which you are using from your mobile
operator came with a PIN code, then enter it into the Pin Code (if any)
field.
In order for the UMR to successfully establish an Internet via your
mobile operator, you will require the Access Point Name (APN) as
provided by your operator. If you are uncertain what your APN is, then
contact your mobile operator or check your USB modem manual.
Quick Installation Guide 12
Page 15

Restart
You have now finished the installation. Click on Close to save the
changes and the UMR will restart in order for the changes to take
effect.
Quick Installation Guide 13
Page 16

Modem
On the Modem->Modem Settings page, you will be able to insert all
the valid inputs in order to access the internet via your mobile operator.
There are several relevant bits of information which are necessary in
order to complete this task successfully:
•
APN (Access Point Name). If you are not sure what your mobile operator’s
APN is, please contact them or check with your modem manual.
•
PIN code. This is your PIN code provided with your SIM card which
resides in your USB modem.
•
Username & Password: Some operators may require you to insert
a username and password along with APN information in order
to authenticate towards the mobile network. If you haven’t been
provided this, then using only an APN might be sufficient. If not,
then please contact your operator.
Quick Installation Guide 14
Page 17

The following scenarios should assist you in enabling your UMR for
Internet access, depending on which type of USB modem you have
inserted into the UMR.
If your scenario is not available in this guide, then please visit
www.dovado.com/support for latest update.
Once the information has been inserted, the unit will automatically try
to establish a connection to the operator’s network. A solid yellow light
on the USB LED indicates a successful connection.
Note: Mobile operators typically have an Access Point Name (APN) as
the key relevant point of entry towards the mobile broadband network.
Make sure to have the name of your APN in advance of configuring
your USB modem. If you are using any other technology besides GPRS,
EDGE, UMTS or HSPA, you might not require an APN.
Scenario 1: 3G USB modem using a SIM card
• In the Modem->Modem Settings page, select to use SIM.
• Enter your operator Access Point Name and a PIN code if using
one.
• Push Save Modem Settings.
• Restart the UMR.
Scenario 2: 3G USB modem using a SIM card along with a username
and password
• In the Modem->Modem Settings page, select to use SIM.
• Enter your operator Access Point Name and a PIN code if using
one.
• Push Save Modem Settings.
• Go to Modem->PPP and make sure that PPP is enabled.
• Enter your Username and Password
• Save PPP Settings
• Restart the UMR.
Quick Installation Guide 15
.
Page 18

SMS Configuration
The UMR supports SMS on a selected range of USB-modems, please
verify if your modem is supported on www.dovado.com/modems.
You will also need to verify that your mobile broadband subscription
supports SMS.
To activate, go to SMS and click on Settings, then
select Activate the SMS handler. If required, contact
your mobile operator to find out the number to
your operator’s SMS service centre. Insert the
number including your country code.
A blinking green light on the PWR/SMS LED
indicates that the unit has received a SMS. The
PWR/SMS LED will cease to blink once you
access your SMS inbox.
Quick Installation Guide 16
Page 19

Advanced Settings
The Dovado UMR has a built-in firewall. In this section you will learn
more about this and other security features.
Besides password protecting the UMR configuration pages it is possible
to restrict the Wireless LAN devices that may access your private network
and the public Internet through the UMR. You can use encryption
and/or MAC address filtering in order to achieve this.
With encryption you can choose a key, which then all Wireless LAN
clients need to know in order to access your private network through
the UMR. These settings are found in WLAN->Authentication.
With MAC address filtering you can enter the MAC address of each
client that you want to grant access to your private network. This
address is physically linked to the network card in each client. These
settings are found in WLAN->MAC Address Control.
Advanced settings 17
Page 20

WLAN Settings
Under WLAN->WLAN Properties are the settings for the wireless
network.
Wireless Band drop-down menu lets you choose what wireless standard
to use in your private network. Possible choices are 802.11b with a
maximum transfer rate of 11Mbps, 802.11g with a maximum transfer
rate of 54Mbps or 802.11b+g if you have clients with both types of
network cards.
Channel drop-down menu lets you change the radio channel for
the wireless communication. This is useful if you experience poor
performance that could be as a result of interference from other wireless
devices.
Data Rate drop-down menu is the setting for the transmission speed at
the selected Wireless Band. If you experience problems at higher data
rates for 802.11g (54Mbps) it is possible to force 802.11b (11Mbps).
SSID (Service Set Identifier) is the name of the UMR that will appear
in other Wireless LAN clients when they perform a network search.
Default value is DOVADO.
SSID Broadcast enables or disables transmission of the SSID from the
UMR. When disabled, other Wireless LAN clients will not find the
UMR when they perform a network search.
Fragment length is a setting that affects the quality of the wireless
transmissions. If you experience a high packet error rate you can
decrease this value in small steps to reduce this problem. Setting the
fragment length too low may result in poor performance. The default
value is 2346.
RTS length is a setting that affects the quality of the wireless transmissions.
If you experience inconsistent data flow you can decrease this value in
small steps to reduce this problem. The default value is 2311.
Advanced settings 18
Page 21

Wireless Radio enables or disables the WLAN. If you do not use any
Wireless LAN devices it is recommended that you select disable.
Click on Save WLAN Settings and then Restart for the changes to take
effect.
WLAN->Authentication: The encryption settings for your private Wireless
LAN.
Encryption is disabled by default. Choose Enable to show the
available settings. There are three types of encryption methods in the
Authentication Type drop-down menu, WEP Open System, WEP Shared
Key and WPA-PSK.
WEP Open System encrypts all data that is sent over the wireless network
but does not use any authentication. This means it is still possible for
all clients in range to log onto the UMR, but without the correct key
they will not be able to communicate with it. To activate this setting,
choose WEP Open System from the Authentication Type drop-down
menu. Then choose a Key Type, either HEX (range 0-9 and A-F) or
ASCII (any character on the keyboard). Choose Key Size; 64 bits (for
HEX this is 10 characters and for ASCII 5 characters) or 128 bits (for
HEX this is 26 characters and for ASCII 13 characters): the longer the
key, the stronger the encryption. The key is case sensitive. You have the
possibility to define 4 keys at once so that you can easily change key to
maintain security.
WEP Shared Key is identical to WEP Open System except that this mode
also uses authentication. This is less suitable from a security perspective
since it is possible to retrieve the key from the authentication process.
WPA-PSK is the third and strongest security option. Choose it from
the Authentication Type drop-down menu and then enter a pass phrase
between 8 and 63 characters. All Wireless LAN clients must use the
exact same pass phrase in order to access your network. Due to the
Advanced settings 19
Page 22

complexity and larger data overhead this option may decrease the
performance of the network.
Click on Save Authentication Settings and then Restart for the changes
to take effect.
WLAN->MAC Address Control:
The settings for restricting access to your private network via white-listing of
authorized clients.
MAC Address Control
enables or disables the MAC address filtering on
the MAC addresses under WLAN->MAC Address Control.
MAC Address control is a security function that limits which clients
can access your private network and the public Internet through your
UMR. Enter the MAC address of the client that you want to grant
access to your network (the MAC address of a client running Microsoft
Windows can be obtained by clicking on the Start button and then
Run. Type cmd and press enter. Then type ipconfig /all in the command
prompt and press enter. The MAC address is found on the physical
address line). Click on Add to list. Note that the function is enabled or
disabled under WLAN->WLAN Properties. Disabling the function does
not clear the MAC Address Control List.
Advanced settings 20
Page 23

LAN Settings
LAN->LAN Settings:
Network Settings allows you to change the default IP address for your
The network settings for the UMR.
UMR. However, in most cases you do not need to change this setting.
Note that the IP address for the UMR is used on your private network
only. It is not possible to change the subnet mask. Click on Save LAN
Settings
LAN->DHCP: The settings for your private network.
and then Restart for the changes to take effect.
DHCP Server
allows you to enable or disable the built-in DHCP server.
When enabled, all clients on your private network will automatically
obtain an IP address from the range specified under Client IP Address
Range (valid range is from 1 to 254). When disabled you have to
manually enter an IP address from this range into each client.
Client Network Information allows you to set a domain name for the
UMR and specify an additional DNS server.
Static Address Assignment can be used when you want a client to
obtain the same IP address each time it logs on to your private network.
This setting works no matter if the DHCP Server is enabled or disabled.
Select how you want to identify the client, by hostname or MAC
address (it is possible to define 253 static IP addresses based on MAC
addresses and 256 based on hostnames). Type in the hostname or the
MAC address under Host Identifier and finally, set the desired IP address
under Internal Address. Please make sure not to assign the IP address
of the UMR to any of the clients. Click on Add and then Save DHCP
Settings when you are finished.
View DHCP Table is a function that shows the IP and MAC addresses of
all clients that are connected to the UMR.
Advanced settings 21
Page 24

Click on Save DHCP Settings and then Restart for the changes
to take effect.
LAN->Port Forwarding: The settings for manually unblocking certain
communication ports in your private network.
Reserved Ports
is a list of logical ports that cannot be used to access
your private network from the public Internet.
Port Forwarding to LAN lets you specify which ports clients on the
public Internet shall be able to communicate through, to clients on
your private network. Under Port Range, select a range (any range that
does not contain the ports listed under Reserved Ports) from 0-65535.
Select the type of traffic that should be let through on these ports,
TCP or UDP, or Both. Finally, type in the Destination Address, which
is the IP address of the client on your private network that you want
to be accessible from the public Internet. Click on Add when you are
finished. Note that by default, no traffic is permitted inwards if the
request is initiated by an external user. However, clients on your private
network can always access the public Internet.
Click on Restart for the changes to take effect.
LAN->UPnP: The settings for Universal Plug and Play.
The UMR supports Universal Plug and Play. UPnP is a feature that
enables client application on devices behind the UMR to automatically
trigger the opening of TCP/UDP ports through the firewall in the
UMR.
As a security precaution, this feature is disabled by default and can be
enabled manually.
Advanced settings 22
Page 25

System Settings
System->Security: Option for changing the default password of the UMR.
Please enter the same password twice and press Save Password. The
new password will take effect upon restart.
Note: If you have misplaced or forgotten your password, you can reset it
to “password” by pushing the Reset button on the back of the UMR.
Warning: By pushing the Reset button, you will also be clearing out
all the parameters and restoring everything back to the original factory
default settings. Please note that all your stored text messages
(SMS) will be deleted as well.
System->Remote Management: The settings for enabling remote
management of the UMR from another location.
Secure Access Port:
Select which port you would like to access the
UMR interface page from the Internet. By default, remote management
is disabled, but can be enabled by selecting any of the other three ports.
The Standard port is port 80, which is the regular port for HTTP.
Example: Should you wish to access the settings on your UMR
from elsewhere on the internet, simply open a browser, type in
http://<ip address of UMR>:<port>.
For instance, http://183.168.0.35:4430.
IP Address: If remote access has been enabled, then the UMR is open
by default to remote access from anywhere on the Internet. To limit
it to a single or several designated remote locations, type in the IP
address(es) and click on Add to list. After having done this, all other
sources besides those entered will be barred entry.
All changes will take effect upon restart of the UMR.
Advanced settings 23
Page 26

System->Dynamic DNS: In most cases, the operator which provides
the internet service towards your UMR is handing out a constantlyshifting (dynamic) IP address. The Dynamic DNS feature allows you
to contact your UMR via an easily accessible hostname, such as ”umr.
mydyndns.com”.
Advanced settings 24
Page 27

Internet
For Internet Connections, WAN Port Settings and Connection Tracker
push Internet and make your settings.
Internet Connections
The UMR can also be used with a regular fixed broadband connection
from an ADSL- or Cable-modem. To select your primary broadband
connection, push Internet and then select Internet Connection. Make
your selection and then push Save Settings.
Advanced settings 25
Page 28

WAN Port Settings
The default setting is that your operator automatically will give you an
IP address, should your operator have given you a static (specific) IP
address than select Manual settings and fill in the given information in
the relevant fields.
Advanced settings 26
Page 29

Connection Tracker
In order to ensure maximum internet availability you can use the
Connection Tracker feature. When inserting a minimum of 2 IP
addresses, these addresses will be ”pinged” with an interval that you
specify in minutes in the Interval field.
After entering the selected IP addresses, you can test the ping function
to these addresses by pushing the Test now button directly below the IP
address fields. The result will be shown to the right of each IP address
field.
WARNING: Please note that if you are paying for bandwidth usage,
activating this function will add data consumption to your monthly bill.
An approximate figure for the additional monthly data consumption
will be indicated directly to the right of the Interval field. Raising the
interval value will lower the monthly consumption.
Advanced settings 27
Page 30

Should your internet connection drop, you have 3 options on how the
UMR should react:
• Redial only (in WAN Ethernet mode: Reinitialize interface). Default
value that attempts to reestablish the broadband connection.
• Redial and Restart (UMR restarts itself after 3 failed redial attempts).
Using this option, your local area/wireless network will be unreachable
for a short while during the restart of the UMR.
• Auto fail-over to secondary interface. (WAN-to-USB or USB-to-WAN).
UMR is connected to both a USB modem and a fixed broadband
connection. Both of these interfaces must be properly configured in
the event of a fail-over between each other. You can check which
interface is your primary connection on the Internet->Internet
Connection page.
Advanced settings 28
Page 31

Upgrading the firmware
The latest firmware is available on www.dovado.com/umrfirmware
Warning! Do not remove the power or the USB modem during
upgrading as this will break your UMR!
There are two ways to upgrade the firmware: you can either upgrade
the UMR via HTTP or via FTP. HTTP is used for conducting the
upgrade process locally from a computer attached to the UMR, whereas
the FTP method is used when the source of the upgrade file is on a
server located in a remote location.
HTTP Method:
It is recommended that you use the first method. Point a web browser
to www.dovado.com and download the upgrade file to your computer.
Remember where you store the file. Log in to the configuration pages
from your computer as described in section Configuring the UMR. Go
to Upgrade->Upgrade HTTP. Click on the Browse button and select the
upgrade file you just downloaded, and then click on Open. Click on
Start HTTP Upload to start the upgrade process.
When the upgrade is done, the UMR will automatically restart and a
login button will appear in the web browser. The UMR is ready to use
once it has been restarted.
FTP Method:
If you have an FTP server you have the choice to upgrade the UMR via
FTP. Once the upgrade file is on the FTP server in the root directory,
log in to the configuration pages as described in section Configuring the
UMR. Go to Upgrade->Upgrade FTP. Then, type in the IP address of
the FTP server under FTP Server IP and the filename under Filename,
then click on Start FTP Download to start the upgrade process. The text
“Restarting…” will appear in your web browser when the upgrade has
finished.
Advanced settings 29
Page 32

Note: In order to use the FTP upgrade option, the FTP server which contains
the firmware image must be accessible via an anonymous FTP account.
Close the web browser and wait until the UMR has restarted. The
UMR is now ready to use.
Advanced settings 30
Page 33

Troubleshooting
Internet
Q1: My UMR is not connecting to the Internet!
A:
Do all of the following:
• First check if the USB LED on the UMR (third light from the left)
is OFF. If so, continue with the following steps. If not, then see the
answers to Question 2.
• Please verify that you are able to connect to your mobile operator
using the USB modem in your computer!
• Always insert the USB modem into the UMR before powering it
on!
• Log into the UMR on http://192.168.0.1/
• Check that your UMR has identified the USB modem (Check the
Reported Backhaul Technology under Home upon logging into the
UMR). If not, check if your USB modem is supported:
www.dovado.com/modems
• Check the signal strength in the Modem->Modem Status page.
• Verify that a correct Access Point Name (APN) and/or Username
and Password has been inserted in the PDP or PPP sections of the
Modem Settings. Check that the APN information provided by your
mobile operator is identical with the APN information used in the
UMR settings.
• If using a PIN code on your SIM card, insert it in Modem-
>Modem Settings
Troubleshooting 31
page.
Page 34

Q2: The USB LED on the front of the UMR is lit, yet I can’t surf!
How come?
A:
Test to see if you can do the following (in listed order):
1. Ping the UMR’s internal IP address.
• In Windows, click on Start followed by Run and type in cmd.
• Once the black command prompt is open, type in ping 192.168.0.1
followed by Enter and see if 4 pings are replied positively.
• If positive, then try the next step.
• If negative, please try with another computer if possible. Also check
your IP settings and switch to DHCP (dynamic IP) settings on your
computer’s network interface.
2. Ping an external IP address.
• Try to ping www.yahoo.com and note if 4 pings are replied
positively.
• If so, then please check your web browser’s settings for any conflicting
proxy settings.
Troubleshooting 32
Page 35

Support
Technical support for this product is available by email however the
www.dovado.com/support website offers Configuration scenarios along
with a Frequently Asked Questions (FAQ) section for troubleshooting.
When contacting by email (support@dovado.com), do not forget to
provide the following information (it can be found on the label at the
bottom of the UMR unit or under Home in the configuration pages):
• Model number or product name
• Serial number of the product
• Firmware revision
• Any possible screenshots or visual feedback relating to the problem.
Support 33
Page 36

Technical specifications
Connectors
• 2 x USB 2.0
• 4 x RJ45 Connector for LAN
• 1 x RJ45 Connector for WAN
• SMA Connector for WLAN antenna
• Power supply jack (DC12V)
Power supply
• DC12V, 1.5A AC adapter (100-240V AC, 50/60Hz)
WLAN Transmission power
• 63 mW Minimum typical for 802.11b
• 25 mW Minimum typical for 802.11g
Power consumption
• 5 W Standby mode
• 15 W Maximum load
Dimensions
• 30 mm x 187 mm x 100 mm without antenna
Technical specifications 34
Page 37

Guidelines for safe and
efficient use
Product care and maintenance
Your UMR is a highly sophisticated electronic device. To get the most out of
your UMR, be sure to read the following text about product care, safety and
efficient use.
Use only the power supply adapter that comes with the unit. Replacement power
supply adapters can be obtained from Dovado upon request.
Do not expose the product to liquid or moisture.
Do not expose the product to extreme temperatures, either hot or cold.
Do not expose the product to lit candles, cigarettes, cigars, open flames, etc.
Do not drop, throw, or try to bend the product. Rough treatment may damage
the product.
Do not attempt to disassemble your product; the warranty is no longer valid
if the warranty seal has been broken. The product does not contain consumer
serviceable components. Service should only be performed by Certified Service
Centers.
Do not allow children to play with the UMR as it contains small parts that could
be detached and create a choking hazard.
Use only original Dovado components and replacement parts. Failure to do so
may result in performance loss, damage to the product, fire, electric shock or
injury, and will invalidate the warranty.
Avoid using this telephone equipment during an electrical storm. There may be a
remote risk of electric shock from lightning.
Treat the product with care, keep it in a clean and dust free place. Use only a soft,
damp cloth to clean the product.
Guidelines for safe and efficient use 35
Page 38

Limited Warranty
Save your original receipt. You will need it for warranty/repair claims. Should
your Dovado Product need warranty service, return it to the place of purchase or
contact your local Dovado Call-Centre for further information.
Our warranty. Dovado guarantees this Product to be free from defects in material
and workmanship at the time of its original purchase by a consumer, and for a
subsequent period of one (1) year.
What we will do. If, during the warranty period, this product fails to operate under
normal use and service, due to improper materials or workmanship, Dovado
subsidiaries, authorized distributors, or Certified Service Centers will, at their
decision, either repair or replace the Product in accordance with the terms and
conditions stipulated herein.
Conditions
1. The warranty is only valid if accompanied by the original receipt, as issued to
the original purchaser by the retailer and specifying the date of purchase and
product serial number, when the product is submitted for repair or service.
Dovado reserves the right to refuse warranty service if this information has
been removed or altered subsequent to the original purchase of the Product
from the retailer.
2. Once Dovado repairs or replaces the product, the repaired or replaced
Product shall be covered by warranty for the remaining time of the original
warranty period or for ninety (90) days from the date of repair, whichever is
longer. Repair or replacement may include the use of functionally equivalent
reconditioned units. Replaced faulty parts or components will become the
property of Dovado.
3. This warranty does not cover any failure of the product due to normal wear
and tear or misuse, (including but not limited to use in a manner other than
the normal and customary manner, in accordance with Dovado instructions
for use and maintenance of the product), accident, modification or adjustment,
acts of God, improper ventilation, and damages resulting from contact with
liquids.
4. This warranty does not cover product failures due to repair installations,
modifications, or improper service performed by a non-Dovado Certified
Service Centre or opening of the product by non-Dovado certified persons.
5. The warranty does not cover product failures caused by the use of non-
Dovado original accessories.
Guidelines for safe and efficient use 36
Page 39

6. Tampering with any of the seals on this product will void the warranty.
7. No other express warranties, whether written or oral, other than this printed
limited warranty shall apply. All implied warranties, including, and without
limitation, the implied warranties or merchantability or fitness for a particular
purpose, are limited to the duration of this limited warranty. Dovado shall
under no circumstances be liable for incidental or consequential damages of
any nature whatsoever. Such damages include, but are not limited to, lost profits
or commercial loss, to the full extent that said damages can be disclaimed by
law.
Power Supply. Only connect the AC (Power Supply) to designated power sources
such as those marked on the product. When removing the cord from the outlet,
do so by holding onto the AC adapter rather than the cord in order to reduce the
risk of damage to the electric cord. Make sure the cord is positioned so that it
will not be stepped on, tripped over, or otherwise subjected to damage or stress.
To reduce risk of electric shock, unplug the unit from any power source before
attempting to clean it. The power supply must not be used outdoors or in damp
areas.
Guidelines for safe and efficient use 37
Page 40

CE mark for European Harmonized Standards
Page 41

THE FCC REGULATION WARNING (for U.S.A)
This equipment has been tested and found to comply with the limits for a Class B digital
device, pursuant to Part 15 B of the FCC Rules. These limits are designed to provide
reasonable protection against harmful interference in a residential installation. This
equipment generates, uses, and can radiate radio frequency energy and, if not installed
and used in accordance with the instructions, may cause harmful interference to radio
communications. However, there is no guarantee that interference will not occur in a
particular installation. If this equipment does cause harmful interference to radio or
television reception, which can be determined by turning the equipment off and on, the
user is encouraged to try to correct the interference by one or more of the following
measures:
• Reorient or relocate the receiving antenna
• Increase the separation between the equipment and the receiver
• Connect the equipment into an outlet on a circuit different from that to which the
receiver is connected
• Consult the dealer or an experienced radio/TV technician for help
Unauthorized changes or modification to this system can void the user’s authority to
operate this equipment.
Page 42

Open source software notice
This product includes certain open source or other software originated from third parties that
are subject to the GNU General Public License (GPL), GNU Library/Lesser General Public
License (LGPL) and different and/or additional copyright licenses, disclaimers and notices.
You may obtain a complete corresponding machine-readable copy of the source code of such
software under the GPL or LGPL at http://www.dovado.com/ Alternatively; Dovado offers to
provide such source code to you on CD-ROM for a charge covering the cost of performing
such distribution, such as the cost of media, shipping and handling, upon written request to:
Dovado FZ-LLC
Dubai Internet City
Al-Thuraya Tower 1, office 504
P.O. Box 500422
Dubai, United Arab Emirates
This offer is valid for a period of three (3) years from the date of the distribution of this
product by Dovado.
The Mobile Choice for your Broadband Internet
UMR-DOV-A001 © Dovado FZ-LLC, Quick User Guide & Reference Manual
 Loading...