


SAFFIRE LX
Installation Guide Outline
Document Revision: Draft 1.0
Page 1 of 28 |
Saffire LX |

|
Table of Contents |
|
Table of Contents |
|
|
1. |
Introduction and disclaimers................................................................... |
3 |
2. |
Recommended Tools ............................................................................. |
3 |
3. |
Components ......................................................................................... |
4 |
4. |
Install key cylinder (optional) ................................................................. |
6 |
5. |
Install thumbturn spindle (optional) ........................................................ |
6 |
6. |
Install the lock spindle ........................................................................... |
7 |
7. |
Setting up the inside trim assembly......................................................... |
9 |
8. |
Installing the locking mechanism on the door ......................................... |
12 |
8.1. Installing the mortise ASM (if lock equipped) ....................................... |
12 |
|
8.2. Installing the cylindrical models (if lock equipped) ................................ |
15 |
|
9. |
Installing the lock housings on the door ................................................. |
18 |
10. |
Connecting the cables.......................................................................... |
19 |
11. |
Installating inside cover ....................................................................... |
20 |
12. |
Installing the outside lever handle......................................................... |
23 |
13. |
Install the batteries ............................................................................. |
23 |
14. |
Test lock functionality .......................................................................... |
24 |
15. |
Program the lock................................................................................. |
24 |
Annex A.. ................................................................................................... 25 |
||
Annex B………………………………………………………………………………………………………….. ..……… 28 |
||
Model: Saffire LX
Caution: Changes or modifications to this equipment not expressly approved by the party responsible for compliance could void the user's authority to operate the equipment.
This device complies with part 15 of the FCC Rules. Operation is subject to the following two conditions: (1) This device may not cause harmful interference, and (2) this device must accept any interference received, including interference that may cause undesired operation.
This device complies with Industry Canada’s licence-exempt RSSs. Operation is subject to the following two conditions: (1) This device may not cause interference; and (2) This device must accept any interference, including interference that may cause undesired operation of the device.
Le présent appareil est conforme aux CNR d'Industrie Canada applicables aux appareils radio exempts de licence. L'exploitation est autorisée aux deux conditions suivantes : (1) l'appareil ne doit pas produire de brouillage, et (2) l'utilisateur de l'appareil doit accepter tout brouillage radioélectrique subi, même si le brouillage est susceptible d'en compromettre le fonctionnement.
Made in Canada
©2018 dormakaba Lodging Systems.All trademarks and registered trademarks are the property of their respective owners.
Page 2 of 28 |
Saffire LX |
1. Introduction and disclaimers
Caution: Please read and follow all directions carefully. Wear safety glasses when making the holes.
Target Audience: These instructions are designed for use by maintenance professionals or lock installers who are familiar with common safety practices and competent to perform the steps described. dormakaba is not responsible for damage or malfunction due to incorrect installation however arising.
Important: Carefully inspect windows, doorframe, door, etc. to ensure that the recommended procedures will not cause damage. dormakaba Lodging Systems standard warranty does not cover damages caused by installation.
Respect applicable building codes regarding handle height.
Definition of Terms: In these instructions, the term ASM refers to American Standard Mortise and ADB refers to Autodeadbolt Mortise.
Technical Assistance
For technical assistance, call:
1.877.468.3555 / +1.514.340.9025RT: 1.800.999.6213 / +1.248.837.3700
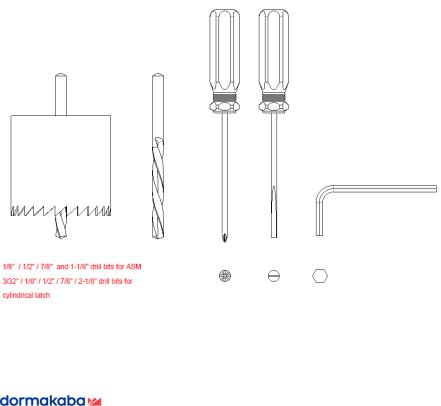
2. Recommended Tools
Page 3 of 28 |
Saffire LX |

3. Components
Page 4 of 28 |
Saffire LX |
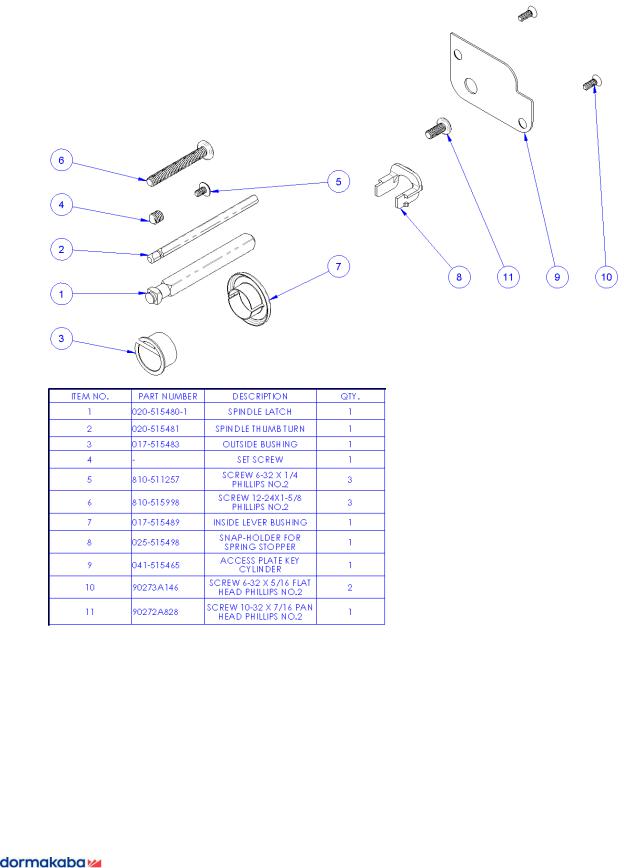
Hardware
For doors more than 2 1/2" thick up to 3 3/4", order the appropriate hardware bag to receive the correct length of spindles and mounting screws. Part# 062-XXXXXX-XXX; (XXX = choice of finish).
For outdoor installations, order gasket 033-515996-1 for standard lock and 033- 515996-2 for MKO lock.
Page 5 of 28 |
Saffire LX |

4.Install key cylinder (optional)
•Insert the cylinder core in the key override housing.
•Secure the cylinder core using screw (item 11).
•Secure the access plate key cylinder (item 9) over the key override housing.
•Secure the access plate using two screws (item 10).
5.Install thumb turn spindle (optional)
•Verify that the line markers for the thumb turn hole are aligned. If the holes are misaligned, use the flat screwdriver to correct the position.
•Insert the thumb turn spindle (item 2) into the thumb turn hole. Press firmly to ensure the spindle clicks in place.
•Rotate the spindle to ensure that the part remains in place.
Page 6 of 28 |
Saffire LX |

Lines to be aligned
6. Install the lock spindle
The spindle must be installed and properly secured in the front lock housing assembly. The spindle is used to connect the handle to operate the opening and closing door mechanism.
Prior to installing the spindle, you must first adjust the required positioning of the hub receiving the spindle. There are 2 modes, Left Hand (LH) and Right Hand (RH) according door handing.
•Turn the hub for correct door handing by turning clockwise for right and counter clockwise for left.
•
Page 7 of 28 |
Saffire LX |
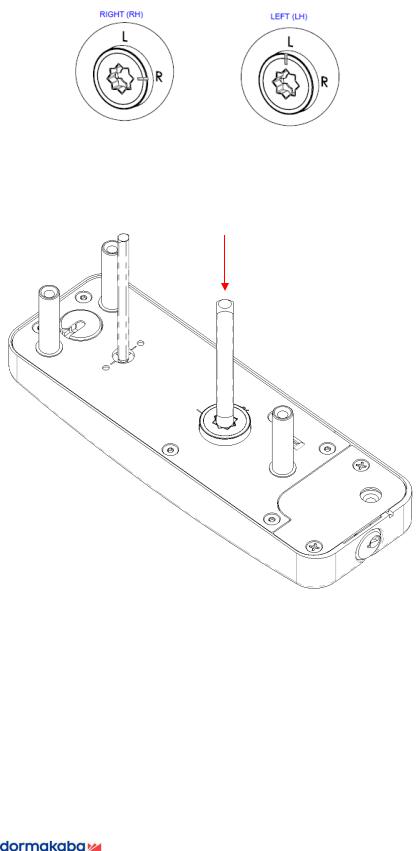
•Insert the spindle (item 1) smoothly until it clips.
Page 8 of 28 |
Saffire LX |

7. Setting up the inside trim assembly
Decide if the lever handle is a RH or LH position based on the door handing. The inside lever handle must be installed as is does not come preinstalled.
•To set proper handing, insert the lever from the back plate and turn in the direction required for the handing (L or R).
Page 9 of 28 |
Saffire LX |
 Loading...