

Page 1

UserManual
Wave3G
BrandName:doppio
ModelName:DP5007
FCCID:N2GDP50073G
Page 2

Contents
Your phone . . . . . . . . . . . . . . . . . . . . . . . . . . . . . . . . 1
Contents . . . . . . . . . . . . . . . . . . . . . . . . . . . . . . . . . . 2
Let’s go . . . . . . . . . . . . . . . . . . . . . . . . . . . . . . . . . . . 3
Touchscreen & keys . . . . . . . . . . . . . . . . . . . . . . . . . 5
Home screen . . . . . . . . . . . . . . . . . . . . . . . . . . . . . . .9
Calls . . . . . . . . . . . . . . . . . . . . . . . . . . . . . . . . . . .… 14
Web . . . . . . . . . . . . . . . . . . . . . . . . . . . . . . . . . . . ... 19
Google Maps™. . . . . . . . . . . . . . . . . . . . . . . . . . . . . 22
Latitude. . . . . . . . . . . . . . . . . . . . . . . . . . . . . . . . . . . 26
Manage your life . . . . . . . . . . . . . . . . . . . . . . . . . . …29
Contacts . . . . . . . . . . . . . . . . . . . . . . . . . . . . . . . . . . 32
Messaging . . . . . . . . . . . . . . . . . . . . . . . . . . . . . . . . .35
Text entry . . . . . . . . . . . . . . . . . . . . . . . . . . . . . . . ....39
Tips & tricks . . . . . . . . . . . . . . . . . . . . . . . . . . . . . . . .41
Personalize . . . . . . . . . . . . . . . . . . . . . . . . . . . . . . . . 43
Photos & videos . . . . . . . . . . . . . . . . . . . . . . . . . … . 46
Music . . . . . . . . . . . . . . . . . . . . . . . . . . . . . . . . . . .... 54
Bluetooth™ wireless . . . . . . . . . . . . . . . . . . . . . . …. 62
Wi-Fi . . . . . . . . . . . . . . . . . . . . . . . . . . . . . . . . . . . … 65
USB & memory card. . . . . . . . . . . . . . . . . . . . . . . … 67
Tools . . . . . . . . . . . . . . . . . . . . . . . . . . . . . . . . . . . . ..69
Management . . . . . . . . . . . . . . . . . . . . . . . . . . . . …. 70
Security. . . . . . . . . . . . . . . . . . . . . . . . . . . . . . . . . … 71
Troubleshooting . . . . . . . . . . . . . . . . . . . . . . . . . . .... 73
1
Page 3

Let’s go
Let’s get you up and running
Assemble & charge
Note: Your device is always on when being charged.
Set up & go
The first time you turn on your phone, a setup wizard
guides you through signing in to your existing
Google™ account. If you don’t have a Google ac co unt,
you can create one using the wizard.
Open the back cover and insert the SIM card. The
microSD card may already be inserted. Put the battery
in and then replace the back cover.
Tip: Remember to write down your user name and
password, and keep them in a safe place.
Turning the phone on & off
To turn on your phone, press and hold the Power
button.
To turn off your phone, press and hold Power then
touch Power off on the screen.
Wi-Fi connect
If you want to use a Wi-Fi computer network for even
faster Internet access, touch Menu > Settings >
Wireless & networks > Wi-Fi settings.
2
Page 4

Cool content & more
Browse and download thousands of the coolest Apps
on the planet from Android Market™.
Your phone comes with a microSD memory card
installed—you can load it up with photos, videos, and
music from your computer using “USB drag & drop” on
page 67.
3
Page 5

Touchscreen & keys
A few essentials
Touch tips
Here are some tips on how to navigate around your
phone.
Touch
To choose an
icon or option,
touch it.
Touch & hold
To open special options, touch and hold an icon or
other item. Try it: In the home screen, touch
Contacts, then touch and hold a contact to open
options.
Drag
To scroll through a list or
move slowly, drag across
the touchscreen. Try it: In
the home screen, touch
Contacts, and then drag
your Contacts list up or
down.
Tip: When you drag or flick a list, a scroll bar appears
on the right. Drag the scroll bar to move the list to a
4
Page 6

letter between A and Z.
Flick
To scroll through a list or move quickly, flick across the
touchscreen (drag quickly and release).
Tip: When you flick a long list, touch the screen to stop
it from scrolling.
Zoom
Get a closer look at maps or web pages. To zoom in,
double touch the screen. To zoom out, double to uc h,
the screen again.
You can also zoom in or out by pinching your fingers
together or moving them apart on the screen.
Touch to Zoom
5
Page 7

Key tips
Menu, home, & back
Power key
• In power off mode, press this key to turn on your
phone.
• In power on mode and screen-off mod e, press this
key to turn on the screen.
• In power on and screen-on mode, press this key to
turn the screen off.
Touch Home / to close any menu or App and
return to the home screen. From the home screen,
touch and hold Home / to show the last few
Apps you used, then touch an App to open the
selected App.
Touch Menu to open menu options, or touch Back
to go back.
Sleep & wake up
To save your battery, prevent accidental touches, or
when you want to wipe smudges off your touchscreen,
put the touchscreen to sleep by pressing Power. To
wake up the touchscreen, press Power again, or
open the phone.
To change how long your phone waits before the
screen goes to sleep automatically, touch Menu >
6
Page 8

Settings > Sound & display > Screen timeout.
Tip: To make the screen lock when the phone goes
into sleep mode, use “Screen lock” on page 71. To
unlock the screen, press Power or open the phone,
then drag to the right.
Power key menu
Press and hold Power to open the power key menu,
where you can turn off the phone (Power off), or turn
Airplane mode or Silent mode on or off.
Adjust volume
Press the volume keys to change the ring volume (from
the home screen), or the earpiece volume (during a
call).
Rotate the screen
When you rotate the phone 90 degrees anticlockwise,
the touchscreen can rotate to stay right-side up:
Find it: Menu > Settings > Sound & display
> Orientation
7
Page 9

Home screen
Quick access to the things you need most
Quick start: Home screen
The home screen gives you all your latest information
in one place. It’s what you see when you turn on the
phone or touch Home from a menu. It will appear
basically like this:
Note: Your home screen might look a little different.
8
Page 10

The home screen extends beyond what you see on the
screen to give you more room for adding shortcuts,
widgets, and more. Flick the home screen left and right
to see more panels or to add widgets or shortcuts.
Widgets
Add a widget, such as a clock, music player, or a
calendar that shows upcoming appointments.
To open a widget, touch it. To add widgets, touch
Menu > Add > Widge ts . If your home screen is full,
you won’t see the add option. You’ll have to delete
widgets or shortcuts to make room.
Note: If you install Apps from Android Market that have
widgets, touch and hold the home screen, then select a
widget to add to the home screen.
9
Page 11

Shortcuts
To add shortcuts to the home screen, open the App
menu (see below), then touch and hold the shortcut
you wish to add. It will be added to the home screen.
Alternatively, access Menu > Add > Shortcuts.
Apps
Your phone comes with a few Apps already installed,
and you can download and install more. To open an
App, touch it.
App menu
All the Apps on your phone, including the Apps that
came with your phone and the ones you download and
install, are listed in alphabetical order in your App
(application) menu. To open the App menu, touch
and drag up.
Running multiple Apps
There is no need to close an App before opening
another one.
Your phone can run multiple Apps, all at once.
You can open a new App by touching Home / to
return to the home screen, then opening the App menu
and touching the App you want. To switch from one
running App to another, touch and hold Home /
10
Page 12
to see what Apps are already open, then touch the one
you want. You can view up to the last six Apps that you
ran.
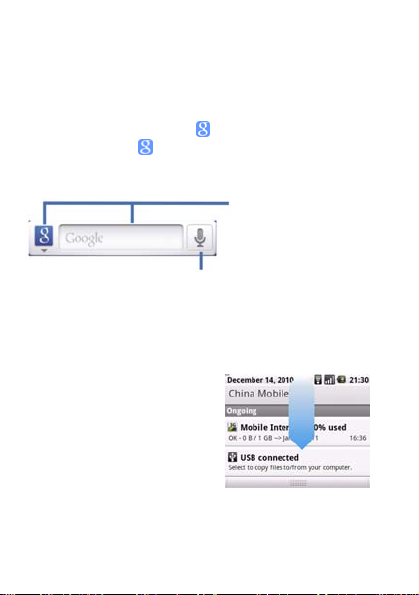
Search
To search, touch Search on the front of the phone,
or touch Search on the QWERTY keypad.
For a text search, touch
the text box & type
using the touch keypad
or the QWERTY keypad.
Then, touch the icon for
a text search.
Search by voice.
Phone status & notifications
The status bar at the top of
the screen contains icons
that tell you about
messages and phone
status. To view your
notifications, touch the
status bar and drag it down.
Icons on the right tell you about phone status:
11
Page 13
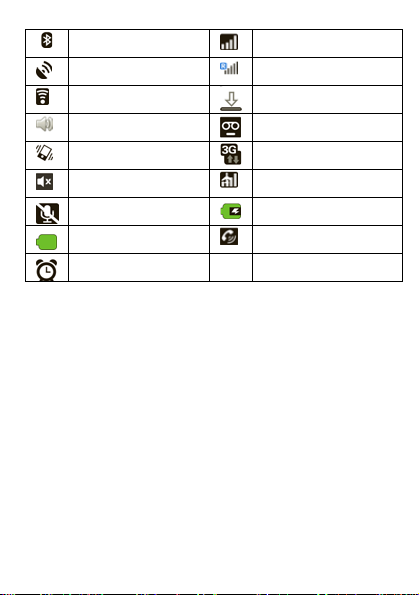
Bluetooth™ active
GPS active
Wi-Fi active
volume
vibrate
silent
mute call
battery (full charge)
alarm set
Tip: To see today’s date, touch and hold the status bar
at the top of the screen.
12
network (full signal)
network (roaming)
downloading
voicemail message
3G (fastest data)
flight mode
battery (charging)
speakerphone active
Page 14
Calls
It’s good to talk
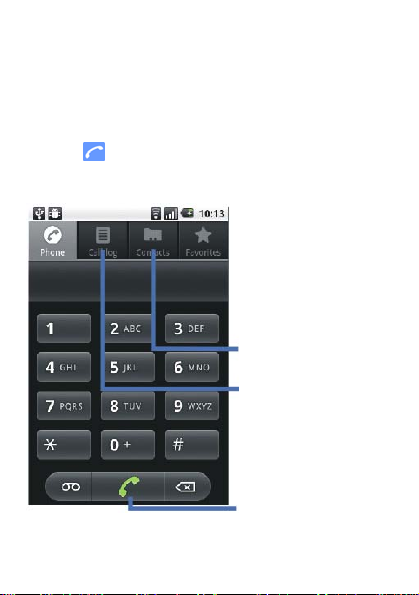
Quick start: Calls
Dialling options
Find it: Phone
Contacts
Touch to open, then touch
an entry to call.
Recent Calls
Touch to open, then touch
an entry to call.
Call
Enter a phone num er & b
touch here to call it.
13
Page 15

In-call options
During a call:
• To use a Bluetooth™
device, touch
Bluetooth. (The
device must be
turned on and
previously
paired — see “Connect new devices” on page 63.)
• To mute a call, touch Mute.
• To use the speakerphone, tou ch Speaker.
Note: Using a mobile device or accessory while driving
may cause distraction and may be illegal.
Always obey the laws and drive safely.
Tip: You can touch Home or / Back to
leave the active call display. To reopen it, touch Home
/ > Phone > Return to call in progress.
Make & answer calls
To make a call, touch Phone, enter a number,
then touch .
Tip: If the screen is locked, drag to the right.
To answer a call, drag to the right.
To end a call, touch End.
To ignore a call, drag to the left.
14
Page 16
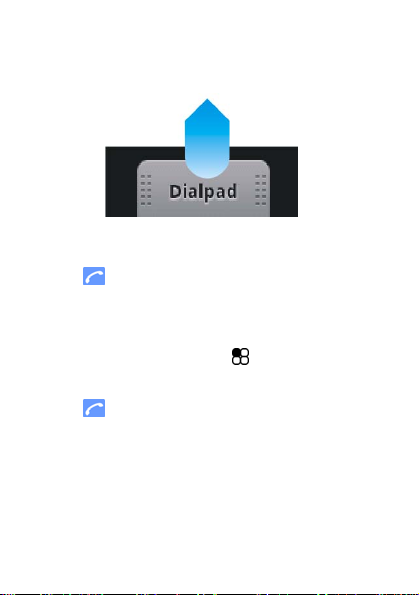
Enter numbers during a call
To enter numbers during a call, touch Dialpad.
Recent calls
Find it: Phone > Call log
• To call a number, touch it.
• To send a text message, create a contact, view a
contact, or other options, touch and hold an entry.
• To clear the list, touch Menu > Clear call log
Frequent calls
Find it: Phone > Favourites
• To call a number, touch it.
• To send a text message, view a contact, or other
options, touch and hold an entry.
15
Page 17

Conference calls
To start a conference call, call the first number. After
the call is answered, touch Add call and call the next
number.
When the next number answers, touch Merge call.
Tip: Before merging, you can switch back and forth
between the two calls by touching .
Your phone number
Find it: Menu > Settings > About phone >
Status > My phone number
Emergency calls
Note: Your service provider programs one or more
emergency phone numbers (such as 911 or 112) that
you can call under any circumstances, even if your
phone is locked. Emergency numbers vary by country.
Your pre-programmed emergency number(s) may not
work in all locations, and sometimes an emergency call
cannot be placed due to network, environmental or
interference issues.
1 Touch Phone (if your phone is locked, touch
Emergency Call).
2 Enter the emergency number.
3 Touch to call the emergency number.
16
Page 18

Note: Your mobile device can use AGPS satellite
signals to help emergency services find y ou.
17
Page 19
Web
You don’t need a PC, surf the web with your phone
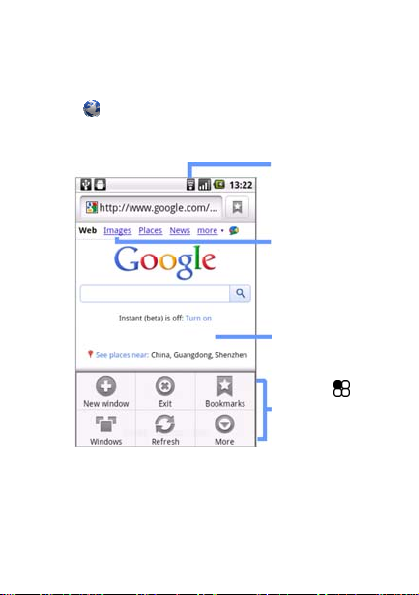
Quick start: Browser
Find it: Browser
Connection
Over the air
or Wi-Fi.
Links
Touch to open.
Note: If you can’t connect, contact your service
provider.
18
Drag or flick
to scroll.
Touch to
display
options.
Page 20

Connect
Your phone uses the mobile phone network (over the
air) to connect to the Web automatically.
Note: Your service provider may charge to surf the
Web or download data.
To use a wireless network, touch Menu > Settings
> Wireless & networks. Touch Wi-Fi to turn it on and
touch Wi-Fi settings to search for nearby wireless
networks. Touch a network to connect.
Web touch tips
Zoom & magnify
In Web pages, when you scroll (drag or flick), zoom
icons appear at the bottom of your screen.
Select links
When you touch a link, your phone outlines it and goes
to that page.
Zoom In/Out
19
Page 21

If you touch and hold
the link, your phone
shows options, like
Open in new window
or Bookmark link.
Browser options
Touch Menu to see browser options:
Options
Open Open a new browser window.
Bookmarks See your bookmarks.
Windows View the browser windows that
are currently open.
Refresh Reloads the current pa ge.
Back/Forward Navigate to previously viewed
pages.
More Shows additional browser
options.
20
Page 22
Google Maps™
Where you are, where you’re going
Note: This feature is not available in all areas. Check
with your service provider.
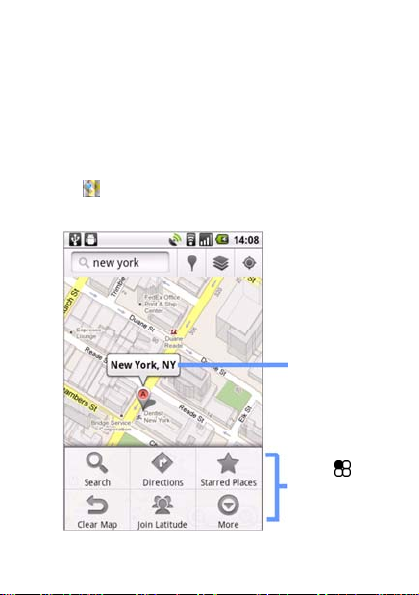
Quick start: Google Maps
Where am I? Where do I want to go? Don’t worry - let
Google Maps™ find out for you.
Find it: Maps
Map View
Drag or flick
to scroll.
Touch to show
zoom.
Touch to
show options.
21
Page 23
Google Maps™ opens by default in “Map mode”. To
learn more about the different map modes, go to
“Select map mode” on page 24.
Set your location sources
Set your phone to determine your location using GPS
satellite signals (highly accurate, but uses battery
power) or using the mobile network (less accurate, but
conserves battery power).
To set your location, touch Menu > Settings >
Location & security > Use GPS satellites and/or Use
wireless networks.
Find your location
Note: Don’t forget to set your location sources.
From the main Map screen, touch Menu > My
Location. Your location is shown on the map as .
The bigger the circle, the less accurate the location.
Find any location
1 Touch Menu > Search.
2 Enter text in the search box, i.e. an address,
business, or city, then touch .
Tip: If it’s an address you have visited before, select
from the list shown.
22
Page 24

3 Touch the search box to view all the results, then
touch the one you want.
Get directions
1 Touch Menu > Directions.
2 Enter a starting point address or touch and select
My current location, Contacts, or Points on map.
3 Enter an end point address or touch and select
Contacts or Points on map.
4 Select your mode of transport (car, public transport
or walk), then touch Go. Your directions are shown as
a list. To view your directions on a map, touch Show
on map.
5 When you have finished, touch Menu > More
> Clear map.
Select map mode
Touch Menu > Layers to select from Traffic,
Satellite, Latitude or recent searches, viewed
positions or directions.
Touch Menu > Layers > More layers to select
from My Maps, Wikipedia, or Transit Lines.
Touch Clear Map to clear your selections.
Map view
Shows a map, complete with names of streets, rivers,
lakes, mountains and borders. This is the default view.
23
Page 25

Satellite view
Shows map on top of aerial photo.
Traffic view
If available in your area, real-time traffic conditions are
shown on the roads as color-coded lines.
24
Page 26

Latitude
Where are your friends & family?
Note: This feature is not available in all areas. Check
with your service provider.
Join Latitude
See where your friends and family are on Google
Maps™. Plan to meet up, check that your parents got
home safely, or just stay in touch.
Don’t worry. Your location is not shared unless you
agree to it. You need to join Latitude, and then invite
your friends to view your location or accept their
invitations. When using Google Maps, touch Menu
> Join Latitude. Read the privacy policy and if you
agree with it, touch Agree & share.
Add & remove friends
Find it: Maps > Menu > Latitude
To add friends:
1 Touch Menu > Add friends.
2 Touch Select from Contacts or Add via email
address, then touch a contact > Add friends.
If your friends already use Latitude, they’ll receive an
email request and a notification. If they have not yet
joined Latitude, they’ll receive an email request that
invites them to sign in to Latitude with their Google
25
Page 27

account.
To remove friends:
1 Touch Menu > Latitude to show your friend’s list,
then touch a friend in your list.
2 Touch Remove.
Share location
When you receive a request to share location details
you can choose to:
• Accept and share back - see your friend’s location,
and your friend can see yours.
• Accept, but hide my location - s ee y our friend's
location, but they can't see yours.
• Don't accept - location informati on is not shared
between you and your friend.
Hide your location
Touch Menu > Latitude to show your friend’s list.
Touch your contact name, then touch Menu
> Privacy > Hide your location.
Turn off Latitude
Touch Menu > Latitude to show your friend’s list.
Touch Menu > Privacy > Turn off Latitude.
26
Page 28

Your account
Log in or create account
Find it: Menu > My account
1 To create your YouTube account, touch “Don’t have
a YouTube account? Click here to create one” link.
If you already have a YouTube account, enter your
user name and password, and touch Sign in.
2 For a new account, enter a user name, complete the
fields, then touch I accept.
Upload videos
Find it: Menu > Upload
1 Select the video you want to upload. You can change
video title, description, set the access, and add tags.
2 Choose Upload.
27
Page 29

Manage your life
Stay on top of things.
What can you manage?
Email, contacts, and calendar on your phone gi ve you
access to the same personal information that you add,
view, and edit on your computer with the use of
Microsoft™ Outlook™.
You can:
• View Google™, Facebook, and Exchange contacts in
one list.
• Schedule and respond to meeting requests.
Gmail
Create a new email
Find it: > Gmail > Menu > Compose
Enter the recipient email address and message, then
touch Send.
Tip: Touch Menu for options, like Attach or Add
Cc/Bcc.
Tips
• To search in Gmail for messages, touch Menu
> Search.
28
Page 30

• To set new email notifications, such as having a
special sound play when you receive a message,
touch Menu > Settings > Email notifications,
then select the ringtone and vibrate options.
• To label an email thread, touch and hold a message,
then touch Change labels.
Email
Set up an account
Find it: > Email
The email setup wizard will guide you through setting
up your email account.
Tip: It is possible to get your Microsoft Outlook mail on
your mobile phone.
Create a new email
Find it: > Email > Menu > Compose
Enter the recipient email address and write a message,
then touch Send.
Tip: Touch Menu for options, like Attach or Add
Cc/Bcc.
29
Page 31

Calendar
Find it: >
Calendar
You can manage your
personal life on the
Google calendar and
your business affairs
on the Corporate
calendar. View a
calendar in different
ways: Touch Menu
> Agenda, Day, or
Week. When you
highlight an event in
the day and week
views, more details
appear.
Add calendar events
From any calendar view, touch Menu > New event.
Enter event details and touch Done.
Manage calendar events
To edit an event, touch and hold the event, then touch
Edit event. Edit event details, then when you’re done ,
touch Done.
30
Page 32

Contacts
Contacts like you’ve never had before
Quick start: Contacts
Find it: Contacts
Tip: To search the list, just open your phone and type
a name, or simply touch Search and type using
the touchscreen keypad. When you flick or drag this list,
a scroll bar appears on the right. Drag the scroll bar to
move the list faster.
Contacts List
Touch to view
contact information.
Touch & hold to edit,
delete, & more.
Menu Options
Touch Menu to
edit sync groups or
to add/import new
contacts.
31
Page 33

Sync with Facebook friends
When you first log onto Facebook from your phone,
you will be prompted to sync your phone’s contacts
with your Facebook friends’ profiles, including profile
pictures. You can sync with only people in your
phone’s contacts, with your entire Facebook list, or you
can choose not to sync.
Call, text, or email contacts
Find it: Contacts
For View contact, Call contact, Text contact, Add to
favourites, or other options, touch and hold the
contact.
Edit or delete contacts
Find it: Contacts
Touch the contact, then touch Menu > Edit
contact or Delete contact.
Create contacts
Find it: Contacts > Menu > New contact
Select the account to save the contact to, then type
the contact name and details.
32
Page 34

Touch + to add another
entry.
Touch - to remove this entry.
To see more details, flick up.
When you’re finished, touch Done.
Groups
Find it: Contacts > Menu > Display options
You can put your Contacts into groups that you create
(like “friends”, “family”, or “work”). Then, you can find
contacts faster by showing one group at a time.
33
Page 35

Messaging
Sometimes it’s best 2 text, or IM, or email . . .
Quick start: Messaging
Find it: Messaging
Message List
Touch to open a message.
Touch & hold to move,
Tip: To see more messages, flick or drag up.
Read & reply to messages
• To open a message and all of its replies, touch it.
• To respond to a message, just open it and enter your
response in the text box at the bottom.
34
delete, & more.
Page 36

• To open options, touch and hold a message.
Create messages
Find it: Messaging > New message
Enter the recipient and message. In text messages and
emails, touch Menu for options, like Insert smiley
or Attach.
Send & receive attachments
To send a file in a message, open a new message and
touch Menu > Attach.
When you receive a message with an attachment,
open the message and touch the file name to
download it. Then, touch the name again to open it.
Some file formats can be converted to HTML for faster
viewing. In such cases, your phone will show a button
that says
Get HTML version.
Tip: To send and re ceive large attachments faster, use
Wi-Fi connection, in “Wi- Fi” on page 65.
Google Talk™
Google Talk instant messaging lets you chat with other
Google Talk users on phones or on the web.
35
Page 37

Find it: > Talk
Touch Menu to see a list of your Google Talk
friends, send invitations to add new friends, and much
more.
Instant messages
To send and receive instant messages, you can use an
instant messaging App (such as Google Talk™) or
36
Page 38

your browser.
• To download and use an insta nt messaging App,
touch Market > Apps > Communication, then
choose an App for your provider. Once you
download the App, you’ll see it on the App menu
(see “Apps” on page 14).
• If you don’t see an App for your IM provider, you can
use your Web browser. Touch Browser, then
enter your provider’s Web site and touch Go. Once
you’re there, follow the link to sign in.
Voicemail
When you have a new voicemail, is shown at the
top of your screen. To hear th e voicemail, touch
Phone then touch and hold .
37
Page 39

Text entry
Think keyboard, now think sma ller
To change text entry settings, change languages, and
see the dictionary of terms you’ve used, from the home
screen, touch Menu > Settings > Language &
keyboard.
Touchscreen keypad
When your phone is closed, you can open the display
keypad by touching a text field. To close the keypad,
touch Back .
Text Entry
Touch to open the touchscreen keypad.
38
Page 40

To change your settings for this keypad, from the home
screen, touch Menu > Settings > Language &
keyboard > keyboard.
Text entry settings
When you use the touchscreen keypad, your phone
suggests words from your dictionary and chosen
language. Your phone also au tomatically enters
apostrophes in some words, like “dont.”
Find it: Menu > Settings > Language &
keyboard
• To change the language and style of your
touchscreen keypad, touch Select locale.
• To edit your dictionary, touc h User dictionary.
• To change the sounds, correction, and other settings
for your touchscreen keypad, touch keyboard.
• To change the automatic correction settings for your
full keypad, touch keyboard.
39
Page 41

Tips & tricks
A few handy hints
General tips
• To return to home screen, touch Home
• To see recently dialled numbers, touch Phone
> Call log.
• To sleep/wake your phone, press Power
• To set screen timeout, touch Menu > Settings
> Sound & display > Screen timeout.
• To search, touch Search .
• To show recently used Apps, touch and hold Home
/ .
• To turn sound on/off, press and hold Power
> Silent mode.
• To turn airplane mode on/off, press and hold
Power > Airplane mode.
40
Page 42

Battery tips
Want to extend your battery life? Try these:
• To turn off automatic applications sync, touch
Menu > Settings > Accounts & sync.
• To turn off Bluetooth power, touch Menu
> Settings > Wireless & networks > Bluetooth.
• To turn off Wi-Fi, touch Menu > Settings
> Wireless & networks > Wi-Fi.
• To add a Power Control widget, touch Menu
> Add > Widgets > Power Control.
Note: The Power Control widget is a simple way to
enable/disable Wi-Fi, Bluetooth™ wireless, GPS,
Sync (turns on/off all active accounts, Goo gle, and
Exchange), and display brightness.
41
Page 43

Personalize
Add your personal touch
Widgets
To create a new widget:
1 Find an empty spot on your home screen where you
want to add a widget, then touch and hold.
Tip: You can flick left or right to open other panels on
your home screen.
2 Touch Widgets.
3 Touch the type of widget. If necessary, enter the
widget settings.
You can personalize widgets with content that you
choose.
Ringtones
To personalize your ringtones:
Find it: Menu > Settings > Sound & display
> Phone ringtone or Notification ringtone
To set your vibrate options:
Find it: Menu > Settings > Sound & display
> Phone vibrate
42
Page 44

Wallpaper
To apply a new wallpaper:
1 Find an empty spot on your home screen, then touch
and hold.
2 Touch Wallpapers.
3 Touch Media gallery to select a photo as your
wallpaper, or touch Wallpaper gallery to choose a
wallpaper that comes with your phone.
Sounds
• To set volume for media and vid eos, touch Menu
> Settings > Sound & display > Media volume.
• To play tones when using dial pad, touch Menu
> Settings > Sound & display > Audible touch
tones.
• To play sound on a screen selection, touch Menu
> Settings > Sound & display > Audible selection.
Display settings
• To set display brightness, touch Menu
> Settings > Sound & display > Brightness.
• To set orientation, touch Menu > Settings
> Sound & display > Orientation.
• To set animation, touch Menu > Settings
> Sound & display > Animation.
Note: Some Apps are designed so that your phone
can “animate” them by rotating, fading, moving, and
stretching one or more images.
43
Page 45

Quick launch shortcuts
To set keyboard shortcuts to launch your favourite App,
touch Menu > Settings > Applications > Quick
launch > Assign Application.
To use a quick launch shortcut, touch Search and
the assigned key, for example, Search and B to
launch the browser.
You can also add shortcuts directly to the home screen
for actions like Direct dial and Direct message. Just
touch and hold an empty spot on the home screen,
then touch Shortcuts and select a shortcut.
Language & region
Set your menu language and reg ion:
Find it: Menu > Settings > Language &
keyboard > Select locale
44
Page 46

Photos & videos
See it, capture it, share it!
Photos
Take & share photos
Take that family photo, and post it online for everyone
to see.
Note: To get the clearest photos, wipe the lens clean
with a soft, dry cloth before you take a photo.
Find it: Press Camera key .
Note: Photos are stored on your microSD memory
card. Picture Resolution is 5MP, unless you change it.
To take the photo, touch and hold , or press
Camera key
Note: When you turn on the camera you may hear a
series of clicks as the autofocus motor initializes.
Thumbnail of
Last Photo
Touch to view.
Drag up to
change to
camcorder.
Touch to take
the photo.
45
Page 47

A thumbnail of the photo you’ve just taken is shown on
the right. Touch the thumbnail to view it.
• To set the photo as a wallpaper or contact photo,
touch Menu > Set as.
• To send the photo in a message or post it online,
touch Menu > Share. For more info on sharing
your photos, see “Share your photo gallery” on page
49.
• To delete the photo, touch Menu > Delete.
• For more options, touch Menu > More.
Photo options
In the viewfinder, touch Menu > Settings to open
the camera menu:
Options
Store location Save the latitude and longitude of
Scene mode Select a setting for better image
46
where the photo was taken so the
photo can be displayed on Google
Maps or used in other Applications.
capture under different lighting
environments: Auto, Action,
Portraits, Landscape, Night,
Beach, Snow, and Sunset.
Page 48

W
Options
Flash mode Choose from Automatic, On, and
Off.
hite balance Compensate for colour differences
in different lighting. Set to Auto or,
for greater precision, set to
Incandescent or Fluorescent for
indoor lighting or to Daylight or
Cloudy for outdoor lighting.
Colour effect Apply different colour effects to
images. Choose Sepia for an
“antique” look, Mono for black and
white, Negative to invert the image,
Red Tint, Blue Tint, or Green Tint
to apply tints to the image.
Picture size Set the size of your photo. (You
may need to reduce the image size
for a picture message because
some networks limit the size of files
you can send.)
Picture Choose from Fine, Super fine, and
quality Normal. (Reduce picture quality for
photos that you send in
MMS/picture messages.)
47
Page 49

Options
Flash mode Choose from Auto (for best overall
View your photos
Find it: >
Gallery > Camera
Play a slideshow
Touch >
Gallery > Camera,
touch a photo, then touch
Slideshow to start a
slideshow. To stop the
slideshow, touch the
screen. To return to the
gallery, touch Back .
Share your photo gallery
Find it: >
Gallery > Camera
To send your photo in a
message or post it online:
48
image quality), Infinity, and Macro
(for close-ups).
Page 50

1 Touch and hold a photo, then touch Share.
2 Choose how you want to share — like Bluetooth,
Email, or Messaging.
Manage your photos
Find it: > Gallery > Camera
Touch and hold a photo, then:
• To delete the photo, touch Delete.
• To set the photo as a contact picture or wallpaper,
touch More > Set as.
Tip: To copy photos to/from a computer, go to “USB
drag & drop” on page 67.
Edit your photos
Touch > Gallery > Camera, touch & hold the
photo, then select your edit option.
Videos
Record & share videos
Find it: Press Camera , then drag the switch up.
Note: To get the clearest videos, wipe the lens clean
with a soft, dry cloth before you record a video.
49
Page 51

Tip: To send your video in a message, set the video
quality to Low (for MMS messages) by touching
Menu > Settings > Video Quality.
To record a video, touch . Touch again to stop
the video, or press Camera key .
A thumbnail of the video you’ve just taken is shown on
the right. Touch the thumbnail, then touch Menu :
• To send the video in a message or post it online,
touch Share. For more info on sharing your photos,
see “Share your photo gallery” on page 49.
• To play the video, touch .
• To delete the video, touch Delete.
Video options
In the viewfinder, touch Menu > Settings to open
the video menu:
50
Thumbnail of
Last Video
Touch to view.
Drag down to
change t o
camera.
Touch to record
a video.
Page 52

V
W
Options
ideo quality Select Low if sending the video in
Video Set the length of your video. Select
Duration 30 seconds if sending the video in
hite balance Compensate for colour differences
Colour effect Apply different colour effects on
an MMS message, High if storing
the video on an SD card
an MMS/video message. Select 10
minutes or 30 minutes if storing
the video on an SD card.
in different lighting. Set to Auto or,
for greater precision, set to
Incandescent or Fluorescent for
indoor lighting or to Daylight or
Cloudy for outdoor lighting.
videos. Choose Sepia for an
“antique” look, Mono for black and
white, Negative to invert the video
image, Red Tint, Blue Tint, or
Green Tint to apply tints to the
video.
51
Page 53

Play your videos
Find it: > Gallery > Camera > select_video
Progress Bar Video Controls
Note: To see the controls while the video is playing,
touch the display.
52
Page 54

Music
When music is what you need...
Quick start: Music
Touch, touch, play — instant music. Just open your
music library, then select what you want to play.
Find it: > Music
Categories Music Controls
Touch a category, then touch a song or playlist.
Tip: When a song is playing, you can add it to a
playlist by touching Menu > Add to playlist.
53
Page 55

Set up music
What music transfer tools do I need?
To put music on your computer and then load it on
your phone, you need:
• A Microsoft™ Windows™ PC or Apple™
Macintosh™
• A USB data cable.
You need a memory card
Your music is stored on your memory card. Your
phone supports removable microSD memory cards.
Make sure your memory card is installed.
Tip: To see the available memory on your memory
card, touch Menu > Settings > SD card & phone
storage.
What music file formats can I play?
Your phone can play many types of files: AMR-NB/WB,
MP3, PCM/WAV, AAC, AAC+, eAAC+, MIDI, OGG,
and WMA.
Note: Your phone does not support DRM (digital rights
management) protected files.
54
Page 56

What headphones can I use?
Your phone has a 3.5mm headset jack for wired stereo
listening. You can go wireless with Bluetooth™ stereo
headphones or speakers (see “Bluetoot h™ w i rel ess”
on page 62).
Get music
Transfer music using USB
Transfer music files from a computer to your memory
card.
1 With a memory card inserted, and your phone
showing the home screen, connect a micro USB data
cable from your phone’s micro USB port to a USB
port on your computer. Your phone should show
in the status bar.
Note: You may need to remove the USB data cable
from the charger power head.
Note: Make sure to connect the phone to a high
power USB port. Typically, these are located directly
on your computer.
Note: Your phone supports Microsoft™ Windows™
XP, Windows Vista™, and Apple™ Macintosh™.
Other operating systems may not be compatible.
2 Your phone shows a USB connection dialog, at the
top of the screen. Flick down, then touch USB
55
Page 57

connection. You are not able to use the files on your
memory card while it is connected.
3 Touch Mount (if asked) to connect your memory card.
4 On your computer, locate and click on the
“Removable Disk” icon to access the phone’s
memory card.
5 Drag and drop your music to a folder on the memory
card.
Tip: To help manage your music, create a “Music”
folder on your memory card.
6 When you’re done, select the “Safely Remove
Hardware” feature on your computer. On your phone,
drag down the notificat ion panel (see “Phone status
& notifications” on page 12), touch Turn off USB
storage, and select Turn off.
Tip: You can also use Windows Media Player to sync
music from your PC to your phone. To download
Windows Media Player, go to
http://www.microsoft.com/windowsmedia.
Play music
Music library
Open your music library, then select what you want to
play.
56
Page 58

Find it: > Music
Categories
Touch to list songs
or playlists.
Your music is stored by artists, albums, songs, and
playlists. Touch a category, then touch the song or
playlist you want to play. Touch Menu > Party
shuffle to randomly play all your songs.
57
Page 59

Music player
Just touch a song or playlist to get going.
Open Playlist
Music player controls
• Play/pause — Touch / .
• Previous/next — Touch / .
• Fast forward/rewind — Touch and hold / .
• View playlist — Touch .
58
Shuffle On/Off
Repeat Off/All
/Current
Total Song Time
Progress Bar
Page 60

• Shuffle — Touch .
• Repeat — Touch .
• Volume — Press the side volume keys.
• View library — Touch Menu > Library.
• Turn shuffle on/off — Touch Menu > Party
shuffle.
• Add to playlist — Touch Menu > Add to
playlist.
• Use as ringtone — Touch Menu > Use as
ringtone.
• Delete — Touch Menu > Delete.
Hide, wake, turn off
Touch Home / to use another App. Your music
will continue to play.
When you see in the status bar, a song is playing,
flick down to see details. Touch the song to return to
the music controls.
To turn off your music touch .
Playlists
To add a song from the music library to a playlist,
touch and hold the song then touch Add to playlist.
Choose an existing playlist, or touch New to create a
new playlist.
59
Page 61

To add a song to the playlist you’re playing, touch
Menu > Add to playlist in the music player.
To edit, delete and rename playlists, touch and hold
the playlist, in the music library.
60
Page 62

Bluetooth™ wireless
Lose the wires and go wireless
Quick start: Bluetooth wireless
Find it: Menu > Settings > Wireless & networks
> Bluetooth settings
Turn Bluetooth power on or off
Find it: Touch Menu > Settings > Wireless &
networks > Bluetooth.
Note: To extend battery life, turn Bluetooth power off
when not in use.
Touch to turn on & scan.
Touch to re-scan.
Touch to connect.
61
Page 63

Connect new devices
Note: This feature requires an optional accessory.
To connect with a new device, you need to pair with it.
You only need to do this once for each device — to
connect again, see “Reconnect devices” on page 64.
1 Make sure the device you are pairing with is in
discoverable mode.
Note: Refer to the guide that came with the device
for details.
2 Touch Menu > Settings > Wireless & networks
> Bluetooth settings.
3 Touch Bluetooth to turn on and scan. If Bluetooth is
already on, touch Scan for devices.
4 Touch a device to connect.
5 If necessary, touch OK, or enter the device passkey
(like 0000) to connect to the device. When the device
is connected, the Bluetooth indicato r appears in
the status bar.
Note: Using a mobile device or accessory while driving
may cause distraction and may be illegal. Always obey
the laws and drive safely.
62
Page 64

Reconnect devices
To automatically reconnect your phone with a paired
device, simply turn on the device.
To manually reconnect your phone with a paired
device, touch the device name in the Bluetooth
devices list.
Disconnect devices
To automatically disconnect your phone from a paired
device, simply turn off the device.
To manually disconnect your phone from a paired
device, touch the device name in the devices list, then
touch Menu > Disconnect.
Edit properties
To edit the device name, touch Menu > Settings >
Wireless & networks > Bluetooth set tings > Device
name. Enter a name and touch OK.
63
Page 65

Wi-Fi
Home, office, or hotspot
Quick start: Wi-Fi
Find it: Menu > Settings > Wireless & networks
> Wi-Fi settings
Use a wireless network for fast Internet access and to
download data.
Turn Wi-Fi on or off
Find it: Menu > Settings > Wireless & networks
> Wi-Fi.
Note: To extend battery life, turn off Wi-Fi power when
not in use.
64
Touch to turn on & scan.
Touch to connect.
Page 66

Wi-Fi search & connect
To find networks in your range:
1 Touch Menu > Settings > Wireless & networks
> Wi-Fi settings.
2 Touch Wi-Fi to turn on and scan. If Wi-Fi is already
on, touch Menu > Scan. Your phone lists the
networks it finds within range.
Tip: To see your phone’s MAC address or other Wi-
Fi details, touch Menu > Advanced.
3 Touch a network to connect.
4 If necessary, enter Network SSI D, Security, and
Wireless password, and touch Connect. When
your phone is connected to the network, the wireless
indicator appears in the status bar.
Tip: When you are in range and Wi-Fi is on, you will
automatically reconnect to available networks you’ve
connected to before.
65
Page 67

USB & memory card
Connect your phone and computer, then drag & drop
USB drag & drop
You can transfer your pictures, videos, music,
ringtones, and more, from your computer to your
phone’s memory card.
1 With a memory card inserted, and your phone
showing the home screen, connect a micro USB data
cable from your phone’s micro USB port to a USB
port on your computer. Your phone should show
in the status bar.
Note: You may need to remove the USB data cable
from the charger power head.
Note: Make sure to connect the phone to a high
power USB port. Typically, these are located directly
on your computer.
2 Your phone shows a USB connection dialog at the
top of the screen. Flick down, then touch USB
connected. You will not be able to use the files on
your memory card while it is connected.
3 Touch Mount (if asked) to connect your memory card.
4 On your computer, locate and click on the
“Removable Disk” icon to access the phone’s
memory card.
5 Drag and drop your pictures, videos, music,
66
Page 68

ringtones, and more, to the phone folder on the
memory card. To help manage your files, you can
create more folders inside your phone folder.
6 When you’re done, select the “Safely Remove
Hardware” feature on your computer. On your phone,
drag down the notificat ion panel (see “Phone status
& notifications” on page 12), touch Turn off USB
storage, and select Turn off.
Memory card
Note: You need to install a memory card to use your
phone.
Remove or format your memory card
Before you remove or format your memory card you
need to unmount it. Touch Menu > Settings > SD
card & phone storage > Unmount SD card.
To format your memory card, touch Format SD card.
Warning: All data on your memory card will be deleted.
67
Page 69

Tools
Stay on top of things
Alarm clock
Find it: > Alarm Clock
To turn on an alarm, touch the
check box.
When an alarm sounds, touch
Dismiss to turn it off or Snooze
to delay.
To add an alarm, touch Menu
> Add alarm, then enter alarm
details.
To enable or disable an alarm,
touch the check box.
Calculator
Find it: > Calculator
Your calculator has basic and advanced views. To
change views, touch Menu > Advanced panel or
Basic panel. To clear history, touch Menu > Clear
history.
68
Page 70

Management
Stay in control
Wireless manager
Find it: Menu > Settings > Wireless & networks
Manage all your wireless connections: Wi-Fi,
Bluetooth™, airplane mode, & mobile networks.
Airplane mode
Use airplane mode to turn all your wireless
connections off — useful when flying.
Update my phone
To keep your phone current, software updates may be
available. Touch Menu > Settings > About phone
> System updates to see if your phone is up to date. If
it isn’t, touch Update.
Network
You should not need to change any network settings.
Contact your service provider for help.
Touch Menu > Settings > Wireless & networks >
Mobile networks to show options for roaming
networks, network selection, operator selection, and
access point names.
69
Page 71

Security
Help keep your phone safe
Quick start: Security
Find it: Menu > Settings > Location & security
Screen lock
Note: You can make emergency calls on a locked
phone. A locked phone still rings, but you need to
unlock it to answer.
Lock the screen in the following ways:
• Press Power .
• Let the screen time out (don’t press anything).
• Switch the power off.
To unlock the screen, press Po wer , or open the
70
Page 72

phone, then, drag to the right.
Set unlock pattern
To set an unlock pattern, that you need to draw to
unlock your screen, touch Menu > Settings
> Location & security > Set unlock pattern, then
follow the instructions to draw your pattern.
To turn the lock off, touch Menu > Settings
> Location & security > Require pattern.
To change the lock pattern, touch Menu > Settings
> Location & security > Change unlock pattern.
Forgot your pattern or password?
If you forget your pattern or password, see your se rvice
provider.
71
Page 73

Troubleshooting
We’re here to help
Crash recovery
In the unlikely event that your phone stops responding
to touches and key presses, try a quick reset. Remove
the back cover and battery, then replace and switch
your phone on as usual.
Reset
To reset your phone to factory settings and erase all
the data on your phone, touch Menu > Settings
> Privacy > Factory data reset > Reset phone.
Warning: All data on your phone will be deleted.
72
Page 74

Changes or modifications to this unit not expressly approved by the party responsible for compliance
could void the user's authority to operate the equipment.
FCC statement
This device complies with Part 15 of the FCC Rules: Operation is subject to
the following two conditions:
1. This device may not cause harmful interference and
2. This device must accept any interference that is received, including any interfer
ence that may cause undesired operation.
*RF warning for Portable device: The device has been evaluated to meet general
RF exposure requirement. The device can be used in portable exposure condition
without restriction.
This device is acting as slave and operating in the 2.4 GHz (2412 ~2462 MHz)
band.
Ad Hoc function is supported but not able to operate on non-US frequencies.
Do not use the device with the environment which below minimum -10℃ or maximum
over 50℃ .
NOTE: This equipment has been tested and found to comply with the limits for
a Class B digital device, pursuant to part 15 of the FCC Rules. These limits are
designed to provide reasonable protection against harmful interference in a
residential installation. This equipment generates uses and can radiate radio
frequency energy and, if not installed and used in accordance with the
instructions, may cause harmful interference to radio communications.
However, there is no guarantee that interference will not occur in a particular
installation. If this equipment does cause harmful interference to radio or
television reception, which can be determined by turning the equipment off and
on, the user is encouraged to try to correct the interference by one or more of
the following measures:
- Reorient or relocate the receiving antenna.
- Increase the separation between the equipment and receiver.
-Connect the equipment into an outlet on a circuit different from that to which
the receiver is connected.
-Consult the dealer or an experienced radio/TV technician for help
38
 Loading...