

HM1000 Stand alone controller operation menu
1. Specification:
①Input Power: 9-15 VDC ②Working Current: ≤70mA ③Standby current: ≤45mA
④Reading distance:up to 8 cm ⑤Temperature:-10 ℃~70℃ ⑥Humidity:5%~95%
⑦ door open mode:Prox. + Push button ⑧ Capacity:1000 single Users + 65535 block user(max)
⑨ External Wiegand reader ⑩ Support IR keypad
2. Master function card of HM1000:
There are 2 master function cards in HM1000 system, one is called ADD other is called DEL.
By present those two cards in different sequence may configurate HM1000 controller as:
2.1 : ADD ADD : Add block user
2.2: ADD DEL : change door open time mode
2.3: ADD new user card new user card … : enroll single user card to controller
2.4: DEL reginstered user card registered user card … : delete card from controller
2.5: DEL ADD : Delete all cards from controller (includes block user card)
2.6: DEL DEL : disnable all block user card from controller.
3. Installation
1) Drill hole according to the template., then fix the bottom with screws
2) Install top case and fix the screw
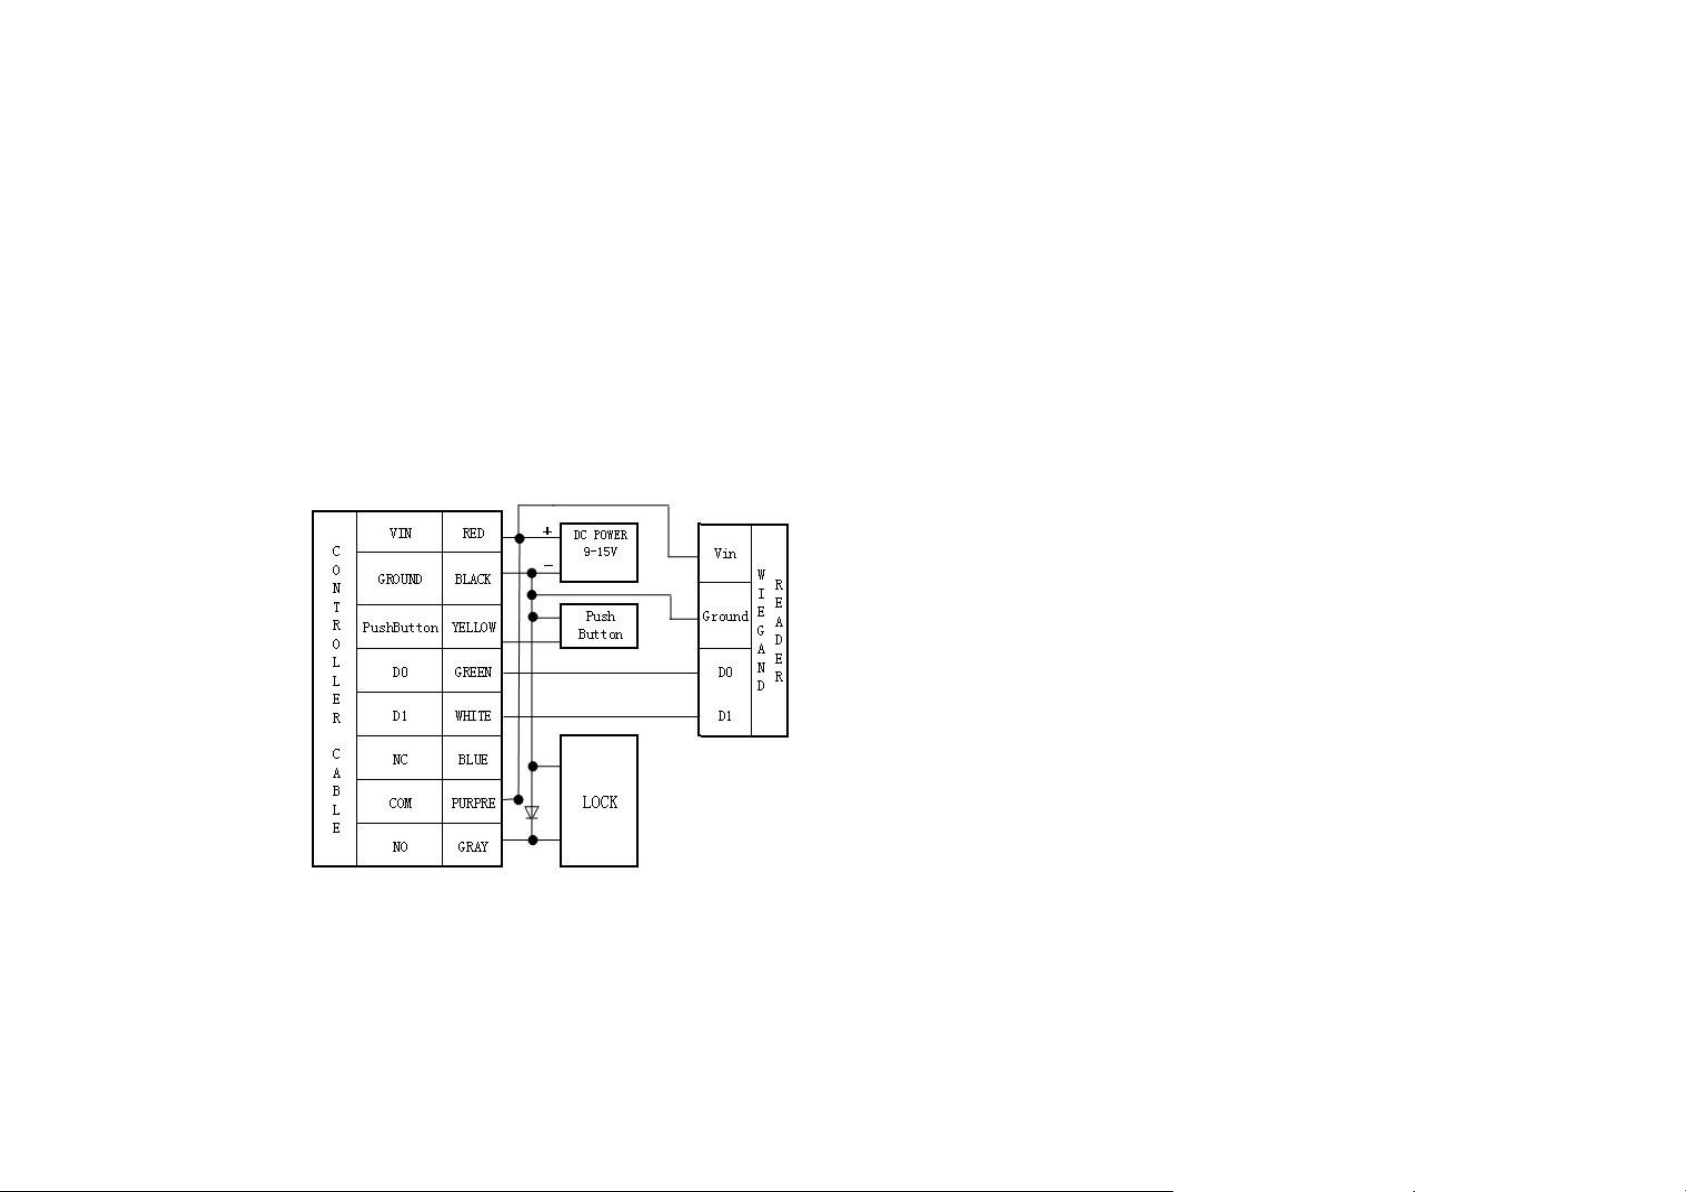
4. System wiring
5. USAGE of HM1000
Present the regisitered card to controller to open the door, Press the push button to open the door.
If external proximty card reader (wiegand26 interface) is installed, cards read on exnternal reader has
same function as cards read on controller.
If external keypad reader is installed, each keypress on reader will function same as IR keypad, And it
enable HM1000 PIN+Prox card user function (card and PIN should preent at together to open the door)
6. Operation with master function cards
Remark: during each operation Below, controller sounds 3 beeps mean operation is fail, controller
sounds 1 beep, means operation is successful
● Add new user card: present ADD card to controller(Green LED flash), then present the card
want to be added (controller sounds 1 beep), then p resent other card want to be added …. Present ADD
card to stop adding new card, controller will sound one beep and back to standby mode.
● Delete user card: present DEL card to controller(Green LED flash) then present the card want to be
deleted (controller sound 1 beep), then present other card want to be deleted …. Present the master DEL
card to stop deleting card, controller will sound 1 beep and back to standby mode.
● Delete ALL user cards : present DEL card to controller(Green LED flash) then present ADD card
to controller, controller sounds 1 beep, all card are deleted. (include single users and also block card)
● Modify door release time : present ADD card to controller, then present DEL card to controller,
then controller will go into change door release time mode, in this mode,
Present DEL card, controller sounds 2 beeps, the delay time is changed to 1 second, Then present DEL
card again, delay time is changed to 2 seconds….(delay time will add 1 second at each presentation of DEL
card, the delay release time is 1-15s), present the master ADD card to stop the process, controller back to
standby mode.
● Enroll block users : present ADD card to controller 2 times, Controller goes into ADD block user
mode, present the card with start number of block user ( controller sounds 2 beeps), then present the
card with end number of block user, block user is set well.
● Disable block users : present DEL card to controller 2 times, Controller will disable block user
function. (will not affect enrolled single users)
● Create ADD and DEL card: User may create the function card as below steps: Power Off
controller, open the bottom case of controller, short PIN2 and PIN3 by a jumper, Power On controller,
Green LED is flash, present 2 cards to controller, controller will accept them and goes to standby mode.
The first card is ADD card, and 2nd is DEL card, take OFF the jumper , re-power unit
7. Operation of IR keypad (IR keypad is optional)
● Enter Programming mode : press” # ” on IR keypad, then press 6 digital programming
password(default password is “000000”), Green LED on, Controller goes in to programming mode
● Exist from Programming mode: press” * ” will quit from programming mode immediately.
During programming mode, if no key is pressed within 3 seconds, controller will quit from programming
and return to normal working mode automatically.
● Enroll one card: in programming mode, press “ 2 ”, then press 3 digital user numbers (000-999),
Green Led flash, present the card want to be enrolled, controller sounds 1 beep, card is enrolled well.
Repeat above to enroll more cards.( or enroll 6 ditigal user password)
● Delete one card: in programming mode, press “ 3 ” , then press 3 digital user number(000-999), or
present the card want to be deleted , controller sounds 1 beep, card is deleted. Repeat to delete others.
● Delete All card: in programming mode, press “ 4 ” 2 times, all data are deleted.
● Chang door open time: in programming mode, press “ 5 ”, then press 3 digitals delay time(from
001 to 255), controller sounds 1 time. (020 means 2 seconded, 255 means 25.5 seconds)
● Create master card by IR: in programming mode, press “ 7 ”, Green LED flash, present 2 cards to
controller, The first card will be functioned as ADD card, and 2nd is DEL card.
● Delete card by input card number(if card is lost) : in programming mode, press “ 6 ”, Green
LED flash, press 8 digital card numbers, controller sounds 1 beep, the card is deleted. Repeat to delete
others. The card number data format is FC( 3 digital) and number ( 5 digitals), for example, 125,00678 .
● Change programming password: in programming mode, press “ 1 ”, then press 6 digital new
password. Controller sounds 1 beep and new password is set.
● ADD Prox + PIN user(need external keypad reader): in programming mode, press “ 0 ”, then
press 3 digital user number, then present one card to controller, once card is accepted by controller, Green
and Red LED flash, then input 6 digital user PIN code to controller
● Reset programming password: Programming passworkd can be reset to factory default if it is
missed as below steps: Power Off controller, open bottom case , short PIN5 and PIN6 by a jumper, Power
On controller, Green LED is on, then password is reset to 000000

8.FCC Statement
This equipment complies with Part 15 of FCC RF Rules. Operation is subject to the following two conditions:
1) This device may not cause interference and
2) This device must accept any interference, including interference that may cause undesired operation of the device.
Caution!
The manufacturer is not responsible for any radio or TV interference caused by unauthorized modifications to this equipment. Such modifications could void the user authority to operate the equipment.
 Loading...