

Page 1
AirCon Service VES100
DE 5 Kältemittelwaage
Bedienungsanleitung
EN 16 Refrigerant scales
Operating manual
FR 26 Balance de réfrigérant
Notice d’utilisation
ES 37 Báscula de refrigerante
Instrucciones de uso
IT 47 Bilancia per refrigerante
Istruzioni per l’uso
NL 57 Koudemiddelweegschaal
Gebruiksaanwijzing
DA 67 Kølemiddelvægt
Betjeningsvejledning
SV 77 Våg för köldmedium
Bruksanvisning
NO 87 Kjølemiddelvekt
Bruksanvisning
FI 96 Kylmäainevaaka
Käyttöohje
PT 107 Balança de agente refrigerante
Manual de instruções
RU 117 Весы для хладагента
Инструкция по эксплуатации
PL 128 Waga czynnika chłodniczego
Instrukcja obsługi
CS 138 Váha chladiva
Návod k obsluze
SK 147 Váha chladiaceho prostriedku
Návod na obsluhu
HU 157 Hűtőközeg-mérleg
Használati utasítás
Page 2
VES100
1 2
34
1
1
2
3
2
2
Page 3
VES100
6
1
23
5
4
3
4
1
8
7
2
3
4
5
6
3
Page 4

VES100
5
6
4
Page 5

DE
VES100 Erklärung der Symbole
Bitte lesen Sie diese Anleitung vor der Inbetriebnahme sorgfältig durch
und bewahren Sie sie auf. Geben Sie sie im Falle einer Weitergabe des
Produktes an den Nutzer weiter.
Inhaltsverzeichnis
1 Erklärung der Symbole . . . . . . . . . . . . . . . . . . . . . . . . . . . . . . . . . . . 5
2 Sicherheitshinweise . . . . . . . . . . . . . . . . . . . . . . . . . . . . . . . . . . . . . . 6
3 Lieferumfang . . . . . . . . . . . . . . . . . . . . . . . . . . . . . . . . . . . . . . . . . . . 8
4 Bestimmungsgemäßer Gebrauch . . . . . . . . . . . . . . . . . . . . . . . . . . . 8
5 Technische Beschreibung . . . . . . . . . . . . . . . . . . . . . . . . . . . . . . . . . 8
6 Gebrauch . . . . . . . . . . . . . . . . . . . . . . . . . . . . . . . . . . . . . . . . . . . . . 10
7 Batterien wechseln. . . . . . . . . . . . . . . . . . . . . . . . . . . . . . . . . . . . . . 13
8 Störungsbeseitigung . . . . . . . . . . . . . . . . . . . . . . . . . . . . . . . . . . . . 13
9 Reinigung und Pflege. . . . . . . . . . . . . . . . . . . . . . . . . . . . . . . . . . . . 14
10 Gewährleistung . . . . . . . . . . . . . . . . . . . . . . . . . . . . . . . . . . . . . . . . 14
11 Entsorgung. . . . . . . . . . . . . . . . . . . . . . . . . . . . . . . . . . . . . . . . . . . . 14
12 Technische Daten . . . . . . . . . . . . . . . . . . . . . . . . . . . . . . . . . . . . . . 15
1 Erklärung der Symbole
WARNUNG!
!
!
A
Sicherheitshinweis: Nichtbeachtung kann zu Tod oder schwerer
Verletzung führen.
VORSICHT!
Sicherheitshinweis: Nichtbeachtung kann zu Verletzungen
führen.
ACHTUNG!
Nichtbeachtung kann zu Materialschäden führen und die
Funktion des Produktes beeinträchtigen.
5
Page 6

DE
Sicherheitshinweise VES100
HINWEIS
I
➤ Handlung: Dieses Symbol zeigt Ihnen, dass Sie etwas tun müssen. Die
erforderlichen Handlungen werden Schritt für Schritt beschrieben.
✓ Dieses Symbol beschreibt das Ergebnis einer Handlung.
Abb. 1 5, Seite 3: Diese Angabe weist Sie auf ein Element in einer Abbildung hin, in diesem Beispiel auf „Position 5 in Abbildung 1 auf Seite 3“.
Ergänzende Informationen zur Bedienung des Produktes.
2 Sicherheitshinweise
Der Hersteller übernimmt in folgenden Fällen keine Haftung für Schäden:
Beschädigungen am Produkt durch mechanische Einflüsse und Über-
spannungen
Veränderungen am Produkt ohne ausdrückliche Genehmigung vom
Hersteller
Verwendung für andere als die in der Anleitung beschriebenen Zwecke
2.1 Allgemeine Sicherheit
!
6
WARNUNG!
Wenn das Gerät sichtbare Beschädigungen aufweist, dürfen
Sie es nicht in Betrieb nehmen.
Wenn das Anschlusskabel dieses Gerätes beschädigt wird,
muss es durch den Hersteller, seinen Kundendienst oder eine
ähnlich qualifizierte Person ersetzt werden, um Gefährdungen
zu vermeiden.
Reparaturen an diesem Gerät dürfen nur von Fachkräften
durchgeführt werden. Durch unsachgemäße Reparaturen können erhebliche Gefahren entstehen.
Dieses Gerät kann von Kindern ab 8 Jahren und darüber sowie
von Personen mit verringerten physischen, sensorischen oder
mentalen Fähigkeiten oder Mangel an Erfahrung und Wissen
benutzt werden, wenn sie beaufsichtigt oder bezüglich des
sicheren Gebrauchs des Gerätes unterwiesen wurden und die
daraus resultierenden Gefahren verstehen.
Reinigung und Benutzer-Wartung dürfen nicht von Kindern
ohne Beaufsichtigung durchgeführt werden.
Page 7

DE
VES100 Sicherheitshinweise
Kinder dürfen nicht mit dem Gerät spielen.
Kinder sollten beaufsichtigt werden, um sicherzustellen, dass
sie nicht mit dem Gerät spielen.
Verwahren und benutzen Sie das Gerät außerhalb der Reich-
weite von Kindern unter 8 Jahren.
VORSICHT!
!
A
2.2 Sicherheit beim Betrieb des Gerätes
!
Trennen Sie das Gerät vom Netz
– vor jeder Reinigung und Pflege
– nach jedem Gebrauch
ACHTUNG!
Vergleichen Sie die Spannungsangabe auf dem Typenschild
mit der vorhandenen Energieversorgung.
Schließen Sie das Gerät mit dem Wechselstromkabel an das
Wechselstromnetz an.
Ziehen Sie den Stecker nie am Anschlusskabel aus der Steck-
dose.
VORSICHT!
Achten Sie vor der Inbetriebnahme darauf, dass Zuleitung und
Stecker trocken sind.
A
ACHTUNG!
Stellen Sie das Gerät nicht in der Nähe von offenen Flammen
oder anderen Wärmequellen (Heizung, starke Sonneneinstrahlung, Gasöfen usw.) ab.
Tauchen Sie das Gerät nie in Wasser.
Schützen Sie das Gerät und die Kabel vor Hitze und Nässe.
7
Page 8
DE
Lieferumfang VES100
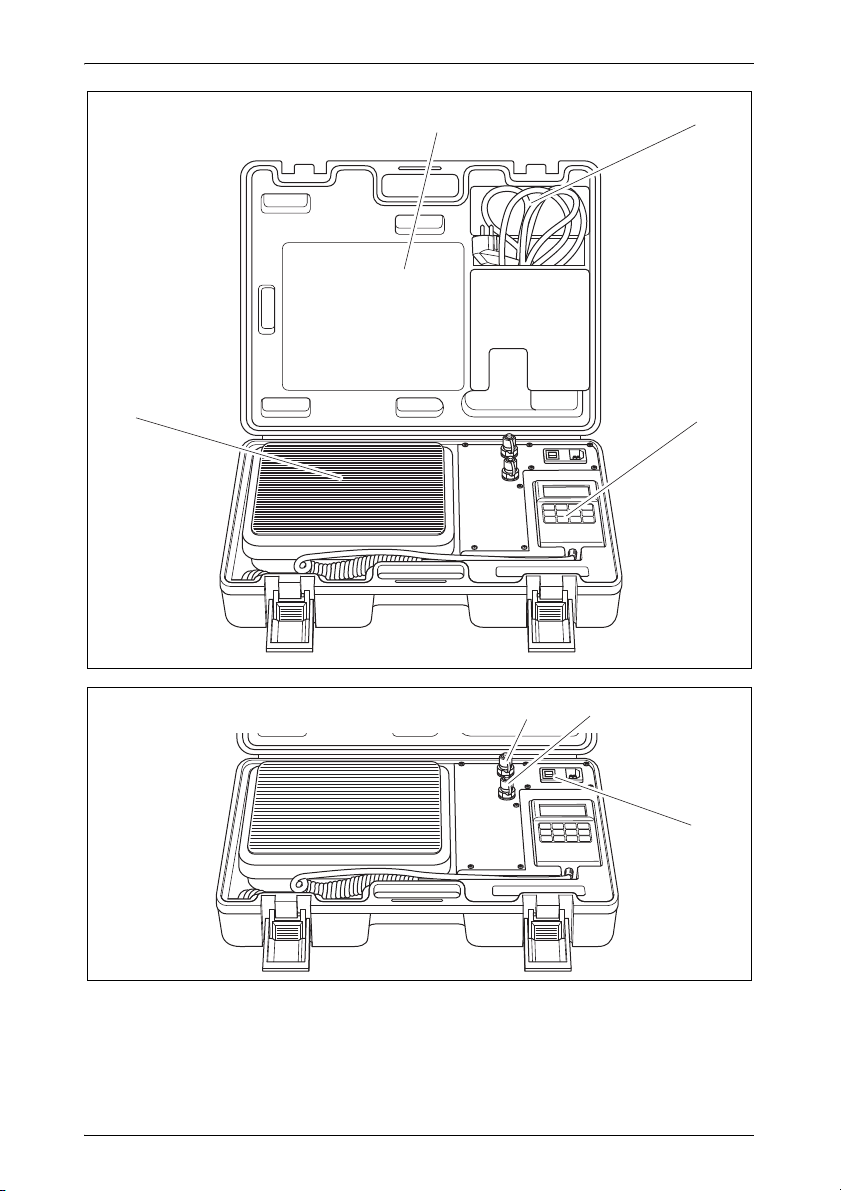
3Lieferumfang
Pos. in Abb. 1,
Seite 2
1 Schutzkoffer
2 Wechselstromkabel
3 Hand-Display
4 Waage
Bezeichnung
4 Bestimmungsgemäßer Gebrauch
Mit der Kältemittelwaage VES100 lässt sich Kältemittel in einen Kältemittelbehälter übertragen oder absaugen.
5 Technische Beschreibung
Die Waage ist herausnehmbar und ermöglicht das Wiegen außerhalb des
Schutzkoffers. Das Hand-Display ist ebenfalls herausnehmbar. Es kann
außerhalb der Koffers aufgehängt werden.
Die Waage schaltet sich automatisch nach 30 Minuten ohne Tastendruck
aus.
Mit der Waage wird die Menge an Kältemittel bestimmt.
Ein Magnetventil im Gerät schließt oder öffnet die Verbindung zwischen den
beiden Anschlüssen „Input“ und „Output“.
Pos. in Abb. 2,
Seite 2
1 Anschluss „Input“
2 Anschluss „Output“
3 Ein/Aus-Schalter
8
Bezeichnung
Page 9
DE
VES100 Technische Beschreibung
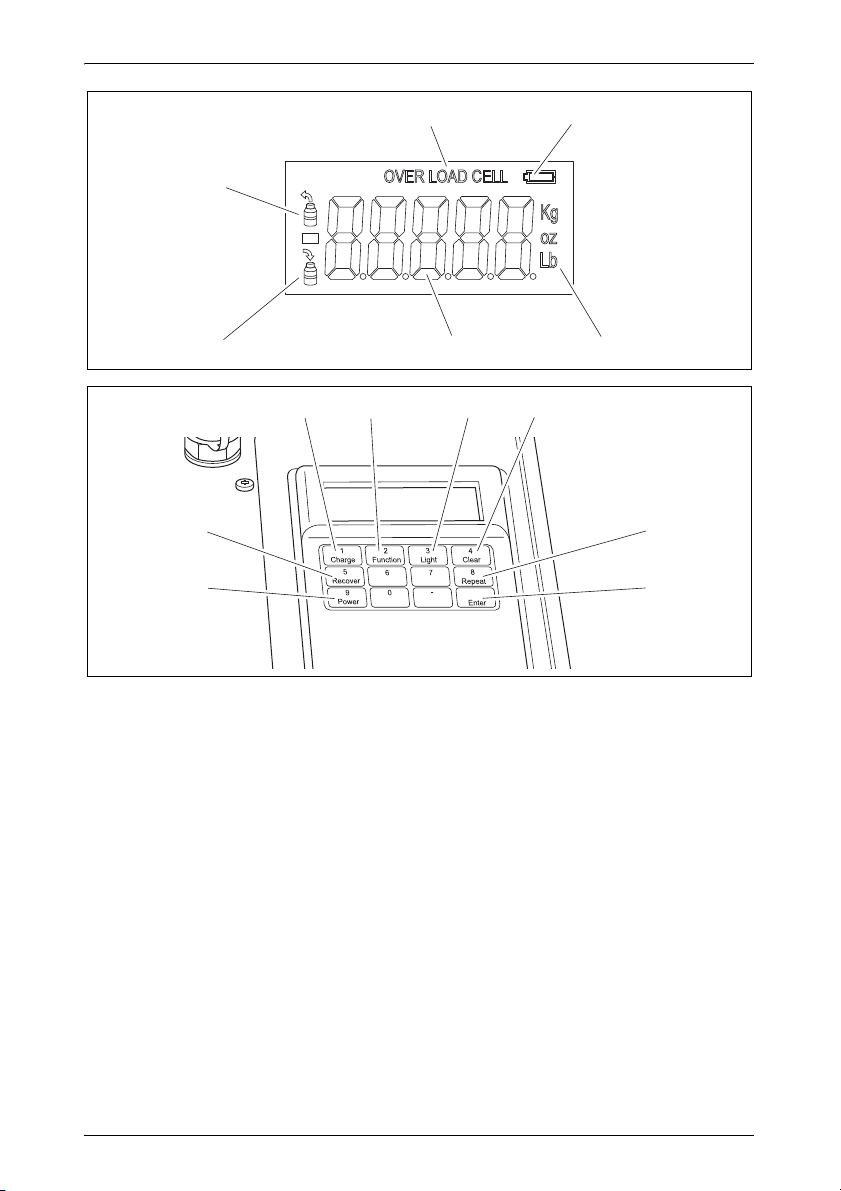
5.1 Anzeigeelemente Hand-Display
Pos. in Abb. 3,
Seite 3
1 Batterieanzeige
2 Gewichtseinheit
3 Ziffernanzeige
4 Anzeige „Absaugen“
5 Anzeige „Übertragen“
6 Überlastanzeige
Bezeichnung
5.2 Bedienelemente Hand-Display
Die Tasten sind gleichzeitig mit Ziffern und folgenden Funktionen belegt:
Pos. in Abb. 4,
Seite 3
1 Taste „Charge“ Startet das Übertragen.
2 Taste „Function“ Wählt die Gewichtseinheit aus.
3 Taste „Light“ Schaltet die Hintergrundbe-
4 Taste „Clear“ Löscht alle Eingaben und kehrt
5 Taste „Repeat“ Verwendet das zuvor ausge-
6 Taste „Enter“ Zeigt das aktuelle Gewicht an.
Bezeichnung Erklärung
leuchtung ein und aus.
zum Wiege-Modus zurück.
wählte Gewicht und wiederholt
den Vorgang Übertragen/
Absaugen.
7 Taste „Power“ Schaltet die Waage ein und
aus.
8 Taste „Recover“ Schaltet die Anzeige im Hand-
Display ein.
9
Page 10

DE
Gebrauch VES100
6Gebrauch
ACHTUNG!
A
I
6.1 Gewichtseinheit wählen
Die Kältemittelwaage verfügt über drei Gewichtseinheiten: Kilogramm (kg),
Unzen (oz) und Pfund (lb).
Achten Sie darauf, die maximale Wiegekapazität nicht zu überschreiten, da dies die Kältemittelwaage beschädigen könnte.
HINWEIS
Die Waage kann sowohl im Koffer als auch im Freien aufge-
stellt werden. Die Waage muss eben stehen und darf das
Anschlusskabel nicht berühren, da sonst die Präzision beeinflusst werden kann.
Platzieren Sie die Kältemittelflasche mittig auf der Waage und
achten Sie darauf, das Kältemittel vorher nicht zu schütteln.
Decken Sie die Anschlüsse „Input“ und „Output“ nach jedem
Gebrauch mit den Schutzkappen ab.
Schalten Sie die Kältemittelwaage nach jedem Gebrauch aus.
Entnehmen Sie die Batterien, wenn das Gerät gelagert werden soll oder für längere Zeit nicht benutzt wird.
➤ Drücken Sie die Taste „Function“ (Abb. 4 2, Seite 3) mehrmals, um die
gewünschte Gewichtseinheit auszuwählen.
6.2 Hintergrundbeleuchtung einschalten
Die Hintergrundbeleuchtung schaltet sich nach 30 Sekunden ohne Tastendruck automatisch aus.
➤ Drücken Sie die Taste „Light“ (Abb. 4 3, Seite 3), um die Hintergrundbe-
leuchtung des Displays ein- oder auszuschalten.
10
Page 11

DE
VES100 Gebrauch
6.3 Kältemittel übertragen
HINWEIS
I
➤ Schließen Sie die Kältemittelwaage mit dem Wechselstromkabel
(Abb. 1 1, Seite 2) an das Wechselstromnetz an.
➤ Verbinden Sie eine gefüllte Kältemittelflasche mit dem Anschluss „Input“
(Abb. 2 1, Seite 2).
➤ Verbinden Sie die Gasflasche, die befüllt werden soll, mit dem Anschluss
„Output“ (Abb. 2 2, Seite 2).
➤ Schalten Sie die Waage mit dem Ein/Aus-Schalter ein (Abb. 2 3,
Seite 2) ein.
➤ Stellen Sie die gefüllte Gasflasche auf die Waage (Abb. 5, Seite 4).
➤ Warten Sie, bis die Waage das derzeitige Gewicht ermittelt hat und im
Display anzeigt.
➤ Drücken Sie die Taste „Charge“ (Abb. 3 1, Seite 3).
➤ Geben Sie das aufzuladende Gewicht (min. 50 g) über die Zifferntasten
ein.
Die Kältemittelwaage muss an das Wechselstromnetz angeschlossen sein, damit das Magnetventil funktioniert.
➤ Drücken Sie die Taste „Enter“ (Abb. 3 6, Seite 3).
✓ Das Magnetventil öffnet sich und das Kältemittel wird übertragen.
Wenn die ausgewählte Menge an Kältemittel übertragen wurde, schließt
das Magnetventil.
Die Waage zeigt die restliche Menge an Kältemittel in der gefüllten Kältemittelgasflasche an.
HINWEIS
I
Drücken Sie die Taste „Enter“ Abb. 3 6, Seite 3), um einen
Vorgang abzubrechen. Drücken Sie danach die Taste
„Charge“ (Abb. 3 1, Seite 3), um zum vorherigen Bildschirm
zurückzukehren.
Wenn Sie den Übertragungsvorgang beenden wollen, bevor
die ausgewählte Menge an Kältemittel erreicht wurde, drücken
Sie die Taste „0“. Drücken Sie die Taste „Enter“ (Abb. 3 6,
Seite 3), um den Modus zu verlassen.
11
Page 12

DE
Gebrauch VES100
6.4 Kältemittel absaugen
HINWEIS
I
➤ Verbinden Sie die Gasflasche mit einer Absaugvorrichtung (Abb. 6,
Seite 4).
➤ Schließen Sie die Kältemittelwaage mit dem Wechselstromkabel
(Abb. 1 1, Seite 2) an das Wechselstromnetz an.
➤ Verbinden Sie den Anschluss „Output“ mit der Klima-Service-Station
(Abb. 2 2, Seite 2).
➤ Verbinden Sie die Gasflasche, aus der abgesaugt werden soll, mit dem
Anschluss „Input“ (Abb. 2 1, Seite 2).
➤ Schalten Sie die Waage mit dem Ein/Aus-Schalter ein (Abb. 2 3,
Seite 2) ein.
➤ Stellen Sie die zu entleerende Gasflasche auf die Waage.
Wenn das ausgewählte Gewicht das Gesamtgewicht an Käl-
temittel in der Gasflasche übersteigt, wird die Fehlermeldung
"ERROR" angezeigt.
Das Gewicht der zu befüllenden Flasche darf 80 % der
Gesamtmenge nicht übersteigen.
➤ Warten Sie, bis die Waage das derzeitige Gewicht ermittelt hat und
anzeigt.
➤ Drücken Sie die Taste „Recover“ (Abb. 3 8, Seite 3).
➤ Geben Sie das zu entnehmende Gewicht (min. 50 g) über die Zifferntas-
ten ein.
➤ Drücken Sie die Taste „Enter“ (Abb. 3 6, Seite 3).
✓ Das Magnetventil öffnet sich und das Kältemittel wird entnommen.
Wenn die ausgewählte Menge an Kältemittel übertragen wurde, schließt
das Magnetventil.
Die Waage zeigt die restliche Menge an Kältemittel in der gefüllten Kältemittelflasche an.
12
Page 13

DE
VES100 Batterien wechseln
HINWEIS
I
Drücken Sie die Taste „Enter“ Abb. 3 6, Seite 3), um einen
Vorgang abzubrechen. Drücken Sie danach die Taste „Recover“ (Abb. 3 8, Seite 3), um zum vorherigen Bildschirm
zurückzukehren.
Wenn Sie den Ladevorgang beenden wollen, bevor die ausge-
wählte Menge an Kältemittel erreicht wurde, drücken Sie die
Taste „0“. Drücken Sie die Taste „Enter“ (Abb. 3 6, Seite 3),
um den Modus zu beenden.
6.5 Vorgang wiederholen
➤ Drücken Sie nach dem Übertragen oder Absaugen die Taste „Repeat“
(Abb. 3 5, Seite 3), um das zuvor ausgewählte Gewicht nochmals zu
übertragen.
7 Batterien wechseln
➤ Öffnen Sie die Abdeckung auf der Rückseite des Hand-Displays.
➤ Tauschen Sie die Batterien (9 V) aus.
➤ Schließen Sie die Abdeckung.
8 Störungsbeseitigung
Störung Lösung
Im Display wird
„ERROR“ angezeigt.
Das Display reagiert
nicht.
Drücken Sie die Taste „Power“ und warten Sie
3 Sekunden. Drücken Sie die Taste „Power“ erneut, um
das System neu zu starten.
13
Page 14

DE
Reinigung und Pflege VES100
9 Reinigung und Pflege
ACHTUNG!
A
➤ Reinigen Sie das Produkt gelegentlich mit einem feuchten Tuch.
Keine scharfen oder harten Gegenstände oder Reinigungsmittel
zur Reinigung verwenden, da dies zu einer Beschädigung des
Produktes führen kann.
10 Gewährleistung
Es gilt die gesetzliche Gewährleistungsfrist. Sollte das Produkt defekt sein,
wenden Sie sich bitte an die Niederlassung des Herstellers in Ihrem Land
(Adressen siehe Rückseite der Anleitung) oder an Ihren Fachhändler.
Zur Reparatur- bzw. Gewährleistungsbearbeitung müssen Sie folgende
Unterlagen mitschicken:
eine Kopie der Rechnung mit Kaufdatum,
einen Reklamationsgrund oder eine Fehlerbeschreibung.
11 Entsorgung
➤ Geben Sie das Verpackungsmaterial möglichst in den entsprechenden
Recycling-Müll.
Wenn Sie das Produkt endgültig außer Betrieb nehmen, informieren Sie sich bitte beim nächsten Recyclingcenter oder bei
M
14
Ihrem Fachhändler über die zutreffenden Entsorgungsvorschriften.
Page 15

DE
VES100 Technische Daten
12 Technische Daten
VES100
Art.-Nr.: 8885100099
Wiegekapazität: 100 kg/220 lbs/3528 oz
Auflösung: 5 g/0,01 lbs/0,2 oz
Genauigkeit: 0,05 %
Anschlussspannung: 110– 240 Vw
Umgebungstemperatur: –10–+40 °C
≤75% Luftfeuchtigkeit
Kältemittelanschlüsse: 1/4"
Abmessungen Waage: 237 mm x 237 mm
Gewicht: 5 kg
15
Page 16

EN
VES100
Please read this instruction manual carefully before first use, and store
it in a safe place. If you pass on the product to another person, hand
over this instruction manual along with it.
Table of contents
1 Explanation of symbols . . . . . . . . . . . . . . . . . . . . . . . . . . . . . . . . . . 17
2 Safety instructions . . . . . . . . . . . . . . . . . . . . . . . . . . . . . . . . . . . . . . 17
3 Scope of delivery . . . . . . . . . . . . . . . . . . . . . . . . . . . . . . . . . . . . . . . 19
4 Intended use . . . . . . . . . . . . . . . . . . . . . . . . . . . . . . . . . . . . . . . . . . 19
5 Technical description . . . . . . . . . . . . . . . . . . . . . . . . . . . . . . . . . . . . 19
6 Use. . . . . . . . . . . . . . . . . . . . . . . . . . . . . . . . . . . . . . . . . . . . . . . . . . 21
7 Replacing the batteries . . . . . . . . . . . . . . . . . . . . . . . . . . . . . . . . . . 24
8 Troubleshooting . . . . . . . . . . . . . . . . . . . . . . . . . . . . . . . . . . . . . . . . 24
9 Cleaning and maintenance . . . . . . . . . . . . . . . . . . . . . . . . . . . . . . . 24
10 Warranty . . . . . . . . . . . . . . . . . . . . . . . . . . . . . . . . . . . . . . . . . . . . . 25
11 Disposal . . . . . . . . . . . . . . . . . . . . . . . . . . . . . . . . . . . . . . . . . . . . . . 25
12 Technical data . . . . . . . . . . . . . . . . . . . . . . . . . . . . . . . . . . . . . . . . . 25
16
Page 17

EN
VES100 Explanation of symbols
1 Explanation of symbols
WARNING!
!
!
A
I
➤ Action: This symbol indicates that action is required on your part. The
required action is described step-by-step.
✓ This symbol describes the result of an action.
Safety instruction: Failure to observe this instruction can cause
fatal or serious injury.
CAUTION!
Safety instruction: Failure to observe this instruction can lead to
injury.
NOTICE!
Failure to observe this instruction can cause material damage and
impair the function of the product.
NOTE
Supplementary information for operating the product.
Fig. 1 5, page 3: This refers to an element in an illustration. In this case,
item 5 in figure 1 on page 3.
2 Safety instructions
The manufacturer accepts no liability for damage in the following cases:
Damage to the product resulting from mechanical influences and excess
voltage
Alterations to the product without express permission from the manu-
facturer
Use for purposes other than those described in the operating manual
2.1 General safety
WARNING!
!
Do not operate the device if it is visibly damaged.
17
Page 18

EN
Safety instructions VES100
If this device's power cable is damaged, it must be replaced
by the manufacturer, customer service or a similarly qualified
person in order to prevent safety hazards.
This appliance may only be repaired by qualified personnel.
Inadequate repairs may cause serious hazards.
This device can be used by children aged 8 years or over, as
well as by persons with diminished physical, sensory or mental
capacities or a lack of experience and knowledge, providing
they are supervised, or have been taught how to use the device
safely and are aware of the resulting risks.
Cleaning and user maintenance must not be carried out by
unsupervised children.
Children must not play with the device.
Children must be supervised to ensure that they do not play with
the device.
Always keep and use the device out of the reach of children
under 8 years of age.
CAUTION!
!
Disconnect the device from the mains
– before cleaning and maintenance
– after every use
NOTICE!
A
2.2 Operating the device safely
!
A
18
Check that the voltage specification on the type plate is the
same as that of the power supply.
Connect the device to the AC mains using the AC cable.
Never pull the plug out of the socket by the connection cable.
CAUTION!
Before starting the device, ensure that the power supply line
and the plug are dry.
NOTICE!
Do not place it near naked flames or other heat sources
(heaters, direct sunlight, gas ovens etc.).
Never immerse the device in water.
Protect the device and the cable against heat and moisture.
Page 19

EN
VES100 Scope of delivery
3 Scope of delivery
No. in fig. 1,
page 2
1 Protective case
2 AC cable
3 Hand display
4 Scales
Description
4 Intended use
Using the VES 100 refrigerant scales, refrigerant can be charged or recovered into a refrigerant container.
5 Technical description
The scales can be moved and allow weighing outside the protective case.
The hand display is also removable. It can be suspended outside the protective case
If no button is pressed, the scale automatically switches off after 30 minutes.
The quantity of refrigerant is determined using the scale.
A solenoid valve in the device opens or closes the connection between both
the “Input” and “Output” connections.
No. in fig. 2,
page 2
1 “Input” connection
2 “Output” connection
3 On/off switch
Description
19
Page 20
EN
Technical description VES100
5.1 Hand display element
No. in fig. 3,
page 3
1 Battery indicator
2 Weighing unit
3 Numeric display
4 “Recovery” display
5 “Charging” display
6 Over load display
Description
5.2 Hand display control element
Buttons are simultaneously assigned numbers and the following functions:
No. in fig. 4,
page 3
1 “Charge” button Starts the charging.
2 “Function” button Selects the weight unit.
3 “Light” button Switches the backlight on and
4 “Clear” button Deletes all entries and returns
5 “Repeat” button Uses the previously selected
6 “Enter” button Displays the current weight.
Description Explanation
off.
to scales mode.
weight and repeats the
charging/
recovery procedure.
7 “Power” button Switches the scales on and off.
8 “Recover” button Switches the display on in the
hand display.
20
Page 21

EN
VES100 Use
6Use
NOTICE!
A
I
6.1 Selecting the weight unit
The refrigerant unit has three weight units: kilogrammes (kg), ounces (oz)
and pounds (lb).
Ensure the scales' maximum capacity is not exceeded as this
many damage the refrigerant scales.
NOTE
The scales can be set up in the case as well as outside the
case. The scale must be on a flat surface and must not
touch the connection cable as this may otherwise affect the
precision.
Place the refrigerant bottle at the centre of the scale and
ensure you do not shake the refrigerant beforehand.
Cover the “Input” and “Output” connections with the safety
caps prior to each use.
Switch off the refrigerant scale after every use. Remove the
batteries if the device is to be stored, or will not be used for an
extended period.
➤ Press the “Function” button (fig. 4 2 page 3) several times, in order to
select the weight unit required.
6.2 Switching on the backlight
The backlight switches off automatically after 30 minutes without a button
being pressed.
➤ Press the “Light” button (fig. 4 3, page 3) to switch the backlight of the
display on or off.
21
Page 22

EN
Use VES100
6.3 Charging refrigerant
NOTE
I
➤ Connect the refrigerant scale to the AC mains using the AC cable
(fig. 1 1, page 2).
➤ Connect a filled refrigerant bottle to the “Input” connection (fig. 2 1,
page 2).
➤ Connect the gas bottle to be filled to the “Output” connection (fig. 2 2,
page 2).
➤ Switch on the scales using the on/off switch (fig. 2 3, page 2).
➤ Place the filled gas bottle on the scale (fig. 5, page 4).
➤ Wait until the scale has determined the current weight and shown this in
the display.
➤ Press the “Charge” button (fig. 3 1, page 3).
➤ Enter the intended charging weight (min 50 g) using the numerical keys.
➤ Press the “Enter” button (fig. 3 6, page 3).
The refrigerant scales must be connected to the AC mains in
order for the solenoid valve to work.
✓ The solenoid valve is opened and the refrigerant is charged.
The solenoid value closes when the selected refrigerant quantity has
been charged.
The scale displays the quantity of refrigerant remaining in the filled
refrigerant gas bottle.
NOTE
I
Press the “Enter” button fig. 3 6, page 3) to stop a process at
any time. After this, press the "Charge button (fig. 3 1,
page 3), to return to the previous screen.
If you want to end the charging process before the selected
quantity of refrigerant has been reached, then press the “0”
button. Press the “Enter” button (fig. 3 6, page 3) to exit the
mode.
22
Page 23

EN
VES100 Use
6.4 Recovering refrigerant
NOTE
I
➤ Connect the gas bottle to a recovery system (fig. 6, page 4).
➤ Connect the refrigerant scale to the AC mains using the AC cable
(fig. 1 1, page 2).
➤ Connect the “Output” connection to the air conditioning service
station(fig. 2 2, page 2).
➤ Connect the gas bottle from which refrigerant is to be recovered to the
“Input” connection (fig. 2 1, page 2).
➤ Switch on the scale using the on/off switch (fig. 2 3, page 2).
➤ Place the filled gas bottle to be emptied on the scale.
➤ Wait until the scale has determined the current weight and displayed this.
➤ Press the “Recover” button (fig. 3 8, page 3).
If the weight selected exceeds the total weight of refrigerant in
the gas bottle, the fault message "ERROR" is displayed.
The weight of the bottle to be filled must not exceed 80 % of
the total quantity.
➤ Enter the weight to be removed (min 50 g) using the numerical keys.
➤ Press the “Enter” button (fig. 3 6, page 3).
✓ The solenoid valve is opened and the refrigerant extracted.
The solenoid value closes when the selected quantity of refrigerant has
been charged.
The scale displays the remaining quantity of refrigerant in the filled
refrigerant bottle.
NOTE
I
Press the “Enter” button fig. 3 6, page 3) to stop a process at
any time. After this, press the “Recover” button (fig. 3 8,
page 3), to return to the previous screen.
If you want to end the charging process before the selected
quantity of refrigerant has been reached, then press the “0”
button. Press the “Enter” button (fig. 3 6, page 3) to exit the
mode.
23
Page 24
EN
Replacing the batteries VES100
6.5 Repeating the process
➤ After charging or recovering, press the “Repeat” button (fig. 3 5,
page 3), in order to charge the previously selected weight again.
7 Replacing the batteries
➤ Open the cover on the back of the hand display.
➤ Replace the batteries (9 V).
➤ Close the cover.
8 Troubleshooting
Problem Remedy
“ERROR” is shown on
the display.
The display does not
react.
Press the “Power” button and wait for 3 seconds. Press
the “Power” button again to restart the system.
9 Cleaning and maintenance
NOTICE!
A
➤ Occasionally clean the product with a damp cloth.
Do not use sharp or hard objects or cleaning agents for cleaning
as these may damage the product.
24
Page 25
EN
VES100 Warranty
10 Warranty
The statutory warranty period applies. If the product is defective, please
contact the manufacturer's branch in your country (see the back of the
instruction manual for the addresses) or your retailer.
For repair and guarantee processing, please include the following documents when you send in the device:
A copy of the receipt with purchasing date
A reason for the claim or description of the fault
11 Disposal
➤ Place the packaging material in the appropriate recycling waste bins
wherever possible.
If you wish to finally dispose of the product, ask your local recycling
centre or specialist dealer for details about how to do this in
M
accordance with the applicable disposal regulations.
12 Technical data
VES100
Item no.: 8885100099
Weighing capacity: 100 kg/220 lbs/3528 oz
Resolution: 5 g/0.01 lbs/0.2 oz
Accuracy: 0.05 %
Voltage: 110–240 Vw
Ambient temperature: –10–+40 °C
≤75% humidity
Refrigerant connections: 1/4"
Scale dimensions: 237 mm x 237 mm
Weight: 5 kg
25
Page 26

FR
VES100
Veuillez lire ce manuel attentivement avant de mettre l'appareil en
service et conservez-le. En cas de passer le produit, veuillez le transmettre au nouvel acquéreur.
Table des matières
1 Explication des symboles. . . . . . . . . . . . . . . . . . . . . . . . . . . . . . . . . 27
2 Consignes de sécurité . . . . . . . . . . . . . . . . . . . . . . . . . . . . . . . . . . . 27
3 Pièces fournies . . . . . . . . . . . . . . . . . . . . . . . . . . . . . . . . . . . . . . . . 29
4 Usage conforme. . . . . . . . . . . . . . . . . . . . . . . . . . . . . . . . . . . . . . . . 29
5 Description technique . . . . . . . . . . . . . . . . . . . . . . . . . . . . . . . . . . . 30
6 Utilisation . . . . . . . . . . . . . . . . . . . . . . . . . . . . . . . . . . . . . . . . . . . . . 32
7 Changement des piles . . . . . . . . . . . . . . . . . . . . . . . . . . . . . . . . . . . 35
8 Dépannage . . . . . . . . . . . . . . . . . . . . . . . . . . . . . . . . . . . . . . . . . . . 35
9 Entretien et nettoyage . . . . . . . . . . . . . . . . . . . . . . . . . . . . . . . . . . . 35
10 rantie . . . . . . . . . . . . . . . . . . . . . . . . . . . . . . . . . . . . . . . . . . . . . . . . 36
11 Retraitement . . . . . . . . . . . . . . . . . . . . . . . . . . . . . . . . . . . . . . . . . . 36
12 Caractéristiques techniques. . . . . . . . . . . . . . . . . . . . . . . . . . . . . . . 36
26
Page 27

FR
VES100 Explication des symboles
1 Explication des symboles
AVERTISSEMENT !
!
!
A
I
➤ Manipulation : ce symbole vous indique une action à effectuer. Les
manipulations à effectuer sont décrites étape par étape.
✓ Ce symbole décrit le résultat d’une manipulation.
Consigne de sécurité : le non-respect de ces consignes peut
entraîner la mort ou de graves blessures.
ATTENTION !
Consigne de sécurité : le non-respect de ces consignes peut
entraîner des blessures.
AVIS !
Le non-respect de ces consignes peut entraîner des dommages
matériels et des dysfonctionnements du produit.
REMARQUE
Informations complémentaires sur l'utilisation du produit.
Fig. 1 5, page 3 : cette information renvoie à un élément figurant sur une
illustration, dans cet exemple à la « position 5 de l'illustration 1 à la page 3 ».
2 Consignes de sécurité
Le fabricant décline toute responsabilité pour des dommages dans les cas
suivants :
des influences mécaniques et des surtensions ayant endommagé le
matériel
des modifications apportées au produit sans autorisation explicite de la
part du fabricant
une utilisation différente de celle décrite dans la notice
27
Page 28

FR
Consignes de sécurité VES100
2.1 Consignes générales de sécurité
AVERTISSEMENT !
!
Si l'appareil présente des dégâts visibles, vous ne devez pas le
mettre en service.
Si le câble de raccordement de l'appareil est endommagé, il doit
être remplacé par le fabricant, son service après-vente ou une
personne de qualification similaire, afin d'éviter tout danger.
Seul un personnel qualifié est habilité à effectuer des répara-
tions sur l'appareil. Toute réparation mal effectuée risquerait
d'entraîner de graves dangers.
Les enfants âgés de 8 ans et plus ainsi que les personnes ayant
des déficiences physiques, sensorielles ou mentales ou un
manque d'expérience ou de connaissances peuvent utiliser
ce produit à condition d'être sous surveillance ou d'avoir reçu
des instructions concernant l'utilisation de l'appareil en toute
sécurité et de comprendre les dangers qui en résultent.
Le nettoyage et la maintenance ne doivent pas être effectués
par des enfants sans surveillance.
Les enfants ne doivent pas jouer avec cet appareil.
Les enfants doivent être surveillés pour s'assurer qu'ils ne
jouent pas avec l'appareil.
Placez et utilisez l'appareil hors de portée des enfants de moins
de 8 ans.
!
A
28
ATTENTION !
Débranchez l'appareil du secteur
– avant tout nettoyage et entretien
– après chaque utilisation
AVIS !
Vérifiez que la tension indiquée sur la plaque signalétique
correspond à l'alimentation électrique dont vous disposez.
Branchez l'appareil au réseau électrique de courant alternatif
avec le câble de raccordement.
Ne tirez jamais sur le câble de raccordement pour sortir la fiche
de la prise.
Page 29
FR
VES100 Pièces fournies
2.2 Consignes de sécurité concernant le fonctionnement de l'appareil
ATTENTION !
!
A
Avant de mettre l'appareil en service, assurez-vous que la ligne
d'alimentation électrique et le connecteur sont secs.
AVIS !
Ne placez pas l'appareil près de flammes ou d'autres sources
de chaleur (chauffage, rayons solaires, fours à gaz etc.).
Ne plongez jamais l'appareil dans l'eau.
Tenez l'appareil et les câbles à l'abri de la chaleur et de
l'humidité.
3 Pièces fournies
Pos. dans fig. 1,
page 2
1 Mallette de protection
2 Câble de courant alternatif
3 Écran d'affichage
4Balance
Désignation
4 Usage conforme
La balance de réfrigérant VES 100 permet de transvaser ou d'aspirer le réfrigérant d'un récipient.
29
Page 30
FR
Description technique VES100
5 Description technique
La balance est amovible et permet la pesée hors la mallette. L'écran
d'affichage est également amovible. On peut l'accrocher hors du coffret.
La balance s'éteint automatiquement au bout de trente secondes sans
pression de touche.
La balance permet de définir le volume de réfrigérant.
L'appareil comprend une électrovanne qui permet le raccordement ou la
coupure de l'entrée (« Input ») et de la sortie (« Output »).
Pos. dans fig. 2,
page 2
1 Raccord d'entrée (« Input »)
2 Raccord de sortie (« Output »)
3 Interrupteur de marche/arrêt
Désignation
5.1 Éléments d'affichage de l'écran
Pos. dans
fig. 3, page 3
1 Témoin de charge
2 Unité de masse
3 Affichage en chiffres
4 Affichage « Aspiration »
5 Affichage « Transvasement »
6 Affichage de surcharge
Désignation
30
Page 31

FR
VES100 Description technique
5.2 Éléments de commande de l'écran
Les touches chiffrées se rapportent aux fonctions suivantes :
Pos. dans
fig. 4, page 3
1 Touche « Charge » Cette touche permet de lancer
2 Touche « Function » Cette touche permet de choisir
3 Touche « Light » Cette touche permet d'allumer
4 Touche « Clear » Cette touche permet d'effacer
5 Touche « Repeat » Cette touche permet d'appli-
6 Touche « Enter » Cette touche permet d'afficher
7 Touche « Power » Cette touche permet d'allumer
8 Touche « Recover » Cette touche permet d'activer
Désignation Explication
le transvasement.
une unité de masse.
ou d'éteindre le rétroéclairage.
les entrées de repasser en
mode de pesée.
quer l'unité de masse sélectionnée et de reprendre
l'opération de transvasement/
aspiration.
le poids.
ou d'éteindre la balance.
l'affichage de l'écran.
31
Page 32

FR
Utilisation VES100
6 Utilisation
AVIS !
A
I
6.1 Sélection d'unité de masse
Trois unités de masse sont disponibles sur la balance : le kilogramme (kg),
l'once (oz) et la livre (lb).
Veillez à ne pas dépasser la capacité de pesage car cela peut
endommager la balance.
REMARQUE
On peut installer la balance dans ou hors de la mallette. La
balance doit être droite et ne doit pas être en contact avec le
câble de raccordement car cela peut altérer la précision de
l'instrument.
Ne secouez pas la bouteille de réfrigérant avant de la placer
au centre de la balance.
Remettez les capuchons de protection des raccords d'entrée
(« Input ») et de sortie (« Output ») après chaque usage.
Éteignez la balance de réfrigérant après chaque usage.
Retirez les piles si vous souhaitez stocker l'appareil ou ne
comptez pas l'utiliser pendant une longue période.
➤ Appuyez plusieurs fois sur la touche « Function » (fig. 4 2, page 3), pour
sélectionner une unité de masse.
6.2 Allumage du rétroéclairage
Le rétroéclairage s'éteint automatiquement au bout de trente secondes sans
pression de touche.
➤ Appuyez sur la touche « Light » (fig. 4 3, page 3) pour allumer ou
éteindre le rétroéclairage de l'écran.
32
Page 33

FR
VES100 Utilisation
6.3 Transvasement de réfrigérant
REMARQUE
I
➤ Branchez l'appareil au réseau électrique de courant alternatif avec le
câble de raccordement (fig. 1 1, page 2).
➤ Raccordez la bouteille de réfrigérant pleine à l'entrée « Input » (fig. 2 1,
page 2).
➤ Raccordez la bouteille de gaz à remplir à la sortie « Output » (fig. 2 2,
page 2).
➤ Allumez la balance avec l'interrupteur de marche/arrêt (fig. 2 3, page 2).
➤ Posez la bouteille remplie sur la balance (fig. 5, page 4).
➤ Attendez que l'écran affiche le poids détecté par la balance.
➤ Appuyez sur la touche « Charge » (fig. 3 1, page 3).
➤ Entrez le poids à charger (minimum : 50 g) par le pavé numérique.
➤ Appuyez sur la touche « Enter » (fig. 3 6, page 3).
La balance doit être branchée au réseau électrique de courant
alternatif pour que l'électrovanne fonctionne.
✓ L'ouverture de l'électrovane permet de transvaser le réfrigérant.
L'électrovanne se fermera dès que le volume de réfrigérant sélectionné
aura été transvasé.
La balance affiche le volume résiduel de réfrigérant dans la bouteille
remplie.
REMARQUE
I
Appuyer sur la touche « Enter » (fig. 3 6, page 3) permet
d'annuler une opération. Appuyez ensuite sur la touche
«Charge» (fig.3 1, page 3) afin de retourner à l'affichage
précédent.
Si vous souhaitez arrêter l'opération de transvasement avant
que le volume de réfrigérant défini ne soit atteint, appuyez sur
la touche « 0 ». Appuyez sur la touche « Enter » (fig. 3 6,
page 3) pour quitter le mode.
33
Page 34

FR
Utilisation VES100
6.4 Aspiration de réfrigérant
REMARQUE
I
➤ Raccordez la bouteille de gaz à un appareil d'aspiration (fig. 6, page 4).
➤ Branchez l'appareil au réseau électrique de courant alternatif avec le
câble de raccordement (fig. 1 1, page 2).
➤ Raccordez la sortie « Output » au poste d'entretien de systèmes de
climatisation (fig. 2 2, page 2).
➤ Raccordez la bouteille de gaz d'où le fluide va être aspiré à l'entrée
« Input » (fig. 2 1, page 2).
➤ Allumez la balance avec l'interrupteur de marche/arrêt (fig. 2 3, page 2).
➤ Posez la bouteille de gaz à vider sur la balance.
➤ Attendez que la balance détecte et affiche le poids.
L'écran affichera le message d'erreur "ERROR" » si le poids
sélectionné dépasse le poids total en réfrigérant dans la
bouteille de gaz.
Le poids de la bouteille à remplir ne doit pas dépasser 80 %
du volume total.
➤ Appuyez sur la touche « Recover » (fig. 3 8, page 3).
➤ Entrez le poids à extraire (minimum : 50 g) par le pavé numérique.
➤ Appuyez sur la touche « Enter » (fig. 3 6, page 3).
✓ L'ouverture de l'électrovane permet d'extraire le réfrigérant.
L'électrovanne se fermera dès que le volume de réfrigérant sélectionné
aura été transvasé.
La balance affiche le volume résiduel de réfrigérant dans la bouteille
remplie.
REMARQUE
I
Appuyer sur la touche « Enter » (fig. 3 6, page 3) permet
d'annuler une opération. Appuyez ensuite sur la touche
« Recover » (fig. 3 8, page 3) afin de retourner à l'affichage
précédent.
Si vous souhaitez arrêter la procédure de chargement avant
que le volume de réfrigérant défini ne soit atteint, appuyez sur
la touche « 0 ». Appuyez sur la touche « Enter » (fig. 3 6,
page 3) pour arrêter le mode.
34
Page 35

FR
VES100 Changement des piles
6.5 Répétition de l'opération
➤ Afin de transvaser une nouvelle fois le poids défini, appuyez sur la touche
« Repeat » (fig. 3 5, page 3) après le transvasement ou l'aspiration.
7 Changement des piles
➤ Ouvrez le cache au dos de l'écran.
➤ Remplacez les piles (9 V).
➤ Fermez le cache.
8 Dépannage
Dysfonctionnement Solution
L'écran affiche
«ERROR».
L'écran n'affiche rien.
Appuyez sur la touche « Power » et attendez trois
secondes. Appuyez une nouvelle fois sur la touche
« Power » pour redémarrer le système.
9 Entretien et nettoyage
AVIS !
A
➤ Nettoyez le produit avec un tissu humide.
N’utilisez aucun objet coupant ou dur, ni de détergents pour le
nettoyage. Cela pourrait endommager le produit.
35
Page 36

FR
rantie VES100
10 rantie
Le délai légal de garantie s'applique. Si le produit s'avérait défectueux,
veuillez vous adresser à la filiale du fabricant située dans votre pays (voir
adresses au verso du présent manuel) ou à votre revendeur spécialisé.
Veuillez y joindre les documents suivants pour la gestion des réparations et
de la garantie :
une copie de la facture avec la date d'achat,
le motif de la réclamation ou une description du dysfonctionnement.
11 Retraitement
➤ Jetez les emballages dans les conteneurs de déchets recyclables prévus
à cet effet.
Lorsque vous mettrez votre produit définitivement hors service,
informez-vous auprès du centre de recyclage le plus proche ou
M
auprès de votre revendeur spécialisé sur les prescriptions relatives
au retraitement des déchets.
12 Caractéristiques techniques
VES100
Référence : 8885100099
Capacité de pesage : 100 kg/220 lbs/3528 oz
Résolution : 5 g/0,01 lbs/0,2 oz
Précision : 0,05 %
Tension de raccordement :
Température ambiante : –10–+40 °C
Raccords de réfrigérant : 1/4"
Dimensions de la
balance :
Poids : 5 kg
36
110 –240 Vw
≤75 % d'humidité de l'air
237 mm x 237 mm
Page 37

ES
VES100 Explicación de los símbolos
Antes de poner en funcionamiento el producto, lea atentamente estas
instrucciones y consérvelas para futuras consultas. En caso de vender
o entregar el producto a otra persona, entregue también estas instrucciones.
Índice
1 Explicación de los símbolos. . . . . . . . . . . . . . . . . . . . . . . . . . . . . . . 37
2 Indicaciones de seguridad . . . . . . . . . . . . . . . . . . . . . . . . . . . . . . . . 38
3 Volumen de entrega. . . . . . . . . . . . . . . . . . . . . . . . . . . . . . . . . . . . . 40
4 Uso adecuado . . . . . . . . . . . . . . . . . . . . . . . . . . . . . . . . . . . . . . . . . 40
5 Descripción técnica . . . . . . . . . . . . . . . . . . . . . . . . . . . . . . . . . . . . . 40
6 Uso. . . . . . . . . . . . . . . . . . . . . . . . . . . . . . . . . . . . . . . . . . . . . . . . . . 42
7 Cambiar las pilas . . . . . . . . . . . . . . . . . . . . . . . . . . . . . . . . . . . . . . . 45
8 Solución de averías . . . . . . . . . . . . . . . . . . . . . . . . . . . . . . . . . . . . . 45
9 Limpieza y cuidado . . . . . . . . . . . . . . . . . . . . . . . . . . . . . . . . . . . . . 45
10 Garantía legal . . . . . . . . . . . . . . . . . . . . . . . . . . . . . . . . . . . . . . . . . 46
11 Gestión de residuos . . . . . . . . . . . . . . . . . . . . . . . . . . . . . . . . . . . . . 46
12 Datos técnicos . . . . . . . . . . . . . . . . . . . . . . . . . . . . . . . . . . . . . . . . . 46
1 Explicación de los símbolos
¡ADVERTENCIA!
!
!
Indicación de seguridad: su incumplimiento puede acarrear la
muerte o graves lesiones.
¡ATENCIÓN!
Indicación de seguridad: su incumplimiento puede acarrear
lesiones.
37
Page 38

ES
Indicaciones de seguridad VES100
¡AVISO!
A
I
➤ Paso a seguir: este símbolo le indica que debe realizar un paso. Todos
los procedimientos necesarios se describen paso a paso.
✓ Este símbolo describe el resultado de un paso realizado.
Fig. 1 5, página 3: esta indicación hace referencia a un elemento de una
figura, en este ejemplo a la “Posición 5 en la figura 1 de la página 3”.
Su incumplimiento puede acarrear daños materiales y perjudicar
el correcto funcionamiento del producto.
NOTA
Información adicional para el manejo del producto.
2 Indicaciones de seguridad
El fabricante declina toda responsabilidad ante daños ocurridos en los
siguientes casos:
daños en el producto debido a influencias mecánicas y sobretensiones
modificaciones realizadas en el producto sin el expreso consentimiento
del fabricante
utilización del aparato para fines distintos a los descritos en las
instrucciones
2.1 Seguridad general
¡ADVERTENCIA!
!
38
No ponga el aparato en funcionamiento si presenta
desperfectos visibles.
Si se daña el cable de conexión del aparato, el fabricante, su
servicio de atención al cliente o una persona cualificada debe
reemplazarlo para evitar así posibles peligros.
Solo personal especializado está autorizado a realizar
reparaciones en el aparato. Una reparación incorrecta entraña
riesgos considerables.
Page 39

ES
VES100 Indicaciones de seguridad
Los niños mayores de 8 años y las personas de capacidad
física, sensorial o mental disminuida, así como aquellas
personas con falta de experiencia y conocimientos suficientes
solo podrán utilizar este aparato bajo vigilancia o si han sido
instruidos respecto al uso seguro del aparato y a los posibles
peligros que pueden emanar de él.
Los niños solo podrán realizar las tareas de limpieza y
mantenimiento bajo vigilancia.
Los niños no están autorizados a jugar con el aparato.
Controle a los niños para asegurarse de que no jueguen con el
aparato.
Mantenga y utilice el aparato fuera del alcance de los niños
menores de 8 años.
¡ATENCIÓN!
!
A
Desconecte el aparato de la red
– antes de realizar cualquier tarea de limpieza o manteni-
miento
– después de cada uso
¡AVISO!
Compare el valor de tensión indicado en la placa de
características con el suministro de energía existente.
Conecte el aparato únicamente con el cable de corriente alterna
a la red de corriente alterna.
No desenchufe nunca el cable de conexión tirando de él.
2.2 Seguridad durante el funcionamiento del aparato
¡ATENCIÓN!
!
A
Antes de la puesta en funcionamiento, asegúrese de que el
cable de alimentación y la clavija de enchufe estén secos.
¡AVISO!
No coloque el aparato cerca de llamas abiertas ni de otras
fuentes de calor (calefacción, radiación directa del sol, estufas
de gas, etc.).
No sumerja nunca el aparato en agua.
Proteja el aparato y los cables del calor y de la humedad.
39
Page 40

ES
Volumen de entrega VES100
3 Volumen de entrega
Pos. en fig. 1,
página 2
1 Maletín de protección
2 Cable de corriente alterna
3 Pantalla de mano
4Balanza
Denominación
4 Uso adecuado
Con la báscula de refrigerante VES100 se puede transferir o aspirar
refrigerante a un recipiente de refrigerante.
5 Descripción técnica
La báscula es extraíble y permite el pesaje fuera del maletín de protección.
La pantalla de mano también es extraíble y puede colgarse fuera del maletín.
La pantalla se apaga automáticamente después de 30 minutos si no se pulsa
ninguna tecla.
La báscula permite determinar la cantidad de refrigerante.
Una electroválvula en el aparato abre o cierra la conexión entre ambas
conexiones “Input” y “Output”.
Pos. en fig. 2,
página 2
1 Conexión “Input”
2 Conexión “Output”t"jfjfjfjf
3 Interruptor de encendido/apagado
40
Denominación
Page 41

ES
VES100 Descripción técnica
5.1 Elementos de visualización de la pantalla de mano
Pos. en fig. 3,
página 3
1 Indicador de batería
2 Unidad de peso
3 Indicador de cifras
4 Indicador “Aspiración”
5 Indicador “Transferencia”
6 Indicador de sobrecarga
Denominación
5.2 Elementos de mando de la pantalla de mano
Las teclas están ocupadas al mismo tiempo con cifras y con las siguientes
funciones:
Pos. en fig. 4,
página 3
1 Tecla “Charge” Inicia la transferencia.
2 Tecla “Function” Selecciona la unidad de peso.
3 Tecla “Light” Enciende y apaga la ilumina-
4 Tecla “Clear” Elimina todos los datos y
5 Tecla “Repeat” Utiliza el peso seleccionado
6 Tecla “Enter” Muestra el peso actual.
Denominación Explicación
ción de fondo.
regresa al modo de pesaje.
anteriormente y repite el
proceso de transferencia/
aspiración.
7 Tecla “Power” Enciende y apaga la balanza.
8 Tecla “Recover” Enciende la visualización en la
pantalla de mano.
41
Page 42

ES
Uso VES100
6Uso
¡AVISO!
A
I
6.1 Seleccionar unidad de peso
La báscula de refrigerante cuenta con tres unidades de peso: kilogramo (kg),
onza (oz) y libra (lb).
Asegúrese de no superar la capacidad de pesaje máxima, ya que
de lo contrario podría dañarse la báscula de refrigerante.
NOTA
La báscula puede instalarse tanto en el maletín como fuera de
este. La báscula debe estar sobre una superficie uniforme y
no debe tocar el cable de conexión, ya que de lo contrario se
afectaría su precisión.
Coloque la botella de refrigerante en el centro de la báscula y
asegúrese de sacudir el refrigerante antes de pesarlo.
Después de cada uso, tape las conexiones “Input” y “Output”
con las cubiertas protectoras.
Apague la báscula de refrigerante después de cada uso. Quite
las baterías en caso de que vaya a almacenar el aparato o a
no utilizarlo durante un período de tiempo prolongado.
➤ Pulse la tecla “Function” (fig. 4 2, página 3) varias veces para
seleccionar la unidad de peso deseada.
6.2 Encendido de la iluminación de fondo
La iluminación de fondo se apaga automáticamente después de 30
segundos si no se pulsa ninguna tecla.
➤ Pulse la tecla “Light” (fig. 4 3, página 3) para encender o apagar la
iluminación de fondo de la pantalla.
42
Page 43

ES
VES100 Uso
6.3 Transferencia de refrigerante
NOTA
I
➤ Conecte la báscula de refrigerante con el cable de corriente alterna
(fig. 1 1, página 2) a la red de corriente alterna.
➤ Conecte una botella llena de refrigerante a la conexión “Input” (fig. 2 1,
página 2).
➤ Conecte la bombona de gas que se desea rellenar a la conexión “Output”
(fig. 2 2, página 2).
➤ Encienda la báscula con el interruptor de encendido/apagado (fig. 2 3,
página 2).
➤ Coloque la botella de gas a llenar en la báscula (fig. 5, página 4).
➤ Espere hasta que la balanza determine el peso actual y lo muestre en la
pantalla.
➤ Pulse la tecla “Charge” (fig. 3 1, página 3).
➤ Introduzca el peso a cargar (mín. 50 g) a través de las teclas numéricas.
La báscula de refrigerante debe estar conectada a la red de
corriente alterna para que la electroválvula funcione.
➤ Pulse la tecla “Enter” (fig. 3 6, página 3).
✓ La electoválvula se abre y se transfiere el refrigerante.
La electroválvula se cierra una vez que se ha transferido la cantidad
seleccionada.
La báscula muestra la cantidad de refrigerante restante en la botella de
gas refrigerante rellenada.
NOTA
I
Pulse la tecla “Enter” fig. 3 6, página 3) si desea interrumpir
un proceso. Pulse a continuación la tecla “Charge” (fig. 3 1,
página 3) para regresar a la pantalla anterior.
Pulse la tecla “0” si desea finalizar el proceso de transferencia
antes de alcanzar la cantidad seleccionada de refrigerante.
Pulse la tecla “Enter” (fig. 3 6, página 3) para salir del modo.
43
Page 44

ES
Uso VES100
6.4 Aspiración de refrigerante
NOTA
I
➤ Conecte la botella de gas a un dispositivo de aspiración (fig. 6,
página 4).
➤ Conecte la báscula de refrigerante con el cable de corriente alterna
(fig. 1 1, página 2) a la red de corriente alterna.
➤ Conecte la conexión “Output” a la estación de mantenimiento de aire
acondicionado (fig. 2 2, página 2).
➤ Conecte la bombona de gas de la que se desea aspirar a la conexión
“Output” (fig. 2 1, página 2).
➤ Encienda la báscula con el interruptor de encendido/apagado (fig. 2 3,
página 2).
➤ Coloque la botella de gas a vaciar en la báscula.
Si el peso seleccionado supera el peso total del refrigerante
presente en la botella de gas se mostrará el mensaje
"ERROR".
El peso de la botella a rellenar no debe superar el 80 % de la
cantidad total.
➤ Espere hasta que la balanza haya determinado y muestre el peso actual.
➤ Pulse la tecla “Recover” (fig. 3 8, página 3).
➤ Introduzca el peso a vaciar (mín. 50 g) a través de las teclas numéricas.
➤ Pulse la tecla “Enter” (fig. 3 6, página 3).
✓ La electoválvula se abre y se extrae el refrigerante.
La electroválvula se cierra una vez que se ha transferido la cantidad
seleccionada.
La báscula muestra la cantidad de refrigerante restante en la botella de
gas refrigerante rellenada.
NOTA
I
Pulse la tecla “Enter” fig. 3 6, página 3) si desea interrumpir
un proceso. Pulse a continuación la tecla “Recover” (fig. 3 8,
página 3) para regresar a la pantalla anterior.
Pulse la tecla “0” si desea finalizar el proceso de carga antes
de alcanzar la cantidad seleccionada de refrigerante. Pulse la
tecla “Enter” (fig. 3 6, página 3) para finalizar el modo.
44
Page 45

ES
VES100 Cambiar las pilas
6.5 Repetir el proceso
➤ Pulse la tecla “Repeat” (fig. 3 5, página 3) después de transferir o
aspirar para transferir nuevamente el peso seleccionado anteriormente.
7 Cambiar las pilas
➤ Abra la tapa de la parte posterior de la pantalla de mano.
➤ Cambie las baterías (9 V).
➤ Cierre la tapa.
8 Solución de averías
Avería Solución
En la pantalla se muestra
“ERROR”.
La pantalla no reacciona.
Pulse la tecla “Power” y espere 3 segundos. Pulse
nuevamente la tecla “Power” para reiniciar el sistema.
9 Limpieza y cuidado
¡AVISO!
A
➤ Limpie de vez en cuando el producto con un paño húmedo.
No utilice ningún objeto o producto de limpieza corrosivo o duro
en la limpieza, ya que podría dañar el producto.
45
Page 46

ES
Garantía legal VES100
10 Garantía legal
Rige el plazo de garantía legal. Si el producto presenta algún defecto,
diríjase a la sucursal del fabricante de su país (ver direcciones en el dorso
de estas instrucciones) o a su establecimiento especializado.
Para la tramitación de la reparación y de la garantía debe enviar también los
siguientes documentos:
una copia de la factura con fecha de compra,
el motivo de la reclamación o una descripción de la avería.
11 Gestión de residuos
➤ Deseche el material de embalaje en el contenedor de reciclaje correspon-
diente.
Cuando vaya a desechar definitivamente el producto, infórmese en
el centro de reciclaje más cercano o en un comercio especializado
M
sobre las normas pertinentes de eliminación de materiales.
12 Datos técnicos
VES100
N.° de art.: 8885100099
Capacidad de pesaje 100 kg/220 lbs/3.528 oz
Resolución: 5 g/0,01 lbs/0,2 oz
Precisión: 0,05 %
Tensión de conexión: 110–240 Vw
Temperatura ambiente: –10–+40 °C
≤75% de humedad del aire
Conexiones de refrigerante
Dimensiones de la báscula:
Peso: 5 kg
1/4"
237 mm x 237 mm
46
Page 47

IT
VES100 Spiegazione dei simboli
Prima di effettuare la messa in funzione, leggere accuratamente questo
manuale di istruzioni, conservarlo e, nel caso in cui il prodotto venga
consegnato ad un altro utente, consegnare anche le relative istruzioni.
Indice
1 Spiegazione dei simboli . . . . . . . . . . . . . . . . . . . . . . . . . . . . . . . . . . 47
2 Indicazioni di sicurezza . . . . . . . . . . . . . . . . . . . . . . . . . . . . . . . . . . 48
3 Dotazione. . . . . . . . . . . . . . . . . . . . . . . . . . . . . . . . . . . . . . . . . . . . . 50
4 Conformità d’uso . . . . . . . . . . . . . . . . . . . . . . . . . . . . . . . . . . . . . . . 50
5 Descrizione tecnica . . . . . . . . . . . . . . . . . . . . . . . . . . . . . . . . . . . . . 50
6 Utilizzo . . . . . . . . . . . . . . . . . . . . . . . . . . . . . . . . . . . . . . . . . . . . . . . 52
7 Sostituzione delle batterie . . . . . . . . . . . . . . . . . . . . . . . . . . . . . . . . 55
8 Risoluzione dei guasti . . . . . . . . . . . . . . . . . . . . . . . . . . . . . . . . . . . 55
9 Pulizia e cura . . . . . . . . . . . . . . . . . . . . . . . . . . . . . . . . . . . . . . . . . . 55
10 Garanzia . . . . . . . . . . . . . . . . . . . . . . . . . . . . . . . . . . . . . . . . . . . . . 56
11 Smaltimento . . . . . . . . . . . . . . . . . . . . . . . . . . . . . . . . . . . . . . . . . . . 56
12 Specifiche tecniche . . . . . . . . . . . . . . . . . . . . . . . . . . . . . . . . . . . . . 56
1 Spiegazione dei simboli
AVVERTENZA!
!
!
A
Avviso di sicurezza: la mancata osservanza di questo avviso
può causare ferite gravi anche mortali.
ATTENZIONE!
Avviso di sicurezza: la mancata osservanza di questo avviso
può essere causa di lesioni.
AVVISO!
La mancata osservanza di questa nota può causare danni materiali e compromettere il funzionamento del prodotto.
47
Page 48

IT
Indicazioni di sicurezza VES100
NOTA
I
➤ Modalità di intervento: questo simbolo indica all'utente che è necessario
un intervento. Le modalità di intervento necessarie saranno descritte
passo dopo passo.
✓ Questo simbolo descrive il risultato di un intervento.
Fig. 1 5, pagina 3: questi dati si riferiscono ad un elemento in una figura,
in questo caso alla “posizione 5 nella figura 1 a pagina 3”.
Informazioni integranti relative all'impiego del prodotto.
2 Indicazioni di sicurezza
Il produttore non si assume nessuna responsabilità per danni nei seguenti
casi:
danni al prodotto dovuti a influenze meccaniche o a sovratensioni
modifiche al prodotto senza esplicita autorizzazione del produttore
impiego per altri fini rispetto a quelli descritti nel manuale di istruzioni
2.1 Sicurezza generale
!
48
AVVERTENZA!
Se il dispositivo presenta danni visibili, non metterlo in funzione.
Se il cavo di collegamento di questo dispositivo viene
danneggiato, esso deve essere sostituito dal produttore, dal suo
servizio assistenza clienti o da personale ugualmente
qualificato, al fine di evitare pericoli.
Questo dispositivo può essere riparato solo da personale
specializzato. Possono insorgere gravi pericoli in seguito a
riparazioni non eseguite in maniera corretta.
Il presente dispositivo può essere usato sia da bambini dagli 8
anni in su, sia da persone con ridotte capacità fisiche, sensoriali
o mentali o con poca esperienza o conoscenze, se non lasciati
soli o se istruiti sul suo utilizzo sicuro e in grado di capire i
pericoli che possono sorgere.
La pulizia e la manutenzione da parte dell’utente non possono
essere compiute da bambini lasciati soli.
I bambini non possono giocare con l’apparecchio.
Page 49

IT
VES100 Indicazioni di sicurezza
Controllare che i bambini non giochino con il dispositivo.
Conservare e utilizzare il dispositivo lontano dalla portata dei
bambini al di sotto degli 8 anni.
ATTENZIONE!
!
A
2.2 Sicurezza durante il funzionamento dell'apparec-
!
Scollegare il dispositivo dalla rete
– prima di effettuare la pulizia e la cura
– dopo ogni utilizzo
AVVISO!
Confrontare i dati della tensione riportati sulla targhetta con
quelli delle prese e degli attacchi disponibili.
Collegare il dispositivo alla rete di alimentazione di corrente
alternata tramite il cavo di alimentazione per corrente alternata.
Non estrarre mai la spina dalla presa tirando il cavo di
collegamento.
chio
ATTENZIONE!
Prima della messa in funzione, assicurarsi che la linea di ali-
mentazione e la spina siano asciutte.
A
AVVISO!
Non collocare l'apparecchio nelle vicinanze di fiamme libere o
altre fonti di calore (riscaldamento, intensa esposizione ai raggi
solari, forni a gas ecc.).
Non immergere mai l'apparecchio in acqua.
Proteggere l’apparecchio e i cavi dal caldo e dall’umidità.
49
Page 50

IT
Dotazione VES100
3Dotazione
Pos. in fig. 1,
pagina 2
1 Valigetta protettiva
2 Cavo di alimentazione per corrente alternata
3 Display estraibile
4Bilancia
Descrizione
4 Conformità d’uso
Con la bilancia per refrigerante VES100 è possibile trasferire il refrigerante
in un contenitore apposito o aspirarlo.
5 Descrizione tecnica
La bilancia è estraibile per consentire la pesata al di fuori della valigetta
protettiva. Anche il display è estraibile. Può essere appeso al di fuori della
valigetta.
La bilancia si disattiva automaticamente dopo 30 minuti dall'ultima pressione
di un tasto.
Con la bilancia è possibile determinare la quantità di refrigerante.
Una valvola magnetica nel dispositivo apre o chiude il collegamento tra i due
attacchi “Input” e “Output”.
Pos. in fig. 2,
pagina 2
1 Attacco “Input”
2 Attacco “Output”
3 Interruttore On/Off
50
Descrizione
Page 51

IT
VES100 Descrizione tecnica
5.1 Elementi di visualizzazione display estraibile
Pos. in fig. 3,
pagina 3
1 Indicazione della batteria
2 Unità di peso
3 Indicatore cifra
4 Indicatore “Aspirazione”
5 Indicatore “Trasferimento”
6 Visualizzazione eccesso di carico
Descrizione
5.2 Elementi di comando display estraibile
Con i tasti si attivano sia le cifre che le seguenti funzioni:
Pos. in fig. 4,
pagina 3
1 Tasto “Charge” Avvia il trasferimento.
2 Tasto “Function” Seleziona l'unità di peso.
3 Tasto “Light” Accende e spegne la
4 Tasto “Clear” Cancella tutti gli inserimenti e
5 Tasto “Repeat” Utilizza il peso precedente-
6 Tasto “Enter” Visualizza il peso attuale.
Descrizione Spiegazione
retroilluminazione.
torna alla modalità bilancia.
mente selezionato e ripete
l'operazione di trasferimento/
aspirazione.
7 Tasto “Power” Accende e spegne la bilancia.
8 Tasto “Recover” Attiva la visualizzazione nel
display estraibile.
51
Page 52

IT
Utilizzo VES100
6 Utilizzo
AVVISO!
A
I
6.1 Selezione dell'unità di peso
La bilancia per refrigerante dispone di tre unità di peso: chilogrammi (kg),
once (oz) e libbre (lb).
Fare attenzione a non superare la capacità massima della
bilancia perché potrebbe danneggiarsi.
NOTA
La bilancia può essere utilizzata anche all'aria aperta. La
bilancia deve essere posizionata in orizzontale, non deve
toccare il cavo di collegamento, perché ciò potrebbe
influenzarne la precisione.
Posizionare la bomboletta di refrigerante al centro sulla
bilancia, facendo attenzione a non versare il contenuto.
Dopo ogni utilizzo, servirsi dei cappucci protettivi per coprire
gli attacchi “Input” e “Output”.
Disattivare la bilancia per refrigerante dopo averla utilizzata.
Estrarre le batterie quando il dispositivo viene riposto o se non
lo si utilizza per lungo tempo.
➤ Premere il tasto “Function” (fig. 4 2, pagina 3) più volte per selezionare
l'unità di peso desiderata.
6.2 Attivazione della retroilluminazione
La retroilluminazione si disattiva automaticamente dopo 30 secondi
dall'ultima pressione di un tasto.
➤ Premere il tasto “Light” (fig. 4 3, pagina 3) per attivare o disattivare la
retroilluminazione del display.
52
Page 53

IT
VES100 Utilizzo
6.3 Trasferimento del refrigerante
NOTA
I
➤ Collegare la bilancia per refrigerante alla rete di alimentazione alternata
con l'apposito cavo (fig. 1 1, pagina 2).
➤ Collegare una bomboletta riempita di refrigerante all'attacco “Input”
(fig. 2 1, pagina 2).
➤ Collegare la bomboletta di gas da riempire all'attacco “Output” (fig. 2 2,
pagina 2).
➤ Attivare la bilancia con l'interruttore On/Off (fig. 2 3, pagina 2).
➤ Posizionare la bomboletta riempita sulla bilancia (fig. 5, pagina 4).
➤ Attendere che la bilancia determini il peso e che questo venga
visualizzato sul display.
➤ Premere il tasto “Charge” (fig. 3 1, pagina 3).
➤ Inserire il peso da caricare (min 50 g.) utilizzando il tastierino.
➤ Premere il tasto “Enter” (fig. 3 6, pagina 3).
La bilancia per refrigerante deve essere collegata alla rete di
alimentazione alternata, affinché funzioni la valvola magnetica.
✓ Si apre la valvola magnetica e viene trasferito il refrigerante.
Una volta trasferita la quantità selezionata di refrigerante, la valvola
magnetica si chiude.
La bilancia indica la quantità residua di refrigerante nella bomboletta di
gas refrigerante riempita.
NOTA
I
Premere il tasto “Enter” (fig. 3 6, pagina 3) per interrompere
l'operazione. Premere quindi il tasto “Charge” (fig. 3 1,
pagina 3) per tornare alla videata precedente.
Per interrompere il processo di trasferimento prima di
raggiungere la quantità selezionata di refrigerante, premere il
tasto “0”. Premere il tasto “Enter” (fig. 3 6, pagina 3) per
uscire dalla modalità.
53
Page 54

IT
Utilizzo VES100
6.4 Aspirazione del refrigerante
NOTA
I
➤ Collegare la bomboletta di gas a un dispositivo di aspirazione (fig. 6,
pagina 4).
➤ Collegare la bilancia per refrigerante alla rete di alimentazione alternata
tramite l'apposito cavo (fig. 1 1, pagina 2).
➤ Collegare l'attacco “Output” alla stazione di assistenza del climatizzatore
(fig. 2 2, pagina 2).
➤ Collegare la bomboletta di gas, da cui si deve aspirare, all'attacco “Input”
(fig. 2 1, pagina 2).
➤ Attivare la bilancia premendo l'interruttore On/Off (fig. 2 3, pagina 2).
➤ Posizionare la bomboletta da svuotare sulla bilancia.
➤ Attendere che la bilancia determini e visualizzi il peso.
Se il peso selezionato supera il peso totale di refrigerante nella
bomboletta di gas, viene visualizzato il messaggio di errore
"ERROR".
Il peso della bomboletta da riempire non deve superare l'80 %
della quantità totale.
➤ Premere il tasto “Recover” (fig. 3 8, pagina 3).
➤ Inserire il peso da scaricare (min 50 g.) utilizzando la tastiera.
➤ Premere il tasto “Enter” (fig. 3 6, pagina 3).
✓ Si apre la valvola magnetica e viene estratto il refrigerante.
Una volta trasferita la quantità selezionata di refrigerante, la valvola
magnetica si chiude.
La bilancia indica la quantità residua di refrigerante nella bomboletta di
refrigerante riempita.
NOTA
I
Premere il tasto “Enter” (fig. 3 6, pagina 3) per interrompere
l'operazione. Premere quindi il tasto “Recover” (fig. 3 8,
pagina 3) per tornare alla videata precedente.
Per interrompere il processo di caricamento prima che sia
stata raggiunta la quantità selezionata di refrigerante, premere
il tasto “0”. Premere il tasto “Enter” (fig. 3 6, pagina 3) per
chiudere la modalità.
54
Page 55

IT
VES100 Sostituzione delle batterie
6.5 Ripetizione dell'operazione
➤ Dopo il trasferimento o l'aspirazione, premere il tasto “Repeat” (fig. 3 5,
pagina 3) per trasferire nuovamente il peso precedentemente
selezionato.
7 Sostituzione delle batterie
➤ Aprire la copertura sul lato posteriore del display estraibile.
➤ Sostituire le batterie (9 V).
➤ Chiudere la copertura.
8 Risoluzione dei guasti
Guasto Soluzione
Sul display appare
“ERROR”.
Il display non reagisce.
Premere il tasto “Power” e aspettare 3 secondi.
Premere nuovamente il tasto “Power” per riavviare il
sistema.
9 Pulizia e cura
AVVISO!
A
➤ Pulire il prodotto di tanto in tanto con un panno umido.
Per la pulizia non impiegare oggetti ruvidi o appuntiti, oppure
detergenti perché potrebbero danneggiare il prodotto.
55
Page 56

IT
Garanzia VES100
10 Garanzia
Vale il termine di garanzia previsto dalla legge. Qualora il prodotto risultasse
difettoso, La preghiamo di rivolgersi alla filiale del produttore del suo Paese
(l'indirizzo si trova sul retro del manuale di istruzioni), oppure al rivenditore
specializzato di riferimento.
Per la riparazione e per il disbrigo delle condizioni di garanzia è necessario
inviare la seguente documentazione:
una copia della fattura con la data di acquisto del prodotto,
un motivo su cui fondare il reclamo, oppure una descrizione del guasto.
11 Smaltimento
➤ Raccogliere il materiale di imballaggio possibilmente negli appositi
contenitori di riciclaggio.
Quando il prodotto viene messo fuori servizio definitivamente,
informarsi al centro di riciclaggio più vicino, oppure presso il proprio
M
rivenditore specializzato, sulle prescrizioni adeguate concernenti lo
smaltimento.
12 Specifiche tecniche
VES100
N. art.: 8885100099
Portata: 100 kg/220 lbs/3528 oz
Risoluzione: 5 g/0,01 lbs/0,2 oz
Precisione: 0,05 %
Tensione di allacciamento:
Temperatura ambiente: –10–+40 °C
Attacchi del refrigerante: 1/4"
Dimensioni bilancia: 237 mm x 237 mm
Peso: 5 kg
56
110 –240 Vw
≤75 % di umidità dell'aria
Page 57

NL
VES100 Verklaring van de symbolen
Lees deze handleiding voor de ingebruikneming zorgvuldig door en
bewaar hem. Geef de handleiding bij het doorgeven van het product
aan de gebruiker.
Inhoudsopgave
1 Verklaring van de symbolen. . . . . . . . . . . . . . . . . . . . . . . . . . . . . . . 57
2 Veiligheidsinstructies . . . . . . . . . . . . . . . . . . . . . . . . . . . . . . . . . . . . 58
3 Omvang van de levering . . . . . . . . . . . . . . . . . . . . . . . . . . . . . . . . . 60
4 Gebruik volgens bestemming . . . . . . . . . . . . . . . . . . . . . . . . . . . . . 60
5 Technische beschrijving. . . . . . . . . . . . . . . . . . . . . . . . . . . . . . . . . . 60
6 Gebruik . . . . . . . . . . . . . . . . . . . . . . . . . . . . . . . . . . . . . . . . . . . . . . 62
7 Batterijen vervangen . . . . . . . . . . . . . . . . . . . . . . . . . . . . . . . . . . . . 65
8 Verhelpen van storingen . . . . . . . . . . . . . . . . . . . . . . . . . . . . . . . . . 65
9 Reiniging en verzorging . . . . . . . . . . . . . . . . . . . . . . . . . . . . . . . . . . 65
10 Garantie . . . . . . . . . . . . . . . . . . . . . . . . . . . . . . . . . . . . . . . . . . . . . . 66
11 Afvoer. . . . . . . . . . . . . . . . . . . . . . . . . . . . . . . . . . . . . . . . . . . . . . . . 66
12 Technische gegevens . . . . . . . . . . . . . . . . . . . . . . . . . . . . . . . . . . . 66
1 Verklaring van de symbolen
WAARSCHUWING!
!
!
A
Veiligheidsaanwijzing: Het niet naleven kan leiden tot overlijden
of ernstig letsel.
VOORZICHTIG!
Veiligheidsaanwijzing: Het niet naleven kan leiden tot letsel.
LET OP!
Het niet naleven ervan kan leiden tot materiële schade en de
werking van het product beperken.
57
Page 58

NL
Veiligheidsinstructies VES100
INSTRUCTIE
I
➤ Handeling: dit symbool geeft aan dat u iets moet doen. De vereiste
handelingen worden stap voor stap beschreven.
✓ Dit symbool beschrijft het resultaat van een handeling.
Afb. 1 5, pagina 3: deze aanduiding wijst u op een element in een afbeelding, in dit voorbeeld op „positie 5 in afbeelding 1 op pagina 3”.
Aanvullende informatie voor het bedienen van het product.
2 Veiligheidsinstructies
De fabrikant kan in de volgende gevallen niet aansprakelijk worden gesteld
voor schade:
beschadiging van het product door mechanische invloeden en over-
spanningen
veranderingen aan het product zonder uitdrukkelijke toestemming van de
fabrikant
gebruik voor andere dan de in de handleiding beschreven toepassingen
2.1 Algemene veiligheid
WAARSCHUWING!
!
Als het toestel zichtbaar beschadigd is, mag het niet in gebruik
worden genomen.
Als de aansluitkabel van dit toestel wordt beschadigd, moet
deze om gevaar uit te sluiten door de fabrikant, diens klantenservice of een gelijkwaardig gekwalificeerd persoon worden
vervangen.
Reparaties aan dit toestel mogen uitsluitend door vakmonteurs
uitgevoerd worden. Door onvakkundige reparaties kunnen
grote gevaren ontstaan.
Dit toestel kan door kinderen vanaf 8 jaar en ouder evenals door
personen met verminderde fysieke, zintuiglijke of geestelijke
vermogens of tekortschietende ervaring en kennis gebruikt worden, als ze worden begeleid of hun is uitgelegd hoe ze het toestel veilig kunnen gebruiken. Ook dienen ze inzicht te hebben in
de gevaren die het gebruik van het toestel met zich meebrengt.
58
Page 59

NL
VES100 Veiligheidsinstructies
Reiniging en gebruikeronderhoud mogen niet door kinderen
zonder begeleiding worden uitgevoerd.
Kinderen mogen niet met het toestel spelen.
Er moet toezicht worden gehouden op kinderen, zodat ze niet
met het toestel gaan spelen.
Bewaar en gebruik het toestel buiten het bereik van kinderen
onder 8 jaar.
VOORZICHTIG!
!
A
2.2 Veiligheid bij het gebruik van het toestel
Scheid het toestel van het net
– voor iedere reiniging en ieder onderhoud
– na elk gebruik
LET OP!
Vergelijk de spanning op het typeplaatje met de aanwezige
energievoorziening.
Sluit het toestel alleen met de wisselstroomkabel op het wissel-
stroomnet aan.
Trek de stekker nooit aan de aansluitkabel uit het stopcontact.
!
A
VOORZICHTIG!
Let er voor de ingebruikneming op dat toevoerleiding en stekker
droog zijn.
LET OP!
Plaats het toestel niet in de buurt van open vuur of andere
warmtebronnen (verwarming, sterke zonnestraling, gasovens
enz.).
Dompel het toestel nooit onder in water.
Bescherm het toestel en de kabels tegen hitte en vocht.
59
Page 60

NL
Omvang van de levering VES100
3 Omvang van de levering
Pos. in afb. 1,
pagina 2
1 Beschermkoffer
2 Wisselstroomkabel
3 Handdisplay
4 Weegschaal
Omschrijving
4 Gebruik volgens bestemming
Met de koudemiddelweegschaal VES100 kan koudemiddel in een
koudemiddelhouder worden overdragen of afgezogen.
5 Technische beschrijving
De weegschaal is uitneembaar en maakt het wegen buiten de
beschermkoffer mogelijk. Het handdisplay is eveneens uitneembaar. Het kan
buiten de koffer worden opgehangen.
De weegschaal schakelt zonder toetsbediening automatisch na 30 minuten
uit.
Met de weegschaal wordt de hoeveelheid koudemiddel bepaald.
Een magneetklep in het toestel sluit of opent de verbinding tussen de twee
aansluitingen „Input” en „Output”.
Pos. in afb. 2,
pagina 2
1 Aansluiting „Input”
2 Aansluiting „Output”
3 In/uit-schakelaar
60
Omschrijving
Page 61

NL
VES100 Technische beschrijving
5.1 Weergave-element handdisplay
Pos. in afb. 3,
pagina 3
1 Batterijweergave
2 Gewichtseenheid
3 Cijferweergave
4 Weergave „Afzuigen”
5 Weergave „Overdragen”
6 Overlastweergave
Omschrijving
5.2 Bedienelementen handdisplay
De toetsen zijn gelijktijdig met cijfers en volgende functies bezet:
Pos. in afb. 4,
pagina 3
1 Toets „Charge” Start de overdracht.
2 Toets „Function” Selecteert de gewichtseen-
3 Toets „Light” Schakelt de achtergrondver-
4 Toets „Clear” Wist alle invoer en keert terug
5 Toets „Repeat” Gebruikt het eerdere geselec-
Omschrijving Verklaring
heid.
lichting in en uit.
naar de weegmodus.
teerde gewicht en herhaalt de
voorgang overdragen/
afzuigen.
6 Toets „Enter” Toont het actuele gewicht.
7 Toets „Power” Schakelt de weegschaal in en
uit.
8 Toets „Recover” Schakelt de weergave in het
handdisplay in.
61
Page 62

NL
Gebruik VES100
6Gebruik
LET OP!
A
I
6.1 Gewichtseenheid selecteren
De koudemiddelweegschaal beschikt over drie gewichtseenheden: Kilogram
(kg), ounce (oz) en pound (lb).
de maximale weegcapaciteit mag niet worden overschreden
omdat dit de koudemiddelweegschaal kan beschadigen.
INSTRUCTIE
De weegschaal kan zowel in de koffer als erbuiten worden
opgesteld. De weegschaal moet effen staan en mag de
aansluitkabelkabel niet raken omdat anders de precisie kan
worden beïnvloed.
Plaats de koudemiddelfles in het midden op de weegschaal en
voorkom dat het koudemiddel wordt geschud.
Dek de aansluitingen „Input” en „Output” na elke gebruik met
de kappen af.
Schakel de koudemiddelweegschaal na elk gebruik uit.
Verwijder de batterijen, als het toestel wordt opgeslagen of
langdurig niet wordt gebruikt.
➤ Druk meerdere keren op de toets „Function” (afb. 4 2, pagina 3) om de
gewenste gewichtseenheid te selecteren.
6.2 Achtergrondverlichting inschakelen
De achtergrondverlichting schakelt zonder toetsbediening automatisch na 30
minuten uit.
➤ Druk op de toets „Light” (afb. 4 3, pagina 3) om de achtergrondverlich-
ting van het display in of uit te schakelen.
62
Page 63

NL
VES100 Gebruik
6.3 Koudemiddel overdragen
INSTRUCTIE
I
➤ Sluit de koudemiddelweegschaal met de wisselstroomkabel (afb. 1 1,
pagina 2) op het wisselstroomnet aan.
➤ Verbind een gevulde koudemiddelfles met de aansluiting „Input”
(afb. 2 1, pagina 2).
➤ Verbind de gasfles die moet worden gevuld met de aansluiting „Output”
(afb. 2 2, pagina 2).
➤ Schakel de koudemiddelweegschaal met de in/uit-schakelaar in
(afb. 2 3, pagina 2).
➤ Plaats de gevulde gasfles op de koudemiddelweegschaal (afb. 5,
pagina 4).
➤ Wacht tot de koudemiddelweegschaal het actuele gewicht heeft bepaald
en in het display weergeeft.
➤ Druk op de toets „Charge” (afb. 3 1, pagina 3).
De koudemiddelweegschaal moet op het wisselstroomnet zijn
aangesloten om de magneetklep te laten functioneren.
➤ Voer het te laden gewicht (min. 50 g) via de cijfertoetsen in.
➤ Druk op de toets „Enter” (afb. 3 6, pagina 3).
✓ De magneetklep gaat open en de overdracht van koudemiddel vindt
plaats.
Als de geselecteerde hoeveelheid koudemiddel werd overgedragen, sluit
de magneetklep.
De koudemiddelweegschaal toont de resterende hoeveelheid in de
gevulde koudemiddelfles.
INSTRUCTIE
I
Druk op de toets „Enter” afb. 3 6, pagina 3) om een proce-
dure af te breken. Druk daarna op de toets „Charge”
(afb. 3 1, pagina 3) om naar het vorige beeldscherm terug te
keren.
Als u de overdracht wilt beëindigen voordat de geselecteerde
hoeveelheid koudemiddel werd bereikt, drukt u op de toets „0”.
Druk op de toets „Enter” (afb. 3 6, pagina 3) om de modus te
verlaten.
63
Page 64

NL
Gebruik VES100
6.4 Koudemiddel afzuigen
INSTRUCTIE
I
➤ Verbind de gasfles met een afzuiginrichting (afb. 6, pagina 4).
➤ Sluit de koudemiddelweegschaal met de wisselstroomkabel (afb. 1 1,
pagina 2) op het wisselstroomnet aan.
➤ Verbind de aansluiting „Output” met het aircoservicestation (afb. 2 2,
pagina 2).
➤ Verbind de gasfles waaruit moet worden afgezogen met de aansluiting
„Input” (afb. 2 1, pagina 2).
➤ Schakel de weegschaal met de in/uit-schakelaar in (afb. 2 3, pagina 2).
➤ Plaats de te legen gasfles op de weegschaal.
➤ Wacht tot de weegschaal het actuele gewicht heeft bepaald en weergeeft.
➤ Druk op de toets „Recover” (afb. 3 8, pagina 3).
Als het geselecteerde gewicht het totale koudemiddelgewicht
in de gasfles overschrijdt, verschijnt de foutmelding "ERROR".
Het gewicht van te vullen fles mag 80 % van de totale hoeveel-
heid niet overschrijden.
➤ Voer het te ontnemen gewicht (min. 50 g) via de cijfertoetsen in.
➤ Druk op de toets „Enter” (afb. 3 6, pagina 3).
✓ De magneetklep gaat open en het koudemiddel wordt ontnomen.
Als de geselecteerde hoeveelheid koudemiddel werd overgedragen, sluit
de magneetklep.
De weegschaal toont de resterende hoeveelheid koudemiddel in de
gevulde koudemiddelfles.
INSTRUCTIE
I
Druk op de toets „Enter” afb. 3 6, pagina 3) om een
procedure af te breken. Druk daarna op de toets „Recover”
(afb. 3 8, pagina 3) om naar het vorige beeldscherm terug te
keren.
Als u de laadprocedure wilt beëindigen voordat de geselec-
teerde hoeveelheid koudemiddel werd bereikt, drukt u op de
toets „0”. Druk op de toets „Enter” (afb. 3 6, pagina 3) om de
modus te beëindigen.
64
Page 65

NL
VES100 Batterijen vervangen
6.5 Procedure herhalen
➤ Druk na het overdragen of afzuigen op de toets „Repeat” (afb. 3 5,
pagina 3) om het eerder geselecteerde gewicht opnieuw over te dragen.
7 Batterijen vervangen
➤ Open de afdekking aan de achterzijde van het handdisplay.
➤ Vervang de batterijen (9 V).
➤ Verwijder de afdekking.
8 Verhelpen van storingen
Storing Oplossing
Op het display wordt
„ERROR” weergegeven.
Het display reageert niet.
Druk op de toets „Power” en wacht 3 seconden.
Druk opnieuw op de toets „Power” om het systeem te
herstarten.
9 Reiniging en verzorging
LET OP!
A
➤ Reinig het product af en toe met een vochtige doek.
Geen scherpe of harde voorwerpen of reinigingsmiddelen bij het
reinigen gebruiken. Dit kan het product beschadigen.
65
Page 66

NL
Garantie VES100
10 Garantie
De wettelijke garantieperiode is van toepassing. Als het product defect is,
wendt u zich tot het filiaal van de fabrikant in uw land (adressen zie achterkant van de handleiding) of tot uw speciaalzaak.
Voor de afhandeling van de reparatie of garantie dient u de volgende documenten mee te sturen:
een kopie van de factuur met datum van aankoop,
reden van de klacht of een beschrijving van de storing.
11 Afvoer
➤ Laat het verpakkingsmateriaal indien mogelijk recyclen.
Als u het product definitief buiten bedrijf stelt, informeer dan bij het
dichtstbijzijnde recyclingcentrum of uw speciaalzaak naar de
M
betreffende afvoervoorschriften.
12 Technische gegevens
VES100
Artikelnr.: 8885100099
Weegcapaciteit: 100 kg/220 lbs/3528 oz
Resolutie: 5 g/0,01 lbs/0,2 oz
Nauwkeurigheid: 0,05 %
Aansluitspanning: 110– 240 Vw
Omgevingstemperatuur: –10–+40 °C
≤75% luchtvochtigheid
Koudemiddelaansluitingen:
Afmetingen weegschaal: 237 mm x 237 mm
Gewicht: 5 kg
1/4"
66
Page 67

DA
VES100
Læs denne vejledning omhyggeligt igennem før ibrugtagning, og gem
den. Giv den til brugeren, hvis du giver produktet videre.
Indholdsfortegnelse
1 Forklaring af symbolerne . . . . . . . . . . . . . . . . . . . . . . . . . . . . . . . . . 68
2 Sikkerhedshenvisninger. . . . . . . . . . . . . . . . . . . . . . . . . . . . . . . . . . 68
3 Leveringsomfang . . . . . . . . . . . . . . . . . . . . . . . . . . . . . . . . . . . . . . . 70
4 Korrekt brug . . . . . . . . . . . . . . . . . . . . . . . . . . . . . . . . . . . . . . . . . . . 70
5 Teknisk beskrivelse . . . . . . . . . . . . . . . . . . . . . . . . . . . . . . . . . . . . . 70
6 Brug . . . . . . . . . . . . . . . . . . . . . . . . . . . . . . . . . . . . . . . . . . . . . . . . . 72
7 Udskiftning af batterier . . . . . . . . . . . . . . . . . . . . . . . . . . . . . . . . . . . 75
8 Udbedring af fejl. . . . . . . . . . . . . . . . . . . . . . . . . . . . . . . . . . . . . . . . 75
9 Rengøring og vedligeholdelse . . . . . . . . . . . . . . . . . . . . . . . . . . . . . 75
10 Garanti . . . . . . . . . . . . . . . . . . . . . . . . . . . . . . . . . . . . . . . . . . . . . . . 75
11 Bortskaffelse . . . . . . . . . . . . . . . . . . . . . . . . . . . . . . . . . . . . . . . . . . 76
12 Tekniske data. . . . . . . . . . . . . . . . . . . . . . . . . . . . . . . . . . . . . . . . . . 76
67
Page 68

DA
Forklaring af symbolerne VES100
1 Forklaring af symbolerne
ADVARSEL!
!
!
A
I
➤ Handling: Dette symbol viser dig, at du skal gøre noget. De påkrævede
handlinger beskrives trin for trin.
✓ Dette symbol beskriver resultatet af en handling.
Sikkerhedshenvisning: Manglende overholdelse kan medføre
død eller alvorlig kvæstelse.
FORSIGTIG!
Sikkerhedshenvisning: Manglende overholdelse kan medføre
kvæstelser.
VIGTIGT!
Manglende overholdelse kan medføre materielle skader og
begrænse produktets funktion.
BEMÆRK
Supplerende informationer om betjening af produktet.
Fig. 1 5, side 3: Denne information henviser til et element på en figur, i
dette eksempel til „Position 5 på figur 1 på side 3“.
2 Sikkerhedshenvisninger
Producenten påtager sig intet ansvar for skader i følgende tilfælde:
Beskadigelser på produktet på grund af mekanisk påvirkning og over-
spænding
Ændringer på produktet uden udtrykkelig tilladelse fra producenten
Anvendelse til andre formål end dem, der er beskrevet i vejledningen
68
Page 69

DA
VES100 Sikkerhedshenvisninger
2.1 Generel sikkerhed
ADVARSEL!
!
Hvis apparatet har synlige beskadigelser, må du ikke tage det i
brug.
Hvis dette apparats tilslutningskabel beskadiges, skal det
udskiftes af producenten, dennes kundeservice eller en
lignende kvalificeret person for at undgå farer.
Reparationer på dette apparat må kun foretages af fagfolk. Ved
ukorrekte reparationer kan der opstå betydelige farer.
Dette apparat kan anvendes af børn over 8 år og derudover af
personer med begrænsede fysiske, sanse- eller mentale evner
eller uden erfaring eller viden, hvis de er under opsyn eller blev
instrueret i sikker brug af apparatet og forstår farerne, der følger
heraf.
Rengøring og brugerens vedligeholdelse må ikke udføres af
børn uden opsyn.
Børn må ikke lege med apparatet.
Børn bør være under opsyn for at sikre, at de ikke leger med
apparatet.
Opbevar og anvend apparatet uden for børns rækkevidde
(under 8 år).
FORSIGTIG!
!
A
2.2 Sikkerhed under anvendelse af apparatet
!
Afbryd apparatet fra nettet
– før rengøring og vedligeholdelse
– efter brug
VIGTIGT!
Sammenlign spændingsangivelsen på typeskiltet med
energiforsyningen, der er til rådighed.
Tilslut apparatet til vekselstrømnettet med vekselstrømkablet.
Træk aldrig stikket ud af stikdåsen med tilslutningskablet.
FORSIGTIG!
Kontrollér før ibrugtagning, at ledningen og stikket er tørre.
69
Page 70

DA
Leveringsomfang VES100
VIGTIGT!
A
Stil ikke apparatet i nærheden af åben ild eller andre varmekil-
der (varmeapparater, stærk sol, gasovne osv.).
Dyp aldrig apparatet i vand.
Beskyt apparatet og kablerne mod varme og fugtighed.
3 Leveringsomfang
Pos. på fig. 1,
side 2
1 Beskyttelseskuffert
2 Vekselstrømkabel
3 Hånddisplay
4Vægt
Betegnelse
4 Korrekt brug
Med kølemiddelvægten VES100 kan kølemiddel overføres til eller opsuges
fra en kølemiddelbeholder.
5 Teknisk beskrivelse
Vægten kan tages ud og gør det muligt at veje uden for beskyttelseskufferten. Hånddisplayet kan også tages ud. Det kan også placeres uden for
kufferten.
Vægten frakobles automatisk efter 30 minutter uden tryk på en tast.
Med vægten bestemmes mængden af kølemiddel.
En magnetventil i apparatet lukker eller åbner forbindelsen mellem de to
tilslutninger „Input“ og „Output“.
Pos. på fig. 2,
side 2
1 Tilslutning „Input“
2 Tilslutning „Output“
3 Til/fra-kontakt
70
Betegnelse
Page 71

DA
VES100 Teknisk beskrivelse
5.1 Visningselement på hånddisplayet
Pos. i fig. 3,
side 3
1 Batterivisning
2 Vægtenhed
3 Taldisplay
4 Visning „Udsugning“
5 Visning „Overføring“
6 Overbelastningsvisning
Betegnelse
5.2 Betjeningselementer hånddisplay
Tasterne er samtidigt belagt med tal og følgende funktioner:
Pos. i fig. 4,
side 3
1 Tast „Charge“ Starter overføringen.
2 Tast „Function“ Vælger vægtenheden.
3 Tast „Light“ Tænder og slukker baggrunds-
4 Tast „Clear“ Sletter alle indtastninger og
5 Tast „Repeat“ Anvender vægten, der blev
6 Tast „Enter“ Viser den aktuelle vægt.
Betegnelse Forklaring
belysningen.
vender tilbage til vejemodusen.
valgt forinden, og gentager
proceduren overføring/
udsugning.
7 Tast „Power“ Tænder og slukker vægten.
8 Tast „Recover“ Tænder visningen på hånddis-
playet.
71
Page 72

DA
Brug VES100
6Brug
VIGTIGT!
A
I
6.1 Valg af vægtenhed
Kølemiddelvægten har tre vægtenheder: Kilogram (kg), ounces (oz) og pund
(lb).
Sørg for ikke at overskride den maksimale vejekapacitet, da det
kan beskadige kølemiddelvægten.
BEMÆRK
Vægten kan opstilles både i kufferten og i det fri. Vægten skal
stå plant og må ikke berøre tilslutningskablet, da præcisionen
ellers kan påvirkes.
Placér kølemiddelflasken i midten på vægten, og sørg for ikke
at ryste kølemidlet forinden.
Tildæk tilslutningerne „Input“ og „Output“ med beskyttelses-
kapperne efter brug.
Frakobl kølemiddelvægten efter hver brug. Tag batterierne,
hvis apparatet skal opbevares eller ikke anvendes i længere
tid.
➤ Tryk på tasten „Function“ (fig. 4 2, side 3) flere gange for at vælge den
ønskede vægtenhed.
6.2 Tilkobling af baggrundsbelysningen
Baggrundsbelysningen frakobles automatisk efter 30 sekunder uden tryk på
en tast.
➤ Tryk på tasten „Light“ (fig. 4 3, side 3) for at tænde eller slukke
displayets baggrundsbelysning.
72
Page 73

DA
VES100 Brug
6.3 Overføring af kølemidlet
BEMÆRK
I
➤ Tilslut kølemiddelvægten til vekselstrømnettet med vekselstrømkablet
(fig. 1 1, side 2).
➤ Forbind en fyldt kølemiddelflaske med tilslutningen „Input“ (fig. 2 1,
side 2).
➤ Forbind gasflasken, der skal fyldes, med tilslutningen „Output“ (fig. 2 2,
side 2).
➤ Tænd vægten med til/fra-kontakten (fig. 2 3, side 2).
➤ Stil den fyldte gasflaske på vægten (fig. 5, side 4).
➤ Vent, indtil vægten har beregnet den aktuelle vægt og viser den på
displayet.
➤ Tryk på tasten „Charge“ (fig. 3 1, side 3).
➤ Indtast vægten, der skal optages (min. 50 g), med taltasterne.
➤ Tryk på tasten „Enter“ (fig. 3 6, side 3).
Kølemiddelvægten skal være tilsluttet til vekselstrømnettet, så
magnetventilen fungerer.
✓ Magnetventilen åbnes, og kølemidlet overføres.
Hvis den valgte mængde kølemiddel blev overført, lukker
magnetventilen.
Vægten viser den resterende mængde kølemiddel i den fyldte
kølemiddelgasflaske.
BEMÆRK
I
Tryk på tasten „Enter“ fig. 3 6, side 3) for at afbryde en
proces. Tryk derefter på tasten „Charge“ (fig. 3 1, side 3) for
at vende tilbage til det forrige skærmbillede.
Tryk på tasten „0“, hvis du vil afslutte overføringsprocessen,
før den valgte mængde kølemiddel blev nået. Tryk på tasten
„Enter“ (fig. 3 6, side 3) for af forlade modusen.
73
Page 74

DA
Brug VES100
6.4 Udsugning af kølemiddel
BEMÆRK
I
➤ Forbind gasflasken med en udsugningsanordning (fig. 6, side 4).
➤ Tilslut kølemiddelvægten til vekselstrømnettet med vekselstrømkablet
(fig. 1 1, side 2).
➤ Forbind tilslutningen „Output“ med klimaservicestationen (fig. 2 2,
side 2).
➤ Forbind gasflasken, der skal suges ud af, med tilslutningen „Input“
(fig. 2 1, side 2).
➤ Tænd vægten med til/fra-kontakten (fig. 2 3, side 2).
➤ Stil gasflasken, der skal tømmes på vægten.
➤ Vent, indtil vægten har beregnet og vist den aktuelle vægt.
➤ Tryk på tasten „Recover“ (fig. 3 8, side 3).
Når den valgte vægt overstiger den samlede vægt for
kølemiddel i gasflasken, vises fejlmeldingen "ERROR".
Vægten af flasken, der skal fyldes, må ikke overstige 80 % af
den samlede mængde.
➤ Indtast vægten, der skal udtages (min. 50 g), med taltasterne.
➤ Tryk på tasten „Enter“ (fig. 3 6, side 3).
✓ Magnetventilen åbnes, og kølemidlet udtages.
Hvis den valgte mængde kølemiddel blev overført, lukker
magnetventilen.
Vægten viser den resterende mængde kølemiddel i den fyldte
kølemiddelflaske.
BEMÆRK
I
Tryk på tasten „Enter“ fig. 3 6, side 3) for at afbryde en pro-
ces. Tryk derefter på tasten „Recover“ (fig. 3 8, side 3) for at
vende tilbage til det forrige skærmbillede.
Tryk på tasten „0“, hvis du vil afslutte opladningen, før den
valgte mængde kølemiddel blev nået. Tryk på tasten „Enter“
(fig. 3 6, side 3) for af afslutte modusen.
74
Page 75

DA
VES100 Udskiftning af batterier
6.5 Gentagelse af processen
➤ Tryk efter overføringen eller udsugningen på tasten „Repeat“ (fig. 3 5,
side 3) for igen at overføre vægten, der blev valgt forinden.
7 Udskiftning af batterier
➤ Åbn afdækningen på bagsiden af hånddisplayet.
➤ Udskift batterierne (9 V).
➤ Luk afdækningen.
8 Udbedring af fejl
Fejl Løsning
På displayet vises
„ERROR“.
Displayet reagerer ikke.
Tryk på tasten „Power“, og vent 3 sekunder. Tryk igen
på tasten „Power“ for at starte systemet igen.
9 Rengøring og vedligeholdelse
VIGTIGT!
A
➤ Rengør af og til produktet med en fugtig klud.
Anvend ikke skarpe eller hårde genstande eller rengøringsmidler
til rengøring, da det kan beskadige produktet.
10 Garanti
Den lovbestemte garantiperiode gælder. Hvis produktet er defekt, skal du
kontakte producentens afdeling i dit land (adresser, se vejledningens bagside) eller din forhandler.
Ved reparation eller krav om garanti skal du medsende følgende bilag:
En kopi af regningen med købsdato
En reklamationsgrund eller en fejlbeskrivelse
75
Page 76

DA
Bortskaffelse VES100
11 Bortskaffelse
➤ Bortskaf så vidt muligt emballagen sammen med det tilsvarende
genbrugsaffald.
Hvis du tager produktet endegyldigt ud af drift, skal du kontakte det
nærmeste recyclingcenter eller din faghandel for at få de pågæl-
M
dende forskrifter om bortskaffelse.
12 Tekniske data
VES100
Art.nr.: 8885100099
Vejekapacitet: 100 kg/220 lbs/3528 oz
Opløsning: 5 g/0,01 lbs/0,2 oz
Nøjagtighed: 0,05 %
Tilslutningsspænding: 110–240 Vw
Udenomstemperatur: –10–+40 °C
≤75 % luftfugtighed
Kølemiddeltilslutninger: 1/4"
Mål vægt: 237 mm x 237 mm
Vægt: 5 kg
76
Page 77

SV
VES100
Läs igenom anvisningarna noga innan produkten tas i drift. Spara
bruksanvisningen för senare bruk. Överlämna bruksanvisningen till
den nya ägaren vid ev. vidareförsäljning.
Innehållsförteckning
1 Förklaring av symboler. . . . . . . . . . . . . . . . . . . . . . . . . . . . . . . . . . . 78
2 Säkerhetsanvisningar . . . . . . . . . . . . . . . . . . . . . . . . . . . . . . . . . . . 78
3 Leveransomfattning . . . . . . . . . . . . . . . . . . . . . . . . . . . . . . . . . . . . . 80
4 Ändamålsenlig användning . . . . . . . . . . . . . . . . . . . . . . . . . . . . . . . 80
5 Teknisk beskrivning . . . . . . . . . . . . . . . . . . . . . . . . . . . . . . . . . . . . . 80
6 Användning . . . . . . . . . . . . . . . . . . . . . . . . . . . . . . . . . . . . . . . . . . . 82
7 Byta batterier . . . . . . . . . . . . . . . . . . . . . . . . . . . . . . . . . . . . . . . . . . 85
8 Felsökning . . . . . . . . . . . . . . . . . . . . . . . . . . . . . . . . . . . . . . . . . . . . 85
9 Rengöring och skötsel . . . . . . . . . . . . . . . . . . . . . . . . . . . . . . . . . . . 85
10 Garanti . . . . . . . . . . . . . . . . . . . . . . . . . . . . . . . . . . . . . . . . . . . . . . . 86
11 Avfallshantering . . . . . . . . . . . . . . . . . . . . . . . . . . . . . . . . . . . . . . . . 86
12 Tekniska data. . . . . . . . . . . . . . . . . . . . . . . . . . . . . . . . . . . . . . . . . . 86
77
Page 78

SV
Förklaring av symboler VES100
1 Förklaring av symboler
VARNING!
!
!
A
I
➤ Arbetssteg: denna symbol står framför en arbetsinstruktion.
Tillvägagångssättet beskrivs steg för steg.
✓ Denna symbol står framför beskrivningen av resultatet.
Observera: Beaktas anvisningen ej kan det leda till dödsfara eller
svåra skador.
AKTA!
Observera: Beaktas anvisningen ej kan det leda till kropps-
skador.
OBSERVERA!
Om anvisningarna inte beaktas kan det leda till materialskador
och produktens funktion kan påverkas negativt.
ANVISNING
Kompletterande information om användning av produkten.
Bild 1 5, sidan 3: anger en detalj på en bild, i detta exempel ”position 5 på
bild 1 på sidan 3”.
2 Säkerhetsanvisningar
Tillverkaren övertar inget ansvar för skador i följande fall:
skador på produkten, orsakade av mekanisk påverkan eller överspänning
ändringar som utförts utan uttryckligt medgivande från tillverkaren
ej ändamålsenlig användning
2.1 Allmän säkerhet
VARNING!
!
78
Om apparaten uppvisar synliga skador får den ej användas.
Om apparatens anslutningskabel skadas måste den, av
säkerhetsskäl, bytas ut av tillverkaren, tillverkarens kundtjänst
eller annan behörig person.
Page 79

SV
VES100 Säkerhetsanvisningar
Reparationer på apparaten får endast utföras av behörigt
fackfolk. Icke fackmässiga reparationer kan leda till att allvarliga
risker uppstår.
Denna apparat kan användas av barn från 8 år samt av
personer med fysiska, sensoriska eller mentala funktionshinder
och personer som saknar erfarenhet och kunskap under
förutsättning att de använder den under uppsikt eller har
undervisats om hur apparaten används på ett säkert sätt och
känner till ev. risker i samband med användningen.
Rengöring och underhåll får inte genomföras av barn utan
uppsikt.
Barn får inte leka med apparaten.
Barn bör hållas under uppsikt, så att de inte leker med
apparaten.
Förvara och använd apparaten utom räckhåll för barn under 8
år.
AKTA!
!
Koppla alltid bort apparaten från elnätet
– före rengöring och underhåll
– efter varje användning
OBSERVERA!
A
2.2 Säkerhet under användning
!
A
Jämför spänningsuppgifterna på typskylten med elförsörjningen
på plats.
Anslut apparaten till elnätet (växelström) med växelströmska-
beln.
Dra aldrig ut stickkontakten ur uttaget genom att dra i anslut-
ningskabeln.
AKTA!
Kontrollera, innan apparaten tas i drift, att elkabeln och
stickkontakten är torra.
OBSERVERA!
Ställ inte upp den i närheten av öppen eld eller andra
värmekällor (värmeelement, starkt solljus, gasspisar osv.).
79
Page 80

SV
Leveransomfattning VES100
Doppa aldrig ned apparaten i vatten.
Skydda apparaten och kablarna mot hetta och fukt.
3 Leveransomfattning
Pos. på bild 1,
sida 2
1 Skyddshylsa
2 Växelströmskabel
3 Manuell display
4Våg
Beteckning
4 Ändamålsenlig användning
Med vågen för köldmedium VES 100 är det möjligt att överföra eller suga upp
köldmedium i en köldmediumbehållare.
5 Teknisk beskrivning
Vågen är avtagbar, vilket gör att det går att väga utanför skyddshöljet. Det är
också möjligt att ta av den manuella displayen. Den kan hängas upp utanför
höljet.
Om inte någon knapp trycks in slår vågen av sig själv efter 30 minuter.
Med hjälp av vågen fastställs mängden köldmedium.
Med en magnetventil i apparaten stängs eller öppnas anslutningen mellan de
båda anslutningarna ”Input2 och ”Output".
Pos. på bild 2,
sida 2
1 Anslutning ”Input”
2 Anslutning ”Output”
3 På/av-knapp
80
Beteckning
Page 81

SV
VES100 Teknisk beskrivning
5.1 Instrumentenheter på den manuella displayen
Pos. på bild 3,
sida 3
1 Batterinivåvisare
2 Viktenhet
3 Nummervisning
4 Display ”Uppsugning”
5 Display ”Överföring”
6 Överbelastningsindikator
Beteckning
5.2 Kontrollenheter på den manuella displayen
Knapparna är både försedda med nummer och funktionerna nedan:
Pos. på bild 4,
sida 3
1 Knapp ”Charge” Startar överföringen.
2 Knapp ”Function” Väljer viktenhet.
3 Knapp ”Light” Slår på och stänger av
4 Knapp ”Clear” Raderar alla inmatningar och
5 Knapp ”Repeat” Använder vikt som valts tidi-
6 Knapp ”Enter” Visar aktuell vikt.
Beteckning Förklaring
bakgrundsbelysningen.
återgår till vägningsläge.
gare och upprepar processen
Överföring/
uppugning.
7 Knapp ”Power” Slår på och stänger av vågen.
8 Knapp ”Recover” Slår på skärm i manuell
display.
81
Page 82

SV
Användning VES100
6 Användning
OBSERVERA!
A
I
6.1 Välj viktenhet
Vågen för köldmedium har tre olika viktenheter: Kilogram (kg), uns (oz) och
pund (lb).
Se upp så att maximal vägningskapacitet inte överskrids, annars
kan det uppstå skador på vågen för köldmedium.
ANVISNING
Vågen kan installeras både i hölje och utan hölje. Vågen
måste stå på jämnt underlag och får inte komma i kontakt med
anslutningskabeln, eftersom precisionen kan påverkas.
Placera köldmediumflaskan mitt på vågen och se upp så att
köldmediumet inte skakas i förväg.
Efter användning måste anslutningarna ”Input” och ”Output”
alltid täckas över med skyddskåporna.
Efter användning måste vågen för köldmedium alltid stängas
av. Ta bort batterierna om apparaten ska lagras eller inte
användas under en längre tid.
➤ Tryck flera gånger på knappen ”Function” (bild 4 2, sida 3) för att välja
önskad viktenhet.
6.2 Slå på bakgrundsbelysning
Om inte någon knapp trycks in slår bakgrundsbelysningen av sig själv efter
30 minuter.
➤ Tryck på knappen ”Light” (bild 4 3, sida 3) för att slå på eller stänga av
bakgrundsbelysningen på displayen.
82
Page 83

SV
VES100 Användning
6.3 Överföra köldmedel
ANVISNING
I
➤ Anslut vågen för köldmedium med växelströmskabeln (bild 1 1 sida 2)
till elnätet (växelström).
➤ Anslut en full köldmediumflaska till anslutningen ”Input” (bild 2 1,
sida 2).
➤ Anslut gasflaskan som ska fyllas till anslutningen ”Output” (bild 2 2,
sida 2).
➤ Slå på vågen med hjälp av på/av-knappen (bild 2 3, sida 2).
➤ Placera den fyllda gasflaskan på vågen (bild 5, sida 4).
➤ Avvakta tills vågen läst av aktuell vikt och visat resultatet på displayen.
➤ Tryck på knappen ”Charge” (bild 3 1, sida 3).
➤ Ange den vikt som ska laddas (min. 50 g) med hjälp av nummerknap-
parna.
➤ Tryck på knappen ”Enter” (bild 3 6, sida 3).
Vågen för köldmedium måste vara kopplad till elnätet (växelström) så att magnetventilen fungerar.
✓ Magnetventilen öppnas och köldmedlet överförs.
När önskad mängd köldmedium överförts, stängs magnetventilen.
På vågen visas kvarvarande mängd köldmedium i den fyllda
köldmediumgasflaskan.
ANVISNING
I
Tryck på knappen ”Enter” (bild 3 6, sida 3) för att avbryta ett
förlopp. Tryck sedan på knappen ”Charge” (bild 3 1, sida 3)
för att gå tillbaka till föregående bildskärm.
När du vill avsluta överföringen innan önskad mängd
köldmedium uppnåtts, trycker du på knappen ”0”. Tryck på
knappen ”Enter” (bild 3 6, sida 3) för att lämna läget.
83
Page 84

SV
Användning VES100
6.4 Suga upp köldmedel
ANVISNING
I
➤ Anslut gasflaskan till en suganordning (bild 6, sida 4).
➤ Anslut vågen för köldmedium med växelströmskabeln (bild 1 1 sida 2)
till elnätet (växelström).
➤ Anslut anslutningen ”Output” till klimatservicestationen (bild 2 2, sida 2).
➤ Anslut gasflaskan, som ska sugas upp ur, till anslutningen ”Output”
(bild 2 1, sida 2).
➤ Slå på vågen med hjälp av på/av-knappen (bild 2 3, sida 2).
➤ Placera gasflaskan som ska tömmas på vågen.
➤ Avvakta tills vågen läst av aktuell vikt och visat resultatet.
➤ Tryck på knappen ”Recover” (bild 3 8, sida 3).
➤ Ange den vikt som ska tas bort (min. 50 g) med hjälp av nummerknap-
parna.
När önskad vikt överstiger köldmedlets totala vikt i gasflaskan
visas felmeddelandet "ERROR".
Vikten på den flaska som ska fyllas på får inte överstiga 80 %
av den totala vikten.
➤ Tryck på knappen ”Enter” (bild 3 6, sida 3).
✓ Magnetventilen öppnas och köldmedlet tas bort.
När önskad mängd köldmedium överförts, stängs magnetventilen.
På vågen visas kvarvarande mängd köldmedium i den fyllda köldmedi-
umflaskan.
ANVISNING
I
Tryck på knappen ”Enter” (bild 3 6, sida 3) för att avbryta ett
förlopp. Tryck sedan på knappen ”Recover” (bild 3 8, sida 3)
för att gå tillbaka till föregående bildskärm.
Om du vill avsluta laddningen innan önskad mängd köld-
medium uppnåtts, trycker du på knappen ”0”. Tryck på
knappen ”Enter” (bild 3 6, sida 3) för att lämna läget.
84
Page 85

SV
VES100 Byta batterier
6.5 Upprepa
➤ När överföring eller uppsugning avslutats ska du trycka på knappen
”Repeat” (bild 3 5, sida 3) för att överföra vikt som valts tidigare en gång
till.
7 Byta batterier
➤ Öppna locket på baksidan av den manuella displayen.
➤ Byt batterier (9 V).
➤ Stäng locket.
8 Felsökning
Fel Lösning
På displayen visas
”ERROR”.
Displayen reagerar inte.
Tryck på knappen ”Power” och vänta i 3 sekunder.
Tryck en gång till på knappen ”Power” för att starta om
systemet.
9 Rengöring och skötsel
OBSERVERA!
A
➤ Rengör produkten då och då med en fuktig trasa.
Använd inga vassa eller hårda föremål för rengöring, använd inga
skarpa rengöringsmedel; produkten kan skadas.
85
Page 86

SV
Garanti VES100
10 Garanti
Den lagstadgade garantitiden gäller. Om produkten är defekt: kontakta tillverkarens kontor i ditt land (adresser, se bruksanvisningens baksida) eller
återförsäljaren.
Vid reparations- resp. garantiärenden ska följande skickas med:
en kopia på fakturan med inköpsdatum,
en reklamationsbeskrivning/felbeskrivning.
11 Avfallshantering
➤ Lämna om möjligt förpackningsmaterialet till återvinning.
När produkten slutgiltigt tas ur bruk: informera dig om
gällande bestämmelser hos närmaste återvinningscentral
M
eller hos återförsäljaren.
12 Tekniska data
VES100
Artikelnr: 8885100099
Vägningskapacitet: 100 kg/220 lbs/3528 oz
Upplösning: 5 g/0,01 lbs/0,2 oz
Noggrannhet: 0,05 %
Anslutningsspänning: 110–240 Vw
Omgivningstemperatur: –10–+40 °C
≤75 % luftfuktighet
Köldmediumanslutningar: 1/4"
Vågens mått: 237 mm x 237 mm
Vikt: 5 kg
86
Page 87

NO
VES100 Symbolforklaringer
Les bruksanvisningen nøye før du tar i bruk apparatet, og ta vare på
den. Hvis produktet selges videre, må du sørge for å gi bruksanvisningen videre også.
Innhold
1 Symbolforklaringer . . . . . . . . . . . . . . . . . . . . . . . . . . . . . . . . . . . . . . 87
2 Sikkerhetsregler . . . . . . . . . . . . . . . . . . . . . . . . . . . . . . . . . . . . . . . . 88
3 Leveringsomfang . . . . . . . . . . . . . . . . . . . . . . . . . . . . . . . . . . . . . . . 89
4 Tiltenkt bruk . . . . . . . . . . . . . . . . . . . . . . . . . . . . . . . . . . . . . . . . . . . 90
5 Teknisk beskrivelse . . . . . . . . . . . . . . . . . . . . . . . . . . . . . . . . . . . . . 90
6 Bruk . . . . . . . . . . . . . . . . . . . . . . . . . . . . . . . . . . . . . . . . . . . . . . . . . 91
7 Skifte batteri . . . . . . . . . . . . . . . . . . . . . . . . . . . . . . . . . . . . . . . . . . . 94
8 Utbedring av feil . . . . . . . . . . . . . . . . . . . . . . . . . . . . . . . . . . . . . . . . 94
9 Rengjøring og stell . . . . . . . . . . . . . . . . . . . . . . . . . . . . . . . . . . . . . . 94
10 Garanti . . . . . . . . . . . . . . . . . . . . . . . . . . . . . . . . . . . . . . . . . . . . . . . 95
11 Deponering . . . . . . . . . . . . . . . . . . . . . . . . . . . . . . . . . . . . . . . . . . . 95
12 Tekniske data. . . . . . . . . . . . . . . . . . . . . . . . . . . . . . . . . . . . . . . . . . 95
1 Symbolforklaringer
ADVARSEL!
!
!
A
Sikkerhetsregel: Hvis man ikke overholder denne regelen, kan
det føre til død eller alvorlig skade.
FORSIKTIG!
Sikkerhetsregel: Hvis man ikke overholder denne regelen, kan
det føre til personskader.
PASS PÅ!
Hvis man ikke overholder denne regelen, kan det føre til materielle skader og skade funksjonen til produktet.
87
Page 88

NO
Sikkerhetsregler VES100
MERK
I
➤ Handling: Dette symbolet indikerer at du må gjøre noe. De nødvendige
handlingene beskrives trinnvis.
✓ Dette symbolet beskriver resultatet av en handling.
Fig. 1 5, side 3: Denne angivelsen henviser til et element i en illustrasjon,
i dette eksemplet til «Posisjon 5 i illustrasjon 1 på side 3».
Utfyllende informasjon om bruk av produktet.
2 Sikkerhetsregler
Produsenten tar i følgende tilfeller intet ansvar for skader:
Skader på produktet på grunn av mekanisk påvirkning og overspenninger
Endringer på produktet uten at det er gitt uttrykkelig godkjenning av
produsenten
Bruk til andre formål enn det som er beskrevet i veiledningen
2.1 Generell sikkerhet
ADVARSEL!
!
Apparatet må ikke tas i bruk hvis det har synlige skader.
Hvis tilkoblingskabelen på dette apparatet blir skadet, må den
erstattes av produsent, kundeservice eller annen kvalifisert
person for å unngå farlige situasjoner.
Reparasjoner på dette apparatet må kun utføres av fagfolk. Feil
reparasjoner kan føre til betydelige skader.
Dette apparatet kan brukes av barn fra 8 år og oppover, og av
personer med nedsatte fysiske, sensoriske eller mentale evner
eller manglende erfaring og kunnskap, når de er under oppsikt
eller har fått opplæring i sikker bruk av apparatet og hvilke farer
som er forbundet med det.
Rengjøring og vedlikehold må ikke utføres av barn uten at de er
under oppsikt.
Barn må ikke leke med apparatet.
88
Page 89

NO
VES100 Leveringsomfang
Barn skal være under tilsyn for å sikre at de ikke leker med
apparatet.
Oppbevar og bruk apparatet slik at det ikke er tilgjengelig for
barn under 8 år.
FORSIKTIG!
!
A
2.2 Sikkerhet ved bruk av apparatet
!
Koble apparatet fra strømnettet.
– før rengjøring og stell
– hver gang etter bruk
PASS PÅ!
Sammenlign spenningsspesifikasjonene på merkeskiltet med
tilgjengelig strømtilførsel.
Koble apparatet til vekselstrømforsyningen med tilkoblingska-
belen.
Trekk aldri støpslet ut av stikkontakten etter ledningen.
FORSIKTIG!
Før du tar apparatet i bruk, må du passe på at ledningen og
støpslet er tørre.
PASS PÅ!
A
Ikke plasser apparatet i nærheten av åpen flamme eller andre
varmekilder (oppvarming, sterk solbestråling, gassovner osv.).
Dypp aldri apparatet i vann.
Beskytt apparatet og kabelen mot varme og fuktighet.
3 Leveringsomfang
Pos. i fig. 1,
side 2
1 Beskyttelseskoffert
2 Vekselstrømskabel
3 Hånddisplay
4Vekt
Beskrivelse
89
Page 90

NO
Tiltenkt bruk VES100
4 Tiltenkt bruk
Med kjølemiddelvekten VES100 kan man fylle eller suge tom en kjølemiddelbeholder for kjølemiddel.
5 Teknisk beskrivelse
Vekten kan tas ut slik at man kan veie når den ikke befinner seg i kofferten.
Hånddisplayet kan også tas ut. Det kan henges utenfor kofferten.
Vekten slår seg av automatisk hvis ingen tast trykkes i løpet av 30 minutter.
Vekten bestemmer hvor mye kjølemiddel som er nødvendig.
En magnetventil i apparatet lukker eller åpner forbindelsen mellom begge
tilkoblingene «Tilførsel» og «Utløp».
Pos. i fig. 2,
side 2
1 Tilkobling «Tilførsel»
2 Tilkobling «Utløp»
3 På/av-bryter
Betegnelse
5.1 Indikeringselementer hånddisplay
Pos. i fig. 3,
side 3
1 Batteriindikering
2 Vektenhet
3 Sifferindikering
4 «Utsugings»-indikering
5 «Overførings»-indikering
6 Overlastindikering
Betegnelse
90
Page 91

NO
VES100 Bruk
5.2 Betjeningselementer hånddisplay
Tastene har både siffer og følgende funksjoner:
Pos. i fig. 4,
side 3
1 «Charge»-tasten Starter overføring.
2 «Function»-tasten Velger vektenhet.
3 «Light»-tasten Slår bakgrunnsbelysningen av
4 «Clear»-tasten Sletter alle inndata og går
5 «Repeat»-tasten Benytter forrige valgte vekt og
6 «Enter»-tasten Viser aktuell vekt.
7 «Power»-tasten. Slår vekten av og på.
8 «Recover»-tasten Slå på visning i hånddisplayet.
Betegnelse Forklaring
6Bruk
PASS PÅ!
A
Pass på at maksimal veiekapasitet ikke overskrides, da dette kan
skade kjølemiddelvekten.
og på.
tilbake til veiemodus.
gjentar forløpet overfør(
utsuging.
I
MERK
Vekten kan stilles opp både i eller utenfor kofferten. Vekten
skal stå flatt og skal ikke berøre tilkoblingskabelen, da dette
kan påvirke nøyaktigheten.
Plasser kjølemiddelflasken midt på vekten på pass på at det
ikke skvulper.
Dekk til «Input»- og «Output»-tilkoblingene med beskyttelses-
hettene etter hver gangs bruk.
Slå av kjølemiddelvekten etter hver gangs bruk. Ta ut batteri-
ene hvis vekten lagres eller ikke brukes over lang tid.
91
Page 92

NO
Bruk VES100
6.1 Velge vektenhet
Man kan velge mellom tre vektenheter: Kilogram (kg), Unser (oz) og Pund
(lb).
➤ Trykk på «Function»-tasten ("fig. 4 2, side 3) flere ganger for å velge
ønsket vektenhet.
6.2 Slå på bakgrunnsbelysning
Bakgrunnsbelysningen slår seg av automatisk hvis ingen tast trykkes i løpet
av 30 minutter.
➤ Trykk på «Light»-tasten (fig. 4 3, side 3), for å slå bakgrunnsbelysnin-
gen til displayet på eller av.
6.3 Overføre kjølemiddel
MERK
I
➤ Koble kjølemiddelvekten til vekselstrømforsyningen (fig. 1 1, side 2)
med tilkoblingskabelen.
Kjølemiddelvekten må kobles til vekselstrømsnettet for at
magnetventilen skal fungere.
➤ Koble en fylt kjølemiddelflaske til «Input»-åpningen (fig. 2 1, side 2).
➤ Koble gassflasken som skal fylles til «Output»-åpningen (fig. 2 2,
side 2).
➤ Slå på vekten med på/av-tasten (fig. 2 3, side 2).
➤ Plasser den fylte gassflasken på vekten (fig. 5, side 4).
➤ Vent til vekten har registrert vekten og viser denne i displayet.
➤ Trykk på «Charge»-tasten (fig. 3 1, side 3).
➤ Legg inn fyllevekten (min. 50 g) med siffertastene.
➤ Trykk på «Enter»-tasten (fig. 3 6, side 3).
✓ Magnetventilen åpner seg og kjølemidlet overføres.
Magnetventilen lukker når valgt mengde kjølemiddel er overført.
Vekten viser restmengde kjølemiddel i den fylte kjølemiddelflasken.
92
Page 93

NO
VES100 Bruk
MERK
I
Trykk på «Enter»-tasten fig. 3 6, side 3) for å avbryte et
forløp. Trykk deretter på «Charge»-tasten (fig. 3 1, side 3)
for å gå tilbake til forrige skjermbilde.
Trykk på «0»-tasten hvis du ønsker å avbryte overføringen før
valgt mengde kjølemiddel er nådd. Trykk på «Enter»-tasten
(fig. 3 6, side 3) for å gå ut av modusen.
6.4 Suge opp kjølemiddel
MERK
I
➤ Koble til gassflasken med en utsugingsinnretning (fig. 6, side 4).
➤ Koble kjølemiddelvekten til vekselstrømforsyningen (fig. 1 1, side 2)
med tilkoblingskabelen.
➤ Koble «Output»-åpningen til klima-servicestasjonen (fig. 2 2, side 2).
➤ Koble gassflasken som kjølemiddel skal suges ut av til «Input»-åpningen
(fig. 2 1, side 2).
Hvis vekten av kjølemidlet i gassflasken overstiger innstilt
vekt, vises feilmeldingen "ERROR".
Vekten av flasken som skal fylles må ikke overstige 80 % av
totalmengden.
➤ Slå på vekten med på/av-tasten (fig. 2 3, side 2).
➤ Plasser gassflasken som skal tømmes på vekten.
➤ Vent til vekten har registrert vekten og viser denne.
➤ Trykk på «Recover»-tasten (fig. 3 8, side 3).
➤ Legg inn tømmevekten (min. 50 g) med siffertastene.
➤ Trykk på «Enter»-tasten (fig. 3 6, side 3).
✓ Magnetventilen åpner seg og kjølemidlet suges ut.
Magnetventilen lukker når valgt mengde kjølemiddel er overført.
Vekten viser restmengde kjølemiddel i den fylte kjølemiddelflasken.
93
Page 94

NO
Skifte batteri VES100
MERK
I
6.5 Gjenoppta forløpet
➤ Etter å ha overført eller sugd opp trykker du på «Repeat»-tasten
(fig. 3 5, side 3), for å overføre den valgte vekten en gang til.
Trykk på «Enter»-tasten fig. 3 6, side 3) for å avbryte et for-
løp. Trykk deretter på «Recover»-tasten (fig. 3 8, side 3) for
å gå tilbake til forrige skjermbilde.
Trykk på «0»-tasten hvis du ønsker å avbryte ladeforløpet før
valgt mengde kjølemiddel er nådd. Trykk på «Enter»-tasten
(fig. 3 6, side 3) for å avslutte modusen.
7 Skifte batteri
➤ Åpne dekslet på baksiden av hånddisplayet.
➤ Bytt batteriet (9 V).
➤ Lukk dekslet.
8 Utbedring av feil
Feil Løsning
Displayet viser
«ERROR».
Displayet reagerer ikke.
Trykk på «Power»-tasten og vent i 3 sekunder. Trykk på
«Power»-tasten på nytt for å starte systemet om igjen.
9 Rengjøring og stell
PASS PÅ!
A
➤ Rengjør produktet regelmessig med en fuktig klut.
94
Bruk ikke skarpe eller harde gjenstander eller rengjøringsmidler til
rengjøring, da det kan skade produktet.
Page 95

NO
VES100 Garanti
10 Garanti
Lovmessig garantitid gjelder. Hvis produktet skulle være defekt, kontakter du
produsentens filial i ditt land (du finner adressene på baksiden av veiledningen) eller til din faghandler.
Ved henvendelser vedrørende reparasjon eller garanti, må du sende med
følgende dokumentasjon:
kopi av kvitteringen med kjøpsdato,
årsak til reklamasjonen eller beskrivelse av feilen.
11 Deponering
➤ Lever emballasje til resirkulering så langt det er mulig.
Når du tar produktet ut av drift for siste gang, må du sørge for å få
informasjon om deponeringsforskrifter hos nærmeste resirkule-
M
ringsstasjon eller hos din faghandler.
12 Tekniske data
VES100
Art.nr.: 8885100099
Veiekapasitet: 100 kg/220 lbs/3528 oz
Oppløsning: 5 g/0,01 lbs/0,2 oz
Nøyaktighet: 0,05 %
Tilkoblingsspenning: 110 – 240 Vw
Omgivelsestemperatur: –10 – +40 °C
≤75% luftfuktighet
Kjølemiddeltilkobling: 1/4"
Vektens mål 237 mm x 237 mm
Vekt: 5 kg
95
Page 96

FI
VES100
Lue tämä ohje huolellisesti läpi ennen käyttöönottoa ja säilytä ohje
hyvin. Jos myyt tuotteen eteenpäin, anna ohje tällöin edelleen uudelle
käyttäjälle.
Sisällysluettelo
1 Symbolien selitykset . . . . . . . . . . . . . . . . . . . . . . . . . . . . . . . . . . . . 97
2 Turvallisuusohjeet . . . . . . . . . . . . . . . . . . . . . . . . . . . . . . . . . . . . . . 97
3 Toimituskokonaisuus . . . . . . . . . . . . . . . . . . . . . . . . . . . . . . . . . . . . 99
4 Käyttötarkoitus . . . . . . . . . . . . . . . . . . . . . . . . . . . . . . . . . . . . . . . . . 99
5 Tekninen kuvaus . . . . . . . . . . . . . . . . . . . . . . . . . . . . . . . . . . . . . . 100
6 Käyttö. . . . . . . . . . . . . . . . . . . . . . . . . . . . . . . . . . . . . . . . . . . . . . . 102
7 Paristojen vaihtaminen. . . . . . . . . . . . . . . . . . . . . . . . . . . . . . . . . . 105
8 Häiriöiden poistaminen . . . . . . . . . . . . . . . . . . . . . . . . . . . . . . . . . 105
9 Puhdistus ja hoito. . . . . . . . . . . . . . . . . . . . . . . . . . . . . . . . . . . . . . 105
10 Tuotevastuu . . . . . . . . . . . . . . . . . . . . . . . . . . . . . . . . . . . . . . . . . . 105
11 Hävittäminen . . . . . . . . . . . . . . . . . . . . . . . . . . . . . . . . . . . . . . . . . 106
12 Tekniset tiedot . . . . . . . . . . . . . . . . . . . . . . . . . . . . . . . . . . . . . . . . 106
96
Page 97

FI
VES100 Symbolien selitykset
1 Symbolien selitykset
VAROITUS!
!
!
A
I
➤ Menettely: Tämä symboli ilmaisee, että sinun tulee tehdä jotakin. Tarvit-
tava menettely kuvataan askel askeleelta.
✓ Tämä symboli kuvailee menettelyn tuloksen.
Turvallisuusohje: Huomiotta jättäminen voi aiheuttaa hengenvaaran tai vakavan loukkaantumisen.
HUOMIO!
Turvallisuusohje: Huomiotta jättäminen voi johtaa loukkaantu-
miseen.
HUOMAUTUS!
Huomiotta jättäminen voi johtaa materiaalivaurioihin ja haitata
tuotteen toimintaa.
OHJE
Tuotteen käyttöä koskevia lisätietoja.
Kuva 1 5, sivulla 3: Tämä tieto viittaa kuvassa olevaan elementtiin, tässä
esimerkissä ”kohteeseen 5 kuvassa 1, sivulla 3”.
2 Turvallisuusohjeet
Valmistaja ei ota mitään vastuuta vahingoista seuraavissa tapauksissa:
tuotteeseen mekaanisen vaikutuksen tai ylijännitteiden takia syntyneet
vauriot
tuotteeseen ilman valmistajan nimenomaista lupaa tehdyt muutokset
käyttö muuhun kuin käyttöohjeessa ilmoitettuun tarkoitukseen
97
Page 98

FI
Turvallisuusohjeet VES100
2.1 Yleinen turvallisuus
VAROITUS!
!
Laitetta ei saa ottaa käyttöön, jos siinä on näkyviä vaurioita.
Jos tämän laitteen liitäntäjohto vaurioituu, tulee valmistajan tai
valtuutetun asiakaspalvelun tai vastaavasti pätevän henkilön
vaihtaa se vaaran välttämiseksi.
Ainoastaan ammattilaiset saavat korjata tätä laitetta. Epäasian-
mukaisista korjauksista saattaa aiheutua huomattavia vaaroja.
Tätä laitetta voivat käyttää valvonnan alaisuudessa myös vähin-
tään 8-vuotiaat lapset samoin kuin henkilöt, joiden fyysiset, aistinvaraiset tai henkiset valmiudet ovat rajoittuneet tai joilta
puuttuu käytön vaatima kokemus tai tietämys. Tämä koskee
myös tilannetta, jossa edellä mainitut henkilöt ovat saaneet laitteen turvallista käyttöä koskevan perehdytyksen ja jotka tämän
perusteella ymmärtävät laitteen käytöstä aiheutuvat vaarat.
Lapset eivät saa puhdistaa laitetta tai tehdä käyttäjähuoltoa
ilman valvontaa.
Lapset eivät saa leikkiä laitteella.
Lapsia on pidettävä silmällä ja varmistettava siten, että he eivät
voi leikkiä laitteella.
Säilytä ja käytä laitetta alle 8-vuotiaiden lasten ulottumatto-
missa.
!
A
98
HUOMIO!
Irrota laite verkosta
– ennen jokaista puhdistusta tai huoltoa
– jokaisen käytön jälkeen
HUOMAUTUS!
Vertaa tyyppikilven jännitetietoja käytettävissä olevaan
energiansyöttöön.
Yhdistä laite vaihtovirtaverkkoon vain vaihtovirtakaapelilla.
Älä ota pistoketta koskaan pois pistorasiasta johdosta vetä-
mällä.
Page 99

FI
VES100 Toimituskokonaisuus
2.2 Laitteen käyttöturvallisuus
HUOMIO!
!
A
Varmista ennen laitteen käyttöönottoa, että virtakaapeli ja
pistoke ovat kuivia.
HUOMAUTUS!
Älä aseta laitetta alttiiksi avotulelle tai muille lämpölähteille
(lämmitys, voimakas auringonpaiste, kaasu-uunit jne.).
Älä koskaan upota laitetta veteen.
Suojaa laite ja kaapelit kuumuudelta ja kosteudelta.
3 Toimituskokonaisuus
Kohta – kuva 1,
sivulla 2
1 Suojalaukku
2 Vaihtovirtakaapeli
3 Kädessä pidettävä näyttölaite
4Vaaka
Nimitys
4 Käyttötarkoitus
Kylmäainevaa'an VES100 avulla kylmäaineen voi siirtää kylmäainesäiliöön
tai imeä pois säiliöstä.
99
Page 100

FI
Tekninen kuvaus VES100
5 Tekninen kuvaus
Vaa'an voi poistaa laukusta, jolloin punnitseminen on mahdollista myös
suojalaukun ulkopuolella. Kädessä pidettävän näyttölaitteen voi myös
poistaa laukusta. Näytön voi kiinnittää sopivaan paikkaan laukun
ulkopuolelle.
Vaaka kytkeytyy automaattisesti pois päältä, jos mitään painiketta ei ole
painettu 30 minuutin kuluessa.
Vaaka on tarkoitettu kylmäaineen määrän määrittämiseen.
Laitteessa oleva magneettiventtiili sulkee tai avaa yhteyden liitäntöjen ”Input”
ja ”Output” välillä.
Kohta – kuva 2,
sivulla 2
1 Liitäntä ”Input”
2 Liitäntä ”Output”
3 Virtakytkin
Nimitys
5.1 Elementit kädessä pidettävän näyttölaitteen
näytössä
Kohta –
kuva 3,
sivulla 3
1 Akun näyttö
2 Painon yksikkö
3 Numeronäyttö
4 Imutoiminnon näyttö
5 Siirtotoiminnon näyttö
6 Ylikuormituksen näyttö
Nimitys
100
 Loading...