

Page 1
B)TDometic
Diagnostic Service Manuals
United States
SERVICE OFFICE
DOMETIC SALES CORP
509 South Poplar
LaGrange,
IN 46761
SERVICE
Edition
August 1982
DSC
#651
2
SERVICE MANUAL
RM182
When
ordering
MODEL.
For
electric
VOLTAGE -WATTAGE
spare parts always state:
QUANTITY * PART NUMBER * DESCRIPTION
details also:
REFRIGERATOR
B
Page 2

TABLE OF CONTENTS
A.
Installation Instructions
B.
Instructions For Use
RM
182B
Page 2
Page 3
General Instructions
Sealed Combustion Unit
Ventilator (improved cooling performance)
Fuse
-
12 Volt Circuit
Steps To Take When The Refrigerator Has Not
Been Used For A Long Period
Pilot Outage
Periodic Maintenance
Removal And Installation Of Refrigerator
c.
Component Replacement
D.
Replacing The Electric Heating Element
Replacing Voltage Selection Switch
Replacing Gas Shut-Off Valve (Gas-Cock)
Replacing
Thermostat
And
Flame Failure Safety
Device (Safety Valve)
Replacing Thermo-current Adapter
Page 4
Page 4
Page 4
Page 4
Page 4
Page 4
Page 4
Page
5
Page 6
Page 6
Page 6
Page 6
Page
Page
6
7
&
7
Replacing Thermocouple
Replacing Spark Ignitor With Cable
Replacing Burner Jet
Cooling
Removing The Air
Wiring Diagram
E.
Troubleshooting The Refrigerator- L.P. Gas
F.
Troubleshooting The Refrigerator - Electric
G.
Figures 1 through
H.
Unit Replacement
The Piston
(Joint
15
RM 182 B
Pump
And
Ring)
Replacing
Page
Page
Page
Page
7
7
8
8
Page 9
Page 9
Page l0
Page 11
Page 12
-
-l-
Page 3

A.
INSTALLAT
INSTRUCT IONS
ION
The design of this refrigerator has been certified and approved by the American
Gas Association and the Canadian
This certification is dependent,
GAS
Association for
Recreational Vehicles.
however upon proper installation’-and the use of
the venting components as shown in these instructions.
Installation
The installation of the refrigerator must
sence of local codes
the following American National Standards and Canadian Stan-
dards are applicable
In the USA:
ANSI z
ANSI c
223.1.1
1978 National Fuel Gas Code
1978 National Electric Code
In Canada:
CSA Std. Z 240.4.
-
*Gas Equipped Recreational
Vehicles and Mobile Housing
*Note:
and Z 24o.4.2.
CSA Std. Z
Will be replaced by CSA Stds. Z
when available.
24o.6.1.
-
Electrical Requirement for
Mobile Housing
CSA
Std. Z
24o.6.2.
-
Electrical Requirement for
Recreat
comply with local codes or in the ab-
24o.4.1
ional
Vehicles
-2-
Page 4

B. INSTRUCTIONS FOR USE
RM182B
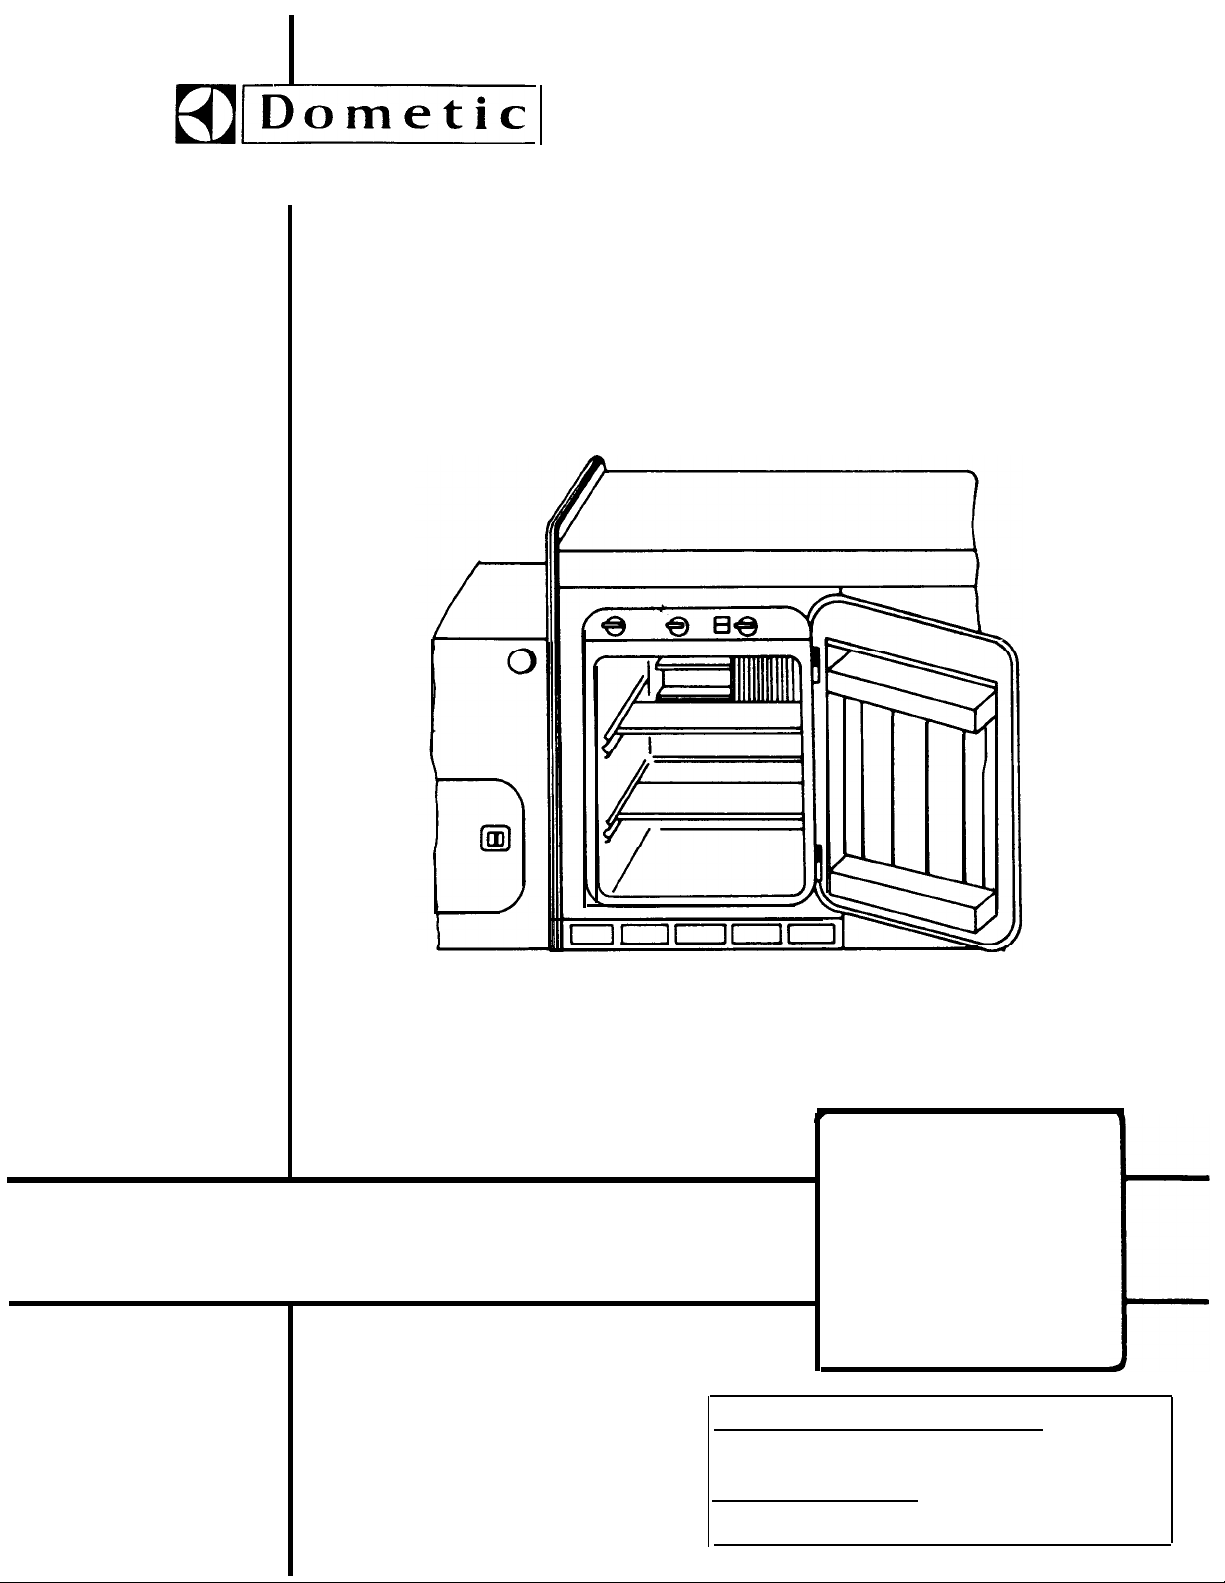
The Controls
Control Panel : Fig. 1 Page 1
1.
“A”
-
"B"
-
"C"
_
:
Controls are located at the top of the refrigerator.
___
Air Pump and Piezo Lighter
Safety Valve
Thermostat for Gas and 120
the unit runs
continously)
Volt Operation (12 volt has no thermostat,
Voltage Selector Switch
Gas Shut-Off Valve
Flame Pilot Sight Peep
2.
Gas Operation
_________ ____________ ____ ___________
1.
Place Voltage Switch
Valve
2.
3.
4.
Turn thermostat "C" (Fig. 1) to
Depress button
Release button "B" and pump knob "A" (Fig. 1) 20 times DO
-
Lighting the Burner
"D"
"E"
(Fig.1) to position
"B"
(Fig. 1) for 20 seconds to let gas flow to burner
(Fig. 1) on position
until click is heard, stop short of this position.
5.
Once again, press button
knob
“A” (Fig. 1) several times until
"B"
is Piezo Lighter).
6.
7.
When burner is lit, hold button
Flame may be observed through pilot sight peep "F" (Fig. 1) and ice
tray should show signs of cold after two hours.
A
,
then place Gas
I
maximum
NOT
pump
(Fig. 1) and hold, simultaneously pump
noticable
"B'
(Fig. 1) for at least lo seconds.
click is heard (this
3.
Electrical Operation
1.
2.
_
Place Gas Valve "E" (Fig. 1) to position 0
Place Voltage Selector Switch
NOTE:
cause of an inserted relay, the 12 Volt operation is only possible
if the car ignition is switched on.
4.
Temperature Control
_______
_______________
With the thermostat knob "C" (Fig. 1) set at the middle position, the
cabinet will automatically maintain a suitable temperature for ordinary
food storage.
hot weather, or when more cooling is required, the knob
must be turned to a higher position.
If less cooling is required, the knob should be turned to a lower
sition.
If knob
circuit is switched off. During gas operation the same position corres-
ponds to
_______
"D"
(Fig.
1) to the appropriate voltage.
The 12 volt circuit is not thermostatically controlled, Be-
Usually, no further adjustment will be necessary, but in
"C"
(Fig. 1)
"C"
(Fig. 1) is turned completely to the left, the
Minimum
Cooling.
120
Volt
po-
-3-
Page 5
General Instructions
Sealed Combustion Unit
The sealed canbustion unit is made up of the burner, a fresh air intake and
exhaust pipes, and a vent/air-intake assembly in the wall.
The burner unit is completely sealed off’
of the two special inlet and outlet pipes.
from the interior of the van by means
In the vent /air-intake assembly,
fresh air is drawn in one pipe and combusted gases are safely vented to the
outside through the other pipe.
Ventilator (Cooling Fan)
In order to improve the cooling performance under the difficult built-in situ-
ation and high ambient temperatures,
matically when the temperature around the
140~
gerator) reaches
NOTE:
F and switched off at 124 F.
a o,6 W ventilator is switched on auto-
condenser
fins (behind the refri-
The ventilator is connected to the 12 V-circuit in such a manner that it is
also operational during the 120 V and gas operations.
Fuse
For 12 V use the refrigerator is protected by a fuse installed in the general electrical circuit of the vehicle. If the fuse bums out, trace the cause
and correct it before fitting a new lo amp. fuse.
Steps To Take When The Refrigerator Has Not Been Used For A Long Period
If there has been a heavy rain,or the vehicle has been through a car wash,
be_
water may have collected in the burner housing. This must
the gas is lit.
For this, the sealing plug underneath the front of the refri-
removed before
gerator on the left is unscrewed from the drainage tube and the water is
allowed to escape.
The sealing plug must then be carefully refitted since a
good seal is essential for the proper function of the combustion system._ Check
that the windscreen of the outside wall of the van is clean and remove any
dirt that is present.
Pilot Outage
It has been determined that this problem can be causedbya poor seal between
"E"
the slide for ventilation housing
(Fig.2) and the side wall of the ve-
hicle.
When properly sealed,
this plate acts as a baffle to protect the exhaust outlet tube from direct air flow. If this seal is not complete, air will be
allowed to flow between the plate and the side wall of the vehicle directly
into the exhaust outlet tube.
"D"
This problem can be caused by failure to tighten the mount
"F"
properly, a bad gasket
(Fig.2) or a warped locating plate
(Fig. 2) screws
"E"
(Fig. 2).
Periodic Maintenance
Once or twice a year, depending on use,
it is necessary to clean and adjust
the burner assembly.
The burner ist fitted with a # 24 jet, which is suitable for use on Propane
or Butane gas at a supply pressure of 11 inches water column pressure. The
orifice in the jet is very small and must never be cleaned by means of a pin
or a similar instrument for this will damage the orifice. Should, for
reason,
the jet require cleaning,
it should be washed in alcohol and blown
some
dry with air.
The entire gas installation should be checked for leaks. Test all pipe connec-
tions with soapy water, not with an open flame.
-4-
Page 6
C.
REMOVAL
AND INSTALLATION OF REFRIGERATOR
Remova
1.
1
Disconnect electrical supply. And make sure the
gas supply is shut off at
its source.
2.
Remove the vent /air-intake assembly on the van
a. Unscrew three self-tapping screws
(A,Fig.2)
then remove windscreen and separating plate
b. Unscrew four screws
(D,Fig.2)
of the fixing
fixing plate and gasket (F, Fig. 2) from the
wall outside .
of the windscreen
(B,Fig.2)
(C, Fig. 2).
plate (E,Fig. 2) and remove
caravan wall (G, Fig. 2) to
the vent casing (H,Fig. 2).
3.
Open and remove all three doors of the kitchen cabinet (Fig.3). Pull out drawer. Dismantle and remove shelves. Then lift door from hinge posts (Fig.3).
4.
Remove three protective caps (A, Fig.4) from the refrigerator frame
(B,Fig.4)
and unscrew the three screws that are behind the caps. Then on each side
through the doors,unscrew two
phillips
screws (C, Fig.4) from the walls of
the refrigerator.
5.
t en pull out the left groove according to arrow
F
6.
Remove 120 V connection plug (A, Fig.6) from the socket, pull out 12 V plug
pull refrigerator frame forward in the lower right (Fig.
(B,Fig.S)
toward the right.
5,arrow
connection (B, Fig.6).
Unscrew threaded union of the gas-connection line
(C,Fig.6)
of the refrige-
rator.
A)
7.
Unscrew ventilation grill (A. Fig. 7) by removing two screws (B, Fig. 7) and
then remove refrigerator by pulling forward.
Installation
The installation is carried out in the reverse sequence to that described for
the removal of the refrigerator.
IMPORTANT:
After installation, check gas system for leaks, with soapy water.
NEVER USE A
MATCH
-5-
Page 7

D.
COMPONENT
NOTE:
REPLACEMENT RM182B
For the removal of gas and electrical components and of the refrigerator
cooling unit, the refrigerator must be removed from the kitchen cabinet
(see chapter C)
.
1. Replacing the electric heater
_____
1. Squeeze the heater insulation in direction of arrow (A,Fig. 8) until it
clicks open. Pull open the insulation in direction of arrow ( B,Fig. 8)
and remove it .
2. Unscrew fixing screw (C, Fig. 8) of the heater and remove the heater from
its pocket by pulling straight up.
3. Unscrew the two screws of the cover (F,Fig. 9) exposing the terminal
block.
4. Unscrew the heater cable at the terminal block and remove heater with
cable.
5. To replace heater,
NOTE
:
reverse the procedure.
The heater has a groove (D, Fig. 8) at the bottom, into which the fi-
xing screw fits.Place the new heater inside the heater tube so that
the groove is in the correct position for the fixing screw. The bottom
of the heater should be level with the bottom of the heater tube.
2. Replacing the voltage selection switch
_____
(D,Fig.9)
1. Remove plug-connections of the voltage selection switch.
2. Press in the four fixing legs on the switch and at the same time press out
the switch from the control panel.
3. To replace switch,reverse the procedure.
3. Replacing the gas-cock G Fig. 9)
_____
1. Unscrew union nut (H, Fig. 9) and union nut ( I, Fig. 9
2. Unscrew support bracket ( J, Fig 9) for gas-cock ( 2 screws
----- ___
)
) .
3. To replace gas-cock, reverse the procedure.
4. Replacing the thermostat and flame failure safety device
_____
(
Safety
______
Valve)
1. Remove ice-tray support (A, Fig. lo) from evaporator by withdrawing in
a forward direction.
CAUTION: Only take hold of it at the left side (indicated by the arrow). Now
pull the capillary tube of the thermostat off.
2. Bend straight the capillary tube from the rear of the cabinet.
3. Unscrew union nut (A, fig. 11) from gas-cock (B, fig. 11). (Use a second
fork-spanner to hold counterpart the gas-cock).
-6-
Page 8

4.
Pull off thermostat knob (C,
(E, Fig. 11).
Fig.11)
and
knob
(D,
Fig.11)
of safety device
5.
Unscrew union nut (F,
Fig.11)
of gas-pipe (G,
Fig.11)
from flame failure
safety device (E, Fig. 11).
6.
Remove three cable plug-connections from thermostat (H,
7.
Unscrew thermo-coupling (I,
8.
Unscrew thermostat (H,
9.
Unscrew two clips (L,
Remove gas-equipment from cabinet and dismantle.
10.
11.
Dismantling of thermostat (H,
(E,
Fig.11)
(N,
Fig.11)
12.
Dismantling of the flame failure safety device (E,
with thermo-current adapter (J,
from thermostat.
Fig.11)
failure safety device from thermostat (H,
current adapter (J,
For reassembly, proceed in the reverse sequence of dismantling.
13.
CAUTION:
Coat threaded unions at the connection/thermostat and thermostat/flame
Fig.11)
Fig.11)
Fig.11)
from thermo-current adapter (J,
from support bracket (K,
from capillary tube (M,
:
Fig.11)
Unscrew flame failure safety device
Fig.11)
and the connection
Fig.11)
Fig.11).
Then unscrew
from the flame failure safety device.
Fig.11).
Fig.11)
Fig.11).
:
Unscrew flame
failure safety device with Loctite 572 to ensure good sealing.
Be careful not to get any Loctite inside any parts.
5.
Replacing
_____ _____ ____
1.
Unscrew thermo-coupling (I,
2.
Unscrew thermo-current adapter from flame failure safety device (E,
the thexmo-current adapter
Fig.11)
from thermo-current adapter.
(J,Fig.
11).
____
and replace by new unit.
Fig.11).
( 2 screws
thermo-
Fig.11)
).
(I,
Fig.
6. Replacing the thermocouple
_____ _____ ___
1.
Unscrew thermo-coupling from thermo-current adapter (J, Fig. 11).
2.
Unscrew clip (0,
Fig.11)
for gas-pipe (G,
3. Unscrew the three screws of the mounting plate (A,
part of gas-burner.
thermocouple (I,
4.
Unscrew lock-nut (D,
5.
Bend new thermocoupling (I, Fig.
Take off spark ignitor (B,
Fig.12)
and gasket (C,
Fig.12)
of the thermocouple
11)
11+12)
Fig.11)
and thermocouple.
Fig.12)
Fig.12),
mounting plate with
Fig.12).
to shape of old one. For reassemhly,
proceed in the reverse sequence of dismantling.
IMPORTANT:
The gasket (C,
Fig.12)
between the lower part of the burner and the
mounting plate must be replaced by a new one and carefully positioned
to ensure that the burner is properly sealed.
7. Replacement of spark
1.
Remove ignition cable (P,
2.
Unscrew the one screw (A3,
ignitor
with cable
Fig.11)
Fig.12)
ignitor and replace it by a new one.
from piezo
(B,Fig. 12)
ignitor
(Q,
from the spark ignitor, withdraw spark
Reassemble in the reverse order.
from the bottom
Fig.11).
-7-
Page 9

8.
Replacing the burner-jet ( E Fig.
___ ____
12)
Unscrew union nut
1.
and a second one (14
Unscrew burner jet from the bottom part of gas-burner.
2.
Screw in the new burner jet, refit gas pipe.
3.
IMPORTANT:
The gasket (G,
(F,
Fig. 12) of gas pipe by using a lo mm fork-spanner
mm)
to hold counterpart the jet.
Fig.12)
between the lower part of the burner and
the burner-jet must be replaced by a new one and carefully positioned to ensure that the burner is properly sealed.
9. Cooling unit replacement.
_________ ________
1.
Unscrew thermo-coupling (I,
2.
Unscrew clip (0,
Remove the three connections (A, Fig.
3.
Fig.11)
Fig.11)
from thermo-current adapter
for gas-pipe (G,
13/R,
Fig.11)
Fig.ll),
(J,Fig.ll).
and thermocouple.
unscrew support
bracket (B, Fig. 13) of the ventilator.
4.
Unscrew thermostat (S, Fig. 11) from condenser fins and remove plug-connection of grounding cable (T, Fig. 11) above the condenser fins.
5.
Squeeze the heater insulation in direction of arrow (A, Fig.8) until it
clicks open. Pull open the insulation in direction of arrow (B, Fig. 8)
and remove it.
6. Unscrew fixing screw (C, Fig.8) of the heater and remove the heater from
its pocket by pulling straight up.
7.
Unscrew union nut (A, Fig. 14) of flexible exhaust pipe (B, Fig. 14)using
a pipe wrench,remove flexible pipe and gasket from gas heating-pipe
(C,Fig.l4).
8. Unscrew union nut (U,
Unscrew six screws (A,
9.
screws from support bracket (B,
lo. Take off bottom part of burner with thermocouple, gas pipe and spark
tor with cable from upper part of burner (D,
Fig.11)
Fig.15)
from air feed-pipe.
from the bottom part of gas burner and two
Fig.15)
of the drainage tube (C,
Fig. 15).
igni-
Fig.15)
by withdrawing to the
right side .
11. Unscrew upper part of gas burner (D,
fran the gas heating pipe (F,
Fig.15)
12. Unscrew locking plate from pilot sight peep (H,
Fig.15)
with air inlet pipe (E,
(2 screws G, Fig.
Fig.15).
Fig.15)
15).
13. Unscrew eight screws (I,Fig. 15) from the cooling unit attachment panel ‘and
take cooling unit out of the cabinet.
14. For the installation of the cooling unit, proceed in the reverse sequence.
CAUTION: The location of the thermostat capillary tube should be noted at
IMPORTANT
this time for relocation later on. The tubes
correct position otherwise, improper
:
The
gasket (H,
Fig.12)
between the lower and upper part of the
performance
must
be placed in the
will result..
burner must be replaced by a new one and carefully positioned
to ensure that the burner is properly sealed.
Also the gasket (I,
Fig.12)
between the upper part of the bur-
ner and the gas heating pipe should be replaced too.
-8-
Page 10

lo. Removing the air
___________ __ _____ _____
1.
Unscrew knob (A, Fig.9) of air pump (K, Fig.9) from the shaft (L, Fig.9).
2.
Unscrew air pump ( 4 screws / M, Fig. 9).
Unscrew cover of air-pump ( 2 screws / N, Fig. 9).
3.
Withdraw shaft, force out retaining disc from the groove, pull off large
4.
pump
and replacing the piston.
disc and change joint ring.
Reassemble in the reverse order.
5.
CAUTION:
After all repairs to the gas equipment,the entire gas system must be
checked for leaks with soapy solution.
NEVER
E.
WIRING
USE A
DIAGRAM
MATCH
THERMOSTAT
RMINAL
TE
BLOCK
HEATER
1
HEATER
1
GREY
5 0
W
a
t$$i
P
MAINS CABLE
120V
y
w
5
5
s
+
z
iii
12V
SUPPLY CABLE
-9-
4 g
Page 11

F. TROUBLESHOOTING THE REFRIGERATOR - L.P. GAS
SYMPTOM
CAUSE
NOTE: It will be noted in this guide that several causes can
for one effect.The real cause or causes should be
the process of elimination, investigating each possible cause, starting at the top of the guide and proceeding to the bottom.
Gas leaks
Inadequate ventilation
refrigerator not level
Jet orifice clogged
The thermocouple tip not in position
No contact between thermocouple and safety valve
-
Faulty safety valve magnet
-
Improper flame
-
By-pass flame too large
-
Vent air-intake assembly clogged
-
Unstable burner flame
Improper food storage
-
Thermostat incorrectly used
-
Improper storage of liquid and moist foods
-
Leaky cabinet seals
-
Ambient temperature too high
Flame contacts flue tube
-
Insufficient air to burner
-
Infrequent cleaning of food compartment
-
Refrigerator shut off with closed door
-
Unwrapped odorous food
Incomplete contact of the thermostat capillary tube
-
Thermostat charge lost
-
Refrigerator unit failure
Room temperature too low
Piezo
ignitor faulty
Piezo ignitor cable faulty
-
Water in the burner housing
Vent/air-intake assembly is not mounted securely
Y
No iqnition spark; distance of electrode
Air-pump failure piston faulty
Gauze in burner head clogged
-
Dirt in thermostat or valve seat
-
By-pass flame too small
-
be responsible
determined by
-10-
Page 12

G. TROUBLESHOOTING THE REFRIGERATOR - ELECTRIC
SYMPTOM
CAUSE
NOTE: It will be noted in this guide that several causes can be responsible
for one effect.
The real cause or causes should be determined by
the process of elimination, investigating each possible cause, starting at the top of the guide and proceeding to the bottom.
Inadequate ventilation
Refrigerator not level
Defective heater, wrong voltage or type
Voltage not constant
Electric connections loose
Heater not inserted correctly in its pocket
Improper food storage
-
H
-
H
Thermostat incorrectly used
-
Improper storage of liquid and moist foods
-
Leaky cabinet seals
Infrequent cleaning of food compartment
H
Refrigerator shut off with closed door
-
-
r/
Unwrapped odorous food
-
-
H
fl
#
-
-
H
fl
-
-
Incomplete contact of the thermostat capillary tube
Thermostat charge lost
Refrigerator unit failure
Ambient temperature too low
12 Volt relay faulty
Ambient temperature too high
-ll-
Page 13

A
8
c
13
E
Fig. 1
Fig.
2
/--
@I
I
/-
0
0
C
\
I
A'
Fig.
Fig. 3
4
Fig. 5
-12
Fig. 6
-
Page 14

I
I
I
I
I
I
I
I
I
,I
I
.I
I
I
I
.I
,I
,
I
.I
‘I
I
I
A;
I
-1
I
I
‘I
I
I
.I
I
.I
.I
I
.I
*I
I
I
I
1
I
I
it--
il
II
II
II
II
II
11
II
II
II II
IllI
II
II
ll
II
I
’
II
II
I!
II
Fig. 7
II
II
II
11
._
Fig. 8
Page 15

h
n
E D
-
a
I*
f
1
.
t-+
R
L1--r’
1
c
1
B
f-l
1 ,,
1,
I.1 R
A
L-J
I
n
Fig. 9
Page 16

C
-
.
I 1,
f-l
D
I
%
i
Fig.11
-
15-
Page 17

L
,,-,--I_
--.
t:i __)
F
/-
E
/-
-16 -
Q
Fig.12
Page 18

Fig.14
. .
I’
’
II
rl
--
-
t
Fig.15
-17-
 Loading...