

Page 1
822 70 69-02
RKE 400
RKE - 1D
RKE - 2D
English page 4
Português página 7
Norsk side 10
Svenska sida 13
RKE 300
Page 2
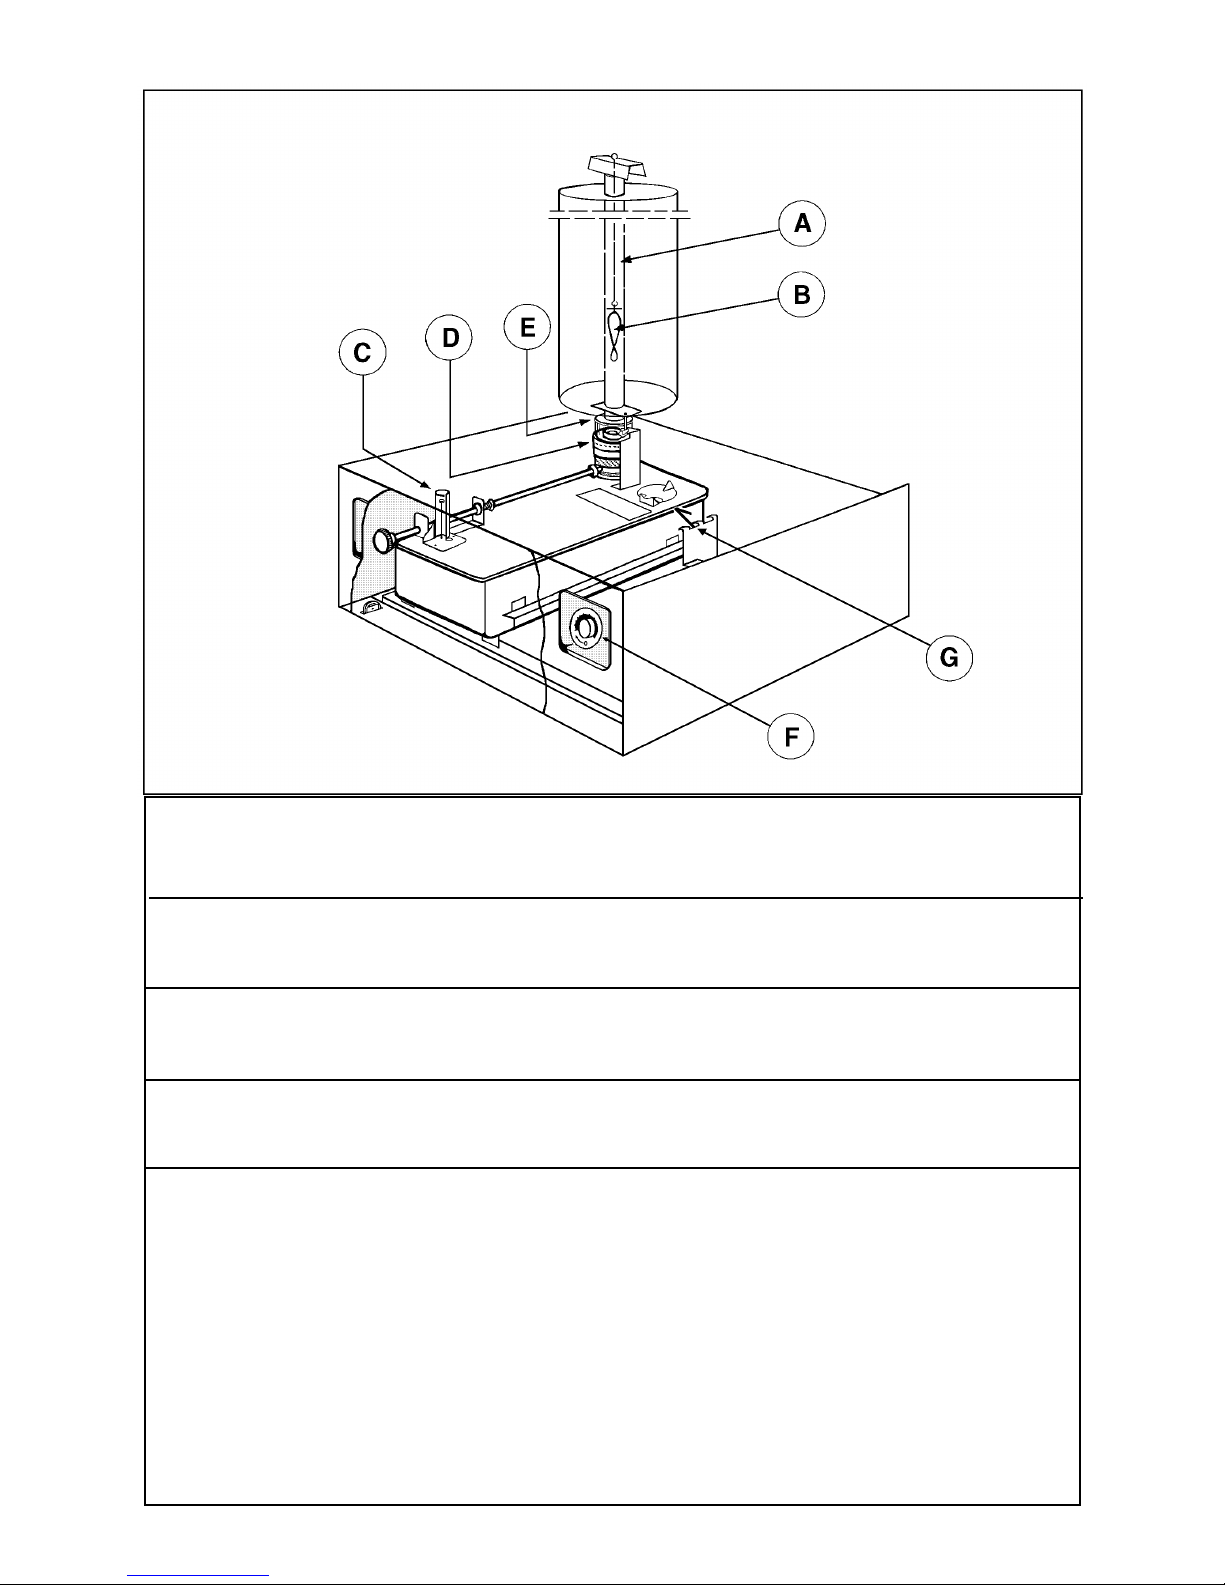
A. Flue tube D. Burner G. Lever arm
B. Flue baffle E. Seal ring
C. Fuel gauge F. Thermostat
A. Chaminé D. Queimador G. Braço da alavanca
B. Deflector E. Anel vedante
C. Indicador de nível F. Termostato
A. Trekkanalrør D. Brenner G. Hevarm
B. Trekkanal-ledeplate E. Tetningsring
C. Drivstoffmåler F. Termostat
A. Skorsten D. Brännare G. Hävarm
B. Lågspridare E. Tätningsring
C. Nivåvisare F. Termostat
2
Page 3
12
3
4
5
3
Page 4

INSTRUCTIONS FOR USE
Installation
The cabinet must be installed on a firm floor and must
be in a horizontal position. Use a water lev el and check
both ways in the freezer compartment.
Avoid locating the refrigerator in a room subject to high
temperatures or strong draughts .
See that a space of at least 16 inches (400 mm) is left
free above the top of the cabinet to allow an unrestrict ed
circulation of air, which is essential for the efficient
operation of the refrigerator. The ventilation opening at
the top of the cabinet must not be cover ed in any way.
The refrigerator should not be placed in a small pantry
or similar location.
The flue baffle must be positioned as shown on the
illustration.
Filling the Tank
Always use the kerosene funnel when filling the tank,
and fill until the gauge pointer approaches the red mark.
Clean off any kerosene on the top of the tank. If kerosene
overflows, the tank should be remov ed from the refrigerator and wiped clean.
Do not let the tank run dry while the refrigerator is in use
because refrigeration will be interrupted and a portion of
the wick will be burned off, reducing the life of the wick.
Always use best quality burning kerosene (Paraffin) and see that it is kept clean, dry and unadulterated. Under no circumstances must vapori zing
kerosene, petrol or spirit of any kind be used.
Li ghting the Burner
Remember that the kerosene lamp is an essential part
of the refrigerator and that care taken to maintain it in
good condition is well repaid.
Before lighting a n ew wick for the first time, allo w the wick
to become soaked with kerosene for at least two hours .
Important
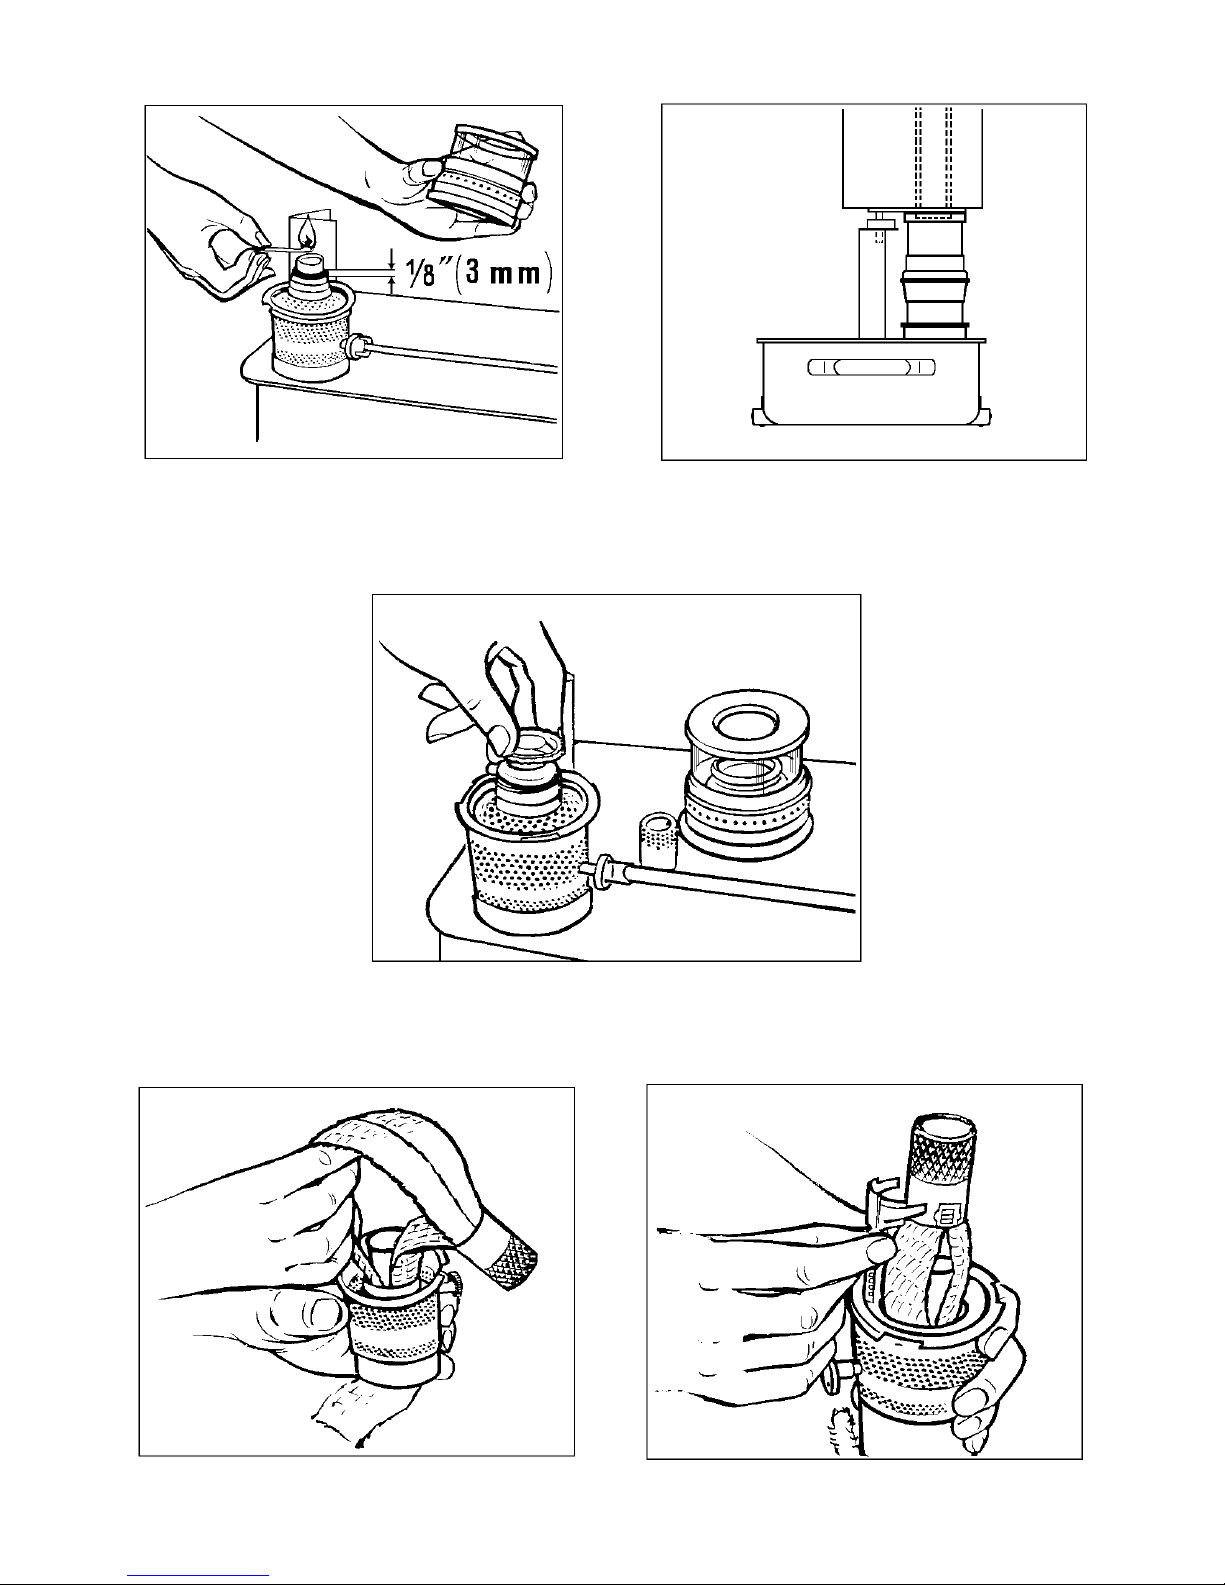
When lighting the burner, remove the gallery , lamp glass
and seal ring as one unit after turning the gallery anticlockwise to unlock (FIG. 1). Do not attempt t o light the
burner by turning up the wick as high as it will go, leaving
the gallery in place, as this will damage the wick and
result in unsatisfactory refrigeration.
Adjust the wick turner so that the wick height is about
1/8" (3 mm) above the top of the outer wick tube
(FIG. 1).
Light the wick. Allow the flame to travel round the wic k,
and replace the gallery complete with lamp glass and
seal ring. T urn the gallery clockwise until lock ed securely
in position. Should the flame be extinguished, relight
following the above procedure.
Push the tank into the tank holder underneath the cabinet and at the rear of the refrigerator. Slide the tank
carefully forwards against the guide pin. Carefully lift the
tank by means of the lever arm and check that the guide
pin enters the hole in the bracket on the left side of the
burner (FIG. 2).
Make sure that the sealing ring on the top of the lamp
glass seals against the bottom of the flue tube, it should
not be any air gap between the flue tube and the sealing
ring. Lock the lev er arm in the position were the sealing
ring seals against the flue tube.
The burner should burn with a blue flame; a partly or
wholly yellow flame indicates an air gap and must be
adjusted.
When the burner is in position under the flue tube, adjust
the wick to produce a medium-high blue flame. Wait 30
minutes to allow the burner to warm up before making
any further wick adjustments. To obtain better cooling,
turn the wick up which raises the light-blue flame.
To make the refrigeration less cold, turn the wick down
to give a blue flame of reduced height. To maintain
steady cabinet temperatures the refrigerator should
operate continuously day and night.
NOTE: Never operate the burner with a flame having
yellow tips or streaks on or in the bright blue lower
portion, or with a wholly yellow flame. Such conditions
will result in rapid carbonization of the wick, smell, and
possible damage to the cooling unit.
Do not force wick turner if it will not turn readily, as this
may be an indication that the burner needs cleaning or
that the wick should be replaced.
Cleaning Wick and Burner
While the flame is burning, carbon forms on the top of
the wick, on the flange of the outer wick tube and on t he
surface of the flame spreader. For the best refrigerat io n
results and to prolong the life of the wick, this carbon
must be cleaned off every two or three days f or the first
two weeks and at least once a month thereafter, provided a good grade of ker osene is used. When poor gr ade
kerosene is used, the burner should be cleaned at least
once a week.
To clean the wick and the burner, loosen the lever arm
and pull out the tank, remove the seal ring, lamp glass
and gallery by turning it anti-clockwise and lift off. Take
out the flame spreader . Insert the wick cleaner , (supplied
with the burner) in the burner tube and adjust the wick
by pressing the cleaner gent ly against the wic k surf ac e.
Turn the wick cleaner in a clock-wise direction, gently
cleaning and reshaping the burning surface (FIG. 3).
Be careful not to fray the wick.
The top surface of the properly cleaned wick should be
free from carbon and frayed fabric threads. It should
slope upwards to its inner top edge, which should be
fairly even.
Blow off all loose carbon from the wick and burner, and
remove any dirt or carbon, which has fallen into the
burner base.
Reassemble the burner .
When cleaning the burner, take out the b urner from th e
tank and inspect the tails of the wick. If they are dirty,
unsuitable kerosene has been used and the tank must
be cleaned. Empty the tank and put the dirty kerosene
aside for other uses. Rinse the tank twice with clean
kerosene and refill with filtered kerosene.
4
Page 5

Replacing the Wick
Remove burner from tank. Remove out er wick tube (see
Burner Parts) by turning it anti-clockwise to unlock (Aladdin 23E), by unscrewing the locking nuts on either side
(Aladdin 32) and lifting it off the burner.
T urn the wic k up as far as possible. Pull the wick and th e
wick carrier out from the top of the burner. Disengage
the wick from the wick carrier.
A new wick should be free from moister (water).
Before inserting the new wic k, m ak e s ure that the flam e
spreader is in position in the burner tube.
New wicks have adhesive papers at the tail ends to
afford ease of replacement, and these should first be
straightened out. Put one of the papers through the
opening around the wick tube, and pull in the paper unt il
the fabric end of the wick is t hrough the opening. Repeat
the procedure with the other end of the wick in the
opposite opening around the wick tube (FIG. 4). When
both wick tails are through the respective openings, pull
the wick through the burner until about 1" (25 mm ) of the
tails protrudes below the bottom of the burner.
Be careful not to fra y the top of the wick during replacement.
Install the wick carrier on the wick, ensuring that the rack
of the wick carrier is on the same s ide as the wick turner
(FIG. 5). Ease the wick and wick carrier downwards by
pulling gently on the bottom ends of the wick, and when
the rack of the wick carrier enters the annular opening,
guide it against the cog wheel on the wick turner.
Depress the wick carrier rack over the cog wheel of the
wick turner and move the wick down as far as it will go.
Be sure that the inside reinforcement tape of the wick
slips over the burner tube. If the wick gets stuck in the
burner, do not f orce the wick turner as this ma y damag e
the wick carrier.
Replace the outer wick tube on the burner, pressing it
down and turning it clockwise to lock in position (Aladdin
23E), tighten the locking nuts (Aladdin 32). Check that
the wick can be turned up and down readily.
T o prolong the lif e of the wick, it should be cleaned e very
two or three days for the first two weeks and once a
month thereafter, provided a good grade of keros ene is
used. W hen poor grade kerosene is used, the burner an d
wick should be cleaned at least once a week.
Only Aladdin wicks can be used in this burner.
Cleaning the Flue Sys tem
Cleaning of the flue at least once e very year is, however,
recommended. Poor grade kerosene may cause the
burner to smoke, and as s oot will then collec t in t he fl ue
it should be cleaned immediately. To clean the flue
remove the tank and burner, lift off the flue cap complet e
with wire and flue baffle, and place a sheet of paper
underneath the flue tube to catch the soot. Clean the flue
with the brush supplied with the refrigerator and, after
cleaning, ensure that the flue cap and baffle are
refitted in position.
NOTE: The refrigerator will not operate properly if
the flue baffle is not in place.
Defrosting
Remove all food from the refrigerator; extinguish the
flame and leave the door and frozen storage compartment door open. The frost will melt rapidly and run down
into a receptacle at the rear of the refrigerator where it
evaporates. Defrost water in the freezer compartment
should be mopped up with a cloth.
It is advisable to clean the refriger ator in conjunction with
defrosting. Use lukewarm water and a non-perfumed
detergent. Never use scouring powder, steel wool and
the like.
Before starting the refrigerat or again, dry out the froze n
storage compartment and refrigeration spac e. Wash t he
ice-tray s and fill them with fresh water.
Turning off
If the refrigerator is to remain out of use, extinguish the
burner flame. Empty the cabinet, defrost it and clean it
thoroughly. Leave the door ajar .
Electric operation
Check that the voltage stated on the data plate is the
same as the main voltage in use.
Plug the refrigerator power cord into an easily accessible
earthed wall socket.
If no earthed wall socket is available consult an electrician before using the refrigerator .
Refrigerator temperature is kept at a constant level by
mean s of th e the rmost at. S elec t the t emp era tur e required
by turning the thermostat knob to a suitable figure.
This knob is graduated from 0 (marked by a spot) to
figure 7 and MAX. At the MAX position the cabinet is set
for continual operation, i.e. the thermostat is b y-passed.
The thermostat controls refrigerator temperature only
when on electric operation. When running on kerosene,
the temperature is controlled by means of the knob on
the kerosene tank.
To render the refrigerator completely electrically inert,
pull the plug out of the wall socket.
Changing from kerosene operation to
electric operation or vice versa
1. Extinguish the kerosene flame.
2. Plug the power cord into the wall socket.
3. Set the thermostat.
Switching from electric to kerosene operation:
1. Pull the power cord out of the wall socket.
2. Start the refrigerator on kerosene.
NOTE: Do not run the refrigerator on electricity and
kerosene simultaneously. Refrigerating efficiency will
thereby be somewhat impaired but abo ve all the unit may
overheat and ruin the refrigerating system.
5
Page 6

Changing the heating element
The heater, which is fitted inside the boiler casing B of
the refrigerator unit, can be changed as f ollows: (FIG. 6)
1. Pull the power cord out of the wall socket.
2. Remove the cover C.
3. Remove some insulatio n wool so that the heater A is
accessible.
4. Open the cover to the terminal block and disconnect
the heater leads.
5. Turn and lift the heater out of its pocket.
6. Fit the new heater into th e pock et.
7. Connect the leads and close the terminal block cover.
8. Carefully put the insu lation wool back into position
and close the cover of the boiler casing.
Lighting
The refrigerator is provided wit h a battery power int erior
light.
The battery box is at the rear of the refrigerator.
Four batteries, type LR20 1,5 volts are to be used.
Fault Tracing Chart
Cause and Remedy
Refrigerator not cold enou gh
1. Air circulation restricted rounds the unit.
See that a space of at least 16 inches (400 mm) is
left free above the top of the cabine t. (See "Ins talla tion").
2. Refrigerator is not lev el.
Level cabinet so that the sides and the front are
vertical. (Use a water level).
3. Yellow flame
a) Incorrectly lit.
Relight correctly. (See FIG. 1 ).
b) Improper chimney seal.
(See FIG. 2).
c) Wick requires cleaning.
Clean wick and burner. (See FIG. 4).
d) Needs new wick.
Replace the wick. (See FIG. 5 and 6 ).
e) Inferior grade of kerosene-paraffin.
Drain and refill the tank. Fit a new wick.
f) Flue requires cleaning.
(See "Cleaning the flue system").
4. Flame too low or too high.
5. Evaporator heavily frosted.
Turn out the flame to defrost.
6. Refrigerator overloa ded.
Spread foodstuffs on shelves to permit free air circulation in the cabinet.
7. Flickering flame ( water in kerose ne -paraffin ).
Keep storage drum or container in dry place with lid
on to prevents condensed water to enter the container.
Refrigerator too cold
1. Yellow flame.
Burner incorrectly lit. Religh t corr ectly. (S ee FIG. 1 ).
2. Flame too high.
Turn down the flame.
Points to remember
• Keep the refrigerator level.
• Defrost weekly or fortnightly .
• Keep the burner clean.
• Never use fo rce to turn up the wick mover.
• Do not overload the ref rigerator so that the air cannot
circulate freely inside the cabinet.
• Use only good grade of kerosene-paraffin.
• Do not let the fuel tank run dry.
• Inspect the flame regularly.
• Always have a blue flame.
6
Page 7

INSTRUCÕES DE UTILIZAÇÃO
Instalação
O frigorífico deve ser instalado num solo firme e numa
posição horizontal. Utilize um nivelador de água e verifique em ambas as direcções no compartimento para
congelados.
Evite colocar o frigorífico numa divisão sujeita a elevadas temperaturas ou a fortes correntes de ar.
Certifique-se de que é deixado um espaço livre de pelo
menos 400 mm (16 polegadas) sobre a parte superior
do frigorífico a fim de permitir uma livre circulação do ar ,
o que é essencial para o funcionamento eficiente do
frigorífico. A abertura de vent ilação no topo do f rigorífico
não deve ser coberta seja de que maneira for.
O frigorífico não deve ser colocado numa pequena
despensa ou local semelhante.
O deflector deve ser posicionado como se mostra na
ilustração.
Encher o tanque
Para encher o tanque, utilize sempre o funil para
petróleo e encha até o ponteiro do indicador de nív el se
aproximar da marca vermelha.
Limpe o petróleo que ficar no topo do tanque. Se o
petróleo se derramar, o tanque deve ser removido do
frigorífico e bem limpo.
Não deixe o tanque esvaziar-se enquanto o frigor ífico
estiver a ser utilizado porque a refrigeração será interrompida e uma parte da mecha será queimada, reduzindo a vida útil da mesma.
Utilize sempre petróleo de combustão da melhor
qualidade (Parafina) e providencie para que este
seja mantido limpo, seco e não adulterado. Em
circunstânci a alguma deve ser u tilizado petróleo de
evaporação, gasolina ou álcool de qualquer
espécie.
Acender o queimador
Tenha em mente que a lâmpada de petróleo constitui
uma parte essencial do frigorífico e que os cuidados em
mantê-la em boas condições serão bem recompensados.
Antes de acender uma mecha pela primeira vez, deixe
que esta fique mergulhada no petróleo durante pelo
menos duas horas.
Importante
Ao acender o queimador, remova a protecção do queimador, o vidro e o anel de v edação como uma unidade,
depois de ter rodado a protecção do queimador no
sentido contrário ao dos ponteiros do relógio, para a
libertar (FIG. 1). Não tente acender o queimador lev antando a mecha tão alto quanto possível, com a
protecção do queimador no seu lugar, porque isso iria
danificar a mecha e resultar numa refrigeração não
satisfatória.
Ajuste o controlador da mecha de m odo que a altura da
mecha fique cerca de 3 mm (1/8") acim a do topo do tubo
exterior da mecha (FIG. 1).
Acenda a mecha. Deixe que a chama alastre a toda a
volta da mecha e volte a colocar a protecção do queimador juntamente com o vidro da lâmpada e o anel de
vedação. Rode a protecção do queimador no sentido
dos ponteiros do relógio até ficar bem segura na sua
posição. Se a chama se apagar, volte a acendê-la
seguindo o procedimento acima descrito.
Empurre o tanque para o seu compartimento por
debaixo do armário e na parte posterior do frigorífico.
Faça deslizar o tanque cuidadosamente para a frente
contra o pino guia. Levante cuidadosamente o tanque
por meio do braço da alavanca e verifique que o pino
guia entra no orifício do suporte no lado esquerdo do
queimador (FIG. 2).
Certifique-se de que o anel vedante no topo do vidro da
lâmpada veda convenientemente contra o fundo da
chaminé, não deve haver ar entre a chaminé e o anel
vedante. Fix e o braço da ala vanca na posição em que o
anel vedante veda a chaminé.
O queimador deve queimar com uma chama azul; uma
chama parcial ou totalmente amarela indica que existe
uma entrada de ar e deve ser f eito o ajuste.
Quando o queimador estiver em posição por debaixo da
chaminé, ajuste a mecha por forma a produzir uma
chama azul de meia altura. Aguarde 30 minutos para
permitir que o queimador aqueça antes de fazer novos
ajustes à mecha. A fim de obter uma melhor refrigeração, levante a mecha, o que faz aumentar a chama
azul claro. Para regular para um a refrigeração de menos
frio, baixe a mecha para produzir uma chama azul de
altura reduzida. Para manter temperaturas regulares, o
frigorífico de ve funcionar de f orma contínua, dia e noit e.
NOTA: Nunca faça funcionar o queimador com uma
chama que apresente pontas ou riscas amarelas na
parte inferior azul brilhante, ou com uma chama totalmente amarela. Tais condições resultam numa rápida
carbonização da mecha, cheiros e possíveis danos da
unidade de refrigeração.
Não force o controlador da mecha se este não rodar
facilmente, pois isso pode constituir uma indicação de
que o queimador precisa de ser limpo ou de que a
mecha deve ser subst ituí da.
Limpeza da mecha e do queimador
Quando a chama está acesa, formam-se depósitos de
carbono no topo da mecha, no rebordo do tubo exte rior
da mecha e na superfície do difusor da chama. Para
obter os melhores resultados de refrigeração e para
prolongar a vida da mecha, estes depósitos de carbono
devem ser limpos cada dois ou três dias durante as duas
primeiras semanas e , post eriormente, pelo menos um a
vez por mês, desde que se utilize petróleo de boa
qualidade. Se for utilizado petróleo de grau inferior, o
queimador deve ser limpo no mínimo uma vez por
semana.
Para limpar a mecha e o queimador, liberte o braço da
alavanca e puxe o tanque para fora, remova o anel
veda n te, o vi dro d a l âm pa da e a p rot ecç ão d o queimador
rodando-a no sentido contrário ao dos ponteiros do
relógio e levantando . Retire o dif usor da chama. Insira o
dispositivo de limpeza da mecha (fornecido com o queimador) no tubo do queimador e ajuste a mecha premindo
gentilmente o dispositivo de limpez a contra a superf ície
7
Page 8

da mecha. Rode o dispositivo de limpeza da mecha no
sentido dos ponteiros do relógio, limpando e refazendo
a superfície de combustão (FIG. 3).
Tenha cuidado para não desfiar a mecha.
A superfície superior da mecha devidam ente limpa dev e
estar isenta de carbono e de fios de tecido. Deve
inclinar-se para cima, para o bordo interior superior, o
qual deve estar razoavelmente nivelado.
Sopre as partículas soltas de carbono da mecha e do
queimador, e remo va qualquer sujidade de carbono que
tenha caído para a base do queimador.
Volt e a montar o queimador.
Quando limpar o queimador, retire- o do tanque e inspeccione as pontas da mecha. Se estas estiverem sujas,
isso significa que foi utiliz ado petróleo não apropriado e
o tanque deve ser limpo. Esvazie o tanque e ponha de
lado o petróleo sujo que pode ser utilizado para outros
fins. Lave o tanque duas vezes com petróleo limpo e
volte a enchê-lo de petróleo filtrado.
Substituição da mecha
Remova o queimador do tanque. Retire o tubo exterior
da mecha (consulte P eças do Queimador) rodando-o no
sentido contrário ao dos ponteiros do relógio para o
desbloquear (Aladdin 23E), desaparafusando as porcas
de fixação em qualquer um dos lados (Aladdin 32) e
levantando o queimador.
Levant e a mecha o mais que for pos sível. Puxe a mecha
e o portador da mecha para fora, pela parte superior do
queimador. Separe a mecha do respectivo portador. A
nova mecha dev e estar livre de humidade (água).
Antes de inserir a nova mecha, certifique-se de que o
difusor da chama se encontra na sua posição no tubo
do queimador.
As mechas novas dispõem de tiras de papel adesivo nas
extremidades para assegurar uma fácil substituição, e
estas devem primeiro ser endireitadas. Faça passar
uma das tiras através da aber tura existente à volta do
tubo da mecha e puxe a tira de papel para dentro até a
extremidade do tecido da mecha ter passado pela
abertura. Repita o procedimento com a outra e xtremidade da mecha na abertura do lado oposto à volt a do tubo
da mecha (FIG. 4). Quando am bas as pontas da mecha
tiverem passado pelas respectivas aberturas, puxe a
mecha através do queimador até cerca de 25 mm (1")
das pontas ficarem saídas abaixo do fundo do queimador.
Tenha cuidado para não esfiar a parte superior da
mecha durante a substituição .
Instale o portador na mecha, assegurando que o suporte
do portador da mecha fique do mesmo lado que o
controlador da mecha (FIG. 5). Baixe a mecha e o
respectivo portador puxando gentilmente as extremidades inferiores da mecha, e quando o suporte do portador da mecha entrar na abertura em forma de anel,
guie-o contra a roda dentada do controlador da mecha.
Pressione o suporte do portador da mecha sobre a roda
dentada do controlador da mecha e desloque a mecha
o mais possível para baixo.
Certifique-se de que a fita interior de reforço da mecha
desliza pelo tubo do queimador. S e a mecha ficar presa
no queimador, não force o controlador da mecha pois
isso poderá danificar o portador da mecha.
Volt e a colocar o tubo exterior da mecha no queimador,
pressionando-o para baixo e rodando-o no sentido dos
ponteiros do relógio para o fixar na sua posição (Aladdin
23E), apertando as porcas de fixação (Aladdin 32).
Verifique que a mecha pode ser subida e baixada f acilmente.
Para prolongar a vida da mecha, esta deverá ser limpa
cada dois ou três dias durante as duas prim eiras semanas e uma vez por mês de aí em diante, desde que seja
utilizado petróleo de boa qualidade. Se for utilizado
petróleo de grau inferior , a mecha e o queimador dev em
ser limpos no mínimo uma vez por semana.
Nes te q uei mad or s ó p ode m se r u tili za das mec has Aladdin.
Limpeza da chaminé
Recomenda-se no entanto a limpeza da chaminé pelo
menos uma vez por ano. O petróleo de grau inferior pode
fazer com que o queimador liberte fumos, e como a
fuligem se acumula na chaminé, esta deve ser limpa
imediatamente. Par a limpar a chaminé remov a o tanque
e o queimador, levante a cobertura da chaminé junta mente com o fio e o deflector, e coloque uma folha de
papel por debaixo da chaminé para recolher a fuligem.
Limp e a ch am in é com o e sco v ilh ã o f o rne ci do juntament e
com o frigorífico e, depois da limpeza, assegu re-se de
que a cobertura da chaminé e o deflector são
colocados de n o v o nas suas po siçõ es.
NOTA: O frigorífico não funcionará correctamente
se o deflector não estiver no seu lugar.
Descongelação
Remova todos os alimentos do frigorífico; apague a
chama e deixe abertas a porta do frigorífico e a por ta
do compartimento para congelados. O gelo derrete-se
rapidamente e escorre para um receptáculo situado na
parte posterior do frigorífico onde se evapora. A água
resultante da descongelação retida no compartimento
dos congelados deve ser limpa com um pano.
Recomenda-se proceder à limpeza do frigorífico conju ntamente com a descongelação . Ut ilize água tépida e um
detergente não perfumado . Nunca ut ilize pó de limpeza,
palha de aço ou produtos semelhantes.
Antes de colocar o frigorífico novamente em funcionamento, seque o compartimento para congelados e o
espaço da refrigeração. Lave as bandejas do gelo e
encha-as com água fresca.
Desligar
Se o frigorífico não estiver a ser utilizado,apague a
chama do queimador.
Esvazie o frigorífico, descongele-o e limpe-o com pletamente. Deix e a porta encostada.
Funcionament o eléc trico
Verifique que a tensão que consta da chapa de características é a mesma que a da corrente utilizada.
Ligue o cabo de ligação à rede do frigorífico a uma
tomada de parede com ligação de terra que seja de fácil
acesso.
Se não estiver disponível nenhuma tomada de parede
com ligação de terra consulte um electricista antes de
utilizar o frigorífico.
8
Page 9

A temperatura do frigorífico é mantida a um nível
constante por meio de um termostato. Seleccione a
temperatura desejada rodando o comando do termostato
para um valor adequando.
O comando está graduado de 0 (marcado com um
ponto) a 7 e MAX. Na posição MAX o frigorífico está
regulado para funcionamento contínuo, ou seja, o
termostato não é levado em consideração .
O termostato só controla a temperatura do frigorífico no
caso do funcionamento eléctrico. No funcionamento a
petróleo, a temperatura é controlada por meio do
manípulo do tanque de petróleo.
Para tornar o frigorífico com pletamente inerte electricamente, retire o cabo de alimentação da tomada de
parede.
Comutação do funci on ament o a petró leo
para funcionament o a elect ri cid ade ou
vice versa.
1. Apague a chama do pe tról eo.
2. Ligue o cabo de alimentação eléctrica a uma tomada
de parede.
3. Regule o termostato.
Comutação do funcionamento a electricidade para o
funcionamento a petróleo:
1. Retire o cabo de alimentação eléctrica da tomada de
parede.
2. Inicie o funcionamento do frigorífico a petróleo.
NOTA: Não faça funcionar o frigorífico a elec tricidade e
a petróleo simultaneamente. A eficiência da refrigeração será de certo modo afectada mas, sobretudo, o
frigorífico poderá sobreaquecer e danif icar o sistema de
refrigeração.
Substituição do elemento de aquecimento
O aquecedor, situado no interior da armação da caldeira
B do frigorífico, pode ser substituído como a seguir se
indica: (FIG. 6).
1. Retire o cabo de alimentação eléctrica da tomada de
parede.
2. Remova a tampa C.
3. Remova o material isolante de forma a tornar acessível o aquecedor A.
4. Abra a tampa do bloco do s te rminai s e desl igue os
fios do aquecedor.
5. Rode e levante o aquecedor do seu compartimento.
6. Instale o novo aquecedor no compartimento.
7. Ligue os fios e feche a tampa do bloco dos terminais.
8. Volte a colocar cuid adosame nte o material isolan te
na sua posição e fec he a ta mpa do comparti mento
do aquecedor.
Iluminação
O frigorífico está equipado com uma luz interior accionada por pilha.
A caixa das pilhas encontra-se na parte de trás do
frigorífico.
Devem -se utilizar quatro pilhas do tipo LR20 de 1,5 volts.
Gráfico de detecção de falhas
Causa e solução
O frigorífico não está suficien temen te fri o
1. A circulação do ar à volta do frigo rífico está restringida.
Providencie para que exista um espaço livre acima
do frigorífico de pelo menos 400 mm (16 polegadas)
(consulte "Instalação").
2. O frigorífico não está n ivelad o.
Nivele o frigorífico por forma a que os lados e a frente
fiquem verticais (utilize um nivelador de água).
3. Cham a am arela.
a) Incorrectamente acesa.
Volte a acender a chama correctamente
(consulte a FIG. 1).
b) Vedante da chaminé inadequado.
(Consulte a FIG. 2).
c) A mecha precisa de ser limpa.
Limpe a mecha e o queimador (consulte a FIG. 4).
d) É necessária uma nova mecha.
Substitua a mecha (consulte a s FIG. 5 e 6 ).
e) P etróleo ou pa rafina de grau inferi or.
Despeje o tanque e volte a enchê-lo. Inst ale uma
nova mecha.
f) A chaminé precisa de ser limpa.
(Consulte "Limpeza da chaminé").
4. Chama demasiad o baixa ou dem asi ado alta .
5. O evaporador está bastante congelado.
Apague a chama para descongelar.
6. Frigorífico com demasiada carga.
Espalhe os alimentos nas prateleiras para permitir a
livre circulação do ar dentro do frigorífico.
7. Chama cintilante (existê ncia de água no pe tróleo ou
parafina).
Conserve o tambor de armazenamento ou contentor
num local seco com a tampa devidamente colocada
para impedir que a água condensada entre no
contentor.
Frigorífico demasiado frio
1. Cham a am arela.
Queimador incorrectamente aceso. Volte a acendêlo de forma correcta (consulte a F IG. 1).
2. Chama demasiad o alta.
Reduza a chama.
Pontos a lembrar
• Mantenha o frigorífico nivelado.
• Proceda à descongelação uma vez por semana ou a
cada duas semanas.
• Mantenha o queimador limpo.
• Nunca use a força para rodar o controlador da mecha.
• Não sobrecarregue o frigorífico de forma que impeça
a livre circulação do ar dentro do mesmo.
• Utilize apenas petróleo/parafina de boa qualidade.
• Não deixe secar o tanque do combustível.
• Inspeccione a chama com regularidade.
• Certifique-se de que a chama está sempre azul.
9
Page 10

BRUKSANVISNING
Installasjon
Kjøleskapet må installeres på et fast underlag og må stå
i horisontalt. Bruk vater og kontroller begge retninger i
frysedelen.
Unngå å plassere kjø leskapet i rom der det f orekom mer
høy e tem perat urer eller kraf tig trek k.
Se til at det er et frirom på 400 mm over øvre del av
kjøleskapet, slik at luften kan sirkulere fritt. Dette er
avgjø rende fo r a t kj ø les kape t sk al k unne fungere effektivt.
Vent ilasjonsåpningen øverst på skapet må ikke tildekk es
på noen måte. Kjøleskapet må ikke plasseres i et lite
spiskammer eller liknende.
Trekkanal-ledeplaten må posisjoneres som vist på
illustrasjonen.
Fylling av tanken
Bruk alltid parafint rakten ved fylling av tanken, og fyll opp
inntil målernålen nærmer seg det røde merket. Fjern evt.
parafinsøl fra toppen av tanken. Dersom parafin flyter
over , må tanken fjernes fra kjø leskapet og tanken tø rkes
ren.
Ikke la tanken gå tom mens kjøleskapet er i bruk, fordi
kjølingen da vil b li a vbrutt og en del av vek en vil b li brent
opp, noe som forko rter veken s brukstid.
Bruk alltid parafin av høyeste kvalitet, og påse at den
alltid er ren, tørr og ufortynnet. Det må ikke under
noen omstendighet benyttes motorpetroleum,
bensin eller sprit av noe slag .
Tenning av brenneren
Husk at parafinlampen er en viktig del av kjøleskapet,
og at det lønner seg å vedlikeholde den godt.
Før tenning av en ny veke for første gang, må veken
dynkes med parafin i minst to timer .
Viktig!
Ved tenning av brenneren må glassholder, lampeglass
og tetningsring tas av samlet etter at du har løsnet
glassholderen ved å skru den mot urviseren. (FIG. 1)
Ikke forsø k å tenne opp i brenneren ved å skru opp veken
så langt den går mens glassholderen ennå er på plass
- dette vil skade vek en og føre t il utilfredsstillende kjø ling.
Juster vekeskruen slik at veken rager ca. 3 mm over
toppen av det ytre vekerøret (FIG. 1).
Tenn veken. La flammen fenge over hele veken, og sett
glassholder, lampeglass og tetningsring på plass igjen
som én enhet. Vri glassholderen med urviseren til den
er forsvarlig låst i posisjon. Dersom flammen slokner,
kan den tennes igjen ved å følge prosedyren ovenfor.
Skyv tanken inn i tankholderen under skapet og på
baksiden av kjøleskapet. La tanken gli forsiktig mot
føringsstift en. Løft f or sik t ig ta nken ved hj e lp a v h e varmen
og kontroller at føringsstiften glir inn i hullet i braketten
på venstre side av brenneren (FI G. 2).
Kontroller at tetningsringen på toppen av lampeglasset
slutter tett mot bunnen av trekkanalrøret, det skal ikke
være noen luftspalte mellom trekkanalrø ret og tetningsringen. Lås he varmen i en slik posisjon at tetningsringen
slutter tett mot trekkanalrøret.
Brenneren skal brenne med blå flamme. En delvis eller
helt gul flamme viser at det foreligger en luftspalte, og
dette må justeres.
Når brenneren er i posisjon under trekkanalrøret , justeres veken slik at det fremkommer en middels høy, blå
flamme. Vent 30 minutter, inntil brenneren er varmet
tilstrekkelig opp , fø r det foretas ytterligere just eringer av
veken. Du oppnår bedre kjølevirkning ved å skru ve ken
opp, noe som ø k er høyden på den lyseblå flammen.
Ønsker du å gjø re kjø leskapet mindre kaldt, skrus v eken
ned, slik at du får en blå flamme med redusert høyde.
For å opprettholde en stabil kjøleskaptemperatur bør
kjøleskapet stå på både dag og natt.
OBS! La aldri brenneren stå med en flamme som har
gule spisser eller striper ved eller i den klare blå, nedre
delen, og heller ikke med en helt gul flamme. Slike
forbrenningsf orhold vil føre til hurtig forkulling av veken,
uønsk et lukt og mulig skade på kjøleenheten.
Ikke bruk makt på veken dersom den ikke lar seg skru
opp eller ned slik du ønsker, dette kan være en indikasjon på at brenneren trenger å rengjøres eller at veken
må skiftes.
Rengjørin g av veke og brenner
Mens flammen brenner, dannes forkullede rester
(karbon) på toppen av veken, på flensen på det ytre
vekerøret og på overflaten av flammesprederen. De
beste nedkjølings resultatene oppnås ved å rense v eken
for forkullede rester hver 2 - 3 dag under de førs te to
ukene og minst i én måned etter dette, forutsatt at det
brukes høyv erdig parafin. Dette vil også f orlenge vekens
brukstid. Hvis det derimot brukes parafin av lavere
kvalitet, må brenneren rengjø r es minst en gang i uken.
Du rengjør veken og brenneren ved å løsne hevarmen
og dra ut tanken og deretter fjerne tetningsring, lampeglass og glassholder ved å skru komponentene mot
urviseren og løfte dem av. Ta ut flammesprederen. Sett
inn vekerenseren (følger med brenneren) i brennerrø ret
og juster veken ved å trykke renseren forsiktig mot
overflaten på veken. Drei vekerenseren med urviseren
slik at du samtidig forsiktig renser og gjenoppretter
overflaten (FIG. 3).
Vær forsiktig så du ikke frynser opp vek en.
Den øverste flaten på en skikkelig rengjort veken skal
være fri for kull og opptrevlede stofftråder. Den skal
skråne oppover m ot den indre, ø verst e kanten, som skal
være så jevn som mulig.
Blås bort all løst kull fra v eke og brenner og fjern all skitt
eller kull som har falt inn i brenners okkelen.
Sett brenneren sammen igjen.
Ved rengjø ring av brenneren, ta ut brenneren fra tanken
og inspiserer endene på veken. Dersom de er skitne, er
det brukt uegnet parafin, og tanken må rengjøres. Tøm
tanken og sett den skitne par afinen til side til annet bruk.
10
Page 11

Skyll tanken to ganger med ren parafin og fyll opp med
filtrert parafin.
Skifte av veke
Fjern brenneren fra tanken. Fjern det ytre ve ke r øret (se
Brennerdeler) ved å skru det mot urviseren slik at det
frigjøres ( Aladdin 23), eller v ed å skru opp låsemutterne
på hver side (Aladdin 32) og løfte det ut av brenneren.
Skru veken så langt opp som mulig. Dra veken og
vekefremfø ringen ut fra toppen av brenneren. Skill veken
fra vekefremføringen.
En ny ve ke skal være fri f or fuktighet (v ann). Før du setter
inn den nye veken, må du påse at flammespr ederen står
i riktig posisjon i brennerrøret.
Nye veker har selvklebende papirbiter på endene for å
forenkle utskiftingen av veken, og disse må først rettes
ut. Før en av papirbitene gjennom åpningen rundt
vekerøret og trekk inn papiret inntil stoffenden av v ek e n
er kommet gjennom åpningen. Gjenta prosedyren med
den andre enden av veken i den motsatte åpningen
rundt vekerøret (FIG. 4). Når begge vekeendene er
kommet gjennom de respektive åpningene, dras veken
gjennom brenneren til omlag 25 mm av endene stikker
ut under bunnen av brenneren.
Vær forsiktig så du ik kefrynser til toppen av v eken under
utskiftningen.
Monter vekefremføringen på veken, og påse at tannstangen på vekef remf øringen står på den samme siden
som vekeskruen (FIG. 5). Før vek en og vekefr emføringen nedover ved å dra forsiktig i de nedre endene av
veken. Når tannstangen på vekefremføringen går inn i
den ringformete åpningen, føres den mot tannhjulet på
vekeskruen.
Trykk ned tannstangen på vekefremføringen over tannhjulet på vekeskruen og før veken ned så langt som
mulig. Kontroller at det innvendige forsterkningsbåndet
på veken glir over brennerrøret. Dersom veken setter
seg fast i brenneren, må du ikke bruke makt på
vekeskruen, da dette kan skade ve kef remf øringen.
Bytt det ytre vekerøret på brenneren ved å trykke det
ned og dreie det med ur viseren til det låses i posisjon
(Aladdin 23E) eller trekk til låsemutterne (Aladdin 32).
Kontroller at vek en lett kan skrus opp og ned.
Du forlenger brukstiden for veken ved å rengjøre den
hver 2. - 3. dag under de første to ukene og minst i én
måned etter dette, forutsatt at det brukes høyverdig
parafin. Hvis det derimot brukes parafin av lav ere kv a litet, må brenneren rengjøres mins t en gang i uken.
Det kan bare brukes Aladdin-veker i denne brenneren.
Rengjøring av trekkanalsystemet
Det anbefales å foreta rengjøring av trekkanalen minst
én gang i året. Mindreverdig parafin kan forårsake
røykutvikling i brenneren, og siden sot da vil samle seg
i trekkanalen, må denne rengjøres umiddelbart.
Du rengjør trekkanalen v ed å fjerne tanken og brennere n
og deretter løfte av trekkanalhetten komplett med vaier
og trekkanal-ledeplate.
Plasser et papirark under trekkanalrø ret for å samle op p
soten. Rengjø r trekkanalen m ed børsten som følger me d
kjøleskapet.
Etter rengjøring må det sikres at trekkanalhette og
ledeplate er satt riktig på plass igjen.
OBS! Kjøleskapet vil ikke fungere ski kkeli g der so m
trekkanal-ledeplaten ikke er på plass.
Avising
Fjern alle matvarer f ra kjøleskapet, slukk flammen og la
kjøleskapdøren og døren til f rysedelen stå åpen. Isen vil
smelte raskt og renne ned inn i en beholder på baksiden
av kjøleskapet , der vannet fordam per . Tint vann i frysedelen må tørkes opp med en klut.
Det anbefales å foreta rengjø ring av kjø leskapet i forbindelse med avisingen.
Bruk lunkent vann og evt. ikke-parfymert vaskemiddel.
Bruk aldri skurepulver, stålull og liknende. Før ny start
av kjøleskapet , må det tørkes ut av frysedelen og kjø leavdelingen. V ask isbr ettene og fyll dem med friskt vann.
Skru av
Dersom kjøleskapet ikke skal brukes, slukkes brennerflammen. Tøm skapet, foreta avising og rengjør det
grundig. La døren stå på glø t t.
Elektrisk drift
Kontroll at spenningen som er angitt på typeskiltet er de n
samme som er i bruk.
Koble kjøleskapets strømkabel til en lett tilgjengelig og
jordet veggkontakt.
Dersom det ikke finnes noen tilgjengelig, jordet veggkontakt, ta kontakt med en elektriker fø r du tar kjø leskapet i bruk.
Kjøleskaptemperaturen holdes på et konstant nivå ved
hjelp av termostaten. V elg ø nsket temperatur ved å dr eie
termostatknapp til et passende tall. Denne knappen er
inndelt fra 0 (merket med et punkt) til tallet 7 og MAX.
I MAX.-posisjon er skapet innstilt med permanent drift,
dvs. termostaten blir koblet ut. Termostaten styrer
kjøleskaptemperaturen kun ved elektrisk drift . Ved bruk
av parafin styres tem peraturen v ed hjelp a v knappen på
parafintanken.
Kjøleskapet blir fullstendig elektrisk isolert når du trekker
ut støpselet fra veggk ontakt en.
Endre fra parafindrift til elektrisk drift
eller omvendt
1. Slukk parafinflammen.
2. Koble strømkabelen til veggkontakten.
3. Still inn termostaten.
Omkopling fra elektrisk drift til parafind rift
1. Trekk strømkabelen ut av veggkontakten.
2. Start kjøleskapet med parafin.
OBS! Ikke driv kjøleskapet med elektrisitet og parafin
samtidig. Kjøleeffekten vil på den måten bli noe redusert,
men framfor alt kan enheten ov eropphetes og ø delegge
kjølesystemet.
11
Page 12

Utskifting av varmeelementet
Varmeapparatet, som befinner seg innenfor boilerrøret
B på kjøleenheten, kan skiftes ut på følgende måte
(FIG. 6).
1. Trekk strømkabelen ut av veggkontakten.
2. Fjern dekselet C.
3. Fjern noe av isolasjon sfibrene , slik at varmeapparatet
A blir tilgjengelig.
4. Åpne dekselet til koblingsrekken og kople fra lederne
til varmeapparatet.
5. Snu og løft varmeapparatet ut av hulrommet det sitter
i.
6. Sett inn det nye varmeapparatet i hulrommet.
7. Kople til lederne og lukk dekselet til koblingsrekken.
8. Sett isolasjonsfibrene forsiktig tilbake på plass og
steng dekselet til boilerrøret.
Belysning
Kjøleskapet er utstyrt med et batteridre vet innvendig lys .
Batteriboksen befinner seg på baksiden av kjø lesk apet.
Det skal brukes fire batterier av type LR20 1,5 volt.
Feilsøkingsskjema
Årsak og utbedring
Kjøleskapet er ikke kaldt nok
1. Innskrenket lufts irkulasjon rundt enh eten. Se til det
er et mellomrom på minst 400 mm over øverste del
av skapet. (Se "Installasjon").
2. Kjøleskapet står ikke i vater. Juster skapet slik at
sidene og fronten står vertikalt. Bruk et vater.
3. Gul flamme
a) Feil tenning.
Tenn på nytt. Se FIG. 1.
b) Dårlig skorsteinstetning.
Se FIG. 2.
c) Veken trenger rens.
Rengjør veke og brenner. Se FIG. 4.
d) Tr enge r ny v eke.
Skift ut veken. Se FIG. 5 og 6.
e) Mindreverdig parafin.
Tøm og fyll opp tanken. Sett inn ny veke.
f) Trekkanalen trenger rens.
(Se "Rengjøring av trekkanalsystemet").
4. Flammen er for lav eller for høy.
5. Kjøleelementet kraftig nediset.
Skru opp flammen og foreta avising.
6. Kjøleskap overbelastet.
Fordel matvarene på hyllene for å sikre fri luftsirkulasjon i kjøleskapet.
7. Blafrende flamme (vann i parafinen).
Oppbevar lagertrommel eller beholder på et tørt sted
med lokk på for å hindre at kondensert vann trenger
inn i beholderen.
Kjøleskapet er for kaldt
1. Gul flamme.
Brenneren er tent feil. Te nn på nytt. Se FIG . 1.
2. Fl a m m e n e r f o r hø y .
Skru n e d f lammen.
Ting du bør hu ske
• Kjøleskapet må stå i vater.
• Foreta avising uk entlig eller hv er fjortende dag.
• Hold brenneren ren.
• Bruk aldri makt for å skru opp veken.
• Ikke overbelast kjøleskapet slik at luften ikke kan
sirkulere fritt inne i skapet.
• Bruk bare høyverdig parafin.
• Ikke la drivstofftanken gå tom.
• Inspiser flammen med jevne mellomrom.
• Flammen skal alltid være blå.
12
Page 13

Bruksanvisning
Installation
Skåpet ska stå v ågrätt på f ast underlag. Kontrollera både
i sidled och djupled i frysfac ket med vatt enpass.
Undvik att ställa kylskåpet i rum där det kan utsättas för
värmestrålning eller kraftigt drag.
Se till att det finns mins t 400 mm fritt ovanf ör s kåpet, så
att luften kan cirkulera fritt. F ri luftc irkulation är vikt ig f ör
att skåpet ska fungera ordentligt. Täck inte över v entilationsöppningen upptill på skåpet! Kylskåpet bör inte
placeras i ett smalt skaffer i eller annat trångt utrymme.
Lågspridaren ska sitta som bilden visar.
Påfyllning av tanken
Använd alltid fotogentratten när du fyller tanken och fyll
tills nivåvisaren närmar sig det röda märket. T orka a v ev .
fotogen som du spillt på tanken. Om fotogenen rinner
över , ska du lyfta ut tanken ur skåpet och torka rent den.
Låt inte tanken gå torr när skåpet är igång. Då upphör
kylningen och en del av veken bränns upp, vilket minskar
vekens livslängd.
Använd alltid prima lysfotogen (paraffinolja)och se
till att den skyddas mot smuts och vatten. Använd
aldrig flygfotogen, bensin eller sprit under några
omständigheter.
Tändning av brännaren
Kom ihåg att brännaren är en viktig del av kylskåpet och
att det lönar sig att sköta den omsorgsfullt.
Vänta mins t tv å timmar efter att du fyllt tanken innan d u
tänder veken, så att den hinner bli ordentligt genomdränkt med fotogen.
Viktigt!
När du tänder brännaren, lossa då först brännaröv erdelen moturs och lyft sedan ur brännaröverdelen, lampglaset och tätningsringen tillsammans, se fig. 1. Tänd inte
veken genom att vrida upp den så högt som går för att
slippa lyfta överdelen. Det skadar veken, vilket ger otillfredsställande kylning.
Justera vek ens höjd med vekskruven, så att vek en sticker upp ca 3 mm ovanför ledhylsan, se fig. 1.
Tänd veken. Låt lågan sprida sig runt veken och sätt
sedan tillbaka överdelen, lampglaset och tätningen. Vrid
överdelen medurs tills den sitter ordentligt i läge. Om
lågan slocknar, tänder du den igen på samma sätt som
ovan.
Skjut in tanken på sin plats under- och baktill i skåpet.
Skjut försiktigt in tanken mot styrstiftet. Lyft tanken försiktigt med hävarmen och kontrollera att styrstiftet går i
hålet på hållaren till vänster om brännaren, se fig. 2.
Se till att tätningsringen överst på lampglaset sluter tätt
mot skorstenens nederdel, så at t det inte uppstår någon
springa där luft kan sugas in. Lås häva rmen när tätningsringen sluter tätt mot skorstenen.
Brännaren ska brinna med blå låga. Är lågan delvis eller
helt gul betyder det att det finns en luftspringa som
måste åtgärdas.
När brännaren är på plats under skorst enen, juster ar d u
veken så att den ger en medelhög blå låga. Låt brännaren värmas upp i 30 minuter och justera sedan veken
igen. Vill du få större kylning, vrider du upp veken och
höjer på så sätt den ljusblå lågan.
Vill du ha mindre kylning, vrider du ned veken, så att
höjden på den ljusblå lågan sänks. Brännaren bör vara
tänd hela tiden, så att skåptemperat uren hålls konst ant.
OBS! Låt aldrig lågan brinna med gula toppar eller stråk
på eller i den ljusblå delen, eller med helt gulf ärgad låga.
Det får veken att förkolna och osa samt kan skada
kylapparaten.
Tvinga inte runt vekskruven om den går trögt. Går den
trögt, kan det bero på att brännaren behöver rengöras
eller vek en bytas ut.
Rengöring av veke och brä nna re
När lågan brinner, bildas det k ol upptill på veken. Kolst oftet avsätts på ledhylsans fläns och på lågspridarens yta.
För att få bäst kylverkan och förlänga vek ens livslängd,
så bör du ta bort kolstoftet var annan eller v ar t redje dag
de första två veckorna och sedan minst en gång i
månaden, förutsatt att du använder prima fotogen. Om
du inte använder prima fotogen, bör du rengöra brännaren minst en gång i veckan.
När du rengör brännaren, lossar du hävarmen och drar
ut tanken, tar du bort tätningsringen, lampglaset och
överdelen genom att vrida moturs och sedan lyfta av
delarna. Ta ut lågspridaren. Sätt i vekrensaren (som
följde med brännaren) i centralröret och justera veken
genom att försiktigt trycka vekr ensaren m ot v ek ens y ta.
Vrid vekrensaren medurs och rengör och jämna till den
brända ytan, se fig 3.
Akta så att du inte fransar upp veken.
När vekens överdel är ordentligt rengjord, så ska den
inte ha något kolstoft eller några uppfransade trådar.
Brännytan ska slutta uppåt mot innerkanten och vara
jämn.
Blås bort allt löst kolstoft från veke och brännare och ta
bort smuts som fallit ned i brännarens underdel.
Sätt ihop brännaren igen.
När du rengör brännaren, bör du ta ut brännaren ur
tanken och kontrollera v ekändarna. Om de är smutsiga,
har du använt olämplig fotogen och måste rengöra tanken. Töm tanken och ställ undan den smutsiga fotogenen för andra ändamål. Skölj tank en två gånger med r en
fotogen och fyll sedan på med filtrerad fotogen.
Byte av veke
Ta ut brännaren ur tanken. Ta bort ledhylsan, se "brännarens olika delar". Du lossar den genom att vrida den
moturs (Aladdin 23E) eller skruva loss låsmuttrarna på
sidorna (Aladdin 32) och sedan lyfta av den.
Vrid upp veken så långt det går. Dra ut veken och
vekföraren ur brännaröverdelen. Lossa veken från vekföraren.
Se till att den nya veken är absolut torr.
13
Page 14

Innan du sätter i den nya veken, bör du kontrollera att
lågspridaren är på plats i brännarröret.
Nya vekar har självhäft ande papper i ändarna, så att det
går lättare att byta. De måst e först slätas ut. T rä in en av
pappersändarna genom öppningen runt vekröret och
dra i papperet till vekens tygände kommer genom öppningen. Gör likadant med den andra vekänden i öppningen mittemot, se fig 4. När båda vekändarna kommit
genom sina resp . öppningar , drar du veken genom brännaren tills ca 25 mm av ändarna sticker ut under brännarens nederkant.
Akta så att du inte fransar upp veken upptill vid b ytet .
Montera vekföraren på veken. Se till att kuggarna på
vekförar en sitter på samma sida som v ekskruven, se fig.
5. F ör f örsiktigt ned v ek en och vekf öraren genom att dra
lätt i vekändarna. När vekf örarens kuggbana k ommer in
i den ringformiga öppningen, för du den mot vekskruvens kugghjul.
Tryck vekförarens kuggbana ned mot vekskruvens
kugghjul och för ned veken så långt som det går. Se till
att förstärkningstejpen på vek ens insida inte glider öv er
brännarröret. Om vek en fa stnar i brännaren, tv inga inte
runt vekskruven. Det kan skada vekföraren.
Sätt på ledhylsan på brännaren igen. Pressa ned den
och vrid den medurs (Aladdin 23E) eller dra åt låsmuttrarna (Aladdin 32). Kontrollera att veken lätt kan vridas
upp och ned.
För att förlänga v ekens livslängd, så bör du rengöra den
varannan eller var tredje dag de f örsta tv å veck orna och
sedan minst en gång i månaden, f örut satt att du a n v änder prima fotogen. Om du inte använder prima f otogen,
bör du rengöra brännaren och veken minst en gång i
veckan.
Använd bara Aladdinvekar i brännaren.
Rengöring av skorst en en
Rengör skorstenen åtminstone en gång om året. Fotogen av sämre kvaliet kan få brännaren att ryka, vilket gör
att sot avsätts i skorstenen. Den bör då rengöras omedelbart. Så här rengör du: ta ut tank och brännare ur
skåpet, lyft av skorstens topp och lågspridare med vajer .
Lägg ett papper under skorstenen som samlar upp sotet.
Rengör skorstenen med sotv iskan som f öljde ky lskåpet
och sätt sedan tillbaka skorstenstoppen och lågspridaren igen.
OBS! Kylskåpet fungerar inte som det ska, om inte
lågspridaren är på plats.
Avfrostning
Ta ut all mat ur kylskåpet, släck lågan och lämna dörr
och frysfack öppna. Frosten smälter snabbt och rinner
ned i droppskålen på baksidan av skåpet där den avdunstar. T orka upp smältvattnet i frysfacket med en trasa.
Det är lämpligt att rengöra kylskåpet i samband med
avfrostningen. Anv änd ljummet v atten och ett oparfymerat diskmedel. Använd aldrig skurpulver, stålull eller
liknande. Torka ur frysfacket och kylutrymmet innan du
startar kylskåpet igen. Diska ur islådorna och fyll dem
med friskt vatten.
Avstängning
Ska inte kylskåpet användas, släcker du brännarlågan.
Töm skåpet, avfrosta det och rengör det ordentligt.
Lämna dörren på glänt.
Eldrift
Kontrollera att spänningen på märkplåten stämmer
överens med nätspänningen.
Sätt i kylskåpets kontakt i ett lättillgängligt, jordat vägguttag.
Finns det inget jordat väggutt ag, rådgör du f örst med en
elektriker innan du börjar använda skåpet.
Kylskåpstemperaturen hålls konstant med hjälp av en
termostat. Välj temperat ur genom att vrida termostatvredet till lämplig siffra. Vredet är graderat från 0 (mark erat
med en punkt) till 7 samt MAX. I MAX-läge går skåpet
kontinuerligt, dvs termostaten förbikopplas . T ermostaten
styr kylskåpstemperaturen enbart vid eldrift. Vid foto-
gendrift reglerar du temperaturen med vredet på fotogentanken.
Dra ur kontakten om du vill göra skåpet strömlöst.
Byta från fo togendrift till eldrift eller
tvärtom
1. Släck fotogenlågan.
2. Sätt i kontakten i vägguttaget.
3. Ställ in termostaten.
Byta från el- till fotogendrift:
1. Dr a ut kontakt en ur vägg ut t aget.
2. Starta kylskåpet med fotogendrift.
OBS! Kör inte kylskåpet på el och fotogen samtidigt.
Kyleff ekten försämr as något, men du riskerar framför allt
att överhetta och förstöra kylapparaten.
Byte av värmepatron
Så här byter du värmepatronen inuti kylapparatens
kokarkåpa B,se fig 6:
1. Dr a ut kontakt en ur vägg ut t aget.
2. Ta bort locket C.
3. Ta bort isole ringen, så att du kommer åt värmepatronen A.
4. Öppna locket till kopplingsdosan och lossa elanslutningarna.
5. Vrid och lyft värmepatronen ut ur fickan.
6. Sätt i den nya värmepatronen i fickan.
7. Anslut elledningar na och s täng locket till kopplings dosan.
8. Lägg försiktig t tillbaka isoler ingen där den ska va ra
och stäng höljet till kokarkåpan.
Belysning
Kylskåpet har en in vändig batteribelysning. Batterilådan
sitter bak på skåpet. Det går åt fyra 1,5 V-batterier typ
LR20.
14
Page 15

Felsökningsschema
Orsak och åtgärd
Kylskåpet är inte kallt nog
1. Luftcirkulationen runt kylapparaten är begränsad.
Se till att det finns minst 40 0 mm fri tt ovanför skå pet.
(Se "Installation").
2. Kylskåpet är inte vågrätt.
Rikta upp skåpet, s å att sidorna och framsidan är
lodräta. (Använd vattenpass).
3. Gu l låga
a) Fe l tä ndni ng. Tän d om igen . (Se fig . 1).
b) Otät skorstenstätning.
(Se fig. 2).
c) Smutsig veke.
Rengör veke och brännare. ( Se fig. 4).
d) Veken måste bytas.
Byt veken. (Se fig. 5 och 6) .
e) Dålig fotogenkvalitet.
Töm tanken och fyll på ny fo tog en. Sätt i n y veke.
f) Smutsig skorsten.
(Se "Rengöring av skorstenen").
4. Lågan är för låg eller hög.
5. Tjockt islager på evap oratorn.
Släck lågan och frosta av.
6. För mycket i kylskåpet.
Fördela livsmedlen på hyllorna, så att luften kan
cirkulera fritt i skåpet.
7. Fladdrande låga ( vatten i fo togenen ).
Förvara fotoge ndunken med locket på i ett tor rt utrymme, så att inte kondensva tten blandas ut i fotogenen.
Kylskåpet för kallt
1. Gu l låga.
Feltänd brännare. Tänd om igen. (Se fig. 1).
2. Lågan för hög. Vrid ne d låga n.
Kom ihåg
• Se till att kylskåpet står vågrätt.
• Frosta av varje eller var annan vec k a.
• Håll brännaren ren.
• Tvinga aldrig runt vekskruven.
• Överfyll inte ky lskåpet , så att luften inte k an cirkuler a
fritt intui.
• Använd bara fotogen av prima kvalitet .
• Fyll alltid tanken innan den är helt tom.
• Kontrollera lågan med jämna mellanrum.
• Se till att lågan alltid är blå.
15
Page 16

(Aladdin 23E).
Burner Parts
1. Seal ring 2. Lamp glass 3. Gallery 4. Ou ter wick tube
5. F lame spreader 6. B urner base 7. Wick turner 8. Wick
cleaner 9. Wick carrier 10. Wic k 11. Burner complete
(without lamp glass and seal ring).
Elementos do queimado r
1. Anel vedante 2. Vidro da lâmpada 3. Protecção do
queimador 4. Tubo exterior da mecha 5. Difusor da
chama 6. Base do queimador 7. Controlador da mecha
8. Dispositivo de limpeza da mecha 9. Portador da
mecha 10. Mecha 11. Queimador completo (sem vidro
da lâmpada e anel vedant e).
Brennerdeler
1. Tetningsring 2. Lampeglass 3. Glassholder
4. Y tre vekerør 5. Flammespreder 6. Brennersokkel
7. Vekeskrue 8. Vekerenser 9. Vekefremføring 10. Veke
11. Komplet t brenner (uten lampeglass og tetningsring).
(Aladdin 32)
Burner Parts
A. Seal ring B. Lamp glass C. Gallery D. Flame spreader
E. Outer wick tube F. Loc king nut G. Wick H. Wick carrier
J. Burner base K. Tank sleeve L. Burner complete
(without lamp glass and seal ring) M. Wick cleaner
N. Adapter O. Adapter
Elementos do queimado r
A. Anel vedante B. Vidro da lâmpada C. Protecção do
queimador D. Difusor da chama E. Tubo exterior da
mecha F. Porca de fixação G. Mecha H. Portador da
mecha J. Queimador base K. Manga do tanque
L. Queimador completo (sem vidro da lâmpada e anel
vedante) M. Dispositivo de limpeza da mecha
N. Adaptador O. Adaptador
Brennerdeler
A. Tetningsring B. Lampeglass C. Glassholder D. F lam-
mespreder E. Ytre veke rør F. Låsem utter G. Veke
H. Vekefremføring J. Brennersokkel K. Tankhylse
L. Komplett brenner (uten lampeglass og tetningsring)
M. Vekerenser N. Adapter O. Adapter
A
B
C
D
E
F
G
H
J
K
O
L
M
N
16
Page 17

Brännarens olika delar (Aladdin 23E).
1. T ätningsring 2. Lampglas 3. Brännaröverdel 4. Ledhylsa
för veke 5. Lågspridare 6. Brännarbas 7. Vekskruv
8. V ekrensare 9. V ekförare 10. V eke 11. Brännare , kompl.
(utan lampglas och tätningsring).
Brännarens olika delar (Aladdin 32)
A. Tätningsring B. Lampglas C. Brännaröverdel
D. Lågspridare E. Ledhylsa för ve ke F. Lås mutter G. V eke
H. Vekförare J. Brännarbas K. Tankhylsa L. Brännare,
kompl. (utan lampglas och tätningsring) M. Vekrensare
N. Adapter O. Adapter
17
Page 18

6
A
B
C
18
Page 19

Page 20

MO-FO 0327
 Loading...