

Page 1
INSTALLATION AND
822707000
RK400
by
Dometic
OPERATING INSTRUCTIONS
REFRIGERATOR FOR KEROSENE OPERATION.
Model RK 400
I
822 70 70-00
USA
Service Off ice
The
Dometic
509 South Poplar Street
LaGrange, IN 46761
Phone: 219-463-4858
Corporation
Corporate Office
2320 Industrial Parkway
For Service Center Assistance
Call:
800-544-4881
Elkhart,
RECORD THIS INFORMATION FOR FUTURE
REFERENCE BEFORE INSTALLING THE
Model No.
Product No.
Date
Placeof
. . . . . . . . . . . . . . . . . . . . . . . . .
. . . . . . . . . . . . . . . . . . . . . . .
Purchased
Purchase
IN 46515
. . . . . . . . . . . . . . . .
. . . . . . . . . . . . . . . . . . . . . . . . . . . . . . . . . . . . . . . . . . . . . . . . . . . . . . .
CANADA
Dometic
866 Langs Drive
Cambridge,Ontario
N3H 2N7
Phone: 51 g-653-4390
SerialNo.
Distribution Inc.
Canada
UNIT:
. . . . . . . . . . . . . . . . . . . . . . .
I
Page 2
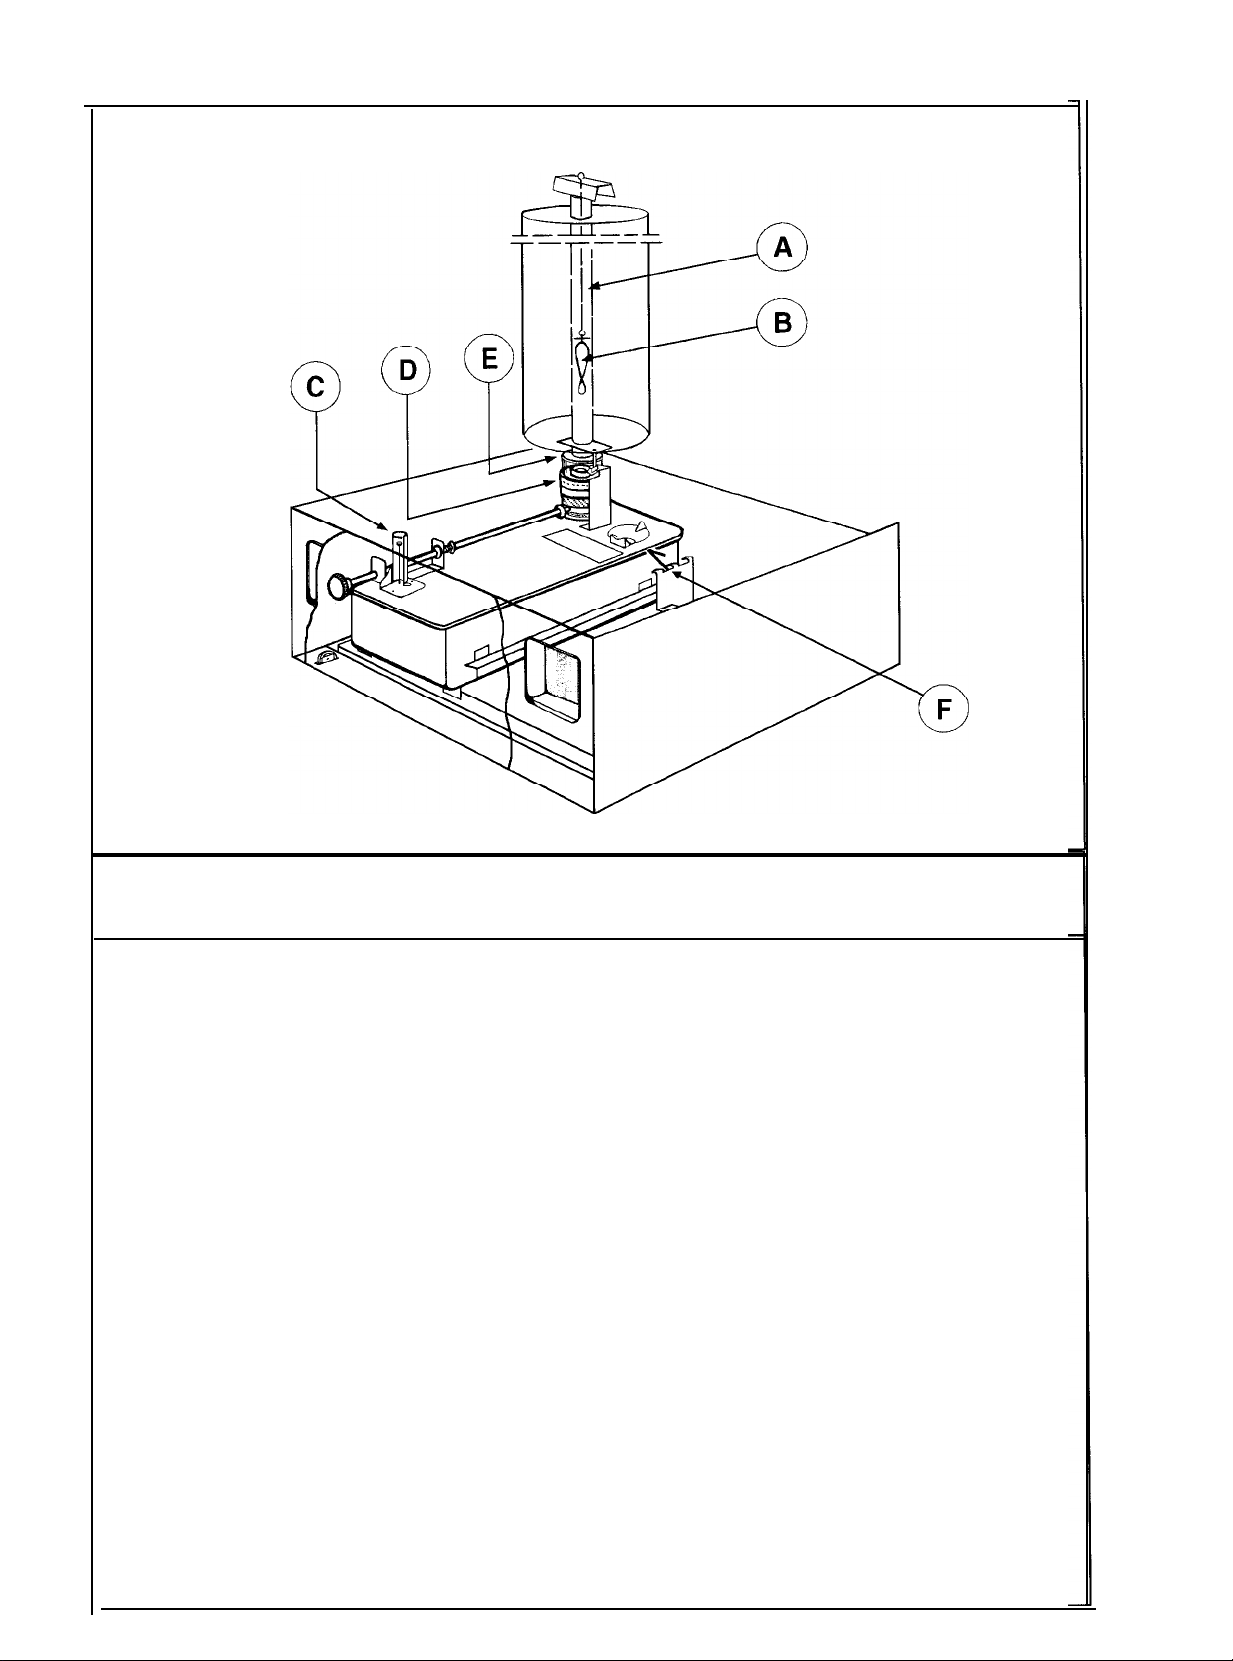
A. Flue tube
B. Flue baffle
C. Fuel gauge
D. Burner
E. Seal ring
F. Lever arm
Page 3

-
1
2
3
Page 4

INSTRUCTIONS FOR USE
Installation
The cabinet must be installed on a firm floor and must
be in a horizontal position. Use a water level and check
both ways in the freezer compartment.
Avoid locating the refrigerator in a room subject to high
temperatures or strong draughts.
See that a space of at least 16 inches (400 mm) is left
free above the top of the cabinet to allow an unrestricted
circulation of air, which is essential for the efficient
operation of the refrigerator. The ventilation opening at
the top of the cabinet must not be covered in any way.
The refrigerator should not be placed in a small pantry
or similar location.
The flue baffle must be positioned as shown on the
illustration.
Filling the Tank
Always use the kerosene funnel when filling the tank,
and fill until the gauge pointer approaches the red mark.
Clean off any kerosene on the top of the tank. If kerosene
overflows, the tank should be removed from the refrigerator and wiped clean.
Do not let the tank run dry while the refrigerator is in use
because refrigeration will be interrupted and a portion of
the wick will be burned off, reducing the life of the wick.
Always use best quality burning kerosene (Paraf-
fin) and see that it is kept clean, dry and unadulter-
ated. Under no circumstances must vaporizing
kerosene, petrol or spirit of any kind be used.
Lighting the Burner
Remember that the kerosene lamp is an essential part
of the refrigerator and that care taken to maintain it in
good condition is well repaid.
Before lighting a new wick for the first time, allow the wick
to become soaked with kerosene for at least two hours.
Important
When lighting the burner, remove the gallery, lamp glass
and seal ring as one unit after turning the gallery
clockwise to unlock. (FIG. 1) Do not attempt to light the
burner by turning up the wick as high as it will go, leaving
the gallery in place, as this will damage the wick and
result in unsatisfactory refrigeration.
Adjust the wick turner so that the wick height is about
1/8”
(3 mm) above the top of the outer wick tube.
(FIG. 1).
Light the wick. Allow the flame to travel round the wick,
and replace the gallery complete with lamp glass and
seal ring. Turn the gallery clockwise until locked securely
in position. Should the flame be extinguished, relight,
following the above procedure.
Push the tank into the tank holder underneath the cabinet and at the rear of the refrigerator. Slide the tank
carefully forwards against the guide pin. Carefully lift the
tank by means of the lever arm and check that the guide
pin enter the hole in the bracket on the left side of the
burner. (FIG. 2).
anti-
Make sure that the sealing ring on the top of the lamp
glass seals against the bottom of the flue tube, it should
not be any air gap between the flue tube and the sealing
ring. Lock the lever arm in the position were the sealing
ring seals against the flue tube.
The burner should burn with a blue flame; a partly or
wholly yellow flame indicates an air gap and must be
adjusted.
When the burner is in position under the flue tube, adjust
the wick to produce a medium-high blue flame. Wait 30
minutes to allow the burner to warm up before making
any further wick adjustments. To obtain better cooling,
turn the wick up which raises the light-blue flame.
To make the refrigeration less cold, turn the wick down
to give a blue flame of reduced height. To maintain
steady cabinet temperatures the refrigerator should
operate continuously day and night.
NOTE:
yellow tips or streaks on or in the bright blue lower
portion, or with a wholly yellow flame. Such conditions
will result in rapid carbonizing of the wick, smell, and
possible damage to the cooling unit.
Do not force wick turner if it will not turn readily, as this
may be an indication that the burner needs cleaning or
that the wick should be replaced.
Never operate the burner with a flame having
Cleaning Wick and Burner
While the flame is burning, carbon forms on the top of
the wick, on the flange of the outer wick tube and on the
surface of the flame spreader. For the best refrigeration
results and to prolong the life of the wick, this carbon
must be cleaned off every two or three days for the first
two weeks and at least once a month thereafter, provi-
ded a good grade of kerosene is used. When poor grade
kerosene is used, the burner should be cleaned at least
once a week.
To clean the wick and the burner, loosen the lever arm
and pull out the tank, remove the seal ring, lamp glass
and gallery by turning it anti-clockwise and lift off. Take
out the flame spreader. Insert the wick cleaner, (supplied
with the burner) in the burner tube and adjust the wick
by pressing the cleaner gently against the wick surface.
Turn the wick cleaner in a clock-wise direction, gently
cleaning and reshaping the burning surface (FIG. 3).
Be careful not to fray the wick.
The top surface of the properly cleaned wick should be
free from carbon and frayed fabric threads. It should
slope upwards to its inner top edge, which should be
fairly even.
Blow off all loose carbon from the wick and burner, and
remove any dirt or carbon which has fallen into the
burner base.
Reassemble the burner.
When cleaning the burner, take out the burner from the
tank and inspect the tails of the wick. If they are dirty,
unsuitable kerosene has been used and the tank must
be cleaned. Empty the tank and put the dirty kerosene
aside for other uses. Rinse the tank twice with clean
kerosene and refill with filtered kerosene.
Page 5

Replacing the Wick
Remove burner from tank. Remove outer wick tube (see
Burner Parts) by turning it anti-clockwise to unlock, and
lifting it off the burner.
Turn the wick up as far as possible. Pull the wick and the
wick carrier out from the top of the burner. Disengage
the wick from the wick carrier.
A new wick should be free from moister (water).
Before inserting the new wick, make sure that the flame
spreader is in position in the burner tube.
New wicks have adhesive papers at the tail ends to
afford ease of replacement, and these should first be
straightened out. Put one of the papers through the
opening around the wick tube, and pull in the paper until
the fabric end of the wick is through the opening. Repeat
the procedure with the other end of the wick in the
opposite opening around the wick tube (FIG. 4). When
both wick tails are through the respective openings, pull
the wick through the burner until about 1” (25 mm) of the
tails protrudes below the bottom of the burner.
Be careful not to fray the top of the wick during replace-
ment.
Install the wick carrier on the wick, ensuring that the rack
of the wick carrier is on the same side as the wick turner
(FIG. 5). Ease the wick and wick carrier downwards by
pulling gently on the bottom ends of the wick, and when
the rack of the wick carrier enters the annular opening,
guide it against the cog wheel on the wick turner.
Depress the wick carrier rack over the cog wheel of the
wick turner and move the wick down as far as it will go.
Be sure that the inside reinforcement tape of the wick
slips over the burner tube. If the wick gets stuck in the
burner, do not force the wick turner as this may damage
the wick carrier.
Replace the outer wick tube on the burner, pressing it
down and turning it clockwise to lock in position. Check
that the wick can be turned up and down readily.
To prolong the life of the wick, it should be cleaned every
two or three days for the first two weeks and once a
month thereafter, provided a good grade of kerosene is
used. When poor grade kerosene is used, the
wick should be cleaned at least once a week.
Only Aladdin wicks can be used in this burner.
burner and
Cleaning the Flue System
Cleaning of the flue at least once every year is, however,
recommended. Poor grade kerosene may cause the
burner to smoke, and as soot will then collect in the flue
it should be cleaned immediately. To clean the flue
remove the tank and burner, lift off the flue cap complete
with wire and flue baffle, and place a sheet of paper
underneath the flue tube to catch the soot. Clean the flue
with the brush supplied with the refrigerator and, after
cleaning,
refitted in position.
NOTE: The refrigerator will not operate properly if
the flue baffle is not in place.
ensure that the flue cap and baffle are
Defrosting
Remove all food from the refrigerator, extinguish the
flame and leave the door and frozen storage compartment door open. The frost will melt rapidly and run down
into a receptacle at the rear of the refrigerator where it
evaporates. Defrost water in the freezer compartment
should be mopped up with a cloth.
It is advisable to clean the refrigerator in conjunction with
defrosting. Use lukewarm water and a non-perfumed
detergent. Never use scouring powder, steel wool and
the like.
Before starting the refrigerator again, dry out the frozen
storage compartment and refrigeration space. Wash the
ice-trays and fill them with fresh water.
Turning off
If the refrigerator is to remain out of use, extinguish the
burner flame. Empty the cabinet, defrost it and clean it
thoroughly. Leave the door ajar.
Lighting
The refrigerator is provided with a battery power interior
light.
The battery box is at the rear of the refrigerator.
Four batteries, type LR20
1,5
volts are to be used.
Fault Tracing Chart
Cause and Remedy
Refrigerator not cold enough
Air circulation restricted round the unit.
1.
See that a space of at least 16 inches (400 mm) is
left free above the top of the cabinet. (See
tion”).
Refrigerator not level.
2.
Level cabinet so that the sides and the front are
vertical. (Use a water level).
Yellow flame
3.
Incorrectly lit.
a)
Relight correctly. (See FIG. 1).
Improper chimney seal.
b)
(See FIG. 2).
Wick requires cleaning.
c)
Clean wick and burner. (See FIG. 4).
Needs new wick.
d)
Replace the wick. (See FIG. 5 and 6).
Inferior grade of kerosene-paraffin.
e)
Drain and refill the tank. Fit a new wick.
Flue requires cleaning.
f )
(See “Cleaning the flue system”).
Flame too low or too high.
4.
Evaporator heavily frosted.
5.
Turn out the flame to defrost.
Refrigerator overloaded.
6.
Spread food stuffs on shelves to permit free air
circulation in the cabinet.
Flickering flame (water in kerosene-paraffin).
7.
Keep storage drum or container in dry place with lid
on to prevent condensed water to enter the container.
“lnstalla-
5
Page 6

Refrigerator too cold
Yellow flame.
1.
Burner incorrectly lit. Relight correctly. (See FIG. 1).
2.
Flame too high.
Turn down the flame.
Points to remember
Keep the refrigerator level.
Defrost weekly or fortnightly.
Keep the burner clean.
Never use force to turn up the wick mover;
Do not overload the refrigerator so that the air cannot
circulate freely inside the cabinet.
Use only good grade of kerosene-paraffin.
Do not let the fuel tank run dry.
Inspect the flame regularly.
Always have a blue flame.
Burner Parts (Aladdin 23E).
1.
Seal ring 2. Lamp glass 3. Gallery 4. Outer wick tube
5. Flame spreader 6. Burner base 7. Wick turner 6. Wick
cleaner 9. Wick carrier
(without lamp glass and seal ring).
10.
Wick
11.
Burner complete
6
 Loading...