

Page 1
Type H20 / 60
821 2677-09
MBA 01/2011 N 1
RH 303 L
Absorber-Kühlschrank
Réfrigérateur absorbeur
Frigorifero assorbitore
Absorption fridge
BEDIENUNGSANLEITUNG / EINBAUANLEITUNG
MODE D'EMPLOI / INSTRUCTIONS D'INSTALLATION
ISTRUZIONI PER L'USO / ISTRUZIONI PER L'INSTALLAZIONE
INSTRUCTION FOR USE / INSTALLATION INSTRUCTION
CH
Page 2

2
Änderungen vorbehalten
Sous réserve de modifications
Con riserva di modifiche
Subject to change without notice
Deutsch . . . . . . . . . . . . . . . . . . . . . . . . . . . . . . . . . . . . . . . . . . . . . . . . . . . 3
Français . . . . . . . . . . . . . . . . . . . . . . . . . . . . . . . . . . . . . . . . . . . . . . . . . . 15
Italiano . . . . . . . . . . . . . . . . . . . . . . . . . . . . . . . . . . . . . . . . . . . . . . . . . . . 27
English . . . . . . . . . . . . . . . . . . . . . . . . . . . . . . . . . . . . . . . . . . . . . . . . . . . . 39
Page 3

3
1.0 Allgemeines . . . . . . . . . . . . . . . . . . . . . . . . . . . . . . . . . . . . . . . . . . . 4
1.1 Einleitung . . . . . . . . . . . . . . . . . . . . . . . . . . . . . . . . . . . . . . . . . . . . . . . . . . . . . . . . . . . . . . . . . . 4
1.2 Hinweise zu dieser Bedienungsanleitung . . . . . . . . . . . . . . . . . . . . . . . . . . . . . . . . . . . . . . . . . 4
1.3 Urheberschutz . . . . . . . . . . . . . . . . . . . . . . . . . . . . . . . . . . . . . . . . . . . . . . . . . . . . . . . . . . . . . . 4
1.4 Erklärung der verwendeten Symbole . . . . . . . . . . . . . . . . . . . . . . . . . . . . . . . . . . . . . . . . . . . . . 4
1.5 Garantie . . . . . . . . . . . . . . . . . . . . . . . . . . . . . . . . . . . . . . . . . . . . . . . . . . . . . . . . . . . . . . . . . . . 5
1.6 Haftungsbeschränkung . . . . . . . . . . . . . . . . . . . . . . . . . . . . . . . . . . . . . . . . . . . . . . . . . . . . . . . 5
1.7 Kundendienst . . . . . . . . . . . . . . . . . . . . . . . . . . . . . . . . . . . . . . . . . . . . . . . . . . . . . . . . . . . . . . . 5
1.8 Ersatzteile . . . . . . . . . . . . . . . . . . . . . . . . . . . . . . . . . . . . . . . . . . . . . . . . . . . . . . . . . . . . . . . . . . 6
1.9 Umwelthinweise . . . . . . . . . . . . . . . . . . . . . . . . . . . . . . . . . . . . . . . . . . . . . . . . . . . . . . . . . . . . . 6
1.9.1 Entsorgung . . . . . . . . . . . . . . . . . . . . . . . . . . . . . . . . . . . . . . . . . . . . . . . . . . . . . . . . . . . . . . . . . . . . . . . . . 6
1.9.2 Energisparhinweise . . . . . . . . . . . . . . . . . . . . . . . . . . . . . . . . . . . . . . . . . . . . . . . . . . . . . . . . . . . . . . . . . . . 6
1.10 Konformitätserklärung . . . . . . . . . . . . . . . . . . . . . . . . . . . . . . . . . . . . . . . . . . . . . . . . . . . . . . . . 6
2.0 Sicherheitshinweise . . . . . . . . . . . . . . . . . . . . . . . . . . . . . . . . . . . . . 7
2.1 Bestimmungsgemäße Verwendung . . . . . . . . . . . . . . . . . . . . . . . . . . . . . . . . . . . . . . . . . . . . . . 7
2.2 Verantwortung des Nutzers . . . . . . . . . . . . . . . . . . . . . . . . . . . . . . . . . . . . . . . . . . . . . . . . . . . . 7
2.3 Kinder schützen bei Entsorgung des Gerätes . . . . . . . . . . . . . . . . . . . . . . . . . . . . . . . . . . . . . . 7
2.4 Arbeiten und Überprüfungen am Kühlschrank . . . . . . . . . . . . . . . . . . . . . . . . . . . . . . . . . . . . . 7
2.5 Kältemittelinformation . . . . . . . . . . . . . . . . . . . . . . . . . . . . . . . . . . . . . . . . . . . . . . . . . . . . . . . . 7
3.0 Installation . . . . . . . . . . . . . . . . . . . . . . . . . . . . . . . . . . . . . . . . . . . . 8
3.1 Auspacken . . . . . . . . . . . . . . . . . . . . . . . . . . . . . . . . . . . . . . . . . . . . . . . . . . . . . . . . . . . . . . . . . 8
3.2 Netzanschluss . . . . . . . . . . . . . . . . . . . . . . . . . . . . . . . . . . . . . . . . . . . . . . . . . . . . . . . . . . . . . . 8
3.3 Einbau . . . . . . . . . . . . . . . . . . . . . . . . . . . . . . . . . . . . . . . . . . . . . . . . . . . . . . . . . . . . . . . . . . . . 8
3.3.1 Einbauschemata . . . . . . . . . . . . . . . . . . . . . . . . . . . . . . . . . . . . . . . . . . . . . . . . . . . . . . . . . . . . . . . . . . . . . 8
3.3.2 Einbau in eine 6/6 Nische . . . . . . . . . . . . . . . . . . . . . . . . . . . . . . . . . . . . . . . . . . . . . . . . . . . . . . . . . . . . . . 10
3.4 Schleppscharnier . . . . . . . . . . . . . . . . . . . . . . . . . . . . . . . . . . . . . . . . . . . . . . . . . . . . . . . . . . . . 10
3.5 Montage des Türgriffs . . . . . . . . . . . . . . . . . . . . . . . . . . . . . . . . . . . . . . . . . . . . . . . . . . . . . . . . 10
4.0 Bedienung . . . . . . . . . . . . . . . . . . . . . . . . . . . . . . . . . . . . . . . . . . . . 11
4.1 Reinigung . . . . . . . . . . . . . . . . . . . . . . . . . . . . . . . . . . . . . . . . . . . . . . . . . . . . . . . . . . . . . . . . . . 11
4.2 Inbetriebnahme . . . . . . . . . . . . . . . . . . . . . . . . . . . . . . . . . . . . . . . . . . . . . . . . . . . . . . . . . . . . . 11
4.3 Temperaturregelung . . . . . . . . . . . . . . . . . . . . . . . . . . . . . . . . . . . . . . . . . . . . . . . . . . . . . . . . . . 11
4.4 Einlagern von Lebensmitteln und Eiswürfelbereitung . . . . . . . . . . . . . . . . . . . . . . . . . . . . . . . . 11
4.4.1 Einlagern von Waren in den Kühlraum . . . . . . . . . . . . . . . . . . . . . . . . . . . . . . . . . . . . . . . . . . . . . . . . . . . . 11
4.4.2 Einlagern von Waren in das Frosterfach . . . . . . . . . . . . . . . . . . . . . . . . . . . . . . . . . . . . . . . . . . . . . . . . . . . 12
4.4.3 Eiswürfelbereitung . . . . . . . . . . . . . . . . . . . . . . . . . . . . . . . . . . . . . . . . . . . . . . . . . . . . . . . . . . . . . . . . . . . 12
4.5 Außerbetriebnahme . . . . . . . . . . . . . . . . . . . . . . . . . . . . . . . . . . . . . . . . . . . . . . . . . . . . . . . . . . 12
4.6 Abtauen . . . . . . . . . . . . . . . . . . . . . . . . . . . . . . . . . . . . . . . . . . . . . . . . . . . . . . . . . . . . . . . . . . . 12
4.7 Beleuchtung . . . . . . . . . . . . . . . . . . . . . . . . . . . . . . . . . . . . . . . . . . . . . . . . . . . . . . . . . . . . . . . . 13
4.7.1 Wechsel der Glühlampe . . . . . . . . . . . . . . . . . . . . . . . . . . . . . . . . . . . . . . . . . . . . . . . . . . . . . . . . . . . . . . . 13
4.8 Türanschlag wechseln . . . . . . . . . . . . . . . . . . . . . . . . . . . . . . . . . . . . . . . . . . . . . . . . . . . . . . . . 13
4.9 Dekorplatte wechseln . . . . . . . . . . . . . . . . . . . . . . . . . . . . . . . . . . . . . . . . . . . . . . . . . . . . . . . . . 13
4.10 Technische Daten . . . . . . . . . . . . . . . . . . . . . . . . . . . . . . . . . . . . . . . . . . . . . . . . . . . . . . . . . . . . 13
4.11 Verhalten bei Störungen . . . . . . . . . . . . . . . . . . . . . . . . . . . . . . . . . . . . . . . . . . . . . . . . . . . . . . . 14
4.12 Service-Information . . . . . . . . . . . . . . . . . . . . . . . . . . . . . . . . . . . . . . . . . . . . . . . . . . . . . . . . . . 51
Inhaltsverzeichnis
Deutsch
Page 4
4
Allgemeines
1.0 Allgemeines
Mit diesem Absorber-Kühlschrank haben Sie eine
gute Wahl getroffen. Wir sind davon überzeugt,
dass Ihr neuer Kühlschrank Sie in jeder Hinsicht
zufrieden stellen wird. Der geräuschlos arbeitende Kühlschrank entspricht hohen Qualitätsanforderungen und gewährleistet einen effizienten
Umgang mit Ressourcen und Energien im
gesamten Lebenslauf - bei Herstellung, Nutzung
und Entsorgung.
1.1 Einleitung
Die Angaben, Texte und Abbildungen in dieser
Anleitung sind urheberrechtlich geschützt und
unterliegen den gewerblichen Schutzrechten.
Kein Teil dieser Anleitung darf ohne die schriftliche Genehmigung des Herstellers reproduziert,
kopiert oder sonstwie verwendet werden.
1.3 Urheberschutz
Bevor Sie den Kühlschrank in Betrieb setzen,
lesen Sie diese Bedienungsanleitung bitte
sorgfältig durch.
Diese Anleitung gibt Ihnen die nötigen Hinweise
für den richtigen Gebrauch Ihres Kühlschranks.
Beachten Sie besonders die Sicherheitshinweise. Die Einhaltung der Hinweise und
Handlungsanweisungen ist wichtig für den sicheren Umgang mit Ihrer miniBar und schützt Sie
und die miniBar vor Schäden. Das Gelesene
muss verstanden worden sein, bevor Sie eine
Maßnahme durchführen.
Bewahren Sie diese Bedienungsanleitung
sorgfältig in der Nähe des Kühlschranks auf,
sodass sie jederzeit verwendet werden kann.
1.2 Hinweise zu dieser
Bedienungsanleitung
1.4 Erklärung der verwendeten
Symbole
Warnhinweise sind durch Symbole gekennzeichnet. Ein ergänzender Text erläutert Ihnen den
Grad der Gefährdung.
Beachten Sie diese Warnhinweise sehr genau.
Damit schützen Sie sich, andere Personen
und das Gerät vor Schäden.
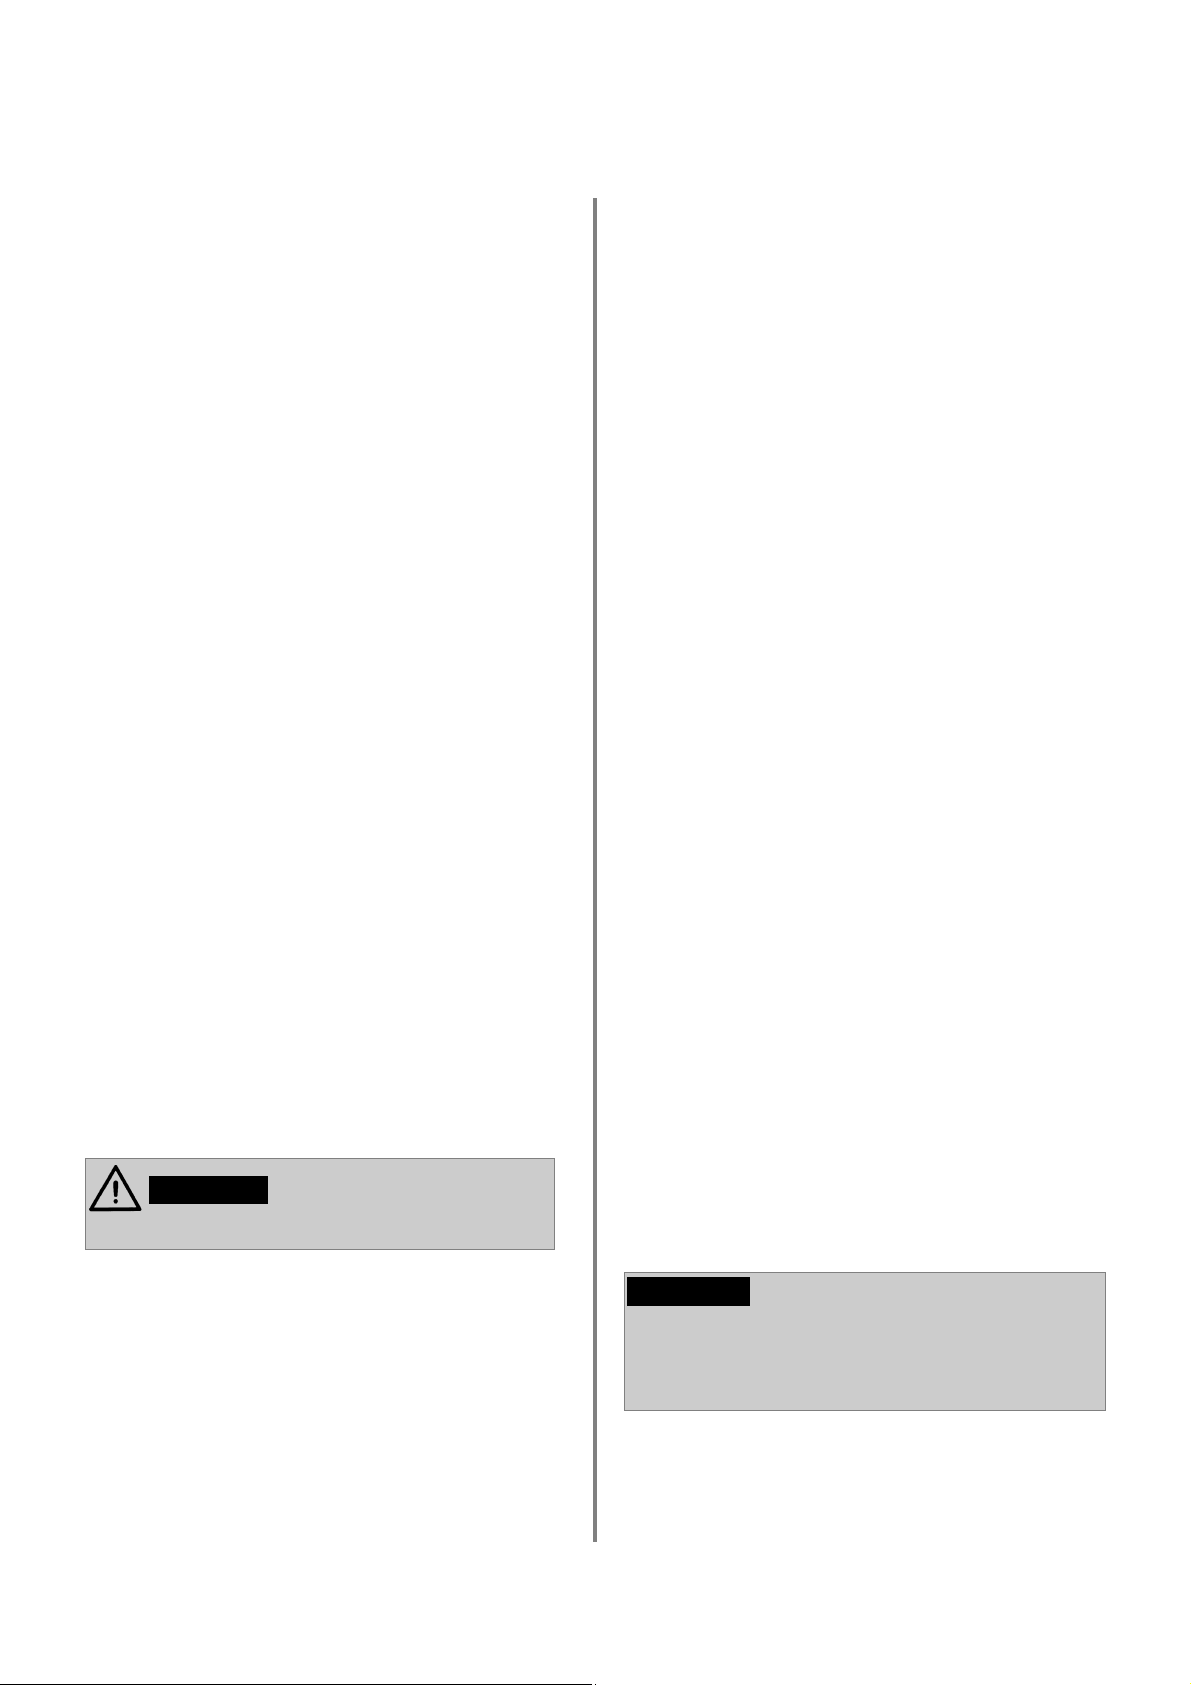
Warnhinweise
WARNUNG kennzeichnet eine mögliche
Gefahrensituation, die zum Tod oder einer ernsten
Verletzung führen kann, wenn die angegebenen
Anweisungen nicht befolgt werden.
WARNUNG!
VORSICHT kennzeichnet eine mögliche
Gefahrensituation, die zu leichten oder mittleren
Verletzungen führen kann, wenn die angegebenen
Anweisungen nicht befolgt werden.
VORSICHT!
VORSICHT!
VORSICHT ohne Sicherheitssymbol kennzeichnet
eine mögliche Gefahrensituation, die zu
Beschädigungen des Gerätes führen kann, wenn
die angegebenen Anweisungen nicht befolgt werden.
Page 5

5
Allgemeines
Information
INFORMATION gibt Ihnen ergänzende und nützli-
che Hinweise zum Umgang mit Ihrem
Kühlschrank.
Umwelthinweis
UMWELTHINWEIS gibt Ihnen nützliche Hinweise
zur Energieeinsparung und Entsorgung des
Gerätes.
Für jedes Produkt gewähren wir ab Verkauf bzw.
Lieferdatum an den Endverbraucher eine
Garantie von 2 Jahren. (Ausweis durch
Garantieschein, Faktura oder Verkaufsbeleg).
Die Garantieleistung umfasst die Kosten für
Material, Arbeits- und Reisezeit.
Die Garantieleistung entfällt bei Nichtbeachtung
der Gebrauchsanweisung und Betriebs-vorschriften, unsachgerechter Installation, sowie bei
Beschädigung durch äussere Einflüsse, höhere
Gewalt, Eingriffe Dritter und Verwendung von
Nicht-Original Teilen.
1.5 Garantie
Alle Angaben und Hinweise in dieser
Bedienungsanleitung wurden unter
Berücksichtigung geltender Normen und
Vorschriften sowie dem Stand der Technik
erstellt. Der Hersteller behält sich vor, jederzeit
Änderungen am Produkt vorzunehmen, die im
Interesse der Verbesserung des Produktes und
der Sicherheit angebracht sind.
Der Hersteller übernimmt keine Haftung für
Schäden bei :
Nichtbeachtung der Bedienungsanleitung
nicht bestimmungsgemäßer Verwendung
Verwendung von nicht originalen
Ersatzteilen
unsachgemäßen Veränderungen und
Eingriffen am Gerät
Einwirkung von Umgebungseinflüssen, wie
- Temperaturänderungen
- Luftfeuchtigkeit
1.6 Haftungsbeschränkung
Geben Sie bei Kontakten mit dem Kundendienst
bitte immer das Modell, Produktnummer,
Seriennummer und ggf. den MLC - Code an!
Diese Informationen finden Sie auf dem
Typenschild im Innenraum Kühlschranks.
Service-Information : S. 51
1.7 Kundendienst
Page 6
6
Allgemeines
Im Kühlaggregat wird als Kältemittel Ammoniak
(natürliche Verbindung aus Wasserstoff und
Stickstoff) verwendet. Als Treibmittel für die
Isolierung aus PU-Schaum kommt das ozonunschädliche Cyclopentan zum Einsatz.
Um die stoffliche Verwertung der recyclingfähigen Verpackungsmaterialien sicherzustellen, sind
diese den ortsüblichen Sammelsystemen zuzuführen. Das Gerät ist einem entsprechenden
Entsorgungsunternehmen zu überlassen, das
eine Verwertung der recyclingfähigen Anteile und
die ordnungsgemäße Entsorgung des Restes
gewährleistet. Zur umweltfreundlichen
Entleerung des Kühlmediums aus allen AbsorberKühlschrankaggregaten ist eine geeignete
Entsorgungsanlage einzusetzen.
Geräte, die mit diesem Symbol
gekennzeichnet sind, müssen an
dem örtlichen Sammelpunkt für die
Entsorgung von elektrischen und
elektronischen Geräten abgegeben
werden. Dieses Produkt darf nicht
über den normalen Haushaltsabfall
entsorgt werden.
1.9 Umwelthinweise
1.9.1 Entsorgung
1.8 Ersatzteile
Geben Sie bitte immer das Modell und die
Produktnummer an! Diese Informationen finden
Sie auf dem Typenschild im Innenraum des
Kühlschrankes.
Service-Information : S. 51
Den Kühlschrank nicht der direkten Sonnenbe-
strahlung oder einer anderen Wärmequelle
(z.B. Heizung) aussetzen.
Eine ungehinderte Luftzirkulation des
Kühlschrankaggregates gewährleisten.
Den Kühlschrank ca. 12 Stunden vor der
Bestückung in Betrieb setzen.
Wenn möglich, immer vorgekühlte und ver-
packte Waren einlagern.
Ablageroste und Fächer nicht überfüllen, um
die interne Luftzirkulation nicht zu behindern.
Abstand zwischen Kühlgut und Nachver-
dampfer (“Kühlrippen”) lassen.
Bei Warenentnahme die Kühlschranktür nur
kurzzeitig öffnen.
Einbauhinweise beachten (Pkt. 3.3)!
1.9.2 Energiesparhinweise
1.10 Konformitätserklärung
- Low Voltage Directive 73/23/EEC and the
Amendment to LVD 90/683/EEC,2006/95EC
- EMC Directive 89/336/EEC, 2004/108/EC
- CE Marking Directive 93/68/EEC
- RoHS Directive 2002/95EC
Directives
Type family : H 20/60
- EN 60335-1;2002+A11+A12+A1+A2
(IEC 60335-1; 2001+A1+A2)
- EN 60335-2-24;2003+A1+A2+A11
(IEC 60335-2-24; 2002+A1+A2)
- EN 61000-3-2;95,A1,A2,A14
- EN 61000-3-3;95,A1
- EN 50366;2003+A1
- EN 55014-1;00,A1,A2
- EN 55014-2;97,A1
Standards
Page 7
7
Sicherheitshinweise
2.0 Sicherheitshinweise
Der Kühlschrank ist nicht für die fachgerechte Lagerung von Medikamenten vorgesehen. Beachten Sie dazu die Hinweise
in der Packungsbeilage des Arzneimittels.
WARNUNG!
Dieser Kühlschrank für den Einbau in Möbel vorgesehen.
Benutzen Sie die miniBar ausschließlich zum
Kühlen und Lagern von Lebensmitteln.
2.1 Bestimmungsgemäße
Verwendung
2.4 Arbeiten und Überprüfungen
am Kühlschrank
2.3 Kinder schützen nach
Entsorgung des Gerätes
Arbeiten an den Elektroeinrichtungen dürfen
nur von autorisierten Fachkräften ausgeführt werden. Durch nicht fachgerechte
Maßnahmen können erhebliche Sachund/oder Personenschäden entstehen.
WARNUNG!
Öffnen Sie niemals das Absorberkühlaggregat ! Es steht unter hohem Druck.
Es besteht Verletzungsgefahr!
WARNUNG!
Personen, die den Kühlschrank bedienen, müssen mit dem sicheren Umgang vertraut sein und
die Hinweise dieser Bedienungsanleitung kennen.
2.2 Verantwortung des Nutzers
2.5 Kältemittelinformation
Als Kältemittel wird Ammoniak verwendet.
Dies ist eine natürliche Verbindung, die auch in
Haushaltsreinigern enthalten ist (1 Liter
Salmiakreiniger enthält bis zu 200 g Ammoniak,
ca. doppelt soviel, wie im Kühlgerät enthalten ist).
Natriumchromat wird als Korrosionsschutzmittel
eingesetzt (1,8 Gewichtsprozent des
Lösungsmittels).
So verhalten Sie sich bei einer eventuell auftretenden Leckage (leicht erkennbar wegen des
starken Geruchs) :
- Schalten Sie das Gerät ab.
- Durchlüften Sie den Raum gut .
- Informieren Sie den autorisierten Kundendienst.
Zur Ihrer Sicherheit wurde gutachterlich festgestellt, dass keine Beeinträchtigung der
Gesundheit bei Austritt des Kältemittels
besteht.
Demontieren Sie die Gerätetür bei Entsorgung des Kühlschranks und belassen Sie
die Ablageroste im Kühlgerät . Ein versehentliches Einschließen und Ersticken wird
verhindert.
WARNUNG!
Page 8
8
Installation
3.0 Installation
Beim Auspacken kontrollieren Sie bitte, ob die
Ware keine Mängel aufweist.
Melden Sie Transportschäden unmittelbar
dem Transportunternehmen.
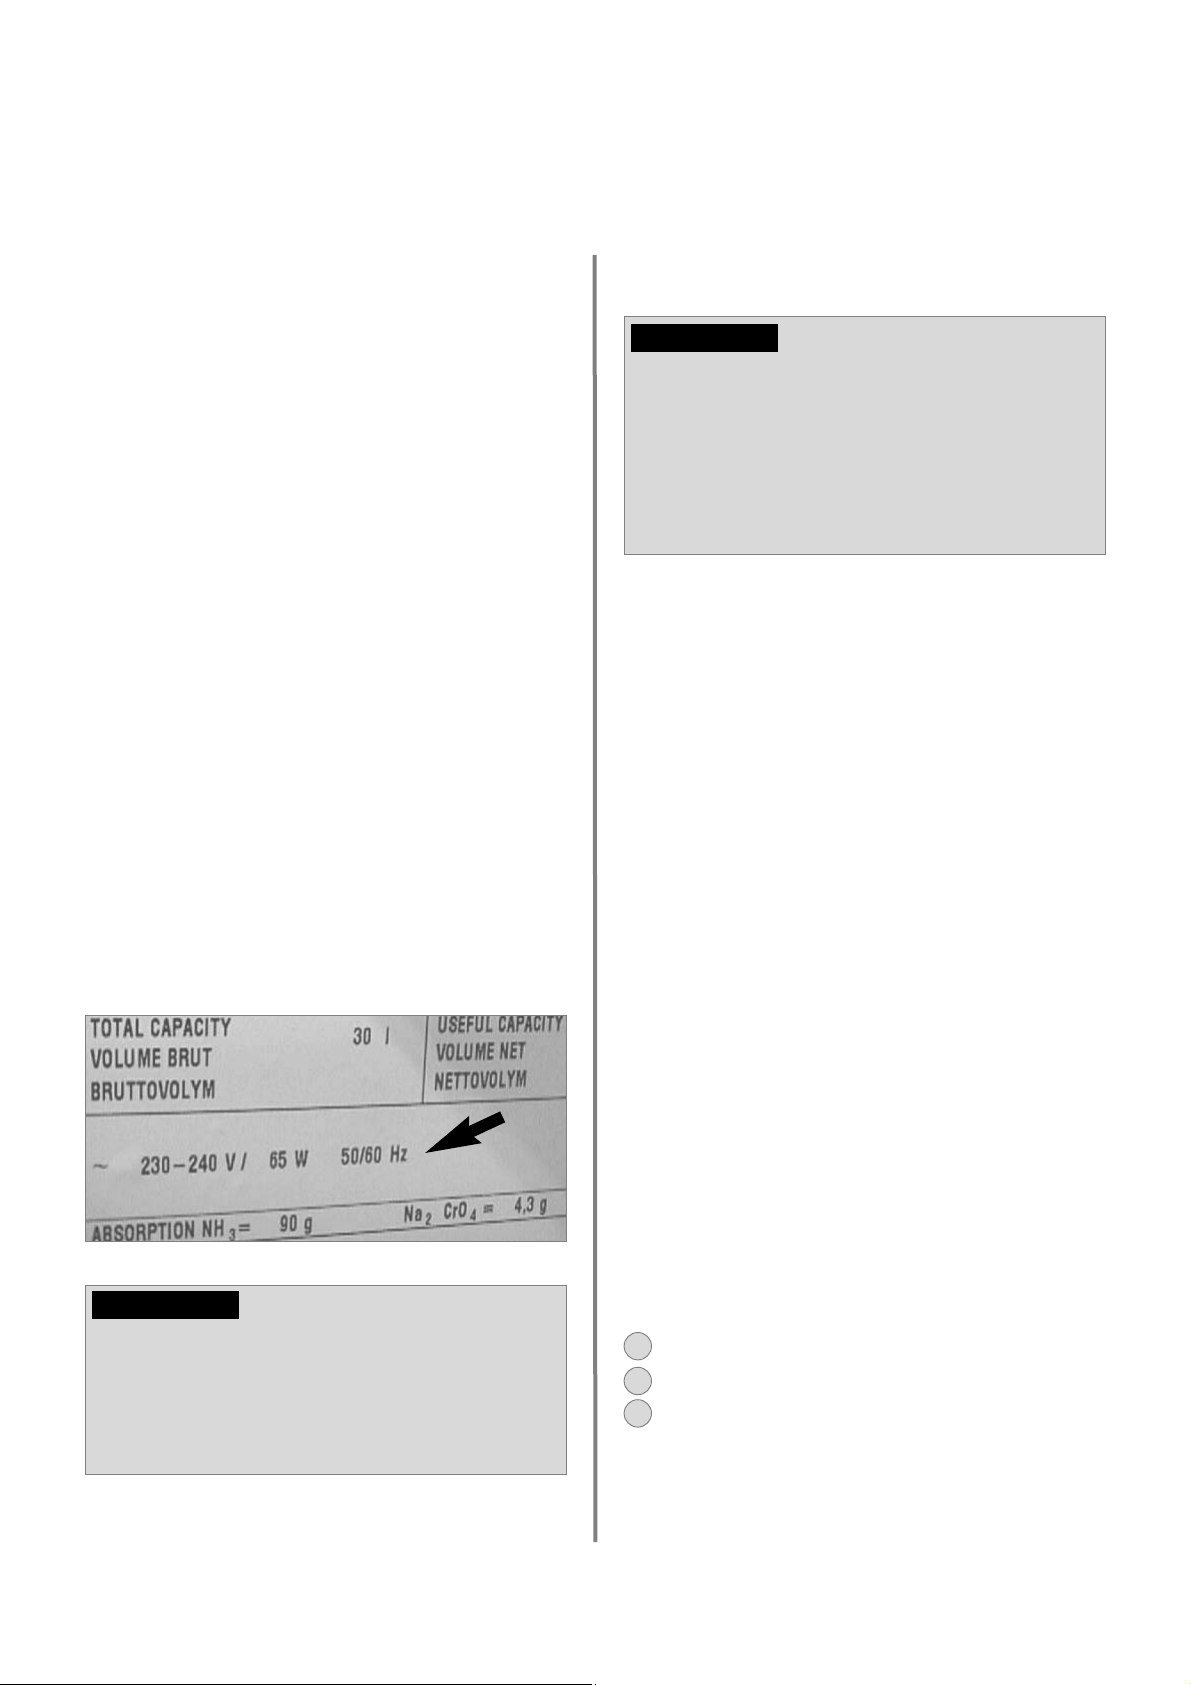
Vergleichen Sie, ob die auf dem Typenschild
angegebene Spannung mit der Netzspannung
übereinstimmt.
3.1 Auspacken
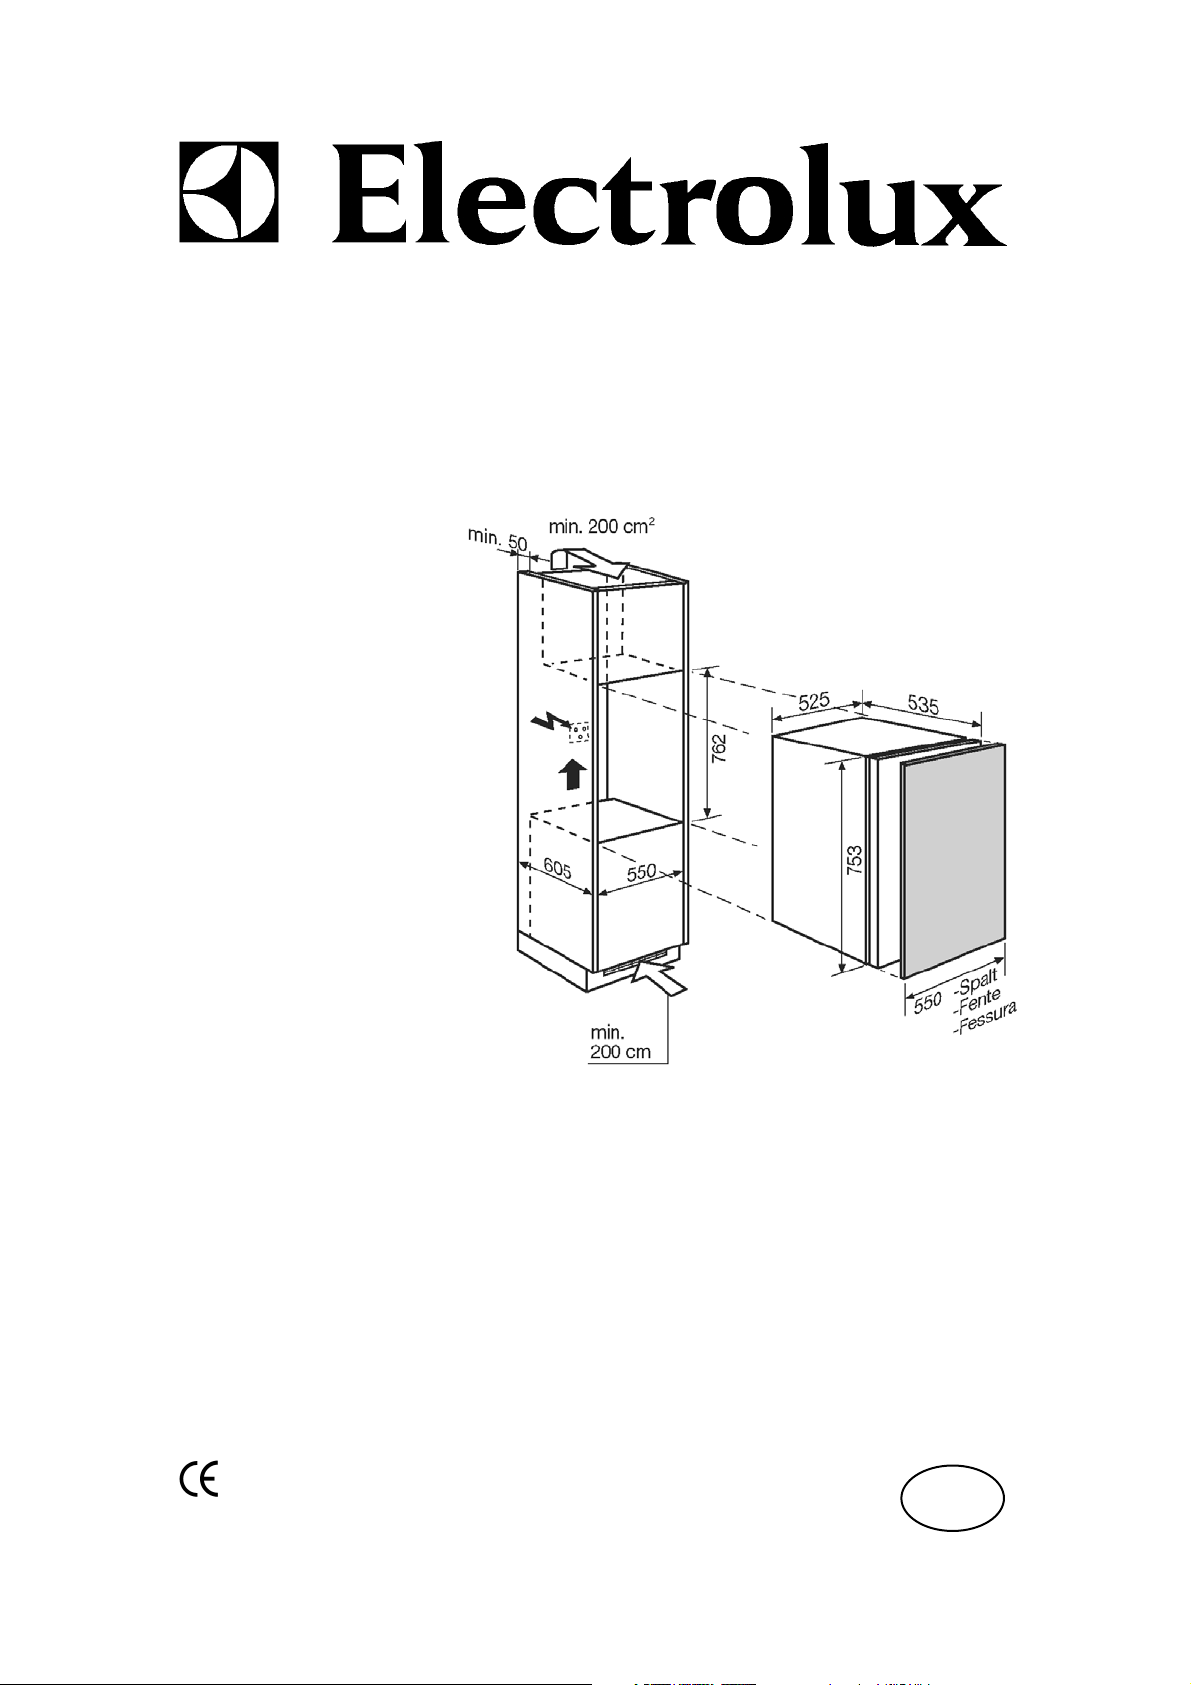
Die miniBar ist unbedingt waagerecht
aufzustellen.
Der Abstand zwischen Kühlaggregat und
Wand muss mindestens 20 mm betragen.
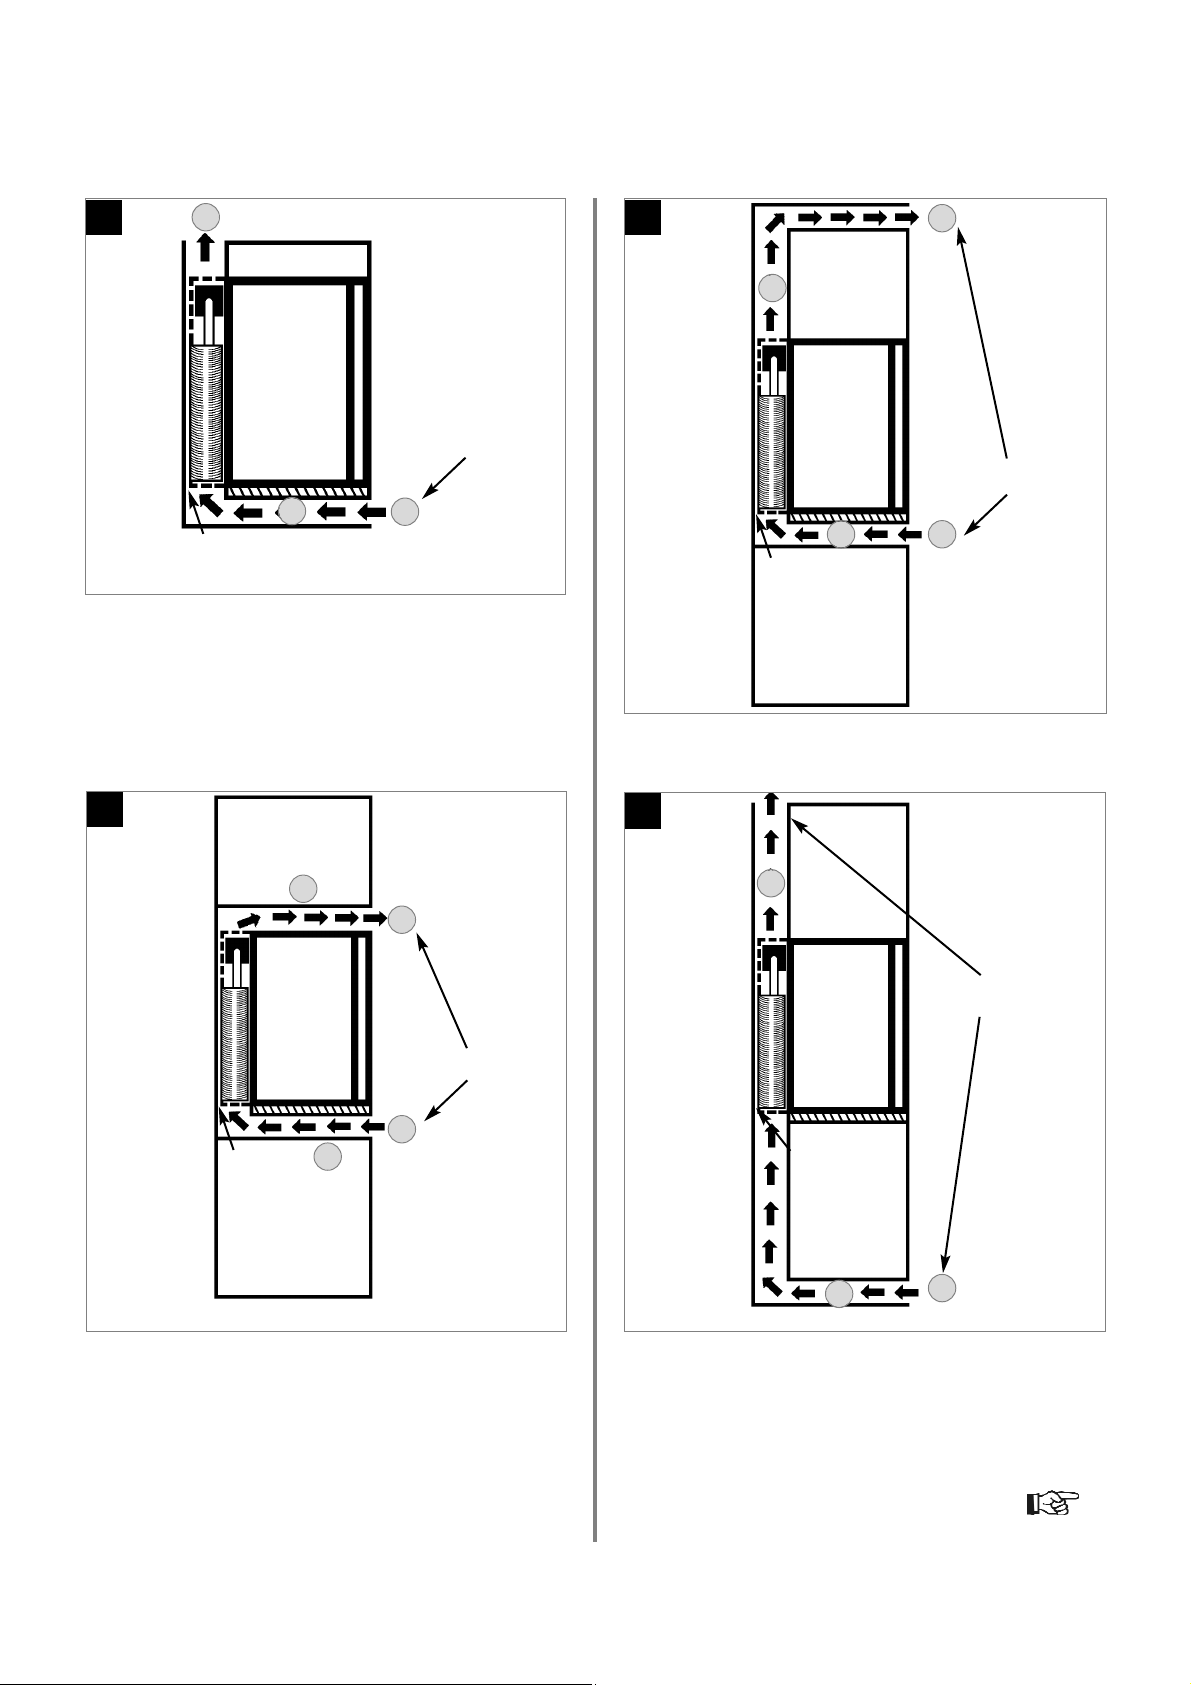
Eine ungehinderte Luftzirkulation muss
gemäß den Abbildungen 1, 2, 3 oder 4
gewährleistet sein.
Nur das Kühlaggregat darf in den
Belüftungskanal hineinragen.
Die durch den Belüftungskanal geleitete
Luft darf in nicht durch andere Wärmequellen aufgeheizt werden.
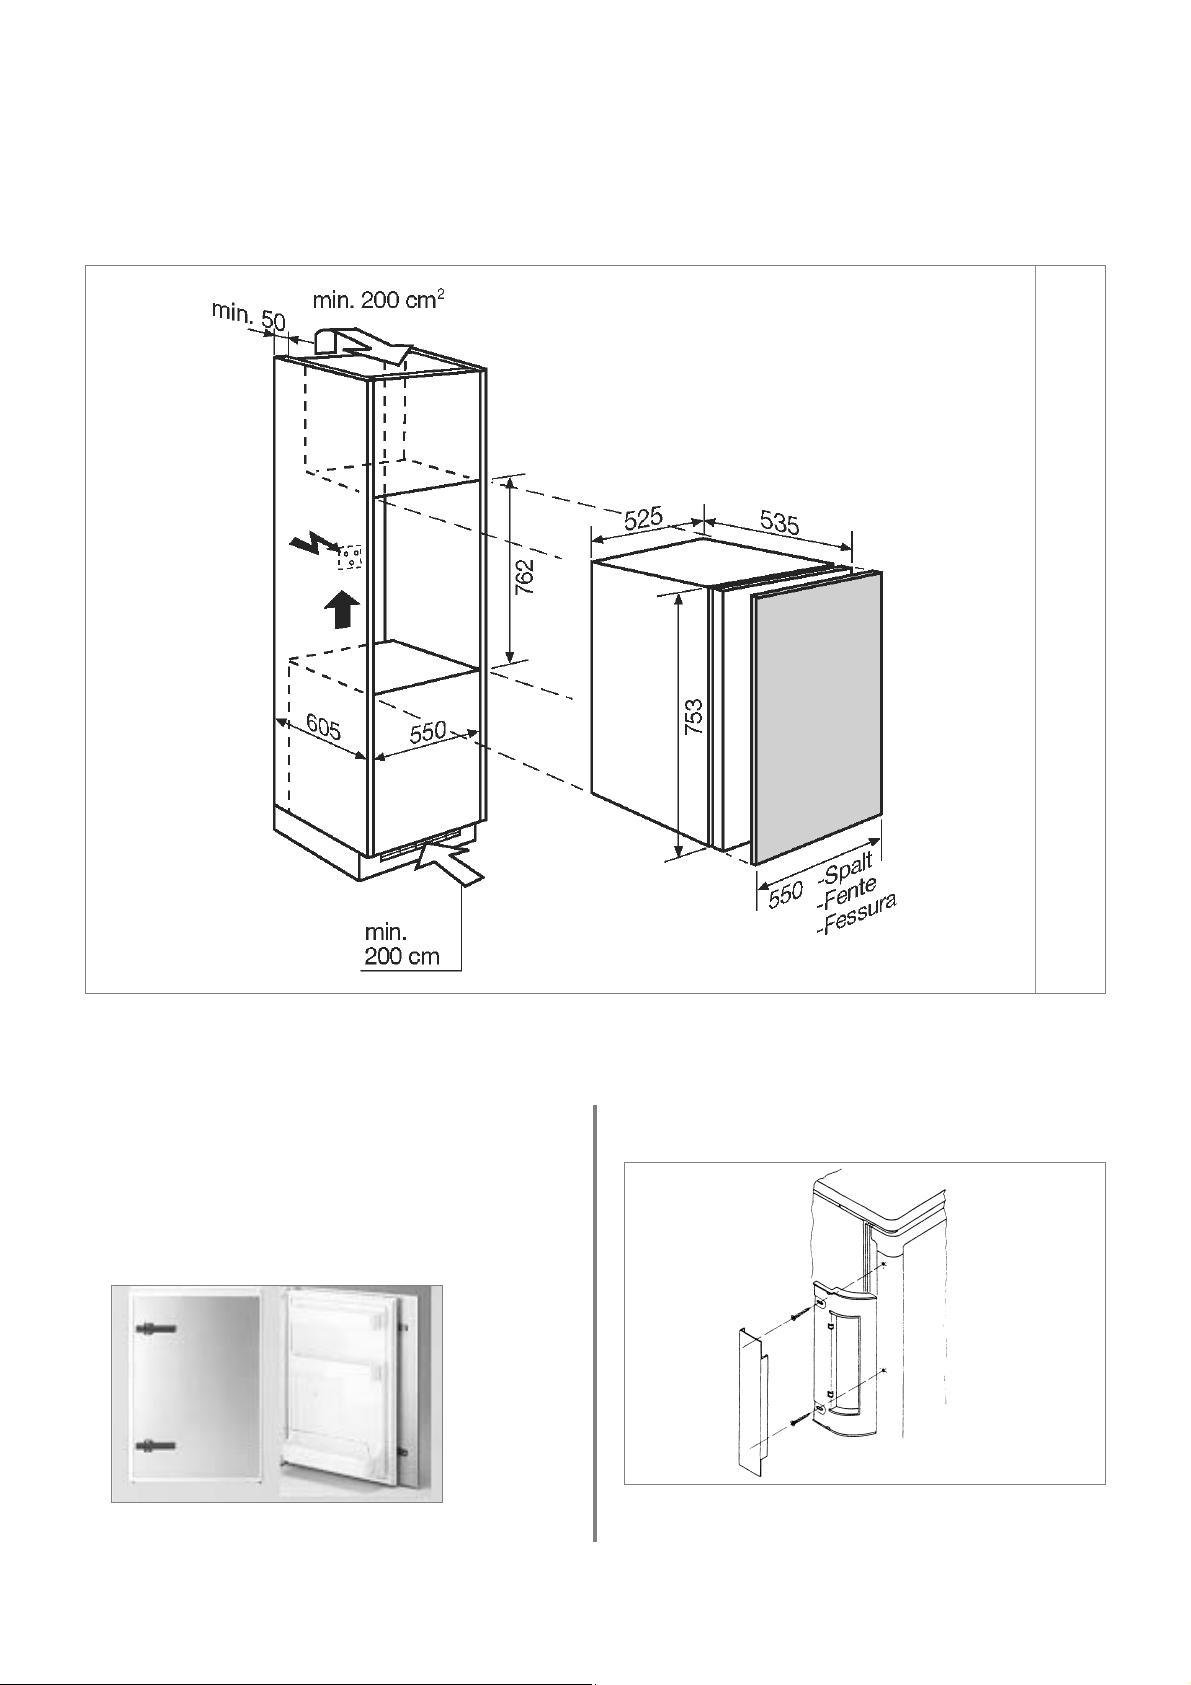
Die Lüftungsgitter müssen einen freien
Querschnitt von min. 200 cm² haben.
Verwenden Sie Standardgitter
(B = 455 mm, H = 65 mm)
Die Nischentiefe sollte mindestens 580 mm
betragen.
3.3 Einbau
Schenken Sie den Einbauinformationen
hohe Aufmerksamkeit, da sich Garantie und
Gewährleistung lediglich auf Geräte
beschränkt, die gemäß der Einbauinformationen installiert wurden.
VORSICHT!
3.2 Netzanschluss
Die miniBar muss nach den jeweiligen
Ländervorschriften an eine vorschriftsmäßig geerdete Steckdose angeschlossen
werden.
Der Netzstecker muss frei zugänglich sein.
Vor Inbetriebnahme kontrollieren Sie bitte,
ob die auf dem Typenschild angegebene
Spannung mit der Netzspannung überein
stimmt. Sollte dieses nicht der Fall sein,
schließen Sie das Gerät nicht an! Wenden
Sie sich an den zuständigen Händler.
Abb. 1
Wenn die Anschlussleitung beschädigt wird,
muss sie durch den Kundendienst von
Electrolux oder durch ebenso qualifiziertes
Personal ersetzt werden, um Gefährdungen
zu vermeiden.
VORSICHT!
3.3.1 Einbauschemata
Die folgenden Bilder (1 - 4 ) zeigen verschiedene
Einbaumöglichkeiten für das Gerät.
= Ventilationsgitter
= Zuluft
= Abluft
2
1
3
Page 9
9
Installation
Abb. 2
Abb. 3
1
2
200 cm²
20 mm
200 cm²
20 mm
Abb. 4
3
200 cm²
20 mm
Abb. 5
4
200 cm²
20 mm
2
2
2
2
1
1
1
1
1
1
3
3
3
3
Page 10
10
Installation
3.4 Schleppscharnier
3.5 Montage des Türgriffs
Die Möbeltür darf im geschlossenen
Zustand nicht auf dem Möbelumbau aufliegen (Abstand 1-2 mm), da sonst die
Kühlschranktür nicht dicht schließt.
3.3.2 Einbau in eine 6/6 Nische
Abb. 6
Abb. 7
Abb. 7
Einbau in 6/6 Nischen nach SMS-Norm
Befestigungspunkte sind markiert.
Page 11
11
Bedienung
4.0 Bedienung
Bevor Sie den Kühlschrank in Betrieb setzen,
empfiehlt es sich, die miniBar von innen und
außen zu reinigen.
Benutzen Sie dafür ein weiches Tuch und
lauwarmes Wasser mit einem milden
Reinigungsmittel.
Anschließend den Kühlschrank mit klarem
Wasser nachwaschen und gut abtrocknen.
In jährlichen Abständen sollte das Kühl-
schrankaggregat mit einem Pinsel oder
einem weichen Lappen von Staub befreit
werden.
4.1 Reinigung
Stecken Sie den Gerätestecker in eine
vorschriftsmäßig geerdete Steckdose.
Nach einigen Stunden erreicht der Kühl-
schrank seine Betriebstemperatur im Kühlraum.
4.2 Inbetriebnahme
Zur Vermeidung von Materialverschlechterungen beachten Sie bitte :
Verwenden Sie keine Seife oder scharfe,
körnige bzw. sodahaltige Reinigungsmittel.
Die Türdichtung nicht mit Öl oder Fett in
Berührung bringen.
VORSICHT!
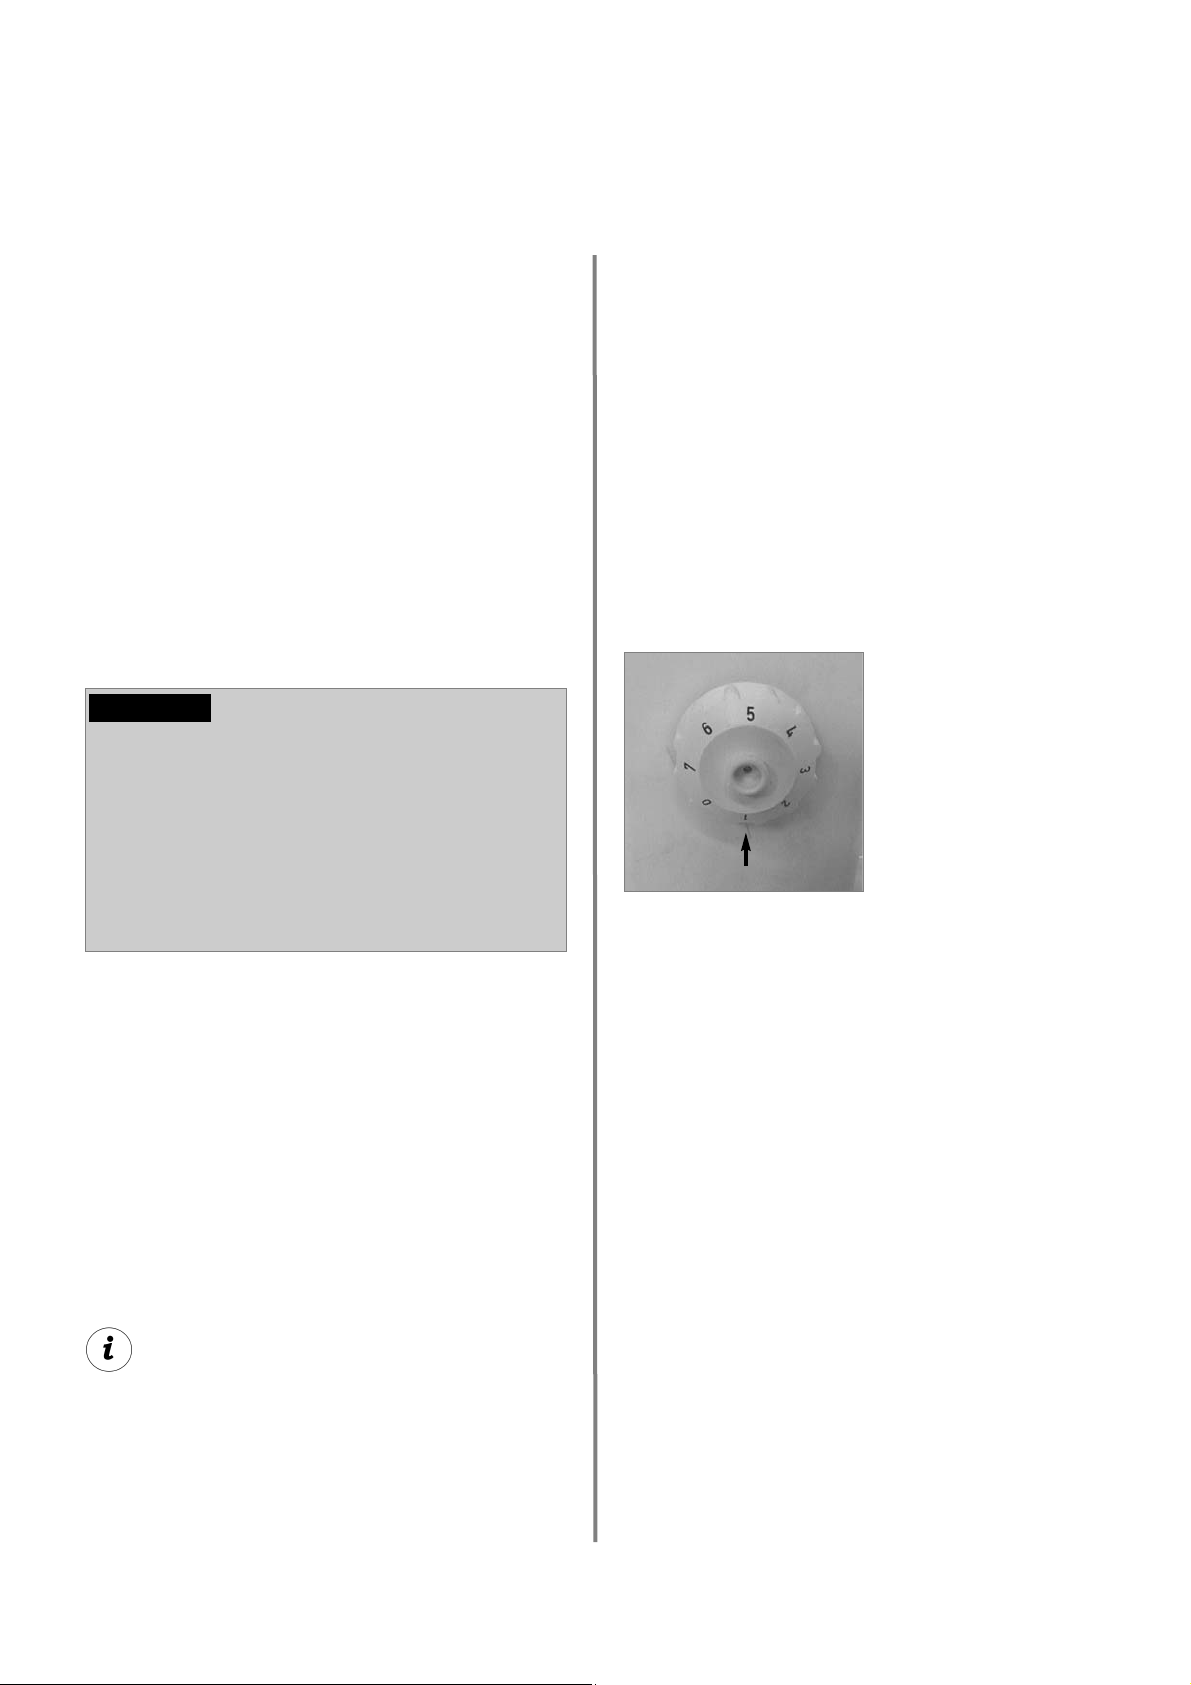
Der Kühlschrank ist mit einem Thermostat ausgestattet. Der Thermostatbedienknopf befindet sich
im hinteren Teil des Innenbehälters.
Stellen Sie den Drehknopf in Position 3 - 5, um
eine mittlere Temperatur zu erreichen.
Wenn eine niedrigere (kältere) Temperatur
gewünscht wird, den Drehknopf auf eine höhere
Stufe drehen.
In Stellung "0" ist der Kühlschrank ausgeschaltet.
4.3 Temperaturregelung
Abb. 8
Der Kühlschrank arbeitet lautlos.
4.4 Einlagern von Lebensmitteln
und Eiswürfelbereitung
Setzen Sie den Kühlschrank ca. 12 Stunden
vor der Bestückung in Betrieb.
Lagern Sie immer vorgekühlte Waren ein.
Achten Sie bereits beim Kauf und Transport
darauf, dass die Ware gut gekühlt ist.
Verwenden Sie Isoliertaschen.
Bei Warenentnahme die Kühlschranktür nur
kurzzeitig öffnen.
Waren müssen verpackt, am besten in
geschlossenen Behältern, Alufolie oder dgl.
und getrennt voneinander eingelagert werden, um ein Austrocknen und Geruchsbildung zu vermeiden.
4.4.1 Einlagern von Waren in den
Kühlraum
Page 12
12
Bedienung
4.6 Abtauen
Mit der Zeit bildet sich Reif auf den Kühlrippen im
Inneren des Kühlschranks. Wenn diese
Reifschicht etwa 3 mm beträgt, sollten Sie den
Kühlschrank abtauen.
Schalten Sie den Kühlschrank aus
(Thermostatregler auf Position "0") .
Nehmen Sie alle Lebensmittel und die Eis-
schale heraus.
Lassen Sie die Kühlschranktür geöffnet, um
Luft hineingelangen zu lassen und Schimmelbildung zu vermeiden.
Wischen Sie beide Kühlfächer nach dem
Abtauen (Frosterfach und Kühlrippen sind frei
von Reif) mit einem Tuch trocken.
Bemerkung: Das Tauwasser des Hauptkühlfaches läuft in einen Auffangbehälter auf der
Rückseite des Gerätes. Dort verdunstet das
Wasser.
4.5 Außerbetriebnahme
Wird der Kühlschrank für längere Zeit nicht
benutzt, sollte er außer Betrieb genommen werden.
1. Thermostatregler auf Position "0"
2. Netzstecker ziehen
Den Kühlschrank entleeren, abtauen und reinigen
wie vorher beschrieben.
Die Kühlschranktür leicht geöffnet lassen.
4.4.2 Einlagern von Waren in das
Frosterfach
Bewahren Sie keine kohlesäurehaltigen
Getränke im Frosterfach auf.
Das Frosterfach ist für die Eiswürfelbereitung
und für die kurzfristige Aufbewahrung gefrorener Lebensmittel geeignet. Es ist nicht
geeignet zum Einfrieren von Lebensmitteln.
Zur Eisbereitung wird die Eisschale mit Wasser
gefüllt und auf den Boden im Tiefkühlfach
gestellt. Für eine schnellere Eisbereitung stellen
Sie den Thermostatknopf auf höchste Stufe.
Nach Fertigstellung der Eiswürfel den Thermostatknopf wieder zurückstellen.
4.4.3 Eiswürfelbereitung
Nur Trinkwasser verwenden!
WARNUNG!
Nie warme Lebensmittel in den Kühlschrank
einlagern, erst abkühlen lassen.
Waren, die leichtflüchtige, brennbare Gase
abgeben können, dürfen nicht im Kühlschrank aufbewahrt werden.
Der Kühlschrank darf nicht der direkten
Sonnenbestrahlung ausgesetzt werden.
Eine ungehinderte Luftzirkulation des Kühl-
schrankaggregates muss gewährleistet sein.
Die Lüftungsgitter dürfen nicht verdeckt sein.
Die Reifschicht darf niemals gewaltsam
entfernt oder das Abtauen mit einem
Heizstrahler beschleunigt werden!
VORSICHT!
Page 13
13
Bedienung
4.8 Türanschlag wechseln
Den unteren Scharnierbolzen lösen.
Die Kühlschranktüre abnehmen.
Den oberen Scharnierbolzen lösen und auf der
entgegengesetzten Seite montieren.
Die Tür auf den oberen Scharnierbolzen set-
zen und den unteren Bolzen montieren.
Kontrollieren, dass sich die Tür frei bewegen
lässt und die Türdichtung dicht am Kühlschrankgehäuse anliegt.
Bei montiertem Türgriff, Türgriff auf andere
Seite montieren.
4.9 Dekorplatte wechseln
Tür ausbauen wie unter “Türanschlag wech-
seln” beschrieben.
Unteren Teil des Türrahmens abschrauben,
Dekorplatte nach unten herausziehen.
Neue Platte einpassen und nach oben schie-
ben.
Unteren Teil des Türrahmens wieder anschrau-
ben.
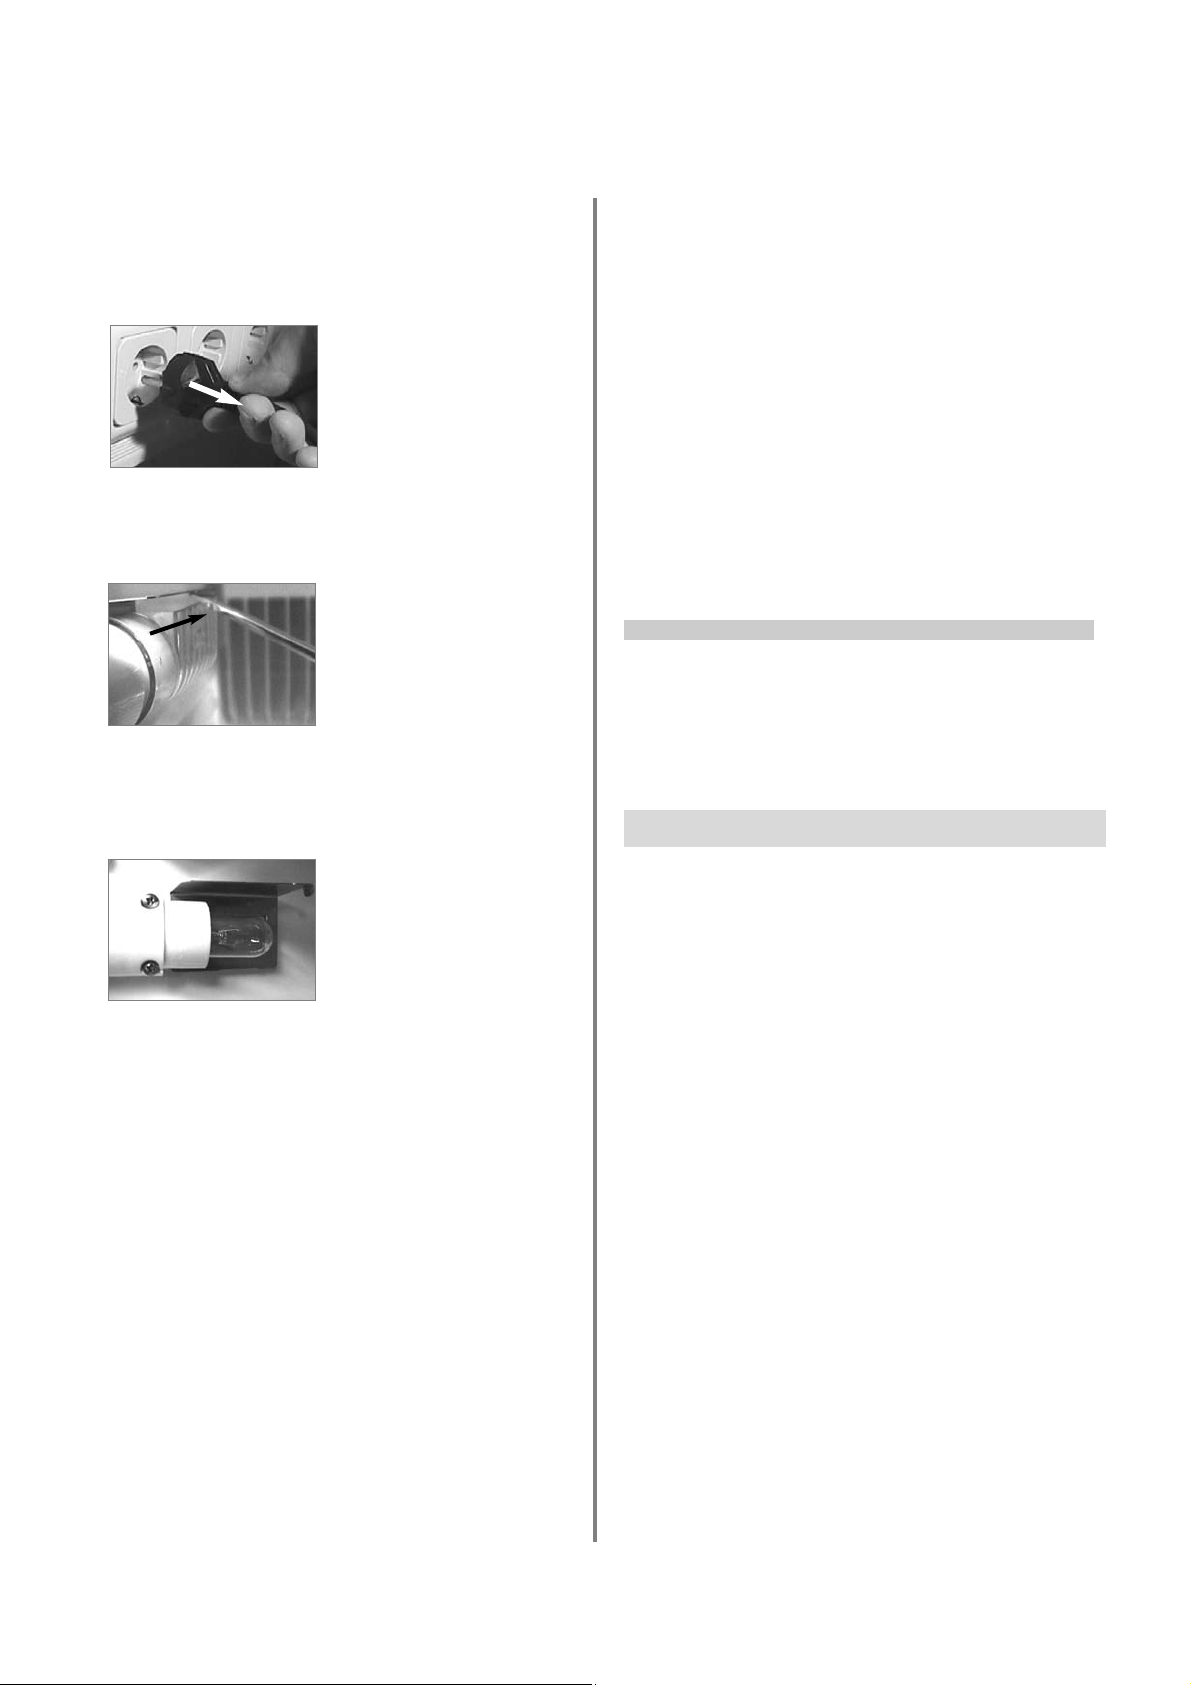
4.7 Beleuchtung
Netzstecker herausziehen.
Sicherungsblech anheben und Streuscheibe
nach hinten herausziehen.
Defekte Glühlampe herausdrehen und neue
Lampe einschrauben.
(Glühlampe E14, 230V, 6/10W)
4.7.1 Wechsel der Glühlampe
Abb. 9
Abb. 10
Abb. 11
Abmessungen der Dekorplatte :
724,0 mm 492,5 mm max. 3,2 mm
Höhe Breite Dicke
RH 303 L
Gehäuse Metall
Bruttoinhalt (Liter) 103
davon Frosterfach 12
Abmessungen (mm)
(H x B xT) 753 x 525 x 535
Anschlussleistung (W) 125
Stromverbrauch
kWh / 24h* 2,6
Nettogewicht (kg) 31
Einbau x
4.10 Technische Daten
*
Durchschnittlicher Stromverbrauch gemessen bei
einer durchschnittlichen Umgebungstemperatur von
25°C im Jahresmittel.
Technische Änderungen vorbehalten!
Page 14
14
Bedienung
4.11 Verhalten bei Störungen
a.) Der Thermostat steht auf "0".
b.) Der Gerätestecker ist nicht
eingesteckt.
c.) An der Steckdose liegt keine
Spannung an.
d.) Heizpatrone defekt.
a.) Temperaturregelung auf
mittlere Stellung bringen.
b.) Gerätestecker einstecken.
c.) Haussicherung überprüfen.
d.) Neue Heizpatrone einbauen.
a.) Das Gerät steht nicht in der
Waage.
b.) Das Gerät ist erst vor kurzer
Zeit eingeschaltet worden.
c.) Kühlaggregat defekt.
a.) Das Gerät mit Hilfe einer
Wasserwaage ausrichten.
b.) Das Gerät 5-6 Std. in Betrieb
lassen, erneut prüfen.
c.) Überprüfen ob Reparatur lohnt,
wenn nicht Gerät tauschen.
Störung: Keine Kühlung (das Aggregat auf der Rückseite des Gerätes ist kalt).
Mögliche Ursache Selbsthilfe autorisierter Service
Störung : Keine Kühlung ( das Aggregat ist warm).
Mögliche Ursache Selbsthilfe autorisierter Service
a.) Die Kühlschranktür schließt
nicht dicht ab.
a.) Einbau gemäß 3.3
überprüfen.
a.) Türdichtung prüfen, ggf. aus-
wechseln.
Störung : Frostbildung im Kühlschrank.
Mögliche Ursache Selbsthilfe autorisierter Service
a.) Die Belüftung des
Kühlaggregates ist nicht
ausreichend.
b.) Gerät ist der direkten
Sonnenbestrahlung
ausgesetzt.
c.) Die Kühlschranktür schließt
nicht dicht.
d.) Dauerbeleuchtung bei
geschlossener Tür.
e.) Der Kühlschrank wurde vor
kurzer Zeit aufgefüllt.
a.) Prüfen ob die Ventilationsgitter
nicht abgedeckt sind.
b.) Installationsanweisung
beachten.
c.) Einbau überprüfen.
e.) Kühlschrank nach 5-6 Stunden
auf Kühlung überprüfen
c.) Türdichtung prüfen, ggf. aus-
wechseln.
d.) Beleuchtung überprüfen
eventuell austauschen.
Störung : Schlechte Kühlleistung.
Mögliche Ursache Selbsthilfe autorisierter Service
Page 15

15
1.0 Généralités . . . . . . . . . . . . . . . . . . . . . . . . . . . . . . . . . . . . . . . . . . . . 16
1.1 Introduction . . . . . . . . . . . . . . . . . . . . . . . . . . . . . . . . . . . . . . . . . . . . . . . . . . . . . . . . . . . . . . . . 16
1.2 Indications concernant cette notice d'utilisation . . . . . . . . . . . . . . . . . . . . . . . . . . . . . . . . . . . . 16
1.3 Droit de reproduction réservé . . . . . . . . . . . . . . . . . . . . . . . . . . . . . . . . . . . . . . . . . . . . . . . . . . 16
1.4 Explication des symboles utilisés . . . . . . . . . . . . . . . . . . . . . . . . . . . . . . . . . . . . . . . . . . . . . . . 16
1.5 Garantie . . . . . . . . . . . . . . . . . . . . . . . . . . . . . . . . . . . . . . . . . . . . . . . . . . . . . . . . . . . . . . . . . . . 17
1.6 Limitation de la responsabilité . . . . . . . . . . . . . . . . . . . . . . . . . . . . . . . . . . . . . . . . . . . . . . . . . . 17
1.7 Service après-vente . . . . . . . . . . . . . . . . . . . . . . . . . . . . . . . . . . . . . . . . . . . . . . . . . . . . . . . . . . 17
1.8 Pièces de rechange . . . . . . . . . . . . . . . . . . . . . . . . . . . . . . . . . . . . . . . . . . . . . . . . . . . . . . . . . . 18
1.9 Conseils relatifs à l'environnement . . . . . . . . . . . . . . . . . . . . . . . . . . . . . . . . . . . . . . . . . . . . . . 18
1.9.1 Mise au rebut . . . . . . . . . . . . . . . . . . . . . . . . . . . . . . . . . . . . . . . . . . . . . . . . . . . . . . . . . . . . . . . . . . . . . . . 18
1.9.2 Conseils d'économie d'énergie . . . . . . . . . . . . . . . . . . . . . . . . . . . . . . . . . . . . . . . . . . . . . . . . . . . . . . . . 18
1.10 Déclaration de conformité . . . . . . . . . . . . . . . . . . . . . . . . . . . . . . . . . . . . . . . . . . . . . . . . . . . . . 18
2.0 Consignes de sécurité concernant . . . . . . . . . . . . . . . . . . . . . . . . . 19
2.1 Utilisation conforme . . . . . . . . . . . . . . . . . . . . . . . . . . . . . . . . . . . . . . . . . . . . . . . . . . . . . . . . . . 19
2.2 Responsabilité de l'utilisateur . . . . . . . . . . . . . . . . . . . . . . . . . . . . . . . . . . . . . . . . . . . . . . . . . . 19
2.3 Protéger les enfants lors de la mise au rebut de l'appareil . . . . . . . . . . . . . . . . . . . . . . . . . . . . 19
2.4 Travaux et contrôles sur le réfrigérateur . . . . . . . . . . . . . . . . . . . . . . . . . . . . . . . . . . . . . . . . . .19
2.5 Informations sur le fluide réfrigérant . . . . . . . . . . . . . . . . . . . . . . . . . . . . . . . . . . . . . . . . . . . . . 19
3.0 Installation . . . . . . . . . . . . . . . . . . . . . . . . . . . . . . . . . . . . . . . . . . . . 20
3.1 Déballage . . . . . . . . . . . . . . . . . . . . . . . . . . . . . . . . . . . . . . . . . . . . . . . . . . . . . . . . . . . . . . . . . . 20
3.2 Branchement de l'appareil au réseau . . . . . . . . . . . . . . . . . . . . . . . . . . . . . . . . . . . . . . . . . . . . 20
3.3 Installation . . . . . . . . . . . . . . . . . . . . . . . . . . . . . . . . . . . . . . . . . . . . . . . . . . . . . . . . . . . . . . . . . 20
3.3.1 Schéma de montage . . . . . . . . . . . . . . . . . . . . . . . . . . . . . . . . . . . . . . . . . . . . . . . . . . . . . . . . . . . . . . . . . 20
3.3.2 Installation dans une niche 6/6 . . . . . . . . . . . . . . . . . . . . . . . . . . . . . . . . . . . . . . . . . . . . . . . . . . . . . . . . . 22
3.4 Glissière d'entraînement de porte . . . . . . . . . . . . . . . . . . . . . . . . . . . . . . . . . . . . . . . . . . . . . . . 22
3.5 Montage de la poignée de porte . . . . . . . . . . . . . . . . . . . . . . . . . . . . . . . . . . . . . . . . . . . . . . . .22
4.0 Utilisation . . . . . . . . . . . . . . . . . . . . . . . . . . . . . . . . . . . . . . . . . . . . . 23
4.1 Nettoyage . . . . . . . . . . . . . . . . . . . . . . . . . . . . . . . . . . . . . . . . . . . . . . . . . . . . . . . . . . . . . . . . . . 23
4.2 Mise en service . . . . . . . . . . . . . . . . . . . . . . . . . . . . . . . . . . . . . . . . . . . . . . . . . . . . . . . . . . . . . 23
4.3 Réglage de la température . . . . . . . . . . . . . . . . . . . . . . . . . . . . . . . . . . . . . . . . . . . . . . . . . . . . . 23
4.4 Stockage des aliments et préparation des glaçons . . . . . . . . . . . . . . . . . . . . . . . . . . . . . . . . . 23
4.4.1 Stockage des aliments dans la chambre frigorifique . . . . . . . . . . . . . . . . . . . . . . . . . . . . . . . . . . . . . . . . . 23
4.4.2 Stockage des aliments dans le freezer . . . . . . . . . . . . . . . . . . . . . . . . . . . . . . . . . . . . . . . . . . . . . . . . . . . 24
4.4.3 Préparation des glaçons . . . . . . . . . . . . . . . . . . . . . . . . . . . . . . . . . . . . . . . . . . . . . . . . . . . . . . . . . . . . . . . 24
4.5 Mise hors-service . . . . . . . . . . . . . . . . . . . . . . . . . . . . . . . . . . . . . . . . . . . . . . . . . . . . . . . . . . . . 24
4.6 Dégivrage . . . . . . . . . . . . . . . . . . . . . . . . . . . . . . . . . . . . . . . . . . . . . . . . . . . . . . . . . . . . . . . . . . 24
4.7 Éclairage . . . . . . . . . . . . . . . . . . . . . . . . . . . . . . . . . . . . . . . . . . . . . . . . . . . . . . . . . . . . . . . . . . . 25
4.7.1 Remplacement de l'éclairage . . . . . . . . . . . . . . . . . . . . . . . . . . . . . . . . . . . . . . . . . . . . . . . . . . . . . . . . . . . 25
4.8 Changement du sens d'ouverture de la porte . . . . . . . . . . . . . . . . . . . . . . . . . . . . . . . . . . . . . . 25
4.9 Remplacement du panneau décoratif . . . . . . . . . . . . . . . . . . . . . . . . . . . . . . . . . . . . . . . . . . . . 25
4.10 Caractéristiques techniques . . . . . . . . . . . . . . . . . . . . . . . . . . . . . . . . . . . . . . . . . . . . . . . . . . . 25
4.11 Conseils en cas de panne . . . . . . . . . . . . . . . . . . . . . . . . . . . . . . . . . . . . . . . . . . . . . . . . . . . . . 26
4.12 Service-Information . . . . . . . . . . . . . . . . . . . . . . . . . . . . . . . . . . . . . . . . . . . . . . . . . . . . . . . . . . 51
Table des matières
Français
Page 16
16
Généralités
1.0 Généralités
En achetant ce réfrigérateur à absorption, vous
avez fait un choix judicieux. Nous sommes persuadés que votre nouveau réfrigérateur vous
donnera entière satisfaction. Ce réfrigérateur, de
marche silencieuse, satisfait aux exigences de
qualité et garantit une utilisation optimale pendant toute sa durée de vie (fabrication, utilisation
et mise au rebut).
1.1 Introduction
Les indications, textes et figures contenus dans
cette notice sont soumis au droit de reproduction
réservé et au droit de propriété industrielle.
Aucun contenu de cette notice ne peut être
reproduit, copié ou utilisé de quelconque manière sans l'accord par écrit du fabricant.
1.3 Droit de reproduction réservé
Il convient de lire attentivement ce mode
d'emploi avant de mettre le réfrigérateur en
marche.
Cette notice vous donne les indications nécessaires pour une utilisation conforme et correcte
de votre réfrigérateur. Tenez compte en particu-
lier des consignes de sécurité. Il est important
de respecter les indications et instructions de
service pour votre propre sécurité et pour éviter
tout dommage sur l'appareil. Il est important de
comprendre ce que vous lisez avant d'effectuer
toute manipulation.
Conservez soigneusement ce mode d'emploi
à proximité du réfrigérateur afin de pouvoir le
consulter à tout moment.
1.2 Indications concernant
cette notice d'utilisation
1.4 Explication des symboles
utilisés
Les avertissements sont caractérisés par des
symboles. Un texte complémentaire vous indique
le degré de danger.
Veuillez tenir compte de ces avertissements.
Vous protégez ainsi les personnes contre les
blessures et votre appareil contre les dégâts.
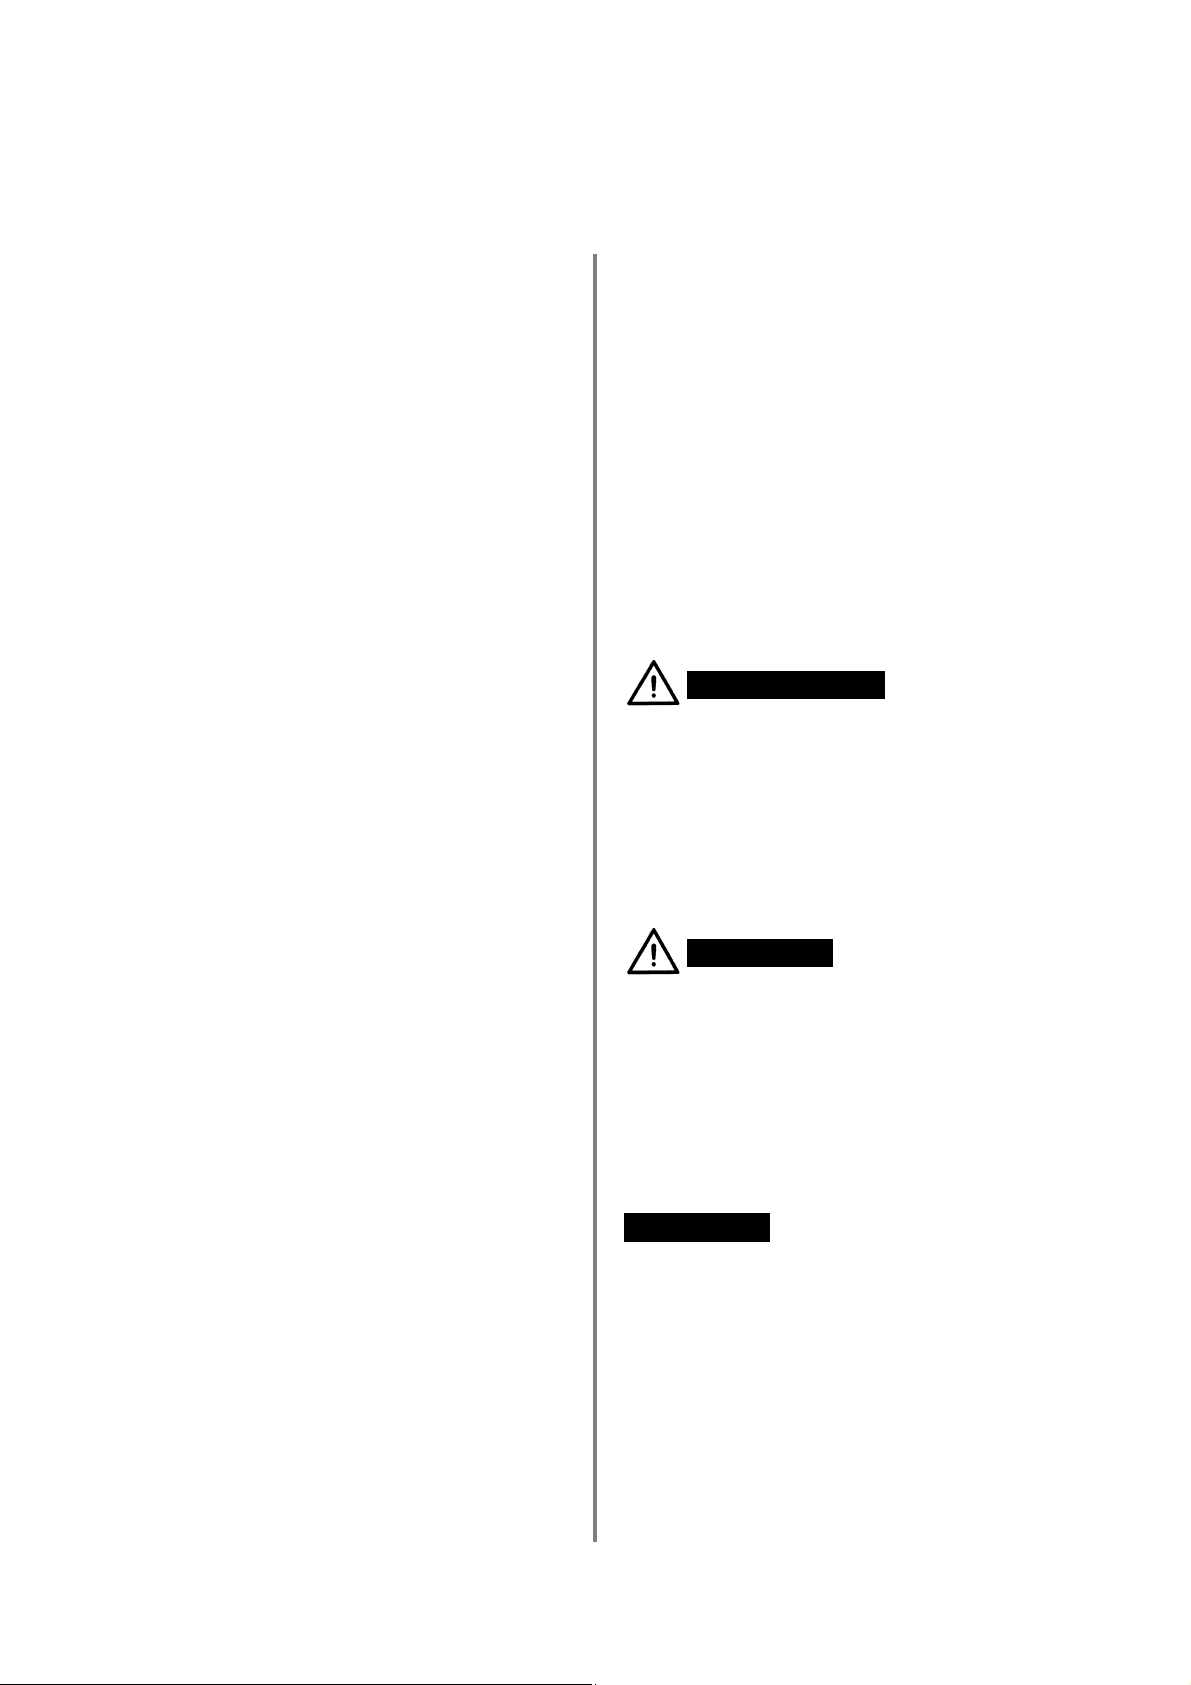
Avertissements
AVERTISSEMENT caractérise une situation de
danger possible qui peut causer la mort ou des
blessures graves en cas de non-application des
mesures de prévention.
AVERTISSEMENT !
ATTENTION caractérise une situation de danger
possible qui peut causer des blessures légères ou
sérieuses en cas de non-application des mesures
de prévention.
ATTENTION!
ATTENTION!
ATTENTION sans le symbole de sécurité caracté-
rise une situation de danger possible qui peut
endommager l'appareil en cas de non-application
des mesures de prévention.
Page 17

17
Généralités
Information
INFORMATION vous donne des indications com-
plémentaires utiles pour une manipulation correcte de votre réfrigérateur.
Environnement
ENVIRONMENT vous donne des conseils utiles
pour économiser l'énergie et pour la mise au rebut
de votre appareil.
Nous octroyons sur chaque produit 2 ans de
garantie à partir de la date de livraison ou de la
mise en service au consommateur (documenté
au moyen d'une facture, d'un bon de garantie ou
d'un justificatif d'achat). Notre garantie couvre les
frais de mains d'oeuvres et de déplacement, ainsi
que les pièces de rechange.
Les conditions de garantie ne sont pas valables
en cas d'intervention d'un tiers non autorisé, de
l'emploi de pièces de rechange non originales,
d'erreurs de maniement ou d'installation dues à
l'inobser-vation du mode d'emploi, et pour des
dommages causés par des influences extérieures
ou de force majeure.
1.5 Garantie
Toutes les instructions et indications contenues
dans ce mode d'emploi ont été données en
tenant compte des normes et prescription en
vigueur et correspondent au niveau de la technique. Le fabricant se réserve le droit d'effectuer à
tout moment des modifications sur le produit
qu'il considère appropriées pour l'amélioration
du produit et la sécurité.
Le fabricant n'endosse aucune responsabilité
pour les dommages résultant de :
non-observation du mode d'emploi
utilisation non conforme
utilisation de pièces de rechange non origi-
nales
modifications incorrectes et interventions
non appropriées sur l'appareil
Effets dûs aux conditions ambiantes, tels
que
- changements de température
- humidité
1.6 Limitation de la responsabilité
Lorsque vous contactez nos services aprèsvente, indiquez toujours le modèle, le numéro du
produit, le numéro de série et, le cas échéant, le
code MLC ! Vous trouverez ces informations sur
la plaque signalétique située à l'intérieur du réfrigérateur.
Information de services : p. 51
1.7 Service après-vente
Page 18

18
Généralités
Le fluide réfrigérant utilisé dans le groupe frigorifique est de l'ammoniaque (composé naturel
d'hydrogène et d'azote). Le cyclopentane, produit qui n'attaque pas la couche d'ozone, est utilisé comme produit moussant dans la préparation de la mousse PU d'isolation.
Afin de s'assurer que le matériel d'emballage
recyclable sera réutilisé, il doit être envoyé au
centre de collecte habituel. L'appareil doit être
cédé à une société de recyclage appropriée qui
assure la récupération des parties recyclables et
une mise au rebut conforme du reste de l'appareil. Pour des raisons écologiques, la vidange du
liquide réfrigérant de tous les groupes frigorifiques à absorption doit être effectuée dans un
établissement de retraitement approprié.
Les appareils portant ce symbole
doivent être obligatoirement remis à
un point de collecte local pour la mise
au rebut d'appareils électriques et
électroniques.
1.9 Conseils relatifs à
l'environnement
1.9.1 Mise au rebut
1.8 Pièces de rechange
Lorsque vous contactez le centre d'appels, indiquez toujours le modèle et le numéro du produit !
Vous trouverez ces informations sur la plaque
signalétique située à l'intérieur du réfrigérateur.
Information de services : p. 51
Ne pas exposer le réfrigérateur au rayonnement
direct du soleil ou à toute autre source de chaleur (p. ex. chauffage).
Veiller à ne pas obstruer la circulation d'air
du groupe frigorifique.
Mettre le réfrigérateur en service environ 12
heures avant de le remplir.
Dans la mesure du possible, ne stocker que
des aliments déjà refroidis.
Ne pas surcharger les clayettes et comparti-
ments pour ne pas entraver la circulation d'air
interne.
Laisser un espace entre les denrées réfrigérées
et l'évaporateur (" ailettes de refroidissement ").
Lors du retrait de denrées, veillez à refer-
mer rapidement la porte du réfrigérateur.
Tenir compte des indications de montage
(Para. 3.3) !
1.9.2 Conseils d'économie d'énergie
1.10 Déclaration de conformité
- Low Voltage Directive 73/23/EEC and the
Amendment to LVD 90/683/EEC,2006/95EC
- EMC Directive 89/336/EEC, 2004/108/EC
- CE Marking Directive 93/68/EEC
- RoHS Directive 2002/95EC
Directives
Type family : H 20/60
- EN 60335-1;2002+A11+A12+A1+A2
(IEC 60335-1; 2001+A1+A2)
- EN 60335-2-24;2003+A1+A2+A11
(IEC 60335-2-24; 2002+A1+A2)
- EN 61000-3-2;95,A1,A2,A14
- EN 61000-3-3;95,A1
- EN 50366;2003+A1
- EN 55014-1;00,A1,A2
- EN 55014-2;97,A1
Standards
Page 19

19
Consignes de sécurité
2.0 Consignes de sécurité
Ce refrigérateur est prévu pour un encastrement
dans un meuble.
Utilisez le réfrigérateur uniquement pour le refroidissement et le stockage des aliments.
2.1 Utilisation conforme 2.4 Travaux et contrôles sur le
réfrigérateur
2.3 Protéger les enfants après
la mise au rebut de l'appareil
Seule une personne habilitée est autorisée à
effectuer des travaux sur les installations
électriques. Les mesures non appropriées
peuvent causer des dommages aux personnes et des dégâts matériels considérables.
AVERTISSEMENT !
Ne jamais ouvrir le groupe frigorifique à
absorption! Il est sous haute pression.
Risque de blessures !
AVERTISSEMENT !
Les personnes utilisant le réfrigérateur doivent
être familiarisées avec les consignes de sécurité
et connaître les indications de ce mode d'emploi.
2.2 Responsabilité de l'utilisateur
2.5 Information sur le fluide réfrigérant
L'ammoniaque est utilisée comme fluide réfrigérant.
C'est un composé naturel, également contenu
dans les nettoyants ménagers (1 litre de nettoyant au sel ammoniac contient jusqu'à 200 g
d'ammoniaque, c'est-à-dire environ deux fois
plus que le réfrigérateur). Le chromate de sodium
est utilisé comme agent anti-corrosion (dosé
1,8% du dissolvant).
En cas de fuite (facilement décelable en raison de
la forte odeur) procédez ainsi :
- Débranchez l'appareil.
- Aérez la pièce à fond.
- Informez votre service après-vente agréé.
Pour votre sécurité , une expertise a été
menée et confirme, qu'en cas de fuite du fluide réfrigérant, il n'y a aucun risque pour la
santé.
Lors de la mise au rebut du réfrigérateur,
démontez toutes les portes et laissez les
clayettes dans l'appareil. Tout risque d'enfermement ou d'asphyxie pourra ainsi être
évité.
AVERTISSEMENT !
Le réfrigérateur n'a pas été conçu pour la
conservation professionnelle de médicaments. Veuillez tenir compte des indications
figurant sur la notice d'emballage du médicament.
AVERTISSEMENT !
Page 20

20
Installation
3.0 Installation
Vérifiez au cours du déballage que l'appareil ne
présente aucun défaut.
Tout dommage imputable au transport doit
être signalé sur le champ au transporteur.
Vérifiez que la puissance indiquée sur l'éti-
quette correspond à la puissance du
réseau.
3.1 Déballage
Le réfrigérateur doit être à niveau dans
les deux sens.
Il doit y avoir 20 mm de dégagement par
rapport au mur.
Une aération doit être prévue selon les
schémas 1, 2, 3 ou 4.
Seule l'unité de refroidissement entière
doit s'avancer dans le conduit comme
illustré.
L'air passant dans le conduit ne doit pas
être chauffé au préalable par une source
de chaleur.
Si des grilles d'aération sont utilisées,
elles doivent présenter des ouvertures
d'au moins 200 cm² chacune.
Utilisez des grilles standard !
(L = 455 mm, H = 65 mm)
La profondeur de niche doit être d'au moins
580 mm.
3.3 Installation
Veuillez suivre attentivement les détails de
l'installation fournis ci-dessous. La garantie
ne vaut que pour les produits installés conformément à la description suivante.
ATTENTION
3.3.1 Schéma de montage
Les différentes possibilités de montage de l'appareil sont représentées sur les illustrations suivantes (1 à 4).
= Grille de ventilation
= Amenée d'air
= Air vicié
2
1
3
3.2 Branchement de l'appareil au
réseau
L'appareil doit être raccordé à une prise
correctement mise à la terre et conforme
aux normes en usage dans le pays.
La fiche secteur doit être accessible.
Vérifiez que la puissance indiquée sur l'éti
quette correspond à la puissance du
réseau. Dans le cas contraire, ne procédez
pas au branchement et prenez contact
avec votre revendeur !
Fig. 1
Si la ligne de branchement est endommagée, celle-ci doit être remplacée par le service clientèle de Electrolux ou tout autre
personnel également qualifié afin d'éviter
les éventuels dangers.
ATTENTION!
Page 21

21
Installation
Fig. 2
Fig. 3
1
2
200 cm²
20 mm
200 cm²
20 mm
3
200 cm²
20 mm
Fig. 5
4
200 cm²
20 mm
2
2
2
2
1
1
1
1
1
1
3
3
3
3
Page 22

22
Installation
3.4 Glissière d'entraînement de
porte
3.5 Montage de la poignée de
porte
Une fois fermée, la porte du placard ne doit
pas reposer contre le reste de l'entourage
du placard (distance de 1à 2 mm).
3.3.2 Installation dans une niche 6/6
Fig. 6
Fig. 7
Fig. 7
Les points de fixation sont marqués.
Page 23

23
Utilisation
4.0 Utilisation
Avant de mettre en route le réfrigérateur, nous
vous conseillons de procéder à un nettoyage
intérieur et extérieur.
Munissez-vous d'un chiffon doux, d'eau
tiède et d'un détergent doux.
Puis, lavez le réfrigérateur à l'eau propre et
séchez-le entièrement.
Tous les ans, ôtez du groupe frigorifique la
poussière accumulée à l'aide d'une brosse ou
d'un chiffon doux.
4.1 Nettoyage
L'appareil doit être branché à une prise cor
rectement mise à la terre.
Le réfrigérateur datteint sa température de
fonctionnement en quelques heures.
4.2 Mise en Service
En prévention des dommages matériels :
N'utilisez jamais de savon ou de détergents durs, abrasifs ou contenant
de la soude.
Protégez le joint de porte des graisses
et huiles.
ATTENTION!
Le miniBar est équipé d'un dispositif de contrôle
de température électronique. Le bouton de contrôle du thermostat se situe dans la partie arrière
de la cuve.
Réglez le bouton tournant sur la position 3 - 5
pour atteindre une température moyenne.
Si vous souhaitez une température plus basse
(plus froide), réglez le bouton tournant sur une
position plus élevée.
Le réfrigérateur est éteint en position " 0 ".
4.3 Réglage de la température
Fig. 8
Le réfrigérateur fonctionne en silence !
4.4 Stockage des aliments et
préparation des glaçons
Mettez votre réfrigérateur en marche environ
12 heures avant de le remplir.
Ne stockez que des denrées refroidies à
l'avance. Lors des achats et du transport,
veillez à ce que les denrées soient bien fraîches et refroidies. Utilisez des sacs thermo.
Lors du retrait de denrées, veillez à refermer
rapidement la porte du réfrigérateur.
Il convient d'emballer les denrées dans des
boîtes de conservation, du papier alu ou du
film transparent et de les stocker séparément
afin d'éviter qu'elles ne se dessèchent ou ne
dégagent des odeurs.
4.4.1 Stockage des aliments dans la
chambre de réfrigération
Page 24

24
Utilisation
4.6 Dégivrage
Avec le temps, du givre se forme sur les ailettes
de refroidissement à l'intérieur du réfrigérateur
Lorsque la couche de givre atteint environ 3 mm,
il faut dégivrer le réfrigérateur.
Débranchez le réfrigérateur (thermostat sur
" 0 ").
Retirez tous les aliments et le bac à glaçons.
Laissez la porte du réfrigérateur ouverte pour
y laisser l'air circuler et éviter la formation de
moisissures.
Après le dégivrage, essuyez avec un chiffon
sec les deux compartiments du réfrigérateur
(le bac de congélation et les ailettes de refroidissement sont libérés du givre).
Remarque: L'eau de dégivrage du compartiment réfrigérateur est recueillie dans un bac collecteur, situé à l'arrière de l'appareil, d'où elle
s'évapore.
4.5 Mise hors-service
Si le réfrigérateur n'est pas utilisé pendant une
période prolongée, le mettre hors service.
1. Régler le thermostat sur la position " 0 "
2. Débrancher la fiche de secteur
Vider le réfrigérateur, le laisser se décongeler et le
nettoyer comme décrit ci-dessus.
Laisser la porte du réfrigérateur entrouverte.
4.4.2 Stockage des aliments dans le
congélateur
Ne conservez pas de boissons gazeuses
dans le congélateur.
Le congélateur est prévu pour la préparation
des glaçons et la conservation à court terme
des aliments congelés. Il n'est pas adapté à
la congélation d'aliments.
Pour la préparation de glaçons, remplir le bac à
glaçons d'eau et le déposer dans le fond du
compartiment congélateur. Réglez le bouton du
thermostat sur la position la plus élevée pour
accélérer la préparation des glaçons. Remettre le
bouton du thermostat en place lorsque les glaçons sont prêts.
4.4.3 Préparation des glaçons
Utiliser uniquement de l'eau potable !
AVERTISSEMENT!
Laissez d'abord refroidir les denrées avant de
les placer au réfrigérateur.
Ne pas stocker de denrées contenant des
gaz volatiles et inflammables dans le réfrigérateur.
Ne pas exposer le réfrigérateur aux rayons
directs du soleil. Tenez compte que la température à l'intérieur d'un véhicule fermé et
exposé au soleil augmente fortement et
entrave la performance du réfrigérateur.
Veiller à ne pas obstruer la circulation d'air du
groupe frigorifique. Les grilles d'aération ne
doivent pas être recouvertes.
Ne jamais enlever la couche de givre en utilisant la force, ni accélérer le dégivrage en
utilisant une source de chaleur !
ATTENTION!
Page 25

25
Utilisation
4.8 Changement du sens
d'ouverture de la porte
Dévisser le boulon de charnière du bas.
Retirer la porte du réfrigérateur.
Dévisser le boulon de charnière du haut et le
monter sur le côté opposé.
Placer la porte sur le boulon de charnière du
haut et monter le boulon du bas.
Vérifier que la porte puisse s'ouvrir librement
et que le joint de porte adhère parfaitement
sur le corps du réfrigérateur.
Si une poignée de porte est installée, la mon-
ter de l'autre côté.
4.9 Changement du panneau de
décor
Démonter la porte comme décrit sous "
Changement du sens d'ouverture de la porte ".
Dévisser la partie inférieure du cadre de porte,
enlever le panneau décoratif en le tirant vers le
bas.
Ajuster le nouveau panneau et le pousser vers le
haut.
Revisser la partie inférieure du cadre de porte.
4.7 Eclairage
Débranchez la prise de raccordement au
réseau.
Soulever la tôle de protection et enlever le
verre diffuseur en le tirant vers l'arrière.
Dévisser l'ampoule défectueuse et revisser une
nouvelle ampoule.
(ampoule E14, 230V, 6/10W)
4.7.1 Remplacement des ampoules
Fig. 9
Fig. 10
Fig. 11
Dimensions du panneau de décor :
724,0 mm 492,5 mm max. 3,2 mm
Hauteur Largeur Epaisseur
RH 303 L
Carrosserie Métal
Contenance brute (litres) 103
compartiment congélateur 12
Dimensions (mm)
(H x L x P) 753 x 525 x 535
Puissance nominale (W) 125
Consommation électrique
kWh / 24h* 2,6
Poids net (kg) 31
Encastré x
4.10 Caractéristiques techniques
*
Consommation électrique mesurée à une température
ambiante moyenne de 25°C considérée comme valeur
moyenne annuelle. Nous nous réservons le droit
demodifier sans préavis les caractéristiques techniques de nos produits !
Page 26

26
Utilisation
4.11 Conseils en cas de panne
a.) Le thermostat est sur la
position "0".
b.) La prise de l'appareil n'est
pas branchée.
c.) Pas de tension à la prise.
e.) Résistance de chauffage
défectueuse.
a.) Placer le contrôle de
température sur la position
moyenne.
b.) Brancher la prise de
l'appareil.
c.) Vérifier le fusible de l'installation.
d.) Installer une nouvelle résistance
de chauffage.
a.) L'appareil n'est pas de
niveau.
b.) L'appareil n'est en marche
que depuis peu de temps.
c.) Groupe frigorifique défectueux.
a.) Mettre l'appareil de niveau
à l'aide d'un niveau àbulle.
b.) Mettre l'appareil en marche
et le laisser fonctionner
pendant 5 à 6 heures.
c.) Vérifier si une réparation est pos
sible. Dans le cas contraire,
changer l'appareil.
Problème : Absence de refroidissement (l'agrégat au dos de l'appareil est froid).
Cause Possible Vous pouvez Intervention du Réparateur Agréé
Problème : Pas de refroidissement (l'agrégat est tiède).
Cause Possible Vous pouvez Intervention du Réparateur Agréé
a.) La porte du réfrigérateur ne
ferme pas complètement.
a.) Vérifier si l'installation est
conforme aux instructions
3.3 .
a.) Installer un nouveau joint de
porte si nécessaire.
Problème : Formation de givre dans le réfrigérateur
Cause Possible Vous pouvez Intervention du Réparateur Agréé
a.) Le groupe frigorifique est
insuffisamment ventilé.
b.) L'appareil est directement
exposé aux rayons du soleil.
c.) La porte du réfrigérateur ne
ferme pas complètement.
d.) La lumière reste allumée
quand la porte est fermée.
e.) Le réfrigérateur vient juste
d'être chargé.
a.) Vérifier que les grilles de
ventilation ne sont obstruées.
b.) Suivre les instructions
d'installation.
c.) Vérifier si l'installation est
conforme aux instructions
3.3 .
e.) Vérifier le bon fonctionne-
ment du système de réfri gération après 4 ou 5 heures de
marche.
c.) Le joint magnétique de la porte
est-il en place ? Installer une
nouvelle porte si nécessaire.
Problème : Refroidissement insuffisant
Cause Possible Vous pouvez Intervention du Réparateur Agréé
Page 27

27
1.0 Generalità . . . . . . . . . . . . . . . . . . . . . . . . . . . . . . . . . . . . . . . . . . . . . 28
1.1 Introduzione . . . . . . . . . . . . . . . . . . . . . . . . . . . . . . . . . . . . . . . . . . . . . . . . . . . . . . . . . . . . . . . . 28
1.2 Avvertenze relative a queste istruzioni per l'uso . . . . . . . . . . . . . . . . . . . . . . . . . . . . . . . . . . . . 28
1.3 Tutela dei diritti d'autore . . . . . . . . . . . . . . . . . . . . . . . . . . . . . . . . . . . . . . . . . . . . . . . . . . . . . . 28
1.4 Spiegazione dei simboli utilizzati . . . . . . . . . . . . . . . . . . . . . . . . . . . . . . . . . . . . . . . . . . . . . . . . 28
1.5 Garanzia . . . . . . . . . . . . . . . . . . . . . . . . . . . . . . . . . . . . . . . . . . . . . . . . . . . . . . . . . . . . . . . . . . . 29
1.6 Limitazione della responsabilità . . . . . . . . . . . . . . . . . . . . . . . . . . . . . . . . . . . . . . . . . . . . . . . . . 29
1.7 Servizio Clienti . . . . . . . . . . . . . . . . . . . . . . . . . . . . . . . . . . . . . . . . . . . . . . . . . . . . . . . . . . . . . . 29
1.8 Pezzi di ricambio . . . . . . . . . . . . . . . . . . . . . . . . . . . . . . . . . . . . . . . . . . . . . . . . . . . . . . . . . . . . 30
1.9 Consigli sull'ambiente . . . . . . . . . . . . . . . . . . . . . . . . . . . . . . . . . . . . . . . . . . . . . . . . . . . . . . . . 30
1.9.1 Smaltimento . . . . . . . . . . . . . . . . . . . . . . . . . . . . . . . . . . . . . . . . . . . . . . . . . . . . . . . . . . . . . . . . . . . . . . . . 30
1.9.2 Suggerimenti per il risparmio energetico . . . . . . . . . . . . . . . . . . . . . . . . . . . . . . . . . . . . . . . . . . . . . . . . . . 30
1.10 Dichiarazione di conformità . . . . . . . . . . . . . . . . . . . . . . . . . . . . . . . . . . . . . . . . . . . . . . . . . . . . 30
2.0 Norme di sicurezza . . . . . . . . . . . . . . . . . . . . . . . . . . . . . . . . . . . . . 31
2.1 Uso conforme alle norme . . . . . . . . . . . . . . . . . . . . . . . . . . . . . . . . . . . . . . . . . . . . . . . . . . . . . . 31
2.2 Responsabilità dell'utente . . . . . . . . . . . . . . . . . . . . . . . . . . . . . . . . . . . . . . . . . . . . . . . . . . . . . 31
2.3 Protezione dei bambini per lo smaltimento dell'apparecchio . . . . . . . . . . . . . . . . . . . . . . . . . . 31
2.4 Lavori e controlli sul frigorifero . . . . . . . . . . . . . . . . . . . . . . . . . . . . . . . . . . . . . . . . . . . . . . . . . . 31
2.5 Informazioni sul refrigerante . . . . . . . . . . . . . . . . . . . . . . . . . . . . . . . . . . . . . . . . . . . . . . . . . . . . 31
3.0 Installazione . . . . . . . . . . . . . . . . . . . . . . . . . . . . . . . . . . . . . . . . . . . 32
3.1 Disimballo . . . . . . . . . . . . . . . . . . . . . . . . . . . . . . . . . . . . . . . . . . . . . . . . . . . . . . . . . . . . . . . . . . 32
3.2 Collegamento alla linea elettrica . . . . . . . . . . . . . . . . . . . . . . . . . . . . . . . . . . . . . . . . . . . . . . . . 32
3.3 Installazione . . . . . . . . . . . . . . . . . . . . . . . . . . . . . . . . . . . . . . . . . . . . . . . . . . . . . . . . . . . . . . . . 32
3.3.1 Schema di installazione . . . . . . . . . . . . . . . . . . . . . . . . . . . . . . . . . . . . . . . . . . . . . . . . . . . . . . . . . . . . . . . 32
3.3.2 Installazione in una nicchia 6/6 . . . . . . . . . . . . . . . . . . . . . . . . . . . . . . . . . . . . . . . . . . . . . . . . . . . . . . . . . 34
3.4 Cerniera . . . . . . . . . . . . . . . . . . . . . . . . . . . . . . . . . . . . . . . . . . . . . . . . . . . . . . . . . . . . . . . . . . . 34
3.5 Montare la maniglia della porta . . . . . . . . . . . . . . . . . . . . . . . . . . . . . . . . . . . . . . . . . . . . . . . . . 34
4.0 Istruzioni per l’uso . . . . . . . . . . . . . . . . . . . . . . . . . . . . . . . . . . . . . . 35
4.1 Pulizia . . . . . . . . . . . . . . . . . . . . . . . . . . . . . . . . . . . . . . . . . . . . . . . . . . . . . . . . . . . . . . . . . . . . . 35
4.2 Attivazione iniziale . . . . . . . . . . . . . . . . . . . . . . . . . . . . . . . . . . . . . . . . . . . . . . . . . . . . . . . . . . . 35
4.3 Controllo della temperatura . . . . . . . . . . . . . . . . . . . . . . . . . . . . . . . . . . . . . . . . . . . . . . . . . . . . 35
4.4 Sistemazione degli alimenti in frigorifero e preparazione dei cubetti di ghiaccio . . . . . . . . . . . 35
4.4.1 Conservare gli alimenti nel vano frigorifero . . . . . . . . . . . . . . . . . . . . . . . . . . . . . . . . . . . . . . . . . . . . . . . . 35
4.4.2 Conservazione di alimenti nel comparto del congelatore . . . . . . . . . . . . . . . . . . . . . . . . . . . . . . . . . . . . . 36
4.4.3 Produzione di cubetti di ghiaccio . . . . . . . . . . . . . . . . . . . . . . . . . . . . . . . . . . . . . . . . . . . . . . . . . . . . . . . . 36
4.5 Messa fuori servizio . . . . . . . . . . . . . . . . . . . . . . . . . . . . . . . . . . . . . . . . . . . . . . . . . . . . . . . . . . 36
4.6 Sbrinamento . . . . . . . . . . . . . . . . . . . . . . . . . . . . . . . . . . . . . . . . . . . . . . . . . . . . . . . . . . . . . . . . 36
4.7 Illuminazione . . . . . . . . . . . . . . . . . . . . . . . . . . . . . . . . . . . . . . . . . . . . . . . . . . . . . . . . . . . . . . . . 37
4.7.1 Sostituzione dei bulbi . . . . . . . . . . . . . . . . . . . . . . . . . . . . . . . . . . . . . . . . . . . . . . . . . . . . . . . . . . . . . . . . . 37
4.8 Sostituzione del fermo dello sportello . . . . . . . . . . . . . . . . . . . . . . . . . . . . . . . . . . . . . . . . . . . .37
4.9 Sostituzione del lastra decorativa . . . . . . . . . . . . . . . . . . . . . . . . . . . . . . . . . . . . . . . . . . . . . . . 37
4.10 Dati tecnici . . . . . . . . . . . . . . . . . . . . . . . . . . . . . . . . . . . . . . . . . . . . . . . . . . . . . . . . . . . . . . . . . 37
4.11 Elenco di controllo . . . . . . . . . . . . . . . . . . . . . . . . . . . . . . . . . . . . . . . . . . . . . . . . . . . . . . . . . . . 38
4.12 Service-Information . . . . . . . . . . . . . . . . . . . . . . . . . . . . . . . . . . . . . . . . . . . . . . . . . . . . . . . . . . 51
Sommario
Italiano
Page 28

28
Generalità
1.0 Generalità
Con questo frigorifero ad assorbimento avete
fatto una buona scelta. Siamo sicuri che sarete
completamente soddisfatti del vostro nuovo frigorifero, sotto tutti i punti di vista. Il frigorifero,
che funziona silenziosamente, è prodotto in base
a standard di alta qualità e garantisce un efficiente utilizzo delle risorse e dell'energia elettrica per
tutta la durata del suo ciclo vitale, durante la produzione, durante l'uso e quando viene rottamato.
1.1 Introduzione
Dati, testi e illustrazioni di queste istruzioni d'uso
sono protetti dai diritti d'autore e sono soggetti ai
diritti di protezione industriale.
Nessuna parte di queste istruzioni può essere
riprodotta,copiata o altrimenti utilizzata senza
l'autorizzazione del produttore.
1.3 Tutela dei diritti d'autore
leggere attentamente queste istruzioni per
l'uso.
Queste istruzioni vi forniscono le necessarie indicazioni per l'uso corretto del vostro frigorifero.
Fate particolarmente attenzione alle norme di
sicurezza. L'osservanza delle avvertenze e delle
istruzioni sul modo di procedere è importante per
l'impiego sicuro del vostro frigorifero e per proteggere da danni voi e il frigorifero. Per poter
attuare un provvedimento è necessario aver
capito quanto è stato letto.
Conservate accuratamente queste istruzioni
per l'uso accanto al frigorifero in modo da
poterle utilizzare in qualsiasi momento.
1.2 Avvertenze relative a queste
istruzioni per l'uso
1.4 Spiegazione dei simboli utilizzati
Le avvertenze sono contrassegnate da simboli.
Un testo integrativo vi spiega il grado di pericolo.
Osservate molto accuratamente questi segnali di avvertimento. In questo modo potete
proteggere da danni voi, altre persone e l'apparecchio.
Avvertenze
AVVERTIMENTO questo simbolo indica una situa-
zione potenziale di pericolo che può causare la
morte o ferite gravi in caso di mancata osservanza delle istruzioni date.
AVVERTIMENTO!
ATTENZIONE questo simbolo indica una situazio-
ne potenziale di pericolo che, può causare ferite
leggere o di media gravità in caso di mancata
osservanza delle istruzioni date.
ATTENZIONE!
ATTENZIONE!
ATTENZIONE questo simbolo indica una situazio-
ne potenziale di pericolo che, può causare ferite
leggere o di media gravità in caso di mancata
osservanza delle istruzioni date.
Page 29

29
Generalità
Informazioni
INFORMAZIONE questo simbolo vi fornisce ulte-
riori e utili indicazioni sul modo di procedere con il
vostro frigorifero.
Indicazione per l'ambiente
INDICAZIONE PER L'AMBIENTE questo simbolo
vi fornisce indicazioni utili sul risparmio di energia
e lo smaltimento dell'apparecchio.
Per ogni prodotto concediamo una garanzia di 2
anni a partire dalla data di consegna o dalla sua
messa in funzione. (fa stato la data della fattura,
del certificato di garanzia o dello scontrino d'acquisto) Nella garanzia sono comprese le spese di
manodopera, di viaggio e del materiale.
Dalla copertura sono esclusi il logoramento ed i
danni causati da agenti esterni, intervento di
terzi, utilizzo di ricambi non originali o dalla inosservanza delle prescrizioni d'istallazione ed istruzioni per l'uso.
1.5 Garanzia
Tutti i dati e le indicazioni di queste istruzioni per
l'uso sono stati stabiliti tenendo conto delle
norme e delle disposizioni in vigore, nonché
secondo lo stato dell'arte. Il produttore si riserva
di apportare in qualsiasi momento delle modifiche sul prodotto che siano opportune per migliorare sia il prodotto stesso che la sicurezza.
Il produttore non assume nessuna responsabilità
nel caso di:
mancata osservanza delle istruzioni per
l'uso,
impiego non conforme alle norme,
uso di pezzi di ricambio non originali,
modifiche e interventi non appropriati
sull'apparecchio
effetto di influenze ambientali, come
- variazioni di temperatura
- umidità atmosferica
1.6 Limitazione della responsabilità
Quando si contatta il Servizio clienti, indicare il
modello, il numero di prodotto e il numero di
serie, insieme al codice MLC, se applicabile.
Queste informazioni si trovano sulla targhetta dei
dati all'interno del frigorifero.
Informazioni die servizio : p. 51
1.7 Servizio Clienti
Page 30

30
Generalità
L'ammoniaca (un composto naturale di idrogeno
e azoto) è usata nell'unità di raffreddamento
come refrigerante. Il ciclopentano, non dannoso
per l'ozono, è usato come propellente per la produzione della schiuma di isolamento PU.
Per far in modo che i materiali riciclabili siano riutilizzati, gli stessi dovrebbero essere inviati al
centro di raccolta locale. L'apparecchio dovrebbe essere trasportato ad un'azienda specializzata nell'eliminazione dei rifiuti, in modo tale che i
componenti riciclabili siano riutilizzati e gli altri
componenti siano eliminati secondo le leggi
vigenti. Per l'eliminazione in modo ecologico del
refrigerante da tutte le unità del frigorifero di
assorbimento, deve essere usato un adeguato
impianto di smaltimento.
Gli apparecchi contrassegnati da
questo simbolo devono essere consegnati al centro di raccolta locale
preposto allo smaltimento di apparecchiature elettriche ed elettroniche.
Questo prodotto non deve essere
smaltito nei rifiuti domestici.
1.9 Consigli sull'ambiente
1.9.1 Smaltimento
1.8 Pezzi di ricambio
Indicare il modello, il numero di prodotto e il
numero di serie, insieme al codice MLC, se applicabile. Queste informazioni si trovano sulla targhetta dei dati all'interno del frigorifero.
Informazioni die servizio : p. 51
Non esporre il frigorifero alla luce diretta del
sole o ad altre fonti di calore (ad es. riscaldamento).
Deve essere assicurata la libera circolazio-
ne dell'aria nel frigorifero.
Mettere il frigorifero in funzione 12 ore
prima dell'installazione.
Se possibile, lasciar raffreddare le vivande
prima di metterle nel frigorifero.
Non riempire eccessivamente i ripiani e i cas-
setti per consentire una corretta circolazione
dell'aria all'interno.
Lasciare dello spazio libero tra i prodotti con-
servati nel frigorifero e l'evaporatore posteriore
("alette di raffreddamento").
Quando si preleva un alimento, aprire solo
brevemente la porta del frigorifero.
Seguire le istruzioni di installazione
(punto 3.3)!
1.9.2 Consigli sul risparmio energetico
1.10 Dichiarazione di conformità
- Low Voltage Directive 73/23/EEC and the
Amendment to LVD 90/683/EEC,2006/95EC
- EMC Directive 89/336/EEC, 2004/108/EC
- CE Marking Directive 93/68/EEC
- RoHS Directive 2002/95EC
Directives
Type family : H 20/60
- EN 60335-1;2002+A11+A12+A1+A2
(IEC 60335-1; 2001+A1+A2)
- EN 60335-2-24;2003+A1+A2+A11
(IEC 60335-2-24; 2002+A1+A2)
- EN 61000-3-2;95,A1,A2,A14
- EN 61000-3-3;95,A1
- EN 50366;2003+A1
- EN 55014-1;00,A1,A2
- EN 55014-2;97,A1
Standards
Page 31

31
Norme di sicurezza
2.0 Norme di sicurezza
Il frigorifero non è stato ideato per la conservazione conforme di medicinali. Fate
attenzione alle indicazioni nel foglietto
illustrativo dei medicinali.
AVVERTIMENTO!
Questo frigorifero è stato progettato per l'installazione a incasso.
Utilizzate il frigorifero esclusivamente per raffreddare e immagazzinare generi alimentari.
2.1 Uso conforme alle norme 2.4 Lavori e controlli sul
frigorifero
2.3 Proteggere i bambini dopo lo
smaltimento dell'apparecchio
Lavori su impianti a gas, impianti di gas di
scarico ed elettrici devono essere effettuati
solo da personale di servizio autorizzato.
Con provvedimenti non conformi alla perfetta regola d'arte possono risultare gravi
danni a persone e/ o a cose.
AVVERTIMENTO!
Non aprire mai il gruppo refrigeratore ad
assorbimento! È ad alta pressione.
Vi è pericolo di ferimento!
AVVERTIMENTO!
Le persone che utilizzano il frigorifero devono
avere dimestichezza con l'uso dello stesso e
conoscere le avvertenze di queste istruzioni
d'uso.
2.2 Responsabilità dell'utente
2.5 Informazioni sul refrigerante
Il refrigerante usato è l'ammoniaca.
Questa sostanza è un composto naturale usato
anche come prodotto di pulizia per la casa (1 litro
di Salmiak per la pulizia contiene fino a 200 grammi di ammoniaca -circa il doppio della quantità
usata nel frigorifero). Il sodio cromato viene utilizzato per proteggere dalla corrosione (1,8 % sul
peso del solvente).
In caso di perdite (facilmente identificabili
dall'odore sgradevole) procedere come segue:
- Spegnere l'apparecchio.
- Aerare bene la stanza .
- Contattare il centro autorizzato di Servizio clienti.
Per la vostra sicurezza è stato accertato dalla
perizia che non vi è alcun pregiudizio alla salute a causa dell'uscita del refrigerante.
Quando il frigorifero viene rottamato, rimuovere tutti gli sportelli e lasciare i ripiani all'interno. Questa operazione ne impedirà la
chiusura accidentale e il rischio soffocamento.
AVVERTIMENTO!
Page 32

32
Installazione
3.0 Installazione
Durante il disimballo, controllare che l'unità sia
priva di difetti.
Riferire ore eventuali danni alla società che ha
effettuato il trasporto.
Verificare che la tensione indicata sull'etichet-
ta del modello corrisponda
alla tensione di rete.
3.1 Disimballo
Il frigorifero deve essere a livello in entrambe le direzioni.
Vi dovrebbe essere uno spazio libero al
muro pari a 20 mm.
La ventilazione deve essere assicurata
come illustrato nelle alternative 1, 2, 3 o 4.
Solo l'intera unità di raffreddamento deve
proiettarsi nel condotto come illustrato.
L'aria passante attraverso il condotto non
deve essere preriscaldata da nessuna fonte
di calore.
Le griglie di ventilazione, se utilizzate,
devono essere dotate di aperture di almeno
200 cm² ciascuna.
Utilizzare griglie di ventilazione standard!
(L = 455 mm, A = 65 mm)
La profondità della nicchia deve essere pari
ad almeno 580 mm.
3.3 Installazione
Vi preghiamo di seguire con attenzione i dettagli di installazione illustrati sotto. La
garanzia è valida solo per i prodotti installati
come descritto.
ATTENZIONE!
3.2 Collegamento alla linea
elettrica
L'unità deve essere collegata ad una presa
correttamente messa a terra secondo le normative di legge valide per il paese.
La presa deve essere accessibile.
Prima dell'attivazione iniziale, verificare che la
tensione indicata sull'etichetta del modello
corrisponda alla tensione di rete. In caso contrario, non collegare l'unità e contattare il for
nitore.
Fig. 1
3.3.1 Schema di installazione
Le seguenti immagini (1 - 4) mostrano le diverse
possibilità di installazione dell'apparecchio.
= Grata di ventilazione
= Ingresso aria
= Aria di scarico
2
1
3
Se la linea di allacciamento è danneggiata,
deve essere sostituita dall'assistenza clienti
Electrolux o da personale specializzato e
qualificato al fine di evitare pericoli.
ATTENZIONE!
Page 33

33
Installazione
Fig. 2
Fig. 3
1
2
200 cm²
20 mm
200 cm²
20 mm
3
200 cm²
20 mm
Fig. 5
4
200 cm²
20 mm
2
2
2
2
1
1
1
1
1
1
3
3
3
3
Page 34

34
Installazione
3.4 Cerniera
Quando è chiuso, lo sportello del mobile (A)
deve trovarsi contro il resto della circostante
area del mobile (distanza 1-2 mm).
3.3.2 Installazione in una nicchia 6/6
Fig. 6
Fig. 7
3.5 Montare la maniglia della
porta
Fig. 7
I punti di fissaggio sono segnati.
Page 35

35
Istruzioni per l'uso
4.0 Istruzioni per l'uso
Prima di mettere in funzione il frigorifero si raccomada di pulire l'apparecchio all'interno e
all'esterno e di ripetere tale operazione regolarmente.
Usare un panno soffice e acqua tiepida con un
detergente delicatol.
Poi risciacquare l'apparecchio con acqua e
asciugarlo con cura.
Rimuovere la polvere dal frigorifero a interval
li annuali usando una spazzola o un
panno soffice.
4.1 Pulizia
L'unità deve essere collegata ad una presa
correttamente messa a terra.
Il frigorifero raggiunge la temperatura
d'esercizio dopo diverse ore.
4.2 Attivazione iniziale
Per evitare il deterioramento dei materiali :
Non usare sapone o tessuti ruvidi, prodot
ti di pulizia abrasivi o contenenti soda.
Non far entrare la guarnizione dello sportello in contatto con olio o grasso.
ATTENZIONE!
Il frigorifero è dotato di un controllo
elettronico della temperatura. Il pulsante di controllo del termostato si trova
nell'area posteriore del contenitore interno.
Posizionare la manopola su 3 - 5 per ottenere una
temperatura media.
Se si desidera una temperatura più bassa (più
fredda), ruotare la manopola fino a raggiungere la
posizione successiva.
In posizione "0", il frigorifero risulta spento.
4.3 Controllo della temperatura
Fig. 8
Il frigorifero funziona in maniera silenziosa
4.4 Sistemazione degli alimenti in
frigorifero e preparazione dei
cubetti di ghiaccio
Mettere il frigorifero in funzione 12 ore prima
dell'sistemazione.
Riporre sempre prodotti preraffreddati.
Assicurarsi che già al momento dell'acquisto
e durante il trasporto i prodotti siano ben raffreddati. Usare borse isotermiche.
Quando si preleva un alimento, aprire solo
brevemente la porta del frigorifero.
Gli alimenti devono essere confezionati pos-
sibilmente in contenitori chiusi e riposti separatamente uno dall'altro, per evitare che si
secchino o per impedire la formazione di
odori.
4.4.1 Conservare gli alimenti nel vano
frigorifero
Page 36

36
Istruzioni per l'uso
4.6 Sbrinamento
Con il tempo si accumula del ghiaccio sulle griglie. Può formarsi una patina di brina più spessa
da un lato, ma ciò non comporta una disfunzione.
Quando lo strato di ghiaccio è spesso circa 3
mm, il frigorifero deve essere sbrinato.
Spegnere il frigorifero (termostato sullo "0").
Rimuovere tutte le vivande e il vassoio dei
cubetti di ghiaccio.
Lasciare aperta la porta del frigorifero per
lasciare entrare l'aria e impedire che si formi
della muffa.
Dopo lo sbrinamento (scomparto surgelati e
griglie libere dal ghiaccio), asciugare con un
panno i due compartimenti del frigorifero.
Nota: L'acqua che si forma a causa dello scongelamento nel comparto principale del frigorifero
finisce in un appropriato contenitore posto sul
retro dell'apparecchio, da cui evapora.
4.5 Messa fuori servizio
Se il frigorifero non viene utilizzato per lungo
tempo, è opportuno metterlo fuori servizio.
1. Posizionare il termostato sullo "0"
2. Estrarre la spina
Svuotare, sbrinare e pulire il frigorifero come precedentemente descritto.
Lasciare leggermente aperto lo sportello del frigorifero.
4.4.2 Conservazione di alimenti nello
scomparto surgelati
Non conservare nello scomparto surgelati
delle bevande addizionate di anidride carbonica.
Lo scomparto surgelati è previsto per produr-
re cubetti di ghiaccio e per una breve conservazione di vivande surgelate. Non è adatto
per congelare vivande.
Per la preparazione dei cubetti di ghiaccio, riempire il contenitore d'acqua e riporlo sul piano del
congelatore. Per una preparazione più rapida,
posizionare la manopola del termostato sul livello più alto. Dopo aver terminato la preparazione
dei cubetti di ghiaccio, ruotare nuovamente la
manopola del termostato sul livello iniziale.
4.4.3 Produzione di cubetti di ghiaccio
Usare solo acqua potabile!
AVVERTIMENTO!
Far raffreddare i cibi riscaldati prima di ripor-
li in frigorifero.
Non conservare nel frigorifero prodotti da cui
possano esalare gas volatili o infiammabili.
Il frigorifero non deve essere esposto diretta-
mente ai raggi del sole. Occorre tener conto
che la temperatura interna in un veicolo chiuso aumenta molto se questo è esposto ai
raggi del sole; ciò può danneggiare il frigorifero.
Deve essere assicurata la libera circolazione
dell'aria nel frigorifero. La grata di ventilazione non deve essere coperta.
Lo strato di ghiaccio non deve mai essere
rimosso con la forza e il processo di sbrinamento non deve essere accelerato usando una sorgente di calore!
ATTENZIONE
Page 37

37
Istruzioni per l'uso
4.8 Sostituzione del fermo dello
sportello
Allentare il perno della cerniera inferiore.
Togliere lo sportello del frigorifero.
Allentare il perno della cerniera superiore e
montarlo sul lato opposto.
Posizionare lo sportello sul perno della cernie-
ra superiore e montare il perno inferiore.
Controllare che lo sportello possa muoversi
liberamente e che la guarnizione aderiscabene all'alloggiamento del frigorifero.
Se è presente, montare la maniglia dalla parte
opposta.
4.9 Sostituzione della placca
decorativa
Smontare lo sportello come descritto in
"Sostituzione del fermo dello sportello".
Svitare la parte inferiore del telaio dello spor
tello, tirare in basso la placca decorativa.
Inserire la nuova placca e farla scorrere verso
l'alto.
Riavvitare la parte inferiore del telaio dello
sportello.
4.7 Illuminazione
Estrarre la spina dalla presa di rete.
Sollevare la lamiera di sicurezza e tirare indie-
tro lo schermo diffusore.
Svitare la lampadina guasta e avvitare quella
nuova.
(Lampadina E14, 230V, 6/10W)
4.7.1 Sostituzione dei bulbi
Fig. 9
Fig. 10
Fig. 11
Dimensioni della placca decorativa :
724,0 mm 492,5 mm max. 3,2 mm
Altezza Larghezza Spessore
RH 303 L
Rivestimento Metallico
Contenuto lordo (litri) 103
scomparto surgelati 12
Dimensioni (mm)
(H x L x P) 753 x 525 x 535
Uscita nominale (W) 125
Potenza dissipata
kWh / 24h* 2,6
Peso netto (kg) 31
Installazione da incasso x
4.10 Dati tecnici
*
Potenza dissipata misurata ad una temperatura
ambiente media di 25 °C come valore annuo medio.
Ci riserviamo il diritto di apportare modifiche tecniche
ai nostri prodotti senza preavviso.
Page 38

38
Istruzioni per l'uso
4.11 Elenco di controllo
a.) Il termostato è impostato a "0".
b.) La spina dell'unità non è inserita
nella presa.
c.) Nella presa non è presente
tensione.
d.) Cartuccia di riscaldamento
difettosa.
a.) Impostare il controllo della tem-
peratura ad una posizione inter
media.
b.) Inserire la spina dell'unità nella
presa.
c.) Controllare il fusibile dell'
impianto.
d.) Installare una nuova cartuccia di
riscaldamento.
a.) L'unità non è livellata.
b.) L'unità è stata accesa da troppo
poco tempo.
c.) Gruppo di raffreddamento
difettoso.
a.) Livellare l'unità per mezzo di una
livella a bolla d'aria.
b.) Accendere l'unità e farla funzio-
nare per 5-6 ore.
c.) Verificare che la riparazione sia
possibile. In caso contrario,
sostituire l'unità.
Problema: Nessun raffreddamento (il gruppo sul retro dell'unità è freddo).
Possibile causa Provvedimento Assistenza autorizzata
Problema: Nessun raffreddamento (il gruppo è caldo).
Possibile causa Provvedimento Assistenza autorizzata
a.) Lo sportello del frigorifero non si
chiude correttamente.
a.) Verificare che l'installazione sia in
linea con 3.3.
a.) Il magnete dello sportello è pre-
sente? Installare un nuovo sportello
Problema: Formazione di brina nel frigorifero.
Possibile causa Provvedimento Assistenza autorizzata
a.) Il gruppo di raffreddamento non è
sufficientemente arieggiato.
b.) L'unità è esposta alla luce solare
diretta.
c.) Lo sportello del frigorifero non si
chiude correttamente.
d.) Il frigorifero è stato rifornito poco
tempo prima.
a.) Verificare che le griglie di ventila
zione non siano coperte.
b.) Seguire le istruzioni per l'installa-
zione.
c.) Verificare che l'installazione sia in
linea con 3.3.
d.) Controllare il frigorifero dopo 5-6
ore per verificare il corretto
funzionamento del raffreddamento.
c.) Installare un nuovo sportello, se
necessario.
Problema: Prestazioni di raffreddamento insoddisfacenti.
Possibile causa Provvedimento Assistenza autorizzata
Page 39

39
1.0 General . . . . . . . . . . . . . . . . . . . . . . . . . . . . . . . . . . . . . . . . . . . . . . 40
1.1 Introduction . . . . . . . . . . . . . . . . . . . . . . . . . . . . . . . . . . . . . . . . . . . . . . . . . . . . . . . . . . . . . . . . 40
1.2 Guide to these operating instructions . . . . . . . . . . . . . . . . . . . . . . . . . . . . . . . . . . . . . . . . . . . .40
1.3 Copyright protection . . . . . . . . . . . . . . . . . . . . . . . . . . . . . . . . . . . . . . . . . . . . . . . . . . . . . . . . . 40
1.4 Explanation of symbols used in this manual . . . . . . . . . . . . . . . . . . . . . . . . . . . . . . . . . . . . . . . 40
1.5 Warranty . . . . . . . . . . . . . . . . . . . . . . . . . . . . . . . . . . . . . . . . . . . . . . . . . . . . . . . . . . . . . . . . . . . 41
1.6 Limitation of liability . . . . . . . . . . . . . . . . . . . . . . . . . . . . . . . . . . . . . . . . . . . . . . . . . . . . . . . . . . 41
1.7 Customer services . . . . . . . . . . . . . . . . . . . . . . . . . . . . . . . . . . . . . . . . . . . . . . . . . . . . . . . . . . . 41
1.8 Spare parts . . . . . . . . . . . . . . . . . . . . . . . . . . . . . . . . . . . . . . . . . . . . . . . . . . . . . . . . . . . . . . . . . 42
1.9 Environmental notices . . . . . . . . . . . . . . . . . . . . . . . . . . . . . . . . . . . . . . . . . . . . . . . . . . . . . . . . 42
1.9.1 Disposal . . . . . . . . . . . . . . . . . . . . . . . . . . . . . . . . . . . . . . . . . . . . . . . . . . . . . . . . . . . . . . . . . . . . . . . . . . . 42
1.9.2 Energy saving tips . . . . . . . . . . . . . . . . . . . . . . . . . . . . . . . . . . . . . . . . . . . . . . . . . . . . . . . . . . . . . . . . . . . 42
1.10 Declaration of conformity . . . . . . . . . . . . . . . . . . . . . . . . . . . . . . . . . . . . . . . . . . . . . . . . . . . . . . 42
2.0 Safety instructions . . . . . . . . . . . . . . . . . . . . . . . . . . . . . . . . . . . . . . 43
2.1 Application according to regulations . . . . . . . . . . . . . . . . . . . . . . . . . . . . . . . . . . . . . . . . . . . . .43
2.2 User's responsibility . . . . . . . . . . . . . . . . . . . . . . . . . . . . . . . . . . . . . . . . . . . . . . . . . . . . . . . . . . 43
2.3 Protection of children when disposing of the refrigerator . . . . . . . . . . . . . . . . . . . . . . . . . . . . . 43
2.4 Working upon and checking the refrigerator . . . . . . . . . . . . . . . . . . . . . . . . . . . . . . . . . . . . . . . 43
2.5 Information on coolant . . . . . . . . . . . . . . . . . . . . . . . . . . . . . . . . . . . . . . . . . . . . . . . . . . . . . . . . 43
3.0 Installation . . . . . . . . . . . . . . . . . . . . . . . . . . . . . . . . . . . . . . . . . . . . 44
3.1 Unpacking . . . . . . . . . . . . . . . . . . . . . . . . . . . . . . . . . . . . . . . . . . . . . . . . . . . . . . . . . . . . . . . . . 44
3.2 Connecting the device to the electricity supply . . . . . . . . . . . . . . . . . . . . . . . . . . . . . . . . . . . . 44
3.3 Installation . . . . . . . . . . . . . . . . . . . . . . . . . . . . . . . . . . . . . . . . . . . . . . . . . . . . . . . . . . . . . . . . . 44
3.3.1 Installation schemes . . . . . . . . . . . . . . . . . . . . . . . . . . . . . . . . . . . . . . . . . . . . . . . . . . . . . . . . . . . . . . . . . . 44
3.3.2 Installation into 6/6 recess . . . . . . . . . . . . . . . . . . . . . . . . . . . . . . . . . . . . . . . . . . . . . . . . . . . . . . . . . . . . . 46
3.4 Sliding hinge . . . . . . . . . . . . . . . . . . . . . . . . . . . . . . . . . . . . . . . . . . . . . . . . . . . . . . . . . . . . . . . . 46
3.5 Mounting the door handle . . . . . . . . . . . . . . . . . . . . . . . . . . . . . . . . . . . . . . . . . . . . . . . . . . . . . 46
4.0 Operation . . . . . . . . . . . . . . . . . . . . . . . . . . . . . . . . . . . . . . . . . . . . . 47
4.1 Cleaning . . . . . . . . . . . . . . . . . . . . . . . . . . . . . . . . . . . . . . . . . . . . . . . . . . . . . . . . . . . . . . . . . . . 47
4.2 Initial operation . . . . . . . . . . . . . . . . . . . . . . . . . . . . . . . . . . . . . . . . . . . . . . . . . . . . . . . . . . . . . . 47
4.3 Temperature control . . . . . . . . . . . . . . . . . . . . . . . . . . . . . . . . . . . . . . . . . . . . . . . . . . . . . . . . . . 47
4.4 Storing food and making ice cubes . . . . . . . . . . . . . . . . . . . . . . . . . . . . . . . . . . . . . . . . . . . . . .47
4.4.1 Storing products in the cooling compartment . . . . . . . . . . . . . . . . . . . . . . . . . . . . . . . . . . . . . . . . . . . . . . 47
4.4.2 Storing products in the freezer compartment . . . . . . . . . . . . . . . . . . . . . . . . . . . . . . . . . . . . . . . . . . . . . . 48
4.4.3 Making ice cubes . . . . . . . . . . . . . . . . . . . . . . . . . . . . . . . . . . . . . . . . . . . . . . . . . . . . . . . . . . . . . . . . . . . . 48
4.5 Shutting off the refrigerator . . . . . . . . . . . . . . . . . . . . . . . . . . . . . . . . . . . . . . . . . . . . . . . . . . . . 48
4.6 Defrosting . . . . . . . . . . . . . . . . . . . . . . . . . . . . . . . . . . . . . . . . . . . . . . . . . . . . . . . . . . . . . . . . . . 48
4.7 Interior light . . . . . . . . . . . . . . . . . . . . . . . . . . . . . . . . . . . . . . . . . . . . . . . . . . . . . . . . . . . . . . . . 49
4.7.1 Changing the light bulb . . . . . . . . . . . . . . . . . . . . . . . . . . . . . . . . . . . . . . . . . . . . . . . . . . . . . . . . . . . . . . . 49
4.8 Changing the doorhang . . . . . . . . . . . . . . . . . . . . . . . . . . . . . . . . . . . . . . . . . . . . . . . . . . . . . . . 49
4.9 Changing the decor panel . . . . . . . . . . . . . . . . . . . . . . . . . . . . . . . . . . . . . . . . . . . . . . . . . . . . . 49
4.10 Technical data . . . . . . . . . . . . . . . . . . . . . . . . . . . . . . . . . . . . . . . . . . . . . . . . . . . . . . . . . . . . . . 49
4.11
Troubleshooting . . . . . . . . . . . . . . . . . . . . . . . . . . . . . . . . . . . . . . . . . . . . . . . . . . . . . . . . . . . . . . 50
4.12 Service-Information . . . . . . . . . . . . . . . . . . . . . . . . . . . . . . . . . . . . . . . . . . . . . . . . . . . . . . . . . . 51
Table of contents
English
Page 40

40
1.0 General
You have made an excellent choice in selecting
this Absorption Refrigerator. We are sure that you
will be satisfied with your new refrigerator in all
respects. The refrigerator, which works silently,
meets high quality standards and guarantees the
efficient utilisation of resources and energy
throughout its entire life cycle, during manufacture, in use and when being disposed of.
1.1 Introduction
The information, texts and illustrations in these
instructions are copyright protected and are subject to industrial property rights.
No part of these instructions may be reproduced,
copied or utilised in any other way without written
authorisation by the manufacturer.
1.3 Copyright protection
Before you start using the refrigerator, please
read the operating instructions carefully.
These instructions provide you with the necessary guidance for the proper use of your refrigerator. Observe in particular the safety instructi-
ons. Observation of the instructions and handling
recommendations is important for dealing with
the refrigerator safely and for protecting you from
injury and the refrigerator from damage. You must
understand what you have read before you carry
out a task.
Keep these instructions in a safe place close
to the refrigerator so they may be referred to
at any time.
1.2 Guide to these operating
instructions
1.4 Explanation of symbols
used in this manual
Warning notices are identified by symbols. A supplementary text gives you an explanation of the
degree of danger.
Observe these warning notices rigorously. You
will thus protect yourself and other people
from injury, and the appliance from damage .
Warning notices
WARNING indicates a potentially hazardous situa-
tion which, if not avoided, could result in death or
serious injury.
WARNING!
CAUTION indicates a potentially hazardous situa-
tion which, if not avoided, may result in minor or
moderate injury.
CAUTION!
CAUTION!
CAUTION (used without the safety alert symbol)
indicates a potentially hazardous situation which,
if not avoided, may result in damage to the appliance.
General
Page 41

41
Information
INFORMATION gives you supplementary and use-
ful guidance when dealing with your refrigerator.
Environmental Tips
ENVIRONMENTAL TIPS gives you useful guidan-
ce for saving energy and disposal of the appliance.
For each product we provide a two-year guarantee from the date of purchase or delivery to the
consumer (with a guarantee certificate, invoice or
sales receipt serving as proof).
The guarantee covers the costs of materials,
labour and travel.
The guarantee will lapse if the operating instructions and conditions of use are not adhered to, if
the product is incorrectly installed, or in the event
of damage caused by external influences, force
majeure, intervention by third parties or the use of
non-genuine components.
1.5 Warranty
All information and guidance in these operating
instructions were prepared after taking into consideration the applicable standards and regulations as well as the current state of the art. The
manufacturer reserves the right to make changes
at any time which are deemed to be in the interest of improving the product and safety.
The manufacturer will assume no liability for
damage in the case of :
non-observation of the operating instructi-
ons
application not in accordance with the
regulations or provisions
use of non-original spare parts
modifications and interferences to the
appliance
effect of environmental influences, such as
- temperature fluctuations
- humidity
1.6 Limitation of liability
When contacting Customer Services, please
state the model, product number and serial number together with the MLC code, if applicable.
You will find this information on the rating plate
inside the refrigerator.
Customer service information : p. 51
1.7 Customer services
General
Page 42

42
General
Ammonia (a natural compound of hydrogen and
nitrogen) is used in the cooling unit as a coolant.
Non-ozone-hazardous cyclopentane is used as a
propellant for manufacturing PU foam insulation.
In order to ensure that the recyclable packaging
materials are re-used, they should be sent to the
customary local collection system. The appliance
should be transferred to a suitable waste disposal company that will ensure re-use of the recyclable components and proper disposal of the
rest. For eco-friendly draining of the coolant from
all absorber refrigeration units, a suitable disposal plant should be used.
Appliances which are marked with
this symbol must be handed over to
the local collection point for the disposal of electric and electronic equipment. This product must not be disposed of in the normal domestic
waste.
1.9 Environmental notices
1.9.1 Disposal
1.8 Spare parts
Always give the model and product number when
you contact the customer service! You will find
this information on the rating plate inside the
refrigerator.
Customer service information : p. 51
Do not expose the refrigerator to direct
sunlight. or any other heating source
(e.g. heating).
Ensure that air circulation of the cooling unit
is not obstructed.
Run the refrigerator for about 12 hours
before filling it.
Where possible, always store precooled
products.
Do not overfill the storage racks to ensure good
air ventilation inside.
Please leave a gap between stored food and
post evaporator ("cooling fins")
Open the refrigerator door only for a short
period of time when removing products.
Oberve installation instructions (3.3)!
1.9.2 Energy-saving tips
1.10 Declaration of conformity
- Low Voltage Directive 73/23/EEC and the
Amendment to LVD 90/683/EEC,2006/95EC
- EMC Directive 89/336/EEC, 2004/108/EC
- CE Marking Directive 93/68/EEC
- RoHS Directive 2002/95EC
Directives
Type family : H 20/60
- EN 60335-1;2002+A11+A12+A1+A2
(IEC 60335-1; 2001+A1+A2)
- EN 60335-2-24;2003+A1+A2+A11
(IEC 60335-2-24; 2002+A1+A2)
- EN 61000-3-2;95,A1,A2,A14
- EN 61000-3-3;95,A1
- EN 50366;2003+A1
- EN 55014-1;00,A1,A2
- EN 55014-2;97,A1
Standards
Page 43

43
Safety instructions
2.0 Safety instructions
The refrigerator is not suitable for the proper storage of medication. Please observe in addition the instructions in the medication package inserts.
WARNING!
This refrigerator is designed for installation in furniture.
The refrigerator is to be used solely for storing
foodstuffs.
2.1 Application according to
regulations
2.4 Working upon and checking
the refrigerator
2.3 Protection of children when
disposing of the refrigerator
Work on electrical facilities must be carried
out by authorised personnel only.
Substantial damage to property and/or injury to persons can arise through unprofessional procedures.
WARNING!
Never open the absorber cooling unit! It is
under high pressure.
There is a danger of injury!
WARNING!
Anyone operating the refrigerator must be familiar with the safe handling and understand the
advice in these operating instructions.
2.2 User's responsibility
2.5 Information on coolant
Ammonia is used as a coolant.
This is a natural compound also used in household cleaning agents (1 litre of Salmiak cleaner
contains up to 200g of ammonia - about twice as
much as is used in the refrigerator). Sodium chromate is used for corrosion protection (1.8% by
weight of the solvent).
In the event of leakage (easily identifiable from
the strong odour), proceed as follows:
- Switch off the appliance.
- Air the room thoroughly.
- Inform authorised customer services.
For your safety it was ascertained in an
expert's report that no impairment of health
exists when the coolant is discharged.
When disposing of the refrigerator, detach
all refrigerator doors and leave the storage
racks in the refrigerator. In this way inadvertent entrappment and suffocation is prevented.
WARNING!
Page 44

44
Installation
3.0 Installation
Check during unpacking that the device is
defect-free.
Report transport damage to the transport
company immediately.
Check that the voltage noted on the model
label corresponds to the mains voltage.
3.1 Unpacking
The refrigerator must be level both
directions.
There should be 20 mm clearance to the
wall.
Ventilation must be provided as shown in
alternatives 1, 2, 3 or 4.
Only the entire cooling unit must project
into the duct as shown.
Air passing through the duct must not be
preheated by any source of heat.
Ventilation grills, if used, must have openings of at least 200cm² each.
Use standard ventilation grids.
(W = 455 mm, H = 65 mm)
The depth of the recess should be at least
580 mm.
3.3 Installation
Please follow the installation details below
carefully. Guarantee is valid for products
installed as described only.
CAUTION!
3.3.1 Installation schemes
The following illustrations (1,2,3,4) show four different ways for installing the refrigerator.
= ventilation grid
= air going in
= air coming out
2
1
3
3.2 Connecting the device to
the electricity supply
The device must be connected to a properly
earthed socket in line with the relevant valid
country regulations.
The mains plug/socket must be freely
accessible.
Check prior to initial operation that the vol-
tage noted on the model label corresponds
to the mains voltage. If this is not the case, do
not connect the device and contact your
dealer!
Abb. 1
If the connection cable is damaged it must
be replaced by the Customer Service, or by
respectively qualified personnel, in order to
prevent any hazards.
CAUTION!
Page 45

45
Installation
Fig. 2
Fig. 3
1
2
200 cm²
20 mm
200 cm²
20 mm
3
200 cm²
20 mm
Fig. 5
4
200 cm²
20 mm
2
2
2
2
1
1
1
1
1
1
3
3
3
3
Page 46

46
Installation
3.4 Sliding hinge
When closed, the cupboard door must not
lie against the rest of the surrounding cupboard area (distance 1-2mm), otherwise the
fridge door does not close tightly.
3.3.2 Installation into 6/6 recess
Fig. 6
Fig. 7
3.5 Mounting the door handle
Fig. 7
The fixing points are marked.
Page 47

47
Operation
4.0 Operation
Before operating the refrigerator, we recommend
you clean it both inside and outside.
Use a soft cloth, lukewarm water and a mild
detergent.
Following this, wash out the refrigerator using
clean water and dry thoroughly.
At annual intervals, remove dust from fridge
aggregate using a brush or soft cloth.
4.1 Cleaning
The device must be plugged into a properly
earthed socket.
The refrigerator achieves its operating
temperature after several hours.
4.2 Initial operation
To prevent material damage :
Do not use soap or detergents which are
harsh, coarse or which contain soda .
Keep the door seal free from oil and
grease.
CAUTION!
The refrigerator is fitted with an thermostat control. The thermostat control button is situated in
the internal container's rear area.
Normally set the thermostat control button to
position 3-5.
Turning the thermostat control button to a higher
position e.g. "6" , causes a colder temperature in
the cooling compartment.
On position "0" the refrigerator is switched off!
4.3 Temperature control
Fig. 8
The refrigerator operates silently.
4.4 Storing food and making
ice cubes
Switch the refrigerator on approx. 12 hours
before filling it.
Always store pre-cooled foods in the refrige-
rator. Make sure that the food is well cooled
when it is bought and also when transporting
it. Use insulated cooling bags.
Open the refrigerator door only for a short
period of time when removing products.
Products must be packed - best of all in clo-
sed containers, wrapped in aluminium foil or
similar - and stored separately from each
other, in order to prevent drying out or
odours.
4.4.1 Storing products in the cooling
compartment
Page 48

48
Operation
4.6 Defrosting
As time goes by, frost builds up on the fins inside
the refrigerator. When this layer of frost is about 3
mm thick, the refrigerator should be defrosted.
Switch off the refrigerator
(thermostat control button to "0") .
Remove all food and the ice cube tray.
Leave the refrigerator door open to allow air
to enter and to prevent formation of mildew.
After defrosting (freezer compartment and
fins free of frost), wipe both cooling compartments dry with a cloth.
Note: Water thawing in the main compartment of
the refrigerator runs into an appropriate container
at the back of the refrigerator. From there, the
water evaporates.
4.5 Shutting off the refrigerator
If the refrigerator is not be used for some time:
1. Set the thermostat control button to "0"
2. Pull out the mains plug
Empty the refrigerator. Defrost and clean it as
described earlier. Leave the doors of the refrigerator and the frozen food compartment ajar.
4.4.2 Storing products in the freezer
compartment
Do not keep carbonated drinks in the freezer.
The freezer compartment is suitable for
making ice cubes and for short-term storage
of frozen food. It is not suitable as a means of
freezing foods.
Fill the ice tray to just below the brim with drinking water and place it on the freezer shelf. For a
quick "ice making" turn the thermostat control
button to a higher position e.g. "7". After finishing the ice cubes turn the control button back in
normally position.
4.4.3 Making ice cubes
Only use drinking water!
WARNING!
Allow foods that have been warmed up to
cool down before storing.
Avoid storing products in the refrigerator that
could emit volatile flammable gases.
Do not expose the refrigerator to direct sun
light. Please bear in mind that the temperature inside a closed vehicle increases sharply if
exposed to sunlight and that this can reduce
the efficiency of the refrigerator.
Ensure that air circulation of the cooling unit
is not obstructed. Keep the ventilation grilles
free from obstructions.
The layer of ice must never be removed forcibly, nor may defrosting be accelerated
using a heat source!
CAUTION!
Page 49

49
Operation
4.8 Changing the doorhang
Remove the lower hinge pin.
Take off the door by moving it upwards.
Unscrew the upper hinge pin and mount it on
the opposite side hinge.
Fit the door on the upper hinge pin and mount
the lower hinge pin.
Check that the door closes properly and seals
all round.
If the door handle is mount, fix the door hand
le of the opposide side.
4.9 Changing the decor panel
Remove the door, see Changing the
doorhang.
Unscrew the door strip and then withdraw the
panel by sliding it downwards.
Fit the new panel in place and slide it up as far
as possible.
Fit the door strip back in place.
4.7 Interior light
Pull out the mains plug.
Lift the safety plate and clip reflector disk out.
Remove the defective bulb and put in the new
one. (Bulb E14, 230V, 6/10W)
4.7.1 Changing the light bulb
Fig. 9
Fig. 10
Fig. 11
Decor panel dimensions :
724,0 mm 492,5 mm max. 3,2 mm
Height Width Thickness
RH 303 L
Casing Metal
Gross Ccapacity (litres) 103
freezer compartnent 12
Dimensions (mm)
(H x W x D) 753 x 525 x 535
Connection mains (W) 125
Consumption
kWh / 24h* 2,6
Netweight (kg) 31
Built-in x
4.10 Technical data
*
Power consumption measured at an average ambient
temperature of 25°C as an average annual value.
We reserve the right to make technical modifications
to our products without notice!
Page 50

50
Operation
4.11 Troubleshooting
a.) The thermostat is set to "0".
b.) The device plug is not plugged in.
c.) No voltage in socket.
d.) Defective heating cartridge
a.) Set temperature control to
middle position.
b.) Plug in device plug.
c.) Check building fuse.
d.) Install new heating cartridge.
a.) The device is not level
b.) The device was only switched on
a short while ago.
c.) Defective cooling aggregate.
a.) Level the device using a spirit
level.
b.) Switch on the device and let it
run for 5-6 hours.
c.) Check whether repair is feasible.
If not, exchange device.
Failure: No cooling (the aggregate at the back of the device is cold).
Possible Cause Self Help Authorised Service
Failure: No cooling (the aggregate is warm).
Possible Cause Self Help Authorised Service
a.) The fridge door does not close
tightly.
a.) Check installation is in line with
3.3.
a.) Is door magnet there?
Install new door.
Failure : Frost formation in fridge.
Possible Cause Self Help Authorised Service
a.) The cooling aggregate is not suffi-
ciently ventilated.
b.) The device is exposed to direct
sunlight.
c.) The fridge door does not close
tightly.
d.) Light permanently on when door
closed.
e.) The fridge was stocked a short
while ago.
a.) Check that the ventilation grids
are not covered.
b.) Follow installation instruction 3.3.
c.) Check installation.
e.) Check fridge after 5-6 hours for
proper cooling function.
c.) Is door magnet there? Install new
door, if required.
d.) Replace lighting sensor. Install
new door, if required.
Failure : Poor Cooling Performance.
Possible Cause Self Help Authorised Service
Page 51

51
Service
4.12 Service-Information
Servicestellen / Points de service / Servizio dopo vendita / Points of service
5506 Mägenwil/Zürich
Industriestr. 10
9000 St. Gallen
Zürcherstrasse 204 e
4052 Basel
St. Jakob-Turm
Birsstrasse 320B
6020 Emmenbrücke
Seetalstrasse 11
7000 Chur
Comercialstrasse 19
3018 Bern
Morgenstrasse 131
1028 Préverenges
Le Trési 6
6916 Grancia
Zona Industriale E
Ersatzteilverkauf / Point de vente de rechange / Vendita pezzi di ricambio / spare parts service
5506 Mägenwil, Industriestrasse 10, Tel. 0848 848 111
Fachberatung, Verkauf / Demonstration, Vente / Consulente (cucina), Vendita / consulting, sales
8048 Zürich, Badenerstrasse 587, Tel. 044 405 81 11
Service-Helpline
Service-Helpline
0848 848 111
0848 848 111
service@electrolux.ch
service@electrolux.ch
Page 52

www.electrolux.ch
 Loading...