

Page 1

207.5132.10
RC 1205 GC
Type: JCB-01
0402
Operating Instructions
Bedienungsanleitung
Notice d’ utilisation
Istruzioni per l'uso
Gebruiksaanwijzing
Manual de Instrucciones
Manual de instruções
ES
PT
NL
IT
FR
DE
GB
Page 2
GB
2
Thank you for choosing our appliance. We are sure it will provide you with trouble-free use.
In the following, we would like to familiarise you with some symbols, which we bring to your attention to ensure
the safe and efficient operation of the appliance:
source of danger, in event of improper operation
suggested useful tips to read
information concerning environmental protection
The cooling box you have purchased is designed for operation from electrical mains, from a vechile battery
or from self sealing gas cartridge (250g).
Please read these operating instructions carefully before putting the
refrigeration unit into operation. If you later sell or dispose of it, please ensure
that the new owner receives these operating instructions.
Attention!
Your portable Refrigerator - in gas operation - must only be used in a well-ventilated
place, above ground, where it is protected from rain or water splashes.
In electrical operation, the appliance can be used in an enclosed area. However
the appliance must still be protected from moisture.
The unit must not be used with gas operation in motor vehicles and boats
whilest the vehicle or boat is in motion!
Operation using liquid gas in enclosed spaces in not permitted!
THIS COOLING UNIT MAY ONLY BE USED WITH GAS OUT OF DOORS!
Outdoor use includes tents (awnings) which are well ventilated throughout unit
operation and flat garden terraces.
In this appliance the storage of any toxic or explosive substance is forbidden!
Only operate this appliance on one energy source at a time.
This appliance can be used by children aged from 8 years and above and persons
with reduced physical, sensory or mental capabilities or lack of experience and
knowledge if they have been given supervision or instruction concerning use of the
appliance in a safe way and understand the hazards involved.
Children shall not play with the appliance.
Cleaning and user maintenance shall not be made by children without supervision.
It is important in the interests of efficiency, to give the back of the unit as much
ventilation as possible to allow the heat to escape. The hottest spot is in the vicinity
of the burner, and particularly when operating on gas, it is essential that this
place be kept clear of any obstruction or flammable materials.
Page 3
3
CCONTENT
ONTENTSS
1. Unpacking
2. View of the appliance
3. Cleaning
4. Positioning the appliance
5. Using the appliance
5.1. From electrical mains
5.2. From vehicle battery
5.3. From bottled gas
6. Ice-making
7. Useful suggestions
8. Defrosting, cleaning and maintenance
9. Customer service
10. Putting into operation, technical data
10.1. Connecting to electrical mains
10.2. Connecting to vehicle battery
10.3. Connection and replacement of the gas cartridge
11. Environmental protection information
12. Recycling
ATTENTION!
Warranty arrangements are in accordance with EC Directive 44/19999/CE and the
normal conditions applicable in the country concerned.
For warranty or other servicing, such as spare-parts, please contact our Dometic
Service Network.
The warranty does not cover any damage due to improper use.
The warranty does not cover any modifications to the appliance or the use of non-
original Dometic spareparts.
The warranty does not apply if the installing and operating instructions are not adhered
to.
When contacting Dometic Service Network, please state the model, product number
and serial number.
You will find this information on the data plate on the rear cover of the refrigerator.
GB
Page 4
4
1. Unpacking
After removal from the cardboard packaging, make
sure the appliance is not damaged. If you find damage
to the appliance resulting from transport, report it
immediately to the transportation firm.
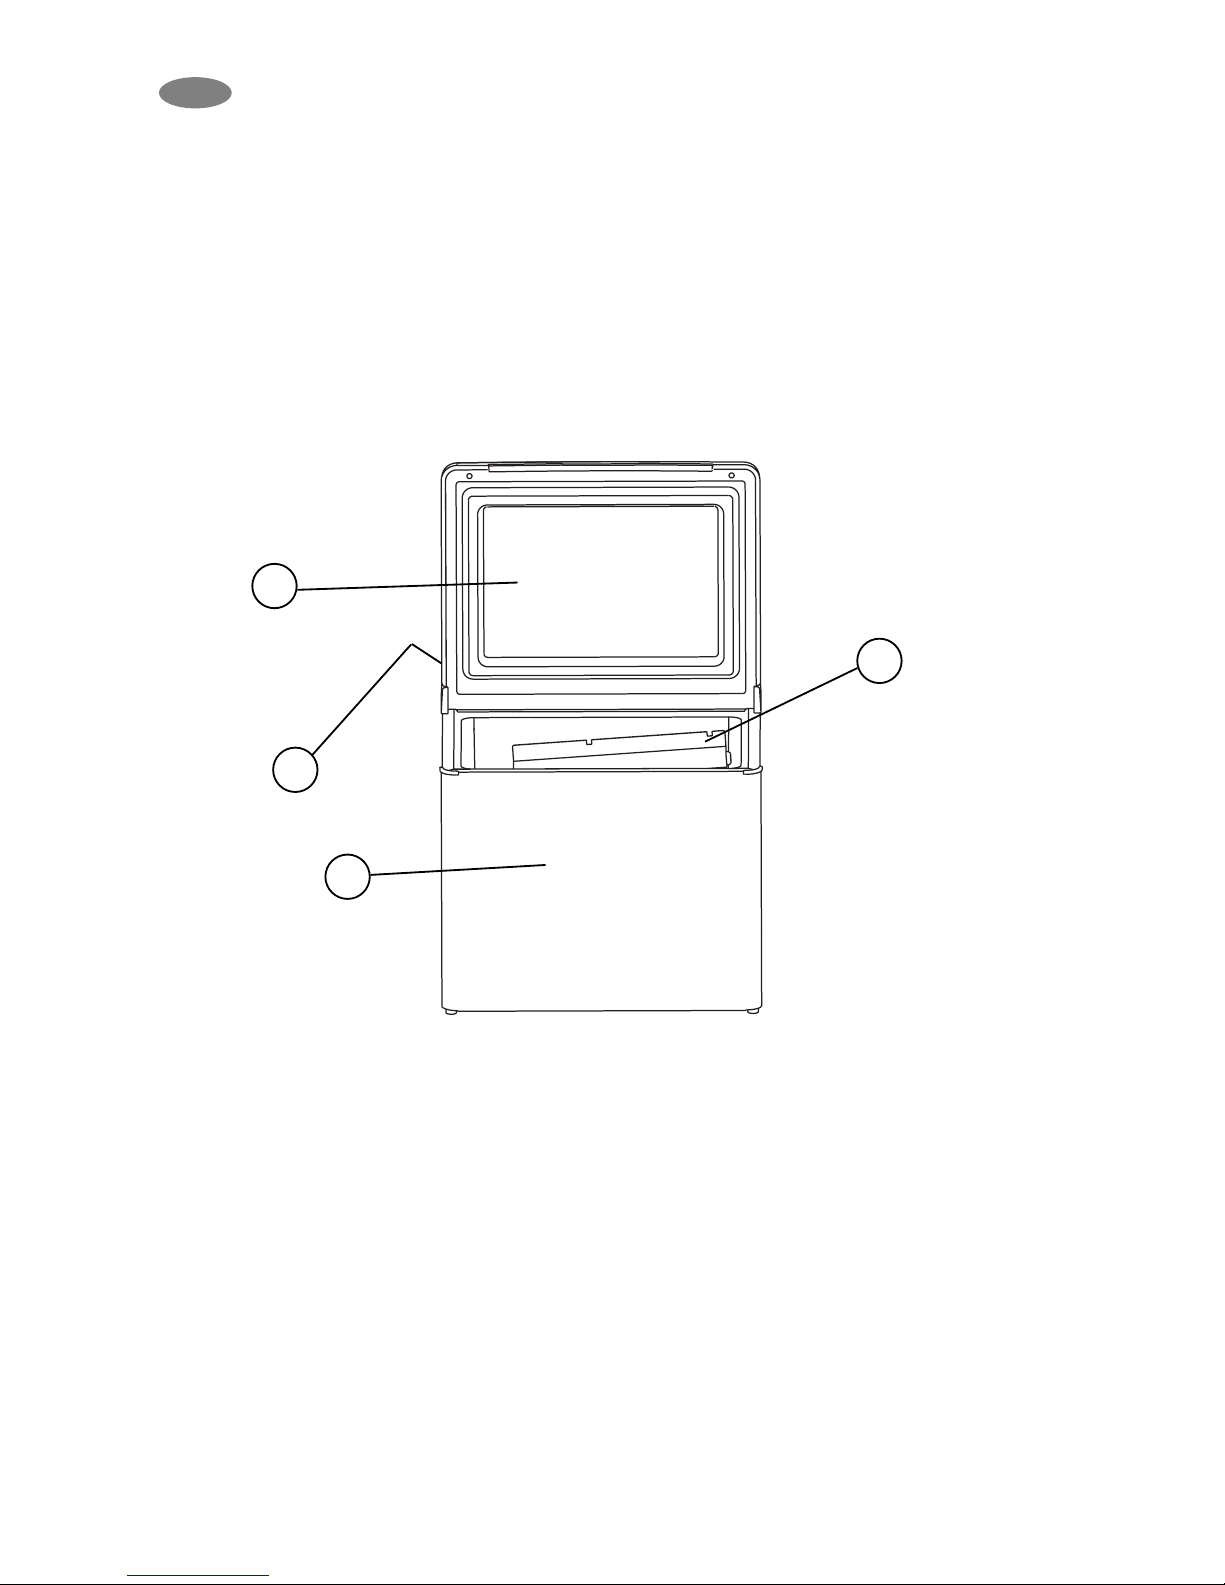
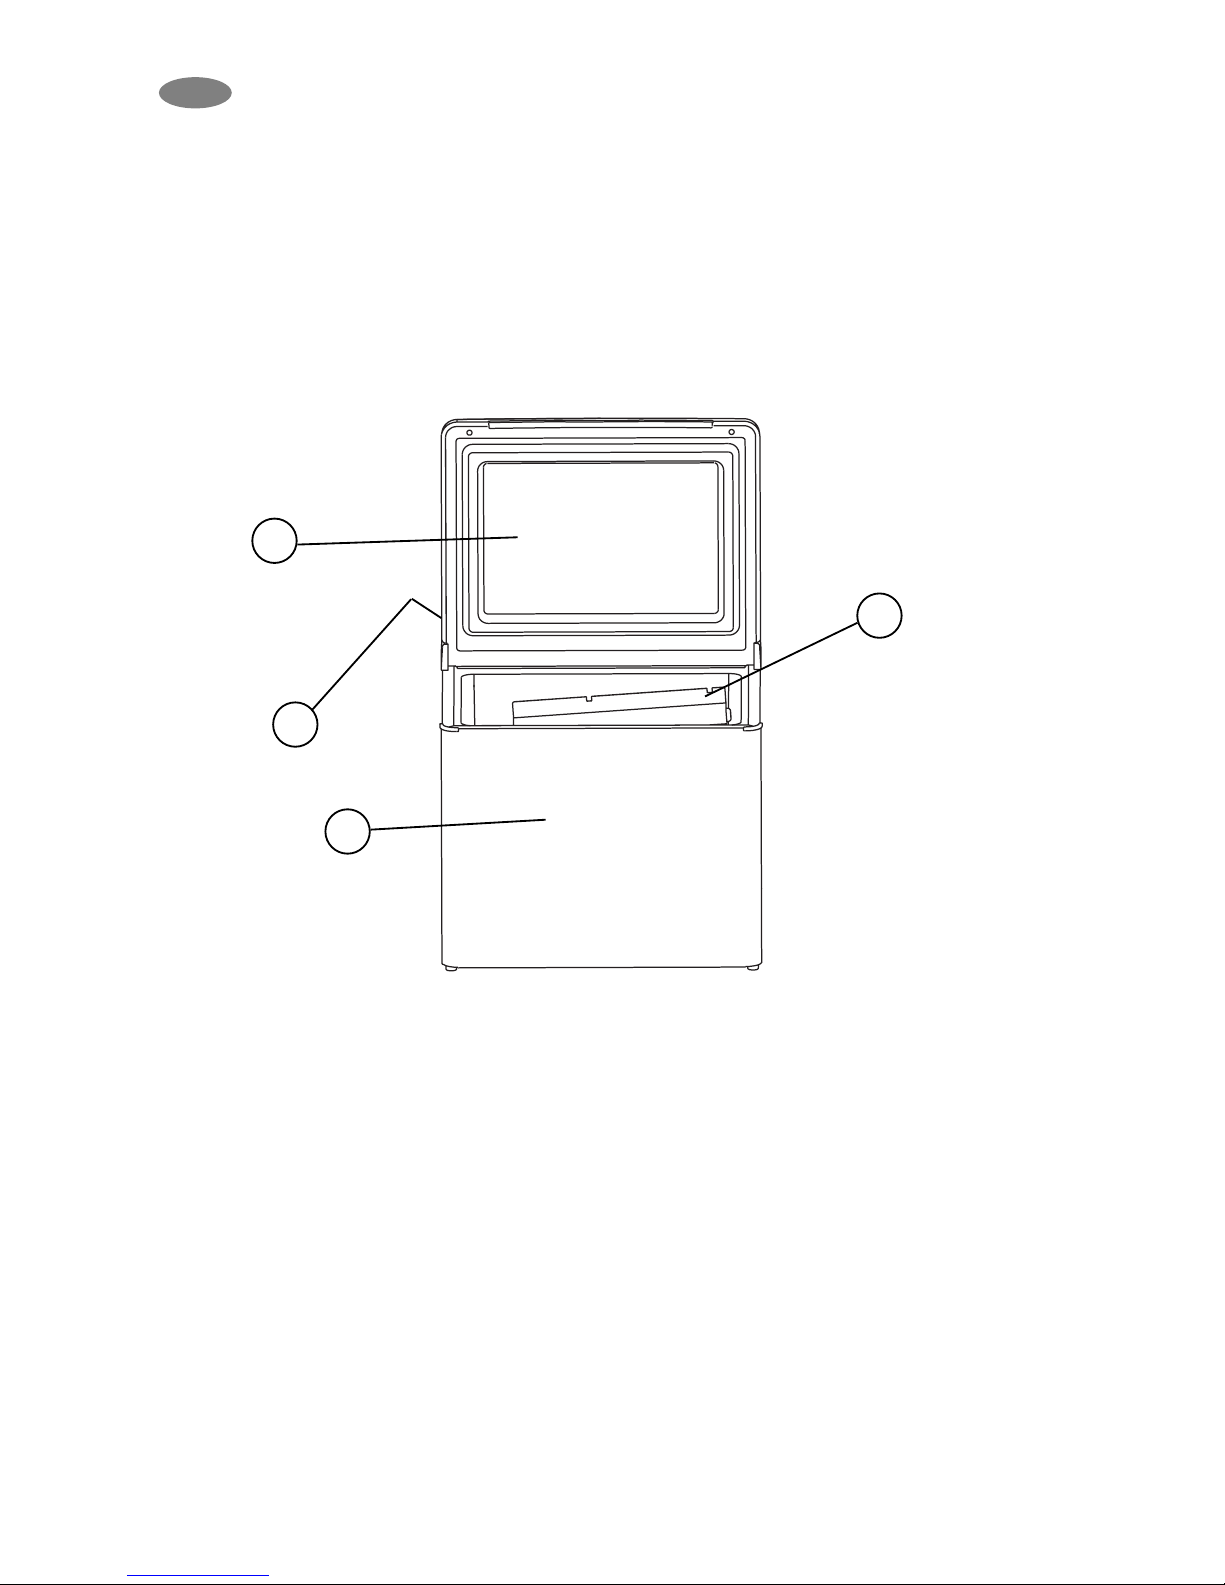
2. View of the appliance
1. insulated casing
2. insulated lid
3. control panel
4. evaporator panel
Figure 1.
2
4
3
1
GB
Page 5
5
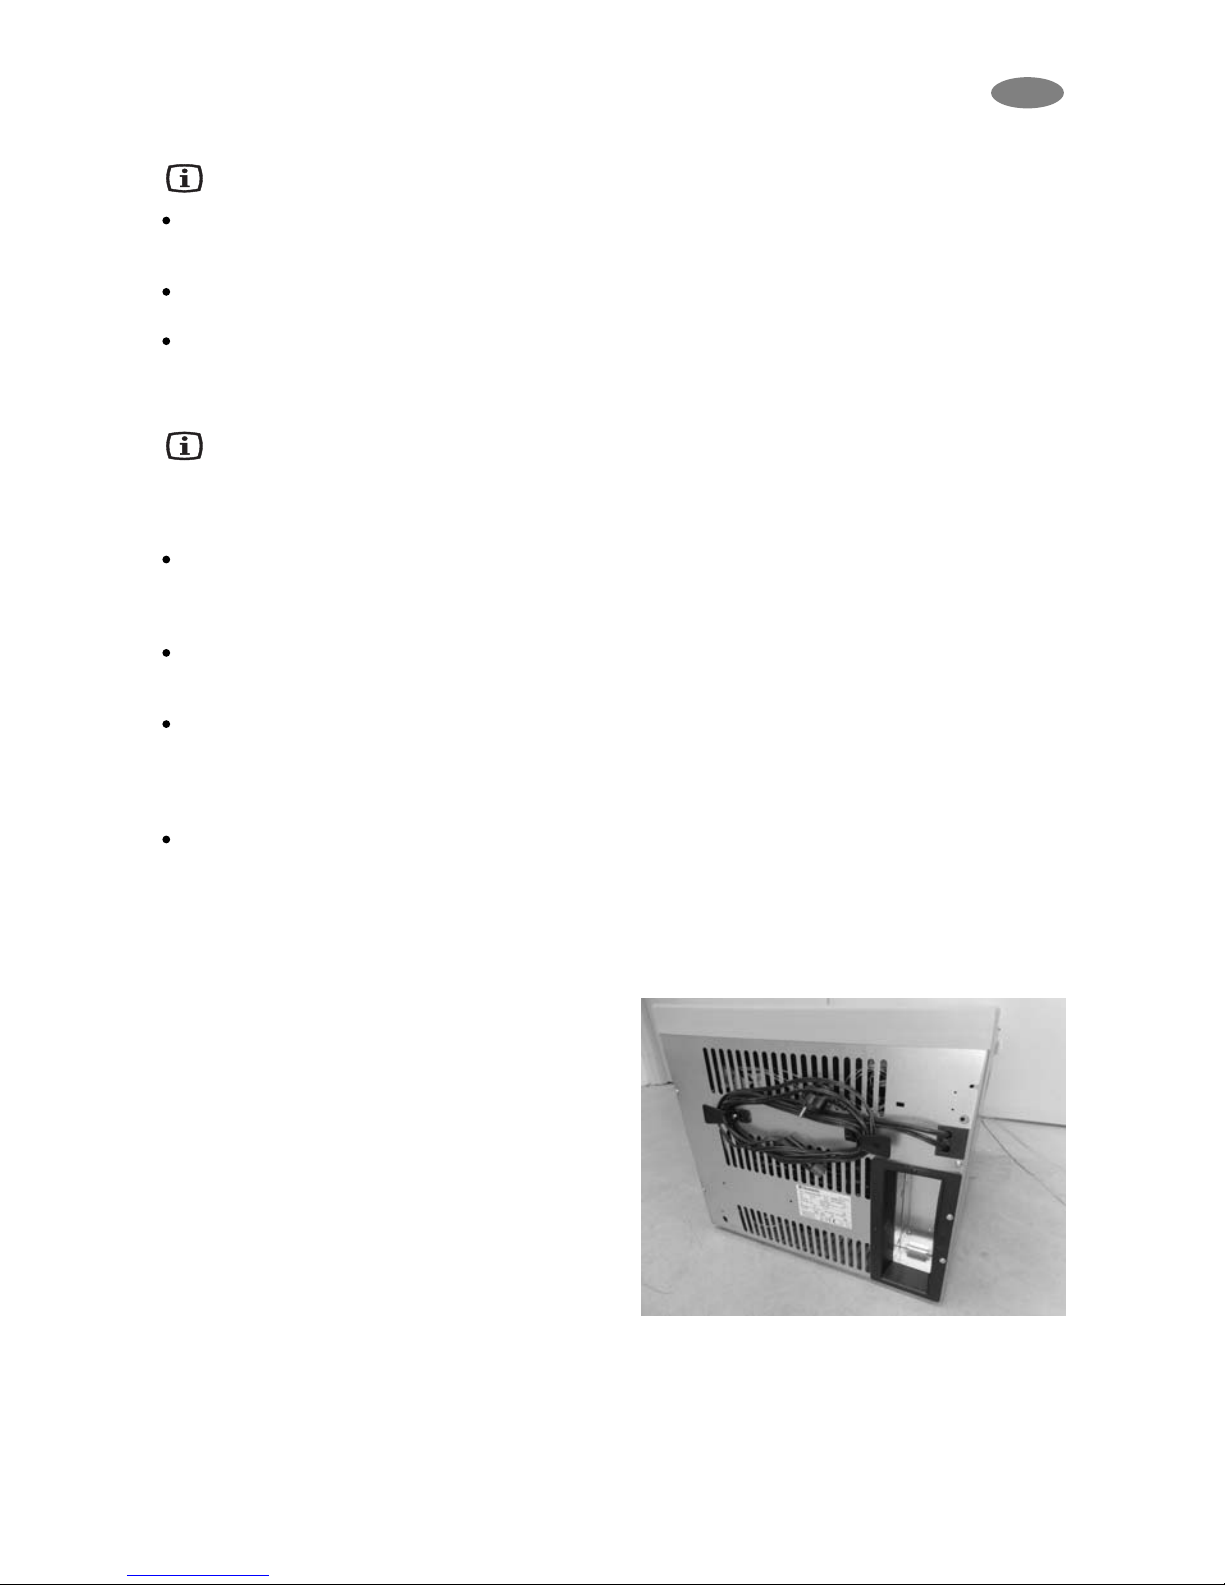
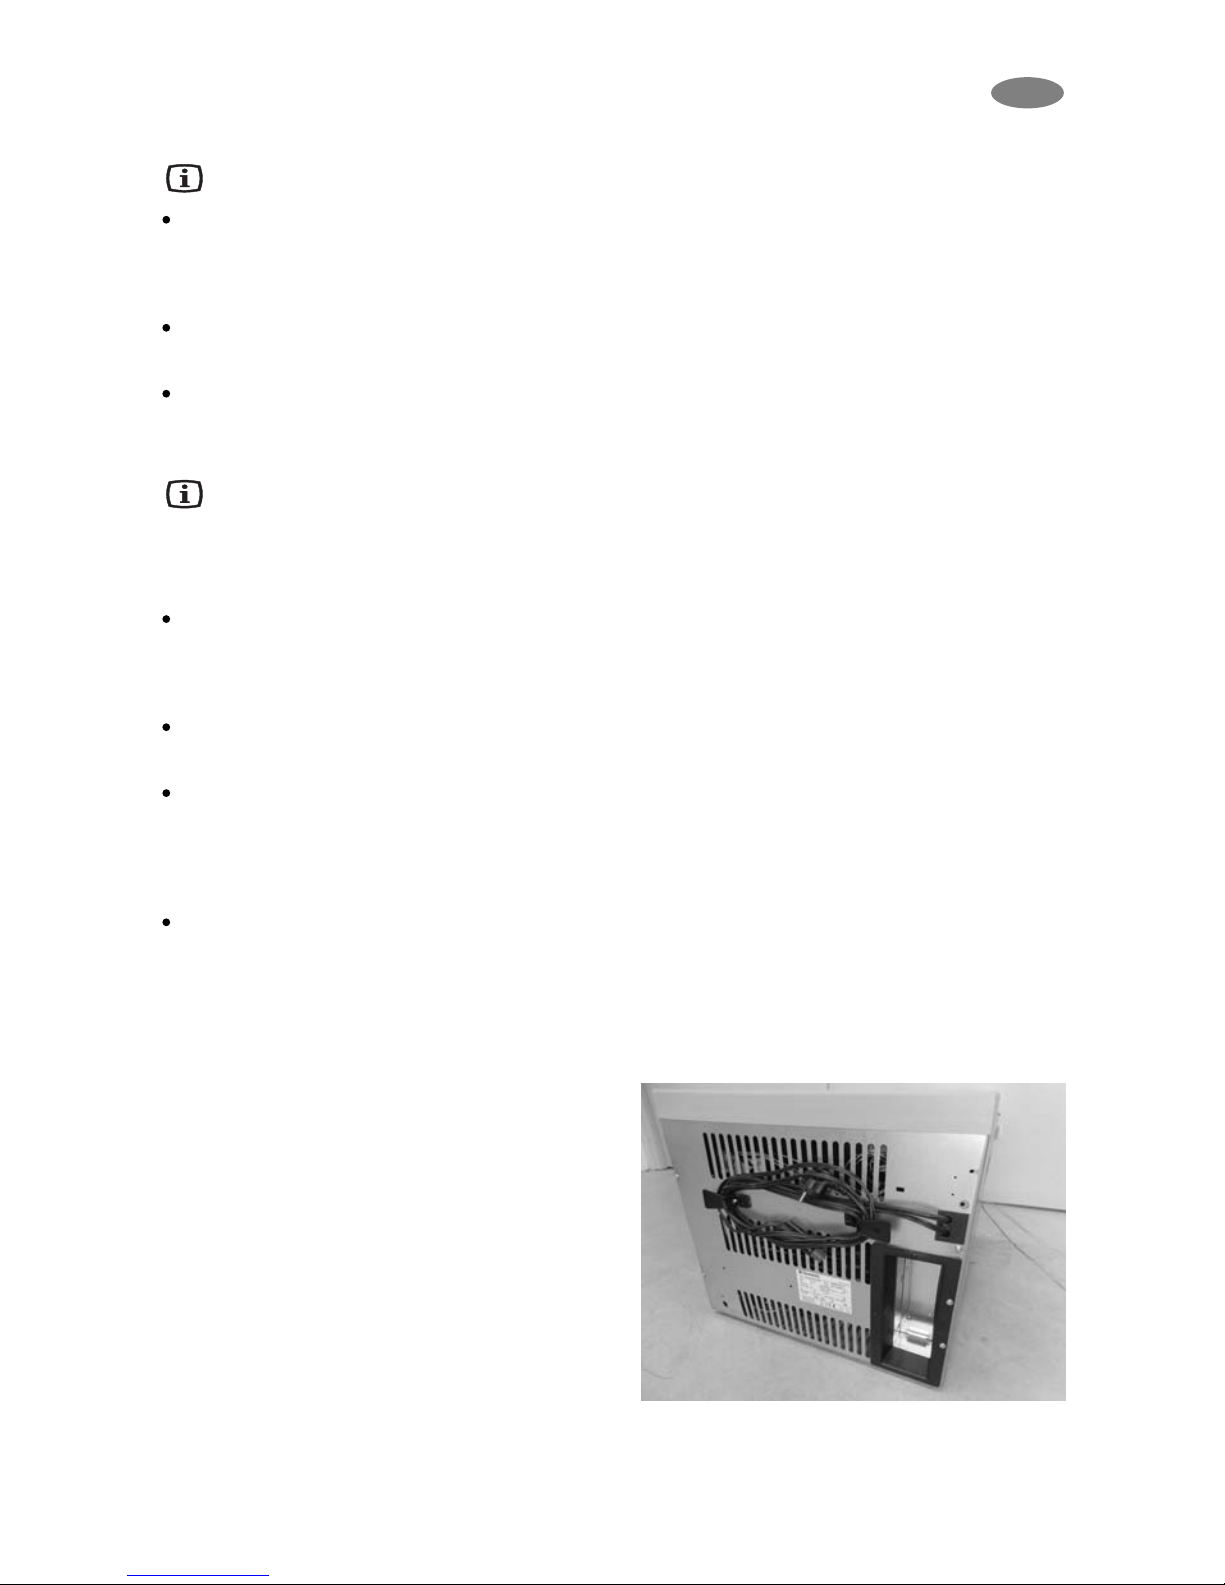
Figure 2.
3. Cleaning
Clean both the inside and outside of the appliance
before putting it into use.
To do so, use a soft towel, lukewarm water and a nonabrasive detergent. Ensure water does not enter the
rear cover grille or the control elements.
Afterwards, wipe the appliance with a clean towel and
cleanwater, and then wipe it dry.
To avoid damage, do not use soap, soda or abrasive
cleaners.
4. Positioning the appliance
During the refrigeration process, the appliance
gives off heat from the condenser (under the
upper part of the rear cover) into the surrounding air.
The more ventilated the condenser is, the more
effective the refrigeration will be.
The other condition for satisfactory operation is that
the appliance stands on a flat surface. This is best
seen by placing a glass of water on top of the
appliance.
It is important that the appliance is not directly
exposed to radiated heat (sunlight, radiator, near an
oven, etc.).
In gas operation following clearances should be
kept from the walls or other materials: from the back
side of the appliance minimum 10cms, from both
sidewalls 4cms each, from the top of the appliance
minimum 30 cms, from the bottom minimum 5 cms.
In the immediate vicinity of the appliance within the
specified distances no inflammable matters (paper,
wood, grass, textile etc.) should be met with.
5. Using the appliance
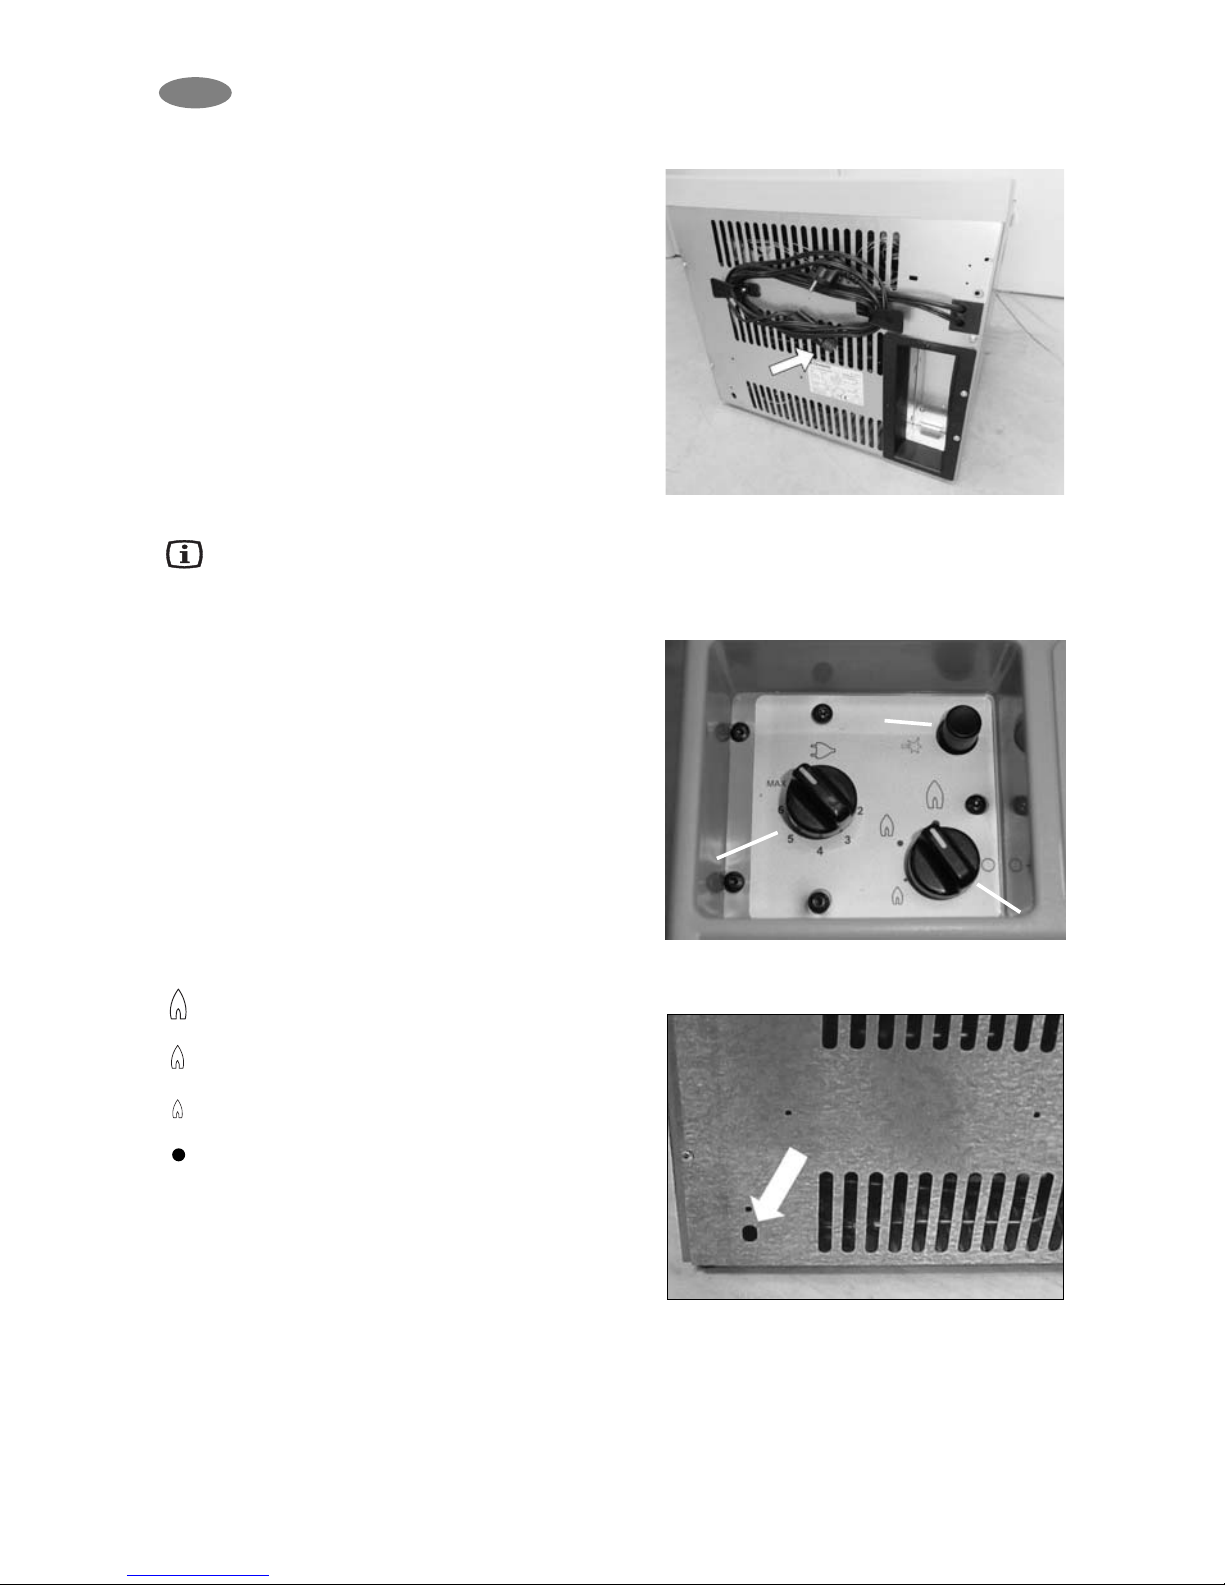
The cable for mains connection, the 12V connecting
cable and the connector for the gas hook-up are
located on the rear cover of the cooling box. (Figure
2).
5.1. Operating from electrical mains
Make sure the voltage shown on the data plate of the
appliance matches that of the mains voltage to which
you wish to connect the appliance. Pull out the mains
connecting cable and connect it to a receptacle
earthed socket for connection.
When connecting the appliance for the first time, set
the thermostat (Figure 4. A), to maximum; then, after
about five hours, set it back towards minimum
according to your need of cooling.
NB: Plug is provided according to specific
regulations in each country and may be different to
that shown.
GB
Page 6
6
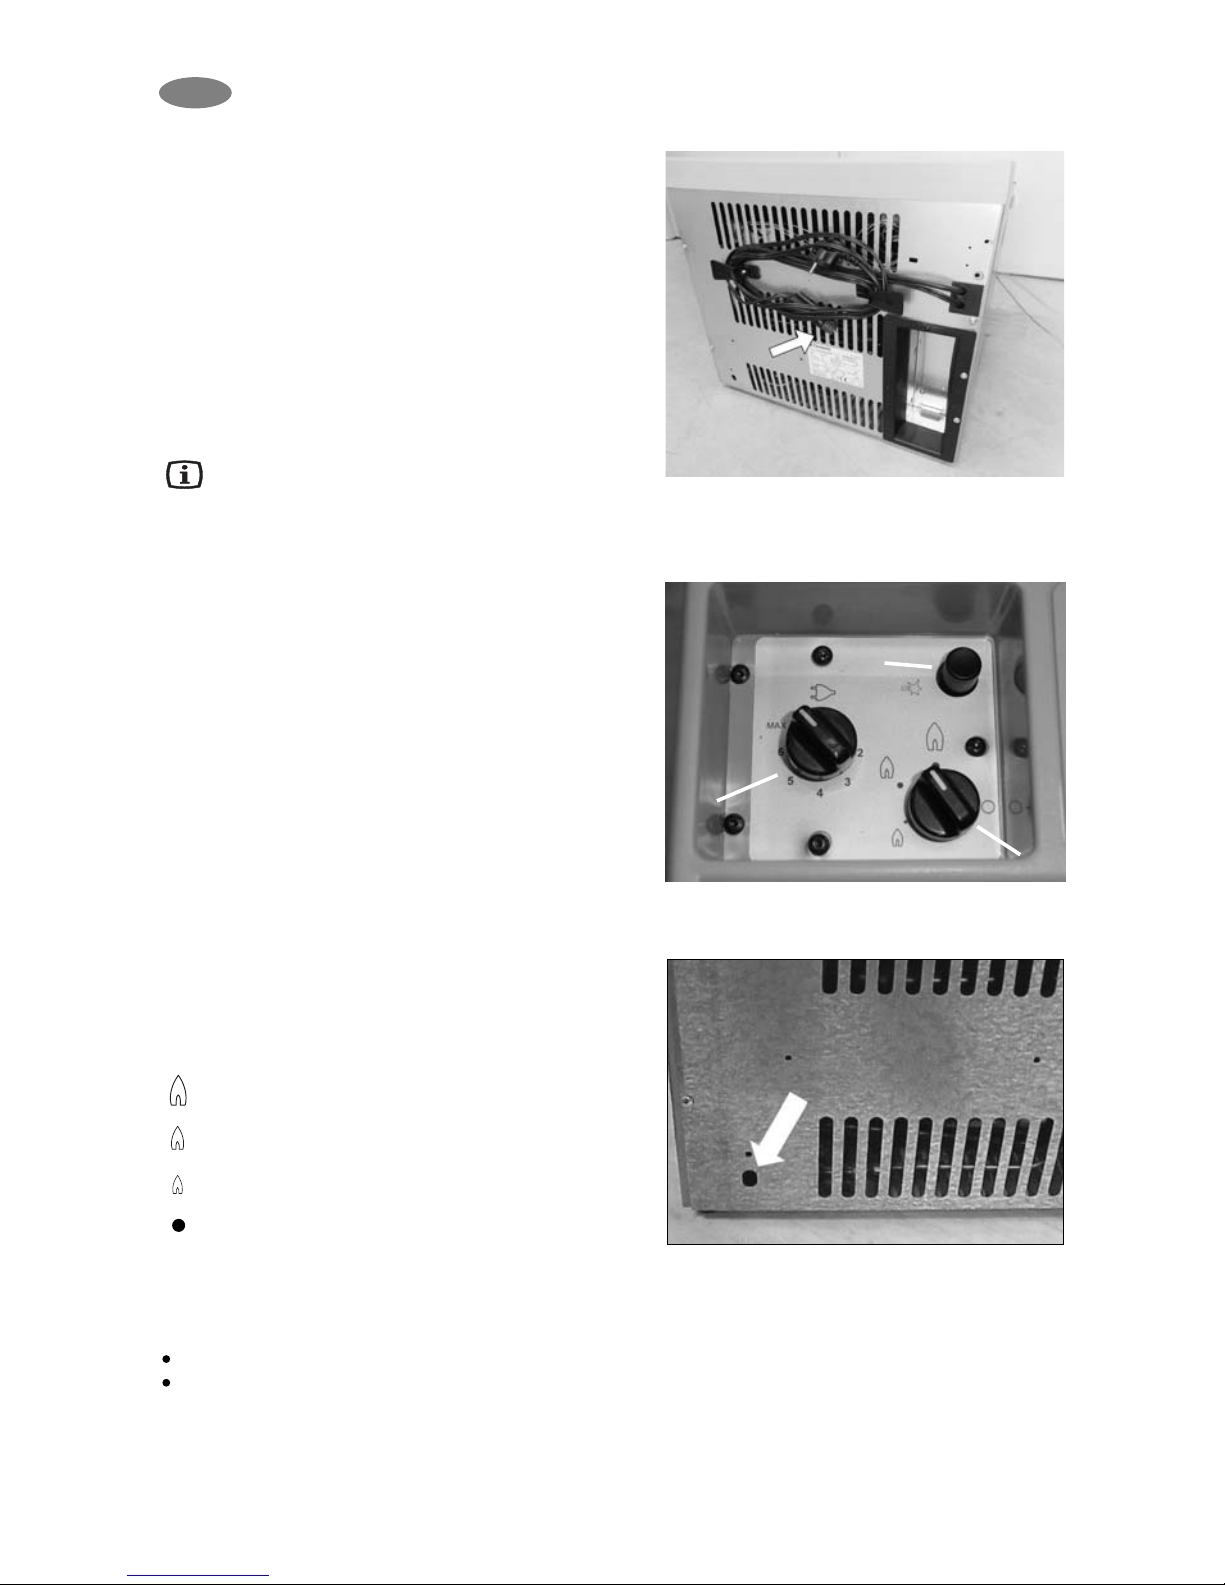
Figure 3.
Figure 4.
5.2. Operating from vehicle battery
Make sure the voltage shown on the data plate of the
appliance matches the voltage of the vehicle battery
(12V or 24V).
12V DC voltage appliances are equipped with
connectors that can be plugged into cigarette lighters
(Figure 3.). For some types of vehicles, you may need
to remove the red plastic ring located on the end of
the connector. To do so, turn the plastic ring anticlockwise and pull it off. The appliance can then be
connected to the cigarette lighter. In 12V operation,
the appliance runs uninterrupted without temperature
control.
24V DC voltage appliances are shipped with bare wire
ends. The wire ends must be connected to a terminal
block, which is connected to the vehicle battery via a
5A fuse and 5A switch.
Whenever the engine is not running, the
appliance connector must be removed from the
cigarette lighter (12V appliance) or the switch turned
off (24V appliance). Otherwise, the appliance will
discharge the vehicle battery rapidly.
5.3. Operating from bottled gas
Connection to the gas cartridge is described in
sections 10.3.
After connecting the gas cartridge to the appliance
and checking for gas leaks turn thermostat to
maximum position (Figure 4.B), press down the gas
safety valve hold it down for about 10 seconds and
then, press the piezo-ignition button several times in
quick succession (Figure 4.C). If the flame does not
ignite, repeat the process. (Air in the appliance gas
line prior to connection to the gas cylinder must be
purged. Only then can the gas be lit.).
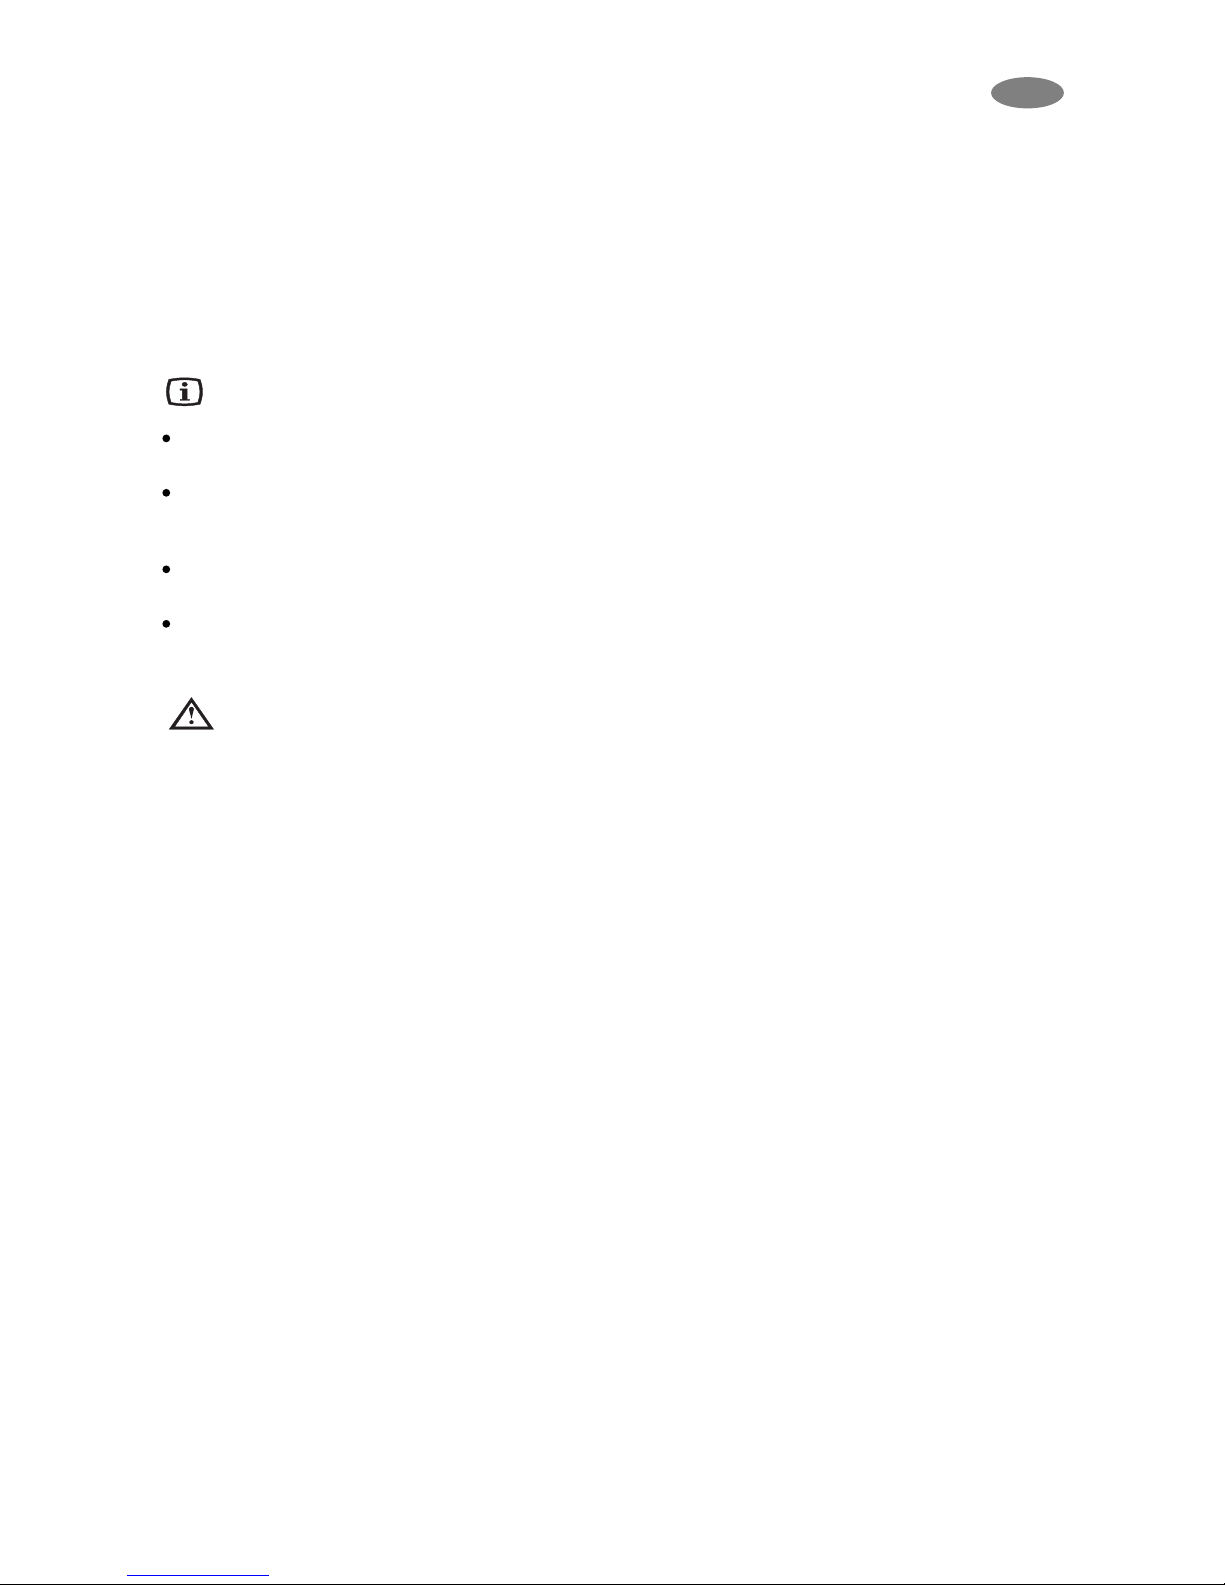
The control knob has 4 positions:
: high flame (MAX) = gas supply maximum
(high ambient temperature ~32 °C);
: medium flame (MID)= gas supply medium
(normal ambient temperature ~25°C);
: low flame (MIN) = gas supply minimum (low
ambient temperature ~16°C);
: off-position = gas supply to burner is shut off.
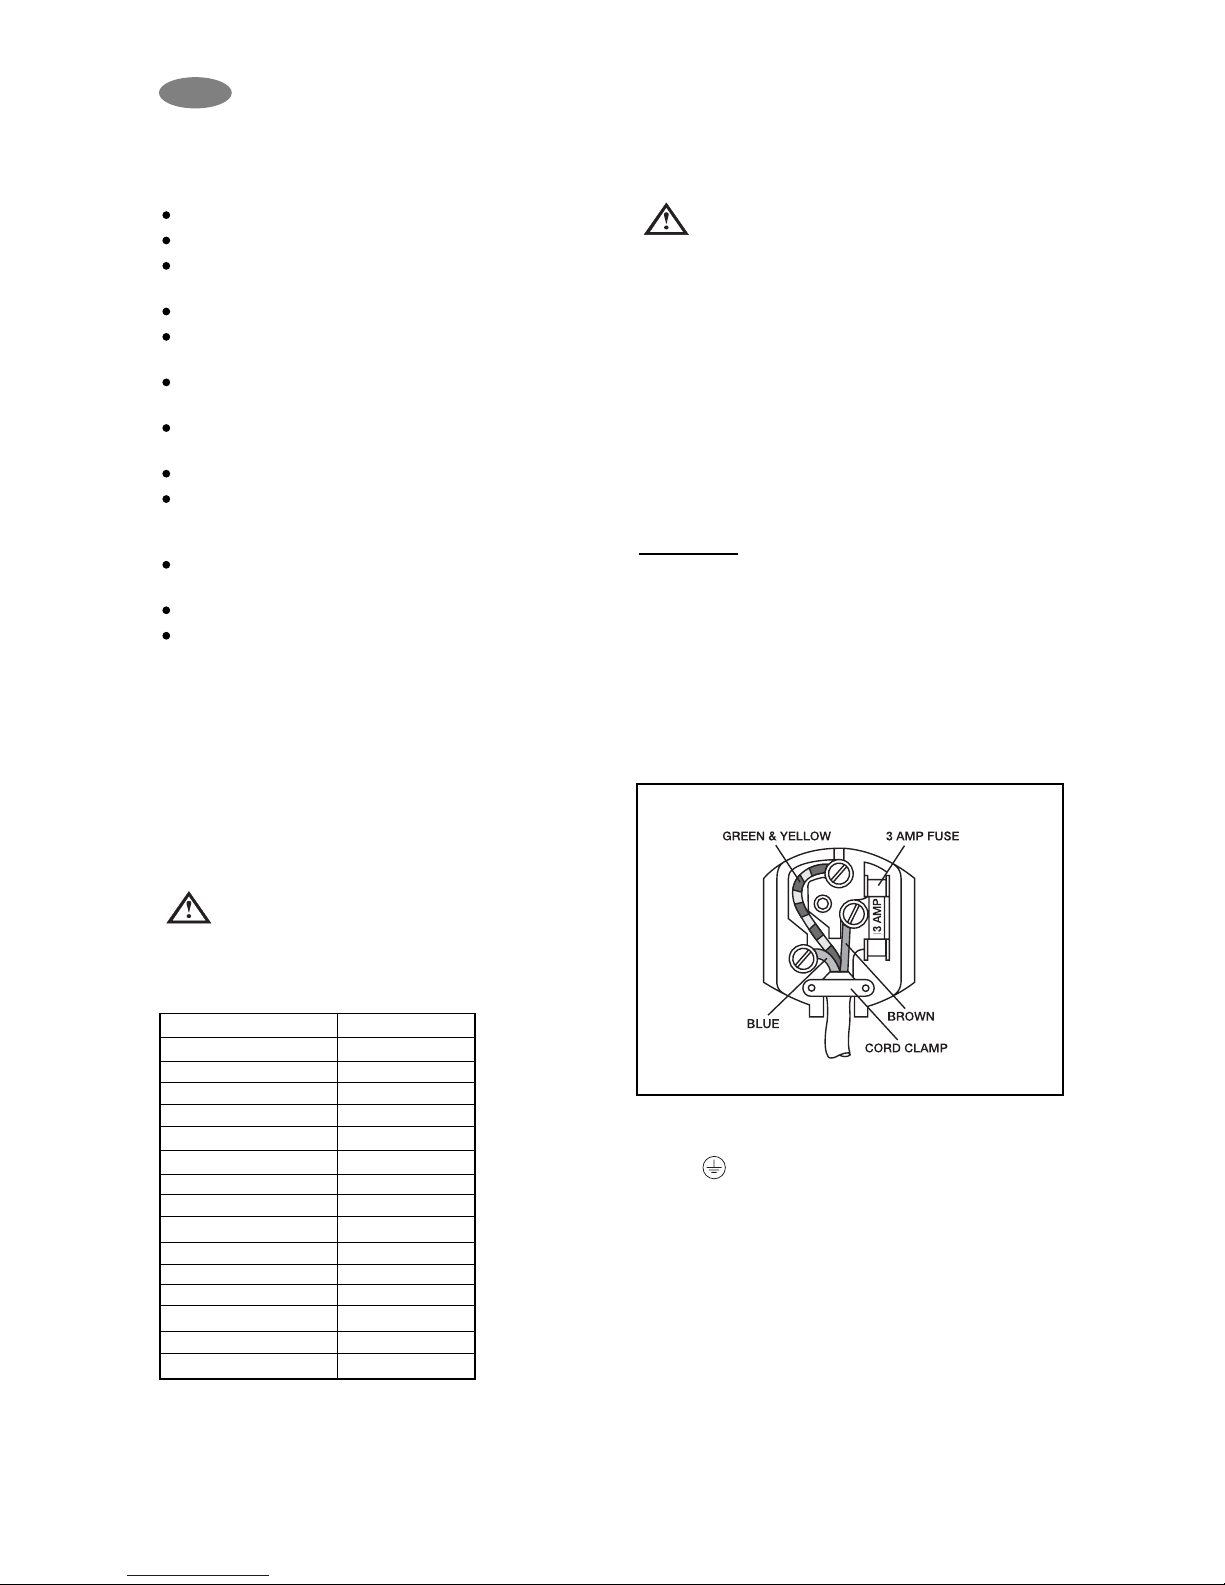
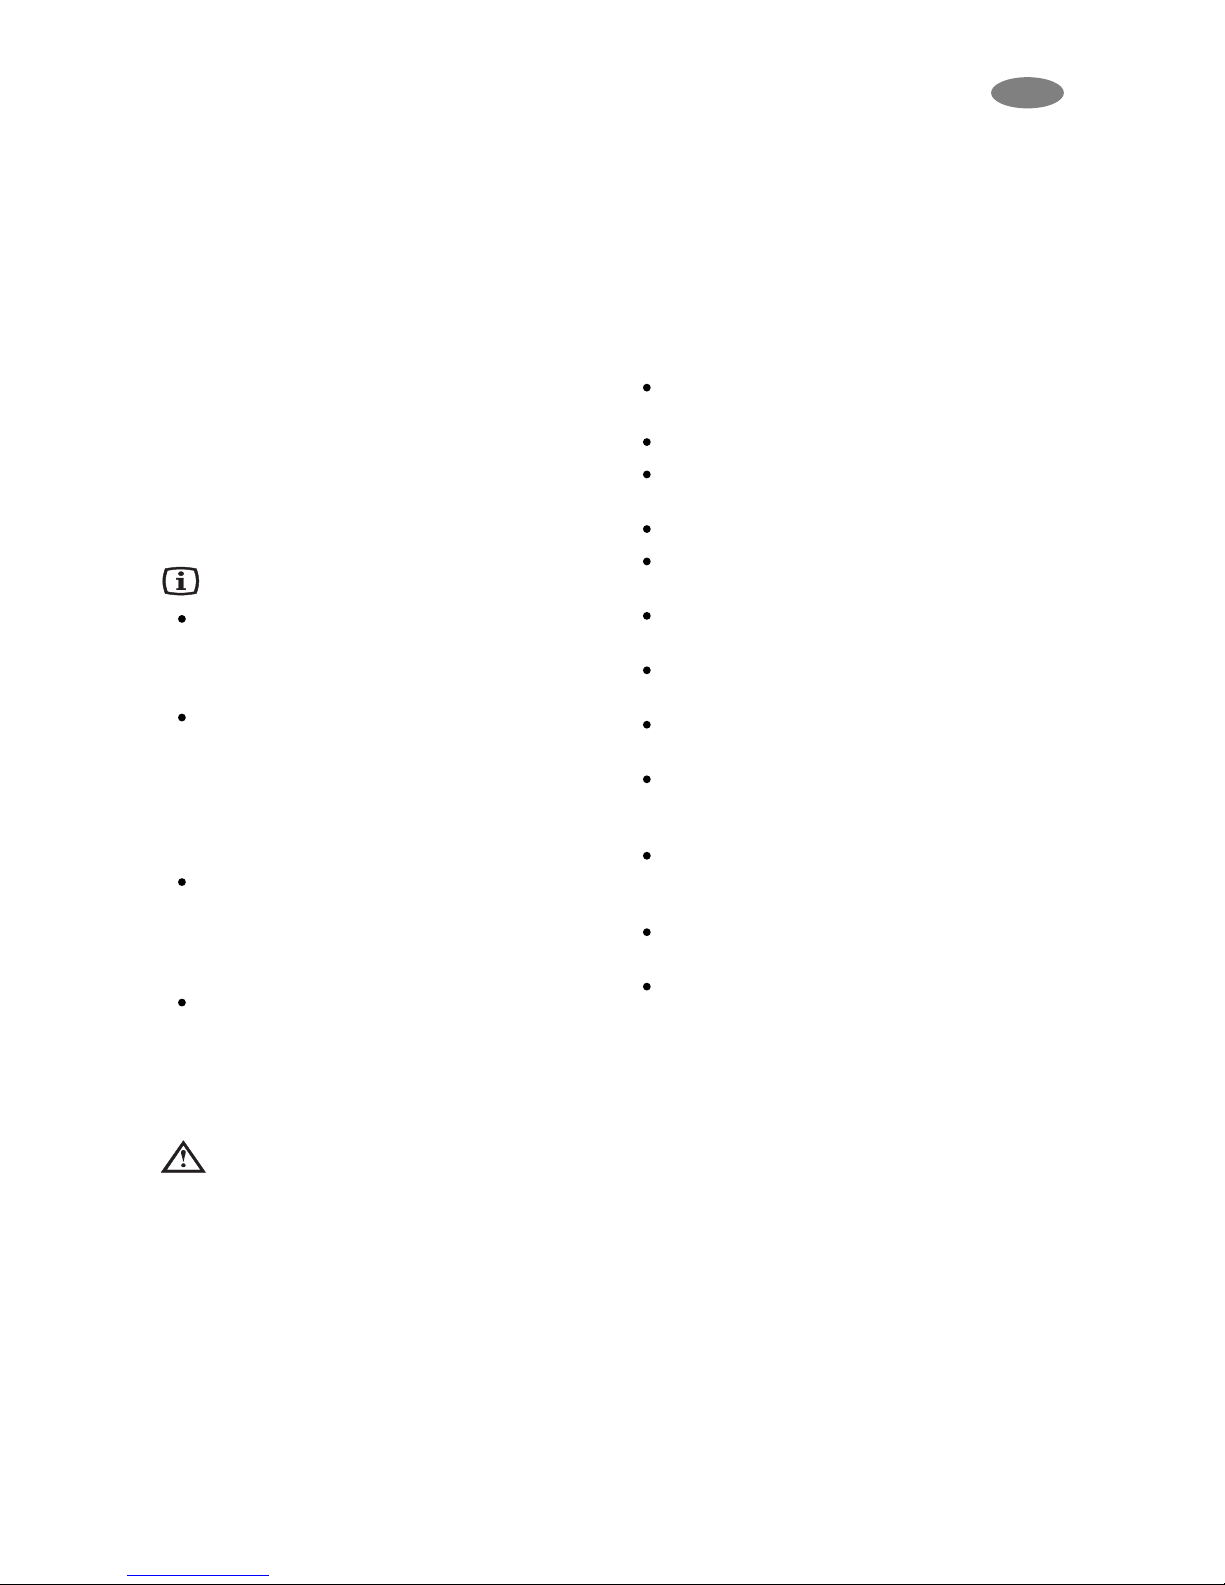
Ignition of the flame can be verified through the flameview
opening (Figure 5). After you have the flame alight keep the
safety gas valve pressed down for a further 20 seconds.
To stop the gas operation the safety valve is to close and
disconnect the gas cartridge
Figure 5.
GB
C
A
B
Page 7
7
6. Ice-making
Fill the ice-tray with drinking water to within 4/5 from the top and cover with lid. Wipe off any drops of water
which may be on the tray and lid to prevent freezing together and place in the cooler on the refrigerating unit.
Ice will be made more quickly when the thermostat knob (for electric operation) or regulating knob (for liquid
gas operation) is set to MAX for a short time. (When ice has formed, do not forget to return the knob to its
normal setting.)
To remove the ice, allow the ice-tray to defrost slightly for a while or run it under tap water at normal
temperature before removing the lid from the tray. The ice cubes can now be removed easily from the tray.
7. Useful suggestions
When setting out on a trip, run the appliance on 230 V (in thermostat setting between "min" and "max") for
24 hours prior to departure. Place food in a precooled condition into the appliance.
Frost forms on the evaporator panel when in operation. When opening the lid or putting in food, some of
this frost melts and collects in the form of water on the bottom of the appliance. Wipe the water off
occasionally using a sponge.
Avoid putting foods with fragile packaging (such as glass) into the cooling box. Movements and shaking of
the unit may cause these items to break.
Once the coolong box is in its permanent position, make sure foods do not come into contact with the
evaporator panel, as this can cause freezer-burn to the foods.
8. Defrosting, cleaning and maintenance
For defrosting, always unplug the appliance from an electrical power source to avoid the risk of shock.
Make sure no other power source is connected (gas or 12V/24V). Remove food from the refrigeration unit and
leave the lid open. Depending on the temperature, frost melts in a short time from the evaporator panel, with
water collecting at the bottom of the appliance.
Wipe it off using a towel. Afterwards, clean the appliance by following the instructions in section 3.
Leave the lid ajar to prevent any odours from forming.
The appliance does not require any further maintenance.
GB
Page 8
8
9. Customer service
Before notifying customer service, please check the
following:
Are location and ventilation satisfactory?
Is the appliance level?
Is there a current in the wall socket and is the
connection suitable for the appliance?
Is the mains power cable damaged?
For mains operation, is the electric thermostat swiched
on?
For gas operation, was the safety valve knob pressed
down long enough?
Is the thermostat knob set towards the maximum
position?
Is the gas cylinder or the pressure regulator valve open?
Is there any gas in cartridge(If by shaking, no liquide
movement can be detected, then the cartridge is
empty)?
Are by any chance two different power sources
connected (such as gas or electricity)?
Was warm food placed in the unit?
Was a large quantity of food put in at one time?
If after checking the above, the appliance still does not
operate properly, contact customer service.
When reporting the problem, state the type of problem, the
type of appliance, and the product number and serial
number from the data plate.
We assume the warranty in accordance with our warranty
assumptions for the appliance.
www.dometic.com
10. Putting into operation
You must, in all instances, operate the
appliance from a single energy source only.
Connecting several energy sources at the same time
will cause failure of the appliance.
Technical data:
10.1. Connecting to electrical mains
Make sure no other energy source is connected (gas,
12V).
The appliance may only be operated from
nominal voltage mains as shown on the data
plate. The appliance mains plug may be connected to a
mains socket earthed in accordance with regulations.
Any electrical work required to install this appliance
should be carried out by a qualified electrician or
competent person.
The manufacturer declines any liability should
these safety measures not be observed.
Electrical Requirements
Before switching on, make sure the electricity supply
voltage is the same as that indicated on the appliance
data plate.
Only f
or UK:
The appliance is supplied with a 3 amp plug fitted. In the
event of having to change the fuse in the plug supplied,
a 3 amp ASTA approved (BS 1362) fuse must be used.
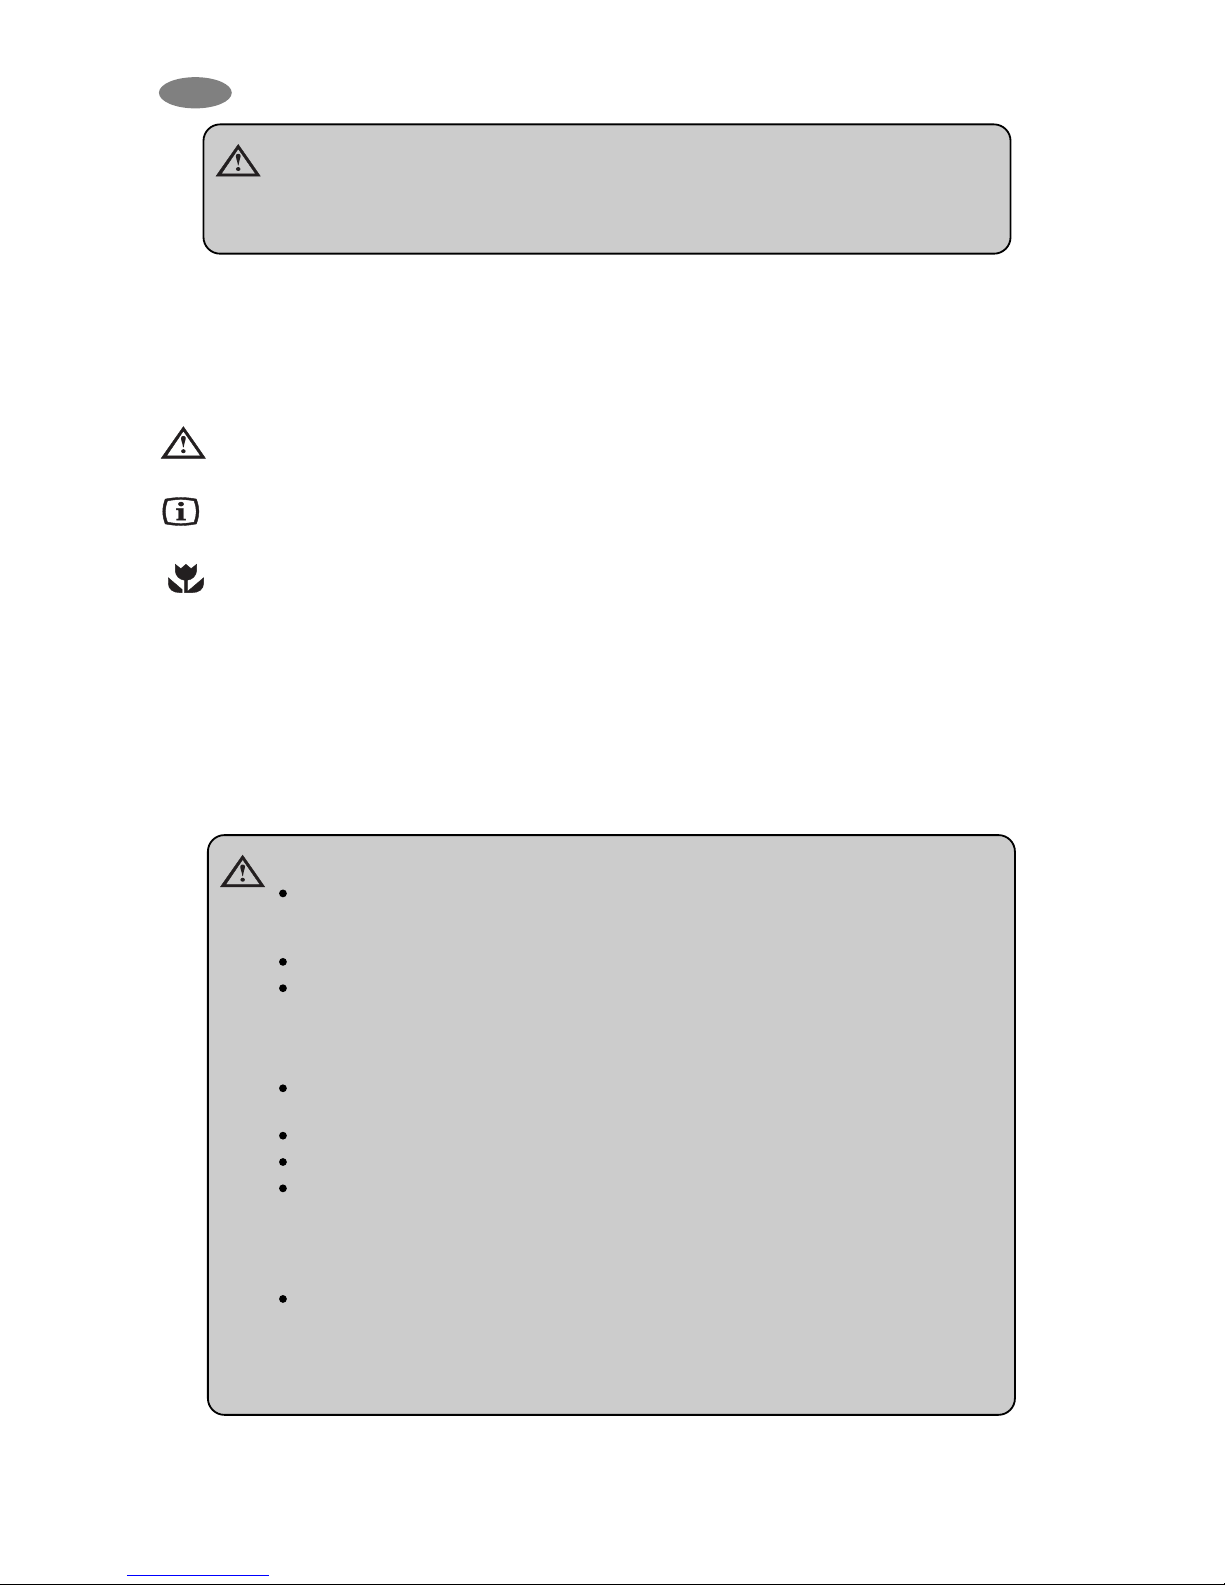
Should the plug need to be replaced for any reason, the
wires in the mains lead are coloured in accordance with
the following code:
Green and Yellow: Earth
Blue: Neutral
Brown: Live
The wire coloured green and yellow must be connected
to the terminal marked with the letter „E“ or by the earth
symbol or coloured green and yellow.
The wire coloured blue must be connected to the
terminal „N“ or coloured black.
The wire coloured brown must be connected to the
terminal marked „L“ or coloured red.
Upon completion there must be no cut, or stray strands
of wire present and the cord clamp must be secure over
the outer sheath.
Model RC 1205 GC
Type JCB - 01
Gross volume 41 litre
Mains operation 220 - 240V (AC)
Input 85W
Energy consumption 1.38 kWh/24h
Battery operation 12V (DC)
Input 85W
Energy consumption 170Ah/24h
Gas pressure (p) 28-30/37 mbar
Gas classification I
3
+
Jet size 2
Rated thermal loading: butane 134W - 9,8 g/h
Min.thermal loading: butane 106W - 7,7g/h
Climate class N
Refrigerant 143g H
2
O + 67g NH
3
GB
Page 9

9
10.2. Connecting to vehicle power
source
Make sure no other energy source is connected (gas,
230V).
A safety fuse must be installed in the electricity supply
between battery and the cooling box in a duct.
12V appliances must be connected to a vehicle
cigarette lighter, which is protected with a 10A fuse.
24V appliances must be connected by inserting a
terminal block and switch and protected with a 5A
fuse. The switch must be suitable for switching a 5A
current.
It is not necessary to consider the polarity when
connecting the unit.
In case you need a longer cable, please refer to the
table below:
max. cable lengths
Cable cross section 12 V 24 V
2.5 mm
2
until 2.5 m 5 m
4.0 mm
2
until 4.0 m 8 m
6.0 mm
2
until 6.0 m 12 m
Do not connect a cable thicker than 2.5 mm
2
into the
cigarette lighter plug! Please build a terminal block
connection.
10.3. Connection and replacement of
the gas cartridge
The correct connection of the fridge has to be
carried out by a skilled specialist. Note the
particularly valid national rules for usage of
liqiud gas driven appliances.
Make sure no other energy source is connected
(230V, 12V).
The unit must not be connected to town or
natural gas pipelines. It is suitable for use with self
sealing gas cartridge (250g).
Before connecting the gas cartridge, please read
the handling and storage instructions provided on
the side of the cartridge. Check the proper fitting of
the gas cartridge to the connecting port of the
appliance. Before connecting the gas cartridge,
check the cleanliness of the connecting port of the
appliance to the gas cartridge.
Perform this operation in a well-ventilated area, free
from ignition sources. Close the appliance valve.
Put the lever on upper position. Place the cartridge
in the appliance.
While transporting and handling the appliance, the
gas cartridge may not be connected to the
appliance.
GB
For your safety:
Do not check for leaks with a naked flame! Do not smoke while checking for leaks!
Appliances bearing this symbol must be
deposited at the designated local reception
point for the disposal of electrical and
electronic equipment.
It is not permitted that this product be
disposed of by way of the normal
household refuse collection system.
Dometic refrigerators bear this symbol on the
specifications plate (data plate) to be found on the rear
cover of the unit.
This appliance complies with the following EEC
directives:
LVD-Directive 2006/95/EC
EMC-Directive 2004/108/EC
Gas-Directive 90/396/EEC
CE-Directive 93/68/EEC
RoHS-Directive 2002/95/EC
WEEE-Directive 2002/96/EC.
11. Environmental protection
information
Ammonia (natural hydrogen and nitrogen compound) is
used as refrigerant agent in the cooling unit.
The ozone-friendly cyclopentane is used as a blowing
agent for the PU foam insulation.
Sodium chromate is used for corrosion protection (less
than 2 weight % of the coolant).
12. Recycling
After unpacking the appliance, the packing materials
should be delivered to a local collection site. At the end of
its useful lifetime, the appliance should be delivered to a
specialised recycling firm, which reclaims the usable
materials. The rest is properly destroyed.
Page 10
10
DE
Wir gratulieren Ihnen zum Erwerb unseres Produktes und hoffen, daß Sie mit der Funktion des Gerätes
zufrieden sind.
Nachfolgend ist die Bedeutung einiger Symbole erklärt, die zu beachten sind, damit ein sicherer und
effizienter Betrieb des Produktes gewährleistet ist.
Gefahrenquelle im Falle unsachgemäßer Bedienung
Nützliche Hinweise
Informationen zum Umweltschutz
Die von Ihnen gekaufte Kühlbox kann vom elektrischen Netz, von Fahrzeugbatterie oder mit selbstdichtender
Gaskartusche (250g) betrieben werden.
Achtung!
Im Gasgebrauch sollte die transportable Kühl- oder Gefrierbox in einem gut
belüfteten Raum, ebenerdig, vor Regen oder Spritzwasser geschützt betrieben
werden.
Das Betreiben des Gerätes auf Gas ist in Pkw´s, Lkw´s und Booten verboten.
Betrieb mit Flüssiggas in geschlossenen Räumen ist nicht erlaubt!
DIE KÜHLBOX DARF MIT GAS NUR IM FREIEN BETRIEBEN WERDEN!
Benutzung im Freien heißt: auch Zelte (Vorzelte), die während des Betriebes des
Gerätes gut belüftet sind, sowie ebenerdige Gartenterrassen.
Bei elektrischem Betrieb kann das Gerät auch in einem geschlossenen Raum
eingesetzt werden. Auch in diesem Fall ist das Gerät vor Feuchtigkeit zu schützen.
Es ist verboten, giftige oder explosive Stoffe in diesem Gerät aufzubewahren!
Betreiben Sie das Gerät stets nur mit einer Energiequelle.
Dieses Gerät ist nicht für die Benutzung von Personen (auch Kindern) mit physischen,
sensorischen oder mentalen Beeinträchtigungen oder Mangel an Erfahrung und
Wissen vorgesehen. Außer, die für sie verantwortliche Person gibt ihnen Anleitung und
Beaufsichtigt sie. Kinder sollten Beaufsichtigt werden um sicher zu stellen, dass sie
nicht mit dem Gerät spielen.
Für eine effektive Funktionsweise ist es wichtig, dass die Rückseite des Gerätes
möglichst gut belüftet ist, um die Wärme abzuleiten. Am heißesten wird das Gerät am
Brenner. Daher muss vor allem im Gasbetrieb gewährleistet werden, dass sich in
unmittelbarer Umgebung des Brenners keine Hindernisse oder brennbaren Stoffe
befinden (z.B. trockenes Gras oder entzündbare Kunststoffzeltplanen)
Vor Inbetriebnahme der Kühl-Gefrierbox ist diese Bedienungsanleitung
sorgfältig durchzulesen. Beim Verkauf oder bei Weitergabe an einen neuen
Besitzer muß auch die Bedienungsanleitung weitergeleitet werden.
Page 11

11
DE
Inhalt
Inhalt
1. Auspacken
2. Geräteübersicht
3. Reinigung
4. Aufstellen des Gerätes
5. Einsatz des Gerätes
5.1 Betrieb über Stromnetz
5.2 Betrieb über Fahrzeugbatterie
5.3 Betrieb über Gasflasche
6. Eiswürfelbereitung
7. Hilfreiche Empfehlungen
8. Abtauen, Reinigung und Wartung
9. Kundendienst
10. Inbetriebnahme, Technische Daten
10.1 Anschluß an das Stromnetz
10.2 Anschluß an Fahrzeugbatterie
10.3 Anschluss und Tausch der Gaskartusche
11. Umweltschutz-Information
12. Recycling
Achtung!
Die Garantiebedingungen entsprechen der EU Richtlinie 44/1999/CE und den im
jeweiligen Bestimmungsland geltenden Gesetzen.
Bei Fragen zu Garantie und Kundendienst sowie für Ersatzteile wenden Sie sich bitte
an unser Dometic Servicenetzwerk.
Die Garantie deckt keine Schäden durch unsachgemäße Benutzung ab.
Die Garantie deckt keine Änderungen am Gerät oder den Einsatz nicht-originaler
Ersatzteile von Dometic ab.
Die Garantie erlischt, wenn das Gerät nicht gemäß den Anweisungen installiert und
benutzt wird.
Nennen Sie bitte das Modell sowie die Produkt und die Seriennummer des Geräts,
wenn Sie sich mit dem Dometic Servicenetzwerk in Verbindung setzen. Diese
Informationen finden Sie auf dem Typenschild auf der Rückseite der Kühlbox.
Page 12
12
DE
1. Gehäuse
2. Deckel
3. Bedienelemente
4. Verdampfer
Abbildung 1.
1. Auspacken
Nach der Entnahme aus der Kartonverpackung
prüfen, daß das Gerät unbeschädigt ist. Bei
Transportschäden diese bitte sofort an das mit dem
Transport beauftragte Unternehmen melden.
2. Geräteübersicht
2
4
3
1
Page 13
13
DE
3. Reinigung
Das Gerät ist vor der Inbetriebnahme sowohl
innen als auch außen zu reinigen.
Hierzu ein weiches Handtuch, lauwarmes Wasser
und ein nicht scheuerndes Reinigungsmittel
verwenden. Prüfen sie, daß kein Wasser in das
Gitter der Rückwandabdeckung und die
Bedienelemente gelangt.
Gerät danach mit einem sauberen Handtuch und
klarem Wasser abwischen und anschließend
trockenreiben.
Keine Seife, Natron oder Scheuerreiniger
verwenden, um Beschädigungen zu vermeiden.
4. Aufstellen des Gerätes
Während des Kühlvorgangs leitet das Gerät
entzogene Wärme durch den Kondensator
(unterhalb des oberen Teils der Rückwandabdeckung)
in die Umgebungsluft. Je besser der Kondensator
belüftet ist, um so wirksamer wird der Kühlvorgang
ablaufen.
Eine weitere Bedingung für einen
zufriedenstellenden Betrieb ist die Aufstellung des
Gerätes auf ebenem Untergrund. Das läßt sich am
besten überprüfen, indem man ein Glas Wasser auf
das Gerät stellt.
Gerät unbedingt vor direkter Wärmestrahlung
schützen (Sonnenlicht, Heizkörper, Ofenwärme
usw.).
Beim Betrieb mit Gas sind bei der Aufstellung
folgende Abstände einzuhalten: mindestens 10 cm
von der Geräterückwand, mindestens 4 cm auf
beiden Seiten, mindestens 30 cm zur
Geräteabdeckung, mindestens 5 cm zur
Gerätunterseite.
Zu brennbarem Material (Papier, Holz, Gras, Textilien
usw.) in unmittelbarer Umgebung des Gerätes sind
die oben genannten Abstände einzuhalten.
5. Einsatz des Gerätes
Das Kabel für den Anschluß an das Stromnetz, das
12-V-Kabel und die Anschlußverbindung für
Gasflaschen befinden sich auf der Rückseite der
Kühlbox. (Abbildung 2).
5.1. Betrieb über Stromnetz
Prüfen sie, daß die auf dem Typenschild des Gerätes
angegebene Versorgungsspannung der Spannung
entspricht, an die das Gerät angeschlossen werden
soll. Stromkabel abwickeln und Stecker in eine
Steckdose mit Schutzkontakt stecken.
Beim erstmaligen Gebrauch des Gerätes Thermostat
auf Maximalleistung stellen (Abbildung 4. A); nach
etwa 5 Stunden dann gegen Minimum stellen. Diese
Einstellung eignet sich für die allgemeine Verwendung
des Kühlgerätes.
Hinweis: Der Stecker entspricht jeweils den
Normen des Bestimmungslandes und kann anders
als auf der Abbildung aussehen.
Abbildung 2
Page 14
14
DE
Abbildung 4
Abbildung 5
5.2. Betrieb über Fahrzeugbatterie
Prüfen sie, daß die auf dem Typenschild des Gerätes
angegebene Versorgungsspannung der Spannung
der Fahrzeugbatterie entspricht (12 V).
Beim 12-V-Betrieb läuft das Gerät permanent, ohne
Temperaturüberwachung.
Geräte mit 12 V Gleichspannung sind mit Anschlüssen
ausgestattet, die in Zigarettenanzünder gesteckt
werden können (Abbildung 3). Bei manchen
Fahrzeugtypen ist gegebenenfalls der am Ende des
Anschlusses befindliche rote Ring zu entfernen.
Hierzu ist der rote Ring entgegen dem Uhrzeigersinn
zu drehen und abzuziehen. Das Gerät kann dann über
den Zigarettenanzünder angeschlossen werden.
Läuft der Fahrzeugmotor nicht, muss der
Gerätestecker stets vom Zigarettenanzünder
(12V) abgezogen, bzw. das Gerät über den Schalter
(24V) abgeschaltet werden. Andernfalls entlädt sich
die Fahrzeugbatterie in relativ kurzer Zeit.
5.3. Betrieb über Gasflasche
Das Anschließen an die Gasflasche ist in den Kapiteln
10.3 beschrieben.
Nach dem Anschließen der Gaskartusche und nach
der Dichtheitskontrolle drehen Sie den Thermostat in
die Maximum-Stelle (Abbildung 4.B), drücken Sie das
Gas-Sicherheitsventil, halten Sie es etwa 10
Sekunden gedrückt, dann drücken Sie die PiezoZündtaste schnell mehrmals nacheinander (Abbildung
4.C). Falls die Flamme nicht zündet, den Vorgang
wiederholen. (Die beim Anschluß an die Gasflasche
noch in der Gasleitung des Gerätes befindliche Luft
muß entweichen. Erst dann kann das Gas gezündet
werden.)
Das Zünden der Flamme kann durch das FlammenSichtfenster (Abbildung 5) überprüft werden. Nach
dem Zünden der Flamme das Sicherheitsventil
weitere 20 Sekunden gedrückt halten.
Das Stellorgan hat drei Stellpositionen:
: große Flamme (MAX) = Gaszufuhr maximum
(hohe Umgebungstemperatur ~32 °C);
: mittlere Flamme (MED)= Gaszufuhr mittel
(mittlere Umgebungstemperatur ~25°C);
: kleine flamme (MIN) = Gaszufuhr klein
(niedrige Umgebungstemperatur ~16°C);
: Aus-Stellung = Gaszufuhr zum Brenner abgespert.
Zur Einstellung des Gasbetriebs ist das
Sicherheitsventil zu schließen, und die Gaskartusche
zu trennen.
Gasbetrieb abstellen
Gasflaschen- bzw. Druckreglerventil schließen.
Knopf B rechts herum in Aus-Stellung drehen.
Abbildung 3
C
A
B
Page 15
15
DE
6. Eiswürfelbereitung
Die Eisschale zu 4/5 mit Trinkwasser füllen und mit
dem Deckel verschließen. Eventuell vorhandene
Wassertropfen von Schale und Deckel abwischen, um
ein Festfrieren zu vermeiden. Eiswürfelschale im
Gerät auf den Kälteabstrahler stellen.
Um die Eiswürfelbildung zu beschleunigen, bei
Betrieb mit Strom den Thermostatknopf, bei Betrieb
mit Flüssiggas den Reglerknopf evtl. für kurze Zeit in
"MAX"-Position drehen (Rückstellung nach der
Eiswürfelherstellung nicht vergessen)!
Zur Eiswürfelentnahme die komplette Eisschale kurze
Zeit antauen lassen oder einen Moment unter normal
temperiertes Leitungswasser halten, dann den Deckel
von der Schale abnehmen. Die Eiswürfel lassen sich
nun leicht aus der Schale bzw. den Fächern des
Deckels herausnehmen.
7. Hilfreiche Empfehlungen
Für Ausflüge Gerät zuvor 24 Stunden lang bei
230 V laufen lassen, bei Thermostatposition
"Max". Lebensmittel in vorgekühltem Zustand in
das Gerät legen.
Während des Betriebs bildet sich an der
Verdampferplatte Eis. Wenn der Deckel geöffnet
wird oder wenn Lebensmittel in das Gerät gelegt
werden, schmilzt ein Teil dieses Eises und
sammelt sich in Form von Wasser am Boden des
Gerätes. Wasser gelegentlich mit einem
Schwamm abwischen.
Beim Transport keine Lebensmittel mit
zerbrechlicher Verpackung (beispielsweise Glas)
in die Kühlbox legen. Bewegungen und
Erschütterungen der Kühlbox können zum Bruch
dieser Verpackungen führen.
Nach Aufstellung der Kühlbox am vorgesehenen
Standort prüfen, daß Lebensmittel nicht mit der
Verdampferplatte in Berührung kommen, da dies
Gefrierbrand an den Lebensmitteln verursachen
kann.
8. Abtauen, Reinigung und
Wartung
Beim Abtauen zur Vermeidung eines Stromschlags ist
immer zuerst die Verbindung des Gerätes zur
Stromquelle zu unterbrechen. Zusätzlich ist zu prüfen,
daß das Gerät an keine weitere Versorgungsquelle
angeschlossen ist (Gas, 12V). Alle Lebensmittel aus
der Kühlbox nehmen und Deckel geöffnet lassen.
Abhängig von der Temperatur taut die Eisschicht an
der Verdampferplatte in kurzer Zeit, wobei sich am
Boden der Kühlbox Wasser sammelt. Dieses mit
einem Handtuch aufwischen. Danach Gerät unter
Beachtung der in Abschnitt 3 gegebenen
Anweisungen reinigen. Deckel in leicht geöffneter
Stellung lassen, um jegliche Geruchsbildung zu
verhindern. Das Gerät benötigt keinerlei weitere
Wartungsmaßnahmen.
9. Kundendienst
Vor Benachrichtigung des Kundendienstes
folgende Punkte überprüfen:
Aufstellungsort geeignet? Belüftung
ausreichend?
Steht das Gerät auf ebenem Untergrund?
Wird die benutzte Steckdose mit Strom versorgt,
und ist die Verbindung für das Gerät geeignet?
Ist das Stromkabel beschädigt?
Beim Betrieb mit Strom: Ist das elektrische
Thermostat eingeschaltet?
Beim Betrieb mit Gas: Wurde der
Sicherheitsventilknopf lange genug gedrückt?
Ist der Thermostatknopf auf Max position
eingestellt?
Sind Gasflasche bzw. Druckreglerventil
geöffnet?
Gibt es noch Gas in der Kartusche? (Wenn beim
Schütteln Bewegung von Flüssigkeit nicht
feststellbar ist, dann ist die Kartusche leer?)
Sind eventuell zwei unterschiedliche
Energieversorgungsquellen angeschlossen
(beispielsweise Gas und Elektrizität)?
Wurden warme Lebensmittel in der Kühlbox
aufbewahrt?
Wurde eine große Menge an Lebensmitteln zum
selben Zeitpunkt hineingelegt?
Falls das Gerät auch nach dem Überprüfen obiger
Punkte nicht ordnungsgemäß funktioniert, ist der
Kundendienst zu kontaktieren. Bei der
Beschreibung der Störung die Art der Störung, den
Typ des Gerätes und die auf dem Typenschild
angegebene Produktnummer und die
Seriennummer angeben.
Garantieleistungen werden vom Hersteller
entsprechend den für das Gerät geltenden
Garantiebedingungen gewährt.
www.dometic.com
Page 16
16
DE
10. Inbetriebnahme
Das Gerät ist stets nur an eine einzige
Energieversorgungsquelle anzuschließen.
Das Anschließen mehrerer Energieversorgungsquellen führt zum Ausfall des Gerätes.
Technische Daten:
10.1. Anschluß an das Stromnetz
Prüfen sie, daß keine andere Versorgungsquelle
angeschlossen ist (Gas, 12 V).
Das Gerät darf nur mit den auf dem Typenschild
angegebenen Nennbetriebsspannungen betrieben
werden. Der Netzstecker des Gerätes darf nur mit
einer vorschriftsmäßig geerdeten Steckdose
verbunden werden. (Im Ausland kann auf Grund
anderer Steckdosen ein Adapter erforderlich sein.)
Elektroarbeiten zur Installation des Gerätes sind von
einem qualifizierten Fachmann durchzuführen.
Falls diese Sicherheitsmaßnahmen nicht
beachtet werden, lehnt Dometic Zrt jede Haftung
ab.
Elektrische Anforderungen
Vor dem Einschalten ist sicherzustellen, dass die
Spannungsangabe auf dem Typenschild des Gerätes
der Versorgungsspannung entspricht, an die das
Gerät angeschlossen werden soll.
10.2. Anschluß an Fahrzeugbatterie
Prüfen sie, daß keine andere Versorgungsquelle
angeschlossen ist (Gas, 230 V).
In die Stromzuleitung zwischen Batterie und Box muss
in eine Leitung eine Sicherung eingebaut sein bzw.
werden.
12-V-Geräte müssen mit einem im Fahrzeug
befindlichen Zigarettenanzünder verbunden werden,
der über eine 10A Sicherung geschützt ist.
Modell RC 1205 GC
Typ JCB - 01
Bruttovolume 41 litre
Netzbetrieb 220 - 240V (AC)
Eingangsleistung 85W
Stromverbrauch 1.38 kWh/24h
Batteriebetrieb 12V (DC)
Eingangsleistung 85W
Stromverbrauch 170Ah/24h
Gasdruck (p) 30 mbar
Gasklassifikation I
3B/P
Düsengröße 2
Nennwärmebelastung: 134W-9,8 g/h
Minimalwärmebelastung: 106W - 7,7g/h
Klimaklasse N
Kühlmittel 143g H
2
O + 67g NH
3
Beachtung der Polarität ist beim Anschluß nicht
notwendig.
Falls sie eine längere Stromleitung brauchen,
beachten sie folgendes:
max. Kabellänge
Kabelquerschnitte 12 V
2.5 mm
2
bis 2.5 m
4.0 mm
2
bis 4.0 m
6.0 mm
2
bis 6.0 m
Versuchen sie keine von 2,5mm
2
dickerer Leitung
in den Stecker zu montieren. In diesem Fall
müssen die Leitungen über eine Lüsterklemme
angeschlossen werden.
10.3. Anschluss und Tausch der
Gaskartusche
Der fachgerechte Anschluss des
Kühlschrankes muss durch eine zugelassene
Fachkraft gemäâ der Technischen Regeln
Flüssiggas (TRF) ausgeführt werden. Die
jeweils gültigen nationalen Vorschriften für den
Einsatz von flüssiggasbetriebenen Geräten
müssen beachtet werden.
Prüfen sie, daß keine andere Versorgungsquelle
angeschlossen ist (230 V, 12 V).
Das Gerät ist ausschließlich für 30 mbar Propan/Butan Gasbetrieb geeignet.
Es ist zum Betrieb mit selbstsichernden
Gaskartusche (250g) geeignet.
Das Gerät ist mit eingebautem Druckregler
versehen. Druck ist am Typenschild angebracht.
Vor dem Anschließen der Gaskartusche lesen Sie
die Behandlungs- und Lagerungsanweisungen an
der Seite der Gaskartusche durch. Kontrollieren
Sie die richtige Verbindung des Anschlusses der
Gaskartusche und des Gerätes. Vor dem
Anschließen der Gaskartusche kontrollieren Sie die
Reinheit des Gerätes und der Gaskartusche.
Führen Sie diese Tätigkeit auf einem gut belüfteten,
von Zündquellen freien Gebiet durch. Schließen
Sie das Ventil des Gerätes. Stellen Sie den Hebel
in die Stellung Oben. Legen Sie die Kartusche ins
Gerät ein.
Bei der Lieferung und Bewegung des Gerätes darf
die Gaskartusche am Gerät nicht angeschlossen
sein.
Page 17
17
DE
11. Umweltschutz-Information
Im Kühlaggregat wird Ammoniak (natürliche
Wasserstoff- und Stickstoffverbindung) als Kühlmittel
eingesetzt. Das ozonfreundliche Cyclopentan wird als
Treibmittel für die PU-Schaumisolierung eingesetzt.
Natriumchromat wird als Korrosionsschutz verwendet
(weniger als 2 Gew.% des Kühlmediums)
12. Recycling
Nach dem Auspacken des Gerätes ist die Verpackung
der lokalen Sammelstelle zuzuführen. Zur
ordnungsgemäßen Entsorgung nach Ablauf der
Lebensdauer des Gerätes ist dieses an ein hierfür
spezialisiertes Entsorgungs- und Wiederaufbereitungs-Unternehmen weiterzuleiten, das eine
Rückgewinnung der verwertbaren Materialien
vornimmt. Das Restmaterial wird ordnungsgemäß
vernichtet.
Geräte, die mit diesem Symbol
gekennzeichnet sind, müssen an dem
örtlichen Sammelpunkt für die Entsorgung
von elektrischen und elektronischen
Geräten abgegeben werden.
Dieses Produkt darf nicht über den
normalen Haushaltsabfall entsorgt werden.
Kühlschränke von Dometic enthalten das Symbol auf
dem Datenschild (Typenschild) auf der Rückseite des
Gerätes.
Das Gerät entspricht den folgenden EGRichtlinien:
Niederspannungsgeräte-
Richtlinie 2006/95/EC
EMV Richtlinie 2004/108/EC
Gas Richtlinie 90/396/EEC
CE Kennzechnug Richtlinie 93/68/EEC
RoHS Richtlinie 2002/95/EC
WEEE Richtlinie 2002/96/EC
Automotive Richtlinie 72/245/EEC
letzte Änderung 95/54/EEC
Page 18
18
FR
Merci d'avoir choisi notre appareil. Nous espérons qu'il vous donnera entière satisfaction.
Nous vous invitons maintenant à vous familiariser avec les symboles suivants qui vous permettront
d'identifier les consignes importantes permettant une utilisation efficace et sûre de votre appareil.
Source de danger en cas d'opération incorrecte
Conseils utiles
Informations se rapportant à la protection de l'environnement
La glacière que Vous venez d'acheter a été conçue pour être utilisée à partir du réseau électrique, des
batteries d'un véhicule ou d'une cartouche de gaz autofermante (250g).
Veuillez lire attentivement le mode d'emploi avant de mettre le réfrigérateur
en service. Si vous deviez vendre ou céder l'appareil ultérieurement,
veuillez vous assurer que le mode d'emploi sera transmis au nouveau
propriétaire.
Achtung!
Votre réfrigérateur portable ne peut être utilisé, alimenté au gaz, que dans une
pièce bien ventilée, en surface et à l'abri de la pluie ou des éclaboussures
d'eau.
Cet appareil ne peut en aucun cas être utilisé, alimenté au gaz, à bord de
véhicules ou de bateaux en mouvement!
Le fonctionnement au gaz liquéfié est interdit dans les locaux clos!
CET APPAREIL NE POURRA FONCTIONNER AU GAZ QU'EN PLEIN AIR!
Utilisation en plein air signifie que l'appareil pourra aussi être installé dans une
tente (sous l'auvent) suffisamment ventilée ainsi que sur des terrasses de jardin
planes.
Dans le cas d'un fonctionnement à l'électricité, l'appareil peut également être
utilisé dans des lieux fermés. Dans ce cas, il convient de l'installer dans un
endroit à l'abri de l'humidité.
Il est interdit de stocker des matières dangereuses ou explosives dans cet
appareil!
Ne mettez l'appareil en service que branché à une seule source d'énergie.
Cet appareil n'est pas destiné à être utilisé par des personnes (y compris des
enfants) présentant des troubles physiques, sensoriels ou mentaux, ou ne
possédant pas une expérience ou une connaissance de l'appareil suffisante, à
moins que ces personnes aient été formées à l'utilisation de cet appareil ou
soient supervisées par une personne responsable de leur sécurité.
Les enfants doivent être surveillés pour éviter qu'ils jouent avec cet appareil.
Il est important, pour que votre réfrigérateur fonctionne correctement, d'assurer
une circulation d'air suffisante à l'arrière de l'appareil, afin de permettre à la
chaleur de s'évacuer. L'élément le plus chaud est le brûleur, et
particulièrement si l'appareil fonctionne au gaz, il est essentiel d'assurer
que l'emplacement ne soit obstrué d'une quelconque façon et qu'aucun
matériau inflammable ne se trouve à proximité (par exemple du gazon ou un
revêtement de sol plastique susceptibles de prendre feu).
Page 19

19
FR
TTaable des matièr
ble des matièr
es
es
1. Déballage
2. Vue de l'appareil
3. Nettoyage
4. Positionnement de l'appareil
5. Utilisation de l'appareil
5.1 Alimentation sur secteur
5.2 Alimentation sur batterie auto
5.3 Fonctionnement au gaz
6. Fabrication de glaçons
7. Conseils utiles
8. Dégivrage, nettoyage et entretien
9. Service après-vente
10. Mise en service, caractéristiques techniques
10.1 Raccordement au secteur
10.2 Raccordement sur batterie auto
10.3 Raccordement et remplacement de la cartouche de gas
11. Informations relatives à la protection de l'environnement
12. Recyclage
Attention!
Les conditions de garantie sont conformes à la Décision du Comité mixte de
l'EEE nº 44/1999 du 26 mars 1999 modifiant l'annexe (environnement) de
l'accord EEE, et également conformes aux lois applicables dans les divers pays.
Si vous avez des questions concernant la garantie, le service après-vente ou les
pièces de rechange, veuillez bien vous adresser à notre réseau de services
Dometic.
Les dommages résultant d'un usage inapproprié de l'appareil ne sont pas
couverts par la garantie.
Les modifications apportées à l'appareil ou l'utilisation de pièces de rechange
qui ne sont pas d'origine Dometic, ne sont pas couvertes par la garantie.
Le non-respect des instructions d'installation ou du mode d'emploi, entraîne
l'extinction totale de cette garantie.
Veuillez bien préciser le modèle d'appareil, la référence du produit et le numéro
de série si vous voulez contacter le réseau de services Dometic. Vous trouverez
ces informations sur la plaque signalétique, située à l'arrière du réfrigérateur.
Page 20

20
FR
1. Déballage
A la réception, s'assurer après avoir déballé
l'appareil que celui-ci n'a pas été endommagé
pendant le transport. En cas de dégâts, il convient
d'en aviser immédiatement le transporteur.
2. Vue de l'appareil
1. Châssis isolé thermiquement
2. Couvercle isolé thermiquement
3. Commandes
4. Évaporator
Figure 1.
2
4
3
1
Page 21

21
FR
3. Nettoyage
Avant de procéder à la mise en service, il
convient de nettoyer l'intérieur et l'extérieur de
l'appareil.
Utiliser à cet effet un chiffon doux et de l'eau
tiède additionnée d'un détergent doux. S'assurer
que l'eau ne pénètre pas dans la grille du
panneau arrière ou dans les commandes.
Ensuite rincer l'appareil à l'aide d'un chiffon
propre et d'eau claire, et le sécher.
Pour éviter d'endommager votre appareil, ne
pas utiliser de savon, de soude ménagère ou de
détergents abrasifs.
4. Positionnement de l'appareil
Au cours du processus de réfrigération,
l'appareil transmet la chaleur à l'air ambiant à
travers le condensateur situé sous la partie
supérieure du panneau arrière. Plus le condensateur
est ventilé, plus le réfrigérateur sera efficace.
L'autre condition nécessaire au bon
fonctionnement est que l'appareil soit posé sur
une surface plane. Le meilleur moyen de vérifier
que cette condition est remplie est de poser un
verre d'eau sur le dessus de l'appareil.
Il est important de veiller à ce que l'appareil ne
soit pas exposé à un rayonnement ou à une
source de chaleur direct(e) (soleil, radiateur, à
proximité d'un foyer, etc.)
En cas d'alimentation au gaz, il faut prévoir les
espaces de sécurité suivants : au minimum 10 cm
à l'arrière de l'appareil, au minimum 4 cm de part
et d'autre de l'appareil, au minimum 30 cm audessus de l'appareil et au minimum 5 cm entre le
sol et l'appareil.
Toute matière inflammable (papier, bois, herbe,
textile, etc.) à proximité immédiate de l'appareil
doit être maintenue aux distances indiquées cidessus.
5. Utilisation de l'appareil
Le cordon de raccordement au secteur, le câble
de branchement 12 V et le connecteur de
raccordement au gaz sont situés du panneau
arrière du réfrigérateur (figure 2).
5.1 Alimentation sur secteur
S'assurer que le voltage indiqué sur la plaque
signalétique de l'appareil correspond à la tension
de la prise électrique où vous souhaitez brancher
votre appareil. Déroulez le câble de branchement
au secteur et connectez-le à une prise de terre
pour la mise en marche de l'appareil.
Lorsque vous branchez l'appareil pour la première
fois, réglez le thermostat (figure 4. A) sur
maximum durant 5 heures, puis ramenez-le à une
position inférieure selon vos besoins en
réfrigération.
Remarque°: La fiche d'alimentation électrique se
conformant aux normes correspondantes des
divers pays, pourra différer de celle ici illustrée.
Figure 2
Page 22

22
FR
5.2 Alimentation sur batterie auto
S'assurer que le voltage indiqué sur la plaque
signalétique de l'appareil correspond à la tension
de la batterie du véhicule (12 ou 24 V).
Les appareils 12 V CC (courant continu) sont
équipés de connecteurs pouvant être branchés
dans les prises allume-cigares des véhicules
(figure 3). Sur certains types de véhicule, il se
peut que vous soyez amené à enlever la bague en
plastique rouge située à l'extrémité du connecteur.
Pour ce faire tourner la bague dans le sens inverse
des aiguilles d'une montre et l'enlever. L'appareil
peut alors être branché sur la prise allume-cigares.
En fonctionnement 12 V, l'appareil fonctionne en
continu et sans contrôle de température.
Les appareils 24 V CC sont livrés avec des
extrémités de fils dénudées. Ces extrémités
doivent être branchées dans un boîtier terminal
relié à la batterie du véhicule par l'intermédiaire
d'un fusible 5A et d'un interrupteur 5 A.
Si le moteur du véhicule est arrêté,
débranchez toujours la fiche d'alimentation
de la prise allume-cigares (12 V) ou arrêtez
l'appareil en passant par l'interrupteur (24 V). Si
vous oubliez de le faire, la batterie de véhicule se
déchargerait rapidement.
5.3 Fonctionnement au gaz
La description du raccordement à la cartouche de
gaz se trouve dans les chapitres 10.3.
Après avoir raccordé l'appareil à la cartouche et
effectué le contrôle de la fuite de gaz, il faut tourner le
thermostate à la position maximale (figure 4.B),
appuyer le clapet de sécurité du gaz, le tenir appuyé
pendant une dizaine de secondes, ensuite appuyer
plusieurs fois successivement le bouton piezo
d'allumage (figure 4.C). Si la flamme n'apparaît pas,
répétez le processus (l'air présent dans le tuyau avant
branchement à la bouteille de gaz doit d'abord être
évacué. Ce n'est qu'à ce moment que le gaz peut
être allumé).
L'allumage de la flamme peut être vérifié au
niveau de l'ouverture de contrôle de la flamme
(figure 5). Lorsque la flamme est allumée,
maintenez la soupape de sécurité du gaz
enfoncée pendant 20 secondes supplémentaires.
Le bouton régulateur a 4 positions:
: grosse flamme (MAX) = quantité maximum de gaz
(haute température ambientale ~ 32 °C);
: flamme moyenne (MID)= quantité moyenne de gaz
(température ambientale moyenne ~25°C);
: petite flamme (MIN) = quantité minimum de gaz
(température ambientale basse ~16°C);
: position arrêt = le brűleur ne reçoit pas de gaz.
Pour débrancher un appareil fonctionnant au gaz
Fermer la bouteille de gaz et le régulateur de pression
et tourner le bouton B vers la droite sur la position
d'arręt.
Pour fermer le gaz, il faut fermer le clapet de sécurité
et couper le raccordement de la cartouche.
Figure 4
Figure 5
Figure 3
C
A
B
Page 23

23
FR
6. Fabrication de glaçons
Remplissez le bac à glaçons aux 4/5 avec de
l'eau potable froide et fermez le couvercle. Placez
ensuite le bac à glaçons sur l'étagère prévue à
cet effet. Epongez tout épanchement d'eau afin
d'éviter que le bac à glaçons ne reste fixé au
diffuseur.
Pour accélérer la production de glaçons, vous
pouvez régler temporairement sur la position
"MAX" le bouton du thermostat si l'appareil
fonctionne à l'électricité ou le bouton de réglage si
l'appareil fonctionne au gaz. N'oubliez cependant
pas de le ramener ensuite à sa position initiale.
Pour faciliter le détachement des glaçons,
maintenez le bac sous un robinet d'eau froide et
retirez ensuite le couvercle avec les glaçons. Les
glaçons s'extrairont alors facilement de leurs
logements.
7. Conseils utiles
Avant de partir en voyage, faites fonctionner
l'appareil sur le secteur 230 V (thermostat en
position intermédiaire entre min. et max., 24
heures avant votre départ. Placer de la
nourriture préalablement réfrigérée dans
l'appareil.
Il y a formation de givre au niveau du
panneau de l'évaporateur lorsque l'appareil
est en marche. Lorsqu'on ouvre le couvercle
ou que l'on met des aliments dans l'appareil,
une partie de ce givre peut fondre et être
collecté sous forme d'eau au fond du
réfrigérateur. Essuyer l'eau de temps à autre
à l'aide d'une éponge.
Eviter de placer des aliments conservés dans
des emballages fragiles (comme le verre)
dans le réfrigérateur lorsque vous souhaitez
le déplacer sur ses roues. Les mouvements
et les chocs pourraient les casser.
Une fois que le réfrigérateur est dans sa
position définitive, s'assurer que les aliments
n'entrent pas en contact avec le panneau de
l'évaporateur, étant donné que cela pourrait
les avarier.
8. Dégivrage, nettoyage et
entretien
Pour le dégivrage, toujours débrancher l'appareil
de toute source d'énergie électrique afin d'éviter
tout risque de décharge. S'assurer que l'appareil
n'est branché sur aucune autre source d'énergie
(gaz ou 12V/24V). Sortir les aliments du
réfrigérateur et laisser le couvercle ouvert.
Suivant la température, le givre fond rapidement
sur le panneau de l'évaporateur, l'eau étant
collectée sur le fond du réfrigérateur. L'essuyer à
l'aide d'un chiffon. Puis nettoyer l'appareil
conformément aux instructions du paragraphe
3. Laisser le couvercle entrouvert afin d'éviter
toute formation de mauvaises odeurs.
L'appareil ne nécessite aucun autre entretien.
9. Service après-vente
Avant de vous adresser au service après-vente,
veuillez vérifier les points suivants :
L'emplacement et la ventilation sont-ils
satisfaisants ?
L'appareil est-il de niveau ?
Y a-t-il du courant dans la prise murale et
cette connexion est-elle compatible avec
l'appareil ?
Le câble d'alimentation secteur est-il
endommagé ?
En mode de fonctionnement électrique, le
thermostat est-il en position ON ?
Dans le cas d'un fonctionnement au gaz, le
bouton de la soupape de sécurité a-t-il été
maintenu enfoncé suffisamment longtemps ?
Le bouton du thermostat est t-il réglé sur
position max. ?
La bouteille de gaz ou le détendeur sont-ils
ouverts ?
Y a-t-il du gaz dans la cartoucheÊ? (Si l'on
ne peut pas sentir de mouvement de liquide
en remuant la cartouche, la cartouche est
vide?)
L'appareil serait-il par hasard connecté
simultanément à deux sources d'alimentation
distinctes (par exemple le gaz et l'électricité)?
Des denrées alimentaires chaudes ont-elles
été mises dans l'appareil ?
Une quantité importante d'aliments a-t-elle
été placée dans l'appareil ?
Si l'appareil ne fonctionne toujours pas de
manière satisfaisante après vérification des
points ci-dessus, contacter le service aprèsvente. En signalant le problème, décrire le type
de problème, préciser le type d'appareil, la
référence du produit et le numéro de série
figurant sur la plaque signalétique.
Nous assumons la garantie conformément à
nos conditions de garantie applicables pour
l'appareil.
www.dometic.com
10. Mise en service
Vous ne devez faire fonctionner l'appareil
que sur une seule source d'énergie. Le
branchement simultané à plusieurs sources
d'énergie différentes entraînerait un
dysfonctionnement de l'appareil.
Page 24

24
FR
10.1 Raccordement au secteur
S'assurer que l'appareil n'est raccordé à aucune
autre source d'énergie (12 V, gaz).
L'appareil ne peut fonctionner qu'à la tension
nominale mentionnée sur la plaque signalétique.
L'appareil peut être branché à une prise de terre
conforme à la réglementation en vigueur (dans les
pays étrangers, l'utilisation d'un adaptateur peut
s'avérer nécessaire, les prises de courant n'étant
pas les mêmes).
Tout travail électrique exigé pour installer cet
appareil doit être effectué par un électricien
qualifié ou une autre personne compétente.
Le fabricant décline toute responsabilité en
cas de non-respect de ces mesures de
sécurité.
Exigences en matière d'électricité
Assurez-vous que la tension d'alimentation
correspond à la tension indiquée sur la plaque
signalétique avant de mettre l'appareil en service.
10.2 Raccordement sur batterie
auto
S'assurer que l'appareil n'est raccordé à aucune
autre source d'énergie (230 V, gaz).
Un fusible de sécurité doit être installé au niveau
de la ligne d'alimentation entre la batterie et le
réfrigérateur.
Les appareils 12 V doivent être branchés sur la
prise allume-cigares (protégée par un fusible 10 A)
du véhicule.
Les appareils 24 V doivent être branchés en
insérant un bloc adaptateur avec interrupteur
protégé par un fusible de 5 A. L'interrupteur doit
pouvoir supporter une intensité de 5 A.
Il n'est pas nécessaire de vérifier la polarité lors
de la mise en marche de l'appareil.
Longueur de câble max.
Section de câble 12 V 24 V
2.5 mm
2
jusqu'à 2.5 m 5 m
4.0 mm
2
jusqu'à 4.0 m 8 m
6.0 mm
2
jusqu'à 6.0 m 12 m
10.3 Raccordement et
remplacement de la
cartouche de gas
Le raccordement du réfrigérateur doit être
fait par un spécialiste qualifié. Il faut
respecter les normes nationales en vigueur,
relatives à l'utilisation des appareils
fonctionnant avec du gaz liquide.
S'assurer que l'appareil n'est raccordé à
aucune autre source d'énergie (230 V, 12 V).
L'appareil ne fonctionne qu'avec du
propane/butane. Il est apte à être utilisé avec
une cartouche de gaz autofermante (250 g).
L'appareil est équipé d'un réglage de pression
automatique. La pression est indiquée sur la
plaque de données.
Avant de faire le raccordement de la cartouche,
lire les instructions de manipulation et de
stockage qui se trouvent sur le côté de la
cartouche. Contrôler l'ajustement du
raccordement de la cartouche de gaz et de
l'appareil. Avant de faire le raccordement de la
cartouche, vérifier la propreté de l'appareil et
du raccord de la cartouche.
L'opération doit être effectuée dans un espace
bien ventilé, exempte de source de feu. Fermer
le clapet de l'appareil. Mettre le bras à la
position supérieure.ÊMettre la cartouche dans
l'appareil.
Pendant le transport et le déplacement de
l'appareil, la cartouche ne doit pas être
raccordée à l'appareil.
L'APPAREIL NE PEUT FONCTIONNER SOUS
UNE PRESSION AUTRE QUE CELLE
INDIQUEE SUR LA PLAQUE
SIGNALETIQUE.
Modèle
Type
Contenance
Alimentation secteur
Entrée
Consommation d'énergie
Batterie
Entrée
Consommation d'énergie
Pression de gaz
Type de gaz
Injecteur n°
Consommation nominale
de chaleur:
Consommation
miniminale de chaleur:
Catégorie climatique
Réfrigérant
RC 1205GC
JCB - 01
41 litres
220-240V (CA)
85 W
1,38 kWh/24h
12V (CC)
85 W
170Ah/24h
28-30/37 mbar
I3+
2
134W - 9,8 g/h
106W - 7,7g/h
N
143g H
2
O+67g NH
3
Caractéristiques techniques
Toute recherche de fuite à la flamme est interdite !
NE PAS FUMER ! DANGER D'EXPLOSION ET DE BRULURE !
Page 25

25
FR
11. Informations relatives
à la protection de
l'environnement
L'ammoniaque (hydrogène naturel et composé
d'azote) est utilisée comme réfrigérant dans cet
appareil.
Le cyclopentane, qui ne présente aucun risque
pour la couche d'ozone, est un agent actif de la
mousse de polyuréthane utilisée comme isolant
thermique.
Le chromate de sodium est un agent anticorrosion (dosé à moins de 2% du poids du
liquide de refroidissement).
12. Recyclage
Après avoir déballé l'appareil, les matériaux
d'emballage devraient être acheminés vers un site
local de collecte de déchets. En fin de vie, il est
recommandé de confier l'appareil à une entreprise
spécialisée de collecte et de recyclage qui pourra
assurer la récupération des matériaux recyclables
et un recyclage écologique de l'appareil.
Les appareils portant ce symbole
doivent être obligatoirement remis à
un point de collecte local pour la
mise au rebut d'appareils électriques
et électroniques.
Il est interdit de jeter ce produit dans
les ordures ménagères.
Sur les réfrigérateurs Dometic, le symbole figure
sur la plaque des caractéristiques (plaque
signalétique) apposée à l'arrière de l'appareil.
L'appareil est conforme aux directives CEE
suivantes :
Directive LVD 2006/95/CE
Directive EMC 2004/108/CE
Directive relative au gaz 90/396/CEE
Directive CE 93/68/CEE
Directive RoHS 2002/95/CE
Directive WEEE 2002/96/CE
Page 26

26
IT
Grazie per aver scelto il nostro prodotto. Ci auguriamo che vi garantisca la massima semplicità d'uso.
Qui di seguito viene spiegato il significato di alcuni simboli, che vi segnaliamo al fine di assicurare un
impiego sicuro ed efficace dell'apparecchio:
pericolo in caso di utilizzo improprio
suggerimenti utili
informazioni relative alla tutela ambientale
ll frigorifero da campeggio che Lei ha acquistato si può funzionare con corrente della rete, batteria della
macchina e cartuccia di gas di chiusura automatica (250 g).
SSii rraaccccoommaannddaa ddii lleeggggeerree aatttteennttaammeennttee llee pprreesseennttii iissttrruuzziioonnii ppeerr ll''uussoo pprriimmaa ddii
mmeetttteerree iinn ffuunnzziioonnee
ll''uunniittàà ddii rreeffrriiggeerraazziioonnee.. SSee iinn ffuuttuurroo vveennddeerreettee oo pprreesstteerreettee
ll''aappppaarreecccchhiioo,, aacccceerrttaatteevvii cchhee aanncchhee
iill nnuuoovvoo pprroopprriieettaarriioo rriicceevvaa llee iissttrruuzziioonnii..
Attenzione!
Il vostro Frigorifero portatile - nel funzionamento a gas - deve essere utilizzato
solo in luogo ben ventilato, al di sopra del livello del terreno, dove sia protetto
da pioggia o spruzzi d'acqua.
L'apparecchiatura non deve essere utilizzata in funzionamento a gas nei
veicoli a motore e barche mentre il veicolo o la barca sono in movimento.
È vietato il funzionamento con gas liquido in ambienti chiusi!
QUESTO FRIGORIFERO PUÒ FUNZIONARE A GAS SOLO IN AMBIENTI
APERTI!
Per funzionamento all'aperto s'intende: in tenda (veranda), che sia ben
arieggiata durante il funzionamento dell'apparecchio, così come sulle terrazze o
in giardino.
Nel caso di funzionamento elettrico, l'apparecchio può essere impiegato anche
in un ambiente chiuso. In tal caso, occorre tenerlo al riparo anche dall'umidità.
Non conservare assolutamente sostanze tossiche o esplosive nell'apparecchio!
L'apparecchio può essere utilizzato collegandolo solamente a una fonte di energia
alla volta.
Questa apparecchiatura non è intesa per l'uso da parte di persone (compresi i
bambini) con ridotte capacità fisiche, sensoriali o mentali, o la mancanza di
esperienza e conoscenza, a meno che non siano state istruite e siano sotto la
supervisione di personale responsabile per la loro sicurezza.
I bambini devono essere sorvegliati per garantire che essi non possano giocare
con l'apparecchiatura.
Per un corretto funzionamento è importante posizionare la parte posteriore
dell'apparecchio in una zona aerata per permettere la fuoriuscita del calore. Il
punto più caldo si trova in prossimità del bruciatore: in particolare in caso di
funzionamento a gas è fondamentale tenere lontana questa parte da
qualunque ostruzione o da materiali infiammabili (ad es. erba o superfici in
plastica che possono prendere fuoco).
Page 27

27
SSOOMMMMAARRIIOO
SSOOMMMMAARRIIOO
1. Disimballaggio
2. Schema dell'apparecchio
3. Pulizia
4. Posizionamento dell'apparecchio
5. Impiego dell'apparecchio
5.1. Funzionamento elettrico
5.2. Funzionamento mediante batteria veicolare
5.3. Funzionamento mediante bombola di gas
6. Preparazione dei cubetti di ghiaccio
7. Suggerimenti utili
8. Sbrinamento, pulizia e manutenzione
9. Assistenza clienti
10. Messa in funzione, caratteristiche tecniche
10.1. Allacciamento alla rete elettrica
10.2. Allacciamento all'alimentatore veicolare
10.3. Raccordo e cambio della cartuccia di gas
11. Informazioni sulla tutela ambientale
12. Riciclaggio
AAtttteennzziioonnee!!
Le condizioni di garanzia sono conformi alla direttiva CE 44/1999/CE nonché alle
disposizioni specifiche vigenti nel paese interessato.
Per questioni di garanzia o altre esigenze di assistenza tecnica (come p.es. i ricambi)
contattare la Dometic Service Network.
La garanzia non include i danni causati dall'uso improprio dell'apparecchio.
La garanzia decade in caso di qualsiasi modifica apportata all'apparecchio o qualora
non fossero utilizzati ricambi originali Dometic.
La garanzia decade in caso di inosservanza delle istruzioni di installazione e uso.
Al momento di contattare il Dometic Service Network occorre segnalare il modello, il
codice prodotto e il numero di serie. Queste informazioni sono riportate sulla
targhetta identificativa applicata sul pannello posteriore del frigorifero.
IT
Page 28

28
11.. DDiissiimmbbaallllaaggggiioo
Dopo aver estratto l'apparecchio dall'imballaggio di
cartone, accertarsi che non sia danneggiato.
Qualora vengano riscontrati danneggiamenti dovuti
al trasporto, occorre segnalarli subito alla ditta
incaricata.
22.. SScchheemmaa ddeellll''aappppaarreecccchhiioo
1. telaio termoisolato
2. coperchio termoisolato
3. comandi
4. panello evaporatore
Figura 1.
2
4
3
1
IT
Page 29

29
33.. PPuulliizziiaa
Prima di mettere in funzione l'apparecchio, si
consiglia di pulirne sia l'interno sia l'esterno.
Procedere alla pulizia mediante un panno
morbido, acqua tiepida e detersivo non abrasivo.
Accertarsi che l'acqua non penetri nei comandi o
nella griglia della calotta posteriore.
Lavare quindi l'apparecchio con panno e acqua
puliti. Procedere poi all'asciugatura.
Per evitare che l'apparecchio venga danneggiato,
è vietato l'uso di sapone, carbonato di sodio o
detersivi abrasivi.
44.. PPoossiizziioonnaammeennttoo ddeellll''aappppaarreecccchhiioo
Durante il processo di refrigerazione,
l'apparecchio trasmette calore all'aria
circostante attraverso il condensatore collocato
sotto la parte superiore della calotta posteriore.
Maggiore è l'areazione del condensatore, più
efficace sarà la refrigerazione.
L'altra condizione per un funzionamento ottimale
è il posizionamento su una superficie piana. Per
verificare ciò basta posizionare un bicchiere
d'acqua sopra l'apparecchio.
È importante che l'apparecchio non venga
esposto a fonti di calore dirette (sole, radiatori,
accanto a un forno ecc.).
In caso di alimentazione a gas vanno rispettate le
seguenti distanze: almeno 10 cm dalla parte
posteriore dell'apparecchio, almeno 4 cm su
entrambi i lati, almeno 30 cm dalla parte
superiore, almeno 5 cm dal fondo.
Tutti i materiali infiammabili (carta, legno, erba,
tessuti, ecc.) che si trovassero nelle immediate
vicinanze dell'apparecchio devono essere
mantenuti alle distanze sopra specificate.
55.. IImmppiieeggoo ddeellll''aappppaarreecccchhiioo
Il cavo per l'allacciamento alla rete, il cavo di
collegamento da 12 V e il connettore per
l'allacciamento al gas si trovano dietro calotta
posteriore. (Fig.2)
55..11 FFuunnzziioonnaammeennttoo eelleettttrriiccoo
Accertarsi che la tensione indicata sulla targhetta
corrisponda alla tensione di rete cui desiderate
collegare l'apparecchio. Per il collegamento alla rete,
estrarre il cavo di connessione ed inserirlo in una
presa di terra.
Quando collegate l'apparecchio per la prima volta
regolate il termostato sul massimo (Fig. 4. A) poi,
dopo circa cinque ore, riportatelo al minimo, a
seconda delle vostre necessità di refrigerazione.
N.B.: La spina elettrica viene fornita in base alle
disposizioni specifiche di ogni paese e può non
corrispondere a quella raffigurata.
Figura 2
IT
Page 30

30
55..22 FFuunnzziioonnaammeennttoo mmeeddiiaannttee bbaatttteerriiaa
vveeiiccoollaarree
Accertarsi che la tensione indicata sulla targhetta
dell'apparecchio corrisponda a quella della batteria
veicolare (12 o 24V).
Gli apparecchi da 12V DC sono dotati di connettori
che possono essere inseriti nell'accendisigaro in
dotazione al veicolo (figura 3). In alcuni tipi di veicoli,
sarà necessario rimuovere l'anello rosso di plastica
situato all'estremità del connettore. Sarà sufficiente
ruotarlo in senso antiorario e sfilarlo. A questo
punto, è possibile collegare l'apparecchio
all'accendisigaro. Nel caso del funzionamento a 12V,
l'unità funziona ininterrottamente senza controllo
della temperatura.
Gli apparecchi da 24V DC vengono forniti con cavi
dalle estremità nude. Queste ultime devono essere
collegate a una morsettiera, la quale, a sua volta, è
collegata alla batteria veicolare mediante un fusibile
da 5A e un interruttore da 5A.
A motore fermo l'apparecchio deve essere
staccato scollegandolo dall'accendisigari
(versione a 12V) o tramite l'apposito interruttore
(versione a 24V). Altrimenti la batteria del veicolo si
scaricherà in breve tempo.
55..33.. FFuunnzziioonnaammeennttoo mmeeddiiaannttee bboommbboollaa
ddii ggaass
La descrizione del raccordo alla cartuccia di gas si
trova nei capitoli 10.3.
Dopo aver fatto il raccordo della cartuccia di gas
all'apparecchio et il controllo dell'infiltrazione, girare
il termostat alla posizione massima (figura 4.B),
premere la valvola di sicurezza di gas, mantenere
premuta circa 10 secondi, e dopo premere
parecchie volte velocemente il bottone piezo
d'accensione (figura 4.C). Se la fiamma non si
accende, ripetere l'operazione (Prima del
collegamento alla bombola, occorre far uscire l'aria
contenuta nel condotto del gas della bombola
stessa; solo allora il gas si potrr accendere.)
È possibile verificare se la fiamma è accesa
guardando attraverso l'apposita apertura (figura 5).
Una volta che la fiamma c accesa, tenere abbassata
la valvola di sicurezza per altri 20 secondi.
Il pulsante regolatore ha 4 posizioni:
: fiamma grande (MAX) = quantitŕ massimale di gas
(temperatura ambientale alta ~32 °C);
: fiamma media (MID)= quantitŕ media di gas
(temperatura ambientale media ~25°C);
: fiamma piccola (MIN) = quantitŕ minima di gas
(temperatura ambientale bassa ~16°C);
: posizione off = l'impianto non riceve gas.
Per fermare il funzionamiento del gas, si deve fermare la
valvola di sicurezza e rompere il raccordo della cartuccia di
gas.
Spegnimento del gas
Chiudere la bombola del gas o la valvola di
regolazione della pressione.
Girare la manopola B verso destra, nella
posizione di chiusura.
Figura 4.
Figura 5.
Figura 3
IT
C
A
B
Page 31

31
66..
Preparazione dei cubetti di
ghiaccio
Riempire la vaschetta di ghiaccio per 4/5 di acqua
potabile e chiuderla con il coperchio. Asciugare
eventuali gocce d'acqua dalla vaschetta e dal
coperchio per evitare che si congeli sulla base del
refrigeratore. Porre la vaschetta del ghiaccio nel
refrigeratore.
Per accelerare la formazione di cubetti di
ghiaccio, girare eventualmente brevemente sulla
posizione MAX la manopola A in caso di
funzionamento elettrico, la manopola B in caso di
funzionamento a gas. (Non dimenticare di
riposizionarla sulla temperatura originaria a
formazione di ghiaccio avvenuta!).
Per prelevare i cubetti di ghiaccio prelevare la
vaschetta e lasciarla qualche minuto a
temperatura ambiente o passarla brevemente
sotto acqua corrente, togliere quindi il coperchio.
I cubetti di ghiaccio possono essere prelevati a
questo punto dalla vaschetta o dagli incavi del
coperchio.
77.. SSuuggggeerriimmeennttii uuttiillii
Prima di mettersi in viaggio, far funzionare
l'apparecchio a 230 V (con il termostato
regolato in posizione intermedia tra "min" e
"max") per 24 ore prima della partenza. Inserirvi
alimenti preraffreddati.
Durante il funzionamento si formerà del
ghiaccio sul pannello dell'evaporatore. Quando
si apre la calotta o si introducono alimenti, parte
del ghiaccio si scioglie e si raccoglie sul fondo
dell'apparecchio sotto forma di acqua.
Asciugare quest'ultima di tanto in tanto
servendosi di una spugna.
Se desiderate trainare l'unità di refrigerazione
sulle ruote, evitate di collocare all'interno
alimenti con imballaggi fragili (per esempio
vetro). Il movimento e le scosse subite dall'unità
potrebbero infatti causarne la rottura.
Una volta collocata l'unità di refrigerazione in
una posizione stabile, accertarsi che gli alimenti
non vengano a contatto con il pannello
dell'evaporatore, poiché ciò potrebbe causare la
comparsa di macchie sui cibi dovute al gelo.
88.. SSbbrriinnaammeennttoo,, ppuulliizziiaa
ee mmaannuutteennzziioonnee
Prima dello sbrinamento scollegare l'apparecchio
dall'alimentazione elettrica per evitare il rischio di
scosse. Accertarsi che non sia collegata
nessun'altra fonte di energia (gas o 12/24V). Togliere
le vivande dall'unità di refrigerazione e lasciare
aperto il coperchio. A seconda della temperatura, il
ghiaccio sul pannello dell'evaporatore si scioglie in
un tempo più o meno breve e l'acqua si raccoglie
sul fondo dell'unità. Asciugarla con un panno.
Pulire quindi l'apparecchio seguendo le istruzioni
della sezione 3. Lasciare aperto il coperchio per
impedire la formazione di cattivi odori.
L'apparecchio non richiede ulteriori operazioni di
manutenzione.
99.. AAssssiisstteennzzaa cclliieennttii
Prima di rivolgersi al servizio di assistenza clienti,
verificare quanto segue:
il posizionamento e l'areazione sono adeguati?
l'apparecchio si trova su una superficie piana?
nella presa a muro passa la corrente?
L'allacciamento è adatto all'apparecchio?
il cavo di collegamento alla rete è danneggiato?
nel caso del funzionamento mediante la rete, il
termostato elettrico è acceso?
nel caso del funzionamento a gas, la manopola
della valvola di sicurezza è stata abbassata per
un tempo sufficiente?
La manopola del termostato c regolata sul
massimo?
la bombola del gas e la valvola del regolatore di
pressione sono aperte?
C'è gas nella cartuccia? (Se non si può sentire
movimento di liquido con l'agitazione, la
cartuccia è vuota?)
sono forse collegate due diverse fonti di
energia, per esempio gas ed elettricità?
all'interno dell'unità sono stati collocati alimenti
caldi?
all'interno dell'unità è stata collocata in un'unica
volta un'eccessiva quantità di vivande?
Se, dopo aver verificato quanto sopra,
l'apparecchio continua a non funzionare,
contattare il servizio di assistenza clienti. Indicare
il tipo di problema, il tipo di apparecchio nonché il
numero di prodotto e il numero di serie riportati
sulla targhetta dei dati.
La garanzia è valida solo nel caso in cui vengano
osservate le condizioni imposte dall'uso
all'apparecchio.
www.dometic.com
IT
Page 32

32
1100.. MMeessssaa iinn ffuunnzziioonnee
È sempre necessario far funzionare
l'apparecchio mediante un'unica fonte di
energia. Il collegamento simultaneo a più fonti di
energia determinerà infatti un guasto.
CCaarraatttteerriissttiicchhee tteeccnniicchhee
1100..11 CCoolllleeggaammeennttoo aallllaa rreettee eelleettttrriiccaa
Assicurarsi che tutte le altre fonti di energia (gas,
12V) siano scollegate.
L'apparecchio può essere impiegato solo mediante
una rete con la tensione nominale indicata sulla
targhetta dei dati. La spina di rete dell'apparecchio
può essere inserita in una presa messa a terra in
conformità alle disposizioni vigenti (all'estero può
risultare necessario l'impiego di un adattatore per
via delle prese differenti).
Qualsiasi operazione d'installazione
dell'apparecchio va effettuata da parte di personale
esperto o da una persona competente.
LL''aazziieennddaa pprroodduuttttrriiccee ddeecclliinnaa ooggnnii rreessppoonnssaabbiilliittàà iinn
ccaassoo ddii iinnoosssseerrvvaannzzaa ddeellllee pprreesseennttii mmiissuur
ree ddii
ssiiccuurreezzzzaa..
RReeqquuiissiittii eelleettttrriiccii
Prima di accendere, assicurarsi che la tensione di
rete corrisponda alla tensione indicata sulla
targhetta dell'apparecchio.
1100..22 CCoolllleeggaammeennttoo aallllaa bbaatttteerriiaa
vveeiiccoollaarree
Assicurarsi che tutte le altre fonti di energia (gas,
230V) siano scollegate.
Nella linea di alimentazione elettrica tra la
batteria ed il frigorifero si trova un dispositivo di
protezione.
Gli apparecchi da 12V devono essere collegati a
un accendino veicolare protetto da un fusibile da
10A.
Gli apparecchi da 24V devono essere collegati
inserendo una morsettiera e un interruttore e
devono essere protetti mediante un fusibile da
5A. L'interruttore deve essere adatto alla
commutazione di una corrente da 5A.
Non è necessario osservare la polarità
nell'allacciamento dell'apparecchio.
1100..33 RRaaccccoorrddoo ee ccaammbbiioo ddeellllaa
ccaarrttuucccciiaa ddii ggaass
IIll rraaccccoorrddoo ddeell ffrriiggoorriiffeerroo ssii ddeevvee eesssseerree
eeffffeettttuuaattoo ddaa uunn tteeccnniiccoo qquuaalliiffiiccaattoo.. BBiissooggnnaa
rriissppeettttaarree l
lee nnoorrmmee llooccaallii iinn vviiggoorree,, rreellaattiivvee
aallll''uuttiilliizzzzaazziioonnee ddii aappppaarreecccchhii cchhee ffuunnzziioonnaannoo ccoonn
ggaass lliiqquuiiddoo..
Assicurarsi che tutte le altre fonti di energia
(230V, 12V) siano scollegate.
Il frigorifero è equipaggiato per una determinata
pressione di gas che corrisponde alla pressione
standard del paese nel quale l'apparecchio viene
venduto. Può essere utilizzato con cartuccia di
gas di chiusura automatica (250g).
L'apparecchio è provvisto di un regolatore di
pressione. La pressione è indicata sul pannello di
dati.
Prima di fare il raccordo della cartuccia di gas, si
deve leggere le istruzioni di manovra e
magazzinaggio che si trovano sul fianco della
cartuccia. Controllare l'accoppiamento del
apparecchio e del raccordo della cartucchia di
gas. Prima di faire il raccordo della cartuccia,
controllare la pulizia dell'apparecchio e del
raccordo della cartuccia di gas.
L'operazione deve essere fatta in uno spazio ben
aerato, esente da fonti di fuoco. Chiudere la
valvola dell'apparecchio. Mettere la leva alla
posizione superiore. Introdurre la cartuccia
nell'apparecchio.
Durante il trasporto ed le manovre fatte
coll'apparecchio, la cartuccia di gas non deve
essere raccordata all'apparecchio.
Modello RC 1205 GC
Typo JCB - 01
Volume lordo 41 litre
Funzionamento mediante
la rete 220 - 240V (AC)
Alimentazione 85W
Consumo di energia 1.38 kWh/24h
Funzionamento a batteria 12V (DC)
Alimentazione 85W
Consumo di energia 170Ah/24h
Pressione del gas (p) 28-30/37 mbar
Classificazione gas I
3+
Dimensioni del getto 2
Tarico termico nominale 134W - 9,8 g/h
Tarico termico minimo 106W - 7,7g/h
Classe climatica N
Refrigerante 143g H
2
O + 67g NH
3
lunghezza massima cavo
Sezione di cavo bei 12 V 24 V
2.5 mm
2
fino a 2.5 m 5 m
4.0 mm
2
fino a 4.0 m 8 m
6.0 mm
2
fino a 6.0 m 12 m
IT
Page 33

33
1111.. IInnffoorrmmaazziioonnii ssuullllaa ttuutteellaa
aammbbiieennttaallee
Come refrigerante per l'unità di refrigerazione viene
utilizzata ammoniaca (composto naturale di
idrogeno e azoto).
Il ciclopentano, sostanza non nociva all'ozono, viene
attivato come agente motore per l'isolamento
mediante poliuretano espanso.
Il sodio cromato viene utilizzato per proteggere
dalla corrosione (il suo peso equivale a meno del
2% del peso del refrigerante).
1122.. RRiicciiccllaaggggiioo
Dopo aver disimballato l'apparecchio, occorre
consegnare il materiale di imballaggio a un centro
locale di raccolta. Al termine della vita utile, è
necessario portare l'apparecchio a una ditta
specializzata nella raccolta e nella rilavorazione, la
quale recupererà i materiali riutilizzabili. Il resto verrà
distrutto.
Gli apprecchi che sono contrassegnati
con questo simbolo devono essere
consegnati al posto di raccolta locale
per lo smaltimento e il trattamento di
apparecchi elettrici ed elettronici.
Questo prodotto non deve essere smaltito con i
normali rifiuti domestici.
Il simbolo si trova sulla targhetta dei dati tecnici
dei frigoriferi Dometic (targhetta del modello) sul
panello posteriore dell'apparecchio.
È VIETATO UN CONTROLLO DI ERMETICITÀ A VIVA FIAMMA!
NON FUMARE! PERICOLO DI INCENDIO E DI ESPLOSIONE!
IT
LL''aappppaarreecccchhiioo èè ccoonnffoorrmmee aallllee sseegguueennttii
ddiirreettttiivvee CCEEEE::
direttiva sui dispositivi
a bassa tensione 2006/95/CE
direttiva sulla compatibilità
elettromagnetica 2004/108/CE
direttiva sul gas 90/396/CEE
direttiva sul CE 93/68/CEE
direttiva sul RoHS 2002/95/CE
direttiva sul WEEE 2002/96/CE
Page 34

34
NL
Wij danken u dat u ons apparaat heeft gekozen. Wij hopen dat u er lang plezier aan zult beleven.
Hieronder willen wij u vertrouwd maken met enkele symbolen om een veilig en efficiënt gebruik van het
apparaat te verzekeren:
bron van gevaar bij onjuist gebruik
nuttige tips
informatie omtrent milieubescherming
De door u gekochte koelbox is ontworpen om op het elektriciteitsnet, een voertuigaccu of een zelfdichtend
gaspatroon (250gr) te werken.
Let op!
Bij gebruik op gas moet uw draagbare koelbox of vriesbox alleen worden gebruikt in
een goed geventileerde ruimte, boven de grond, waar het beschermd is tegen water.
Het toestel mag niet op gas worden gebruikt in motorvoertuigen en boten terwijl het
voertuig of de boot in beweging is.
Toepassing met vloeibaar gas in gesloten ruimten is niet toegestaan!
DIT KOELAPPARAAT MAG ALLEEN BUITEN MET GAS WORDEN
GEBRUIKT
Het gebruik in de openlucht betekent : ook tenten (voortenten), die tijdens het
bedrijf van het apparaat goed geventileerd zijn, alsmede terrassen op de
begane grond.
Bij aansluiting op het elektriciteitsnet kan het apparaat ook binnenshuis gebruikt
worden. Ook dan moet het apparaat beschermd worden tegen vocht.
Het is verboden om giftige of explosieve substanties in dit toestel op te slaan!
Het toestel altijd maar met één energiebron gebruiken.
Dit apparaat is niet bedoeld voor gebruik door personen (inclusief kinderen) met
verminderde lichamelijk, zintuiglijk of geestelijk vermogen of gebrek aan ervaring en
kennis, tenzij aan hen toezicht of instructie is gegeven, over het gebruik van het
apparaat, door een persoon die verantwoordelijk is voor hun veiligheid.
Er moet worden opgelet dat kinderen niet spelen met het apparaat.
Voor een efficiënte werking is het belangrijk dat het toestel aan de achterzijde zoveel
mogelijk ventilatieruimte heeft zodat de hitte kan ontsnappen. Het heetst is het in de
omgeving van de brander, en het is dus van groot belang -vooral wanneer het
toestel op gas loopt - dat deze plaats niet wordt afgedekt of in contact komt met
ontvlambare materialen (bijv. gras of brandbare kunststofbodemzeilen).
Lees deze gebruiksaanwijzing aandachtig voor u het apparaat in werking stelt.
Indien u het apparaat later verkoopt of weggeeft, zorg er dan voor dat de nieuwe
eigenaar de gebruiksaanwijzing ontvangt.
Page 35

35
INHOUD
INHOUD
1. Uitpakken
2. Afbeelding van het apparaat
3. Schoonmaken
4. Plaatsing van het apparaat
5. Het apparaat gebruiken
5.1. Via aansluiting op het elektriciteitsnet
5.2. Via aansluiting op de accu van een auto
5.3. Via aansluiting op een gasfles
6. Bereiden van ijsblokjes
7. Nuttige tips
8. Ontdooien, schoonmaken en onderhouden
9. Klantenservice
10. Inwerkingstelling
10.1. Aansluiting op het elektriciteitsnet
10.2. Aansluiting op de accu van een voertuig
10.3. Aansluiten en vervangen van de gaspatroon
11. Recycling
12. Serviceadressen
Let op!
De garantiebepalingen voldoen aan de EU-richtlijn 44/1999/CE en de wettelijke
bepalingen van het betreffende land.
Vragen over garantie, klantenservice en onderdelen kunt u richten aan de Dometic
servicedienst.
Niet onder de garantie valt schade veroorzaakt door verkeerd gebruik.
Niet onder de garantie valt schade die het gevolg is van veranderingen aan het
toestel of als gevolg van onderdelen niet afkomstig van Dometic.
De garantie vervalt indien het toestel niet volgens voorschrift geïnstalleerd en
gebruikt wordt.
Gelieve het model product- en serienummer van het toestel aan te geven, indien
u contact met de Dometic servicedienst opneemt. Deze gegevens vindt u op het
typeplaatje aan de achterkant van de koelbox.
NL
Page 36

36
1. Uitpakken
Controleer na het verwijderen van de kartonnen
verpakking of het apparaat niet beschadigd is. Indien
het apparaat beschadigd werd tijdens het vervoer,
moet u dit meteen melden aan uw leverancier.
2. Afbeelding van het apparaat
1. Geďsoleerde mantel
2. Geďsoleerde deksel
3. Bedieningselementen
4. Verdamperpaneel
Afbeelding 1.
2
4
3
1
NL
Page 37

37
3. Schoonmaken
Maak het apparaat zowel aan de binnen- als de
buitenkant schoon voor u het in gebruik neemt.
Gebruik hiervoor een zachte doek, lauw water en
een niet bijtend reinigingsmiddel. Zorg ervoor dat
er geen water in het rooster van de achterplaat en
de bedieningselementen loopt.
Veeg daarna het apparaat af met een schone doek
en helder water en wrijf het droog.
Gebruik, om schade te voorkomen, geen zeep,
schurende of bijtende reinigingsmiddelen.
4. Plaatsing van het apparaat
Tijdens het vries / koelproces geeft het apparaat via
de condensor (onder het bovenste deel van de
achterplaat) de onttrokken warmte af aan de omgeving.
Hoe beter de ventilatie van de condensor, hoe efficiënter
de koeling zal verlopen.
De andere voorwaarde voor een efficiënt gebruik:
het apparaat moet op een vlak oppervlak staan. Dit
kunt u het best controleren door een glas water op
het apparaat te plaatsen.
Het is belangrijk dat het apparaat niet blootgesteld
wordt aan directe warmtestraling (zonlicht, radiator,
dicht bij een oven, enz.)
Bij het werken op gas moeten de volgende vrije
afstanden in acht worden genomen: minimaal 10 cm
van de achterkant van het toestel, minimaal 4 cm van
beide kanten, minimaal 30 cm van de bovenkant van
het toestel, minimaal 5 cm van de bodem.
Alle brandbare voorwerpen (papier, hout, gras,
textiel enz.) in de onmiddellijke nabijheid van het
toestel dienen op de bovenvermelde afstanden te
worden gehouden.
5. Het apparaat gebruiken
De kabel voor aansluiting op het elektriciteitsnet, de
12V-verbindingskabel en het verbindingsstuk voor de
gasaansluiting bevinden zich aan de achterzijde van
het apparaat (Afbeelding 2).
5.1 Via aansluiting op het
elektriciteitsnet
Controleer of de elektrische spanning, vermeld op het
typeplaatje van het apparaat, overeenstemt met de
spanning van het elektriciteitsnet waarop u het apparaat
wenst aan te sluiten. Wikkel de elektriciteitskabel af en
steek de stekker in een geaard stopcontact.
Zet de thermostaat (Afbeelding 4. A) op maximum
wanneer u het apparaat voor het eerst gebruikt. Zet de
thermostaat vervolgens na ongeveer vijf uur op een
lagere stand, afhankelijk van de koeling die u nodig
heeft.
Aanwijzing: De stekker voldoet aan de normen
van het betreffende land van bestemming en kan
er anders uitzien als op de afbeelding.
Afbeelding 2
NL
Page 38

38
5.2 Via aansluiting op de accu
van een auto
Controleer of de elektrische spanning, zoals vermeld
op het typeplaatje van het apparaat, overeenstemt
met de spanning van de accu (12V of 24V).
Gelijkstroomapparaten op 12V zijn voorzien van
connectoren die aangesloten kunnen worden op
de sigarettenaansteker (Afbeelding 3). Voor
bepaalde voertuigmodellen kan het nodig zijn de
rode plastic ring aan het uiteinde van de
connector te verwijderen. Draai hiervoor de plastic
ring tegen de wijzers van de klok in en trek eraan.
Het apparaat kan nu aangesloten worden op de
sigarettenaansteker. Bij aansluiting met 12V werkt
het apparaat ononderbroken zonder
temperatuurcontrole.
Gelijkstroomapparaten op 24V worden geleverd
met draden met onbeklede uiteinden. De
uiteinden moeten verbonden worden met een
klemmenstrook, die op zijn beurt via een zekering
(5A) en een stroomschakelaar (5A) verbonden
wordt met de accu. Bij aansluiting met 24V is het
apparaat via de thermostaat te regelen.
Als de motor niet draait, dient u de connector
uit de aansteker te trekken (apparaat met 12V)
of de stroomschakelaar af te zetten (apparaat met
24V). Indien dit niet gebeurt, zal het werkende
apparaat de accu leegmaken.
5.3. Via aansluiting op een gasfles
In hoofdstukken 10.3 vindt u de beschrijving voor
aansluiting op een gaspatroon.
Zet, nadat de gaspatroon op het toestel is
aangesloten en op lekkend gas is gecontroleerd de
thermostaat op de maximumpositie (afbeelding 4.B),
druk het gas-veiligheidsventiel in, houd deze ongeveer
10 seconden ingedrukt en druk daarna snel meerdere
malen op de piëzo-ontsteking (afbeelding 4.C). Indien
u geen vlam krijgt, herhaal dan de procedure. (De
lucht die zich nog in de gasleiding van het apparaat
bevond voor het werd aangesloten op de gasfles moet
eerst verwijderd worden. Pas dan kan het gas
ontstoken worden).
De ontsteking kan worden gecontroleerd via het
vlammenkijkgaatje (Figuur 5). Wanneer de vlam
brandt, moet u de veiligheidsknop nog 20 seconden
ingedrukt houden.
De regulatorknop heeft 4 standen:
: grote vlam (MAX) = maximum gasvoorziening
(hoge omgevingstemperatuur ~32 °C);
: middelgrote vlam (MID)= middelmatige
gasvoorziening
(normale omgevingstemperatuur ~25°C);
: kleine vlam (MIN) = minimale gasvoorziening
(lage omgevingstemperatuur ~16°C);
: uitgeschakelde toestand = de brander wordt niet
van gas voorzien.
Afbeelding 4.
Afbeelding 5.
Figure 3
Om de werking op gas te stoppen moet het
veiligheidsventiel afgesloten worden en de
gaspatroon afgesloten worden
Gasbetrieb abstellen
Gasflaschen- bzw. Druckreglerventil schließen.
Knopf B rechts herum in Aus-Stellung drehen.
NL
C
A
B
Page 39

39
6. Bereiden van ijsblokjes
De ijsbak voor 4/5 vullen met drinkwater en met
het deksel afsluiten. Eventueel aanwezige
waterdruppels van schaal en deksel afwrijven om
het vastvriezen te voorkomen. IJsblokjesschaal in
het apparaat op de koeleenheid plaatsen.
Om de vorming van ijsblokjes te versnellen dient
u, bij toepassing met stroom, de thermostaatknop
of, bij toepassing met vloeibaar gas, de
regelaarsknop eventueel gedurende korte tijd op
de MAX-stand te regelen. (Vergeet niet de knop
weer terug te zetten nadat u de ijsblokjes heeft
aangemaakt!)
Om de ijsblokjes eruit te nemen dient u de
complete ijsbak kortstondig te laten dooien of een
ogenblik onder gewoon leidingwater te houden en
vervolgens het deksel van de bak te nemen. De
ijsblokjes kunnen nu gemakkelijk uit de bak resp.
uit de vakjes in het deksel worden genomen.
7. Nuttige tips
Voor u op reis vertrekt laat u het apparaat best
gedurende 24 uur ingeschakeld op 230 V (zet de
thermostaat tussen 'min' en 'max').
Wanneer het apparaat in werking is, wordt op het
verdamperpaneel ijs gevormd. Wanneer u het
deksel opent of wanneer voedsel in het apparaat
wordt geplaatst, smelt dit ijs gedeeltelijk en vormt
zich water op de bodem van het apparaat. Veeg het
water af en toe weg met een spons.
Als u het apparaat als koelbox gebruikt: Plaats liever
geen voedsel met een breekbare verpakking (zoals
glas) in het apparaat, wanneer wilt verplaatsen.
Door de beweging en het schudden van het
apparaat kan deze verpakking breken.
Als u het apparaat als vriesbox gebruikt: Plaats
geen voedsel in het apparaat in een verpakking
welke niet tegen bevriezen kan (zoals glas).
Zorg ervoor dat, zodra het apparaat zich op een
vaste plaats bevindt, het voedsel niet in contact
komt met het verdamperpaneel, aangezien dit
vriesbrand kan veroorzaken.
8. Ontdooien, schoonmaken
en onderhouden
Trek vóór het ontdooien de stekker van het apparaat
steeds uit het stopcontact om elektrische schokken te
voorkomen. Zorg ervoor dat er geen andere
energiebron is aangesloten (gas of 12V/24V). Maak
het koelapparaat leeg en laat het deksel openstaan.
Afhankelijk van de temperatuur, smelt het ijs van het
verdamperpaneel in korte tijd en vormt zich water op
de bodem van het koelapparaat. Veeg dit weg met
behulp van een spons. Maak daarna het apparaat
schoon volgens de instructies in paragraaf 3. Laat
het deksel open zodat er geen nare luchtjes
ontstaan. Het apparaat behoeft geen verder
onderhoud.
9. Klantenservice
Gelieve het volgende te controleren
alvorens contact op te nemen met de Electrolux
Servicedienst:
Zijn de standplaats en ventilatie optimaal ?
Staat het apparaat waterpas ?
Staat er spanning op het stopcontact en is de
aansluiting geschikt voor het apparaat ?
Is de elektriciteitskabel beschadigd ?
Voor werking op elektriciteit, is de elektrische
thermostaat ingeschakeld?
Voor werking op gas, werd de veiligheidsknop
lang genoeg ingedrukt ?
Staat de thermostaat op maximum?
Staat de gasfles of het drukreduceerventiel open?
Zit er gas in de patroon (is er bij schudden geen
beweging van vocht waarneembaar dan is de
patroon leeg)?
Zijn er per toeval twee verschillende
energiebronnen aangesloten ? (bijvoorbeeld gas
en elektriciteit)
Werd er warm voedsel in het apparaat gezet ?
Werden grote hoeveelheden voedsel in een keer
in het apparaat gezet ?
Als het apparaat na deze controle nog steeds niet
of niet goed functioneert, neem dan contact op met
de Electrolux Servicedienst. Wanneer u melding
maakt van het probleem, vermeld dan ook de aard
van het probleem, het type apparaat, en het
product- en serienummer op het typeplaatje.
Wij komen de garantievoorwaarden voor het apparaat
na.
www.dometic.com
NL
Page 40

40
10. Inwerkingstelling
U mag het apparaat slechts op één energiebron
aansluiten. Wanneer u het opverscheidene
energiebronnen tegelijk aansluit zal het apparaat niet
werken.
Technische gegevens:
10.1 Aansluiting op het elektriciteitsnet
Zorg ervoor dat er geen andere energiebron is
aangesloten (gas, 12V).
Het apparaat kan slechts werken met nominale
netspanning zoals aangegeven op het typeplaatje. De
stekker van het apparaat kan aangesloten worden op
een volgens de wettelijke voorschriften geaard
stopcontact. (In het buitenland kan omwille van
andere soorten stopcontacten, een adapter
noodzakelijk zijn.
Als er voor de installatie van dit toestel elektrische
werken nodig zijn, dan dient een erkende elektricien
of een bevoegd persoon deze uit te voeren.
De fabrikant wijst elke verantwoordelijkheid bij
niet-naleving van deze veiligheidsmaatregelen.
Elektrische vereisten
Voor u de koelkast aanzet, dient u na te gaan of het
voltage hetzelfde is als dat vermeld op het
gegevensplaatje van het toestel.
10.2 Aansluiting op de accu
van een voertuig
Zorg ervoor dat er geen andere energiebron is
aangesloten (gas, 230V).
In de stroomvoedingskabel tussen batterij en
koelbox is of moet een zekering in een kabel
worden ingebouwd.
Apparaten op 12V moeten op een aansteker
aangesloten worden die uitgerust is met een
zekering van 10A.
Apparaten op 24V moeten aangesloten worden
via een klemmenstrook en een
stroomschakelaar en moeten beveiligd zijn met
een zekering van 5A. De stroomschakelaar
moet geschikt zijn voor het omzetten van een
stroom van 5A.
Bij aansluiten van de apparaten hoeft met de
aansluitpolen geen rekening te worden
gehouden.
10.3 Aansluiten en vervangen van
de gaspatroon
De koelkast moet op een juiste manier door een
hiervoor opgeleide vakman worden aangesloten.
Neem de voorschriften die gelden in uw land voor
het gebruik van op vloeibaar gas functionerende
toestellen in aanmerking.
Zorg ervoor dat er geen andere energiebron is
aangesloten (230V, 12V).
Het apparaat mag niet op stads- of aardgas
worden aangesloten. Geschikt voor gebruik
met zelfdichtend gaspatroon (250gr).
Het toestel is van een ingebouwde gasdrukregelaar
voorzien. Deze druk staat in de gegevenstabel
vermeld.
Lees voor het aansluiten van de gaspatroon
zorgvuldig de instructies voor bediening en
bewaren op de zijkant van het patroon. Controleer
of de gaspatroon en de aansluiting van het toestel
adequaat op elkaar aangesloten zijn. Controleer
voor aansluiting van de gaspatroon of het toestel en
de aansluiting van de gaspatroon schoon zijn.
Voer deze handeling in een goed ventileerbare
ruimte zonder ontstekingsbronnen uit. Sluit het
ventiel van het toestel. Zet de hendel in de
bovenste positie. Plaats de patroon in het toestel.
Bij het vervoeren en verplaatsen van het toestel
mag het gaspatroon niet op het toestel zijn
aangesloten.
Model RC 1205 GC
Type JCB - 01
Bruto inhoud 41 liter
Spanning 220 - 240V (wisselstroom)
Vermogen 85W
Energieverbruik 1.38kWh/24h
Accu 12V (gelijkstroom)
Vermogen 85W
Energieverbruik 170Ah/24h
Gasdruk 28-30 mbar
Gasclassificatie I3 B/P
Straalomvang 2
Nominale
warmtebelasting 134W - 9,8g/h
Minimale
warmtebelasting 106W - 7,7g/h
Klimaatklasse N
Koelmiddel 143g H
2
O + 67g NH
3
max. kabellengte
Kabeldiameters bei 12 V 24 V
2.5 mm
2
tot 2.5 m 5 m
4.0 mm
2
tot 4.0 m 8 m
6.0 mm
2
tot 6.0 m 12 m
NL
Page 41

41
11. Informatie omtrent
milieubescherming
Ammoniakgas (natuurlijke waterstof en
stikstofverbinding) wordt gebruikt als koelmiddel in het
koelapparaat.
Het ozonvriendelijke cyclopentaan dient als agens
voor de polyurethaan schuimisolatie.
Der anvendes natriumchromat til
korrosionsbeskyttelse (i en koncentration pĺ mindre
end 2% i křlervćsken).
12. Recycling
Nadat u het apparaat heeft uitgepakt, brengt u het
verpakkingsmateriaal bij voorkeur naar een plaatselijk
inzamelpunt. Na de nuttige levensduur, moet het
apparaat afgeleverd worden bij een gemeentelijk
inzameldepot of bij een gespecialiseerd inzamel- en
recyclingbedrijf, dat de nog bruikbare materialen
terugwint. De rest wordt volledig vernietigd.
Apparaten, die met dit symbool zijn
voorzien, moeten bij het gemeentelijk
verzamelpunt voor afgedankte elektrische
en electronische apparatuur worden
afgegeven.
Ze mogen niet via het gewone huisafval
worden weggegooid.
Bij koelkasten van Dometic staat het symbool op het
typeplaatje aan de achterkant van het apparaat.
Dit apparaat voldoet aan de volgende EEGrichtlijnen:
LVD-Richtlijn 2006/95/EG
EMC-Richtlijn 2004/108/EG
Gas-Richtlijn 90/396/EEG
CE-Richtlijn 93/68/EEG
RoHS-Richtlijn 2002/95/EG
WEEE-Richtlijn 2002/96/EG
NL
Page 42

42
ES
Muchas gracias por haber adquirido nuestro equipo. Esperamos que le proporcione un uso sin problemas.
A continuación intentaremos familiarizarle con algunos símbolos, cuyo objetivo es llamar su atención para
garantizar un servicio seguro y eficiente:
Fuente de peligro en caso de manejo indebido
Sugerencias útiles a tener en cuenta
Información relativa a la protección del medio ambiente
La heladera portátil que Usted acaba de comprar puede funcionar con corriente de la red, de la batería del
coche o con un cartucho de gas autocierre (250 g).
LLeeaa aatteennttaammeennttee eell MMaannuuaall ddee IInnssttrruucccciioonneess aanntteess ddee ppoonneerr llaa uunniiddaadd rreeffrriiggeerraaddoorraa eenn
mmaarrcchhaa.. SSii mmáás
s ttaarrddee UUdd.. llaa vveennddee oo ssee ddeesshhaaccee ddee eellllaa,, aasseeggúúrreessee eennttoonncceess ddee qquuee eell
nnuueevvoo pprrooppiieettaarriioo rreecciibbaa ttaammb
biiéénn eell MMaannuuaall ddee IInnssttrruucccciioonneess..
AAtteenncciióónn!!
Su refrigerador portátil - en operación de gas - solo puede utilizarse en un lugar bien
ventilado, por encima del suelo, donde esté protegido de la lluvia y salpicaduras de
agua.
El aparato no debe de ser utilizado en operación de gas con vehículos de motor
mientras el vehículo o embarcación esté en movimiento.
¡Queda terminantemente prohibido el uso de gas líquido en habitaciones
cerradas!
¡ESTE REFRIGERADOR SÓLO DEBE UTILIZARSE CON
FUNCIONAMIENTO A GAS AL AIRE LIBRE!
Uso al aire libre significa también tiendas de campaña (entoldado) que estén
bien ventiladas durante el funcionamiento del aparato, así como patios al nivel
del suelo.
En servicio eléctrico puede ser también utilizado en un recinto cerrado. En este
caso, debe estar protegido de la humedad
..
Está prohibido el almacenamiento de sustancias tóxicas o explosivas en este
aparato.
Ponga este aparato a funcionar alimentándolo siempre con una sola fuente de
energía.
Para que pueda funcionar con eficacia es importante que la parte trasera de la
unidad reciba tanta ventilación como sea posible para permitir que el calor salga.
El punto más caliente se encuentra en las cercanías del quemador y
eessppeecciiaallmmeennttee
ccuuaannddoo ssee eessttáá uuttiilliizzaannddoo ccoonn ggaass
, es esencial que este lugar se mantenga libre de
cualquier obstrucción o material inflamable (por ejemplo, hierba o plásticos para el
suelo que puedan arder).
Este electrodoméstico no debe ser utilizado por personas (incluidos nińos) con
capacidades físicas, sensoriales o mentales reducidas, o con falta de experiencia o
sin los conocimientos necesarios, a no ser que sean supervisados o instruidos por
personas que se responsabilicen de su seguridad.
Los nińos deben ser supervisados para asegurar que no jueguen con el aparato.
Page 43

43
INDICE
INDICE
1. Desembalaje
2. Descripción del aparato
3. Limpieza
4. Colocación del aparato
5. Servicio del aparato
5.1 Con electricidad de la red
5.2 Con batería de vehículo
5.3 Con botella de gas
6. Preparación de cubitos de hielo
7. Sugerencias útiles
8. Descongelación, limpieza y mantenimiento
9. Servicio al cliente
10. Puesta en marcha, características técnicas
10.1 Conexión a alimentación eléctrica
10.2 Conexión a batería de vehículo
10.3 Enchufe y cambio del cartucho del gas
11. Protección del medio ambiente, Información
12. Reciclaje
AAtteenncciióónn!!
Las condiciones de la garantía corresponden a la Directiva 44/1999/CE de la Unión
Europea y las respectivas leyes vigentes del país donde se utilice este aparato.
Si usted tiene alguna pregunta sobre la garantía y el servicio al cliente o si necesita
piezas de recambio, diríjase por favor a la red de servicio de Dometic.
La garantía no cubre daños causados por el uso indebido de este aparato.
La garantía no cubre las modificaciones al aparato ni tampoco el empleo de piezas
de recambio que no sean piezas originales de Dometic.
La garantía queda anulada si este aparato se instala o se utiliza de forma contraria a
la estipulada en las instrucciones.
Indique por favor el nombre del modelo así como el número del producto y su
número de serie al comunicarse con la red de servicio de Dometic. Hallará estos
datos en la placa de características técnicas situada en la parte posterior del
aparato.
ES
Page 44

44
11.. DDeesseemmbbaallaajjee
Después de quitar la caja de embalaje, controle si el
aparato presenta algún daño. Si halla Ud. alguna
avería debida al transporte, informe entonces
inmediatamente a la empresa de transporte.
22.. DDeessccrriippcciióónn ddeell aappaarraattoo
1. Chasis aislante de calor
2. Tapa aislante de calor
3. Elementos de control
4. Panel de evaporación
Figure 1.
2
4
3
1
ES
Page 45

45
Figure 2
3. Limpieza
Limpiar el aparato por dentro y por fuera antes
de ponerlo en servicio.
Utilice, para ello, un paño suave, agua templada y
un detergente no abrasivo. Procurar que no
penetre agua en la rejilla posterior o en los
elementos de control.
Limpiar después el aparato con un paño limpio y
agua limpios y secarlo.
A fin de evitar averías, no utilice jabón, sosa o
limpiadores abrasivos.
44.. CCoollooccaacciióónn ddeell aappaarraattoo
Durante el proceso de refrigeración, el aparato
envía aire caliente a través del condensador
(debajo de la parte superior de la cubierta posterior)
hacia el aire circundante. Cuanto más ventilado esté el
condensador, tanto más efectiva será la refrigeración.
La segunda condición para un funcionamiento
satisfactorio es que el aparato esté asentado sobre
una superficie plana. Esto puede apreciarse
colocando un vaso de agua sobre el aparato.
Es importante que el aparato no esté expuesto a la
radiación directa de calor (luz solar, radiador, cerca
de un horno, etc.).
En caso de utilización con gas, deje los siguientes
espacios libres: 10 cm como mínimo desde la parte
posterior del aparato, 4 cm como mínimo a ambos
lados, 30 cm como mínimo desde la parte superior
del aparato y 5 cm como mínimo desde la parte
inferior.
Todas las materias inflamables (papel, madera,
hierba, tejidos, etc.) que se encuentren cerca del
aparato deben mantenerse a la distancia indicada
anteriormente.
5. Servicio del aparato
El cable de conexión a la red, la conexión a 12V y
conectador de enganche para el gas van localizados
en la parte derecha de la cubierta posterior del
refrigerador, detrás de la puerta (Fig. 2).
5.1 Servicio con electricidad
de la red
Observar que el voltaje indicado en la placa de
características del aparato coincide con el de la red a
la cual se desea conectar. Para ponerlo en
funcionamiento, tire del cable de alimentación a la red
eléctrica y conéctelo a un enchufe con toma de tierra.
Al conectar el aparato por primera vez graduar el
termostato al máximo (Fig. 4. A.) y después de
aproximadamente 5 horas, reducirlo a la posición
media, de acuerdo a sus necesidades.
Nota: en cada caso, el enchufe corresponderá a las
normas del país en que se use este aparato y puede,
por tanto, ser diferente al que se muestra en la
figura.
ES
Page 46

46
Figure 4.
Figure 5.
Figure 3
55..22 SSeerrvviicciioo ccoonn bbaatteerrííaa
ddee vveehhííccuulloo
Observar que el voltaje indicado en la placa de
características del aparato coincide con el de la
batería del vehículo (12V o 24V).
Los aparatos para 12V DC van equipados con
enchufes para el encendedor de cigarrillos (Fig. 3).
En algunos tipos de vehículos es necesario quitar el
anillo rojo de plástico del extremo del enchufe. Para
ello, girar el anillo de plástico en sentido inverso a
las agujas del reloj y extraerlo. El aparato puede ser
ya conectado en el encendedor. En servicio de 12V,
el aparato funciona ininterrumpidamente sin control
de temperatura.
Los aparatos para 24V DC van equipados con
cables de extremo desnudo. Estos tienen que ser
conectados a un bloque terminal conectado a su
vez a la batería del vehículo a través de un fusible de
5A y un interruptor de 5A.
Si el motor del vehículo no está en marcha,
debe desconectarse del encendedor de
cigarrillos el enchufe del aparato (aparato con
alimentación de 12V) o se debe apagar el interruptor
(aparato con alimentación de 24V). De lo contrario,
el aparato en servicio descargaría la batería del
vehículo en muy poco tiempo.
5.3 Servicio con botella de gas
La descripción del enchufe del cartucho de gas se
halla en los capítulos 10.3.
Después de hacer el enchufe del cartucho de gas y
comprobar la infiltración de gas, dar vuelta al
termostat hasta la posición máxima (dibujo 4.B), tocar
la válvula de seguridad del gas, mantener apretada
unos 10 segundos, y después tocar varias veces
rápidamente el botón piezo de ignición (dibujo 4.C). Si
no se enciende la llama, repetir la operación. (Es
necesario evacuar el aire alojado en la tubería del
aparato antes de conectarlo a la botella de gas. Solo
así puede circular el gas libremente).
Puede observarse el encendido de la llama a través
de la mirilla (Fig. 5). Después de encendida la llama
mantener oprimida la válvula de seguridad durante
otros 20 segundos.
El botón de regulación tiene 4 posiciones:
: llama grande (MAX) = cantidad maxima de gas
(temperatura ambiental alta ~32 °C);
: llama mediana (MID)= cantidad mediana de gas
(temperatura ambiental normal ~ 25°C);
: llama pequeña (MIN) = cantidad minima de gas
(temperatura ambiental baja ~ 16°C);
: posición apagada = el quemador no recibe gas
Para cerrar el funcionamiento del gas, se debe cerrar
la válvula de seguridad y cortar el enchufe del
cartucho de gas.
Desconexión del funcionamiento a gas
Cierre la válvula de la botella de gas o la válvula
reductora de presión.
Gire el mando B hacia la derecha a la posición
de apagado.
ES
C
A
B
Page 47

47
66..
Preparación de cubitos de hielo
Llene la bandeja de hielo hasta sus 4/5 partes con
agua potable y ciérrela con la tapadera. Si hay
gotas de agua en la bandeja o en la tapadera
séquelas para evitar que se congelen. Coloque la
bandeja para hielo en el reflector de frío.
Para acelerar la formación de cubitos de hielo y si
es necesario gire, en caso de conexión eléctrica,
el termostato y, en caso de funcionamiento a gas
líquido, el mando regulador a la posición máxima
«MAX», por un corto espacio de tiempo. (¡No se
olvide de volver a girarlo a una posición inferior
una vez finalizado el proceso para la formación de
cubitos de hielo!). Para sacar los cubitos de hielo
de la bandeja debe dejar que se descongele
durante un corto espacio de tiempo o ponerla bajo
un chorro de agua a temperatura normal. Quítele
la tapadera. Ahora podrá sacar fácilmente los
cubitos de hielo de la bandeja o la tapadera.
77.. SSuuggeerreenncciiaass úúttiilleess
Para preparar un viaje, poner el aparato en
funcionamiento en 230 V (ajuste del termostato
entre "min" y "max" 24 horas antes de emprender
el viaje. Colocar los productos en el aparato
previamente enfriados.
Se forma hielo en el panel evaporador durante el
servicio. Al abrir la tapa o colocar alimentos, parte
de ese hielo se derrite y va a parar en forma de
agua al fondo del aparato. Eliminar
ocasionalmente el agua con un paño absorbente.
Evitar colocar alimentos con envases frágiles
(como vidrio) en la unidad refrigeradora. Los
movimientos y sacudidas pueden ser causa de
rotura de esos envases.
Una vez que la unidad refrigeradora esté en su
posición definitiva, procure que los alimentos no
tengan contacto con el panel evaporador, ya que
éste puede causar quemaduras por congelación
en los alimentos.
88.. DDeessccoonnggeellaacciióónn,, lliimmppiieezzaa yy
mmaanntteenniimmiieennttoo
Para descongelar desenchufar siempre al aparato de
la alimentación eléctrica, para evitar el peligro de
choques eléctricos. Asegúrese de que ninguna otra
fuente de energía esté conectada (gas o 12V / 24V).
Quite los alimentos de la unidad refrigeradora y deje la
tapa abierta. De acuerdo a la temperatura, el hielo se
derrite rápidamente en el panel evaporador y el agua
es recogida en el fondo de la unidad refrigeradora.
Eliminarla con un paño absorbente. A continuación,
limpiar el aparato siguiendo las instrucciones
indicadas en la sección 3. Dejar la tapa ligeramente
abierta para evitar malos olores. El aparato no
requiere ningún otro tipo de mantenimiento.
99.. SSeerrvviicciioo aall cclliieennttee
Antes de avisar al Servicio al Cliente compruebe
lo siguiente:
Son satisfactorias la ubicación y la ventilación?
Está nivelado el aparato?
Existe corriente en el enchufe de la pared y es
apto el enchufe para el aparato?
Está deteriorado el cable de alimentación de la
red?
Está conectado el termostato eléctrico para
alimentación de la red?
Para el funcionamiento con gas fue oprimido el
botón de la válvula de seguridad durante el
tiempo suficiente?
Está graduado el termostato hacia la posición
máxima?
Está abierta la botella de gas o la válvula
reguladora de presión?
¿Hay gas en el cartucho? (Si no se nota
movimiento de liquido al agitar el cartucho,
¿éste está vacío?)
Hay, acaso, dos fuentes diferentes de energía
conectadas (como gas y electricidad)?
Han sido colocados alimentos calientes en el
aparato?
Si, después de controlar estos puntos, el aparato
no funciona correctamente, avise entonces al
Sevicio al Cliente. Al comunicar el problema,
especifique el tipo de problema, el número del
aparato y el número de serie de la placa de
características técnicas.
Asumimos la garantía en base a las condiciones
de garantía para el aparato.
www.dometic.com
1100.. PPuueessttaa eenn mmaarrcchhaa
Debe emplearse siempre una sola fuente
de energía. La conexión de varias
fuentes de energía al mismo tiempo puede causar
averías en el aparato.
ES
Page 48

48
CCaarraacctteerrííssttiiccaass ttééccnniiccaass
Modelo RC 1205 GC
Tipo JCB - 01
Volumen bruto 41 litre
Alimentación de red 220 - 240V (AC)
Entrada 85W
Consumo de energia 1.38 kWh/24h
Servicio con bateria 12V (DC)
Entrada 85W
Consumo de energia 170Ah/24h
Presión de gas (p) 28-30/37 mbar
Clasificación de gas I
3
+
Diámetro conductor 2
Capacidad calorifica
nominal 134W - 9,8 g/h
Capacidad calorifica
mínima 106W - 7,7g/h
Clase de clima N
Re fr igerant e 143g H
2
O + 67g NH
3
10.1 Conexión a alimentación eléctrica
Asegúrese de que no está conectada ninguna otra
fuente de energía (gas, 12V).
Solo debe manejarse el aparato con el voltaje
nominal de la red indicado en la placa de
características. El aparato debe enchufarse a un
enchufe de la red con toma de tierra, conforme a las
disposiciones vigentes. (A causa de los diferentes
tipos de corriente, en algunos países puede ser
necesario un adaptador).
Cualquier trabajo eléctrico que se precise para la
instalación de esta unidad, deberá ser realizado
por personal eléctrico cualificado o por alguna
persona competente.
El fabricante no asumirá ninguna
responsabilidad, si no se observan estas
medidas de seguridad.
Requisitos eléctricos
Antes de conectarlo, asegúrese de que el voltaje
del suministro eléctrico es el mismo que el
indicado en la placa de datos de la unidad.
10.2 Conexión a batería de
vehículos
Asegúrese de que no está conectada ninguna
otra fuente de energía (gas, 230V).
Para hacer posible el funcionamiento con
batería debe de introducirse o estar ya
introducido un fusible en el conductor de
corriente entre la batería y el refrigerador móvil
refrigerador.
Los aparatos de 12V deben ser conectados al
encendedor de cigarrillos de un vehículo, el cual
debe estar protegido con un fusible de 10A.
Los aparatos de 24V deben ser conectados a un
bloque terminal con un interruptor interpuesto y
un fusible de protección de 5A. El interruptor
deberá ser el adecuado para corriente 5A.
No es necesario tener en cuenta la polaridad al
conectar el aparato.
10.3 Enchufe y cambio del cartucho
del gas
El enchufe del frigorífico debe realizarse por
un especialista calificado. Se debe respetar las
normas locales en vigor, relacionadas con el
uso de aparatos que funcionan con gas
líquido.
Asegúrese de que no está conectada ninguna
otra fuente de energía (230V, 12V).
No debe usarse nunca el aparato con gas natural
o gas ciudad. Es apto para el funcionamiento con
cartucho de gas autocierre (250 g).
El aparato está equipado con un moderador de
presión. La presión está indicada sobre la placa
de datos.
Antes de hacer el enchufe del cartucho de gas,
leer las instrucciones de manejo y
almacenamiento que se hallan sobre el lado del
cartucho. Comprobar el ajuste perfecto del
enchufe del aparato y del cartucho de gas. Antes
de hacer el enchufe del cartucho de gas,
comprobar la limpieza del aparato y del enchufe
del cartucho de gas.
La operación debe realizarse en un espacio bien
ventilado, sin fuentes de fuego. Cerrar la válvula
del aparato. Poner el brazo a la posición de arriba.
Introducir el cartucho en el aparato.
Durante el transporte y el desplazamiento del
aparato, el cartucho no debe ser enchufado al
aparato.
Longitud máxima del cable
Sección del cable bei 12 V 24 V
2.5 mm
2
de 2.5 m 5 m
4.0 mm
2
de 4.0 m 8 m
6.0 mm
2
de 6.0 m 12 m
ES
Page 49

49
ES
1111.. PPrrootteecccciióónn ddeell mmeeddiioo
aammbbiieennttee IInnffoorrmmaacciióónn
Como agente refrigerante del aparato se emplea
amoníaco (compuesto de nitrógeno e hidrógeno
natural).
El ciclopetano, compatible con el medio ambiente,
está activado como agente motor para el
aislamiento de espuma de PU.
El cromato sódico se utiliza para la protección
contra la corrosión (menos del 2% del peso del
refrigerante)
1122.. RReecciiccllaajjee
Después de desempacar el aparato, los materiales
de embalaje deben ser enviados a un centro local de
recogida. Al final de su vida útil, el aparato deberá
ser enviado a un centro de especializado de
recogida y reprocesamiento, para que se recuperen
los materiales aprovechables. El resto deberá ser
destruido adecuadamente.
Los aparatos que lleven este símbolo
deberán depositarse en los lugares
locales de recogida de aparatos
eléctricos y electrónicos. Este
producto no debe desecharse en la
basura doméstica convencional. Los
refrigeradores de Dometic llevan el símbolo en la
placa de datos (placa indicadora) situada en la parte
posteiror del aparato.
EEssttee ppaarraattoo ssee aajjuussttaa aa llaass ssiigguuiieenntteess
ddiirreeccttiivvaass ddee llaa CCEEEE::
Directiva LVD 2006/95/CE
Directiva EMC 2004/108/CE
Directiva sobre gas 90/396/CEE
Directiva CE 93/68/CEE
Directiva RoHS 2002/95/CE
Directiva WEEE 2002/99/CE
Page 50

50
PT
Agradecemos a escolha do nosso aparelho. Temos a certeza que poderá usá-lo sem problemas.
Nas seguintes linhas gostaríamos de apresentar-lhe algumas sinalizações e chamar a sua atenção
sobre elas para que o aparelho possa funcionar com segurança e sem problemas:
fonte de perigo, se o aparelho não funiconar devidamente
conselhos úteis que vale a pena ler
conhecimentos relacionados com a proteção de ambiente
O box frigorífico adquirido por você foi desenhado de maneira que possa ser ligado à rede elétrica,
ao acumulador dum veículo ou possa funcionar a cartucho de gás autovedante (250).
Por favor, leia com cuidado este manual de instruções antes de ligar o
aparelho frigirífico. Caso o venda ou o passe mais tarde para o posse de
outrem, por favor, assegure que o novo proprietário possa receber este
manual de instruções.
Atenção!
O seu frigorífico portátil só pode ser utilizado a cartucho de gás
exclusivamente em lugares com boa ventilação, acima do nível do solo, onde
esteja protegido da chuva e de qualquer contato com água.
O aparelho pode ser usado em lugares fechados quando estiver ligado à
eletricidade. Mas sempre tem que estar protegido contra a humidade.
O aparelho não pode ser usado a cartucho de gás em veículos e barcos de
motor, enquanto o veículo ou o barco estiver em movimento!
Não é permitido usá-lo a gás líquido em lugares fechados!
ESTA UNIDADE FRIGORÍFICA PODE SER USADA A GÁS
EXCLUSIVAMENTE EM ESPAÇOS EXTERIORES!
Podem ser considerados espaços exteriores também as tendas (toldos) desde
que assegurem ao aparelho uma boa circulação de ar, e também os terraços
abertos.
É proibido armazenar no aparelho material tóxico ou explosivo!
Só se deve usar o aparelho ligado a uma fonte de energia.
O aparelho pode ser manuseado por crianças de 8 ou mais anos de idade e por
pessoas portadoras de alguma deficiência física, sensorial ou mental ou por
indivíduos que careçam de conhecimentos e experiência se tiverem alguém a
subervisioná-las ou receberem instruções acerca da maneira segura da
utilização do aparelho que se tiverem consciência dos perigos inerentes.
Crianças não podem brincar com o aparelho.
Os trabalhos de limpeza e manutenção feitos pelo utilizador não podem ser
efetuados por crianças sem supervisão dum adulto.
Para o bom desempenho, temos que assegurar a maior ventilação possível na
parte de trás do aparelho para que o calor possa afastar-se. O ponto mais
quente fica ao redor do bico, principalmente quando está a funcionar a gás, é
preciso manter este espaço livre de obstáculos e de materiais inflamáveis.
Page 51

51
INDICE
INDICE
1. Desembrulho
2. O esquema do aparelho
3. Limpeza
4. Posicionamento do aparelho
5. Utilização do aparelho
5.1 Da rede elétrica
5.2 Do acumulador dum veículo
5.3 De cartucho de gás
6. Preparação de gelo
7. Conselhos úteis
8. Descongelamento, limpeza e manutenção
9. Serviço ao cliente
10. Como pôr o aparelho em funcionamento, dados técnicos
10.1 Como conectar à rede elétrica
10.2 Como conectar ao acumulador dum veículo
10.3 Como conectar a cartucho de gás e como efetuar a substituição do mesmo
11. Informações acerca da proteção de ambiente
12. Reciclagem
Atenção!
As instruções de garantia estão de acordo com a Diretiva CE 44/19999/CE e com
as condições normais aplicáveis no país em questão.
Em relação a questões de garantia e outros serviços, por favor, contacte a nossa
Rede de Serviços Dometic.
A garantia não abrange nenhum dano proveniente de utilização incorreta.
A garantia não abrange nenhuma modificação do aparelho, nem o uso de partes
de substituição que não sejam produtos originais Dometic.
A garantia não é válida se as instruções sobre a montagem e manutenção não
tiverem sido respeitadas.
Sempre se ligar ao número da Rede de Serviços Dometic, por favor, identifique
o modelo, o número de produto e o número de série do produto.
Todos estes dados podem ser encontrados na tabela de dados situada na tampa
de trás do frigorífico.
PT
Page 52

52
11..
Desembrulho
Depois de tirar o aparelho do seu embrulho de
papelão, por favor, confira se o aparelho está
intato. Se encontrar qualquer dano que tenha
surgido durante o transporte, informe
imediatamente a empresa encarregada do
transporte.
22..
O esquema do aparelho
1. Revestimento isolado
2. Tampa isolada
3. Painel de controlo
4. Painel de vaporização
1ª imagem
2
4
3
1
PT
Page 53

53
3. Limpeza
Limpe tanto o interior como o exterior do
aparelho antes de começar a usá-lo.
Para isso utilize pano macio, água morna e
detergente não abrasivo. Tenha cuidado para não
deixar entrar água na grelha de cobertura de trás ou
nos elementos de controlo.
A seguir limpe o aparelho com pano limpo e água
limpa, depois use um pano seco para secar o
aparelho completamente.
Para não danificar o aparelho, não use sabonete,
carbonato de sódio ou detergentes abrasivos.
4. Posicionamento do aparelho
Durante o processo da refrigeração o aparelho
solta calor do condensador (debaixo da parte
superior da tampa de trás) para o ar ao redor.
Quanto melhor é a ventilação do condensador, tanto
mais eficaz será a refrigeração.
Outra condição do funcionamento satisfatório é que
o aparelho deve ser instalado em superfície plana.
Isso pode ser verificado da melhor maneira
colocando um copo de água em cima do aparelho.
É importante que o aparelho não apanhe calor
radiante (luz de sol, aquecedor, perto de forno, etc.).
Quando utilizado a gás, é preciso manter as
seguintes distâncias das paredes e de outros
materiais: no mínimo 10 cm do lado de trás do
aparelho, 4 cm da cada parede lateral, no mínimo
30 cm do topo do aparelho, no mínimo 5 cm da
parte de baixo.
Não pode haver materiais inflamáveis (papel, árvore,
madeira, ervas, tecidos, etc.) na proximidade imediata
do aparelho, dentro das distancâncias acima referidas.
5. Utilização do aparelho
O cabo necessário para a ligação à rede elétrica, o
cabo de ligação de 12V e a ligação necessária para
contectar o aparelho a gás, encontram-se na tampa de
trás do box frigorífico. (2ª imagem).
5.1 Funcionamento a partir da
rede elétrica
Assegure-se se a tensão que figura da tabela de dados
do aparelho corresponde à tensão de rede à qual
quererá conectar o aparelho. Retire o cabo de ligaçã
o de rede e contecte-a à tomada ligada à terra.
Quando ligar o aparelho pela primeira vez, coloque o
termóstato no nível máximo (3ª imagem "A") e ca. de
cinco horas mais tarde coloque-a num nível mais
próximo ao mínimo, de acordo com a sua necessidade
de refrigeração.
Nota: O tipo de ficha providenciada depende das
exigências específicas existentes em cada país, assim
pode diferir daquele que se apresenta aqui.
2ª imagem
PT
Page 54

54
4ª imagem
5ª imagem
3ª imagem
PT
C
A
B
5.2 Funcionamento a partir do
acumulador dum veículo
Assegure-se se a tensão que figura da tabela de dados
do aparelho corresponde à tensão do acumulador do
veículo (12V ou 24V) ao qual quererá conectar o
aparelho.
Os aparelhos de tensão 12V DC têm fichas que podem
ser conectadas a tomadas de isqueiro (3ª imagem).
Em certos tipos de veículos é preciso afastar o anel
vermelho de plástico que se encontra na ponta da
tomada. Para isso vire o anel em sentido contrário ao
dos ponteiros do relógio e retire-o. Depois disso pode
conectar o aparelho à tomada de isqueiro. Se
conectado a 12V, o aparelho funciona sem
interrupções, sem necessidade de regular a
temperatura.
Os aparelhos de tensão 24V DC são providenciados
com pontas de arame desnudadas. As pontas de
arame têm que ser conectadas ao bloco terminal que
está conectado ao acumulador do veículo com um
fusível de 5A e a um interruptor de 5A.
Quando o motor não estiver a funcionar, a ficha
do aparelho tem que ser retirada da tomada do
isqueiro (aparelho de 12 V) ou o interruptor tem que ser
desligado (aparelho de 24 V). Senão, o aparelho irá
esvaziar o acumulador de veículo rapidamente.
5.3 Funcionamento a cartucho
de gás
Nos capítulos 10.3 está descrito como conectar o
aparelho a cartucho de gás.
Depois de conectar o aparelho à cartucho de gás e
verificar se não há fuga de gás, coloque o termóstato
no nível máximo (4ª imagem "B”), pressione a válvula
de segurança para baixo, mantenha-a assim durante
ca. de 10 segundos, e pressione o botão de ignição
piezo várias vezes em seguida (4ª imagem "C”). Se o
lume não acender, repita o processo. (O ar que estiver
no tubo de gás do aparelho tem que ser retirado antes
de conecção ser feito. Só depois disso é que se pode
acender o gás.)
O regulador tem 4 posições:
:
lume alto (MAX) = fornecimento de gás máximo
(temperatura ambiental alta ~32°C);
: lume médio (MID) = fornecimento de gás médio
(temperatura ambiental normal ~25°C);
: lume brando (MIN) = fornecimento de gás
mínimo(temperatura ambiental baixo ~16°C);
:
posição desligado = o fornecimento de gás a
queimador está desligado
O acender do lume pode ser verificado através da
abertura de vista de lume. (5ª imagem). Depois de o
lume acender, mantenha a válvula de segurança de
gás pressionada durante mais 20 segundos.
Para terminar a fase do funcionamento a gás, é preciso
fechar a válvula de segurança e desconectar o
cartucho de gás.
Page 55

55
6. Preparação de gelo
Encha o tabuleiro do gelo com água potável enchendoo até 4/5 a contar do topo, e feche-o com a tampa. Tire
com pano as gotas de água que possam estar no
tabuleiro e na tampa, para evitar que congelem um ao
outro e coloque-o na unidade congeladora do
frigorífico. O gelo fica feito mais depressa se o
termóstato (em caso de funcionamento a eletricidade)
ou o botão regulador (em caso de funcionamento a gás
líquido) estiver colocado na posição MAX durante um
curto espaço de tempo. (Quando o gelo estiver pronto,
não se esqueça de colocar o botão de novo na posição
normal.)
Para afastar o gelo, deixe descongelar o tabuleiro do
gelo durante algum tempo ou coloque-o debaixo de
água da torneira de temperatura normal, antes de tirar
a tampa do tabuleiro. Os cubos de gelo assim poderão
ser retirados do tabuleiro com facilidade.
7. Conselhos úteis
Quando se prepara para viajar, ponha a funcionar o
aparelho a 230V (posicionando o termóstato entre
„min” e „max”) durante 24 horas antes da partida.
Coloque oa alimentos no aparelho em estado prérefrigerado.
Durante o funcionamento cria-se gelo no painel de
vaporização. Quando se abre a tampa ou se coloca
alimentos dentro, alguma parte deste gelo fica
descongelado e se junta em forma de água no
fundo do aparelho. De vez em quando absorva essa
água usando uma esponja.
Evite colocar alimentos em embalagens frágeis
(como por exemplo em vidro) no box frigorífico. Os
movimentos e tremores do aparelho podem quebrar
estas embalagens.
Depois de ter colocado o box frigorífico em posição
final, assegure-se se os alimentos não estão juntos
ao painel de vaporização, já que isso pose causar
danos de congelamento nos alimentos.
8. Descongelamento,
limpeza e manutenção
Na altura do descongelamento desconecte sempre o
aparelho da eletricidade para evitar qualquer choque
elétrica proveniente da fonte de eletricidade.
Assegure-se se não está conectada ao aparelho outra
fonte elétrica (gás ou 12V/24V). Retire os alimentos da
unidade frigorífica e deixe a tampa aberta.
Dependendo da temperatura, o gelo descongela
rapidamente do painel de vaporização e se junta em
forma de água no fundo do aparelho.
Absorva a água utilizando um pano. Depois limpe o
aparelho seguindo as instruções do capítulo 3.
Deixe a tampa meia aberta para evitar que se crie
qualquer cheiro desagradável.
O aparelho não precisa de mais manutenção.
PT
9. Serviço ao cliente
Antes de contactar o serviço ao cliente, por favor,
verifique as seguintes coisas:
Se o posicionamento e a ventilação estão
corretos?
Se o aparelho está colocado em superfície lisa?
Se há electricidade na tomada da parede e se a
conecção ao aparelho está correta?
Se o cabo elétrico da rede está danificado?
Em caso de funcionamento da rede elétrica, se o
termóstato elétrico está ligado?
Se o botão do termóstato está colocado na
posição máxima?
Se a de gás ou a válvula reguladora de pressão
estão abertas?
Se há gás no cartucho (se ao sacudir não nos
apercebemos de nenhum movimento de líquido,
a cartucho está vazio)?
Por acaso o aparelho poderá estar conectado a
duas fontes elétricas distintas ao mesmo tempo
(como por exemplo ao gás e à eletricidade)?
Terão colocado alimento quente no frigorífico?
Terão colocado uma grande quantidade de
alimentos ao mesmo tempo?
Se depois de ter verificado todos estes detalhes o
aparelho continua a não funcionar, contacte o nosso
serviço ao cliente.
Quando fizer contacto por causa do problema,
informe sobre o tipo de problema, o tipo do
aparelho, o número do produto e o número de série
de produto que poderá encontrar na tabela de
dados.
Asseguramos a garantia de acordo com as nossas
condições de garantia em vigor.
www.dometic.com
Page 56

56
10. Como pôr o aparelho em
funcionamento
O aparelho pode funcionar sempre só de uma
fonte elétrica. Se conectado a várias fontes de
energia ao mesmo tempo, o aparelho poderá avariar.
Dados técnicos:
10.1 Como conectar à rede
elétrica
Assegure-se que não há outra fonte de energia
conectada (gás, 12V).
O aparelho só pode funcionar a partir de rede de
tensão nominal de acordo com os dados que figuram
na tabela. A ficha do aparelho pode ser conectada à
tomada ligada à terra, de acordo com as instruções.
Os trabalhos necessários à montagem do aparelho só
podem ser efetuados por um eletricista classificado ou
uma pessoa autorizada.
O produtor não se responsabilizará se não
respeitarem estas instruções de segurança.
Exigências eletrónicas
Antes de ligar o aparelho assegure-se de que o
fornecimento de electricidade está de acordo com o
sinalizado na tabela de dados.
Modelo
Tipo
Volume total
Funcionamento de rede elétrica
Input (rendimento)
Consumo de energia
Funcionamento a acumulador
Input (rendimento)
Consumo de energia
Pressão de gás (p)
Classificação do gás
Tamanho de embocadura
Carga térmica calculada: butano
Carga térmica mínima: butano
Classe climática
Fluído refrigerante
RC 1205 GC
JCB - 01
41 liter
220-240V (AC)
85W
1,38 kWh/24h
12V (DC)
85W
170Ah/24h
28-30/37 mbar
I3+
2
134W 9,8 g/h
106W 7,7 g/h
N
143g H2O + 67g NH3
10.2 Como conectar ao
acumulador dum veículo
Assegure-se que não há outra fonte de energia
conectada (gás, 230V).
Tem que ser montado um fusível de segurança no
fornecimento de eletricidade num canal entre o
acumulador e o box frigorífico.
10.3 Como conectar a cartucho de gás e como
efetuar a substituição
do mesmo
A conecção correta do frigorífico tem que ser
efetuada por um técnico classificado. Preste
atenção nas instruções nacionais específicas
relacionadas ao uso de aparelhos que
funcionem a gás líquido.
Assegure-se que não há outra fonte de energia
conectada (230V, 12V).
É proibido conectar o aparelho à rede urbana e à
rede do gás natural. Foi desenhado para funcionar
com cartucho de gás autovedante (250g).
Antes de conectar o aparelho ao cartucho de gás,
por favor, leia as instruções de manutenção e
armazenamento que se encontram no lado do
cartucho. Verifique se a ligação do cartucho à porta
de ligação do aparelho está correta. Antes de ligar o
cartucho de gás verifique o estado de limpeza da
porta de ligação do aparelho. Esta operação tem
que ser feita em terreno bem ventilado, isento de
fontes de incêndio. Feche a válvula do aparelho.
Ponha a alavanca na posição de cima. Coloque o
cartucho dentro do aparelho.
Quando o aparelho estiver a ser transportado ou
movimentado, não poderá ficar conectado ao
cartucho de gás.
PT
Os aparelhos de 12V têm que ser conectados à
tomada de isqueiro do veículo que está protegida
por um fusível de 10A.
Os aparelhos de 24V têm que ser conectados
usando um bloco terminal e um interruptor e
protegidos por um fusível de 5A. O interruptor tem
que ser apto para ligar eletricidade de 5A.
Não é preciso considerar a polaridade no ato de
conectar o aparelho.
Se precisar de um cabo mais comprido, por favor,
veja a tabela que segue em baixo:
Comprimento máximo do cabo
Perfil do cabo 12V 24V
2,5 mm2 até 2,5m até 5m
4,0 mm2 até 4,0m ate 8m
6,0 mm2 até 6,0m até 12m
Não conecte cabo mais grosso do que 2,5mm2 à
tomada de isqueiro! Por favor, monte uma conecção
de bloco terminal.
Em interesse da sua segurança:
Não verifique fugas de gás usando lume aberto!
Não fume enquanto estiver verificando as fugas de gás!
Page 57

57
PT
O aparelho corresponde às seguintes
diretivas da CEE:
Diretiva de LVD 2006/95/EK
Diretiva de EMC 2004/108/EK
Diretiva de Gás 90/396/EGK
Diretiva de CE 93/68/EGK
Diretiva de RoHS 2002/95/EK
Diretiva de WEEE 2002/96/EK
11. Informações acerca da
proteção de ambiente
Na unidade frigorífica usa-se amónia (um composto
natural de hidrogénio e nitrogénio) como agente de
refrigeração.
Como agente espumante do isolamento esponjoso PU
usa-se ciclopentano, material que não danifica a
camada de ozono.
Como proteção contra corrosão usa-se natriocromato
(menos do que 2% do peso do refrigerador).
12. Reciclagem
Depois de desembrulhar o aparelho o material de
embalagem tem que ser transportado para o ponto de
recolha de lixo para reciclagem. O aparelho, no fim da
sua duração útil, tem que ser entregue a uma empresa
especializada em reciclagem que reciclará os
materiais que possam ser aproveitados. O resto terá
que ser destruído de maneira correta.
Aparelhos que tenham este símbolo
têm que ser entregues em pontos de
entrega designados e formados
especialmente com a finalidade de
eliminação de aparelhos elétricos e
eletrónicos.
Este aparelho não pode ser deitado fora
através do sistema normal de recolha de lixo
doméstico.
Este símbolo pode-se ver na tabela específica (tabela
de dados) que se encontra na tampa de trás dos
frigoríficos Dometic.
Page 58

58
Page 59

59
Page 60

Printed by Océ Hungária Kft. 2013. 03. 26.
 Loading...