

Page 1
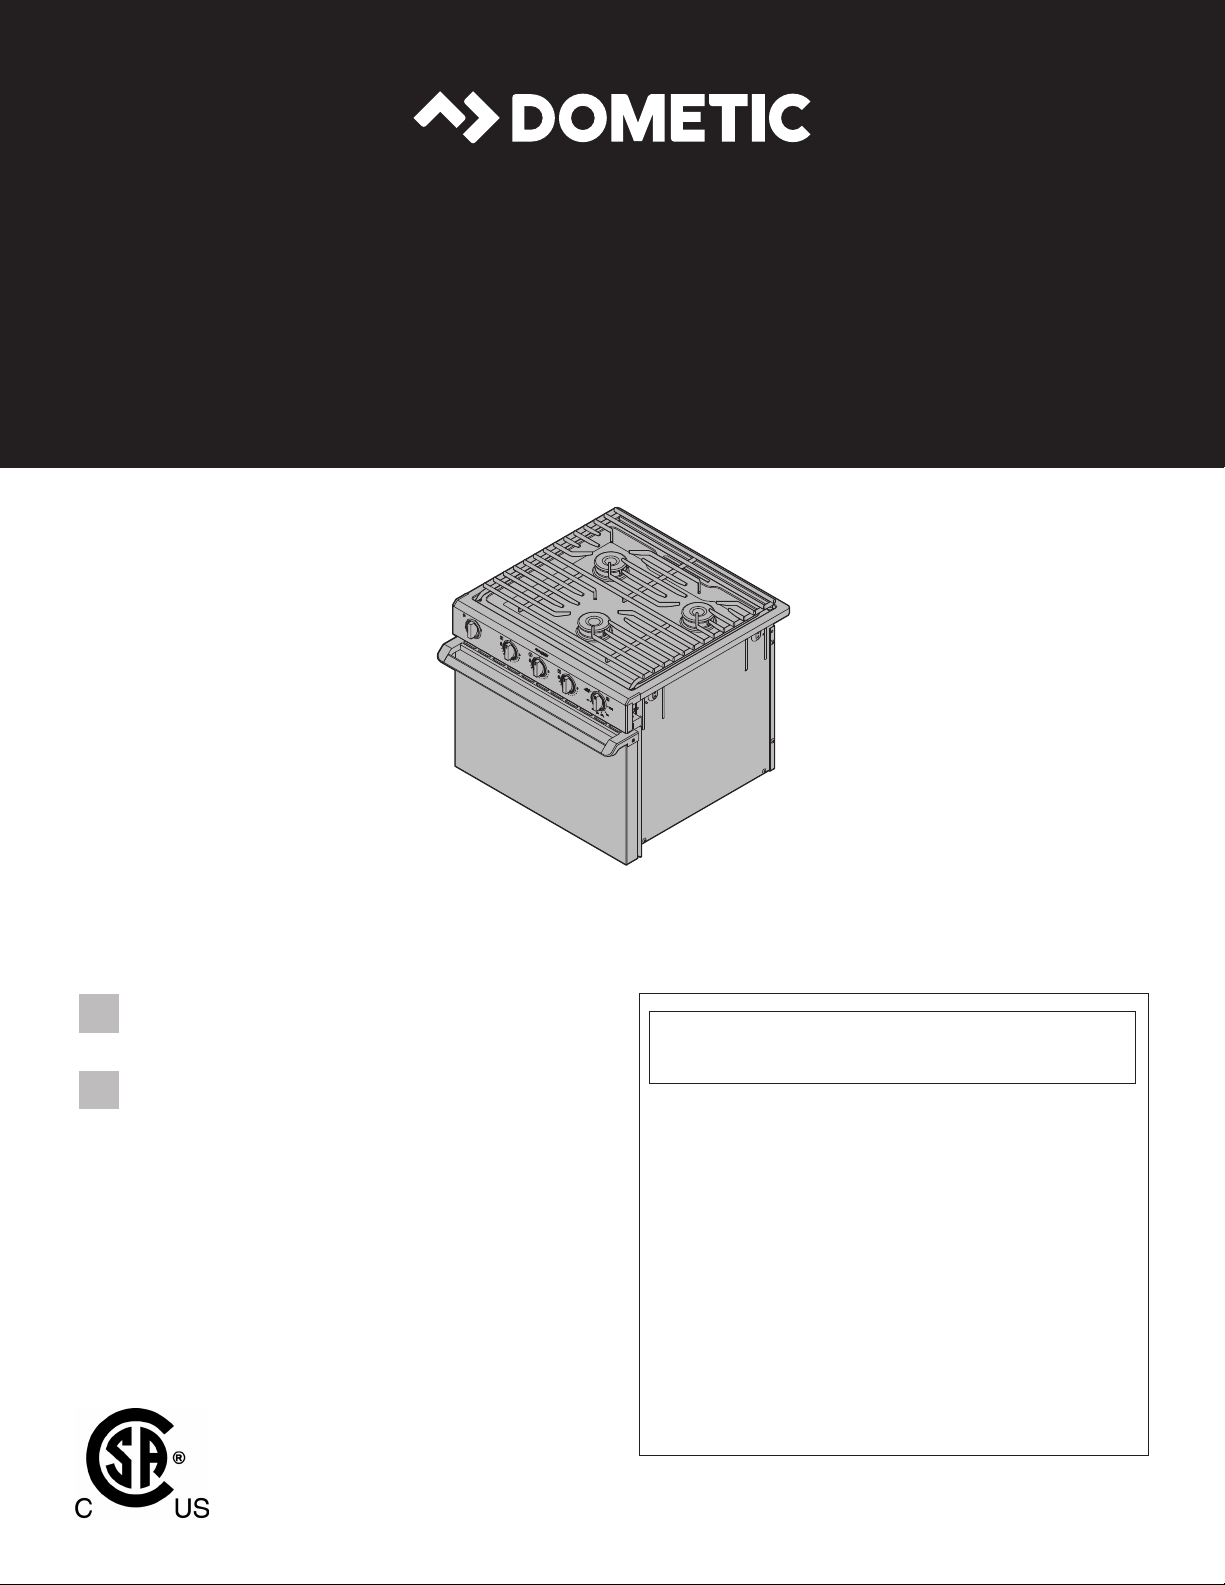
HOT PRODUCTS
COOKTOP
RANGE AND SLIDE-IN
EN
Installation and Operation Manual ...............1
CUISINIÈRE ET PLAQUE DE CUISSON
FR
Manuel d’installation et d’utilisation ............18
R31 and S31 SERIES
WARNING: If the information in this manual is not followed
exactly, a fire or explosion may result causing property
damage, personal injury, or death.
− Do not store or use gasoline or other flammable vapors and
liquids in the vicinity of this or any other appliance.
− WHAT TO DO IF YOU SMELL GAS
• Do not try to light any appliance.
• Do not touch any electrical switch.
• Do not use any phone in your recreational vehicle.
• Clear the recreational vehicle of all occupants.
• Turn off the gas supply tank valve(s) or main gas supply.
• Immediately call your gas supplier for instructions.
• If you cannot reach your gas supplier, call the fire
department.
− Have the gas system checked and leakage source corrected by a
qualified installer, service agency, manufacturer or dealer, or the
gas supplier.
Page 2
RANGE AND SLIDE-IN
NORTH AMERICAN ADDRESS INFORMATION
USA & CANADA
Service Office
Dometic Corporation
1120 North Main Street
Elkhart, IN 46514
REVISION F | Form No. 50467 01/19 | ©2019 Dometic Corporation
Read these instructions carefully. These instructions MUST stay with this product.
TO THE INSTALLER: LEAVE THIS MANUAL WITH THE APPLIANCE
TO THE CONSUMER RETAIN THIS MANUAL FOR FUTURE REFERENCE
Service Center & Dealer Locations
Visit: www.dometic.com
CONTENTS
1 Important Safety Instructions and Document Symbols ...................................... 3
2 General Information .................................................................. 4
3 Intended Use ........................................................................ 4
4 Pre-Installation ...................................................................... 5
5 Installation .......................................................................... 8
6 Operation ..........................................................................10
7 Maintenance ........................................................................15
8 Storage ............................................................................17
9 Disposal ............................................................................17
10 Replacement Parts ...................................................................17
11 Limited 2-Year Warranty ...............................................................17
EN
2
Page 3

RANGE AND SLIDE-IN
1 IMPORTANT SAFETY INSTRUCTIONS AND DOCUMENT SYMBOLS
This manual has safety information and instructions to help you eliminate or reduce the risk of accidents
and injuries.
1.1 Recognize Safety Information
This is the safety alert symbol. It is used to alert you to potential physical injury hazards. Obey all
safety messages that follow this symbol to avoid possible injury or death.
1.2 Understand Signal Words
A signal word will identify safety messages and property damage messages, and will indicate the degree or level
of hazard seriousness.
indicates a hazardous situation that, if not avoided, could result in death or serious injury.
indicates a hazardous situation that, if not avoided, could result in minor or moderate
injury.
is used to address practices not related to physical injury.
Indicates additional information that is not related to physical injury.
I
1.3 Supplemental Directives
Read and follow all safety information and instructions to avoid possible injury or death.
Read and understand these instructions before installation, use, or maintenance of this product.
Incorrect installation, operation, or maintenance of this product can lead to serious injury or death.
The installation must comply with all applicable local or national codes, including the latest edition of the
following standards:
U.S.A.
CANADA
• ANSI/NFPA70, National Electrical Code (NEC)
• ANSI/NFPA 1192, Recreational Vehicles Code
• ANSI Z21.57, Recreational Vehicles Code
• ANSI/NFPA 70, National Electrical Code
Models with an oven light will utilize an external electrical source. When installed, these models must be
electrically grounded in accordance with state or other codes. In the absence of such codes, refer to the National
Electrical Code, ANSI/NFPA 70.
• CSA C22.1, Parts l & ll, Canadian Electrical Code
• CSA Z240 RV Series, Recreational Vehicles
3
EN
Page 4

RANGE AND SLIDE-IN
1.4 General Safety Messages
Failure to obey the following warnings could result in property damage, death, or serious
injury:
• This product must be installed and serviced by a qualified service technician.
• Dometic gas-operated cooking units are for use with liquid propane (LP) gas only and for installation in
recreational vehicles only (e.g. travel trailers, motor homes, tent campers, etc.).
• Do not store or use gasoline or other flammable vapors and liquids in the vicinity of this or any other
appliance.
• Do not modify this product in any way. Modifi cation can be extremely hazardous.
• Improper installation, adjustment, service, or maintenance can cause injury, property damage, or
death. Refer to this manual. For assistance or additional information, consult a qualified installer, service
agency, manufacturer, or gas supplier.
• Do not install this cooking unit if any part has been underwater.
• CARBON MONOXIDE HAZARD. This product can produce carbon monoxide, which has no odor
and can be life-threatening. Gas flames consume oxygen, which must be replaced to assure proper
combustion. A window or air vent should be open slightly while using any cooking appliance. Failure to
provide fresh air during combustion can lead to carbon monoxide poisoning and could result in serious
injury or death.
BURN HAZARD, FIRE, EXPLOSION, AND/OR CARBON MONOXIDE HAZARD. Never use the
range or slide-in as a space heater to heat or warm the room or as a storage space. Doing so may result in a
burn, a fire or explosion, and/or carbon monoxide poisoning and overheating of the room.
2 GENERAL INFORMATION
Recommended Tools
Phillips Screwdriver Drill
Optional Parts* Reference Number
Bi-Fold Covers See www.dometic.com
*Available as accessory (not included).
3 INTENDED USE
This range or slide‑in is designed and intended for use inside the recreational vehicle (hereinaer referred to as
“RV”) for which it is supplied. Use the instructions to ensure correct installation, operation, and maintenance of
the range or slide‑in. This range or slide‑in is not designed for installation adjacent to another range or slide‑in.
Dometic Corporation accepts no liability for damage in the following cases:
• Faulty assembly or connection.
• Damage to the product resulting from mechanical influences and excess voltage.
• Alterations to the product without express permission from the manufacturer.
• Use for purposes other than those described in the operating manual.
Dometic Corporation reserves the right to modify appearances and specifications without notice.
EN
4
Page 5

RANGE AND SLIDE-IN
4 PRE-INSTALLATION
FIRE HAZARD. Failure to obey the warnings or pre-installation instructions in this section
could result in property damage, death, or serious injury.
4.1 Preparing The Cabinet
The minimum vertical distance to combustible material is 18 in. (46 cm) above the top of the range or
I
slide-in. The range or slide-in must be installed in accordance with Clause 5.6 of ANSI 1192.
For proper range or slide-in operation, the cabinet must:
• Be properly constructed.
• Be squared to the counter top and cabinet face.
For proper range or slide-in operation, the cabinet opening must:
• Be level from side-to-side and from front-to-rear.
• Be positioned so that combustible material cannot be placed next to the range or slide-in sides.
• Be free from gaps between the range or slide-in and any adjacent cabinet.
• Meet the minimum clearances to combustibles as described in "Cutting The Opening" on page 6.
• Provide direct current electrical supply conductors with strain relief at the range or slide-in.
• Be framed-in or guarded to prevent the creation of storage space around the recessed portion of the
appliance, except for the vent thimble.
• Have closed openings around the gas and electrical service outlets at the time of installation, except
when the construction of the range or slide-in provides the necessary closure.
5
EN
Page 6
RANGE AND SLIDE-IN
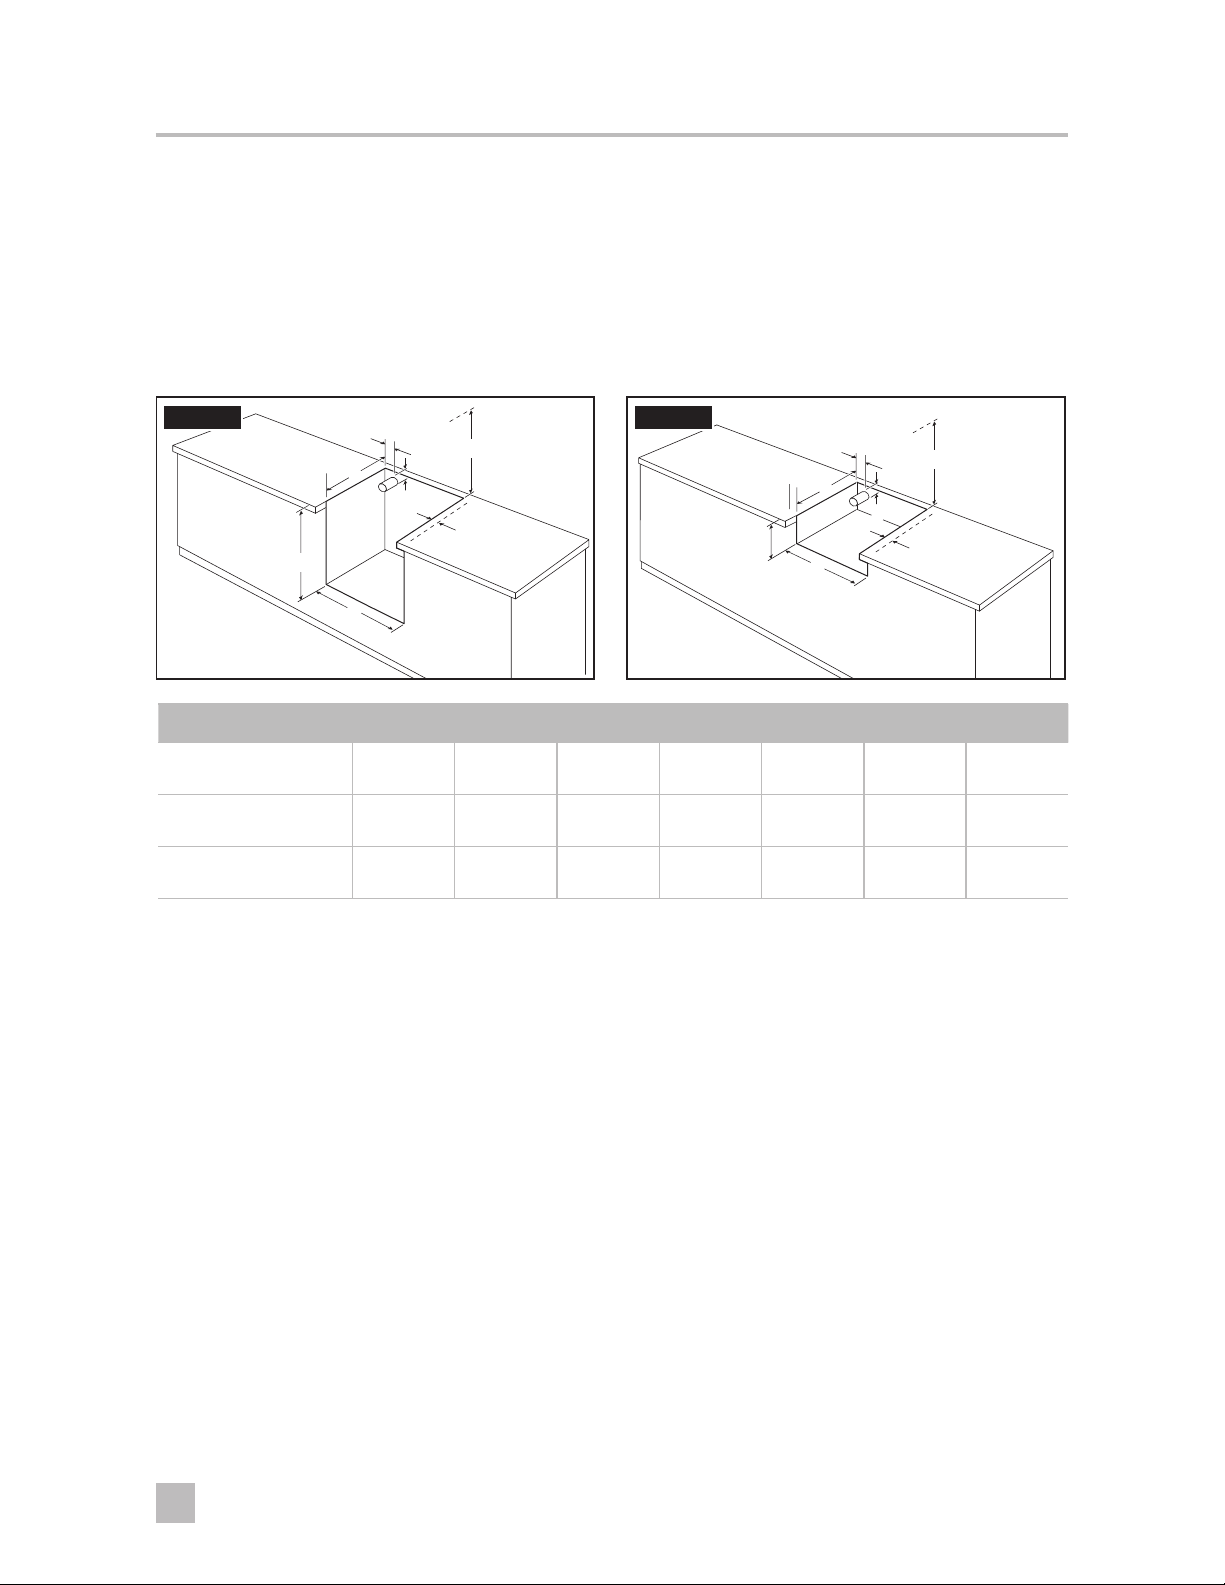
4.2 Cutting The Opening
• Verify the cutout location and dimensions. Refer to "Cutout Dimensions" on page 6.
• Cut the hole for the range or slide-in. The cutout is open; no front edge remains on the counter.
• Confirm a propane-certified gas line is in place that meets the appropriate RV and gas codes.
Cutout Dimensions
If using a recessed bi-fold cover, follow the instructions included with the cover for cutout
I
dimensions, installation, and use.
FIG.1
Range with Oven
E
A
F
D
B
G
C
FIG.2
Slide-In
E
A
D
B
G
F
C
A B C* D E F G*
17" Ranges 17.75"
(45 cm)
21" Ranges 17.75"
(45 cm)
Slide‑in 17.75"
(45 cm)
* The minimum clearance to combustible materials allowed from the surface of the range or slide‑in to a combustible object (curtains, board,
wall, floor, etc.). Consider both sides, the back side, and above the cabinet when determining clearances. These measurements do not
apply to a side‑by side installation. The range or slide‑in is not intended for side‑by side installations with another range or slide‑in.
20.25"
(51 cm)
20.25"
(51 cm)
20.25"
(51 cm)
1.13"
(3 cm)
1.13"
(3 cm)
1.13"
(3 cm)
16"
(41 cm)
20"
(41 cm)
3.125"
(41 cm)
1.75"
(4 cm)
1.75"
(4 cm)
1.75"
(4 cm)
1.5
(4 cm)
1.5"
(4 cm)
1.5"
(4 cm)
19.5"
(50 cm)
19.5"
(50 cm)
19.5"
(50 cm)
The maximum depth of cabinets installed above the range or slide-in is 13 in (33 cm). Do not install
I
any structure directly above the stove (for the width of the stove) except a range hood.
EN
6
Page 7
RANGE AND SLIDE-IN
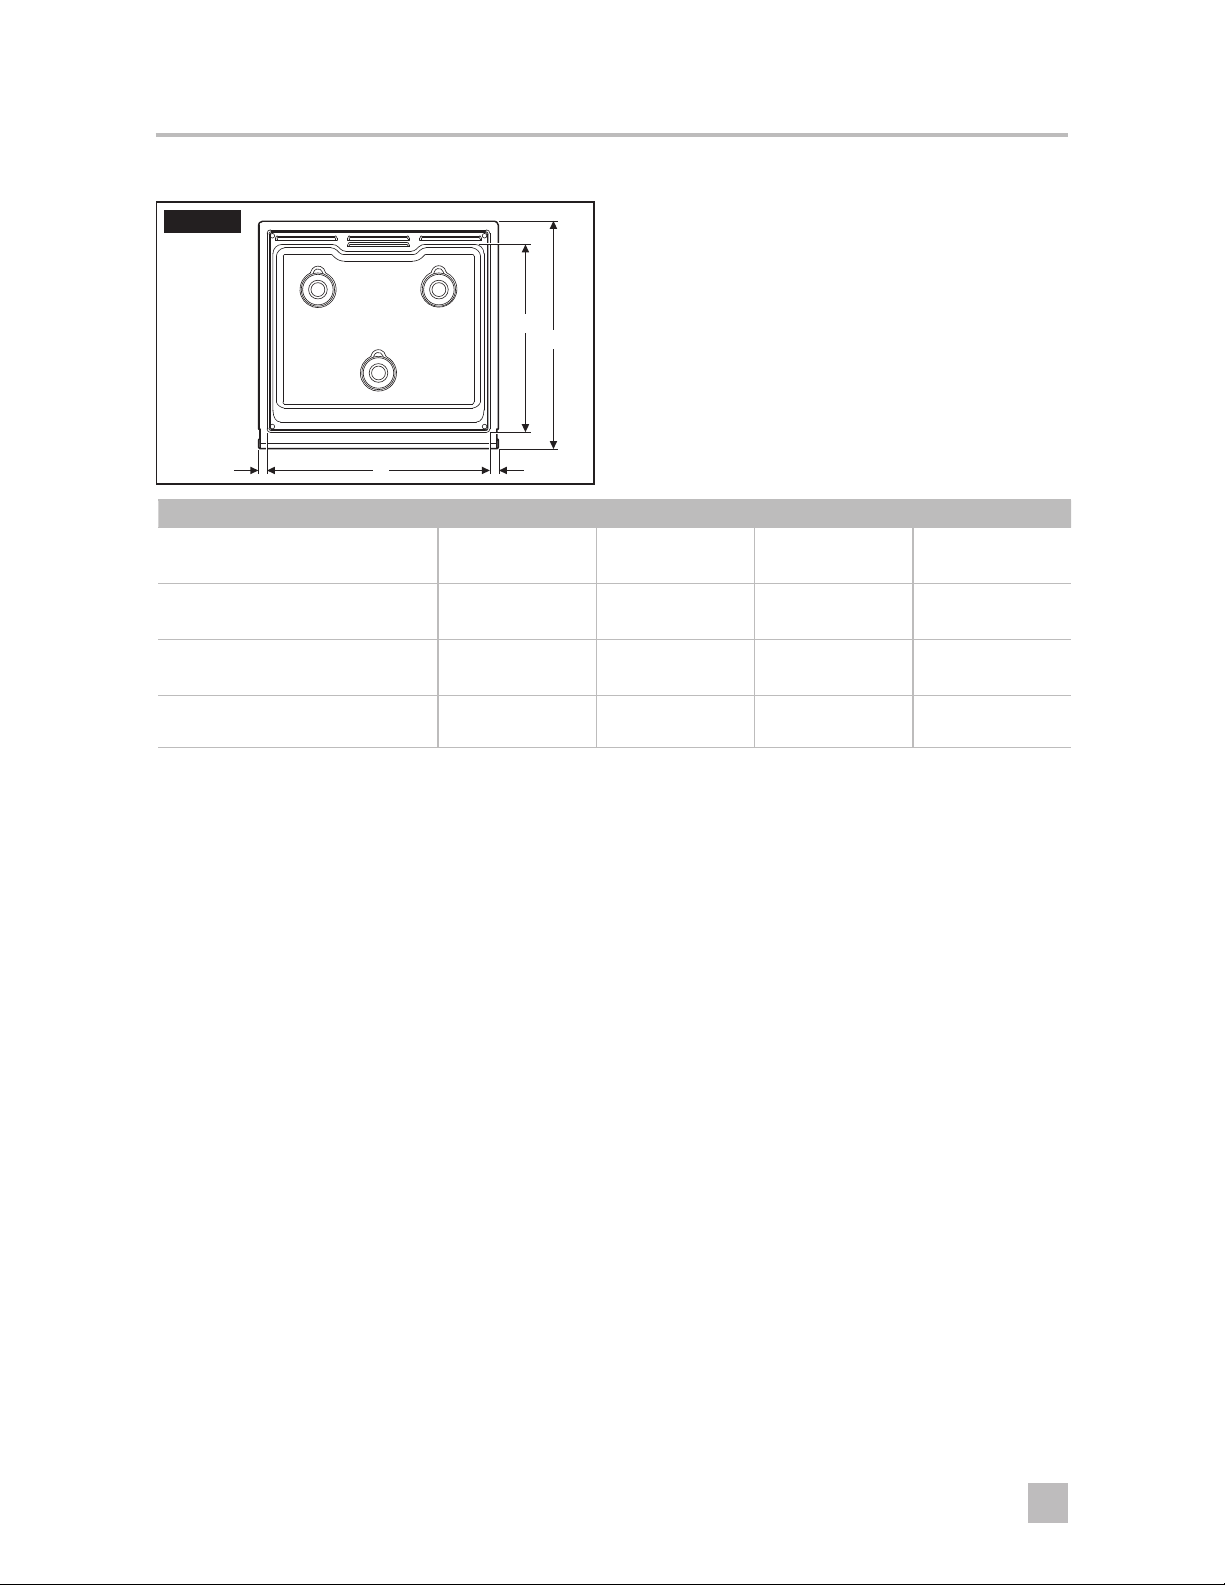
Range Top Mounting Dimensions
FIG.3
C
D
B BA
A B C D
Range Top 19-3/8"
(49 cm)
Mounting Trim 3/4"
(2 cm)
Range Top Depth 16-1/2"
(42 cm)
Range Top Plus Oven Vent 20"
(51 cm)
7
EN
Page 8
RANGE AND SLIDE-IN
5 INSTALLATION
ELECTRICAL SHOCK, FIRE, EXPLOSION, AND/OR CARBON MONOXIDE HAZARD. Failure
to obey the warnings or installation instructions in this section could result in property damage, death, or
serious injury:
• The range or slide-in must be completely separated and/or sealed from other air moving or airconsuming devices such as, but not limited to, furnaces, microwave ovens, clothes dryers, cooling fans,
and doors or drawers in common cabinets. Failure to do so can affect the appliance(s) combustion air
supply by creating either a negative or positive dra.
• Do not use matches, candles, or other sources of ignition to test fittings and gas lines for leaks.
• Do not use a ventilation system that blows air downward toward the range or slide-in, as ignition and
combustion problems with the gas cooking appliance could occur.
• Direct current electrical supply conductors must be provided with strain relief at the range or slide-in.
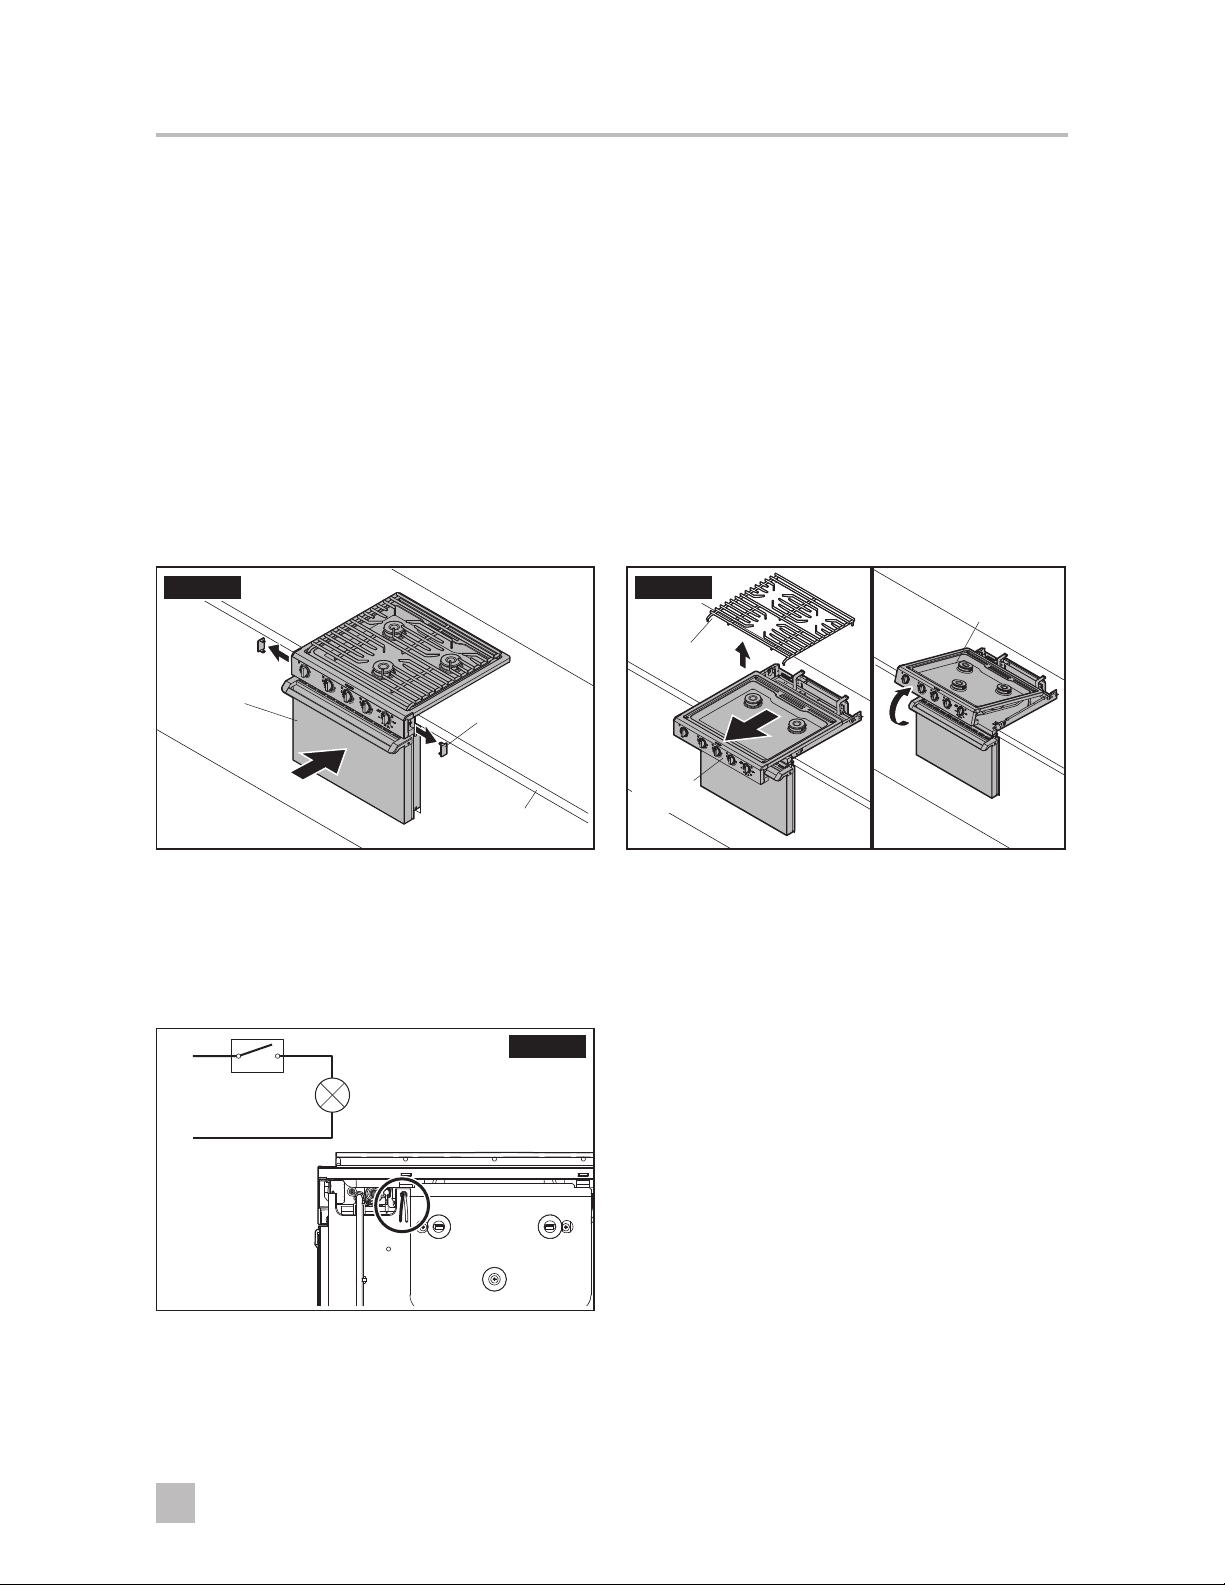
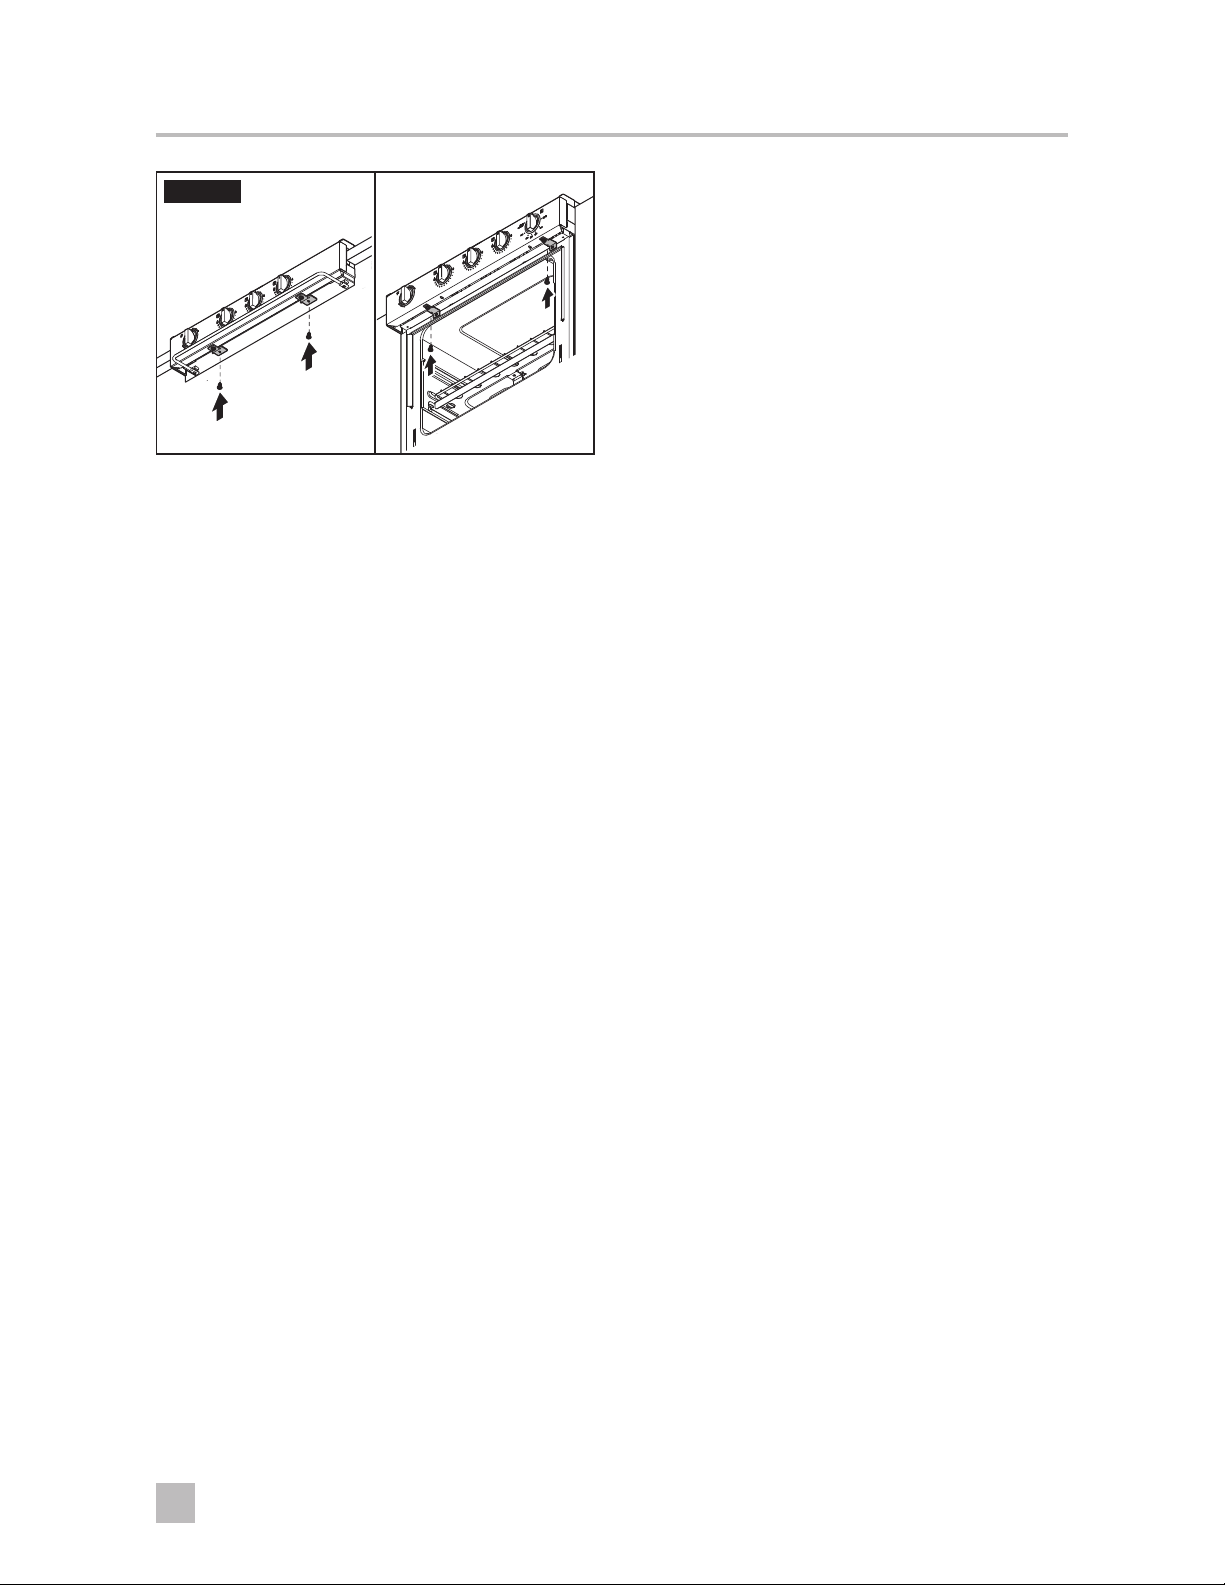
5.1 Installing The Range Or Slide-In
STEP1
Range
• Remove the endcaps and place the range or
slide-in within the cutout.
• Verify the range or slide-in is level on all sides.
If using a recessed bi‑fold cover, the endcaps
I
remain attached to the range or slide‑in.
+
Endcap
Counter
STEP3
−
STEP2
Grate
Control
Panel
• Remove the grate and pull the range or slide-in
forward.
• Li up the range or slide-in top.
Do not remove the range or slide‑in top by
I
pulling on the grate.
• Connect the black wire to positive and the white
striped wire to negative.
ELECTRICAL SHOCK/FIRE
HAZARD. Be sure to label all wires before removing or servicing the range. Wiring errors can cause
improper and dangerous operation of the range.
Failure to obey this caution could result in minor or
moderate injury.
Range
To p
• For ranges with an oven light, connect the two
wire leads at the back of the range to a 12 VDC
circuit that is fuse protected with a max rating of
no more than 5 A.
EN
• Verify proper operation of the range aer
servicing.
8
Page 9
RANGE AND SLIDE-IN
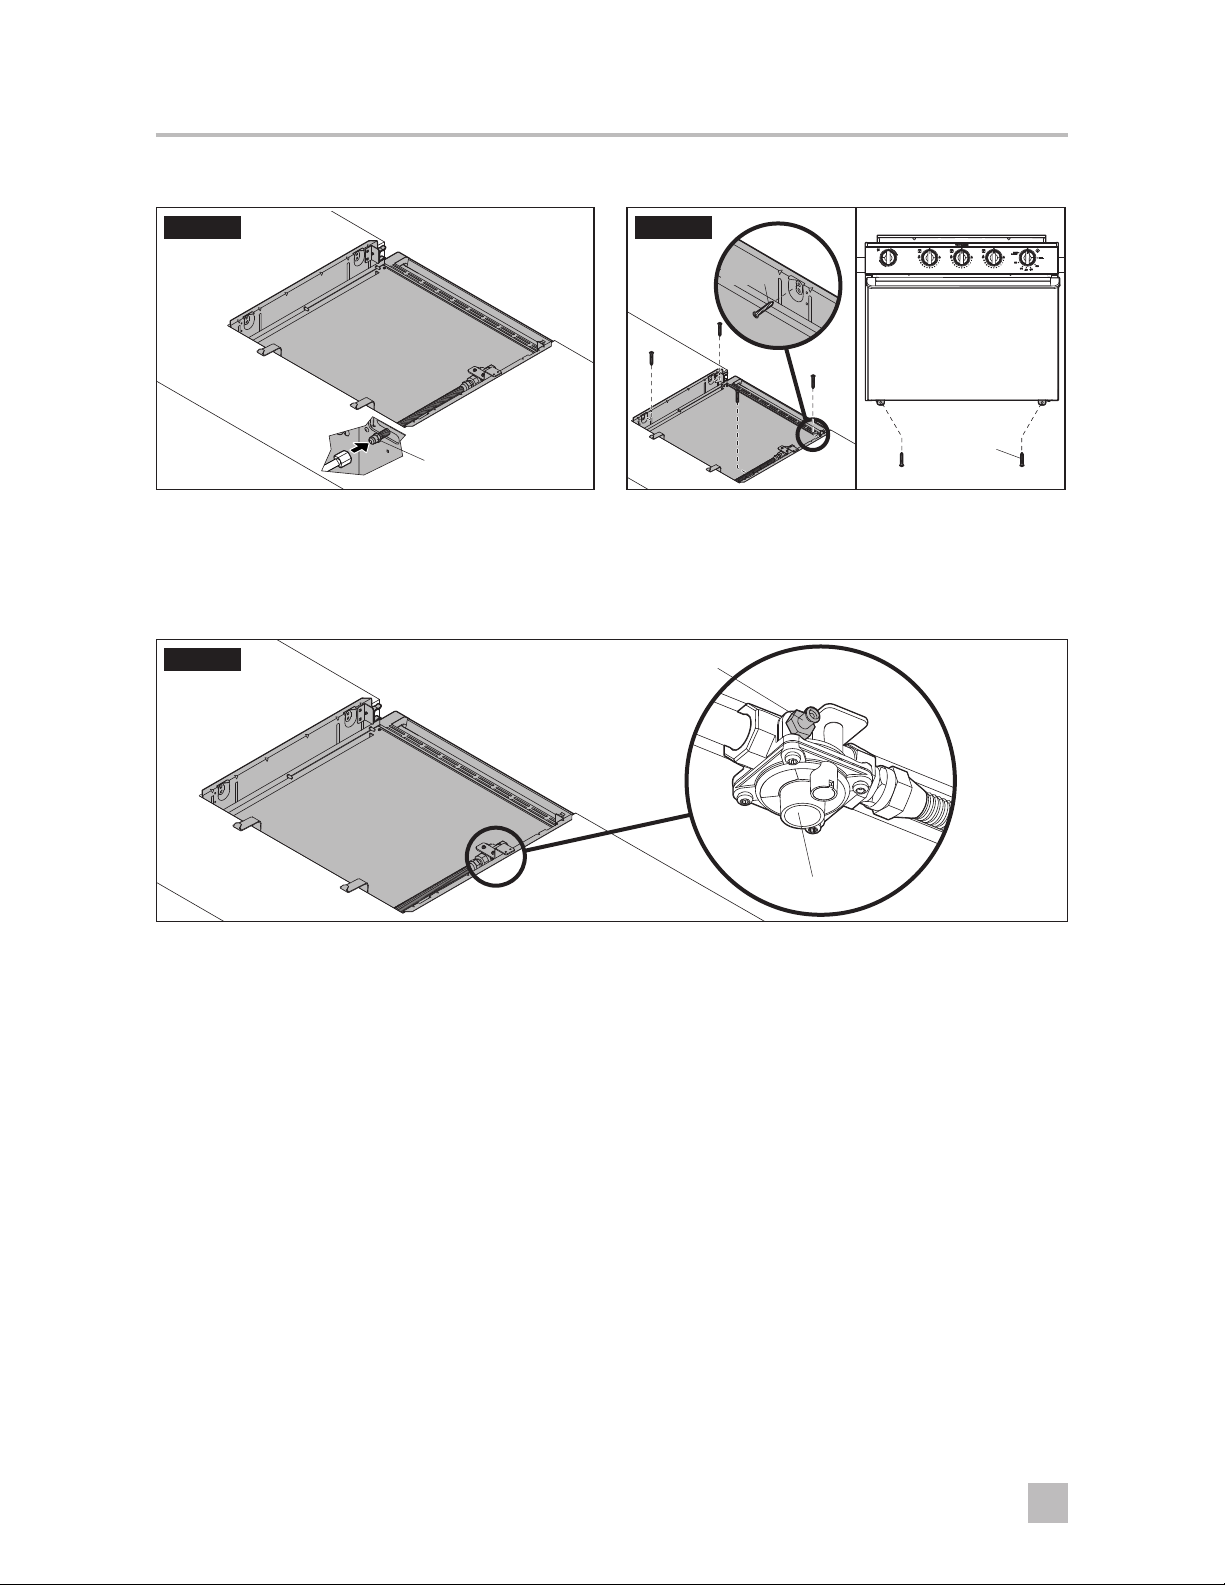
STEP4
Gas Connection
• Connect all gas connections on the range
or slide-in and tighten according to the
appropriate RV and gas codes.
All openings in the cabinetry around the gas
I
line must be closed at the time of installation.
STEP6
STEP5
Screw
Screw
• Secure the range or slide-in by placing wood
screws (not provided) through the designated
holes and into the cabinet. Do not force the
mounting flanges to bend.
Screw
Regulator
• Turn on the gas supply.
• Conduct the range or slide-in leak testing:
• Loosen the leak check fitting screw on the regulator by one turn.
• Place the gauge on the fitting.
• Check for leaks:
– Leak testing shall be conducted according to the manufacturer's instructions.
– Use a non-corrosive leak detection fluid. Do not use soap and water.
– Leak tests in excess of 0.5 PSI of air pressure will invalidate warranty.
• Retighten the leak check fitting screw upon completion of the leak test.
• Conduct the range or slide-in gas pressure testing prior to operation.
When conducting the range or slide-in gas pressure testing prior to operation:
I
• The range or slide‑in, and any individual shut‑off valves, must be disconnected from the gas supply piping
system when pressure testing the system at pressures exceeding 0.5 PSI.
• The gas supply pressure for checking the regulator setting shall be at least 1 in. W.C. (249 Pa) above the
manufacturer's specified manifold pressure. The maximum gas supply pressure is 14 in. W.C.
• Turn off the gas supply.
9
EN
Page 10
RANGE AND SLIDE-IN
STEP7
• Slide the range or slide-in back into the cutout.
• Secure the range or slide-in:
– RANGE: Secure the two brackets with the
provided sheet metal screws.
– SLIDE-IN: Attach the bracket to the burner
box with the provided sheet metal screws.
• Replace the grate.
6 OPERATION
BURN, FIRE, EXPLOSION, AND/OR CARBON MONOXIDE HAZARD Failure to obey the
following warnings could result in damage, a burn hazard, possible explosion, carbon monoxide buildup,
serious injury, or death:
• Do not place more than 40 lbs (18 kg) on the grate while cooking.
• Do not place more than 20 lbs (9 kg) on the oven rack while cooking.
• Do not operate the range or slide-in during excessively windy conditions as this may cause a negative
or positive dra, which is air moving across the range or slide-in top that may blow out the burner flame
during use or move the flame inside of the range or slide-in.
• Use care when lighting a burner by hand. Burns could occur if the burner lights unexpectedly.
• Verify that there is a sufficient gas supply before attempting to light any burner. Air in the line will
significantly delay the burner ignition and a burner may light unexpectedly as the air in the line clears
out and is replaced by LP gas; this unexpected ignition may cause an explosion or burns.
• If any burner or the oven pilot should unexpectedly extinguish, turn all knobs off and wait five minutes
before attempting to re-light the burner or oven pilot.
• Do not attempt to light more than one burner at a time.
• Do not use the oven as a storage area or space heater.
• Extinguish all pilots when refueling or traveling.
• Do not store flammable or combustible material on, in, or near the range or slide-in or in the cabinets
above, or above and adjacent to, the range or slide-in. Do not use the oven as a storage area. While
using the range or slide-in, frequently check the temperature of contents within the cabinet areas above
the range or slide-in.
• To avoid a carbon monoxide poisoning hazard, do not cover the oven vent openings while the oven is
in operation. Do not cover the ventilation holes in the oven broiler shelf (above oven burner) or cooking
times will vary from normal and food may become burned or undercooked.
• Do not operate the range or slide-in if it is damaged or not working properly.
• Do not touch burners, burner grates, areas near burners, inner surfaces of the oven, the oven door, the
wire rack, or any utensils inside the oven, during and aer use, as burns may occur. Do not let clothing
or other flammable materials contact these areas until they have had sufficient time to cool, as they may
ignite.
• Never leave burners unattended when in use, as pan contents may boil over, resulting in smoke or a
grease spill that may ignite.
• Because grease is flammable, never allow grease to collect around top burners or on the range or slidein surface. Wipe up any grease spills immediately. Never use water on grease fires, and never pick up
a flaming pan. Smother a flaming pan with a tight-fitting lid or cookie sheet. Flaming grease outside
of the pan can be extinguished with baking soda or a multipurpose dry chemical or foam-type fire
extinguisher.
• Do not heat unopened containers as they could explode.
EN
10
Page 11

RANGE AND SLIDE-IN
• Use pans that are large enough to cover the burner area and contain the cooked food but that do not
exceed 10 in. (25 cm) in size. This will reduce or eliminate heavy splattering or spills that can ignite and
cause an explosion or burns and any excessive heat build-up that would result in damage to the range or
slide-in top.
• Turn pan handles inward, but not over other burners. This reduces the chance of burns due to bumping
a pan.
• Do not drop pans on the porcelain surface. Cracks or chips in the porcelain surface may result.
• Be sure that all cooking utensils are safe for use on the range or slide-in surface. Only certain kinds of
utensils are suitable for surface or burner use without breaking due to sudden changes in temperature.
Do not adjust the burner flames to extend beyond the edge of the cooking utensil or the flame could
cause burns or poor cooking results.
• Use only dry potholders as moist or damp potholders on hot surfaces may result in steam burns. Do not
let the potholder touch an open flame or use a towel or bulky cloth for a potholder as fire could result.
• Control knobs must be turned off when not cooking. Fire and/or a burning hazard my occur if a burner
is accidentally le on.
• Do not apply excessive weight against the range or slide-in door, as it could spring the hinges; in this
event, any such damage would not be covered under warranty.
6.2 Preparing The Range Or Slide-In For Use
STEP1
(Back Of Range)
• Turn the gas on at the shut-off valve.
If your unit is equipped with a bi‑fold cover,
I
raise the cover before using the range or
slide‑in.
Shut-Off
Valve
11
EN
Page 12

RANGE AND SLIDE-IN
6.3 Using The Range Top Or Slide-In
All burner controls operate counterclockwise and must be pressed inward when turning to light.
I
Lighting The Burners
FIG.1
• To light the burner with a match, turn the knob
approximately 90° until it points to the large
flame decal.
• Hold a lit match near the burner to ignite the
flame.
Burner
Match
FIG.2
• To light the burner using a spark igniter, turn the
knob approximately 90° until it points to the
large flame decal.
• Turn the spark igniter knob clockwise until
it clicks. Continue turning the knob until the
burner ignites.
Spark Igniter
EN
12
Page 13

RANGE AND SLIDE-IN
Extinguishing The Burner Flame
FIG.1
• Turn the knob clockwise until it points to the
solid circle at the top of the knob.
6.4 Using The Oven
Setting The Oven Pilot
STEP1
STEP2
Pilot
Range Or Slide-In Knob Settings
Setting Recommended Use
• Light the burner
• Start food cooking
• Bring liquids to a boil
• Hold liquids at a boil
• Cook food at different temperature
levels
• Keep food warm
• Turn the burner off
Aer top burners have been on for a period of
I
time, a popping sound may occur when the
burner is turned off. This is normal and does
not create a safety hazard.
Top Burner Models
• For top burner models, push in and rotate the
oven control knob until it points to pilot - push/
hold.
• Push in and hold the knob while holding a lit
match under the oven pilot located at the back
of the oven, under the broiler shelf.
Piezo Ignitor Models
• For models with the Piezo Ignitor, push in and
rotate the oven control knob until it points to
pilot - push/hold.
• Turn the spark ignitor knob clockwise until it an
audible click is heard. Continue to repeat this
step until the burner ignites.
All Models
• Release knob and verify that the pilot stays lit.
Repeat the process if the pilot does not stay lit.
• The oven pilot has been factory set and requires
no further adjustment.
• To extinguish the oven pilot, push in the oven
control knob and rotate clockwise to off.
13
EN
Page 14

RANGE AND SLIDE-IN
STEP3
1"– 2"
(2 – 5 cm)
• Place the food to be baked in the center of the
oven allowing 1 in. – 2 in. (2 – 5 cm) space from
the oven walls on all sides of the container.
Cooking times will be longer at higher
I
attitudes (+4000 feet (1219 m)).
Oven Knob Settings
Setting Recommended Use
Pilot
Push/Hold
Broil • Sets the oven temperature to broil
300 – 500 • Sets the oven to a particular
• Starting point for lighting the oven
• Keeps the oven pilot lit for
• Turns the oven pilot off
(Oven Pan)
Broiler Area
pilot
continued use of the oven
temperature
1"– 2"
(2 – 5 cm)
Oven Light Operation
STEP4
• To turn the oven light ON, turn the switch on the
control panel to the ON position.
EN
14
Page 15

RANGE AND SLIDE-IN
7 MAINTENANCE
BURN, FIRE, EXPLOSION, AND/OR CARBON MONOXIDE HAZARD. Failure to obey the
following warnings could result in damage, a burn hazard, possible explosion, carbon monoxide buildup,
serious injury, or death:
• Keep range or slide-in top area clear of combustible cleaning materials, gasoline, and other flammable
vapors and liquids.
• Do not obstruct the flow of combustion and ventilation air.
• Leak testing shall be conducted according to the manufacturer's instructions.
• Make sure all controls are OFF and the range or slide-in surfaces, burner grates, burners, and oven
surfaces are cool before cleaning or disassembling the range or slide-in.
• Do not use oven cleaners, bleach, or rust removers on the range or slide-in top or burner grates.
• Clean oven with oven cleaner only. Follow directions on the cleaning product container.
• Never use a wire brush or metallic item for cleaning burner ports or orifices. Brush may “shed” bristles,
that may lodge in the orifice or burner ports and cause a fire or explosion.
BURN AND/OR DAMAGE HAZARD. Failure to obey the following cautions could result in
damage or injury:
• Clean all surfaces as soon as possible aer boil overs or spillovers. Do not allow foods containing acids
(such as lemon juice, tomato juice, or vinegar) to remain on porcelain or painted surfaces. Acids may
remove the glossy finish. Pitting and discoloration will result if spills are allowed to remain for any length
of time on stainless steel. Do not allow spills to remain on burner caps. Caps could be permanently
stained if spills are not cleaned up promptly.
• Do not use steel wool, or abrasive cleaners, or acid type cleaners such as chlorine bleach on your range
top, slide-in, or grate systems. They will damage your range or slide-in. Use only non-abrasive plastic
scrubbing pads.
• Do not use abrasive cleaning materials, oven cleaner, or harsh chemicals on the control panel as these
may damage or remove the operating instructions printed on the front of the unit.
• The grate and surface of the cooktop is covered with porcelain coating. Porcelain is a glass/ceramic
coating glazed to the surface of the metal. Porcelain is designed to provide a surface that can withstand
high temperatures and maintain an attractive appearance and make it easier to clean. Do not wash
warm porcelain surfaces. Allow these areas to cool before cleaning. Burns can occur or the porcelain
could crack.
• When cleaning around the burners, use care to prevent damage to the electrode (if so equipped). If a
sponge or cloth should catch the metal igniter electrode, it could damage or break the electrode. If this
occurs, the burner will not light.
• Use warm soapy water only to clean the burner grates, burner box, painted surfaces, porcelain surfaces,
stainless steel surfaces, and plastic items on your range top or slide-in. Do not use gritty or acid-type
cleaners. Do not use steel wool or abrasive cleaners, as they will damage your range top or slide-in. Use
only non-abrasive plastic scrubbing pads.
15
Proper installation and care will help keep your range or slide-in operating properly. Most cleaning
I
can be performed using normal household items.
EN
Page 16

RANGE AND SLIDE-IN
7.1 Checking The Burner Flames And Oven Pilot
STEP1
• Light the burners, one at a time. Refer to
"Lighting The Burners" on page 12, for more
information.
• Confirm that the burner flame is present and
adjusts when the control knob is turned.
Burner
7.2 Cleaning The Range Or Slide-In
STEP1
Range Top
Cleaning the range top or slide-in:
• Remove the grate.
• Clean with warm, soapy water.
• Rinse with clean water.
• Dry with so cloth.
Heavy burned on soil may require repeated
I
cleaning steps until the soil is completely
removed.
Grate
So Cloth
STEP2
(Oven Interior)
• Light the oven pilot. Refer to "Setting The Oven
Pilot" on page 13, for more information.
• Confirm the pilot flame is present.
Additional Cleaning Methods
Item Cleaning Method
Control knobs Pull the knobs straight off of the
stems to clean. Use a mild liquid
cleaner or glass cleaner.
Control Panel Use a spray glass cleaner,
applying the cleaner to a paper
towel. Do not spray glass cleaner
directly on the panel. Do not
use oven cleaner on the control
panel.
Range Top
Surface
Surface Burner
Grates
Surface Burners,
Burner Ports, or
Orifices
Oven Use warm, soapy water. For
Use a mild liquid cleaner or glass
cleaner.
Clean area as soon as it becomes
dirty. Use a non‑abrasive, plastic,
scrubbing pad, as necessary.
If clogged, gently brush
perforated areas with a
lightweight brush (toothbrush)
or carefully clean the holes out
using a toothpick.
heavy soil, use an oven‑cleaning
spray and follow the
manufacturer directions on the
label. Use a non‑abrasive, plastic,
scrubbing pad, as necessary.
Pilot
EN
16
Page 17

RANGE AND SLIDE-IN
8 STORAGE
8.1 Preparing The Range Or Slide-In For
Storage
STEP1
Vegetable Oil
• Dry all surfaces.
• Spray surfaces with vegetable oil or a similar
product to prevent rust during storage.
• Clean oil off the surface of the range or slide-in
before reinstalling and operating.
9 DISPOSAL
Place packaging material only in the appropriate recycling waste bins, whenever possible. Do not dispose of the
range or slide‑in without consulting a local recycling center or specialist dealer for details about how to dispose
of the range or slide‑in in accordance with the applicable national and local regulations.
10 REPLACEMENT PARTS
For the most current parts information, visit www.dometic.com.
11 LIMITED 2-YEAR WARRANTY
LIMITED 2‑YEAR WARRANTY AVAILABLE AT
WWW.DOMETIC.COM/WARRANTY.
IF YOU HAVE QUESTIONS, OR TO OBTAIN A
COPY OF THE LIMITED WARRANTY FREE OF
CHARGE, CONTACT:
DOMETIC CORPORATION
CUSTOMER SUPPORT CENTER
1120 NORTH MAIN STREET
ELKHART, INDIANA, USA 46514
1‑800‑544‑4881 OPT 3
17
EN
Page 18

APPAREILS DE CUISSON
PLAQUE DE CUISSON
CUISINIÈRE ET PLAQUE DE CUISSON
FR
Manuel d’installation et d’utilisation
SÉRIES S31 ET R31
AVERTISSEMENT: suivre à la lettre les consignes énoncées
dans ce manuel sous peine de départ de feu ou d’explosion
causant des dégâts matériels, des blessures personnelles,
voire la mort.
− Ne pas stocker ni utiliser d’essence ou d’autres vapeurs ou
liquides inflammables à proximité de cet appareil ou de
toutautre.
− QUE FAIRE EN CAS D’ODEUR DE GAZ
• Ne pas essayer d’allumer un quelconque appareil.
• Ne toucher aucun interrupteur électrique.
• Ne pas utiliser de téléphone dans votre véhicule récréatif.
• Évacuer tous les occupants du véhicule récréatif.
• Fermer le gaz au réservoir ou à l’arrivée de gaz réseau.
• Communiquer immédiatement avec le fournisseur de
gaz pour recevoir ses instructions.
• S’il est impossible de joindre le fournisseur, appeler
lespompiers.
− Faire vérifier le circuit de gaz et réparer l’origine de la fuite par
un installateur qualifié, un centre de réparation, lefabricant ou le
revendeur, ou le fournisseur de gaz.
Page 19

CUISINIÈRE ET PLAQUE DE CUISSON
ADRESSE – AMÉRIQUE DU NORD
ÉTATS-UNIS ET CANADA
Bureau de service
Dometic Corporation
1120 North Main Street
Elkhart, IN 46514
RÉVISION F | Document nº 50506 01/19 | ©2019 Dometic Corporation
Lire attentivement ces instructions. Ces instructions DOIVENT rester avec ce produit.
À L’ATTENTION DE L’INSTALLATEUR: LAISSER CE MANUEL AVEC L’APPAREIL
À L’ATTENTION DU CONSOMMATEUR: CONSERVER CE MANUEL POUR
Liste des centres de service et des revendeurs
Visitez: www.dometic.com
RÉFÉRENCEULTÉRIEURE
SOMMAIRE
1 Consignes de sécurité importantes et symboles utilisés dans le document .................... 20
2 Informations générales ...............................................................21
3 Indication ..........................................................................21
4 Avant l’installation ...................................................................21
5 Installation ......................................................................... 24
7 Entretien ...........................................................................31
8 Entreposage ....................................................................... 33
9 Élimination ........................................................................ 33
10 Pièces de rechange ................................................................. 33
19
FR
Page 20

CUISINIÈRE ET PLAQUE DE CUISSON
1 11 GARANTIE LIMITÉE DE DEUX ANS 33
CONSIGNES DE SÉCURITÉ IMPORTANTES
ET SYMBOLES UTILISÉS DANS LE DOCUMENT
Ce manuel contient des consignes de sécurité et des instructions pour aider l’utilisateur à éliminer ou réduire le
risque d’accidents et de blessures.
1.1 Reconnaître les consignes de sécurité
C’est le symbole d’alerte à la sécurité. Il signale des risques de blessures physiques. Obéir à tous les
messages de sécurité qui suivent ce symbole pour éviter les risques de blessure ou de mort.
1.2 Comprendre les mots-indicateurs
Un mot‑indicateur identifie les messages de sécurité et les messages liés aux dégâts matériels, et signale le degré
ou niveau de gravité du danger.
indique une situation dangereuse qui, si elle n’est pas évitée, peut causer la mort
ou des blessures graves.
indique une situation dangereuse qui, si elle n’est pas évitée, peut causer des blessures
mineures ou modérées.
est utilisé pour signaler des pratiques non liées à une blessure physique.
Fournit des renseignements additionnels sans rapport avec des blessures physiques.
I
1.3 Directives supplémentaires
Lire et suivre toutes les consignes de sécurité et les instructions pour éviter tout risque de blessure ou
de mort. Lire et bien comprendre ces instructions avant d’installer, d’utiliser ou d’entretenir ce produit.
L’installation, l’utilisation ou l’entretien incorrects de ce produit peuvent causer des blessures graves ou la
mort. L’installation doit se conformer à tous les codes locaux ou nationaux applicables, y compris la toute
dernière édition des normes suivantes:
ÉTATS-UNIS
CANADA
• ANSI/NFPA70, national de l’électricité (CNE)
• ANSI/NFPA 1192, Code des véhicules récréatifs
• ANSI Z21.57, Code des véhicules récréatifs
Les modèles avec une lampe de four utiliseront une alimentation électrique externe. Une fois installés, ces
modèles seront mis à la terre conformément aux codes provinciaux ou autres. En l’absence de tels codes, se
référer au Code national de l’électricité, ANSI/NFPA 70.
• CSA C22.1, Parties l et ll, Code canadien de
l’électricité
• CSA Z240 RV Series, véhicules récréatifs
1.4 Messages de sécurité d’ordre général
Le non-respect des avertissements suivants pourrait entraîner des dégâts
matériels, desblessures graves ou la mort:
• Ce produit doit être installé et réparé par un agent technique qualifié.
• Les appareils de cuisson au gaz Dometic s’utilisent seulement avec du propane liquide (PL) et sont
uniquement destinés à une installation dans des véhicules récréatifs (caravanes, autocaravanes,
caravanes àtente pliante, etc.).
• Ne pas stocker ni utiliser d’essence ou d’autres vapeurs ou liquides inflammables à proximité de cet
appareil ou de tout autre appareil.
• Ne pas modifier ce produit d’une quelconque manière. Une modifi cation peut être extrêmement
dangereuse.
• Une installation, un ajustement, une réparation ou une maintenance inadéquats peuvent causer
des blessures, des dégâts matériels ou la mort. Se référer à ce manuel. Pour une assistance ou des
renseignements complémentaires, consulter un installateur qualifié, un centre de réparation, le
FR
20
Page 21

CUISINIÈRE ET PLAQUE DE CUISSON
fabricant ou le fournisseur degaz.
• Ne pas installer cet appareil de cuisson si une quelconque de ses pièces a été immergée.
• DANGER LIÉ AU MONOXYDE DE CARBONE. Ce produit peut produire du monoxyde de carbone, un
gaz inodore potentiellement mortel. Les flammes consomment de l’oxygène, qui doit être renouvelé
pour garantir une combustion adéquate. Une fenêtre ou une bouche d’aération doit être légèrement
ouverte lors de l’utilisation de tout appareil de cuisson. L’absence d’apport d’air frais en cours de
combustion peut causer une intoxication au monoxyde de carbone et se solder par des blessures ou la
mort.
RISQUE DE BRÛLURE, DÉPART DE FEU, EXPLOSION ET/OU DANGER LIÉ AU
MONOXYDE DE CARBONE. Ne jamais utiliser la cuisinière ou la plaque de cuisson comme chauffage
d’appoint pour chauffer la pièce ou comme espace de rangement sous peine de brûlure, de départ de feu,
d’explosion et/ou d’intoxication au monoxyde de carbone et surchauffe de la pièce.
2 INFORMATIONS GÉNÉRALES
Outils recommandés
Tournevis cruciforme Perceuse
Pièces facultatives* Numéro de référence
Couvercles à double rabat Voir www.dometic.com
*Disponibles comme accessoires (non fournies).
3 INDICATION
Cette cuisinière ou la plaque de cuisson a été conçue pour une utilisation à l’intérieur du véhicule récréatif (ci‑
après appelé «VR») pour lequel elle est fournie. Suivre les instructions pour garantir l’installation, l’utilisation et
l’entretien corrects de la cuisinière ou la plaque de cuisson. Cette cuisinière ou la plaque de cuisson n’est pas
destinée à être installée à côté d’une autre cuisinière indépendante ou intégrable. La Dometic Corporation se
réserve le droit de modifier l’apparence et les caractéristiques techniques de l’appareil sans préavis.
Dometic Corporation n’endosse aucune responsabilité en cas de dommages dans les cas suivants:
• Assemblage ou branchement incorrect.
• Endommagement du produit résultant des influences mécaniques et d’une tension excessive.
• Altération du produit sans la permission expresse du fabricant.
• Utilisation à d’autres fins que celles décrites dans le manuel d’utilisation.
4 AVANT L’INSTALLATION
RISQUE DE DÉPART DE FEU. Le non-respect des avertissements ou des
instructions de préinstallation dans cette section peut se solder par des dégâts matériels, la mort ou des
blessures graves.
4.1 Préparation de l’armoire
La distance verticale minimum jusqu’à un matériau combustible est de 45,7cm à partir du haut
I
de la cuisinière ou la plaque de cuisson. La cuisinière ou la plaque de cuisson doit être installée
conformément à la clause 5.6 de la norme ANSI 1192.
Pour que la cuisinière ou la plaque de cuisson fonctionne correctement, l’armoire doit:
• Être correctement construite.
• Être d’équerre par rapport au haut du comptoir et à la face de l’armoire.
21
FR
Page 22

CUISINIÈRE ET PLAQUE DE CUISSON
Pour que la cuisinière ou la plaque de cuisson fonctionne correctement, l’ouverture de l’armoire doit:
• Être de niveau d’un côté à l’autre et d’avant en arrière.
• Être positionnée de sorte qu’un matériau combustible ne puisse pas être placé près des côtés de la
cuisinière ou de la plaque de cuisson.
• Il ne doit pas y avoir d’espace entre la cuisinière ou la plaque de cuisson et toute armoire adjacente.
• Satisfaire aux distances minimums de matériaux combustibles, comme décrit à « Découpe de
l’ouverture » à la page 22.
• Fournir des conducteurs électriques (courant continu) avec un réducteur de tension à la cuisinière ou la
plaque de cuisson.
• Être encadrée ou protégée pour éviter la création d’un espace de rangement autour de la partie en
retrait de l’appareil, à l’exception de la virole de ventilation.
• Fermer les ouvertures autour des arrivées de gaz et d’électricité au moment de l’installation, sauf si la
construction de la cuisinière ou la plaque de cuisson procure l’étanchéité nécessaire.
4.2 Découpe de l’ouverture
• Vérifier l’emplacement et les dimensions de la découpe. Voir « Dimensions de la découpe » à la page 22.
• Découper le trou pour la cuisinière ou la plaque de cuisson. La découpe est ouverte; il ne reste pas de
bord avant sur le comptoir.
• Confirmer qu’une conduite de gaz «certifiée propane» conforme aux codes appropriés sur les VR et le
gaz est en place.
Dimensions de la découpe
Si un couvercle à double rabat en retrait est utilisé, suivre les instructions incluses avec le couvercle
I
pour les dimensions de la découpe, l’installation et l’utilisation.
FIG.1
Cuisinière
E
A
F
D
B
G
C
FIG.2
Plaque de
cuisson
E
A
D
B
G
F
C
A† B† C* D E F G*
Cuisinières de 43cm 45 cm 51,4cm 2,8cm 40,6cm 4,4cm 3,8cm 49,5cm
Cuisinières de 53cm 45 cm 51,4cm 2,8cm 50,8cm 4,4cm 3,8cm 49,5cm
Plaque de cuisson 45 cm 51,4cm 2,8cm 7,94 cm 4,4cm 3,8cm 49,5cm
* La distance minimum de matériaux combustibles permise de la surface de la cuisinière ou la plaque de cuisson à un objet combustible (rideaux, planche, mur,
plancher, etc.). Tenir compte des deux côtés, de l’arrière et du dessus de l’armoire pour déterminer les dégagements. Ces mesures ne s’appliquent pas à une
installation côte à côte. La cuisinière ou la plaque de cuisson n’est pas destinée à une installation côte à côte avec une autre cuisinière ou plaque de cuisson.
† Pour un ajustement correct, ces dimensions doivent être exactes à +/‑ 3 mm.
La profondeur maximum des armoires installées au-dessus de la cuisinière ou la plaque de cuisson
est de 33cm. N’installer aucune structure directement au-dessus de la cuisinière (largeur de la
I
cuisinière), sauf une hotte aspirante.
FR
22
Page 23

CUISINIÈRE ET PLAQUE DE CUISSON
Dimensions de montage de la cuisinière
FIG.3
C
D
B BA
A B C D
Cuisinière 49,2cm
Garniture de montage 1,9cm
Profondeur de la cuisinière 42cm
Cuisinière plus évent du four 50,8cm
23
FR
Page 24

CUISINIÈRE ET PLAQUE DE CUISSON
5 INSTALLATION
RISQUE DE DÉCHARGE ÉLECTRIQUE, DE DÉPART DE FEU, D’EXPLOSION ET/
OU DANGER LIÉ AU MONOXYDE DE CARBONE. Le non-respect des avertissements ou des instructions
d’installation dans cette section peut se solder par des dégâts matériels, la mort ou des blessures graves:
• La cuisinière ou la plaque de cuisson doit être complètement séparée et/ou isolée des autres appareils
déplaçant ou consommant de l’air tels que les fours, fours à micro-ondes, séchoirs, ventilateurs et
portes ou tiroirs dans les placards ordinaires, entre autres. Respecter cette consigne sous peine de
compromettre l’arrivée d’air de combustion à l’appareil en créant un tirage négatif ou positif.
• Ne pas utiliser d’allumettes, bougies, ou autres sources d’allumage pour tester l’étanchéité des
raccords et lignes de gaz.
• Ne pas utiliser un système de ventilation qui souffle de l’air vers le bas en direction de la cuisinière ou la
plaque de cuisson sous peine de problèmes d’allumage et de combustion avec l’appareil de cuisson au gaz.
• Les conducteurs électriques (courant continu) doivent être fournis avec un réducteur de tension à la
cuisinière ou la plaque de cuisson.
5.1 Installation de la cuisinière ou la plaque de cuisson
ÉTAPE1
Cuisinière
• Enlever les capuchons d’extrémité et placer
la cuisinière ou la plaque de cuisson dans la
découpe.
• S’assurer que la cuisinière ou la plaque de
cuisson est de niveau sur tous les côtés.
Si un couvercle à double rabat en retrait est
utilisé, les capuchons d’extrémité restent
I
attachés à la cuisinière ou la plaque de cuisson.
+
Capuchon
d’extrémité
Comptoir
STEP3
−
ÉTAPE2
Grille
Panneau de
commande
• Enlever la grille et tirer la cuisinière ou la plaque
de cuisson vers l’avant.
• Soulever le dessus de la cuisinière ou la plaque
de cuisson.
Ne pas enlever le dessus de la cuisinière ou la
I
plaque de cuisson en tirant sur la grille.
• Brancher le fil noir sur la borne positive et le fil
rayé blanc sur la borne négative.
CHOC ÉLECTRIQUE/RISQUE
DE DÉPART DE FEU. Veiller à étiqueter tous les
fils avant d’enlever ou de réparer la cuisinière.
Les erreurs de branchement peuvent causer le
fonctionnement impropre et dangereux de la
cuisinière. Le non-respect de cette mise en garde pourrait entraîner des blessures légères ou
modérées.
• Vérifier le bon fonctionnement de la cuisinière après
une maintenance.
Dessus de la
cuisinière
• Pour les cuisinières avec une lampe de four,
brancher les deux fils à l’arrière de la cuisinière
sur un circuit 12 V c.c. protégé par un fusible
d’une intensité nominale maximale de 5 A.
FR
24
Page 25

CUISINIÈRE ET PLAQUE DE CUISSON
ÉTAPE4
Raccordement au gaz
• Faire tous les raccordements au gaz sur la
cuisinière ou la plaque de cuisson et serrer les
raccords conformément aux codes appropriés
surles VR et le gaz.
outes les ouvertures dans l’armoire autour
T
I
de la ligne de gaz doivent être fermées au
moment de l’installation.
ÉTAPE6
ÉTAPE5
Vis
Vis
• Fixer la cuisinière ou la plaque de cuisson en
insérant des vis à bois (non fournies) dans les
trous désignés et dans l’armoire. Ne pas forcer
sur les brides au point de les courber.
Vis
Détendeur
• Ouvrir l’arrivée de gaz.
• Effectuer le test d’étanchéité de la cuisinière ou la plaque de cuisson:
• Desserrer d’un tour la vis du raccord de contrôle d’étanchéité sur le détendeur.
• Placer le manomètre sur le raccord.
• Vérifier s’il y a des fuites:
– Le test d’étanchéité doit être effectué conformément aux instructions du fabricant.
– Utiliser un liquide détecteur de fuites non corrosif. Ne pas utiliser d’eau savonneuse.
– Les tests d’étanchéité à plus de 3,44kPa de pression d’air annuleront la garantie.
• Resserrer d’un tour la vis du raccord de contrôle d’étanchéité une fois le test d’étanchéité terminé.
• Effectuer le test de pression du gaz de la cuisinière ou la plaque de cuisson avant utilisation.
Lors du test de pression du gaz de la cuisinière ou la plaque de cuisson avant utilisation:
I
• La cuisinière ou la plaque de cuisson, et tout robinet d’arrêt individuel, doivent être déconnectés du
réseau de gaz lors d’un test de pression du système à des pressions supérieures à 3,4kPa.
• La pression d’arrivée de gaz pour vérifier le réglage du détendeur sera de 249 Pa minimum au‑dessus de
la pression spécifiée par le fabricant au collecteur. La pression d’arrivée de gaz maximum est de 3,4 kPa.
• Fermer l’arrivée de gaz.
25
FR
Page 26

CUISINIÈRE ET PLAQUE DE CUISSON
ÉTAPE7
• Glisser à nouveau la cuisinière ou la plaque de
cuisson dans la découpe.
• Fixer la cuisinière ou la plaque de cuisson:
– CUISINIÈRE : fixer les deux supports avec
les vis à tôle fournies.
– PLAQUE DE CUISSON : attacher le support
au boîtier des brûleurs avec les vis à tôle
fournies.
• Remettre la grille en place.
FR
26
Page 27

CUISINIÈRE ET PLAQUE DE CUISSON
6 MODE D’EMPLOI
6.1 Consignes de sécurité
RISQUE DE BRÛLURE, DÉPART DE FEU, EXPLOSION ET/OU DANGER LIÉ AU
MONOXYDE DE CARBONE. Respecter les avertissements suivants sous peine de dommages, brûlures,
explosion, accumulation de monoxyde de carbone, blessures graves ou mort:
• Ne pas placer plus de 18kg sur la grille en cours de cuisson.
• Ne pas placer plus de 9kg sur la grille du four en cours de cuisson.
• Ne pas utiliser la cuisinière ou la plaque de cuisson par vent très fort sous peine de tirage négatif ou positif,
car l’air se déplaçant à travers la cuisinière ou la plaque de cuisson risque d’éteindre la flamme du brûleur
en cours d’utilisation ou de déplacer la flamme à l’intérieur de la cuisinière ou la plaque de cuisson.
• Faire attention en allumant un brûleur à la main. Risque de brûlures si le brûleur s’allume soudainement.
• S’assurer qu’il y a assez de gaz dans le réservoir avant d’essayer d’allumer un brûleur. La présence d’air
dans la ligne retardera sensiblement l’allumage du brûleur et un brûleur risque de s’allumer subitement
une fois l’air évacué de la ligne et remplacé par du gaz PL; cet allumage soudain peut causer une
explosion ou des brûlures.
• Si tout brûleur ou la veilleuse du four s’éteint subitement, mettre tous les boutons à l’arrêt et attendre
cinq minutes avant d’essayer de rallumer le brûleur ou la veilleuse du four.
• Ne pas essayer d’allumer plusieurs brûleurs à la fois.
• Ne pas utiliser le four comme espace de rangement ou chauffage d’appoint.
• Éteindre toutes les veilleuses avant de faire le plein ou de prendre la route.
• Ne pas remiser de matériau inflammable ou combustible sur, dans ou près de la cuisinière ou la plaque
de cuisson ou dans les armoires se trouvant au-dessus, ou au-dessus et à côté de la cuisinière ou la
plaque de cuisson. Ne pas utiliser le four comme espace de rangement. En cours d’utilisation de la
cuisinière ou la plaque de cuisson, vérifier fréquemment la température du contenu dans les zones des
armoires au-dessus de la cuisinière ou la plaque de cuisson.
• Pour éviter tout risque d’intoxication au monoxyde de carbone, ne pas couvrir l’évent du four en
marche. Nepas couvrir les orifices de ventilation de l’étagère du gril du four (au-dessus du brûleur du
four); en effet, les temps de cuisson s’écarteront de la normale et les aliments risquent d’être brûlés ou
pas assez cuits.
• Ne pas utiliser la cuisinière ou la plaque de cuisson si elle est endommagée ou qu’elle ne fonctionne pas
correctement.
• Ne pas toucher les brûleurs, les grilles de brûleur, les zones près des brûleurs, les surfaces intérieures du
four, la porte du four, la grille du four ou tout ustensile à l’intérieur du four, durant et après l’utilisation,
sous peine de brûlures. Ne pas laisser les vêtements ou autres matériaux inflammables entrer en contact
avec ces zones avant qu’elles n’aient eu le temps de refroidir pour éviter toute brûlure.
• Ne jamais laisser les brûleurs sans surveillance en cours d’utilisation, car le contenu de la casserole ou la
poêle peut déborder, causant de la fumée ou un déversement de graisse pouvant prendre feu.
• Comme la graisse est inflammable, ne jamais laisser la graisse s’accumuler autour des brûleurs ou à la
surface de la cuisinière ou la plaque de cuisson. Essuyer immédiatement tout déversement de graisse.
Ne jamais utiliser d’eau sur les feux de graisse et ne jamais saisir une poêle enflammée. Étouffer une
poêle enflammée avec un couvercle de la taille exacte ou une tôle à biscuits. La graisse enflammée en
dehors de la poêle peut être éteinte avec du bicarbonate de soude, une poudre extinctrice ABC ou un
extincteur à mousse.
• Ne pas faire chauffer de contenant fermé sous peine d’explosion.
• Utiliser des casseroles et des poêles assez grandes pour couvrir la surface du brûleur et contenir les
aliments cuits, mais ne dépassant pas 25,4cm de diamètre. Ceci permettra de réduire ou éliminer les
projections ou déversements importants susceptibles d’enflammer et de causer une explosion ou des
brûlures et toute accumulation de chaleur excessive qui se solderait par des dommages sur le dessus de
la cuisinière ou la plaque de cuisson.
• Tourner les manches de casseroles et de poêles vers l’intérieur, mais pas au-dessus d’autres brûleurs,
pour réduire le risque de brûlures au cas où l’on heurterait la casserole ou la poêle.
• Ne pas faire tomber les casseroles ou poêles sur la surface en porcelaine sous peine de la fissurer ou de
l’écailler.
27
FR
Page 28

CUISINIÈRE ET PLAQUE DE CUISSON
• S’assurer que tous les ustensiles de cuisine peuvent s’utiliser sans danger sur la surface de la cuisinière ou
la plaque de cuisson. Seuls certains types d’ustensiles sont adaptés à une utilisation sur surface ou brûleur
sans se rompre sous l’effet d’une variation de température soudaine. Ne pas régler les flammes de brûleur
au-delà du bord de la casserole ou la poêle sous peine de brûlures ou résultats de cuisson médiocres.
• Utiliser seulement des maniques sèches dans la mesure où des maniques humides ou mouillées peuvent
causer des brûlures par la vapeur au contact de surfaces brûlantes. Ne pas laisser les maniques toucher
une flamme nue ni utiliser un torchon ou une serviette épaisse en guise de manique sous peine de
départ de feu.
• Les boutons de commande doivent être en position arrêt lorsque la cuisinière ou la plaque de cuisson n’est
pas utilisée. Risque de départ de feu et/ou de brûlure si un brûleur est accidentellement laissé allumé.
• Ne pas appliquer de poids excessif contre la porte de la cuisinière ou la plaque de cuisson sous peine
de faire sauter les charnières; dans ce cas, les dommages ne seraient pas couverts par la garantie.
6.2 Préparation à l’utilisation de la cuisinière ou la plaque de cuisson
ÉTAPE1
Robinet
d’arrêt
(Arrière de
lacuisinière)
• Fermer le gaz au robinet d’arrêt.
Si l’appareil est équipé d’un couvercle à
I
double rabat, relever le couvercle avant
d’utiliser la cuisinière ou la plaque de cuisson.
6.3 Utilisation de la cuisinière ou la plaque de cuisson
Toutes les commandes de brûleur fonctionnent dans le sens inverse des aiguilles d’une montre; pour
I
allumer, presser et tourner.
Allumage des brûleurs
FIG.1
Brûleur
Allumette
FIG.2
Allumeur
• Pour allumer le brûleur avec une allumette,
tourner le bouton de 90° environ, jusqu’à ce
qu’il pointe vers la grande flamme.
• Tenir une allumette près du brûleur pour allumer
la flamme.
FR
• Pour allumer le brûleur avec l’allumeur, tourner
le bouton de 90° environ, jusqu’à ce qu’il pointe
vers la grande flamme.
• Tourner le bouton de l’allumeur dans le sens
des aiguilles d’une montre jusqu’au déclic.
Continuer à tourner le bouton jusqu’à ce que le
brûleur s’allume.
28
Page 29

CUISINIÈRE ET PLAQUE DE CUISSON
Extinction de la flamme du brûleur
FIG.1
• Tourner le bouton dans le sens des aiguilles
d’une montre jusqu’à ce qu’il pointe vers le
cercle plein en haut du bouton.
6.4 Utilisation du four
Réglage de la veilleuse du four
STEP1
STEP2
Pilot
Réglage des boutons de la cuisinière ou la
plaque de cuisson
Réglage Utilisation recommandée
• Allumage des brûleurs
• Début de cuisson des aliments
• Portée à ébullition des liquides
• Maintien des liquides à ébullition
• Cuisson des aliments à différentes
températures
• Maintien des aliments au chaud
• Extinction du brûleur
Un bruit de claquement pourra se faire
I
entendre lors de l’extinction d’un brûleur
allumé depuis un certain temps. Ceci est
normal et ne pose aucun danger.
Modèles à brûleur en haut
• Sur les modèles à brûleur en haut, pousser et
tourner le bouton de commande du four jusqu’à
ce qu’il pointe vers pilot - push/hold.
• Pousser et maintenir le bouton dans cette
position tout en plaçant une allumette allumée
sous la veilleuse au fond du four, sous l’étagère
du gril.
Modèles à allumeur piézoélectrique
• Pour les modèles à allumeur piézoélectrique,
pousser et tourner le bouton de commande du
four jusqu’à ce qu’il pointe vers pilot - push/
hold.
• Tourner le bouton de l’allumeur à étincelle dans
le sens horaire jusqu’au clic audible. Continuer
à répéter cette étape jusqu’à ce que le brûleur
s’allume.
Tous les modèles
• Relâcher le bouton et s’assurer que la veilleuse
reste allumée. Répéter la procédure si la
veilleuse ne reste pas allumée..
• La veilleuse du four a été réglée à l’usine et
n’exige aucun autre ajustement.
• Pour éteindre la veilleuse du four, pousser le
bouton de commande du four et tourner dans le
sens des aiguilles d’une montre sur Arrêt.
29
FR
Page 30

CUISINIÈRE ET PLAQUE DE CUISSON
• Placer les aliments à cuire au centre du four en
laissant entre 2,5 et 5cm entre les parois du four
ettous les côtés du plat.
Les temps de cuisson seront plus longs à plus
I
haute altitude (+1200m).
Réglage du bouton de four
Réglage Utilisation recommandée
Pilot
Push/
Hold
Broil • Température de grillage
300–500 • Réglage du four à une température
Fonctionnement de la lampe du four
STEP3
• Pour allumer la lampe du four, tourner
l’interrupteur du panneau de commande sur la
position Marche.
• Point de départ pour l’allumage de
la veilleuse
• Maintien de la veilleuse allumée
pour une utilisation continue du four
spécifique
• Extinction de la veilleuse du four
FR
30
Page 31

CUISINIÈRE ET PLAQUE DE CUISSON
7 ENTRETIEN
RISQUE DE BRÛLURE, DÉPART DE FEU, EXPLOSION ET/OU DANGER LIÉ AU
MONOXYDE DE CARBONE. Respecter les avertissements suivants sous peine de dommages, brûlures,
explosion, accumulation de monoxyde de carbone, blessures graves ou mort:
• Garder la zone du dessus de la cuisinière ou la plaque de cuisson à l’écart de produits de nettoyage
combustibles, d’essence et autres vapeurs et liquides inflammables.
• Ne pas entraver la circulation d’air de combustion et de ventilation.
• Le test d’étanchéité doit être effectué conformément aux instructions du fabricant.
• S’assurer que toutes les commandes sont à l’arrêt et que les surfaces, grilles de brûleur, brûleurs et
surfaces du four de la cuisinière ou la plaque de cuisson ont refroidi avant nettoyage ou démontage.
• Ne pas utiliser de nettoyant pour four, eau de Javel ou antirouille sur le dessus ou les grilles de brûleur
de la cuisinière ou la plaque de cuisson.
• Nettoyer le four avec un nettoyant pour four seulement. Suivre les instructions du fabricant du nettoyant
pour four.
• Ne jamais utiliser une brosse ou un autre objet métallique pour nettoyer les orifices de brûleur. Des soies
de la brosse risquent de tomber et se loger dans les orifices, et de causer un incendie ou une explosion.
RISQUE DE BRÛLURE ET/OU DOMMAGES. Le non-respect des mises en garde suivantes
pourrait entraîner des dommages ou des blessures:
• Nettoyer toutes les surfaces le plus tôt possible après un débordement ou déversement. Ne pas laisser
les aliments contenant des acides (comme le jus de citron, le jus de tomate ou le vinaigre) stagner sur la
porcelaine ou les surfaces peintes, car ils peuvent en ternir la finition. Si des déversements stagnent sur
l’acier inoxydable, ilen résultera des piqûres de rouille et une décoloration. Ne pas laisser stagner les
déversements sur les cuvettes de brûleur, car celles-ci risquent d’être définitivement tachées si elles ne
sont pas nettoyées au plus vite.
• Ne pas utiliser de laine d’acier ou de nettoyants abrasifs, ou de nettoyants acides tels que l’eau de Javel
sur la cuisinière, la plaque de cuisson ou les grilles sous peine d’endommager la cuisinière ou la plaque
de cuisson. Utiliser uniquement des tampons à récurer en plastique non abrasifs.
• Ne pas utiliser de produits nettoyants abrasifs, nettoyant pour four ou produit chimique fort sur le
panneau de commande, car ils risquent d’endommager ou d’effacer les instructions d’utilisation
imprimées sur l’avant de l’appareil.
• La grille et la surface de cuisson ont un revêtement en porcelaine. La porcelaine est un revêtement en
verre/céramique émaillé sur la surface du métal. La porcelaine est censée fournir une surface capable
de résister aux hautes températures, maintenir un aspect attrayant et faciliter le nettoyage. Ne pas laver les
surfaces en porcelaine chaudes. Les laisser refroidir avant nettoyage sous peine de brûlures ou de fissuration
de la porcelaine.
• En nettoyant autour des brûleurs, veiller à ne pas abîmer l’électrode (le cas échéant). Toute éponge ou
chiffon qui accroche l’électrode métallique de l’allumeur peut l’endommager ou la casser. Dans ce cas,
le brûleur ne s’allumera pas.
• Utiliser seulement de l’eau savonneuse chaude pour nettoyer les grilles de brûleur, le boîtier du brûleur,
lessurfaces peintes, les surfaces en porcelaine, les surfaces en acier inoxydable et les articles en
plastique de la cuisinière ou la plaque de cuisson. Ne pas utiliser de nettoyants granuleux ou acides. Ne
pas utiliser de laine d’acier ou nettoyants abrasifs sous peine d’endommager la cuisinière ou la plaque
de cuisson. Utiliser uniquement des tampons à récurer en plastique non abrasifs.
31
Une installation et un entretien adéquats permettront le fonctionnement correct de la cuisinière
I
ou la plaque de cuisson. L’essentiel du nettoyage peut se faire en utilisant des produits ménagers
courants.
FR
Page 32

CUISINIÈRE ET PLAQUE DE CUISSON
7.1 Contrôle des flammes de brûleur et de la veilleuse du four
ÉTAPE1
• Allumer les brûleurs un par un. Pour en savoir
plus, se référer à « Allumage des brûleurs » à la
page 28.
• Confirmer la présence de la flamme, réglable en
tournant le bouton de commande.
Brûleur
ÉTAPE2
(Intérieur du four)
• Allumer la veilleuse du four. Pour en savoir plus,
se référer à « Réglage de la veilleuse du four » à
la page 29.
• Confirmer la présence de la flamme de la
veilleuse.
7.2 Nettoyage de la cuisinière ou la plaque de cuisson
ÉTAPE1
Cuisinière
Nettoyage de la cuisinière ou la plaque de cuisson:
• Enlever la grille.
• Nettoyer à l’eau savonneuse chaude.
• Rincer à l’eau claire.
• Essuyer avec un chiffon doux.
Les souillures lourdes carbonisées pourront
I
exiger la répétition des étapes de nettoyage
jusqu’à élimination complète.
Grille
Chiffon doux
Autres méthodes de nettoyage
Composant Méthode de nettoyage
Boutons de
commande
Panneau de
commande
Surface de la
cuisinière
Grilles de
brûleur
Brûleurs ou
orifices de
brûleur
Four Utiliser de l’eau savonneuse
Veilleuse
Tirer droit sur les boutons pour
les sortir de la tige et les nettoyer.
Utiliser un nettoyant liquide doux
ou un nettoyant pour vitres.
Utiliser un vaporisateur nettoyant
pour vitres, en l’appliquant sur un
essuie‑tout. Ne pas pulvériser le
nettoyant pour vitres directement
sur le panneau. Ne pas utiliser
de nettoyant pour four sur le
panneau de commande.
Utiliser un nettoyant liquide doux
ou un nettoyant pour vitres.
Nettoyer dès qu’elles se
salissent. Si nécessaire, utiliser
un tampon à récurer en plastique
non abrasif.
S’ils sont obstrués, brosser
doucement les zones perforées
avec une brosse légère
(brosse à dents) ou nettoyer
minutieusement les trous avec
uncure‑dent.
chaude. Pour des souillures
lourdes, utiliser un nettoyant
pour four et suivre le mode
d’emploi du fabricant sur
l’étiquette. Si nécessaire,
utiliserun tampon à récurer
enplastique non abrasif.
FR
32
Page 33

CUISINIÈRE ET PLAQUE DE CUISSON
8 ENTREPOSAGE
8.1 Préparation à l’entreposage de la
cuisinière ou la plaque de cuisson
ÉTAPE1
Huile végétale
• Essuyer toutes les surfaces.
• Pulvériser de l’huile végétale sur les surfaces
ou un produit similaire pour éviter la rouille en
cours d’entreposage.
• Nettoyer l’huile de la surface de la cuisinière
ou la plaque de cuisson avant réinstallation
etréutilisation.
9 ÉLIMINATION
• Placer les matériaux d’emballage seulement dans les bacs de recyclage appropriés, si possible. Ne pas
mettre au rebut la cuisinière ou la plaque de cuisson sans consulter un centre de recyclage local ou un
revendeur spécialisé pour en savoir plus sur les réglementations locales et nationales applicables en
lamatière.
10 PIÈCES DE RECHANGE
Pour les toutes dernières informations sur les pièces, visiter www.dometic.com.
11 GARANTIE LIMITÉE DE DEUX ANS
GARANTIE LIMITÉE DISPONIBLE À WWW.DOMETIC.COM/WARRANTY.
POUR TOUTE QUESTION OU POUR OBTENIR UNE COPIE GRATUITE DE LA GARANTIE LIMITÉE, CONTACTER :
DOMETIC CORPORATION
CUSTOMER SUPPORT CENTER
1120 NORTH MAIN STREET
ELKHART, INDIANA, ÉTATS UNIS 46514
1‑800‑544‑4881 OPT. 3
33
FR
 Loading...