

Dometic PW1000, PW1500, PW1750 Operating Manual
EN
DE
FR
ES
PT
IT
NL
DA
SV
NO
FI
RU
PL
SK
CS
HU
SL
EL
AWNINGS
PERFECTWALL
PW1000, PW1500, PW1750
Awning
Operating manual . . . . . . . . . . . . . . . . . . . . 12
Markise
Bedienungsanleitung . . . . . . . . . . . . . . . . . 31
Store extérieuru
Notice d’utilisation . . . . . . . . . . . . . . . . . . .50
Tol d o
Instrucciones de uso . . . . . . . . . . . . . . . . . .70
Markiisi
Käyttöohje . . . . . . . . . . . . . . . . . . . . . . . . .202
Синусоидальный инвертор
Инструкция по эксплуатации . . . . . . . . . 221
Markiza
Instrukcja obsługi . . . . . . . . . . . . . . . . . . . 240
Markíza
Návod na obsluhu. . . . . . . . . . . . . . . . . . . 259
Markýza
Návod k obsluze . . . . . . . . . . . . . . . . . . . . 278
Előtető
Használati utasítás. . . . . . . . . . . . . . . . . . . 296
Markiza
Navodilo za uporabo . . . . . . . . . . . . . . . . 314
ȉȑȞIJĮ
ȅįȘȖȓİȢ ȤİȚȡȚıȝȠȪ . . . . . . . . . . . . . . . . 332
Tol d o
Manual de instruções . . . . . . . . . . . . . . . . .90
Ten da da sol e
Istruzioni per l’uso . . . . . . . . . . . . . . . . . . . 110
Zonnescherm
Gebruiksaanwijzing. . . . . . . . . . . . . . . . . .129
Markise
Betjeningsvejledning . . . . . . . . . . . . . . . .148
Markis
Bruksanvisning. . . . . . . . . . . . . . . . . . . . . .166
Markise
Bruksanvisning. . . . . . . . . . . . . . . . . . . . . .184

PW1000, PW1500, PW1750
1
1
2
2
3
1
2
4
3
1. 2. 3.
3
1,5 m
3
1,5 m
PW1000, PW1500, PW1750
4
4
PW1000, PW1500, PW1750
1.
5
2.
6
5
7
8 9
PW1000, PW1500, PW1750
0
1.
2.
3.
6
PW1000, PW1500, PW1750
a
1.
2.
b
3.
c
1.
2.
7
1.
2.
d
e
PW1000, PW1500, PW1750
f
max. 1,2 m
8
PW1000, PW1500, PW1750
g h
i
1.
2.
9

j
k
PW1000, PW1500, PW1750
l
1.
2.
A
D
C
B
CD
B
A
10
PW1000, PW1500, PW1750
15 – 25 Nm
m
2
1
1
n
11
EN
PW1000, PW1500, PW1750
WARNING!
!
• This instruction manual must be read and understood before the
device is operated, cleaned or serviced.
• This product must be mounted by a specialist. Improper assembly
can lead to serious injury. Alterations to the product can be
extremely dangerous and lead to serious injury or damage to the
device.
• Keep this instruction manual with the product. The owner must read
it carefully.
Table of contents
1 Notes on using the instruction manual. . . . . . . . . . . . . . . . . . . . . . . . . . . . . .13
2 Safety instructions . . . . . . . . . . . . . . . . . . . . . . . . . . . . . . . . . . . . . . . . . . . . . .13
3 Scope of delivery . . . . . . . . . . . . . . . . . . . . . . . . . . . . . . . . . . . . . . . . . . . . . .15
4 Accessories . . . . . . . . . . . . . . . . . . . . . . . . . . . . . . . . . . . . . . . . . . . . . . . . . . .16
5 Intended use . . . . . . . . . . . . . . . . . . . . . . . . . . . . . . . . . . . . . . . . . . . . . . . . . .16
6 Technical description . . . . . . . . . . . . . . . . . . . . . . . . . . . . . . . . . . . . . . . . . . .17
7 Operating the awning. . . . . . . . . . . . . . . . . . . . . . . . . . . . . . . . . . . . . . . . . . .18
8 Cleaning and maintenance. . . . . . . . . . . . . . . . . . . . . . . . . . . . . . . . . . . . . . 25
9 Troubleshooting . . . . . . . . . . . . . . . . . . . . . . . . . . . . . . . . . . . . . . . . . . . . . . 27
10 Warranty . . . . . . . . . . . . . . . . . . . . . . . . . . . . . . . . . . . . . . . . . . . . . . . . . . . . 28
11 Disposal. . . . . . . . . . . . . . . . . . . . . . . . . . . . . . . . . . . . . . . . . . . . . . . . . . . . . 28
12 Technical data . . . . . . . . . . . . . . . . . . . . . . . . . . . . . . . . . . . . . . . . . . . . . . . . 29
12
EN
PW1000, PW1500, PW1750 Notes on using the instruction manual
1 Notes on using the instruction manual
WARNING!
!
A
Safety instruction: Failure to observe this instruction can cause fatal or
serious injury.
NOTICE!
Failure to observe this instruction can cause material damage and impair
the function of the product.
NOTE
Supplementary information for operating the product.
I
2 Safety instructions
Please observe the prescribed safety instructions and stipulations from the
vehicle manufacturer and service workshops.
The manufacturer accepts no liability for damage in the following cases:
• Damage to the product resulting from mechanical influences and excess voltage
• Alterations to the product without express permission from the manufacturer
• Use for purposes other than those described in the operating manual
Please note the following warnings:
WARNING!
!
• Before starting your journey, check that the awning is fully retracted.
Never move the vehicle when the awning is open.
• Never drive with the crank inserted. Remove the crank before starting
your journey.
• Do not drive the vehicle if the fabric is damaged or torn, even if the
awning has been properly retracted. The awning arms are held in
place by the fabric. If the fabric rips while driving, the awning will
suddenly shoot out. This can lead to serious injury. Secure the awning
so that it cannot extend suddenly and unexpectedly while driving.
• Do not open the awning while driving.
• Do not open the awning in strong winds or snowfall.
13

EN
Safety instructions PW1000, PW1500, PW1750
• Retract the awning if strong winds, heavy rain or snowfall are
imminent.
• Make sure that water or snow does not accumulate on the fabric.
Otherwise this could damage the awning or the awning arms could
collapse and cause severe or fatal injury.
• Do not approach the awning
– if it was left open during heavy winds
– if pools of water have formed on it
– if snow has accumulated on it
– if any debris is on the awning fabric.
The awning may move unexpectedly, become unstable and bend or
break off.
• Optional for PW1500/PW1750: If the connection cable of the
awning is damaged, it must be replaced by an expert.
• Optional for PW1500/PW1750: Disconnect the power supply by
means of the on/off switch before you clean the vehicle in the vicinity
of the awning or the awning itself.
A
• Do not leave the extended awning unattended. Retract the awning
before leaving your site.
• Keep a safe distance away from the awning when having barbecues or
open fires. The fabric can be damaged by heat or catch fire.
• This device can be used by children aged 8 years or over, as well as by
persons with diminished physical, sensory or mental capacities or a
lack of experience and knowledge, providing they are supervised or
have been taught how to use the device safely and are aware of the
resulting risks.
• Optional for PW1500/PW1750: Electrical devices are not
toys.
Keep the remote control out of the reach of children. Prevent children
from playing with the wall switch (accessory).
• Children must be supervised to ensure that they do not play with the
device.
NOTICE!
• Park the motor home or caravan at a site where debris (branches,
leaves or similar) cannot fall onto the fabric.
• The fabric of the awning should not hang down at the edges, and must
remain taut at all times. If the fabric hangs down, it could rub against
the arms and become damaged.
The fabric used for long awnings should not sag in the middle.
14
EN
PW1000, PW1500, PW1750 Scope of delivery
• Only retract the awning when the fabric is free of debris (branches,
leaves or similar). Otherwise the awning may be damaged when it is
retracted.
• Keep the awning free of dirt to prevent abrasions, stains and mildew.
• Only retract the awning if it is wet for safety reasons. Extend it again as
soon as possible. Otherwise, mildew or stains can form or the colour
may fade.
• Never bend down an awning arm or the cover to drain water off the
awning. This can bend the awning and impair its function.
• Do not hang any objects on the awning, on the front cover or the
awning arms.
• Do not use any sprays (e. g. insect repellent, hairspray) near the
awning. This will soil the fabric or the water-repellent effect of the
fabric will be lost.
• If there is insufficient space above the door after the awning is
mounted, the door must remained closed when retracting or
extending to avoid the door making contact with the arms or the lead
rail.
The required space depends on the design of the door (door width,
swing or sliding door) as well as the set awning angle of inclination.
3Scope of delivery
Quantity Description
1 Awning
1 Hand crank (only awnings without motor)
1 Tension rafter (for awnings more than 4 m in length only)
1 Remote control (only PW1500/PW1750, optional)
1 Awning switch (only PW1500/PW1750, optional)
4Pegs
1 Operating manual
1 Installation manual
15
EN
Accessories PW1000, PW1500, PW1750
4Accessories
Available as accessories (not included in the scope of delivery):
Description
TieDown Kit
Straps for anchoring the awning
CampRoom
Awning tent front panel and sides for various models with support legs in different sizes
RainProtect
Front panel and sides available in different sizes
SunProtect
Front panel and sides available in different sizes
Rollo+ (not for PW1750)
Roller blind
Dometic Light LK120
LED light kit with remote control for installation on the awning arms
LED LightStrip
LED strip available in different lengths for installation on the underside of the awning
LED Profile
LED lighting available in different lengths for installation on the underside of wall-mounted
awnings
Awning cleaner
Special awning cleaner
Repair Kit
Awning repair patch
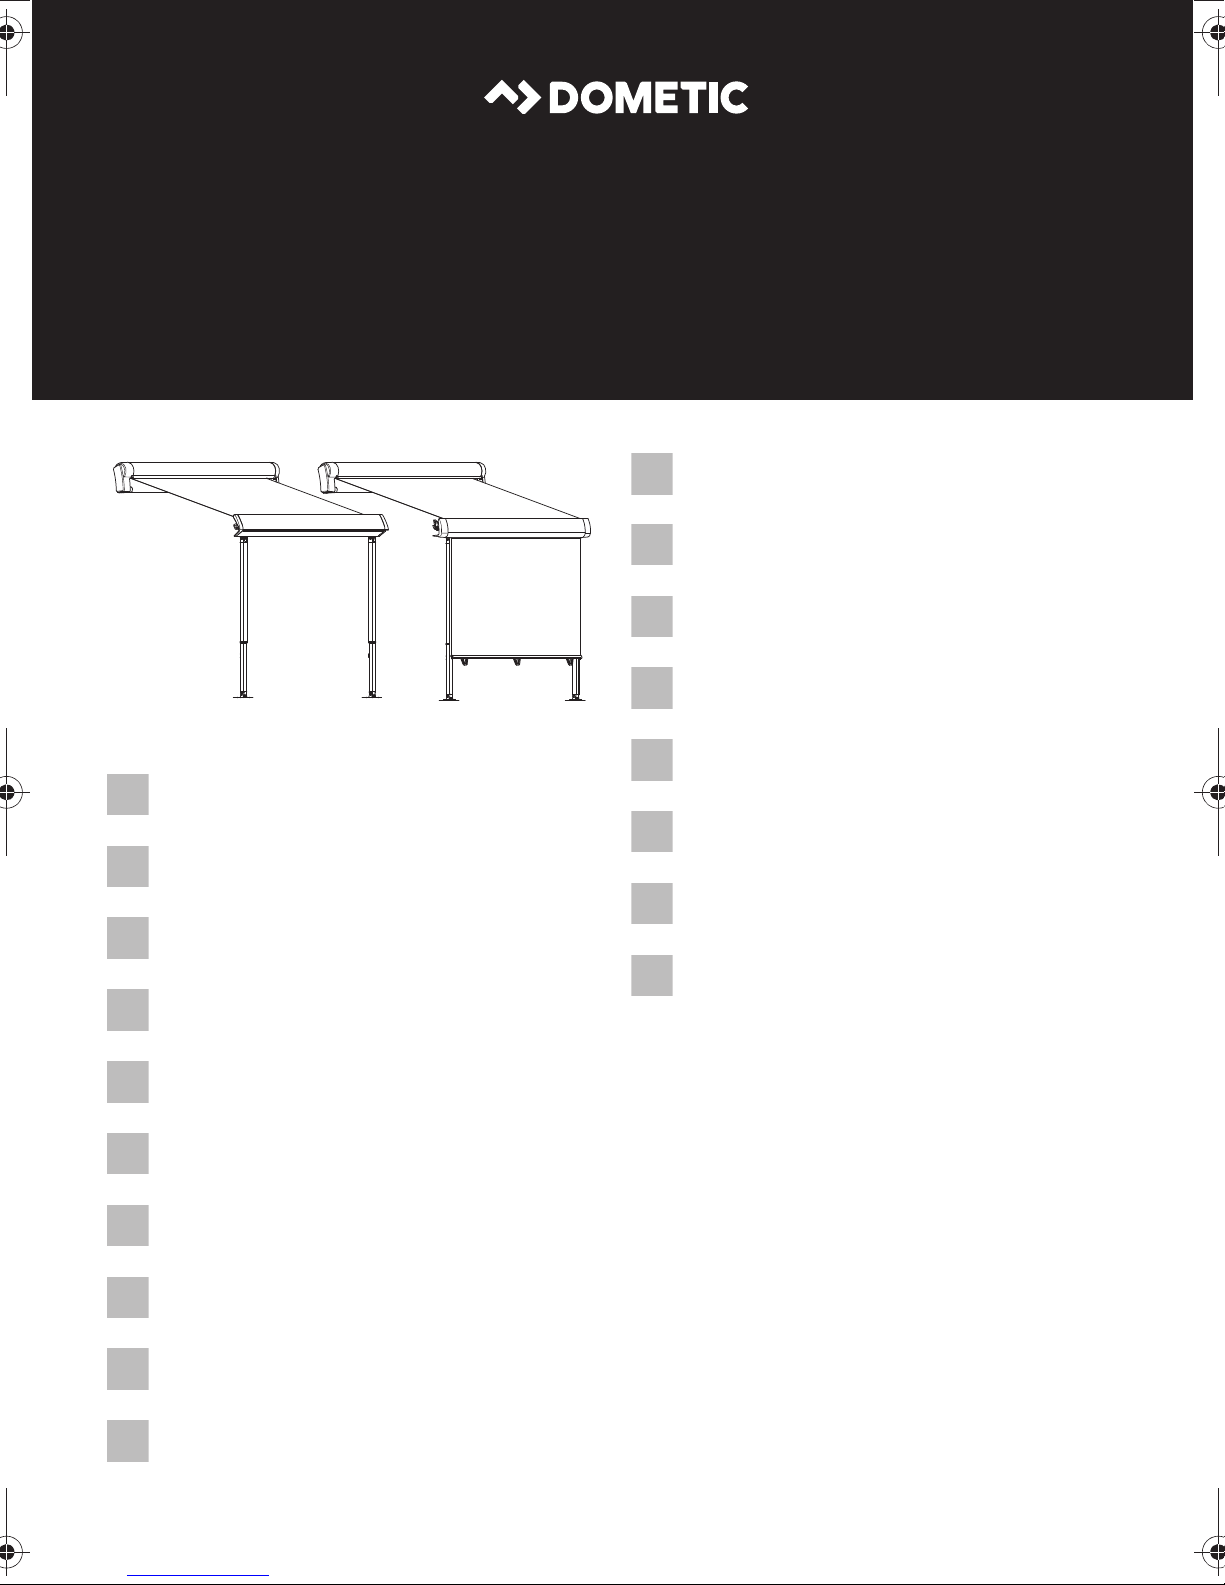
5 Intended use
The PerfectWall PW1000, PW1500 and PW1750 are awnings are suitable for installation on motor homes or caravans.
The awnings may only be used while the vehicle is stationary.
16
EN
PW1000, PW1500, PW1750 Technical description
6 Technical description
PerfectWall PW1000, PW1500 and PW1750 are awnings which can be extended
and retracted using a hand crank.
The PerfectWall PW1500 and PW1750 awnings can optionally also be extended
and retracted with a 12 V motor that is controlled by switch or remote control.
The awning is secured on the side of the vehicle or on the ground using struts.
The PW1750 awning has a roller blind integrated into the lead rail and that can be
pulled out for protection against rain or sun.
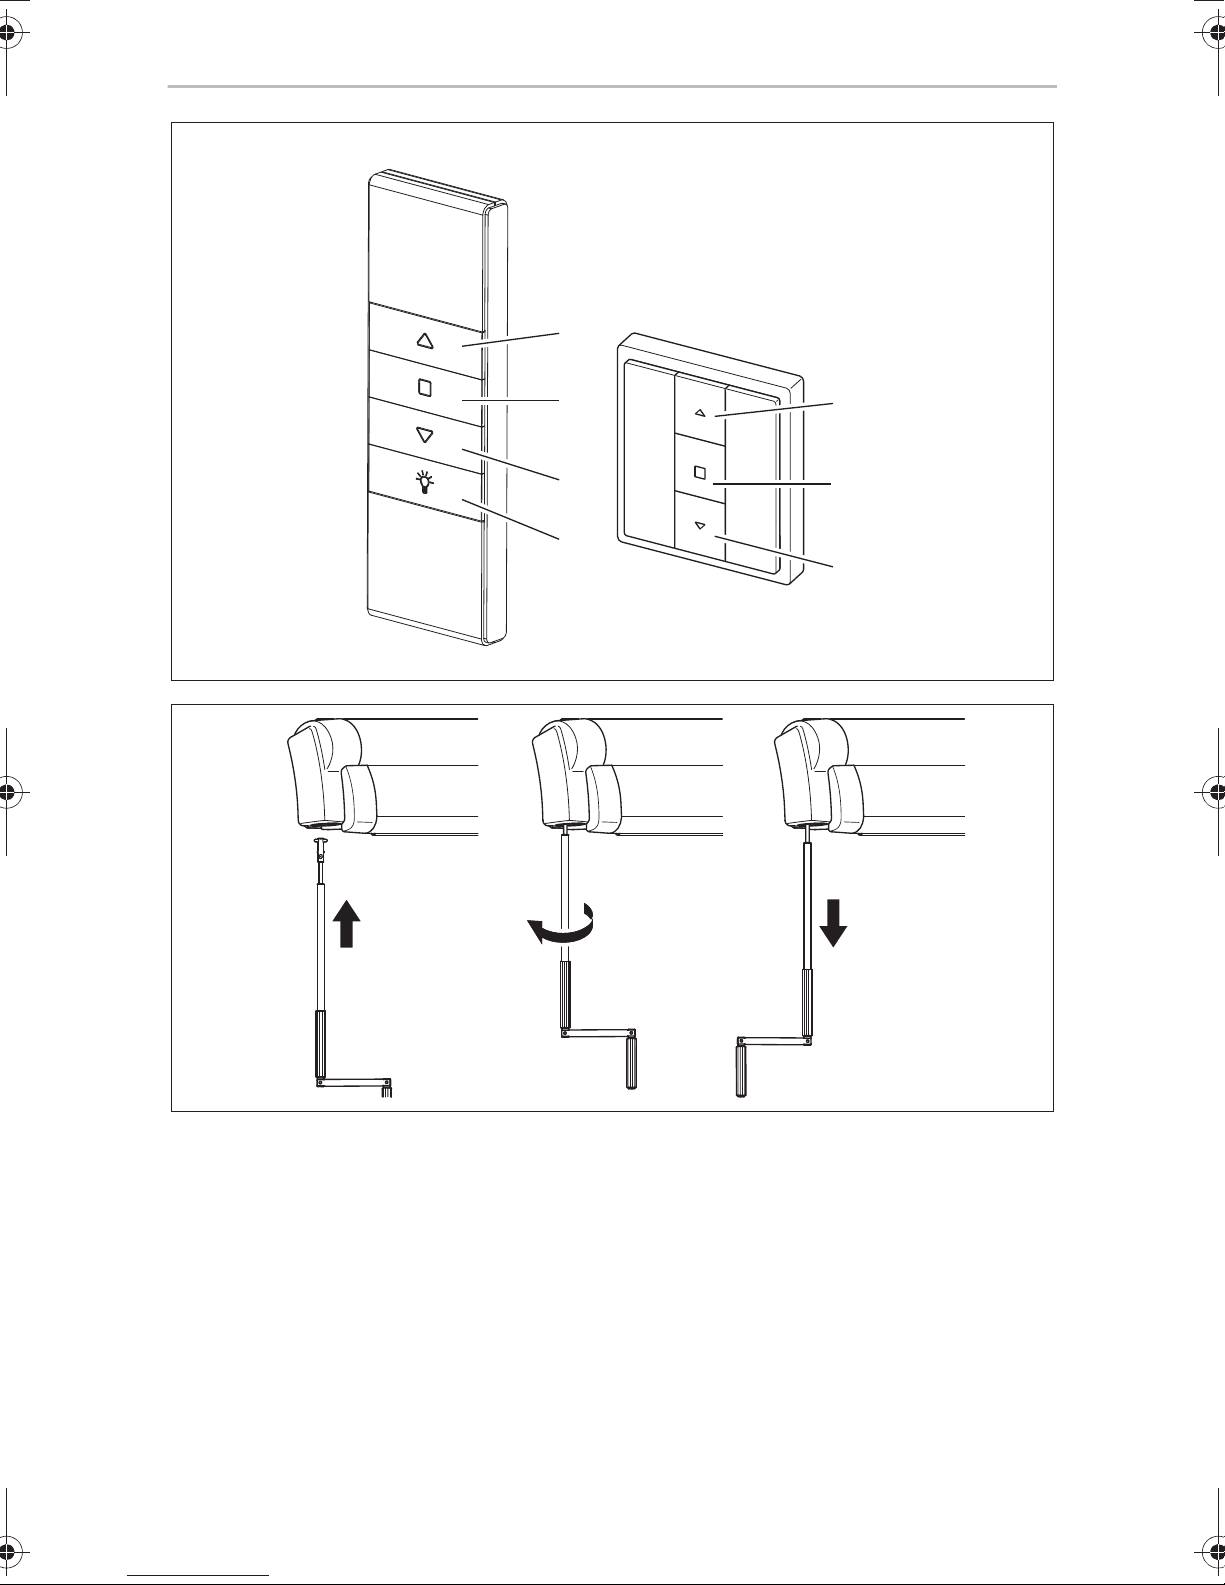
Controls of the remote control (only PW1500/PW1750, optional)
No. in fig. 1,
page 3
1 Retract awning
2 Stop
3 Extend awning
4 Switch LED lighting on/off (accessory)
Description
Controls of the switch (only PW1500/PW1750, optional)
No. in fig. 1,
page 3
1 Retract awning
2 Stop
3 Extend awning
Description
17

EN
Operating the awning PW1000, PW1500, PW1750
7 Operating the awning
Observe the safety instructions in chapter “Safety instructions” on page 13.
7.1 Note on the vehicle location
NOTICE!
A
7.2 Extending the awning
Extending the awning using a hand crank
!
• Park the vehicle so that no debris (branches, leaves or similar) gets on
to the fabric.
• Keep the awning free of dirt to prevent abrasions, stains and mildew.
WARNING! Beware of injury.
Keep a sufficient distance from objects or other vehicles. Once it is
retracted, it should be at least 40 cm away from other objects and
vehicles on all sides.
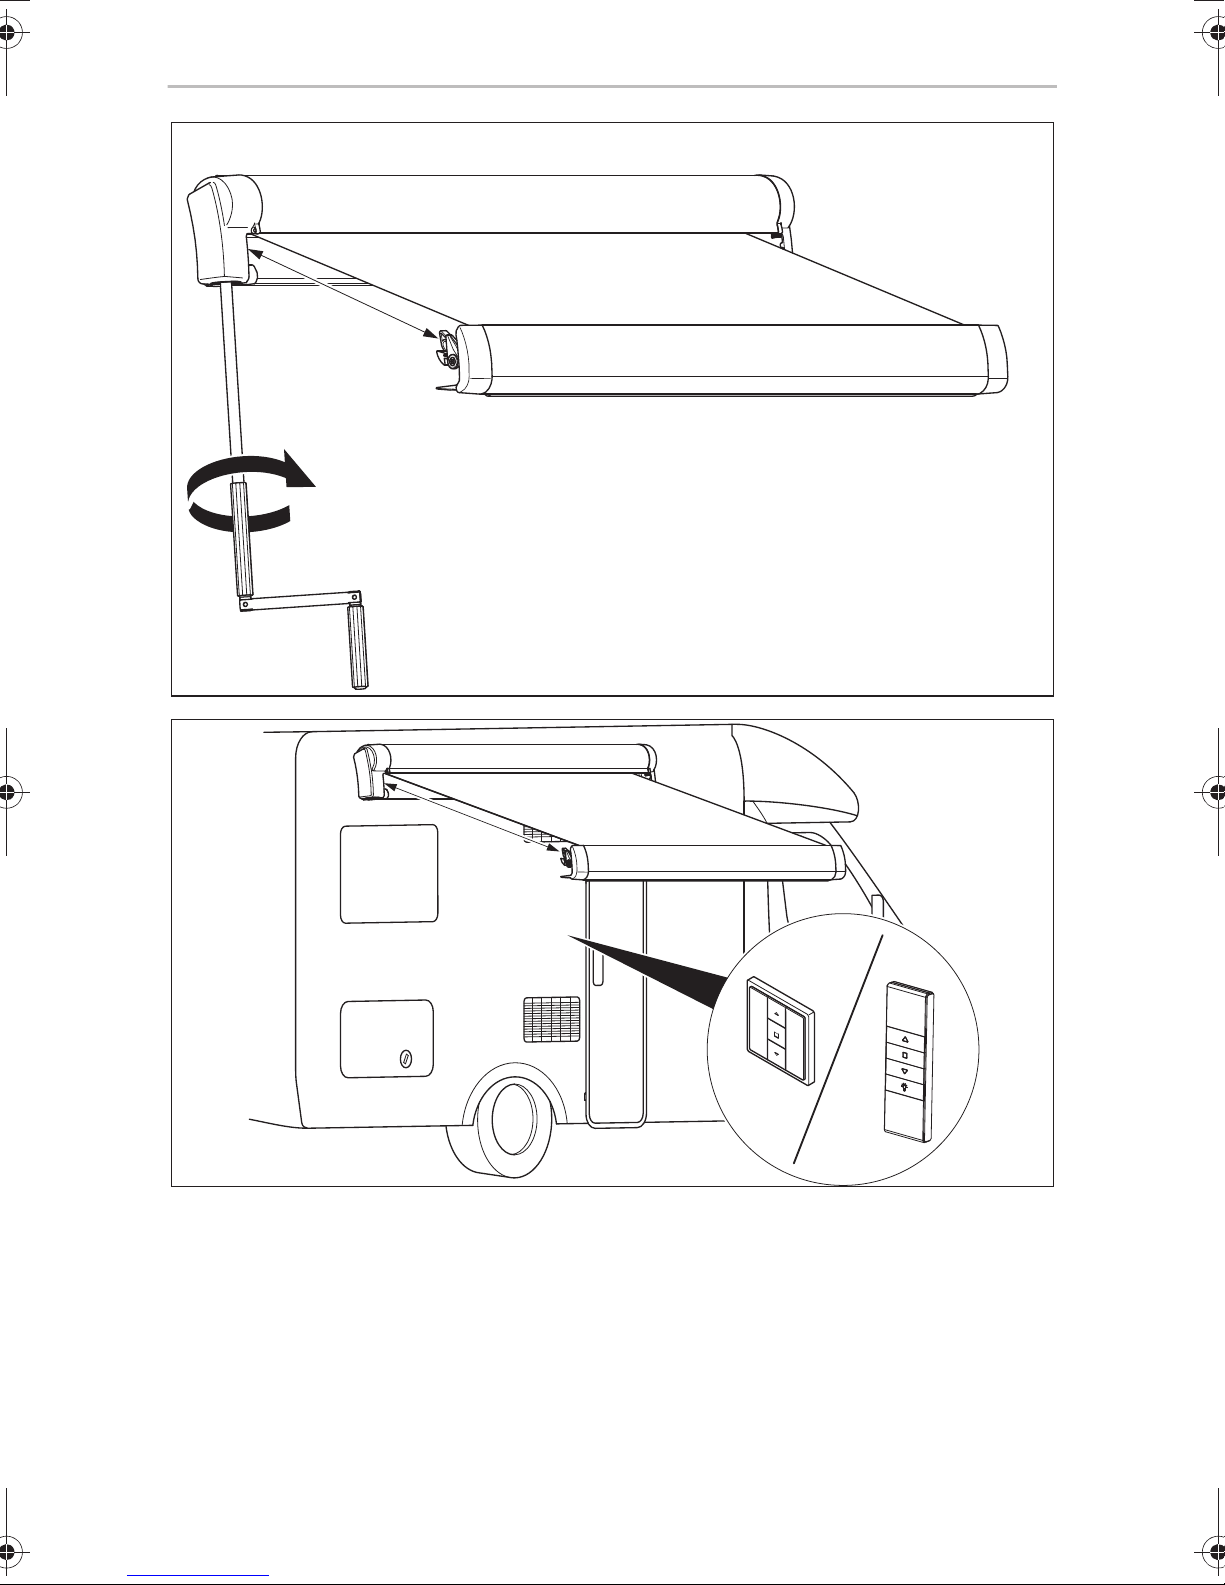
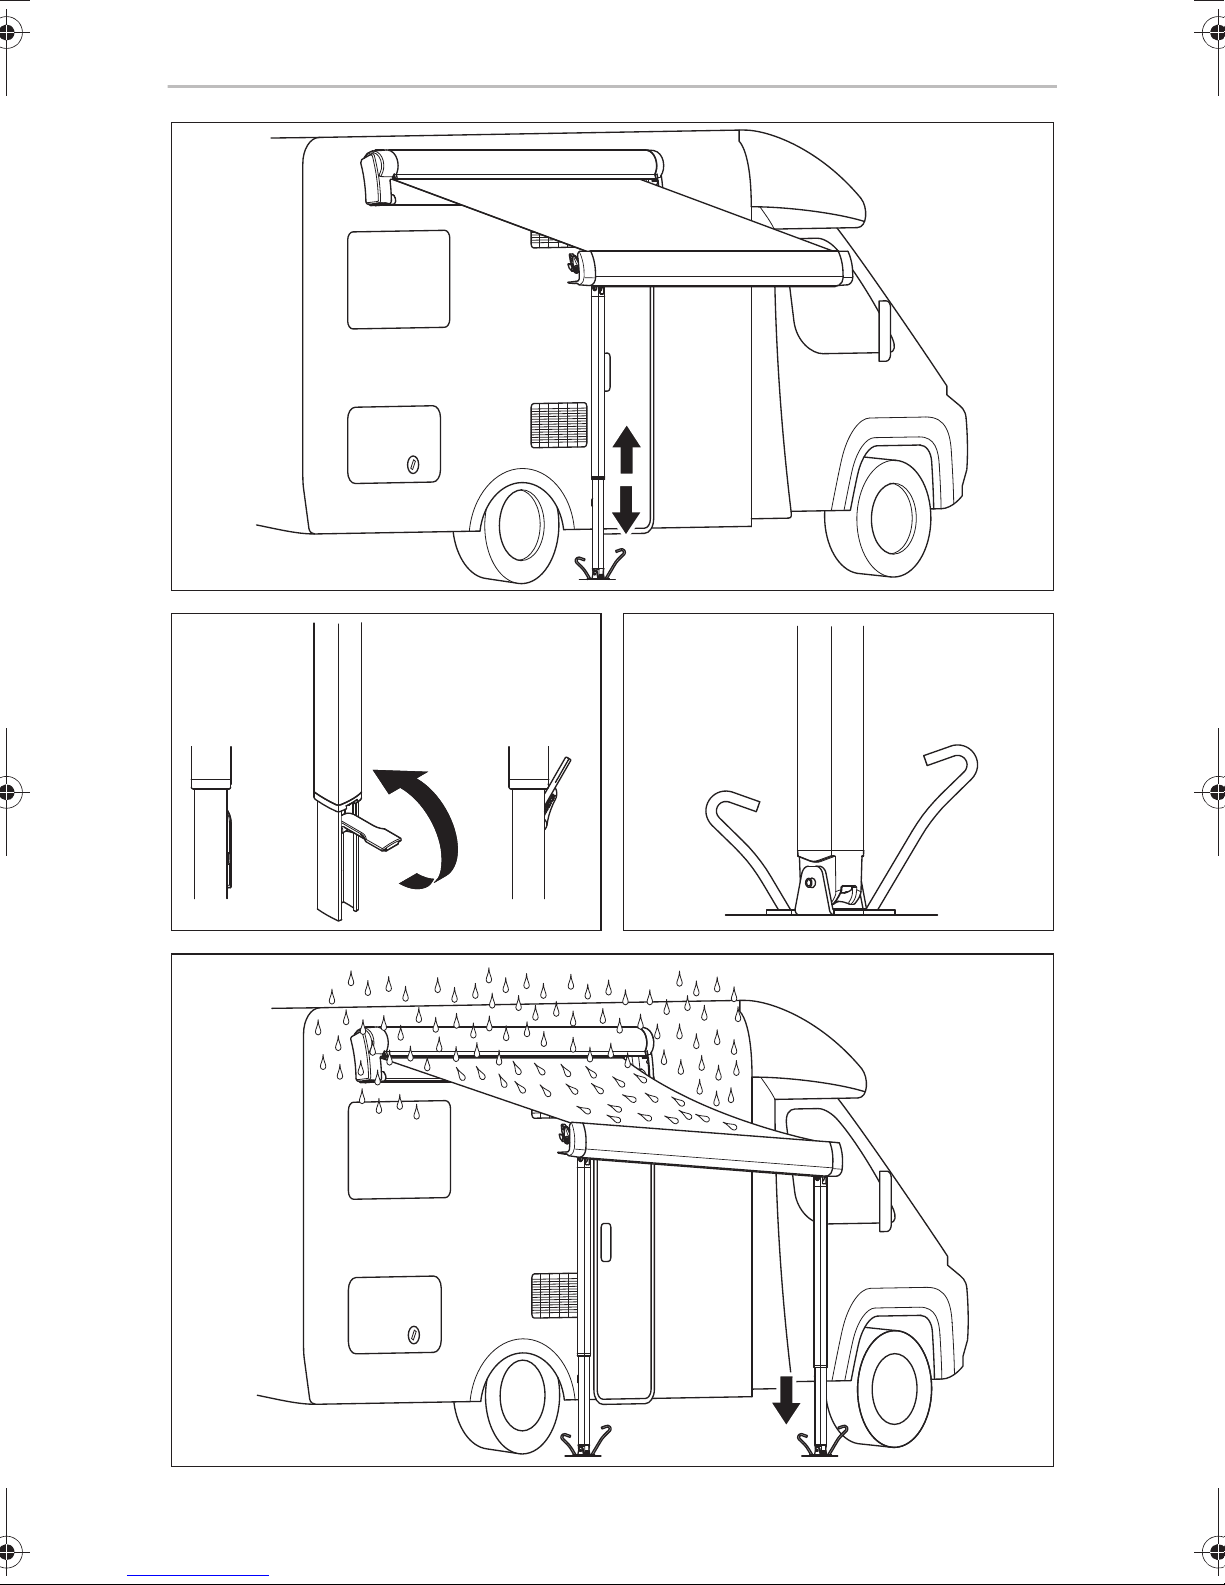
➤ Click the hand crank into the holder in the awning (fig. 2, page 3).
➤ Turn the hand crank until the awning is extended by about 1.5 metres (fig. 3,
page 4).
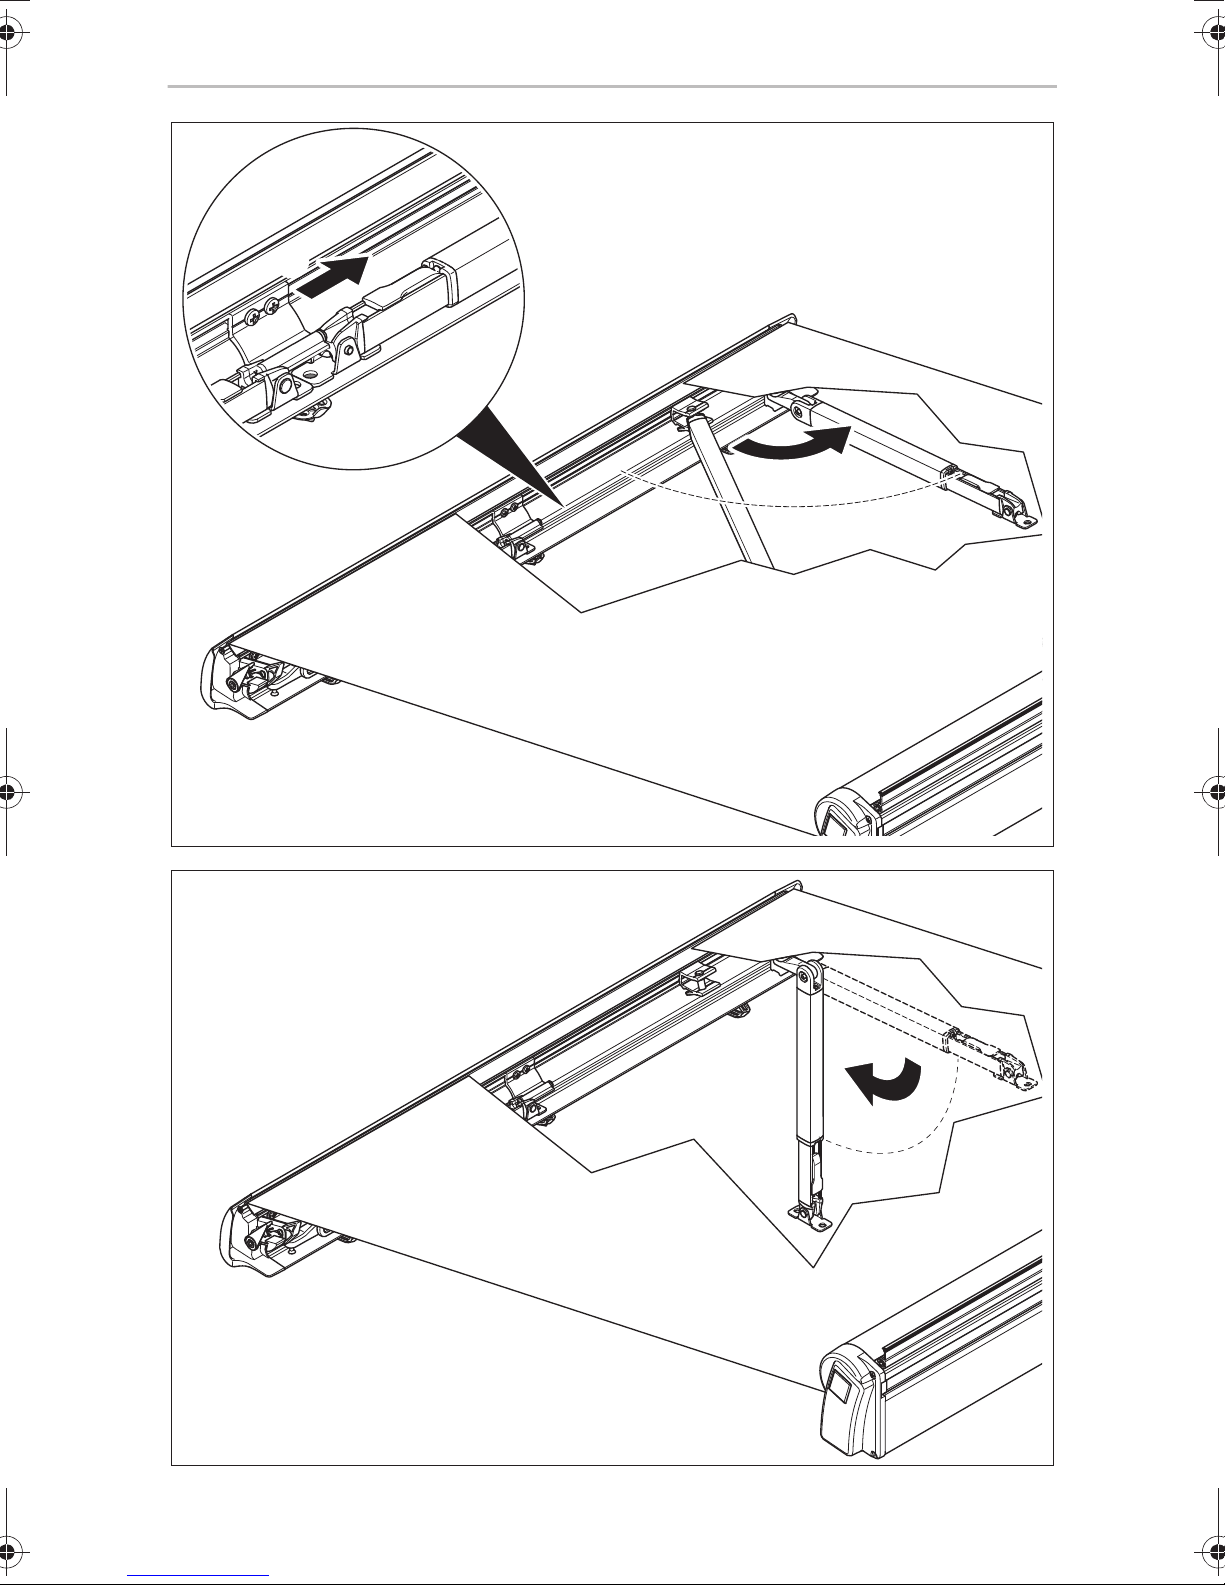
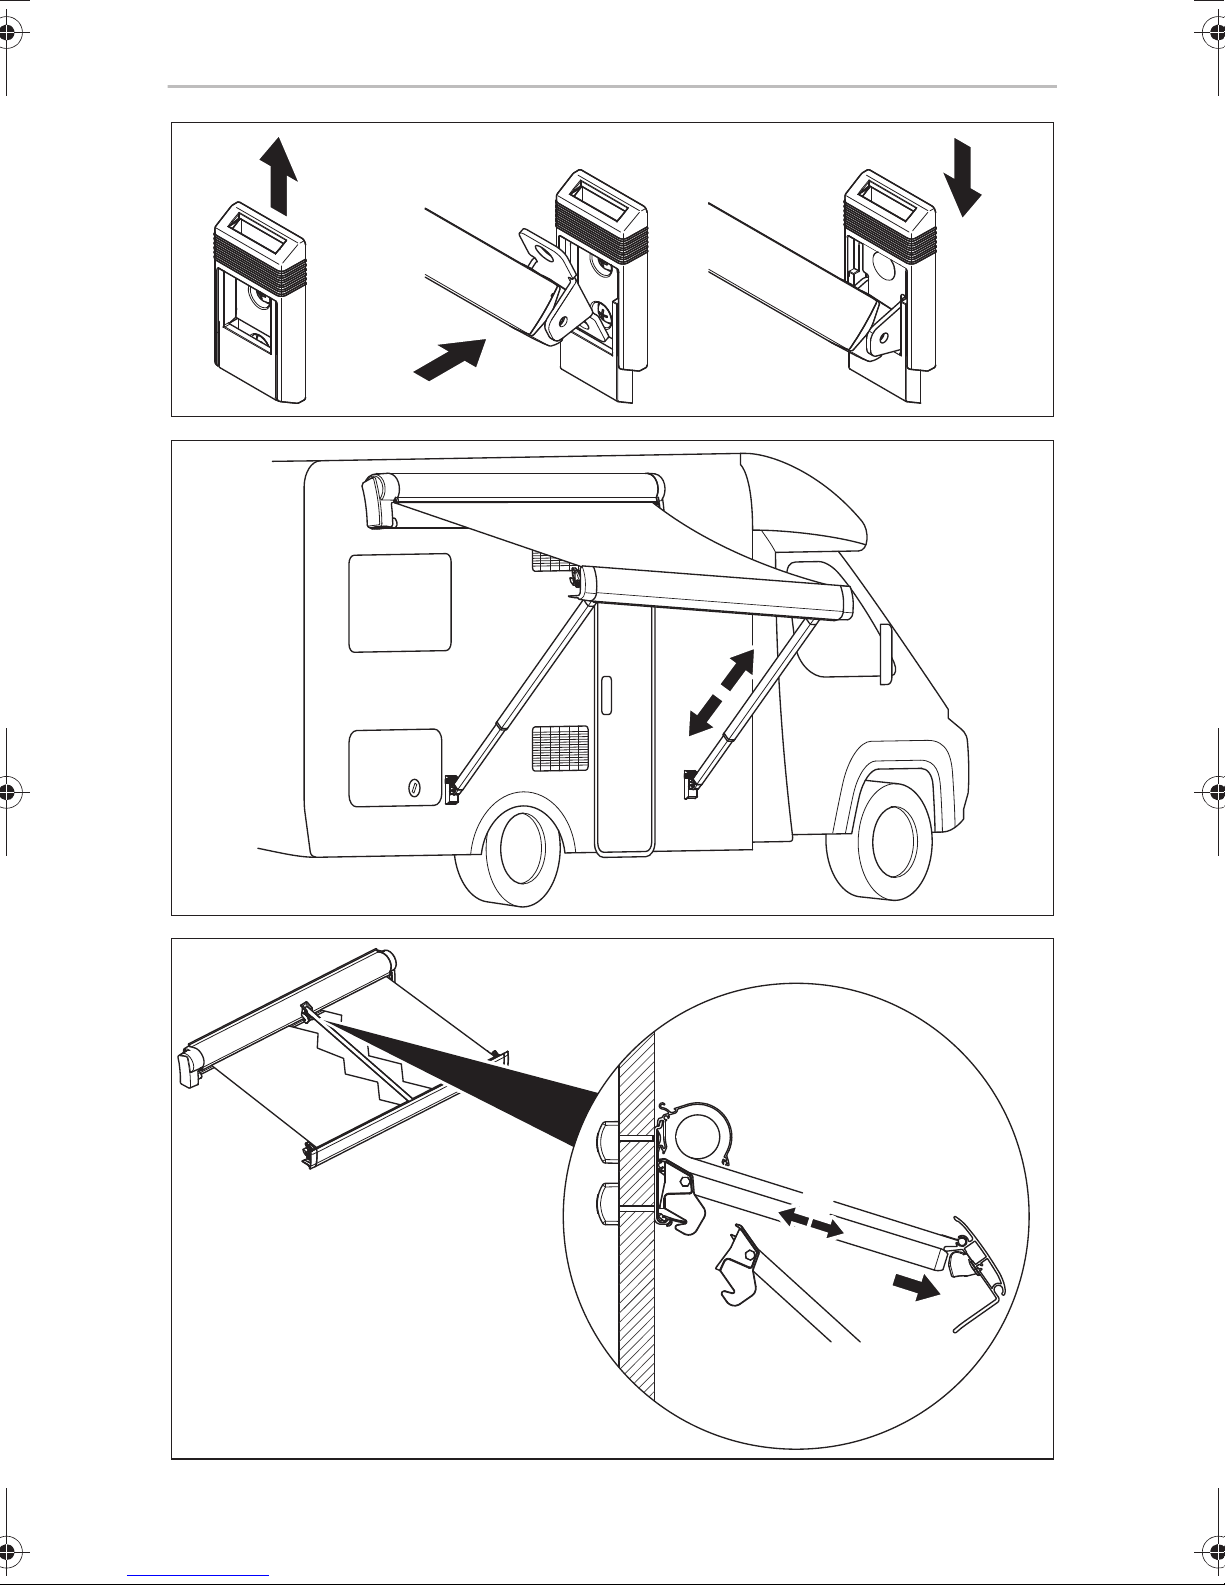
➤ Push the right strut in the front cover together so that you can move it freely
(fig. 5, page 5).
➤ Turn the right strut to the side (fig. 5, page 5).
➤ Fold the right strut down and set it on the ground (fig. 6, page 5).
➤ Adjust the strut to the required height (fig. 7, page 6).
➤ Fold the lever for the strut up to secure the struts (fig. 8, page 6).
➤ Extend the other strut in the same way.
➤ Turn the hand crank until the awning is extended to the required position.
Position the struts vertically and back under the lead rail every 30 cm so that the
awning stays secured at all times.
➤ Turn the hand crank approx. a quarter of the way back to tighten the fabric.
18

EN
PW1000, PW1500, PW1750 Operating the awning
NOTICE! Beware of damage.
A
➤ Remove the hand crank from the holder on the awning.
Extending the awning using a 12 V motor (only PW1500/PW1750,
optional)
!
The fabric of the awning should not hang down at the edges, and must
remain taut at all times. If the fabric hangs down, it could rub against the
arms and become damaged.
The fabric used for long awnings should not sag in the middle.
WARNING! Beware of injury.
Keep a sufficient distance from objects or other vehicles. Once it is
retracted, it should be at least 40 cm away from other objects and
vehicles on all sides.
NOTE
I
➤ Press the button of the switch or the remote control until the awning is
extended by about 1.5 metres (fig. 4, page 4).
➤ Push the right strut in the front cover together so that you can move it freely
(fig. 5, page 5).
➤ Turn the right strut to the side (fig. 5, page 5).
Only for operation with the remote control:
• When the vehicle is started, the awning retracts automatically. While
the vehicle is running, the awning is blocked and can not be
extended.
• The receiver beeps once when it is switched on.
• Operation of the remote control can be affected by interference if
another device is being used nearby on the same frequency.
• Keep the remote control in a safe place while you are driving. The
magnet in the holder is not designed for strong vibrations, such as
sudden braking.
➤ Fold the right strut down and set it on the ground (fig. 6, page 5).
➤ Adjust the strut to the required height (fig. 7, page 6).
➤ Fold the lever for the strut up to secure the struts (fig. 8, page 6).
➤ Extend the other strut in the same way.
19
EN
Operating the awning PW1000, PW1500, PW1750
➤ Press the button of the switch or the remote control until the awning is
extended to the required position. Position the struts vertically and back under
the lead rail every 30 cm so that the awning stays secured at all times.
➤ Press the switch of the switch or the remote control until the awning has
retracted far enough to tauten the fabric.
NOTICE! Beware of damage.
A
Positioning the struts on the ground
!
The fabric of the awning should not hang down at the edges, and must
remain taut at all times. If the fabric hangs down, it could rub against the
arms and become damaged.
The fabric used for long awnings should not sag in the middle.
WARNING! Beware of injury
• Only position the struts on solid ground.
• Secure the struts from slipping.
➤ Position the struts vertically underneath the lead rail.
➤ Secure the struts with pegs (fig. 9, page 6).
➤ Position one of the struts slightly lower so that the lead rail hangs at an angle. This
allows rain to run off more easily (fig. 0, page 6).
Securing the struts on the vehicle
You can secure the awning on your vehicle directly if you have already mounted the
latches for the struts.
➤ Slide the cover of the latch up (fig. a, page 7).
➤ Fit the struts into the latch (fig. a, page 7).
➤ Slide the cover of the latch down (fig. a, page 7).
➤ Position one of the struts slightly lower so that the lead rail hangs at an angle. This
allows rain to run off more easily (fig. b, page 7).
20
EN
PW1000, PW1500, PW1750 Operating the awning
Mounting the tension rafter (fig. c, page 7)
Awnings with a length of 4 metres or more need to have a tension rafter fitted in the
middle of the awning. This prevents the awning from sagging.
➤ Slide the tension rafter together.
➤ Fit the top end of the tension rafter into the attachment on the housing.
➤ Slide the other end of the tension rafter into the attachment in the lead rail.
7.3 Retracting the awning
NOTICE!
A
• Only retract the awning when the fabric is free of debris (branches,
leaves or similar). Otherwise the awning may be damaged when it is
retracted.
• Keep the awning free of dirt to prevent abrasions, stains and mildew.
• When retracting the awning, make sure that no branches or other
objects are trapped in it.
➤ Remove any debris (branches, leaves or similar) lying on the fabric.
➤ Loosen the struts from the fastenings (pegs or latches on the vehicle).
Retracting the awning using a hand crank
➤ Click the top end of the hand crank into the holder in the awning.
➤ Turn the hand crank until the awning is extended by only about 1.5 metres.
Position the struts vertically and back under the lead rail every 30 cm so that the
awning stays secured at all times.
➤ Fold the lever of the right strut down to loosen the struts.
➤ Slide the struts together completely.
➤ Fold the right strut up.
➤ Turn the right strut into the lead rail.
➤ Slide the bottom part of the right strut into the latch of the lead rail.
➤ Retract the other strut in the same way.
➤ Turn the hand crank until the awning is fully retracted.
21
EN
Operating the awning PW1000, PW1500, PW1750
➤ Double-check that the awning is fully retracted before starting your journey.
The lead rail should be right up against the housing.
➤ Remove the hand crank from the holder on the awning.
NOTICE! Beware of damage.
A
Retracting the awning using a 12 V motor (only PW1500/PW1750,
optional)
➤ Press the button of the switch or the remote control until the awning is only
extended by about 1.5 metres. Position the struts vertically and back under the
lead rail every 30 cm so that the awning stays secured at all times.
➤ Fold the lever of the right strut down to loosen the struts.
If the awning is retracted when wet, extend it again and let the fabric dry
out at the next opportunity. If the wet fabric stays rolled up for a long
time, mildew will form and the fabric can fade.
➤ Slide the struts together completely.
➤ Fold the right strut up.
➤ Turn the right strut into the lead rail.
➤ Slide the bottom part of the right strut into the latch of the lead rail.
➤ Retract the other strut in the same way.
➤ Press the button of the switch or the remote control until the awning has been
completely retracted.
➤ Double-check that the awning is fully retracted before starting your journey. The
lead rail should be right up against the housing.
NOTICE! Beware of damage.
A
If the awning is retracted when wet, extend it again and let the fabric dry
out at the next opportunity. If the wet fabric stays rolled up for a long
time, mildew will form and the fabric can fade.
22

EN
PW1000, PW1500, PW1750 Operating the awning
7.4 Unrolling the blind (only PW1750)
➤ Open the lock in the middle of the lead rail (fig. d, page 8).
➤ Push the brackets on the right and left into the rails of the roller blind (fig. e,
page 8).
➤ Guide the tensioning belts or cords through the loops of the brackets (fig. e,
page 8).
➤ Pull the roller blind down evenly with both hands at the rails (fig. f, page 8).
The maximum extension height is 1.2 m.
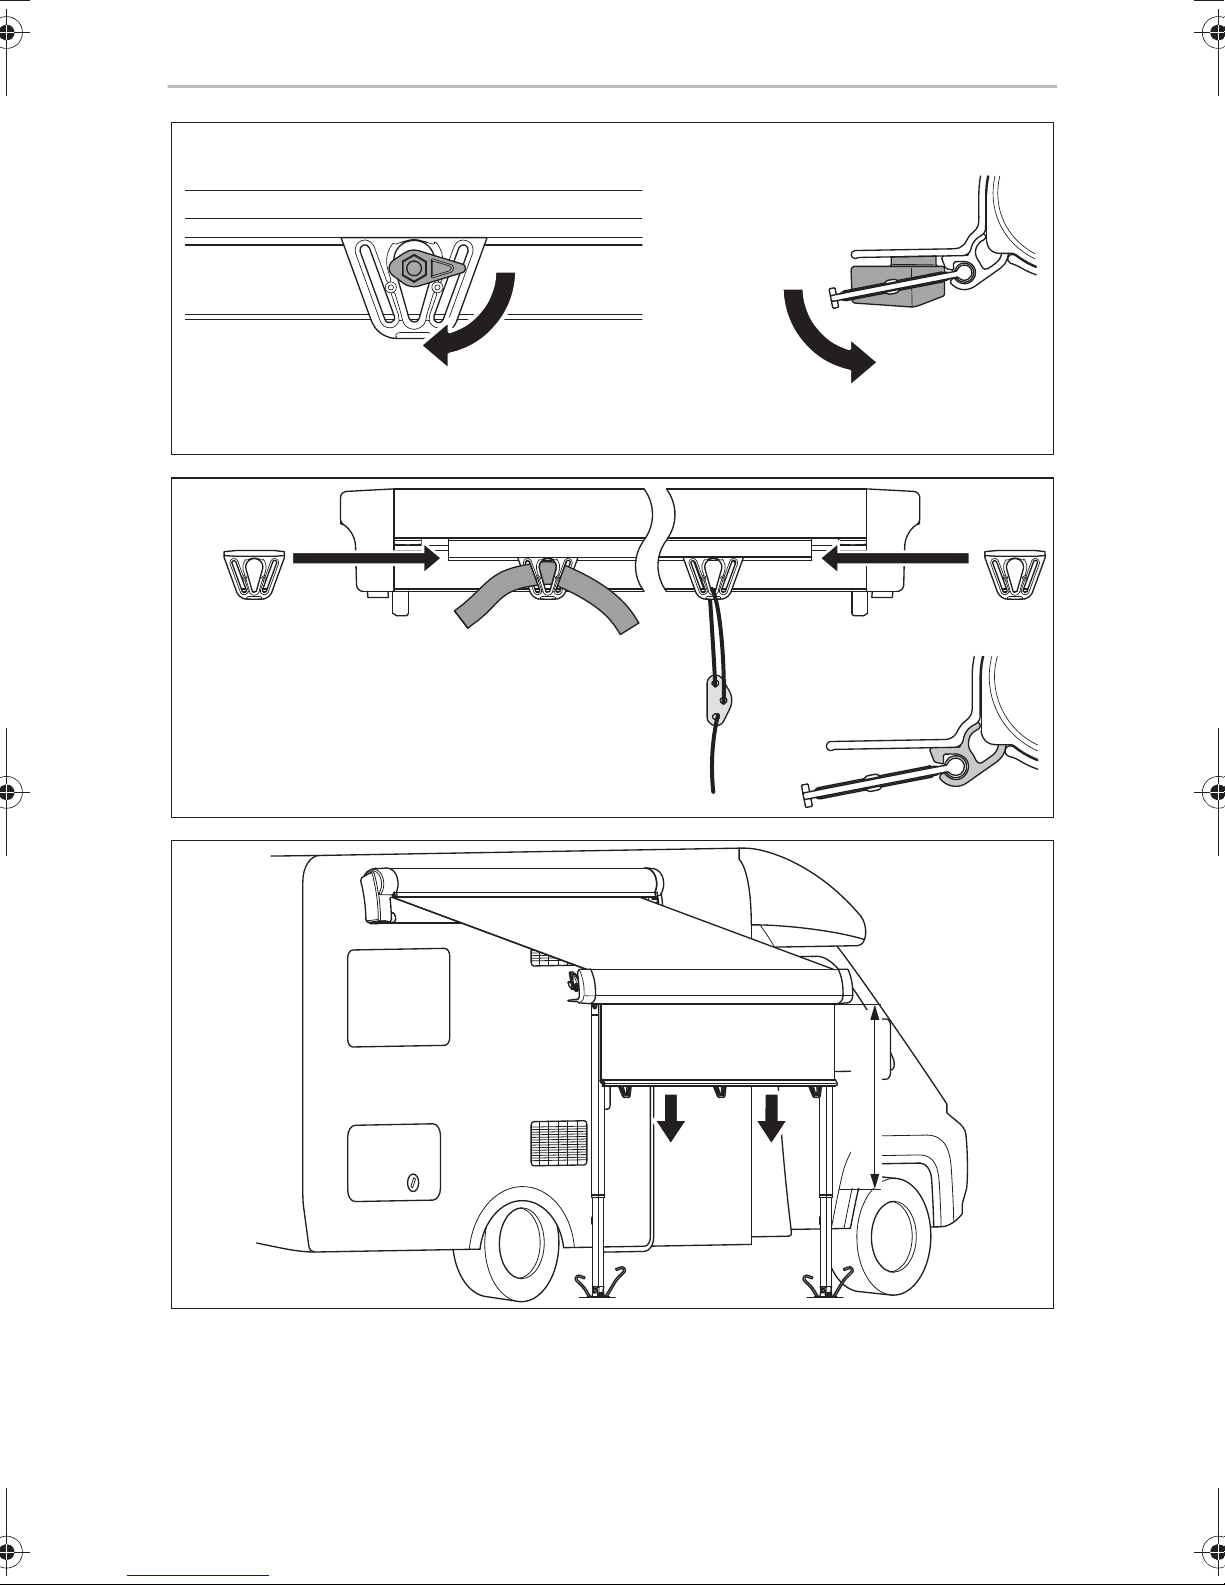
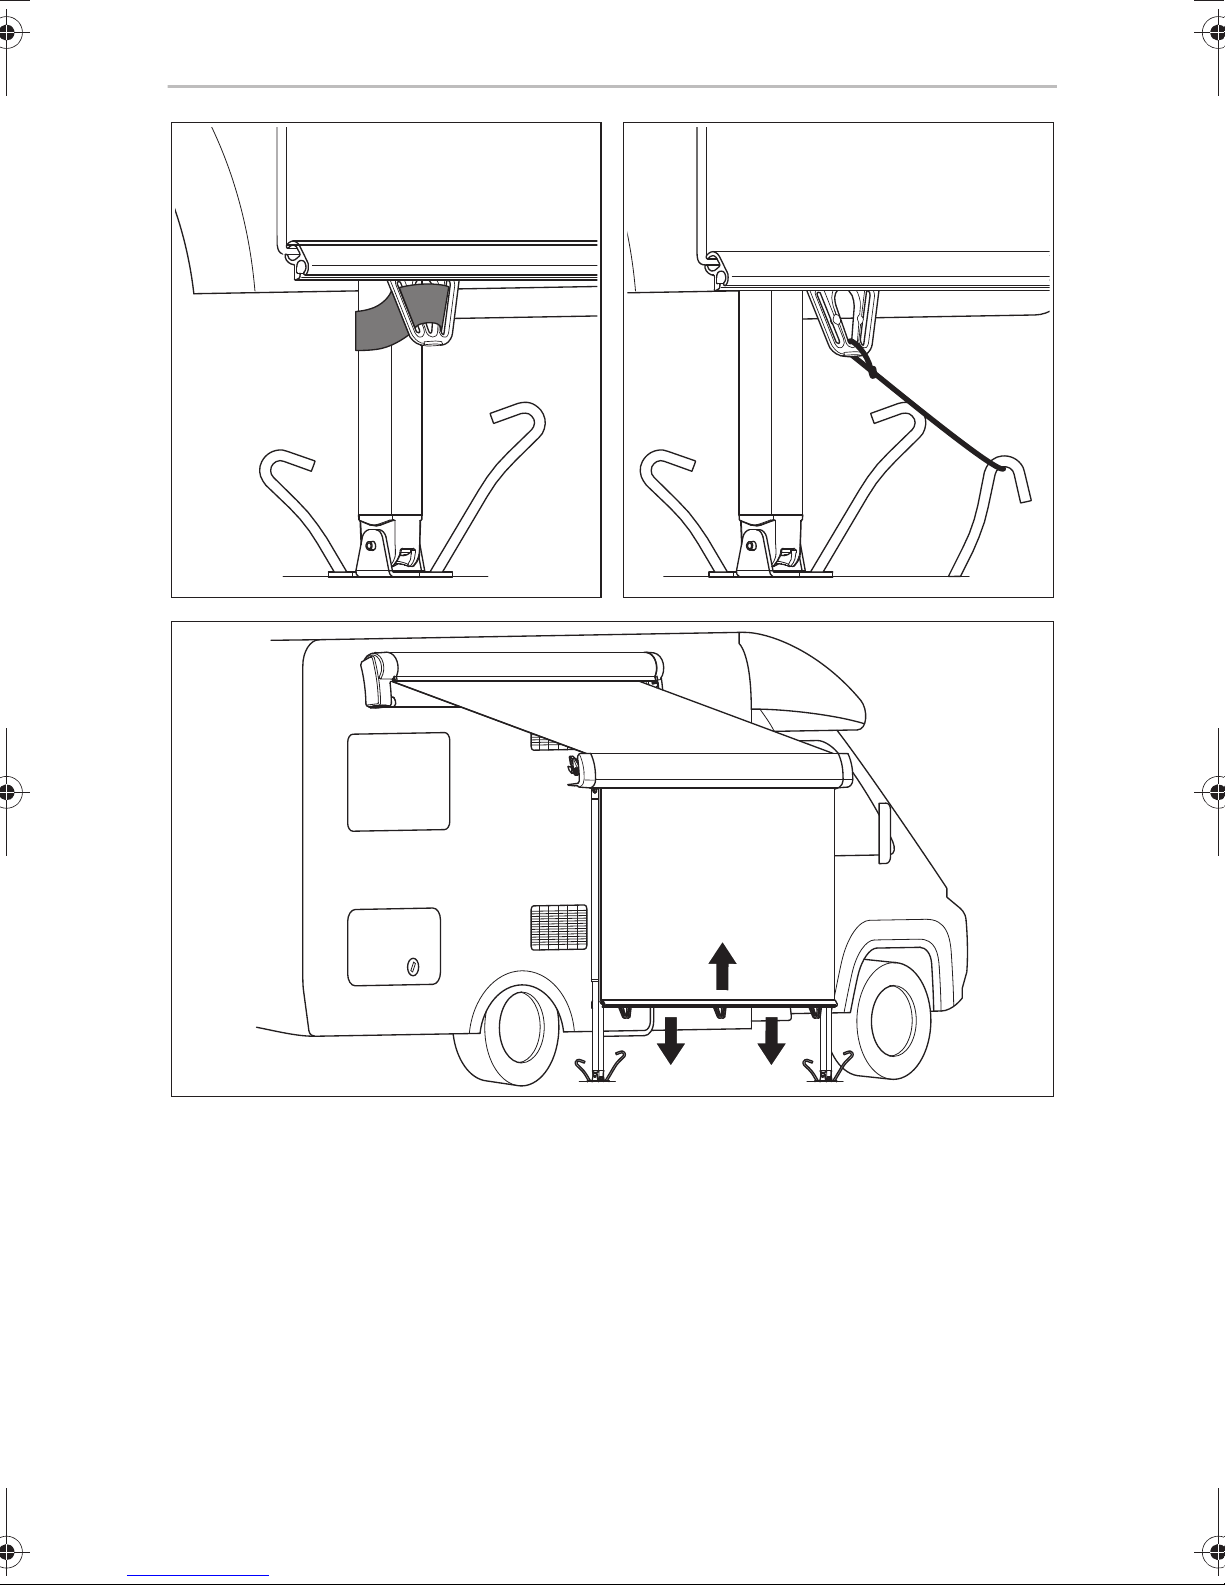
➤ Secure the brackets on the right and left using the struts (fig. g, page 9).
or
➤ Secure the cords with pegs (fig. h, page 9).
7.5 Rolling up the blind (only PW1750)
➤ Loosen the fasteners of the roller blind.
➤ Pull the roller blind down (fig. i, page 9).
✓ The blind then rolls itself into the lead rail.
➤ Pull the brackets on the right and left out of the rail (fig. j, page 10).
➤ Lock the lock in the middle of the lead rail (fig. k, page 10).
NOTICE! Beware of damage.
A
If the roller blind is rolled up when wet, roll it out again at the next
opportunity and let the fabric dry out. If the wet fabric stays rolled up
for a long time, mildew will form and the fabric can fade.
23
EN
Operating the awning PW1000, PW1500, PW1750
7.6 Adjusting the 12 V motor (only PW1500/PW1750,
optional)
NOTE
The 12 V motor is pre-assembled in the roller tube.
I
➤ If the awning no longer fully closes or opens, then adjust the 12 V motor (fig. l,
page 10).
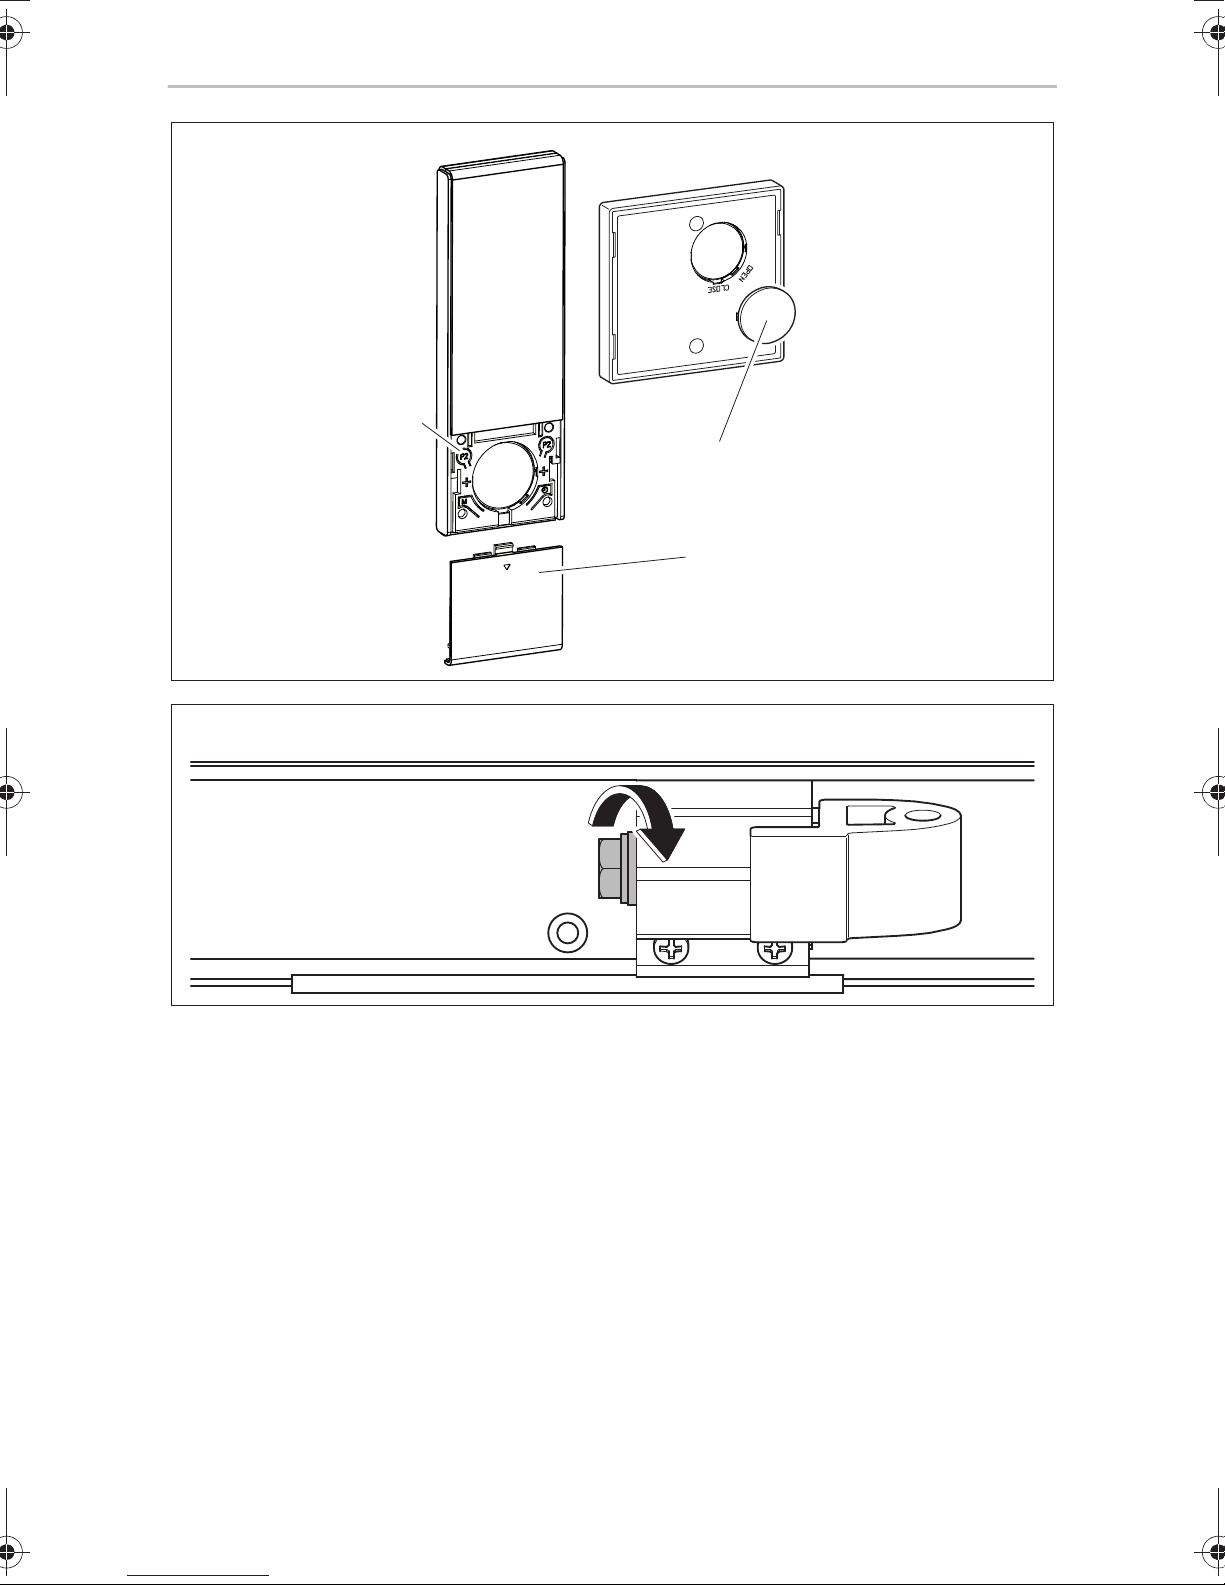
7.7 Replacing the batteries of the remote control and the
wall switch (only PW1500/PW1750, optional)
NOTE
I
If the LED of the remote control does not light up after pressing one of
the buttons, the remote control battery is flat.
➤ Open the housing (fig. m 1, page 11).
➤ Remove the old battery from the holder.
➤ Insert a new battery (type CR2450 for remote control, type CR2430 for wall
switch, fig. m 2, page 11) into the holder with the positive terminal facing
upwards.
➤ Reassemble the remote control or wall switch.
Protect the environment!
Do not dispose of any batteries with general household waste.
B
Return defective or used batteries to your retailer or dispose of them at
collection points.
24
EN
PW1000, PW1500, PW1750 Cleaning and maintenance
8 Cleaning and maintenance
8.1 Cleaning
NOTICE! Beware of damage.
A
➤ Remove any debris (twigs, leaves or similar) lying on the awning fabric to prevent
abrasions, stains and mildew. The awning can also be damaged when it is
retracted.
➤ Clean the awning fabric regularly to remove any dirt and dust:
– To do this, use water with 30 ml detergent and 30 ml bleach for 10 litres of
– Soap down the fabric and leave the liquid to soak in for five minutes.
– Rinse thoroughly with clean water.
– Leave the fabric to dry.
• Never clean the awning with a high-pressure cleaner.
• Do not use abrasive cleaning agents or hard objects during cleaning,
as these can damage the product.
water.
Make sure that the detergent with the bleach is completely washed off.
Otherwise it can damage the fabric.
NOTE
I
8.2 Lubricating
➤ If required, lubricate the joints of the awning with paraffin wax, teflon oil or
silicone oil.
The manufacturer recommends:
To clean the cloth, use the Dometic awning cleaner
(ref. no. 9600000165, available from your service partner).
25
EN
Cleaning and maintenance PW1000, PW1500, PW1750
8.3 Checking
WARNING!
!
➤ Check the awning regularly for any imbalance and wear, as well as damage to
major parts.
➤ Check the awning regularly:
– Is the fabric free of damage?
– Are the arms and lead rail free of damage with no signs of wear?
– Does the awning close properly?
Do not use the awning if any settings or maintenance work are required.
If you discover any damage, please contact a service partner in the
respective country (see addresses on the back of the manual).
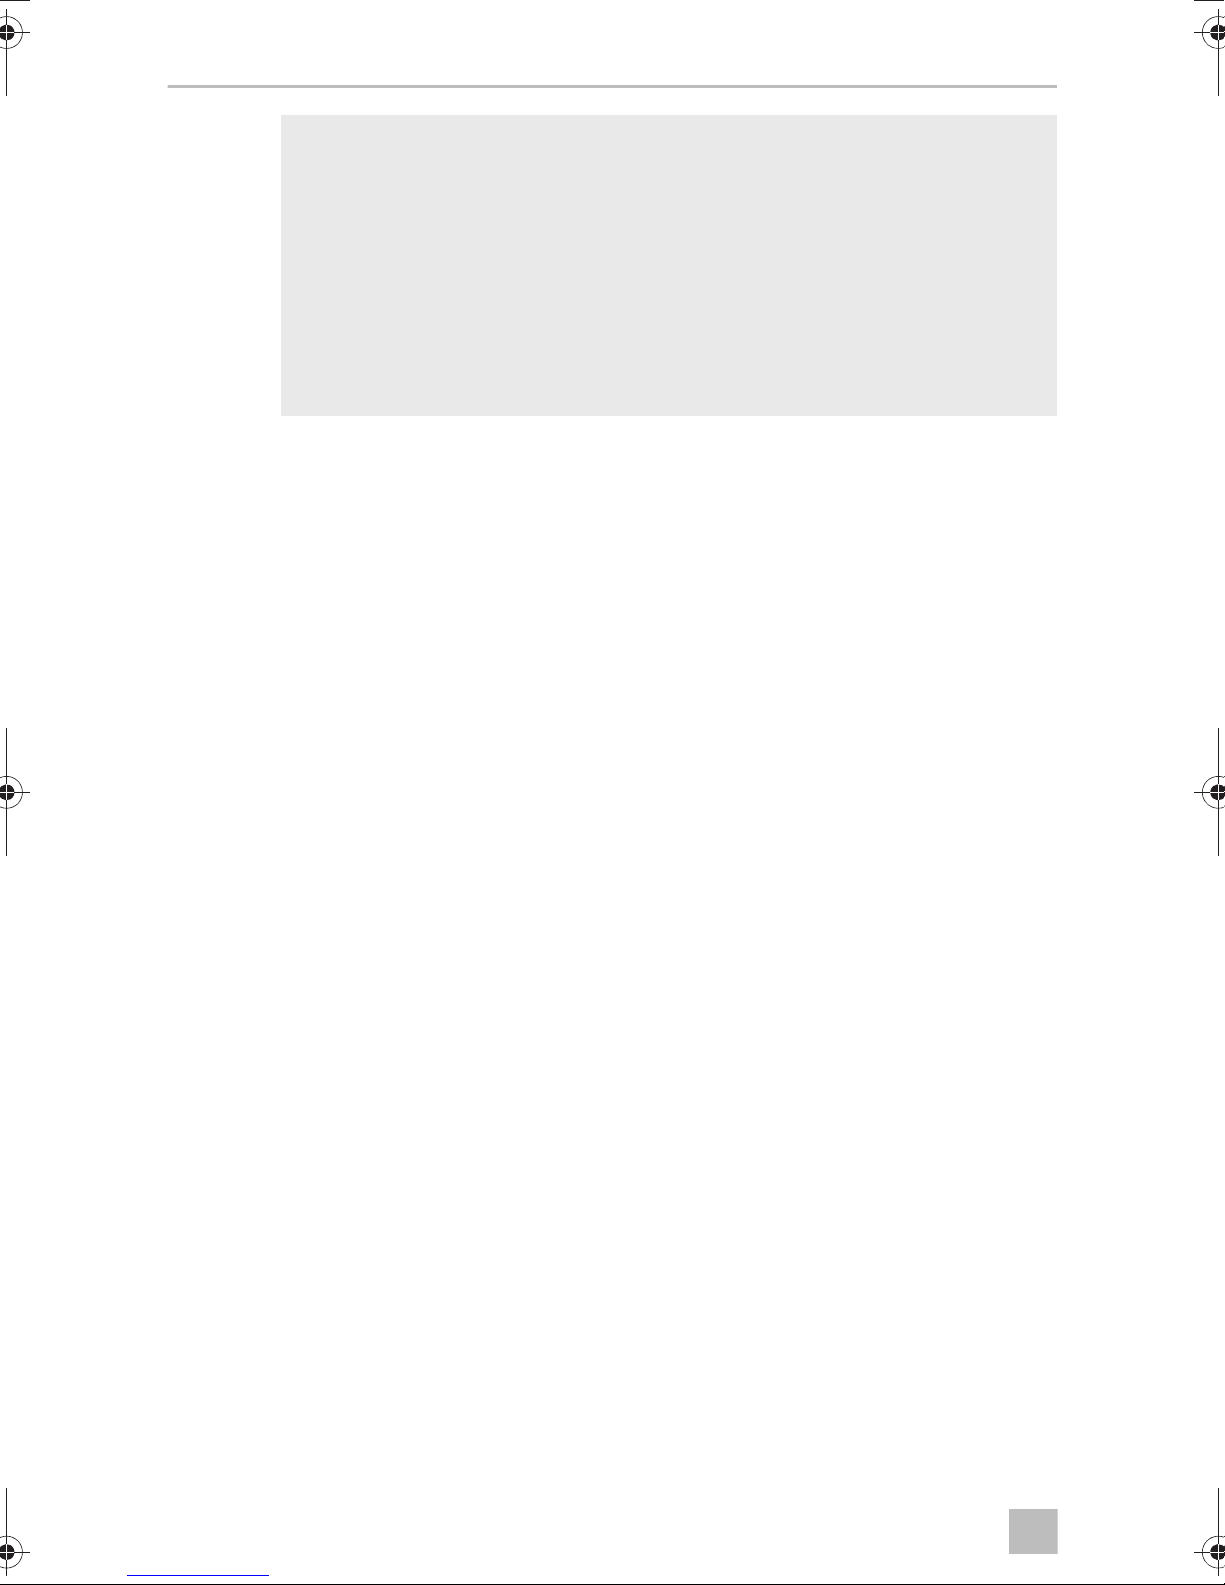
8.4 Tighten up the screws on the rear hinge
The screws on the rear hinge must be re-tightened after being subjected to a load for
the first time:
• after the first holiday using the awning
• after driving 20,000 km or six months after the awning was installed
(whichever occurs first)
The screws on the rear hinge also need to be checked during the routine vehicle
inspection.
Contact your service partner to re-tighten the screws.
Instructions for servicing (fig. n, page 11)
NOTICE!
A
➤ Lift up the lead rail slightly so that the hinge is not bearing any load.
➤ Tighten the screws with 15 – 25 Nm.
The awning arms must not bear any load. This is to prevent the fastening
torque of the screws from being distorted.
26
EN
PW1000, PW1500, PW1750 Troubleshooting
8.5 Patching small holes in the fabric
You can patch any small holes in the fabric or parts where the coating has come off:
➤ Use a cotton cloth to rub around the damaged area with a small amount of liquid
vinyl plaster (ref. no. 9103104018, available from your service partner).
✓ The liquid vinyl plaster dissolves the coating. The coating seals the hole when it
dries.
➤ Wait until the area is dry before you retract the awning again.
9 Troubleshooting
NOTE
I
If you are not able to rectify a fault with the help of the following table,
please contact the relevant service partner in your country (see the back
of the manual for the address).
Fault Possible cause Suggested remedy
PW1500/PW1750
only:
The motor is not
responding to the
remote control.
The remote control
battery is flat.
The remote control is no
longer or not properly
set to the motor.
No power supply
available
The motor is defective. Retract the awning manually and
Briefly press one of the buttons or
. If the remote control LED does not
light up, the battery is flat.
Replace the battery, see chapter
“Replacing the batteries of the remote
control and the wall switch (only
PW1500/PW1750, optional)” on
page 24.
Reprogram the remote control, see the
installation manual.
Check the electric connections.
contact the service partner in the
respective country.
27
EN
Warranty PW1000, PW1500, PW1750
10 Warranty
The statutory warranty period applies. If the product is defective, please contact your
retailer or the manufacturer's branch in your country (see the back of the instruction
manual for the addresses).
For repair and guarantee processing, please include the following documents when
you send in the device:
• A copy of the receipt with purchasing date
• A reason for the claim or description of the fault
11 Disposal
➤ Place the packaging material in the appropriate recycling waste bins wherever
possible.
M
If you wish to finally dispose of the product, ask your local recycling centre
or specialist dealer for details about how to do this in accordance with the
applicable disposal regulations.
28
EN
PW1000, PW1500, PW1750 Technical data
12 Technical data
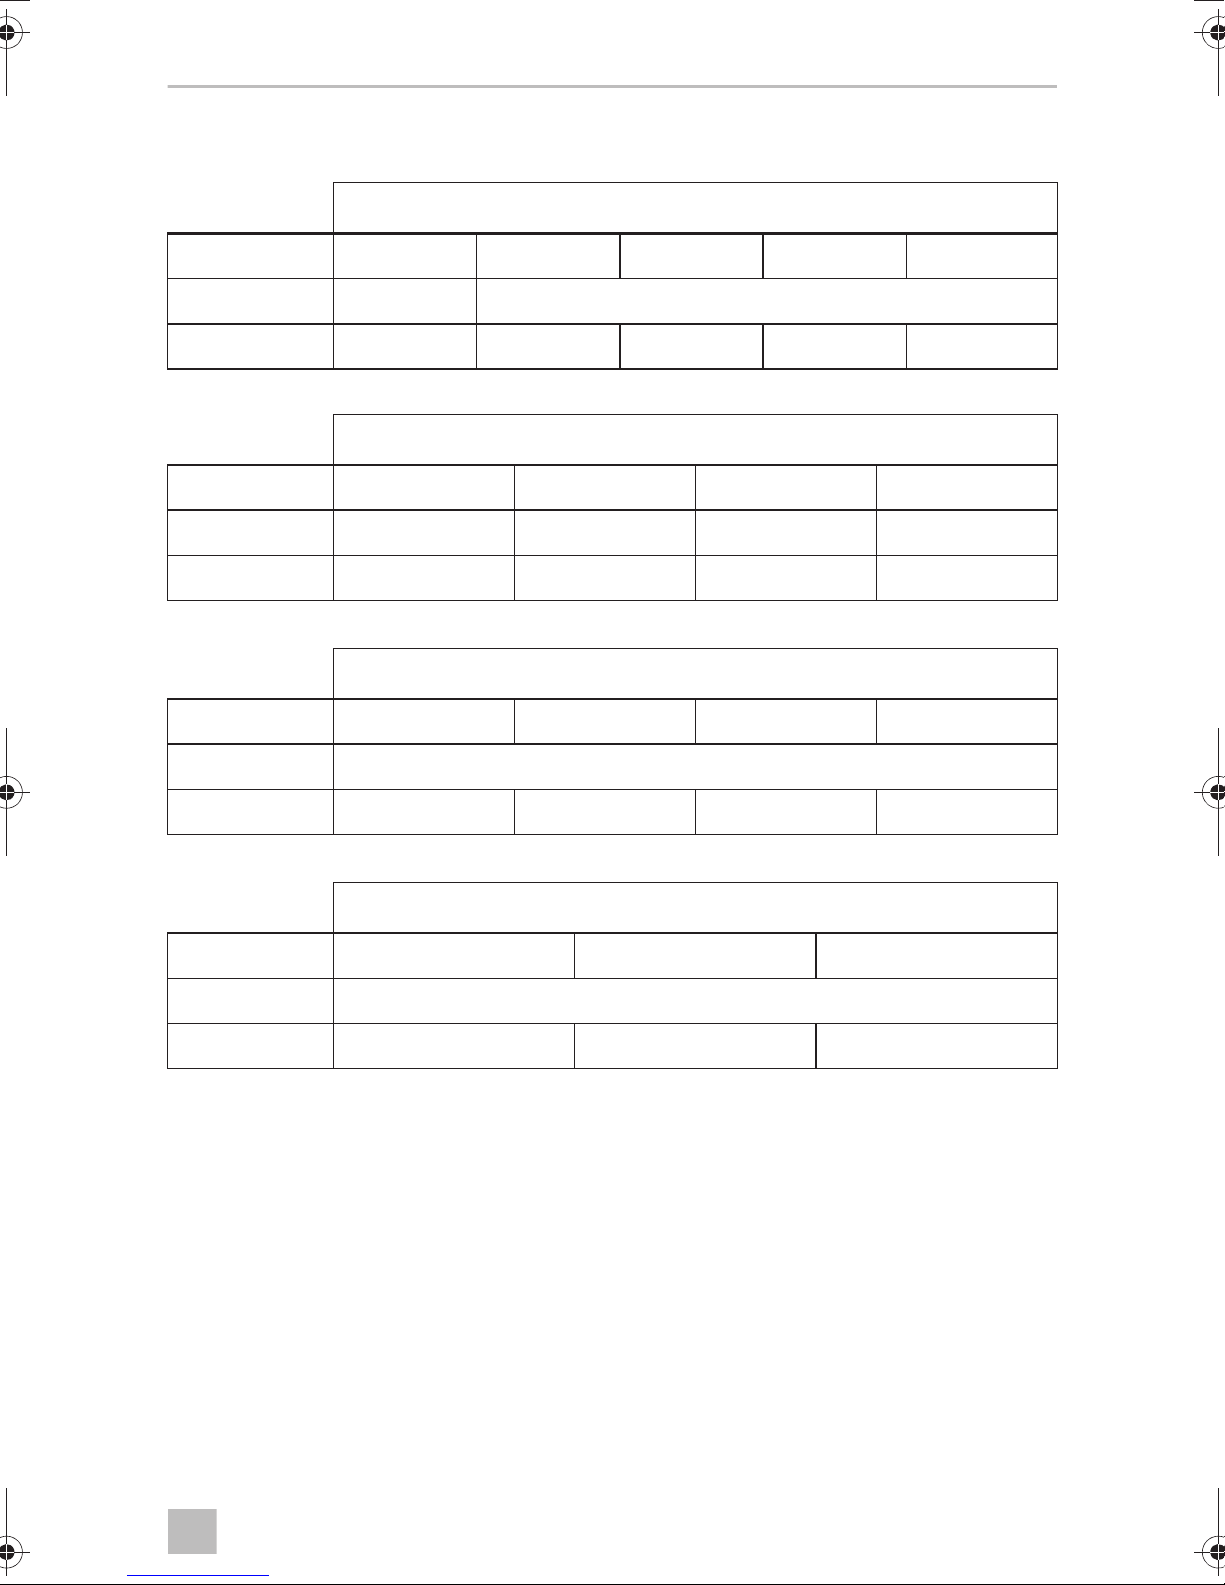
PerfectWall PW1000
Width: 2.6m 3m 3.5m 4m 4.5m
Extended: 2 m 2.5 m
Weight: 18.6kg 21kg 24kg 27kg 30kg
PerfectWall PW1500
Width: 1.5m 2.6m 3m 3.5m
Extended: 1 m 2 m 2.5 m 2.5 m / 2.75 m
Weight: 12kg 18kg 21kg 24kg
PerfectWall PW1500
Width: 4m 4.5m 5m 5.5m
Extended: 2.5 m / 2.75 m
Weight: 27kg 30kg 33kg 36kg
PerfectWall PW1750
Width: 3m 3.5m 4m
Extended: 2.5 m
Weight: 26kg 30kg 33kg
29
EN
Technical data PW1000, PW1500, PW1750
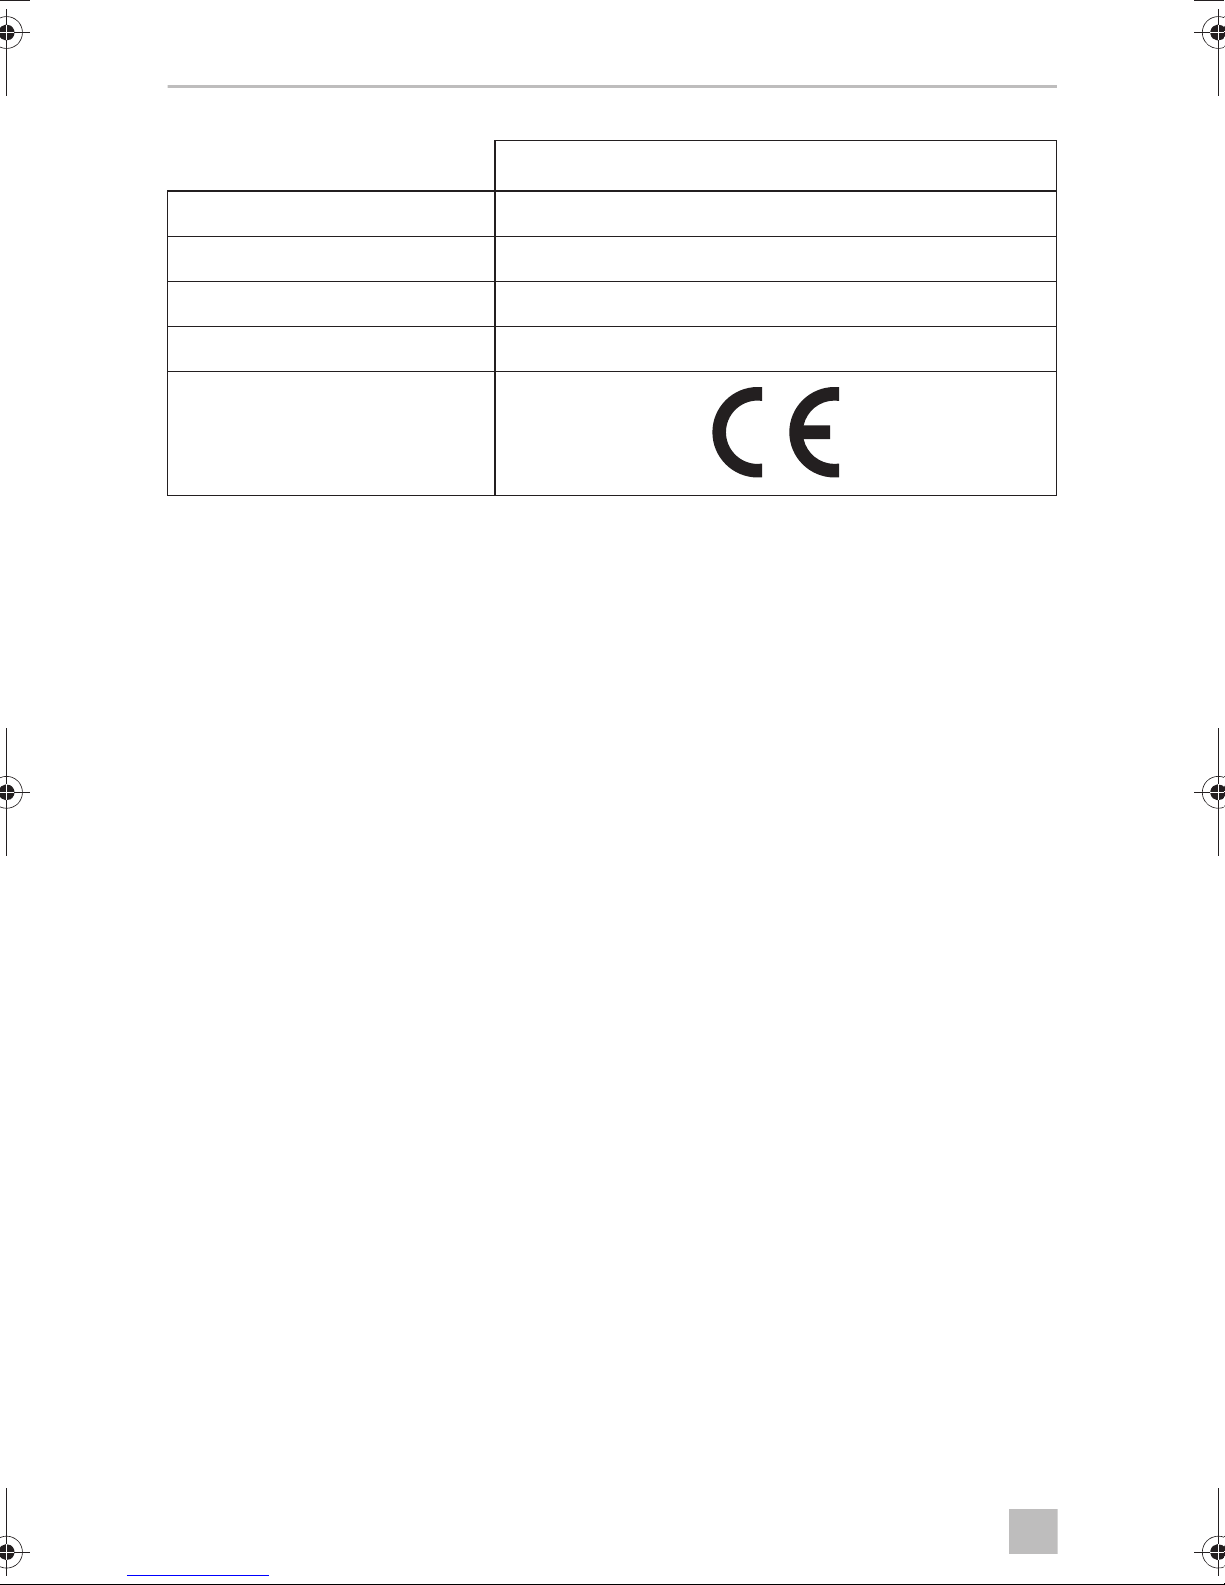
12 V motor (only PW1500 and PW1750)
Connection voltage: 12 Vg (11 – 15 V)
Amperage: 7 A
Output power: 84 W
Torque: 35 Nm
Inspection/certification:
30
 Loading...