

Dometic PR4500 Operating Manual
PR4500
ENDEFRESPTITNL
EL
AWNINGS
PERFECTROOF
Premium Awning
Operating manual . . . . . . . . . . . . . . . . . . . . . 7
Premium Markise
Bedienungsanleitung . . . . . . . . . . . . . . . . .28
Auvent premium
Notice d’utilisation . . . . . . . . . . . . . . . . . . .50
Tol do P re m ium
Instrucciones de uso . . . . . . . . . . . . . . . . . . 71
Tol do P re m ium
Manual de instruções . . . . . . . . . . . . . . . . .93
Marquise Premium
Istruzioni per l’uso . . . . . . . . . . . . . . . . . . . 115
Premium zonnescherm
Gebruiksaanwijzing. . . . . . . . . . . . . . . . . .136
Τέντα Premium
Οδηγίες χειρισμού . . . . . . . . . . . . . . . . 157

PR4500
1
1
2
3
4
5
2
2
1
3
1
4
3
PR4500
1
5
6
A
B
1.
2.
CD
1
4
2
PR4500
7
8
A
B
1
2
1
5
PR4500
1
9
16 – 18 Nm
20 – 22 Nm
0
6

EN
PR4500
WARNING!
!
• This manual must be read and understood before use, adjustment,
cleaning and maintenance. This unit must be installed by a qualified
service technician. Incorrect installation can lead to severe injury.
Modification of this product can be extremely hazardous and could
result in personal injury or property damage.
• These instructions must stay with unit. Owner read carefully.
Table of contents
1 Explanation of symbols. . . . . . . . . . . . . . . . . . . . . . . . . . . . . . . . . . . . . . . . . . .8
2 Important safety instructions. . . . . . . . . . . . . . . . . . . . . . . . . . . . . . . . . . . . . . .8
3 Intended use . . . . . . . . . . . . . . . . . . . . . . . . . . . . . . . . . . . . . . . . . . . . . . . . . . 11
4 Accessories . . . . . . . . . . . . . . . . . . . . . . . . . . . . . . . . . . . . . . . . . . . . . . . . . . . 11
5 Technical description . . . . . . . . . . . . . . . . . . . . . . . . . . . . . . . . . . . . . . . . . . .12
6 Operating the awning. . . . . . . . . . . . . . . . . . . . . . . . . . . . . . . . . . . . . . . . . . .12
7 Adjusting the awning . . . . . . . . . . . . . . . . . . . . . . . . . . . . . . . . . . . . . . . . . . .18
8 Cleaning and maintenance. . . . . . . . . . . . . . . . . . . . . . . . . . . . . . . . . . . . . . 22
9 Warranty . . . . . . . . . . . . . . . . . . . . . . . . . . . . . . . . . . . . . . . . . . . . . . . . . . . . 24
10 Disposal . . . . . . . . . . . . . . . . . . . . . . . . . . . . . . . . . . . . . . . . . . . . . . . . . . . . . 24
11 Troubleshooting . . . . . . . . . . . . . . . . . . . . . . . . . . . . . . . . . . . . . . . . . . . . . . 25
12 Technical data . . . . . . . . . . . . . . . . . . . . . . . . . . . . . . . . . . . . . . . . . . . . . . . . 27
7
EN
Explanation of symbols PR4500
1 Explanation of symbols
WARNING!
!
A
Safety instruction: Failure to observe this instruction can cause fatal or
serious injury.
NOTICE!
Failure to observe this instruction can cause material damage and impair
the function of the product.
NOTE
Supplementary information for operating the product.
I
2 Important safety instructions
Please observe the prescribed safety instructions and stipulations from the
vehicle manufacturer and service workshops.
The manufacturer accepts no liability for damage in the following cases:
• Damage to the product resulting from mechanical influences and excess voltage
• Alterations to the product without express permission from the manufacturer
• Use for purposes other than those described in the operating manual
Observe the following warnings:
WARNING!
!
• Make sure that water or snow does not accumulate on the fabric.
Otherwise this could damage the awning or the awning arms could
collapse and cause severe injury or fatality.
• Do not open the awning while driving.
• Do not open the awning in strong wind or snowfall.
• Retract the awning if strong wind, heavy rain or snowfall is expected.
8
EN
PR4500 Important safety instructions
• Do not approach awning
– if left open during high winds,
– if water has pooled,
– if snow accumulated,
– if heavy debris is on awning fabric.
The awning could move unpredictably, become unstable, and bend
or collapse.
• Do not leave the extended awning unattended. Retract the awning
before leaving your location.
• Do not use the awning if it or the connection cable shows visible signs
of damage. Always have any damage repaired by a service partner in
the respective country (addresses on the back of the manual).
• Do not use the awning if the wind sensor does not work.
• Before starting your journey, check that the awning is fully retracted.
Never move the vehicle when the awning is open.
• Do not drive the vehicle if the fabric is damaged or torn, even if the
awning has been properly retracted. The awning arms are held in
place by the fabric. If the fabric rips while driving, the awning will
suddenly shoot out. This can lead to serious injury. Secure the awning
so that it cannot extend quickly and unexpectedly during transit.
• If the connection cable for the awning is dam aged , it must be replaced
by an electrician.
• Disconnect the power supply with the external on/off switch before
you clean the vehicle in the vicinity of the awning, or if you clean the
awning itself.
• Keep a safe distance away from the awning when having barbecues or
open fires. The fabric can be damaged by heat or catch fire.
• Persons (including children) whose physical, sensory or mental
capabilities or whose lack of experience and knowledge prevent them
from using the device safely should not use it without supervision or
instruction by a person responsible for their safety.
• Electrical devices are not toys.
Always keep the remote control out of the reach of children. Keep
children from playing with the wall switch (accessory).
• Children must be supervised to ensure that they do not play with the
device.
9

EN
Important safety instructions PR4500
NOTICE!
A
• Park the motorhome or caravan so that no debris (branches, leaves or
similar) can get onto the fabric. If the wind sensor is triggered by a
strong wind, the awning retracts automatically and any debris lying on
the fabric can result in damage to the awning.
• The fabric edges of the awning should not hang down and must be
taut at all times. If the fabric hangs down, it could rub on the arms and
get damaged.
Readjust the outer limit if the fabric hangs down when the awning is
fully extended.
On long awnings the fabric may sag in the middle.
• Only retract the awning, when the fabric is free of debris (branches,
leaves or similar). Otherwise the awning can be damaged when it is
retracted.
• Keep the awning free of debris to avoid abrasion, stains and mildew.
• Only retract the awning wet in case of safety issues. After this open it
as soon as possible to dry. Otherwise the awning could become
mildewed, or discoloured, or stained.
• Never pull an awning arm or the cover down to drain water off the
awning. This can bend the awning and impair its function.
• Do not hang any objects on the awning, on the front cover or the
awning arms.
• Do not use any sprays (e. g. insect repellent, hairspray) near the
awning. This will soil the fabric or the water-repellent effect of the
fabric will be lost.
• Do not exceed the rated operating time of 5 min/hour.
• If there is insufficient space above the door after the awning is
mounted, the door must remained closed when retracting or
extending to avoid the door making contact with the arms or the front
panel.
The required space depends on the design of the door (door width,
swing or sliding door) as well as the set awning angle of inclination.
10
EN
PR4500 Intended use
3 Intended use
The PerfectRoof Awning Type PR4500 is suitable for installing on motorhomes or
caravans.
The awning may only be used whilst the vehicle is stationary.
4Accessories
Available as accessories (not included in the scope of delivery):
Description Ref. no.
Dometic Light LK120
LED illumination with remote control for fitting on the awning arms
Side panel SP22 9103501069
Shade View, white, 3 m 9108677349
Shade View, white, 4.5 m 9108677357
Shade View, blue, 3 m 9108677353
Shade View, blue, 4.5 m 9108677361
Weather Kit 9103500743
9106504018
11
EN
Technical description PR4500
5 Technical description
PerfectRoof PR4500 is a support-free awning. It can be extended and retracted
electronically with the remote control.
It is retracted automatically in very strong winds by a built-in wind sensor. If the
awning has been retracted automatically, it can only be extended again after
60 seconds.
Light rainfall can easily drain off, as one side of the awning hangs slightly lower when
extended (fig. 1, page 3).
Control elements of the remote control (fig. 2, page 3)
Item Description
1 Retract awning
2 Stop
3 Extend awning
4 Switching the LED light on and off (accessory)
5 Operation LED
6 Operating the awning
Observe the safety instructions in chapter “Important safety instructions” on page 8.
NOTE
I
• When the vehicle engine is started, the awning retracts
automatically. While the vehicle engine is running, the awning is
blocked and cannot be extended.
• The receiver beeps once when it is switched on.
• Remote control operation can be affected by interference if another
device is being used nearby on the same frequency.
• Keep the remote control in a safe place while you are driving. The
magnet in the holder is not designed for severe shocks such as
sudden braking.
12
EN
PR4500 Operating the awning
6.1 Note on the vehicle location
Observe the following when setting up the vehicle, to avoid injury and damage:
NOTICE!
A
6.2 Extending the awning
!
➤ Briefly press the button.
✓ The awning extends all the way.
A
• Park the vehicle so that no debris (branches, leaves or similar) gets on
to the fabric. If the wind sensor is triggered by a strong wind, the
awning retracts automatically and any debris lying on the fabric can
result in damage to the awning.
• Keep the awning free of debris to avoid abrasion, stains and mildew.
WARNING! Beware of injury
Keep a sufficient distance from objects or other vehicles. Once it is
extended, it should be at least 40 cm away from other objects and
vehicles.
NOTICE! Beware of damage
Make sure that the fabric edges are taut and do not hang down. If the
fabric hangs down, it could rub on the arms and get damaged.
Readjust the outer limit if the fabric hangs down when the awning is fully
extended.
On long awnings the fabric may sag in the middle.
13
EN
Operating the awning PR4500
6.3 Retracting the awning
NOTICE! Beware of damage
A
➤ Remove any debris (branches, leaves or similar) lying on the fabric.
➤ Briefly press the button.
✓ The awning retracts.
➤ Double-check that the awning is fully retracted before starting your journey.
The front cover should rest closely alongside the housing.
• Only retract the awning, when the fabric is free of debris (branches,
leaves or similar). Otherwise the awning can be damaged when it is
retracted.
• Keep the awning free of debris to avoid abrasion, stains and mildew.
• When retracting the awning, make sure that any branches or other
objects are not trapped in it.
NOTICE! Beware of damage
A
6.4 Testing the wind sensor
!
If the awning is retracted when wet, extend it again at the next
opportunity and let the fabric dry out. If the wet fabric stays rolled up for
a long time it becomes mildewed and can stain.
WARNING!
• The wind sensor is a safety-related part. Malfunctioning of the wind
sensor can lead to fatality or serious injury, as well as serious damage
to your vehicle.
• Test the wind sensor before each journey and at regular intervals.
• Do not change any settings on the wind sensor. A change in the
default settings can cause the wind sensor to malfunction and lead to
fatality and serious injury, as well as serious damage to your vehicle.
NOTE
Any change made to the default setting will invalidate the warranty.
I
To test the wind sensor, proceed as follows:
➤ Briefly press the button.
✓ The awning extends all the way.
14
EN
PR4500 Operating the awning
➤ Move the front cover (fig. 4 1, page 3) for about 8 seconds approx. 75 to
100 mm repeatedly back and forth to simulate vibrations from the wind.
✓ The awning retracts automatically all the way.
If the awning does not retract automatically
➤ Check the battery status of the wind sensor and replace if necessary, see chapter
“Changing the batteries in the wind sensor” on page 16.
➤ Test the wind sensor again.
➤ If the wind sensor does not work and the awning does not retract automatically,
reprogram it, see chapter “Reprogramming the wind sensor” on page 18.
➤ Test the wind sensor again.
➤ If the wind sensor does not work after reprogramming, contact your service
partner.
6.5 Changing the battery in the remote control
NOTE
I
➤ Open the housing of the remote control (fig. 3 1, page 3).
➤ Remove the old battery from the holder.
➤ Insert the new CR2450 (3 V) battery type into the holder with the positive
terminal facing upwards.
➤ Reassemble the remote control.
B
If the LED in the remote control does not light up after pressing one of
the buttons, the remote control battery is flat.
Protect the environment!
Do not dispose of any batteries with general household waste.
Return defective or used batteries to your retailer or dispose of them at
collection points.
15
EN
Operating the awning PR4500
6.6 Changing the batteries in the wind sensor
NOTE
I
➤ Extend the awning if required.
➤ Move the wind sensor (fig. 5 1, page 4) on the inside of the front cover to the
left and take it off.
➤ Release the sensor insert with a screwdriver (fig. 6 A, page 4).
➤ Remove the sensor insert from the housing (fig. 6 B, page 4).
When the batteries of the wind sensor are running low, the wind sensor
indicates this with a brief beep tone which is repeated every 5 seconds.
The awning also retracts automatically after 30 minutes, even if it is not
windy.
NOTE
Do not use rechargeable batteries.
I
➤ Replace the used batteries with new AAA or LR03 (1.5 V) alkaline batteries
(fig. 6 C, page 4). Make sure the polarity is correct.
✓ After correctly inserting the new batteries, the LED (1) lights up for about 1 second
(fig. 6 D, page 4).
If the LED does not light up, remove the batteries and reinsert them correctly
(fig. 6 C, page 4).
Protect the environment!
Do not dispose of any batteries with general household waste.
B
➤ Test the wind sensor (chapter “Testing the wind sensor” on page 14).
➤ If the wind sensor does not work, reprogramme it (chapter “Reprogramming the
wind sensor” on page 18).
Return defective or used batteries to your retailer or dispose of them at
collection points.
16
EN
PR4500 Operating the awning
6.7 Closing the awning manually in emergencies
If the awning is damaged, the motor is faulty or the power supply is unavailable, the
awning can be closed manually.
To do this, you need the following tools:
• Screwdriver
• 10-mm open-ended or ring spanner.
WARNING!
!
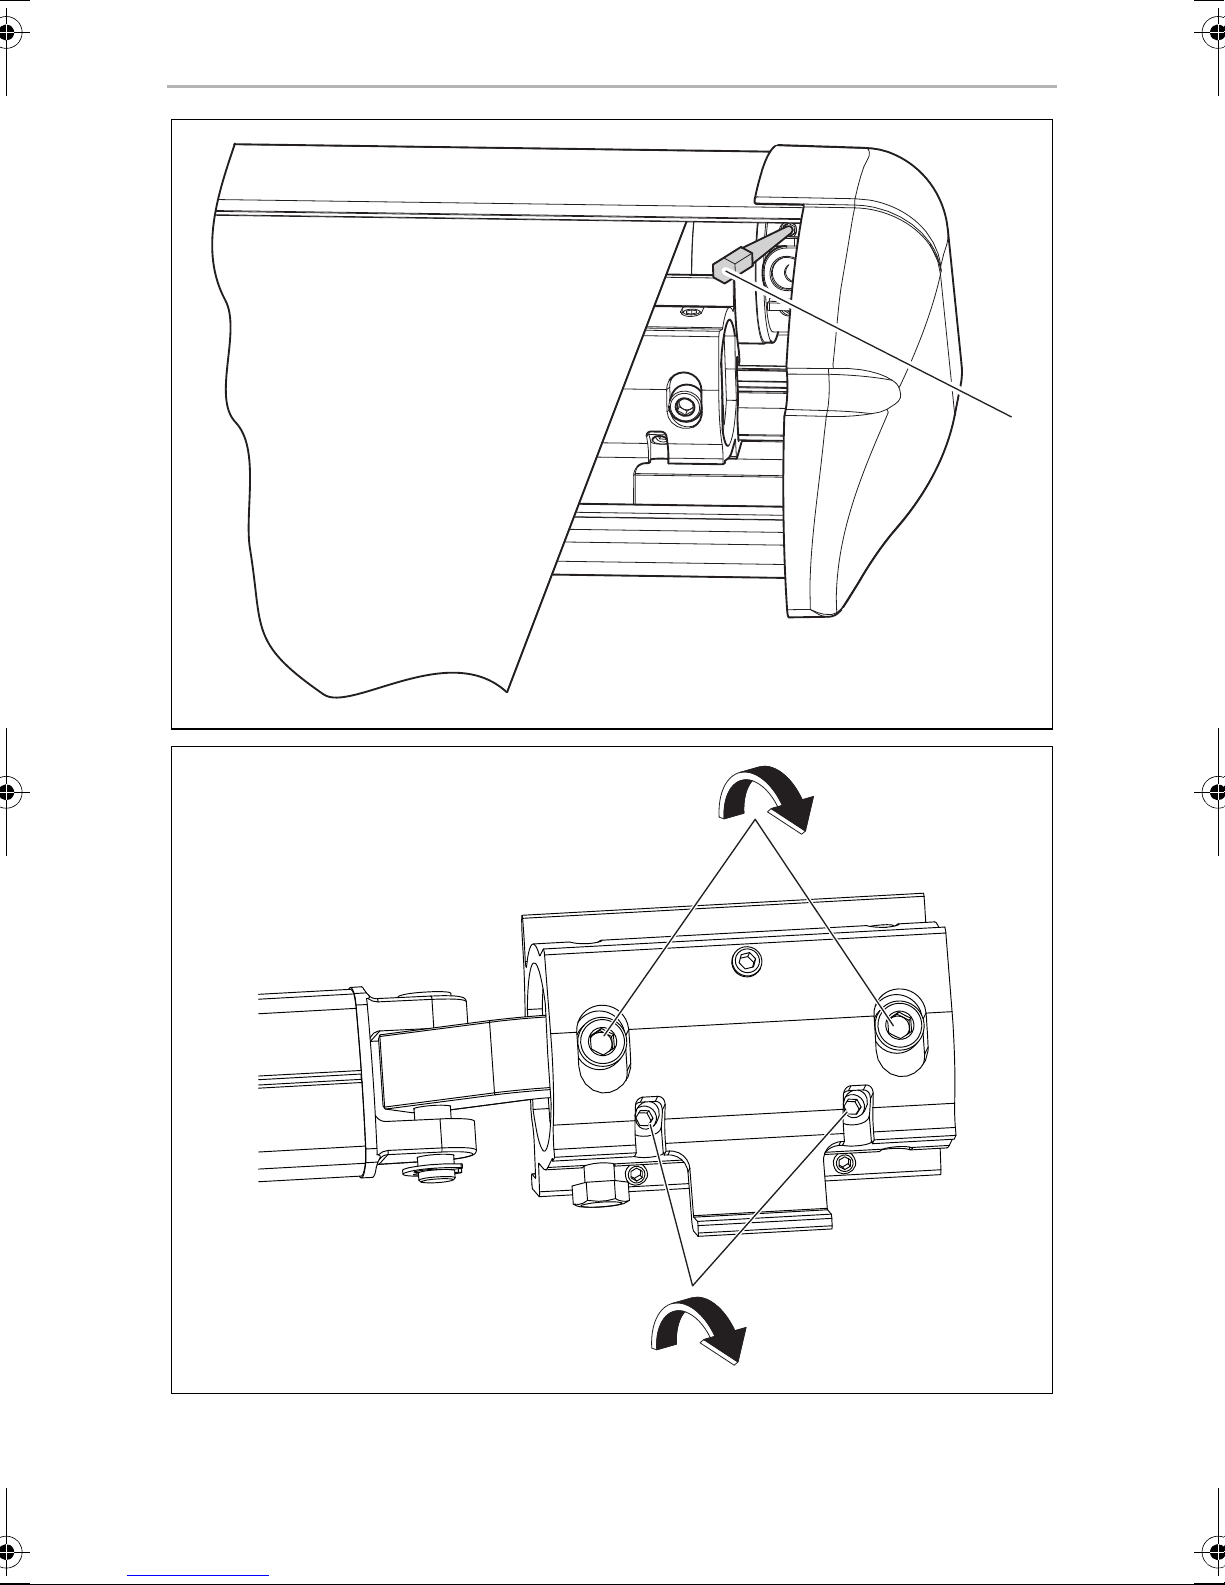
➤ Undo the screw (fig. 7 2, page 5) with a screwdriver and remove the cover cap
(fig. 7 1, page 5).
Disconnect the awning from the power before you start the procedure.
Otherwise the awning could start working again unexpectedly. The
awning motor could rotate the hexagonal shaft causing the tool to spin
uncontrollably and lead to serious injury or cause serious damage to
your vehicle.
➤ Turn the hexagonal shaft (fig. 8 1, page 5) anti-clockwise with a 10 mm
open-ended or ring spanner, until the awning is fully retracted.
NOTE
I
➤ Put on the left-hand cap.
➤ Contact the service partner in the respective country to get the awning repaired.
• Due to its design, the awning is not able to retract as far manually, as
it can in the electric mode. A gap remains between the front cover
and the housing. This does not affect safety.
• When the awning has been retracted manually, the settings are no
longer correct. After repair, the awning needs to be reset, see
chapter “Resetting the motor and remote control” on page 20.
6.8 Switching the LED light on and off (accessory)
If the awning is fitted with an LED light (max. 30 W), you can use the remote control
to switch the light on and off as follows:
➤ Press the button to switch on the LED light.
➤ Press the button again to switch off the LED light.
17
EN
Adjusting the awning PR4500
7 Adjusting the awning
7.1 Resetting the outer limit
The optimum outer limit of the awning is set by default. Over time, the setting for the
outer limit can become incorrect. The awning then fails to extend fully or far enough
so that the fabric hangs down.
Reset the outer limit as follows:
➤ Extend the awning all the way until it stops.
➤ Turn the top control knob on the motor (fig. 9 1, page 6) anti-clockwise to
extend the stop limit further.
➤ Turn the top control knob on the motor (fig. 9 1, page 6) clockwise to reduce
the stop limit inwards.
➤ Retract and extend the awning a little to check the setting.
➤ Repeat the setting if necessary.
7.2 Reprogramming the wind sensor
The wind sensor is set to motor and remote control by default. In the following cases,
the wind sensor needs to be reprogrammed:
• If the wind sensor no longer responds
• If the wind sensor has been replaced
• After the motor and remote control have been reset.
In this case perform the step 1, and then go directly to step 3.
To reprogram the wind sensor, proceed as follows:
Step 1: Remove the wind sensor and sensor unit
➤ Briefly press the button.
✓ The awning extends all the way until it stops.
➤ Push the wind sensor (fig. 5 1, page 4) to the left on the inside of the front panel
and remove it.
➤ Unlatch the sensor unit (fig. 6 A, page 4) and take it out of the housing.
18

EN
PR4500 Adjusting the awning
Step 2: Programme the wind sensor
➤ Turn the knob for setting the sensitivity (fig. 6 2, page 4) to “0”.
➤ Press the programming button in the battery compartment of the remote control
(fig. 3 2, page 3).
✓ The receiver beeps once briefly.
✓ The awning moves twice briefly.
➤ Press the programming button directly afterwards in the battery compartment of
the remote control (fig. 3 2, page 3).
✓ The receiver beeps once briefly.
➤ Press the programming button on the wind sensor (fig. 6 1, page 4) once
briefly.
✓ The sensor beeps once briefly.
✓ The awning moves twice briefly.
✓ The receiver beeps five times briefly.
✓ The wind sensor is now linked to the awning.
➤ Turn the knob for setting the sensitivity (fig. 6 2, page 4) to “3”.
Step 3: Insert the wind sensor and sensor unit and check the sensor
➤ Insert the sensor unit in the housing.
➤ Install the wind sensor on the inside of the front panel.
➤ Test the wind sensor by moving the front panel approx. 10 cm up and down
quickly in the middle for 8 seconds (fig. 4, page 3).
✓ The awning retracts.
The wind sensor is correctly programmed and the procedure is complete.
➤ If the awning fails to retract, repeat the programming.
19
EN
Adjusting the awning PR4500
7.3 Resetting the motor and remote control
The motor and remote control are synchronised by default. The motor and remote
control must be reset in the following cases:
• If the awning no longer responds to the remote control commands
• If the remote control or the receiver have been changed.
Step 1: Check the battery in the remote control
➤ Check that the battery in the remote control is not run down:
To do this, press a button on the remote control.
✓ The LED on the remote control lights up briefly.
If the LED does not light up, the battery is flat. Replace the battery (see chapter
“Changing the battery in the remote control” on page 15).
Step 2: Check the function of the motor and remote control
➤ Check that the motor and remote control work by pressing the button briefly.
✓ The awning extends all the way.
If the awning does not respond, does not extend all the way, extends too far
(fabric is not taut) or stops when the button is released, continue with step 3.
20
EN
PR4500 Adjusting the awning
Step 3: Reprogramming the motor and remote control
➤ Switch off the awning power supply with the main switch for 10 seconds.
➤ Switch the power supply on again.
✓ The receiver beeps once briefly.
➤ Press the programming button briefly within 4 seconds in the battery
compartment of the remote control (fig. 3 2, page 3).
✓ The receiver beeps once briefly.
➤ Press the programming button again briefly in the battery compartment of the
remote control (fig. 3 2, page 3).
✓ The receiver beeps once briefly.
➤ Briefly press the button.
✓ The receiver beeps four times briefly.
✓ The awning moves twice briefly.
✓ The remote control and awning are now adjusted to each other.
➤ Check the function of the awning, see chapter “Retracting the awning” on
page 14 and chapter “Extending the awning” on page 13.
➤ If the awning fails to respond to the remote control, repeat step 3.
➤ Reprogramme the wind sensor, see chapter “Reprogramming the wind sensor”
on page 18.
21
EN
Cleaning and maintenance PR4500
8 Cleaning and maintenance
8.1 Cleaning
WARNING!
Disconnect the power before cleaning the awning.
!
NOTICE! Beware of damage
A
➤ Remove any debris (branches, leaves or similar) lying on the fabric to avoid
abrasion, stains and mildew. Furthermore the awning can be damaged when it is
retracted.
• Never clean the awning with a high-pressure cleaner.
• Do not use abrasive cleaning agents or hard objects during cleaning,
as these can damage the product.
• Never clean the remote control under running water or in dishwater.
➤ Clean the awning fabric regularly to remove any dirt and dust:
– To do this, use water with 30 g detergent and 30 g bleach for 10 litres of
water.
– Soap down the fabric and leave the liquid to soak in for five minutes.
– Rinse thoroughly with clean water.
Make sure that the cleaning liquid and bleach is completely washed off.
Otherwise it can damage the fabric.
– Leave the fabric to dry.
➤ Clean the remote control with a damp cloth from time to time.
8.2 Lubricating
➤ If required, lubricate the joints of the awning with Teflon adhesive lubricant.
22

EN
PR4500 Cleaning and maintenance
8.3 Checking
WARNING!
!
➤ Frequently examine awning for imbalance, or signs of wear or damage to cables
and other critical parts.
➤ Check the awning regularly:
– Is the fabric undamaged?
– Are the arms and front cover undamaged and free from any signs of wear?
– Does the awning close properly?
Do not operate awning if adjustments or repairs are necessary.
If you discover any damage, contact the service partner in the respective
country (addresses on the back of the manual).
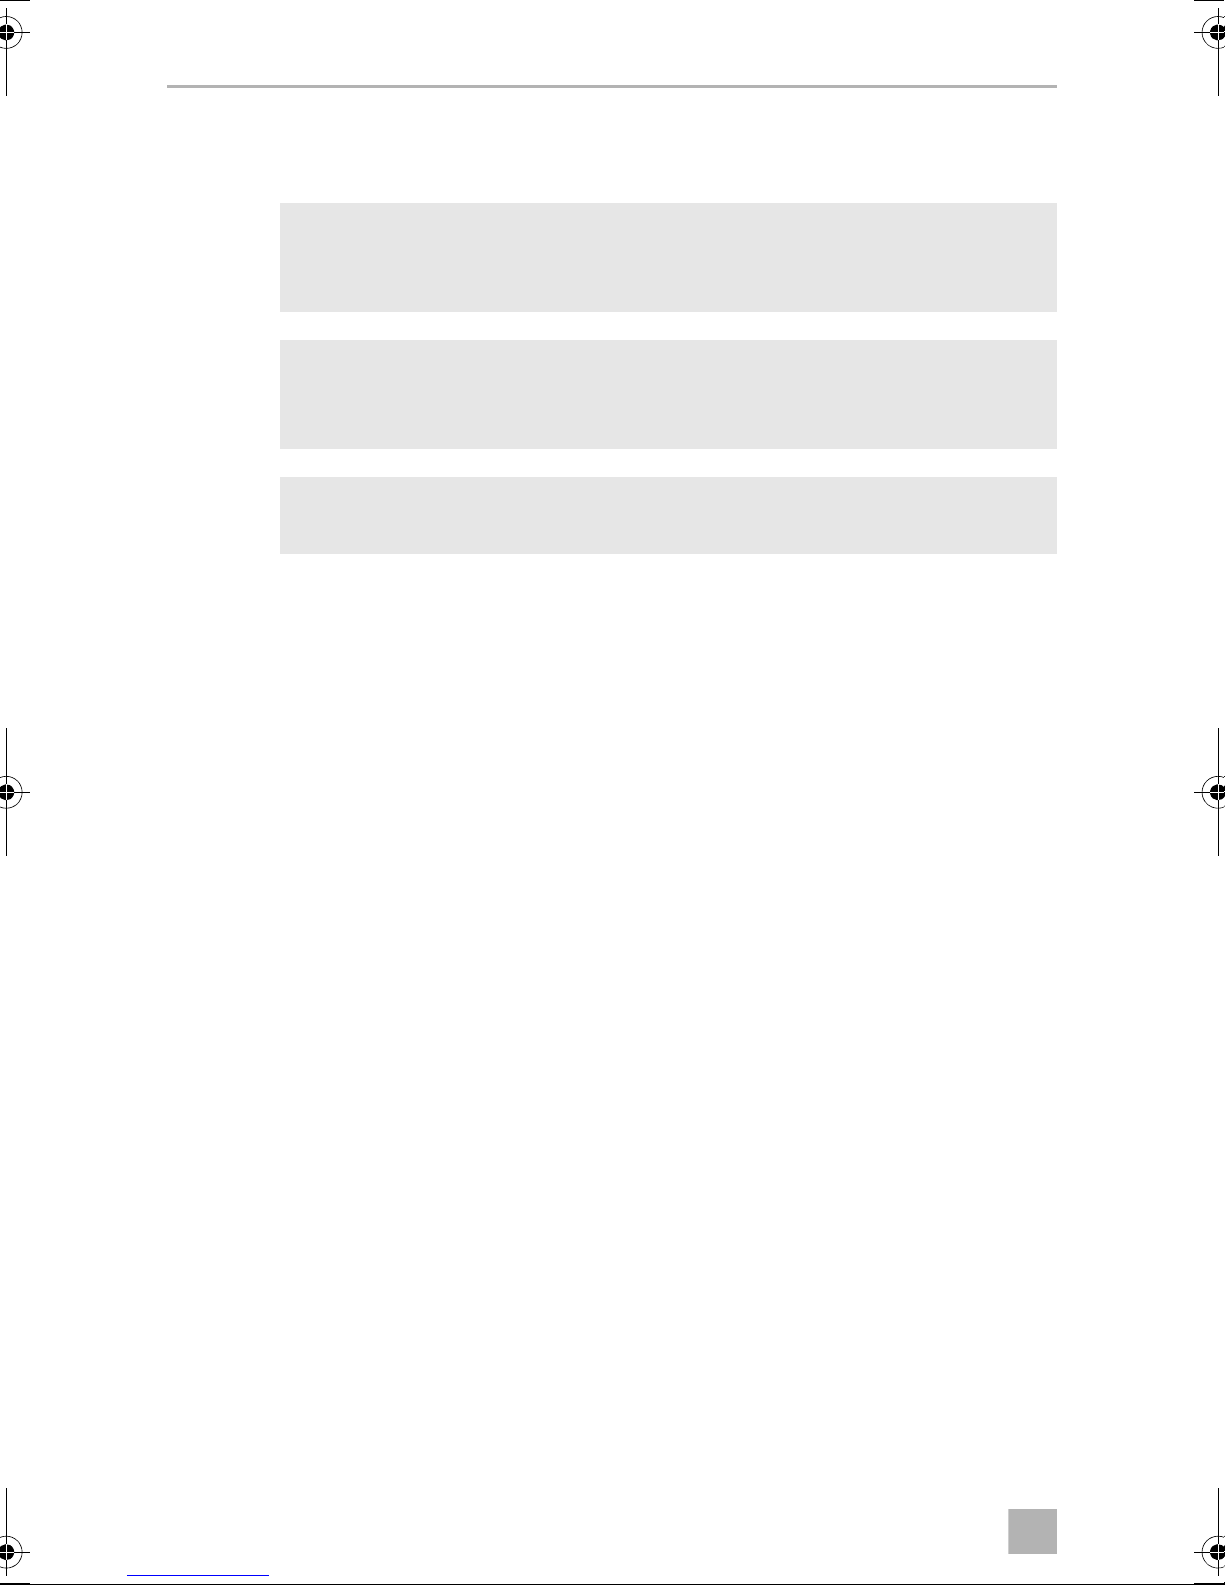
8.4 Tighten up the screws on the shoulder joint
The screws on the rear hinge must be tightened up after being used initially:
• after the first holiday using the awning
• after driving 20,000 km or six months after the awning was mounted
(whichever occurs first)
The screws on the rear hinge also need to be checked during the routine vehicle
inspection.
Contact your service partner to tighten up the screws.
Instructions for servicing (fig. 0, page 6):
NOTICE!
A
➤ Lift up the front panel slightly so that the hinge is not bearing any load.
➤ Tighten both central screws with 20 – 22 Nm.
➤ Tighten both lower screws with 16 – 18 Nm.
The awning arms must not bear any load. This is to prevent the fastening
torque of the screws from being distorted.
23

EN
Warranty PR4500
8.5 Patching small holes in the fabric
You can patch any small holes in the fabric or parts where the coating has come off:
➤ Use the repair kit (ref. no. 9103104019).
Proceed as described in the instructions provided.
9Warranty
The statutory warranty period applies. If the product is defective, please contact your
retailer or the manufacturer's branch in your country (see the back of the instruction
manual for the addresses).
For repair and guarantee processing, please include the following documents when
you send in the device:
• A copy of the receipt with purchasing date
• A reason for the claim or description of the fault
10 Disposal
➤ Place the packaging material in the appropriate recycling waste bins wherever
possible.
If you wish to finally dispose of the product, ask your local recycling centre
or specialist dealer for details about how to do this in accordance with the
M
B
applicable disposal regulations.
Protect the environment!
Do not dispose of any batteries with general household waste.
Return defective or used batteries to your retailer or dispose of them at
collection points.
24
EN
PR4500 Troubleshooting
11 Troubleshooting
NOTE
I
Problem Possible cause Suggested remedy
If you are not able to rectify faults with the help of the following table,
please contact the service partner in the respective country (addresses
on the back of the manual).
Awning does not
retract automatically in
strong winds.
Awning retracts
automatically in light
winds.
Awning retracts
automatically after
30 minutes, even if it is
not windy.
The wind sensor beeps
every 5 seconds.
Awning retracts
automatically after
60 minutes, even if it is
not windy.
The batteries in the wind
sensor are flat.
The wind sensor is not
programmed properly.
The wind sensor is not
programmed properly.
The batteries in the wind
sensor are almost flat.
Wind sensor is missing
or not properly attached
onto the base plate
Replace the batteries (see chapter
“Changing the batteries in the wind
sensor” on page 16).
Turn the knob for setting the sensitivity
(fig. 6 2, page 4) to “3”.
Turn the knob for setting the sensitivity
(fig. 6 2, page 4) to “3”.
Replace the batteries (see chapter
“Changing the batteries in the wind
sensor” on page 16).
Push the wind sensor onto the base
plate until it clicks into place.
25
EN
Troubleshooting PR4500
Problem Possible cause Suggested remedy
The motor is not
responding to the
remote control.
The switch-on delay is
active.
If the awning has been
retracted automatically
by the wind sensor, it can
only be extended again
after 60 seconds.
The remote control
battery is flat.
The remote control is not
properly set to the
motor.
No power supply
available.
Wait for this time to elapse or switch
the power supply to the awning off and
on again to bypass the switch-on delay.
Only extend again, if the wind is not
present any more.
Briefly press the or button. If
the remote control LED does not light
up, the battery is flat.
Replace the battery (see chapter
“Changing the battery in the remote
control” on page 15).
Reset the motor and the remote
control, see chapter “Resetting the
motor and remote control” on
page 20.
Check the electrical connections.
Awning does not fully
extend or extends too
far (fabric sags at ends).
The motor is defective. Retract the awning manually, see
chapter “Closing the awning manually
in emergencies” on page 17, and
contact the service partner in the
respective country.
The outer limit is not
properly set.
Reset the outer limit, see chapter
“Resetting the outer limit” on page 18.
26
EN
PR4500 Technical data
12 Technical data
12.1 Electrical Data
PR4500
Motor Rating
Rated voltage:
Rated current:
Rated power:
Rated torque:
Rated speed:
Rated operating time: 5 min/hour
12 Vg (11 – 15 V)
4.4 A
52.8 W
20 Nm
14 min
-1
12.2 Mechanical Data
PR4500
Width: 260 cm 312 cm 369 cm
Extended: 175 cm 225 cm 250 cm
Weight: 27.5 kg 31 kg 33.8 kg
PR4500
Width: 404 cm 477 cm 504 cm
Extended: 250 cm 250 cm 250 cm
Weight: 37 kg 48.5 kg 50.5 kg
Te s t /c e r t i f i c a t e s
27
DE
PR4500
WARNUNG!
!
• Diese Anleitung muss vor der Benutzung, dem Einrichten, der
Reinigung und Wartung gelesen und verstanden werden. Dieses
Gerät muss von einer Fachkraft installiert werden. Eine fehlerhafte
Installation kann zu schweren Verletzungen führen. Umbauten am
Gerät können äußerst gefährlich werden und zu schweren
Verletzungen oder zu Geräteschäden führen.
• Diese Anleitung muss beim Gerät verbleiben. Der Besitzer muss sie
aufmerksam lesen.
Inhaltsverzeichnis
1 Erklärung der Symbole . . . . . . . . . . . . . . . . . . . . . . . . . . . . . . . . . . . . . . . . . 29
2 Wichtige Sicherheitshinweise . . . . . . . . . . . . . . . . . . . . . . . . . . . . . . . . . . . 29
3 Bestimmungsgemäßer Gebrauch . . . . . . . . . . . . . . . . . . . . . . . . . . . . . . . . 32
4 Zubehör. . . . . . . . . . . . . . . . . . . . . . . . . . . . . . . . . . . . . . . . . . . . . . . . . . . . . 32
5 Technische Beschreibung . . . . . . . . . . . . . . . . . . . . . . . . . . . . . . . . . . . . . . 33
6 Markise bedienen . . . . . . . . . . . . . . . . . . . . . . . . . . . . . . . . . . . . . . . . . . . . . 33
7 Markise einstellen . . . . . . . . . . . . . . . . . . . . . . . . . . . . . . . . . . . . . . . . . . . . . 40
8 Reinigung und Pflege . . . . . . . . . . . . . . . . . . . . . . . . . . . . . . . . . . . . . . . . . . 44
9 Gewährleistung. . . . . . . . . . . . . . . . . . . . . . . . . . . . . . . . . . . . . . . . . . . . . . . 46
10 Entsorgung . . . . . . . . . . . . . . . . . . . . . . . . . . . . . . . . . . . . . . . . . . . . . . . . . . 46
11 Störungsbeseitigung . . . . . . . . . . . . . . . . . . . . . . . . . . . . . . . . . . . . . . . . . . 47
12 Technische Daten . . . . . . . . . . . . . . . . . . . . . . . . . . . . . . . . . . . . . . . . . . . . . 49
28

DE
PR4500 Erklärung der Symbole
1 Erklärung der Symbole
WARNUNG!
!
A
Sicherheitshinweis: Nichtbeachtung kann zu Tod oder schwerer
Verletzung führen.
ACHTUNG!
Nichtbeachtung kann zu Materialschäden führen und die Funktion des
Produktes beeinträchtigen.
HINWEIS
Ergänzende Informationen zur Bedienung des Produktes.
I
2 Wichtige Sicherheitshinweise
Beachten Sie die vom Fahrzeughersteller und vom Kfz-Handwerk
vorgeschriebenen Sicherheitshinweise und Auflagen!
Der Hersteller übernimmt in folgenden Fällen keine Haftung für Schäden:
• Beschädigungen am Produkt durch mechanische Einflüsse und
Überspannungen
• Veränderungen am Produkt ohne ausdrückliche Genehmigung vom Hersteller
• Verwendung für andere als die in der Anleitung beschriebenen Zwecke
Beachten Sie folgende Warnhinweise:
WARNUNG!
!
• Achten Sie darauf, dass sich kein Wasser oder Schnee auf dem Tuch
ansammelt. Anderenfalls kann die Markise beschädigt werden oder
die Markisenarme können abbrechen und so schwere Verletzungen
oder Tod verursachen.
• Öffnen Sie die Markise nicht während der Fahrt.
• Öffnen Sie die Markise nicht bei starken Wind oder Schneefall.
• Fahren Sie die Markise ein, wenn bei starker Wind, starker Regen oder
Schneefall zu erwarten sind.
29
DE
Wichtige Sicherheitshinweise PR4500
• Nähern Sie sich nicht der Markise,
– wenn sie während heftigem Wind offengelassen wurde,
– wenn sich Wasserlachen auf ihr gebildet haben,
– wenn sich Schnee angehäuft hat,
– wenn sich viel grober Schmutz auf dem Markisentuch befindet.
Die Markise kann sich unerwartet bewegen, instabil werden und sich
verbiegen oder abbrechen.
• Lassen Sie die ausgefahrene Markise nicht unbeaufsichtigt. Fahren Sie
die Markise ein, bevor Sie Ihren Standplatz verlassen.
• Benutzen Sie die Markise nicht, wenn sie oder das Anschlusskabel
sichtbare Beschädigungen aufweist. Lassen Sie Schäden stets von
einem Service Partner im jeweiligen Land (Adressen siehe Rückseite
der Anleitung) reparieren.
• Benutzen Sie die Markise nicht, wenn der Windsensor nicht
funktioniert.
• Kontrollieren Sie vor Fahrtantritt, ob die Markise vollständig
eingefahren ist. Bewegen Sie nie bei geöffneter Markise das
Fahrzeug.
• Fahren Sie das Fahrzeug nicht, wenn das Tuch beschädigt oder
eingerissen ist, auch wenn die Markise ordnungsgemäß geschlossen
ist! Die Markisenarme werden durch das Tuch gehalten. Wenn das
Tuch beim Fahren reißt, schnellt die Markise plötzlich heraus. Das
kann zu schweren Verletzungen führen. Sichern Sie die Markise so,
dass sie während der Fahrt nicht plötzlich und unerwartet ausfahren
kann.
• Wenn das Anschlusskabel der Markise beschädigt ist, muss es von
Fachmann ausgetauscht werden.
• Unterbrechen Sie mit dem externen Ein-/Aus-Schalter die
Spannungsversorgung, bevor Sie das Fahrzeug in der Umgebung der
Markise oder die Markise selbst reinigen.
• Halten Sie beim Grillen mit offenem Feuer Abstand von der Markise.
Das Tuch kann durch die Hitze beschädigt werden oder in Brand
geraten.
• Personen (einschließlich Kinder), die aufgrund ihrer physischen,
sensorischen oder geistigen Fähigkeiten oder ihrer Unerfahrenheit
oder Unkenntnis nicht in der Lage sind, das Gerät sicher zu benutzen,
sollten dieses Gerät nicht ohne Aufsicht oder Anweisung durch eine
verantwortliche Person nutzen.
30
 Loading...