

Dometic PERFECTVIEW CAM360 Operating Manual
EN
DE
FR
ES
PTITNL
DA
SV
NO
FI
RU
PL
SK
CS
HU
DRIVING SUPPORT
PERFECTVIEW
CAM360
360° camera system
Operating manual . . . . . . . . . . . . . . . . . . . . . 6
360° Kamerasystem
Bedienungsanleitung . . . . . . . . . . . . . . . . .23
Système de caméra 360°
Notice d’utilisation . . . . . . . . . . . . . . . . . . .40
Sistema de cámara de 360°
Instrucciones de uso . . . . . . . . . . . . . . . . . .57
Sistema de câmaras de 360°
Manual de instruções . . . . . . . . . . . . . . . . . 74
Sistema con telecamere a 360°
Istruzioni per l’uso . . . . . . . . . . . . . . . . . . . . 91
360° camerasysteem
Gebruiksaanwijzing. . . . . . . . . . . . . . . . . .108
360° kamerasystem
Betjeningsvejledning . . . . . . . . . . . . . . . .125
360° kamerasystem
Bruksanvisning. . . . . . . . . . . . . . . . . . . . . .143
360° Kamerasystem
Bruksanvisning . . . . . . . . . . . . . . . . . . . . . 161
360° kamerajärjestelmä
Käyttöohje . . . . . . . . . . . . . . . . . . . . . . . . . 179
Видеосистема с обзором 360°
Инструкция по эксплуатации . . . . . . . . . 196
System kamer 360°
Instrukcja obsługi . . . . . . . . . . . . . . . . . . . 213
Kamerový systém so
záberom 360°
Návod na obsluhu. . . . . . . . . . . . . . . . . . . 230
Kamerový systém 360°
Návod k obsluze . . . . . . . . . . . . . . . . . . . . 247
360° kamerarendszer
Használati utasítás. . . . . . . . . . . . . . . . . . . 264

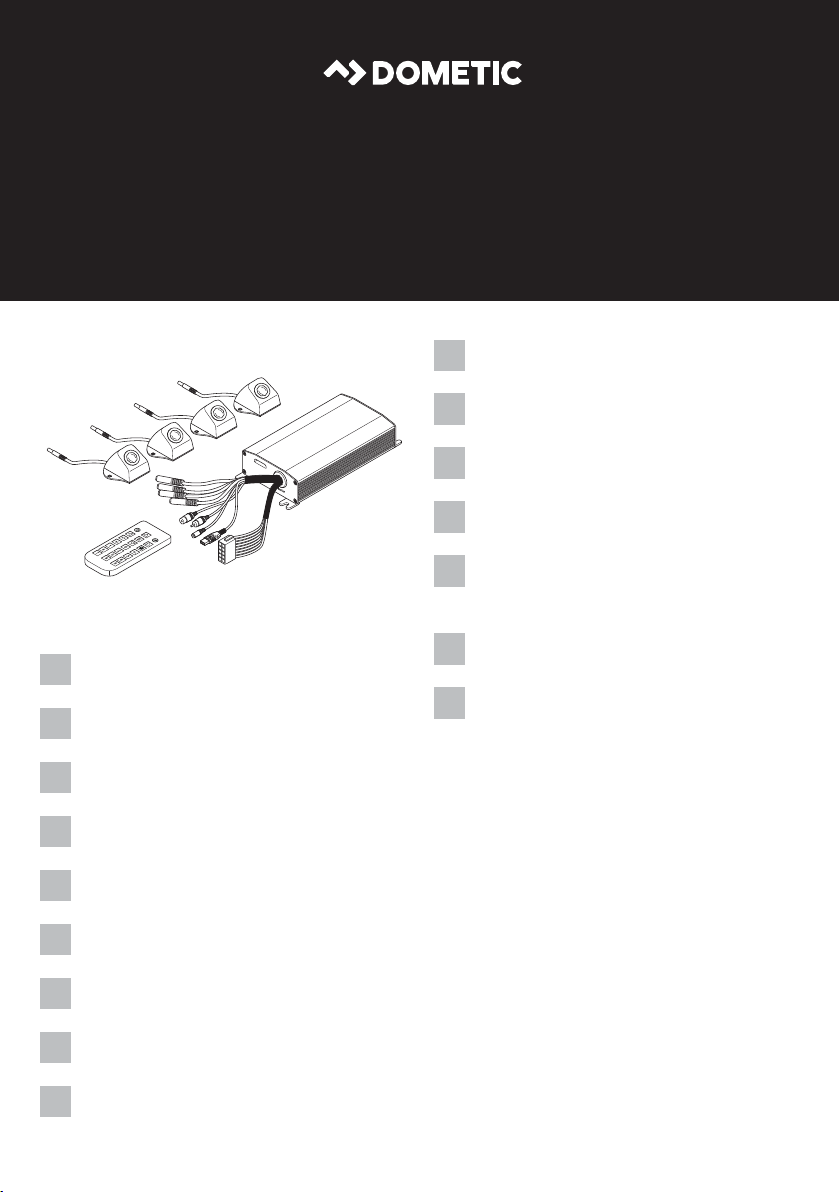
CAM360
1
3 4
2
3
1
2
3
4
8
7
6
5
5
CAM360
6
2
2017/03/08 11:13
1
4

CAM360
7
8
33
2750
5

EN
CAM360
Please read this instruction manual carefully before first use, and store it in
a safe place. If you pass on the product to another person, hand over this
instruction manual along with it.
You will find the installation manual for this product on the following
website: dometic.com
Table of contents
1 Explanation of symbols. . . . . . . . . . . . . . . . . . . . . . . . . . . . . . . . . . . . . . . . . . .7
2 Safety instructions . . . . . . . . . . . . . . . . . . . . . . . . . . . . . . . . . . . . . . . . . . . . . . .7
3 Intended use . . . . . . . . . . . . . . . . . . . . . . . . . . . . . . . . . . . . . . . . . . . . . . . . . . .8
4 Technical description . . . . . . . . . . . . . . . . . . . . . . . . . . . . . . . . . . . . . . . . . . . .9
5 Video system settings . . . . . . . . . . . . . . . . . . . . . . . . . . . . . . . . . . . . . . . . . . . 11
7 Cleaning and caring for the video system . . . . . . . . . . . . . . . . . . . . . . . . . . .21
8 Warranty . . . . . . . . . . . . . . . . . . . . . . . . . . . . . . . . . . . . . . . . . . . . . . . . . . . . . 21
9 Disposal . . . . . . . . . . . . . . . . . . . . . . . . . . . . . . . . . . . . . . . . . . . . . . . . . . . . . . 21
10 Technical data . . . . . . . . . . . . . . . . . . . . . . . . . . . . . . . . . . . . . . . . . . . . . . . . 22
6

EN
CAM360 Explanation of symbols
1 Explanation of symbols
WARNING!
!
A
I
Safety instruction: Failure to observe this instruction can cause fatal or
serious injury.
NOTICE!
Failure to observe this instruction can cause material damage and impair
the function of the product.
NOTE
Supplementary information for operating the product.
2 Safety instructions
Please observe the safety instructions and stipulations issued by the
vehicle manufacturer and service workshops.
The manufacturer accepts no liability for damage in the following cases:
• Faulty assembly or connection
• Damage to the product resulting from mechanical influences and excess voltage
• Alterations to the product without express permission from the manufacturer
• Use for purposes other than those described in the operating manual
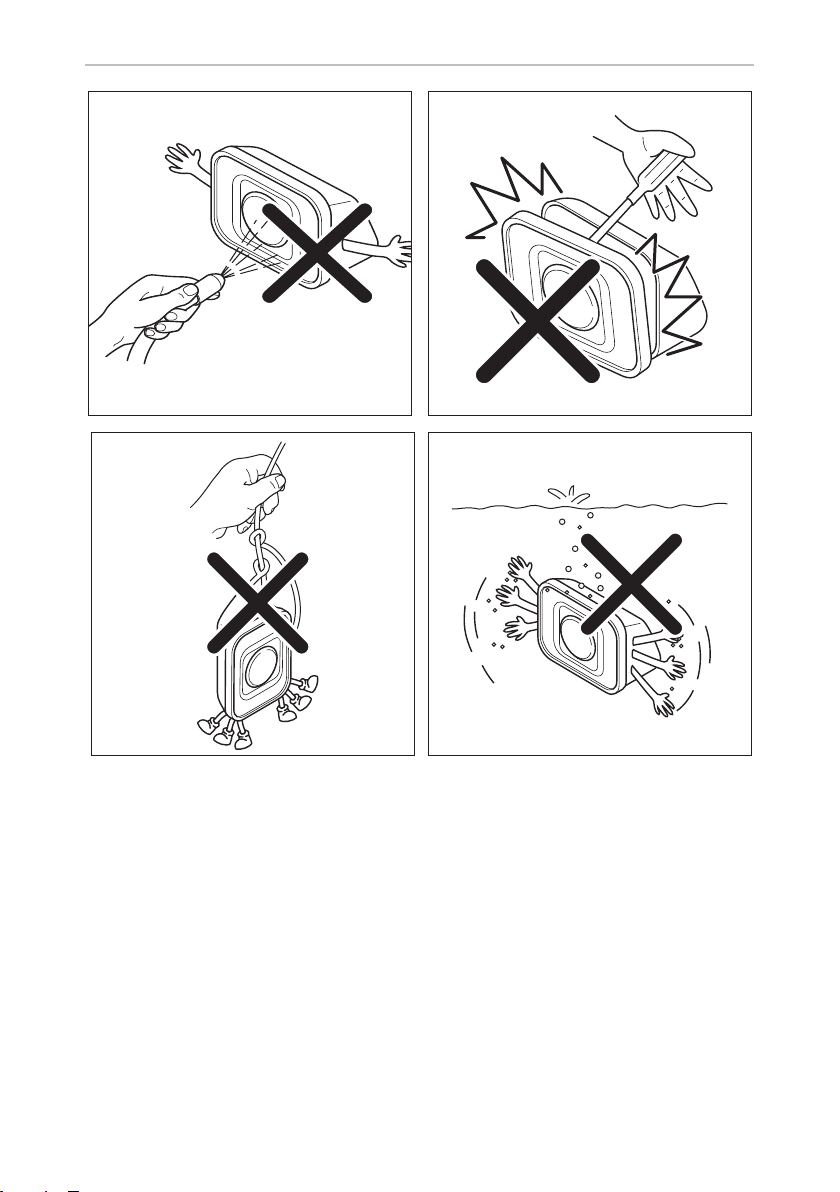
The cameras are waterproof. However, the seals on the cameras cannot withstand a
high-pressure cleaner (fig. 1, page 3). Therefore, you should observe the following
instructions when handling the cameras:
NOTICE!
A
• Do not open the cameras, as this impairs the leak tightness and the
function of the cameras (fig. 2, page 3).
• Do not pull at the cables, as this impairs the tightness and the function
of the cameras (fig. 3, page 3).
• The cameras are not suitable for use under water (fig. 4, page 3)!
7

EN
Intended use CAM360
2.1 Operating the appliance safely
WARNING!
!
A
• Never play videos while you are driving to avoid dangerous situations
in road traffic. Adhere to the country-specific laws and regulations.
• When driving, only use the device in its function as a driver assistance
system, e.g. when changing lanes, manoeuvring or parking. The
driver must not look be distracted at any time while driving. This could
cause serious accidents.
NOTICE!
• If you use the device, the vehicle should be running during operation
to prevent the vehicle battery from discharging.
3 Intended use
WARNING!
!
Danger of personal injury by vehicle.
Video systems are designed merely as an additional aid for reversing,
however this does not relieve you of the duty to take proper care
when reversing, turning or driving forwards.
The CAM360 video system (ref. no. 9600000509) is designed for use in vehicles.
The cameras transmit images in a 360° panoramic view, providing you with a
birds-eye view of the vehicle’s environment to the sides, in front and behind.
In addition, one of the four cameras can be shown selectively (split screen). The
selection of an individual camera image depends on the input signals from the turn
signals and reverse gear. In addition, the selection can also be made via the remote
control provided.
It is used to monitor the direct vehicle environment, e.g. when driving, changing
lanes, manoeuvring or parking.
8

EN
CAM360 Technical description
4 Technical description
Four 180° wide wangle cameras are located on the front, the rear, and the left and
right sides of the vehicle. A video processor merges the recorded images into a single image in real time that shows a birds-eye view of the vehicle and its surroundings
at the front, rear and sides.
The camera system is switched on as soon as the vehicle is started.
The camera system provides a 360° panoramic view and transmits the images in a
birds-eye view of the vehicle’s environment to the sides, in front and behind.
Depending on the settings, individual cameras can be activated by input signals,
e.g. by using a turn signal or reverse gear.
The control unit features four camera inputs and connects the cameras to the screens
via a plug connector.
The control unit allows the following options:
• A permanent split screen, or a split screen triggered by a control signal
• Automatic full screen mode for the reversing camera as a rear mirror function
• Permanent full screen mode for the 360° panorama view while the screen is
upright
Videos from the cameras can be saved (SD card or USB stick) and played back
according to the circular buffer principle. A recording sequence lasts 10 minutes,
then the next recording sequence begins automatically. Once the memory is full, the
oldest file is overwritten automatically.
9
EN
Technical description CAM360
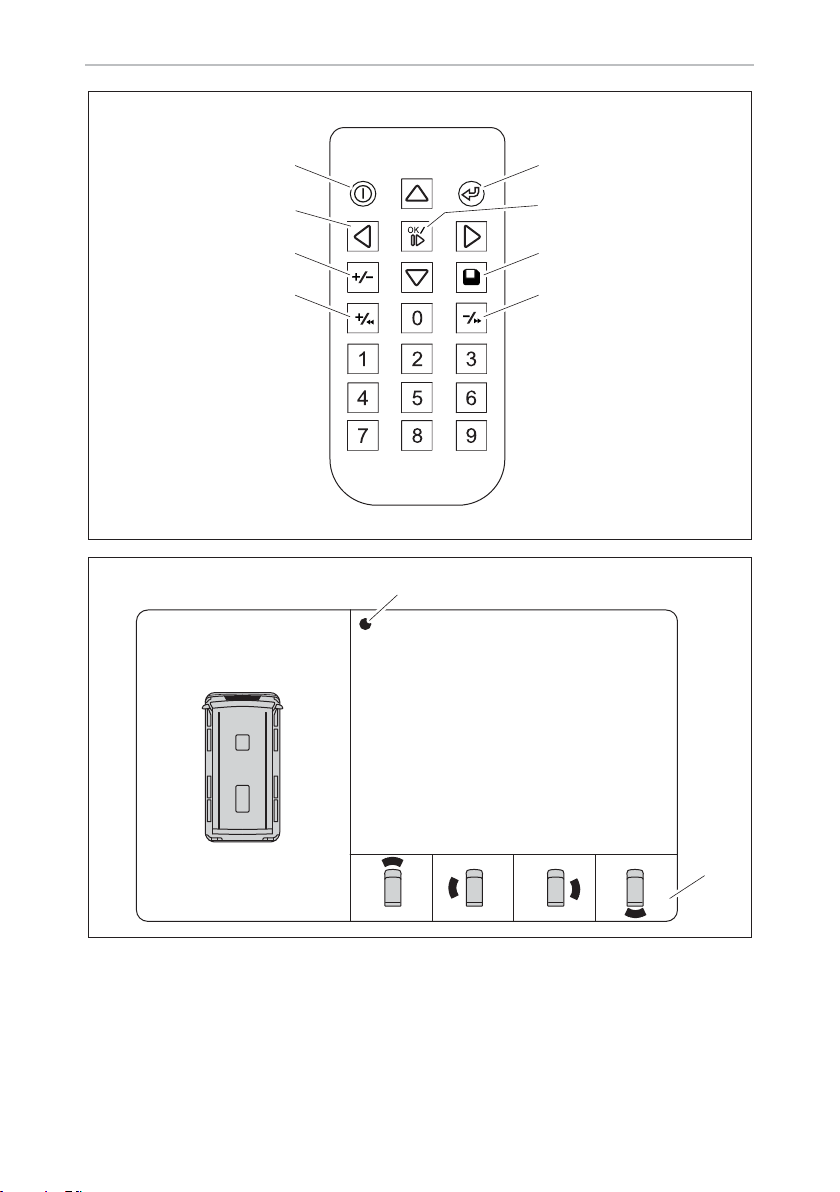
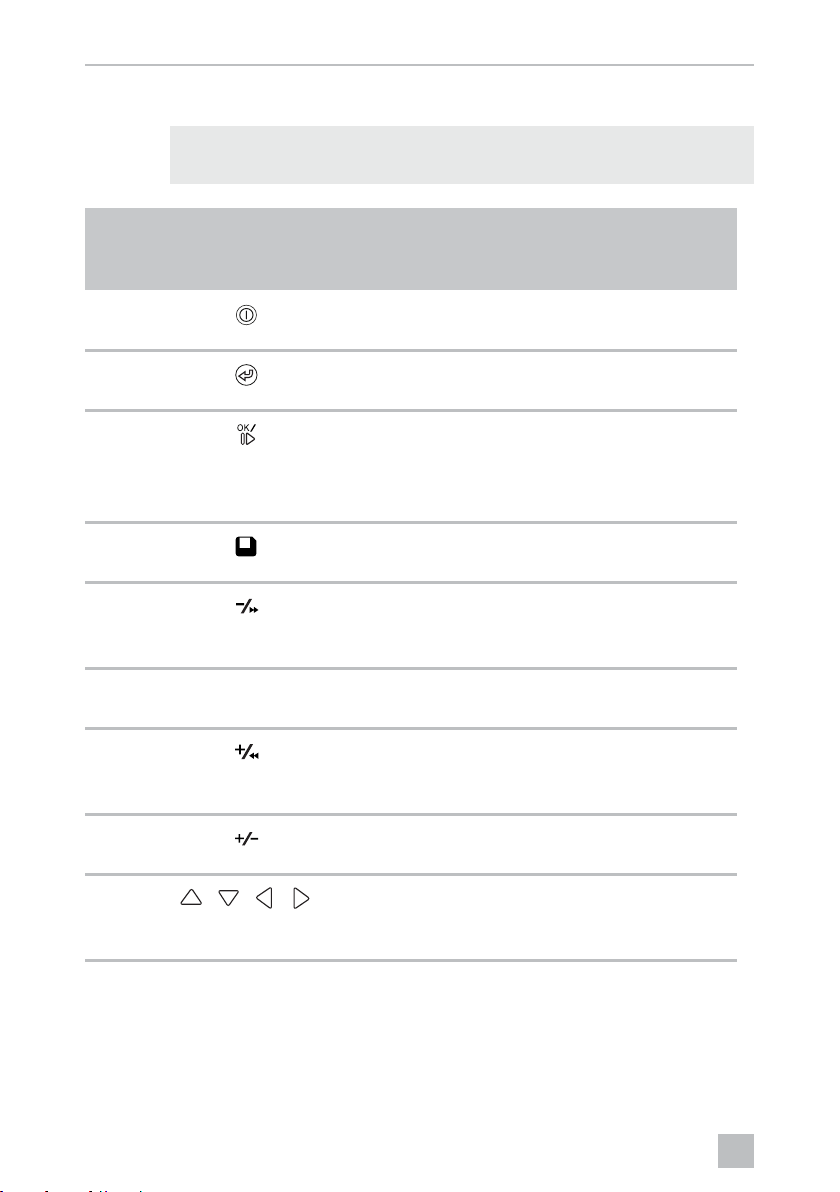
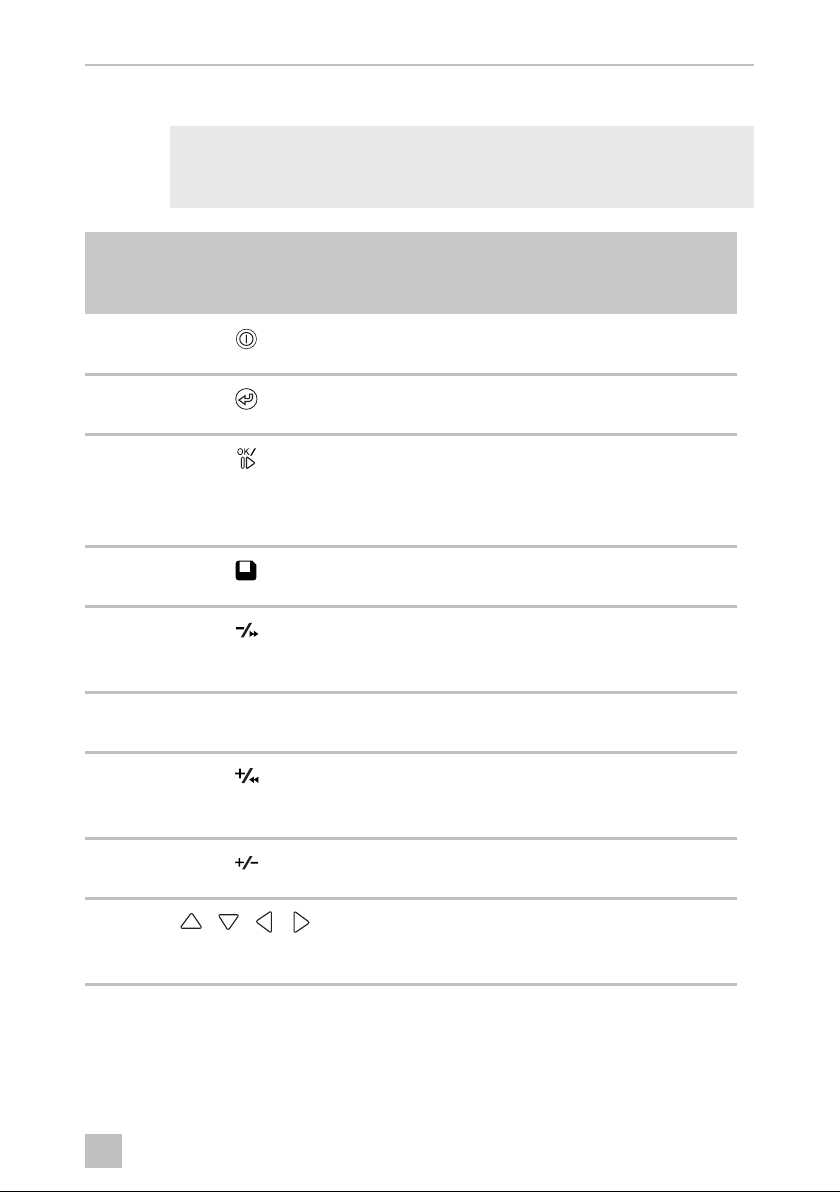
4.1 Control and display elements
NOTE
I
No. in
fig. 5,
page 4
Use the remote control to navigate the video menu.
Button Description
1 ON/OFF button:
Switch video transmission to the screen on or off
2 BACK button:
Go back a step in the main or submenu
3 OK or PLAY/PAUSE button:
– Activate menu
– Confirm entry
– Play or interrupt recorded videos
4 SAVE button:
Save
5 Minus or rewind button:
– Reduce value
– Fast rewind during video playback
6 0 – 9 Number keys:
Enter numbers
7 Plus or forward button:
– Increase value
– Fast forward during video playback
8 Plus or minus button:
No function assigned
9
, , ,
Arrow buttons:
– Select front, rear, left or right camera
– Navigate the main or submenu
10
EN
CAM360 Video system settings
5 Video system settings
NOTE
I
5.1 Menu overview
Navigating the video menu
• Please note that recording videos is prohibited in several countries.
• Video recording is switched off at the factory.
• To activate video recording, see chapter “Making settings for video
recording” on page 13.
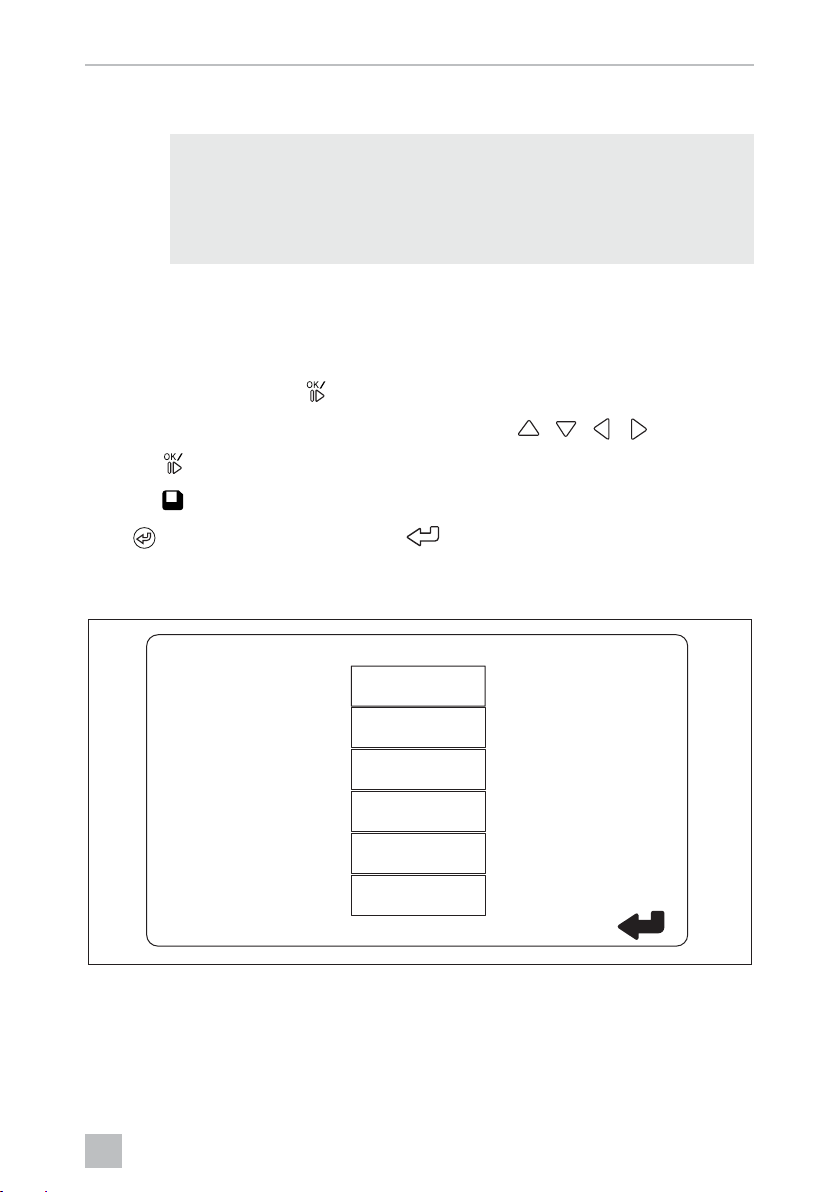
➤ Activate the menu with
➤ Navigate to the required menu item or video with , , , .
➤ Press
➤ Press or the SAVE icon in the menu to save.
Press to cancel your action or select the icon in the menu.
Main menu
to select the menu item.
.
VIDEO LIST
VIDEO SET
CONTROL SET
CALIBRATION
SETTINGS
VERSION
11

EN
Video system settings CAM360
Description Description
“VIDEO LIST” Managing videos
(see chapter “Managing videos” on page 19)
“VIDEO SET” – Set the date and time
(see chapter “Setting the date and time” on page 13)
– Make settings for video recording
(see chapter “Making settings for video recording” on
page 13)
“CONTROL SET” Configure the video controls
(see chapter “Configuring the screen display” on page 14)
“CALIBRATION” ONLY for specialists: see assembly instructions
“SETTINGS” ONLY for specialists: see assembly instructions
“VERSION” Display the current firmware version
5.2 Language settings
NOTICE!
A
The settings in this menu are intended only for trained specialists.
Do not change any other settings, as this could affect the function of
the camera system.
➤ Select the “SETTINGS”.
➤ Enter the password “654321”.
➤ Select “BASIC VALUES”.
➤ Select a “LANGUAGE”.
➤ Choose between “ENGLISH”, “DEUTSCH” (German), “FRANCAIS” (French).
➤ Save your settings.
➤ Exit the menu with
.
12

EN
CAM360 Video system settings
5.3 Setting the date and time
➤ Select “VIDEO SET”.
➤ Make the following settings:
–“YEAR”
–“MONTH”
–“DATE”
–“HOUR”
–“MINUTE”
–“SECOND”
➤ Save your settings.
5.4 Making settings for video recording
NOTE
I
➤ Select “VIDEO SET”.
➤ Select “STORAGE LOCATION”.
➤ Make the following settings:
–USB
–SD
You can only select a storage medium if that storage medium is
plugged in.
➤ Select a “CHANNEL”.
➤ Make the following settings:
– “NONE”
–“LEFT”
–“REAR”
–“RIGHT”
–“FRONT”
–“FOUR”
➤ Save your settings.
13

EN
Video system settings CAM360
5.5 Configuring the screen display
Description Description
“REAR MIRROR” “ON” When you shift to reverse gear,
the system switches to the rear
view mirror function (rear camera in full screen mode) with a
time delay.
“OFF” The split screen function is
permanently active.
“REAR MIRROR DURATION” “REAR MIRROR” = “ON” “CONST ON”: During reversing
the rear view mirror function is
permanently active, even while
the turn signal is active.
“INTERRUPTED”: When you
indicate while driving forwards,
the system switches to a split
screen while the turn signal is
active.
“START BY CLAMP 15”
(start upon ignition)
“REAR MIRROR” = “OFF” Duration of the split screen
while the ignition is on.
“ON”: Permanent split screen.
“TURN SIGNAL” “START BY CLAMP 15”
(start upon ignition)
not “ON”
“REVERSE GEAR” “REAR MIRROR” = “OFF” Duration of split screen after
“REAR MIRROR” = “ON” Duration of the split screen after
Duration of split screen after
turn signal was activated.
reversing.
reversing before the system
switches back to the rear view
mirror function.
14

EN
CAM360 Video system settings
➤ Select “CONTROL SET”.
➤ Select “REAR MIRROR”.
➤ Make the following settings:
– “OFF”
–“ON”
➤ Select “REAR MIRROR DURATION”.
➤ Make the following settings:
– “CONST ON” (permanent)
–“INTERRUPTED”
➤ Select “START BY CLAMP 15” (start upon ignition).
➤ Make the following settings:
– “OFF”
–“ON”
–“15SECOND”
–“1MINUTE”
➤ Select “TURN SIGNAL”.
➤ Make the following settings:
–“2SECOND”
–“5SECOND”
–“10SECOND”
➤ Select “REVERSE GEAR”.
➤ Make the following settings:
–“5SECOND”
–“10SECOND”
–“20SECOND”
–“1MINUTE”
–“10MINUTE”
➤ Save your settings.
15

EN
Video system settings CAM360
Other screen settings
NOTICE!
A
Screen layout
➤ Select the “SETTINGS”.
➤ Enter the password “654321”.
➤ Select “BASIC VALUES”.
➤ Select “DISP MODE”.
➤ Make the following settings:
– “BV” = birds-eye view only (vertical screen)
– “BV+SV” = birds-eye view left + individual image right
– “SV+BV” = individual image left + birds-eye view right
➤ Save your settings.
The settings in this menu are intended only for trained specialists.
Do not change any other settings, as this could affect the function
of the camera system.
➤ Exit the menu with
Startup logo
➤ Select the “SETTINGS”.
➤ Enter the password “654321”.
➤ Select “BASIC VALUES”.
➤ Select a “LOGO”.
➤ Make the following settings:
– “OFF”
–“3SECOND”
–“5SECOND”
–“10SECOND”
➤ Save your settings.
➤ Exit the menu with
.
.
16

EN
CAM360 Using the video system
6 Using the video system
6.1 Switching the video system on/off
NOTE
I
In its basic setting, the video system shows two images on a split screen: a
360° panorama view on one half, and the image from the front camera on the
other half (fig. 6, page 4).
The 360° panorama view is always displayed. The display of the individual image
from one of the four cameras can be selected with the arrow buttons or with the left
turn signal, right turn signal and reverse gear input signals.
➤ Press to switch off the video system.
6.2 Selecting cameras
➤ Press , , , to select the front, rear, left or right camera.
✓ The symbol (fig. 6 1, page 4) for the relevant camera is highlighted.
The video system is switched on as soon as the ignition of the vehicle is
switched on.
➤ Operate the left or right turn signal to activate the camera image of the relevant
side.
➤ Shift to reverse gear to activate the rear camera image.
17

EN
Using the video system CAM360
6.3 Making a video
NOTICE!
A
I
The video is recorded automatically:
• The video recording begins when the vehicle is started.
• A red dot (fig. 6 2, page 4) on the top left corner of the display indicates that the
system is recording.
• The recording is stopped automatically after 10 minutes and a new recording is
started, so every video file has a maximum duration of 10 minutes. Once the
memory is full, the first file is overwritten automatically.
• The recording stops as soon as the ignition is switched off. Wait another
10 seconds before taking the storage medium out of the device.
To switch off video recording:
Never remove the data carrier (USB stick or SD card) when recording in
order to avoid damage or loss of stored data.
NOTE
Please note that recording videos is prohibited in several countries.
➤ Select a “CHANNEL”.
➤ Make the following settings:
– “NONE”
➤ Save your settings.
✓ Video recording is switched off.
18
EN
CAM360 Using the video system
6.4 Managing videos
VIDEO LIST
INDEX
001
002
003
004
DATE
2017-03-08
2017-03-08
2017-03-08
2017-03-08
TIME
11:13:02
11:08:31
11:01:50
11:57:18
DELETELOCK
DURATION
00:16
00:09
00:03
00:03
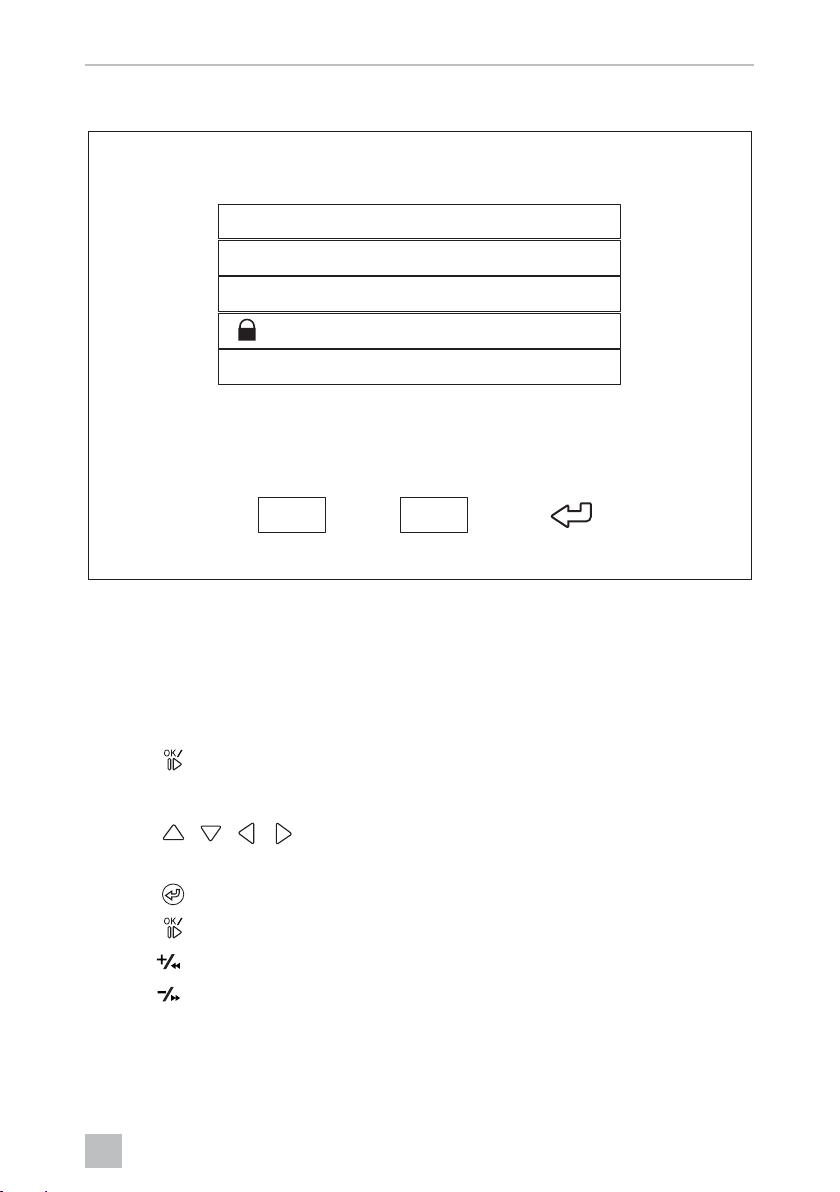
➤ Select a “VIDEO LIST”.
✓ A list of saved videos (sorted by date and time) is displayed.
Playing back a video
➤ Select the required video.
➤ Press
.
✓ The video is played back in the 4-camera view.
➤ Press
, , , to view the relevant recording from the individual
camera.
➤ Press
➤ Press
➤ Press to fast forward.
➤ Press for fast rewinding.
to switch back to the 4-camera view.
again to pause the video.
19

EN
Using the video system CAM360
Protecting a video
➤ Select the required video.
➤ Select the “LOCK” menu item.
✓ Symbol
✓ This video is excluded from the circular buffer principle and will not be
overwritten.
✓ The “UNLOCK” menu item appears.
➤ Select the “UNLOCK” menu item.
✓ The video can now be overwritten.
Deleting a video
➤ Select the required video.
➤ Select the “DELETE” menu item.
➤ Confirm the deletion with .
✓ The video is deleted.
appears in front of the video.
6.5 Replacing the remote control batteries
Batteries need to be replaced if the range of the remote control reduces or the
remote control can no longer be used to operate the device.
➤ Open the cover on the back of the remote control (fig. 7, page 5).
➤ Replace the batteries (type CR2025, 3 V).
➤ Close the cover.
20

EN
CAM360 Cleaning and caring for the video system
7 Cleaning and caring for the video
system
NOTICE!
A
➤ Occasionally clean the product with a damp cloth.
➤ Clean regularly with a damp cloth, particularly the infrared sensor.
Do not use sharp or hard objects or cleaning agents for cleaning as these
may damage the product.
8Warranty
The statutory warranty period applies. If the product is defective, please contact the
manufacturer's branch in your country (see the back of the instruction manual for the
addresses) or your retailer.
For repair and guarantee processing, please send the following items:
• Defect components
• A copy of the receipt with purchasing date
• A reason for the claim or description of the fault
9Disposal
➤ Place the packaging material in the appropriate recycling waste bins wherever
possible.
If you wish to finally dispose of the product, ask your local recycling centre
or specialist dealer for details about how to do this in accordance with the
M
B
applicable disposal regulations.
Protect the environment!
Do not dispose of any batteries with general household waste.
Return defective or used batteries to your retailer or dispose of them at
collection points.
21

EN
Technical data CAM360
10 Technical data
PerfectView CAM360
Ref. no.: 9600000509
Camera:
Image sensor: 1/3"
Pixels: 720 (H) x 480 (V)
Horizontal resolution: 580
Sensitivity: 0.1 lux
Viewing angle: 180°
Dimensions (W x H x D): fig. 8, page 5
Wei ght: 70 g
Protection class: IP67
Operating temperature: –20 °C to +75 °C
Control unit:
Video format: PAL/NTCS, 1 Vpp
Connection voltage: 9 Vg – 32 Vg
Power consumption
(switched on): <650 mA (~450 mA/12 V, ~200 mA/24 V)
Power consumption
(switched off): ~2 mA
Operating temperature: –20 °C to +75 °C
22

DE
CAM360
Bitte lesen Sie diese Anleitung vor der Inbetriebnahme sorgfältig durch
und bewahren Sie sie auf. Geben Sie sie im Falle einer Weitergabe des
Produktes an den Nutzer weiter.
Die Installationsanleitung zu diesem Produkt finden Sie auf folgender
Webseite: dometic.com
Inhaltsverzeichnis
1 Erklärung der Symbole . . . . . . . . . . . . . . . . . . . . . . . . . . . . . . . . . . . . . . . . . 24
2 Sicherheitshinweise . . . . . . . . . . . . . . . . . . . . . . . . . . . . . . . . . . . . . . . . . . . 24
3 Bestimmungsgemäßer Gebrauch . . . . . . . . . . . . . . . . . . . . . . . . . . . . . . . . 25
4 Technische Beschreibung . . . . . . . . . . . . . . . . . . . . . . . . . . . . . . . . . . . . . . 26
5 Videosystem einstellen . . . . . . . . . . . . . . . . . . . . . . . . . . . . . . . . . . . . . . . . . 28
7 Videosystem pflegen und reinigen . . . . . . . . . . . . . . . . . . . . . . . . . . . . . . . 38
8 Gewährleistung. . . . . . . . . . . . . . . . . . . . . . . . . . . . . . . . . . . . . . . . . . . . . . . 38
9 Entsorgung . . . . . . . . . . . . . . . . . . . . . . . . . . . . . . . . . . . . . . . . . . . . . . . . . . 38
10 Technische Daten . . . . . . . . . . . . . . . . . . . . . . . . . . . . . . . . . . . . . . . . . . . . . 39
23

DE
Erklärung der Symbole CAM 360
1 Erklärung der Symbole
WARNUNG!
!
A
I
Sicherheitshinweis: Nichtbeachtung kann zu Tod oder schwerer
Verletzung führen.
ACHTUNG!
Nichtbeachtung kann zu Materialschäden führen und die Funktion des
Produktes beeinträchtigen.
HINWEIS
Ergänzende Informationen zur Bedienung des Produktes.
2 Sicherheitshinweise
Beachten Sie die vom Fahrzeughersteller und vom Kfz-Handwerk
vorgeschriebenen Sicherheitshinweise und Auflagen!
Der Hersteller übernimmt in folgenden Fällen keine Haftung für Schäden:
• Montage- oder Anschlussfehler
• Beschädigungen am Produkt durch mechanische Einflüsse und Über-
spannungen
• Veränderungen am Produkt ohne ausdrückliche Genehmigung vom Hersteller
• Verwendung für andere als die in der Anleitung beschriebenen Zwecke
Die Kameras sind wasserdicht. Die Dichtungen der Kameras halten aber nicht einem
Hochdruckreiniger stand (Abb. 1, Seite 3). Beachten Sie deshalb folgende
Hinweise zum Umgang mit den Kameras:
ACHTUNG!
A
24
• Öffnen Sie die Kameras nicht, da dieses ihre Dichtigkeit und die
Funktionsfähigkeit beeinträchtigt (Abb. 2, Seite 3).
• Ziehen Sie nicht an den Kabeln, da dieses die Dichtigkeit und die
Funktionsfähigkeit der Kameras beeinträchtigt (Abb. 3, Seite 3).
• Die Kameras sind nicht für den Betrieb unter Wasser geeignet
(Abb. 4, Seite 3).

DE
CAM360 Bestimmungsgemäßer Gebrauch
2.1 Sicherheit beim Betrieb des Gerätes
WARNUNG!
!
A
• Spielen Sie niemals während der Fahrt Videos ab, um Gefahren-
situationen im Straßenverkehr zu vermeiden. Halten Sie sich an die
länderspezifisch geltenden Gesetze und Vorschriften.
• Verwenden Sie das Gerät während der Fahrt nur in seiner Funktion als
Fahrassistenzsystem, z.B. beim Spurwechsel, beim Rangieren oder
Einparken. Der Fahrer darf während der Fahrt in keinem Fall abgelenkt
sein. Dies könnte zu schweren Unfällen führen.
ACHTUNG!
• Wenn Sie das Gerät einsetzen, sollte das Fahrzeug während des
Betriebs laufen, damit die Fahrzeugbatterie nicht entladen wird.
3 Bestimmungsgemäßer Gebrauch
WARNUNG!
!
Gefahr von Personenschäden durch das Fahrzeug.
Videosysteme stellen eine Unterstützung beim Rückwärtsfahren dar, sie
entbinden Sie jedoch nicht von der besonderen Vorsichtspflicht
beim Rückwärtsfahren, Abbiegen sowie Vorwärtsfahren.
Das Videosystem CAM360 (Art.-Nr. 9600000509) für den Einsatz in Fahrzeugen
gedacht. Die Kameras übermitteln die Bilder in einer 360°-Rundumsicht, als ob Sie
aus der Vogelperspektive auf die Fahrzeugumgebung seitlich, davor und dahinter
blicken.
Zusätzlich kann eine der vier Kameras selektiv dargestellt werden (geteilter Bildschirm). Die Auswahl der Einzelkameraansicht ist abhängig von den Eingangssignalen der Blinker sowie Rückwärtsgang. Zudem kann die Selektion auch über die
mit gelieferte Fernbedienung erfolgen.
Es dient zur Beobachtung der direkten Fahrzeugumgebung, z. B. beim Fahren,
Spurwechsel, Rangieren oder Einparken.
25

DE
Technische Beschreibung CAM360
4 Technische Beschreibung
Vier 180°-Weitwinkelkameras befinden sich an der Front, dem Heck und der linken
und rechten Fahrzeugseite. Die erfassten Bilder werden via Videoprozessor in Echtzeit zu einem Bild zusammengefügt, das in der Draufsicht das Fahrzeug und seine
Umgebung vorne, hinten und an den Seiten darstellt.
Das Kamerasystem schaltet sich ein, sobald das Fahrzeug gestartet wird.
Das Kamerasystem bietet eine 360°-Rundumsicht und übermittelt die Bilder, als
ob Sie aus der Vogelperspektive auf die Fahrzeugumgebung seitlich, davor und
dahinter blicken.
Einzelne Kameras können je nach Einstellung einzeln durch Eingangssignale aktiviert
werden, z. B. durch das Benutzen eines Blinkers oder des Rückwärtsganges.
Das Steuergerät verfügt über vier Kameraeingänge und dient zur Verbindung der
Kameras mit Steckverbinder mit einem Monitor.
Das Steuergerät ermöglicht die Wahl
• den Bildschirm dauerhaft geteilt oder über ein Steuersignal geteilt darzustellen
• der automatischen Vollbildfunktion der Rückfahrkamera als Rückspiegelfunktion
• der dauerhaften Vollbildfunktion der 360°-Rundumsicht bei senkrechtem
Monitor
Videos der Kameras können im Ringspeicherprinzip gespeichert (SD-Karte oder
USB-Stick) und wiedergegeben werden. Die Dauer einer Aufnahmesequenzen
beträgt 10 Minuten. danach startet automatisch die nächste Aufnahmesequenz. Ist
der Speicher voll, wird automatisch die älteste Datei überschrieben.
26
DE
CAM360 Technische Beschreibung
4.1 Bedien- und Anzeigeelemente
HINWEIS
I
Nr. in
Abb. 5,
Seite 4
Benutzen Sie die Fernbedienung, um durch das Video-Menü zu
navigieren.
Ta s t e Beschreibung
1 EIN-/AUS-Taste:
Videoübertragung zum Monitor ein- oder ausschalten
2 ZURÜCK-Taste:
Im Haupt- und Untermenü zurück navigieren
3 OK- oder ABSPIELEN-/PAUSE-Taste:
– Menü aktivieren
– Eingabe bestätigen
– Gespeicherte Videos abspielen oder unterbrechen
4 SPEICHERN-Taste:
Speichern
5 Minus- oder Rückwärts-Taste:
– Wert reduzieren
– Schneller Rücklauf beim Abspielen von Videos
6 0 – 9 Zifferntasten:
Ziffern eingeben
7 Plus- oder Vorwärts-Taste:
– Wert erhöhen
– Schneller Vorlauf beim Abspielen von Videos
8 Plus- oder Minus-Taste:
Ohne Funktion
9
, , ,
Pfeiltasten:
– Vordere, hintere, linke oder rechte Kamera auswählen
– Im Haupt- und Untermenü navigieren
27
DE
Videosystem einstellen CAM360
5 Videosystem einstellen
HINWEIS
I
5.1 Überblick Menü
Navigation durch das Video-Menü
• Beachten Sie, dass das Aufnehmen von Videos in einigen Ländern
verboten ist.
• Die Videoaufnahme ist ab Werk ausgeschaltet.
• Um die Videoaufnahme zu aktivieren, siehe Kapitel „Einstellungen
für die Videoaufnahme vornehmen“ auf Seite 30.
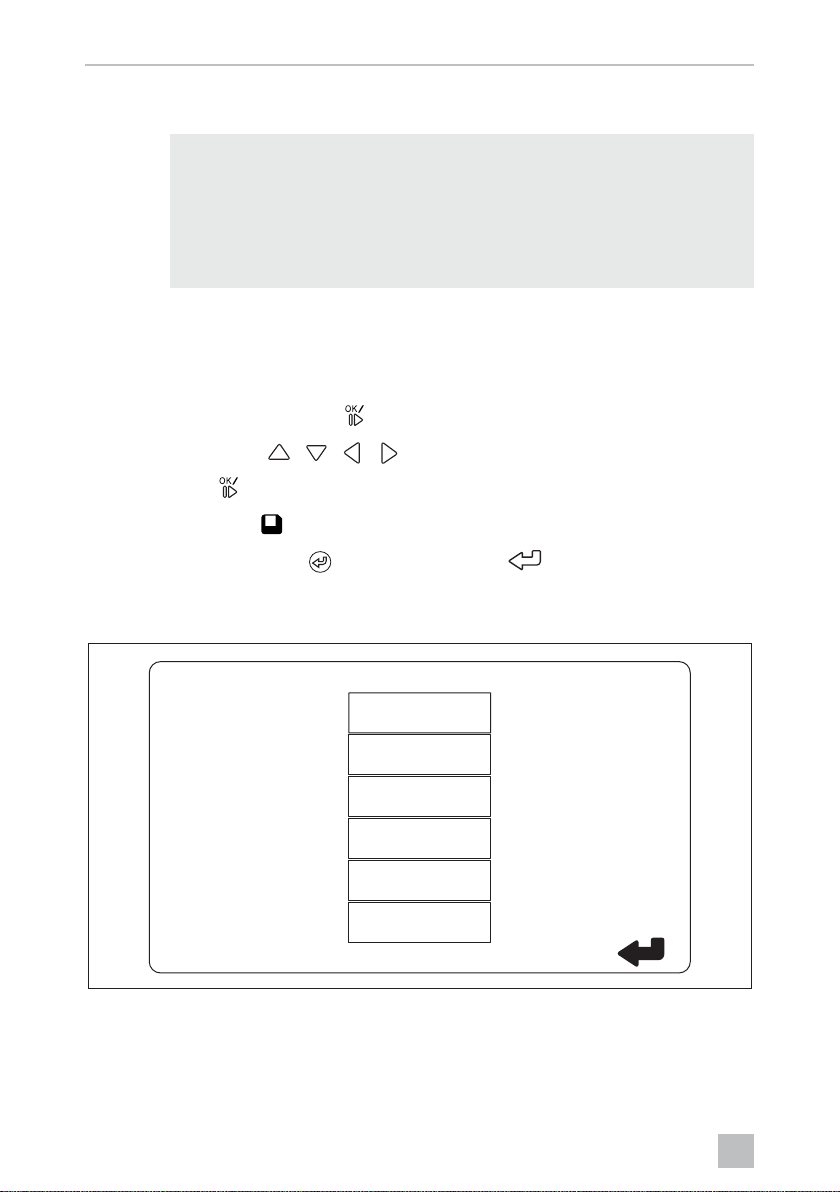
➤ Aktivieren Sie das Menü mit
➤ Navigieren Sie mit , , , zum gewünschten Menüpunkt oder Video.
➤ Drücken Sie
➤ Speichern Sie mit oder dem SAVE-Icon im Menü.
Brechen Sie Ihre Aktion mit ab oder wählen Sie das -Icon im Menü.
Hauptmenü
um den Menüpunkt auszuwählen.
.
VIDEO LISTE
VIDEO EINST
STEUER KONFIG
KALIBRIERUNG
EINSTELLUNGEN
VERSION
28

DE
CAM360 Videosystem einstellen
Bezeichung Beschreibung
„VIDEO LISTE“ Videoaufnahmen verwalten
(siehe Kapitel „Videoaufnahmen verwalten“ auf Seite 36)
„VIDEO EINST“ – Datum und Uhrzeit einstellen
(siehe Kapitel „Datum und Uhrzeit einstellen“ auf Seite 30)
– Einstellungen für die Videoaufnahme vornehmen
(siehe Kapitel „Einstellungen für die Videoaufnahme
vornehmen“ auf Seite 30)
„STEUER KONFIG“ Video-Steuerung konfigurieren
(siehe Kapitel „Bildschirmanzeige konfigurieren“ auf
Seite 31)
„KALIBRIERUNG“ NUR für Fachkräfte: siehe Montageanleitung
„EINSTELLUNGEN“ NUR für Fachkräfte: siehe Montageanleitung
„VERSION“ Anzeigen der aktuellen Firmware-Version
5.2 Sprache einstellen
ACHTUNG!
A
Die Einstellungen in diesem Menü sind nur für Fachkräfte vorgesehen.
Ändern Sie keine anderen Einstellungen, da ansonsten die Funktion des
Kamerasystems beeinträchtigt werden kann.
➤ Wählen Sie „EINSTELLUNGEN“.
➤ Geben Sie das Password „654321“ ein.
➤ Wählen Sie „BASISWERTE“.
➤ Wählen Sie „SPRACHE“.
➤ Wählen Sie zwischen „ENGLISH“ (Englisch), „DEUTSCH“,
„FRANCAIS“ (Französisch).
➤ Speichern Sie die Einstellung.
➤ Verlassen Sie das Menü mit
.
29

DE
Videosystem einstellen CAM360
5.3 Datum und Uhrzeit einstellen
➤ Wählen Sie „VIDEO EINST“.
➤ Stellen Sie ein:
–„JAHR“
–„MONAT“
–„DATUM“
–„STUNDE“
–„MINUTE“
–„SEKUNDE“
➤ Speichern Sie die Einstellung.
5.4 Einstellungen für die Videoaufnahme vornehmen
HINWEIS
I
➤ Wählen Sie „VIDEO EINST“.
➤ Wählen Sie „SPEICHERORT“.
➤ Stellen Sie ein:
–USB
–SD
Ein Speichermedium kann nur ausgewählt werden, wenn ein
entsprechendes Speichermedium eingesteckt ist.
➤ Wählen Sie „KANAL“.
➤ Stellen Sie ein:
–„KEIN“
–„LINKS“
–„HINTEN“
–„RECHTS“
–„VORNE“
–„VIER“
➤ Speichern Sie die Einstellung.
30
 Loading...