

Dometic HiPro 3000, HiPro 4000, HiPro Series, HiPro 6000, HiPro 4000 Vision Installation And Operating Manual
Page 1
ENDEFRESPTITNLDASVNOFIRUPLSKCS
HU
MINIBAR
HiPro3000, HiPro4000,
HiPro4000Vision, HiPro6000
Minibar
Installation and Operating Manual. . . . . . . 14
Minibar
Montage- und Bedienungsanleitung . . . . .29
Minibar
Instructions de montage
et de service . . . . . . . . . . . . . . . . . . . . . . . . .45
Minibar
Instrucciones de montaje y de uso. . . . . . .62
Minibar
Instruções de montagem e manual de
instruções . . . . . . . . . . . . . . . . . . . . . . . . . . .78
Minibar
Istruzioni di montaggio e d’uso . . . . . . . . .95
Minibar
Montagehandleiding en
gebruiksaanwijzing . . . . . . . . . . . . . . . . . . 111
Minibar
Monterings- og betjeningsvejledning . . .126
Minibar
Monterings- och bruksanvisning . . . . . . . 141
HIPRO
Minibar
Monterings- og bruksanvisning. . . . . . . . 155
Minibaari
Asennus- ja käyttöohje . . . . . . . . . . . . . . . 170
Мини-бар
Инструкция по монтажу и эксплуатации 186
Minibar
Instrukcja montażu i obsługi. . . . . . . . . . .203
Minibar
Návod na montáž a uvedenie
do prevádzky. . . . . . . . . . . . . . . . . . . . . . . 219
Minibar
Návod k montáži a obsluze . . . . . . . . . . .234
Minibár
Szerelési és használati útmutató . . . . . . .249
Page 2
HiPro 3000
HiPro 4000
HiPro 6000
4
3
2
1
5
HiPro 4000
Vision
1
3
2
HiPro 4000
Vision
1
3
2
HiPro 4000
4
3
5
1
2
1
HiPro
2
Page 3

HiPro
1
2
3
Page 4
HiPro
AB
CD
≥ 200 cm²
≥ 200 cm²
≥ 200 cm²
≥ 200 cm²
≥ 20 mm
≥ 200 cm²≥ 200 cm²
3
4
Page 5
HiPro
1.
5.
4.
5.
4.
6.
AB
2.
3.
4
1.
2.
HiPro 4000
HiPro 4000 Vision
5
5
Page 6

HiPro
3.
4.
1.
2.
6
2.
1.
7
1.
2.
8
6
Page 7

3.
1.
2.
9
HiPro
7
Page 8
HiPro
1-2
6-8
≤ 40
HiPro 3000
HiPro 4000
HiPro 6000
0
HiPro 3000
HiPro 4000
HiPro 6000
1.
2.
a
8
Page 9
HiPro
HiPro 3000
HiPro 4000
HiPro 6000
1.
2.
b
HiPro 3000A294,5 mm
311,5 mm
376,5 mm
B
418 mm
452 mm
475 mm
C
492 mm
524 mm
533 mm
HiPro 4000
HiPro 6000
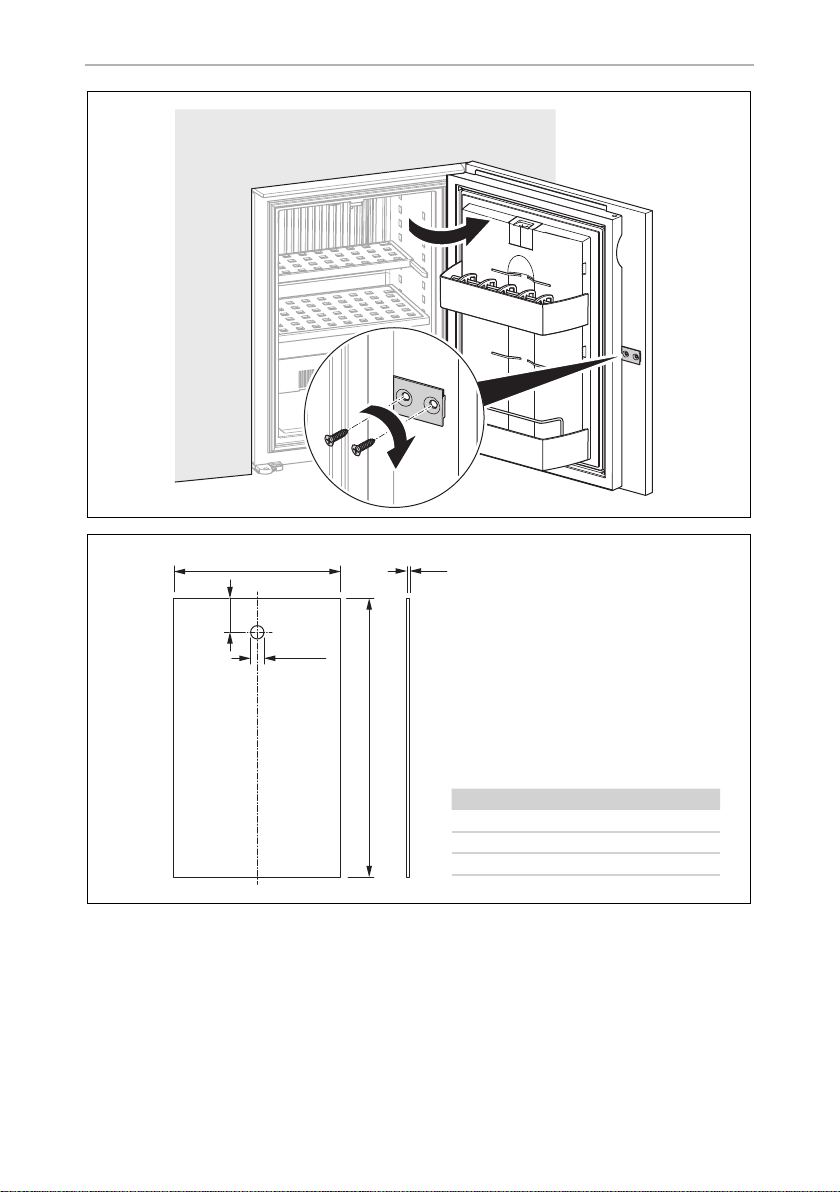
A ≤ 2
Ø 23,5
C
62
HiPro 3000
HiPro 4000
HiPro 6000
c
9
Page 10

HiPro
2.
3.
1.
d
1.
2.
3.
e
10
Page 11
HiPro
1.
2.
3.
f
g
HiPro 3000, HiPro 4000, HiPro 6000
1.
2.
h
11
Page 12
5 °C 7 °C 12 °C3 °C
3x 5x 7x 12x
1
2
5
3
4
i
HiPro
12
Page 13

HiPro
HiPro 4000
A
405 mm
405 mm
B
472 mm
484 mm
C
601 mm
601 mm
HiPro 4000 Vision
HiPro 3000
A
388 mm
405 mm
490 mm
405 mm
B
418 mm
452 mm
475 mm
464 mm
C
527 mm
559 mm
568 mm
559 mm
HiPro 4000
HiPro 6000
HiPro 4000 Vision
AB BA
C
C
HiPro 3000
HiPro 4000
HiPro 6000
HiPro 4000
HiPro 4000 Vision
j
13
Page 14

EN
Explanation of symbols HiPro
Please read this instruction manual carefully before installation and first
use, and store it in a safe place. If you pass on the product to another
person, hand over this instruction manual along with it.
Table of contents
1 Explanation of symbols . . . . . . . . . . . . . . . . . . . . . . . . . . . . . . . . . . . . . . . . . .14
2 Safety instructions . . . . . . . . . . . . . . . . . . . . . . . . . . . . . . . . . . . . . . . . . . . . . . 15
3 Scope of delivery . . . . . . . . . . . . . . . . . . . . . . . . . . . . . . . . . . . . . . . . . . . . . . 17
4 Accessories . . . . . . . . . . . . . . . . . . . . . . . . . . . . . . . . . . . . . . . . . . . . . . . . . . .17
5 Intended use . . . . . . . . . . . . . . . . . . . . . . . . . . . . . . . . . . . . . . . . . . . . . . . . . .17
6 Technical description . . . . . . . . . . . . . . . . . . . . . . . . . . . . . . . . . . . . . . . . . . .18
7 Setting up and connecting the refrigerator . . . . . . . . . . . . . . . . . . . . . . . . . .19
8 Using the refrigerator . . . . . . . . . . . . . . . . . . . . . . . . . . . . . . . . . . . . . . . . . . 22
9 Cleaning and care . . . . . . . . . . . . . . . . . . . . . . . . . . . . . . . . . . . . . . . . . . . . . 25
10 Troubleshooting . . . . . . . . . . . . . . . . . . . . . . . . . . . . . . . . . . . . . . . . . . . . . . 25
11 Warranty . . . . . . . . . . . . . . . . . . . . . . . . . . . . . . . . . . . . . . . . . . . . . . . . . . . . 27
12 Disposal . . . . . . . . . . . . . . . . . . . . . . . . . . . . . . . . . . . . . . . . . . . . . . . . . . . . . 27
13 Technical data . . . . . . . . . . . . . . . . . . . . . . . . . . . . . . . . . . . . . . . . . . . . . . . . 28
1 Explanation of symbols
WARNING!
!
!
A
14
Safety instruction: Failure to observe this instruction can cause fatal or
serious injury.
CAUTION!
Safety instruction: Failure to observe this instruction can lead to injury.
NOTICE!
Failure to observe this instruction can cause material damage and impair
the function of the product.
Page 15

EN
HiPro Safety instructions
NOTE
I
Supplementary information for operating the product.
2 Safety instructions
The manufacturer accepts no liability for damage in the following cases:
•
Faulty assembly or connection
•
Damage to the product resulting from mechanical influences and incorrect
connection voltage
•
Alterations to the product without express permission from the manufacturer
•
Use for purposes other than those described in the operating manual
2.1 General safety
WARNING!
•
!
Never open the absorber unit. It is under high pressure and can cause
injury if it is opened.
•
Do not store any explosive substances such as spray cans with a
flammable propellant in the device.
•
The refrigerant in the refrigerant circuit is highly flammable.
In the event of any damage to the refrigerant circuit (smell of ammonia):
– Switch off the appliance.
– Avoid naked flames and sparks.
•
Air the room well.
•
Do not operate the device if it is visibly damaged.
•
If the power cable for this device is damaged, it must be replaced by
the manufacturer, customer service or a similarly qualified person in
order to prevent safety hazards.
•
This appliance may only be repaired by qualified personnel.
Inadequate repairs may cause serious hazards.
•
Th is devic e can be u sed by childre n aged 8 years o r over, a s well as by
persons with diminished physical, sensory or mental capacities or a
lack of experience and knowledge, providing they are supervised, or
have been taught how to use the device safely and are aware of the
resulting risks.
15
Page 16

EN
Safety instructions HiPro
•
Cleaning and user maintenance may not be carried out by
unsupervised children.
•
Children must be supervised to ensure that they do not play with the
appliance.
CAUTION!
•
!
A
Danger of crushing! Do not place your hand on the hinge.
•
Before start-up, ensure that the power supply line and power plug are
dry.
•
Food may only be stored in its original packaging or in suitable
containers.
NOTICE!
•
Do not open the refrigerant circuit under any circumstances.
•
Do not install the device near naked flames or other heat sources
(heaters, direct sunlight, gas ovens etc.).
•
Check that the voltage specification on the type plate is the same as
that of the energy supply.
•
Only use the cable supplied to connect the appliance to the AC
mains.
•
Never pull the power plug out of the socket by the cable.
•
Do not store any substances that are caustic or contain solvents in the
refrigerator.
•
Only use cables with a suitable cross-section.
•
Keep the condensation opening clean at all times.
2.2 Operating the refrigerator safely
NOTICE!
•
A
Do not use electrical devices inside the device unless they are
recommended by the manufacturer for that purpose.
•
Danger of overheating!
Always ensure sufficient ventilation so that the heat generated during
operation can dissipate. Make sure that the device is sufficiently far
away from walls and other objects so that the air can circulate.
•
The absorber unit becomes hot during operation. Do not touch the
absorber unit!
•
Ensure that the ventilation openings are not covered.
16
Page 17
EN
HiPro Scope of delivery
•
Do not fill the inner container with ice or liquids.
•
Never immerse the device in water.
•
Protect the device and the cable against heat and moisture.
•
Make sure that foodstuffs do not touch the walls of the refrigerator
compartment.
3Scope of delivery
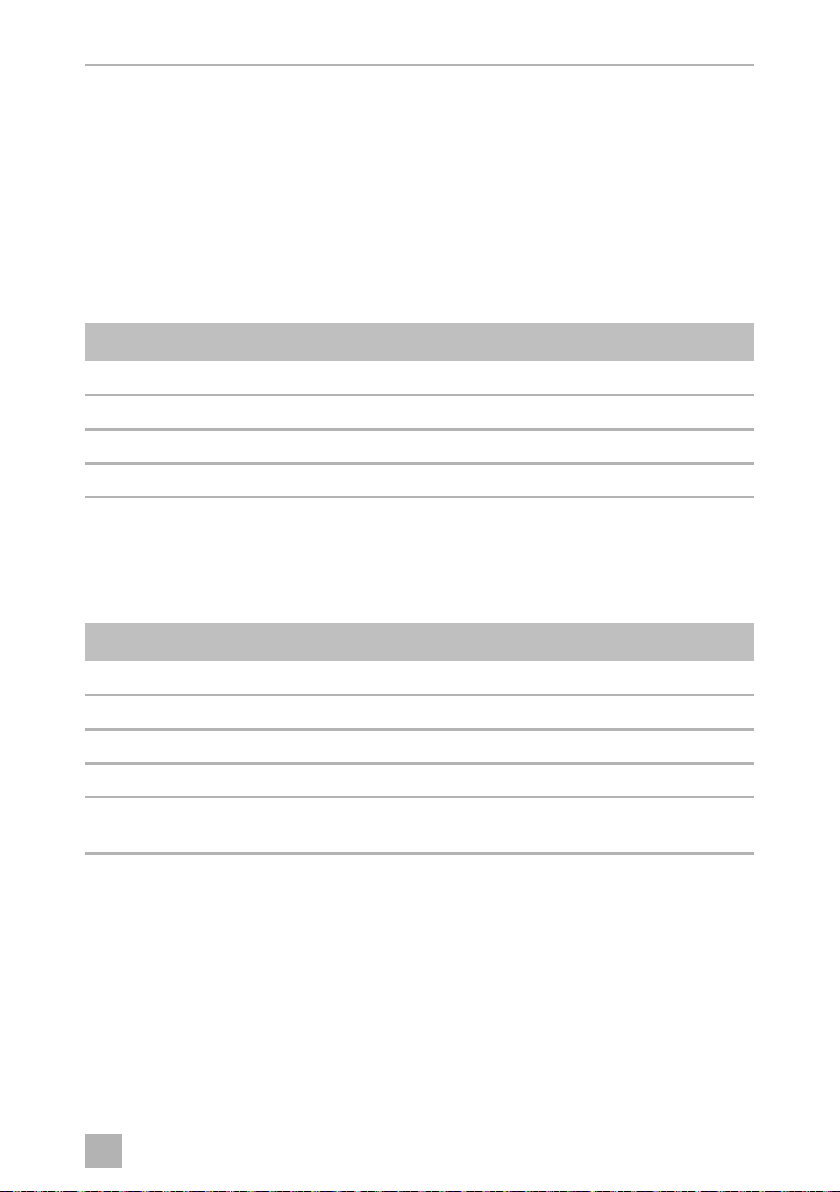
Quantity Description
1 Mini-bar
2Shelf
2 Door rack (not for HiPro4000 Vision)
1 Installation and operating manual
4Accessories
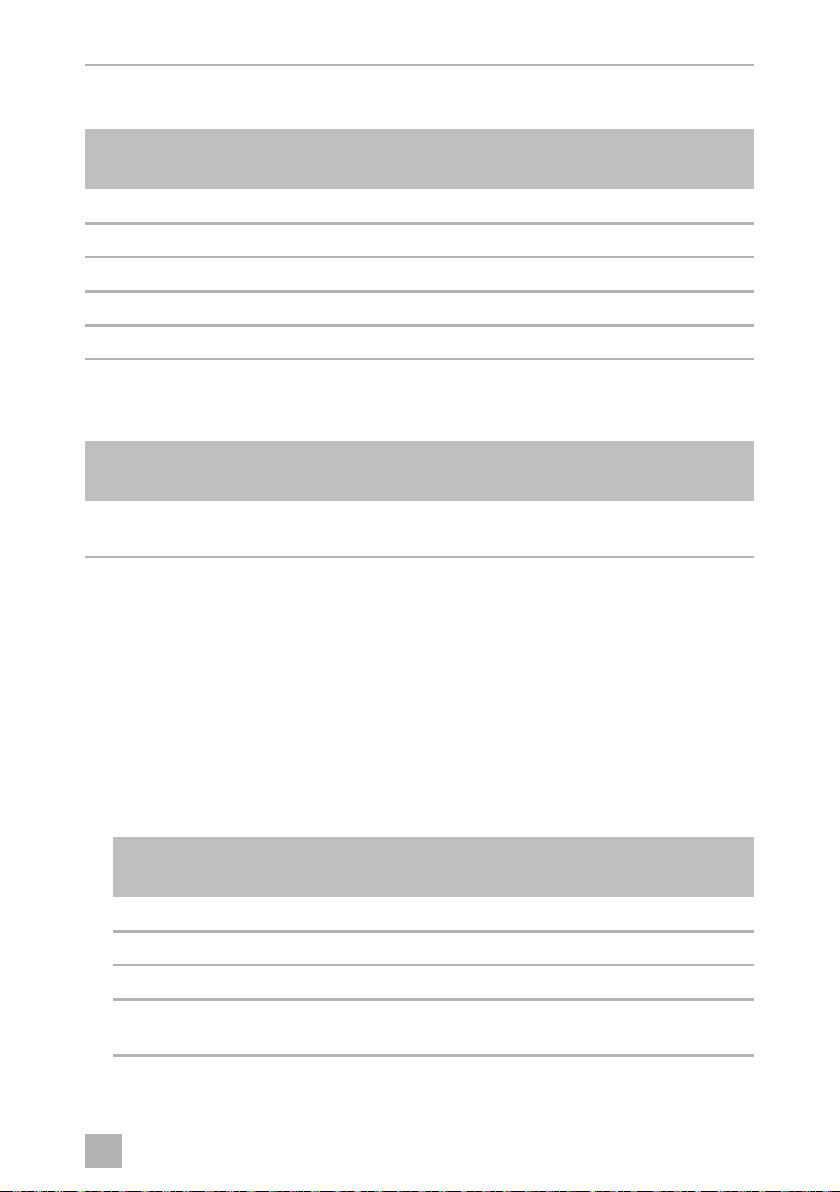
Available as accessories (not included in the scope of delivery):
Description Explanation
Remote control For door opening monitor and temperature regulation
Reflector For door opening monitor
Keys For versions with lock
Sliding hinge For simultaneous opening of cabinetry door and refrigerator door
Cooler lid and high
device feet
For HiPro4000 and HiPro4000 Vision, as free-standing versions
5 Intended use
The mini-bar is designed for operation in enclosed buildings, such as:
•
In staff kitchens in stores, offices and other work areas
•
In the agricultural sector
•
In hotels, motels and other accommodations
17
Page 18

EN
Technical description HiPro
•
In bed and breakfast establishments
•
In catering businesses or similar wholesaler operations
The mini-bar is not suitable for installation in caravans, mobile homes, or boats.
The mini-bar is intended for installation in a piece of cabinetry or an installation niche.
Once it is installed, only the front of the appliance may be accessible.
The HiPro4000 and HiPro4000Vision mini-bars can also stand freely on the floor, if
the optional cooler lid is mounted on the rear and the high device feet are installed.
The mini-bar is designed exclusively for cooling and storing of beverages and foods
in closed containers.
The mini-bar is not suitable for storage of perishable foods.
WARNING!
!
!
The device is not intended for proper storage of medicine.
CAUTION! Health hazard!
Please check if the cooling capacity of the device is suitable for storing
the food you wish to cool.
6 Technical description
The mini-bar is a refrigerator with absorption cooling. Ammonia is used as the
refrigerant. All materials used are compatible for use with foodstuffs. The refrigerant
circuit is maintenance-free.
The mini-bar (except for HiPro4000Vision) has two shelves and two door racks.
There is a door rack intended for bottles. A 1.5 l bottle can be stored in the door rack
for bottles. The second door rack is intended for smaller bottles or snacks.
The HiPro4000Vision mini-bar has two shelves and a transparent acrylic door
without door racks.
The HiPro4000 and HiPro4000Vision mini-bars can optionally be used as
free-standing versions with a cooler lid and high device feet.
18
Page 19
EN
HiPro Setting up and connecting the refrigerator
6.1 Control elements on the refrigerator
No. in
fig. 1, page 2
1 Interior light
2 LED of the door opening monitor (optional)
3Shelf
4 Lower door rack
5 Upper door rack
Explanation
6.2 Control elements outside the refrigerator
No. in
fig. 2, page 3
1 Remote control for door opening monitor and temperature regula-
Explanation
tion (optional)
7 Setting up and connecting the
refrigerator
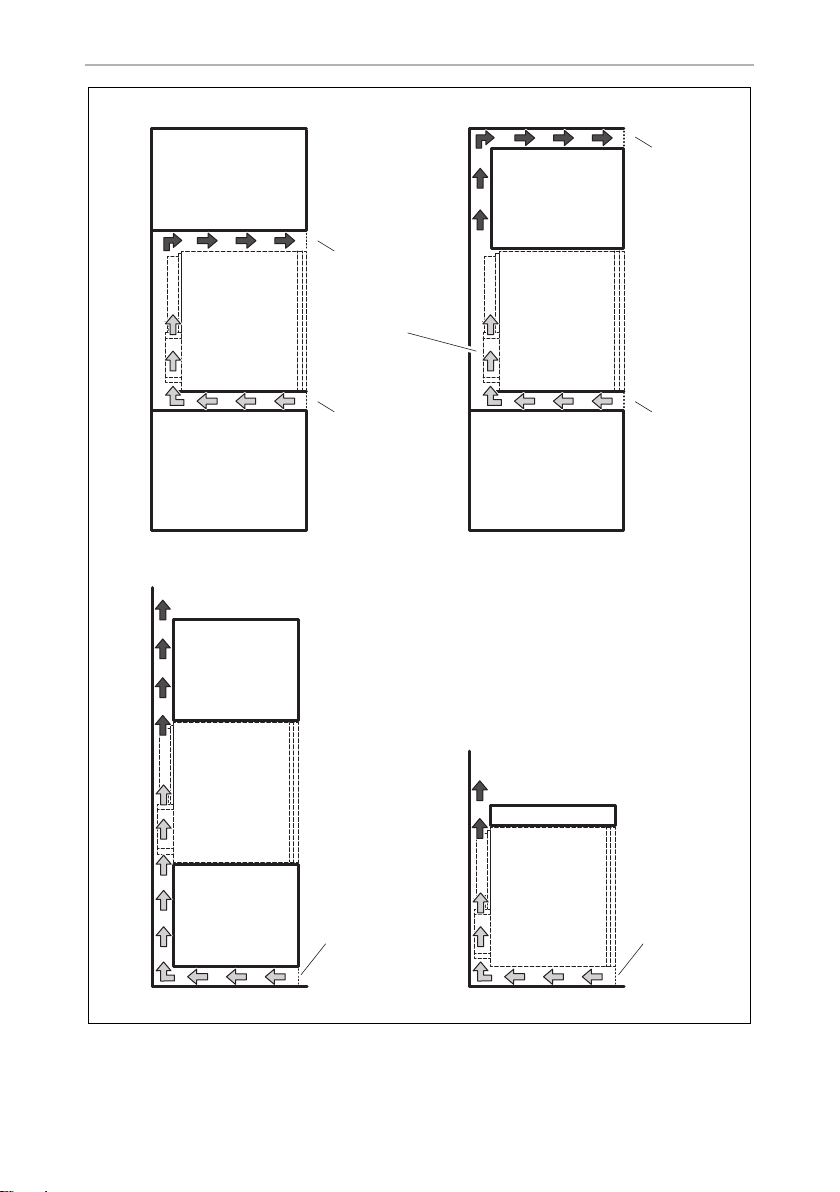
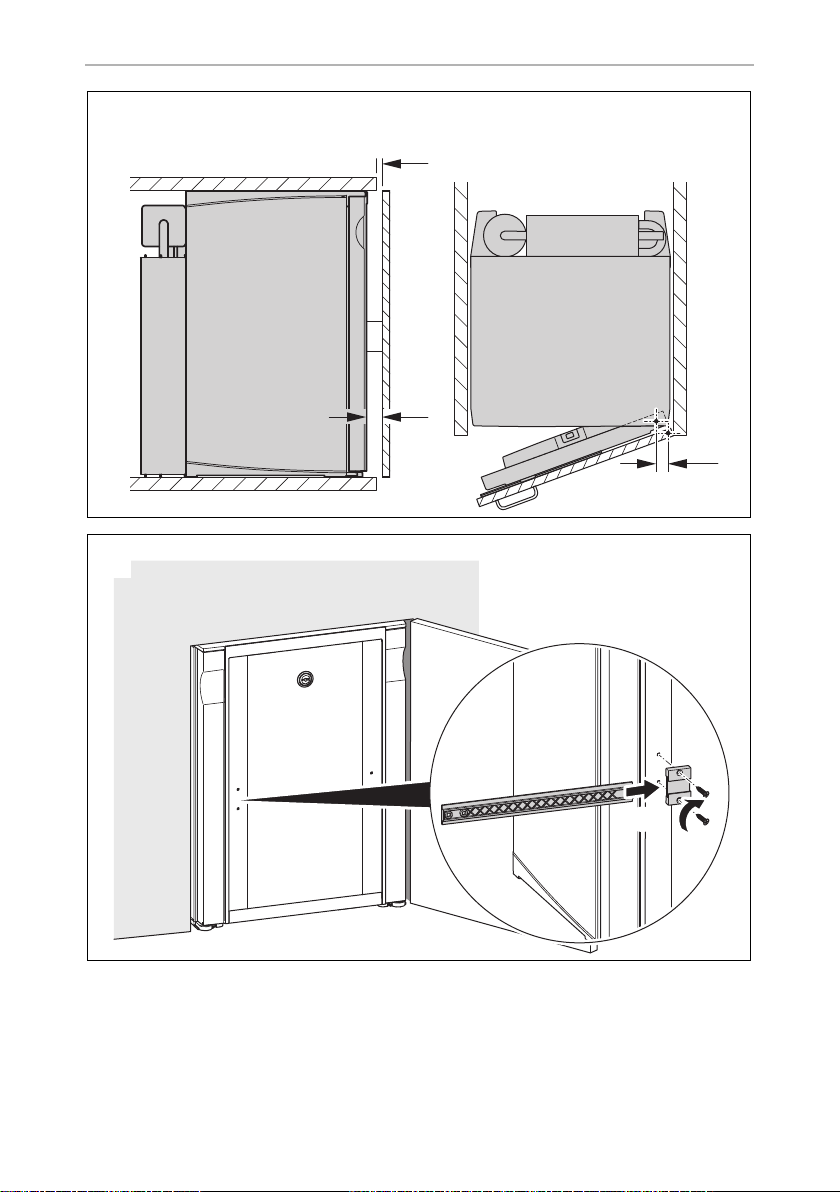
7.1 Instructions for installing the refrigerator
Observe the following when installing the refrigerator:
•
Install the refrigerator so that the warm air produced can easily flow away (either
upwards or to the sides, fig. 3, page 4).
Description in
fig. 3, page 4
A Cold intake air
B Heated exhaust air
C Condenser
D Clearance above the refrigerator if exhaust air can not adequately
Explanation
circulate upwardly or at the side
19
Page 20

EN
Setting up and connecting the refrigerator HiPro
•
Maintain a minimum distance of 20 mm between the cooling unit and the rear
wall.
•
Keep objects clear of openings in the housing or installation structure (such as
ventilation slots, etc.).
7.2 Setting up the refrigerator in a freestanding position
Observe the following information if you wish to set up the refrigerator freestanding
on the floor:
•
Position the refrigerator horizontally. Use a water level to check this.
7.3 Installing refrigerator in cabinetry
Observe the following instructions if you wish to install the refrigerator in cabinetry:
•
Set up the refrigerator so that both device feet lie on the storage surface.
•
Air must be able to circulate without any hindrance (fig. 3, page 4).
•
Only the cooling unit may extend into the ventilation duct.
•
The air in the ventilation duct may not be heated by other heat sources.
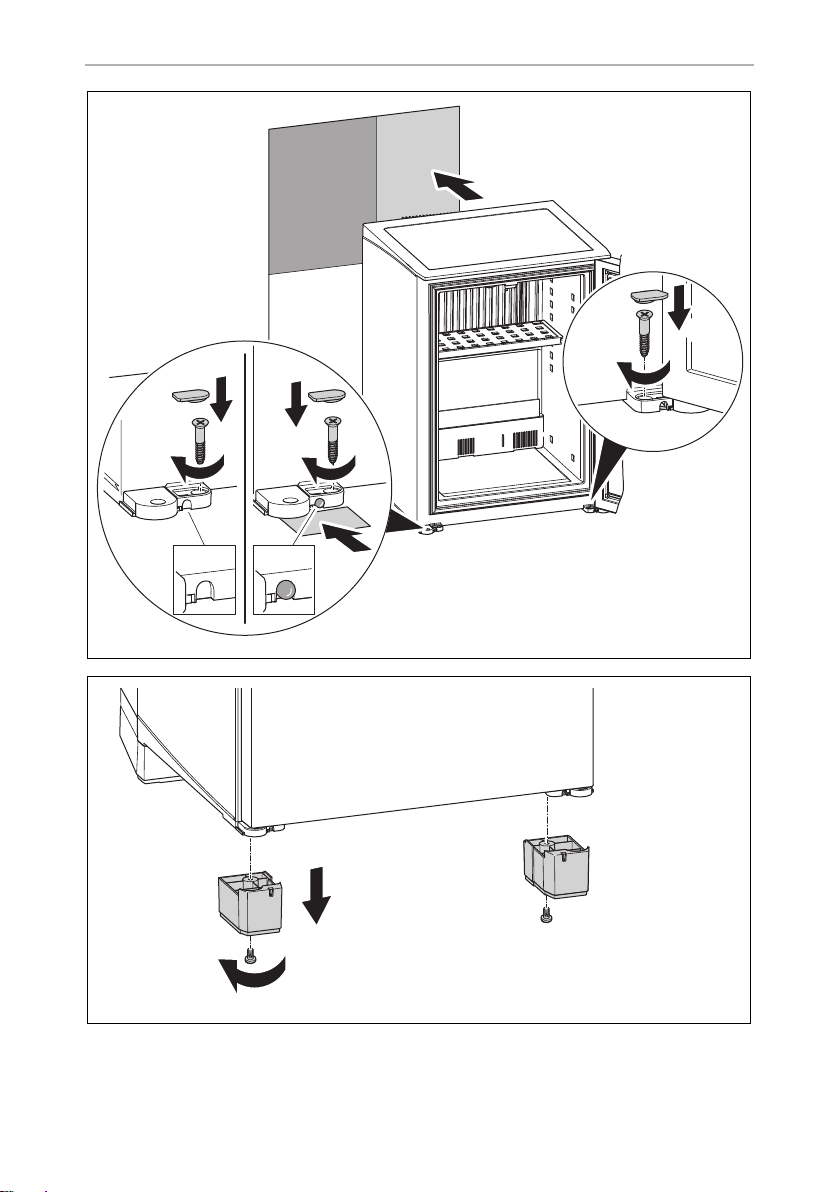
Proceed as follows (fig. 4, page 5):
➤ Attach the reflector for the door opening monitor (optional).
➤ Screw the device feet in place.
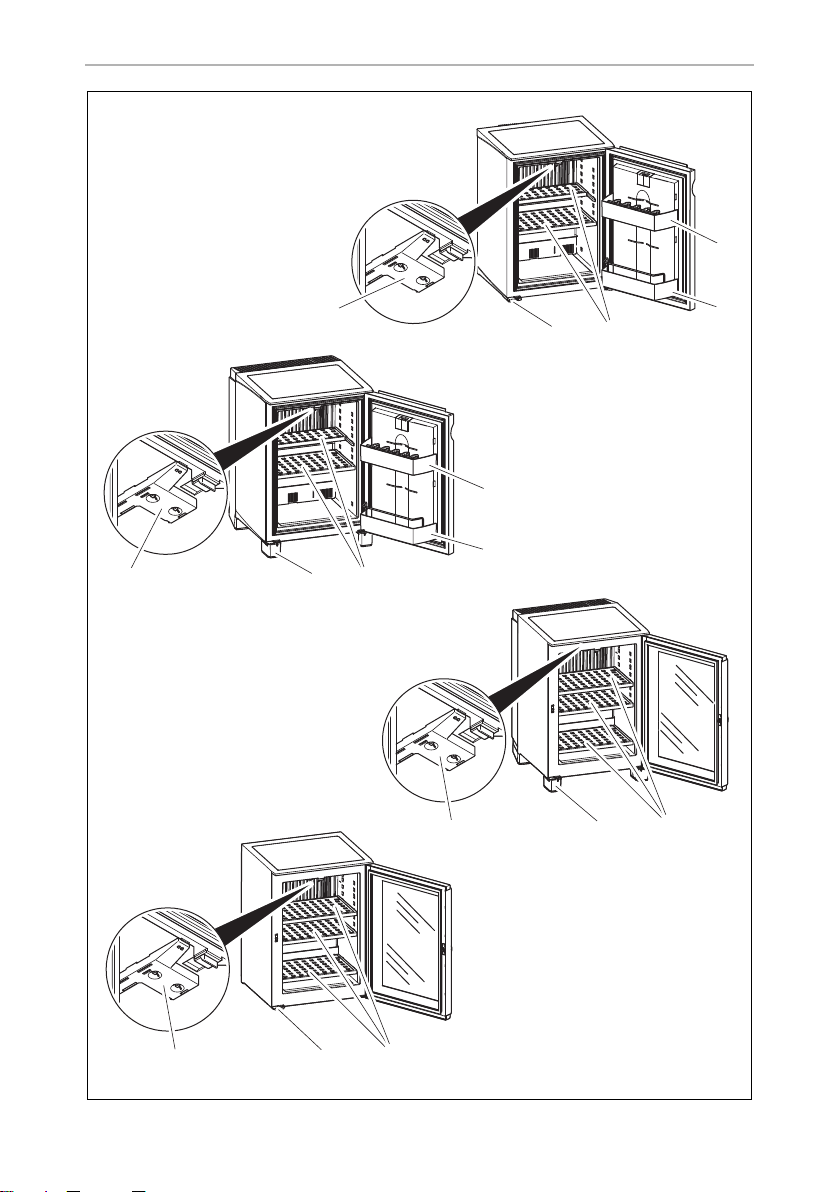
7.4 Changing the door hinge
You can also change the hinge of the door, so that it opens to the left rather than the
right.
NOTE
I
With an existing LED for the door opening monitor, proceed as follows:
➤ Pull the LED out.
➤ Lay the cable in the guide.
➤ Insert the LED on the other side again.
The LED of the door opening monitor (optional) must always be located
opposite the door hinge.
20
Page 21

EN
HiPro Setting up and connecting the refrigerator
Then proceed as follows (fig. 5, page 5 until fig. 9, page 7):
HiPro4000, HiPro4000Vision (for version with high feet)
➤ Unscrew the high feet.
HiPro3000, HiPro4000, HiPro6000, HiPro4000Vision
➤ Pull the lower hinge out.
➤ Pull the door with the hinges out.
➤ Remove the hinge pins.
➤ Insert the hinge pins on the other side again.
➤ Insert the door with the lower hinge again.
NOTE
I
HiPro4000, HiPro4000Vision (for version with high feet)
➤ Screw on the high feet again.
HiPro4000Vision: Insert the door rotated by 180°.
7.5 Install sliding hinge
➤ Observe the distances in fig. 0, page 8.
➤ Proceed as displayed infig. a, page 8 until fig. b, page 9.
7.6 Install panel plate
➤ Observe the installation dimensions in fig. c, page 9.
➤ Remove the retaining ring of the lock (optional, fig. d, page 10).
➤ Proceed as displayed infig. d, page 10 until fig. e, page 10.
21
Page 22

EN
Using the refrigerator HiPro
8 Using the refrigerator
NOTICE!
•
A
I
8.1 Energy saving tips
•
Choose a well ventilated position which is protected from direct sunlight.
•
Put the refrigerator into operation about 12 hours prior to use.
•
Arrange the shelves evenly in the refrigerator compartment.
•
Allow hot food to cool down first before you put it in the refrigerator.
•
Do not open the refrigerator more often than necessary.
•
Do not leave the door open for longer than necessary. With the door open, the
interior light is lit continuously.
•
Avoid unnecessarily low temperature settings.
•
Adjust the room temperature to about 20 °C.
Do not place any electrical devices inside the refrigerator.
Exceptions are devices approved for the purpose by the
manufacturer.
•
Ensure that food or liquids in glass containers are not excessively
refrigerated. Liquids expand when they freeze. This can therefore
destroy glass containers.
•
Food may only be stored in its original packaging or in suitable
containers.
•
Ensure that the items placed in the cooler are suitable for cooling to
the selected temperature.
NOTE
•
Before starting your new refrigerator for the first time, you need to
clean it inside and outside with a damp cloth for hygienic reasons
(see also chapter “Cleaning and care” on page 25).
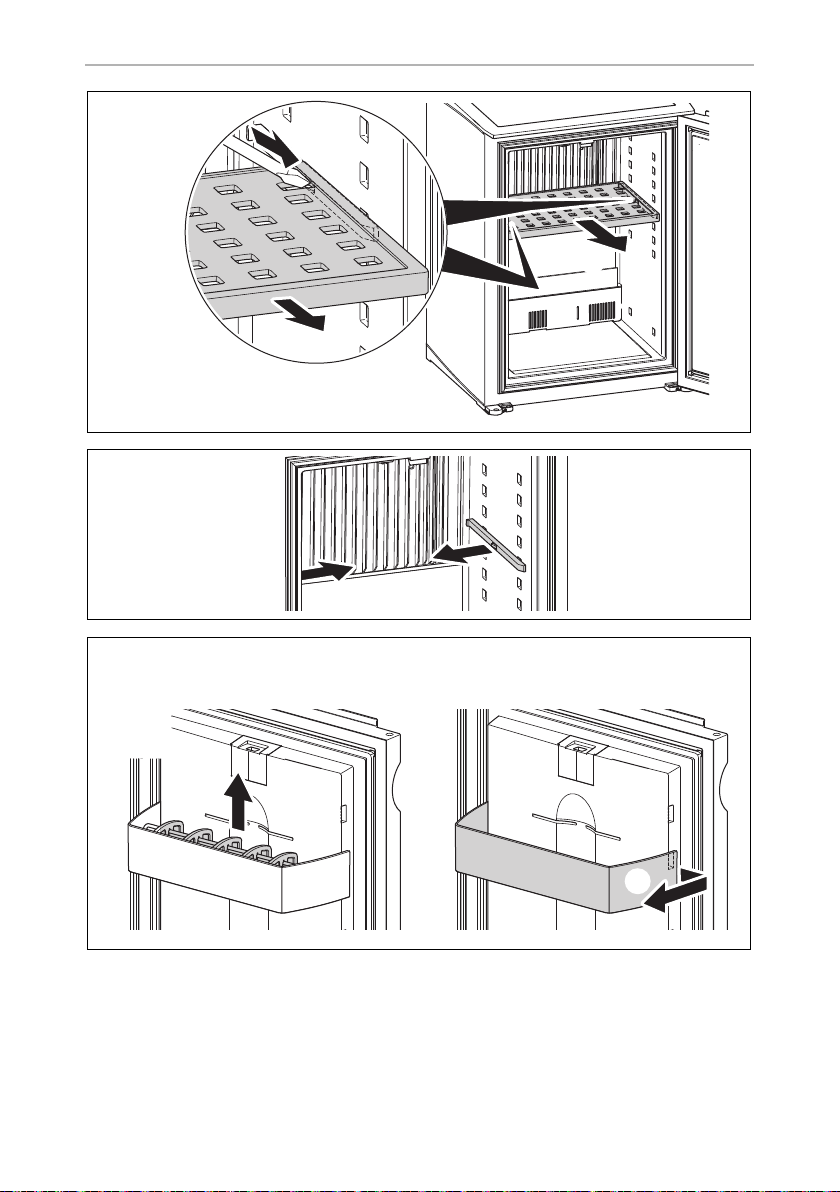
8.2 Positioning the shelves
➤ Proceed as displayed infig. f, page 11 until fig. g, page 11.
8.3 Positioning door rack
➤ Proceed as displayed in fig. h, page 11.
22
Page 23

EN
HiPro Using the refrigerator
8.4 Switch on the refrigerator
DANGER! mortal danger!
D
!
A
I
➤ Plug the power plug into the socket.
✓ The refrigerator starts a self-test. After about 10 seconds, the LED interior light
illuminates for 2 seconds.
✓ The refrigerator is switched on.
Never handle plugs and switches with wet hands or if you are standing
on a wet surface.
WARNING!
Only connect the refrigerator to a correctly earthed socket.
NOTICE!
The power plug must be freely accessible after the refrigerator has been
installed.
NOTE
The refrigerator automatically switches on if it is connected to the mains
supply.
8
NOTE
I
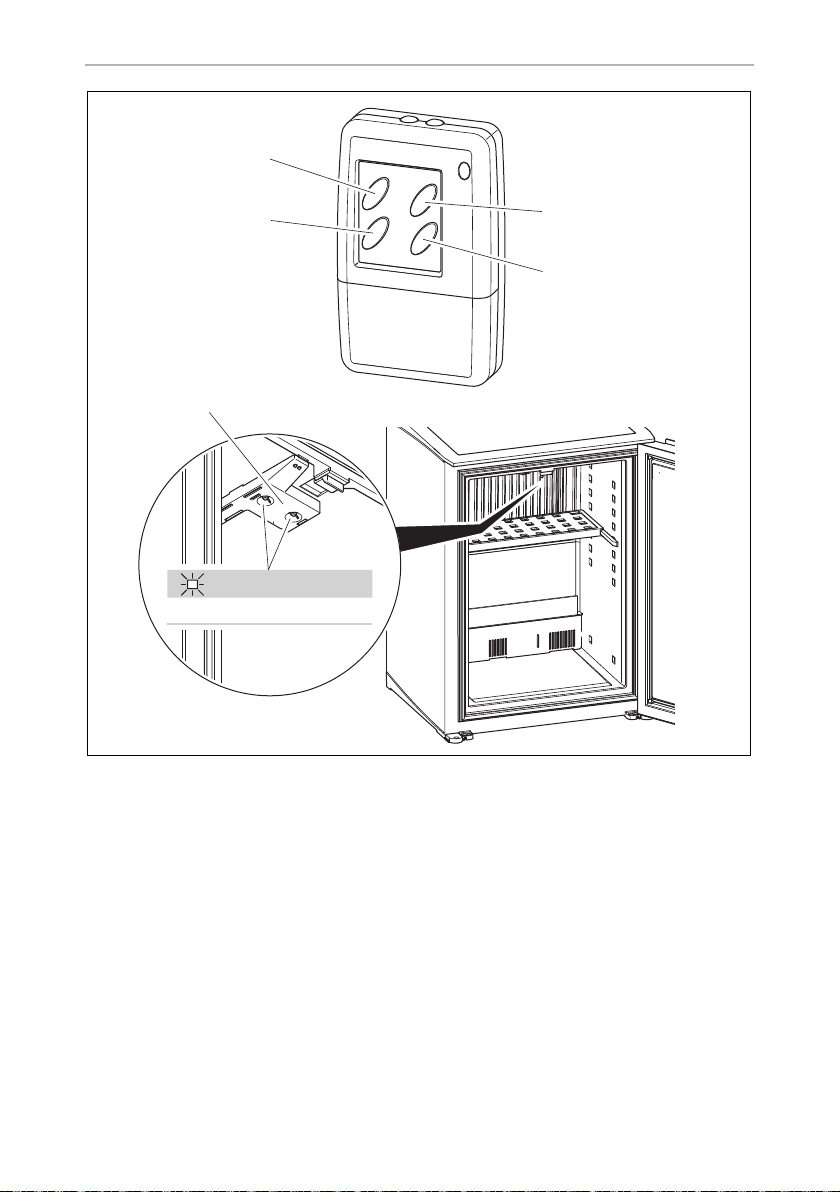
8.5 Setting the temperature
The refrigerator is equipped with an automatic temperature regulation function. The
cooling temperature is preset to 5 °C.
With the optional remote control you can adjust the preset to 3 °C, 5 °C, 7 °C or
12 °C (fig. i, page 12). With each press of the button on the remote control, the
cooling temperature switches between the possible values:
➤ Remove the plastic insulation from the battery holder before initial use.
✓ By pressing a button, a red LED illuminates on the remote control. If the red LED
does not illuminate, replace the batteries in the remote control.
➤ Align the upper side of the remote control to the LEDs of the interior light (5).
Maintain a distance of less than 20 cm.
After switching on, the refrigerator needs several hours to reach the
cooling temperature within the refrigerator compartment.
23
Page 24

EN
Using the refrigerator HiPro
➤ Press the yellow button (3) to set the cooling temperature to 3 °C or 7 °C.
✓ The LEDs of the interior light (5) flash three times or seven times, respectively, to
display the preset temperature (fig. i, page 12).
➤ Press the blue button (4) to set the cooling temperature to 5 °C or 12 °C.
✓ The LEDs of the interior light (5) flash five times or twelve times, respectively, to
display the preset temperature (fig. i, page 12).
8
NOTE
I
The red LED illuminates as soon as a signal has been sent out. Check the
batteries if the LED does not illuminate.
8.6 Using the door opening monitor
The door opening monitor (optional) displays via an LED (fig. 1 4,page 2) whether
the refrigerator door has been opened.
If the door opening monitor LED illuminates:
➤ Open the refrigerator.
➤ If necessary, refill the refrigerator.
➤ Reset the door opening monitor with the remote control (optional). To do this,
press the red button once (fig. i 1, page 12).
➤ Close the refrigerator.
8.7 Defrosting the cooling device
The refrigerator is equipped with an automatic defrosting function.
The defrosting phase takes place every 22 hours for a duration of 2 hours.
NOTE
I
The first defrosting phase starts 39 hours after the refrigerator has been
switched on. Start-up during the day ensures that the defrosting phases
occur during nighttime hours.
8.8 Switching off and storing the refrigerator
If you do not intend to use the refrigerator for a long time, proceed as follows:
➤ Pull the power plug out of the socket.
➤ Clean the refrigerator (see chapter “Cleaning and care” on page 25).
24
Page 25
EN
HiPro Cleaning and care
9 Cleaning and care
NOTICE! Risk of damage!
•
A
➤ Disconnect the device from the mains supply prior to cleaning and maintaining it.
➤ Clean the refrigerator with a soft cloth and lukewarm water. Use a mild cleanser.
➤ Rinse the refrigerator after cleaning with clear water.
➤ Finally, wipe the refrigerator dry with a cloth.
➤ Use a brush or soft cloth to remove dust from the absorber unit on a yearly basis.
Clean the refrigerator regularly and as soon as it becomes dirty.
•
Do not use any soap or strong, grainy or alkaline cleaning agents.
•
Do not use any hard implements for cleaning.
•
Do not use hard or pointed tools to speed up the defrosting process.
•
Make sure that no water drips into the seals. This can damage the
electronics.
•
Do not allow grease or oil to come into contact with the door seal.
•
Do not re-lubricate the cylinder locks (optional). The cylinder locks
have been permanently lubricated at the factory.
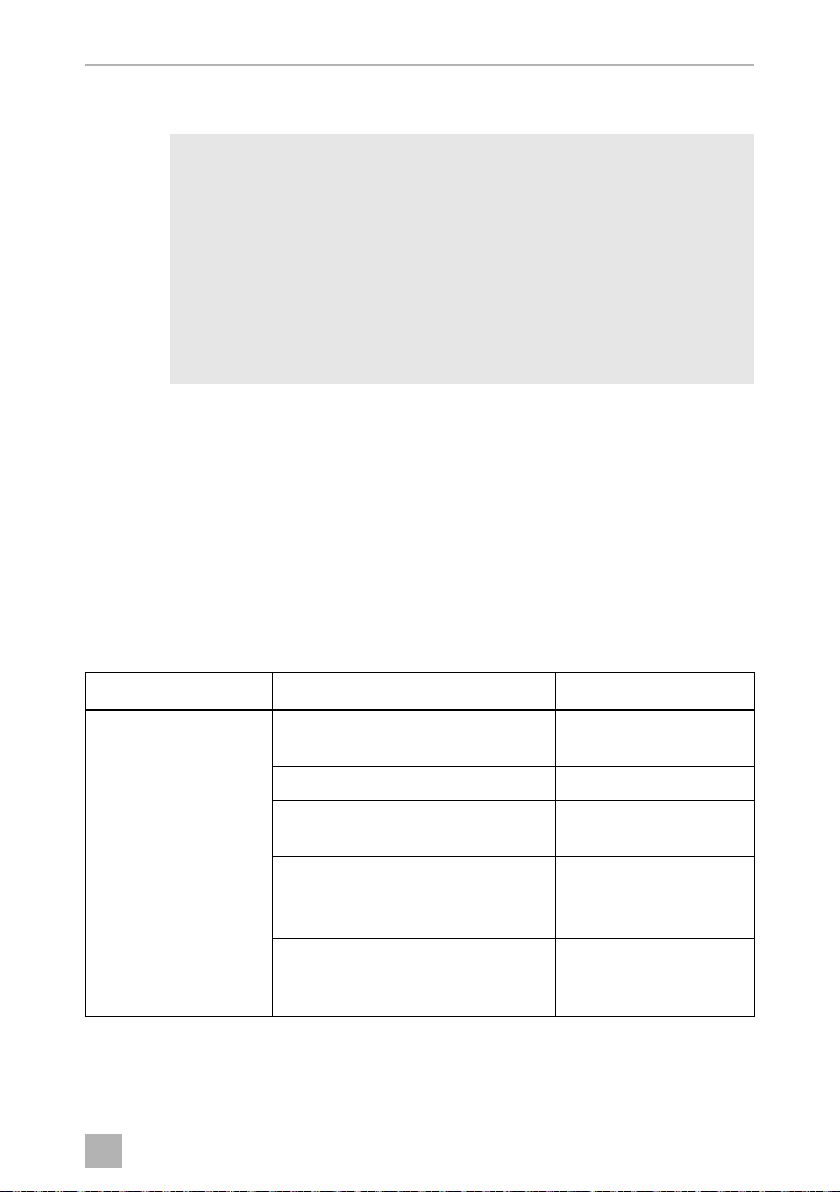
10 Troubleshooting
Fault Possible cause Solution
No cooling, absorber
unit cold
Power plug not plugged in Insert power plug in
socket
No voltage in socket Check household fuse
Electronics or sensors defective Authorized service: Install
new electronics or sensor
Heating cartridge defective Authorized service:
Install new heating cartridge
Defrosting phase active (see chapter
“Defrosting the cooling device” on
page 24)
No action required
25
Page 26
EN
Troubleshooting HiPro
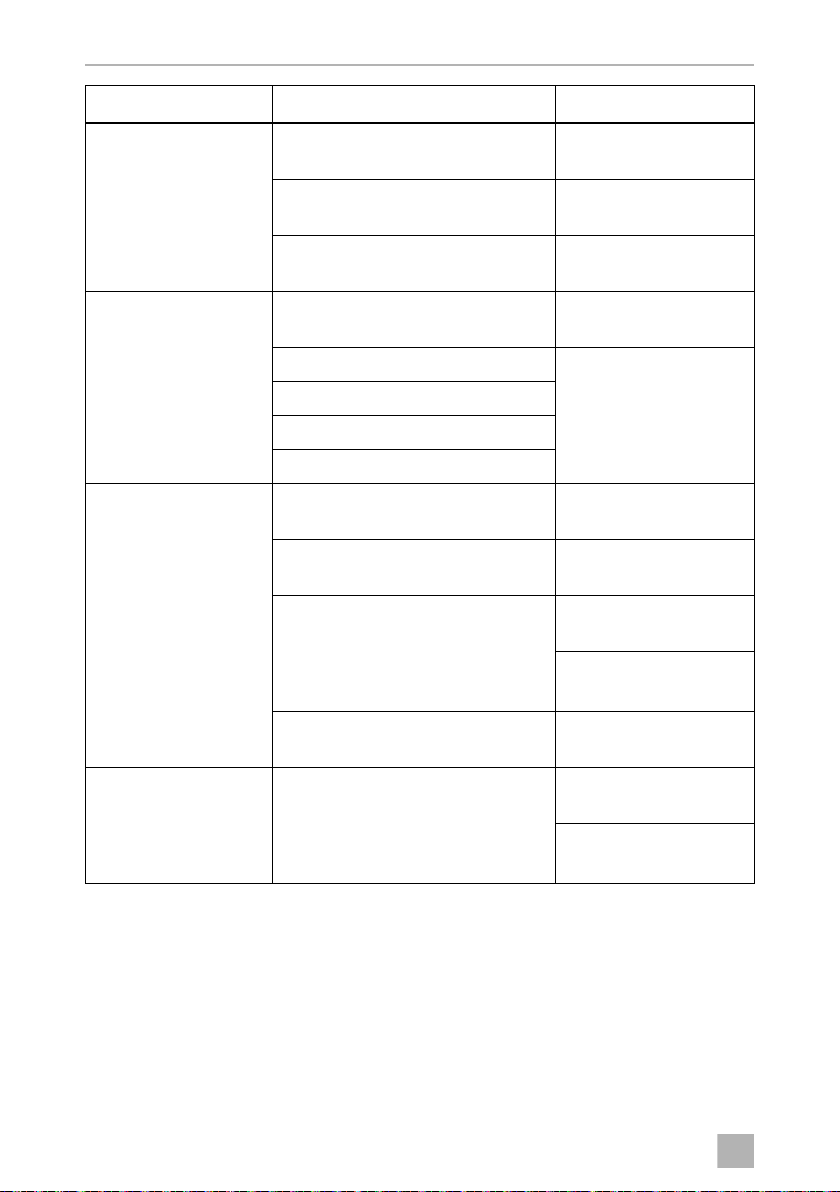
Fault Possible cause Solution
No cooling, absorber
unit warm
No cooling, interior
light and door opening
monitor (optional) flash
continuously
Poor cooling performance
Refrigerator is not level Align refrigerator with
water level
Refrigerator was only switched on
recently
Cooling unit is defective Authorized service:
Refrigerator is not level Align refrigerator with
Cooling unit blocked Contact authorized cus-
Cooling unit not water-tight
Heating element defective
Error during self-test
Cooling unit not sufficiently ventilated Bring about sufficient ven-
Refrigerator is exposed to direct sunlight
Door of refrigerator does not close
with a tight seal
Refrigerator was recently filled Check cooling again after
Check cooling again after
5 to 6 hours
Replace refrigerator
water level
tomer service
tilation (fig. 3, page 4)
Take refrigerator out of
direct sunlight
Check distances (fig. 0,
page 8)
Authorized service:
Replace door seal
5 to 6 hours
Frost formation in the
refrigerator compartment
26
Door of refrigerator does not close
with a tight seal
Check distances (fig. 0,
page 8)
Authorized service:
Replace door seal
Page 27

EN
HiPro Warranty
11 Warranty
The statutory warranty period applies. If the product is defective, please contact the
manufacturer's branch in your country (see the back of the instruction manual for the
addresses) or your retailer.
For repair and warranty processing, please include the following documents when
you send in the device:
•
A copy of the receipt with purchasing date
•
A reason for the claim or description of the fault
12 Disposal
WARNING! Children beware!
!
➤ Place the packaging material in the appropriate recycling waste bins wherever
possible.
Before disposing of your old refrigerator:
•
Take off the doors.
•
Leave storage shelves in the refrigerator so that children cannot
climb inside.
M
If you wish to finally dispose of the product, ask your local recycling centre
or specialist dealer for details about how to do this in accordance with the
applicable disposal regulations.
27
Page 28
EN
Technical data HiPro
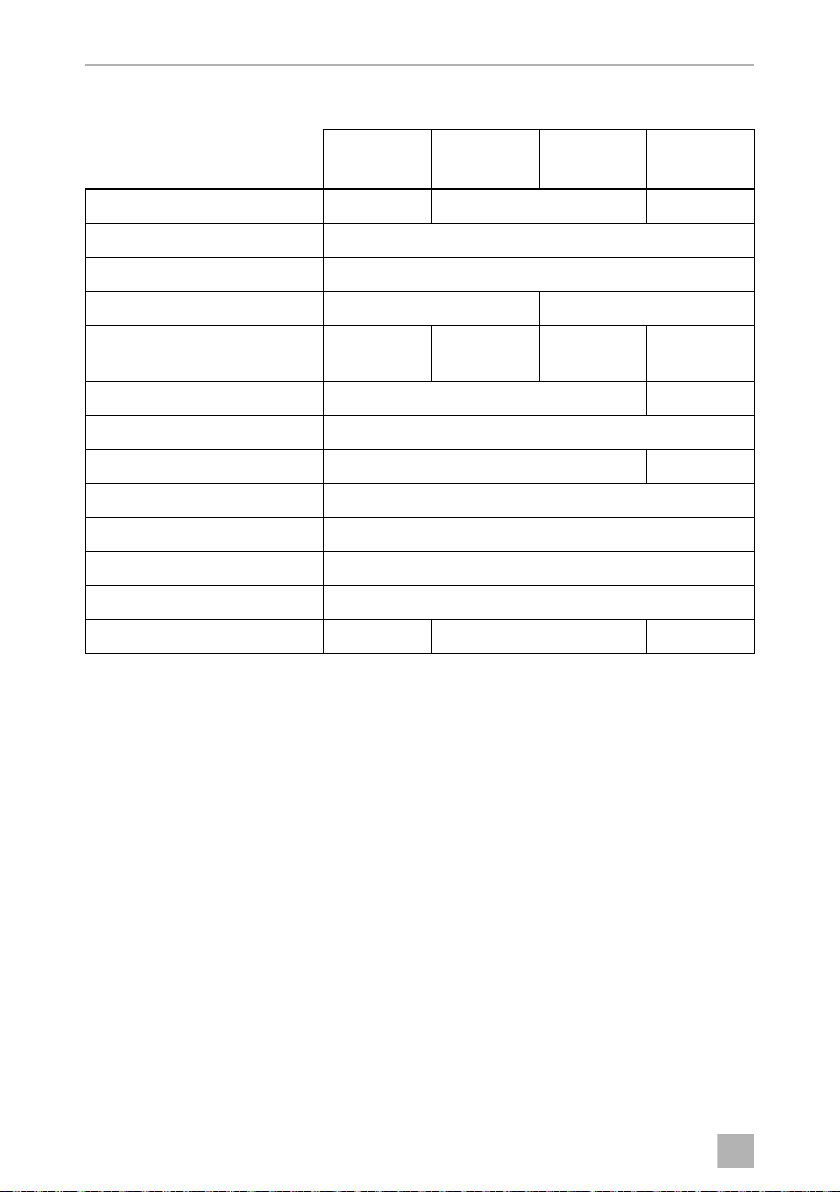
13 Technical data
HiPro3000 HiPro4000
Storage capacity: 26 l 34 l 48 l
Climate class: SN
Ambient temperature: +10 °C to +32 °C
Energy efficiency class: C D
Energy consumption
(kWh/annum):
Input voltage: 230 to 240 V 230 V
Input frequency: 60 Hz
Rated input power: 65 W 80 W
Noise emission: > 0dB
Propellant: cyclopentane
Coolant: ammonia
Dimensions: fig. j, page 13
Weight: 12kg 13.5kg 17kg
207 237 270 254
HiPro4000
Vision
HiPro6000
For the current EU Declaration of Conformity for your device, please refer to the
respective product page on dometic.com or contact the manufacturer directly (see
back page).
28
Page 29

DE
HiPro Erklärung der Symbole
Bitte lesen Sie diese Anleitung vor Einbau und Inbetriebnahme sorgfältig
durch und bewahren Sie sie auf. Geben Sie sie im Falle einer Weitergabe
des Produktes an den Nutzer weiter.
Inhaltsverzeichnis
1 Erklärung der Symbole . . . . . . . . . . . . . . . . . . . . . . . . . . . . . . . . . . . . . . . . . 29
2 Sicherheitshinweise . . . . . . . . . . . . . . . . . . . . . . . . . . . . . . . . . . . . . . . . . . . 30
3 Lieferumfang . . . . . . . . . . . . . . . . . . . . . . . . . . . . . . . . . . . . . . . . . . . . . . . . . 32
4 Zubehör. . . . . . . . . . . . . . . . . . . . . . . . . . . . . . . . . . . . . . . . . . . . . . . . . . . . . 32
5 Bestimmungsgemäßer Gebrauch . . . . . . . . . . . . . . . . . . . . . . . . . . . . . . . . 33
6 Technische Beschreibung . . . . . . . . . . . . . . . . . . . . . . . . . . . . . . . . . . . . . . 34
7 Kühlgerät aufstellen und anschließen . . . . . . . . . . . . . . . . . . . . . . . . . . . . . 35
8 Kühlgerät benutzen. . . . . . . . . . . . . . . . . . . . . . . . . . . . . . . . . . . . . . . . . . . . 37
9 Reinigung und Pflege . . . . . . . . . . . . . . . . . . . . . . . . . . . . . . . . . . . . . . . . . . . 41
10 Störungen beseitigen . . . . . . . . . . . . . . . . . . . . . . . . . . . . . . . . . . . . . . . . . . 42
11 Gewährleistung. . . . . . . . . . . . . . . . . . . . . . . . . . . . . . . . . . . . . . . . . . . . . . . 43
12 Entsorgung . . . . . . . . . . . . . . . . . . . . . . . . . . . . . . . . . . . . . . . . . . . . . . . . . . 43
13 Technische Daten . . . . . . . . . . . . . . . . . . . . . . . . . . . . . . . . . . . . . . . . . . . . . 44
1 Erklärung der Symbole
WARNUNG!
!
!
A
Sicherheitshinweis: Nichtbeachtung kann zu Tod oder schwerer
Verletzung führen.
VORSICHT!
Sicherheitshinweis: Nichtbeachtung kann zu Verletzungen führen.
ACHTUNG!
Nichtbeachtung kann zu Materialschäden führen und die Funktion des
Produktes beeinträchtigen.
29
Page 30

DE
Sicherheitshinweise HiPro
HINWEIS
I
Ergänzende Informationen zur Bedienung des Produktes.
2 Sicherheitshinweise
Der Hersteller übernimmt in folgenden Fällen keine Haftung für Schäden:
•
Montage- oder Anschlussfehler
•
Beschädigungen am Produkt durch mechanische Einflüsse und falsche
Anschlussspannung
•
Veränderungen am Produkt ohne ausdrückliche Genehmigung vom Hersteller
•
Verwendung für andere als die in der Anleitung beschriebenen Zwecke
2.1 Allgemeine Sicherheit
WARNUNG!
•
!
Öffnen Sie niemals das Absorberaggregat. Es steht unter hohem
Druck und kann Verletzungen verursachen, wenn es geöffnet wird.
•
Lagern Sie keine explosionsfähigen Stoffe wie z. B. Sprühdosen mit
brennbarem Treibgas im Gerät.
•
Das Kältemittel im Kühlkreislauf ist leicht entflammbar.
Bei einer Beschädigung des Kühlkreislaufs (Ammoniakgeruch):
– Schalten Sie das Gerät aus.
– Vermeiden Sie offenes Feuer und Zündfunken.
•
Lüften Sie den Raum gut.
•
Wenn das Gerät sichtbare Beschädigungen aufweist, dürfen Sie es
nicht in Betrieb nehmen.
•
Wenn das Anschlusskabel dieses Gerätes beschädigt wird, muss es
durch den Hersteller, seinen Kundendienst oder eine ähnlich
qualifizierte Person ersetzt werden, um Gefährdungen zu vermeiden.
•
Reparaturen an diesem Gerät dürfen nur von Fachkräften
durchgeführt werden. Durch unsachgemäße Reparaturen können
erhebliche Gefahren entstehen.
•
Dieses Gerät kann von Kindern ab 8 Jahren und darüber sowie von
Personen mit verringerten physischen, sensorischen oder mentalen
Fähigkeiten oder Mangel an Erfahrung und Wissen benutzt werden,
wenn sie beaufsichtigt oder bezüglich des sicheren Gebrauchs des
Gerätes unterwiesen wurden und die daraus resultierenden Gefahren
verstehen.
30
Page 31

DE
HiPro Sicherheitshinweise
•
Reinigung und Benutzer-Wartung dürfen nicht von Kindern ohne
Beaufsichtigung durchgeführt werden.
•
Kinder sollten beaufsichtigt werden, um sicherzustellen, dass sie nicht
mit dem Gerät spielen.
VORSICHT!
•
!
A
Quetschgefahr! Fassen Sie nicht in das Scharnier.
•
Achten Sie vor der Inbetriebnahme darauf, dass Zuleitung und
Netzstecker trocken sind.
•
Lebensmittel dürfen nur in Originalverpackungen oder geeigneten
Behältern eingelagert werden.
ACHTUNG!
•
Öffnen Sie auf keinen Fall den Kühlkreislauf.
•
Bauen Sie das Gerät nicht in der Nähe von offenen Flammen oder
anderen Wärmequellen (Heizung, Gasöfen usw.) ein.
•
Vergleichen Sie die Spannungsangabe auf dem Typenschild mit der
vorhandenen Energieversorgung.
•
Schließen Sie das Gerät nur mit dem zugehörigen Anschlusskabel an
das Wechselstromnetz an.
•
Ziehen Sie den Netzstecker nie am Anschlusskabel aus der
Steckdose.
•
Lagern Sie keine ätzenden oder lösungsmittelhaltigen Stoffe im
Kühlgerät.
•
Verwenden Sie nur Kabel mit passendem Leitungsquerschnitt.
•
Halten Sie die Kondenswasseröffnung stets sauber.
2.2 Sicherheit beim Betrieb des Kühlgerätes
ACHTUNG!
•
A
Benutzen Sie keine Elektrogeräte innerhalb des Gerätes, außer wenn
diese Elektrogeräte vom Hersteller dafür empfohlen werden.
•
Überhitzungsgefahr!
Achten Sie stets darauf, dass beim Betrieb entstehende Wärme
ausreichend abgeführt werden kann. Sorgen Sie dafür, dass das Gerät
in ausreichendem Abstand zu Wänden oder Gegenständen steht,
sodass die Luft zirkulieren kann.
•
Das Absorberaggregat wird beim Betrieb heiß. Berühren Sie das
Absorberaggregat nicht!
31
Page 32

DE
Lieferumfang HiPro
•
Achten Sie darauf, dass die Lüftungsöffnungen nicht abgedeckt
werden.
•
Füllen Sie keine Flüssigkeiten oder Eis in den Innenbehälter.
•
Tauchen Sie das Gerät nie in Wasser.
•
Schützen Sie das Gerät und die Kabel vor Hitze und Nässe.
•
Achten Sie darauf, dass die Speisen keine Wand des Kühlraums
berühren.
3 Lieferumfang
Menge Bezeichnung
1 Minibar
2 Einlegeboden
2 Türablage (nicht bei HiPro4000Vision)
1 Montage- und Bedienungsanleitung
4Zubehör
Als Zubehör erhältlich (nicht im Lieferumfang enthalten):
Bezeichnung Erklärung
Fernbedienung Für Türöffnungskontrolle und Temperaturregelung
Reflektor Für Türöffnungskontrolle
Schlüssel Für Ausführungen mit Schloss
Schleppscharnier Zum gleichzeitigen Öffnen von Möbeltür und Tür des Kühlgeräts
Aggregatabdeckung
und hohe Gerätefüße
Für HiPro4000 und HiPro4000 Vision, als freistehende Variante
32
Page 33

DE
HiPro Bestimmungsgemäßer Gebrauch
5 Bestimmungsgemäßer Gebrauch
Die Minibar ist für den Betrieb in geschlossenen Gebäuden ausgelegt, z. B:
•
in Personalküchen von Läden, Büros und anderen Arbeitsbereichen
•
in der Landwirtschaft
•
in Hotels, Motels oder anderen Unterkünften
•
in Frühstückspensionen
•
im Catering und ähnlichen Großhandelsanwendungen
Die Minibar eignet sich nicht zum Einbau in Wohnwagen, Wohnmobilen oder
Booten.
Die Minibar ist für den Einbau in ein Möbelstück oder eine Einbaunische
vorgesehen. Nach dem Einbau darf ausschließlich die Gerätefront frei zugänglich
sein.
Die Minibars HiPro4000 und HiPro4000Vision können auch frei auf dem Boden
stehen, wenn die optional erhältliche Aggregatabdeckung an der Rückseite und die
hohen Gerätefüße montiert ist.
Die Minibar eignet sich ausschließlich zum Kühlen und Lagern von Getränken und
Lebensmitteln in geschlossenen Behältern.
Die Minibar eignet sich nicht für die Lagerung von leicht verderblichen
Lebensmitteln.
!
!
WARNUNG!
Das Gerät ist nicht für die fachgerechte Lagerung von Medikamenten
vorgesehen.
VORSICHT! Gesundheitsgefahr!
Prüfen Sie bitte, ob die Kühlleistung des Gerätes den Anforderungen
der Lebensmittel entspricht, die Sie kühlen wollen.
33
Page 34

DE
Technische Beschreibung HiPro
6 Technische Beschreibung
Das Minibar ist ein Kühlgerät mit Absorberkühlung. Als Kältemittel wird Ammoniak
verwendet. Alle verwendeten Materialien sind unbedenklich für Lebensmittel. Der
Kühlkreislauf ist wartungsfrei.
Die Minibar (außer HiPro4000Vision) hat zwei Einlegeböden und zwei Türablagen.
Eine Türablage ist für Flaschen vorgesehen. In der Türablage für Flaschen kann eine
1,5-l-Flasche verstaut werden. Die zweite Türablage ist für kleinere Flaschen oder
Snacks vorgesehen.
Die Minibar HiPro4000Vision hat zwei Einlegeböden und eine durchsichtige
Acrylglastür ohne Türablagen.
Optional können die Minibars HiPro4000 und HiPro4000Vision mit
Aggregatabdeckung und hohen Gerätefüße als freistehende Variante verwendet
werden.
6.1 Bedienelemente am Kühlgerät
Nr. in
Abb. 1, Seite 2
1 Innenbeleuchtung
2 LED der Türöffnungskontrolle (optional)
3 Einlegeboden
4 Türablage unten
5 Türablage oben
Erklärung
6.2 Bedienelemente außerhalb des Kühlgeräts
Nr. in
Abb. 2, Seite 3
1 Fernbedienung für Türöffnungskontrolle und Temperaturregelung
Erklärung
(otional)
34
Page 35

DE
HiPro Kühlgerät aufstellen und anschließen
7 Kühlgerät aufstellen und anschließen
7.1 Hinweise zum Aufstellen des Kühlgeräts
Beachten Sie folgende Hinweise beim Aufstellen:
•
Stellen Sie das Kühlgerät so auf, dass die erwärmte Luft gut abziehen kann
(entweder nach oben oder zu den Seiten, Abb. 3, Seite 4).
Bezeichnung in
Abb. 3, Seite 4
A kalte Zuluft
B warme Abluft
C Kondensator
D Abstand oberhalb, wenn nach oben oder zur Seite nicht genü-
•
Halten Sie einen Mindestabstand von 20 mm zwischen dem Kühlaggregat und
Erklärung
gend Abluft zirkulieren kann
der Rückwand ein.
•
Halten Sie Öffnungen (Lüftungsschlitze usw.) im Gehäuse oder der
Einbaustruktur frei von Gegenständen.
7.2 Kühlgerät freistehend aufstellen
Beachten Sie die folgenden Hinweise, wenn Sie das Kühlgerät freistehend auf dem
Boden aufstellen möchten:
•
Stellen Sie das Kühlgerät waagerecht auf. Verwenden Sie zur Kontrolle eine
Wasserwaage.
7.3 Kühlgerät in ein Möbel einbauen
Beachten Sie die folgenden Hinweise, wenn Sie das Kühlgerät in ein Möbel
einbauen möchten:
•
Stellen Sie das Kühlgerät so auf, dass beide Gerätefüße auf der Abstellfläche
aufliegen.
•
Die Luftzirkulation muss ungehindert möglich sein (Abb. 3, Seite 4).
•
Nur das Kühlaggregat darf in den Belüftungskanal hineinragen.
•
Die Luft im Belüftungskanal darf nicht durch andere Wärmequellen aufgeheizt
werden.
35
Page 36

DE
Kühlgerät aufstellen und anschließen HiPro
Gehen Sie folgendermaßen vor (Abb. 4, Seite 5):
➤ Befestigen Sie den Reflektor für die Türöffnungskontrolle (optional).
➤ Schrauben Sie die Gerätefüße fest.
7.4 Türanschlag ändern
Sie können den Anschlag der Tür ändern, so dass die Tür nach links statt nach rechts
aufschwingt.
HINWEIS
I
Bei vorhandener LED zur Türöffnungskontrolle gehen Sie zunächst wie folgt vor:
➤ Ziehen Sie die LED heraus.
➤ Verlegen Sie das Kabel in der Führung.
➤ Setzen Sie die LED auf der anderen Seite wieder ein.
Anschließend gehen Sie wie folgt vor (Abb. 5, Seite 5 bis Abb. 9, Seite 7):
Die LED der Türöffnungskontrolle (optional) muss sich immer
gegenüber des Türanschlags befinden.
HiPro4000, HiPro4000Vision (bei Ausführung mit hohen Füßen)
➤ Schrauben Sie die hohen Füße ab.
HiPro3000, HiPro4000, HiPro6000, HiPro4000Vision
➤ Ziehen Sie die unteren Scharniere hervor.
➤ Ziehen Sie die Tür mit den Scharnieren heraus.
➤ Entnehmen Sie die Scharnierstifte.
➤ Setzen Sie die Scharnierstifte auf der anderen Seite wieder ein.
➤ Schieben Sie die Tür mit dem unteren Scharnier wieder ein.
HINWEIS
I
HiPro4000, HiPro4000Vision (bei Ausführung mit hohen Füßen)
➤ Schrauben Sie die hohen Füße wieder an.
HiPro4000Vision: Setzen Sie die Tür um 180° gedreht ein.
36
Page 37

DE
HiPro Kühlgerät benutzen
7.5 Schleppscharnier einbauen
➤ Beachten Sie die Abstände in Abb. 0, Seite 8.
➤ Gehen Sie vor wie in Abb. a, Seite 8 bis Abb. b, Seite 9 gezeigt.
7.6 Dekorplatte einsetzen
➤ Beachten Sie die Einbaumaße in Abb. c, Seite 9.
➤ Entfernen Sie den Haltering des Schlosses (optional, Abb. d, Seite 10).
➤ Gehen Sie vor wie in Abb. d, Seite 10 bis Abb. e, Seite 10 gezeigt.
8Kühlgerät benutzen
ACHTUNG!
•
A
Im Inneren des Kühlgeräts dürfen keine elektrischen Geräte
eingesetzt werden. Als Ausnahme gelten Geräte, die vom Hersteller
dafür freigegeben sind.
•
Achten Sie darauf, dass Sie Getränke oder Speisen in Glasbehältern
nicht zu stark abkühlen. Beim Gefrieren dehnen sich Getränke oder
flüssige Speisen aus. Dadurch können die Glasbehälter zerstört
werden.
•
Lebensmittel dürfen nur in Originalverpackungen oder geeigneten
Behältern eingelagert werden.
•
Achten Sie darauf, dass sich nur Gegenstände bzw. Waren im
Kühlgerät befinden, die auf die gewählte Temperatur gekühlt
werden dürfen.
I
HINWEIS
•
Bevor Sie das Kühlgerät in Betrieb nehmen, sollten Sie es aus
hygienischen Gründen innen und außen mit einem feuchten Tuch
reinigen (siehe auch Kapitel „Reinigung und Pflege“ auf Seite 41).
37
Page 38

DE
Kühlgerät benutzen HiPro
8.1 Tipps zum Energiesparen
•
Wählen Sie einen gut belüfteten und vor Sonnenstrahlen geschützten Einsatzort.
•
Setzen Sie das Kühlgerät etwa 12 Stunden vor der Benutzung in Betrieb.
•
Ordnen Sie die Einlegeböden gleichmäßig im Kühlraum an.
•
Lassen Sie warme Speisen erst abkühlen, bevor Sie diese einlagern.
•
Öffnen Sie das Kühlgerät nicht häufiger als nötig.
•
Lassen Sie die Tür nicht länger offen stehen als nötig. Bei geöffneter Tür ist die
Innenbeleuchtung dauerhaft eingeschaltet.
•
Vermeiden Sie unnötig tiefe Temperatureinstellungen.
•
Stellen Sie die Zimmertemperatur auf etwa 20 °C ein.
8.2 Einlegeboden positionieren
➤ Gehen Sie vor wie in Abb. f, Seite 11 bis Abb. g, Seite 11 gezeigt.
8.3 Türablage positionieren
➤ Gehen Sie vor wie in Abb. h, Seite 11 gezeigt.
8.4 Kühlgerät einschalten
D
!
A
I
38
GEFAHR! Lebensgefahr!
Hantieren Sie nie mit Steckern und Schaltern, wenn Sie nasse Hände
haben oder mit den Füßen in der Nässe stehen.
WARNUNG!
Schließen Sie das Kühlgerät nur an eine vorschriftsmäßig geerdete
Steckdose an.
ACHTUNG!
Der Netzstecker muss nach dem Einbau des Kühlgeräts frei zugänglich
sein.
HINWEIS
Das Kühlgerät schaltet sich automatisch ein, wenn es mit dem Stromnetz
verbunden wird.
Page 39

DE
HiPro Kühlgerät benutzen
➤ Stecken Sie den Netzstecker in die Steckdose.
✓ Das Kühlgerät startet einen Selbsttest. Nach ca. 10 Sekunden leuchtet die
LED-Innenbeleuchtung für 2 Sekunden auf.
✓ Das Kühlgerät ist eingeschaltet.
8
HINWEIS
I
Nach dem Einschalten benötigt das Kühlgerät einige Stunden, bis die
Kühltemperatur im Kühlraum erreicht wird.
8.5 Temperatur einstellen
Das Kühlgerät ist mit einer automatischen Temperaturregelung ausgestattet. Die
Kühltemperatur ist auf 5 °C voreingestellt.
Mit der optionalen Fernbedienung können Sie die Voreinstellung auf 3 °C, 5 °C,
7 °C oder 12 °C ändern (Abb. i, Seite 12). Mit jedem Tastendruck auf der
Fernbedienung wechselt die Kühltemperatur zwischen den möglichen Werten:
➤ Entfernen Sie vor dem ersten Gebrauch die Plastikisolierung aus der
Batteriehalterung.
✓ Bei Betätigung einer Taste leuchtet eine rote LED an der Fernbedienung. Wenn
die rote LED nicht leuchtet, dann wechseln Sie die Batterie der Fernbedienung.
➤ Richten Sie die Oberseite der Fernbedienung auf die LEDs der
Innenbeleuchtung (5) aus. Halten Sie dabei einen Abstand von weniger als
20 cm ein.
➤ Drücken Sie die gelbe Taste (3), um die Kühltemperatur auf 3 °C oder 7 °C
einzustellen.
✓ Die LEDs der Innenbeleuchtung (5) blinken dreimal bzw. siebenmal, um die
voreingestellte Temperatur anzuzeigen (Abb. i, Seite 12).
➤ Drücken Sie die blaue Taste (4), um die Kühltemperatur auf 5 °C oder 12 °C
einzustellen.
✓ Die LEDs der Innenbeleuchtung (5) blinken fünfmal bzw. zwölfmal, um die
voreingestellte Temperatur anzuzeigen (Abb. i, Seite 12).
8
HINWEIS
I
Die rote LED leuchtet sobald ein Signal ausgesendet wird. Prüfen Sie die
Batterien wenn die LED nicht leuchtet.
39
Page 40

DE
Kühlgerät benutzen HiPro
8.6 Türöffnungskontrolle benutzen
Die Türöffnungskontrolle (optional) zeigt über eine LED (Abb. 1 4,Seite 2) an, ob
die Tür des Kühlgeräts geöffnet wurde.
Wenn die LED der Türöffnungskontrolle leuchtet:
➤ Öffnen Sie das Kühlgerät.
➤ Falls nötig, füllen Sie das Kühlgerät wieder auf.
➤ Setzen Sie die Türöffnungskontrolle mit der Fernbedienung (optional) zurück.
Drücken Sie dazu einmal die rote Taste (Abb. i 1, Seite 12).
➤ Schließen Sie das Kühlgerät.
8.7 Kühlgerät abtauen
Das Kühlgerät ist mit einer automatischen Abtaufunktion ausgestattet.
Die Abtauphase findet alle 22 Stunden für einer Dauer von 2 Stunden statt.
HINWEIS
I
Die erste Abtauphase startet 39 Stunden nach dem Einschalten des
Kühlgeräts. Bei Inbetriebnahme tagsüber wird so sichergestellt, dass
die Abtauphasen in den Nachtstunden liegen.
8.8 Kühlgerät ausschalten und stilllegen
Wenn Sie das Kühlgerät für längere Zeit stilllegen wollen, gehen Sie wie folgt vor:
➤ Ziehen Sie den Netzstecker aus der Steckdose.
➤ Reinigen Sie das Kühlgerät (siehe Kapitel „Reinigung und Pflege“ auf Seite 41).
40
Page 41

DE
HiPro Reinigung und Pflege
9 Reinigung und Pflege
ACHTUNG! Beschädigungsgefahr!
•
A
➤ Trennen Sie das Gerät vom Stromnetz, bevor Sie es reinigen und pflegen.
➤ Reinigen Sie das Kühlgerät mit einem weichen Tuch und lauwarmem Wasser.
Verwenden Sie ein mildes Reinigungsmittel.
➤ Waschen Sie das Kühlgerät nach dem Reinigen mit klarem Wasser nach.
➤ Wischen Sie das Kühlgerät anschließend mit einem Tuch trocken.
Reinigen Sie das Kühlgerät regelmäßig und sobald es verschmutzt
ist.
•
Verwenden Sie zur Reinigung keine Seife oder scharfe, körnige oder
sodahaltige Reinigungsmittel.
•
Verwenden Sie zur Reinigung keine harten Gegenstände.
•
Benutzen Sie keine harten oder spitzen Werkzeuge, um den
Abtauprozess zu beschleunigen.
•
Achten Sie darauf, dass kein Wasser in die Dichtungen tropft. Dies
kann die Elektronik beschädigen.
•
Bringen Sie die Türdichtung nicht mit Öl oder Fett in Berührung.
•
Schmieren Sie die Zylinderschlösser (optional) nicht nach. Die
Zylinderschlösser sind werksseitig dauerhaft geschmiert.
➤ Befreien Sie das Absorberaggregat jährlich mit einem Pinsel oder einem weichen
Tuch von Staub.
41
Page 42

DE
Störungen beseitigen HiPro
10 Störungen beseitigen
Störung Mögliche Ursache Lösung
Keine Kühlung,
Absorberaggregat kalt
Keine Kühlung,
Absorberaggregat
warm
Keine Kühlung, Innenbeleuchtung und Türöffnungskontrolle
(optional) blinken
dauerhaft
Netzstecker nicht eingesteckt Netzstecker in die Steck-
dose einstecken
Steckdose ohne Spannung Haussicherung über-
prüfen
Elektronik oder Sensorfühler defekt Autorisierter Service:
Neue Elektronik oder
Sensor einbauen
Heizpatrone defekt Autorisierter Service:
Neue Heizpatrone einbauen
Abtauphase aktiv (siehe Kapitel „Kühlgerät abtauen“ auf Seite 40)
Kühlgerät steht nicht waagerecht Kühlgerät mit Wasser-
Kühlgerät erst vor kurzer Zeit eingeschaltet
Kühlaggregat defekt Autorisierter Service:
Kühlgerät steht nicht waagerecht Kühlgerät mit Wasser-
Aggregat blockiert Autorisierten Kunden-
Aggregat undicht
Heizschale defekt
Fehler beim Selbsttest
Keine Handlung erforderlich
waage ausrichten
Kühlung nach 5 bis 6
Stunden erneut prüfen
Kühlgerät tauschen
waage ausrichten
dienst kontaktieren
42
Page 43

DE
HiPro Gewährleistung
Störung Mögliche Ursache Lösung
Schlechte Kühlleistung Kühlaggregat nicht ausreichend
belüftet
Kühlgerät ist direkter Sonneneinstrahlung ausgesetzt
Tür des Kühlgeräts schließt nicht dicht Abstände prüfen
Kühlgerät wurde vor kurzer Zeit aufgefüllt
Frostbildung im Kühlraum
Tür des Kühlgeräts schließt nicht dicht Abstände prüfen
Ausreichende Belüftung
herbeiführen (Abb. 3,
Seite 4)
Kühlgerät aus direkter
Sonneneinstrahlung
entfernen
(Abb. 0, Seite 8)
Autorisierter Service:
Türdichtung auswechseln
Kühlung nach
5bis6Stunden erneut
prüfen
(Abb. 0, Seite 8)
Autorisierter Service:
Türdichtung auswechseln
11 Gewährleistung
Es gilt die gesetzliche Gewährleistungsfrist. Sollte das Produkt defekt sein, wenden
Sie sich bitte an die Niederlassung des Herstellers in Ihrem Land (Adressen siehe
Rückseite der Anleitung) oder an Ihren Fachhändler.
Zur Reparatur- bzw. Gewährleistungsbearbeitung müssen Sie folgende Unterlagen
mitschicken:
•
eine Kopie der Rechnung mit Kaufdatum,
•
einen Reklamationsgrund oder eine Fehlerbeschreibung.
12 Entsorgung
WARNUNG! Kinderfalle!
!
Vor der Entsorgung Ihres alten Kühlgeräts:
•
Hängen Sie die Türen aus.
•
Belassen Sie die Abstellflächen im Kühlgerät, damit Kinder nicht
hineinsteigen können.
43
Page 44

DE
Technische Daten HiPro
➤ Geben Sie das Verpackungsmaterial möglichst in den entsprechenden
Recycling-Müll.
Wenn Sie das Produkt endgültig außer Betrieb nehmen, informieren Sie
sich bitte beim nächsten Recyclingcenter oder bei Ihrem Fachhändler
M
über die zutreffenden Entsorgungsvorschriften.
13 Technische Daten
HiPro3000 HiPro4000
Nutzinhalt: 26 l 34 l 48 l
Klimaklasse: SN
Umgebungstemperatur: +10 °C bis +32 °C
Energieeffizienzklasse: C D
Energieverbrauch
(kWh/annum):
Eingangsspannung: 230 bis 240 V 230 V
Eingangsfrequenz: 60 Hz
Nenneingangsleistung: 65 W 80 W
Schallemissionen: 0 dB
Treibmittel: Cyclopentan
Kühlmittel: Ammoniak
Abmessungen: Abb. j, Seite 13
Gewicht: 12 kg 13,5 kg 17 kg
Die aktuelle EU-Konformitätserklärung für Ihr Gerät erhalten Sie auf der jeweiligen
Produktseite auf dometic.com oder direkt über den Hersteller (siehe Rückseite).
207 237 270 254
HiPro4000
Vision
HiPro6000
44
Page 45

FR
HiPro Explication des symboles
Veuillez lire attentivement cette notice avant le montage et la mise en
service. Veuillez ensuite la conserver. En cas de passer le produit, veuillez
le transmettre au nouvel acquéreur.
Sommaire
1 Explication des symboles . . . . . . . . . . . . . . . . . . . . . . . . . . . . . . . . . . . . . . . 45
2 Consignes de sécurité . . . . . . . . . . . . . . . . . . . . . . . . . . . . . . . . . . . . . . . . . 46
3 Pièces fournies . . . . . . . . . . . . . . . . . . . . . . . . . . . . . . . . . . . . . . . . . . . . . . . 48
4 Accessoires . . . . . . . . . . . . . . . . . . . . . . . . . . . . . . . . . . . . . . . . . . . . . . . . . . 49
5 Usage conforme . . . . . . . . . . . . . . . . . . . . . . . . . . . . . . . . . . . . . . . . . . . . . . 49
6 Description technique . . . . . . . . . . . . . . . . . . . . . . . . . . . . . . . . . . . . . . . . . 50
7 Installation et raccordement de l’appareil de réfrigération. . . . . . . . . . . . . . 51
8 Utilisation de l’appareil de réfrigération . . . . . . . . . . . . . . . . . . . . . . . . . . . 53
9 Nettoyage et entretien . . . . . . . . . . . . . . . . . . . . . . . . . . . . . . . . . . . . . . . . . 57
10 Guide de dépannage . . . . . . . . . . . . . . . . . . . . . . . . . . . . . . . . . . . . . . . . . . 58
11 Garantie. . . . . . . . . . . . . . . . . . . . . . . . . . . . . . . . . . . . . . . . . . . . . . . . . . . . . 60
12 Retraitement . . . . . . . . . . . . . . . . . . . . . . . . . . . . . . . . . . . . . . . . . . . . . . . . . 60
13 Caractéristiques techniques . . . . . . . . . . . . . . . . . . . . . . . . . . . . . . . . . . . . . . 61
1 Explication des symboles
AVERTISSEMENT !
!
!
A
Consigne de sécurité : le non-respect de ces consignes peut entraîner
la mort ou de graves blessures.
ATTENTION !
Consigne de sécurité : le non-respect de ces consignes peut entraîner
des blessures.
AVIS !
Le non-respect de ces consignes peut entraîner des dommages
matériels et des dysfonctionnements du produit.
45
Page 46

FR
Consignes de sécurité HiPro
REMARQUE
I
Informations complémentaires sur l'utilisation du produit.
2 Consignes de sécurité
Le fabricant décline toute responsabilité pour des dommages dans les cas suivants :
•
des défauts de montage ou de raccordement
•
des sollicitations mécaniques et une tension de raccordement incorrecte ayant
endommagé le matériel
•
des modifications apportées au produit sans autorisation explicite de la part du
fabricant
•
une utilisation différente de celle décrite dans la notice
2.1 Sécurité générale
AVERTISSEMENT !
•
!
N’ouvrez jamais le module d’absorption. Il se trouve sous haute
pression et peut provoquer des blessures s’il est ouvert.
•
Ne stockez aucune substance explosive comme p. ex. des aérosols
contenant des agents propulseurs dans l’appareil.
•
Le réfrigérant du circuit frigorifique s’enflamme facilement.
En cas d’endommagement du circuit frigorifique (odeur
d’ammoniac) :
– Éteignez l’appareil.
– Évitez tout feu ouvert et toute étincelle.
•
Aérez bien la pièce.
•
Si l’appareil présente des dommages visibles, vous ne devez pas le
mettre en service.
•
Si le câble de raccordement de l’appareil est endommagé, il doit être
remplacé par le fabricant, son service après-vente ou une personne de
qualification similaire, afin d’éviter tout danger.
•
Seul un personnel qualifié est habilité à effectuer des réparations sur
l’appareil. Toute réparation mal effectuée risquerait d’entraîner de
graves dangers.
46
Page 47

FR
HiPro Consignes de sécurité
•
Les enfants âgés de 8 ans et plus ainsi que les personnes ayant des
déficiences physiques, sensorielles ou mentales ou un manque
d’expérience ou de connaissances peuvent utiliser ce produit à
condition d’être sous surveillance ou d’avoir reçu des instructions
concernant l’utilisation de l’appareil en toute sécurité et de
comprendre les dangers qui en résultent.
•
Le nettoyage et la maintenance ne doivent pas être effectués par des
enfants sans surveillance.
•
Les enfants doivent être surveillés pour s’assurer qu’ils ne jouent pas
avec l’appareil.
ATTENTION !
•
!
A
Risque d’écrasement ! Ne mettez pas les doigts dans la charnière.
•
Avant de mettre l’appareil en service, assurez-vous que la ligne
d’alimentation électrique et la fiche secteur sont sèches.
•
Les aliments doivent être conservés dans leurs emballages originaux
ou dans des récipients appropriés.
AVIS !
•
N’ouvrez jamais le circuit frigorifique.
•
Ne montez pas l’appareil près de flammes nues ou d’autres sources
de chaleur (chauffage, fours à gaz, etc.).
•
Vérifiez que la tension indiquée sur la plaque signalétique correspond
à l’alimentation électrique dont vous disposez.
•
Pour raccorder l’appareil au courant alternatif, veuillez utiliser
exclusivement le câble de raccordement correspondant.
•
Ne tirez jamais sur le câble de raccordement pour sortir la fiche
secteur de la prise.
•
Ne stockez pas de produits agressifs ou contenant des solvants dans
l’appareil de réfrigération.
•
Utilisez uniquement des câbles de section appropriée.
•
Veillez à ce que l’ouverture d’eau de condensation soit toujours
propre.
2.2 Sécurité d’exploitation de l’appareil de réfrigération
AVIS !
•
A
N’utilisez aucun appareil électrique à l’intérieur du réfrigérateur, sauf
si le fabricant le recommande.
47
Page 48

FR
Pièces fournies HiPro
•
Risque de surchauffe !
Veillez toujours à ce que la chaleur produite lors du fonctionnement
puisse se dissiper suffisamment. Veillez à ce que l’appareil se trouve à
distance suffisante des murs ou des objets, de sorte que l’air puisse
circuler.
•
Pendant son fonctionnement, le module d’absorption chauffe. Ne
touchez pas le module d’absorption !
•
Assurez-vous que les ouvertures d’aération ne sont pas recouvertes.
•
Ne remplissez pas le bac intérieur de substances liquides ou de glace.
•
Ne plongez jamais l’appareil dans l’eau.
•
Tenez l’appareil et les câbles à l’abri de la chaleur et de l’humidité.
•
Veillez à ce que la nourriture ne touche pas les parois du
compartiment de réfrigération.
3Pièces fournies
Quantité Désignation
1 Minibar
2 Tablette
2 Bac porte (pas sur HiPro 4000Vision)
1 Notice de montage et d’utilisation
48
Page 49

FR
HiPro Accessoires
4Accessoires
Disponibles en accessoires (non compris dans la livraison) :
Désignation Explication
Télécommande Pour le contrôle de l’ouverture de la porte et la régulation de la tem-
pérature
Réflecteur Pour le contrôle de l’ouverture de la porte
Clé Pour les versions avec serrure
Charnière coulissante Pour l’ouverture simultanée de la porte de meuble et de la porte de
l’appareil de réfrigération
Plaque de protection
du module et pieds
hauts de l’appareil
Pour HiPro4000 et HiPro4000 Vision, modèle non encastré
5Usage conforme
Le minibar est conçu pour fonctionner dans des bâtiments fermés, par ex.
•
dans les cuisines destinées au personnel de boutiques, bureaux et autres lieux de
travail
•
dans l’agriculture
•
dans les hôtels, motels ou autres logements
•
dans les « bed and breakfast »
•
dans le catering et les utilisations semblables du commerce en gros
Le minibar ne doit pas être installé dans des caravanes, camping-cars ou bateaux.
Le minibar est conçu pour être installé dans un meuble ou une alcôve. Une fois le
montage effectué, seul l’avant de l’appareil doit pouvoir être accessible.
Les minibars HiPro4000 et HiPro4000 Vision peuvent également être installés sur le
sol sans être encastrés si la plaque de protec tio n du mod ule d isp oni ble en o pti on e st
installée à l’arrière et que les pieds hauts de l’appareil sont montés.
Le minibar est conçu uniquement pour la réfrigération et le stockage de boissons et
d’aliments placés dans des récipients fermés.
Le minibar ne convient pas au stockage d’aliments périssables.
49
Page 50

FR
Description technique HiPro
AVERTISSEMENT !
!
!
L’appareil n’est pas conçu pour le stockage conforme de médicaments.
ATTENTION ! Risques pour la santé !
Veuillez vérifier si la puissance frigorifique de l’appareil de réfrigération
correspond à la température de conservation recommandée pour les
aliments que vous souhaitez conserver au frais.
6 Description technique
Le minibar est un appareil de réfrigération à refroidissement par absorption. Le
réfrigérant utilisé est de l’ammoniac. Les matériaux utilisés n’altèrent pas la qualité
des aliments. Le circuit frigorifique est sans entretien.
Le minibar (sauf HiPro4000 Vision) a deux tablettes et deux bacs porte. Un bac porte
est destiné aux bouteilles. Le bac porte pour bouteilles peut contenir une bouteille
de 1,5 l. Le deuxième bac porte est conçu pour des bouteilles de petite taille ou des
snacks.
Le minibar HiPro4000Vision a deux tablettes et une porte transparente en plexiglas
sans bac porte.
Les minibars HiPro4000 et HiPro4000Vision peuvent également être utilisés sans
être encastrés avec plaque de protection et pied hauts disponibles en option.
6.1 Éléments de commande sur l’appareil de
réfrigération
N° dans
fig. 1, page 2
1 Éclairage intérieur
2 LED du contrôle d’ouverture de la porte (en option)
3 Tablette
4 Bac porte en bas
5 Bac porte en haut
Explication
50
Page 51

FR
HiPro Installation et raccordement de l’appareil de réfrigération
6.2 Éléments de commande à l’extérieur de l’appareil de
réfrigération
N° dans
fig. 2, page 3
1 Télécommande pour le contrôle d’ouverture de la porte et la régula-
Explication
tion de la température (en option)
7 Installation et raccordement de
l’appareil de réfrigération
7.1 Remarques concernant l’appareil de réfrigération
Observez les consignes suivantes en ce qui concerne l’installation :
•
Installez l’appareil de réfrigération de manière à ce que l’air chaud puisse bien
s’échapper (soit par le haut, soit par les côtés, fig. 3, page 4).
Désignation dans
fig. 3, page 4
A air entrant froid
B air évacué chaud
C condenseur
D espace supérieur si la circulation d’air évacué en haut ou sur le
Explication
côté est insuffisante
•
Laissez un espace minimum de 20 mm entre le module de réfrigération et la
cloison arrière.
•
Ne bouchez pas les ouvertures (fentes d’aération, etc.) du bâti ou de la structure
d’encastrement.
7.2 Installation non encastrée de l’appareil de
réfrigération
Respectez les consignes suivantes si vous souhaitez installer l’appareil de
réfrigération sur le sol sans l’encastrer :
•
Installez l’appareil de réfrigération à l’horizontale. Contrôlez la position
horizontale avec un niveau.
51
Page 52

FR
Installation et raccordement de l’appareil de réfrigération HiPro
7.3 Installation de l’appareil de réfrigération dans un
meuble
Respectez les consignes suivantes si vous souhaitez installer l’appareil de
réfrigération dans un meuble :
•
Installez l’appareil de réfrigération de manière à ce que ses deux pieds reposent
sur la surface de pose.
•
L’air doit circuler sans difficultés (fig. 3, page 4).
•
Seul le module de réfrigération peut pénétrer dans le canal d’aération.
•
L’air du canal d’aération ne doit pas être chauffé par d’autre sources de chaleur.
Procédez de la façon suivante (fig. 4, page 5):
➤ Fixez le réflecteur du contrôle d’ouverture de la porte (en option).
➤ Vissez et serrez les pieds de l’appareil.
7.4 Modification du côté d’ouverture de la porte
Vous pouvez modifier le côté d’ouverture de la porte de sorte que la porte s’ouvre
vers la gauche et non vers la droite.
REMARQUE
I
La LED du contrôle d’ouverture de la porte (en option) doit toujours se
trouver en face du côté d’ouverture de la porte.
Si la LED du contrôle d’ouverture de la porte est installée, procédez d’abord de la
façon suivante :
➤ Retirez la LED.
➤ Posez le câble dans le guidage.
➤ Remettez en place la LED de l’autre côté.
Procédez ensuite de la façon ensuite (fig. 5, page 5 à fig. 9, page 7) :
HiPro4000, HiPro4000 Vision (version avec pieds hauts)
➤ Dévissez les pieds hauts.
HiPro3000, HiPro4000, HiPro6000, HiPro4000Vision
➤ Tirez les charnières inférieures.
➤ Retirez la porte et les charnières.
52
Page 53

FR
HiPro Utilisation de l’appareil de réfrigération
➤ Retirez les tiges de charnière.
➤ Remettez en place les tiges de charnière de l’autre côté.
➤ Insérez à nouveau la porte avec la charnière inférieure.
REMARQUE
I
HiPro4000, HiPro4000 Vision (version avec pieds hauts)
➤ Revissez les pieds hauts.
HiPro4000Vision : Installez la porte en la tournant à 180°.
7.5 Montage de la charnière coulissante
➤ Respectez les distances indiquées à la fig. 0, page 8.
➤ Procédez comme indiqué de la fig. a, page 8 à la fig. b, page 9.
7.6 Installation de la plaque de décor
➤ Respectez les dimensions indiquées à la fig. c, page 9.
➤ Retirez l’anneau de retenue de la serrure (en option, fig. d, page 10).
➤ Procédez comme indiqué de la fig. d, page 10 à la fig. e, page 10.
8 Utilisation de l’appareil de réfrigération
AVIS !
•
A
Aucun appareil électrique ne doit être utilisé à l’intérieur de
l’appareil. Les seules exceptions sont les appareils autorisés par le
fabricant à cet effet.
•
Veillez à ce que les boissons ou aliments placés dans des récipients
en verre ne soient pas soumis à des températures trop basses. En
gelant, le volume des boissons et aliments liquides augmente. Les
récipients en verre risquent alors de se casser.
•
Les aliments doivent être conservés dans leurs emballages originaux
ou dans des récipients appropriés.
•
Veillez à ne déposer dans l’appareil de réfrigération que des objets
ou des aliments qui peuvent être réfrigérés à la température
sélectionnée.
53
Page 54

FR
Utilisation de l’appareil de réfrigération HiPro
REMARQUE
•
I
Avant la mise en service de l’appareil de réfrigération, nous vous
conseillons, pour des raisons d’hygiène, d’en nettoyer l’intérieur et
l’extérieur à l’aide d’un chiffon humide (voir aussi chapitre
« Nettoyage et entretien », page 57).
8.1 Comment économiser de l’énergie?
•
Choisissez un emplacement bien aéré et à l’abri du soleil.
•
Mettez l’appareil de réfrigération en service environ 12 heures avant l’utilisation.
•
Disposez les tablettes de façon régulière à l’intérieur de l’appareil.
•
Laissez refroidir les aliments chauds avant de les mettre dans le réfrigérateur.
•
N’ouvrez pas l’appareil de réfrigération plus souvent que nécessaire.
•
Ne laissez pas la porte ouverte plus longtemps que nécessaire. Lorsque la porte
est ouverte, l’éclairage intérieur reste allumé en permanence.
•
Évitez de choisir une température inutilement basse.
•
Réglez la température ambiante sur environ 20 °C.
8.2 Positionnement des tablettes
➤ Procédez comme indiqué de la fig. f, page 11 à la fig. g, page 11.
8.3 Positionnement du bac porte
➤ Procédez comme indiqué à la fig. h, page 11.
8.4 Mise en marche de l’appareil de réfrigération
DANGER ! Danger de mort !
D
!
Ne vous approchez pas de prises ou de commutateurs lorsque vous
avez les mains mouillées ou les pieds dans l’eau.
AVERTISSEMENT !
Raccordez l’appareil de réfrigération uniquement à une prise
correctement mise à la terre.
54
Page 55

FR
HiPro Utilisation de l’appareil de réfrigération
AVIS !
A
I
➤ Enfichez la fiche secteur dans la prise.
✓ L’appareil de réfrigération lance un autotest. Au bout d’environ 10 secondes,
l’éclairage intérieur à LED s’allume pendant 2 secondes.
✓ L’appareil de réfrigération est en marche.
I
Après l’installation, la fiche secteur doit rester facilement accessible.
REMARQUE
L’appareil de réfrigération se met automatiquement en marche dès qu’il
est relié au réseau électrique.
8
REMARQUE
Après la mise en marche, l’appareil de réfrigération a besoin de
quelques heures pour atteindre la température de réfrigération à
l’intérieur de l’appareil.
8.5 Réglage de la température
L’appareil de réfrigération est équipé d’une fonction automatique de régulation de
la température. La température de réfrigération est préréglée sur 5 °C.
La télécommande en option vous permet de modifier ce préréglage et de régler la
température sur 3°C, 5°C, 7°C ou 12°C (fig.i, page 12). À chaque pression de
la touche de la télécommande, la température de réfrigération change :
➤ Avant d’utiliser la télécommande, retirez l’isolation plastique qui se trouve dans
le compartiment de la pile.
✓ Lorsque vous appuyez sur une touche, une LED rouge s’allume sur la
télécommande. Si la LED rouge ne s’allume pas, remplacez la pile de la
télécommande.
➤ Dirigez le côté supérieur de la télécommande vers les LED de l’éclairage intérieur
(5). Votre distance ne doit pas dépasser 20 cm.
➤ Appuyez sur la touche jaune (3) pour régler la température de réfrigération sur
3°C ou 7°C.
✓ Les LED de l’éclairage intérieur (5) clignotent trois fois ou sept fois afin d’indiquer
la température préréglée (fig. i, page 12).
➤ Appuyez sur la touche bleue (4) pour régler la température de réfrigération sur
5°C ou 12°C.
55
Page 56

FR
Utilisation de l’appareil de réfrigération HiPro
✓ Les LED de l’éclairage intérieur (5) clignotent cinq fois ou douze fois afin
d’indiquer la température préréglée (fig. i, page 12).
8
REMARQUE
I
La LED rouge s’allume dès qu’un signal est envoyé. Contrôlez les piles si
la LED ne s’allume pas.
8.6 Utilisation du contrôle de l’ouverture de la porte
Le contrôle de l’ouverture de la porte (en option) indique à l’aide d’une LED
(fig. 1 4,page 2) si la porte de l’appareil de réfrigération a été ouverte.
Si la LED du contrôle de l’ouverture de la porte s’allume :
➤ Ouvrez l’appareil de réfrigération.
➤ Si nécessaire, remplissez à nouveau l’appareil de réfrigération.
➤ Réinitialisez le contrôle de l’ouverture de la porte à l’aide de la télécommande
(en option). Pour cela, appuyez une fois sur la touche rouge (fig. i 1, page 12).
➤ Fermez l’appareil de réfrigération.
8.7 Dégivrage de l’appareil de réfrigération
L’appareil de réfrigération est équipé d’une fonction de dégivrage automatique.
La phase de dégivrage a lieu toutes les 22 heures pendant une période de 2 heures.
REMARQUE
I
La première phase de dégivrage commence 39 heures après la mise en
marche de l’appareil de réfrigération. Si la mise en service est effectuée
pendant la journée, les phases de dégivrage ont lieu ainsi pendant la
nuit.
8.8 Extinction et mise hors service de l’appareil de
réfrigération
Lorsque vous voulez mettre l’appareil de réfrigération hors service pendant une
période prolongée, procédez de la façon suivante :
➤ Débranchez la fiche secteur de la prise.
➤ Nettoyez l’appareil de réfrigération (voir chapitre « Nettoyage et entretien »,
page 57).
56
Page 57

FR
HiPro Nettoyage et entretien
9 Nettoyage et entretien
AVIS ! Risque d’endommagement !
•
A
➤ Débranchez l’appareil du réseau électrique avant de le nettoyer et de
l’entretenir.
➤ Nettoyez l’appareil de réfrigération avec un chiffon doux et de l’eau tiède.
Utilisez un produit nettoyant doux.
➤ Lavez l’appareil de réfrigération à l’eau claire après l’avoir nettoyé.
Nettoyez l’appareil de réfrigération régulièrement et dès qu’il est
sale.
•
Pour le nettoyage, n’utilisez pas de savon ni de produits nettoyants
agressifs, granulés ou contenant de la soude.
•
N’utilisez pas d’objets durs pour le nettoyage.
•
N’utilisez pas d’outils durs ou pointus pour accélérer le processus de
dégivrage.
•
Veillez à ce que de l’eau ne goutte pas sur les joints. Cela risque
d’endommager les composants électroniques.
•
Ne mettez pas le joint de la porte en contact avec de l’huile ou de la
graisse.
•
Ne lubrifiez pas les serrures à cylindre (en option). Les serrures à
cylindre sont lubrifiées d’usine de façon durable.
➤ Essuyez ensuite l’appareil de réfrigération avec un chiffon.
➤ Une fois par an, enlevez la poussière du module d’absorption avec un pinceau ou
un chiffon doux.
57
Page 58

FR
Guide de dépannage HiPro
10 Guide de dépannage
Dysfonctionnement Cause possible Solution
Pas de réfrigération,
module d’absorption
froid
Pas de réfrigération,
module d’absorption
chaud
Pas de réfrigération,
l’éclairage intérieur et le
contrôle d’ouverture de
la porte (en option) clignotent en permanence
Fiche secteur non enfichée Enficher la fiche secteur
dans la prise
Prise sans tension Contrôler les fusibles du
bâtiment
Système électronique ou sonde de
capteur défectueux
Cartouche chauffante défectueuse Service agréé :
Phase de dégivrage active (voir chapitre « Dégivrage de l’appareil de
réfrigération », page 56)
L’appareil de réfrigération n’est pas à
l’horizontale
L’appareil de réfrigération a été
récemment mise en marche
Module de réfrigération défectueux Service agréé : rempla-
L’appareil de réfrigération n’est pas à
l’horizontale
Module bloqué Contacter le service
Le module n’est pas étanche
Service agréé : monter un
nouveau système électronique ou capteur
monter une nouvelle cartouche chauffante
Aucune action nécessaire
Positionner l’appareil de
réfrigération avec un
niveau
Vérifier à nouveau la réfrigération au bout de 5 ou
6heures
cer l’appareil de réfrigération
Positionner l’appareil de
réfrigération avec un
niveau
après-vente agréé
Coque chauffante défectueuse
Erreur lors de l’autotest
58
Page 59

FR
HiPro Guide de dépannage
Dysfonctionnement Cause possible Solution
Puissance frigorifique
insuffisante
Formation de glace à
l’intérieur de l’appareil
Aération insuffisante du module de
réfrigération
L’appareil de réfrigération est exposé
directement aux rayons du soleil
La porte de l’appareil de réfrigération
ne ferme pas hermétiquement
L’appareil de réfrigération a été
récemment rempli
La porte de l’appareil de réfrigération
ne ferme pas hermétiquement
Veiller à une aération suffisante (fig. 3, page 4)
Retirer l’appareil de réfrigération des rayons du
soleil
Vérifier les distances
(fig. 0, page 8)
Service agréé :
remplacer le joint de la
porte
Vérifier à nouveau la réfrigération au bout de 5 ou
6heures
Vérifier les distances
(fig. 0, page 8)
Service agréé :
remplacer le joint de la
porte
59
Page 60

FR
Garantie HiPro
11 Garantie
Le délai légal de garantie s'applique. Si le produit s'avérait défectueux, veuillez vous
adresser à la filiale du fabricant située dans votre pays (voir adresses au verso du
présent manuel) ou à votre revendeur spécialisé.
Veuillez y joindre les documents suivants pour la gestion des réparations et de la
garantie :
•
une copie de la facture avec la date d'achat,
•
le motif de la réclamation ou une description du dysfonctionnement.
12 Retraitement
AVERTISSEMENT ! Risque d’enfermement pour les enfants !
!
➤ Jetez les emballages dans les conteneurs de déchets recyclables prévus à cet
effet.
Avant de mettre au rebut votre ancien appareil de réfrigération :
•
Enlevez les portes de leurs gonds.
•
Laissez les étagères dans l’appareil de réfrigération afin que les
enfants ne puissent pas entrer dedans.
M
60
Lorsque vous mettrez votre produit définitivement hors service,
informez-vous auprès du centre de recyclage le plus proche ou auprès de
votre revendeur spécialisé sur les prescriptions relatives au retraitement
des déchets.
Page 61

FR
HiPro Caractéristiques techniques
13 Caractéristiques techniques
HiPro3000 HiPro4000
Capacité utile : 26 l 34 l 48 l
Classe climatique : SN
Température ambiante : de +10 °C à +32 °C
Catégories d’efficacité
d’énergie .
Consommation d’énergie
(kWh/an) :
Tension d’entrée : 230 à 240 V 230 V
Fréquence d’entrée : 60 Hz
Puissance d’entrée nominale : 65 W 80 W
Émissions sonores : 0 dB
Fluide moteur : cyclopentane
Fluide frigorigène : ammoniac
Dimensions : fig. j, page 13
Poids : 12 kg 13,5 kg 17 kg
207 237 270 254
CD
HiPro4000
Vision
HiPro6000
Vous trouverez la déclaration de conformité UE actuelle pour votre appareil sur la
page de produit concernée sur dometic.com ou directement auprès du fabricant
(voir verso).
61
Page 62

ES
Explicación de los símbolos HiPro
Lea detenidamente estas instrucciones antes de llevar a cabo la instalación
y puesta en funcionamiento, y consérvelas en un lugar seguro. En caso de
vender o entregar el producto a otra persona, entregue también estas
instrucciones.
Índice
1 Explicación de los símbolos . . . . . . . . . . . . . . . . . . . . . . . . . . . . . . . . . . . . . 62
2 Indicaciones de seguridad . . . . . . . . . . . . . . . . . . . . . . . . . . . . . . . . . . . . . . 63
3 Volumen de entrega . . . . . . . . . . . . . . . . . . . . . . . . . . . . . . . . . . . . . . . . . . . 65
4 Accesorios. . . . . . . . . . . . . . . . . . . . . . . . . . . . . . . . . . . . . . . . . . . . . . . . . . . 66
5 Uso adecuado . . . . . . . . . . . . . . . . . . . . . . . . . . . . . . . . . . . . . . . . . . . . . . . . 66
6 Descripción técnica . . . . . . . . . . . . . . . . . . . . . . . . . . . . . . . . . . . . . . . . . . . 67
7 Instalación y conexión de la nevera . . . . . . . . . . . . . . . . . . . . . . . . . . . . . . . 68
8 Uso de la nevera . . . . . . . . . . . . . . . . . . . . . . . . . . . . . . . . . . . . . . . . . . . . . . 70
9 Limpieza y mantenimiento . . . . . . . . . . . . . . . . . . . . . . . . . . . . . . . . . . . . . . 74
10 Solución de averías . . . . . . . . . . . . . . . . . . . . . . . . . . . . . . . . . . . . . . . . . . . . 75
11 Garantía legal . . . . . . . . . . . . . . . . . . . . . . . . . . . . . . . . . . . . . . . . . . . . . . . . 76
12 Gestión de residuos . . . . . . . . . . . . . . . . . . . . . . . . . . . . . . . . . . . . . . . . . . . 77
13 Datos técnicos. . . . . . . . . . . . . . . . . . . . . . . . . . . . . . . . . . . . . . . . . . . . . . . . 77
1 Explicación de los símbolos
¡ADVERTENCIA!
!
!
62
Indicación de seguridad: su incumplimiento puede acarrear la
muerte o graves lesiones.
¡ATENCIÓN!
Indicación de seguridad: su incumplimiento puede acarrear
lesiones.
Page 63

ES
HiPro Indicaciones de seguridad
¡AVISO!
A
I
Su incumplimiento puede acarrear daños materiales y perjudicar el
correcto funcionamiento del producto.
NOTA
Información adicional para el manejo del producto.
2 Indicaciones de seguridad
El fabricante declina toda responsabilidad ante daños ocurridos en los siguientes
casos:
•
errores de montaje o de conexión
•
desperfectos en el producto debidos a influencias mecánicas y una tensión de
conexión incorrecta
•
modificaciones realizadas en el producto sin el expreso consentimiento del
fabricante
•
utilización del aparato para fines distintos a los descritos en las instrucciones
2.1 Seguridad general
!
¡ADVERTENCIA!
•
No abra nunca la unidad de absorción. Está bajo alta presión y puede
causar lesiones si se abre.
•
No guarde en el aparato sustancias con peligro de explosión como, p.
ej., sprays con gases combustibles.
•
El refrigerante del circuito de refrigeración es muy inflamable.
En caso de que se produzcan daños en el circuito de refrigeración
(olor a amoniaco):
– Desconecte el aparato.
– evite las llamas abiertas y las chispas.
•
Ventile bien la habitación.
•
No ponga el aparato en funcionamiento si presenta desperfectos
visibles.
•
Si el cable de conexión resulta dañado, deberá ser reemplazado por
el fabricante, por el servicio de atención al cliente o por una persona
cualificada para así evitar posibles peligros.
63
Page 64

ES
Indicaciones de seguridad HiPro
•
Solo personal especializado puede realizar reparaciones en el
aparato. Las reparaciones que se realicen incorrectamente pueden
dar lugar a situaciones de considerable peligro.
•
Los niños mayores de 8 años y las personas de capacidad física,
sensorial o mental disminuida, así como aquellas personas con falta de
experiencia y conocimientos suficientes solo podrán utilizar este
aparato bajo vigilancia o si han sido instruidos respecto al uso seguro
del aparato y a los posibles peligros que pueden emanar de él.
•
Los niños solo podrán realizar las tareas de limpieza y mantenimiento
bajo vigilancia.
•
Se debe vigilar a los niños para asegurarse de que no jueguen con el
aparato.
¡ATENCIÓN!
•
!
A
¡P eli gro de a pla sta mie nto! No i ntr odu zca la m ano en e l ár ea d e ac ció n
de la bisagra.
•
Antes de la puesta en funcionamiento, asegúrese de que el cable de
alimentación y el enchufe estén secos.
•
Los alimentos solo se pueden guardar en los envases originales o en
recipientes adecuados.
¡AVISO!
•
No abra nunca el circuito de refrigeración.
•
No monte el aparato cerca de fuego abierto ni de otras fuentes de
calor (calefacción, estufas de gas, etc.).
•
Compare el valor de tensión indicado en la placa de características
con el suministro de energía existente.
•
Conecte el aparato a la red de corriente alterna solo con el cable de
conexión correspondiente.
•
No extraiga el enchufe de la caja de enchufe tirando del cable de
conexión.
•
No guarde en la nevera sustancias corrosivas o que contengan
disolventes.
•
Utilice únicamente cables que tengan la sección adecuada.
•
Mantenga siempre limpia la abertura para agua de condensación.
64
Page 65

ES
HiPro Volumen de entrega
2.2 Seguridad durante el funcionamiento de la nevera
¡AVISO!
•
A
No utilice ningún aparato eléctrico dentro de la nevera, a no ser que
el aparato en cuestión haya sido recomendado para ello por su
fabricante.
•
¡Peligro de sobrecalentamiento!
Asegúrese de que quede constantemente garantizada una salida
adecuada del calor que se desprende durante el funcionamiento.
Asegúrese también de que el aparato guarde la suficiente distancia
respecto a paredes u objetos, de forma que el aire pueda circular.
•
El grupo absorbedor se calienta cuando está en funcionamiento. ¡No
toque el grupo absorbedor!
•
Evite que se obstruyan las aberturas de ventilación.
•
No introduzca líquidos ni hielo en el recipiente interior.
•
No sumerja nunca el aparato en agua.
•
Proteja el aparato y los cables del calor y de la humedad.
•
Preste atención a que los alimentos no toquen ninguna pared del
interior de la nevera.
3 Volumen de entrega
Cantidad Denominación
1 Minibar
2Bandeja
2 Compartimento de puerta (no incluido en HiPro 4000Vision)
1 Instrucciones de montaje y de uso
65
Page 66

ES
Accesorios HiPro
4Accesorios
Disponibles como accesorio (no incluidos en el volumen de entrega):
Denominación Explicación
Control remoto Para controlar la apertura de la puerta y regular la temperatura
Reflector Para controlar la apertura de la puerta
Llave Para modelos con cerradura
Bisagra de arrastre Para abrir simultáneamente la puerta del mueble y la puerta de la
nevera
Cubierta de unidad y
pies de aparato altos
Para HiPro4000 y HiPro4000Vision, como variante autónoma
5Uso adecuado
El minibar está diseñado para funcionar en edificios cerrado, como por ejemplo:
•
en las cocinas para el personal en establecimientos comerciales, oficinas u otros
recintos de trabajo,
•
en el trabajo en el campo
•
en hoteles, moteles u otros tipos de alojamiento
•
en pensiones con desayuno
•
en servicios de catering y otras aplicaciones semejantes
El minibar no es adecuado para ser instalado en caravanas, autocaravanas o
embarcaciones.
El minibar está diseñado para ser instalado en un mueble o en un hueco previsto para
ello. Tras su montaje, únicamente la parte frontal puede ser libremente accesible.
Los minibares HiPro4000 y HiPro4000Vision también pueden instalarse encima el
su el o si la cub iert a de l a u nid ad (a cc eso ri o opcional) en la parte trasera y los pies altos
están montados.
El minibar sirve exclusivamente para enfriar y almacenar bebidas y alimentos en
recipientes cerrados.
El minibar no es apto para almacenar alimentos perecederos.
¡ADVERTENCIA!
!
La aparato no está diseñado para el almacenaje adecuado de
medicamentos
66
Page 67

ES
HiPro Descripción técnica
¡ATENCIÓN! ¡Riesgo para la salud!
!
Compruebe si la potencia de refrigeración del aparato cumple los
requisitos de los alimentos que desea enfriar.
6 Descripción técnica
El minibar es una nevera con refrigeración por absorbedor. Se usa amoniaco como
refrigerante. Todos los materiales utilizados son aptos para alimentos. El circuito de
refrigeración no requiere mantenimiento.
El minibar (exceptuando el modelo HiPro4000Vision) tiene dos bandejas y dos
compartimentos de puerta. El compartimento de puerta está previsto para guardar
botellas. En el compartimento de puerta para botellas cabe una botella de 1,5 litros.
El segundo compartimento de puerta es para botellas más pequeñas o aperitivos.
El minibar HiPro4000Vision tiene dos bandejas y una puerta de vidrio acrílico sin
compartimentos.
Opcionalmente, los minibares HiPro4000 y HiPro 4000Vision con cubierta de
unidad y pies altos se pueden utilizar como variantes autónomas.
6.1 Elementos de mando de la nevera
N.º en
fig. 1, página 2
1 Iluminación interior
2 LED del control de apertura de la puerta (opcional)
3Bandeja
4 Compartimento de puerta inferior
5 Compartimento de puerta superior
Explicación
6.2 Elementos de mando fuera de la nevera
N.º en
fig. 2, página 3
1 Control remoto para controlar la apertura de la puerta y regular la
Explicación
temperatura (opcional)
67
Page 68

ES
Instalación y conexión de la nevera HiPro
7 Instalación y conexión de la nevera
7.1 Indicaciones para la instalación de la nevera
Al instalar la nevera tenga en cuenta las siguientes indicaciones:
•
Coloque la nevera de manera que se pueda evacuar bien el aire caliente (bien
hacia arriba o hacia los lados, fig. 3, página 4).
Denominación en
fig. 3, página 4
A Aire de entrada frío
B Aire de salida caliente
C Condensador
D Distancia a la cara superior, cuando no haya circulación suficiente
•
Mantenga una distancia mínima de 20 mm entre la unidad de refrigeración y la
Explicación
de aire de retorno hacia arriba o hacia los lados.
pared trasera.
•
Preste atención a no obstaculizar con ningún objeto las aperturas (ranuras de
ventilación, etc.) de la carcasa ni el bastidor de montaje.
7.2 Instalación autónoma de la nevera
Tenga en cuenta las siguientes indicaciones si desea instalar la nevera de manera
autónoma sobre el suelo:
•
Coloque la nevera horizontalmente. Utilice un nivel de agua para verificar la
posición.
7.3 Montaje de la nevera en un mueble
Tenga en cuenta las siguientes indicaciones si desea instalar la nevera en un mueble:
•
Coloque la nevera de manera que ambos pies se sitúen sobre la superficie de
apoyo.
•
El aire debe poder circular libremente (fig. 3, página 4).
•
Solamente la unidad de refrigeración puede adentrarse en el canal de
ventilación.
•
El aire del canal de ventilación no debe estar bajo el efecto de otras fuentes de
calor.
68
Page 69

ES
HiPro Instalación y conexión de la nevera
Proceda de la siguiente manera (fig. 4, página 5):
➤ Fije el reflector para el control de apertura de la puerta (opcional).
➤ Atornille firmemente los pies del aparato.
7.4 Cambiar el lado de apertura de la puerta
Puede cambiar la posición de las bisagras de la puerta permitiendo abrirla hacia la
izquierda en lugar de hacia la derecha.
NOTA
I
Si el aparato dispone de LED de control de apertura de puerta, proceda de la
siguiente manera:
➤ Retire el LED.
➤ Tienda el cable en la guía.
➤ Vuelva a colocar el LED en el otro lado.
A continuación, proceda de la siguiente manera (fig. 5, página 5 a fig. 9,
página 7):
El LED del control de apertura de la puerta (opcional) siempre debe
quedar opuesto al lado de apertura de la puerta.
HiPro4000, HiPro4000 Vision (versión con pies altos)
➤ Desatornille los pies altos.
HiPro3000, HiPro4000, HiPro6000, HiPro4000Vision
➤ Extraiga las bisagras inferiores.
➤ Retire la puerta con las bisagras.
➤ Retire el pasador de las bisagras.
➤ Vuelva a colocar el pasador de las bisagras en el otro lado.
➤ Introduzca la puerta con la bisagra inferior.
NOTA
I
HiPro4000Vision: Introduzca la puerta girada a 180°.
69
Page 70

ES
Uso de la nevera HiPro
HiPro4000, HiPro4000 Vision (versión con pies altos)
➤ Atornille los pies altos.
7.5 Montaje de la bisagra de arrastre
➤ Tenga en cuenta las distancias indicadas en fig. 0, página 8.
➤ Proceda como se indica en fig. a, página 8 hasta fig. b, página 9.
7.6 Colocación de la placa embellecedora
➤ Tenga en cuenta las medidas de montaje indicadas en fig. c, página 9.
➤ Extraiga el soporte de la cerradura (opcional, fig. d, página 10).
➤ Proceda como se indica en fig. d, página 10 hasta fig. e, página 10.
8Uso de la nevera
¡AVISO!
•
A
No se deben introducir aparatos eléctricos en el equipo de
refrigeración. Los aparatos permitidos por el fabricante se
consideran la excepción a esta regla.
•
Asegúrese de que las bebidas o los alimentos envasados en
recipientes de cristal no se enfríen demasiado. Si dichos productos
se congelasen, Esto podría provocar que los recipientes de cristal
estallasen.
•
Los alimentos solo se pueden guardar en los envases originales o en
recipientes adecuados.
•
Asegúrese de que en la nevera sólo se encuentren objetos o
productos que puedan enfriarse a la temperatura seleccionada.
I
70
NOTA
•
Por razones de higiene, debería limpiar la nevera por dentro y por
fuera con un paño húmedo antes de ponerla en funcionamiento
(véase también el capítulo capítulo “Limpieza y mantenimiento” en la
página 74).
Page 71

ES
HiPro Uso de la nevera
8.1 Consejos para ahorrar energía
•
Elija un lugar de emplazamiento correctamente ventilado y protegido de la
radiación solar.
•
Ponga en funcionamiento la nevera 12 horas antes de su utilización.
•
Disponga las bandejas de forma repartida dentro de la zona de refrigeración.
•
Si los alimentos están calientes, deje que se enfríen antes de introducirlos en la
nevera.
•
Evite abrir la nevera más de lo necesario.
•
No deje la puerta abierta más tiempo del necesario. Con la puerta abierta, la
iluminación interior permanece constantemente encendida.
•
Evite ajustes de temperatura innecesariamente bajos.
•
Ajuste la temperatura ambiente a 20 °C aproximadamente.
8.2 Colocación de las bandejas
➤ Proceda como se indica en fig. f, página 11 hasta fig. g, página 11.
8.3 Colocación del compartimento de puerta
➤ Proceda como se indica en fig. h, página 11.
8.4 Encendido de la nevera
¡PELIGRO! ¡Peligro de muerte!
D
!
A
I
No manipule los enchufes ni interruptores con las manos mojadas ni con
los pies sobre una superficie mojada.
¡ADVERTENCIA!
Conecte la nevera solamente a una caja de enchufe con toma de tierra
reglamentaria.
¡AVISO!
El enchufe debe estar accesible después de la instalación de la nevera.
NOTA
La nevera se conecta automáticamente cuando se enchufa a la corriente.
71
Page 72

ES
Uso de la nevera HiPro
➤ Conecte el enchufe a la caja de enchufe.
✓ La nevera inicia un autotest. Pasados unos 10 segundos, la luz LED interior se
ilumina durante 2 segundos.
✓ La nevera está encendida.
8
NOTA
I
Tras el encendido, la nevera necesitará algunas horas para llegar a la
temperatura de refrigeración en el interior.
8.5 Ajuste de la temperatura
La nevera está equipada con un control de temperatura automático. La temperatura
de refrigeración está preajustada a 5 °C.
Con el control remoto opcional puede cambiar el preajuste a 3°C, 5°C, 7°C o
12 °C (fig. i, página 12). Con cada pulsación de la tecla del control remoto, la
temperatura de refrigeración cambia entre los valores posibles:
➤ Antes del primer uso, extraiga el aislante de plástico del compartimento de
batería.
✓ Cu ando se pul sa una tecl a s e en cien de un L ED roj o en e l c ont rol r em oto . Si e l LED
rojo no se enciende, cambie la batería del control remoto.
➤ Dirija la parte superior del control remoto hacia los LEDs de la iluminación interior
(5). Mantenga una distancia inferior a 20 cm.
➤ Pulse la tecla amarilla (3) para ajustar la temperatura de refrigeración a 3 °C o
7°C.
✓ Los LEDs de la iluminación interior (5) parpadean tres o siete veces para indicar la
temperatura ajustada (fig. i, página 12).
➤ Pulse la tecla azul (4) para ajustar la temperatura de refrigeración a 5 °C o 12 °C.
✓ Los LEDs de la iluminación interior (5) parpadean cinco o doce veces para indicar
la temperatura ajustada (fig. i, página 12).
8
NOTA
I
El LED rojo se enciende cuando se emite una señal. Verifique el estado
de las baterías cuando el LED no se encienda.
72
Page 73

ES
HiPro Uso de la nevera
8.6 Uso del control de apertura de la puerta
El control de apertura de la puerta (opcional) avisa mediante un LED
(fig. 1 4,página 2) si la puerta de la nevera se ha abierto.
Si el LED de control de apertura de la nevera se enciende:
➤ Abra la nevera.
➤ Si es necesario, vuelva a llenar la nevera.
➤ Restablezca el control de apertura de puerta con el control remoto (opcional).
Para ello, pulse la tecla roja una vez (fig. i 1, página 12).
➤ Cierre la nevera.
8.7 Descongelar la nevera
La nevera está equipada con una función de descongelación automática.
La fase de descongelación se lleva a cabo cada 22 horas durante un período de
2horas.
NOTA
I
La primera fase de descongelación empieza 39 horas después de
encender la nevera. En caso de puesta en funcionamiento durante el
día, ello asegura que la fase de descongelación se lleve a cabo durante
la noche.
8.8 Desconexión y parada de la nevera
Si no va a usar la nevera durante un largo período de tiempo, proceda como se
indica a continuación:
➤ Extraiga el enchufe de la caja de enchufe.
➤ Limpie la nevera (véase el capítulo “Limpieza y mantenimiento” en la página 74).
73
Page 74

ES
Limpieza y mantenimiento HiPro
9 Limpieza y mantenimiento
¡AVISO! ¡Peligro de ocasionar daños materiales!
•
A
➤ Antes de limpiar y realizar trabajos de mantenimiento en el aparato,
desenchúfelo de la red de corriente.
➤ Limpie la nevera con un paño suave y agua tibia. Utilice un detergente suave.
➤ Aclare la nevera con agua después de limpiarla.
➤ Después, seque la nevera con un paño.
➤ Elimine el polvo del grupo absorbedor una vez al año con un pincel o un paño
suave.
Limpie regularmente la nevera y tan pronto como se ensucie.
•
Para la limpieza no utilice jabón ni detergentes corrosivos,
granulosos o que contengan sosa.
•
No utilice objetos duros para limpiar.
•
No utilice ningún utensilio duro ni puntiagudo para acelerar el
proceso de descongelación.
•
Preste atención a que no gotee agua en las juntas, pues ello podría
dañar el sistema electrónico.
•
No ponga la junta de la puerta en contacto con aceite o grasa.
•
No lubrique las cerraduras de bombín (opcional). Las cerraduras de
bombín vienen convenientemente lubricadas de fábrica.
74
Page 75

ES
HiPro Solución de averías
10 Solución de averías
Avería Posible causa Solución
No enfría, el grupo
absorbedor está frío
No enfría, el grupo
absorbedor está
caliente
No enfría; la luz interior
y el control de apertura
de puerta (opcional)
parpadean constantemente
El aparato no está enchufado Introducir el enchufe en la
caja de enchufe
Enchufe sin tensión Comprobar los fusibles
de la casa
Problema electrónico o de sensores Servicio técnico autori-
zado: instalar electrónica
o sensores nuevos
Problema con el cartucho de calefacción
Fase de descongelación en marcha
(véase el capítulo “Descongelar la
nevera” en la página 73)
La nevera no está horizontal Nivelar la nevera con un
La nevera se ha conectado hace poco
tiempo
Problema con el grupo frigorífico Servicio técnico autori-
La nevera no está horizontal Nivelar la nevera con un
Unidad bloqueada Contactar con servicio de
La unidad presenta fugas
Problema con la bandeja de calor
Error en el autotest
Servicio técnico autorizado:
instalar cartucho de calefacción nuevo
No es necesaria ninguna
acción
nivel de agua
Comprobar la refrigeración pasadas 5 o 6 horas
zado: cambiar la nevera
nivel de agua
atención al cliente autorizado
75
Page 76

ES
Garantía legal HiPro
Avería Posible causa Solución
Pobre rendimiento de
enfriado
Formación de escarcha
en el espacio de refrigeración
La unidad de refrigeración no está
suficientemente ventilada
La nevera está directamente expuesta
a la radiación solar
La puerta de la nevera no cierra herméticamente
La nevera se ha llenado hace poco
tiempo
La puerta de la nevera no cierra herméticamente
11 Garantía legal
Facilitar una ventilación
suficiente (fig. 3,
página 4)
Retire nevera de la radiación solar directa
Comprobar objetos
(fig. 0, página 8)
Servicio técnico autorizado:
Cambiar la junta de la
puerta
Comprobar la refrigeración pasadas 5 o 6 horas
Comprobar objetos
(fig. 0, página 8)
Servicio técnico autorizado:
Cambiar la junta de la
puerta
Rige el plazo de garantía legal. Si el producto presenta algún defecto, diríjase a la
sucursal del fabricante de su país (ver direcciones en el dorso de estas instrucciones)
o a su establecimiento especializado.
Para la tramitación de la reparación y de la garantía debe enviar también los
siguientes documentos:
•
una copia de la factura con fecha de compra,
•
el motivo de la reclamación o una descripción de la avería.
76
Page 77

ES
HiPro Gestión de residuos
12 Gestión de residuos
¡ADVERTENCIA! ¡Peligro para los niños!
!
➤ Deseche el material de embalaje en el contenedor de reciclaje correspondiente.
M
Antes de deshacerse de su nevera vieja:
•
Desmonte las puertas.
•
Deje las bandejas dentro de la nevera para que los niños no puedan
introducirse en ella.
Cuando vaya a desechar definitivamente el producto, infórmese en el
centro de reciclaje más cercano o en un comercio especializado sobre las
normas pertinentes de eliminación de materiales.
13 Datos técnicos
HiPro3000 HiPro4000
Capacidad útil: 26 l 34 l 48 l
Clase climática: SN
Temperatura ambiente: de +10 °C a +32 °C
Clase de eficiencia energética: C D
Consumo de energía
(kWh/año):
Tensión de entrada: 230 a 240 V 230 V
Frecuencia de entrada: 60 Hz
Potencia nominal de entrada: 65 W 80 W
Emisiones de ruido: 0 dB
Agente espumante: Ciclopentano
Refrigerante: Amoniaco
Dimensiones: fig. j, página 13
Peso: 12kg 13,5kg 17kg
Encontrará la declaración de conformidad UE actual para su aparato en la página
correspondiente al producto en dometic.com o directamente a través del fabricante
(véase la parte posterior).
207 237 270 254
HiPro4000
Vision:
HiPro6000
77
Page 78

PT
Explicação dos símbolos HiPro
Por favor, leia atentamente este manual antes da montagem e colocação
em funcionamento do aparelho e guarde-o em local seguro. Em caso de
transmissão do produto, entregue o manual ao novo utilizador.
Índice
1 Explicação dos símbolos . . . . . . . . . . . . . . . . . . . . . . . . . . . . . . . . . . . . . . . 78
2 Indicações de segurança . . . . . . . . . . . . . . . . . . . . . . . . . . . . . . . . . . . . . . . 79
3 Material fornecido. . . . . . . . . . . . . . . . . . . . . . . . . . . . . . . . . . . . . . . . . . . . . . 81
4 Acessórios . . . . . . . . . . . . . . . . . . . . . . . . . . . . . . . . . . . . . . . . . . . . . . . . . . . 82
5 Utilização adequada . . . . . . . . . . . . . . . . . . . . . . . . . . . . . . . . . . . . . . . . . . . 82
6 Descrição técnica . . . . . . . . . . . . . . . . . . . . . . . . . . . . . . . . . . . . . . . . . . . . . 83
7 Instalação e ligação do aparelho de refrigeração . . . . . . . . . . . . . . . . . . . . 84
8 Utilização do aparelho de refrigeração . . . . . . . . . . . . . . . . . . . . . . . . . . . . 86
9 Limpeza e manutenção . . . . . . . . . . . . . . . . . . . . . . . . . . . . . . . . . . . . . . . . . 90
10 Eliminar falhas . . . . . . . . . . . . . . . . . . . . . . . . . . . . . . . . . . . . . . . . . . . . . . . . .91
11 Garantia . . . . . . . . . . . . . . . . . . . . . . . . . . . . . . . . . . . . . . . . . . . . . . . . . . . . . 93
12 Eliminação . . . . . . . . . . . . . . . . . . . . . . . . . . . . . . . . . . . . . . . . . . . . . . . . . . . 93
13 Dados técnicos . . . . . . . . . . . . . . . . . . . . . . . . . . . . . . . . . . . . . . . . . . . . . . . 94
1 Explicação dos símbolos
AVISO!
!
!
A
78
Indicação de segurança: o incumprimento pode provocar a morte ou
ferimentos graves.
PRECAUÇÃO!
Indicação de segurança: o incumprimento pode provocar
ferimentos.
NOTA!
O incumprimento pode causar danos materiais e pode prejudicar o
funcionamento do produto.
Page 79

PT
HiPro Indicações de segurança
OBSERVAÇÃO
I
Informações suplementares sobre a operação do produto.
2 Indicações de segurança
O fabricante não se responsabiliza por danos nos seguintes casos:
•
Erros de montagem ou de conexão
•
Danos no produto resultantes de influências mecânicas e tensão de conexão
incorreta
•
Alterações ao produto sem autorização expressa do fabricante
•
Utilização para outras finalidades que não as descritas no manual de instruções
2.1 Segurança geral
AVISO!
•
!
Nunca abra a unidade de absorção. Esta encontra-se sob pressão e
pode originar ferimentos durante a abertura.
•
Não guarde as substâncias com risco de explosão como, por
exemplo, latas de spray com gás carburante inflamável, no aparelho.
•
O líquido refrigerante no circuito de refrigeração é facilmente inflamável.
Em caso de danos no circuito de refrigeração (cheiro a amoníaco):
– Desligue o aparelho.
– Evite chamas abertas ou faíscas causadoras de incêndio.
•
Ventile bem o espaço.
•
Se o aparelho apresentar danos visíveis, não deve ser colocado em
funcionamento.
•
Se danificar o cabo de conexão deste aparelho, o mesmo tem de ser
substituído pelo fabricante, pelo seu serviço de assistência técnica ou
por uma pessoa com qualificações equivalentes para evitar perigos.
•
As reparações neste aparelho apenas devem ser realizadas por
técnicos devidamente qualificados. As reparações inadequadas
podem originar perigos graves.
79
Page 80

PT
Indicações de segurança HiPro
•
Este aparelho pode ser utilizado por crianças a partir dos 8 anos, assim
como por pessoas com capacidades físicas, sensoriais ou mentais
reduzidas ou com insuficiente experiência e conhecimento, quando
supervisionadas ou quando tenham recebido informação acerca da
utilização segura do aparelho e compreendam os perigos dele
resultantes.
•
A limpeza e a manutenção por parte do utilizador não podem ser
efetuadas por crianças sem supervisão.
•
As crianças devem ser supervisionadas para assegurar que não
brincam com o aparelho.
PRECAUÇÃO!
•
!
A
Perigo de esmagamento! Não toque na dobradiça.
•
Antes da colocação em funcionamento, certifique-se de que a
conexão e a ficha de alimentação estão secos.
•
Os géneros alimentícios apenas podem ser armazenados nas
embalagens originais ou recipientes adequados.
NOTA!
•
Não abra, em caso algum, o circuito de refrigeração.
•
Não monte o aparelho na proximidade de chamas abertas ou outras
fontes de calor (aquecimento, fornos a gás, etc.).
•
Compare a indicação da tensão na chapa de características com a
alimentação de energia existente.
•
Ligue o aparelho à rede de corrente alternada apenas com o respetivo
cabo de conexão.
•
Nunca retire a ficha da tomada puxando pelo cabo de conexão.
•
Não armazene produtos com teor de solvente ou cáusticos no
aparelho de refrigeração.
•
Utilize apenas cabos com a secção transversal correspondente.
•
Mantenha a abertura para água de condensação sempre limpa.
2.2 Segurança durante a utilização do aparelho de
refrigeração
NOTA!
•
A
Não utilize aparelhos elétricos dentro do aparelho, exceto se esses
aparelhos elétricos tiverem sido recomendados para o efeito pelo
fabricante.
80
Page 81

PT
HiPro Material fornecido
•
Perigo de sobreaquecimento!
Tenha sempre atenção para que o calor gerado durante o
funcionamento seja dissipado adequadamente. Certifique-se de que
o aparelho está posicionado a uma distância suficiente de paredes ou
objetos de modo que o ar possa circular livremente.
•
A unidade de absorção aquece durante o funcionamento. Não toque
na unidade de absorção!
•
Certifique-se de que as aberturas de ventilação não ficam cobertas.
•
Não verta líquidos ou gelo para dentro do recipiente interior.
•
Nunca mergulhe o aparelho em água.
•
Proteja o aparelho e os cabos do calor e da humidade.
•
Tenha atenção para que as refeições não entrem em contacto com
nenhuma parede do espaço de refrigeração.
3 Material fornecido
Quanti-
dade
1 Minibar
2Prateleira
2 Suporte na porta (apenas no HiPro4000Vision)
1 Manual de montagem e operação
Designação
81
Page 82

PT
Acessórios HiPro
4Acessórios
Disponível como acessório (não incluído no material fornecido):
Designação Explicação
Controlo remoto Para o controlo da abertura da porta e a regulação da temperatura
Refletor Para o controlo da abertura da porta
Chave Para versões com fechadura
Dobradiça de arrasto Para a abertura simultânea da porta do móvel e da porta do apare-
lho de refrigeração
Cobertura da unidade e pés do aparelho altos
Para HiPro4000 e HiPro4000Vision, como variante independente
5Utilização adequada
O minibar foi concebido para ser utilizado em locais fechados, por ex.:
•
em copas de lojas, escritórios e outras áreas de trabalho
•
na agricultura
•
em hotéis, motéis ou outros alojamentos
•
em pensões com pequeno-almoço
•
no Catering e outras utilizações semelhantes no comércio grossista
O minibar não deve ser montado em caravanas, autocaravanas nem barcos.
O minibar destina-se à montagem num móvel ou à instalação encastrada. Após a
instalação, apenas a parte frontal do aparelho deve estar acessível.
Os minibares HiPro4000 e HiPro4000Vision também podem estar apoiados no
chão, caso a cobertura opcional da unidade na parte traseira e os pés altos do
aparelho estejam montados.
O minibar destina-se exclusivamente à refrigeração e ao armazenamento de bebidas
e géneros alimentícios em recipientes fechados.
O minibar não está indicado para o armazenamento de géneros alimentícios
facilmente perecíveis.
AVISO!
!
O aparelho não está indicado para o armazenamento profissional de
medicamentos.
82
Page 83

PT
HiPro Descrição técnica
PRECAUÇÃO! Perigo para a saúde!
!
Verifique se a potência de refrigeração do aparelho cumpre os
requisitos dos géneros alimentícios que pretende refrigerar.
6 Descrição técnica
O minibar é um aparelho de refrigeração com refrigeração por absorção. Como
agente de refrigeração é usado amoníaco. Todos os materiais são inócuos para os
géneros alimentícios. O circuito de refrigeração não necessita de manutenção.
O minibar (exceto HiPro4000Vision) possui duas prateleiras e dois suportes na
porta. Um suporte na porta está previsto para garrafas. No suporte na porta previsto
para garrafas pode ser arrumada uma garrafa de 1,5 l. O segundo suporte na porta
está previsto para garrafas mais pequenas ou lanches.
O minibar HiPro4000Vision possui duas prateleiras e uma porta em vidro acrílico
transparente sem suportes.
Como opção, os minibares HiPro4000 e HiPro4000Vision podem ser usados
como variante independente com cobertura da unidade e pés altos do aparelho.
6.1 Elementos de comando no aparelho de refrigeração
N.º da
fig. 1, página 2
1Iluminação interior
2 LED do controlo da abertura da porta (opcional)
3 Prateleira
4 Suporte inferior na porta
5 Suporte superior na porta
Explicação
6.2 Elementos de comando fora do aparelho de
refrigeração
N.º da
fig. 2, página 3
1 Controlo remoto para controlar a abertura da porta e regular a tem-
Explicação
peratura (opcional)
83
Page 84

PT
Instalação e ligação do aparelho de refrigeração HiPro
7 Instalação e ligação do aparelho de
refrigeração
7.1 Indicações para a instalação do aparelho de
refrigeração
Durante a instalação, preste atenção às seguintes indicações:
•
Instale o aparelho de refrigeração de forma que o ar aquecido possa sair
adequadamente (para cima ou para os lados, fig. 3, página 4).
Designação na
fig. 3, página 4
A Entrada de ar frio
B Saída de ar quente
C Condensador
D Distância acima, se não puder circular ar suficiente para cima ou
•
Mantenha uma distância mínima de 20 mm entre a unidade de refrigeração e a
parede traseira.
•
Mantenha as aberturas (aberturas de ventilação, etc.) da caixa ou da estrutura de
instalação livres de objetos.
Explicação
para o lado
7.2 Instalar o aparelho de refrigeração de forma
independente
Respeite as seguintes indicações quando quiser instalar o aparelho de refrigeração
no chão de forma independente:
•
Coloque o aparelho de refrigeração na horizontal. Verifique o alinhamento com
um nível de bolha de água.
7.3 Encastrar o aparelho de refrigeração num móvel
Respeite as seguintes indicações quando quiser encastrar o aparelho de
refrigeração num móvel:
•
Instale o aparelho de refrigeração de forma que os dois pés do aparelho
assentem na superfície de apoio.
•
A circulação do ar tem de estar desimpedida (fig. 3, página 4).
84
Page 85

PT
HiPro Instalação e ligação do aparelho de refrigeração
•
Apenas a unidade de refrigeração pode sobressair do canal de ventilação.
•
O ar no canal de ventilação não pode ser aquecido por outras fontes de calor.
Proceda da seguinte forma (fig. 4, página 5):
➤ Fixe o refletor para o controlo da abertura da porta (opcional).
➤ Aperte os pés do aparelho.
7.4 Alterar o sentido de abertura da porta
O batente da porta pode ser invertido para que a porta abra para a esquerda em vez
da direita.
OBSERVAÇÃO
I
No caso de existir um LED para controlo da abertura da porta, proceda primeiro da
seguinte forma:
➤ Puxe o LED para fora.
➤ Coloque o cabo na guia.
➤ Coloque novamente o LED no outro lado.
O LED do controlo da abertura da porta (opcional) tem de se encontrar
sempre do lado oposto do batente da porta.
Seguidamente proceda da seguinte forma (fig. 5, página 5 a fig. 9, página 7):
HiPro4000, HiPro4000 Vision (na versão com pés altos)
➤ Desaperte os pés altos.
HiPro3000, HiPro4000, HiPro6000, HiPro4000Vision
➤ Puxe as dobradiças inferiores para a frente.
➤ Puxe a porta com as dobradiças para fora.
➤ Retire os pinos das dobradiças.
➤ Coloque novamente os pinos das dobradiças no outro lado.
➤ Empurre novamente a porta com a dobradiça inferior.
OBSERVAÇÃO
I
HiPro4000Vision: Coloque a porta virada a 180°.
85
Page 86

PT
Utilização do aparelho de refrigeração HiPro
HiPro4000, HiPro4000 Vision (na versão com pés altos)
➤ Aperte novamente os pés altos.
7.5 Montar a dobradiça de arrasto
➤ Respeite as distâncias na fig. 0, página 8.
➤ Proceda tal como indicado na fig. a, página 8 a fig. b, página 9.
7.6 Colocar a placa decorativa
➤ Respeite as medidas de instalação na fig. c, página 9.
➤ Remova o anel de suporte da fechadura (opcional, fig. d, página 10).
➤ Proceda tal como indicado na fig. d, página 10 a fig. e, página 10.
8 Utilização do aparelho de refrigeração
NOTA!
•
A
Não se deve fazer uso de quaisquer aparelhos elétricos no interior
do aparelho. Como exceção são válidos os dispositivos que sejam
aprovados pelo fabricante para tal.
•
Tenha atenção para que as bebidas ou as refeições não esfriem em
demasia nos recipientes de vidro. Ao esfriar, as bebidas ou os
alimentos líquidos dilatam. Deste modo, os recipientes de vidro
podem partir.
•
Os géneros alimentícios apenas podem ser armazenados nas
embalagens originais ou recipientes adequados.
•
Tenha atenção para que no aparelho de refrigeração apenas se
encontrem objetos ou produtos que possam ser refrigerados à
temperatura selecionada.
I
86
OBSERVAÇÃO
•
Por motivos de higiene, antes de colocar o novo aparelho de
refrigeração em funcionamento, deve limpar o seu interior e exterior
com um pano húmido (ver também capítulo “Limpeza e
manutenção” na página 90).
Page 87

PT
HiPro Utilização do aparelho de refrigeração
8.1 Sugestões para poupar energia
•
Escolha um local de utilização bem arejado e protegido da irradiação solar.
•
Coloque o aparelho em funcionamento cerca de 12 horas antes da utilização.
•
Disponha as prateleiras uniformemente pelo espaço de refrigeração.
•
Deixe as refeições quentes arrefecer primeiro antes de as guardar.
•
Não abra o aparelho de refrigeração mais vezes do que as necessárias.
•
Não deixe a porta aberta durante mais tempo do que o necessário. Com a porta
aberta, a iluminação interior está sempre ligada.
•
Evite configurações da temperatura desnecessariamente baixas.
•
Ajuste a temperatura ambiente para cerca de 20 °C.
8.2 Posicionar a prateleira
➤ Proceda tal como indicado na fig. f, página 11 a fig. g, página 11.
8.3 Posicionar o suporte na porta
➤ Proceda tal como indicado na fig. h, página 11.
8.4 Ligar o aparelho de refrigeração
D
!
A
I
PERIGO! Perigo de morte!
Nunca manipule as fichas e os interruptores quando tiver as mãos
molhadas ou quando tiver os pés em pavimento molhado.
AVISO!
Ligue o aparelho de refrigeração apenas numa tomada com ligação
correta à terra.
NOTA!
A ficha de alimentação tem de estar acessível após a montagem do
aparelho de refrigeração.
OBSERVAÇÃO
O aparelho de refrigeração liga-se automaticamente quando é
conectado à rede elétrica.
87
Page 88

PT
Utilização do aparelho de refrigeração HiPro
➤ Insira a ficha na tomada.
✓ O aparelho de refrigeração inicia um autodiagnóstico. Após
aprox. 10 segundos, o LED da iluminação interior acende-se durante
2segundos.
✓ O aparelho de refrigeração está ligado.
8
OBSERVAÇÃO
I
Após a ligação, o aparelho de refrigeração necessita de alguns
segundos para atingir a temperatura de refrigeração no espaço de
refrigeração.
8.5 Regular a temperatura
O aparelho de refrigeração está equipado com uma regulação automática da
temperatura. A temperatura de refrigeração está predefinida para 5 °C.
Com o controlo remoto opcional pode alterar a predefinição para 3 °C, 5 °C, 7 °C
ou 12 °C (fig. i, página 12). Cada ver que premir o botão no controlo remoto, a
temperatura de refrigeração muda entre os valores possíveis:
➤ Antes da primeira utilização, remova o isolamento de plástico do suporte das
pilhas.
✓ Se acionar um botão, acende-se um LED vermelho no controlo remoto. Caso o
LED vermelho não acenda, deve trocar a pilha do controlo remoto.
➤ Alinhe a parte superior do cont ro lo re mo to p ar a o s L ED da ilu mi na çã o int er io r (5) .
Para isso, respeite uma distância inferior a 20 cm.
➤ Prima o botão amarelo (3) para regular a temperatura de refrigeração para 3 °C
ou 7 °C.
✓ Os LED da iluminação interior (5) piscam três vezes ou sete vezes para indicarem
a temperatura predefinida (fig. i, página 12).
➤ Prima o botão azul (4) para regular a temperatura de refrigeração para 5 °C ou
12 °C.
✓ Os LED da iluminação interior (5) piscam cinco vezes ou doze vezes para
indicarem a temperatura predefinida (fig. i, página 12).
8
OBSERVAÇÃO
I
O LED vermelho acende-se assim que for enviado um sinal. Verifique as
pilhas caso o LED não acenda.
88
Page 89

PT
HiPro Utilização do aparelho de refrigeração
8.6 Utilizar o controlo da abertura da porta
O controlo da abertura da porta (opcional) indica através de um LED
(fig. 1 4,página 2) se a porta do aparelho de refrigeração foi aberta.
Se o LED do controlo da abertura da porta estiver aceso:
➤ Abra o aparelho de refrigeração.
➤ Se necessário, encha novamente o aparelho de refrigeração.
➤ Reinicie o controlo da abertura da porta com o controlo remoto (opcional). Para
isso, prima uma vez o botão vermelho (fig. i 1, página 12).
➤ Ligue o aparelho de refrigeração.
8.7 Descongelar o aparelho de refrigeração
O aparelho de refrigeração está equipado com uma função de descongelação
automática.
A fase de descongelação realiza-se todas as 22 horas durante 2 horas.
OBSERVAÇÃO
I
A primeira fase de descongelação começa 39 horas após a ligação do
aparelho de refrigeração. Numa colocação em funcionamento diária
garante-se assim que todas as fases de descongelação se realizam
durante a noite.
8.8 Desligar o aparelho de refrigeração e colocá-lo fora
de funcionamento
Se pretender manter o aparelho de refrigeração fora de funcionamento durante um
longo período de tempo, proceda do seguinte modo:
➤ Retire a ficha da tomada.
➤ Limpe o aparelho de refrigeração (ver capítulo “Limpeza e manutenção” na
página 90).
89
Page 90

PT
Limpeza e manutenção HiPro
9 Limpeza e manutenção
NOTA! Perigo de danos!
•
A
➤ Separe o aparelho da corrente elétrica antes de iniciar a sua limpeza e
manutenção.
➤ Limpe o aparelho de refrigeração com um pano macio e água morna. Utilize um
detergente suave.
➤ Passe o aparelho de refrigeração por água limpa após a limpeza.
Limpe o aparelho de refrigeração com regularidade e logo que
esteja sujo.
•
Não limpe com sabão nem com produtos de limpeza agressivos,
granulados ou alcalinos.
•
Não utilize objetos duros na limpeza.
•
Não utilize ferramentas duras ou pontiagudas para acelerar o
processo de descongelamento.
•
Certifique-se de que não entra água nas vedações. Isto pode
danificar o sistema eletrónico.
•
Não contamine a vedação da porta com óleo ou massa lubrificante.
•
Não lubrifique posteriormente as fechaduras de cilindro (opcional).
As fechaduras de cilindro estão equipadas de fábrica com uma
lubrificação permanente.
➤ Em seguida, seque o aparelho de refrigeração com um pano.
➤ Limpe anualmente o pó da unidade de absorção com um pincel ou um pano
macio.
90
Page 91

PT
HiPro Eliminar falhas
10 Eliminar falhas
Falha Possível causa Solução
Sem refrigeração, unidade de absorção fria
Sem refrigeração, unidade de absorção
quente
Sem refrigeração, iluminação interior e controlo da abertura da
porta (opcional) piscam
permanentemente
Ficha de alimentação não inserida Inserir a ficha de alimenta-
ção na tomada
Tomada sem tensão Verificar o fusível da casa
Sistema eletrónico ou sonda do sensor avariado
Cartucho de aquecimento avariado Assistência técnica autori-
Fase de descongelação ativa (ver
capítulo “Descongelar o aparelho de
refrigeração” na página 89)
Aparelho de refrigeração não está
nivelado
Aparelho de refrigeração ligado apenas há pouco tempo
Unidade de refrigeração avariada Assistência técnica autori-
Aparelho de refrigeração não está
nivelado
Unidade bloqueada Contactar o serviço de
Unidade com fuga
Película de aquecimento avariada
Erro no autodiagnóstico
Assistência técnica autorizada: Montar novo sistema eletrónico ou
sensor
zada:
Montar novo cartucho de
aquecimento
Nenhuma ação necessária
Alinhar o aparelho de
refrigeração com um nível
de bolha de água
Verificar novamente a
refrigeração após 5 a 6
horas
zada: Substituir o aparelho de refrigeração
Alinhar o aparelho de
refrigeração com um nível
de bolha de água
assistência técnica
91
Page 92

PT
Eliminar falhas HiPro
Falha Possível causa Solução
Potência de refrigeração deficiente
Formação de gelo no
espaço de refrigeração
Unidade de refrigeração mal ventilada
Aparelho de refrigeração exposto a
radiação solar direta
A porta do aparelho de refrigeração
não fecha bem
Aparelho de refrigeração foi enchido
há pouco tempo
A porta do aparelho de refrigeração
não fecha bem
Providenciar uma ventilação suficiente (fig. 3,
página 4)
Retirar o aparelho de refrigeração da radiação solar
direta
Verificar as distâncias
(fig. 0, página 8)
Assistência técnica autorizada:
Substituir a vedação da
porta
Verificar novamente a
refrigeração após 5 a 6
horas
Verificar as distâncias
(fig. 0, página 8)
Assistência técnica autorizada:
Substituir a vedação da
porta
92
Page 93

PT
HiPro Garantia
11 Garantia
É válido o prazo de garantia legal. Se o produto estiver com defeito, por favor,
dirija-se à representação do fabricante no seu país (endereços, ver verso do manual)
ou ao seu revendedor.
Para fins de reparação ou de garantia, terá de enviar os seguintes documentos em
conjunto:
•
uma cópia da factura com a data de aquisição,
•
um motivo de reclamação ou uma descrição da falha.
12 Eliminação
AVISO! Perigo para crianças!
!
➤ Sempre que possível, coloque o material de embalagem no respectivo
contentor de reciclagem.
Antes de proceder à eliminação do seu aparelho de refrigeração usado:
•
Retire as portas.
•
Deixe ficar as prateleiras no aparelho de refrigeração para que as
crianças não subam para dentro do aparelho.
M
Para colocar o aparelho definitivamente fora de funcionamento, por
favor, informe-se junto do centro de reciclagem mais próximo ou
revendedor sobre as disposições de eliminação aplicáveis.
93
Page 94

PT
Dados técnicos HiPro
13 Dados técnicos
HiPro3000 HiPro4000
Volume útil: 26 l 34 l 48 l
Classe de climatização: SN
Temperatura ambiente: +10 °C a +32 °C
Classe de eficiência energética:
Consumo de energia
(kWh/ano):
Tensão de entrada: 230 a 240 V 230 V
Frequência de entrada: 60 Hz
Potência nominal de entrada: 65 W 80 W
Emissões acústicas: 0 dB
Propulsor: Ciclopentano
Agente de refrigeração: Amoníaco
Dimensões: fig. j, página 13
Peso: 12kg 13,5kg 17kg
207 237 270 254
CD
HiPro4000
Vision
HiPro6000
Pode obter a atual declaração de conformidade UE para o seu aparelho na respetiva
página do produto, em dometic.com, ou diretamente através do fabricante (ver
verso).
94
Page 95

IT
HiPro Spiegazione dei simboli
Prima di effettuare il montaggio e la messa in funzione leggere
accuratamente questo manuale di istruzioni, conservarlo e in caso di
trasmissione del prodotto, consegnarlo all'utente successivo.
Indice
1 Spiegazione dei simboli . . . . . . . . . . . . . . . . . . . . . . . . . . . . . . . . . . . . . . . . 95
2 Istruzioni per la sicurezza . . . . . . . . . . . . . . . . . . . . . . . . . . . . . . . . . . . . . . . 96
3 Dotazione . . . . . . . . . . . . . . . . . . . . . . . . . . . . . . . . . . . . . . . . . . . . . . . . . . . 98
4 Accessori . . . . . . . . . . . . . . . . . . . . . . . . . . . . . . . . . . . . . . . . . . . . . . . . . . . . 98
5 Conformità d’uso . . . . . . . . . . . . . . . . . . . . . . . . . . . . . . . . . . . . . . . . . . . . . 98
6 Descrizione tecnica. . . . . . . . . . . . . . . . . . . . . . . . . . . . . . . . . . . . . . . . . . . . 99
7 Installazione e allacciamento del frigorifero. . . . . . . . . . . . . . . . . . . . . . . . .100
8 Impiego del frigorifero . . . . . . . . . . . . . . . . . . . . . . . . . . . . . . . . . . . . . . . . .103
9 Pulizia e cura . . . . . . . . . . . . . . . . . . . . . . . . . . . . . . . . . . . . . . . . . . . . . . . . .106
10 Eliminazione dei guasti . . . . . . . . . . . . . . . . . . . . . . . . . . . . . . . . . . . . . . . . .107
11 Garanzia . . . . . . . . . . . . . . . . . . . . . . . . . . . . . . . . . . . . . . . . . . . . . . . . . . . .109
12 Smaltimento . . . . . . . . . . . . . . . . . . . . . . . . . . . . . . . . . . . . . . . . . . . . . . . . .109
13 Specifiche tecniche. . . . . . . . . . . . . . . . . . . . . . . . . . . . . . . . . . . . . . . . . . . . 110
1 Spiegazione dei simboli
AVVERTENZA!
!
!
A
Avviso di sicurezza: la mancata osservanza di questo avviso può causare
ferite gravi anche mortali.
ATTENZIONE!
Avviso di sicurezza: la mancata osservanza di questo avviso può
essere causa di lesioni.
AVVISO!
La mancata osservanza di questa nota può causare danni materiali e
compromettere il funzionamento del prodotto.
95
Page 96

IT
Istruzioni per la sicurezza HiPro
NOTA
I
Informazioni integranti relative all'impiego del prodotto.
2 Istruzioni per la sicurezza
Il produttore non si assume nessuna responsabilità per danni nei seguenti casi:
•
errori di montaggio o di allacciamento
•
danni al prodotto dovuti a influenze meccaniche o a un'errata tensione di
allacciamento
•
modifiche al prodotto senza esplicita autorizzazione del produttore
•
impiego per altri fini rispetto a quelli descritti nel manuale di istruzioni
2.1 Sicurezza generale
AVVERTENZA!
•
!
Non aprire mai il gruppo assorbitore perché è sotto alta pressione e,
se aperto, può causare lesioni.
•
Nell’apparecchio non conservare sostanze esplosive come ad es.
bombolette spray con gas propellente infiammabile.
•
Il refrigerante nel circuito di raffreddamento è facilmente infiammabile.
In caso di danni al circuito di raffreddamento (odore di ammoniaca):
– Spegnere l’apparecchio.
– Evitare fiamme libere e scintille.
•
Aerare bene l’ambiente.
•
Se l’apparecchio presenta danni visibili, non metterlo in funzione.
•
Se il cavo di collegamento di questo apparecchio è danneggiato, per
evitare pericoli, deve essere sostituito dal produttore, dal suo servizio
assistenza clienti oppure da personale qualificato.
•
Questo apparecchio può essere riparato solo da personale
specializzato. Riparazioni eseguite non a regola d’arte possono
causare ingenti pericoli.
•
Il presente apparecchio può essere usato sia da bambini dagli 8 anni
in su, sia da persone con ridotte capacità fisiche, sensoriali o mentali o
con poca esperienza o conoscenze, se non lasciati soli o se istruiti
sull’utilizzo sicuro dell’apparecchio e se in grado di capire i pericoli
che possono sorgere.
96
Page 97

IT
HiPro Istruzioni per la sicurezza
•
La pulizia e la manutenzione da parte dell’utente non possono essere
eseguite da bambini se non in presenza di un adulto.
•
Controllare che i bambini non giochino con l’apparecchio.
ATTENZIONE!
•
!
A
Pericolo di schiacciamento! Non mettere le dita nella cerniera.
•
Prima della messa in funzione, assicurarsi che la linea di alimentazione
e la spina siano asciutte.
•
I generi alimentari possono essere conservati solo nelle confezioni
originali o in contenitori adatti.
AVVISO!
•
Non aprire in nessun caso il circuito di raffreddamento.
•
Non montare l’apparecchio nelle vicinanze di fiamme libere o altre
fonti di calore (riscaldamento, forni a gas, ecc.).
•
Confrontare i dati della tensione riportati sulla targhetta con quelli
delle prese e degli attacchi disponibili.
•
Collegare l’apparecchio alla rete di alimentazione in corrente
alternata utilizzando solo il cavo di collegamento previsto.
•
Non estrarre mai la spina dalla presa tirando il cavo di collegamento.
•
Non conservare materiali corrosivi o solventi in frigorifero.
•
Utilizzare solo cavi con una sezione adatta.
•
Mantenere l’apertura di scarico per l’acqua di condensa sempre
pulita.
2.2 Sicurezza durante il funzionamento del frigorifero
AVVISO!
•
A
Non utilizzare apparecchi elettrici all’interno del frigorifero, ad
eccezione di quelli consigliati dal produttore.
•
Pericolo di surriscaldamento!
Assicurarsi sempre che il calore generato durante il funzionamento
possa disperdersi a sufficienza. Fare in modo che la distanza fra
l’apparecchio e le pareti o altri oggetti sia tale da permettere all’aria di
circolare liberamente.
•
Il gruppo assorbitore durante il funzionamento si surriscalda. Non
toccare il gruppo assorbitore!
•
Fare attenzione che le aperture di aerazione non vengano coperte.
97
Page 98

IT
Dotazione HiPro
•
Non versare nessun tipo di liquido o ghiaccio nel contenitore interno.
•
Non immergere mai l’apparecchio in acqua.
•
Proteggere l’apparecchio e i cavi dal caldo e dall’umidità.
•
Fare attenzione che gli alimenti non entrino in contatto con le pareti
del vano frigorifero.
3Dotazione
Quantità Descrizione
1 Minibar
2 Ripiani
2 Ripiani porta (non per HiPro 4000Vision)
1 Manuale di istruzioni di montaggio e d’uso
4Accessori
Disponibili come accessori (non in dotazione):
Descrizione Spiegazione
Controllo remoto Per il controllo apertura porta e regolazione della temperatura
Riflettore Per il controllo dell’apertura porta
Chiavi Per versioni con serratura
Cerniera a traino Per l’apertura contemporanea della porta del mobile e quella del fri-
gorifero
Copertura del
gruppo e dei piedini
alti dell’apparecchio
Per HiPro4000 e HiPro 4000Vision, come variante a posizionamento libero
5Conformità d’uso
Il minibar è realizzato per il funzionamento in edifici chiusi ad es.:
•
in cucine per il personale in negozi, uffici e altri campi professionali
•
in agricoltura
•
in hotel, motel o altre tipologie di alloggi
98
Page 99

IT
HiPro Descrizione tecnica
•
in bad & breakfast
•
nel catering e impieghi simili nel commercio all’ingrosso
Il minibar non è adatto per essere montato in camper, caravan o imbarcazioni.
Il minibar è realizzato per essere montato in mobili o cucine componibili. Una volta
montato, deve essere accessibile solo la parte anteriore dell’apparecchio.
I minibar HiPro4000 e HiPro 4000Vision possono essere anche allestiti liberamente
sul pavimento se la copertura del gruppo disponibile come opzione è applicata sul
lato posteriore e se i piedini alti dell’apparecchio sono montati.
Il minibar è adatto esclusivamente per raffreddare e conservare bevande e generi
alimentari in contenitori chiusi.
Il minibar non è adatto per la conservazione di generi alimentari facilmente
deperibili.
AVVERTENZA!
!
!
Questo apparecchio non è previsto per la corretta conservazione di
medicinali.
ATTENZIONE! Pericolo per la salute!
Accertarsi che la capacità di raffreddamento del dispositivo sia
conforme ai requisiti degli alimenti da raffreddare.
6 Descrizione tecnica
Il minibar è un frigorifero ad assorbimento. Come refrigerante viene utilizzata
l’ammoniaca. Tutti i materiali utilizzati sono sicuri per gli alimenti. Il circuito di
raffreddamento è esente da manutenzione.
Il minibar (eccetto HiPro4000 Vision) dispone di due ripiani e due ripiani porta. Un
ripiano porta è previsto per le bottiglie. Nel ripiano portabottiglie della porta è
possibile mettere bottiglie da 1,5 l. Il secondo ripiano porta è previsto per bottiglie
più piccole o snack.
Il minibar HiPro4000Vision dispone di due ripiani e una porta in vetro acrilico
trasparente senza ripiani porta.
Come opzione, i minibar HiPro4000 e HiPro 4000Vision con copertura del gruppo
e piedini alti possono essere utilizzati come variante a posizionamento libero.
99
Page 100

IT
Installazione e allacciamento del frigorifero HiPro
6.1 Elementi di comando sul frigorifero
N. in
fig. 1, pagina 2
1 Illuminazione interna
2 LED del controllo apertura porta (opzionale)
3 Ripiani
4 Ripiano porta inferiore
5 Ripiano porta superiore
Spiegazione
6.2 Elementi di comando non posizionati sul frigorifero
N. in
fig. 2, pagina 3
1 Controllo remoto per il controllo apertura porta e regolazione della
Spiegazione
temperatura (opzionale)
7 Installazione e allacciamento del
frigorifero
7.1 Indicazioni sull’installazione del frigorifero
Per l’installazione osservare le seguenti indicazioni:
•
Installare il frigorifero in modo tale da permettere all’aria riscaldata di uscire senza
difficoltà (o verso l’alto o lateralmente, fig. 3, pagina 4).
Descrizione nella
fig. 3, pagina 4
A Aria fredda di alimentazione
B Aria calda di scarico
C Condensatore
D Distanza al di sopra, se non vi è un sufficiente ricircolo dell’aria di
Spiegazione
scarico verso l’alto o lateralmente.
100
 Loading...