

Dometic HC502 Series, HC302 Series, HC302FS, HC502FS, HC302BIU Installation And Operating Manual
...Page 1

Health care refrigerator
EN
DE
FR
NL
Installation and Operating Manual. . . 8
Medikamentenkühlschrank
Montage- und Bedienungsanleitung 24
Réfrigérateur pour
médicaments
Instructions de montage
et de service . . . . . . . . . . . . . . . . . . 42
Medicamentenkoelkast
Montagehandleiding en
gebruiksaanwijzing . . . . . . . . . . . . . 58
HC302, HC502
Page 2

HC302, HC502
1
2
HC302FS
HC502FS
1
4
3
2
5
6
HC302BIU
HC502BIU
3
7
8
21
3
4
2
Page 3
HC302, HC502
3
4
EN: chapter 6.3
DE: Kapitel 6.3
FR: chapitre 6.3
NL: hoofdstuk 6.3
ADCB
2
1
2
2
2
1
1
!
1
m
i
°
n
0
.
0
1
3
Page 4
HC302, HC502
5
EN: chapter 6.3
DE: Kapitel 6.3
FR: chapitre 6.3
NL: hoofdstuk 6.3
6
EN: chapter 6.3
DE: Kapitel 6.3
FR: chapitre 6.3
NL: hoofdstuk 6.3
!
!
4
Page 5

HC302, HC502
7
8
3.
2.
1.
1.
2.
4.
1.
3.
5
Page 6
HC302, HC502
9
CD
AB
0
2 2 3
A
1
B
C
4
6
Page 7

HC302, HC502
820
422 FS: 450; BIU: 440
540
580
HC302
!
a
EN: chapter 6.3
DE: Kapitel 6.3
FR: chapitre 6.3
NL: h oo f ds t uk 6 .3
HC502
948
486 FS: 494; BIU: 484
552
592
!
b
EN: chapter 6.3
DE: Kapitel 6.3
FR: chapitre 6.3
NL: hoofdstuk 6.3
7
Page 8

EN
HC302, HC502
Please read this instruction manual carefully before installation and
first use, and store it in a safe place. If you pass on the product to
another person, hand over this instruction manual along with it.
Table of contents
1 Explanation of symbols . . . . . . . . . . . . . . . . . . . . . . . . . . . . . . . . . . . 9
2 Safety instructions . . . . . . . . . . . . . . . . . . . . . . . . . . . . . . . . . . . . . . . 9
3 Scope of delivery . . . . . . . . . . . . . . . . . . . . . . . . . . . . . . . . . . . . . . . 12
4 Intended use . . . . . . . . . . . . . . . . . . . . . . . . . . . . . . . . . . . . . . . . . . 12
5 Technical description . . . . . . . . . . . . . . . . . . . . . . . . . . . . . . . . . . . . 13
6 Installing and connecting the refrigerator. . . . . . . . . . . . . . . . . . . . . 14
7 Using the refrigerator . . . . . . . . . . . . . . . . . . . . . . . . . . . . . . . . . . . . 16
8 Cleaning and maintenance . . . . . . . . . . . . . . . . . . . . . . . . . . . . . . . 20
9 Troubleshooting . . . . . . . . . . . . . . . . . . . . . . . . . . . . . . . . . . . . . . . . 21
10 Warranty . . . . . . . . . . . . . . . . . . . . . . . . . . . . . . . . . . . . . . . . . . . . . 22
11 Disposal . . . . . . . . . . . . . . . . . . . . . . . . . . . . . . . . . . . . . . . . . . . . . . 22
12 Technical data . . . . . . . . . . . . . . . . . . . . . . . . . . . . . . . . . . . . . . . . . 23
8
Page 9

EN
HC302, HC502 Explanation of symbols
1 Explanation of symbols
DANGER!
D
!
!
A
I
➤ Action: This symbol indicates that action is required on your part. The
required action is described step-by-step.
Safety instruction: Failure to observe this instruction will cause
fatal or serious injury.
WARNING!
Safety instruction: Failure to observe this instruction can cause
fatal or serious injury.
CAUTION!
Safety instruction: Failure to observe this instruction can lead to
injury.
NOTICE!
Failure to observe this instruction can cause material damage and
impair the function of the product.
NOTE
Supplementary information for operating the product.
✓ This symbol describes the result of an action.
Fig. 1 5, page 3: This refers to an element in an illustration. In this case,
item 5 in figure 1 on page 3.
2 Safety instructions
The manufacturer accepts no liability for damage in the following cases:
Faulty assembly or connection
Damage to the product resulting from mechanical influences and excess
voltage
Alterations to the product without express permission from the manu-
facturer
Use for purposes other than those described in the operating manual
9
Page 10

EN
Safety instructions HC302, HC502
2.1 General safety
WARNING!
!
Do not operate the device if it is visibly damaged.
If this device's power cable is damaged, it must be replaced by
customer service or a similarly qualified person in order to
prevent safety hazards.
This device should be repaired by qualified person only.
Inadequate repairs may cause serious hazards.
This device can be used by children aged 8 years or over, as
well as by persons with diminished physical, sensory or mental
capacities or a lack of experience and knowledge, providing
they are supervised, or have been taught how to use the device
safely and are aware of the resulting risks.
Cleaning and user maintenance must not be carried out by
children without supervision.
Children must be supervised to ensure that they do not play with
the device.
Always keep and use the device out of the reach of children
under 8 years of age.
Do not store any explosive substances, such as spray cans with
propellants, in the device.
A
10
NOTICE!
Check that the voltage specification on the type plate is the
same as that of the power supply.
Never pull the plug out of the socket by the connection cable.
The refrigerator is not suitable for storing substances which are
caustic or contain solvents.
Keep the drainage outlet clean at all times.
Do not open the refrigerant circuit under any circumstances.
Never transport the device in a horizontal position, so that no oil
can leak out of the compressor.
Make sure that the refrigerator circuit is not damaged during
transportation.
Set up the device in a dry location where it is protected against
splashing water.
Page 11

EN
HC302, HC502 Safety instructions
2.2 Operating the device safely
DANGER!
D
!
A
Do not touch exposed cables.
CAUTION!
Before starting the device, ensure that the power supply line
and the plug are dry.
NOTICE!
Do not use electrical devices inside the cooling device unless
they are recommended by the manufacturer for that purpose.
Do not place it near naked flames or other heat sources
(heaters, direct sunlight, gas ovens etc.)
Danger of overheating!
Always ensure sufficient ventilation so that the heat generated
during operation can dissipate. Make sure that the device is
sufficiently far away from walls and other objects so that the air
can circulate (fig. 3, page 3).
Ensure that the ventilation vents are not covered.
The device shall not be exposed to rain.
Never immerse the appliance in water.
Protect the appliance and power cable against heat and mois-
ture.
Make sure that the stored substances do not touch the walls of
the cooling area.
11
Page 12

EN
Scope of delivery HC302, HC502
3 Scope of delivery
Quantity Description
1 Refrigerator
1 Handle
1 Battery (CR1632)
1 Installation and operating manual
These instructions are also available in PDF format (e.g. on the
manufacturer‘s website).
4 Intended use
The refrigerator is designed to store medicaments and medical products
which may be stored at temperatures +2 °C and +8 °C.
CAUTION!
!
The refrigerator is not suitable for the storage of blood.
12
Page 13

EN
HC302, HC502 Technical description
5 Technical description
5.1 Function description
All materials used in the refrigerator are compatible for use with medicines.
The refrigerant circuit is maintenance-free.
The refrigerator is available as freestanding version (FS) and as built-in
version (BIU).
The freestanding version (HC302FS, HC502FS) is intended for freestanding
use. The cooling unit cover protects the warm parts of the cooling units. The
foot frame with ventilation openings ensure sufficient ventilation. By removing the foot frame and cooling unit cover the refrigerator can be used as a
built-in version.
The built-in version (HC302BIU, HC 502BIU) is intended to be mounted into
furniture. It doesn‘t have a foot frame or cooling unit cover.
The digital thermometer shows and stores the minimum and maximum inner
temperatures from the last reset so that you can check whether the medicines have been stored at the appropriate temperatures.
5.2 Control elements
No. in
fig. 1,
page 2
1 Door lock
2 Door
3 Digital thermometer (see fig. 2, page 2)
4 Cooling unit cover
5Drawers
6 Interior light
7Fan
8 Foot frame
Explanation
13
Page 14

EN
Installing and connecting the refrigerator HC302, HC502
Key to fig. 2, page 2
No. Explanation
1 Current inner temperature (in °C)
2 Minimum inner temperature (in °C)
3 Maximum inner temperature (in °C)
4 Reset button
6 Installing and connecting the
refrigerator
6.1 Unpacking the refrigerator
➤ Check that the packaging in not damaged.
➤ Remove the cardboard packaging.
➤ Check that the refrigerator is not damaged.
If you find damage on the packaging or at the refrigerator resulting from
transport, report it immediately to the transportation firm.
6.2 Installing freestanding version
Observe the following instructions when installing:
Install the refrigerator so that the warm air produced can easily flow away,
either upwards or to the sides.
Leave the device to stand for at least four hours before you connect it
to the power supply so that the refrigerant can flow back into the
compressor.
➤ Place the refrigerator at the chosen place.
14
Page 15

EN
HC302, HC502 Installing and connecting the refrigerator
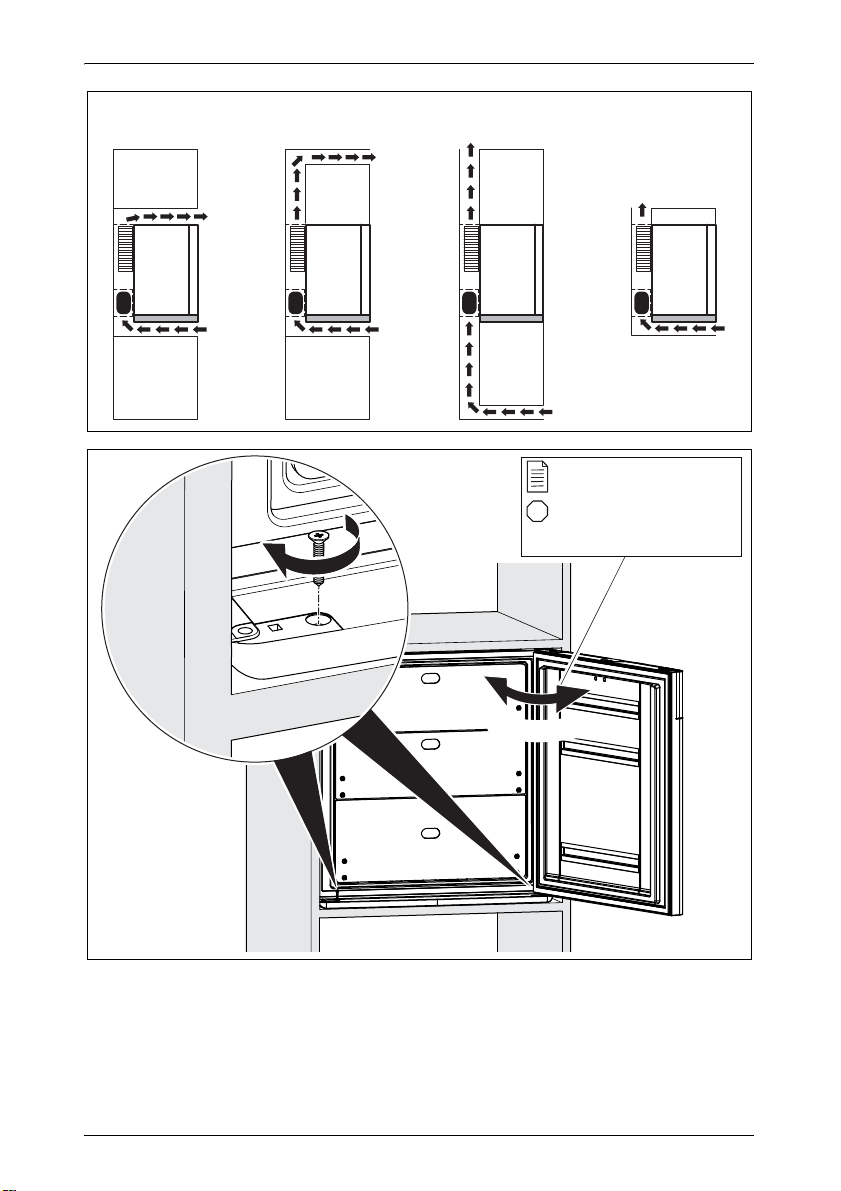
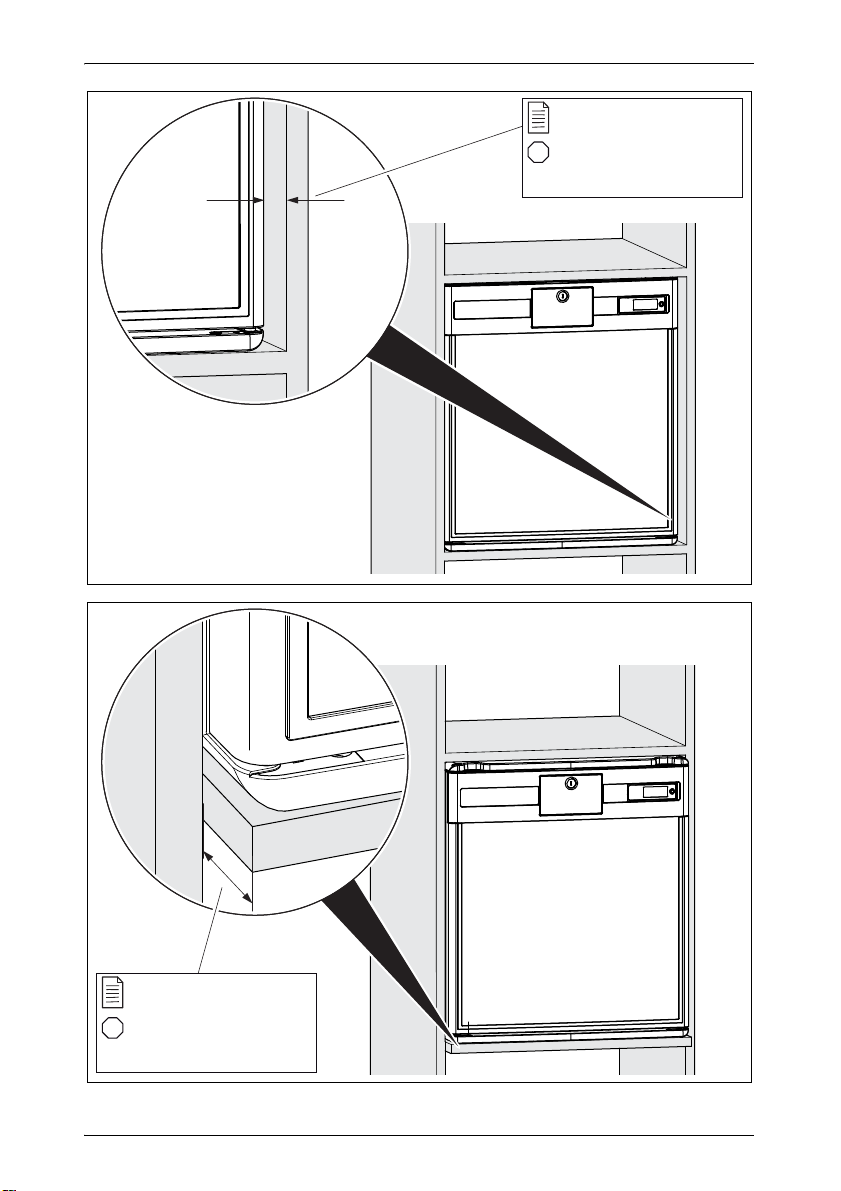
6.3 Installing built-in version
Observe the following instructions when installing:
Install the refrigerator so that the warm air produced can easily flow away
(either upwards or to the front, fig. 3, page 3).
Key to fig. 3, page 3
No. Explanation
1 Cold intake air
2 Hot waste air
Leave the device to stand for at least four hours before you connect it
to the power supply so that the refrigerant can flow back into the
compressor.
Make sure that the refrigerator door is able to open at least 100°. Other-
wise the drawers cannot be used.
➤ Mount the refrigerator to the furniture by two screws through the fittings at
the bottom (fig. 4, page 3).
6.4 Connecting the refrigerator to the power supply
NOTICE!
A
➤ Connect the plug of the connection cable into the AC mains.
➤ Insert the battery into the thermometer (see chapter “Replacing the
battery of the thermometer” on page 17).
✓ The display turns on.
For the first two seconds the display will not show temperature values; it
shows “--.-”. Then the temperature read from the sensor is shown.
UK only: The refrigerator is supplied with a plug fitted with 3 A
fuse. In case this fuse has to be to changed, a 3 A ASTA
approved (BS 1362) fuse must be used.
15
Page 16

EN
Using the refrigerator HC302, HC502
6.5 Mounting and removing the door handle
➤ Mount the handle as shown (fig. 7, page 5).
➤ Remove the handle as shown (fig. 8, page 5).
7 Using the refrigerator
NOTE
I
7.1 Energy saving tips
Choose a well ventilated location which is protected from direct sunlight.
Do not open the refrigerator more often than necessary.
Do not leave the doors open for longer than necessary.
Defrost your refrigerator as soon as a layer of ice forms.
Before starting your new refrigerator for the first time, you
should clean it inside and outside with a damp cloth for
hygienic reasons (please also refer to the chapter “Cleaning
and maintenance” on page 20).
Always leave some space between the medicaments in the
cabinet to ensure efficient and even cooling. If the drawers are
packed too tightly there may be unacceptable temperature
values.
7.2 Using the refrigerator
NOTE
I
After the first start, after replacing the battery or after switching off the
refrigerator for a longer time the display of the digital thermometer (fig. 2,
page 2) shows the current ambient temperature. When the inner temperature
reaches the operating range the thermometer should be reset to avoid showing wrong maximum temperature value.
➤ Press the reset button (fig. 2 4, page 2) for 5 s.
The temperature values are shown in °C. This cannot be
changed.
16
Page 17

EN
HC302, HC502 Using the refrigerator
The thermometer has a blue backlight which makes the temperature values
easier to read.
➤ Press the reset button (fig. 2 4, page 2) briefly.
✓ The blue backlight lights for 2 s.
The thermometer stores the values of the minimum and maximum inner
temperature since the last reset. These values are deleted when the thermometer is reset or the battery is changed.
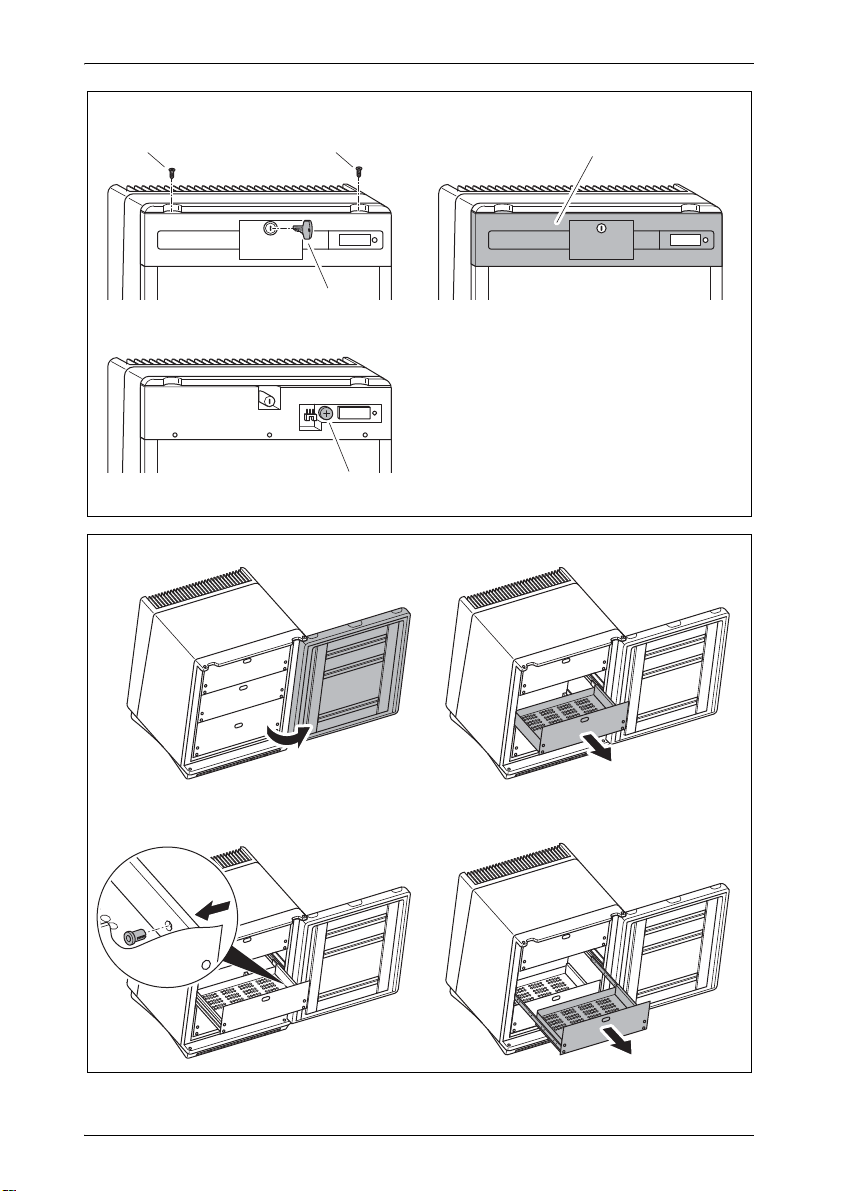
7.3 Replacing the battery of the thermometer
Replace the battery of the thermometer as follows (fig. 9, page 6):
➤ Pull the key (1) from the lock.
➤ Remove the lock cover rosette using two standard screwdrivers.
➤ Remove both screws (2) from front panel.
➤ Push the front panel (3) a bit upwards and remove it by slightly pulling.
➤ Remove the battery (4).
NOTICE!
A
➤ Insert the new battery (CR1632) in its holder.
Make sure the polarity is correct (the “+” must face up).
➤ Remount the front panel and lock cover rosette in reversed order.
17
Page 18

EN
Using the refrigerator HC302, HC502
7.4 Defrosting the refrigerator
NOTE
I
Humidity can cause frost to form in the interior of the refrigerator or on the
vaporiser.
A slight layer of frost or water droplets could form in the interior of the
refrigerator if it has been cooling for longer periods. This is normal because
the moisture in the air condenses to water when the temperature in the refrigerator drops. The refrigerator is not defective.
The condensate flows out through a water drain duct into a water container
at the back of the unit at top of the compressor, where it evaporates.
It is recommended to defrost the refrigerator every three weeks.
Proceed as follows:
➤ Disconnect the refrigerator from the AC mains.
➤ Remove the drawers (see chapter “Removing the drawers” on page 19).
In high ambient temperatures, the refrigerator may operate
continuously, which can lead to excessive formation of frost on
the rear wall of the refrigerator compartment.
➤ Leave the door open.
➤ After defrosting wiped out the cabinet interior with a clean, damp cloth.
➤ Assemble the drawers.
7.5 Switching off and storing the refrigerator
If you do not intend to use the refrigerator for a long time, proceed as follows:
➤ Disconnect the plug.
➤ Clean the refrigerator (see chapter “Cleaning and maintenance” on
page 20).
➤ Leave the door slightly open.
This prevents smells from building up.
18
Page 19

EN
HC302, HC502 Using the refrigerator
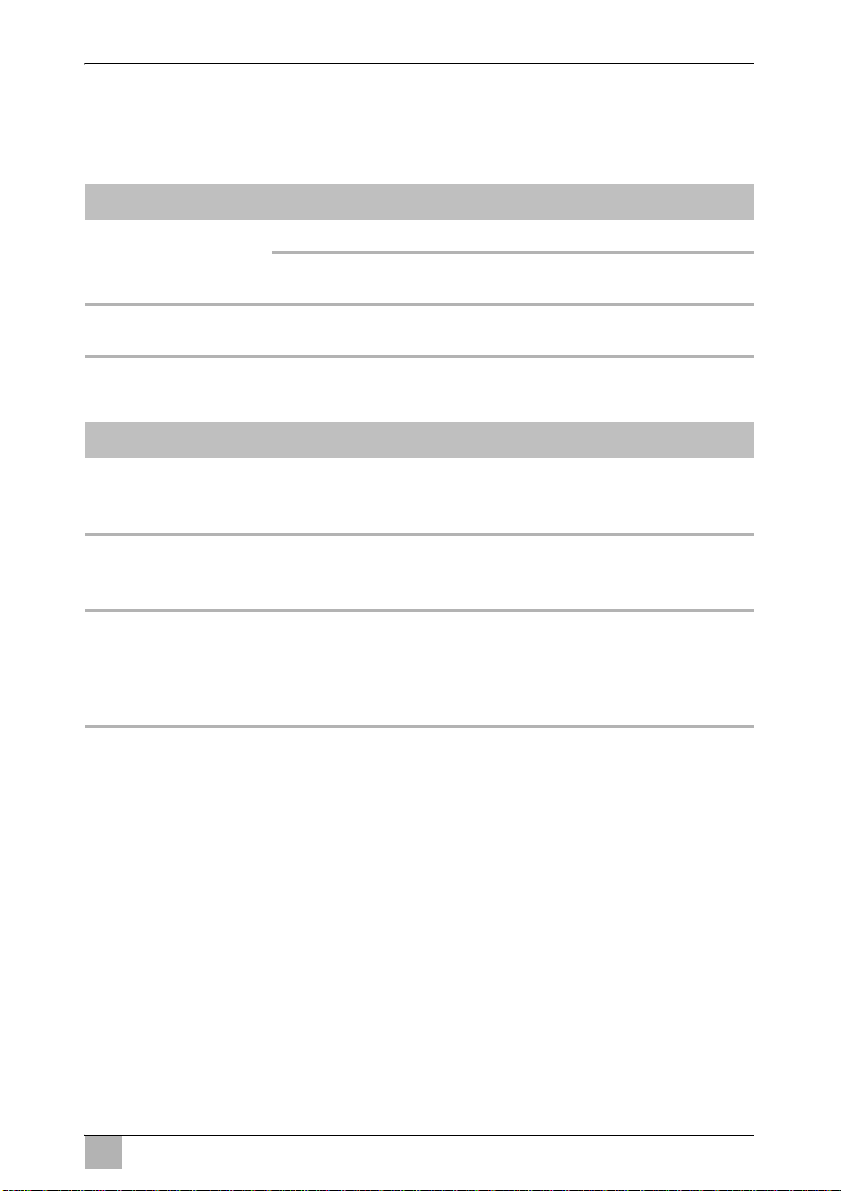
7.6 Removing the drawers
You can remove the drawers, e.g for cleaning.
Proceed as follows (fig. 0, page 6):
➤ Open the door (A).
➤ Pull out the drawer (B).
➤ Push the fixing pins from the outside to the inside (C)
➤ Remove the drawer (D)
➤ Assemble the drawers in reverse order.
19
Page 20

EN
Cleaning and maintenance HC302, HC502
8 Cleaning and maintenance
WARNING!
!
A
➤ Clean the refrigerator regularly and as soon as it becomes dirty with a
damp cloth.
➤ Make sure that no water drips into the seals. This can damage the
electronics.
➤ Wipe the refrigerator dry with a cloth after cleaning.
➤ Check the condensate drain regularly.
Clean the condensate drain when necessary. If it is blocked the
condensate collects on the bottom of the refrigerator.
Always disconnect the refrigerator from the mains before you
clean and service it.
NOTICE!
Do not use abrasive cleaning agents or hard objects during
cleaning as these can damage the refrigerator.
Never use hard or sharp tools to remove ice or to free objects
frozen onto the device.
Do not use any mechanical tools or any other tools to speed
up the defrosting process.
➤ Regularly clean the door seals.
➤ Freestanding version: Clean the grid of the condenser and the
compressor on the back of the device with a vacuum cleaner regularly.
20
Page 21
EN
HC302, HC502 Troubleshooting
9 Troubleshooting
Water in or under the refrigerator
Fault Possible cause Remedy
Water is leaking into the
inside of the refrigerator.
Water is leaking onto the
floor.
Display signals
Signal Explanation
General error
The display blinks each
second.
Sensor failure
The display blinks and
shows “E1”.
Low battery
The display blinks and
shows “E2” alternately
with the current temperature.
The condensate drain duct is clogged. Clean the drain.
Medicines are preventing the water
from flowing to the collector.
There is too much water in the water
container.
The display shows alternately the current inner temperature and
the active error code (fig. 2 1, page 2) (E1 or E2, see below).
The minimum and maximum values will be kept as the last known
values.
The minimum and maximum inner temperatures are still visible
and will be updated from the current inner temperature reading.
Make sure that medicines
do not touch the rear wall.
Clean the water container.
21
Page 22

EN
Warranty HC302, HC502
10 Warranty
The statutory warranty period applies. If the product is defective, please
contact the manufacturer's branch in your country (see the back of the
instruction manual for the addresses) or your retailer.
For repair and guarantee processing, please include the following documents when you send in the device:
A copy of the receipt with purchasing date
A reason for the claim or description of the fault
11 Disposal
WARNING! Children beware!
!
A
Before disposing of your old refrigerator:
Dismantle the drawers.
Leave the drawers in the refrigerator so that children cannot
climb inside.
NOTICE!
An insulating gas is used in the device (see type plate). Check
with the relevant local government authority or your local waste
disposal company about proper disposal and make sure that the
device and all materials are disposed of professionally.
➤ Place the packaging material in the appropriate recycling waste bins
wherever possible.
If you wish to finally dispose of the product, ask your local recycling
centre or specialist dealer for details about how to do this in
M
22
accordance with the applicable disposal regulations.
Page 23
EN
HC302, HC502 Technical data
12 Technical data
HC302 HC502
Gross capacity: 33 l 49 l
Capacity: 29 l 43 l
Connection voltage: 220 – 240 V
Energy consumption: 0.42 kWh/24 h 0.44 kWh/24 h
Power consumption: 0.54 A
Cooling capacity: +2 °C to +8 °C
Climatic class: SN
Refrigerant: R134a
Refrigerant quantity: 38 g
Dimensions: see fig. a, page 7 see fig. b, page 7
Weight: approx. 20 kg approx. 22 kg
Inspection/certification:
Complies with the following EEC directives:
LVD directive: 2006/95/EC
EMC directive: 2004/108/EC
CE directive: 93/68/EC
RoHS directive: 2002/95/EC
WEEE directive: 2002/96/EC
23
Page 24

DE
HC302, HC502
Bitte lesen Sie diese Anleitung vor Einbau und Inbetriebnahme sorgfältig durch und bewahren Sie sie auf. Geb e n Sie sie im Fall e ei ne r
Weitergabe des Produktes an den Nutzer weiter.
Inhaltsverzeichnis
1 Erklärung der Symbole . . . . . . . . . . . . . . . . . . . . . . . . . . . . . . . . . . 25
2 Sicherheitshinweise . . . . . . . . . . . . . . . . . . . . . . . . . . . . . . . . . . . . . 26
3 Lieferumfang . . . . . . . . . . . . . . . . . . . . . . . . . . . . . . . . . . . . . . . . . . 28
4 Bestimmungsgemäßer Gebrauch . . . . . . . . . . . . . . . . . . . . . . . . . . 29
5 Technische Beschreibung . . . . . . . . . . . . . . . . . . . . . . . . . . . . . . . . 29
6 Kühlschrank aufstellen und anschließen . . . . . . . . . . . . . . . . . . . . . 31
7 Kühlschrank benutzen . . . . . . . . . . . . . . . . . . . . . . . . . . . . . . . . . . . 33
8 Reinigung und Pflege. . . . . . . . . . . . . . . . . . . . . . . . . . . . . . . . . . . . 38
9 Störungen beseitigen . . . . . . . . . . . . . . . . . . . . . . . . . . . . . . . . . . . . 39
10 Gewährleistung . . . . . . . . . . . . . . . . . . . . . . . . . . . . . . . . . . . . . . . . 39
11 Entsorgung. . . . . . . . . . . . . . . . . . . . . . . . . . . . . . . . . . . . . . . . . . . . 40
12 Technische Daten . . . . . . . . . . . . . . . . . . . . . . . . . . . . . . . . . . . . . . 41
24
Page 25

DE
HC302, HC502 Erklärung der Symbole
1 Erklärung der Symbole
GEFAHR!
D
!
!
A
I
➤ Handlung: Dieses Symbol zeigt Ihnen, dass Sie etwas tun müssen. Die
erforderlichen Handlungen werden Schritt für Schritt beschrieben.
Sicherheitshinweis: Nichtbeachtung führt zu Tod oder schwerer
Verletzung.
WARNUNG!
Sicherheitshinweis: Nichtbeachtung kann zu Tod oder schwerer
Verletzung führen.
VORSICHT!
Sicherheitshinweis: Nichtbeachtung kann zu Verletzungen
führen.
ACHTUNG!
Nichtbeachtung kann zu Materialschäden führen und die
Funktion des Produktes beeinträchtigen.
HINWEIS
Ergänzende Informationen zur Bedienung des Produktes.
✓ Dieses Symbol beschreibt das Ergebnis einer Handlung.
Abb. 1 5, Seite 3: Diese Angabe weist Sie auf ein Element in einer Abbil-
dung hin, in diesem Beispiel auf „Position 5 in Abbildung 1 auf Seite 3“.
25
Page 26

DE
Sicherheitshinweise HC302, HC502
2 Sicherheitshinweise
Der Hersteller übernimmt in folgenden Fällen keine Haftung für Schäden:
Montage- oder Anschlussfehler
Beschädigungen am Produkt durch mechanische Einflüsse und Über-
spannungen
Veränderungen am Produkt ohne ausdrückliche Genehmigung vom
Hersteller
Verwendung für andere als die in der Anleitung beschriebenen Zwecke
2.1 Allgemeine Sicherheit
WARNUNG!
!
Wenn der Kühlschrank sichtbare Beschädigungen aufweist,
dürfen Sie ihn nicht in Betrieb nehmen.
Wenn das Anschlusskabel dieses Kühlschrankes beschädigt
wird, muss es durch seinen Kundendienst oder eine ähnlich
qualifizierte Person ersetzt werden, um Gefährdungen zu vermeiden.
Reparaturen an diesem Kühlschrank dürfen nur von Fach-
kräften durchgeführt werden. Durch unsachgemäße
Reparaturen können erhebliche Gefahren entstehen.
Dieser Kühlschrank kann von Kindern ab 8 Jahren und darüber
sowie von Personen mit verringerten physischen, sensorischen
oder mentalen Fähigkeiten oder Mangel an Erfahrung und
Wissen benutzt werden, wenn sie beaufsichtigt oder bezüglich
des sicheren Gebrauchs des Kühlschrankes unterwiesen
wurden und die daraus resultierenden Gefahren verstehen.
Reinigung und Benutzer-Wartung dürfen nicht von Kindern
ohne Beaufsichtigung durchgeführt werden.
Kinder sollten beaufsichtigt werden, um sicherzustellen, dass
sie nicht mit dem Kühlschrank spielen.
Verwahren und benutzen Sie den Kühlschrank außerhalb der
Reichweite von Kindern unter 8 Jahren.
Lagern Sie keine explosionsfähigen Stoffe wie z. B. Sprüh-
dosen mit brennbarem Treibgas im Kühlschrank.
26
Page 27

DE
HC302, HC502 Sicherheitshinweise
ACHTUNG!
A
2.2 Sicherheit beim Betrieb des Kühlschrankes
D
Vergleichen Sie die Spannungsangabe auf dem Typenschild
mit der vorhandenen Energieversorgung.
Ziehen Sie den Stecker nie am Anschlusskabel aus der Steck-
dose.
Der Kühlschrank ist nicht geeignet für die Lagerung ätzender
oder lösungsmittelhaltiger Stoffe.
Halten Sie die Abflussöffnung stets sauber.
Öffnen Sie auf keinen Fall den Kühlkreislauf.
Transportieren Sie den Kühlschrank niemals in waagerechter
Stellung, damit kein Öl aus dem Kompressor auslaufen kann.
Achten Sie beim Transport darauf, den Kühlkreislauf nicht zu
beschädigen.
Stellen Sie den Kühlschrank an einem trockenen und gegen
Spritzwasser geschützten Platz auf.
GEFAHR!
Fassen Sie nie an blanke Leitungen.
!
VORSICHT!
Achten Sie vor der Inbetriebnahme darauf, dass Zuleitung und
Stecker trocken sind.
27
Page 28

DE
Lieferumfang HC302, HC502
ACHTUNG!
A
Benutzen Sie keine Elektrogeräte innerhalb des Kühl-
schrankes, außer wenn diese Elektrogeräte vom Hersteller
dafür empfohlen werden.
Stellen Sie den Kühlschrank nicht in der Nähe von offenen
Flammen oder anderen Wärmequellen (Heizung, starke
Sonneneinstrahlung, Gasöfen usw.) ab.
Überhitzungsgefahr!
Achten Sie stets darauf, dass beim Betrieb entstehende Wärme
ausreichend abgeführt werden kann. Sorgen Sie dafür, dass
der Kühlschrank in ausreichendem Abstand zu Wänden oder
Gegenständen steht, sodass die Luft zirkulieren kann (Abb. 3,
Seite 3).
Achten Sie darauf, dass die Lüftungsöffnungen nicht abgedeckt
werden.
Der Kühlschrank darf keinem Regen ausgesetzt werden.
Tauchen Sie den Kühlschrank nie in Wasser.
Schützen Sie den Kühlschrank und das Kabel vor Hitze und
Nässe.
Achten Sie darauf, dass die gelagerten Stoffe keine Wand des
Kühlraums berühren.
3Lieferumfang
Menge Bezeichnung
1 Kühlschrank
1Griff
1 Batterie (CR1632)
1 Bedienungsanleitung
Diese Anleitung ist auch im PDF-Format erhältlich (z. B. auf der HerstellerWebseite).
28
Page 29

DE
HC302, HC502 Bestimmungsgemäßer Gebrauch
4 Bestimmungsgemäßer Gebrauch
Der Kühlschrank eignet sich zur Lagerung von Medikamenten und Medizinprodukten, die bei Temperaturen zwischen +2 °C und +8 °C gelagert werden
können.
VORSICHT!
!
Der Kühlschrank eignet sich nicht zur Lagerung von Blut.
5 Technische Beschreibung
5.1 Funktionsbeschreibung
Alle im Kühlschrank verwendeten Materialien sind unbedenklich für Medizinprodukte.
Der Kühlkreislauf ist wartungsfrei.
Der Kühlschrank ist als freistehende Variante (FS) und Einbauvariante (BIU)
erhältlich.
Die freistehende Variante (HC302FS, HC502FS) ist für den freistehenden
Gebrauch konzipiert. Die Kühlaggregatabdeckung schützt die warmen Teile
des Kühlaggregats. Der Fußrahmen mit Belüftungsgitter stellt die Belüftung
sicher. Durch Entfernen des Fußrahmens und der Kühlaggregatabdeckung
kann der Kühlschrank als Einbaugerät benutzt werden.
Die Einbauvariante (HC302BIU, HC502BIU) ist für den Einbau in Möbel
bestimmt. Sie besitzen keinen Fußrahmen und keine Kühlaggregatabdeckung.
Das Digitalthermometer zeigt die niedrigste und höchste Innentemperatur an
und speichert diese seit dem letzten Zurückstellen, damit Sie prüfen können,
ob die Medizinprodukte bei geeigneten Temperaturen gelagert werden.
29
Page 30

DE
Technische Beschreibung HC302, HC502
5.2 Bedienelemente
Nr. in
Abb. 1,
Seite 2
1 Türschloss
2Tür
3 Digitalthermometer (siehe Abb. 2, Seite 2)
4 Kühlaggregatabdeckung
5 Schubladen
6 Innenlicht
7Lüfter
8 Fußrahmen
Legende zu Abb. 2, Seite 2
Nr. Beschreibung
1 Momentane Innentemperatur
2 Niedrigste Innentemperatur
3 Höchste Innentemperatur
4 Reset-Taste
Beschreibung
30
Page 31

DE
HC302, HC502 Kühlschrank aufstellen und anschließen
6 Kühlschrank aufstellen und
anschließen
6.1 Kühlschrank auspacken
➤ Prüfen Sie, ob die Verpackung unbeschädigt ist.
➤ Entfernen Sie das Verpackungsmaterial.
➤ Prüfen Sie, ob der Kühlschrank beschädigt ist.
Falls Sie Beschädigungen an der Verpackung oder am Kühlschrank
finden, melden Sie diese sofort dem Transportunternehmen.
6.2 Freistehende Variante aufstellen
Beachten Sie folgende Hinweise beim Aufstellen:
Stellen Sie den Kühlschrank so auf, dass die erwärmte Luft gut abziehen
kann, entweder nach oben oder zu den Seiten.
Lassen Sie das Gerät mindestens vier Stunden stehen, bevor Sie es elek-
trisch anschließen, damit das Kühlmittel in den Kompressor zurückfließen
kann.
➤ Stellen Sie den Kühlschrank auf den gewählten Platz.
31
Page 32

DE
Kühlschrank aufstellen und anschließen HC302, HC502
6.3 Einbauvariante aufstellen
Beachten Sie folgende Hinweise beim Aufstellen:
Bauen Sie den Kühlschrank so ein, dass die erwärmte Luft gut abziehen
kann (entweder nach oben oder nach vorn, Abb. 3, Seite 3).
Legende zu Abb. 3, Seite 3
Nr. Erklärung
1kalte Zuluft
2warme Abluft
Lassen Sie das Gerät mindestens vier Stunden stehen, bevor Sie es elek-
trisch anschließen, damit das Kühlmittel in den Kompressor zurückfließen
kann.
Stellen Sie sicher, dass die Tür des Kühlschranks mindestens um 100°
geöffnet werden kann. Andernfalls ist eine Benutzung der Schubladen
nicht möglich.
➤ Befestigen Sie den Kühlschrank am Möbelstück, indem Sie zwei
Schrauben durch die Befestigungsbohrungen auf der Bodenseite
schrauben (Abb. 4, Seite 3).
6.4 Kühlschrank elektrisch anschließen
ACHTUNG!
A
➤ Stecken Sie den Stecker des Anschlusskabels in die Wechselspannungs-
steckdose.
➤ Setzen Sie die Batterie in das Digitalthermometer ein (siehe Kapitel
„Batterie des Digitalthermometers wechseln“ auf Seite 35).
✓ Das Display schaltet sich ein.
Während der ersten zwei Sekunden zeigt das Display keine Temperaturwerte an; es zeigt „--.-“. Danach wird die Temperatur angezeigt, die der
Sensor misst.
Nur Großbritannien: Der Kühlschrank wird mit einem Stecker
ausgeliefert, der eine 3-A-Sicherung enthält. Wenn diese
Sicherung gewechselt wird, müssen Sie eine 3-A-Sicherung
verwenden, die ASTA-genehmigt ist (BS 1362).
32
Page 33

DE
HC302, HC502 Kühlschrank benutzen
6.5 Griff montieren und demontieren
➤ Montieren Sie den Griff wie dargestellt (Abb. 7, Seite 5).
➤ Demontieren Sie den Griff wie dargestellt (Abb. 8, Seite 5).
7 Kühlschrank benutzen
HINWEIS
I
7.1 Tipps zum Energiesparen
Wählen Sie einen gut belüfteten und vor Sonnenstrahlen geschützten
Einsatzort.
Öffnen Sie den Kühlschrank nicht häufiger als nötig.
Lassen Sie die Türen nicht länger offen stehen als nötig.
Tauen Sie den Kühlschrank ab, sobald sich eine Eisschicht gebildet hat.
Bevor Sie den neuen Kühlschrank in Betrieb nehmen, sollten
Sie ihn aus hygienischen Gründen innen und außen mit einem
feuchten Tuch reinigen (siehe auch Kapitel „Reinigung und
Pflege“ auf Seite 38).
Lassen Sie immer etwas Raum zwischen den Medikamenten
im Kühlschrankinnere, um eine effiziente und gleichmäßige
Kühlung sicherzustellen. Wenn die Schubladen zu voll
bepackt sind, können unakzeptable Temperaturwerte
auftreten.
33
Page 34

DE
Kühlschrank benutzen HC302, HC502
7.2 Kühlschrank benutzen
HINWEIS
I
Nach der ersten Inbetriebnahme, nach dem Wechseln der Batterie oder nach
dem Abschalten des Kühlschranks für eine längere Zeit zeigt das Display
des Digitalthermometers (Abb. 2, Seite 2) die aktuelle Umgebungstemperatur an. Wenn die Innentemperatur den Betriebstemperaturbereich
erreicht, sollte das Thermometer zurückgesetzt werden, damit kein falscher
höchster Temperaturwert angezeigt wird.
➤ Drücken Sie die Reset-Taste (Abb. 2 4, Seite 2) für 5 s.
Das Thermometer hat eine blaue Hintergrundbeleuchtung, die das Ablesen
der Temperaturwerte erleichtert.
➤ Drücken Sie die Reset-Taste (Abb. 2 4, Seite 2) kurz.
✓ Die blaue Hintergrundbeleuchtung leuchtet für 2 s.
Das Thermometer speichert die Werte der niedrigsten und höchsten Innentemperatur seit dem letzten Zurückstellen. Diese Werte werden gelöscht,
wenn das Thermometer zurückgesetzt wird oder wenn die Batterie
gewechselt wird.
Die Temperaturwerte werden in °C angezeigt. Dies kann nicht
geändert werden.
34
Page 35

DE
HC302, HC502 Kühlschrank benutzen
7.3 Batterie des Digitalthermometers wechseln
Gehen Sie wie folgt vor, um die Batterie des Digitalthermometers zu
wechseln (Abb. 9, Seite 6):
➤ Ziehen Sie den Schlüssel (1) ab.
➤ Entfernen Sie die Schlossabdeckungsrosette mit Hilfe von zwei
Schraubendrehern.
➤ Schrauben Sie die beiden Schrauben (2) aus der Frontplatte.
➤ Drücken Sie die Frontplatte (3) etwas nach oben und entfernen Sie sie
durch leichtes Ziehen.
➤ Entnehmen Sie die Batterie (4).
ACHTUNG!
A
➤ Setzen Sie eine neue Batterie (CR1632) ein.
➤ Montieren Sie die Frontplatte und die Schlossabdeckungsrosette in
umgekehrter Reihenfolge.
Achten Sie auf die korrekte Polarität (das „+“ muss von oben
sichtbar sein).
35
Page 36

DE
Kühlschrank benutzen HC302, HC502
7.4 Kühlschrank abtauen
HINWEIS
I
Luftfeuchtigkeit kann sich am Verdampfer oder im Innenraum des Kühlschranks als Reif niederschlagen.
Eine leichte Reifschicht oder Wassertropfen können sich im Inneren des
Kühlschrankes absetzen, wenn er längere Zeit gekühlt hat. Dies ist normal,
weil die Feuchtigkeit in der Luft zu Wassertropfen kondensiert, wenn die
Temperatur im Kühlschrank abkühlt. Der Kühlschrank ist nicht defekt.
Das Tauwasser läuft durch den Tauwasserabfluss in einen Wasserbehälter
an der Rückseite des Geräts über dem Kompressor, wo es verdampft.
Der Kühlschrank sollte alle drei Wochen abgetaut werden.
Gehen Sie wie folgt vor:
➤ Trennen Sie den Kühlschrank vom Netz.
➤ Demontieren Sie die Schubladen (siehe Kapitel „Schubladen demontie-
ren“ auf Seite 37).
Bei sehr hoher Umgebungstemperatur kann es vorkommen, dass
der Kühlschrank ununterbrochen arbeitet, was zu einer übermäßigen Reifbildung an der Rückwand des Kühlfachs führt.
➤ Lassen Sie die Tür offen.
➤ Wischen Sie das Kühlschrankinnere nach dem Abtauen mit einem
sauberen, feuchten Tuch ab.
➤ Montieren Sie die Schubladen.
7.5 Kühlschrank ausschalten und stilllegen
Wenn Sie den Kühlschrank für längere Zeit stilllegen wollen, gehen Sie wie
folgt vor:
➤ Trennen Sie den Kühlschrank vom Netz.
➤ Reinigen Sie den Kühlschrank (siehe Kapitel „Reinigung und Pflege“ auf
Seite 38).
➤ Lassen Sie die Tür leicht geöffnet.
So verhindern Sie, dass sich Gerüche bilden.
36
Page 37

DE
HC302, HC502 Kühlschrank benutzen
7.6 Schubladen demontieren
Sie können die Schubladen demontieren, z. B. zur Reinigung.
Gehen Sie wie folgt vor (Abb. 0, Seite 6):
➤ Öffnen Sie die Tür (A).
➤ Ziehen Sie die Schublade heraus (B).
➤ Drücken Sie die Befestigungsstifte von außen nach innen (C).
➤ Entfernen Sie die Schublade (D).
➤ Montieren Sie die Schublade in umgekehrter Reihenfolge.
37
Page 38

DE
Reinigung und Pflege HC302, HC502
8 Reinigung und Pflege
WARNUNG!
!
A
➤ Reinigen Sie den Kühlschrank regelmäßig und sobald er verschmutzt ist
mit einem feuchten Tuch.
➤ Achten Sie darauf, dass kein Wasser in die Dichtungen tropft. Dies kann
die Elektronik beschädigen.
➤ Wischen Sie den Kühlschrank nach dem Reinigen mit einem Tuch
trocken.
Trennen Sie vor jeder Reinigung und Pflege den Kühlschrank
vom Netz.
ACHTUNG!
Verwenden Sie zur Reinigung keine scharfen Reinigungs-
mittel oder harten Gegenstände, da diese den Kühlschrank
beschädigen können.
Verwenden Sie nie harte oder spitze Werkzeuge zum Ent-
fernen von Eisschichten oder zum Lösen festgefrorener
Gegenstände.
Verwenden Sie keine mechanischen oder andere Hilfsmittel,
um den Abtauvorgang zu beschleunigen.
➤ Prüfen Sie den Tauwasserabfluss regelmäßig.
Reinigen Sie den Tauwasserabfluss, falls nötig. Wenn er verstopft ist,
sammelt sich das Tauwasser auf dem Boden des Kühlschranks.
➤ Reinigen Sie die Türdichtungen regelmäßig.
➤ Freistehende Variante: Reinigen Sie das Gitter des Kondensators und
den Kompressor auf der Geräterückseite regelmäßig mit einem Staubsauger.
38
Page 39

DE
HC302, HC502 Störungen beseitigen
9 Störungen beseitigen
Wasser im oder unter dem Kühlschrank
Störung Mögliche Ursache Lösung
Wasser fließt in den
Innenraum des Kühlschranks
Wasser fließt auf den
Boden.
Displayanzeigen
Anzeige Erklärung
Allgemeiner Fehler
Das Display blinkt
einmal pro Sekunde.
Sensorfehler
Das Display blinkt und
zeigt „E1“.
Niedriger
Batteriestand
Das Display blinkt und
zeigt abwechselnd „E2“
und die aktuelle Innentemperatur.
Der Tauwasserabfluss ist verstopft. Reinigen Sie den Abfluss.
Die eingelagerten Medizinprodukte
verhindern, dass das Wasser zum
Tauwasserabfluss fließt.
Es befindet sich zu viel Wasser im
Wasserbehälter.
Das Display zeigt abwechselnd die aktuelle Innentemperatur und
den aktiven Fehlercode (Abb. 2 1, Seite 2) (E1 oder E2, siehe
unten).
Die niedrigste und höchste Innentemperatur werden als letzte
bekannte Werte gespeichert.
Die niedrigste und höchste Innentemperatur werden angezeigt und
durch das Einlesen der aktuellen Innentemperatur aktualisiert.
Stellen Sie sicher, dass
die Medizinprodukte nicht
die Rückwand berühren.
Reinigen Sie den Wasserbehälter.
10 Gewährleistung
Es gilt die gesetzliche Gewährleistungsfrist. Sollte das Produkt defekt sein,
wenden Sie sich bitte an die Niederlassung des Herstellers in Ihrem Land
(Adressen siehe Rückseite der Anleitung) oder an Ihren Fachhändler.
Zur Reparatur- bzw. Gewährleistungsbearbeitung müssen Sie folgende
Unterlagen mitschicken:
eine Kopie der Rechnung mit Kaufdatum,
einen Reklamationsgrund oder eine Fehlerbeschreibung.
39
Page 40

DE
Entsorgung HC302, HC502
11 Entsorgung
WARNUNG! Kinderfalle!
!
A
➤ Geben Sie das Verpackungsmaterial möglichst in den entsprechenden
Recycling-Müll.
M
Vor der Entsorgung Ihres alten Kühlschranks:
Bauen Sie die Schublade aus.
Belassen Sie die Schubladen im Kühlschrank, damit Kinder
nicht hineinsteigen können.
ACHTUNG!
Bei dem Gerät kommt ein Isolationsgas zur Anwendung (siehe
Typenschild). Erkundigen Sie sich bei der zuständigen kommunalen Verwaltungsbehörde oder Ihrem örtlichen Entsorgungsunternehmen über die korrekte Entsorgung und stellen Sie sicher,
dass das Gerät und sämtliche Stoffe einer fachgerechten
Entsorgung zugeführt werden.
Wenn Sie das Produkt endgültig außer Betrieb nehmen, informieren Sie sich bitte beim nächsten Recyclingcenter oder bei
Ihrem Fachhändler über die zutreffenden Entsorgungsvorschriften.
40
Page 41

DE
HC302, HC502 Technische Daten
12 Technische Daten
HC302 HC502
Bruttoinhalt: 33 l 49 l
Nutzinhalt: 29 l 43 l
Anschlussspannung: 220 – 240 V
Leistungsaufnahme: 0,42 kWh/24 h 0,44 kWh/24 h
Stromverbrauch: 0,54 A
Kühlleistung: +2 °C bis +8 °C
Klimaklasse: SN
Kühlmittel: R134a
Kühlmittelmenge: 38 g
Abmessungen: siehe Abb. a, Seite 7 siehe Abb. b, Seite 7
Gewicht: ca. 20 kg ca. 22 kg
Prüfung/Zertifikat:
Geprüft nach den folgenden EEC-Richtlinien:
LVD-Richtlinien: 2006/95/EC
EMC-Richtlinien: 2004/108/EC
CE-Richtlinien: 93/68/EC
RoHS-Richtlinien: 2002/95/EC
WEEE-Richtlinien: 2002/96/EC
41
Page 42

FR
HC302, HC502
Veuillez lire attentivement cette notice avant le montage et la mise en
service. Veuillez ensuite la conserver. En cas de passer le produit,
veuillez le transmettre au nouvel acquéreur.
Sommaire
1 Explication des symboles. . . . . . . . . . . . . . . . . . . . . . . . . . . . . . . . . 43
2 Consignes de sécurité . . . . . . . . . . . . . . . . . . . . . . . . . . . . . . . . . . . 43
3 Pièces fournies . . . . . . . . . . . . . . . . . . . . . . . . . . . . . . . . . . . . . . . . 46
4 Usage conforme. . . . . . . . . . . . . . . . . . . . . . . . . . . . . . . . . . . . . . . . 46
5 Description technique . . . . . . . . . . . . . . . . . . . . . . . . . . . . . . . . . . . 46
6 Installation et raccordement du réfrigérateur . . . . . . . . . . . . . . . . . . 48
7 Utilisation du réfrigérateur . . . . . . . . . . . . . . . . . . . . . . . . . . . . . . . . 50
8 Entretien et nettoyage . . . . . . . . . . . . . . . . . . . . . . . . . . . . . . . . . . . 54
9 Élimination des pannes . . . . . . . . . . . . . . . . . . . . . . . . . . . . . . . . . . 55
10 Garantie . . . . . . . . . . . . . . . . . . . . . . . . . . . . . . . . . . . . . . . . . . . . . . 55
11 Retraitement . . . . . . . . . . . . . . . . . . . . . . . . . . . . . . . . . . . . . . . . . . 56
12 Caractéristiques techniques. . . . . . . . . . . . . . . . . . . . . . . . . . . . . . . 57
42
Page 43

FR
HC302, HC502 Explication des symboles
1 Explication des symboles
DANGER !
D
!
!
A
I
➤ Manipulation : ce symbole vous indique une action à effectuer. Les
manipulations à effectuer sont décrites étape par étape.
Consigne de sécurité : le non-respect de ces consignes
entraîne la mort ou de graves blessures.
AVERTISSEMENT !
Consigne de sécurité : le non-respect de ces consignes peut
entraîner la mort ou de graves blessures.
ATTENTION !
Consigne de sécurité : le non-respect de ces consignes peut
entraîner des blessures.
AVIS !
Le non-respect de ces consignes peut entraîner des dommages
matériels et des dysfonctionnements du produit.
REMARQUE
Informations complémentaires sur l'utilisation du produit.
✓ Ce symbole décrit le résultat d’une manipulation.
Fig. 1 5, page 3 : cette information renvoie à un élément figurant sur une
illustration, dans cet exemple à la « position 5 de l'illustration 1 à la page 3 ».
2 Consignes de sécurité
Le fabricant décline toute responsabilité pour des dommages dans les cas
suivants :
des défauts de montage ou de raccordement
des influences mécaniques et des surtensions ayant endommagé le
matériel
des modifications apportées au produit sans autorisation explicite de la
part du fabricant
une utilisation différente de celle décrite dans la notice
43
Page 44

FR
Consignes de sécurité HC302, HC502
2.1 Sécurité générale
AVERTISSEMENT !
!
Si le réfrigérateur présente des dégâts visibles, vous ne devez
pas le mettre en service.
Si le câble de raccordement du réfrigérateur est endommagé, il
doit être remplacé par le service après-vente ou une personne
de qualification similaire, afin d'éviter tout danger.
Seul un professionnel est habilité à réparer le réfrigérateur.
Toute réparation mal effectuée risquerait d'entraîner de graves
dangers.
Les enfants âgés de 8 ans et plus ainsi que les personnes ayant
des déficiences physiques, sensorielles ou mentales ou un
manque d'expérience ou de connaissances peuvent utiliser ce
réfrigérateur à condition d'être sous surveillance ou d'avoir reçu
des instructions concernant l'utilisation du réfrigérateur en toute
sécurité et de comprendre les dangers qui en résultent.
Le nettoyage et la maintenance ne doivent pas être effectués
par des enfants sans surveillance.
Les enfants doivent être surveillés pour s'assurer qu'ils ne
jouent pas avec le réfrigérateur.
Placez et utilisez le réfrigérateur hors de portée des enfants de
moins de 8 ans.
Ne stockez aucune substance explosive (comme des aérosols
contenant des gaz combustibles, par exemple) dans le réfrigérateur.
A
44
AVIS !
Vérifiez que la tension indiquée sur la plaque signalétique cor-
respond à l'alimentation électrique dont vous disposez.
Ne tirez jamais sur le câble de raccordement pour sortir la fiche
de la prise.
N'utilisez pas le réfrigérateur pour le stockage de produits cor-
rosifs ou de solvants !
Veillez à ce que l'ouverture d'évacuation soit toujours propre.
N'ouvrez jamais le circuit frigorifique.
Ne transportez jamais le réfrigérateur en position horizontale
afin que l'huile ne puisse pas s'écouler du compresseur.
Page 45

FR
HC302, HC502 Consignes de sécurité
Lors du transport, veillez à ne pas endommager le circuit frigo-
rifique.
Installez le réfrigérateur dans un endroit sec et à l'abri des écla-
boussures d'eau.
2.2 Sécurité d'exploitation du réfrigérateur
DANGER !
D
!
A
Ne touchez jamais les lignes électriques dénudées.
ATTENTION !
Avant de mettre l'appareil en service, assurez-vous que la ligne
d'alimentation électrique et le connecteur sont secs.
AVIS !
N'exploitez aucun appareil électrique à l'intérieur du réfrigéra-
teur, sauf si le fabricant le recommande.
Ne placez pas le réfrigérateur près de flammes ou d'autres
sources de chaleur (chauffage, rayons solaires, fours à gaz,
etc.).
Risque de surchauffe
Veillez toujours à ce que la chaleur produite lors du fonctionnement puisse se dissiper suffisamment. Veillez à ce que le réfrigérateur se trouve à distance suffisante des murs ou des objets,
de sorte que l'air puisse circuler (fig. 3, page 3).
Assurez-vous que les ouvertures d'aération ne sont pas recou-
vertes.
Le réfrigérateur ne doit pas être exposé à la pluie.
Ne plongez jamais le réfrigérateur dans l'eau.
Tenez le réfrigérateur et les câbles à l'abri de la chaleur et de
l'humidité.
Veillez à ce que les substances stockées ne touchent pas les
parois du compartiment de réfrigération.
45
Page 46

FR
Pièces fournies HC302, HC502
3 Pièces fournies
Quantité Désignation
1 Réfrigérateur
1 Poignée
1 Pile (CR1632)
1 Notice d'utilisation
Cette notice est également disponible en format PDF (p. ex. sur le site
Internet du fabricant).
4 Usage conforme
Le réfrigérateur est adapté pour le stockage de médicaments et des produits
médicaux qui peuvent être stockés à des températures comprises entre
+2 °C et +8 °C.
ATTENTION !
!
Le réfrigérateur n'est pas adapté pour le stockage du sang.
5 Description technique
5.1 Description du fonctionnement
Les matériaux utilisés lors de la construction du réfrigérateur n'altèrent pas
la qualité des produits médicaux.
Le circuit frigorifique est sans entretien.
Le réfrigérateur est disponible en variante à poser (FS) et en variante à
encastrer (BIU).
La variante à poser (HC302FS, HC502FS) est conçue pour être posée. Le
couvercle du groupe de froid protège les parties chaudes du groupe de froid.
Le cadre de piètement à grille d'aération garantit la ventilation. Le retrait du
cadre de piètement et du couvercle du groupe de froid permet d'utiliser le
réfrigérateur comme appareil à encastrer.
46
Page 47

FR
HC302, HC502 Description technique
La variante à encastrer (HC302BIU, HC 502BIU) est conçue pour être encastrée dans des meubles. Elle ne dispose ni de cadre de piètement ni de couvercle du groupe de froid.
Le thermomètre numérique indique la température interne la plus basse et la
plus haute et les enregistre depuis la dernière réinitialisation, de sorte que
vous pouvez vérifier si les dispositifs médicaux sont stockés à des températures appropriées.
5.2 Éléments de commande
N° dans
fig. 1,
page 2
1 Serrure de la porte
2Porte
3 Thermomètre numérique (voir fig. 2, page 2)
4 Couvercle du groupe de froid
5Tiroirs
6 Éclairage intérieur
7 Ventilateur
8 Cadre de piètement
Description
Légende de fig. 2, page 2
Nº Description
1 Température intérieure momentanée
2 Température intérieure la plus faible
3 Température intérieure la plus élevée
4 Touche de réinitialisation
47
Page 48

FR
Installation et raccordement du réfrigérateur HC302, HC502
6 Installation et raccordement du
réfrigérateur
6.1 Déballage du réfrigérateur
➤ Vérifiez si l'emballage est intact.
➤ Retirez le matériau d'emballage.
➤ Vérifiez si le réfrigérateur est intact.
Si vous trouvez des dommages sur l'emballage ou sur le réfrigérateur,
veuillez le signaler immédiatement à la société de transport.
6.2 Installation de la variante posée
Observez les consignes suivantes en ce qui concerne l'installation :
Installez le réfrigérateur de manière à ce que l'air chaud puisse bien
s'échapper, soit par le haut, soit par les côtés.
Laissez l'appareil au moins quatre heures à la verticale avant de le
raccorder électriquement afin que le réfrigérant du compresseur puisse
s'écouler dans l'autre sens.
➤ Placez le réfrigérateur à l'endroit choisi.
48
Page 49

FR
HC302, HC502 Installation et raccordement du réfrigérateur
6.3 Installation de la variante encastrée
Observez les consignes suivantes en ce qui concerne l'installation :
Installez le réfrigérateur de manière à ce que l'air chaud puisse bien
s'échapper (soit par le haut, soit vers l'avant, fig. 3, page 3).
Légende de fig. 3, page 3
Nº Explication
1 air entrant froid
2 air évacué chaud
Laissez l'appareil au moins quatre heures à la verticale avant de le
raccorder électriquement afin que le réfrigérant du compresseur puisse
s'écouler dans l'autre sens.
Assurez-vous que la porte du réfrigérateur peut être ouverte d'au moins
100°. Sinon, il est impossible d'utiliser les tiroirs.
➤ Fixez le réfrigérateur au meuble en vissant deux vis à travers les trous de
fixation sur le fond (fig. 4, page 3).
6.4 Raccordement électrique du réfrigérateur
AVIS !
A
➤ Enfichez le connecteur du câble de raccordement dans la prise de
courant alternatif.
➤ Insérez la pile dans le thermomètre numérique (voir chapitre
« Changement de la pile du thermomètre numérique », page 52).
✓ L'écran s'allume.
Pendant les deux premières secondes, l'affichage n'indique aucune
valeur de température ; il affiche « --.- ». Ensuite, la température mesurée par le capteur s'affiche.
Grande-Bretagne uniquement : Le réfrigérateur est livré avec
un connecteur possédant un fusible de 3 A. Si ce fusible est remplacé, vous devez utiliser un fusible de 3 A approuvé ASTA
(BS 1362).
49
Page 50

FR
Utilisation du réfrigérateur HC302, HC502
6.5 Montage et démontage de la poignée
➤ Montez la poignée selon l'illustration (fig. 7, page 5).
➤ Démontez la poignée selon l'illustration (fig. 8, page 5).
7 Utilisation du réfrigérateur
REMARQUE
I
7.1 Comment économiser de l'énergie ?
Choisissez un emplacement bien aéré et à l'abri du soleil.
N'ouvrez pas le réfrigérateur plus souvent que nécessaire.
Ne laissez pas les portes ouvertes plus longtemps que nécessaire.
Dégivrez le réfrigérateur dès qu'une couche de glace s'est formée.
Avant de mettre en service votre nouveau réfrigérateur, vous
devez, pour des raisons d’hygiène, le nettoyer à l’intérieur et à
l’extérieur à l’aide d’un tissu humide (voir aussi chapitre
« Entretien et nettoyage », page 54).
Laissez toujours un peu d'espace entre les médicaments à
l'intérieur du réfrigérateur pour assurer un refroidissement efficace et uniforme. Si les tiroirs sont trop pleins, des valeurs de
température non admises peuvent se produire.
50
Page 51

FR
HC302, HC502 Utilisation du réfrigérateur
7.2 Utilisation du réfrigérateur
REMARQUE
I
Après la première mise en service, après le remplacement de la pile ou après
l'arrêt du réfrigérateur pendant une longue période, l'affichage du thermomètre numérique (fig. 2, page 2) indique la température ambiante actuelle.
Lorsque la température intérieure atteint la plage de température de fonctionnement, le thermomètre doit être remis à zéro afin qu'aucune valeur de température maximale erronée ne soit affichée.
➤ Appuyez sur la touche de réinitialisation (fig. 2 4, page 2) pendant 5 s.
Le thermomètre a un rétroéclairage bleu, ce qui facilite la lecture des valeurs
de température.
➤ Appuyez brièvement sur la touche de réinitialisation (fig. 2 4, page 2).
✓ Le rétroéclairage bleu s'allume pendant 2 s.
Le thermomètre enregistre les valeurs de température interne la plus basse
et la plus haute depuis la dernière réinitialisation. Ces valeurs sont supprimées lorsque le thermomètre est réinitialisé ou lorsque la pile est remplacée.
Les valeurs de température sont affichées en °C. Cela ne peut
pas être modifié.
51
Page 52

FR
Utilisation du réfrigérateur HC302, HC502
7.3 Changement de la pile du thermomètre numérique
Procédez de la manière suivante pour changer la pile du thermomètre numérique (fig. 9, page 6) :
➤ Retirez la clé (1).
➤ Retirez la rosette cachant la serrure à l'aide de deux tournevis.
➤ Dévissez les deux vis (2) de la plaque avant.
➤ Poussez la plaque avant (3) vers le haut et retirez-la en tirant légèrement.
➤ Retirez la pile (4).
AVIS !
A
➤ Insérez une nouvelle pile (CR1632).
➤ Montez la plaque avant et la rosette cachant la serrure dans l'ordre
inverse.
Veillez à ce que la polarité soit correcte (le « + » doit être visible
d'en haut).
7.4 Dégivrage du réfrigérateur
REMARQUE
I
L'humidité de l'air peut se condenser sous forme de givre au niveau de l'évaporateur ou à l'intérieur du réfrigérateur.
Une légère couche de givre ou quelques gouttes d'eau peuvent se déposer
à l'intérieur du réfrigérateur s'il a été utilisé pendant un temps assez long.
Ceci est normal, car l'humidité de l'air se condense en gouttes d'eau lorsque
la température refroidit dans le réfrigérateur. Le réfrigérateur n'est pas défectueux.
L'eau de dégivrage s'écoule par une évacuation dans un conteneur d'eau
situé à l'arrière de l'appareil, au-dessus du compresseur, où elle se transforme en vapeur.
Le réfrigérateur doit être dégivré toutes les trois semaines.
Lorsque la température ambiante est très élevée, il peut arriver
que le réfrigérateur fonctionne sans interruption, ce qui entraîne
une formation excessive de givre sur la paroi arrière du compartiment congélation.
52
Page 53

FR
HC302, HC502 Utilisation du réfrigérateur
Procédez comme suit :
➤ Débranchez le réfrigérateur du secteur.
➤ Démontez les tiroirs (voir chapitre « Démontage des tiroirs », page 53).
➤ Laissez la porte ouverte.
➤ Essuyez l'intérieur du réfrigérateur avec un chiffon propre et humide
après l'avoir dégivré.
➤ Montez les tiroirs.
7.5 Arrêt et mise hors service du réfrigérateur
Lorsque vous voulez mettre le réfrigérateur hors service pendant une
période prolongée, procédez de la façon suivante :
➤ Débranchez le réfrigérateur du secteur.
➤ Nettoyez le réfrigérateur (voir le chapitre « Entretien et nettoyage »,
page 54).
➤ Laissez la porte légèrement ouverte.
Vous évitez ainsi la formation d'odeurs.
7.6 Démontage des tiroirs
Vous pouvez démonter les tiroirs, p. ex. pour le nettoyage.
Procédez comme suit (fig. 0, page 6) :
➤ Ouvrez la porte (A).
➤ Ouvrez le tiroir (B).
➤ Appuyez la goupille de fixation de l'extérieur vers l'intérieur (C).
➤ Retirez le tiroir (D).
➤ Montez les tiroirs dans l'ordre inverse.
53
Page 54

FR
Entretien et nettoyage HC302, HC502
8 Entretien et nettoyage
AVERTISSEMENT !
!
A
➤ Nettoyez le réfrigérateur régulièrement et dès qu'il est sale, avec un
chiffon humide.
➤ Veillez à ce que de l'eau ne goutte pas sur les joints. Cela risque d'endom-
mager les composants électroniques.
➤ Essuyez le réfrigérateur avec un chiffon après l'avoir nettoyé.
Avant toute opération de nettoyage ou d'entretien du réfrigérateur, veillez à débrancher celui-ci du secteur.
AVIS !
N’utilisez ni détergents abrasifs, ni objets durs pour le
nettoyage, ceux-ci pouvant endommager le réfrigérateur.
N'utilisez jamais d'outils durs ou pointus pour enlever les
couches de glace ou pour détacher des objets pris dans le
givre.
N'utilisez aucun moyen mécanique ou autre pour accélérer la
procédure de dégivrage.
➤ Vérifiez régulièrement l'écoulement de l'eau de dégivrage.
Nettoyez l'écoulement de l'eau de dégivrage si nécessaire. S'il est
bouché, l'eau de dégivrage s'accumule en bas du réfrigérateur.
➤ Nettoyez régulièrement les joints des portes.
➤ Variante posée : Nettoyez régulièrement la grille du condenseur et le
compresseur au dos de l'appareil avec un aspirateur.
54
Page 55

FR
HC302, HC502 Élimination des pannes
9 Élimination des pannes
Eau dans ou sous le réfrigérateur
Dysfonctionnement Cause possible Solution
De l'eau coule à l'intérieur du réfrigérateur
De l'eau coule sur le sol. Il y a trop d'eau dans le conteneur
Affichages à l'écran
Témoin Explication
Erreur générale
L'écran clignote une fois
par seconde.
Panne du détecteur
L'écran clignote et
indique « E1 ».
Faible niveau de la pile
L'écran clignote et
indique alternativement
« E2 » et la température
interne actuelle.
L'évacuation de l'eau de dégivrage est
bouchée.
Les aliments médicaux stockés
empêchent que l'eau s'écoule vers
l'évacuation.
d'eau.
L'écran affiche alternativement la température interne actuelle et le
code de défaut actif (fig. 2 1, page 2) (E1 ou E2, voir ci-dessous).
Les températures internes minimale et maximale sont mémorisées
comme dernières valeurs connues.
Les températures internes minimale et maximale sont affichées et
mises à jour par l'enregistrement de la température interne
actuelle.
Nettoyez l'évacuation.
Assurez-vous que les produits médicaux ne
touchent pas la paroi
arrière.
Nettoyez le conteneur
d'eau.
10 Garantie
Le délai légal de garantie s'applique. Si le produit s'avérait défectueux,
veuillez vous adresser à la filiale du fabricant située dans votre pays (voir
adresses au verso du présent manuel) ou à votre revendeur spécialisé.
Veuillez y joindre les documents suivants pour la gestion des réparations et
de la garantie :
une copie de la facture avec la date d'achat,
le motif de la réclamation ou une description du dysfonctionnement.
55
Page 56

FR
Retraitement HC302, HC502
11 Retraitement
AVERTISSEMENT ! Risque d'enfermement pour les enfants !
!
A
➤ Jetez les emballages dans les conteneurs de déchets recyclables prévus
à cet effet.
M
Avant de mettre au rebut votre ancien réfrigérateur :
démontez le tiroir.
Laissez les tiroirs dans le réfrigérateur, afin que les enfants ne
puissent pas entrer dedans.
AVIS !
Un gaz isolant est utilisé sur l'appareil (voir la plaque signalétique). Renseignez-vous auprès des autorités communales responsables ou auprès de votre entreprise locale de retraitement
pour connaître le retraitement correct et assurez-vous que l'appareil et toutes les substances sont retraitées de manière conforme.
Lorsque vous mettrez votre produit définitivement hors service,
informez-vous auprès du centre de recyclage le plus proche ou
auprès de votre revendeur spécialisé sur les prescriptions relatives
au retraitement des déchets.
56
Page 57

FR
HC302, HC502 Caractéristiques techniques
12 Caractéristiques techniques
HC302 HC502
Capacité : 33 l 49 l
Capacité utile : 29 l 43 l
Tension de raccordement : 220 – 240 V
Puissance absorbée : 0,42 kWh/24 h 0,44 kWh/24 h
Consommation de
courant :
Puissance frigorifique : De +2 °C à +8 °C
Classe climatique : SN
Fluide frigorigène : R134a
0,54 A
Quantité de fluide
frigorigène :
Dimensions : voir fig. a, page 7 voir fig. b, page 7
Poids : env. 20 kg env. 22 kg
Contrôle/Certificat :
38 g
Vérifié selon les directives CEE suivantes :
Directives basse tension : 2006/95/CE
Directives CEM : 2004/108/CE
Directives CE : 93/68/CE
Directives RoHS : 2002/95/CE
Directives DEEE : 2002/96/CE
57
Page 58

NL
HC302, HC502
Lees deze handleiding voor de montage en de ingebruikname zorgvuldig door en bewaar hem. Geef de handleiding bij het doorgeven van
het product aan de gebruiker.
Inhoudsopgave
1 Verklaring van de symbolen. . . . . . . . . . . . . . . . . . . . . . . . . . . . . . . 59
2 Veiligheidsinstructies . . . . . . . . . . . . . . . . . . . . . . . . . . . . . . . . . . . . 59
3 Omvang van de levering . . . . . . . . . . . . . . . . . . . . . . . . . . . . . . . . . 62
4 Gebruik volgens bestemming . . . . . . . . . . . . . . . . . . . . . . . . . . . . . 62
5 Technische beschrijving. . . . . . . . . . . . . . . . . . . . . . . . . . . . . . . . . . 62
6 Koelkast opstellen en aansluiten . . . . . . . . . . . . . . . . . . . . . . . . . . . 64
7 Koelkast gebruiken . . . . . . . . . . . . . . . . . . . . . . . . . . . . . . . . . . . . . 66
8 Reiniging en onderhoud. . . . . . . . . . . . . . . . . . . . . . . . . . . . . . . . . . 69
9 Storingen verhelpen. . . . . . . . . . . . . . . . . . . . . . . . . . . . . . . . . . . . . 70
10 Garantie . . . . . . . . . . . . . . . . . . . . . . . . . . . . . . . . . . . . . . . . . . . . . . 70
11 Afvoer. . . . . . . . . . . . . . . . . . . . . . . . . . . . . . . . . . . . . . . . . . . . . . . . 71
12 Technische gegevens . . . . . . . . . . . . . . . . . . . . . . . . . . . . . . . . . . . 72
58
Page 59

NL
HC302, HC502 Verklaring van de symbolen
1 Verklaring van de symbolen
GEVAAR!
D
!
!
A
I
➤ Handeling: dit symbool geeft aan dat u iets moet doen. De vereiste
handelingen worden stap voor stap beschreven.
Veiligheidsaanwijzing: Het niet naleven leidt tot overlijden of
ernstig letsel.
WAARSCHUWING!
Veiligheidsaanwijzing: Het niet naleven kan leiden tot overlijden
of ernstig letsel.
VOORZICHTIG!
Veiligheidsaanwijzing: Het niet naleven kan leiden tot letsel.
LET OP!
Het niet naleven ervan kan leiden tot materiële schade en de
werking van het product beperken.
INSTRUCTIE
Aanvullende informatie voor het bedienen van het product.
✓ Dit symbool beschrijft het resultaat van een handeling.
Afb. 1 5, pagina 3: deze aanduiding wijst u op een element in een afbeel-
ding, in dit voorbeeld op „positie 5 in afbeelding 1 op pagina 3”.
2 Veiligheidsinstructies
De fabrikant kan in de volgende gevallen niet aansprakelijk worden gesteld
voor schade:
montage- of aansluitfouten
beschadiging van het product door mechanische invloeden en over-
spanningen
veranderingen aan het product zonder uitdrukkelijke toestemming van de
fabrikant
gebruik voor andere dan de in de handleiding beschreven toepassingen
59
Page 60

NL
Veiligheidsinstructies HC302, HC502
2.1 Algemene veiligheid
WAARSCHUWING!
!
Als de koelkast zichtbaar is beschadigd, mag hij niet in gebruik
worden genomen.
Als de aansluitkabel van deze koelkast wordt beschadigd, moet
deze ter voorkoming van gevaar door de fabrikant, diens klantenservice of een gelijkwaardig gekwalificeerd persoon worden
vervangen.
Reparaties aan deze koelkast mogen uitsluitend door vak-
monteurs worden uitgevoerd. Door onvakkundige reparaties
kunnen grote gevaren ontstaan.
Deze koelkast kan door kinderen vanaf 8 jaar en ouder evenals
door personen met verminderde fysieke, zintuiglijke of geestelijke vermogens of tekortschietende ervaring en kennis gebruikt
worden, als ze worden begeleid of hun is uitgelegd hoe ze de
koelkast veilig kunnen gebruiken. Ook dienen ze inzicht te
hebben in de gevaren die het gebruik van het toestel met zich
meebrengt.
Reiniging en gebruikeronderhoud mogen niet door kinderen
zonder begeleiding worden uitgevoerd.
Er moet op worden gelet dat kinderen niet met de koelkast
spelen.
Bewaar en gebruik de koelkast buiten het bereik van kinderen
onder 8 jaar.
Bewaar geen explosiegevaarlijke stoffen, zoals spuitbussen
met brandbaar drijfgas, in de koelkast.
A
60
LET OP!
Vergelijk de spanning op het typeplaatje met de aanwezige
energievoorziening.
Trek de stekker nooit aan de aansluitkabel uit het stopcontact.
De koelkast is niet geschikt voor de opslag van bijtende of
oplosmiddelhoudende stoffen.
Houd de afvoeropening altijd schoon.
Open in geen geval het koelcircuit.
Page 61

NL
HC302, HC502 Veiligheidsinstructies
Transporteer de koelkast nooit in horizontale stand, zodat er
geen olie uit de compressor kan stromen.
Voorkom beschadiging van het koelcircuit tijdens transport.
Stel de koelkast op een droge en tegen spatwater beschermde
plaats op.
2.2 Veiligheid bij gebruik van de koelkast
GEVAAR!
D
!
A
Blanke leidingen nooit met blote handen aanraken.
VOORZICHTIG!
Let er voor de ingebruikneming op dat toevoerleiding en stekker
droog zijn.
LET OP!
Gebruik geen elektrische toestellen binnen de koelkast,
behalve als deze elektrische toestellen daarvoor door de
fabrikant worden aanbevolen.
Plaats de koelkast niet in de buurt van open vuur of andere
warmtebronnen (verwarming, sterke zonnestraling, gasovens
enz.).
Oververhittingsgevaar!
Let er altijd op dat de warmte die bij het gebruik ontstaat goed
afgevoerd kan worden. Zorg ervoor dat de koelkast op voldoende afstand tot wanden en voorwerpen staat, zodat de lucht
kan circuleren (afb. 3, pagina 3).
Let erop dat de ventilatieopeningen niet worden afgedekt.
De koelkast mag niet aan regen worden blootgesteld.
Dompel de koelkast nooit onder in water.
Bescherm de koelkast en de kabels tegen hitte en vocht.
Voorkom dat de inhoud de wanden van de koelruimte raakt.
61
Page 62

NL
Omvang van de levering HC302, HC502
3 Omvang van de levering
Hoeveelheid Omschrijving
1 Koelkast
1Greep
1 Batterij (CR1632)
1 Gebruiksaanwijzing
Deze handleiding is ook in PDF-formaat verkrijgbaar (bijvoorbeeld op de
fabrikantwebsite).
4 Gebruik volgens bestemming
De koelkast is geschikt voor de opslag van medicamenten en medische producten die bij temperaturen tussen +2 °C en +8 °C kunnen worden opgeslagen.
VOORZICHTIG!
!
De koelkast is niet geschikt voor de opslag van bloed.
5 Technische beschrijving
5.1 Beschrijving van de werking
Alle in de koelkast gebruikte materialen zijn geschikt voor medische
producten.
Het koelcircuit is onderhoudsvrij.
De koelkast is als vrijstaande variant (FS) en als inbouwvariant (BIU) verkrijgbaar.
De vrijstaande variant (HC302FS, HC502FS) is voor vrijstaand gebruik
bedoeld. De afdekking van het koelaggregaat beschermt de warme delen
van het koelaggregaat. Het voetframe met ventilatierooster garandeert de
beluchting. Door verwijderen van het voetframe en de afdekking van het
aggregaat kan de koelkast als inbouwapparaat worden gebruikt.
62
Page 63

NL
HC302, HC502 Technische beschrijving
De inbouwvariant (HC302BIU, HC502BIU) is voor de inbouw in meubels
bedoeld. Hij heeft geen voetframe en geen afdekking van het koelaggregaat.
De digitale thermometer toont de laagste en de hoogste binnentemperatuur
en slaat deze op bij het laatste terugzetten, zodat u kunt controleren of medische producten bij correcte temperaturen worden opgeslagen.
5.2 Bedieningselementen
Nr. in
afb. 1,
pagina 2
1 Deurslot
2 Deur
3 Digitale thermometer (zie afb. 2, pagina 2)
4 Afdekking van het koelaggregaat
5 Lade
6 Binnenverlichting
7Ventilator
8 Voetframe
Beschrijving
Legenda bij afb. 2, pagina 2
Nr. Beschrijving
1 Actuele binnentemperatuur
2 Laagste binnentemperatuur
3 Hoogste binnentemperatuur
4 Reset-toets
63
Page 64

NL
Koelkast opstellen en aansluiten HC302, HC502
6 Koelkast opstellen en aansluiten
6.1 Koelkast uitpakken
➤ Controleer of de verpakking intact is.
➤ Verwijder het verpakkingsmateriaal.
➤ Controleer of de koelkast intact is.
Meld eventuele beschadigingen van de verpakking of de koelkast onmiddellijk aan de transportonderneming.
6.2 V rijstaande variant opstellen
Neem de volgende instructies bij het opstellen in acht:
Stel de koelkast zodanig op dat de verwarmde lucht goed kan wegtrek-
ken, omhoog of opzij.
Laat het toestel minstens vier uur staan alvorens het elektrisch aan te slui-
ten, zodat koelmiddel in de compressor kan terugstromen.
➤ Zet de koelkast op de gewenste plaats.
6.3 Inbouwvariant opstellen
Neem de volgende instructies bij het opstellen in acht:
Stel de koelkast zodanig op dat de verwarmde lucht goed kan wegtrekken
(omhoog of naar voren afb. 3, pagina 3).
Legenda bij afb. 3, pagina 3
Nr. Verklaring
1 Koude toevoerlucht
2 Warme afvoerlucht
Laat het toestel minstens vier uur staan alvorens het elektrisch aan te slui-
ten, zodat koelmiddel in de compressor kan terugstromen.
Controleer of de deur van de koelkast met minstens 100° kan worden
geopend. Anders kunnen de lades niet worden gebruikt.
64
Page 65

NL
HC302, HC502 Koelkast opstellen en aansluiten
➤ Bevestig de koelkast aan het meubelstuk door twee schroeven door de
bevestigingsboringen van de bodemplaat te schroeven (afb. 4,
pagina 3).
6.4 Koelkast elektrisch aansluiten
LET OP!
A
➤ Steek de stekker van de aansluitkabel in de wisselspanning-contactdoos.
➤ Plaats de batterij in de digitale thermometer (zie hoofdstuk „Batterij van
de digitale thermometer vervangen” op pagina 67).
✓ Het display wordt actief.
De eerste twee seconden toont het display geen temperatuurwaarden,
maar „--.-”. Daarna wordt de temperatuur weergegeven die de sensor
meet.
Alleen Groot-Brittannië: De koelkast wordt met een stekker
geleverd die een 3-A-zekering bevat. Als deze zekering wordt
vervangen, moet u een 3-A-zekering gebruiken die ASTA-goedgekeurd is (BS 1362).
6.5 Greep monteren en demonteren
➤ Monteer de greep zoals afgebeeld (afb. 7, pagina 5).
➤ Demonteer de greep zoals afgebeeld (afb. 8, pagina 5).
65
Page 66

NL
Koelkast gebruiken HC302, HC502
7 Koelkast gebruiken
INSTRUCTIE
I
7.1 Tips om energie te sparen
Kies een goed geventileerde en tegen zonnestralen beschermde plaats.
Open de koelkast niet vaker dan nodig.
Laat de deuren niet langer openstaan dan nodig.
Ontdooi de koelkast zodra er zich een ijslaag gevormd heeft.
7.2 Koelkast gebruiken
Voordat u de nieuwe koelkast in gebruik neemt, moet u deze
om hygiënische redenen van binnen en van buiten reinigen
met een vochtige doek (zie ook hoofdstuk „Reiniging en onderhoud” op pagina 69).
Voorkom dat de medicamenten de binnenwanden van de
koelkast raken om een efficiënte en gelijkmatige koeling te
garanderen. Als de lades te vol zijn, kunnen onacceptabele
temperatuurwaarden optreden.
INSTRUCTIE
I
Na de eerste ingebruikname, na het vervangen van de batterij of na het langdurig uitschakelen van de koelkast toont het display van de digitale thermometer (afb. 2, pagina 2) de actuele omgevingstemperatuur. Als de
binnentemperatuur de bedrijfstemperatuur bereikt, moet de thermometer
worden teruggezet zodat geen onjuiste hoogste temperatuur wordt weergegeven.
➤ Druk 5 seconden op de reset-toets (afb. 2 4, pagina 2).
66
De temperatuurwaarden worden in °C weergegeven. Dit kan niet
worden gewijzigd.
Page 67

NL
HC302, HC502 Koelkast gebruiken
De thermometer heeft een blauwe achtergrondverlichting om de
temperatuurwaarden beter te kunnen aflezen.
➤ Druk kort op de reset-toets (afb. 2 4, pagina 2).
✓ De blauwe achtergrondverlichting brandt 2 seconden.
De thermometer slaat de waarden van de laagste en hoogste binnentemperatuur op sinds het laatste terugzetten. Deze waarde worden gewist,
als de thermometer wordt teruggezet of als de batterij wordt vervangen.
7.3 Batterij van de digitale thermometer vervangen
Vervang de batterij van de digitale thermometer als volgt (afb. 9, pagina 6):
➤ Trek de sleutel eruit (1).
➤ Verwijder de slotafdekking met twee schroevendraaiers.
➤ Schroef de beide schroeven (2) uit de frontplaat.
➤ Druk de frontplaat (3) iets omhoog en verwijder hem door er licht aan te
trekken.
➤ Verwijder de batterij (4).
LET OP!
A
➤ Plaats een nieuwe batterij (CR1632).
➤ Monteer de frontplaat en de slotafdekking in omgekeerde volgorde.
Neem de correcte polariteit in acht (de „+” moet van boven
zichtbaar zijn).
67
Page 68

NL
Koelkast gebruiken HC302, HC502
7.4 Koelkast ontdooien
INSTRUCTIE
I
Luchtvochtigheid kan zich op de verdamper of in de binnenruimte van de
koelkast als rijp afzetten.
Een dunne rijplaag of waterdruppels kunnen in de binnenkant van de koelkast achterblijven, als deze langere tijd gekoeld heeft. Dat is normaal, aangezien het vocht in de lucht tot waterdruppels condenseert, als de
temperatuur in de koelkast afkoelt. De koelkast is niet defect.
Het dooiwater loopt door de dooiwaterafvoer in een opvangbak aan de
achterzijde van het apparaat boven de compressor waar het verdampt.
De koelkast moet elke drie weken worden ontdooid.
Ga als volgt te werk:
➤ Scheid de koelkast van het stroomnet.
➤ Demonteer de laden (zie hoofdstuk „Laden demonteren” op pagina 69).
Bij een zeer hoge omgevingstemperatuur kan het voorkomen dat
de koelkast ononderbroken werkt, hetgeen leidt tot een overmatige rijpvorming aan de achterwand van het koelvak.
➤ Laat de deur open.
➤ Wis het de binnenzijde van de koelkast na het ontdooien schoon met een
schone, vochtige doek.
➤ Monteer de laden.
7.5 Koelkast uitschakelen en stilleggen
Als u de koelkast lange tijd wilt stilleggen, gaat u als volgt te werk:
➤ Scheid de koelkast van het stroomnet.
➤ Reinig de koelkast (zie hoofdstuk „Reiniging en onderhoud” op
pagina 69).
➤ Laat de deur licht geopend.
Zo verhindert u geurvorming.
68
Page 69

NL
HC302, HC502 Reiniging en onderhoud
7.6 Laden demonteren
U kunt de laden demonteren, bijvoorbeeld voor de reiniging.
Ga als volgt te werk (afb. 0, pagina 6):
➤ Open de deur (A).
➤ Trek de lade eruit (B).
➤ Druk de bevestigingsstiften van buiten naar binnen (C).
➤ Verwijder de lade (D).
➤ Monteer de lade in omgekeerde volgorde.
8 Reiniging en onderhoud
WAARSCHUWING!
!
A
Scheid de koelkast voor reiniging en onderhoud van het net.
LET OP!
Gebruik voor het reinigen geen bijtende schoonmaakmiddelen
of harde voorwerpen, de koelkast zou hierdoor beschadigd
kunnen raken.
Gebruik nooit hard of spits gereedschap voor het verwijderen
van ijslagen of het losmaken van vastgevroren voorwerpen.
Gebruik geen mechanische of andere hulpmiddelen om het
ontdooien te versnellen.
➤ Reinig de koelkast regelmatig en als hij vuil is met een vochtige doek.
➤ Let erop dat er geen water in de afdichtingen druppelt. Dit kan de elektro-
nica beschadigen.
➤ Wis de koelkast na de reiniging droog met een doek.
➤ Controleer de dooiwaterafvoer regelmatig.
Reinig de dooiwaterafvoer indien nodig. Als deze verstopt is, blijft het
dooiwater achter op de bodem van de koelkast.
➤ Reinig de deurafdichtingen regelmatig.
➤ Vrijstaande variant: Reinig het rooster van de condensator en de
compressor aan de apparaatachterzijde regelmatig met een stofzuiger.
69
Page 70

NL
Storingen verhelpen HC302, HC502
9 Storingen verhelpen
Water in of onder de koelkas t
Storing Mogelijke oorzaak Oplossing
Water stroomt in de
binnenruimte van de
koelkast
Water stroomt op de
bodem.
Displayindicaties
Weergave Verklaring
Algemene fouten
Het display knippert een
keer per seconde.
Sensorfout
Het display knippert en
toont „E1”.
Batterij bijna leeg
Het display knippert en
toont afwisselend „E2”
en de actuele binnentemperatuur.
De dooiwaterafvoer is verstopt. Reinig de afvoer.
De opgeslagen medische producten
voorkomen dat het water naar de
dooiwaterafvoer stroomt.
Er bevindt zich te veel water in de
opvangbak.
Het display toont afwisselende de actuele binnentemperatuur en
de actieve foutcode (afb. 2 1, pagina 2) (E1 of E2, zie onderstaande)
De laagste en hoogste binnentemperatuur worden als laatst
bekende waarden opgeslagen.
De laagste en hoogste binnentemperatuur worden weergegeven
en door het inlezen van de actuele binnentemperatuur geactualiseerd.
Controleer of de medische
producten de achterwand
niet raken.
Reinig de waterafvoer.
10 Garantie
De wettelijke garantieperiode is van toepassing. Als het product defect is,
wendt u zich tot het filiaal van de fabrikant in uw land (adressen zie achterkant van de handleiding) of tot uw speciaalzaak.
Voor de afhandeling van de reparatie of garantie dient u de volgende documenten mee te sturen:
een kopie van de factuur met datum van aankoop,
reden van de klacht of een beschrijving van de storing.
70
Page 71

NL
HC302, HC502 Afvoer
11 Afvoer
WAARSCHUWING! Gevaar voor kinderen!
!
A
➤ Laat het verpakkingsmateriaal indien mogelijk recyclen.
M
Voor het afvoeren van uw oude koelkast:
Demonteer de lade.
Laat de laden in de zodat kinderen er niet kunnen instappen.
LET OP!
Bij het apparaat wordt een isolatiegas gebruikt (zie typeplaatje).
Informeer u bij de verantwoordelijke plaatselijke autoriteit of bij uw
plaatselijke afvalverwerkingsbedrijf over de correcte afvoer, en
zorg ervoor dat het toestel en alle stoffen vakkundig worden afgevoerd.
Als u het product definitief buiten bedrijf stelt, informeer dan bij het
dichtstbijzijnde recyclingcentrum of uw speciaalzaak naar de
betreffende afvoervoorschriften.
71
Page 72

NL
Technische gegevens HC302, HC502
12 Technische gegevens
HC302 HC502
Bruto-inhoud: 33 l 49 l
Nuttige inhoud: 29 l 43 l
Aansluitspanning: 220 – 240 V
Opgenomen vermogen: 0,42 kWh/24 h 0,44 kWh/24 h
Stroomverbruik: 0,54 A
Koelvermogen: +2 °C tot +8 °C
Klimaatklasse: SN
Koelmiddel: R134a
Koelmiddelhoeveelheid: 38 g
Afmetingen: zie afb. a, pagina 7 zie afb. b, pagina 7
Gewicht: ca. 20 kg ca. 22 kg
Keurmerk/certificaat:
Gekeurd naar volgende EEG-richtlijnen:
LVD-richtlijnen: 2006/95/EC
EMC-richtlijnen: 2004/108/EC
CE-richtlijnen: 93/68/EC
RoHS-richtlijnen: 2002/95/EC
WEEE-richtlijnen: 2002/96/EC
72
Page 73

Page 74

Page 75

Page 76

GERMANY
Dometic WAECO International GmbH
Hollefeldstraße 63 · D-48282 Emsdetten
+49 (0) 2572 879-195 · +49 (0) 2572 879-322
Mail: info@dometic-waeco.de · Internet: www.dometic-waeco.de
AUSTRALIA
Dometic Australia Pty. Ltd.
1 John Duncan Court
Varsity Lakes QLD 4227
1800 212121
+61 7 55076001
Mail: sales@dometic-waeco.com.au
AUSTRIA
Dometic Austria GmbH
Neudorferstraße 108
A-2353 Guntramsdorf
+43 2236 908070
+43 2236 90807060
Mail: info@dometic.at
BENELUX
Dometic Branch Office Belgium
Zincstraat 3
B-1500 Halle
+32 2 3598040
+32 2 3598050
Mail: info@dometic.be
BRAZIL
Dometic DO Brasil LTDA
Avenida Paulista 1754, conj. 111
SP 01310-920 Sao Paulo
+55 11 3251 3352
+55 11 3251 3362
Mail: info@dometic.com.br
DENMARK
Dometic Denmark A/S
Nordensvej 15, Taulov
DK-7000 Fredericia
+45 75585966
+45 75586307
Mail: info@dometic.dk
FINLAND
Dometic Finland OY
Mestarintie 4
FIN-01730 Vantaa
+358 20 7413220
+358 9 7593700
Mail: info@dometic.fi
FRANCE
Dometic SAS
ZA du Pré de la Dame Jeanne
B.P. 5
F-60128 Plailly
+33 3 44633525
+33 3 44633518
Mail : vehiculesdeloisirs@dometic.fr
HONG KONG
Dometic Group Asia Pacific
Suites 2207-11 · 22/F · Tower 1
The Gateway · 25 Canton Road,
Tsim Sha Tsui · Kowloon
+852 2 4611386
+852 2 4665553
Mail: info@waeco.com.hk
HUNGARY
Dometic Zrt. Sales Office
Kerékgyártó u. 5.
H-1147 Budapest
+36 1 468 4400
+36 1 468 4401
Mail: budapest@dometic.hu
ITALY
Dometic Italy S.r.l.
Via Virgilio, 3
I-47122 Forlì (FC)
+39 0543 754901
+39 0543 754983
Mail: vendite@dometic.it
JAPAN
Dometic KK
Maekawa-Shibaura, Bldg. 2
2-13-9 Shibaura Minato-ku
Tokyo 108-0023
+81 3 5445 3333
+81 3 5445 3339
Mail: info@dometic.jp
MEXICO
Dometic Mx, S. de R. L. de C. V.
Circuito Médicos No. 6 Local 1
Colonia Ciudad Satélite
CP 53100 Naucalpan de Juárez
Estado de México
+52 55 5374 4108
+52 55 5393 4683
Mail: info@dometic.com.mx
NETHERLANDS
Dometic Benelux B.V.
Ecustraat 3
NL-4879 NP Etten-Leur
+31 76 5029000
+31 76 5029019
Mail: info@dometic.nl
NEW ZEALAND
Dometic New Zealand Ltd.
Unite E, The Gate
373 Neilson Street
Penrose 1, Auckland
+64 9 622 1490
+64 9 622 1573
Mail: customerservices@dometic.co.nz
NORWAY
Dometic Norway AS
Østerøyveien 46
N-3232 Sandefjord
+47 33428450
+47 33428459
Mail: firmapost@dometic.no
POLAND
Dometic Poland Sp. z o.o.
Ul. Puławska 435A
PL-02-801 Warszawa
+48 22 414 3200
+48 22 414 3201
Mail: info@dometic.pl
PORTUGAL
Dometic Spain, S.L.
Branch Office em Portugal
Rot. de São Gonçalo nº 1 – Esc. 12
2775-399 Carcavelos
+351 219 244 173
+351 219 243 206
Mail: info@dometic.pt
RUSSIA
Dometic RUS LLC
Komsomolskaya square 6-1
RU-107140 Moscow
+7 495 780 79 39
+7 495 916 56 53
Mail: info@dometic.ru
SINGAPORE
Dometic Pte Ltd
18 Boon Lay Way 06–140 Trade Hub 21
Singapore 609966
+65 6795 3177
+65 6862 6620
Mail: dometic@dometic.com.sg
SLOVAKIA
Dometic Slovakia s.r.o. Sales Office
Bratislava
Nádražná 34/A
900 28 Ivanka pri Dunaji
/ +421 2 45 529 680
Mail: bratislava@dometic.com
SOUTH AFRICA
Dometic (Pty) Ltd.
Regional Office
South Africa & Sub-Saharan Africa
2 Avalon Road
West Lake View Ext 11
Modderfontein 1645
Johannesburg
+27 11 4504978
+27 11 4504976
Mail: info@dometic.co.za
SPAIN
Dometic Spain S.L.
Avda. Sierra del Guadarrama, 16
E-28691 Villanueva de la Cañada
Madrid
+34 902 111 042
+34 900 100 245
Mail: info@dometic.es
SWEDEN
Dometic Scandinavia AB
Gustaf Melins gata 7
S-42131 Västra Frölunda
+46 31 7341100
+46 31 7341101
Mail: info@dometicgroup.se
SWITZERLAND
Dometic Switzerland AG
Riedackerstrasse 7a
CH-8153 Rümlang
+41 44 8187171
+41 44 8187191
4445101393 207.5933.01 02/2016
www.dometic.com
 Loading...