

Page 1
EN
DE
FRESPT
IT
NL
DA
SV
NO
FI
RU
PL
SK
CS
HU
AIR CONDITIONERS
FRESHLIGHT
Kattooilmastointilaitteisto
Käyttöohje . . . . . . . . . . . . . . . . . . . . . . . . .303
Накрышный кондиционер
Инструкция по эксплуатации . . . . . . . . . 330
Klimatyzator dachowy
Instrukcja obsługi . . . . . . . . . . . . . . . . . . . 360
Strešné klimatizačné zariadenie
Návod na obsluhu. . . . . . . . . . . . . . . . . . . 389
FL1600, FL2200
Air conditioning roof unit
Operating manual . . . . . . . . . . . . . . . . . . . . . 9
Dachklimaanlage
Bedienungsanleitung . . . . . . . . . . . . . . . . .38
Climatiseur de toit
Notice d’utilisation . . . . . . . . . . . . . . . . . . .68
Aire acondicionado de techo
Instrucciones de uso . . . . . . . . . . . . . . . . . .99
Ar condicionado para tejadilho
Manual de instruções . . . . . . . . . . . . . . . . 130
Climatizzatore a tetto
Istruzioni per l’uso . . . . . . . . . . . . . . . . . . .160
Airconditioning voor dakinbouw
Gebruiksaanwijzing. . . . . . . . . . . . . . . . . .189
Klimaanlæg til tagmontering
Betjeningsvejledning . . . . . . . . . . . . . . . .218
Střešní klimatizace
Návod k obsluze . . . . . . . . . . . . . . . . . . . . 419
Te t ők l í ma - b e r e n d e z és
Használati utasítás. . . . . . . . . . . . . . . . . . . 447
Takmonterad klimatanläggning
Bruksanvisning. . . . . . . . . . . . . . . . . . . . . 246
Takmontert klimaanlegg
Bruksanvisning. . . . . . . . . . . . . . . . . . . . . 276
Page 2
Page 3
Dometic FreshLight
1
5
4
3
1
2
2
1
2
3
4
3
Page 4
+
-
MODE
°C
CLOCK
TIMER
SET
SLEEP
R
OOM
F°/C°
LIGHT
3
Dometic FreshLight
17
16
15
14
13
12
08:00
ON
20:00
OFF
1
2
3
4
5
6
7
8
9
4
11
10
F
F
1
234
1
O
4
Page 5
Dometic FreshLight
1
5
6
2
1
5
Page 6
7
8
Dometic FreshLight
1
9
1
1
6
Page 7
Dometic FreshLight
0
a
A
A
B
1
2
1
B
C
2
3
7
Page 8
b
Dometic FreshLight
8
Page 9

EN
Dometic FreshLight
Please read this instruction manual carefully before first use, and store it in
a safe place. If you pass on the product to another person, hand over this
instruction manual along with it.
Table of contents
1 Explanation of symbols . . . . . . . . . . . . . . . . . . . . . . . . . . . . . . . . . . . . . . .10
2 Safety instructions . . . . . . . . . . . . . . . . . . . . . . . . . . . . . . . . . . . . . . . . . . . 11
2.1 General safety . . . . . . . . . . . . . . . . . . . . . . . . . . . . . . . . . . . . . . . . . . . 11
2.2 Operating the device safely . . . . . . . . . . . . . . . . . . . . . . . . . . . . . . . .12
3 Target group for this manual . . . . . . . . . . . . . . . . . . . . . . . . . . . . . . . . . .13
4 Scope of delivery. . . . . . . . . . . . . . . . . . . . . . . . . . . . . . . . . . . . . . . . . . . . .13
5Optional extras . . . . . . . . . . . . . . . . . . . . . . . . . . . . . . . . . . . . . . . . . . . . . .13
6 Intended use. . . . . . . . . . . . . . . . . . . . . . . . . . . . . . . . . . . . . . . . . . . . . . . . .14
7 Technical description . . . . . . . . . . . . . . . . . . . . . . . . . . . . . . . . . . . . . . . . .14
7.1 Components . . . . . . . . . . . . . . . . . . . . . . . . . . . . . . . . . . . . . . . . . . . .15
7.2 Control panel. . . . . . . . . . . . . . . . . . . . . . . . . . . . . . . . . . . . . . . . . . . .16
7.3 Remote control . . . . . . . . . . . . . . . . . . . . . . . . . . . . . . . . . . . . . . . . . .17
7.4 Air conditioning modes . . . . . . . . . . . . . . . . . . . . . . . . . . . . . . . . . . .19
7.5 Additional functions . . . . . . . . . . . . . . . . . . . . . . . . . . . . . . . . . . . . . 20
8 Before initial use . . . . . . . . . . . . . . . . . . . . . . . . . . . . . . . . . . . . . . . . . . . . .21
9 Operating the roof air conditioner . . . . . . . . . . . . . . . . . . . . . . . . . . . . 22
9.1 Basic notes on operation . . . . . . . . . . . . . . . . . . . . . . . . . . . . . . . . . 22
9.2 Using the remote control . . . . . . . . . . . . . . . . . . . . . . . . . . . . . . . . . 22
9.3 Hint for improved use . . . . . . . . . . . . . . . . . . . . . . . . . . . . . . . . . . . . 23
9.4 Switching the roof air conditioner on and off. . . . . . . . . . . . . . . . . . 24
9.5 Selecting the air conditioning mode . . . . . . . . . . . . . . . . . . . . . . . . 25
9.6 Selecting the blower setting manually . . . . . . . . . . . . . . . . . . . . . . . 26
9.7 Setting the temperature . . . . . . . . . . . . . . . . . . . . . . . . . . . . . . . . . . 26
9.8 Adjusting the air nozzles . . . . . . . . . . . . . . . . . . . . . . . . . . . . . . . . . . 27
9.9 Setting the timer . . . . . . . . . . . . . . . . . . . . . . . . . . . . . . . . . . . . . . . . 27
9.10 Activating the sleep function . . . . . . . . . . . . . . . . . . . . . . . . . . . . . . 29
9.11 Activating the “I feel” function . . . . . . . . . . . . . . . . . . . . . . . . . . . . . 29
9.12 Operating the lights . . . . . . . . . . . . . . . . . . . . . . . . . . . . . . . . . . . . . 30
9.13 Replacing the remote control batteries . . . . . . . . . . . . . . . . . . . . . . 30
9
Page 10
EN
Explanation of symbols Dometic FreshLight
9.14 Setting the time . . . . . . . . . . . . . . . . . . . . . . . . . . . . . . . . . . . . . . . . . .31
9.15 Using the blinds. . . . . . . . . . . . . . . . . . . . . . . . . . . . . . . . . . . . . . . . . .31
10 Cleaning the roof air conditioner . . . . . . . . . . . . . . . . . . . . . . . . . . . . . 32
11 Maintenance of the roof air conditioner . . . . . . . . . . . . . . . . . . . . . . . 33
12 Troubleshooting . . . . . . . . . . . . . . . . . . . . . . . . . . . . . . . . . . . . . . . . . . . . 34
13 Warranty . . . . . . . . . . . . . . . . . . . . . . . . . . . . . . . . . . . . . . . . . . . . . . . . . . . 35
14 Disposal . . . . . . . . . . . . . . . . . . . . . . . . . . . . . . . . . . . . . . . . . . . . . . . . . . . . 35
15 Technical data . . . . . . . . . . . . . . . . . . . . . . . . . . . . . . . . . . . . . . . . . . . . . . 37
1 Explanation of symbols
WARNING!
!
Safety instruction: Failure to observe this instruction can cause fatal or
serious injury.
!
A
I
CAUTION!
Safety instruction: Failure to observe this instruction can lead to injury.
NOTICE!
Failure to observe this instruction can cause material damage and impair
the function of the product.
NOTE
Supplementary information for operating the product.
10
Page 11

EN
Dometic FreshLight Safety instructions
2 Safety instructions
The manufacturer accepts no liability for damage in the following cases:
• Damage to the product resulting from mechanical influences and excess voltage
• Alterations to the product without express permission from the manufacturer
• Use for purposes other than those described in the operating manual
In particular, the manufacturer will not be liable for any consequential damage,
especially consequential damage caused by failure of the roof air conditioner.
Note the following basic safety information when using electrical devices to protect
against:
• Electric shock
• Fire hazards
• Injury
2.1 General safety
WARNING!
!
• Electrical devices are not toys.
Keep electrical appliances out of reach of children or infirm persons.
Do not let them use the appliances without supervision.
• Persons (including children) whose physical, sensory or mental
capabilities or whose lack of experience and knowledge prevent them
from using the device safely should not use it without supervision or
instruction by a responsible person.
• Only use the device as intended.
• Do not make any alterations or conversions to the device.
• Installation, maintenance and repairs of the roof air conditioner may
only be carried out by qualified personnel who are familiar with the
risks involved and the relevant regulations. Inadequate repairs may
cause serious hazards. For repair service, please contact the service
centre in your country (addresses on the back page).
• Do not use the roof air conditioner near flammable fluids or in closed
rooms.
• Make sure no combustible objects are stored or installed near the air
outlet. A distance of at least 50 cm must be kept.
11
Page 12
EN
Safety instructions Dometic FreshLight
• Do not reach into air outlets or insert any foreign objects in the roof air
conditioner.
• Do not undo the upper cover of the roof air conditioner in the event of
a fire. Use approved extinguishing agents instead. Do not use water to
extinguish fires.
NOTICE!
A
2.2 Operating the device safely
• Never drive through automatic car washes when the roof air
conditioner is mounted.
• Please ask your vehicle manufacturer if a technical inspection is
required after fitting an air conditioner and whether the height entered
in your vehicle documents needs to be altered (increased height
210 mm).
• If faults occur in the roof air conditioner's refrigerant circuit, the roof air
conditioner must be checked by a specialist company and properly
repaired. The refrigerant must never be released into the air.
WARNING!
• Always disconnect the power supply when working on the device.
!
NOTICE!
A
• Do not operate the roof air conditioner if the ambient temperature is
below 0 °C. There is a risk of damage from freezing condensation.
12
• The roof air conditioner is not suitable for use in agricultural or
construction vehicles.
• Operate the device only if you are certain that the housing and the
cables are undamaged.
Page 13
EN
Dometic FreshLight Target group for this manual
3 Target group for this manual
This operating manual is for the user of the roof air conditioner.
4Scope of delivery
FreshLight 1600
Designation Item number
Dometic FreshLight 1600 roof air conditioner 9102900207
Installation manual
Operating manual
FreshLight 2200
Designation Item number
Dometic FreshLight 2200 roof air conditioner 9102900165
Installation manual
Operating manual
5Optional extras
Available as an option (not included in scope of delivery):
Designation Item number
DC extension kit DC-Kit2 9100300001
DC extension kit DC-Kit3 9100300002
DC extension kit DC-Kit5 9100300073
NOTE
I
The DC extension kit (accessory) allows the Dometic FreshLight roof air
conditioner to be used while in motion.
13
Page 14
EN
Intended use Dometic FreshLight
6 Intended use
The Dometic FreshLight roof air conditioner with integrated roof window can
condition the interior of campers and caravans with cool or warm air.
The roof air conditioner is not suitable for installation in construction machines, agricultural machines or similar equipment. It will not work properly if exposed to strong
vibrations.
The operating mode of the roof air conditioner is guaranteed for temperature up to
52 °C.
Do not operate the roof air conditioner in the “Heating” air conditioning mode if the
room temperature is above 30 °C.
Heating operation is recommended at ambient temperatures of +2 °C and above.
7 Technical description
The roof air conditioner with integrated window supplies the interior with cool or
warm dehumidified air without dust and dirt. Used air can be extracted from the
interior with a blower.
Two dimmable LED lamps integrated in the air outlet unit provide pleasant lighting.
The roof window has two blinds: the blackout roller blind lets no light through, while
the sun protection blind protects from direct sunlight.
The roof air conditioner is operated with the remote control.
NOTE
I
When the outside temperature drops, the heating capacity of the roof air conditioner
sinks. Heating operation is recommended only at temperatures of +2 °C and above.
The roof air conditioner can lower or raise the temperature within the
vehicle to a certain level. The temperature depends on the type of
vehicle, the ambient temperature and the cooling capacity of your roof
air conditioner. Below an outer temperature of 16 °C the roof air
conditioner does not cool anymore. In this case only use the air
conditioning mode “Circulating air”.
14
Page 15
EN
Dometic FreshLight Technical description
7.1 C o m p o n en t s
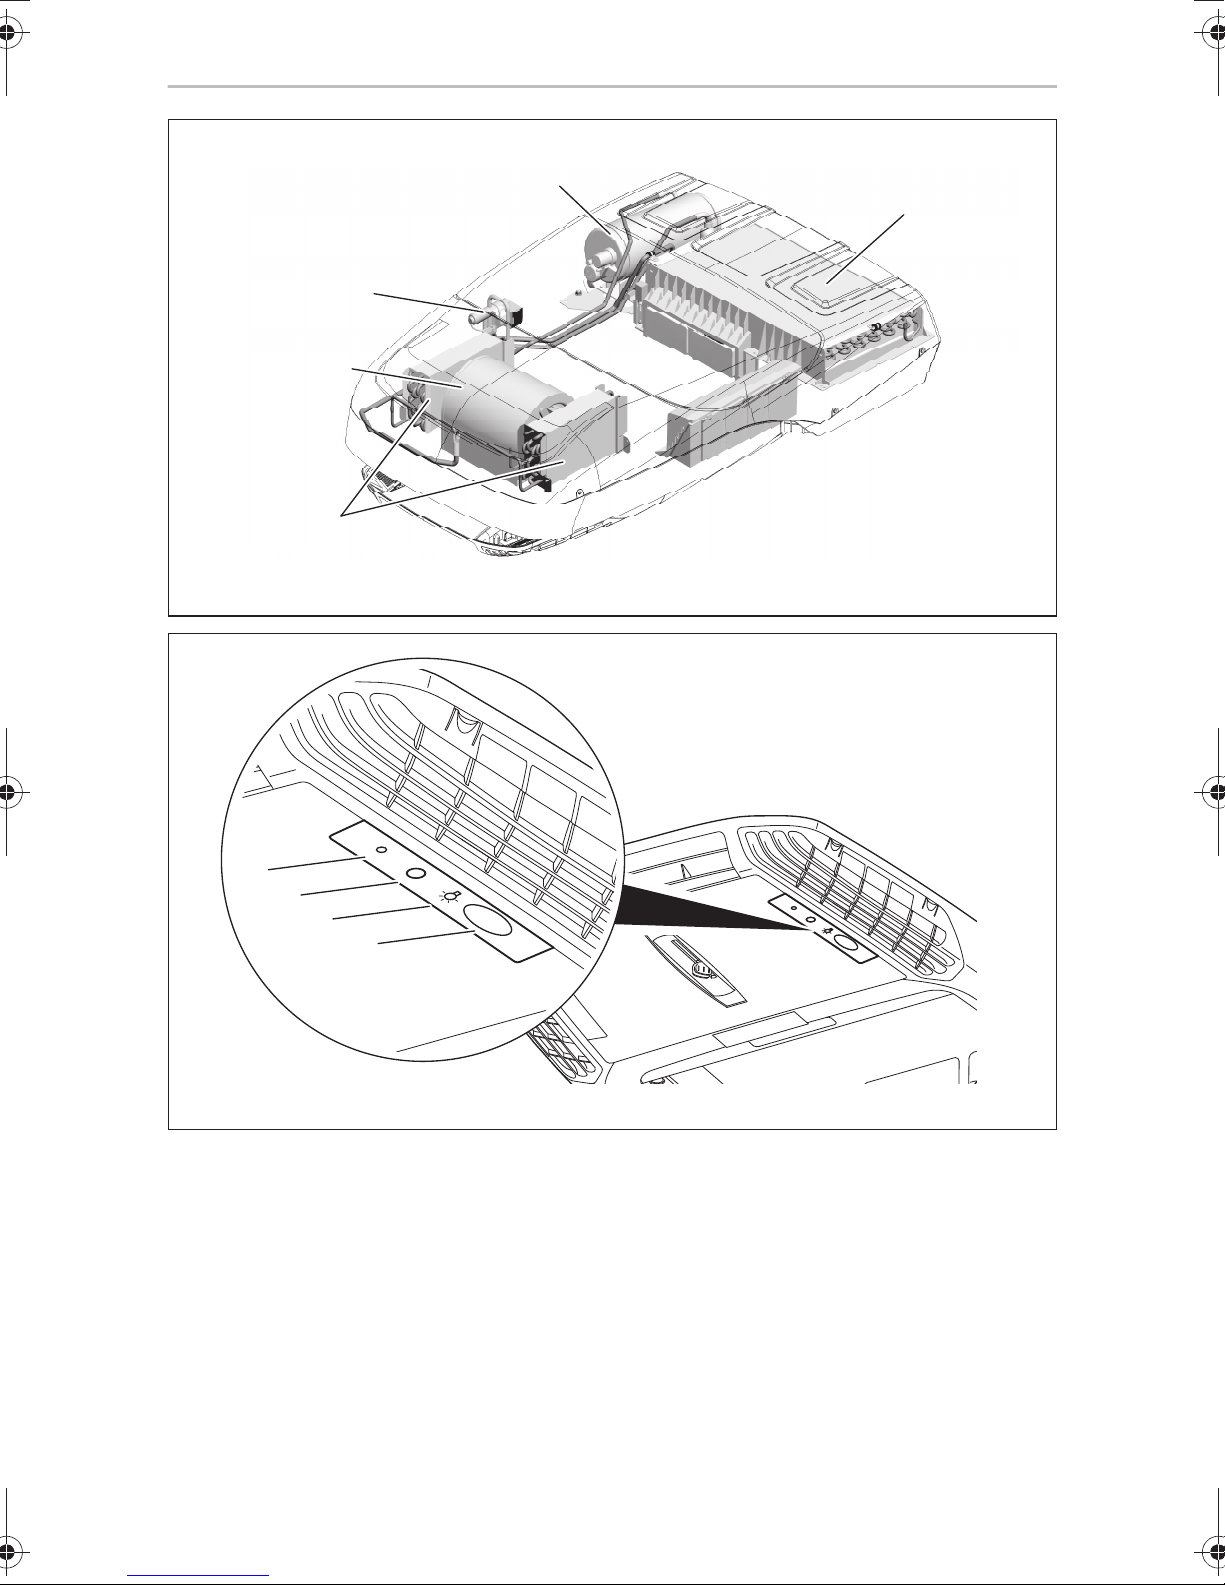
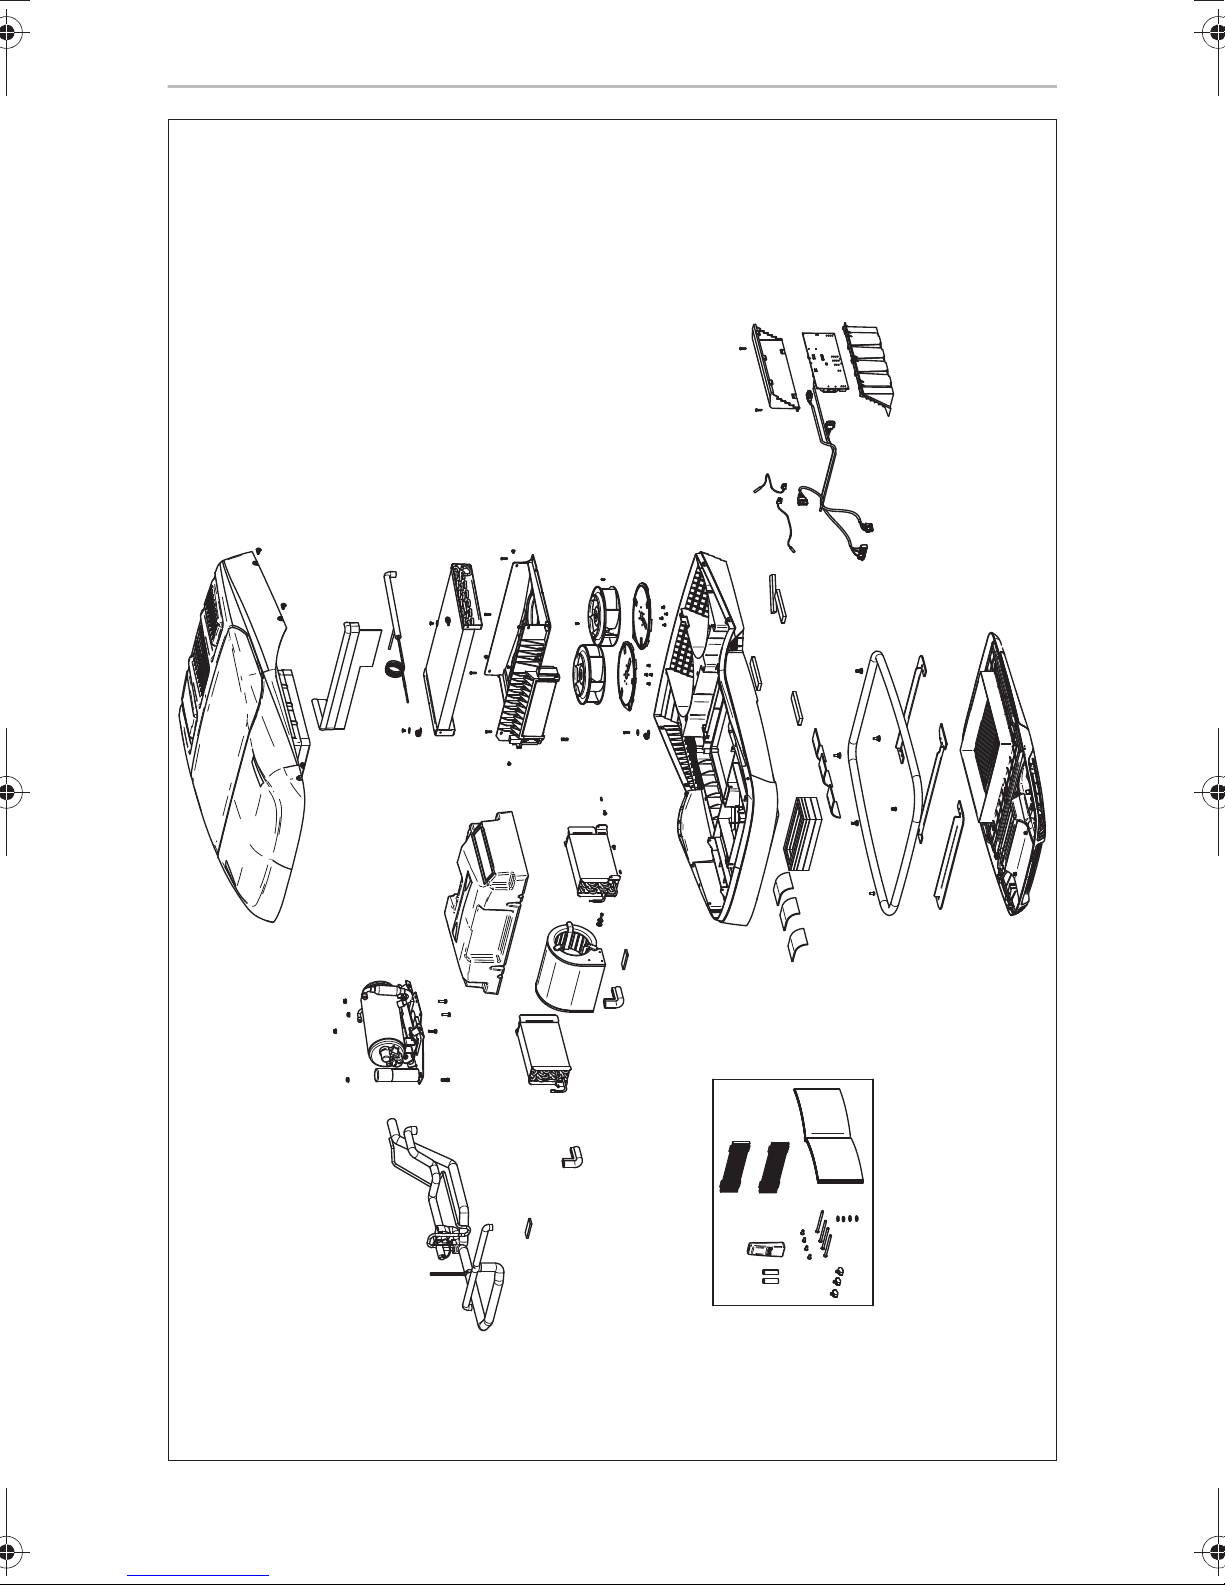
The refrigerant circuit of the roof air conditioner consists of five main components
(fig. 1, page 3):
• Compressor (1)
The compressor draws in the R407c refrigerant used and compresses it. This
raises the pressure and therefore the temperature of the refrigerant.
• Condenser (2)
The built-in liquefier works like a cooler or heat exchanger. The air flowing past
absorbs the heat and the hot refrigerant gas cools down and becomes liquid.
• Evaporator (3)
The evaporators cool down and dehumidify the air flowing past them. The
refrigerant absorbs the heat and vaporises.
• Blower (4)
A blower distributes the cooled air within the vehicle through an air outlet unit.
• Solenoid valve (5)
The solenoid valve allows the cooling cycle to be reversed and the air feeding in
to be heated.
Overview of all parts: fig. b, page 8.
15
Page 16
EN
Technical description Dometic FreshLight
7.2 Control panel
The control panel (fig. 2, page 3) is at the air outlet unit of the roof air conditioner.
It contains the following control and display elements:
No. Explanation
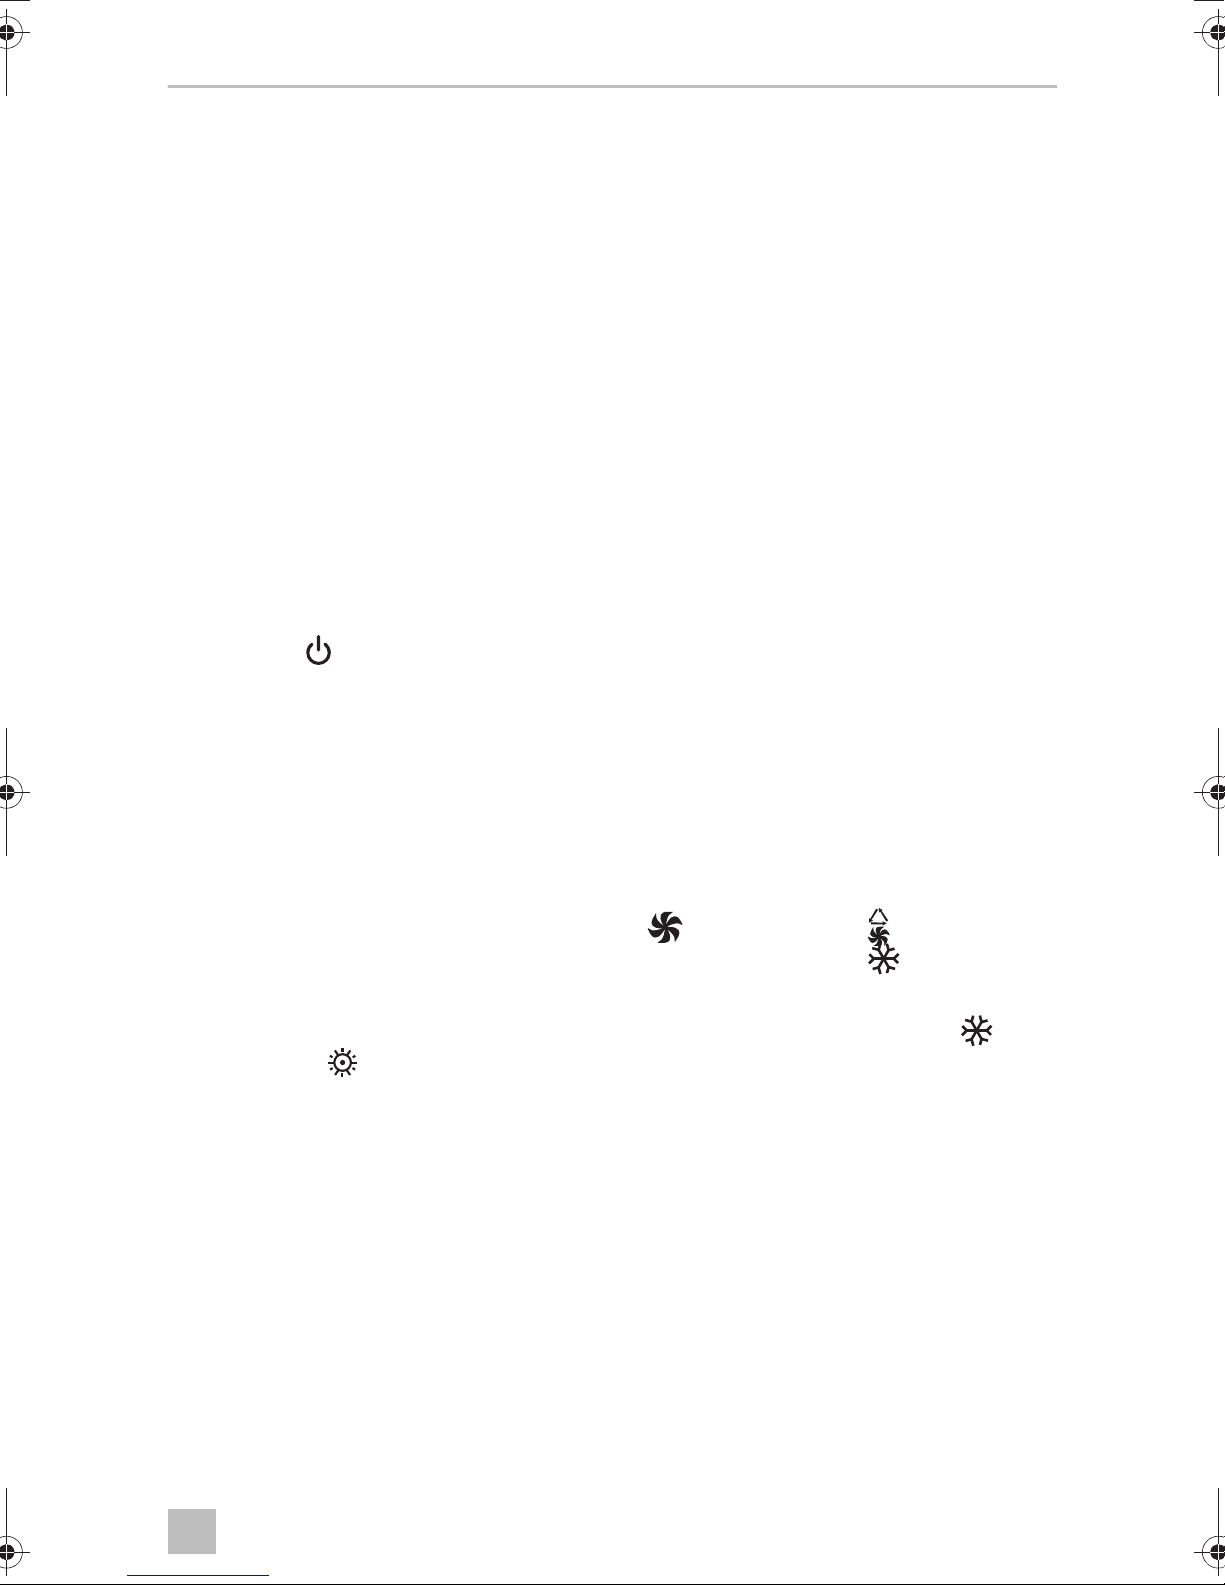
1 Status LED
No light: The roof air conditioner is switched off.
Orange light: The roof air conditioner is in stand-by mode.
Green light: The roof air conditioning is switched on.
Flashing green light: The roof air conditioner is switching to the “Heating”
conditioning mode ( ) or is being defrosted.
Red light: Only if the system is connected to 12 Vg: the supply
voltage of 230 Vw is not available.
Slowly flashing red
light:
Flashing red light: Malfunction in exterior temperature sensor E2
Quickly flashing red
light:
2
Button
3
Button
4 Infrared receiver for the remote control
Malfunction in interior temperature sensor E1
Malfunction in exterior temperature sensor E3
Switches the roof air conditioner on, off or to
stand-by mode
Pressing the button longer engages the automatic
mode.
Switches the light on or off or dims it.
Only active when the roof air conditioner is switched
on or on stand-by.
16
Page 17

EN
Dometic FreshLight Technical description
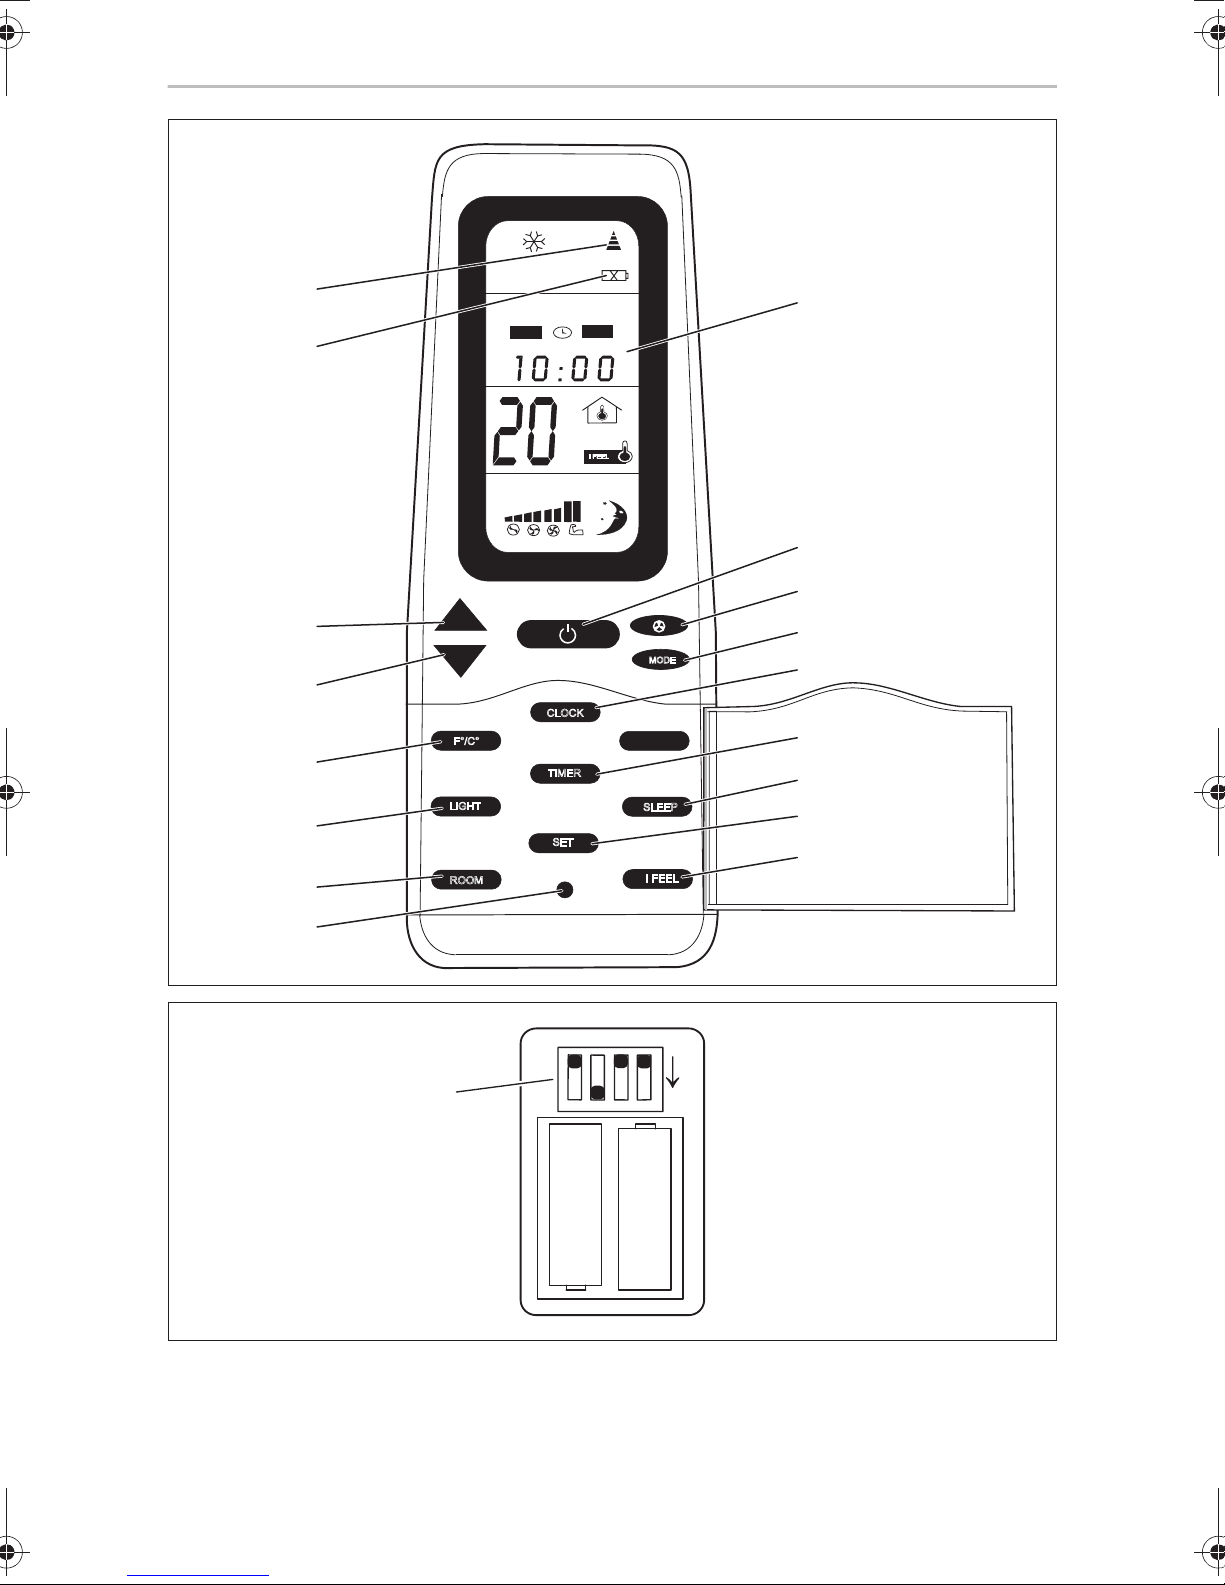
7.3 Remote control
All settings of the device (e. g. temperature settings, timer programming) are
transmitted to the roof air conditioner by remote control.
The following control and display elements are available on the remote control
(fig. 3, page 4):
No. Explanation
1 Digital display:
displays the following:
• Time
• Selected room temperature (target value) in °C or °F
• Actual room temperature
• Air conditioning mode
• Blower level
• Symbols for active additional functions
• Battery status
2
Button :
Switches the roof air conditioner and remote control on or to stand-by mode
3
Button :
Selects the blower setting
4 MODE button:
Selects the air conditioning mode
5 CLOCK button:
Sets the time
6 TIMER button:
Sets the timer
7 SLEEP button:
Activates the sleep function. The sleep function automatically reduces the target
value to provide a pleasant sleeping temperature.
17
Page 18
EN
Technical description Dometic FreshLight
No. Explanation
8 SET button:
Transmits current data to the roof air conditioner.
9 I FEEL button:
Activates the “I feel” function. Every 10 minutes, the “I feel” function adjusts the
target temperature to the temperature measured by the remote control.
The remote control must be pointed at the IR receiver (fig. 2 4, page 3) on the
control panel.
10 Reset button
Resets all values to standard values
11 ROOM button:
Press once:
Press again:
12 LIGHT button:
Switches the light of the roof air conditioner on or off.
The LIGHT button remains functional even when the remote control is switched off.
13 F°/C° button:
Switches between temperature units Celsius (°C) and Fahrenheit (°F)
14 – button:
Reduces the value
15 + button:
Increases the value
16
Symbol (batteries empty)
Is displayed when the batteries in the remote control are empty. If this happens,
replace the batteries, see “Replacing the remote control batteries” on page 30.
17
Symbol (transmitting values)
Is displayed briefly when the remote control is transmitting values to the roof air
conditioner.
Displays the current interior temperature (symbol is
displayed).
Displays the set temperature.
18
Page 19
EN
Dometic FreshLight Technical description
7.4 Air conditioning modes
The roof air conditioner has the following air conditioning modes:
Air conditioning
mode
Automatic You specify the temperature, and the roof air
Cooling You specify the temperature and blower settings, and
Heating You specify the temperature and blower settings, and
Circulating air You specify the blower level, and the roof air
Ventilation The roof air conditioner ventilates the interior by
Display
message
Explanation
conditioner brings the interior to this temperature by
heating or cooling and by controlling the necessary
blower output.
The button is deactivated in this mode.
the roof air conditioner cools the interior to this temperature.
the roof air conditioner heats the interior to this
temperature.
conditioner blows air into the interior
sucking the used air from the interior with the blower.
The ventilation flap is opened for this purpose.
.
The button is deactivated in this mode.
Dehumidification You specify the temperature, and the roof air
conditioner brings the interior to this temperature by
heating or cooling the air, by controlling the necessary
blower output and by dehumidifying the interior
(Circulating air mode).
The button is deactivated in this mode.
19
Page 20
EN
Technical description Dometic FreshLight
08:00
I FEEL
7.5 Additional functions
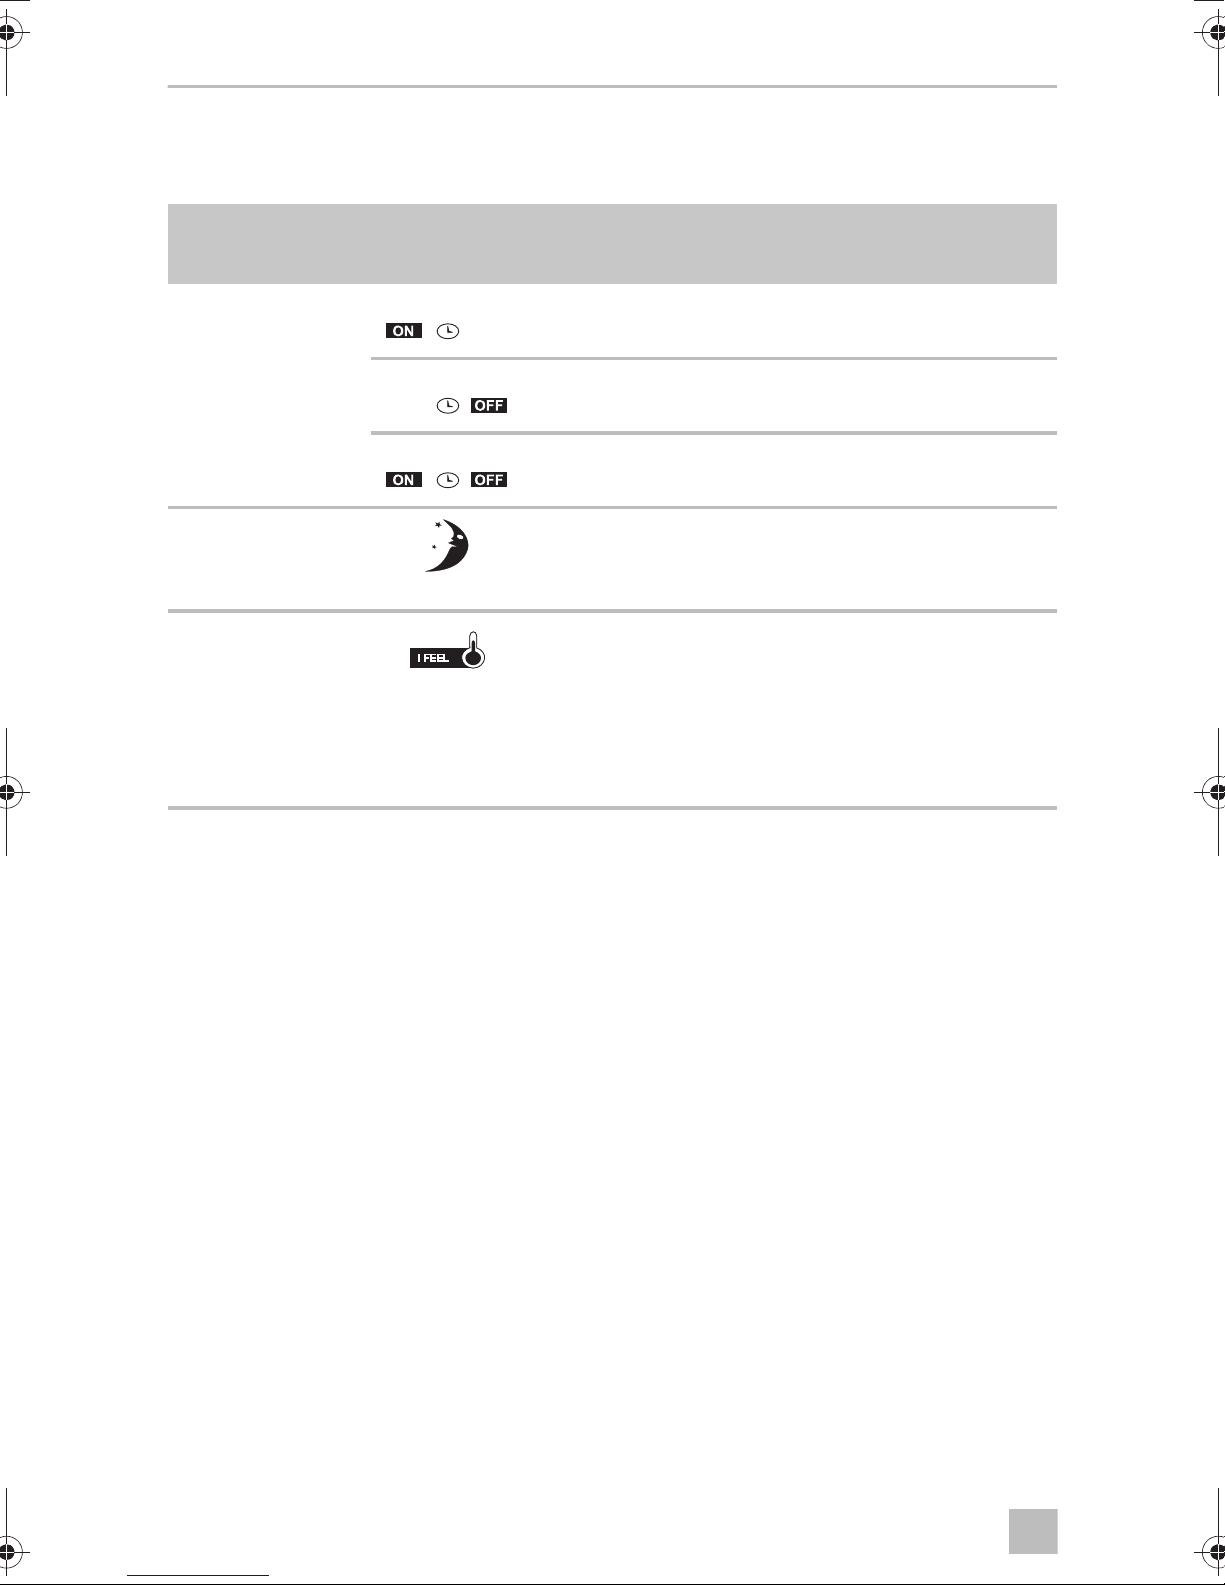
The roof air conditioner has the following additional functions:
Additional
function
Display
message
Explanation
Timer The roof air conditioner is switched on at the specified
time.
20:00
The roof air conditioner is switched off at the specified
time.
08:00 20:00
The roof air conditioner is switched on and off at the
specified times.
Sleep The set temperature is reduced by 1 °C after one hour
and by 2 °C after two hours to generate a pleasant
temperature for sleeping.
I feel The remote control measures the room temperature
and transmits this measurement to the roof air
conditioner every 10 minutes. The roof air conditioner
adapts the target value to this measurement.
The remote control must be pointed at the IR receiver
(fig. 2 4, page 3) on the control panel.
20
Page 21
EN
Dometic FreshLight Before initial use
8 Before initial use
Inspection before starting up
Before you switch on the roof air conditioner, observe the following:
➤ Check whether the supply voltage and frequency correspond to the values
specified in the technical data, see page 37.
➤ Ensure both the air intake opening and the air nozzles are free. All ventilation
grilles must always be kept free to ensure that the roof air conditioner is able to
operate at maximum capacity.
CAUTION! Beware of injury
!
Check remote control and insert batteries
Do not insert your fingers or objects into the air nozzles or the intake
grille.
➤ Insert the provided batteries in the remote control battery compartment, see
“Replacing the remote control batteries” on page 30.
➤ Check that the four Dip switches (fig. 4, page 4) are in the correct position.
➤ If you changed the position of the Dip switches: Acknowledge the new setting
using the Reset button (fig. 3 10
Setting the time
➤ Set the current time: see “Setting the time” on page 31.
, page 4).
21
Page 22
EN
Operating the roof air conditioner Dometic FreshLight
9 Operating the roof air conditioner
9.1 Basic notes on operation
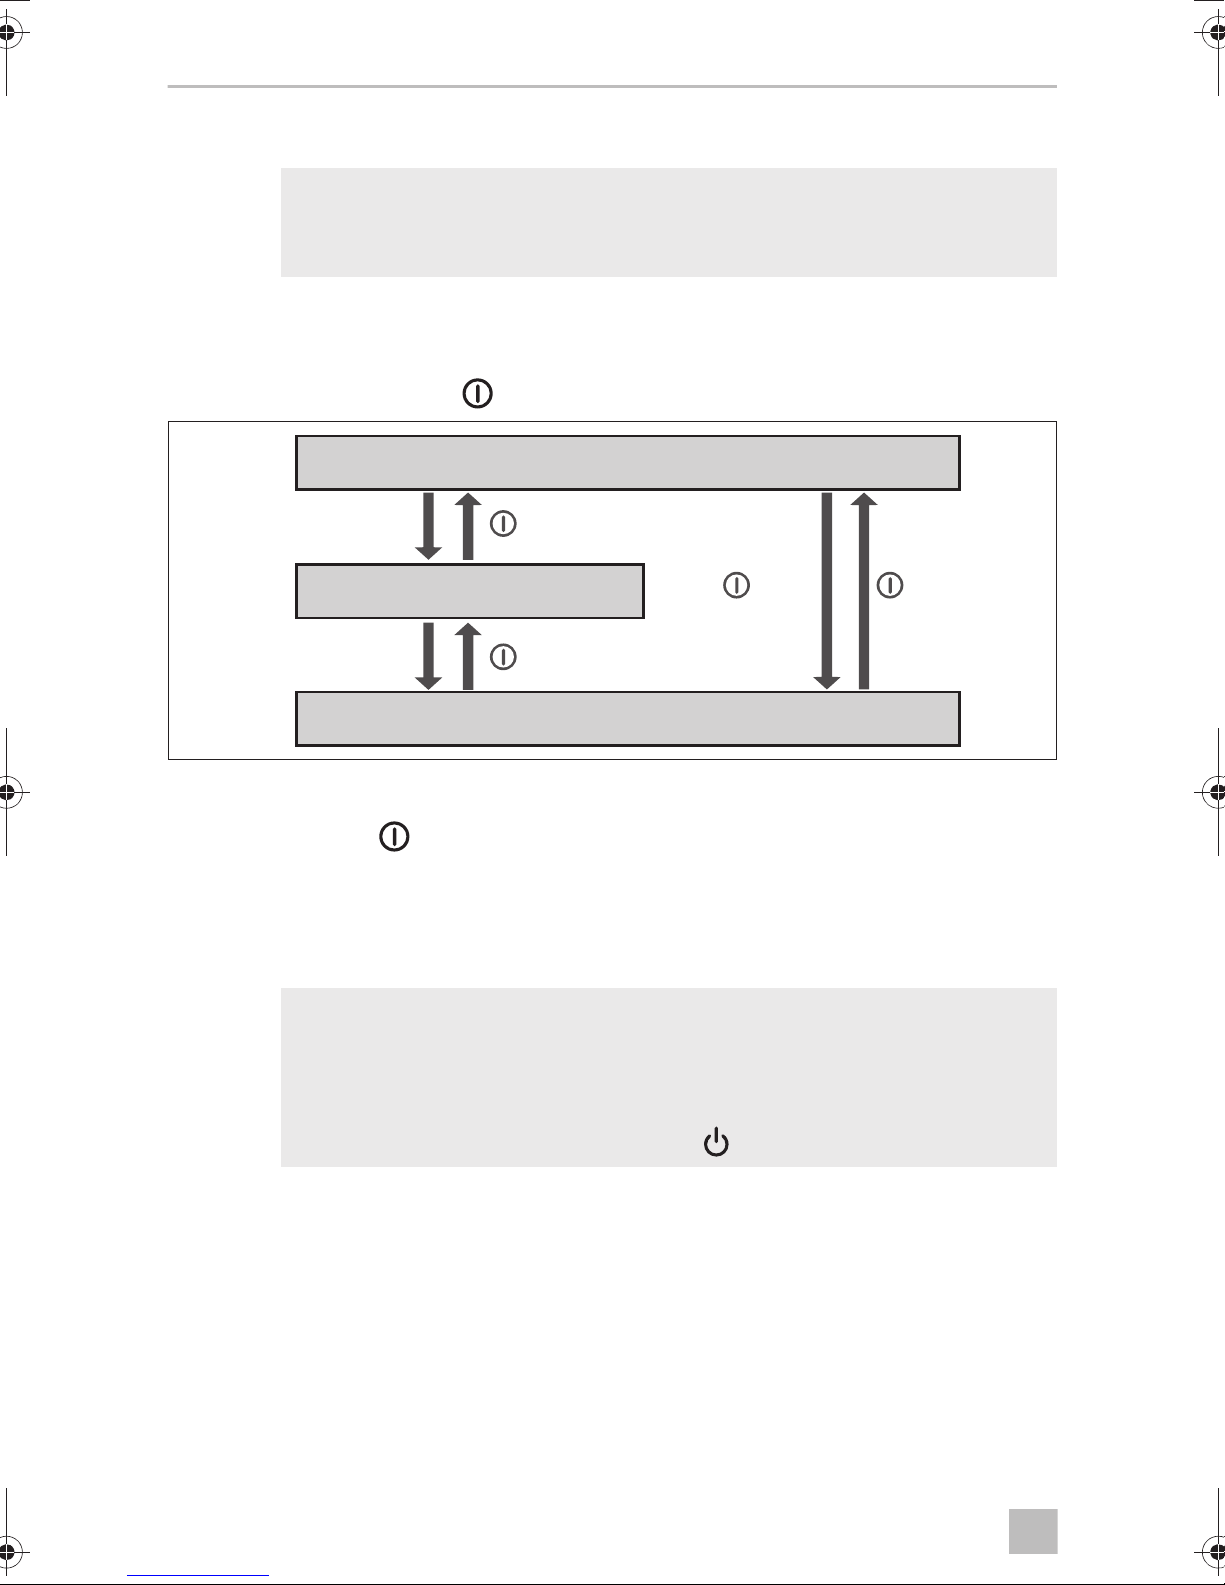
The roof air conditioner has three operating modes:
Operating mode Features
Off The roof air conditioner is switched off.
The remote control is inactive.
Stand-by The roof air conditioning is ready for operation and can be
switched on with the remote control.
On The roof air conditioner is conditioning the air in the interior.
You can use the control panel to
• switch the roof air conditioner on, off or to stand-by mode
• switch the light on and off or dim it
You can use the remote control to
• switch the roof air conditioner to and from stand-by mode.
• switch the light on and off
• make the settings
• select additional functions
9.2 Using the remote control
There are two ways to control the roof air conditioner with the remote control:
• You can transmit the values directly to the roof air conditioner when you set them
• You can first specify all values on the remote control and then transmit them
collectively to the roof air conditioner
Transmitting values directly when they are set
The remote control must be pointed at the IR receiver (fig. 2 4, page 3) on the
control panel during operation.
When a button is pressed, the value is transmitted directly to the roof air conditioner.
The roof air conditioner confirms the receipt of data with a high note.
22
Page 23
EN
Dometic FreshLight Operating the roof air conditioner
Specifying values and transmitting them collectively to the roof air
conditioner
The remote control may not be pointed at the IR receiver (fig. 2 4, page 3) on the
control panel during operation.
Specify the required values on the remote control. Once you have made all your
settings, point the remote control to the IR receiver on the control panel and press
the SET button. This transmits the data to the roof air conditioner. The roof air
conditioner confirms the receipt of data with a high note.
Switching only the remote control to or from stand-by
In stand-by mode, the remote control display shows only the time.
If the remote control is not pointing to the IR receiver (fig. 2 4, page 3) on the
control panel, you can activate the remote control or switch it to stand-by independently from the roof air conditioner:
➤ Press the button.
9.3 Hint for improved use
The following hints will optimise the performance of your roof air conditioner:
• Improve the heat insulation of your vehicle by sealing gaps and hanging reflective
blinds or curtains on your windows.
• If the vehicle has been subjected to direct sunlight for a long time: Operate the
roof air conditioner in the “Circulated air” ( ) or “Ventilation” ( ) mode with the
windows open for a while before switching on the “Cooling” ( ) air conditioning mode.
• Avoid opening doors and windows as far as possible in the “Cooling” ( ) and
“Heating” ( ) modes.
• Select an appropriate temperature and blower speed.
• Align the air nozzles sensibly.
• Make sure the air nozzles and intake grille are not covered by cloths, paper or
other objects.
23
Page 24
EN
Operating the roof air conditioner Dometic FreshLight
press
and
hold
press
briefly
press briefly
press and hold
Roof air conditioner switched off
Stand-by mode
Roof air conditioner switched on
9.4 Switching the roof air conditioner on and off
NOTE
I
With the control panel
The figure shows how to use the control panel to switch the roof air conditioner on,
off or to stand-by. Press the button as shown in the illustration:
When it is switched on, it begins to condition the air to the values that
were set most recently.
Example: The roof air conditioner is in stand-by mode. You want to switch it off.
➤ Briefly press the button.
✓ The roof air conditioner is switched off.
With the remote control
NOTE
I
• The roof air conditioner can only be operated by the remote control
when it is switched on or in stand-by mode.
• You can use the remote control to switch the roof air conditioner to
and from stand-by mode. Press the button.
24
Page 25
EN
Dometic FreshLight Operating the roof air conditioner
9.5 Selecting the air conditioning mode
NOTE
I
➤ Select the air conditioning mode of your choice using the MODE key, see “Air
conditioning modes” on page 19.
✓ The roof air conditioner confirms the receipt of the values with a high note.
✓ The roof air conditioner is switched to the selected air conditioning mode.
• Before selecting the “Ventilation” ( ) air conditioning mode, you
have to open both blinds completely.
• In the “Ventilation” ( ) mode, the blower only starts once the
ventilation flap (fig. 5 1, page 5) is open. This can take a few
minutes.
• When the roof air conditioner is switched to the “Heating” ( )
mode, it takes approx. 30 seconds before heating begins. During
this time, the status LED on the control panel flashes and the cooling
cycle is reversed.
25
Page 26
EN
Operating the roof air conditioner Dometic FreshLight
AUTO
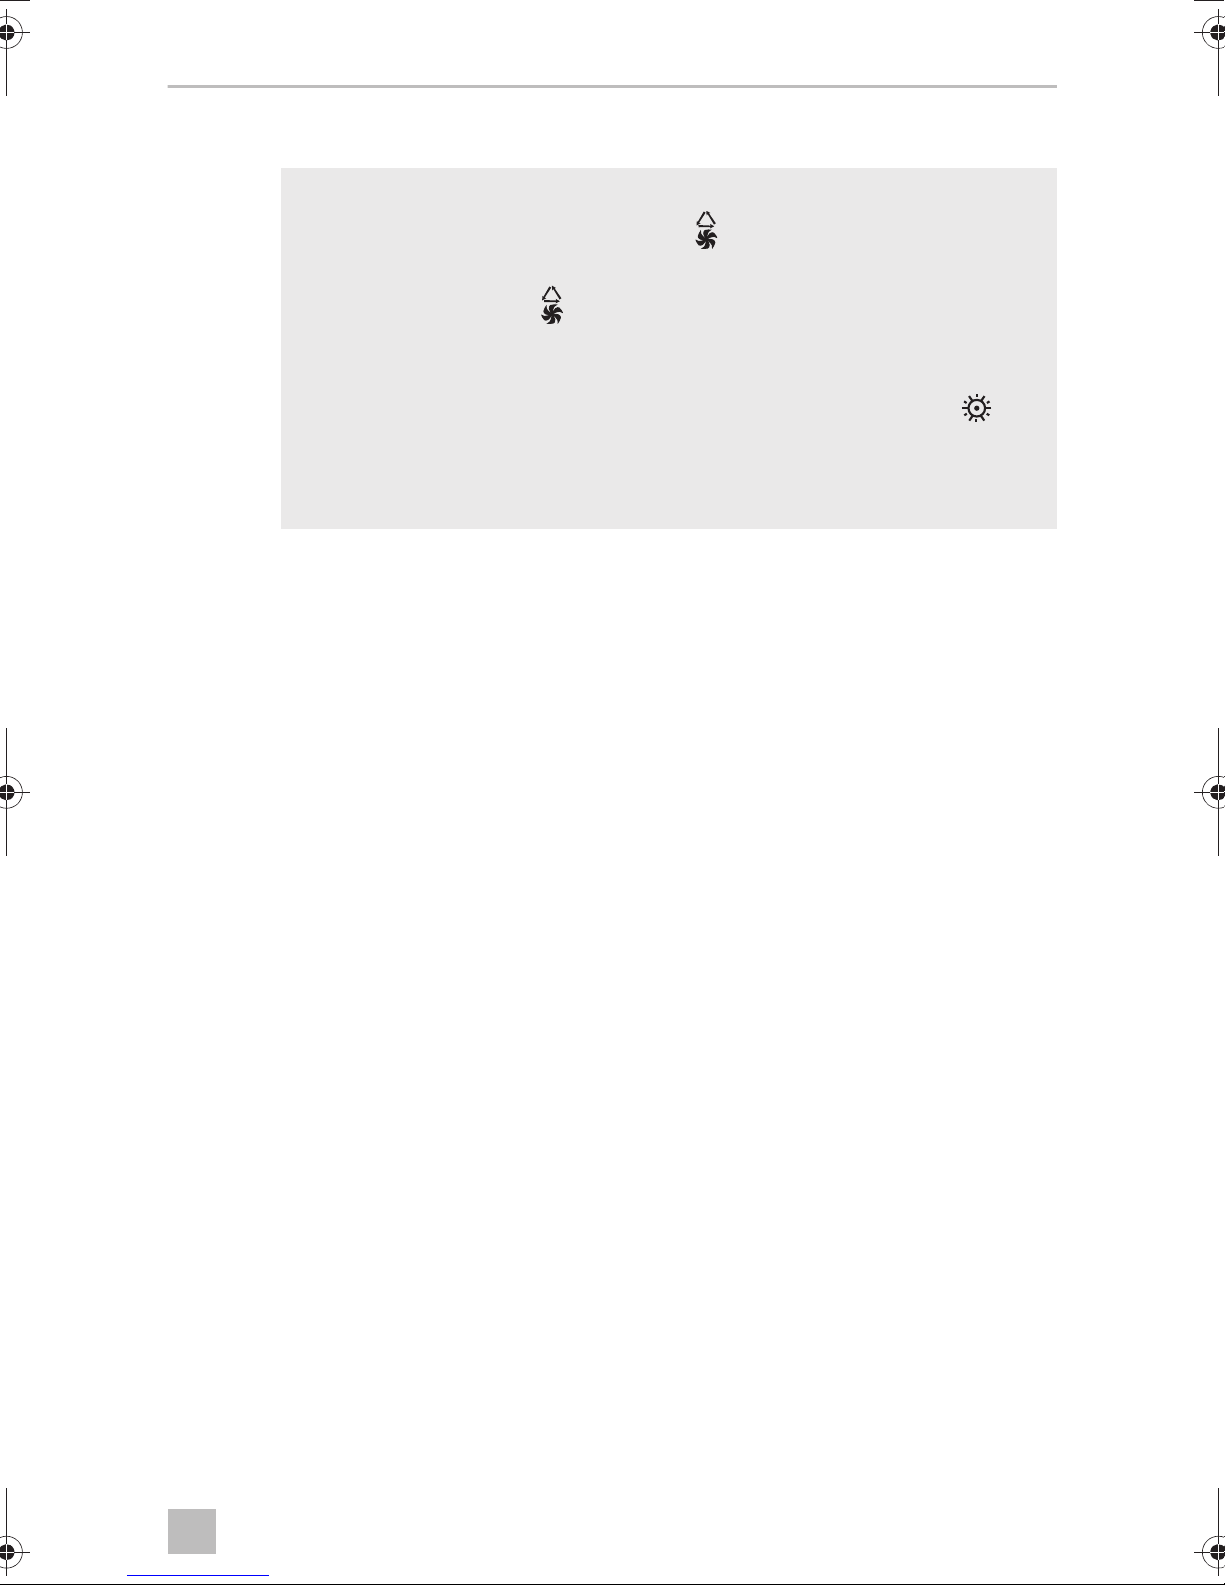
9.6 Selecting the blower setting manually
The blower controls the strength of the air supply.
In the “Cooling” ( ), “Heating” ( ) and “Circulated air”( ) modes, the blower
levels can be selected manually. In the other air conditioning modes, the roof air
conditioner controls the blower level automatically.
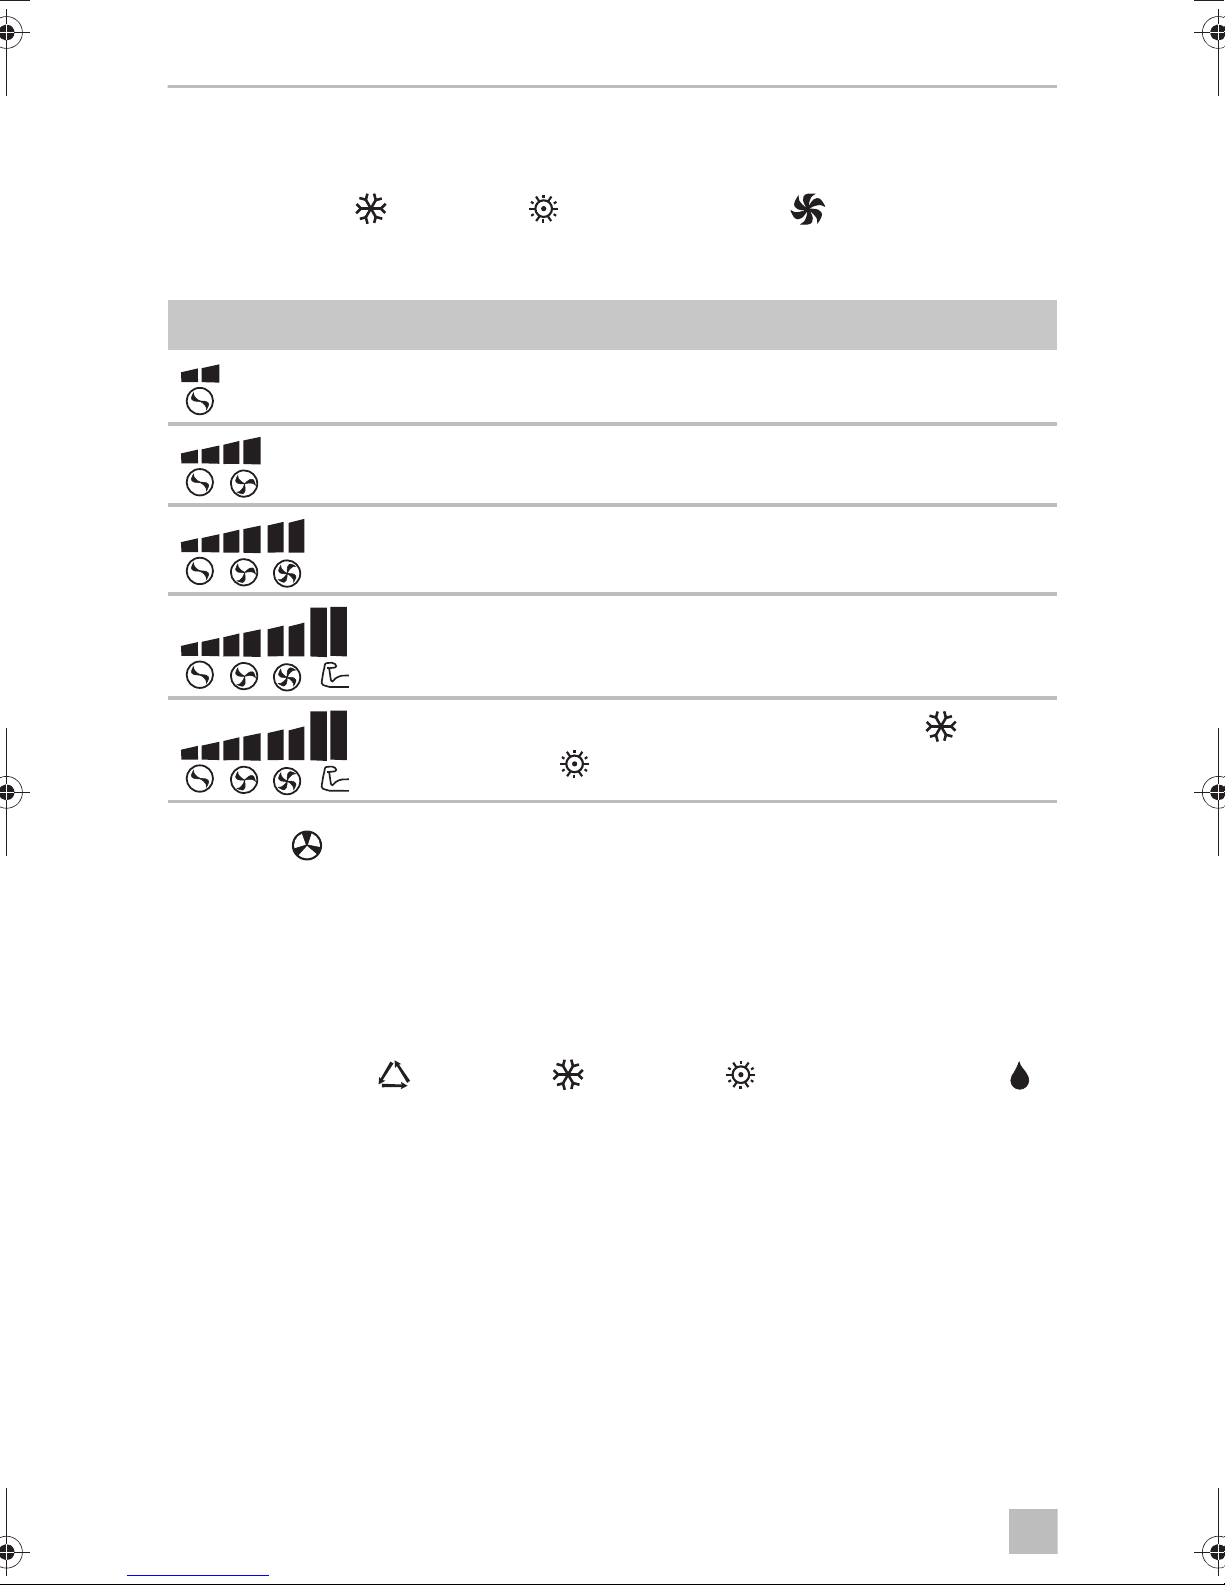
Display message Explanation
Low blower level
Medium blower level
High blower level
Highest blower level
Automatic mode, only available in the “Cooling” ( ) and
“Heating” ( ) air conditioning modes.
➤ Use the button to select the desired blower level.
✓ The roof air conditioner confirms the receipt of the values with a high note.
✓ The new blower level has been set.
9.7 Setting the temperature
In the “Automatic” ( ), “Cooling” ( ), “Heating” ( ) and “Dehumidifying” ( )
modes, you can specify a temperature between 16 °C and 31 °C via the remote
control.
➤ Use the + or – button to select the desired temperature.
✓ The roof air conditioner confirms the receipt of the values with a high note.
✓ The temperature is set on the roof air conditioner.
26
Page 27

EN
Dometic FreshLight Operating the roof air conditioner
08:00
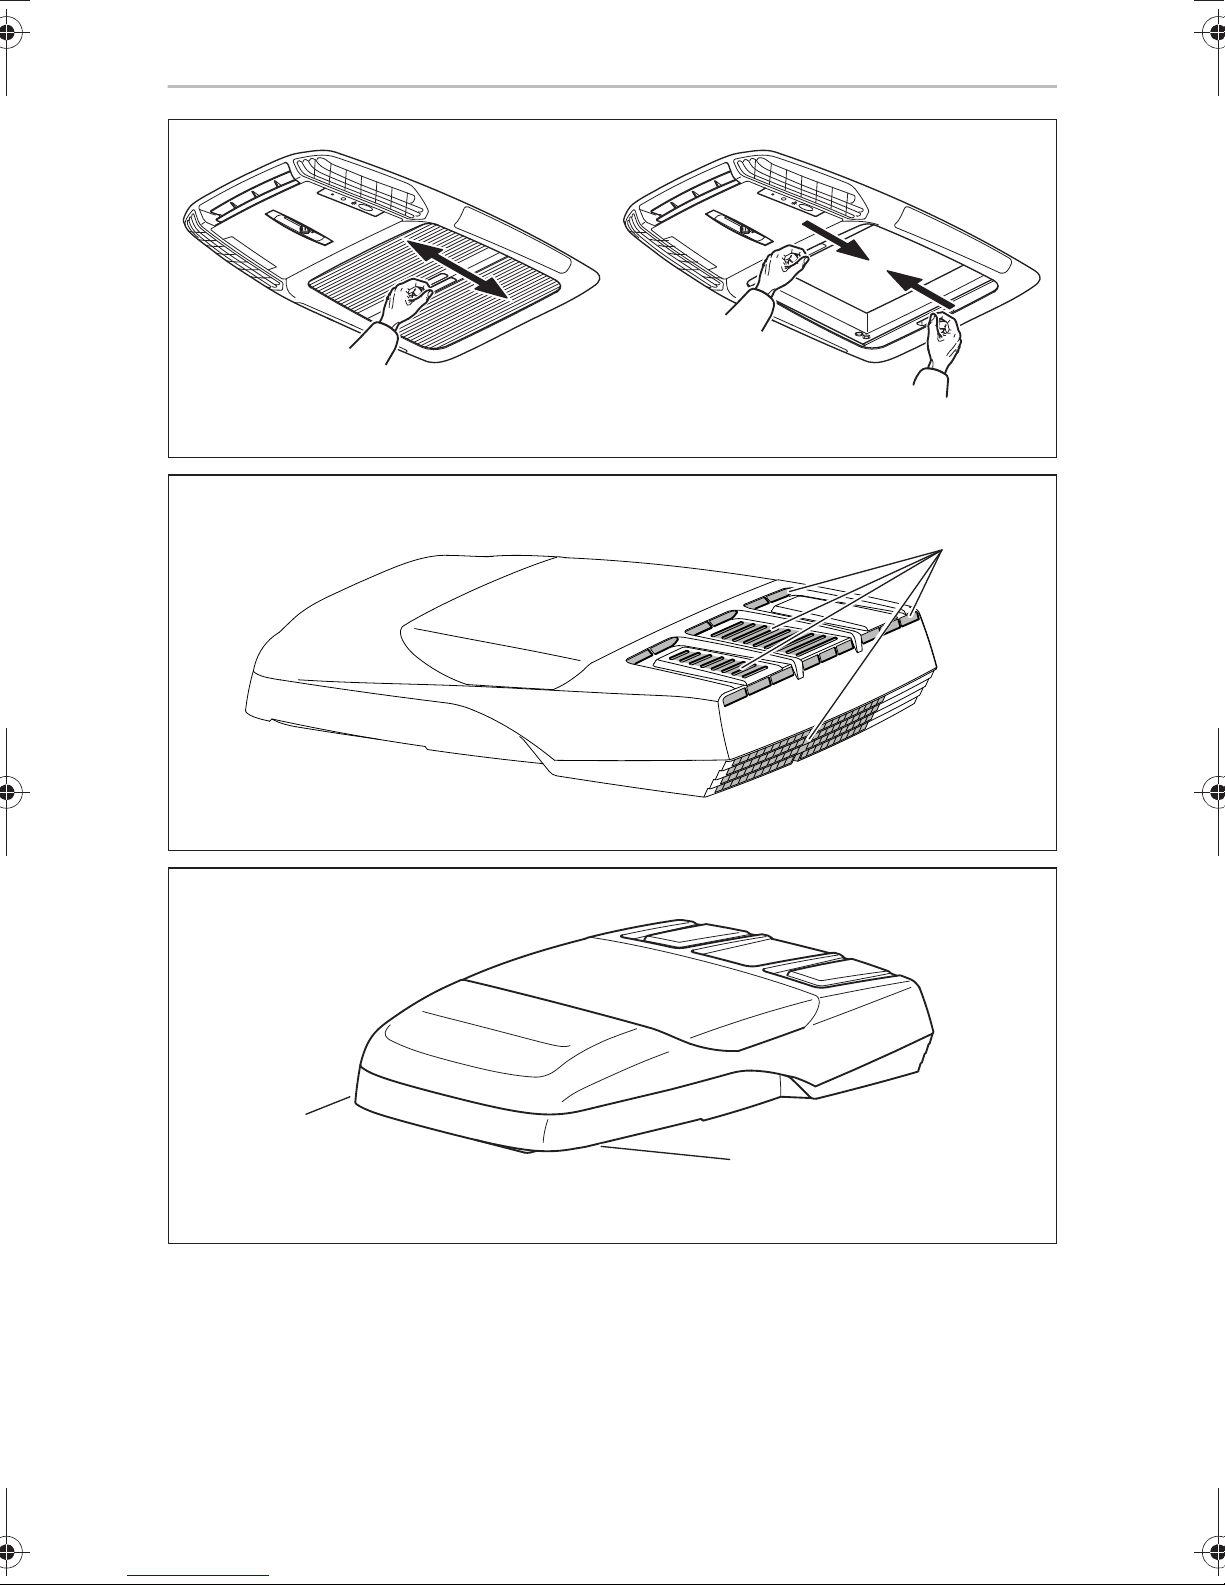
9.8 Adjusting the air nozzles
The air supply within the vehicle can be regulated by setting the air nozzles.
The air nozzles can be regulated with a slide button (fig. 6 2, page 5) so that air is
directed to the front, the back or in both directions:
➤ Turn the knob on the slider anti-clockwise.
➤ Move the slider so that the air is directed in the required direction.
➤ Tighten the knob again in clockwise direction.
The slats (fig. 6 1, page 5) in the front air nozzle can be moved. This directs the air
in the required direction.
9.9 Setting the timer
The timer function allows you to set a specific time period for air conditioning. You
can specify the switch-on time, the switch-off time or both values. The time can be set
in 10 minute increments.
NOTE
I
➤ Before programming the timer, select the air conditioning mode and all required
values (e.g. temperature).
Setting the switch-on time
➤ Press the TIMER button once.
✓ The ON symbol ( ) flashes on the display of the remote control.
➤ Use the + or – button to set the time when the roof air conditioner is to switch on.
➤ Press the SET button to transmit the value to the roof air conditioner.
✓ The switch-on time is set on the roof air conditioner.
The roof air conditioner is switched on with the selected air conditioning mode
at the specified time.
➤ Switch the roof air conditioner to stand-by.
The remote control returns to its initial mode if no button is pressed on
the remote control for 15 seconds while programming the timer.
27
Page 28
EN
Operating the roof air conditioner Dometic FreshLight
20:00
08:00
20:00
20:00
Setting the switch-off time
➤ Press the TIMER button twice.
✓ The OFF symbol ( ) flashes on the display of the remote control.
➤ Use the + or – button to set the time when the roof air conditioner is to switch off.
➤ Press the SET button to transmit the value to the roof air conditioner.
✓ The switch-off time is set on the roof air conditioner.
The roof air conditioner runs in the selected air conditioning mode until the
specified time.
Setting the switch-on and switch-off times
➤ Press the TIMER button three times.
✓ The ON symbol ( ) flashes on the display of the remote control.
The OFF symbol ( ) is displayed.
➤ Use the + or – button to set the time when the roof air conditioner is to switch on.
➤ Press the TIMER button again.
✓ The OFF symbol ( ) flashes on the display of the remote control.
➤ Use the + or – button to set the time when the roof air conditioner is to switch off.
➤ Press the SET button to transmit the value to the roof air conditioner.
✓ The switch-on and switch-off times are set on the roof air conditioner.
The roof air conditioner starts in the selected air conditioning mode at the
specified time and runs until the second specified time.
➤ Switch the roof air conditioner to stand-by.
Cancelling timer settings
If you have set the timer, you can cancel these settings as follows:
➤ Press the TIMER button five times.
✓ The timer symbol disappears. The setting has been cancelled.
28
Page 29
EN
Dometic FreshLight Operating the roof air conditioner
9.10 Activating the sleep function
When the sleep function is active, the set temperature is reduced by 1 °C after one
hour and by 2 °C after two hours to generate a pleasant temperature for sleeping.
➤ Set the required temperature (see “Setting the temperature” on page 26).
➤ Press the SLEEP button.
✓ The symbol appears in the display.
The sleep function is activated.
9.11 Activating the “I feel” function
When this function is active, the remote control measures the room temperature and
transmits this measurement to the roof air conditioner every 10 minutes. The roof air
conditioner adapts the target value to this measurement.
➤ Press the I FEEL button.
➤ Position the remote control so that it points at the IR receiver (fig. 2 4, page 3)
on the control panel. Otherwise, the values cannot be transmitted to the roof air
conditioner.
NOTE
I
The remote control should not be kept in a part of the room that is
considerably warmer or colder than the average room temperature. It
may not, for example, be left in the sun or in front of the roof air
conditioner.
29
Page 30
EN
Operating the roof air conditioner Dometic FreshLight
9.12 Operating the lights
The lights on the roof air conditioner can be dimmed. When switched on, they revert
to the most recently specified brightness.
Switching the light on/off with the control panel
➤ Briefly press the button to switch the lamps on or off.
Dimming the light with the control panel
➤ Press and hold the button until the lights have been dimmed to the required
brightness.
➤ In order to dim the lights in the other direction: Briefly release the button and
then press and hold it again.
Switching the light on/off with the remote control
➤ Press the LIGHT button to switch the lamps on or off.
9.13 Replacing the remote control batteries
Replace the batteries if you see the symbol on the display.
The battery compartment is on the back of the remote control.
➤ Gently push down the lid of the battery compartment and slide it open in the
direction of the arrow.
➤ Insert the new batteries (2 x type AAA) in the remote control as indicated in the
battery compartment.
➤ Close the cover of the battery compartment.
Protect the environment!
Do not dispose of any batteries with general household waste.
B
Return defective or used batteries to your retailer or dispose of them at
collection points.
30
Page 31

EN
Dometic FreshLight Operating the roof air conditioner
9.14 Setting the time
The remote control needs the current time in order to program the timer. The time is
indicated on the display of the remote control.
Perform the following steps to set the time:
NOTE
I
➤ Press and hold the CLOCK button to go to the mode used to set the time.
✓ The time flashes on the display of the remote control.
➤ Use the + or – button to set the current time.
➤ Press the SET button to confirm the time.
The remote control returns to its initial mode if no key is pressed on the
remote control for ten seconds while setting the time.
9.15 Using the blinds
NOTICE! Beware of damage
A
The two blinds can be used to control the sun and light penetrating the vehicle.
➤ Move the blinds manually (fig. 7, page 6).
The blackout blind may not be closed completely if the vehicle is
standing in the blazing sun. There is a danger of heat accumulation. In
order to prevent damage, the blackout bind must remain open by at
least one third.
31
Page 32

EN
Cleaning the roof air conditioner Dometic FreshLight
10 Cleaning the roof air conditioner
NOTICE! Beware of damage
A
I
• Do not clean the roof air conditioner with a high-pressure cleaner.
Exposure to water can damage the air conditioner.
• Do not use sharp or hard objects or cleaning agents for cleaning as
these may damage the roof air conditioner and the window.
• To clean the roof air conditioner, use water with a gentle cleaning
agent. Never use petrol, diesel or solvents.
• When cleaning the roof window, use only cleaning agents that are
approved by the manufacturer.
– Acrylic glass polish (item no. 9104100242),
– Special polishing cloth (item no. 9104100243) and
– Acrylic glass cleaning agent (item no. 9104100244)
NOTE
The roof window may cloud over in bright sunshine. It will become clear
again as soon as it cools down.
➤ Clean the housing of the roof air conditioner and the air outlet unit occasionally
with a damp cloth.
➤ Regularly remove leaves and other dirt from the ventilation grilles (fig. 8 1,
page 6) of the roof air conditioner. Make sure you do not damage the grilles in
the process.
➤ Clean the remote control with a slightly damp cloth from time to time. We recom-
mend using a cleaning cloth for glasses to clean the display.
➤ Clean the roller blind with mild soap and plenty of water.
32
Page 33

EN
Dometic FreshLight Maintenance of the roof air conditioner
11 Maintenance of the roof air conditioner
WARNING!
!
Interval Inspection/maintenance
Regularly Check the condensation water drainage:
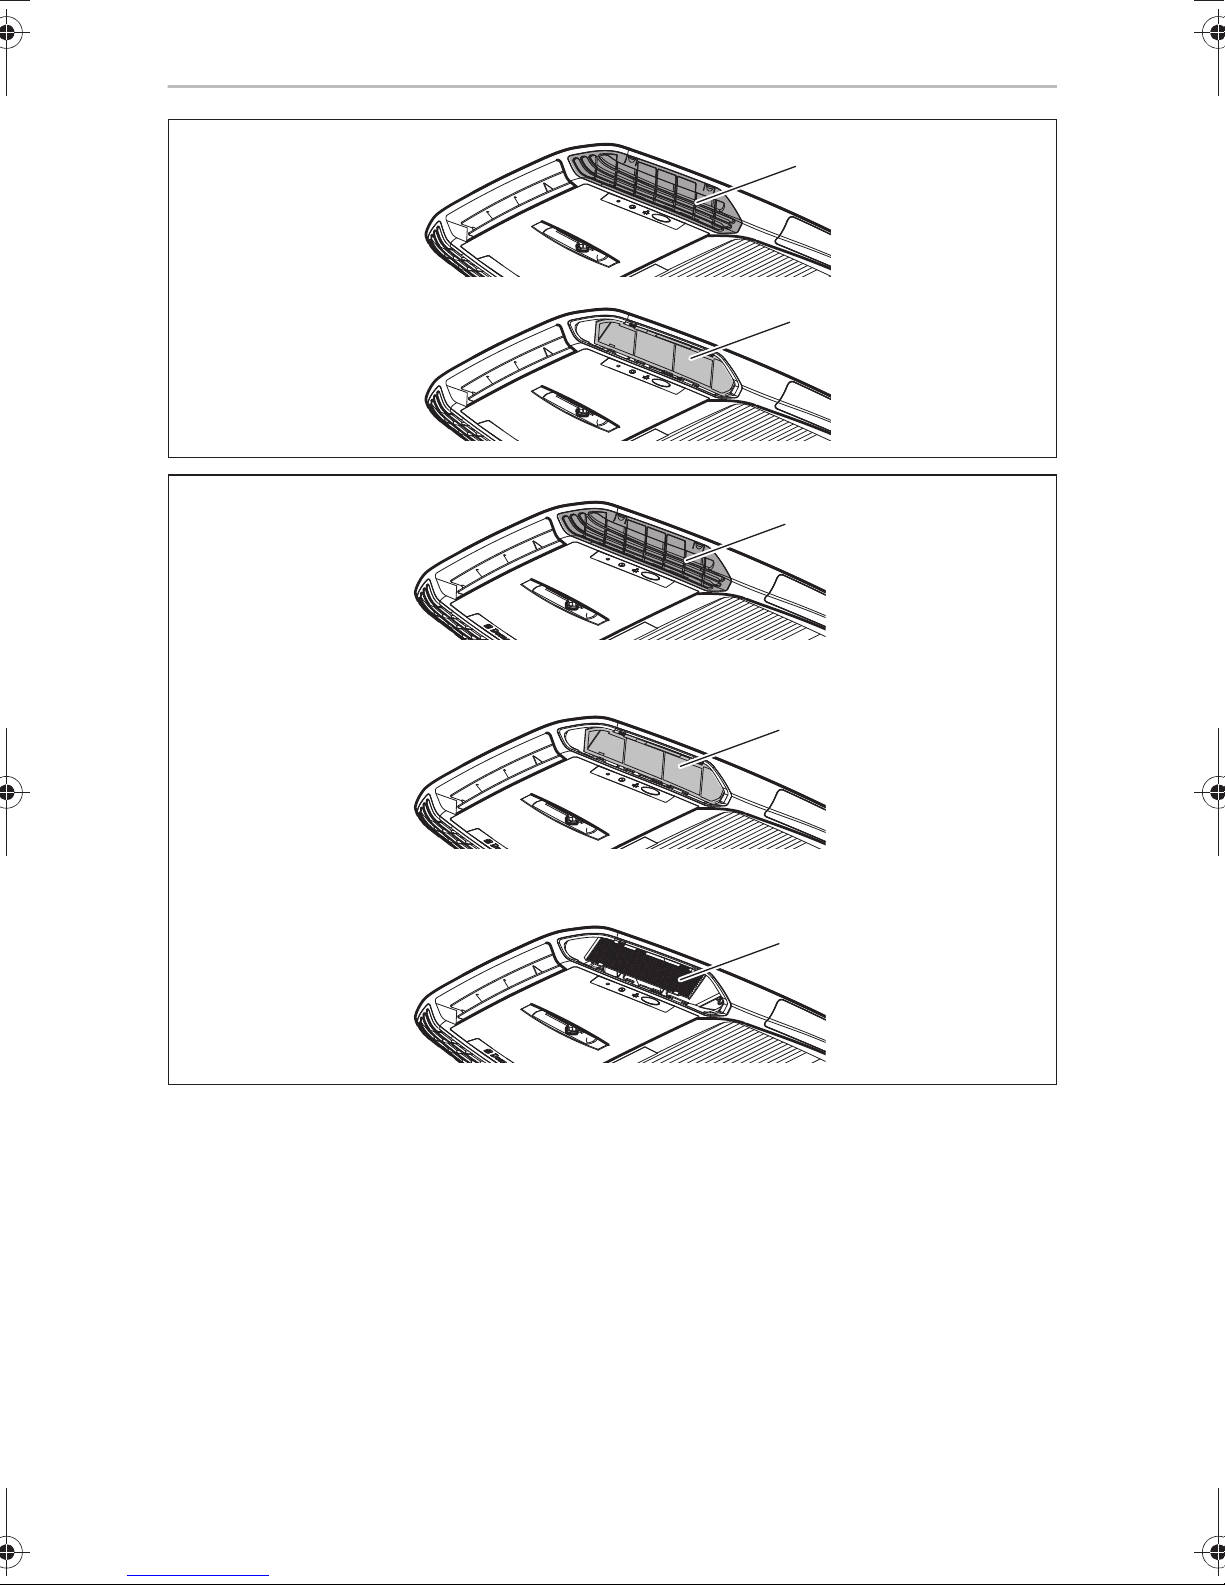
Regularly Clean the filters on both sides of the air discharge unit (fig. 0, page 7):
Any other maintenance work to that which is described here may only
be carried out by qualified personnel who are familiar with the risks
involved when handling refrigerant and air conditioning systems as well
as the relevant regulations.
➤ Check whether the condensation water drainage channels
(fig. 9 1, page 6) at the sides of the roof air conditioner are clear
and the condensation water is able to escape.
➤ Manually take off the filter cover (1).
➤ Remove the filter (2).
➤ Clean the filter (2) with a detergent solution and let it dry.
➤ Put the dry filter (2) back in.
➤ Put the cover (1) back on.
Once per year Check the profile seals:
➤ Check the seal between the roof air conditioner and the roof of the
vehicle for cracks and other damage.
Once per year Have the heat exchanger serviced:
➤ Have the heat exchanger of the roof air conditioner serviced by spe-
cialist workshop.
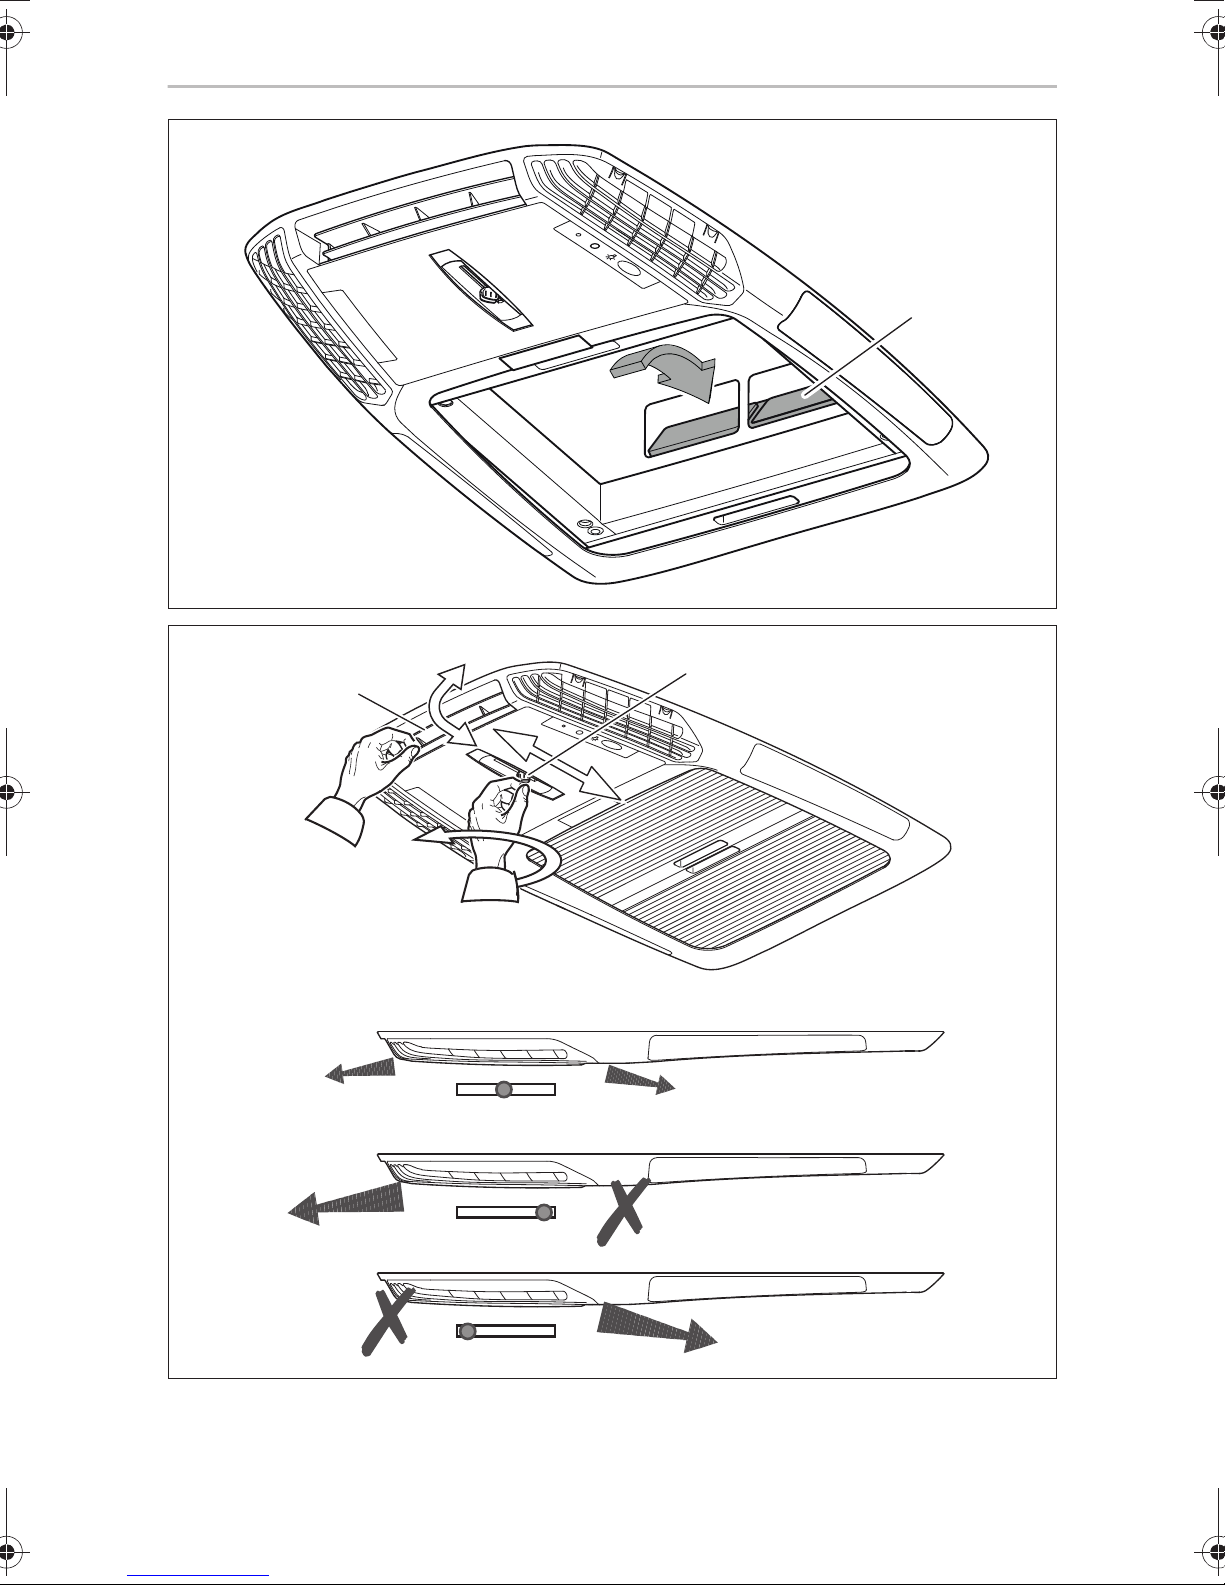
Once per year Replace the carbon filter (fig. a, page 7):
➤ Manually take off the filter cover (1).
➤ Remove the filter (2).
➤ Remove the carbon filter (3).
➤ Clean the filter (2) with a detergent solution and let it dry.
➤ Put a new carbon filter in.
➤ Put the dry filter (2) back in.
➤ Put the cover (1) back on.
33
Page 34

EN
Troubleshooting Dometic FreshLight
12 Troubleshooting
Problem Cause Remedy
Roof air conditioner constantly
switches itself off.
No cooling
capacity
No heating
capacity
Icing sensor has tripped. Outer temperature is too low or all air
nozzles are closed.
The roof air conditioner is not set to
cooling.
The ambient temperature is above 52 °C. The roof air conditioner is only
The temperature set is higher than the
room temperature.
The ambient temperature is below 16 °C. The roof air conditioner is only
One of the temperature sensors is
defective.
The vaporiser fan is damaged.
The condenser fan is damaged.
The ambient temperature is above 30 °C. ➤ Only use the heating function of
➤ Set the roof air conditioner to
cooling.
designed for ambient temperatures of
up to 52 °C.
➤ Select a lower temperature.
designed for ambient temperatures
above 16 °C.
➤ Contact an authorised workshop.
the roof air conditioner at
temperatures below 30 °C.
The ambient temperature is below 2 °C. The heating function of the roof air
conditioner is only designed for
ambient temperatures of up to 2°C.
The temperature set is above 30 °C. ➤ Select a lower temperature.
The roof air conditioner is not set to
heating.
One of the temperature sensors is
defective.
Low air output The air intake section is clogged up. ➤ Remove any leaves and other dirt
The blower is defective. ➤ Contact an authorised workshop.
Water enters the
vehicle
The condensation water drainage openings are clogged up.
The seals are damaged. ➤ Contact an authorised workshop.
➤ Set the roof air conditioning to
heating.
➤ Contact an authorised workshop.
from the ventilation grilles of the
roof air conditioner.
➤ Clean the drainage openings for
condensation water.
34
Page 35

EN
Dometic FreshLight Warranty
Problem Cause Remedy
Roof air conditioner does not
switch on.
Roof air
conditioner does
not switch off.
No supply voltage (230 Vw) connected. ➤ Check the power supply.
The voltage is too low (under 200 V).
The voltage converter is defective.
One of the temperature sensors is
defective.
The electrical fuse of the power supply is
too low.
One of the temperature sensors is
defective.
The electrical fuse of the power supply is
too low.
➤ Contact an authorised workshop.
➤ Check the electrical fuse of the
power supply.
➤ Contact an authorised workshop.
➤ Check the electrical fuse of the
power supply.
13 Warranty
The statutory warranty period applies. If the product is defective, please contact the
service partner in your country (addresses on the back on the instruction manual).
Our experts will be happy to help you and will discuss the warranty process with you
in more detail.
14 Disposal
Regulations for environmental safety and correct disposal
All organisations must apply a set of procedures to identify, evaluate and control the
influence that their activities (manufacturing, products, services, etc.) have on the
environment.
The procedures to be followed to identify significant environmental impact must take
the following factors into account:
• use of raw materials and natural resources
• atmospheric emissions
• discharge of liquids
• waste management and recycling
• contamination of the soil
35
Page 36

EN
Disposal Dometic FreshLight
In order to minimise environmental impact, the manufacturer provides a series of
indications here below that should be taken into account by all those who, for
whatever reason, interact with the appliance during its working life.
• All packing components must be disposed of (preferably recycled) in
compliance with statutory legislation in the country in which disposal takes place.
• All product components must be disposed of (preferably recycled) in
compliance with statutory legislation in the country in which disposal takes place.
• For correct disposal, the appliance must be consigned to an authorised waste
disposal company to ensure that all recyclable components are reused and the
remaining materials are processed properly.
• During installation ensure the room has adequate ventilation to prevent the
build-up of stale air that might be harmful to the health of the operators.
• During operation and maintenance ensure that any waste pollutant products (oil,
grease, etc.) are disposed of correctly.
• Keep noise levels down to reduce noise pollution.
For more information on correct dismantling of our products please refer to the
recycling handbooks at www.dometic.com.
➤ Place the packaging material in the appropriate recycling waste bins wherever
possible.
➤ When in operation or undergoing repairs and maintenance work, make sure that
the refrigerant circuit is not damaged and refrigerant cannot escape. It acts as a
greenhouse gas and should not be allowed into the environment.
If you wish to finally dispose of the product, ask your local recycling centre
or specialist dealer for details about how to do this in accordance with the
M
➤ Dispose of the product at an official waste disposal facility in accordance with the
applicable recycling or disposal guidelines.
B
applicable disposal regulations.
Protect the environment!
Do not dispose of any batteries with general household waste.
Return defective or used batteries to your retailer or dispose of them at
collection points.
36
Page 37

EN
Dometic FreshLight Technical data
10R-030642
15 Technical data
Dometic FreshLight
1600 2200
Item no.: 9102900207 9102900165
Cooling capacity based on ISO 5151: 1500 W 2050 W
Heating capacity: max. 2050 W max. 2700 W
Rated input voltage: 230 Vw/50 Hz
Power consumption in cooling mode: 2.7 A 4.1 A
Power consumption in heating mode: 3.5 A 5.2 A
Operating temperature range: 0 °C to +52 °C
Refrigerant: R407c
Blower: 4 blower levels
1 automatic mode
Protection class: IP X4
Max. volume of space in the vehicle
20 m³ 25 m³
(with insulated walls):
Dimensions L x W x H (mm): 1105 x 758 x 210
(height above vehicle roof)
758
550
53
174 931
210
196 684
110 5
25 – 60
880
Weight: approx. ca. 40 kg approx. ca. 42 kg
Inspection/certification:
37
Page 38

DE
Dometic FreshLight
Bitte lesen Sie diese Anleitung vor der Inbetriebnahme sorgfältig durch
und bewahren Sie sie auf. Geben Sie sie im Falle einer Weitergabe des
Produktes an den Nutzer weiter.
Inhaltsverzeichnis
1 Erklärung der Symbole . . . . . . . . . . . . . . . . . . . . . . . . . . . . . . . . . . . . . . 39
2 Sicherheitshinweise . . . . . . . . . . . . . . . . . . . . . . . . . . . . . . . . . . . . . . . . . 40
2.1 Grundlegende Sicherheit. . . . . . . . . . . . . . . . . . . . . . . . . . . . . . . . . 40
2.2 Sicherheit beim Betrieb des Gerätes . . . . . . . . . . . . . . . . . . . . . . . . .41
3 Zielgruppe dieser Anleitung . . . . . . . . . . . . . . . . . . . . . . . . . . . . . . . . . 42
4Lieferumfang . . . . . . . . . . . . . . . . . . . . . . . . . . . . . . . . . . . . . . . . . . . . . . . 42
5Zubehör. . . . . . . . . . . . . . . . . . . . . . . . . . . . . . . . . . . . . . . . . . . . . . . . . . . . 42
6 Bestimmungsgemäßer Gebrauch. . . . . . . . . . . . . . . . . . . . . . . . . . . . . 43
7 Technische Beschreibung . . . . . . . . . . . . . . . . . . . . . . . . . . . . . . . . . . . . 43
7.1 Komponenten . . . . . . . . . . . . . . . . . . . . . . . . . . . . . . . . . . . . . . . . . . 44
7.2 Bedienpanel . . . . . . . . . . . . . . . . . . . . . . . . . . . . . . . . . . . . . . . . . . . 45
7.3 Fernbedienung . . . . . . . . . . . . . . . . . . . . . . . . . . . . . . . . . . . . . . . . . 46
7.4 Klimamodi . . . . . . . . . . . . . . . . . . . . . . . . . . . . . . . . . . . . . . . . . . . . . 48
7.5 Zusatzfunktionen. . . . . . . . . . . . . . . . . . . . . . . . . . . . . . . . . . . . . . . . 49
8 Vor dem ersten Gebrauch. . . . . . . . . . . . . . . . . . . . . . . . . . . . . . . . . . . . 50
9 Dachklimaanlage bedienen . . . . . . . . . . . . . . . . . . . . . . . . . . . . . . . . . . .51
9.1 Grundsätzliche Hinweise zur Bedienung. . . . . . . . . . . . . . . . . . . . . .51
9.2 Fernbedienung verwenden . . . . . . . . . . . . . . . . . . . . . . . . . . . . . . . .51
9.3 Hinweis zur besseren Nutzung. . . . . . . . . . . . . . . . . . . . . . . . . . . . . 52
9.4 Dachklimaanlage ein- und ausschalten . . . . . . . . . . . . . . . . . . . . . . 53
9.5 Klimamodus wählen . . . . . . . . . . . . . . . . . . . . . . . . . . . . . . . . . . . . . 54
9.6 Gebläsestufe manuell wählen. . . . . . . . . . . . . . . . . . . . . . . . . . . . . . 55
9.7 Temperatur einstellen . . . . . . . . . . . . . . . . . . . . . . . . . . . . . . . . . . . . 55
9.8 Luftdüsen einstellen. . . . . . . . . . . . . . . . . . . . . . . . . . . . . . . . . . . . . . 56
9.9 Timer programmieren . . . . . . . . . . . . . . . . . . . . . . . . . . . . . . . . . . . . 56
9.10 Sleep-Funktion aktivieren . . . . . . . . . . . . . . . . . . . . . . . . . . . . . . . . . 58
9.11 Zusatzfunktion „I feel“ einstellen . . . . . . . . . . . . . . . . . . . . . . . . . . . 58
9.12 Leuchten bedienen . . . . . . . . . . . . . . . . . . . . . . . . . . . . . . . . . . . . . . 59
9.13 Batterien der Fernbedienung austauschen . . . . . . . . . . . . . . . . . . . 59
38
Page 39

DE
Dometic FreshLight Erklärung der Symbole
9.14 Uhrzeit einstellen. . . . . . . . . . . . . . . . . . . . . . . . . . . . . . . . . . . . . . . . 60
9.15 Rollos verwenden . . . . . . . . . . . . . . . . . . . . . . . . . . . . . . . . . . . . . . . 60
10 Dachklimaanlage reinigen . . . . . . . . . . . . . . . . . . . . . . . . . . . . . . . . . . . .61
11 Dachklimaanlage warten . . . . . . . . . . . . . . . . . . . . . . . . . . . . . . . . . . . . 62
12 Störungen beseitigen . . . . . . . . . . . . . . . . . . . . . . . . . . . . . . . . . . . . . . . 63
13 Gewährleistung. . . . . . . . . . . . . . . . . . . . . . . . . . . . . . . . . . . . . . . . . . . . . 65
14 Entsorgung . . . . . . . . . . . . . . . . . . . . . . . . . . . . . . . . . . . . . . . . . . . . . . . . . 65
15 Technische Daten . . . . . . . . . . . . . . . . . . . . . . . . . . . . . . . . . . . . . . . . . . . 67
1 Erklärung der Symbole
WARNUNG!
!
Sicherheitshinweis: Nichtbeachtung kann zu Tod oder schwerer
Verletzung führen.
!
A
I
VORSICHT!
Sicherheitshinweis: Nichtbeachtung kann zu Verletzungen führen.
ACHTUNG!
Nichtbeachtung kann zu Materialschäden führen und die Funktion des
Produktes beeinträchtigen.
HINWEIS
Ergänzende Informationen zur Bedienung des Produktes.
39
Page 40

DE
Sicherheitshinweise Dometic FreshLight
2 Sicherheitshinweise
Der Hersteller übernimmt in folgenden Fällen keine Haftung für Schäden:
• Beschädigungen am Produkt durch mechanische Einflüsse und Überspannungen
• Veränderungen am Produkt ohne ausdrückliche Genehmigung vom Hersteller
• Verwendung für andere als die in der Anleitung beschriebenen Zwecke
Er haftet insbesondere nicht für jegliche Folgeschäden, insbesondere auch nicht für
Folgeschäden, die durch den Ausfall der Dachklimaanlage entstehen können.
Beachten Sie folgende grundsätzliche Sicherheitsmaßnahmen beim Gebrauch von
elektrischen Geräten zum Schutz vor:
• elektrischem Schlag
• Brandgefahr
• Verletzungen
2.1 Grundlegende Sicherheit
WARNUNG!
!
• Elektrogeräte sind kein Kinderspielzeug!
Kinder können Gefahren, die von elektrischen Geräten ausgehen,
nicht richtig einschätzen. Lassen Sie Kinder nicht ohne Aufsicht
elektrische Geräte benutzen.
• Personen (einschließlich Kinder), die aufgrund ihrer physischen,
sensorischen oder geistigen Fähigkeiten oder ihrer Unerfahrenheit
oder Unkenntnis nicht in der Lage sind, das Gerät sicher zu benutzen,
sollten dieses Gerät nicht ohne Aufsicht oder Anweisung durch eine
verantwortliche Person nutzen.
• Benutzen Sie das Gerät nur zu seinem bestimmungsgemäßen
Gebrauch.
• Führen Sie keine Änderungen oder Umbauten am Gerät durch!
• Die Installation, Wartung und Reparaturen der Dachklimaanlage
dürfen nur von Fachkräften durchgeführt werden, die mit den
verbundenen Gefahren und den einschlägigen Vorschriften vertraut
sind. Durch unsachgemäße Reparaturen können erhebliche Gefahren
entstehen. Wenden Sie sich im Reparaturfall an den Service-Stützpunkt in Ihrem Land (Adressen auf der Rückseite).
40
Page 41

DE
Dometic FreshLight Sicherheitshinweise
• Setzen Sie die Dachklimaanlage nicht in der Nähe von entflammbaren
Flüssigkeiten oder in geschlossenen Räumen ein.
• Achten Sie darauf, dass brennbare Gegenstände nicht im Bereich des
Luftaustritts gelagert oder montiert sind. Der Abstand muss mindestens 50 cm betragen.
• Greifen Sie nicht in Lüftungsauslässe, und führen Sie keine Fremdgegenstände in die Dachklimaanlage ein.
• Im Falle von Feuer lösen Sie nicht den oberen Deckel der Dachklima-
anlage, sondern verwenden Sie zugelassene Löschmittel. Verwenden
Sie kein Wasser zum Löschen.
ACHTUNG!
A
• Bei angebauter Dachklimaanlage dürfen Sie auf keinen Fall mit Ihrem
Wohnmobil in die Waschanlage fahren.
• Bitte informieren Sie sich bei Ihrem Fahrzeughersteller, ob aufgrund
des Aufbaus der Dachklimaanlage (Aufbauhöhe 210 mm) eine
Abnahme (nach § 19 StVZO) und eine Änderung des Eintrags der
Fahrzeughöhe in ihren Fahrzeugpapieren notwendig sind.
• Treten Fehler im Kältemittelkreislauf der Dachklimaanlage auf, so muss
die Dachklimaanlage von einem Fachbetrieb geprüft und ordnungsgemäß instand gesetzt werden. Auf keinen Fall darf das Kältemittel in
die freie Atmosphäre abgelassen werden.
2.2 Sicherheit beim Betrieb des Gerätes
WARNUNG!
• Unterbrechen Sie bei Arbeiten am Gerät immer die Stromversorgung.
!
ACHTUNG!
A
• Betreiben Sie die Dachklimaanlage nicht bei Außentemperaturen
unter 0 °C. Anderenfalls besteht Beschädigungsgefahr durch
frierendes Kondenswasser.
• Die Dachklimaanlage ist nicht für den Betrieb in Land- und Baumaschinen geeignet.
• Betreiben Sie das Gerät nur, wenn das Gehäuse und die Leitungen
unbeschädigt sind.
41
Page 42

DE
Zielgruppe dieser Anleitung Dometic FreshLight
3 Zielgruppe dieser Anleitung
Diese Bedienungsanleitung wendet sich an den Anwender der Dachklimaanlage.
4 Lieferumfang
FreshLight 1600
Bezeichnung Artikelnummer
Dachklimaanlage Dometic FreshLight 1600 9102900207
Einbauanleitung
Bedienungsanleitung
FreshLight 2200
Bezeichnung Artikelnummer
Dachklimaanlage Dometic FreshLight 2200 9102900165
Einbauanleitung
Bedienungsanleitung
5Zubehör
Als Zubehör erhältlich (nicht im Lieferumfang enthalten):
Bezeichnung Artikelnummer
DC-Erweiterungskit DC-Kit2 9100300001
DC-Erweiterungskit DC-Kit3 9100300002
DC-Erweiterungskit DC-Kit5 9100300073
HINWEIS
I
Mit einem DC-Erweiterungskit (Zubehör) kann die Dachklimaanlage
Dometic FreshLight für den Fahrbetrieb erweitert werden.
42
Page 43

DE
Dometic FreshLight Bestimmungsgemäßer Gebrauch
6 Bestimmungsgemäßer Gebrauch
Die Dachklimaanlage Dometic FreshLight mit integriertem Dachfenster ist in der
Lage, die Innenräume von Wohnmobilen und Caravans mit kühler oder warmer Luft
zu klimatisieren.
Die Dachklimaanlage ist nicht für die Installation in Baumaschinen, Landmaschinen
oder ähnlichen Arbeitsgeräten geeignet. Bei zu starker Vibrationseinwirkung ist eine
ordnungsgemäße Funktion nicht gewährleistet.
Die Funktion der Dachklimaanlage ist garantiert für Temperaturen bis zu 52 °C.
Betreiben Sie die Dachklimaanlage im Klimamodus „Heizen“ nicht bei Raum-
temperaturen über 30 °C.
Der Heizbetrieb wird bei Außentemperaturen von über +2 °C empfohlen.
7 Technische Beschreibung
Die Dachklimaanlage mit integriertem Fenster versorgt den Innenraum mit kühler
oder warmer entfeuchteter Luft ohne Staub und Schmutz. Verbrauchte Luft kann
durch ein Gebläse aus dem Innenraum gesogen werden.
Zwei in die Luftauslasseinheit integrierte, dimmbare LED-Leuchten sorgen für angenehmes Licht.
Das Dachfenster verfügt über zwei Rollos: Das Verdunklungsrollo lässt kein Licht
durch, das Sonnenschutznetz schützt vor direkter Sonneneinstrahlung.
Die Dachklimaanlage wird mit der Fernbedienung gesteuert.
HINWEIS
I
Die Dachklimaanlage ist in der Lage, die Temperatur im Innenraum des
Fahrzeugs bis auf einen bestimmten Wert abzusenken oder aufzuheizen. Die zu erreichende Temperatur beim Kühlen hängt von dem
Fahrzeugtyp, der Umgebungstemperatur und der Kälteleistung Ihrer
Dachklimaanlage ab. Unter einer Außentemperatur von 16 °C kühlt die
Dachklimaanlage nicht mehr. Schalten Sie in diesem Fall nur den Klimamodus „Umluft“ ein.
Mit sinkender Außentemperatur nimmt die Heizleistung der Dachklimaanlage ab.
Der Heizbetrieb ist nur bei Temperaturen von über +2 °C empfehlenswert.
43
Page 44

DE
Technische Beschreibung Dometic FreshLight
7.1 Komponenten
Der Kältekreislauf der Dachklimaanlage besteht aus fünf Hauptkomponenten
(Abb. 1, Seite 3):
• Kompressor (1)
Der Kompressor saugt das eingesetzte Kältemittel R407c an und verdichtet es.
Somit werden Druck und dadurch auch die Temperatur des Kältemittels erhöht.
• Kondensator (2)
Der eingebaute Verflüssiger funktioniert wie ein Kühler oder ein Wärmetauscher.
Die vorbeiströmende Luft nimmt Wärme auf, das heiße Kältemittelgas kühlt ab
und wird flüssig.
• Verdampfer (3)
Die Verdampfer kühlen die vorbeiströmende Luft ab und entfeuchten sie. Das
Kältemittel nimmt Wärme auf und verdampft.
• Gebläse (4)
Die abgekühlte Luft wird im Fahrzeuginneren durch das Gebläse über eine
Luftauslasseinheit verteilt.
• Magnetventil (5)
Über das Magnetventil ist es möglich, den Kältekreislauf umzukehren und die
zugeführte Luft zu erwärmen.
Übersicht aller Bauteile: Abb. b, Seite 8.
44
Page 45

DE
Dometic FreshLight Technische Beschreibung
7.2 Bedienpanel
An der Luftauslasseinheit der Dachklimaanlage befindet sich das Bedienpanel
(Abb. 2, Seite 3).
Es enthält folgende Bedien- und Anzeigeelemente:
Nr. Erklärung
1 Status-LED
leuchtet nicht: Dachklimaanlage ist ausgeschaltet.
leuchtet orange: Dachklimaanlage ist im Stand-By-Modus.
leuchtet grün: Dachklimaanlage ist eingeschaltet.
blinkt grün: Dachklimaanlage schaltet in den Klimamodus
„Heizen“ ( ) um oder wird gerade entfrostet.
leuchtet rot: Nur wenn die Anlage auch an 12 Vg angeschlossen
ist: Die Versorgungsspannung von 230 Vw steht
nicht zur Verfügung.
blinkt langsam rot: Funktionsstörung des inneren Temperatursensors E1
blinkt rot: Funktionsstörung des äußeren Temperatursensors E2
blinkt schnell rot: Funktionsstörung des äußeren Temperatursensors E3
2
Ta s t e
3
Ta s t e
4 IR-Empfänger für die Fernbedienung
Schaltet die Dachklimaanlage ein, aus oder in den
Stand-By-Modus.
Langes Drücken der Taste schaltet den AutomatikModus ein.
Schaltet das Licht ein oder aus oder dimmt das Licht.
Ist nur dann aktiv, wenn die Dachklimaanlage einge-
schaltet oder im Stand-by-Modus ist.
45
Page 46

DE
Technische Beschreibung Dometic FreshLight
7.3 Fernbedienung
Alle Einstellungen am Gerät (z. B. Temperatureinstellung, Timerprogrammierung)
werden per Fernbedienung zur Dachklimaanlage übertragen.
Folgende Bedien- und Anzeigeelemente stehen auf der Fernbedienung zur
Verfügung (Abb. 3, Seite 4):
Nr. Erklärung
1 Digitaldisplay:
zeigt folgendes an:
• Uhrzeit
• gewünschte Raumtemperatur (Sollwert) in °C oder °F
• tatsächliche Raumtemperatur
• Klimamodus
• Gebläsestufe
• Symbole für aktive Zusatzfunktionen
• Batteriestatus
2
Tas t e :
Dachklimaanlage und Fernbedienung einschalten oder in den Stand-By-Modus
schalten
3
Tas t e :
Gebläsestufe wählen
4 Taste MODE:
Klimamodus wählen
5 Taste CLOCK:
Uhrzeit einstellen
6 Taste TIMER:
Timer programmieren
7 Taste SLEEP:
Sleep-Funktion aktivieren. Mit der Sleep-Funktion wird der Sollwert automatisch
nach unten geregelt, um eine angenehme Schlaftemperatur zu gewährleisten.
8 Taste SET:
Aktuelle Daten an die Dachklimaanlage senden.
9 Taste I FEEL:
„I feel“-Funktion aktivieren. Mit der „I feel“-Funktion wird der Temperatursollwert
alle 10 Minuten an die Temperatur angepasst, die die Fernbedienung misst.
Die Fernbedienung muss dazu auf den IR-Empfänger (Abb. 2 4, Seite 3) am
Bedienpanel zeigen.
46
Page 47

DE
Dometic FreshLight Technische Beschreibung
Nr. Erklärung
10 Reset-Tas te
Alle Werte auf die Standardwerte zurückstellen
11 Taste ROOM:
Einmal drücken:
Erneut drücken:
12 Taste LIGHT:
Licht an der Dachklimaanlage ein- oder ausschalten.
Die Taste LIGHT ist auch bei ausgeschalteter Fernbedienung funktionsfähig.
13 Taste F°/C°:
Temperatur-Einheit zwischen Celsius (°C) und Fahrenheit (°F) umschalten
14 Taste –:
Wert verringern
15 Taste +:
Wert erhöhen
16
Symbol (Batterien erschöpft)
Wird angezeigt, wenn die Batterien der Fernbedienung erschöpft sind. Tauschen
Sie in diesem Fall die Batterien aus, siehe „Batterien der Fernbedienung austauschen“ auf Seite 59.
17
Symbol (Werte senden)
Wird kurz angezeigt, wenn die Fernbedienung Werte zur Dachklimaanlage sendet.
Zeigt die aktuelle Temperatur des Innenraums an (Symbol
wird angezeigt).
Zeigt die eingestellte Temperatur an.
47
Page 48

DE
Technische Beschreibung Dometic FreshLight
7.4 Klimamodi
Die Dachklimaanlage verfügt über folgende Klimamodi:
Klimamodus
Automatik Sie legen die Temperatur fest, die Dachklimaanlage
Kühlen Sie legen Temperatur und Gebläseleistung fest, die
Heizen Sie legen Temperatur und Gebläseleistung fest, die
Umluft Sie legen die Lüfterstufe fest, die Dachklimaanlage
Entlüften Die Dachklimaanlage entlüftet den Innenraum, indem
Display-
meldung
Erklärung
stellt durch Kühlen oder Heizen diese Temperatur im
Innenraum her und steuert die benötigte
Gebläseleistung.
In diesem Modus ist die Taste deaktiviert.
Dachklimaanlage kühlt den Innenraum auf diese
Temperatur.
Dachklimaanlage heizt den Innenraum auf diese
Temperatur.
bläst Luft in den Innenraum
die verbrauchte Luft durch das Gebläse aus dem
Innenraum gesogen wird. Dazu wird die Belüftungsklappe geöffnet.
.
In diesem Modus ist die Taste deaktiviert.
Luftentfeuchtung Sie legen die Temperatur fest, die Dachklimaanlage
stellt durch Kühlen oder Heizen der Raumluft diese
Temperatur im Innenraum her, steuert die benötigte
Gebläseleistung und entfeuchtet den Innenraum
(Umluftbetrieb).
In diesem Modus ist die Taste deaktiviert.
48
Page 49

DE
Dometic FreshLight Technische Beschreibung
08:00
7.5 Zusatzfunktionen
Die Dachklimaanlage bietet folgende Zusatzfunktionen:
Zusatzfunktion
Display-
meldung
Erklärung
Timer Die Dachklimaanlage wird zum eingestellten Zeit-
punkt eingeschaltet.
20:00
Die Dachklimaanlage wird zum eingestellten Zeitpunkt ausgeschaltet.
08:00 20:00
Die Dachklimaanlage wird zu den eingestellten Zeitpunkten ein- und wieder ausgeschaltet.
Sleep Die eingestellte Temperatur wird nach einer Stunde
um 1 °C und nach zwei Stunden um 2 °C abgesenkt,
um eine angenehme Schlaftemperatur zu gewährleisten.
I feel Die Fernbedienung misst die Raumtemperatur und
I FEEL
überträgt den Messwert alle 10 Minuten an die Dachklimaanlage. Die Dachklimaanlage passt die Solltemperatur an diesen Messwert an.
Die Fernbedienung muss dazu auf den IR-Empfänger
(Abb. 2 4, Seite 3) am Bedienpanel zeigen.
49
Page 50

DE
Vor dem ersten Gebrauch Dometic FreshLight
8 Vor dem ersten Gebrauch
Kontrollen vor der Inbetriebnahme
Bevor Sie die Dachklimaanlage einschalten, beachten Sie bitte Folgendes:
➤ Kontrollieren Sie, ob Versorgungsspannung und -frequenz den Werten in den
Technische Daten entsprechen, siehe Seite 67.
➤ Stellen Sie sicher, dass sowohl die Luftansaugöffnung als auch die Luftdüsen frei
sind. Alle Lüftungsgitter müssen immer frei sein, um eine optimale Leistung der
Dachklimaanlage zu gewährleisten.
VORSICHT! Verletzungsgefahr!
!
Fernbedienung kontrollieren und Batterien einlegen
Stecken Sie keine Finger oder Gegenstände in die Luftdüsen oder das
Ansauggitter.
➤ Setzen Sie die mitgelieferten Batterien in das Batteriefach der Fernbedienung
ein, siehe „Batterien der Fernbedienung austauschen“ auf Seite 59.
➤ Prüfen Sie, ob die vier Dip-Schalter (Abb. 4, Seite 4) in der richtigen Stellung
stehen.
➤ Wenn Sie die Position der Dip-Schalter verändert haben: Bestätigen Sie die neue
Einstellung mit der Reset-Taste (Abb. 3 10
Uhrzeit einstellen
➤ Stellen Sie die aktuelle Uhrzeit ein: siehe „Uhrzeit einstellen“ auf Seite 60.
, Seite 4) .
50
Page 51

DE
Dometic FreshLight Dachklimaanlage bedienen
9 Dachklimaanlage bedienen
9.1 Grundsätzliche Hinweise zur Bedienung
Die Dachklimaanlage hat drei Betriebsmodi:
Betriebsmodus Merkmale
Aus Die Dachklimaanlage ist ausgeschaltet,
die Fernbedienung ist inaktiv.
Stand-By Die Dachklimaanlage ist betriebsbereit und kann mit der Fern-
bedienung eingeschaltet werden.
Ein Die Dachklimaanlage klimatisiert den Innenraum.
Am Bedienpanel können Sie
• die Dachklimaanlage ein- und ausschalten sowie in den Stand-By-Modus
schalten
• das Licht ein- und ausschalten sowie dimmen
Mit der Fernbedienung können Sie
• die Dachklimaanlage aus dem Stand-By-Modus einschalten und wieder in den
Stand-By-Modus schalten.
• das Licht ein- und ausschalten
• Einstellungen vornehmen
• Zusatzfunktionen wählen
9.2 Fernbedienung verwenden
Sie haben zwei Möglichkeiten, die Dachklimaanlage mit der Fernbedienung zu
steuern:
• Sie können die Werte direkt beim Einstellen zur Dachklimaanlage senden
• Sie können zunächst alle Werte auf der Fernbedienung festlegen und dann
gesammelt zur Dachklimaanlage senden
Werte direkt beim Einstellen senden
Die Fernbedienung muss beim Bedienen auf den IR-Empfänger (Abb. 2 4,
Seite 3) am Bedienpanel ausgerichtet sein.
51
Page 52

DE
Dachklimaanlage bedienen Dometic FreshLight
Nach dem Drücken einer Taste wird der Wert direkt zur Dachklimaanlage gesendet.
Die Dachklimaanlage quittiert den Empfang der Daten mit einem hohen Ton.
Werte zunächst festlegen und gesammelt zur Dachklimaanlage senden
Die Fernbedienung darf beim Bedienen nicht auf den IR-Empfänger (Abb. 2 4,
Seite 3) am Bedienpanel ausgerichtet sein.
Legen Sie die gewünschten Werte auf der Fernbedienung fest. Wenn Sie alle
Einstellungen vorgenommen haben, richten Sie die Fernbedienung auf den IREmpfänger am Bedienpanel aus und drücken Sie die Taste SET. Dadurch werden die
Daten erneut an die Dachklimaanlage gesendet. Die Dachklimaanlage quittiert den
Empfang der Daten mit einem hohen Ton.
Nur Fernbedienung in Stand-By-Modus schalten oder einschalten
Im Stand-By zeigt das Display der Fernbedienung lediglich die Uhrzeit an.
Wenn die Fernbedienung nicht auf den IR-Empfänger (Abb. 2 4, Seite 3) am
Bedienpanel ausgerichtet ist, können Sie die Fernbedienung getrennt von der Dachklimaanlage in den Stand-By-Modus schalten oder einschalten:
➤ Drücken Sie die Taste .
9.3 Hinweis zur besseren Nutzung
Wenn Sie die folgenden Hinweise beachten, optimieren Sie die Wirkungsweise
Ihrer Dachklimaanlage:
• Verbessern Sie die Wärmeisolierung des Fahrzeugs, indem Sie Spalte abdichten
und Fenster mit reflektierenen Rollos oder Vorhängen verhängen.
• Nachdem das Fahrzeug lange Zeit der Sonnenbestrahlung ausgesetzt war:
Betreiben Sie die Dachklimaanlage erst bei geöffneten Fenstern eine Zeit lang im
Klimamodus „Umluft“ ( ) oder „Entlüften“ ( ), bevor Sie den Klimamodus
„Kühlen“ ( ) eingeschaltet wird.
• Vermeiden Sie im Klimamodus „Kühlen“ ( ) oder „Heizen“ ( ) unnötiges
Öffnen von Türen und Fenstern.
• Wählen Sie eine angemessene Temperatur und Gebläsestufe.
• Richten Sie die Luftdüsen sinnvoll aus.
• Achten Sie darauf, dass die Luftdüsen und Ansauggitter nicht durch Tücher,
Papier oder andere Gegenstände abgedeckt sind.
52
Page 53

DE
Dometic FreshLight Dachklimaanlage bedienen
9.4 Dachklimaanlage ein- und ausschalten
HINWEIS
I
Mit dem Bedienpanel
Die Abbildung zeigt, wie Sie die Dachklimaanlage mit dem Bedienpanel ein-, ausoder in den Stand-By-Modus schalten können. Drücken Sie dazu die Taste , wie in
der Abbildung angegeben:
Nach dem Einschalten wird die Klimatisierung mit den Werten gestartet,
die zuletzt eingestellt waren.
Dachklimaanlage ausgeschaltet
kurz
Stand-By-Modus
lang
Dachklimaanlage e
Beispiel: Die Dachklimaanlage ist im Stand-By-Modus. Sie soll ausgeschaltet
werden.
➤ Drücken Sie die Taste kurz.
✓ Die Dachklimaanlage ist ausgeschaltet.
Mit der Fernbedienung
HINWEIS
I
• Um die Dachklimaanlage mit der Fernbedienung bedienen zu
können, muss die Dachklimaanlage im Stand-By-Modus oder eingeschaltet sein.
• Mit der Fernbedienung können Sie die Dachklimaanlage aus dem
Stand-By-Modus einschalten und wieder in den Stand-By-Modus
ingeschaltet
lang kurz
schalten. Drücken Sie dazu die Taste
.
53
Page 54

DE
Dachklimaanlage bedienen Dometic FreshLight
9.5 Klimamodus wählen
HINWEIS
I
➤ Wählen Sie mit der Taste MODE den gewünschten Klimamodus, siehe „Klima-
modi“ auf Seite 48.
✓ Die Dachklimaanlage quittiert den Empfang der Werte mit einem hohen Ton.
✓ Die Dachklimaanlage wird in den gewählten Klimamodus geschaltet.
• Bevor Sie den Klimamodus „Entlüften“ ( ) auswählen, müssen Sie
die beiden Rollos ganz öffnen.
• Im Klimamodus „Entlüften“ ( ) startet das Gebläse erst, nachdem
die Belüftungsklappe (Abb. 5 1, Seite 5) geöffnet ist. Dies kann ein
paar Minuten dauern.
• Nach dem Umschalten auf den Klimamodus „Heizen“ ( ) startet
die Dachklimaanlage mit dem Heizen erst nach ca. 30 Sekunden. In
dieser Zeit blinkt die Status-LED am Bedienpanel und der Kältekreislauf wird umgekehrt.
54
Page 55

DE
Dometic FreshLight Dachklimaanlage bedienen
AUTO
9.6 Gebläsestufe manuell wählen
Das Gebläse regelt die Stärke der Luftzufuhr.
In den Klimamodi „Kühlen“ ( ), „Heizen“ ( ) und „Umluft“ ( ) kann die Gebläsestufe manuell gewählt werden. In den übrigen Klimamodi steuert die Dachklimaanlage die Gebläsestufe automatisch.
Displaymeldung Erklärung
niedrige Gebläsestufe
mittlere Gebläsestufe
hohe Gebläsestufe
höchste Gebläsestufe
Automatikmodus, nur in den Klimamodi „Kühlen“ ( ) und
„Heizen“ ( ) verfügbar.
➤ Wählen Sie mit der Taste die gewünschte Gebläsestufe.
✓ Die Dachklimaanlage quittiert den Empfang der Werte mit einem hohen Ton.
✓ Die Gebläsestufe ist neu eingestellt.
9.7 Temperatur einstellen
In den Klimamodi „Automatik“ ( ), „Kühlen“ ( ), „Heizen“ ( ) und
„Entfeuchten“ ( ) können Sie über die Fernbedienung eine Temperatur zwischen
16 °C und 31 °C vorgeben.
➤ Wählen Sie mit der Taste + oder – die gewünschte Temperatur.
✓ Die Dachklimaanlage quittiert den Empfang der Werte mit einem hohen Ton.
✓ Die Temperatur ist in der Dachklimaanlage eingestellt.
55
Page 56

DE
Dachklimaanlage bedienen Dometic FreshLight
9.8 Luftdüsen einstellen
Die Luftzufuhr in den Fahrzeug-Innenraum kann über die Stellung der Luftdüsen
reguliert werden.
Die Luftdüsen können mit einem Schieber (Abb. 6 2, Seite 5) reguliert werden,
sodass die Luft entweder in beide Richtungen, nur nach vorne oder nur nach hinten
gelenkt wird:
➤ Drehen Sie den Drehknopf des Schiebers entgegen des Uhrzeigersinns auf.
➤ Verschieben Sie den Schieber, sodass die Luft in die gewünschte Richtung
gelenkt wird.
➤ Drehen Sie den Drehknopf im Uhrzeigersinn wieder fest.
Die Lamellen (Abb. 6 1, Seite 5) der vorderen Luftdüse können gedreht werden.
Dadurch wird die Luft in die gewünschte Richtung geleitet.
9.9 Timer programmieren
Mit der Timerfunktion können Sie einen gewünschten Zeitraum zur Klimatisierung
einstellen. Dabei können Sie entweder nur den Einschaltzeitpunkt oder nur den
Ausschaltzeitpunkt oder beide Werte vorgeben. Die Uhrzeit kann in Schritten von
10 Minuten eingestellt werden.
HINWEIS
I
➤ Wählen Sie vor der Programmierung des Timers den Klimamodus und alle
gewünschten Werte (z. B. Temperatur) aus.
Wird bei der Timerprogrammierung für 15 Sekunden keine Taste auf der
Fernbedienung gedrückt, so wechselt die Fernbedienung zurück zum
Ausgangsmodus.
56
Page 57

DE
Dometic FreshLight Dachklimaanlage bedienen
08:00
20:00
08:00
20:00
20:00
Einschaltzeitpunkt einstellen
➤ Drücken Sie die Taste TIMER einmal.
✓ Das Symbol ON ( ) blinkt auf dem Display der Fernbedienung.
➤ Stellen Sie mit der Taste + oder – die Uhrzeit ein, zu der die Dachklimaanlage ein-
geschaltet werden soll.
➤ Drücken Sie die Taste SET, um den Wert zur Dachklimaanlage zu senden.
✓ Der Einschaltzeitpunkt ist in der Dachklimaanlage eingestellt.
Die Dachklimaanlage startet zum eingestellten Zeitpunkt mit dem gewählten
Klimamodus.
➤ Schalten Sie die Dachklimaanlage in den Stand-By-Modus.
Ausschaltzeitpunkt einstellen
➤ Drücken Sie die Taste TIMER zweimal.
✓ Das Symbol OFF ( ) blinkt auf dem Display der Fernbedienung.
➤ Stellen Sie mit der Taste + oder – die Uhrzeit ein, zu der die Dachklimaanlage
ausgeschaltet werden soll.
➤ Drücken Sie die Taste SET, um den Wert zur Dachklimaanlage zu senden.
✓ Der Ausschaltzeitpunkt ist in der Dachklimaanlage eingestellt.
Die Dachklimaanlage läuft bis zum eingestellten Zeitpunkt mit dem gewählten
Klimamodus.
Einschalt- und Ausschaltzeitpunkte einstellen
➤ Drücken Sie die Taste TIMER dreimal.
✓ Das Symbol ON ( ) blinkt auf dem Display der Fernbedienung.
Das Symbol OFF ( ) ist sichtbar.
➤ Stellen Sie mit der Taste + oder – die Uhrzeit ein, zu der die Dachklimaanlage ein-
geschaltet werden soll.
➤ Drücken Sie die Taste TIMER erneut.
✓ Das Symbol OFF ( ) blinkt auf dem Display der Fernbedienung.
➤ Stellen Sie mit der Taste + oder – die Uhrzeit ein, zu der die Dachklimaanlage
ausgeschaltet werden soll.
➤ Drücken Sie die Taste SET, um den Wert zur Dachklimaanlage zu senden.
57
Page 58

DE
Dachklimaanlage bedienen Dometic FreshLight
✓ Der Einschalt- und der Ausschaltzeitpunkt sind in der Dachklimaanlage einge-
stellt.
Die Dachklimaanlage startet zum eingestellten Zeitpunkt mit dem gewählten
Klimamodus und läuft bis zum zweiten eingestellten Zeitpunkt.
➤ Schalten Sie die Dachklimaanlage in den Stand-By-Modus.
Timerprogrammierung aufheben
Wenn Sie den Timer programmiert haben, können Sie das wie folgt aufheben:
➤ Drücken Sie die Taste TIMER fünfmal.
✓ Das Symbol für den Timer erlischt. Die Programmierung ist aufgehoben.
9.10 Sleep-Funktion aktivieren
Bei aktivierter Sleep-Funktion wird die eingestellte Temperatur nach einer Stunde
um 1 °C und nach zwei Stunden um 2 °C abgesenkt, um eine angenehme Schlaftemperatur zu gewährleisten.
➤ Stellen Sie die gewünschte Temperatur ein (siehe „Temperatur einstellen“ auf
Seite 55).
➤ Drücken Sie die Taste SLEEP.
✓ Das Symbol wird im Display angezeigt.
Die Sleep-Funktion ist aktiviert.
9.11 Zusatzfunktion „I feel“ einstellen
Bei dieser Funktion misst die Fernbedienung die Raumtemperatur und überträgt den
Messwert alle 10 Minuten an die Dachklimaanlage. Die Dachklimaanlage passt die
Solltemperatur an diesen Messwert an.
➤ Drücken Sie die Taste I FEEL.
➤ Legen Sie die Fernbedienung so ab, dass sie auf den IR-Empfänger (Abb. 2 4,
Seite 3) am Bedienpanel zeigt. Sonst können die Werte nicht an die Dachklimaanlage gesendet werden.
HINWEIS
I
Die Fernbedienung sollte sich nicht in einem Bereich des Raums
befinden, der wesentlich wärmer oder kälter als die durchschnittliche
Raumtemperatur ist. Sie darf z. B. nicht in der Sonne oder vor der Dachklimaanlage liegen.
58
Page 59

DE
Dometic FreshLight Dachklimaanlage bedienen
9.12 Leuchten bedienen
Die Leuchten an der Dachklimaanlage sind dimmbar. Sie werden mit dem zuletzt
eingestellten Helligkeitswert eingeschaltet.
Licht am Bedienpanel ein-/ausschalten
➤ Drücken Sie die Taste
Licht am Bedienpanel dimmen
➤ Drücken Sie die Taste so lange, bis die Leuchten auf die gewünschte Hellig-
keit gedimmt sind.
➤ Um die Leuchten in die andere Richtung zu dimmen: Lassen Sie die Taste kurz
los und drücken Sie sie erneut lange.
Licht mit Fernbedienung ein-/ausschalten
➤ Drücken Sie die Taste LIGHT, um die Leuchten ein- oder auszuschalten.
kurz, um die Leuchten ein- oder auszuschalten.
9.13 Batterien der Fernbedienung austauschen
Tauschen Sie die Batterien aus, wenn auf dem Display das Symbol angezeigt
wird.
Das Batteriefach befindet sich an der Rückseite der Fernbedienung.
➤ Drücken Sie den Deckel des Batteriefachs leicht ein und schieben Sie ihn in Pfeil-
richtung auf.
➤ Setzen Sie die neuen Batterien (2 x Typ AAA) wie im Batteriefach abgebildet in
die Fernbedienung ein.
➤ Schließen sie den Deckel des Batteriefachs.
Schützen Sie Ihre Umwelt!
Akkus und Batterien gehören nicht in den Hausmüll.
B
Geben Sie bitte Ihre defekten Akkus oder verbrauchten Batterien beim
Händler oder bei einer Sammelstelle ab.
59
Page 60

DE
Dachklimaanlage bedienen Dometic FreshLight
9.14 Uhrzeit einstellen
Die Fernbedienung benötigt zur Timerprogrammierung die aktuelle Uhrzeit. Die
Uhrzeit wird auf dem Display der Fernbedienung angezeigt.
Zum Einstellen der Uhrzeit führen Sie folgende Schritte aus:
HINWEIS
I
➤ Drücken Sie die Taste CLOCK lange, um in den Modus zum Einstellen der Uhr-
zeit zu gelangen.
✓ Die Uhrzeit blinkt auf dem Display der Fernbedienung.
➤ Stellen Sie mit der Taste + oder – die aktuelle Uhrzeit ein.
Wenn beim Einstellen der Uhrzeit für ca. 10 sekunden keine Taste auf
der Fernbedienung gedrückt wird, so wechselt die Fernbedienung
zurück zum Ausgangsmodus.
➤ Drücken Sie die Taste SET, um die Uhrzeit zu bestätigen.
9.15 Rollos verwenden
ACHTUNG! Beschädigungsgefahr!
A
Mit den beiden Rollos kann der Sonnen- oder Lichteinfall in das Fahrzeuginnere
geregelt werden.
➤ Verschieben Sie die Rollos mit der Hand (Abb. 7, Seite 6).
Wenn das Fahrzeug in der prallen Sonne steht, darf das Verdunklungsrollo nicht ganz geschlossen werden. Es kann zu einem Hitzestau
kommen. Um Materialschäden zu vermeiden, muss das Verdunklungsrollo mindestens zu einem Drittel geöffnet bleiben.
60
Page 61

DE
Dometic FreshLight Dachklimaanlage reinigen
10 Dachklimaanlage reinigen
ACHTUNG! Beschädigungsgefahr!
A
• Reinigen Sie die Dachklimaanlage nicht mit einem Hochdruck-
reiniger. Eindringendes Wasser kann die Dachklimaanlage
beschädigen.
• Verwenden Sie keine scharfen oder harten Gegenstände oder
Reinigungsmittel zur Reinigung, da dies zu einer Beschädigung der
Dachklimaanlage und des Fensters führen kann.
• Verwenden Sie zur Reinigung der Dachklimaanlage lediglich Wasser
mit einem schonenden Reinigungsmittel. Verwenden Sie auf keinen
Fall Benzin, Diesel oder Lösungsmittel.
• Verwenden Sie zur Reinigung des Dachfensters ausschließlich die
vom Hersteller empfohlenen Reinigungsmittel:
– Acrylglas-Politur (Art.-Nr. 9104100242),
– Spezial-Politurtuch (Art.-Nr. 9104100243) und
– Acrylglas-Reiniger (Art.-Nr. 9104100244)
HINWEIS
I
➤ Reinigen Sie das Gehäuse der Dachklimaanlage und die Luftauslasseinheit
gelegentlich mit einem feuchten Tuch.
➤ Entfernen Sie regelmäßig Laub und anderen Schmutz von den Belüftungs-
öffnungen (Abb. 8 1, Seite 6) auf der Dachklimaanlage. Achten Sie darauf, dass
Sie dabei nicht die Lamellen in der Dachklimaanlage beschädigen.
➤ Reinigen Sie die Fernbedienung gelegentlich mit einem leicht feuchten Tuch.
Zur Reinigung des Displays empfiehlt sich ein Brillenputztuch.
➤ Reinigen Sie die Rollos mit milder Seifenlauge und viel Wasser.
Bei starker Sonneneinstrahlung kann sich das Dachfenster eintrüben. Es
wird wieder klar, sobald es sich abkühlt.
61
Page 62

DE
Dachklimaanlage warten Dometic FreshLight
11 Dachklimaanlage warten
WARNUNG!
!
Intervall Prüfung/Wartung
Regelmäßig Kondenswasserabläufe prüfen:
Regelmäßig Filter an beiden Seiten der Luftausströmeinheit reinigen (Abb. 0,
Andere Wartungsarbeiten als die hier beschriebenen dürfen nur von
Fachkräften durchgeführt werden, die mit den Gefahren beim Umgang
mit Kältemittel und Klimaanlagen sowie den einschlägigen Vorschriften
vertraut sind. Durch unsachgemäße Wartungsarbeiten können
erhebliche Gefahren entstehen.
➤ Prüfen Sie, ob die Kondenswasserabläufe (Abb. 9 1, Seite 6) an
den Seiten der Dachklimaanlage frei sind und das entstehende
Kondenswasser ablaufen kann.
Seite 7):
➤ Entfernen Sie von Hand die Abdeckung (1) des Filters.
➤ Entnehmen Sie den Filter (2).
➤ Reinigen Sie die Filter (2) mit einer Waschmittellösung und lassen Sie
ihn trocknen.
➤ Setzen Sie den trockenen Filter (2) wieder ein.
➤ Setzen Sie die Abdeckung (1) wieder ein.
Einmal pro Jahr Profildichtungen prüfen:
➤ Prüfen Sie die Profildichtung der Dachklimaanlage zum Fahrzeug-
dach auf Risse und andere Beschädigungen.
Einmal pro Jahr Wärmetauscher warten lassen:
➤ Lassen Sie die Wärmetauscher der Dachklimaanlage von einer Fach-
werkstatt warten.
Einmal pro Jahr Aktivekohle-Filter ersetzen (Abb. a, Seite 7):
➤ Entfernen Sie von Hand die Abdeckung (1) des Filters.
➤ Entnehmen Sie den Filter (2).
➤ Entfernen Sie den Aktivkohle-Filter (3).
➤ Reinigen Sie die Filter (2) mit einer Waschmittellösung und lassen Sie
ihn trocknen.
➤ Setzen Sie einen neuen Aktivekohle-Filter ein.
➤ Setzen Sie den trockenen Filter (2) wieder ein.
➤ Setzen Sie die Abdeckung (1) wieder ein.
62
Page 63

DE
Dometic FreshLight Störungen beseitigen
12 Störungen beseitigen
Störung Ursache Behebung
Dachklimaanlage
schaltet ständig ab
Keine Kühlleistung Die Dachklimaanlage ist nicht auf Kühlen
Keine Heizleistung Die Umgebungstemperatur liegt
Vereisungsfühler hat geschaltet. Außentemperatur ist zu niedrig oder
eingestellt.
Die Umgebungstemperatur ist höher als
52°C.
Die eingestellte Temperatur ist höher als
die Raumtemperatur.
Die Umgebungstemperatur ist niedriger
als 16 °C.
Einer der Temperaturfühler ist defekt. ➤ Wenden Sie sich an eine
Das Verdampfergebläse ist schadhaft.
Das Kondensatorgebläse ist schadhaft.
über 30 °C.
alle Luftdüsen sind verschlossen.
➤ Stellen Sie die Dachklimaanlage
auf Kühlen.
Die Dachklimaanlage ist nur für eine
Umgebungstemperatur bis 52°C
ausgelegt.
➤ Wählen Sie eine niedrigere Tem-
peratur.
Die Dachklimaanlage ist nur für eine
Umgebungstemperatur ab 16 °C ausgelegt.
autorisierte Fachwerkstatt.
➤ Nutzen Sie die Heizfunktion der
Dachklimaanlage nur bei einer
Temperatur unter 30 °C.
Die Umgebungstemperatur liegt
unter 2 °C.
Die eingestellte Temperatur ist höher als
30 °C.
Die Dachklimaanlage ist nicht auf Heizen
eingestellt.
Einer der Temperaturfühler ist defekt. ➤ Wenden Sie sich an eine
Die Heizfunktion der Dachklimaanlage ist nur für eine Umgebungstemperatur bis 2 °C ausgelegt.
➤ Wählen Sie eine niedrigere
Temperatur.
➤ Stellen sie die Dachklimaanlage
auf Heizen.
autorisierte Fachwerkstatt.
63
Page 64

DE
Störungen beseitigen Dometic FreshLight
Störung Ursache Behebung
Schlechte
Luftleistung
Wassereintritt im
Fahrzeug
Dachklimaanlage
schaltet nicht ein
Die Luftansaugung ist verstopft. ➤ Entfernen Sie Laub und anderen
Schmutz von den Belüftungslamellen auf der Dachklimaanlage.
Das Gebläse ist defekt. ➤ Wenden Sie sich an eine
autorisierte Fachwerkstatt.
Die Ablauföffnungen für Kondenswasser
sind verstopft.
Die Dichtungen sind schadhaft. ➤ Wenden Sie sich an eine
Es liegt keine Versorgungsspannung
(230 Vw) an.
Die Spannung ist zu niedrig (unter
200 V).
Der Spannungswandler ist defekt.
Einer der Temperaturfühler ist defekt.
Die elektrische Absicherung der
Spannungsversorgung ist zu gering.
➤ Reinigen Sie die Ablauföffnungen
für Kondenswasser.
autorisierte Fachwerkstatt.
➤ Kontrollieren Sie die Spannungs-
versorgung.
➤ Wenden Sie sich an eine
autorisierte Fachwerkstatt.
➤ Prüfen Sie die elektrische
Absicherung der Spannungsversorgung.
Dachklimaanlage
schaltet nicht ab
Einer der Temperaturfühler ist defekt. ➤ Wenden Sie sich an eine
autorisierte Fachwerkstatt.
Die elektrische Absicherung der
Spannungsversorgung ist zu gering.
➤ Prüfen Sie die elektrische
Absicherung der Spannungsversorgung.
64
Page 65

DE
Dometic FreshLight Gewährleistung
13 Gewährleistung
Es gilt die gesetzliche Gewährleistungsfrist. Sollte das Produkt defekt sein, wenden
Sie sich bitte an einen Service-Partner in Ihrem Land (Adressen siehe Rückseite der
Anleitung).
Unsere Spezialisten helfen Ihnen gerne weiter und besprechen mit Ihnen den
weiteren Verlauf der Gewährleistung.
14 Entsorgung
Vorschriften für Umweltschutz und fachgerechte Entsorgung
Alle Organisationen müssen eine Reihe von Maßnahmen anwenden, um den
Einfluss, den ihre Aktivitäten (Herstellung, Produkte, Service usw.) auf die Umwelt
haben, zu erkennen, zu bewerten und zu kontrollieren.
Die zu befolgenden Maßnahmen zur Erkennung von erheblichen Auswirkungen auf
die Umwelt müssen folgende Faktoren zu berücksichtigen:
• Verwendung von Rohstoffen und natürlichen Ressourcen
• atmosphärische Emissionen
• Austritt von Flüssigkeiten
• Entsorgung und Recycling
• Bodenkontamination
Um die Auswirkungen auf die Umwelt zu minimieren, stellt der Hersteller im
Folgenden eine Reihe von Anzeichen dar, die jeder berücksichtigen muss, der
(aus welchem Grund auch immer) mit dem Gerät während dessen Lebensdauer
interagiert.
• Das gesamte Verpackungsmaterial muss entsprechend der gesetzlichen Vorschriften des Landes, in dem die Entsorgung stattfindet, entsorgt (vorzugsweise
recycelt) werden.
• Alle Produkt-Komponenten müssen entsprechend der gesetzlichen Vorschriften
des Landes, in dem die Entsorgung stattfindet, entsorgt (vorzugsweise recycelt)
werden.
• Zur korrekten Entsorgung muss das Gerät an ein autorisierten Recyclingcenter
übergeben werden, damit sichergestellt ist, dass alle recycelbaren Komponenten wiederverwendet werden und mit den restlichen Materialien ordnungsgemäß verfahren wird.
65
Page 66

DE
Entsorgung Dometic FreshLight
• Stellen Sie während der Installation sicher, dass der Raum ausreichend belüftet
ist, um das Entstehen von abgestandener Luft zu verhindern, die schädlich für die
Gesundheit des Bediener könnte.
• Stellen Sie während des Betrieb und der Wartung sicher, dass alle schädlichen
Abfallprodukte (Öl, Fett usw.) ordnungsgemäß entsorgt werden.
• Halten Sie den Lärmpegel zur Reduzierung der Lärmbelästigung gering.
Weitere Informationen zur korrekten Deinstallation unserer Produkte entnehmen Sie
bitte den Recycling-Anleitungen auf www.dometic.com.
➤ Geben Sie das Verpackungsmaterial möglichst in den entsprechenden
Recycling-Müll.
➤ Achten Sie im Betrieb sowie bei Reparaturen und Wartungsarbeiten darauf, dass
der Kühlkreislauf nicht beschädigt wird und das Kältemittel nicht entweichen
kann. Es wirkt als Treibhausgas und sollte nicht in die Umwelt gelangen.
Wenn Sie das Produkt endgültig außer Betrieb nehmen, informieren Sie
sich bitte beim nächsten Recyclingcenter oder bei Ihrem Fachhändler
M
über die zutreffenden Entsorgungsvorschriften.
➤ Entsorgen Sie das Produkt nur entsprechend der geltenden Recycling- oder
Entsorgungsvorschriften bei einem autorisierten Entsorgungsunternehmen.
Schützen Sie Ihre Umwelt!
Akkus und Batterien gehören nicht in den Hausmüll.
B
Geben Sie bitte Ihre defekten Akkus oder verbrauchten Batterien beim
Händler oder bei einer Sammelstelle ab.
66
Page 67

DE
Dometic FreshLight Technische Daten
10R-030642
15 Technische Daten
Dometic FreshLight
1600 2200
Art.-Nr.: 9102900207 9102900165
Kühlleistung in Anlehnung an ISO 5151: 1500 W 2050 W
Heizleistung: max. 2050 W max. 2700 W
Eingangsnennspannung: 230 Vw / 50 Hz
Stromaufnahme bei Kühlbetrieb: 4,1 A 4,1 A
Stromaufnahme bei Heizbetrieb: 3,5 A 5,2 A
Betriebstemperaturbereich: 0 °C bis +52 °C
Kältemittel: R407c
Gebläse: 4 Gebläsestufen
1 Automatikmodus
Schutzklasse: IP X4
Max. Raumvolumen des Fahrzeugs
20 m³ 25 m³
(mit isolierten Wänden):
Abmessungen L x B x H (mm): 1105 x 758 x 210
(Höhe über Fahrzeugdach)
758
550
53
174 931
210
196 684
110 5
25 – 60
880
Gewicht: ca. 40 kg ca. 42 kg
Prüfung/Zertifikat:
67
Page 68

FR
Dometic FreshLight
Veuillez lire ce manuel attentivement avant de mettre l'appareil en service
et conservez-le. En cas de passer le produit, veuillez le transmettre au
nouvel acquéreur.
Table des matières
1 Explication des symboles . . . . . . . . . . . . . . . . . . . . . . . . . . . . . . . . . . . . 69
2 Consignes de sécurité . . . . . . . . . . . . . . . . . . . . . . . . . . . . . . . . . . . . . . . 70
2.1 Consignes générales de sécurité . . . . . . . . . . . . . . . . . . . . . . . . . . . 70
2.2 Consignes de sécurité concernant le fonctionnement de l’appareil 71
3 Groupe cible de cette notice . . . . . . . . . . . . . . . . . . . . . . . . . . . . . . . . . 72
4 Contenu de la livraison . . . . . . . . . . . . . . . . . . . . . . . . . . . . . . . . . . . . . . 72
5 Accessoires . . . . . . . . . . . . . . . . . . . . . . . . . . . . . . . . . . . . . . . . . . . . . . . . . 72
6Usage conforme . . . . . . . . . . . . . . . . . . . . . . . . . . . . . . . . . . . . . . . . . . . . 73
7 Description technique . . . . . . . . . . . . . . . . . . . . . . . . . . . . . . . . . . . . . . . 73
7.1 Composantes . . . . . . . . . . . . . . . . . . . . . . . . . . . . . . . . . . . . . . . . . . 74
7.2 Panneau de commande . . . . . . . . . . . . . . . . . . . . . . . . . . . . . . . . . . 75
7.3 Télécommande . . . . . . . . . . . . . . . . . . . . . . . . . . . . . . . . . . . . . . . . . 76
7.4 Modes de climatisation. . . . . . . . . . . . . . . . . . . . . . . . . . . . . . . . . . . 78
7.5 Fonctions supplémentaires. . . . . . . . . . . . . . . . . . . . . . . . . . . . . . . . 79
8 Avant la première utilisation . . . . . . . . . . . . . . . . . . . . . . . . . . . . . . . . . 80
9 Utilisation du climatiseur de toit . . . . . . . . . . . . . . . . . . . . . . . . . . . . . . .81
9.1 Remarques générales concernant l’utilisation . . . . . . . . . . . . . . . . . .81
9.2 Utilisation de la télécommande . . . . . . . . . . . . . . . . . . . . . . . . . . . . .81
9.3 Consignes optimisant l’utilisation de l’appareil. . . . . . . . . . . . . . . . 82
9.4 Mise en marche / à l’arrêt du climatiseur. . . . . . . . . . . . . . . . . . . . . 83
9.5 Sélection du mode de climatisation. . . . . . . . . . . . . . . . . . . . . . . . . 84
9.6 Sélection manuelle de la vitesse de ventilation . . . . . . . . . . . . . . . . 85
9.7 Réglage de la température . . . . . . . . . . . . . . . . . . . . . . . . . . . . . . . . 86
9.8 Réglage des buses de ventilation. . . . . . . . . . . . . . . . . . . . . . . . . . . 86
9.9 Programmation de l’horloge programmable . . . . . . . . . . . . . . . . . 87
9.10 Activation de la fonction Sleep. . . . . . . . . . . . . . . . . . . . . . . . . . . . . 88
9.11 Réglage de la fonction supplémentaire « I feel » . . . . . . . . . . . . . . . 89
9.12 Utilisation des lampes . . . . . . . . . . . . . . . . . . . . . . . . . . . . . . . . . . . . 89
9.13 Changement des piles de la télécommande . . . . . . . . . . . . . . . . . . 90
68
Page 69

FR
Dometic FreshLight Explication des symboles
9.14 Réglage de l’heure . . . . . . . . . . . . . . . . . . . . . . . . . . . . . . . . . . . . . . 90
9.15 Utilisation des stores . . . . . . . . . . . . . . . . . . . . . . . . . . . . . . . . . . . . . .91
10 Nettoyage du climatiseur de toit. . . . . . . . . . . . . . . . . . . . . . . . . . . . . . 92
11 Entretien du climatiseur de toit . . . . . . . . . . . . . . . . . . . . . . . . . . . . . . . 93
12 Guide de dépannage . . . . . . . . . . . . . . . . . . . . . . . . . . . . . . . . . . . . . . . . 94
13 Garantie. . . . . . . . . . . . . . . . . . . . . . . . . . . . . . . . . . . . . . . . . . . . . . . . . . . . 96
14 Retraitement . . . . . . . . . . . . . . . . . . . . . . . . . . . . . . . . . . . . . . . . . . . . . . . 96
15 Données techniques. . . . . . . . . . . . . . . . . . . . . . . . . . . . . . . . . . . . . . . . . 98
1 Explication des symboles
AVERTISSEMENT !
!
Consigne de sécurité : le non-respect de ces consignes peut entraîner
la mort ou de graves blessures.
!
A
I
ATTENTION !
Consigne de sécurité : le non-respect de ces consignes peut entraîner
des blessures.
AVIS !
Le non-respect de ces consignes peut entraîner des dommages
matériels et des dysfonctionnements du produit.
REMARQUE
Informations complémentaires sur l'utilisation du produit.
69
Page 70

FR
Consignes de sécurité Dometic FreshLight
2 Consignes de sécurité
Le fabricant décline toute responsabilité pour des dommages dans les cas suivants :
• des influences mécaniques et des surtensions ayant endommagé le matériel
• des modifications apportées au produit sans autorisation explicite de la part du
fabricant
• une utilisation différente de celle décrite dans la notice
Il décline notamment toute responsabilité pour tous les dommages consécutifs, en
particulier pour les dommages consécutifs à une panne du climatiseur de toit.
Lors de l’utilisation d’appareils électriques, les consignes générales de sécurité suivantes doivent être respectées afin d’éviter
• une décharge électrique,
• un incendie,
• des blessures.
2.1 Consignes générales de sécurité
AVERTISSEMENT !
!
• Les appareils électriques ne sont pas des jouets pour enfants !
Les enfants ne peuvent estimer les dangers éventuels des appareils
électriques. Ne laissez pas les enfants utiliser des appareils électriques
sans surveillance.
• Ne laissez pas des personnes (enfants compris) incapables d’utiliser le
produit de manière sûre, en raison de déficiences physiques, sensorielles ou mentales ou de leur manque d’expérience ou de connaissances, utiliser ce produit sans surveillance.
• Utilisez l’appareil conformément à l’usage pour lequel il a été conçu.
• Ne procédez à aucune modification ni transformation de l’appareil !
• L’installation, la maintenance et les réparations du climatiseur de toit
doivent être effectuées par un personnel qualifié et parfaitement
informé des dangers et règlements spécifiques à ces manipulations.
Toute réparation mal effectuée risquerait d’entraîner de graves dangers. Si des réparations sont nécessaires, adressez-vous à la filiale
chargée du service après-vente dans votre pays (adresses au dos de la
notice).
• N’utilisez pas le climatiseur de toit à proximité de liquides inflammables ou dans des pièces fermées.
70
Page 71

FR
Dometic FreshLight Consignes de sécurité
• Veillez à ce qu’aucun objet inflammable ne soit entreposé ni monté
dans la zone de sortie de l’air. Il convient de maintenir une distance de
50 cm minimum.
• Ne glissez pas les doigts dans les sorties d’air et n’introduisez aucun
objet à l’intérieur du climatiseur de toit.
• En cas d’incendie, n’ouvrez pas le couvercle supérieur du climatiseur
de toit et utilisez un agent d’extinction agréé. N’essayez pas
d’éteindre l’incendie avec de l’eau.
AVIS !
A
2.2 Consignes de sécurité concernant le fonctionnement
• Si votre camping-car est équipé d’un climatiseur de toit, ne le lavez
jamais dans une station de lavage automatique.
• Veuillez vous informer auprès du fabricant de votre véhicule si son
changement de hauteur dû à l’installation du climatiseur de toit (hauteur rapportée : 210 mm) doit être agréé (conformément à la réglementation nationale sur la mise en circulation des véhicules) et
consigné dans les papiers du véhicule.
• Si des défauts apparaissent dans le circuit frigorifique du climatiseur,
ce dernier doit être contrôlé et remis en état par une entreprise spécialisée. Tout échappement du fluide frigorigène dans l’atmosphère est
formellement interdit.
de l’appareil
AVERTISSEMENT !
• Coupez l’alimentation électrique au cours de travaux sur l’appareil.
!
AVIS !
A
• Ne faites pas fonctionner le climatiseur de toit si la température extérieure est inférieure à 0 °C. L’appareil risquerait alors d’être endommagé par de l’eau de condensation gelée.
• Le climatiseur de toit n’est pas conçu pour être utilisé dans des
machines agricoles ou de construction.
• Faites fonctionner l’appareil uniquement si le boîtier et les conduites
sont intacts.
71
Page 72

FR
Groupe cible de cette notice Dometic FreshLight
3 Groupe cible de cette notice
Ce manuel s’adresse à l’utilisateur du climatiseur de toit.
4 Contenu de la livraison
FreshLight 1600
Désignation
Climatiseur de toit Dometic FreshLight 1600 9102900207
Notice d’installation
Notice d’utilisation
FreshLight 2200
Désignation
Climatiseur de toit Dometic FreshLight 2200 9102900165
Notice d’installation
Notice d’utilisation
Numéro de
produit
Numéro de
produit
5Accessoires
Disponibles en accessoires (non compris dans la livraison) :
Désignation
Kit d’extension DC DC-Kit2 9100300001
Kit d’extension DC DC-Kit3 9100300002
Kit d’extension DC DC-Kit5 9100300073
REMARQUE
I
72
À l’aide d’un kit d’extension DC (en accessoire), il est possible d’utiliser
le climatiseur de toit Dometic FreshLight pendant le trajet.
Numéro de
produit
Page 73

FR
Dometic FreshLight Usage conforme
6Usage conforme
Le climatiseur de toit Dometic FreshLight à dôme de toit intégré est capable de
climatiser l’intérieur des camping-cars et des caravanes grâce à de l’air frais.
Le climatiseur de toit ne convient pas aux engins de construction, aux machines
agricoles ou autres engins de travail similaires. Le fonctionnement correct du climatiseur n’est pas garanti en cas de vibrations excessives.
Le fonctionnement du climatiseur de toit est garanti pour des températures allant
jusqu’à 52 °C.
N’utilisez pas le climatiseur de toit en mode de climatisation « chauffage » si la température ambiante est supérieure à 30 °C.
Il est conseillé d’utiliser le mode chauffage de l’appareil à des températures extérieures supérieures à +2 °C.
7 Description technique
Le climatiseur de toit à fenêtre intégrée alimente l’habitacle en air frais ou chaud, déshumidifié, sans poussière ni saleté. L’air vicié peut être aspiré hors de l’habitacle par
une soufflerie.
Deux lampes DEL réglables, intégrées dans l’unité de sortie d’air, éclairent d’une
lumière agréablement tamisée.
Le dôme de toit dispose de deux stores : le store occultant ne laisse pas passer la
lumière, le store de protection protège contre le rayonnement solaire direct.
Le climatiseur de toit est commandé grâce à une télécommande.
REMARQUE
I
Le climatiseur de toit peut réduire ou augmenter la température de
l’intérieur du véhicule jusqu’à une certaine température. La température
pouvant être atteinte varie en fonction du type de véhicule, de la température ambiante et de la puissance frigorifique de votre climatiseur de
toit. En dessous d’une température ambiante de 16° C, le climatiseur de
toit ne refroidit plus. Dans ce cas, utilisez uniquement le mode de climatisation « Circulation d’air ».
Lorsque la température extérieure baisse, la puissance calorifique du climatiseur de
toit diminue. Il est conseillé d’utiliser le mode chauffage de l’appareil uniquement à
des températures supérieures à +2 °C.
73
Page 74

FR
Description technique Dometic FreshLight
7.1 Composantes
Le circuit frigorifique du climatiseur est constitué de cinq éléments principaux
(fig. 1, page 3) :
• Compresseur (1)
Le compresseur aspire le fluide frigorigène R407c utilisé et le comprime. Cela fait
augmenter la pression et donc, la température du frigorigène.
• Condenseur (2)
Le condenseur intégré fonctionne comme un refroidisseur ou un échangeur thermique. L’air qui circule absorbe la chaleur, le gaz frigorigène chaud refroidit et se
liquéfie.
• Évaporateurs (3)
Les évaporateurs refroidissent et déshumidifient l’air qui circule. Le frigorigène
absorbe la chaleur et s’évapore.
• Ventilateur (4)
L’air rafraîchi est diffusé dans l’habitacle du véhicule par le ventilateur, via une
unité de sortie d’air.
• Électrovanne (5)
Grâce à l’électrovanne, il est possible d’inverser le circuit de refroidissement et
de chauffer l’air insufflé.
Vue d’ensemble de tous les éléments : fig. b, page 8.
74
Page 75

FR
Dometic FreshLight Description technique
7.2 Panneau de commande
L’unité de ventilation du climatiseur est munie d’un panneau de commande (fig. 2,
page 3).
Il contient les éléments de commande et d’affichage suivants :
Nº Explication
1 Le voyant d’état
n’est pas éclairé : le climatiseur de toit est éteint
s’allume en orange : le climatiseur de toit est en mode veille
s’allume en vert : le climatiseur de toit est allumé
2
3
clignote lentement en
vert :
s’allume en rouge : uniquement si le climatiseur est raccordé à 12 Vg : la
clignote lentement en
rouge :
clignote en rouge : dysfonctionnement du capteur externe de tempéra-
clignote rapidement en
rouge :
Touche
Touche
Le climatiseur de toit commute en mode
« Chauffage » ( ) ou est en cours de dégivrage.
tension électrique de 230 Vw n’est pas disponible
dysfonctionnement du capteur interne de température E1
ture E2
dysfonctionnement du capteur externe de température E3
Permet d’allumer et d’éteindre le climatiseur de toit
ou de le mettre en mode veille
Un long appui sur la touche permet d’activer le mode
automatique
Permet d’allumer ou d’éteindre la lumière ou tamise la
lumière
4 Récepteur IR pour la télécommande
N’est activé que lorsque le climatiseur de toit est
allumé ou en mode veille
75
Page 76

FR
Description technique Dometic FreshLight
7.3 Télécommande
Tous les réglages du climatiseur (p. ex. réglage de la température, programmation
de la minuterie, etc.) sont transmis au climatiseur par télécommande.
Les éléments de commande et d’affichage suivants sont disponibles sur la télécommande (fig. 3, page 4) :
Nº Explication
1 Écran numérique :
affichage des données suivantes :
• heure
• température intérieure désirée (valeur de consigne) en °C ou °F
• température ambiante effective
• mode de climatisation
• niveau de ventilation
• symboles pour fonctions supplémentaires activées
• état de la batterie
2
Touche :
activation du climatiseur de toit et de la télécommande ou mise en mode veille
3
Touche :
sélection du niveau de soufflerie
4Touche MODE :
sélection du mode de climatisation
5Touche CLOCK :
réglage de l’heure
6Touche TIMER :
programmation de l’horloge programmable
7Touche SLEEP :
activation de la fonction Sleep. La fonction Sleep règle automatiquement la valeur
de consigne vers le bas, afin de garantir une température de sommeil agréable.
8Touche SET :
envoi de données actuelles au climatiseur de toit.
9Touche I FEEL :
activation de la fonction « I feel ». La fonction « I feel » permet d’adapter toutes les
10 minutes la valeur de consigne de la température à la température mesurée par la
télécommande.
Pour ce faire, la télécommande doit être dirigée vers le récepteur IR (fig. 2 4,
page 3) du panneau de commande.
76
Page 77

FR
Dometic FreshLight Description technique
Nº Explication
10 Tou che R ese t :
rétablissement de toutes les valeurs standard
11 Touche ROOM :
Une pression :
affichage de la température actuelle de l’habitacle
(le symbole s’affiche).
Une nouvelle
pression :
12 Touche LIGHT :
allumage ou extinction de la lumière au niveau du climatiseur de toit.
La touche LIGHT fonctionne même lorsque la télécommande est éteinte.
13 Touche F°/C° :
commutation de l’unité de température entre Celsius (°C) et Fahrenheit (°F).
14 Touche – :
diminution de la valeur
15 Touche + :
augmentation de la valeur
16
Symbole (piles épuisées)
S’affiche lorsque les piles de la télécommande sont épuisées. Dans ce cas, remplacez les piles, voir « Changement des piles de la télécommande », page 90.
17
Symbole (envoi des valeurs)
S’affiche brièvement lorsque la télécommande envoie des valeurs au climatiseur de
toit.
affichage de la température réglée.
77
Page 78

FR
Description technique Dometic FreshLight
7.4 Modes de climatisation
Le climatiseur de toit dispose des modes de climatisation suivants :
Mode de
climatisation
Automatique Vous déterminez la température, le climatiseur de toit
Refroidissement Vous déterminez la température et la puissance du
Chauffage Vous déterminez la température et la puissance du
Circulation d’air Vous déterminez le niveau du ventilateur, le climati-
Ventilation Le climatiseur de toit ventile l’habitacle en aspirant l’air
Message à
l’écran
Explication
refroidit ou chauffe l’habitacle pour parvenir à cette
température dans l’habitacle et fixe la puissance
nécessaire du ventilateur.
Dans ce mode, la touche est désactivée.
ventilateur, le climatiseur de toit refroidit l’habitacle à
cette température.
ventilateur, le climatiseur de toit chauffe l’habitacle à
cette température.
seur de toit souffle de l’air froid (air en circulation
refroidi) dans l’habitacle
vicié hors de l’habitacle par une soufflerie. Pour ce
faire, le clapet de ventilation est ouvert.
.
Déshumidification
de l’air
Dans ce mode, la touche est désactivée.
Vous déterminez la température, le climatiseur de toit
refroidit ou chauffe l’air de l’habitacle à cette température, fixe la puissance nécessaire du ventilateur, et déshumidifie l’habitacle (fonctionnement en circulation
d’air).
Dans ce mode, la touche est désactivée.
78
Page 79

FR
Dometic FreshLight Description technique
08:00
08:00 20:00
7.5 Fonctions supplémentaires
Le climatiseur de toit dispose des fonctions supplémentaires suivantes :
Fonction
supplémentaire
Message à
l’écran
Explication
Minuterie Le climatiseur de toit est mis en marche au moment
réglé.
20:00
Le climatiseur de toit est mis à l’arrêt au moment réglé.
Le climatiseur de toit est mis en marche et à l’arrêt aux
moments réglés.
Sleep La température réglée est abaissée de 1 °C au bout
d’une heure et de 2 °C au bout de deux heures, afin
de garantir une température de sommeil agréable.
I feel La télécommande mesure la température ambiante et
I FEEL
transmet la valeur mesurée au climatiseur de toit
toutes les 10 minutes. Le climatiseur de toit adapte la
température de consigne à cette valeur mesurée.
Pour ce faire, la télécommande doit être dirigée vers le
récepteur IR (fig. 2 4, page 3) du panneau de commande.
79
Page 80

FR
Avant la première utilisation Dometic FreshLight
8 Avant la première utilisation
Contrôles avant la mise en service
Avant de mettre en marche le climatiseur, veuillez respecter les consignes suivantes :
➤ vérifiez que la tension et la fréquence d’alimentation correspondent bien aux
valeurs indiquées dans les Caractéristiques techniques, voir page 98.
➤ assurez-vous que ni l’ouverture d’aspiration, ni les buses de ventilation ne sont
bouchées. Aucune des grilles de ventilation ne doit être bouchée afin de garantir
un rendement optimal du climatiseur de toit.
ATTENTION ! Risque de blessures !
!
Contrôle de la télécommande et insertion des piles
Ne glissez ni les doigts, ni un quelconque objet dans les buses de
ventilation ou la grille d’aspiration.
➤ Insérez les piles fournies dans le compartiment des piles de la télécommande,
voir « Changement des piles de la télécommande », page 90.
➤ Vérifiez que les quatre commutateurs Dip (fig. 4, page 4) sont dans la bonne
position.
➤ Si vous avez modifié la position des commutateurs Dip :
confirmez le réglage en appuyant sur la touche Reset (fig. 3 10, page 4).
Réglage de l’heure
➤ Réglez l’heure actuelle : voir « Réglage de l’heure », page 90.
80
Page 81

FR
Dometic FreshLight Utilisation du climatiseur de toit
9 Utilisation du climatiseur de toit
9.1 Remarques générales concernant l’utilisation
Le climatiseur de toit dispose de trois modes de fonctionnement :
Mode de fonctionnement Caractéristiques
désactivé Le climatiseur de toit est éteint, la télécommande est
inactive.
veille Le climatiseur de toit est prêt à fonctionner et peut être mis
en marche à l’aide de la télécommande.
activé Le climatiseur de toit climatise l’habitacle.
Sur le panneau de commande, vous pouvez
• allumer et éteindre le climatiseur de toit et le mettre en mode veille
• allumer et éteindre la lumière et la tamiser
Avec la télécommande, vous pouvez
• allumer le climatiseur de toit à partir du mode veille et le remettre en mode veille
• allumer et éteindre la lumière
• procéder à des réglages et
• sélectionner des fonctions supplémentaires
9.2 Utilisation de la télécommande
Vous avez deux possibilités pour commander le climatiseur de toit avec la télécommande :
• vous pouvez envoyer directement les valeurs au climatiseur lors du réglage
• vous pouvez d’abord fixer toutes les valeurs sur la télécommande puis les
envoyer ensemble au climatiseur de toit
Envoi des valeurs directement lors du réglage
Lors de l’utilisation, la télécommande doit être dirigée vers le récepteur IR (fig. 2
page 3) du panneau de commande.
Après l’appui sur une touche, la valeur est envoyée directement au climatiseur de
toit. Le climatiseur de toit valide la réception des données par un signal aigu.
4,
81
Page 82

FR
Utilisation du climatiseur de toit Dometic FreshLight
Fixation des valeurs puis envoi groupé au climatiseur de toit
Lors de l’utilisation, la télécommande ne doit pas être dirigée vers le récepteur IR
(fig. 2
4, page 3) du panneau de commande.
Déterminez les valeurs souhaitées sur la télécommande. Lorsque vous avez procédé
à tous les réglages, dirigez la télécommande vers le récepteur IR du panneau de
commande et appuyez sur la touche SET. Les données sont alors envoyées de nouveau au climatiseur de toit. Le climatiseur de toit valide la réception des données par
un signal aigu.
Activation ou désactivation de la télécommande uniquement en mode
veille
En mode veille, l’écran de la télécommande indique uniquement l’heure.
Si la télécommande n’est pas dirigée vers le récepteur IR (fig. 2
4, page 3) du pan-
neau de commande, vous pouvez commuter la télécommande en mode veille ou
l’allumer, indépendamment du climatiseur de toit :
➤ Appuyez sur la touche .
9.3 Consignes optimisant l’utilisation de l’appareil
En tenant compte des consignes suivantes, vous optimisez le fonctionnement de
votre climatiseur de toit :
• Améliorez l’isolation thermique du véhicule en colmatant les fentes et en suspendant des volets roulants réfléchissants ou des rideaux devant les fenêtres.
• Si le véhicule a été exposé pendant longtemps au rayonnement solaire : utilisez
d’abord le climatiseur de toit pendant un certain temps avec les fenêtres ouvertes
en mode de climatisation « Circulation d’air » ( ) ou « Ventilation » ( ), avant de
passer en mode de climatisation « Refroidissement » ( ).
• En mode « Refroidissement » ( ) ou « Chauffage » ( ) , évitez d’ouvrir inutile-
ment portes ou fenêtres.
• Choisissez une température et une vitesse de ventilation appropriées.
• Orientez les buses de ventilation de manière pertinente.
• Veillez à ce que les buses de ventilation et la grille d’aspiration ne soient pas
recouvertes par du tissu, du papier ou un quelconque objet.
82
Page 83

FR
Dometic FreshLight Utilisation du climatiseur de toit
9.4 Mise en marche / à l’arrêt du climatiseur
REMARQUE
I
Avec le panneau de commande
L’illustration montre comment allumer, éteindre ou commuter en mode veille le climatiseur de toit à l’aide du panneau de commande. Pour ce faire, appuyez sur la
touche , comme indiqué sur l’illustration :
Après la mise en marche, la climatisation démarre avec les valeurs
dernièrement réglées.
Le climatiseur de toit est éteint
briève
Mode veille
long
Le climatiseur de toit est allumé
Exemple : le climatiseur de toit est en mode veille. Vous souhaitez l’éteindre.
➤ Appuyez brièvement sur la touche .
✓ Le climatiseur est éteint.
Avec la télécommande
REMARQUE
I
• Pour pouvoir utiliser le climatiseur de toit avec la télécommande, le
climatiseur doit être en mode veille ou allumé.
• Avec la télécommande, vous pouvez allumer le climatiseur de toit à
partir du mode veille et le remettre en mode veille. Pour ce faire,
long briève
appuyez sur la touche
.
83
Page 84

FR
Utilisation du climatiseur de toit Dometic FreshLight
9.5 Sélection du mode de climatisation
REMARQUE
I
➤ Avec la touche MODE, sélectionnez le mode de climatisation désiré, voir
« Modes de climatisation », page 78.
✓ Le climatiseur de toit valide la réception des valeurs par un signal aigu.
✓ Le climatiseur de toit commute dans le mode de climatisation sélectionné.
• Avant de sélectionner le mode de climatisation « Ventilation » ( ) ,
vous devez ouvrir complètement les deux stores.
• En mode de climatisation « Ventilation » ( ) , la soufflerie ne démarre
qu’une fois que le clapet de ventilation (fig. 5 1, page 5) est ouvert.
Cela peut durer quelques minutes.
• Après la commutation en mode de climatisation « Chauffage » ( ),
le climatiseur de toit ne commence le chauffage qu’au bout
d’env. 30 secondes. Pendant ce temps, la DEL d’état du panneau de
commande clignote et le circuit de refroidissement est inversé.
84
Page 85

FR
Dometic FreshLight Utilisation du climatiseur de toit
AUTO
9.6 Sélection manuelle de la vitesse de ventilation
Le ventilateur règle la force de l’arrivée d’air.
Dans les modes de climatisation « Refroidissement » ( ), « Chauffage » ( ) et
« Circulation d’air » ( ), il est possible de sélectionner manuellement la vitesse de
ventilation. Dans les autres modes de climatisation, le climatiseur de toit règle automatiquement la vitesse de ventilation.
Message à l’écran Explication
Petite vitesse de ventilation
Vitesse moyenne de ventilation
Grande vitesse de ventilation
Vitesse maximale de ventilation
Mode automatique, disponible uniquement dans les modes de
climatisation « Refroidissement » ( ) et « Chauffage »
().
➤ Avec la touche , sélectionnez la vitesse de ventilation voulue.
✓ Le climatiseur de toit valide la réception des valeurs par un signal aigu.
✓ La vitesse de ventilation est réglée.
85
Page 86

FR
Utilisation du climatiseur de toit Dometic FreshLight
9.7 Réglage de la température
Dans les modes de climatisation « Automatique » ( ), « Refroidissement » ( ),
« Chauffage » ( ) et « Déshumidification » ( ), vous pouvez indiquer une température entre 16 °C et 31 °C.
➤ Sélectionnez avec la touche + ou – la température souhaitée.
✓ Le climatiseur de toit valide la réception des valeurs par un signal aigu.
✓ La température est réglée dans le climatiseur de toit.
9.8 Réglage des buses de ventilation
Il est possible de réguler l’arrivée d’air dans l’habitacle du véhicule grâce à la
position des buses de ventilation.
Il est possible de régler les buses de ventilation à l’aide d’un coulisseau (fig. 6 2,
page 5) de sorte à ce que l’air soit dirigé dans les deux directions, uniquement vers
l’avant ou uniquement vers l’arrière :
➤ Tournez le bouton rotatif du coulisseau dans le sens inverse des aiguilles d’une
montre.
➤ Déplacez le coulisseau de sorte à ce que l’air soit dirigé dans la direction
souhaitée.
➤ Fixez de nouveau le bouton rotatif en le tournant dans le sens des aiguilles d’une
montre.
Il est possible de tourner les lamelles (fig. 6 1, page 5) de la buse de ventilation
avant. Cela permet de diriger l’air dans la direction souhaitée.
86
Page 87

FR
Dometic FreshLight Utilisation du climatiseur de toit
08:00
20:00
9.9 Programmation de l’horloge programmable
La fonction de minuterie vous permet de régler la climatisation pour une période
donnée. Vous pouvez déterminer l’heure de mise en marche ou l’heure de mise à
l’arrêt uniquement, ou encore les deux valeurs. Il est possible de régler l’heure par
incréments de 10 minutes.
REMARQUE
I
➤ Avant la programmation de la minuterie, choisissez le mode de climatisation et
toutes les valeurs souhaitées (p. ex. la température).
Réglage de l’heure de mise en marche
➤ Appuyez une fois sur la touche TIMER.
Lors de la programmation de la minuterie, si vous n’appuyez sur aucune
touche pendant 15 secondes, la télécommande repasse automatiquement au mode initial.
✓ Le symbole ON ( ) clignote sur l’écran de la télécommande.
➤ À l’aide de la touche + ou –, réglez l’heure à laquelle le climatiseur de toit doit
s’allumer.
➤ Appuyez sur la touche SET pour envoyer la valeur au climatiseur de toit.
✓ L’heure de mise en marche est réglée dans le climatiseur de toit.
Le climatiseur de toit démarre à l’heure réglée, avec le mode de climatisation
choisi.
➤ Mettez le climatiseur de toit en mode veille.
Réglage de l’heure de mise à l’arrêt
➤ Appuyez deux fois sur la touche TIMER.
✓ Le symbole OFF ( ) clignote sur l’écran de la télécommande.
➤ À l’aide de la touche + ou –, réglez l’heure à laquelle le climatiseur de toit doit
s’éteindre.
➤ Appuyez sur la touche SET pour envoyer la valeur au climatiseur de toit.
✓ L’heure d’arrêt est réglée dans le climatiseur de toit.
Le climatiseur de toit fonctionne jusqu’à l’heure réglée, avec le mode de climatisation choisi.
87
Page 88

FR
Utilisation du climatiseur de toit Dometic FreshLight
08:00
20:00
20:00
Réglage de l’heure de mise en marche et de mise à l’arrêt
➤ Appuyez trois fois sur la touche TIMER.
✓ Le symbole ON ( ) clignote sur l’écran de la télécommande.
Le symbole OFF ( ) est visible.
➤ À l’aide de la touche + ou –, réglez l’heure à laquelle le climatiseur de toit doit
s’allumer.
➤ Appuyez de nouveau sur la touche TIMER.
✓ Le symbole OFF ( ) clignote sur l’écran de la télécommande.
➤ À l’aide de la touche + ou –, réglez l’heure à laquelle le climatiseur de toit doit
s’éteindre.
➤ Appuyez sur la touche SET pour envoyer la valeur au climatiseur de toit.
✓ L’heure de mise en marche et l’heure de mise à l’arrêt sont réglées dans le clima-
tiseur de toit.
Le climatiseur de toit démarre à l’heure réglée, avec le mode de climatisation
choisi et fonctionne jusqu’à la deuxième heure réglée.
➤ Mettez le climatiseur de toit en mode veille.
Suppression de la programmation de la minuterie
Si vous avez programmé la minuterie, vous pouvez l’effacer de la manière suivante :
➤ Appuyez cinq fois sur la touche TIMER.
✓ Le symbole de la minuterie s’éteint. La programmation est supprimée.
9.10 Activation de la fonction Sleep
Lorsque la fonction Sleep est activée, la température réglée est abaissée de 1 °C au
bout d’une heure et de 2 °C au bout de deux heures, afin de garantir une température de sommeil agréable.
➤ Réglez la température souhaitée (voir « Réglage de la température », page 86).
➤ Appuyez sur la touche SLEEP.
✓ Le symbole s’affiche à l’écran.
La fonction Sleep est activée.
88
Page 89

FR
Dometic FreshLight Utilisation du climatiseur de toit
9.11 Réglage de la fonction supplémentaire « I feel »
Avec cette fonction, la télécommande mesure la température ambiante et transmet
la valeur mesurée au climatiseur de toit toutes les 10 minutes. Le climatiseur de toit
adapte la température de consigne à cette valeur mesurée.
➤ Appuyez sur la touche I FEEL.
➤ Placez la télécommande de telle sorte qu’elle soit dirigée vers le récepteur IR
(fig. 2
envoyées au climatiseur de toit.
I
4, page 3) du panneau de commande. Sinon, les valeurs ne peuvent être
REMARQUE
La télécommande ne doit pas se trouver dans un endroit de la pièce
nettement plus chaud ou nettement plus froid que la température
ambiante moyenne. P. ex., elle ne doit pas se trouver au soleil ou devant
le climatiseur de toit.
9.12 Utilisation des lampes
Les lampes du climatiseur de toit sont réglables. Elles s’allument avec la dernière
valeur de luminosité réglée.
Mise en marche/à l’arrêt de l’éclairage sur le panneau de commande
➤ Appuyez brièvement sur la touche
Tamisage de l’éclairage sur le panneau de commande
➤ Appuyez sur la touche jusqu’à ce que les lampes soient réglées à la luminosité
souhaitée.
➤ Pour allumer les lumières dans l’autre direction : lâchez brièvement la touche
et rappuyez dessus de manière prolongée.
Mise en marche/à l’arrêt de l’éclairage sur la télécommande
➤ Appuyez sur la touche LIGHT pour allumer ou éteindre les lampes.
pour allumer ou éteindre les lampes.
89
Page 90

FR
Utilisation du climatiseur de toit Dometic FreshLight
9.13 Changement des piles de la télécommande
Remplacez les piles lorsque le symbole s’affiche à l’écran.
Le compartiment des piles se trouve au dos de la télécommande.
➤ Appuyez légèrement sur le couvercle du compartiment des piles et faites-le glis-
ser dans le sens de la flèche.
➤ Placez les nouvelles piles (2 x type AAA) en respectant les polarités indiquées
dans le compartiment.
➤ Refermez le couvercle du compartiment des piles.
Protégez l'environnement !
Les piles et les batteries usagées ne sont pas des déchets ménagers.
B
Rapportez les piles défectueuses ou les batteries usagées à votre revendeur ou à un centre de collecte.
9.14 Réglage de l’heure
La télécommande a besoin de l’heure actuelle pour la programmation de la
minuterie. L’heure est affichée sur l’écran de la télécommande.
Pour régler l’heure, procédez comme suit :
REMARQUE
I
➤ Appuyez longtemps sur la touche CLOCK pour accéder au mode de réglage de
l’heure.
✓ L’heure clignote sur l’écran de la télécommande.
➤ À l’aide de la touche + ou –, réglez l’heure actuelle.
➤ Appuyez sur la touche SET pour confirmer l’heure.
Lors du réglage de l’heure, si vous n’appuyez sur aucune touche
pendant env. 10 secondes, la télécommande repasse automatiquement
au mode initial.
90
Page 91

FR
Dometic FreshLight Utilisation du climatiseur de toit
9.15 Utilisation des stores
AVIS ! Risque d’endommagement !
A
Grâce aux deux stores, il est possible de réguler l’entrée de la lumière du soleil à
l’intérieur du véhicule.
➤ Déplacez les stores à la main (fig. 7, page 6).
Lorsque le véhicule se trouve en plein soleil, le store occultant ne doit
pas être complètement fermé. Cela pourrait provoquer une accumulation de chaleur. Afin d’éviter des dommages matériels, le store
occultant doit rester ouvert d’au moins un tiers.
91
Page 92

FR
Nettoyage du climatiseur de toit Dometic FreshLight
10 Nettoyage du climatiseur de toit
AVIS ! Risque d’endommagement !
A
• Ne nettoyez pas le climatiseur de toit avec un nettoyeur haute
pression. Toute infiltration d’eau peut endommager le climatiseur.
• N’utilisez aucun objet coupant ou dur, ni de détergents pour le nettoyage. Cela pourrait endommager le climatiseur de toit et le dôme.
• Pour nettoyer le climatiseur de toit, utilisez uniquement de l’eau et un
détergent doux. N’utilisez en aucun cas de l’essence, du diesel ou
un solvant.
• Pour nettoyer le dôme de toit, utilisez uniquement les détergents
recommandés par le fabricant :
– Polish pour verre acrylique (réf. 9104100242),
– Chiffon spécial pour polish (réf. 9104100243) et
– Détergent pour verre acrylique (réf. 9104100244)
REMARQUE
I
➤ Nettoyez de temps à autre le boîtier du climatiseur et de l’unité de ventilation
avec un chiffon humide.
➤ Enlevez régulièrement les feuilles mortes et autres salissures qui encombrent les
ouvertures de ventilation (fig. 8 1, page 6) du climatiseur. Veillez à ne pas
endommager les lamelles du climatiseur de toit.
➤ Nettoyez de temps à autre la télécommande avec un chiffon légèrement
humide. Il est conseillé d’utiliser un essuie-lunettes pour le nettoyage de l’écran.
➤ Nettoyez les stores roulants avec une lessive douce et beaucoup d’eau.
En cas de fort rayonnement solaire, le dôme de toit peut se troubler. Il
redevient clair dès qu’il refroidit.
92
Page 93

FR
Dometic FreshLight Entretien du climatiseur de toit
11 Entretien du climatiseur de toit
AVERTISSEMENT !
!
Intervalle Contrôle / maintenance
Régulièrement Vérifier les écoulements d’eau de condensation :
Régulièrement Nettoyez les filtres des deux côtés de l’unité de sortie d’air (fig. 0,
Les travaux de maintenance autres que ceux décrits ici doivent être
effectués uniquement par un personnel qualifié et parfaitement informé
des dangers relatifs à la manipulation de réfrigérants et de climatiseurs et
des règlements spécifiques. Tout travail de maintenance mal effectué
risquerait d’entraîner de graves dangers.
➤ Vérifier que les écoulements d’eau de condensation (fig. 9 1,
page 6) sur les côtés du climatiseur ne sont pas bouchés et que l’eau
de condensation peut s’écouler.
page 7) :
➤ Retirer manuellement le couvercle de protection (1) du filtre.
➤ Retirer le filtre (2).
➤ Nettoyer le filtre (2) avec une solution savonneuse et le laisser sécher.
➤ Remettre le filtre sec (2) en place.
➤ Remettre le couvercle de protection (1) en place.
Une fois par an Vérifier les joints profilés :
➤ Vérifier que le joint du climatiseur installé sur le toit du véhicule ne pré-
sente ni fissures ni autres détériorations.
Une fois par an Faire procéder à la maintenance des échangeurs thermiques :
➤ Charger une entreprise spécialisée de procéder à la maintenance des
échangeurs thermiques du climatiseur de toit.
Une fois par an Remplacer le filtre à charbon actif (fig. a, page 7) :
➤ Retirer manuellement le couvercle de protection (1) du filtre.
➤ Retirer le filtre (2).
➤ Retirer le filtre à charbon actif (3).
➤ Nettoyer le filtre (2) avec une solution savonneuse et le laisser sécher.
➤ Insérer un nouveau filtre à charbon actif.
➤ Remettre le filtre sec (2) en place.
➤ Remettre le couvercle de protection (1) en place.
93
Page 94

FR
Guide de dépannage Dometic FreshLight
12 Guide de dépannage
Dysfonctionnement
Le climatiseur de
toit s’éteint en
permanence.
Pas de rafraîchissement
Cause Solution
Le détecteur de givrage interrompt le
fonctionnement.
Le climatiseur de toit n’est pas en mode
rafraîchissement.
La température ambiante est supérieure à
52 °C.
La température réglée est supérieure à la
température ambiante.
La température ambiante est inférieure à
16 °C.
Une des sondes de température est
défectueuse.
La turbine de l’évaporateur est défectueuse.
La température extérieure est trop
basse ou toutes les buses de ventilation sont fermées.
➤ Mettez le climatiseur de toit en
mode rafraîchissement.
Le climatiseur est conçu pour une
température ambiante inférieure à
52 °C.
➤ Sélectionnez une température
plus basse.
Le climatiseur est conçu uniquement
pour une température ambiante supérieure à 16 °C.
➤ Prenez contact avec un atelier
spécialisé.
Le ventilateur du condensateur est défectueux.
Pas de chauffage La température ambiante est supérieure
à30°C.
La température ambiante est inférieure
à2°C.
La température réglée est supérieure à
30 °C.
Le climatiseur de toit n’est pas en mode
chauffage.
Une des sondes de température est
défectueuse.
➤ N’utilisez la fonction chauffage
du climatiseur que lorsque la température est inférieure à 30 °C.
La fonction de chauffage du climatiseur est conçue uniquement pour une
température ambiante supérieure à
2°C.
➤ Sélectionnez une température
plus basse.
➤ Mettez le climatiseur de toit en
mode chauffage.
➤ Prenez contact avec un atelier
spécialisé.
94
Page 95

FR
Dometic FreshLight Guide de dépannage
Dysfonctionnement
Mauvaise
ventilation
Infiltration d’eau
dans le véhicule
Le climatiseur de
toit ne se met pas
en marche
Cause Solution
L’aspiration d’air est bouchée. ➤ Enlevez la poussière et autres
salissures qui encombrent les
lamelles de ventilation du climatiseur.
Le ventilateur est défectueux. ➤ Prenez contact avec un atelier
spécialisé.
Les ouvertures d’écoulement d’eau de
condensation sont bouchées.
Les joints sont défectueux. ➤ Prenez contact avec un atelier
Il n’y a pas de tension électrique (230 V). ➤ Contrôlez l’alimentation en ten-
La tension est trop faible (moins
de 200 V).
Le transformateur est défectueux.
Une des sondes de température est
défectueuse.
➤ Nettoyez les ouvertures d’écou-
lement d’eau de condensation.
spécialisé.
sion.
➤ Prenez contact avec un atelier
spécialisé.
Le climatiseur de
toit ne s’éteint pas
La protection par fusible de l’alimentation
en tension est trop faible.
Une des sondes de température est
défectueuse.
La protection par fusible de l’alimentation
en tension est trop faible.
➤ Vérifiez les fusibles de l’alimenta-
tion en tension.
➤ Prenez contact avec un atelier
spécialisé.
➤ Vérifiez les fusibles de l’alimenta-
tion en tension.
95
Page 96

FR
Garantie Dometic FreshLight
13 Garantie
La période de garantie légale s’applique. Si le produit s’avérait défectueux, veuillez
vous adresser à un de nos partenaires de service présent dans votre pays (voir
adresses au dos du présent manuel).
Nos spécialistes vous aideront avec plaisir et répondront à vos questions concernant
la suite de la procédure pour la garantie.
14 Retraitement
Directives de protection de l’environnement et élimination conforme
Toutes les organisations doivent appliquer une série de mesures visant à détecter,
évaluer et contrôler l’influence que leurs activités (fabrication, produits, service
après-vente, etc.) ont sur l’environnement.
Les mesures à suivre pour la détection d’effets importants sur l’environnement
doivent prendre en compte les facteurs suivants :
• Utilisation de matières premières et de ressources naturelles
• Émissions dans l’atmosphère
• Écoulement de liquides
• Élimination et recyclage
• Contamination du sol
Afin de minimiser les effets sur l’environnement, le fabricant présente ci-dessous une
série de consignes que toute personne interagissant avec l’appareil pendant la
durée de vie de celui-ci (pour quelque raison que ce soit) doit prendre en compte.
• Tous les matériaux d’emballage doivent être éliminés (de préférence recyclés)
conformément aux directives légales en vigueur dans le pays où l’élimination a
lieu.
• Tous les composants du produit doivent être éliminés (de préférence recyclés)
conformément aux directives légales en vigueur dans le pays où l’élimination a
lieu.
• Pour une élimination correcte, l’appareil doit être transmis à un centre de recyclage, afin que tous les composants recyclables puissent être réutilisés et que les
matériaux restants soient traités de manière conforme.
• Pendant l’installation, assurez-vous que l’habitacle est suffisamment aéré pour
éviter la formation d’air vicié, qui pourrait être nocif pour la santé de l’utilisateur.
96
Page 97

FR
Dometic FreshLight Retraitement
• Pendant l’utilisation et l’entretien, assurez-vous que les déchets toxiques (huile,
graisse, etc.) sont éliminés de manière conforme.
• Afin de réduire les nuisances sonores, minimisez le niveau sonore.
Vous trouverez de plus amples informations concernant le démantèlement correct
de nos produits dans les instructions de recyclage disponibles sur www.dometic.com.
➤ Jetez les emballages dans les conteneurs de déchets recyclables prévus à cet
effet.
➤ Lors de l’exploitation ainsi que des réparations et des travaux de maintenance,
veillez à ce que le circuit de refroidissement ne soit pas endommagé et que le
fluide frigorigène ne puisse s’échapper. Il s’agit d’un gaz à effet de serre, qui ne
doit pas parvenir dans l’atmosphère.
Lorsque vous mettez le produit définitivement hors service, informez-vous
auprès du centre de recyclage le plus proche ou auprès de votre reven-
M
deur spécialisé sur les prescriptions relatives à la récupération des
déchets.
➤ Éliminez le produit en vous conformant uniquement aux directives de recyclage
ou d’élimination en vigueur, auprès d’une entreprise de recyclage agréée.
Protégez l'environnement !
Les piles et les batteries usagées ne sont pas des déchets ménagers.
B
Rapportez les piles défectueuses ou les batteries usagées à votre revendeur ou à un centre de collecte.
97
Page 98

FR
Données techniques Dometic FreshLight
10R-030642
15 Données techniques
Dometic FreshLight
1600 2200
N° de produit : 9102900207 9102900165
Puissance frigorifique selon ISO 5151 : 1500 W 2050 W
Puissance calorifique : max. 2050 W max. 2700 W
Tension nominale d’entrée : 230 Vw / 50 Hz
Intensité absorbée en mode
refroidissement :
Intensité absorbée en mode chauffage : 3,5 A 5,2 A
Plage de température de fonctionnement : de 0 °C à +52 °C
Frigorigène : R-407c
Ventilateur : 4 niveaux de soufflerie
Type de protection : IP X4
Volume max. de l’habitacle du véhicule
(avec parois isolées) :
Dimensions l x L x h (mm): 1105 x 758 x 210
110 5
174 931
2,7 A 4,1 A
1 mode automatique
20 m³ 25 m³
(hauteur au-dessus du toit du véhicule)
758
210
53
Poids :
Contrôle/certificat :
196 684
98
880
25 – 60
550
env. 40 kg env. 42 kg
Page 99

ES
Dometic FreshLight
Antes de poner en funcionamiento el producto, lea atentamente estas
instrucciones y consérvelas para futuras consultas. En caso de vender o
entregar el producto a otra persona, entregue también estas
instrucciones.
Índice
1 Aclaración de los símbolos . . . . . . . . . . . . . . . . . . . . . . . . . . . . . . . . . . .100
2 Indicaciones de seguridad . . . . . . . . . . . . . . . . . . . . . . . . . . . . . . . . . . . 101
2.1 Seguridad básica. . . . . . . . . . . . . . . . . . . . . . . . . . . . . . . . . . . . . . . .101
2.2 Seguridad durante el funcionamiento del aparato . . . . . . . . . . . . .103
3 Destinatarios de estas instrucciones . . . . . . . . . . . . . . . . . . . . . . . . . .103
4 Volumen de entrega. . . . . . . . . . . . . . . . . . . . . . . . . . . . . . . . . . . . . . . . .104
5Accesorios. . . . . . . . . . . . . . . . . . . . . . . . . . . . . . . . . . . . . . . . . . . . . . . . . .104
6Uso adecuado . . . . . . . . . . . . . . . . . . . . . . . . . . . . . . . . . . . . . . . . . . . . . .105
7 Descripción técnica. . . . . . . . . . . . . . . . . . . . . . . . . . . . . . . . . . . . . . . . . .105
7.1 Componentes . . . . . . . . . . . . . . . . . . . . . . . . . . . . . . . . . . . . . . . . . .106
7.2 Panel de control. . . . . . . . . . . . . . . . . . . . . . . . . . . . . . . . . . . . . . . . .107
7.3 Control remoto . . . . . . . . . . . . . . . . . . . . . . . . . . . . . . . . . . . . . . . . .108
7.4 Modos de climatización . . . . . . . . . . . . . . . . . . . . . . . . . . . . . . . . . .110
7.5 Funciones adicionales. . . . . . . . . . . . . . . . . . . . . . . . . . . . . . . . . . . . 111
8 Antes del primer uso . . . . . . . . . . . . . . . . . . . . . . . . . . . . . . . . . . . . . . . . 112
9 Manejo del equipo de aire acondicionado de techo . . . . . . . . . . . .113
9.1 Indicaciones básicas para el manejo . . . . . . . . . . . . . . . . . . . . . . . . 113
9.2 Uso del control remoto. . . . . . . . . . . . . . . . . . . . . . . . . . . . . . . . . . . 114
9.3 Indicaciones para un uso óptimo . . . . . . . . . . . . . . . . . . . . . . . . . . . 115
9.4 Encendido y apagado del equipo de aire
acondicionado de techo . . . . . . . . . . . . . . . . . . . . . . . . . . . . . . . . 115
9.5 Selección del modo de climatización . . . . . . . . . . . . . . . . . . . . . . . 116
9.6 Selección manual del nivel del ventilador . . . . . . . . . . . . . . . . . . . . 117
9.7 Ajuste de temperatura. . . . . . . . . . . . . . . . . . . . . . . . . . . . . . . . . . . . 118
9.8 Ajuste de las toberas de aire. . . . . . . . . . . . . . . . . . . . . . . . . . . . . . . 118
9.9 Programación del temporizador . . . . . . . . . . . . . . . . . . . . . . . . . . . 118
9.10 Activación de la función Sleep . . . . . . . . . . . . . . . . . . . . . . . . . . . . .120
9.11 Ajuste de función adicional “I feel” . . . . . . . . . . . . . . . . . . . . . . . . .120
99
Page 100

ES
Aclaración de los símbolos Dometic FreshLight
9.12 Manejo de las luces. . . . . . . . . . . . . . . . . . . . . . . . . . . . . . . . . . . . . . 121
9.13 Recambio de la pila del control remoto . . . . . . . . . . . . . . . . . . . . . . 121
9.14 Ajustar la hora . . . . . . . . . . . . . . . . . . . . . . . . . . . . . . . . . . . . . . . . . .122
9.15 Uso de persianas . . . . . . . . . . . . . . . . . . . . . . . . . . . . . . . . . . . . . . . .122
10 Limpieza del equipo de aire acondicionado de techo . . . . . . . . . . .123
11 Mantenimiento del equipo de aire acondicionado. . . . . . . . . . . . . .124
12 Localización de averías . . . . . . . . . . . . . . . . . . . . . . . . . . . . . . . . . . . . . .125
13 Garantía legal. . . . . . . . . . . . . . . . . . . . . . . . . . . . . . . . . . . . . . . . . . . . . . .127
14 Eliminación de desechos. . . . . . . . . . . . . . . . . . . . . . . . . . . . . . . . . . . . .127
15 Datos técnicos . . . . . . . . . . . . . . . . . . . . . . . . . . . . . . . . . . . . . . . . . . . . . .129
1 Aclaración de los símbolos
!
!
A
I
¡ADVERTENCIA!
Indicación de seguridad: su incumplimiento puede acarrear la
muerte o graves lesiones.
¡ATENCIÓN!
Indicación de seguridad: su incumplimiento puede acarrear
lesiones.
¡AVISO!
Su incumplimiento puede acarrear daños materiales y perjudicar el
correcto funcionamiento del producto.
NOTA
Información adicional para el manejo del producto.
100
 Loading...