

Page 1
RECORD THIS INFORMATION FOR FUTURE
REFERENCE:
Model Number
Serial Number
Date Purchased
Retailer / Qualied Installer
DMH1072
HYBRID REFRIGERATOR
ABSORPTION COOLING SYSTEM
UPPER FOOD STORAGE COMPARTMENT
COMPRESSOR COOLING SYSTEM
LOWER FOOD STORAGE COMPARTMENT
(LOWER DRAWER)
FIRE OR EXPLOSION HAZARD.
If you smell gas:
1. Open windows.
2. Do not attempt to light appliance.
3. Do not touch electrical switches.
4. Extinguish any open ame.
5. Shut off fuel supply.
6. Evacuate immediately and call emergency services.
Failure to follow these instructions could result in re or explosion, which could cause
property damage, personal injury, or death.
OPERATING
INSTRUCTIONS
REVISION C
Form No. 3315255.000 09/16
(French 3315256.000_C)
©2016 Dometic Corporation
LaGrange, IN 46761
Improper installation, adjustment, alteration, service or maintenance can cause injury or
property damage. Refer to this manual. For assistance or additional information consult
a qualied installer, service agency or the gas supplier.
SUFFOCATION AND ENTRAPMENT HAZARD.
Prior to disposal of refrigerator:
1. Remove fresh food and freezer doors.
2. Leave shelves and baskets in place to prevent children from easily climbing inside
refrigerator.
FIRE OR EXPLOSION HAZARD.
Do not store or use gasoline or other ammable vapors and liquids in the vicinity of this
or any other appliance.
Read these instructions carefully. These
instructions MUST stay with this product.
USA
SERVICE OFFICE
Dometic Corporation
1120 North Main Street
Elkhart, IN 46514
CANADA
Dometic Corporation
46 Zatonski, Unit 3
Brantford, ON N3T 5L8
CANADA
SERVICE CENTER &
DEALER LOCATIONS
Please Visit:
www.eDometic.com
Page 2

INTRODUCTION
Thank you for purchasing your new Dometic refrigerator. This refrigerator (hereinafter referred to as “refrigerator,” or “product”) is designed and intended for use in recreational vehicles (hereinafter referred to as “RV,” or “RVs”). This refrigerator is
designed for the storage of fresh and frozen foods, as well as making ice.
Use these instructions to operate your refrigerator safely and correctly. Keep these instructions with your refrigerator for
future reference.
Dometic Corporation reserves the right to modify appearances and specications without notice.
TABLE OF CONTENTS
INTRODUCTION .................................................................................................................................................................... 2
DOCUMENT SYMBOLS ........................................................................................................................................................3
IMPORTANT SAFETY INSTRUCTIONS ................................................................................................................................ 3
A. Recognize Safety Information ...................................................................................................................................3
B. Understand Signal Words ..........................................................................................................................................3
C. Supplemental Directives ............................................................................................................................................3
D. General Safety Messages .........................................................................................................................................4
REFRIGERATOR OVERVIEW ...............................................................................................................................................5
A. Refrigerator Volume ...................................................................................................................................................5
B. Refrigerator Illustration ..............................................................................................................................................5
C. Absorption Cooling System .......................................................................................................................................6
D. Compressor Cooling System .....................................................................................................................................6
E. Keep Refrigerator Level .............................................................................................................................................6
F. Operating Refrigerator At High Altitude ..................................................................................................................... 6
G. Operating Refrigerator During Extreme Cold Weather .............................................................................................. 6
H. When Refrigerator Is Not In Use ............................................................................................................................... 6
CONTROLS ............................................................................................................................................................................7
A. Control Panel Buttons ................................................................................................................................................7
B. Modes Of Operation ..................................................................................................................................................9
C. Temperature (Thermostat) Control ............................................................................................................................9
START / STOP REFRIGERATOR ........................................................................................................................................10
A. Purge LP Gas Lines ................................................................................................................................................10
B. Turn Refrigerator On................................................................................................................................................10
C. Turn Refrigerator Off ................................................................................................................................................ 11
FOOD COMPARTMENTS .................................................................................................................................................... 11
A. Food Compartment Guidelines ................................................................................................................................ 11
B. Shelving ................................................................................................................................................................... 12
C. Baskets .................................................................................................................................................................... 12
D. Lower Food Compartment Drawer .......................................................................................................................... 13
PRODUCT CARE .................................................................................................................................................................13
A. Defrost Food Compartment(s) ................................................................................................................................. 13
B. Clean Food Compartment(s) ................................................................................................................................... 14
C. Airing Position (Store Refrigerator) .......................................................................................................................... 14
PRODUCT MAINTENANCE .................................................................................................................................................15
A. Replace Fuses ......................................................................................................................................................... 15
B. Clean Burner Assembly ........................................................................................................................................... 16
C. Clean Service Area Enclosure ................................................................................................................................. 17
D. Inspect LP Gas Connections ................................................................................................................................... 17
E. Test Control System ................................................................................................................................................17
F. Product Removal / Disposal ....................................................................................................................................17
2
Page 3

TABLE OF CONTENTS
APPENDIX A: TROUBLESHOOTING .................................................................................................................................. 18
A. General Symptoms .................................................................................................................................................. 18
B. Cooling Performance Symptoms ............................................................................................................................. 19
C. Absorption System Ignition Error ............................................................................................................................. 20
D. Compressor System Error Codes ............................................................................................................................ 20
APPENDIX B: SPARE PARTS .............................................................................................................................................21
A. Model DMH1072 Spare Parts ..................................................................................................................................21
APPENDIX C: EQUIPMENT REAR VIEW ...........................................................................................................................22
A. Model DMH1072 Rear View ....................................................................................................................................22
APPENDIX D: SCHEMATIC ................................................................................................................................................. 23
A. Model DMH1072 Schematic .................................................................................................................................... 23
APPENDIX E: CONSUMER SUPPORT ...............................................................................................................................24
APPENDIX F: DOMETIC WARRANTY ................................................................................................................................25
APPENDIX G: MAINTENANCE SCHEDULE ....................................................................................................................... 26
REGISTRATION CARD ........................................................................................................................................................ 27
A. Protect Your New Investment .................................................................................................................................. 27
DOCUMENT SYMBOLS
Indicates additional information that is NOT related
to physical injury.
IMPORTANT SAFETY INSTRUCTIONS
This manual has safety information and instructions to help
you eliminate or reduce the risk of accidents and injuries.
A. Recognize Safety Information
This is the safety alert symbol. It is used to
alert you to potential physical injury hazards.
Obey all safety messages that follow this
symbol to avoid possible injury or death.
B. Understand Signal Words
A signal word will identify safety messages and
property damage messages, and will indicate the
degree or level of hazard seriousness.
indicates a hazardous situation that,
if NOT avoided, could result in death or serious injury.
indicates a hazardous situation that,
if NOT avoided, could result in minor or moderate
injury.
is used to address practices NOT
related to physical injury.
C. Supplemental Directives
Read and follow all safety information and
instructions to avoid possible injury or death.
Read and understand these instructions before [installing / using / servicing / performing
maintenance on] this product.
3
Indicates step-by-step instructions.
Incorrect [installation / operation / servicing /
maintaining] of this product can lead to serious injury. Follow all instructions.
The installation MUST comply with all applicable local and national codes, including
the latest edition of the following standards:
U.S.A.
● ANSI/NFPA70, National Electrical Code
(NEC)
● ANSI/NFPA 1192, Recreational Vehicles
Code
● Title 24 CFR, Part 3280, Manufactured
Home Construction and Safety Standard
● National Fuel Gas Code, ANSI Z223.1/
NFPA 54
CANADA
● CSA C22.1, Parts l & ll, Canadian Electri-
cal Code
● CSA Z240 RV Series, Recreational
Vehicles
● CSA Z240.4, Gas-Equipped Recreational
Vehicles and Mobile Housing
● CSA B149.1, Natural Gas and Propane
Installation Code
Page 4

IMPORTANT SAFETY INSTRUCTIONS
D. General Safety Messages
Failure to obey the following warnings could result in death or serious injury:
● This product MUST be [installed / serviced] by a
qualied service technician.
● Do NOT modify this product in any way. Modica-
tion can be extremely hazardous.
● Disconnect product from power supply (if ap-
plicable), and do NOT operate product when
cleaning or maintaining product.
● Do NOT allow anyone (including children) with
reduced physical, sensory or mental capabilities,
or lack of experience and knowledge to use this
product, unless they have been given supervision
or instruction (concerning use of this product) by
a person responsible for their safety.
● Do NOT allow children to play with product or with
xed controls (if applicable).
● ABSORPTION-COOLING-SYSTEMS. FIRE,
BURN, OR INHALATION HAZARD. Do NOT
fracture or puncture cooling unit. The cooling unit
is under pressure and contains ammonia, sodium
chromate, and other chemicals. Repeated or
prolonged exposure to sodium chromate could
cause organ damage or cancer. Exposure to a
high concentration of ammonia refrigerant could
cause pulmonary edema (uid in lungs); chemical
burns to eyes, lungs, and skin; and could cause
a re (when exposed to open ame).
● COMPRESSOR-COOLING-SYSTEMS. FIRE,
FROSTBITE, OR INHALATION HAZARD. Do
NOT fracture or puncture cooling unit. The cooling
unit is under pressure and contains tetrauoroethane refrigerant, and may contain other chemicals. Contact with liquid refrigerant could cause
irritation or frostbite to eyes and skin. Exposure
to a high concentration of refrigerant could cause
cardiac arrhythmia (irregular heartbeat). A high
concentration of refrigerant could cause a re
(when exposed to open ame).
● FIRE OR INHALATION HAZARD. If refrigerator
stops working and/or it emits an ammonia smell,
immediately turn refrigerator OFF (if it is safe to
do so), leave the vicinity, and contact a qualied
Service Center.
● CARBON MONOXIDE HAZARD. This product
can produce carbon monoxide. Carbon Monoxide
has no odor and can kill you. The burner and ue
system MUST be kept clean.
See “Product Maintenance” on
page (15).
● FIRE OR EXPLOSION HAZARD. Do NOT store
or use gasoline, oil or gasoline soaked rags, or
other ammable vapors and liquids in the service
area behind the refrigerator or in the vicinity of
this or any other gas appliance.
● FIRE OR EXPLOSION HAZARD. BEFORE refu-
eling or parking near a gasoline pump, make sure
ALL LP gas appliances (vented to the outside of
RV) are shut OFF . Otherwise, fumes from gaso-
line pumps could come into contact with an LP
gas appliance burner ame and ignite.
● PRESSURE HAZARD. Do NOT place carbonated
liquids, glass containers, or sealed bottles or cans
in freezer. Liquids expand when frozen and could
cause container to explode.
Failure to obey the following caution
could result in injury:
● FROSTBITE OR FROSTNIP HAZARD. Do NOT
touch cold surfaces (or stored items) in freezer
compartment with damp or wet skin. Skin could
stick to cold surfaces and freeze.
4
Page 5
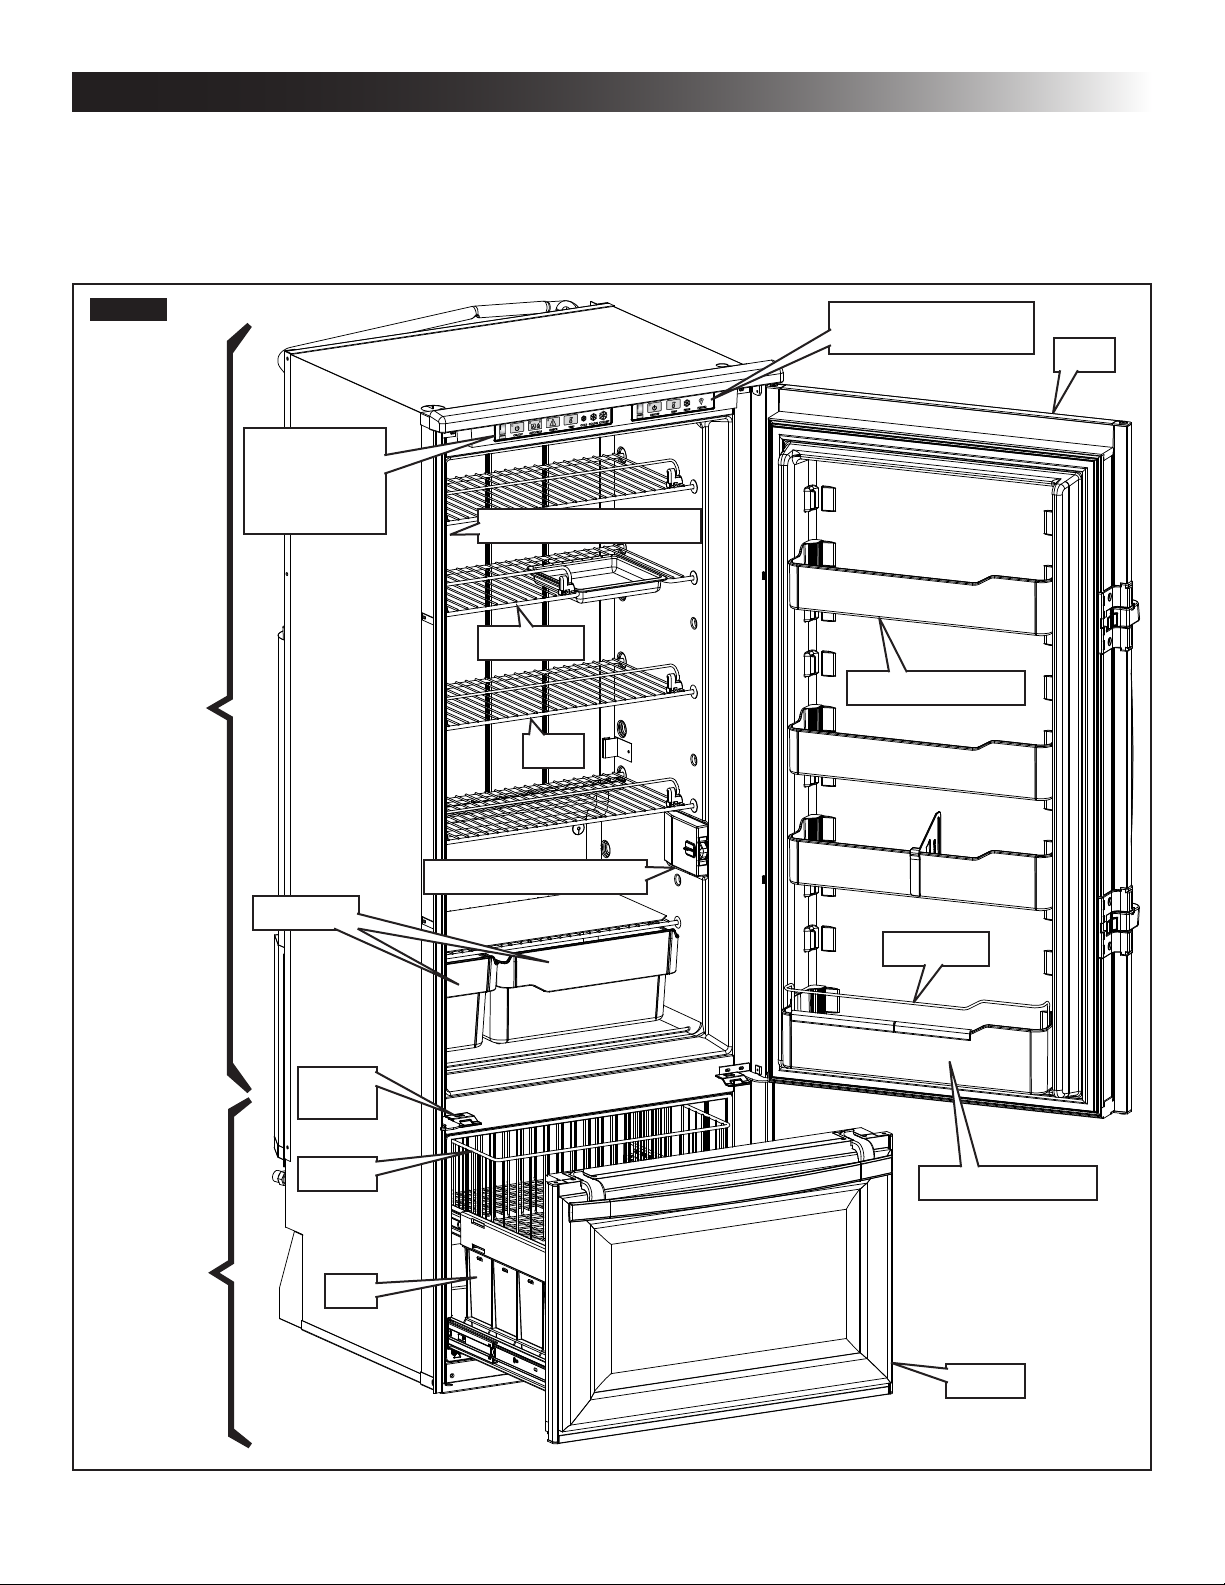
REFRIGERATOR OVERVIEW
A. Refrigerator Volume
Total refrigerator volume: 9.0 cu. ft.
B. Refrigerator Illustration
Appearance and features may vary depending on model. Quantity and position of items may also vary. See (FIG. 1).
FIG. 1
Upper
Food Storage
Compartment
Upper
Compartment
Control
Panel
LH Light / Airing Slide
Milk Shelf
Shelf
RH Light / Airing Slide
Lower Compartment
Control Panel
Upper Door Shelf
Door
Lower
Food Storage
Compartment
Crispers
Drawer
Catch
Basket
Door Rail
Lower Door Shelf
Bin
Drawer
5
Page 6

REFRIGERATOR OVERVIEW
C. Absorption Cooling System
See “General Safety Messages” for information on absorption cooling systems, and
consequences of exposure to refrigerant.
The upper food compartment is used for fresh food
storage only. This compartment is cooled by vaporabsorption refrigeration.
The absorption system will function on BOTH LP
Gas and electric (120 Vac) power.
D. Compressor Cooling System
See “General Safety Messages” for information on compressor cooling systems, and
consequences of exposure to refrigerant.
The lower food compartment (drawer) may be used
for fresh food storage, or frozen food storage (depending on temperature setting). This compartment
is cooled by vapor-compression refrigeration.
The compressor cooling system will function on
electric (120 Vac and 12 Vdc) power ONLY.
E. Keep Refrigerator Level
(ABSORPTION COOLING SYSTEM ONLY)
For optimal cooling performance, an absorption refrigerator must be level. If the refrigerator operates
in a noticeable out-of-level condition for several
hours, loss of cooling performance will occur.
When RV is parked and absorption system is operating, the RV must be level enough to live in and
feel comfortable.
The RV does NOT need to be PERFECTLY
level, but there should be no noticeable slop-
ing of RV oor or walls.
It is NOT critical for refrigerator to be level
while RV is traveling. The rolling and pitching motion of travel helps keep the absorption
system balanced.
F. Operating Refrigerator At High Altitude
All gas appliances experience lowered efciency
(or rating) at high altitude. This is a direct result of
lower atmospheric pressure and oxygen levels, and
is not a defect of the refrigerator.
Reduced cooling performance and burner outage
may occur at altitudes higher than 5500 feet above
sea level (while operating on LP gas). Always operate refrigerator on electric power at altitudes above
5500 feet.
G. Operating Refrigerator During Extreme
Cold Weather
Upper food compartment performance may be reduced in extremely cold (subzero) temperatures.
This temporary condition is normal for absorption
refrigerators and does not indicate product failure.
If performance is reduced during cold weather, turn
upper food compartment OFF.
See “Start / Stop Refrigerator” on page (10).
When ambient temperature rises, please
restart upper food compartment before requesting service.
H. When Refrigerator Is Not In Use
Always turn refrigerator OFF when not in use.
Do NOT allow refrigerator to run idle or unattended for more than a day. See “C. Airing
Position (Store Refrigerator)” on page (14).
6
Page 7
CONTROLS
A. Control Panel Buttons
1. UPPER FOOD COMPARTMENT
See (FIG. 2).
a. (1) ON/OFF (power) button
Press this button to turn power ON or OFF.
Steady blue LED (H) indicates absorption
cooling system is ON. LED (A) indicates
power status. See (Table 1).
Table 1
(1)
Button
ON
OFF
(A)
LED
GREEN
(Steady)
OFF
(Dark)
b. (2) AUTO/GAS (mode selector) button
Press this button to select operation mode of
automatic detect or LP gas only.
LEDs (B) and (C) indicate modes of operation. LED (D) indicates LP gas ignition status. See (Table 2).
(H)
LED
BLUE
(Steady)
OFF
(Dark)
Power to absorption
cooling system is ON.
Power to absorption
cooling system is OFF.
Description
(E)
LED
BLUE
(Steady)
OFF
(Dark)
OFF
(Dark)
c. (3) TEMP (temperature) button
Press this button to cycle through temperature settings.
LEDs (E), (F), and (G) indicate temperature /
cooling levels. See (Table 3).
Table 3
(F)
LED
OFF
(Dark)
BLUE
(Steady)
OFF
(Dark)
(G)
LED
OFF
(Dark)
OFF
(Dark)
BLUE
(Steady)
Description
COLD
(Minimum cooling level.)
COLDER
(Intermediate cooling
level.)
COLDEST
(Maximum cooling level.)
(B)
LED
GREEN
(Steady)
OFF
(Dark)
N/A N/A
FIG. 2
Table 2
(C)
LED
OFF
(Dark)
GREEN
(Steady)
A B C D E F G
(D)
LED
OFF
(Dark)
OFF
(Dark)
AMBER
(Steady)
Description
Absorption cooling
system is in AUTOMATIC
detect mode.
Absorption cooling system
is in LP GAS only mode.
Ignition ERROR.
See “C. Absorption
System Ignition Error” on
page (20).
H
1 2 3
7
Upper Compartment Controls
(Absorption System)
Page 8

CONTROLS
2. LOWER FOOD COMPARTMENT
See (FIG. 3).
a. (4) ON/OFF (power) button
Press this button to turn power ON or OFF.
Steady blue LED (M) indicates compressor cooling system is ON. LED (J) indicates
power / error status. See (Table 4).
Table 4
(4)
Button
ON
OFF
ON
FIG. 3
(J)
LED
GREEN
(Steady)
OFF
(Dark)
GREEN
(Flashing)
(M)
LED
BLUE
(Steady)
OFF
(Dark)
N/A
b. (5) TEMP (temperature) button
Press this button to select storage temperature setting of “fresh food” or “frozen food.”
LEDs (K) and (L) indicate modes of operation. See (Table 5).
(K)
LED
Description
Power to compressor
cooling system is ON.
Power to compressor
cooling system is OFF.
ERROR code.
See “D. Compressor
System Error Codes”
on page (20).
J K L
OFF
(Dark)
BLUE
(Steady)
BLUE
(Flashing)
(L)
LED
BLUE
(Steady)
OFF
(Dark)
BLUE
(Flashing)
Table 5
Description
DEFAULT setting.
Lower food compartment is set
for FROZEN food storage.
Lower food compartment is set
for FRESH food storage.
Temperature ERROR.
See “D. Compressor System
Error Codes” on page (20).
M
4 5
Lower Compartment Controls
(Compressor System)
8
Page 9

CONTROLS
B. Modes Of Operation
See “A. Control Panel Buttons” on page
(7) for details on control settings and LED
indicators.
1. STANDBY MODE
If refrigerator controls cannot read food com-
partment temperature, or if temperature is outside normal operating range, the affected system switches to standby mode. The refrigerator
continues to operate using any available energy
source.
Standby mode for upper food compartment runs
the absorption system continuously. This could
cause fresh food items to freeze.
Standby mode for lower food compartment runs
the compressor system on an intermittent cycle.
This could cause frozen food items to thaw, or
fresh food items to freeze.
For either incident, the affected cooling system
remains in standby mode until sensor failure is
repaired and system is reset.
2. UPPER FOOD COMPARTMENT
The upper food compartment operates on (2)
power modes:
a. Auto mode - [default].
In this mode, the power source is automatically selected in the following order:
I. 120 Vac - [default].
Electric power takes priority in this mode.
The upper compartment attempts to op-
erate on electric power rst.
Electric power is ALWAYS the pri-
mary source of power. The upper
compartment reverts back to electric power (from other power sources) whenever it becomes available.
II. LP Gas - [secondary].
The upper compartment automatically
switches to LP gas if electric power is unavailable.
If electric power becomes available
during LP gas operation, the upper
compartment automatically switches back to electric power.
b. LP gas mode.
In this mode, the upper compartment only
operates on LP gas. The ignition cycle proceeds to light the LP gas burner in the following order:
I. The lighter sparks for approximately 45
seconds.
II. If rst attempt fails, the lighter repeats up
to 3 times.
There is a 2 minute rest period between each attempt.
III. If ignition cycle fails, upper compartment
remains OFF, and will not cool.
To attempt a new ignition cycle for
LP gas operation, see “A. Purge LP
Gas Lines” on page (10).
3. LOWER FOOD COMPARTMENT
The lower food compartment (drawer) operates
on electric power only. The power source is automatically selected in the following order:
a. 120 Vac - [default].
The lower compartment attempts to operate
on 120 Vac power rst.
120 Vac is ALWAYS the primary
source of power. The lower compartment reverts back to 120 Vac (from 12
Vdc) whenever it becomes available.
b. 12 Vdc - [secondary].
The lower compartment automatically
switches to 12 Vdc power if 120 Vac is unavailable.
If 120 Vac becomes available during
12 Vdc operation, the lower compartment automatically switches back to
120 Vac power.
C. Temperature (Thermostat) Control
See “A. Control Panel Buttons” on page
(7) for details on control settings and LED
indicators.
1. UPPER FOOD COMPARTMENT
The upper food compartment has (3) tempera-
ture modes (settings):
a. Cold (minimum cooling level).
b. Colder (intermediate cooling level).
c. Coldest (maximum cooling level).
2. LOWER FOOD COMPARTMENT
The lower food compartment has (2) tempera-
ture modes (settings):
a. Frozen food (freezer) mode - [default].
b. Fresh food (refrigerator) mode.
Before changing temperature
setting from fresh food to freezer, make sure
interior surfaces are completely dry. Otherwise, drawer slides may freeze up, making
drawer operation difcult.
9
Page 10

START / STOP REFRIGERATOR
Failure to obey the following warnings could
result in death or serious injury:
● FIRE OR EXPLOSION HAZARD. BEFORE refu-
eling or parking near a gasoline pump, make sure
ALL LP gas appliances (vented to the outside of
RV) are shut OFF . Otherwise, fumes from gaso-
line pumps could come into contact with an LP
gas appliance burner ame and ignite.
● FIRE HAZARD. Make sure there are NO obstruc-
tions (blockage) between burner jet and burner
tube BEFORE lighting LP gas burner.
FIG. 4
Solenoid Valve
Inlet Fitting
Manual Shutoff Valve
(In Open Position)
Pressure Test Port
Burner Jet
Lighter (Electrode)
LP Gas Burner
Mounting
Screws
Burner Tube
A. Purge LP Gas Lines
If air is trapped in LP gas (supply) lines, the refrigerator will not operate in LP gas mode.
Common causes for air in LP gas lines:
● Refrigerator has not operated in LP gas mode
for a long time.
● LP gas tanks have been replaced or relled.
To purge trapped air from LP gas lines, perform the
following procedure:
1. Press “ON/OFF” button twice (upper storage
controls) to cycle power OFF and ON. See
(FIG. 2).
Door MUST be open to access control
panel.
2. Press “Auto/Gas” button to select LP gas mode,
and start ignition cycle. See (FIG. 2).
a. The lighter sparks for approximately 45 sec-
onds. See (FIG. 4).
b. If rst attempt fails, the lighter repeats up to
3 times.
There is a 2 minute rest period between each attempt.
3. Repeat steps (1) through (2) if ignition cycle fails.
If ignition cycle fails after 4 attempts,
see “Appendix A: Troubleshooting” on
page (18).
B. Turn Refrigerator On
This refrigerator is intended for continuous use. Do NOT allow it to run unattended
when there is a risk for loss of electricity or fuel.
Food spoilage could occur.
The lower and upper food compartments operate
independently. Each food compartment has a dedicated set of controls.
Door MUST be open to access control panel.
See “A. Control Panel Buttons” on page
(7) for details on control settings and LED
indicators.
1. UPPER FOOD COMPARTMENT
For an absorption system to function correctly, it MUST be level. See “E. Keep Refrigerator Level” on page (6).
For LP gas operation, manual gas valves
MUST be open, and 12 Vdc power supply
(for controls) MUST be available.
a. Press “ON/OFF” button (upper storage con-
trols) to turn power ON. See (FIG. 2).
b. Select mode of operation.
See “B. Modes Of Operation” on page
(9) for more details.
I. Auto mode - [default].
This mode is automatically selected when
power is turned ON.
II. LP gas (only) mode.
Press “Auto/Gas” button to select LP gas
mode.
If ignition cycle fails, see “A. Purge
LP Gas Lines” on page (10).
2. LOWER FOOD COMPARTMENT
a. Press “ON/OFF” button (lower storage con-
trols) to turn power ON. See (FIG. 3).
b. The mode of operation (ac/dc) is selected
automatically.
See “B. Modes Of Operation” on page
(9) for more details.
10
Page 11

START / STOP REFRIGERATOR
C. Turn Refrigerator Off
The lower and upper food compartments operate
independently. Each food compartment has a dedicated set of controls.
Door MUST be open to access control panel.
See “A. Control Panel Buttons” on page
(7) for details on control settings and LED
indicators.
1. UPPER FOOD COMPARTMENT
a. Press “ON/OFF” button (upper storage con-
trols) to turn power OFF. See (FIG. 2).
The control system still consumes a
small amount of power when turned
off.
b. Clean out upper food compartment, and per-
form appropriate storage procedure.
See “Product Care” on page (13) for
full cleaning and storage instructions.
2. LOWER FOOD COMPARTMENT
a. Press “ON/OFF” button (lower storage con-
trols) to turn power OFF. See (FIG. 3).
The control system still consumes a
small amount of power when turned
off.
b. Clean out lower food compartment, and per-
form appropriate storage procedure.
See “Product Care” on page (13) for
full cleaning and storage instructions.
FOOD COMPARTMENTS
A. Food Compartment Guidelines
FIRE OR EXPLOSION HAZARD.
Do NOT store gasoline, oil or gasoline soaked rags,
or other ammable vapors and liquids inside storage compartment(s). Failure to obey this warning
could result in death or serious injury.
1. ALL FOOD COMPARTMENTS
The following points apply to both lower and up-
per food compartments:
● Cool food compartment before placing food
inside.
● Never put hot food (or drinks) into food com-
partment. (Allow items to cool rst.)
● Foods that have a strong odor or absorb
odors easily should be covered.
● Vegetables, salads, etc. should be covered to
maintain crispness.
● Do NOT leave food compartment door/draw-
er open longer than necessary. Otherwise,
frost formation and reduced efciency will occur.
● The food compartment is closed and unven-
tilated to maintain low temperature requirements for food storage.
2. UPPER FOOD COMPARTMENT
The upper food compartment is used for fresh
food storage only. The following points apply:
● Arrange items to allow free air circulation.
Do not overpack. A stuffed refrigerator works
harder to cool, and has higher cabinet (enclosure) temperatures.
● Position items according to item (food) tem-
perature requirements:
● The coldest areas of the refrigerator are
near the evaporator (cooling ns), and at
bottom of refrigerator.
● The warmest areas of the refrigerator are
on upper door shelves.
11
Page 12

FOOD COMPARTMENTS
3. LOWER FOOD COMPARTMENT
The lower food compartment may be used for
fresh food storage, or frozen food storage (depending on temperature setting). Ice may also
be made (with ice tray) in frozen food (freezer)
mode.
See “C. Temperature (Thermostat) Control” on page (9).
The following points apply to storage of frozen
food:
● To help prevent food from drying out, keep
food in covered dishes, containers, plastic
bags, or wrap in aluminum foil.
● Meat or sh (raw or prepared) can be stored
approximately 3 times longer when frozen
(compared to fresh food storage).
● Wipe excess moisture off items to be frozen.
Otherwise, frost buildup and reduced efciency could occur.
B. Shelving
1. REMOVE SHELF
a. Remove shelf lock from shelf. See (FIG. 5).
I. Insert tip of at bladed screwdriver into
slot of shelf lock.
II. Turn screwdriver (counter-clockwise),
and remove shelf lock from shelf.
III. Repeat steps (I) through (II) for each shelf
lock (on shelf to be removed).
FIG. 5
Shelf Bushing
FIG. 6
Wall Indent
c. Repeat steps (a) through (b) for each shelf
to be removed.
2. REPLACE SHELF
a. Replace shelf in refrigerator. See (FIG. 6).
I. Choose desired shelf height position.
II. Tilt right side of shelf at an angle (up or
down) and align shelf bushings (left side)
to refrigerator wall indents.
III. Slide shelf to the left until shelf bushings
(left side) fully engage refrigerator wall indents.
IV. Tilt right side of shelf at an angle (up or
down) until shelf bushings (right side)
align with refrigerator wall indents.
V. Slide shelf to the right until shelf bushings
(right side) fully engage refrigerator wall
indents.
b. Replace shelf lock on shelf. See (FIG. 5).
I. Place open end of shelf lock onto left side
of shelf (next to shelf bushing).
II. Push down until shelf lock snaps in place.
III. Repeat steps (I) through (II) for each shelf
lock (to be replaced on shelf).
Shelf
Shelf
Bushing
Shelf
Shelf Lock
b. Remove shelf from refrigerator. See (FIG. 6).
I. Slide shelf to the left until shelf bushings
(right side) disengage from refrigerator
wall indents.
II. Tilt right side of shelf at an angle (up or
down).
III. Slide shelf to the right until shelf bushings
(left side) disengage from refrigerator wall
indents. Then remove shelf.
Twist To
Remove
C. Baskets
1. REMOVE BASKET
a. Pull drawer open. See (FIG. 1).
b. Locate tabs at front edge of basket and press
tabs outward. See (FIG. 7).
c. Pull basket forward.
d. Lift basket to remove.
Rear basket is NOT removable.
12
Page 13

FOOD COMPARTMENTS
FIG. 7
2. REPLACE BASKET
a. With drawer open, align rods on side of bas-
ket with groove in tabs. See (FIG. 7).
b. Push basket rearward until rods clear the
tabs and tabs snap into place, securing basket.
Front basket can be placed in bottom
of drawer for usage.
FIG. 8
Tab
Slide Lever,
Left Side
2. REPLACE DRAWER
a. Push drawer slides all the way back in refrig-
erator lower food compartment.
b. Set drawer on oor in front of refrigerator
with gears on back of drawer aligned with,
and setting on, gear tracks. See (FIG. 9).
FIG. 9
D. Lower Food Compartment Drawer
1. REMOVE DRAWER
a. Pull drawer all the way forward.
b. Locate lever on left side drawer slide and
push lever upward. See (FIG. 8).
c. Locate lever on right side drawer slide and
push lever downward.
d. Pull drawer forward, removing from refrig-
erator.
PRODUCT CARE
A. Defrost Food Compartment(s)
Food compartments require regular defrosting to
maintain cooling efciency. Do NOT allow heavy
frost buildup on evaporator.
Frequency depends on user habits (how often and how long doors are opened). Defrosting once a month is a good general rule.
FIRE, BURN, OR INHALATION
HAZARD. Do NOT fracture or puncture cooling
unit. This could cause a leak in the cooling system.
Gear
Gear Track
c. Lift drawer front off oor and push straight
back into refrigerator.
See “General Safety Messages” for information on
cooling systems, and consequences of exposure to
refrigerant.
Do NOT use a hot air blower to remove frost from storage compartment(s). Permanent damage could occur, including warped metal
or plastic parts.
Do NOT use a knife, ice pick, or any other sharp
tool to remove frost from food compartments.
1. Turn refrigerator off.
13
Page 14

PRODUCT CARE
See “C. Turn Refrigerator Off” on
page (11) for full instructions.
2. Empty refrigerator of all contents.
3. Verify drip tray is in place (under evaporator) inside upper food compartment. See (FIG. 10).
FIG. 10
Drip Tray
Evaporator Fins
Evaporator Cover
4. Place both drawer and door in airing position until frost is melted.
To reduce defrost time, ll ice trays with
warm water and place in lower food compartment.
See “C. Airing Position (Store Refrigerator)” on page (14) for full instructions.
5. When all frost has melted, continue with “B.
Clean Food Compartment(s)” on page (14).
B. Clean Food Compartment(s)
ELECTRICAL SHOCK HAZARD.
Do NOT spray liquids near electrical components,
outlets, or connections. Failure to obey this warning
could result in death or serious injury.
Do NOT use strong chemicals or
abrasives to clean parts, as their protective surfaces will be damaged.
Always keep refrigerator clean. A clean refrigerator
reduces odors and helps prevent stains from developing. Follow the recommended cleaning schedule:
● Clean spills immediately.
● Thoroughly clean immediately after defrosting.
● Clean before storing refrigerator, or when taking
out of storage (before use).
● Thoroughly clean lower and upper food com-
partments once every 3 months (during continuous use).
Discard expired items. Clean shelves,
door shelves, baskets, and bins.
1. To clean door liner and interior liner of refrigerator:
a. Mix 4 tablespoons of baking soda to 1 quart
of warm water.
b. Wipe down surfaces with baking soda solu-
tion.
c. Wipe down surfaces with warm water to re-
move baking soda solution.
d. Dry surfaces with clean cloth.
To clean lower food compartment,
drawer MUST be removed. See “D.
Lower Food Compartment Drawer” on
page (13).
2. To clean nned evaporator, gasket, and shelves:
a. Wipe down surfaces with warm water only.
b. Dry surfaces with clean cloth.
Make sure interior surfaces are completely dry before turning unit back on.
Otherwise, drawer slides may freeze
up, making drawer operation difcult.
3. To remove cover from light(s) for cleaning, maintenance, etc:
a. Spread rear of cover slightly, releasing tabs
(top and bottom).
b. Remove cover.
C. Airing Position (Store Refrigerator)
ALWAYS place refrigerator in airing
position before storage. Otherwise, moisture will be
trapped inside refrigerator, and could result in mold
/ mildew, stains, and lingering odors.
When refrigerator is not in use, perform the following procedures to place drawer and door in airing
position:
1. PREPARE FOR AIRING POSITION
a. Turn refrigerator off.
See “C. Turn Refrigerator Off” on
page (11) for full instructions.
b. Defrost refrigerator (if applicable).
See “A. Defrost Food Compartment(s)”
on page (13) for full instructions.
c. Clean refrigerator.
See “B. Clean Food Compartment(s)”
on page (14) for full instructions.
2. DOOR AIRING (UPPER COMPARTMENT)
a. Pull door open. See (FIG. 1).
b. Push airing slide tab in (toward refrigerator
wall), then pull slide forward (toward user)
until it clicks into airing position. See (FIG. 1)
& (FIG. 11).
If door hinge is on RH side, use LH airing slide. If door hinge is on LH side,
use RH airing slide.
c. Close door against airing slide (to keep door
14
ajar) until latch clicks once.
Page 15

PRODUCT CARE
FIG. 11
Airing Slide
Tab
PRODUCT MAINTENANCE
For refrigerator to function correctly, periodic maintenance MUST be performed. All procedures within
this section MUST be performed by a qualied
service technician.
For more maintenance instructions, see Diagnostic Service
Manual.
See “Appendix G: Maintenance Schedule” on
page (26).
A. Replace Fuses
Replace fuses if blown. See (Table 6).
Table 6
Fuse Location Description
5 A Power Module Absorption Heaters
3 A* Power Module Absorption Control System
3 A In-Line Absorption Cooling Fan
15A In-Line Compressor dc Power
4 A In-Line Compressor ac Power
1 A In-Line Compressor Cooling Fan
*On products built after June 2016, the 3 amp fuse
for the absorption control system is a resettable
fuse and can NOT be replaced. If the resettable
fuse has been tripped, determine and remedy the
cause and address as necessary. Once the condition causing the fuse to trip has been addressed,
reset the control system fuse by pressing the ON
/ OFF button on the absorption control interface to
power OFF the system, wait 5 seconds, and then
press again to restore power mode to ON.
3. DRAWER AIRING (LOWER COMPARTMENT)
a. Pull drawer open. See (FIG. 1).
b. Allow drawer to rest against drawer catch (to
keep drawer ajar). See (FIG. 1).
The drawer cannot be locked in airing position, so the drawer could open
freely.
4. DISCONNECT 12 VDC POWER
The refrigerator control system still consumes
a small amount of power when refrigerator is
turned off.
To prevent battery from discharging (while RV is
in storage), disconnect (switch off) 12 Vdc power to refrigerator.
Alternatively, connect 12 Vdc battery to a
(trickle) charger that is approved for your
RV (house) battery.
1. POWER MODULE FUSES
The power module has (2) fuses. To replace
fuse(s), perform procedure below. See (FIG. 15)
& (Table 6).
a. Turn refrigerator off.
See “C. Turn Refrigerator Off” on
page (11) for full instructions.
b. ELECTRICAL SHOCK HAZ-
ARD. Disconnect 120 Vac power from product. Failure to obey this warning could result
in death or serious injury.
Unplug 120 Vac power cord from receptacle
at rear of refrigerator enclosure.
c. Disconnect the positive (+) 12
Vdc terminal from supply battery. Otherwise,
damage to unit could occur.
d. With refrigerator disconnected from 120 Vac
power, remove power module cover.
e. Remove old fuse(s) from fuse holder(s), and
discard.
f. Insert new fuse(s) into fuse holder(s).
g. Replace power module cover.
h. Reconnect 12 Vdc power.
i. Reconnect 120 Vac power.
2. IN-LINE FUSES
To replace in-line fuse(s), perform procedure be-
low. See (Table 6).
a. Turn refrigerator off.
See “C. Turn Refrigerator Off” on
page (11) for full instructions.
15
Page 16

PRODUCT MAINTENANCE
b. Disconnect the positive (+) 12
Vdc terminal from supply battery. Otherwise,
damage to unit could occur.
c. Open in-line fuse holder (at back of refrigera-
tor), remove old fuse, and discard.
d. Insert new fuse into in-line fuse holder, and
close fuse holder.
e. Reconnect 12 Vdc power.
B. Clean Burner Assembly
Failure to obey the following warnings could result in death or serious injury:
● CARBON MONOXIDE HAZARD. This product
can produce carbon monoxide. Carbon Monoxide
has no odor and can kill you. The burner and ue
system MUST be kept clean.
● FIRE OR EXPLOSION HAZARD. NEVER use a
wire or pin to clear obstructions from burner jet
(damage will occur).
● FIRE OR EXPLOSION HAZARD. Do NOT use
compressed air to clean burner jet (orice could
dislodge).
● FIRE OR EXPLOSION HAZARD. Do NOT at-
tempt to adjust burner jet.
FIG. 12
6. Clean burner tube with a dry brush. See (FIG. 4).
7. Verify burner tube slots are centered under ue
tube. See (FIG. 13).
FIG. 13
Translucent
Blue Flame
Burner Tube
8. Verify electrode is in correct location over burner
tube slots, and has a 1/8″ - 3/16″ gap from burner tube. See (FIG. 14).
Temporarily loosen (electrode mounting)
screw and make adjustments with needle
nose pliers if necessary.
FIG. 14
Flue
Tube
Flue
Tube
Flue Tube
Burner Tube Slots
Burner Jet
1. Turn refrigerator off.
See “C. Turn Refrigerator Off” on
page (11) for full instructions.
2. Unplug 120 Vac power cord from receptacle at
rear of refrigerator enclosure.
3. Disconnect the positive (+) 12 Vdc terminal from
supply battery.
4. Turn manual shutoff valve OFF (to closed posi-
tion). See (FIG. 4).
The slot on manual shutoff valve is vertical
when valve is off (closed).
5. Remove burner cover (with screw) from burner
assembly, and save for reinstallation later. See
(FIG. 15).
Electrode GapScrew
Burner TubeBurner Tube Electrode
9. Reconnect 12 Vdc power.
10. Reconnect 120 Vac power.
11. Turn manual shutoff valve ON (to open position).
See (FIG. 4).
12. Verify burner ame has correct appearance
(translucent blue color). See (FIG. 13).
Under ideal conditions, ame should NOT
have any yellow coloring.
13. Verify LP gas safety shutoff (solenoid valve)
functions correctly. See (FIG. 4).
See Diagnostic Service Manual for full instructions.
16
Page 17

PRODUCT MAINTENANCE
C. Clean Service Area Enclosure
FIRE OR EXPLOSION HAZARD. Do
NOT store or use gasoline, oil or gasoline soaked
rags, or other ammable vapors and liquids in the
service area behind the refrigerator or in the vicinity
of this or any other gas appliance. Failure to obey
this warning could result in death or serious injury.
Check lower vent, upper vent, and area between
these openings for obstructions.
Obstructions may include bird / insect nests,
spider webs, etc.
D. Inspect LP Gas Connections
All connections in the LP gas system (at back of
refrigerator) must be checked for leaks.
1. Verify LP gas (supply) bottle is NOT empty, and
supply line is turned ON.
2. FIRE OR EXPLOSION HAZ-
ARD. NEVER use an open ame to check for
gas leaks. Failure to obey this warning could result in death or serious injury.
Apply an approved non-corrosive leak detection
solution to all LP gas connections.
If bubbles appear, proceed to step (3).
3. FIRE OR EXPLOSION HAZ-
ARD. Turn OFF LP gas supply at tank. Failure
to obey this warning could result in death or serious injury.
Turn LP gas supply line OFF immediately!
4. ALWAYS use a backup wrench
when loosening or tightening LP gas connections.
Tighten all loose connections, and repair all
leaks as necessary.
E. Test Control System
Check control system by connecting/disconnecting
120 Vac power, starting/stopping engine, etc.
F. Product Removal / Disposal
See Installation Instructions for refrigerator removal / replacement procedure, and for recycling
information.
17
Page 18

APPENDIX A: TROUBLESHOOTING
A. General Symptoms
These symptoms apply to general refrigerator operation. See (Table 7).
Table 7
Symptom Possible Cause Action
● Do NOT open refrigerator doors.
● Open RV windows and doors (to air out RV), and evacuate RV.
Refrigerator emits an ammonia smell.
Absorption system is leaking.
● Turn manual LP gas valve OFF at rear of refrigerator.
● Disconnect 120 Vac and 12 Vdc power at rear of refrigerator.
● Contact a Dometic dealer or Service Center for repair.
Do NOT use refrigerator until it has been repaired.
Refrigerator emits an odor
from fumes.
Heavy frost buildup.
Refrigerator does not function in electric mode.
Refrigerator (upper food
compartment) does not
function in LP gas mode.
Dislocated or damaged
burner.
Dirty ue tube.
User habits, including frequent or prolonged opening
of food compartment(s).
Drawer / door is not sealing
correctly.
Electric power source issue.
LP gas power source issue.
● Turn refrigerator OFF at control panel.
● Contact a Dometic dealer or Service Center for repair.
● Do not open drawer / door longer than necessary.
● Regular defrosting is required. See “A. Defrost Food
Compartment(s)” on page (13).
● Make sure drawer / door is fully closed and gasket is sealing.
● Make sure power is turned ON at control panel.
● Make sure 120 Vac or 12 Vdc power is available and con-
nected (plugged in).
● Make sure receptacle is energized by plugging in another
appliance.
● Fuse may be blown. See “A. Replace Fuses” on page (15),
or contact a Dometic dealer or Service Center.
● LP gas (supply) bottle may be empty. Replace (supply) bottle.
● Air may be trapped in gas line. See “A. Purge LP Gas Lines”
on page (10).
18
Page 19

APPENDIX A: TROUBLESHOOTING
B. Cooling Performance Symptoms
These symptoms apply to cooling performance of food storage compartments. See (Table 8).
Table 8
Symptom Possible Cause Action
● Make sure temperature (cooling level) setting is correct.
Cooling performance issues common to BOTH
lower and upper food compartments.
(Too cold, or not cold
enough.)
Cooling performance issues for upper food compartment.
(Too cold, or not cold
enough.)
Improper use or settings.
Standby mode:
Compartment temperature
sensing error.
Refrigerator is out of level. ● See “E. Keep Refrigerator Level” on page (6).
Over-packed food storage. ● Arrange food to allow free air circulation.
Extremely cold (subzero)
weather conditions.
● Make sure drawer / door is closed and sealing properly.
Refrigerator requires time to cool down when power has
been off for a long while.
● See “1. Standby Mode” on page (9) for more information.
● Contact a Dometic dealer or Service Center for repair.
● Turn upper food compartment OFF.
When ambient temperature rises, please restart upper food
compartment before requesting service
Upper food compartment
stops cooling.
(Electric and gas modes.)
Lower food compartment
stops cooling.
Absorption system is not
functioning.
Control module is not operating.
Compressor issue.
● Immediately turn refrigerator OFF.
● Contact a Dometic dealer or Service Center for repair.
Do NOT use refrigerator until it has been repaired. Do
NOT attempt to solve problem by repeatedly restarting
refrigerator.
● Make sure power is turned ON at control panel.
● Make sure 12 Vdc power is available and connected.
● If LED error code is ashing, see “D. Compressor System
Error Codes” on page (20).
● If no LED error code is ashing:
● Make sure power is turned ON at control panel.
● Make sure 120 Vac or 12 Vdc power is available and
connected.
19
Page 20

APPENDIX A: TROUBLESHOOTING
C. Absorption System Ignition Error
This error applies to the upper food compartment. The control panel LED illuminates when an ignition error occurs.
See (FIG. 2) & (Table 9).
See “Controls” on page (7) for more information.
Table 9
(D)
LED
AMBER
(Steady)
● Check LP gas (LP gas did NOT ignite). See “B. Modes Of Operation” on page (9).
● LP gas (supply) bottle may be empty. Replace (supply) bottle.
● Air may be trapped in gas line. See “A. Purge LP Gas Lines” on page (10).
Description
D. Compressor System Error Codes
These error codes apply to the lower food compartment. The control panel LED ashes when certain errors occur.
See (FIG. 3) & (Table 10).
See “Controls” on page (7) for more information.
Table 10
(J)
LED
(K)
LED
(L)
LED
Number Of
Flashes
1
2
Description
● Battery voltage is outside normal operating range. Check battery.
Lower compartment shuts down under this condition if 120 Vac
power is also NOT available.
● Compressor fan overload. Foreign object(s) may be obstructing fan
blades from spinning.
AMBER
(Flashing)
N/A
N/A N/A
BLUE
(Flashing)
BLUE
(Flashing)
3
4
5
Continuous
● Compressor system (motor start error).
● Contact a Dometic dealer or Service Center for repair.
● Compressor system (motor speed error).
● Contact a Dometic dealer or Service Center for repair.
● Thermal shutoff (Compressor controller is too hot). Compressor
system restarts automatically when temperature is within normal
operating range.
● If problem persists, contact a Dometic dealer or Service Center for
repair.
● Temperature in lower food compartment is outside normal operating
range. Compressor system continues to operate in standby mode
until temperature returns to normal operating range.
● If problem persists, contact a Dometic dealer or Service Center for
repair.
20
Page 21

APPENDIX B: SPARE PARTS
A. Model DMH1072 Spare Parts
To order spare parts, see contact information in “Appendix E: Consumer Support” on page (24).
Table 11
Part Number Description
3850992011 Crisper (Narrow)
3850993019 Crisper (Wide)
3850974019 Door Shelf, Upper
3850975016 Door Shelf, Lower
3850324025 Shelf (Wire)
3313470.211 Shelf, Milk (Wire)
2931117234 Shelf, Plastic (Bottom)
2932102011 Lock (Clip), Shelf
3313470.153 Basket, Freezer (Wire)
3313470.154 Drawer Catch (Lock)
3313470.152 Handle Assembly, Door
3313470.151 Handle Assembly, Drawer
3313470.078 Door Assembly
3313470.079 Drawer Front Assembly
3313470.150 LED Light / Airing Slide Assembly (LH / RH)
2932781012 Electrode
3850644422 Heater 325W, 120V
2930697079 Burner (with Conductor)
2932667039 Bafe
2007337120 Shelf Rail (Short)
2007337211 Shelf Rail (Long)
2930693045 Shelf Holder
2932658012 Bottle Holder (Long)
3106753.001 Bottle Holder (Short)
3850959010 Switch
21
Page 22

APPENDIX C: EQUIPMENT REAR VIEW
A. Model DMH1072 Rear View
FIG. 15
Heaters
Power
Module
Cover
12V DC
Burner
Cover Screw
Thermofuse
Flue
Bafe
Flexible
Power Cord
Compressor
Module
12 Vdc
Terminal Block
Inlet Fitting
Compressor
Assembly
Burner
Jet
Manual Gas Shutoff ValveWater Drain Hose
Burner
Cover
22
Page 23

APPENDIX D: SCHEMATIC
A. Model DMH1072 Schematic
FIG. 16
$
&
'
)
+
-
.
0
2
3
5
6
&21752/02'8/(3&%
$%62537,21&21752/
%
,17(5)$&(',63/$<
(/(&752'(
'
7+(50$/6:,7&+
7+(50$/6:,7&+
(
/,*+702'8/(6
+($7(59$&
*
)5$0(+($7(5
7(50,1$/%/2&.
12786('
,
7+(50,6725
7+(50,6725
-
62/(12,'9$/9(
/
$&6$)(7<*1'
3527(&7,9(($57+
1
&2035(6625
&21752//(5
&+$66,6*1'
3
)$1
)$1
4
&2035(6625
&21752/,17(5)$&(
',63/$<
6$)(7<)86(/,1.
6$)(7<)86(/,1.
5
/,*+76:,7&+
%/$&.
%52:1
5('
<(//2:
*5((1
*5((1<(//2:
%/8(
*5(<
:+,7(
25$1*(
,1/,1(48,&.
&211(&7,21
)8//<,168/$7('
)86(
12132/$5,7<6(16,7,9(
&211(&7,21
:,5(&2/25,55(/(9$17
-
*
%
(
$
3
3
3
3
3
3
3
3
6
(
2
-
$
$
$
-
-
-
-
-
-
$
5
5
'
/
1
*
9$&
9
+
-
'&
3
3
3
3
'
0
2
3
12786('
.
&
3
)
/
1
/
1
)
$
&
'
&
3
7
',63/$<%2$5'
4
23
Page 24

APPENDIX E: CONSUMER SUPPORT
Dometic website www.DometicUSA.com
Please visit our website for information and news about Dometic products. Our website provides information on product
care and warranties. You can also download product literature, including manuals and brochures.
Service and spare parts www.eDometic.com
For service and spare parts, please contact Service Center Assistance. Please see the front page of this manual - or -
visit our Dometic website to nd a Dometic Service Center near you.
Contact us www.DometicUSA.com
For contact information, please see the front page of this manual - or - visit our Dometic website.
Register product www.eDometic.com
Timely registration allows for enhanced communication and service under the terms of your warranty. Please see
“Appendix F: Dometic Warranty” on page (25).
To register your product, ll in the pre-printed registration card on the last page of this manual, or register on-line at
www.eDometic.com.
TO REGISTER ON-LINE:
1. Access www.eDometic.com then click “CONSUMER CENTER.”
2. Click “Register My Product.”
3. Complete the on-line form, then click “Submit.”
DOMETIC CORPORAT ION ELKHART, IN U SA
MF G NO
S ER NO
MOD NO
Equipped for LP (Propane) Gas
Manifold pressure of 11" W.C. (2 .74 kPa)
I NSTALL ONLY WI TH VENT KI T ACCORD ING TO
IN STALLEZ UNI QUEMENT AVEC LA TROUSSE
CONFORME'MENT FORMULAI RE NO. 32 1 32 38 . - - -
The model number (e.g. DMH1072) and serial number
(e.g. 012 34567) are printed on the data label inside the
refrigerator compartment.
REFRIGERANT
Na
CrO
4
2
FORM NO 32 1 32 3 8. - - -
D' AI R DE COMBUST ION
YEAR OF M ANUFACT URE:
2014
ANS Z 21 . 1 9 - 20 0 9
CSA 1 . 4 - 2 00 9 REF RI GERAT OR
FOR M ANUFACT URED HOME (MO BI L E H OME)
OR REC REAT I ONAL VEH I CLE I NSTA LL AT I ON
PO UR I NSTA L LAT I ON DANS UNE M AI SO N
PREFA BRI QUEE (MOB I L E) O U UN
VEH I CULE DE CAMPI NG
TEST ED T O 85 0 I BF / I N ( 5 , 86 MPA)
1 546 2 4
MADE IN USA
331 32 87. 009
24
Page 25

APPENDIX F: DOMETIC WARRANTY
Congratulations, and Thank You for purchasing the industry’s best built and best backed RV refrigerator. Dometic’s exclusive
two (2) year warranty is included along with important maintenance information. Please take a few moments to familiarize
yourself with our warranty and maintenance program. We truly appreciate your business, and we are condent you will enjoy
many years of trouble-free RV use.
LIMITED TWO-YEAR WARRANTY DOMETIC REFRIGERATORS
THE SELLER NAMED BELOW MAKES THE FOLLOWING WARRANTY
WITH RESPECT TO THE DOMETIC PRODUCT:
1. This warranty is made only to the rst purchaser (herein after referred to as the “Original Purchaser”) who acquires the product for his own
use and is installed and operated within the continental United States and Canada.
2. This warranty will be in effect for two years on parts and freight and two years on labor from the date of purchase by the Original Purchaser.
It is suggested that the original purchaser retain a copy of the dated bill of sale as evidence of the date of purchase.
3. This warranty covers only specied parts, which shall be free from defects in material and workmanship under normal use. This warranty
does not cover conditions unrelated to the material and workmanship of the product. Such unrelated conditions include, but are not limited
to: (a) damage not reported within the rst 7 days of ownership; (b) faulty installation or installation that does not comply with R.V.I.A. standards, and any damage resulting from such; (c) the need for normal maintenance and any damage resulting from the failure to provide such
maintenance; (d) failure to follow Sellers instructions for use of product; (e) any accident to or misuse of any part of this product and any
alteration by anyone other than the Seller or its authorized representative; (f) any non-Dometic parts that are installed as replacement parts
will void any warranty (implied or written); (g) ame outage due to blow out or high altitude; (h) reduced performance due to high altitude;
(i) radio frequency interference and electromagnetic interference; (j) 12V system chassis ground decay and corrosion; (k) puncture of foam
cabinet or vacuum insulated panels after acknowledged receipt; (l) animal or insect inltration which damages unit or inhibits performance;
(m) abuse or misuse of electrical components.
4. The specied parts covered by this warranty are as follows: Major components (cooling unit, LP gas valve, burner, burner housing, electronic display, electronic module, evaporator ns, foam integrity, frame, thermistor, spark probe, ignition wire, ice maker compressor, second absorption loop, display escutcheon, lower toe plate, humidity switch, frame heater mullion, ice maker mullion) are covered for parts
and freight for two years and labor for two years from date of purchase. All other components that fail must be reported within the rst 90
days of ownership in order to receive coverage of parts, freight and labor under warranty.
5. This warranty requires the Original Purchaser to provide preventative maintenance on a yearly basis, starting at the anniversary
of his date of purchase. The Original Purchaser must keep a record of the preventative maintenance to keep the warranty in effect. Failure
of the Original Purchaser in providing this annual maintenance may void the warranty. The preventative maintenance must be performed
at a Dometic Authorized Service Center/Dealer. The preventative maintenance required is an inspection, cleaning and full diagnostics performed on the entire electronic system, burner assembly, wiring and cooling unit. A copy of the receipt covering the maintenance checks
must accompany the warranty claim during the second year of ownership. The cost of this preventative maintenance is the Original Purchaser’s responsibility and should take about one hour.
6. In order to obtain the benets of this warranty, the original purchaser must return the product which is found defective to the Seller named
below or to a Dometic Authorized Service Center during the period that this warranty is in effect. The original purchaser is responsible for
all charges incurred in delivery of the product to the Seller or Dometic Authorized Service Center, and in pick up after the warranty service
has been completed. To obtain the location of the nearest Authorized Service Center, please call 1-800-544-4881.
7. Any item returned in the manner described in paragraph 6 will be examined by the Seller or the Authorized Dometic Service Center. If it
is found that the returned item was defective in material and workmanship, the Seller or the Authorized Dometic Service Center will repair
the product per the terms outlined in paragraph 4. Conrm the service agency is an Authorized Dometic Service Center. DO NOT pay the
service agency for Warranty repairs. Such payments will not be reimbursed.
8. The Seller does not authorize any person or company to create any warranty obligations or liability on their behalf. This warranty is not
extended by the length of time which you are deprived of the use of the product. Repairs and replacement parts provided under the terms
of this warranty shall carry only the non-expired portion of this warranty.
9. In no event shall either seller be liable for incidental or consequential damages. This includes any damage to another product or products
resulting from such a defect. Some states do not allow the exclusion or limitation of incidental or consequential damages, so the above
limitations may not apply.
10. Any implied warranty, including the implied warranty of merchantability and tness for any purpose, is limited to the duration of this limited
warranty. Some states do not allow limitations on how long an implied warranty can last, so the above limitation may not apply.
11. This warranty give specic legal rights, you may also have other rights which vary from state to state. No action to enforce this warranty
shall be commenced later than ninety (90) days after the expiration of the warranty period. Claims must be submitted in writing to the Dometic Warranty Department for arbitration.
12. All products (except those specically built for commercial use) are warranted only when installed in vehicles built to current edition R.V.I.A.
A119.2 and C.R.V.A. Z-240 Standards.
13. The Seller reserves the right to change the design of any product without notice and with no obligation to make corresponding changes in
products previously manufactured.
DOMETIC CORPORATION
Warranty Department
1120 North Main Street
Elkhart, IN 46514
25
Page 26

APPENDIX G: MAINTENANCE SCHEDULE
REFRIGERATOR OWNER MAINTENANCE YEARLY RECORD
Customer Name: Model No.: Date of Purchase:
Address: Serial No.:
City: State: Zip Code:
Phone:
FIRST YEAR
Date:
Dealership:
Address:
City:
State: Zip:
Phone:
Technician:
Cleaned Burner Assembly: Yes / No
Cleaned/Check All Terminals Connections: Yes / No
Cleaned/Inspect All Ground Connections: Yes / No
Inspect and Test Door Seals: Yes / No
Inspect and Tighten LP Lines: Yes / No
Power Ventilator Installed: Yes / No
Gas Safety Shutdown in 45 seconds: Yes / No
SECOND YEAR
Date:
Dealership:
Address:
City:
State: Zip:
Phone:
Technician:
Cleaned Burner Assembly: Yes / No
Cleaned/Check All Terminals Connections: Yes / No
Cleaned/Inspect All Ground Connections: Yes / No
Inspect and Test Door Seals: Yes / No
Inspect and Tighten LP Lines: Yes / No
Power Ventilator Installed: Yes / No
Gas Safety Shutdown in 45 seconds: Yes / No
ACTUAL SPEC. RANGE
Electrode Gap 3/16"
Thermistor Reading 7-10,000 ohms @ 32°
D/C Voltage 9.5 to 15 volts D/C
A/C Voltage 120 Volts ± 10%
Thermocouple Reading 25-35 Millivolts
Delay Between Modes Approx. 5 seconds
ICE MAKER MODELS
Inspect Water Valve and All Connections: Yes / No
Inspect Heat Tape Switch for Proper
Operation: Yes / No
26
Page 27

REGISTRATION CARD
A. Protect Your New Investment
We truly appreciate your decision to purchase a new Dometic product, and we want to help you protect this wise
investment.
We back our Dometic products with one of the most comprehensive warranties in the industry. Please complete and
mail this registration card, or register your product on-line at www.eDometic.com.
Here
TIME-DATED
MATERIAL
Please Process
Promptly!
Tape
FIRST
CLASS
POSTAGE
REQUIRED
Dometic Processing Center
1120 North Main Street
Elkhart, IN 46514
Tape
Here
Page 28

■ WARRANTY VERIFICATION
Your prompt registration records your right to protection
under the terms and conditions of your warranty.
■ OWNER CONFIRMATION
Your completed registration serves as conrmation
of ownership in the event of product damage or theft.
■ FACTORY COMMUNICATION
Returning the attached card or registering on-line guarantees you will receive product information and specials.
Including your email address will allow us to communi-
cate with you quickly and efciently.
Return this card within 10 days to ensure your:
■ WARRANTY VERIFICATION
■ FACTORY COMMUNICATION
■ OWNER CONFIRMATION
■ 2 PLUS 3 SERVICE CONTRACT INVITATION
■ 2 PLUS 3 SERVICE CONTRACT
Returning the attached card or registering on-line ensures an invitation to upgrade to an optional 2 Plus 3
Full Service Contract. This service contract allows you
to add up to 3 years of additional warranty coverage.
PLEASE RETAIN THESE INSTRUCTIONS
FOR FUTURE REFERENCE
TO THE CONSUMER
PLEASE AFFIX THESE INSTRUCTIONS
TO THE REFRIGERATOR
TO THE INSTALLER
IMPORTANT:
10 Days
Return Within
Name
Address
City
Email Address
Email me exclusive offers and information on new products from Dometic.
Email me offers and information from Dometic partners.
Fold here. Close with tape.
Owner’s Registration Card
Registering your product is an essential step to ensure you receive all the
benets you are entitled to as a DOMETIC customer. Complete the information below
and mail to us, or register on-line at www.eDometic.com.
Be sure to include your email address, so we can communicate with you
quickly and efciently. Your address will remain condential and will not be
distributed to third parties.
State/Prov.
Zip/Postal CodeDate of Purchase
MO DAY YEAR
—
REFRIGERATOR MODEL NUMBER
SERIAL NUMBER
 Loading...